- What is the best base for the pallet
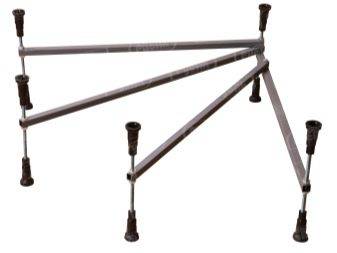
- Metal or plastic frame
- Installing a shower tray on a brick foundation
- The nuances of product management
- Cheap way to adjust
- Automatic control option
- What is a click-clack button?
- What is the difference between a shower drain and a siphon
- Surface finishing
- Varieties of shower trays by materials
- Shower trays
- Acrylic and steel pallets
- Cast iron pallets
- Pallets made of artificial and natural stone
- How to connect the shower siphon
- Installing a siphon from scratch
- Tips from experienced plumbers
- Features of the installation of a shower cabin-hydrobox
- Checking the operation of electrical appliances
- Kinds
- The purpose of the siphons
- Choice
- Geometric parameters
- Technical specifications
- Material quality
- Performance
- Required Tools
- Price
- Conclusions and useful video on the topic
What is the best base for the pallet
The installation of a shower tray can be done in various ways:
- on a brick foundation;
- on plastic support parts;
- on a metal frame.
The base is chosen depending on the configuration of the model and its technological characteristics. The need for a foundation is due to the fact that the drain hole must be located above the level of the sewer line so that the water leaves well.Masters believe that the angle of inclination from the bottom to the entrance to the sewer line should be at least 3 degrees. If it is not possible to make a pedestal or lower the sewer inlet, a special pump will be required to pump out the water.
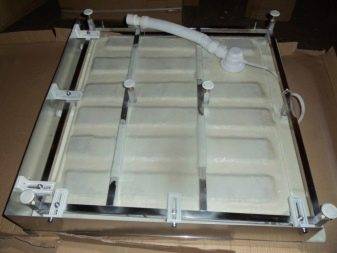
Most deep models are equipped with a special metal profile frame. But if the tray is thin-walled, the feet of the swimmers will quickly push through the bottom between the guides, especially if the owners of the bathroom do not have a fragile constitution. In these places, the acrylic options may even form through cracks. Therefore, deep, thin-walled pallets also require a stable foundation.
Here it is necessary to monitor the quality of laying sewer lines so that the drain hole is higher than the outlet, and the water quickly leaves the container. The element itself is attached to the floor with glue or a cement tile mixture.
Cast iron elements are usually simply placed on the floor. Their height is sufficient for reliable discharge into the sewer. The same goes for stone products. But there may be a problem with the siphon. It will have to be equipped directly on the floor surface, or a flexible unit must be connected and hidden in a specially equipped niche in the wall.
Consider how to mount different types of foundations when installing shower trays.
Metal or plastic frame
If you still choose this type of base, a lot of time for installation will not be required. The main steps here will be:
- Leveling the legs with a building level.
- Shower tray installation.
- Connection to the sewer and fixing the drain hole.
Under the bottom, you can place a plate of extruded polystyrene for thermal insulation of the area. Mounting foam is used in the same way.
This is especially important when installing steel pallets. It will also help reduce the sound of falling water. To protect the thin bottom and give the structure stability, you can make a removable formwork and pour concrete
The installation of the shower tray will be carried out on the resulting pedestal. This method has disadvantages: it is impossible to check and fix the leak. Replacing the sewer unit, and bringing the siphon down is also quite difficult. Alternatively, you will have to use flexible connections and hide the siphon in a niche in the wall
To protect the thin bottom and give the structure stability, you can make a removable formwork and pour concrete. The installation of the shower tray will be carried out on the resulting pedestal. This method has disadvantages: it is impossible to check and fix the leak. Replacing the sewer unit, and bringing the siphon down is also quite difficult. Alternatively, you will have to use flexible connections and hide the siphon in a niche in the wall.
Installing a shower tray on a brick foundation
This is an excellent solution for most pallets, eliminating any deformation and extending the life of plumbing. The main thing is to choose the place where the siphon will be installed.
Bricks in this case are laid not only around the perimeter of the product. Otherwise, the bottom will bend over time. In designs with legs, to eliminate this drawback, an additional support is provided in the center. Since there is a bulge there, you cannot install a similar model on a flat brick foundation. It is necessary to provide a recess for this tubercle.
The correct technique for creating a brick base is as follows:
- Outline the lines of the foundation according to the desired dimensions.
- Knead the cement mortar for masonry.
- Apply several strokes of the composition to the floor with a spatula.
- Lay the first row of bricks, starting from the corner, and tap them with a mallet for a better fit to the floor. The thickness of the seam should be 5–7 mm.
The installation of the shower tray is carried out after 3 days, when the masonry fully rises.
A welded frame made of metal corners 20 by 20 mm can act as a support in the center of the bottom. It is installed between rows of bricks and is fixed to the floor with dowel-nails. Acrylic should be protected from friction against metal surfaces with a layer of insulating rubber glued to the metal.
A deep pallet on a high foundation will require the creation of a ladder to the entrance to the shower stall. Steps can be created from concrete or bricks and overlaid with tiles. The walls behind the pallet are finished with tiles or other waterproof material. The tile adhesive must also have excellent moisture resistance.
The nuances of product management
Often, during the operation of the pallet, it becomes necessary to control the water level, that is, it will need to be made larger or smaller.
This can happen during washing the child, washing, warming up the structure, to ensure greater comfort and other things. In such situations, it will be necessary to block the drain hole of the siphon in order to stop the drainage of fluid.
Cheap way to adjust
To perform the described procedure, drain fittings are equipped with various devices and mechanisms.
In total, there are 3 main control options:
- with the help of a cork;
- automatic;
- click-clack option.
Each of these methods has its advantages and disadvantages, which makes using the pallet more comfortable or vice versa. And also has a significant impact on the cost of the siphon.
Such a device as a cork is familiar to everyone, as it has found a residence in the designs of bathrooms, showers since archaic times. To use it to block or open the drain hole. a person has to perform a number of not always convenient manipulations.


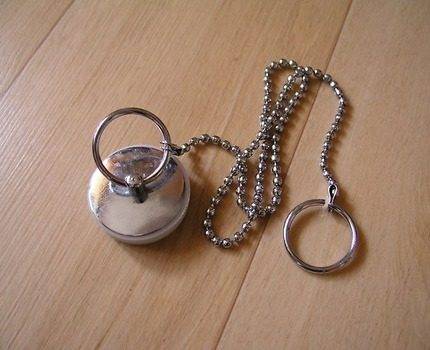
The siphon plug is the easiest way to control the drain, and the chain will not let it roll away somewhere at the most inopportune moment
She has only one drawback, but today it is significant - this is the need to come into contact with water, which is especially unpleasant when it is polluted.
If the above minus is not impressive, then you can safely buy a siphon equipped with a stopper. Moreover, it will help save money, because it refers to budget fittings. The remaining options will significantly increase the cost of purchasing drain equipment.
Automatic control option
This method makes the drain control procedure more comfortable. An automatic siphon is a conventional product belonging to one of the above types. In addition, it is equipped with a lever connected to a damper that, on command, closes the drain hole.
For comfort, the control element is installed in the mixer area. That is, a person does not need to come into contact with contaminated water, bend over or perform any other uncomfortable manipulations. Which is the main advantage of any automatic siphon, while its cost becomes noticeably higher.
What is a click-clack button?
This is the most modern way to control the discharge of contaminated water. Click-clack is a valve that is installed on the drain and changes position when you press it with your foot.
That is, during the first manipulation, the removal of fluid stops, and during the second operation, it opens.
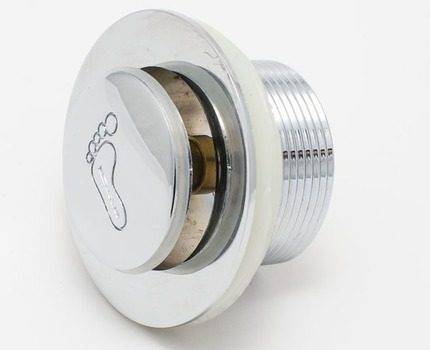
The click-clack button is the most modern and convenient way to control the drain, as it is always in the right place and does not require significant effort.
The valve is installed in such a way that it is always convenient to operate it, moreover, for people with different physical abilities.
The tangible advantages are the absence of additional work during installation, since this mechanical plug is part of the siphon. In contrast to the automatic siphon lever, which must be mounted separately.
In addition, the click-clack valve is reliable, attractive design. A clear disadvantage is not the most affordable cost of siphons equipped with this device, which does not contribute to their mass distribution.
At the same time, a potential buyer should pay attention to the feature of a low tray - it is less designed to regulate the water level than a deep one. Therefore, the advantages that the rather expensive automatic siphon and click-clack provide in this case are partially leveled.
This suggests that the owner of a low pallet should carefully consider whether he needs to overpay for expensive options with reduced efficiency. Or just limit yourself to using a cheap and familiar cork on a chain so that a valuable fixture is not lost at certain points.
Since low pallets are shallow, in most cases there is no overflow hole
Therefore, it is worth paying attention to the fact that there is no such practical function as overflow on siphons intended for low-sided products.
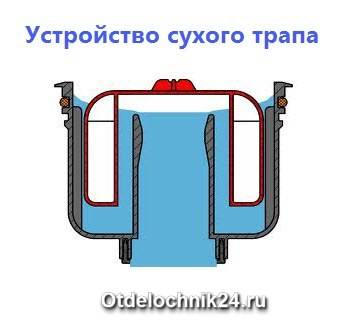
What is the difference between a shower drain and a siphon
Both the drain and the siphon for the shower are designed to drain waste water in a volume of 0.4-0.6 liters per second. However, the ladder costs from 2200 rubles, about the siphon for the shower 450 rubles. What is the difference?
The design of the simplest drain is more complex and involves the retention of sewer gases inside the sewer system. As a result, with a long non-use of the shower, odors do not walk around the apartment.
In a siphon, such retention of gases occurs due to a water plug, which, when the shower is not used, evaporates and the shower begins to “stink”. In the ladder, gases are blocked without water, hence the second name of the shower ladders is “dry ladder”.
Surface finishing
The lining of the inner and outer surfaces of the pallet is performed after the masonry mortar or concrete poured into the formwork has completely solidified. The tile will look great and hold securely, regardless of how the sides are made: you can make a do-it-yourself shower tray from brick or poured concrete.
The technology of laying tiles is no different from facing any other surface, however, it has its own nuances.
An adhesive designed for use in high humidity areas and a similar material for processing seams is selected.
To build a shower tray with your own hands, providing a beautiful flat surface and reliable protection against water penetration, you should not neglect the recommendations of experts.
- Applying the adhesive with a notched trowel will help create a smooth surface.
- The adhesive is applied to the surface to be coated, not to the reverse side of the tile.
- To fix the tile, it should be pressed to the surface.
- Level the surface easily by tapping the tiles with a rubber mallet.
- Special crosses will help to ensure the equal thickness of all seams.
- Paste the surface should be from the corner.
Do-it-yourself shower tray made of tiles - a photo with a sequence of cladding work There are some nuances in finishing the surface with mosaics. This cladding is considered by many to be more preferable than classic tiles. Both glass and plastic tiles are suitable for the pallet, as well as for the walls of the shower cabin. In addition to a large selection of ready-made mosaic sheets with a mesh or paper base, their advantages are ease of installation and a non-slip surface of the finished coating. No special tools are required for cutting - just use ordinary scissors.
All of the above rules for tiling are also valid for mosaic coating, however, in the latter case, there are some nuances:
- It is preferable to use white tile adhesive.
- Grouting and cleaning the surface must be done as quickly as possible, preventing the composition from drying out.
A general requirement for tiling or mosaic tiling is the correct preparation of the adhesive.
It is important to strictly observe the proportions and uniformity of the composition recommended by the manufacturer. To ensure the latter condition, it is better to stir the mixture not manually, but to use a drill with a mixer attachment.
In order to avoid partial “setting” of the adhesive composition and, accordingly, a decrease in its quality, it is better to prepare the mixture in small portions.
A do-it-yourself tile shower tray is difficult to make with rounded edges, so the safety of the structure can be increased by installing special corners.
You can see how the mosaic of the shower tray is finished with your own hands in the video.
When renovating a bathroom, we, first of all, replace the finishing materials of walls, floors and ceilings, as well as update plumbing. If your room is not spacious enough to install a large bathroom in it, then you can significantly “save” space with the help of a shower. This article will discuss how to make a pallet design yourself.


Varieties of shower trays by materials
Pallet
- this is the basis for our shower cabin, which means it must be made of really durable materials. They can be classified like this:
from cast iron. Such pallets are one of the strongest and most durable. Among the minuses - a very large weight, long warm-up and high price.
of steel. Very light, inexpensive and quite durable. However, such pallets have very fragile enamel and low sound insulation.
from ceramics. These pallets are very attractive and easy to operate. But they usually don't have legs and are very fragile.
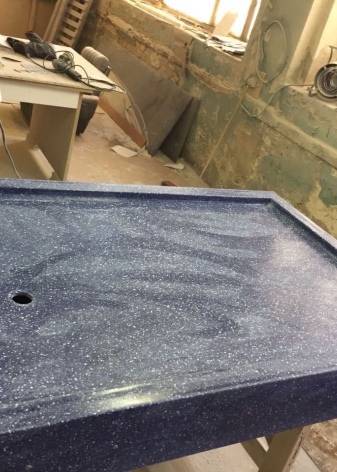
from artificial stone. You will definitely be attracted by the surface texture of such a pallet, however, low thermal conductivity, high price and heavy weight can push you away from the purchase.
from acrylic. Practical, light, beautiful, well absorb noise. There is only one drawback of such pallets: they are prone to damage and deformation.
from wood. Suitable for cottage or country house. Environmentally friendly material, however, will last no more than three to four years.
from plastic.A very budget and short-lived option that we would not recommend for an apartment or house: rather, for a summer shower.
mag.dom.by
Shower trays
Pallets are cheap and expensive.
Cheap:
- Af
- steel;
- ceramic;
- cast iron;
- from artificial stone.
Expensive:
- from natural stone;
- wooden.
Acrylic and steel pallets
in practicality and ease of care
Steel pallets are slightly inferior in popularity to acrylic ones. The advantage of steel pallets is their thermal conductivity, they quickly heat up and become an acceptable temperature. But they also have a drawback, they create a peculiar sound if water is poured on them. The thicker the steel, the less it "noises"
That is why when choosing a pallet, you need to pay attention to its thickness.
Cast iron pallets
Cast iron is already included in the category of medium-cheap. They could be more popular, but the price is no longer quite cheap and a lot of weight. The advantage of this material is strength and practicality.
Pallets made of artificial and natural stone
A pallet made of artificial stone is also included in the category of medium-cheap. Gradually begin to become popular. Compared to ceramics, they are more durable and warmer to the touch.
The pallet made of natural stone has a high cost, and is always made only to order. You can also choose the type of stone, and texture, and shape. All so to speak in accordance with the payment.
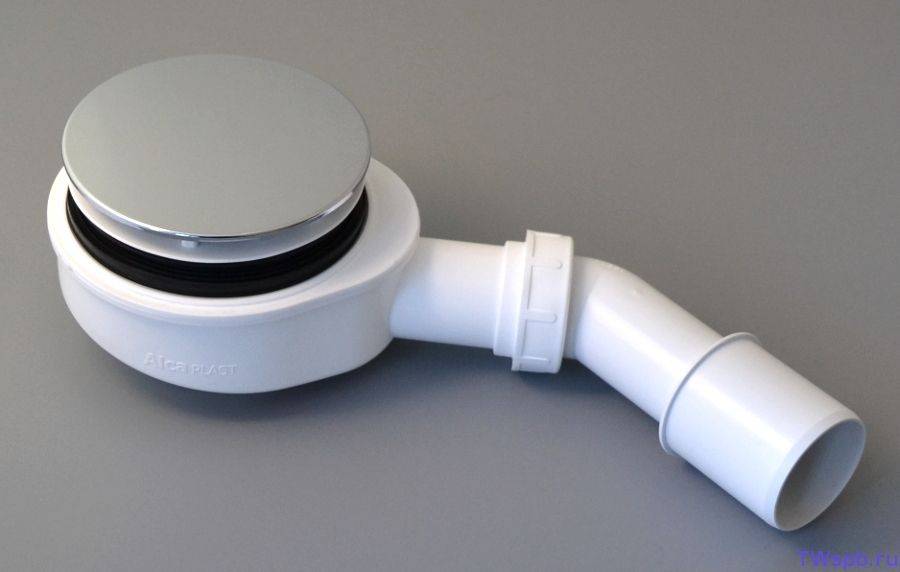
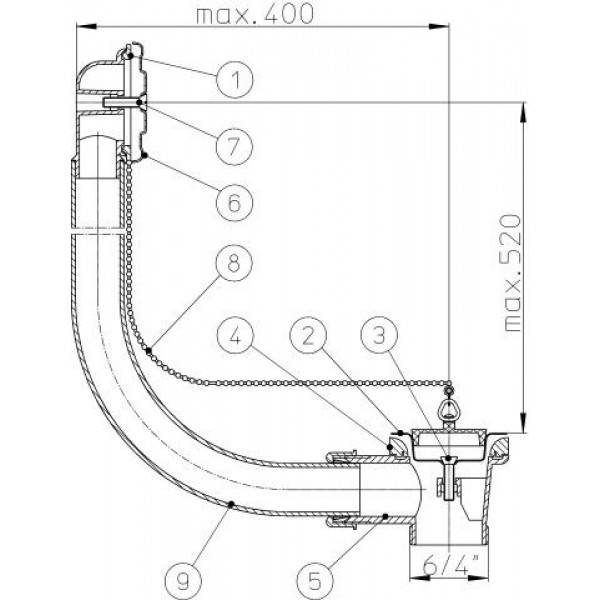
How to connect the shower siphon
You got acquainted with the various designs of shower siphons, which differ in the mechanism of action and a number of other indicators. Regardless of the model, any siphon is connected in the same way.Differences arise only at the stage of installing additional elements (a handle in automatic siphons, a button in click-clack siphons, etc.). Specify the order of their installation in the manufacturer's instructions - depending on the model and the specific brand, the installation may have some differences.
Click-clack button
Button - photo
Exploded button
Installing a siphon from scratch
Instructions for the first connection of the siphon to a new shower enclosure are given in the following table.
Table. Siphon connection
Stage of work
Description
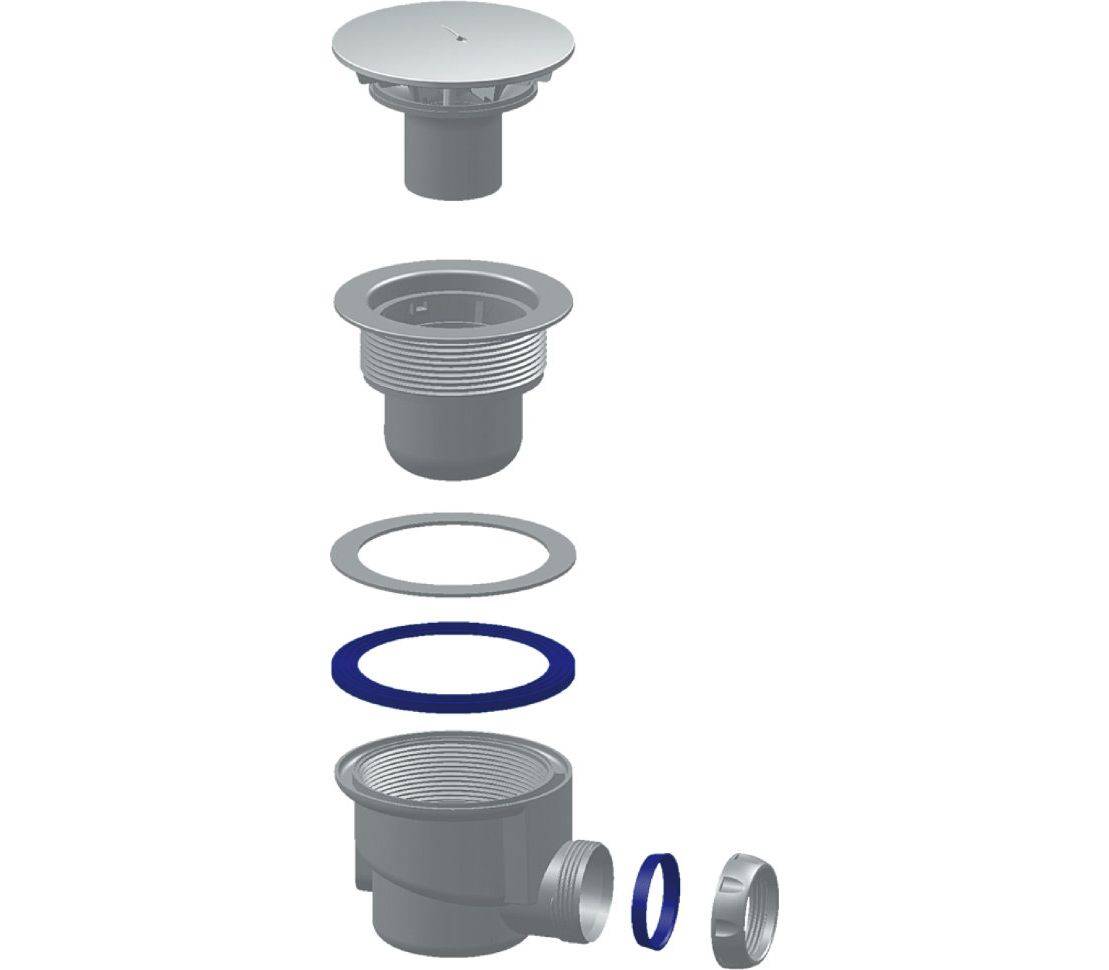
Siphon unpacking
Unpack the siphon as shown in the image.
The beginning of the disassembly of the siphon
Take out the drain valve.
Siphon disassembly continued
Unscrew the sleeve from the housing. Remove cover and gaskets.
Sealing
Run sealant along the drain groove.
Gasket installation
Install the gasket from the kit into the groove treated with sealant.
Gasket sealing
Run sealant along the gasket groove.
Installing the drain cover
Place the cover of the siphon body in the drain hole of the shower tray
It is important that the thread of the cap matches the thread of the hole.
Connection baiting
At this stage, you need to make a connection. To do this, turn the cover sleeve, as shown in the figure.
Fixing the drain
To fix the drain, you need to perform 2 main steps: - tighten the connection with a socket wrench; - insert the valve as shown in the figure.
Overflow installation
Overflow installation is carried out in a similar manner
In this example, the drain has a control knob.Adhere to the following sequence: - loosen the fixing screw (this can be done through the corresponding hole in the handle body), then dismantle the cover; - align the overflow body with the corresponding hole in the shower tray structure. Important! At this stage, as with the installation of the drain, gaskets are installed with mandatory sealing. By tightening the connection between the cover and the body with an adjustable wrench. The said tool must be adjusted correctly so that as a result it is possible to capture the jumper of the overflow cover. Place the handle by which the drain is controlled so that a 3-4 mm gap remains between the surface of the front cover and the end of the handle (see the figure). Tighten the screw after adjustment.
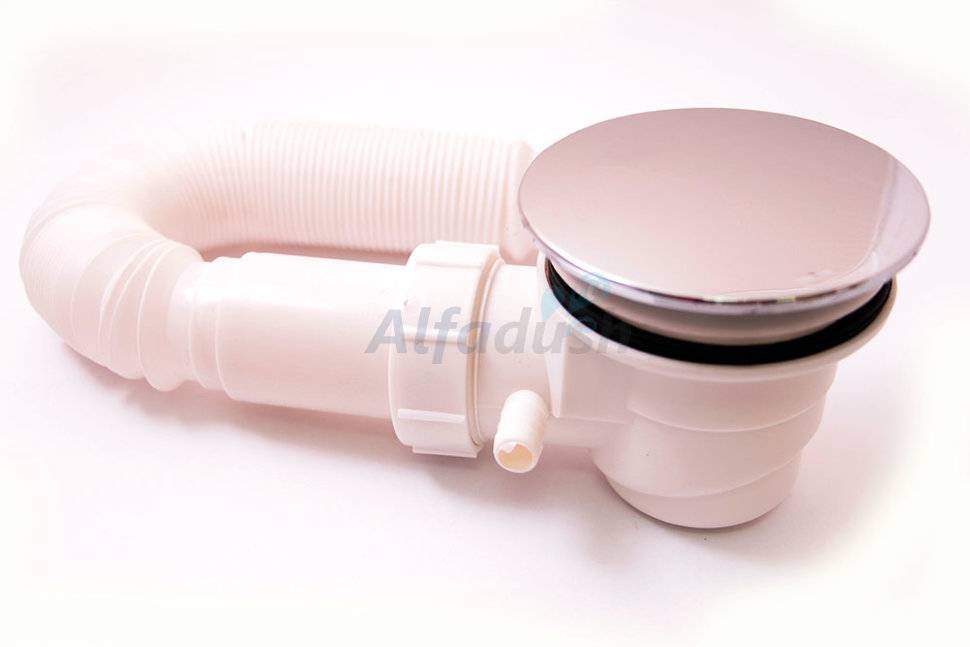
Elbow connection
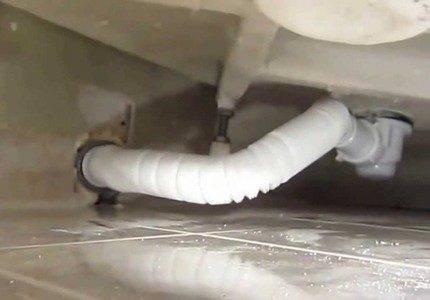
Installation of the siphon elbow is carried out in the direction of the entrance to the sewer. This element is mounted before the test of the tightness of the shower cabin. The result is shown in the figure.
Connecting the knee to the sewer
A corrugated pipe is traditionally used to connect a siphon installed in the correct position to a sewer pipe. Appropriate adapters are used if necessary.
Further assembly of the shower cabin is determined by the features of a particular design.
Tips from experienced plumbers
No matter how reliable the factory assembly of the shower panel may seem, the nuts of the connected pipes, hoses and pipes should be checked and tightened with a wrench. After installing the shower in place, all connecting nodes will be invisible.
It is not clear what will happen behind the blind panels there. It's not worth bringing the matter to the flood.Tightness and once again tightness. No pipe connection should leak a week or a month after the connection and installation of the shower is completed.


If the drain hole of the shower cabin is too far from the sewer inlet, then you will need to install a waste pump. It will not be possible to organize gravity here through pipes. Such a unit works silently, and the size is just right for placement under a pallet.
A bathroom with a shower cabin installed must have good ventilation, this is especially important if there is a “steam bath” function
All piping should be at a slight slope. Gravity is needed for both sewerage and water supply. Sewer pipes are laid with an inclination to the riser, and water pipes - from it to the shower cabin, so that when the water is blocked, it completely flows out of the system.
In overly budget models, the drain can be made of silumin alloy. This drain will last a maximum of two to three years. It’s better to spend money right away and change it to an analogue made of stainless steel, which also comes with a normal siphon made of high-quality plastic.
Water pipes leading to the shower cabin should be equipped with ball shut-off valves and dirt traps. Water in centralized systems is not always perfectly clean. If the holes of the watering can are still not clogged with grains of sand, then the nozzles will definitely stop working. Filters with valves can be placed directly at the riser or at the ends of the inlets at the booth.
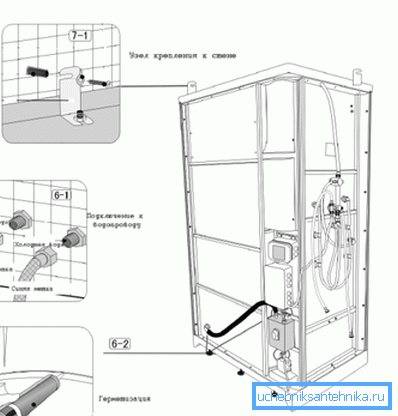
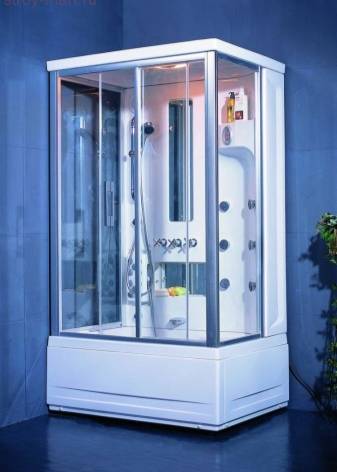
Features of the installation of a shower cabin-hydrobox
In closed showers and hydroboxes, after installing the pallet, it is necessary to assemble a panel covering the wall.It has mounting holes in which all the "gadgets" are pre-installed - nozzles, holders, soap dishes, seats, speakers, lamps, etc. the shape and size of the bottom is different for everyone, so it's hard to make a mistake. It is advisable to lubricate all the "landing holes" with sealant: there will be less dripping later.
Particular attention should be paid to the installation of injectors. In addition to installing the sprayers themselves, they must be connected to each other with hose segments. It is put on the nozzle nozzles, tightened with clamps. All this is assembled according to the scheme available in the instructions.
Pay special attention to ensure that the nozzle tips are intact and the clamps are well tightened. It will not be superfluous to smear each seat with sealant (both under the nozzle and under the hoses)

The wall with connected accessories is placed in a special groove. The junction is also pre-lubricated with sealant. Cold, hot water is connected, you can check the performance of the system.
After installing the walls, the lid is assembled. There is usually a rain shower, maybe a lamp. When installing them, you can also use a sealant - you never know where water gets in ... A hose is put on the shower pipe, which is tightened with clamps. Conductors are connected to the lamp terminals, the junction is carefully insulated, several heat-shrink tubes can be put on in series.
The assembled cover is installed on the wall. The joint is again lubricated with sealant. While the sealant has not hardened, the assembled door frame is installed. When doors are installed depends on the model. In some cases, they need to be hung before installation, in some - after. All joints are sealed.
The assembly of the hydrobox shower cabin is shown in sufficient detail in this video. There are no comments, but the sequence of actions is clear.
Checking the operation of electrical appliances
Everything is done as it should, the exciting moment of testing has come. The water tap opens and nothing happens. Or the interior lighting does not turn on. In any case, such a development of events is not a reason for panic: all possible critical points are sequentially checked, it is possible that the shut-off valve at the input is simply closed or there is no voltage in the network (the machine is turned off).
The radio may not work if the antenna is not installed - this is a frame or a piece of wire. The backlight is usually connected through a special voltage converter (if you do not install it, LEDs that are not designed for 220 V will immediately fail).
We invite you to familiarize yourself Shelf under the sink in the bathroom, do-it-yourself stand installation
As a rule, the assembly of shower cabins is designed for medium-skilled specialists; if all the above recommendations are followed, it should not cause difficulties. A do-it-yourself installation, without the involvement of masters, will help raise self-esteem, as well as give invaluable experience.
First, the operation of the fan, radio and lighting, powered by electric current, is checked. Cabin assembly is not just connecting the pallet to communications, but ensuring proper operation and connection.
It is important to remember that:
- there is moisture in the bathroom, so it is impossible to place electrical and switching panels, chokes and other devices there;
- for good safety against electric shocks and the safety of equipment, as well as protecting it from voltage surges, you need to install special machines to turn off the power in an emergency,
- it is better to install a socket of a hidden type and from the outer (reverse) side of the shower cabin. It must be reliably protected from moisture and dust and have an IP44 index.
- The shower cabin must have good grounding, very often a metal pallet acts as a ground electrode.
After the main part of the assembly is completed, all fastening materials must be left to harden.
Kinds
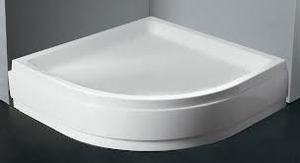
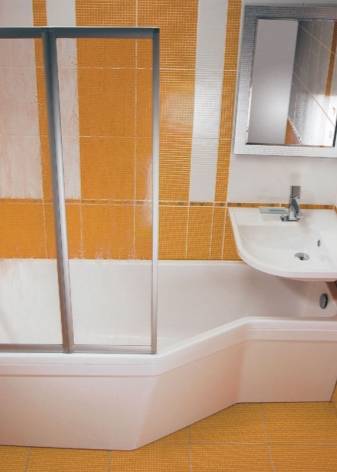
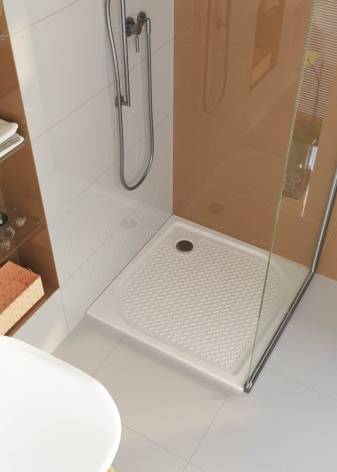
Shower trays vary in height. The shallowest usually have a depth of up to 15 cm. These can be steel and acrylic products of a square, rectangular or quarter-round shape. Steel products have a square shape with overhead sides.
In fact, this is an imitation of a shallow steel bath. There is no support frame for such pallets, therefore, for its installation, it is necessary to provide for a special foundation structure made of foam blocks or bricks. The support structure eliminates deflection. The entire pedestal can be tiled with ceramic tiles for an aesthetic look.
Recently, a variety of shower cabins with trays made in the form of a fairly deep bath is gaining popularity. The dimensions of such a product range from 130 cm in width and increase in increments of 10 cm. Therefore, for bathrooms of various sizes, it is easy to calculate and select a cabin of the right size


When choosing a shower tray, special attention should be paid to the thickness of its walls. The service life of the product directly depends on this parameter.
If the steel product has thin walls, it can be deformed if it is not rigid enough to install it on the foundation, which will lead to cracking and chipping of the enamel. Thin-walled acrylic products will sag under the weight of even a light person and may crack, resulting in the need to replace them. Cracks in such pallets can form due to temperature changes. More durable and durable are trays and bathtubs made of artificial polymer stone. They can have a variety of colors, sizes, and are convenient for non-standard sizes of bathrooms. Cast iron varieties are leaders in rigidity and durability. They have only one drawback - the appearance.
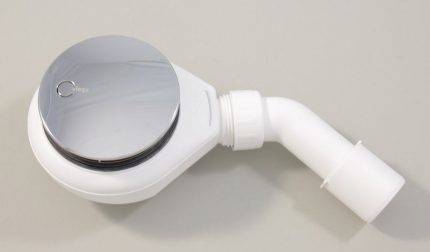
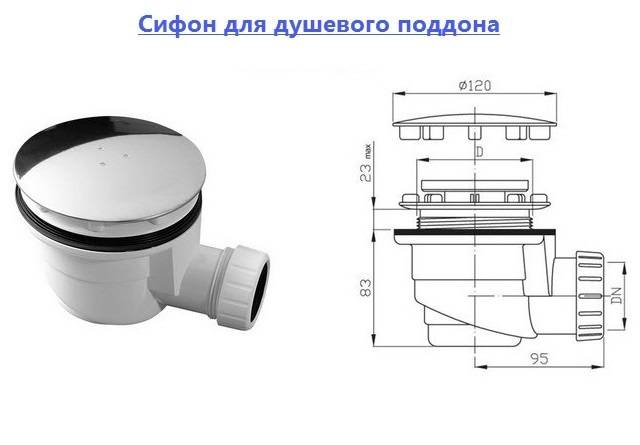
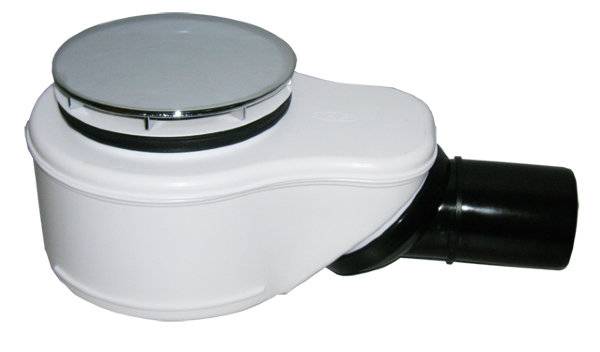
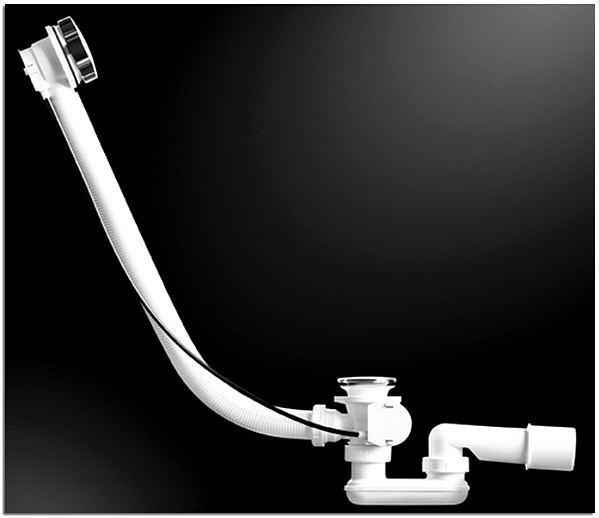
The purpose of the siphons
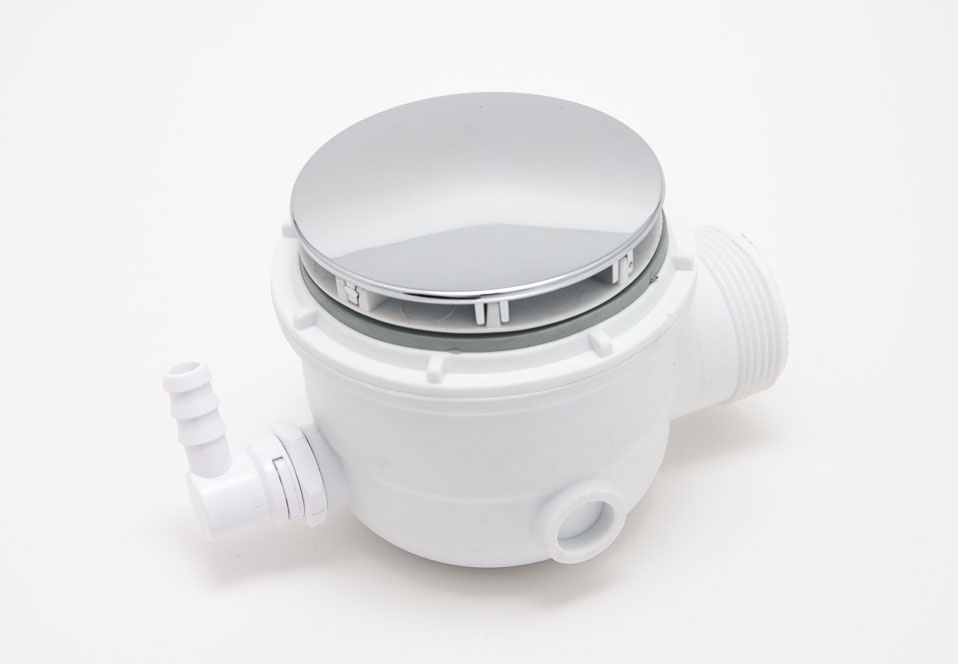
The main function of the drain system is to receive waste water from the hole in the sump, and then direct it directly into the sewer pipe. The key element of the drainage system is the siphon, also referred to as the ladder.
 Siphon for shower tray is a curved tube filled with liquid, the upper segment of which forms a water lock
The siphon will perform two tasks: it provides unhindered draining of dirty water and prevents the spread of an unpleasant odor from the sewer pipe.
The principle of a hydraulic seal, used in traditional siphons, prevents the penetration of air saturated with a large amount of harmful gases in the opposite direction.
Siphons are used everywhere when connecting household plumbing devices, with the exception of only those structures in which a water lock is already an integral part of them.
Choice
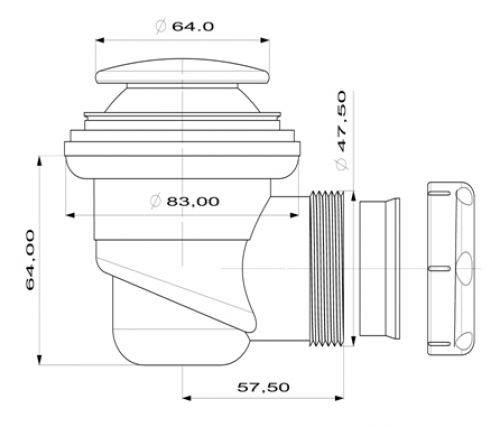
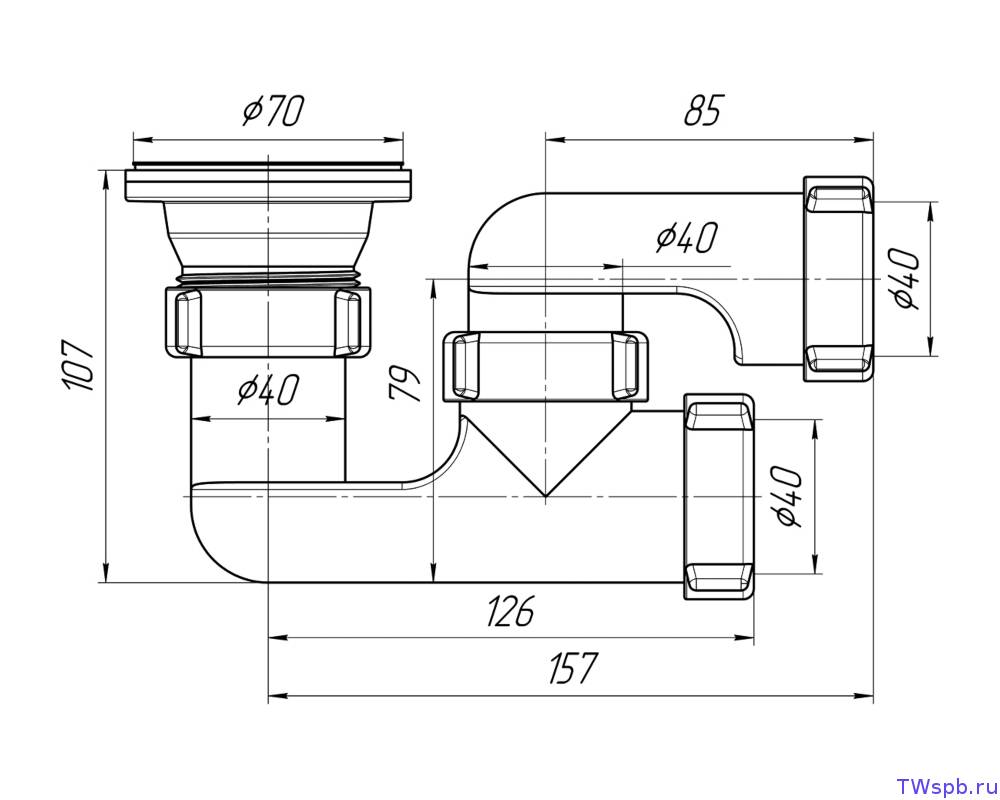
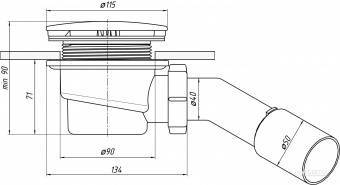
Parameters and characteristics that determine the choice:
- Geometric - the dimensions of the shutter, the height of the space under the shower cabin, the diameter of the drain hole;
- Technical - performance and throughput;
- The quality of the material;
- The complexity of the installation;
- operational features.
Shower cabins are often sold with siphons. If this modification of the cabin suits you, you can purchase it. But no less often you have to choose a siphon yourself
Therefore, you should pay attention to the following points
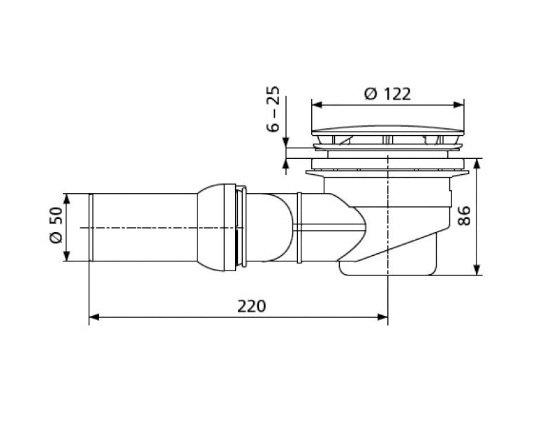
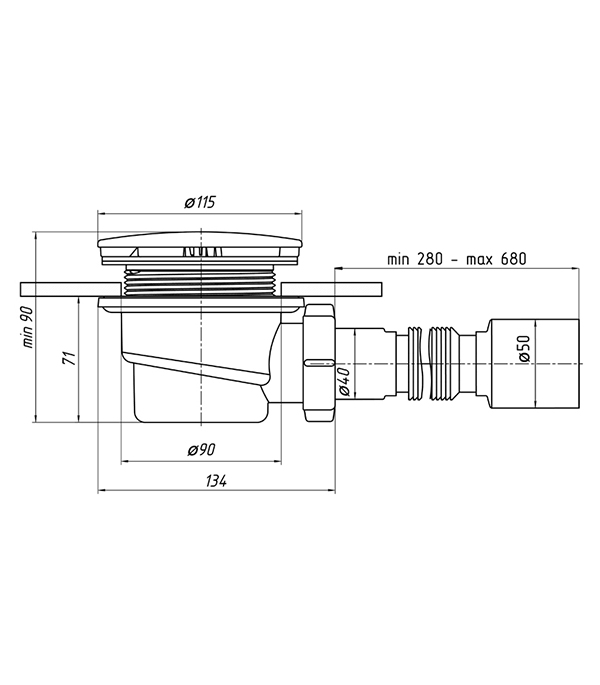
Geometric parameters
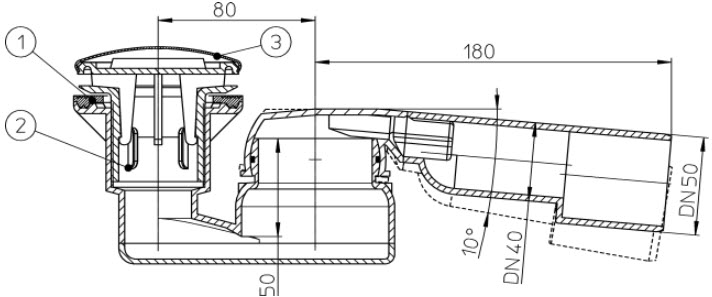
The design of the pallet, the methods of its installation determine the choice of the mounting height of the shutter. Modifications are made to devices with a height of 8 to 20 cm. However, for a low-mounted shower cabin, only those whose height does not exceed 10 cm are suitable. The lower the height of the device, the easier it will be to install. The most difficult thing is to choose the shutters for the cabin, installed directly on the floor.
The market is increasingly selling shower cabins with drain holes with euro sizes - 52, 62 and 90 millimeters. The structural details of the shutter must comply with them.
Technical specifications
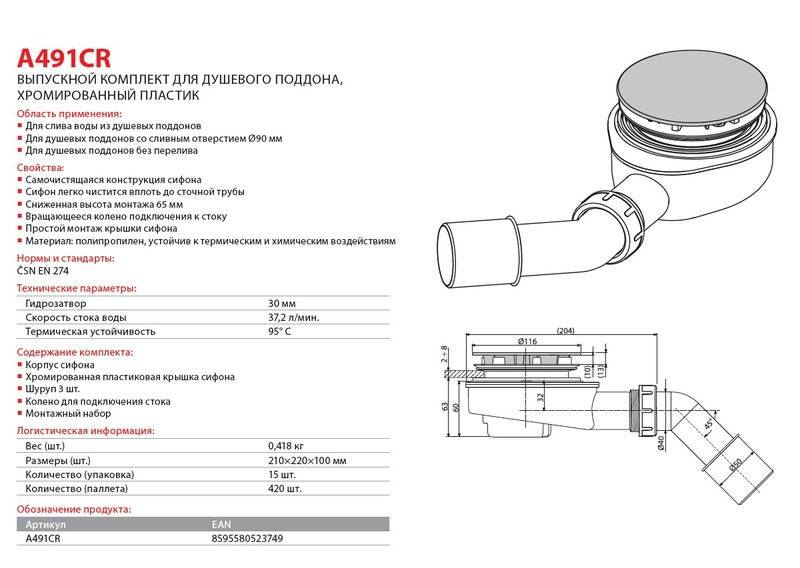
The depth of the shower cabin sink is usually small, the water flow is large, therefore, the water must have time to exit without delay. The throughput (PS) of a water seal determines the speed at which water will flow, as well as how quickly the gate structure will become clogged, how often it will need to be cleaned. PS showers average 30 liters per minute. In the presence of hydromassage and other additional functions, the water consumption increases. The indicator characterizing the PS is the height of the water layer above the level of the top of the drain.With a height of h=12 cm - diameters are 5.2/6.2 cm, with h=15 cm - a diameter of 9 cm. Therefore, for low pallets there are siphons of small diameters - 50 mm, for high ones - large ones. The instructions for the shower cabin indicate the PS, which must be taken into account when choosing a shutter device.
GOST recommends a minimum throughput of at least 15 liters per minute for showers with outlet, at least 21 for siphons with overflow and for deep sinks.
Material quality
The parts located under the shower cabin are not subjected to external physical stress, so they can fail due to the aging of the plastic. Poor-quality plastics begin to crack in the second year of service. Quality ones last a long time.
The grate covering the drain requires attention. The best option when it is stainless steel. This is the most durable material that is used for gratings. There are gratings made of alloys
In this case, pay attention to the decorative coating. Two layers of chrome are a guarantee that the coating will not peel off, and the grille will last a long time.
Chrome is resistant to detergents, which is an additional advantage. Plastic nickel-plated gratings quickly remain without a coating, which cannot be restored on its own.
To facilitate the periodic maintenance of the shutter device, as well as to protect against sewer odors, the shutter devices are supplied with additional parts - dry or hydraulic shutters, removable sump cups. The reliability of the shutter is the lower, the more additional parts. The probability of breakdowns increases with the increase in the number of parts.
When buying cheap hydraulic seals, they throw away large sums of money down the drain, since only raising the pallet will allow them to be replaced. In some cases, you will have to dismantle the entire shower cabin, then you cannot do without breaking its parts. Whether it is worth saving on a shutter device is up to the buyer to decide.
Performance
Drain fittings, according to the regulations, should be easy to disassemble and assemble by hand
This is an important condition, especially when the drain is clogged, or in other emergency cases. Therefore, the installation of the shutter device is carried out with a minimum set of tools.
During operation, the main difficulty is cleaning the locking device. When choosing, you should consider this issue. Some modifications are made self-cleaning. Some are cleanable through the drain hole. Such modifications of the shutter product have an outlet diameter of 90 mm, which allows you to disassemble the device, remove everything you need in sequence, and then assemble the seized in the reverse order.
When buying a siphon, it is better to choose products with click-clacks that are removed with a cleaning basket
Required Tools
When installing and connecting to the sewerage of a shower cabin, you will need a certain tool and consumables. The base is made by pouring a concrete screed, which means that you should prepare a tool for preparing the mortar, carrying out concrete work and applying waterproofing:
- construction mixer;
- shovel;
- measured capacity;
- Master OK;
- grater;
- trowel;
- putty knife;
- knife;
- scissors.
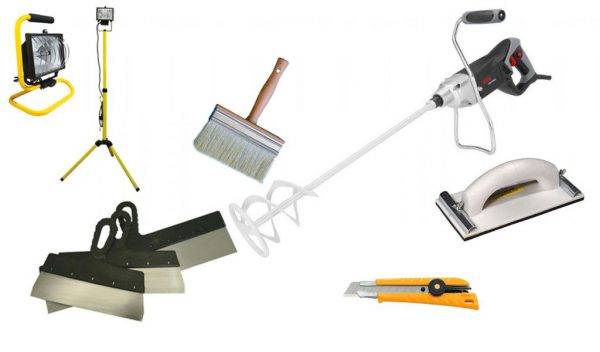 Tools, for concrete screed
Cabin connection is carried out using:
- grinders;
- electric drills;
- perforator;
- screwdriver;
- grinder;
- hacksaws for metal;
- pipe bender;
- screwdrivers;
- pliers;
- vise;
- wrenches, end wrenches, plumbing, adjustable;
- chisels;
- bits;
- hammer;
- mallets;
- paint brushes;
- spatula.
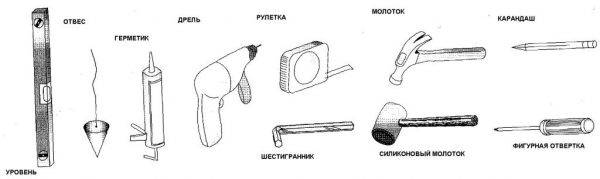 Cabin Connection Tools
Of the consumables you will need:
- mounting foam;
- silicone sealant;
- FUM tape;
- cuffs;
- hairpins.
Quality control and the necessary measurements are provided with a building level, tape measure, metal ruler, corner.
Price
The average cost of models with the best value for money is quite affordable for the average consumer:
- WIRQUIN BOND JAMES - 900-950 rubles;
- WIRQUIN Tourbillon - 430-440 rubles;
- UNICORN - 700-990 rubles;
- Temperlex Plus - 3300-3400 rubles;
- Raindrain - 1300-4800 rubles;
- Ideal Standard - 2300 rubles;
- Uniflex - 2400 rubles.
The cost in most cases varies depending on the design features of the siphon, as well as the material used in the manufacture, brand awareness and the manufacturer's pricing policy.
When choosing, not only the technical characteristics of the siphon are taken into account, but also its diameter, which affects the tightness of the connection being made.
Siphons are distinguished by the color scheme of the decorative cover, which can be gold, bronze and white, as well as chrome-plated.


Designers of shower cabins regularly develop newer siphon models with a reduced height, which makes it possible to make the installed bottom part of the pallet convenient for use not only by children and the elderly, but also by persons with disabilities.
Conclusions and useful video on the topic
Videos will help you understand the nuances of assembling and connecting plumbing equipment.
Video #1 Instructions for assembling and connecting the shower cabin to the water supply:
Video #2How to mount and connect a shower cabin:
You can connect a shower cabin to engineering communications without involving specialists. It is only necessary to have the skills to handle a wrench to connect pipes and a screwdriver to assemble the booth itself. It will take several hours to complete the installation, but everything will be done exactly to the conscience.
You can share your own experience in assembling and installing a shower box, ask questions, talk about the features of operation in the block below. Please comment and ask questions.


