- Manufacturers
- How to assemble a siphon for a sink in a kitchen with an overflow
- Siphon Assembly Expert Tips
- Maintenance and operation of the siphon
- Dismantling the old siphon
- Siphon selection. Design features
- Siphon installation: select material and assemble with your own hands
- How to install a siphon yourself
- Purpose and design of the drain
- How to clean a drain hole
- Purpose and design features
- Connection to the sewer system
- Main components and components
- Conclusions and useful video on the topic
Manufacturers
The choice of a siphon should not only consist of cost, it is also necessary to pay attention to the manufacturer. It often happens that products of well-known companies do not meet expectations and vice versa
Below are a few options to help you choose.
- Viega is the slogan of this company “Quality is the most important. Without quality, everything loses its meaning.” And this is so, their main plus is the high German quality. The products have been on the market for more than 115 years, and a lot has changed since then, but the main thing always remains with them. Today, Viega is the world market leader in the field of sanitary fittings, with more than 10 representatives worldwide.One of the main areas of work is the manufacture of wall-mounted sanitary ware, which not only meets the latest technical specifications, but also has a great design. In the manufacture of their products use different materials in the form of stainless steel, copper, bronze, plastic.
- Alcaplast is a company based in the Czech Republic, its rating is quite high in the market in Central and Eastern Europe. The main assortment, in addition to the creation of inlet and drain mechanisms, are hidden installation systems, various types of siphons for bathtubs, sinks, sinks, shower trays, which will help create comfort in the house.
- Hansgrohe is a leader in design. The founder of the company is a family from Germany, producing products with a high quality standard under two brands: Hansgrohe and AXOR. The perfection of forms and functionality pleases, and this is the main merit of the company. One of the few who advocate for the protection of the environment, thereby releasing quite ecological products.
- McAlpine is a company originally from Scotland, one of the first to manufacture products for water disposal from metal, then they began to master the production of plastic. Today, the factory occupies a leading position in the manufacture of structures for water disposal, which include: siphons, drains, overflows, sewer pipes and more. Having its own laboratory, it allows the factory to check its products for quality (tightness, resistance to different temperatures and aggressive factors, etc.).
- Akvater - the company was founded in Russia in 2008. It has been manufacturing siphons since 2011. In a short period of time, it occupies a good place in the sales market.
- Grohe is a product of German quality, due to large exports it occupies one of the leading places in the world market, without losing its quality. Having bought this production, you can be sure of functionality, originality of forms and reliability.
How to assemble a siphon for a sink in a kitchen with an overflow
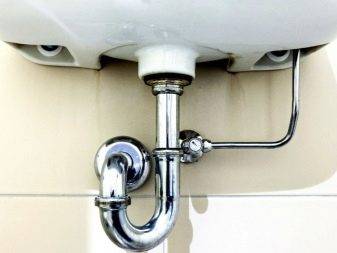
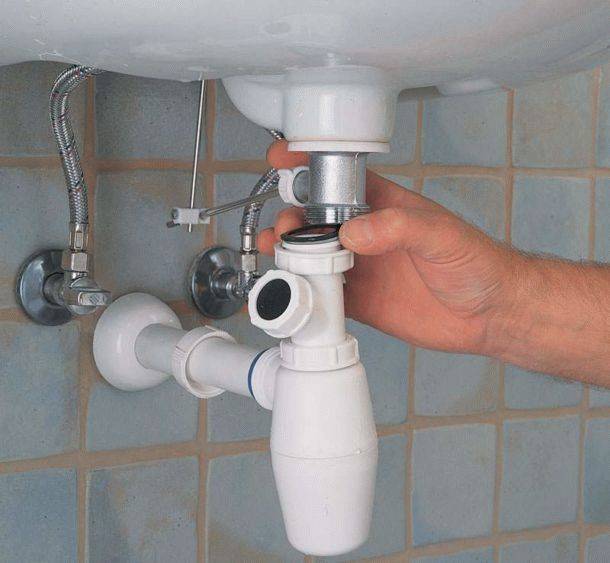
First you need to prepare a place for installing a plumbing fixture. To do this, the old siphon is dismantled and the surface of the sewer pipe outlet is cleaned. If this is a Soviet-era cast iron product, you will have to beat off the cement, which was then used as a waterproofing agent, with a hammer and chisel.
At the same time, debris should not be allowed to enter the sewer pipe, as in the future they will cause blockages. after completion of work, the mouth of the pipe is carefully inspected and solid fragments of construction debris are removed with tweezers or pliers. Then a rubber plug is installed.
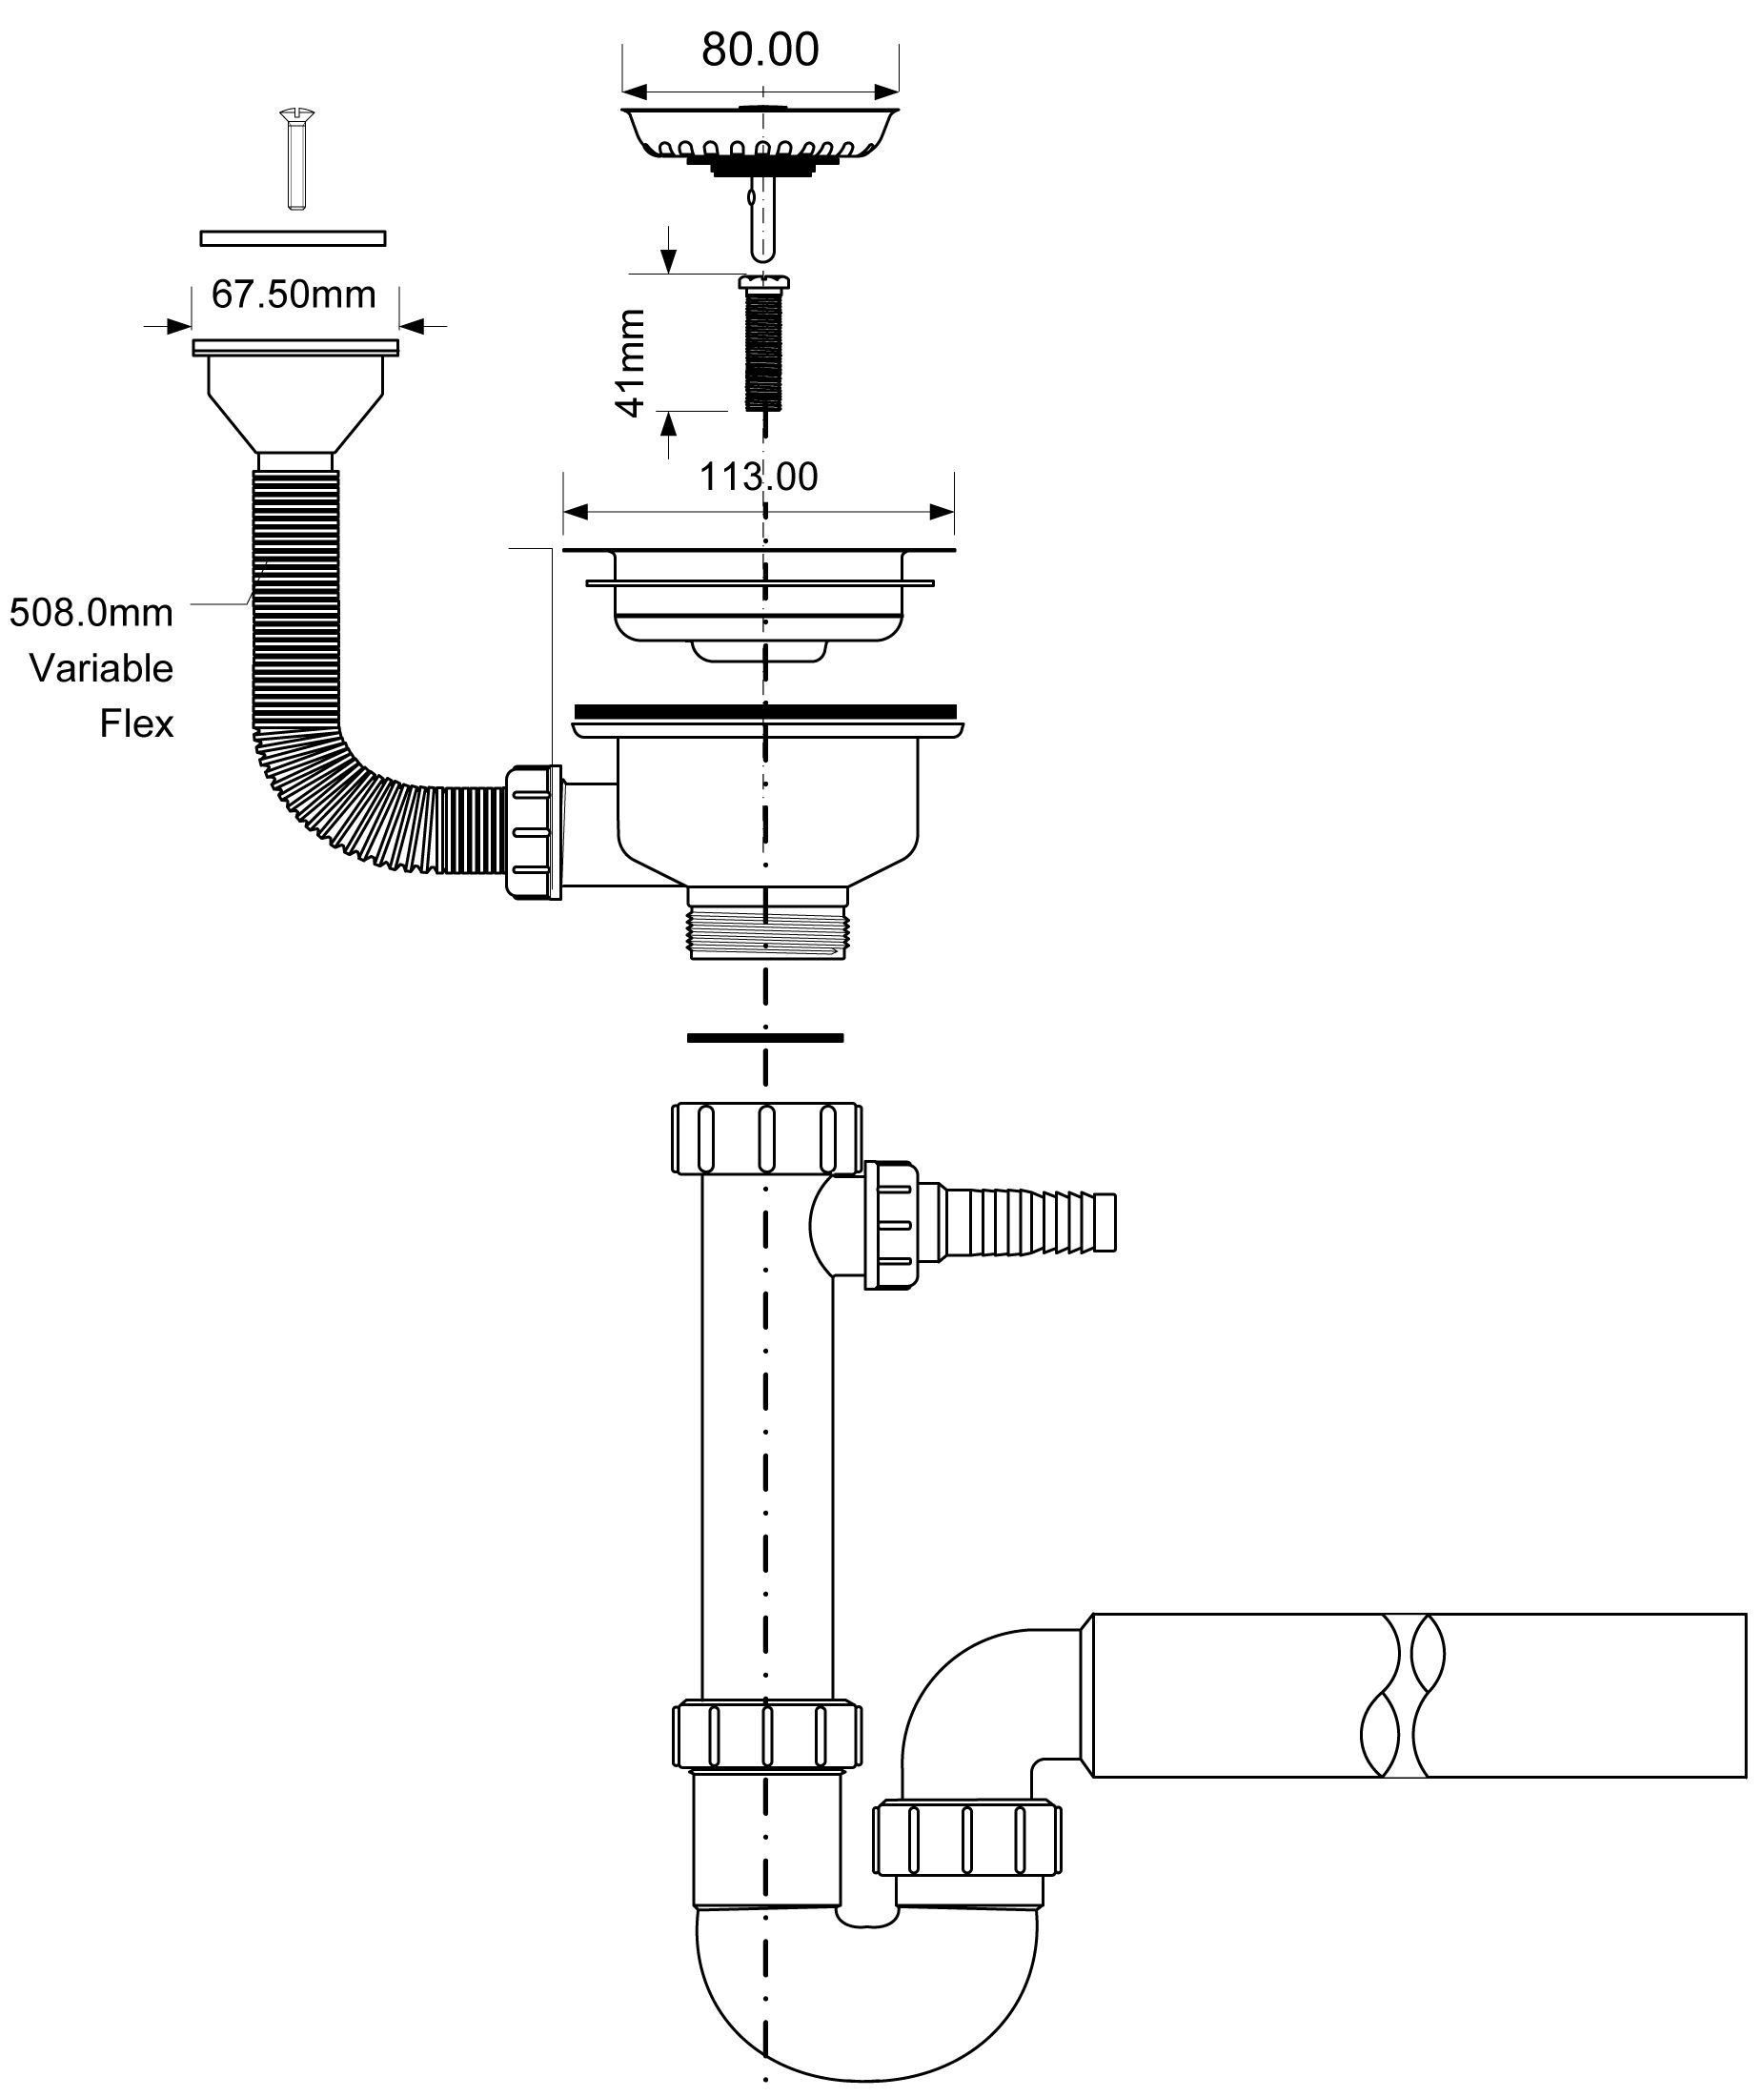
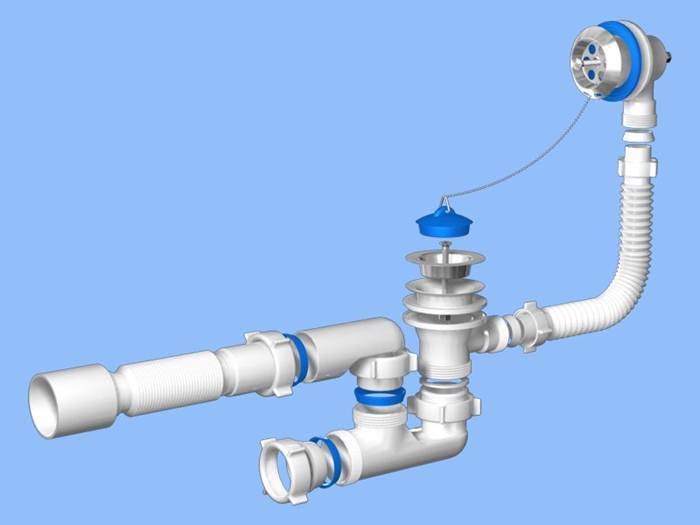
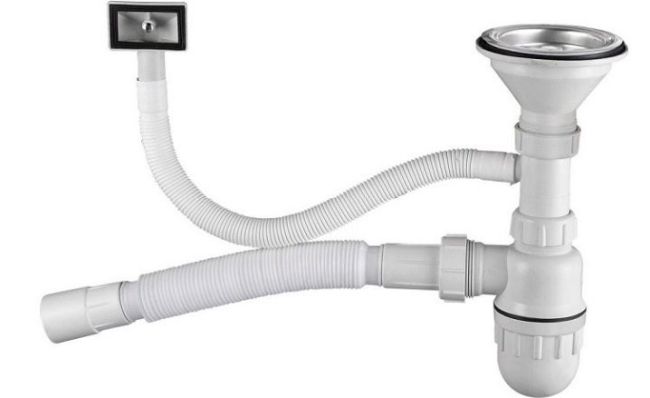
An example of a siphon with overflow
In the design of the sink with overflow, an additional hole is provided in the upper part of the side wall. Its functional purpose is to prevent liquid from splashing over the edge of the container when it is overfilled. To install under such a sink, a siphon is needed, which has an additional pipe for receiving liquid coming from the overflow hole.
Siphon design with overflow
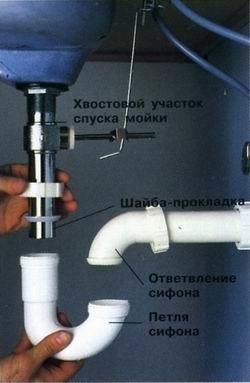
To assemble a siphon for a kitchen with an overflow, in addition to the actions according to the standard scheme, some additional manipulations are required. The lower part of the overflow pipe is attached to the inlet pipe of the plumbing fixture using a union nut and a gasket.
The overflow pipe is brought from the outer part of the sink to the hole made in the upper part of its side surface. On the inside of the sink, the pipeline is strengthened by tightening the screw connection. After performing these steps, the water will flow into the siphon, and not pour out when the tank overflows.
At the final stage, the system performance is checked. To do this, a jet of water is directed into the sink under strong pressure, and all connections are carefully inspected. In the absence of a leak, the work is considered completed. Liquid leakage in a certain place is eliminated by tightening fasteners or replacing defective parts.
Siphon for double sink
Siphon Assembly Expert Tips
When assembling a siphon, you should adhere to the following recommendations:
Seal the threads cut on the metal with a special tape or linen tow.
All gaskets included in the kit must be installed in their place. If after completion of work at least one ring remains in the missed seal, a leak will soon form.
Pipe connections are sealed with only one gasket. Inexperienced craftsmen install two gaskets at pipeline connections to prevent leaks


Such actions lead to depressurization of the system.
Tighten the fixing plastic nuts carefully and carefully. Weakness in the connection should not be allowed, but if excessive force is applied, there is a risk of damage to parts.
Gaskets are installed in the same way
They tighten well on the nozzle, but if you overdo it, the sealant material will break.
To prevent the occurrence of leaks on a regular basis, it is necessary to carry out preventive replacement of worn seals. Otherwise, you can flood the neighbors.
Do not neglect the advice of experts
Compliance with the rules of operation is no less important for increasing the life of the plumbing fixture
Maintenance and operation of the siphon
A well-installed siphon will work flawlessly for many years with timely maintenance of the drain system. The piping system must be periodically cleaned from contaminants arising during operation. Sticky lumps of fat are dissolved with caustic soda.
Good results are obtained by prolonged flushing of the plumbing fixture with a pressure of high temperature water. Cleaning the pipeline network in the event of blockages is carried out using special chemicals. Plumbers often use a flexible metal wire with a thickened end for this purpose.
Dismantling the old siphon

If you do not have an old siphon, you can skip this step. Those who want to replace old equipment with new ones can follow the instructions:
- First, prepare a bucket or basin, a rag or a plastic bag.
- After that, you need to shut off the water supply to the water supply system.
- Place a bucket or basin under the siphon. Any remaining liquid will drain there.
- Using a screwdriver, unscrew the fixing screw that is in the sink. It's screwed into the grid. You need to turn counterclockwise.
- Unscrew all parts of the siphon. This can be done by hand. If the connections are tight, use a pipe wrench or adjustable wrench.
- Now remove the pipe located between the drain hole and the siphon. It also needs to be unlocked.
- It remains only to remove the grille. Wipe the inside of the sink with a rag.
On this, all the preparatory work is completed, you can proceed with the installation. Now we will consider two connection options: in the sink in the kitchen and in the bathroom to the bathroom.
Siphon selection. Design features
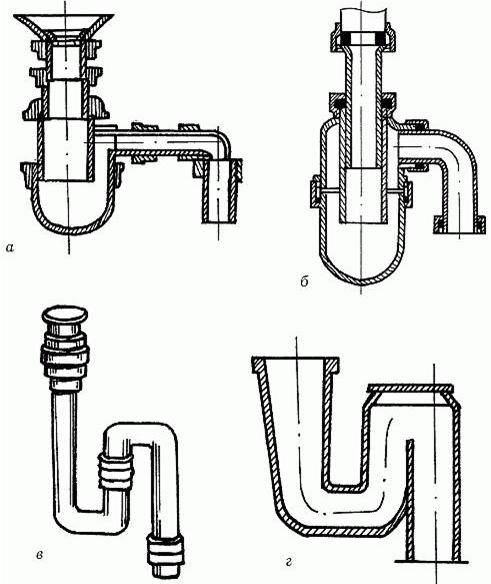
Usually the drain-overflow system is included with the sink, it is designed specifically for the selected model. But if it so happened that the product is not equipped with drain fittings or the installed siphon is out of order, you will have to purchase a new one. Among the large selection of drain systems, several main types of fittings can be distinguished based on the design features of each.
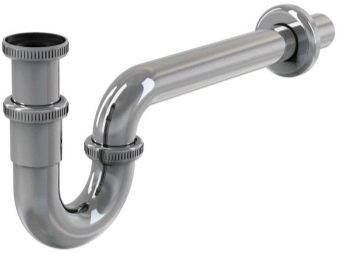
- Rigid pipe siphon. It consists only of a set of pipes connected to each other or one solid pipe. The water seal is formed by bending the main part of the system. If the siphon is non-separable, then its lower part is equipped with an inspection hole closed with a stopper. It is necessary to clean the system and remove fatty deposits.
Rigid pipe siphon
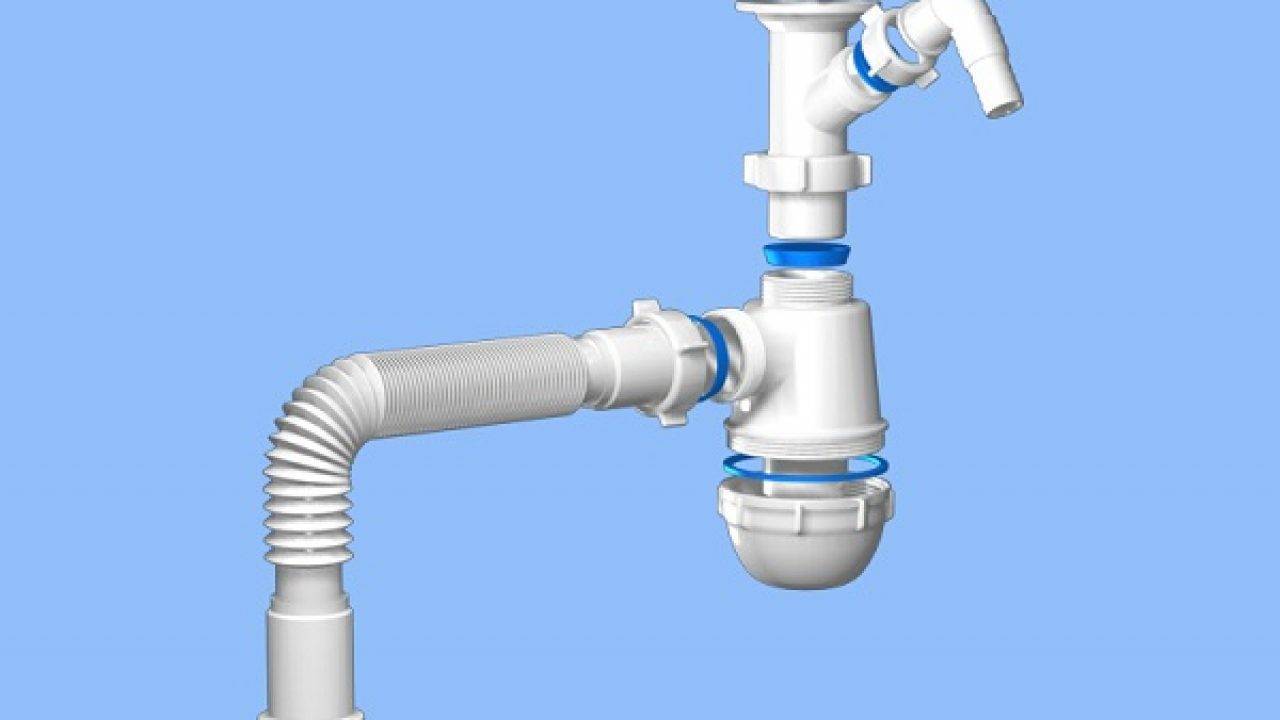
Bottle. The main part is made in the form of a bottle, in which a water seal is formed. The outlet pipe can be either rigid or in the form of a corrugated pipe. The main difference compared to the previous type is the possibility of easy disassembly of the siphon body. If a small object has fallen into the drain hole of the sink, it can be easily removed by unscrewing the bottom of the bottle.
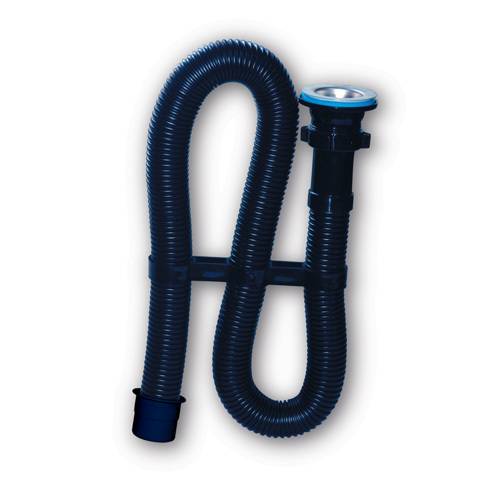
Corrugated siphon. The simplest type of drain valve. It is a corrugated pipe.One end is connected to the outlet (the part that is placed in the drain hole), and the other to the sewer pipe. The siphon effect is achieved due to the S-shaped bend of the pipe. The cheapest and easiest to install and assemble, because. has the least number of constituent elements. However, the corrugated pipe very quickly accumulates fat deposits.
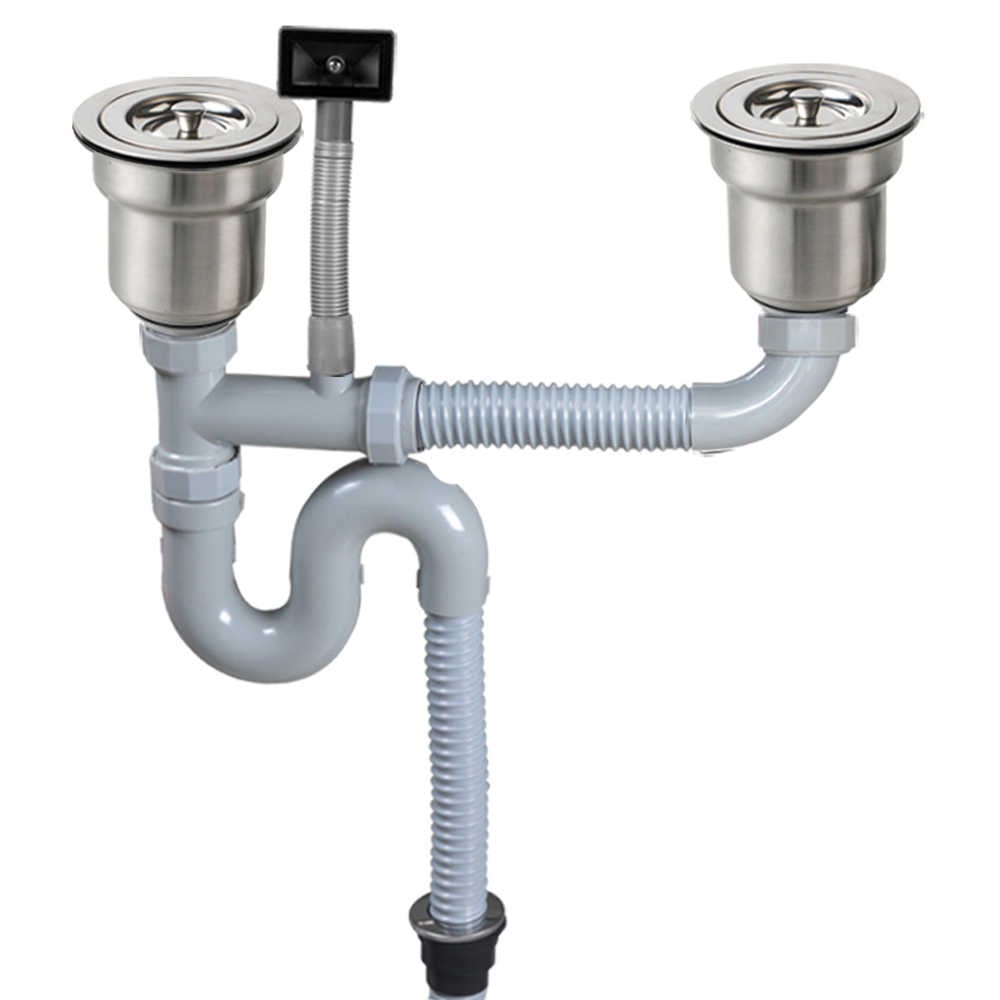
Double siphon (triple, etc.). It is used exclusively in cases where the sink has 2 or more bowls. It features a double neck and outlet, which are connected by a common siphon.
System with an additional outlet. Very handy for washing machine. It is equipped with an additional branch pipe, which is located on the neck - between the outlet and the bottle.
System with additional outlet
Siphon with two additional outlets. Provides connection of the dishwasher in a set to the washing machine.
Siphon with two additional outlets
Siphon installation: select material and assemble with your own hands
Pressing the bulb a few times isn't difficult, but changing the batteries in the siphon is an added headache. And what happens if the electric motor still breaks down….
Battery siphon with mechanical filter
The siphon for cleaning the aquarium is not used only if the aquarium is completely planted with plants. First, I can't imagine how you can siphonize, for example, chemanthus cuba or Eleocharis.


This will inevitably lead to damage to aquarium plants. Secondly, all the sediment that accumulates in the soil is food for aquarium plants. I have not poured the soil for many years, the floors were completely dirty, but now it seems to me that the root will be on my soil.
But still, if there are areas in the aquarium in which plants do not grow siphonized, soil is necessary.
The soil exceeds the number of fish in the aquarium: from once a week to once a month. The soil siphon is suitable for combination with partial water changes - 20% of the sediment is dried, 20% of fresh water is added.
It is not difficult to make a siphon for cleaning the aquarium with your own hands. To do this, you need a hose and a plastic bottle.
on the bottle we cut off the bottom and connected the door to the tube. It is not easy to fix the pumping bulb, so the pipe must be removed to create back draft. But, in my opinion, an aquarium siphon is not equipment that is worth saving less than 100 rubles. It's better to buy ready-made, cheap ones, and you'll be served for years.
Internal siphon
When choosing a siphon, it is necessary to take into account the diameter of the pipe, the larger the diameter of the pipe, the greater the pressure of the water flow.
And if you have a tank of 20 liters, then you don't have time to phon the whole earth faster than to combine all the water in the aquarium :). A 100 liter aquarium fits well with the pipe diameter in centimeters. The siphon process alone will collect about 20 percent of the water needed for water replacement.
How to install a siphon yourself
Installing a siphon in the kitchen is a fairly simple procedure, which makes it possible to carry it out on your own. When installing a plastic device, you must use a screwdriver. All other parts can be screwed by hand.
Step-by-step instruction:
- Initially, you need to screw the top of the release.In most cases, the material of its production is stainless steel. The set is characterized by the presence of a drain ring, on which a decorative mesh is applied. It must be placed on the drain hole of the sink. From below, a rubber seal and the rest of the outlet are attached. The two parts are connected to each other with a screw. After that, the displacement of the seals is checked.
- The next step is to connect the overflow hose and outlet. It is also recommended to attach the grid to the sink. In this case, a stainless bolt is tightened. After assembling the siphon, it is screwed to the outlet, the location of which is the neck. In this case, a plastic nut is used. During the manipulation, it is recommended to check the presence of a flat gasket.
- By analogy with previous works, the outlet pipe is screwed to the body of the siphon. At the final stage, the outlet pipe is connected to the sewer. After carrying out all the manipulations, it is necessary to conduct a test run. In this case, a careful inspection of all connections is necessary. If the system does not leak, then the installation was carried out correctly.
Purpose and design of the drain
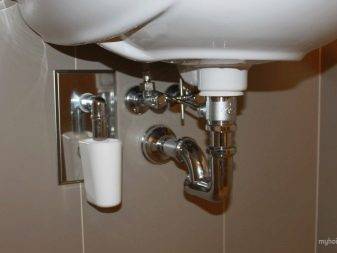
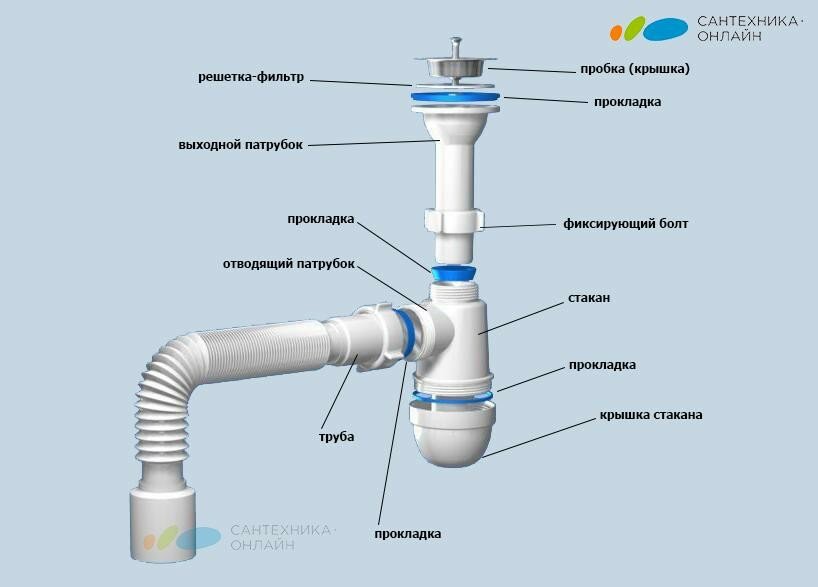
The sink drain is a curved design, the main elements of which are the siphon and the drain pipe.
When flushing, water through the drain hole first enters the siphon and, moving along the curved “knee”, descends into the common drain
The outer element of the drain hole is a metal grill that protects the pipe from hair and small debris.
Located just below the drain hole, the siphon performs two key functions:
- Protects the drain pipe from clogging with waste penetrating through the hole in the sink.
- Interferes with distribution of the unpleasant smell coming from a sewer pipe.
The main secret of the siphon is in its bend.
Thanks to this constructive solution, the water does not completely leave the pipe, forming a kind of water seal, which prevents the spread of sewer "aromas" in the room.
Plastic model with one drain hole with a pipe diameter of 32 mm - the simplest version of the sink siphon
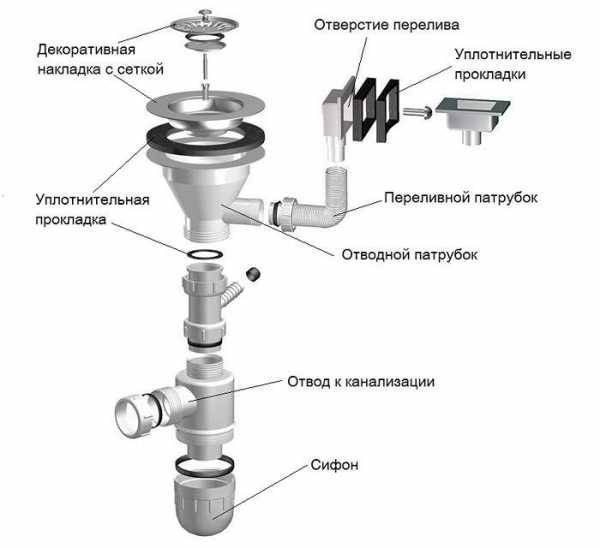
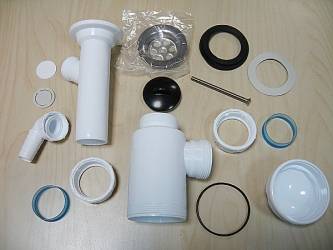
The device package includes the following items:
- frame;
- exhaust pipe;
- rubber and plastic cuffs;
- decorative overlay on the hole;
- rubber stoppers;
- nuts and screws.
In case of clogging of the system, this siphon can be easily removed and cleaned mechanically, chemically or by means of the pressure of a directed jet stream. To prevent such situations, manufacturers recommend purchasing sink drains equipped with overflow.


The design of the system differs in that it is equipped with an additional tube made of flexible corrugation or hard plastic. It connects the hole in the top side of the sink rim to the part of the drain system that is located in front of the trap.
Such a zigzag tube is fixed in the desired position with a plastic clamp.
How to clean a drain hole
There are a lot of reasons why there may be a blockage in the drain hole. It can become clogged not only with hair, but also with small rubbish, pellets from clothes, and the hair of four-legged pets. When all this accumulates in the drain, a lump forms, which is the reason that the water does not leave.Moreover, this lump becomes more and more, a bad smell begins to appear. Well, let's get started. In order to clean the drain hole, you should try the following methods:
try clearing the blockage under the cap covering the drain hole. Even if it seems to you that the cap is clean, check it anyway. It is very likely that you will find hair in huge quantities there. Drains with a Phillips plug are the most prone to these blockages. If you have a bathroom with a plug, you will need to lift the plug before cleaning. The guide plate is unscrewed, and only then can you remove the plug.
If the blockage from the hair is deeper than you expected, then you can use:
wire hook. Take the wire hangers, unwind and bend into a hook. Place a hook in the drain hole and pull out the clog
Important: you need to pull out, and not shove rubbish. Otherwise, you will definitely have to call a plumber.
plunger. Probably the most common method
But it will only help if the blockage is small. The plunger should be the size of a drain hole. Cleaning the drain hole with a plunger is easy, so if your drain is often clogged, it will become your indispensable assistant. How to break through the drain hole with a plunger?
Take the plug and close the drain, Lubricate the plunger with petroleum jelly and press it against the drain hole. Make about 10 sharp reciprocating movements. If the water is still standing, add hot water. Fill the tub with enough water to cover half of the plunger. The subsequent actions are the same as described above: we are trying to “break through” the blockage
Probably the most common method.But it will only help if the blockage is small. The plunger should be the size of a drain hole. Cleaning the drain hole with a plunger is easy, so if your drain is often clogged, it will become your indispensable assistant. How to break through the drain hole with a plunger?
Take the plug and close the drain, Lubricate the plunger with petroleum jelly and press it against the drain hole. Make about 10 sharp reciprocating movements. If the water is still standing, add hot water. Fill the tub with enough water to cover half of the plunger. The subsequent actions are the same as described above: we are trying to “break through” the blockage.
cable. A cable can help with serious sewer blockages. The cable is a twisted wire, at the end of which there is a handle (it can be wooden or plastic). The advantage of this device is that it can cope with a blockage, which is located at a depth of up to 9 meters. How to use the rope? Take the handle and insert the cable into the drain, with one hand hold and scroll the cable, with the other - push it deeper into the drain hole.
Now on the market you can find cables that have interlocking hooks that help get rid of hair in the drain hole.
If you feel that the cable is stuck in something, “stalled” - know that this is the place of the blockage. Now you need to repeat the back and forth movements several times and then you can clean the drain hole. You can then pull out the cable.
tape. To punch a drain hole, you can use any adhesive tape. Cut a strip of approximately 50 cm.Place the tape in the drain hole and run along the inside walls. Almost all hair will remain on the adhesive tape. When you remove the sticky tape with hair, do not forget to wash off the remaining blockage.
chemical preparations. In the fight against blockages, you can use household chemicals. Ask the store clerk to suggest which remedy is best.
Purpose and design features
An overflow bathroom or kitchen sink drain is a curved design whose key purpose is to redirect excess water down the drain, thereby preventing the sink bowl from overflowing.
The device of the drain system of the bath is almost identical to the design intended for the sink.
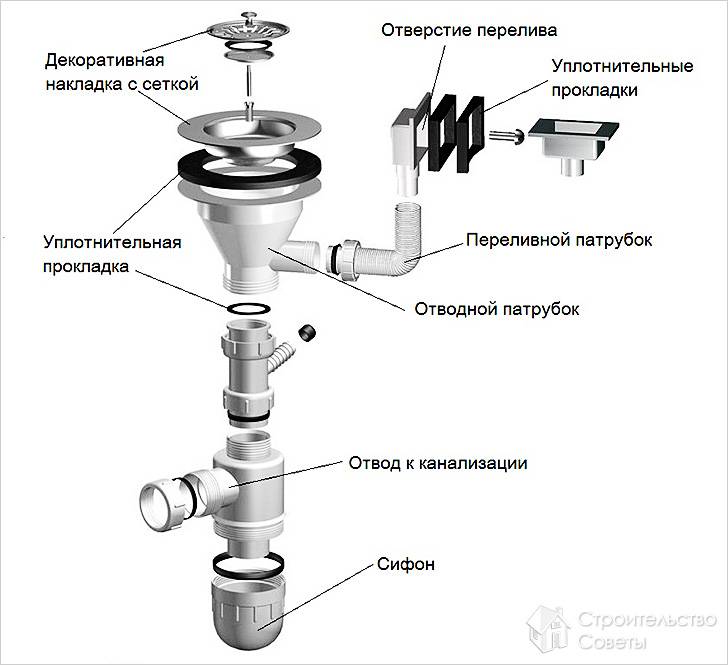
Structurally, the overflow drain for a sink or sink consists of the following elements:
- siphon with water trap - is a "U"-shaped element that performs a dual task: it prevents the exhalation of a fetid odor from the sewer and protects the drain pipe located below from clogging.
- drain pipe - made of corrugated or rigid plastic pipe and is designed to redirect wastewater to the sewer system.
The main secret of the functionality of the siphon is in its design. Due to the bend, the water does not completely leave the pipe. The formed water seal acts as an obstacle to the penetration of sewer "ambre" into the drain hole.
Such designs are convenient in that in case of clogging, it will not be difficult to remove and clean them mechanically or chemically.
Do you want to install a more durable device that is not so afraid of clogging? In this case, it is better to purchase a design in the form of an overflow drain for the sink.It differs from traditional models in that it is equipped with an additional tube.


This device connects the hole made in the upper side of the rim of the bowl with the elements of the drain system located in front of the siphon. This allows the overflow to divert liquid from the sink, thus preventing the bowl from overflowing.
From the outside, the drain hole is covered with a grill. It performs a protective function, retaining small debris and hair, thereby protecting the system from clogging.
Connection to the sewer system
The siphon is connected to the sewerage in the kitchen using a corrugated pipe. A flexible spigot allows you to connect equipment, regardless of its location. If the sewer socket has a larger hole than the corrugation, then a rubber gasket or a special plastic adapter is used to seal the connection. The drain of the siphon must fit snugly against the opening of the sewer system.
At the final stage of work, the tightness of all connections is checked using a large pressure of water. If the installation is done correctly, then there will be no leaks under the sink.
Main components and components
The bottle siphons produced today have a fairly standard appearance and are a design consisting of several main components.
- Protective metal mesh with a decorative nickel-plated finish.
- Overflow pipe.
- Additional outlet for connecting a dishwasher or washing machine.
- Siphon body.
- Outlet pipe for connection to the sewer system.
- Silicone gasket that ensures the tightness of the threaded connection of the collapsible siphon body.
- Cap nuts.
In addition, the product package includes flexible corrugated hoses, gaskets for union nuts and several metal screws for fastening.
The vast majority of these products are made from plastic.
Therefore, before changing the siphon in the kitchen, you should make sure that all its nodes are intact. First of all, the body of the product should not have hidden cracks. This can be easily checked by pouring some water into its container.
Conclusions and useful video on the topic
Videos are a great opportunity to consolidate knowledge about the assembly and installation of siphons, as well as learn how to practice the installation of plumbing equipment on your own, avoiding common mistakes.
Video guide for replacing an old, failed kitchen sink siphon:
Non-standard installation of a siphon connected to a drain hole with a corrugated pipe:
Assembly and tips for proper installation of an inexpensive siphon with overflow:
As you can see, assembling simple models does not take much time and does not require special knowledge. When replacing an old siphon, it takes more effort to dismantle worn-out equipment.
If there are no questions about installing a drain device for a kitchen sink, you can do all the work yourself. To solve more complex problems of connecting the device, it is better to contact a plumber.
Want to talk about your personal experience in installing a siphon under a kitchen sink? Do you have useful information that you would like to share with site visitors? Please write in the block form below, express your opinion and post a photo on the topic of the article.


