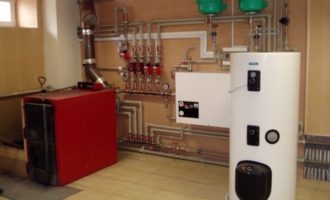
- General scheme of connection to the water supply
- Cold water supply (top to bottom):
- Hot water outlet (top to bottom):
- How to DIY
- Connecting the boiler to the mains
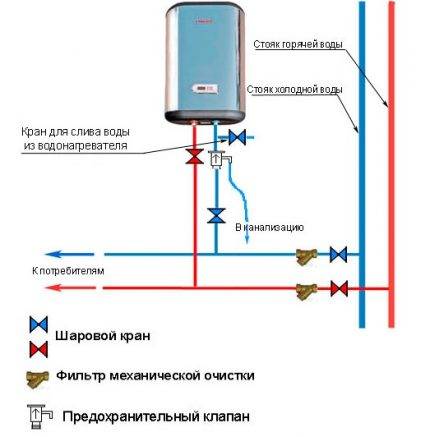
- Some features of the water supply scheme
- Schemes for connecting the water heater to the mains
- Cable
- Socket
- Protection Devices - RCDs and Circuit Breakers
- Wiring diagrams
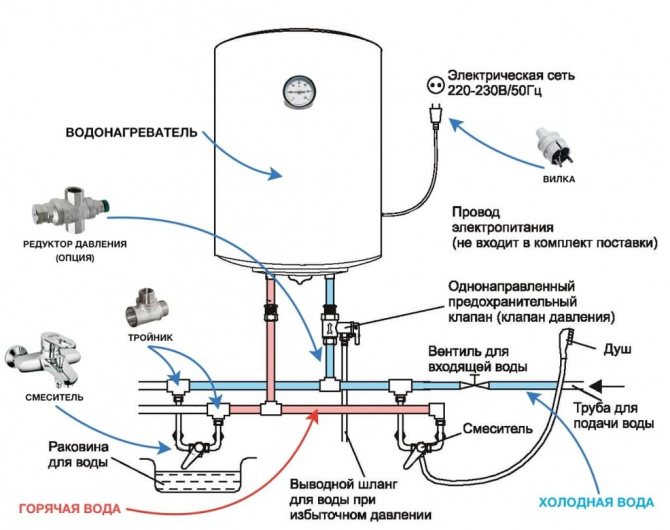
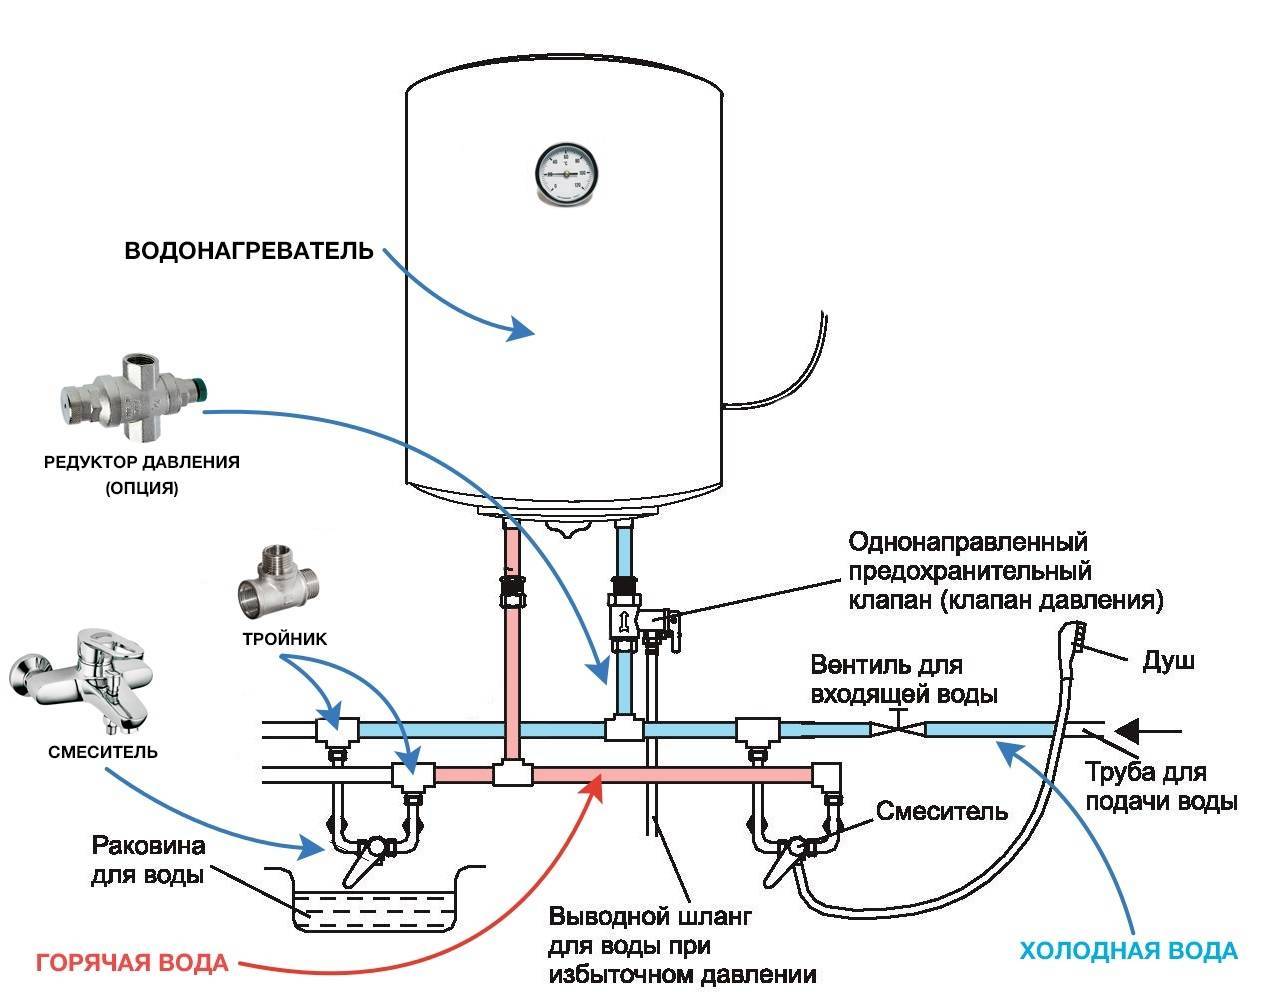
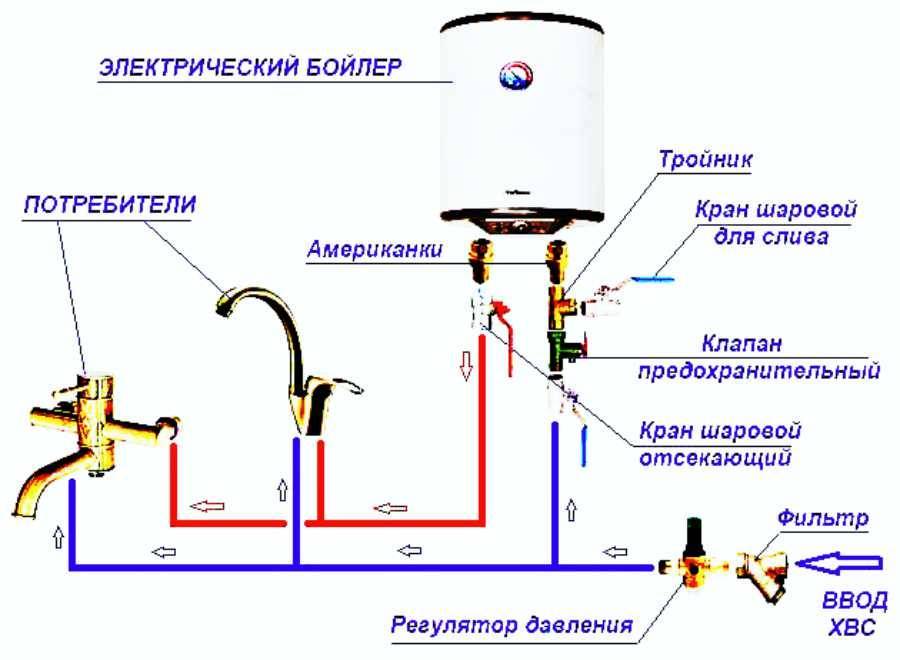
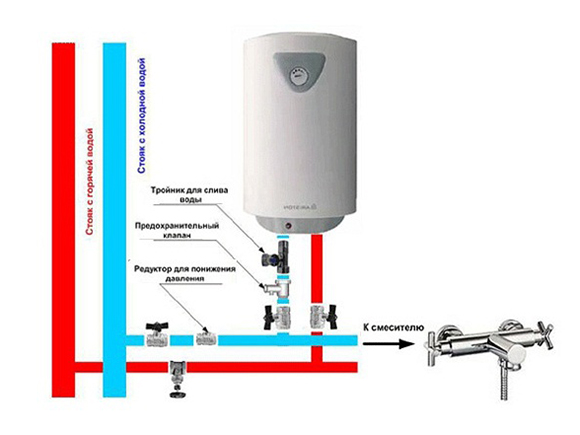
General scheme of connection to the water supply
Connecting the boiler to the water supply from any type of pipes is carried out according to one general scheme.
Cold water supply (top to bottom):
- Mounting the "American" to the water supply pipe of the boiler is one of the simplest and most reliable options for connecting the boiler. If it is necessary to dismantle the water heater, it can be disconnected from the water supply in a few minutes.
- Installation of a brass tee with a tap for draining water. This part is not a prerequisite for connecting the boiler. But for the convenience of draining water from the boiler, this is an excellent and durable option.
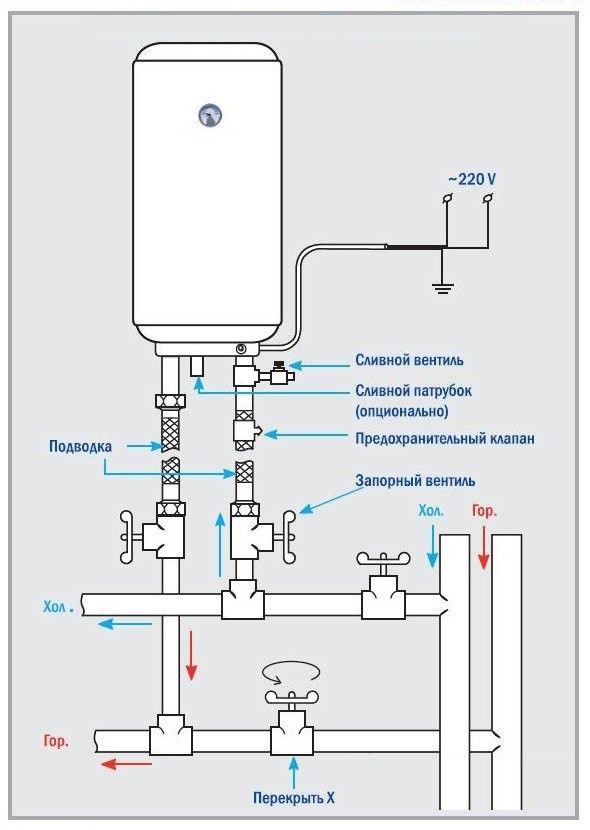
- Installation of a security system is a prerequisite for connecting the boiler to the water supply. The system includes:
Scheme of water supply to the boiler
- non-return valve - will prevent the outflow of hot water from the boiler in the event of a drop in the pressure of the cold water supply or its complete absence;
- safety valve - in the event of an increase in pressure inside the boiler tank, excess water is automatically discharged through this valve to reduce internal pressure.
Attention! The security system included with the water heater is not always reliable. To protect yourself from trouble, purchase a reliable check and "stall" valve.
The importance of a security system cannot be overestimated.
So the absence of a check valve in the event of a shutdown of the water supply (for example, repair of the main line) will lead to the emptying of the tank. In this case, the heaters will still heat, which will lead to their failure.
The importance of a security system cannot be overestimated. So the absence of a check valve in the event of a shutdown of the water supply (for example, repair of the main line) will lead to emptying of the tank
At the same time, the heaters will still heat up, which will lead to their failure.
The safety valve is equally important in the system. Let's say the thermostat in the boiler failed. In this case, the heating elements will not automatically turn off and the temperature of the water in the tank can reach up to 100º. The pressure in the tank will rise rapidly, which will eventually lead to an explosion of the boiler.
Safety valve in the system
- In the case of supplying poor-quality, hard water to the water supply system, a cleaning filter must be installed after the stopcock. Its presence will save the boiler capacity from scale and deposits of water stone, which will significantly extend its service life.
- Stopcock installation. Its purpose is to shut off the water supply to the boiler during its maintenance or repair, while water will be supplied to other points.
- In the case when the pressure in the water supply system “jumps”, experienced craftsmen recommend installing a pressure reducer.If it is already installed at the water inlet to a house or apartment, there is no need to duplicate the installation.
- Inserting a tee into an existing cold water supply pipe.
Hot water outlet (top to bottom):
- Installation of the “American” coupling on the hot water pipe of the boiler.
- Installation of a ball valve for the possibility of draining water from the boiler (if such a valve is already installed elsewhere, there is no need to duplicate it).
- An insert into the distribution of hot water in an apartment or house.
Insertion into a metal-plastic pipe. The easiest way to cut. In the right place, the pipe is cut with a cutter and, using suitable fittings, a tee is mounted on it, from which cold water will be supplied to the boiler. Metal-plastic pipes are already losing their popularity. Outwardly, they do not look very aesthetically pleasing, and their service life is not too long.
Insert into a polypropylene pipe. Such a tie-in is more time-consuming and costly, but at the same time, the most reliable. A tee with an “American” coupling for connection is mounted using a special soldering iron. Having cut a pipe fragment in the right place with special scissors, it is necessary to maintain the alignment of its two parts. Otherwise, soldering the tee will fail.
Scheme of connecting the boiler to the water supply
Cutting into a metal pipe. Such a tie-in will require certain skills in working with spurs and couplings. If it is possible to cut a thread on a cut pipe, the tee is installed using a conventional plumbing fixture or coupling. If the metal pipes are located so that it is impossible to use a threading bowl, they resort to using a special clamp with a threaded outlet, popularly known as a “vampire”. How to work with a "vampire":
- The metal pipe must be carefully cleaned of old paint.
- Drill a hole at the tie-in point in the pipe. The diameter of the hole in the pipe must match the hole in the coupling.
- The “vampire” coupling is mounted on a metal pipe through a rubber gasket and fixed with coupling bolts. The holes in the pipe and the coupling must match.
Attention! A large hole drilled in the pipe will violate the strength characteristics of the pipe; small - after a short time it will become clogged with dirt.
How to DIY

For those who like to do something with their own hands or have a technical education, it will not be difficult to make a flow-through boiler.
A simple design in itself is repairable and productive - all this is possible for budget money. A home-made flow-through boiler is installed by wrapping around a pancake of an electric stove or gas burner with a spiral.


To make a water heater at home, you will need:
- The pipe is made of copper, since it is copper that is an excellent heat conductor. Sometimes they use nichrome wire, winding it several times.
Please note: the length of the pipe does not affect the amount of heat transferred from the source, so in this case it is not necessary to clutter up the structure with additional rings.
- Rubber hose (preferably new).
- Rubber gaskets suitable for the diameter of the hose and metal clamps.
In order to do everything correctly and safely, you need to familiarize yourself with the technical documentation of the electric (gas) stove and determine its potential.
Progress:
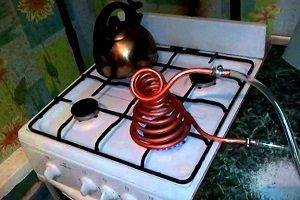
- Measure the diameter of the pancake of the electric stove or burner.
- Bend the copper pipe into a spiral with a diameter slightly larger than the diameter of the plate in such a way that the exits of the spiral protrude 20-30 cm from the plate.It is necessary that the spiral fits snugly against the base of the plate and does not have distortions. Make sure the spiral has even, smooth edges.
- Secure the coil with the shackles and bolts (you can use another mounting bracket to secure).
- Connect a rubber hose to the outlets of the spiral and fix it with a metal clamp.
- Connect the other end of the hose to the faucet and install it along the sink.
- Turn on the water and check the functioning of the system for leaks.
Important to know: before turning off the water, you must first turn off the heating element. If you do the opposite, the coil may burn out. Keep in mind that the lower the pressure of the flowing water, the hotter it is.
Keep in mind that the lower the pressure of the flowing water, the hotter it is.
In case of overheating of the spiral, it is forbidden to turn on the water - this can lead to metal rupture. Turn off the gas (electricity) and let the metal cool down a bit.
All parameters can be varied, since, in fact, a home-made boiler relies on the potential and capabilities of a gas or electric stove.
Connecting the boiler to the mains
The most common and inexpensive wire for connecting a boiler to a 220 volt network is copper, ShVVP brand with a cross section of 2 x 2.5 mm. This section can withstand loads up to 20 amperes. With a boiler power of 1.2 kW, the current load will be only 5.45 amperes. The wire in a corrugated self-extinguishing hose is attached to the wall with dowels "quick installation" with L-shaped studs. The diameter of the dowels is 10 mm, the diameter of the studs is 8 mm.
You can also lay the wire in the prepared strobe. To do this, you need a hammer drill with a pointed lance or a grinder with a diamond wheel. Concrete slab joints can be used to facilitate chasing.A wire with a cross section of 2 x 2.5 mm is laid from the installation site of the boiler to the machine, and from it to the counter.
Before connecting the boiler to the mains, be sure to turn off the electricity in the apartment or in the house. The wire that goes to the boiler is connected to special terminals in the boiler using a Phillips screwdriver. The storage boiler is often equipped with a thermostat, so water heaters in this design are more economical and more reliable in operation.


Scheme of connecting the boiler to the mains.
Attention!
After connecting the wire to the machine or the plugs, you do not need to turn on the power, since the strobe has yet to be sealed with plaster.
Now you can start commissioning. Tank first boiler is filled with water from cold water supply - open the ball valve after the tee on the drain tank. Then immediately open the tap on the DHW line so that the air from the boiler leaves, freeing up space for water. Also open a faucet or tap for hot water - in the kitchen or in the bathroom.
After filling the tank, water will flow from the mixer - you can close it. The boiler is full, the water in it creates a slight pressure, so wait 0.3-2 hours and check all connections for water leakage. If drops appear at the joints, tighten the nuts on the fittings.
<h2>Стационарная или временная установка?</h2>
A flow-type boiler, due to its mobility, can be connected not only permanently, but also temporarily. Temporary water connection can be made using a normal shower hose. A tee cuts into the inlet pipe with cold water, to which a flexible hose is connected through a fitting.Before the tee, both for temporary and for stationary connection, a valve crashes.
Important!
To prevent the water heater heater from burning out, do not apply voltage to it without water in the pipes. You can turn on the boiler only after checking and the presence of water in the tap.
Stationary connection of an instantaneous water heater with a heating element is a scheme with simultaneous supply of cold and hot water. Such a scheme is mounted in parallel with the residential water supply system. With a fixed connection, tees (2 pcs) cut into the pipe and a valve is installed on each tee.
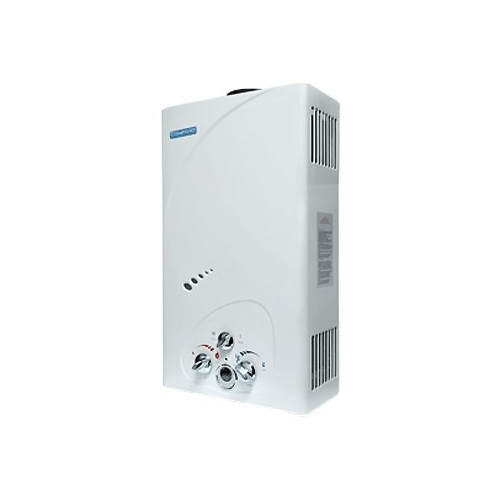
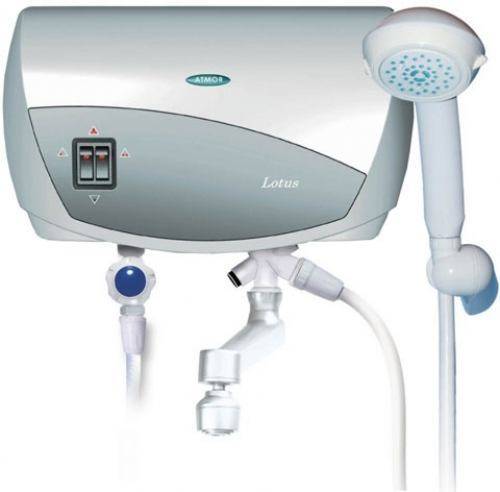 Instantaneous electric water heater.
Such a scheme will eliminate, if necessary, the flow heater of their water supply completely. A pipe with cold water is supplied to the heating element, and hot water is connected to a shut-off valve through a flexible reinforced hose or metal-plastic pipe.
Attention!
If a flow boiler is installed in an apartment building, then, when connecting it permanently, first shut off the common riser so that hot water does not enter the water supply of neighboring apartments.
A flow-type boiler is not always liked by consumers, since hot water is not generated in it constantly, but as needed. In addition, to heat water after opening a tap or mixer, 2-3 minutes must pass until hot water flows. But such a boiler is easier to install, and it can always be replaced with a stationary storage model.


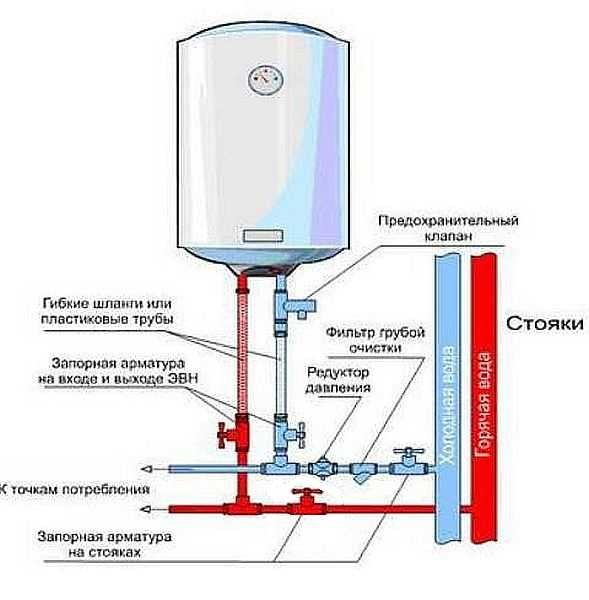


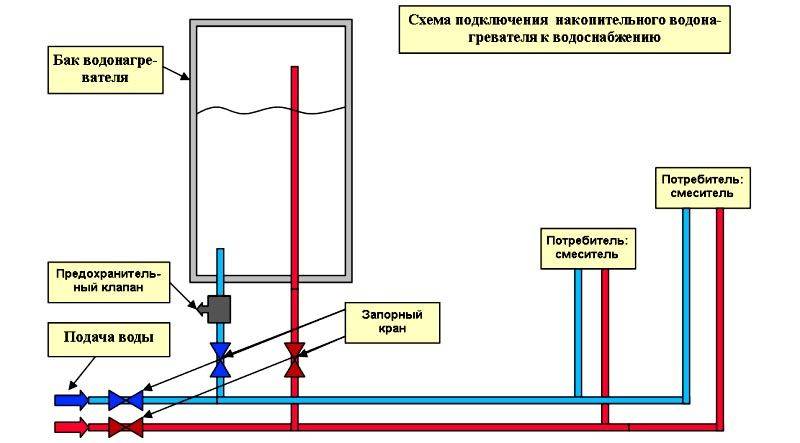
Some features of the water supply scheme
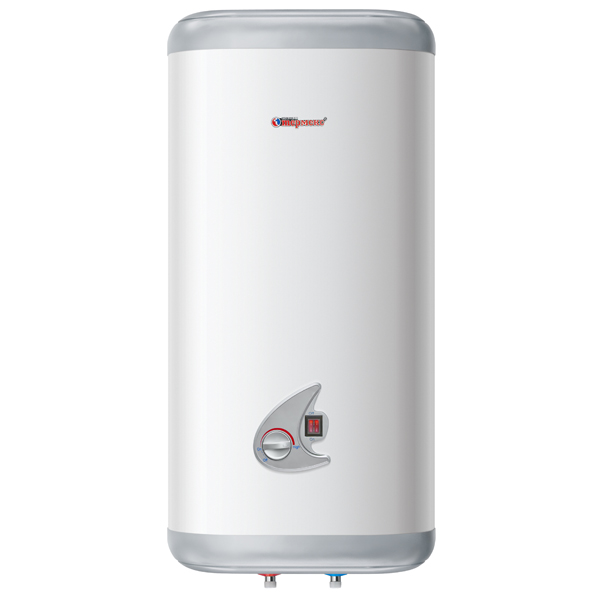
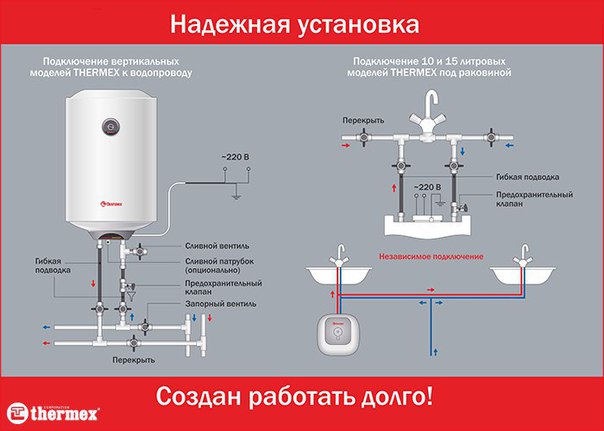
Connecting a storage boiler. The supply of cold water to the boiler system is carried out through a pipeline, which is connected directly to the centralized supply riser.
At the same time, a number of components necessary for the normal functioning of the equipment are mounted on the cold water line:
- Stopcock.
- Filter (not always).
- Safety valve.
- Drain tap.
The specified elements of the circuit are installed in the area between the cold water supply pipe and the boiler in the marked sequence.
The line for the outlet of the heated liquid is also equipped with a shut-off valve by default. However, this requirement is not mandatory, and if a tap is not installed at the DHW outlet, a serious mistake is not seen in this.
 All water heater connection schemes have common features. The cold water supply point is located at the bottom, filters and a reducer must be installed in front of it to reduce the flow pressure (+)
Connecting an instantaneous water heater. Compared to a storage boiler, work is carried out according to a simplified scheme. Here it is enough to install only one shut-off valve in front of the cold water inlet fitting.
But the installation of a shut-off valve at the DHW outlet of the flow heater is regarded by many manufacturers as a gross installation error.
It should also be taken into account: if a well, a well, a water tower, etc. acts as a source of cold water supply for an instantaneous water heater, it is recommended to turn on a coarse filter in series with the tap (after the tap).
Often, an installation error with the filter connection or refusal to install it leads to the loss of the manufacturer's warranty.
Schemes for connecting the water heater to the mains
For safe operation, it is advisable to connect the water heater to the network in a dry place, and it is recommended to cover the cables in a moisture-proof channel. Apart from the boiler, other electrical appliances, especially powerful ones, should not be connected to this branch of the mains.The main elements of the circuit: electrical cable, socket, RCD and automatic.
Cable
The cross section of the cable must be sufficient so that the wiring does not overheat and cause a fire. You will need a copper three-core cable of the NYM brand or its equivalent VVG. The recommended values of the minimum cross section of a copper core for different capacities of a single-phase water heater are shown in Table 1.
Table 1
| Boiler power, kW | 1,0 | 2,0 | 2,5 | 3,0 | 3,5 | 4,0 | 4,5 | 5,0 | 6,0 | 8,0 | 9,0 |
| Minimum cross-section of the core, mm2 | 1 | 1,5 | 2,5 | 2,5 | 2,5 | 4 | 4 | 4 | 4 | 6 | 10 |
Socket
Water heaters of small capacity can be connected directly to a three-wire waterproof socket with a degree of protection against moisture in accordance with GOST 14254-96, for example, IP44 or another suitable for your situation (see table 2), which is installed on a separate supply from the electrical panel.
table 2
| Degrees of IP protection | IPx0 | IPx1 | IPx2 | IPx3 | IPx4 | IPx5 | IPx6 | IPx7 | IPx8 | |
| No protection | Falling vertical drops | Falling vertical drops at an angle of 15° from the vertical | Spray at 60° from vertical | Spray from all sides | Jets from all sides under low pressure | strong currents | Temporary immersion (up to 1 m) | Full immersion | ||
| IP 0x | No protection | IP 00 | ||||||||
| IP 1x | Particles > 50 mm | IP 10 | IP 11 | IP 12 | ||||||
| IP 2x | Particles > 12.5 mm | IP20 | IP 21 | IP 22 | IP 23 | |||||
| IP 3x | Particles > 2.5 mm | IP 30 | IP 31 | IP 32 | IP 33 | IP 34 | ||||
| IP4x | Particles > 1 mm | IP40 | IP 41 | IP 42 | IP 43 | IP44 | ||||
| IP 5x | Dust partially | IP 50 | IP 54 | IP65 | ||||||
| IP6x | Dust completely | IP60 | IP65 | IP66 | IP67 | IP68 |
Ground socket
Such a socket outwardly differs from a two-wire socket by the presence of metal contacts (terminals) for grounding.
Wiring diagram for a grounded socket
Protection Devices - RCDs and Circuit Breakers
It is recommended to include a residual current device (RCD) in the electrical circuit for connecting water heaters (especially at increased power). It is designed to block the operation of the equipment in the event of a current leakage to the case. The current strength at which blocking occurs is indicated on the device and must be 10 mA for the operation of the boiler. This parameter indicates the difference between the current entering and exiting the water heater.


The choice of RCD based on the power of the water heater is shown in table 3.
Table 3
| Water heater power, kW | RCD type |
| up to 2.2 | RCD 10A |
| up to 3.5 | RCD 16A |
| up to 5.5 | RCD 25A |
| up to 7.0 | RCD 32A |
| up to 8.8 | RCD 40A |
| up to 13.8 | RCD 63A |
The type of RCD for the AC network is "A" or "AC". When choosing a device, preference should be given to a more expensive, electromechanical one - it is more reliable, works faster and provides higher protection.
In some boilers, the RCD is included in the basic package and is located directly in the case, in other models it must be purchased additionally.
Outwardly, the RCD and the differential switch (diffavtomat) are very similar, but they are easy to distinguish by marking. A conventional machine cuts off the current to the equipment when the voltage rises, and the differential machine simultaneously performs the function of both the RCD and the machine.
Bipolar selection power machine single-phase water heater is given in table 4.
Table 4
| Water heater power, kW | Machine type |
| 0,7 | 3A |
| 1,3 | 6A |
| 2,2 | 10A |
| 3,5 | 16A |
| 4,4 | 20A |
| 5,5 | 25A |
| 7,0 | 32A |
| 8,8 | 40A |
| 11,0 | 50A |
| 13,9 | 63A |
When choosing overly sensitive protection devices, the boiler will constantly turn off, and the water will not heat up normally.
Wiring diagrams
The connection scheme is adopted depending on the desired level and instrumentation of protection of people and equipment.Below are a few common circuits, as well as a video that provides detailed explanations of these circuits.
Plug-in connection only
Protection - double automatic: 1 - fork; 2 - socket; 3 - double machine; 4 - shield; grounding
Connection through the electrical panel: 1 - automatic; 2 - RCD; 3 - electrical panel
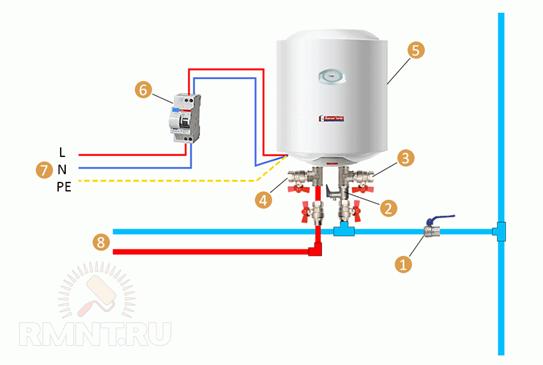
In the RCD + double automatic circuit: 1 - RCD 10 mA; 2 - fork; 3 - socket IP44; 4 - double machine; 5 - water heater line; 6 - apartment line; 7 - electrical panel; 8 - grounding
According to safety rules, all electrical work is carried out with the power supply turned off at an individual electrical panel. Do not turn on the water heater without filling it with water. Do not drain the water from it without turning off the electricity.