- Why is a ground loop needed?
- Preparatory stage
- Connecting the hood in the kitchen to electricity
- Electrical panel installation
- Main Process
- STEP 2. Determination of the required number of outlets
- Work plan
- Marking, preparing walls
- Installation and wiring
- Connection of machines and RCDs
- Connecting lighting fixtures and fittings
- Creating a Preliminary Schematic
- Assembly process
- What is required for a home wiring device?
- Open wiring method
- Calculation of wiring parameters
- Calculation of the length and cross section of the cable (lighting, sockets for electrical appliances)
- Choice of protection devices (machines, RCDs)
- We select the wire
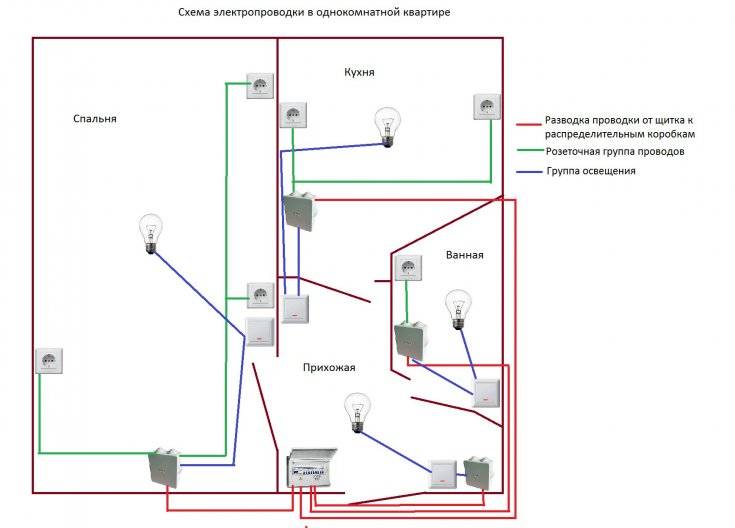
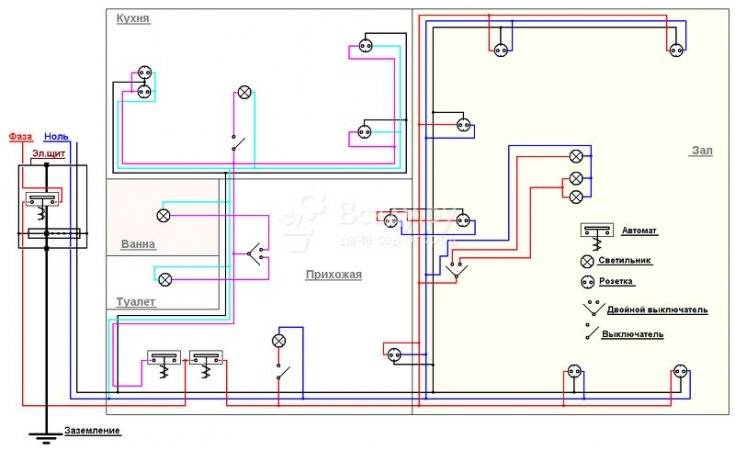
- Wiring diagram in the house
- Where to put the introductory shield, hull requirements
- Organization of entry into the house
- Divide consumers into groups
- Selection and installation of sockets
- What is a wiring diagram for?
- Final events
- Final events
Why is a ground loop needed?
The design of electrical networks for a wooden house necessarily includes a section on the installation of a ground loop, without which the entire energy supply system to the building is considered unsafe. There are several ways to ground the device, and, despite the prohibitions, all of them are still used.
You should refuse to assemble the circuit from improvised materials - this is dangerous.The traditional method of constructing a “triangle” from metal corners and a tire requires free space in the local area, and since 2013 it has been banned as not meeting modern standards (GOST R 50571.5.54-2011).

The length of one mounting pin is 1.5 m. Vertical grounding conductors are located in three ways: one line in a straight trench, a triangle, if there are only three elements, a quadrangle at the corners of the house
It is reasonable to use a modular-pin method of grounding in a suburban area, according to which grounding conductors are installed in a line or along the perimeter of the house.
It does not require the allocation of an impressive free space on the site, because. all elements are located along existing objects. Only a hammer drill is needed to place the pin in the ground.
Steps for installing a ground loop for a private house:
To increase the current-carrying capacity, the electrodes produced at the factory are coated with copper, and all connections, threads and couplings are lubricated with conductive paste during the assembly process.
As a rule, the composition of the paste also includes anti-corrosion additives. As protection against an aggressive external environment, all joints are also wrapped with waterproofing material.
The advantages of ready-made pin type grounding systems are efficiency, low labor costs, space savings, the main disadvantage is high cost.
It is precisely because of the high cost that many owners of wooden cottages and country houses still use segments of a metal corner or reinforcement for a ground loop instead of factory products.
Preparatory stage
Like other repair elements, wiring begins with the calculation of electrical wiring for power and other preparatory measures:
- First of all, decide what electrical wiring in the apartment is already present. If it turns out to be single-phase, then this is not good, and if it is three-phase, then you will have a decent margin in terms of power;
- After that, proceed to the calculation of the final power of electrical appliances. When performing this calculation, consider how the wiring is done, where are the sockets and switches. To make the calculation correctly, you will have to cover the documentation for each appliance in the house in order to subtract the rated power of household kitchen elements;
- Generally speaking, the wiring diagram should go up to 15 kW, rarely when the calculated power exceeds this value. Yes, this huge number shows the final power, provided that all electrical appliances are turned on at once, although this is rare. But just in case of a fire, it is better to have a reserve;
- After that, look for a table on the Internet and select, based on the calculated data, the cross section of wires for lighting and for sockets. The most common among others are cables with a cross section of 6 mm, designed for 10 kW of power consumption. If your design power has gone beyond these limits, then do not despair - they will tell you suitable wires in a hardware store.
A wire cross section table is always useful
As an indicator, keep in mind that if your apartment already had an electric stove, then most likely you have a three-phase network. Even before starting repairs, it is advisable to consult with the Housing Office to find out if grounding and other important events have been carried out.It depends on how the wiring will be installed with your own hands, since not every cable is used without grounding.
Connecting the hood in the kitchen to electricity
Very often, the hood is connected to the stove, more precisely, to the line through which the stove is powered. But doing this is not entirely correct. The fact is that a fairly powerful machine goes to the stove. And the cross section of the hood cable is rarely more than 0.5 mm². This means that in the event of a short circuit in the hood, the machine may not always work, since the short-circuit current in a cable with a cross section of 0.5 mm² may be less than the machine's response threshold. This could lead to a fire hazard. Therefore, I recommend connecting the hood to the light group (where there is often an ampere machine). Almost all hoods are equipped with a Euro plug or a regular flat plug without grounding. If there is a euro plug on the hood, then the grounding in the outlet must also be.
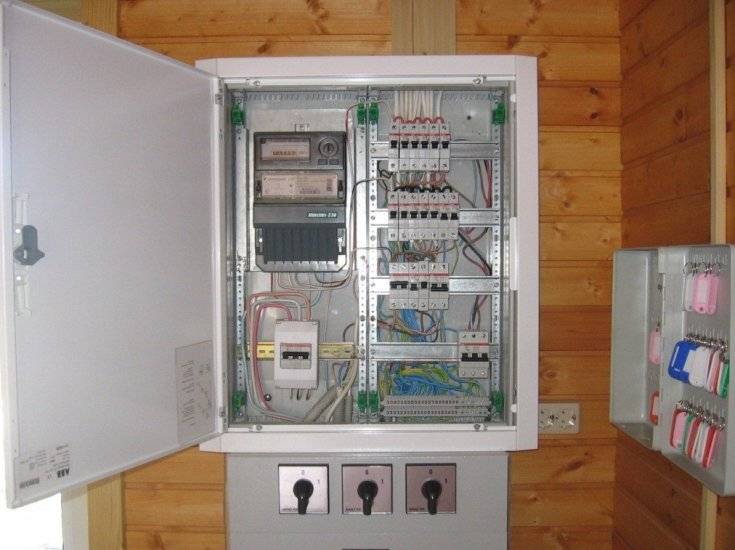
Electrical panel installation
In order to properly conduct the wiring in the apartment and then safely use household appliances in the kitchen, it is important to make an electrical panel, which is placed instead of the classic junction box. An automatic switch or voltage stabilizer is mounted in front of it, the power of which is selected above each energy consumer in the apartment. The sockets are also connected there, the main thing is to choose the right cable for connection. We connect the lighting through the machine in parallel to turn on and turn off the apartment at once, and not each light bulb individually.
If desired, it is allowed to connect each electrical appliance to separate protective devices.As a rule, refrigerators are connected in this way, which are sensitive to voltage drops and can burn out from this. When installing electricity with your own hands, do not forget that a constant high level of humidity is maintained in the kitchen and bathroom and the wall with wiring is sealed there.
Entrust the installation of the electrical panel to a real electrician
Main Process
We will provide installation instructions step by step to make it easier for readers of Sam Elektrik to perceive the material:
- According to the scheme, you need to mark the walls in the kitchen on your own. To do this, we recommend making a homemade laser level. which will allow you to quickly and with a minimum error to carry out horizontal markings for strobes.
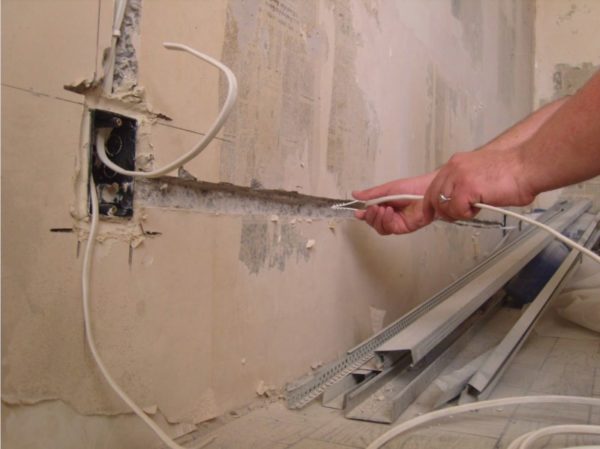
- According to the markup, it is necessary to carry out the gating of the walls for wiring. then lay the cable in ready-made streaks and putty the entire network of grooves in the wall.
- In the prepared seats, you need to connect light switches, sockets and junction boxes.
- Protective automation is installed on the shield for kitchen appliances and electrical wiring.
- The finished electrical wiring in the kitchen is checked by turning on the electricity. If nothing sparks, does not make noise or smoke, and at the same time all the equipment is functioning normally - you did everything right!
Video review of the correct kitchen power line
That's all the instructions for installing electrical wiring in the kitchen with your own hands. As you can see, there is nothing particularly complicated, but there are still many incomprehensible moments, such as what automation should be installed, where it is best to run the cable, etc. We will talk about this just now, providing useful tips on wiring in a panel house and apartment!
STEP 2. Determination of the required number of outlets
It is preliminarily decided which, where and how the kitchen appliances will be located.
Constantly used in the kitchen:
- refrigerators;
- freezers;
- electric stoves;
- hobs;
- fume hoods;
- ovens;
- microwaves;
- multicookers;
- dishwashers;
- small electrical appliances.
Sometimes used, but not required at all:
- electric ignition (to the gas stove);
- furniture lighting.
Installed in the kitchen for comfort:
- televisions;
- waste shredders;
- heated floors.
Quite often used in the kitchen:
- washing machines;
- irons.
Large household appliances usually work constantly - which means that any such electrical appliance needs its own outlet; 3 ÷ 4 sockets are enough for small electrical appliances.
It is advisable to place additional sockets on all walls, as well as at the entrance to the kitchen - through them it will be possible to connect a mobile phone, tablet, vacuum cleaner, etc. A special socket for a landline phone will also come in handy.


The more do-it-yourself electrical outlets, the better (for the future). The most optimal quantity is about 10 pieces.

Work plan
Regardless of the complexity of the circuit, wiring in an apartment can almost always be done independently. Wires can be laid in the walls or along them by any owner with minimal skills in construction and finishing works. However, it is better to entrust the design of electricians with calculations and selection of materials and protection devices to a professional.
The general step-by-step wiring instructions are as follows:
- Marking is carried out indicating on the walls the lines for laying wires and the installation locations of switches with sockets.
- Electric cables are laid in the created channels (strobes).
- Electrical products (sockets, junction boxes for electrical wiring, switches) are installed and connected.
- Protective devices are being installed in the floor electrical panel and wires are connected to them from the apartment.
- The electrical network is checked for short circuits.
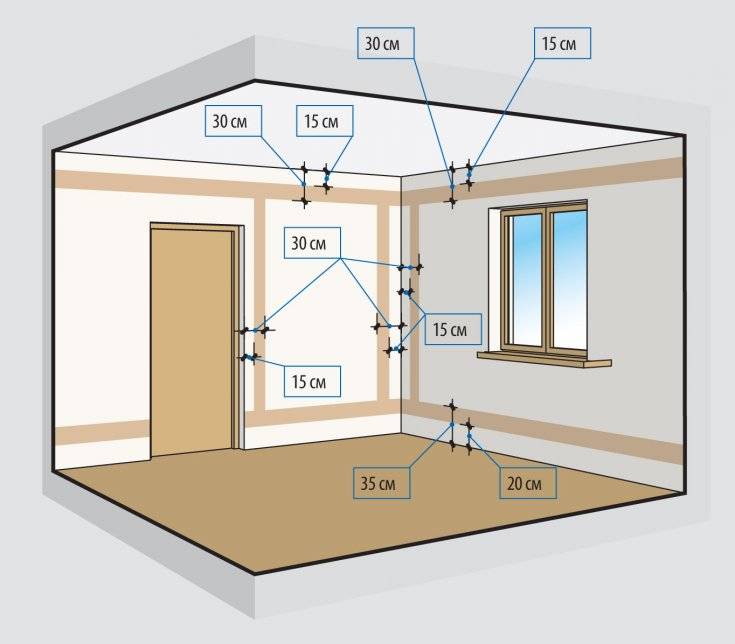
Marking, preparing walls
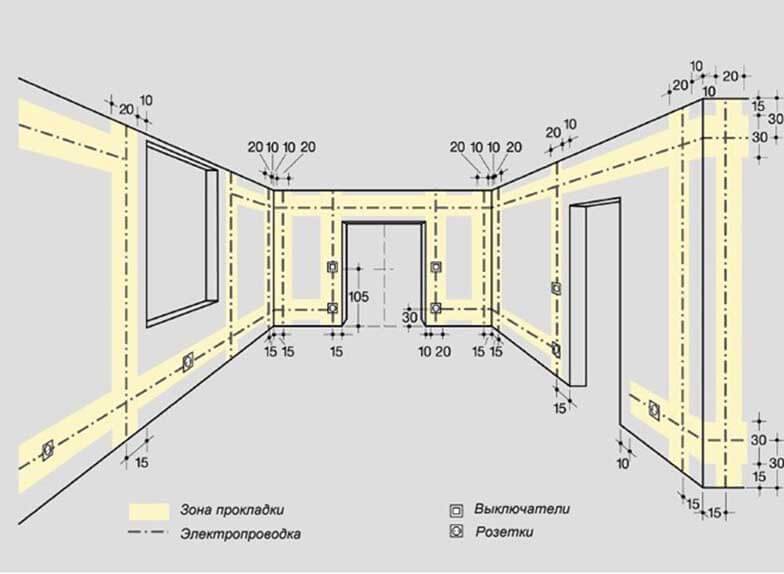
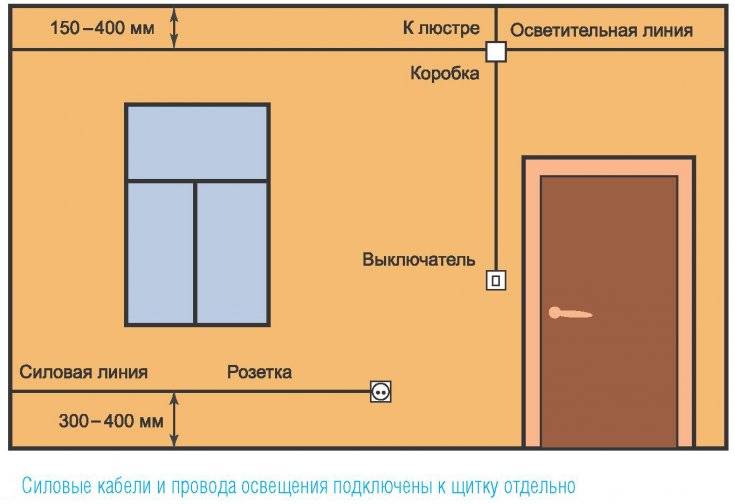
When marking the places for laying wires on the walls, strobes and cable channels should be made straight and with bends only at a right angle. This facilitates the search for electrical wiring in the apartment later, if repairs are necessary, and also avoids by mistake the breakdown of the cores with nails or self-tapping screws during subsequent finishing.
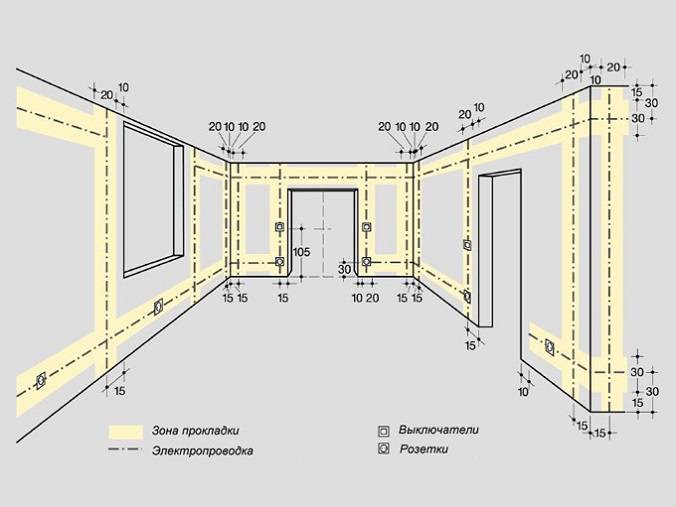
Rules for marking electrical wiring in an apartment
Installation and wiring
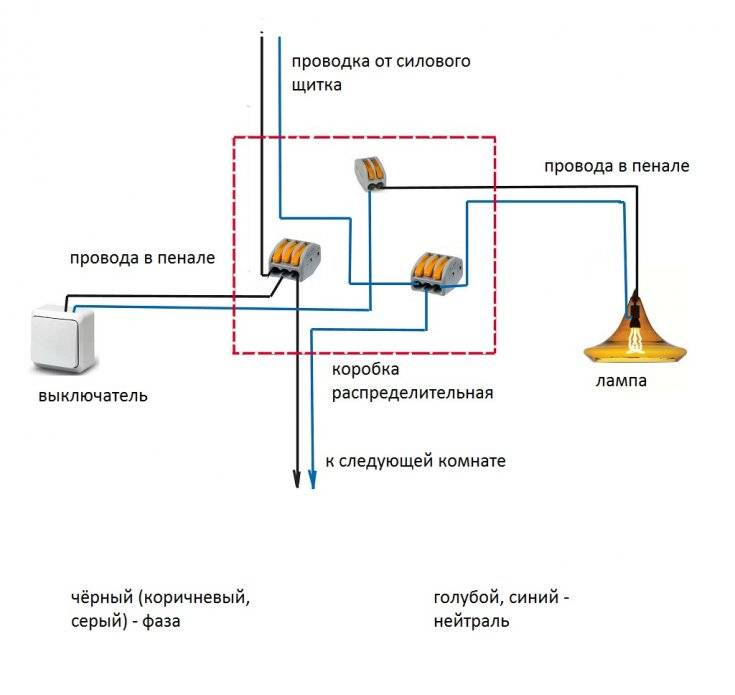
It is recommended to connect the cores using terminals. Soldering them is long and difficult. And twisting should be used only as a last resort, this is the most unreliable method of installation. At the same time, the places of such connections should be located in junction boxes for electrical wiring so that they can be easily reached if necessary.
Connection of machines and RCDs
If there is a well-designed wiring diagram, automatic machines and RCDs can be mounted on it in a shield without involving an electrician. However, to check how correct the assembly turned out as a result, it is still worthwhile to involve a professional.
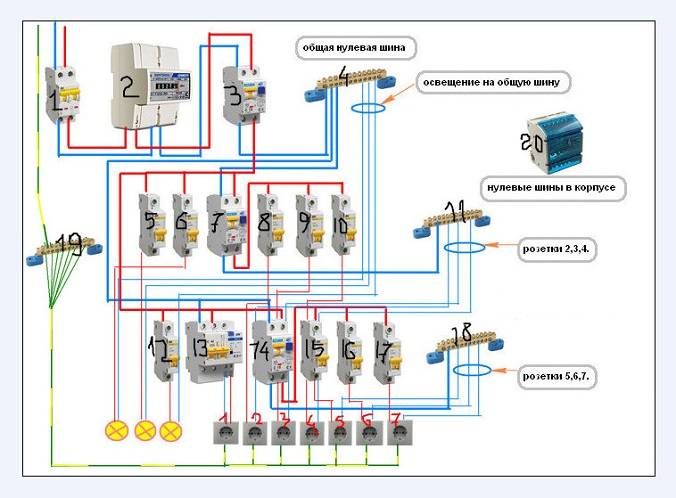
How to distribute the RCD in the apartment into groups
Connecting lighting fixtures and fittings
The simplest stage of electrical installation is the connection of lighting devices and fittings.To do this, each electrical device has screw or spring clamps. It is enough to insert a bare core into them and clamp it in such a terminal.
Creating a Preliminary Schematic
At the stage of planning electrical wiring, you will need to follow a few simple steps:

Types of electrical cables.
- Choice of cable types. Since the kitchen belongs to a group of rooms with constant high humidity and temperature, it would be advisable to choose wires with double insulation. The laying of such cables should be carried out in a hidden way, installing them in pre-prepared recesses in the walls - strobes. This method of installation guarantees the protection of the electrical system from moisture, high temperatures and mechanical damage.
- The distribution of the components of the wiring into groups. For proper and efficient operation, it is necessary to divide all kitchen electrical appliances into conditional groups, depending on their power and energy consumption. There are 4 groups in total: a group of lighting fixtures; a group of low power devices, such as a hood, a mixer, a small kettle, etc.; a group of power electrical appliances (refrigerator, dishwasher and washing machine); group of electric stove or hob.
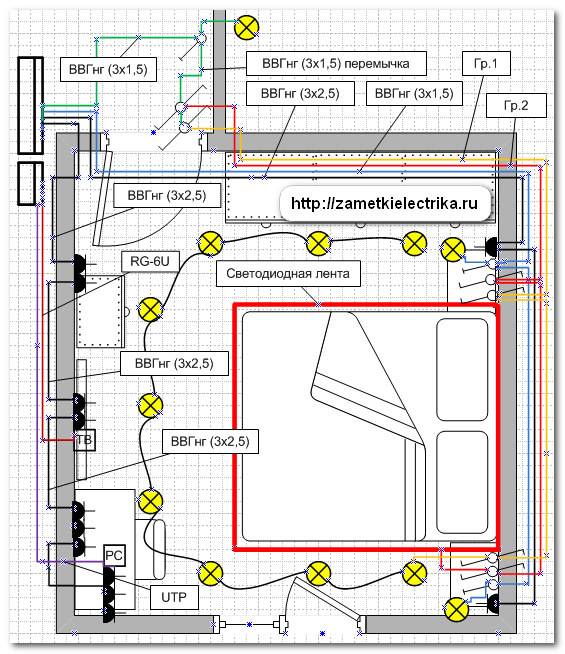
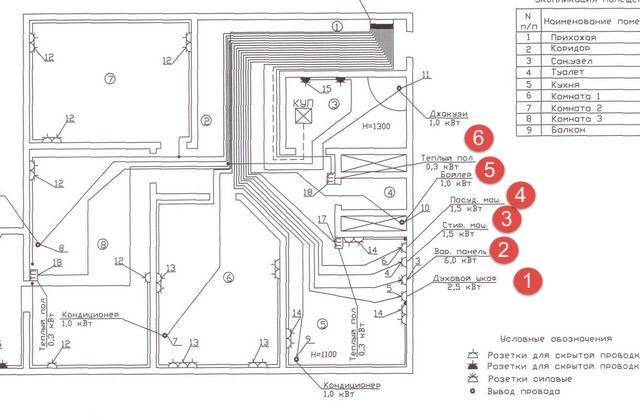
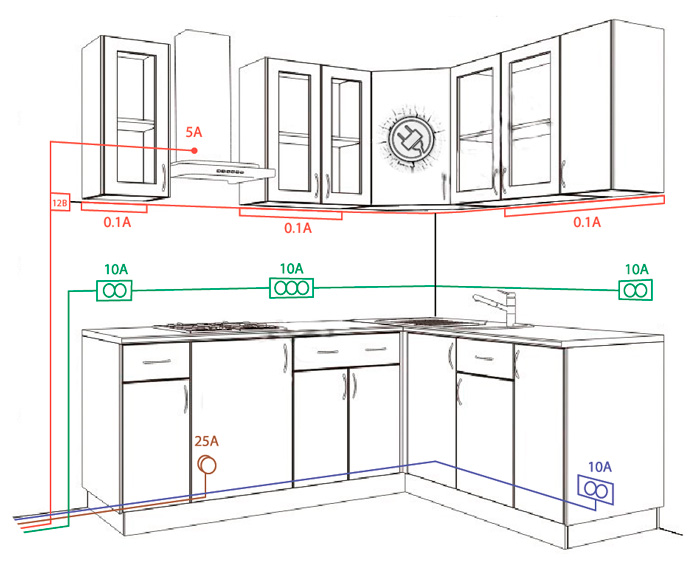
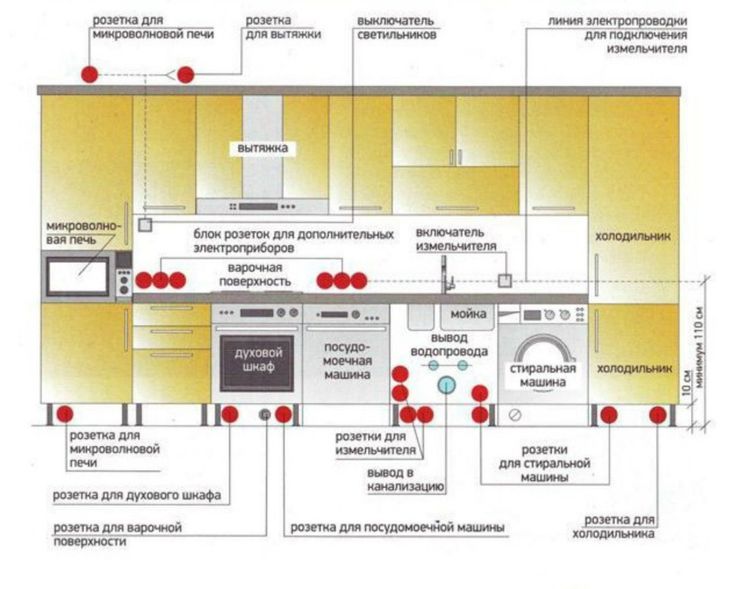
- Selecting the location of the connection points for household appliances. At this stage, the future location of all electrical appliances should be compared with power points. To do this, it is desirable to draw up a rough plan on a scale, which should depict the position of the kitchen furniture and all electrical devices (Fig. 1). The electrical wiring diagram in the kitchen will become your indispensable assistant in the future.
Often there are unpleasant situations when one or several outlets are overlapped by elements of kitchen furniture. In such a situation, inexperienced people simply do not use these points, connect extension cords to available outlets, thereby increasing the load on the network.
Assembly process
Step-by-step instructions for installing electrical wiring in the kitchen are several types of work that are interconnected by a sequence of operations. In this case, it must be borne in mind that all electrical loops are carried out only exactly horizontally or vertically, which is indicated in advance in the diagram. Therefore, two measuring tools are required for work: a plumb line and a building level.
- First of all, a wiring diagram is applied to the wall. Can be applied with a pencil or marker.
- Shtrobes are made along the drawn lines.
- In the places indicated on the diagram, holes are made for planting sockets, switches and junction boxes. Recesses are made with a drill (perforator) with a crown-shaped nozzle.
- Wires are laid in the strobes and distribution boxes are installed.
- Strobes are covered with plaster or putty solutions.
- Sockets and light switches are being installed.
This completes the work inside the kitchen. It remains to connect the main cable in the switchboard. Be sure to install protection in the form of an automaton, which is selected based on the current load on each section, and a residual current device. The first will react to an overload, the second to a short circuit. Now you need to turn on the machines and check if all the sockets and lamps in the kitchen are working, if the wiring is noisy, if it sparks in the junction boxes.If everything works properly, then the wiring is done correctly.
As you can see, there is nothing complicated. Therefore, many people carry out the electrical installation process in the kitchen on their own, taking into account the recommendations of experienced electricians.
In addition, the requirements regarding the location of wires, sockets and switches are taken into account.
What is required for a home wiring device?
First of all, you should understand the structure of the electrical network. It consists of electrical outlets connected to each other and to the power line by various cables and wires, protective devices and circuit breakers, and a ground loop.


Do not confuse wires and cables. The first ones are conductors for internal wiring, which can be single- and multi-core, the second ones consist of several wires united by a common protective sheath.

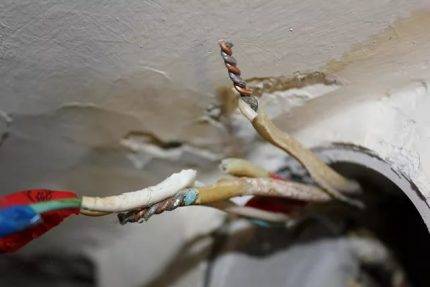
With an independent electrical wiring device, a huge amount of knowledge and skills are needed: from calculating the wire cross section to the skills of twisting wires and installing junction boxes
Cables can be mounted in the ground, under water, in concrete structures; they are also used for building a home electrical network, if you need to connect powerful appliances or special protection.
 The color of the wires is not random, it is determined by the rules of the PUE. Not everyone follows the recommendations for the correct connection, but as a result, it greatly facilitates future repairs.
The cores of the wires are made up of metals that conduct electricity well: copper and aluminum.
Copper is considered a more valuable material for a number of reasons:
- has a high current density;
- differs in wear resistance and endurance on a break;
- has less resistance to oxidation;
- does not shrink like aluminum, so it does not form gaps in the joints.
For internal fixed wiring, it is recommended to use solid copper wires, which are stronger and more reliable than stranded counterparts.
Twisting copper wire with aluminum is an unforgivable mistake. These materials have different characteristics, so the contact between them will never be strong and safe. If necessary, you should use adapters - steel terminals
Types of cables and wires for electrical work:
- VVG (from 1.5 mm² to 10 mm²) and its analogue NYM are both multifunctional;
- PVS - for connecting fixtures;
- PV1 - for electrical panels;
- PV3(6 mm²) - for installation of the EMS.
Varieties of VVG may also be useful: VVG-P (flat), VVGng (A), VVGng (A) -LS, etc.
In addition to the choice of wires or cables, it is important to understand the grounding systems that guarantee the safe use of electrical appliances. In a private house, the installation of a ground loop is mandatory; in city apartments, a bath and household appliances are usually grounded
There are several strict rules: for example, you cannot connect ground wires to metal communications or do independent work in the electrical panel.
It is better to entrust the installation of RCDs and circuit breakers, as well as any installation work in the electrical panel, to qualified electricians with approvals. They will be able to correctly determine the load and select the circuit breaker.
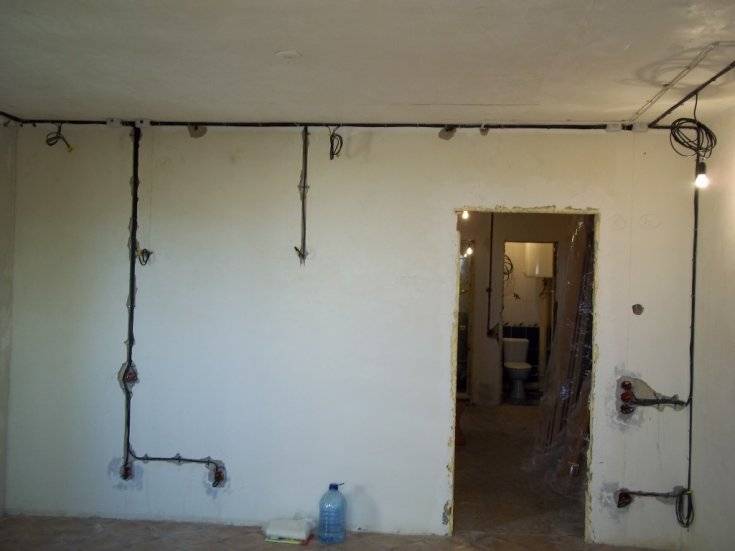
Open wiring method
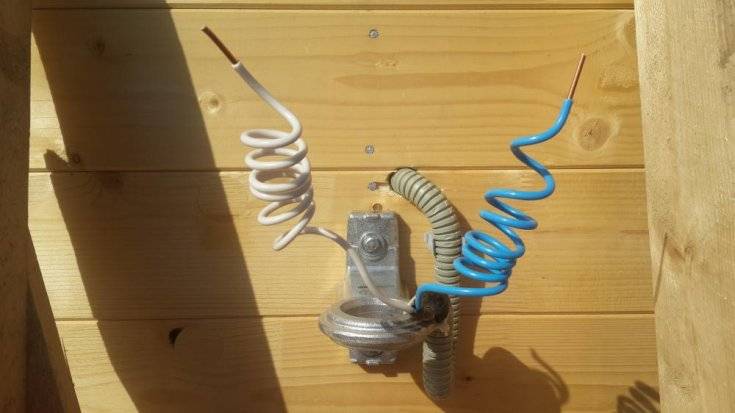
Do-it-yourself installation of electrical wiring by an open method in a private house is carried out using brackets or in a box.
It must be borne in mind that when installing electrical wiring with brackets in a wooden house (or on combustible material) with your own hands, you should use a special non-combustible cable with a braid that does not support combustion.

For a better understanding, before starting work, it is recommended to watch a do-it-yourself wiring video on the Internet.
Installation should begin with sockets, switches, electrical panel and junction boxes. All installed devices are connected by cables laid in boxes. Excess cable channels are cut off with a hacksaw.
The bases of the boxes are attached to the wall with screws or dowel-nails. After that, the cable is laid in the box and covered with a top panel.


At the last stage, in accordance with the electrical circuit, switching the wires in the junction boxes, switches, lighting fixtures and sockets are connected.

Calculation of wiring parameters
Repair of electrical wiring begins with the calculation of the parameters of the future home electrical network, which is equipped taking into account the construction project of your apartment. To do this, you first need to draw up its scheme, and then decide on the following initial data:
- The required footage of the cable, its type (number of cores) and the cross section of each of them.
- Brand and type of mounted protection devices (automatic devices and RCDs).
- Quantity and models of installation products (junction boxes, switches and sockets).
- The total power consumed from the home electrical network (including the connection of new equipment).
- Laying method (hidden or open wiring).
Sample diagram of a home electrical network
Based on these data, the owner of an apartment or house is able to independently calculate the necessary parameters.
Step-by-step instructions for drawing up a home electrical network diagram are on this page.
Calculation of the length and cross section of the cable (lighting, sockets for electrical appliances)
To determine the parameters of the wire, school knowledge of electrical engineering is quite enough. The entire calculation to be carried out boils down to the following steps:
- First, the total footage of the cable required for the apartment is determined.
- To do this, measure the length and width of each of the rooms.
- Then these values are multiplied, and the result is doubled.
- After summing these numbers, the desired value is obtained.
- Having found out the required cable length, proceed to determine its cross section.
- It is selected taking into account the requirements of the PUE, according to which it is enough for home wiring: for laying lighting lines - 1.5 mm2, and for ordinary sockets - 2.5 mm2.
- To connect powerful consumers to the power grid (electric stoves or washing machines, for example), a wire with a cross section of 6.0 mm2 is laid in the project.
Selection of cable cross-section by power and current
To replace the wiring, it is best to use the VVG-ng cable. You can also use NYM or PVS, but the advantages of the VVG cable over others are obvious.
NYM cable
VVG cable
PVA cable
On this, the calculation of wiring in terms of cable selection can be considered complete.
Choice of protection devices (machines, RCDs)
After calculating the parameters of the wires, you should select the type of introductory machine and other switching equipment, including the RCD, which is to be installed in the switch cabinet. In this case, the type of power supply that is supposed to be used in a private house is first determined (single-phase or 3-phase).
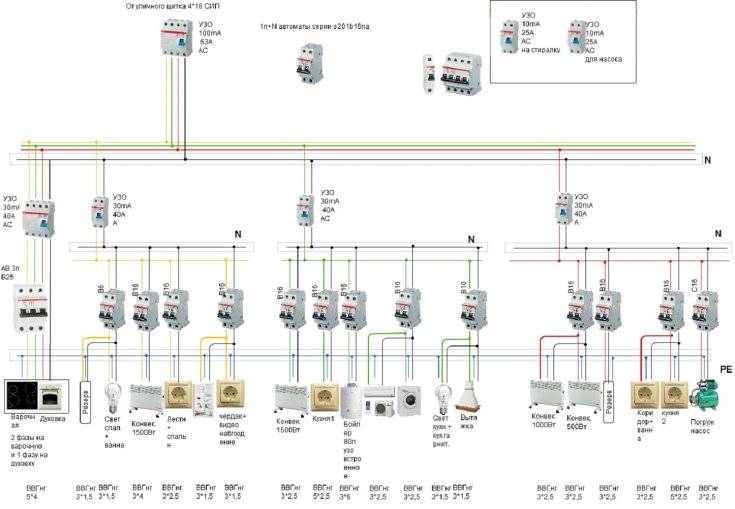
Typical parameters of protective devices for the apartment shield
If a three-phase connection is expected in a private house, you will have to take care of the following requirements:
- The introductory machine and the electric meter should also be replaced with three-phase counterparts.
- The same applies to linear automata and RCDs, selected according to the leakage current in each of the phase lines.
- The distribution cabinet will also have to be replaced, as the amount of equipment placed in it is almost tripled.
- When buying installation products, you will need to take into account special power sockets with four powerful terminals (one of them is grounding).
Three-pin power single-phase socket and plug
Four pin three phase power socket and plug
Five-pin three-phase socket with plug
Unlike apartment buildings, where three-phase power is almost impossible, close attention is paid to this issue in country mansions. This is due to the fact that in capital private buildings there are necessarily working workshops with power equipment such as a milling machine installed in them.
It will also be required if there are heating boilers of a certain design and powerful pumps with three-phase asynchronous motors.
We select the wire
Having calculated the power of future wiring, we proceed to the choice of wire. For internal wiring, aluminum or copper wires in dielectric insulation are used:
- Aluminum wire is most common for internal wiring. This is due to its low cost and low weight. This is where the merits end. The high electrical resistance of aluminum, according to the rules of electrical operation, requires the use of wires with a large cross section.Thick wiring will create installation difficulties, spoiling the appearance of the wall. Aluminum resistance causes heating of the wiring, which is accompanied by loosening of the contacts. The brittleness of aluminum, which increases from overheating, significantly reduces the life of the wire;
- The disadvantage of copper wire is only its high cost. For indoor use, copper wiring is much safer than aluminum wiring. This is due to the lower electrical resistance of copper, which reduces the likelihood of heating the entire wiring. Copper wire is resistant to multiple bending, has a long service life and does not reduce current conductivity after oxidation.
Use the table below to select the appropriate cable for the job:
Wiring diagram in the house
According to current regulations, when connecting electricity without a transformer, the power consumption for a private house should not exceed 15 kW. It is found by adding up the power of all electrical appliances that can be turned on at the same time. If the figure found is less than 15 kW, the introductory machine is set to 50 A. If the power is greater, a transformer is also needed. Its parameters will be indicated to you in the project, since in this case, you cannot do without it.


It is necessary to think over the wiring so that it is convenient to use and that the same consumers are on the same machine
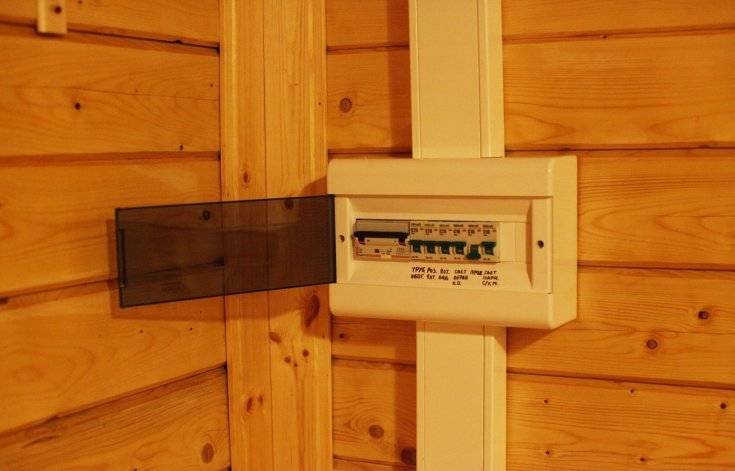
Where to put the introductory shield, hull requirements
Recently, representatives of energy supply organizations have demanded the installation of meters (and introductory machines, respectively) on the street. This is done in order to be able to control consumption even if the owners are not at home. But this requirement is not supported by anything, and, if you wish, you can install everything inside the house.But more often, in order not to quarrel with the controllers, the requirements are met, and an automatic machine and a counter are installed on the street.
Option to build a house power supply scheme
For outdoor installation, the circuit breaker (AZ) and the meter must be in a sealed case, protected from dust, dirt and moisture. The protection class for installation must be at least IP-55. For the convenience of monitoring readings, there should be a window in the door of the box for the electric meter. For installation inside a wooden house, the requirements are somewhat lower: IP-44, but the housing must be metal.
Organization of entry into the house
After the introductory machine, an electric meter is installed, then another RCD is installed - for an emergency shutdown of the power supply in the presence of a short circuit, and then the cable is connected to the electrical panel inside the house. The nominal value of the machine inside the house should be one step lower than that installed outside. In this case, if there are problems, the machine in the house will work first and you will not have to climb the wall every time to the introductory machine installed there.
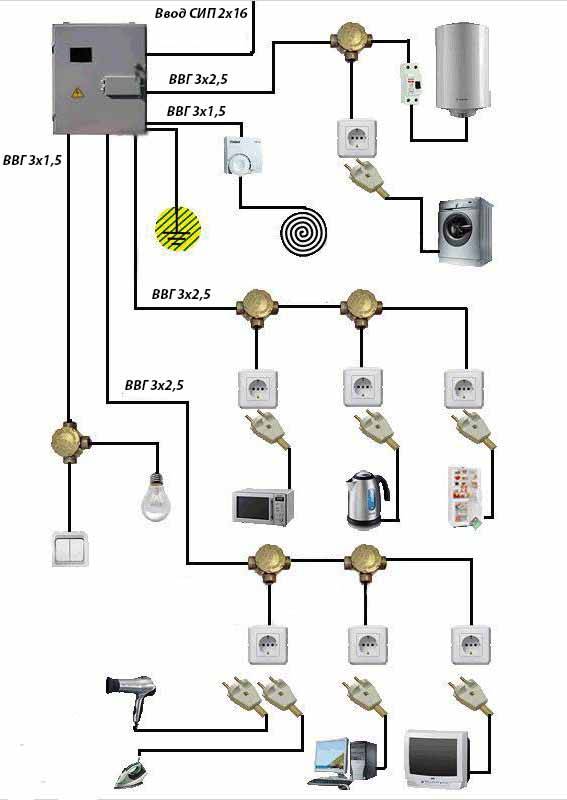
wiring diagram in wood home with a single-phase connection (220 V)
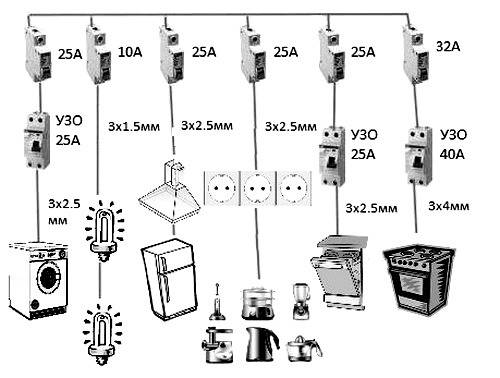
Single-pole automata are installed in the shield, to which wires are connected that diverge throughout the premises. They are mounted on DIN rails, their number is recruited depending on how many separate “branches” of power supply are required. To find out how many machines should be in your shield, count the number of required groups, two or three free machines are added “for development”. This will be the "branches". According to the quantity received, select the electrical panel in size.
Divide consumers into groups
When planning a wiring diagram in a wooden house, all connection points are divided into separate groups (they are often called consumption groups). For example, all sockets on the ground floor are powered by one machine, a separate device is placed on the lighting fixtures in the house, and another one is used for street lighting. If some powerful electrical equipment is used - a boiler, an electric boiler, an electric stove, etc. - for them it is desirable to conduct separate branches of power supply and install personal machines. Separate protection devices are also installed for the power supply of outbuildings (if you do not want to pull separate inputs to them and install a separate meter, but only on condition that the power of all electrical appliances does not exceed 15 kW).
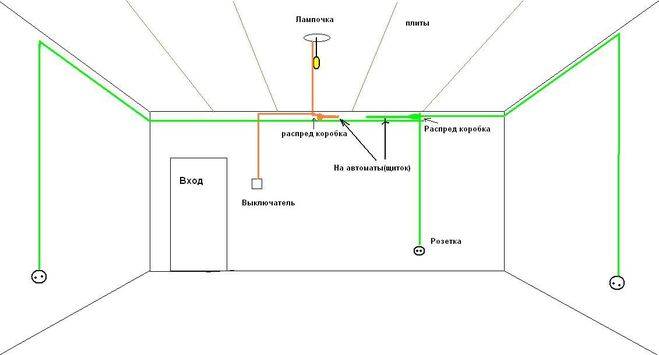
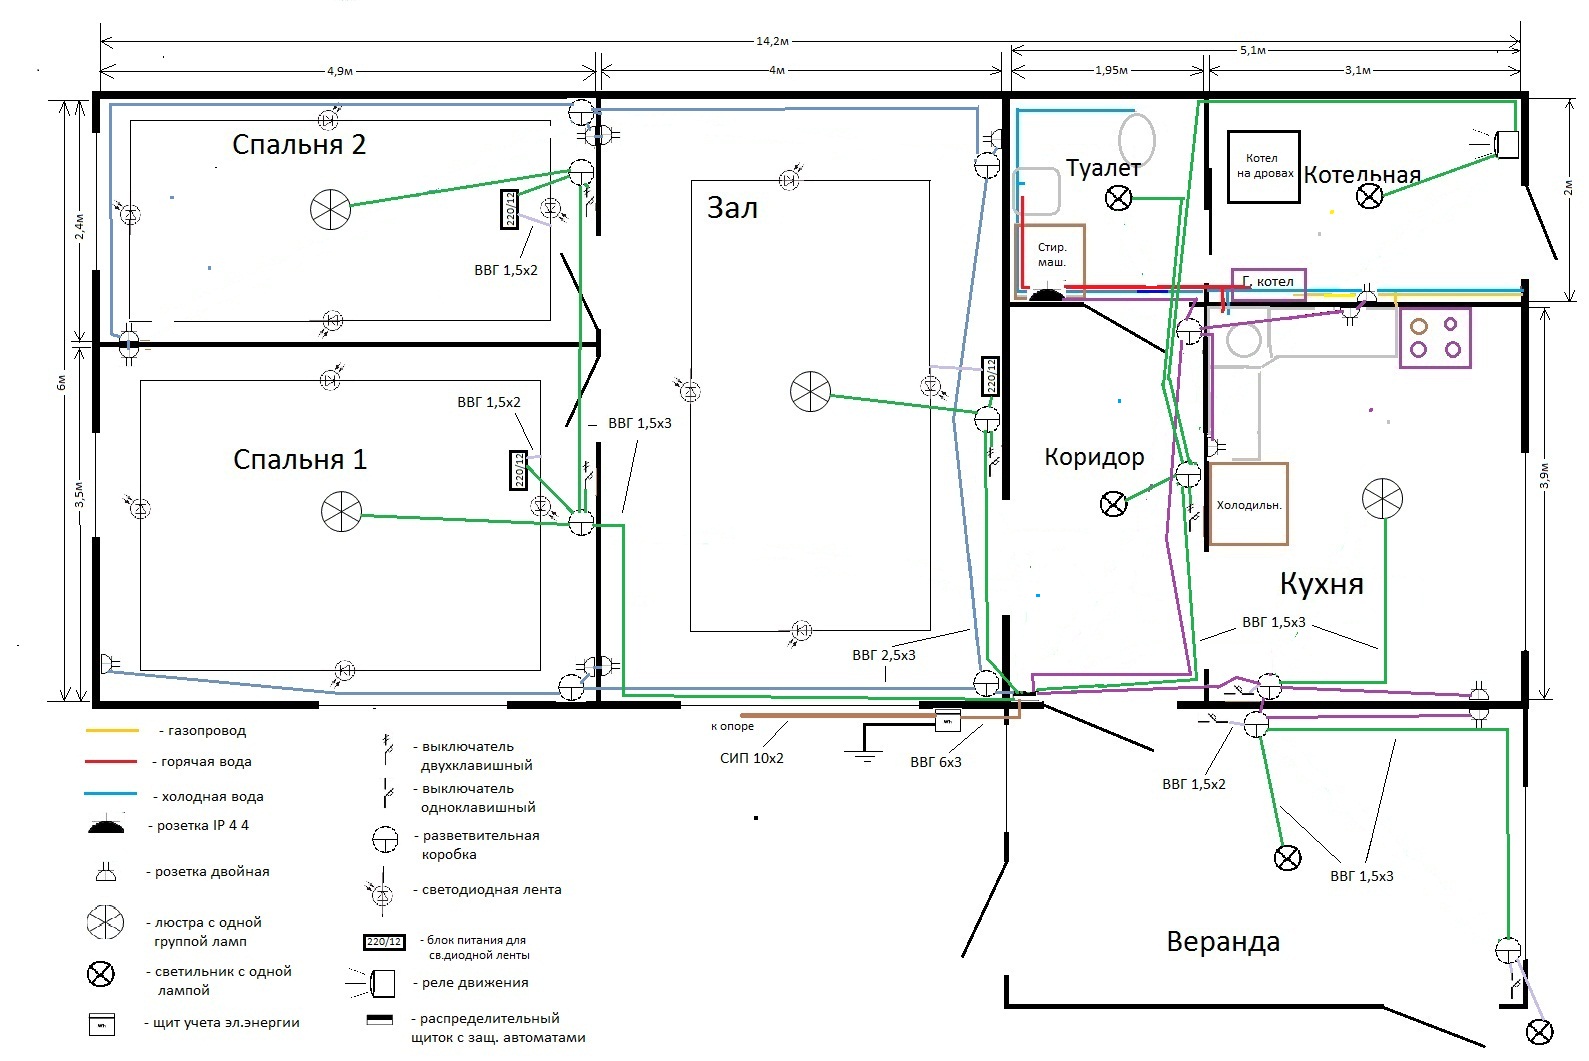
You can imagine the wiring diagram in a wooden house in this form. This makes it easier to understand what devices and cables you need. If you add the length of the cables, it will be possible to calculate the footage of cables / wires
From a safety point of view, it is better to make as many separate branches of the power supply as possible. This will increase the number of machines and increase the cost of the project, but will reduce the number of potentially dangerous connection points. It is in the places where the conductors are removed that problems most often arise: the contacts oxidize, heat up, then start to spark. Therefore, it is better to make the number of connections as small as possible.
An example of a wiring diagram drawn on a plan in a wooden house
And, at the last stage, it is advisable to draw a diagram of the distribution of electricity in the premises on the plan of the house. At the same time, consumer groups are easier to draw in different colors.So you can more fully imagine what the wiring diagram in a wooden house will look like, it will be easier to do it yourself. For example, everything may look like the photo below.
Selection and installation of sockets
Modern devices create a rather large load on the electrical network. If you choose the wrong type of outlet, which is the link between household appliances and wiring, in the future you may encounter such troubles as a short circuit, overheating of network elements, failure of appliances due to power surges created by charred components of the outlet.
To avoid such effects, you should choose models from trusted manufacturers. You should never save on their quality, as high-quality sockets will serve you for many years without causing trouble. The ideal choice for the kitchen will be sockets rated for current from 16 amperes. A positive feature of the design is a ceramic rather than plastic base, spring-loaded slats and a nickel-plated internal mechanism.
In choosing the places for installing sockets, the previously created diagram of their location will help you. Check again if the given number of connection points is sufficient. At the same time, consider both the equipment that you already have and those planned for installation in the near future.
Electricity in the kitchen is one of the main components, without which today it is difficult, and sometimes completely impossible, to imagine the modern process of cooking. Proper design of the electrical wiring system allows not only to hide all the wires inside the walls, but also to protect household appliances from breakdowns, and you from unnecessary financial losses.


What is a wiring diagram for?
It turns out that the device of modern electrical wiring in an apartment is a real art, which only a professional electrician can handle.
If you do not want to constantly change the wall decoration in order to mask cables that appear here and there, we recommend that before repairing an apartment or building a house, draw up a drawing indicating all significant objects related to electricity: sockets, switches, electrical panel with RCD, lighting fixtures.
Sample diagram that a homeowner can sketch
Attention is paid to the designation of the locations of all electrical points, from the electrical panel to the sockets. Focusing on the requirements or wishes of the owner of the home, the electrician draws up a schematic diagram of the electrical wiring in the apartment
His task is to divide the cables into groups in order to properly distribute the load, think over the control and protection system, and ultimately do everything to guarantee safety and comfort.
Focusing on the requirements or wishes of the owner of the home, the electrician draws up a schematic diagram of the electrical wiring in the apartment. His task is to divide the cables into groups in order to properly distribute the load, think over the control and protection system, and ultimately do everything to guarantee safety and comfort.
What must be taken into account when drawing up a diagram, drawing, work plan, necessary for the competent installation of electrical wiring?
Consider the power grid in terms of its constituent parts:
- Automatic protection devices installed in the electrical panel. The functioning of all home equipment and the safety of users depend on their quality and proper installation.
- Cables, wires with a properly selected section and good insulation.
- Sockets and switches with high-quality contacts, safe housings.
In private houses, an obligatory element is an introductory machine and a power cable from it to the shield. With the help of a circuit breaker, they regulate the power consumption and, if necessary, turn off all the electricity in the house.
Approximate wiring diagram in a private house
The main attention should be paid to the distribution of power among circuit breakers and the protection of each dedicated line. The electric meter is usually installed at the entrance, cut after the introductory machine
The electric meter is usually installed at the entrance, cut after the introductory machine.
Final events
At the final stage, a prepared socket or switch is inserted into each designated place, and wires are immediately connected to them. In front of the socket, socket boxes are also inserted, which are fixed there with a fresh solution and remain tightly. It is advisable to plaster the attachment point in advance, before completing the installation of sockets and switches. Having connected the insides of switches and sockets, it is desirable to install plastic elements after the completion of the final finishing work. If you do the opposite, then in the process of finishing work, you will have time to smear beautiful rosettes in wallpaper paste, putty, concrete mortar and a whole bunch more.
Final events
At the final stage, a prepared socket or switch is inserted into each designated place, and wires are immediately connected to them. In front of the socket, socket boxes are also inserted, which are fixed there with a fresh solution and remain tightly.It is advisable to plaster the attachment point in advance, before completing the installation of sockets and switches.
Having connected the insides of switches and sockets, it is desirable to install plastic elements after the completion of the final finishing work. If you do the opposite, then in the process of finishing work, you will have time to smear beautiful rosettes in wallpaper paste, putty, concrete mortar and a whole bunch more.


![Choosing the Best Water Towel Warmers [Our Top 8] | engineer will tell you how to do it](https://fix.housecope.com/wp-content/uploads/2/e/c/2ec9bd33db262982410ba1db2395e9fa.jpeg)