- Basic requirements for electrical wiring in a wooden house
- What inventory should be used?
- Calculation of the amount of materials
- How to make wiring in the house with your own hands
- The initial stage of electrical wiring
- House electrical project. What does it include?
- An Overview of Common Design Mistakes
- Features of the power supply of a private house
- Wiring life
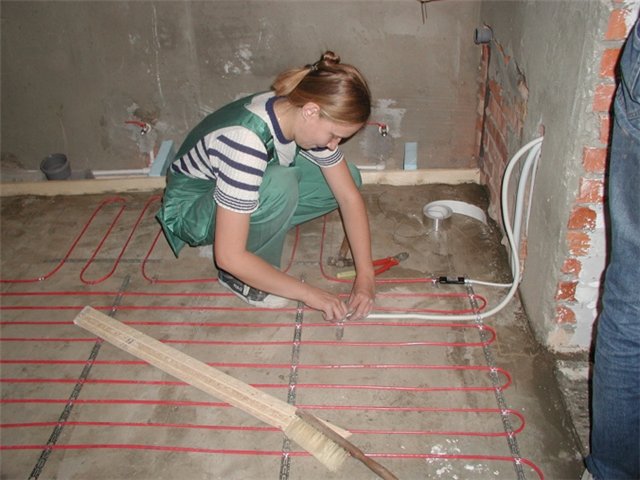
- Do-it-yourself wiring installation
- How to calculate the electrical wiring on the site
- Plan and scheme of electrical wiring in the house. What are they needed for?
- Installation of electrical wiring in a wooden house
- Conclusions and useful video on the topic
Basic requirements for electrical wiring in a wooden house
Codes of rules for PUE and SNiP are developed by security experts. This is not a whim of an armchair official, but a list of necessary norms, the observance of which brings the level of "carelessness" as close as possible to the desired one. It can be said that life itself writes these dry chapters, behind which human tragedies are sometimes hidden.
 The main cause of fires in wooden buildings is a short circuit in the electrical wiring.
Fire statistics unfortunately leave no doubt that timber construction is always at the forefront of fire risk.However, if you remember that for hundreds (or maybe thousands) of years our ancestors lived in wooden log cabins, there is hope that everything is possible, you just need to correctly deal with the wiring. After all, it is in the vast majority of cases that it causes a fire.
The main requirements contained in the PUE and GOSTs are as follows:
- The calculation of the wiring should be made with a margin of up to 30%. This applies primarily to the selection of the cross-sectional area of the wires, since the degree of heating of the insulation and the likelihood of a short circuit during operation depend on this. In order to cover the whole picture of electrification as a whole, it is necessary to prepare a working draft with a detailed diagram and specification of electrical wiring, and upon completion of work, get certified and receive a wiring passport.
- The quality of the connections should not allow the slightest possibility of electric shock to the inhabitants of the house.
- Heating and ignition of cables is unacceptable, as this will most likely lead to arson of the entire house. The possibility of short circuits must be completely excluded.
A significant obstacle hindering independent installation work wiring in a wooden house is the lack of a single document regulating installation. The main regulations are dispersed in the regulatory documents of GOST and SNiP and are not systematized. Therefore, when drafting a project, it is better to contact a specialized organization that has a license for this kind of activity.
What inventory should be used?
Like it or not, but the use of tools for wiring wiring is necessary, since bare hands cannot achieve accuracy and error-free execution.Therefore, we offer you a list of tools that you should first acquire:
- screwdriver-indicator;
- tester or multimeter;
- hammer and perforator;
- pliers, pliers;
- flat and curly screwdrivers;
- insulating material (liquid insulation or electrical tape);
- wall chaser.

Standard Electrician's Kit
When at home, follow the requirements for the location of powerful consumers: sockets and switches. According to modern European standards, the socket is located at a distance of 25 cm from the floor, and the switch is 90 cm.
Calculation of the amount of materials
After creating the circuit, it is necessary to proceed to the next stage - counting the amount of materials for electrical installation. First, count the amount of cable. Please note that the wiring in the garage will be both internal and external (for laying from the pole to the meter and input), so you will need to purchase materials for all types of work. SIP wire is usually laid from the pole, its cross section will be indicated to you in the technical conditions for connection, while according to PUE 7.1.34 and in table 2.4.2 “The smallest cross section or diameter of branch wires from overhead lines to inputs”, the cross section of aluminum conductors is allowed to use no less than 16 sq. mm or more than 2.5 sq. mm, if this is the power supply of a separate electrical equipment (the garage is not one).
Based on the above (PUE 7.1.34), the wiring inside the garage must be made with a copper wire or cable. For wiring inside the garage, use VVGng-LS.
In order to correctly calculate the cable cross-section, it is necessary to accurately determine which electrical appliances will be installed indoors.The total power of all electrical appliances must be multiplied by a factor of "1.2" (a power margin of 20%), on the basis of which, according to the table, select the appropriate value. Lay a cable with a cross section of conductive wires of 2.5 square meters on the sockets. mm, to individual devices - calculate by power.
As for the length, we must take it with a margin, because. the conductor will be cut into pieces (from the socket to the shield, from the switch to the lamp, etc.). For each wire connection, it is necessary to take a margin of 10-15 cm.
Calculate the exact number of outlets in the garage. There must be at least 2 of them. One for an extension cord (in case of machine repair), and the second for a stationary electrical appliance (for example, a compressor or a welding machine). There will be two switches: one for the viewing hole, the second for the main lighting. If necessary, you can add more switches to control the light on each of the walls, for example.
Special attention must be paid to the lamps. In our time, LED and fluorescent lamps are popular. The first option is more economical and durable, but at the same time more expensive.
The first option is more economical and durable, but at the same time more expensive.
At the same time, it will be great if the lamp itself has a high class of dust and moisture protection - IP54 and higher
This is especially important if the garage is unheated and condensation may accumulate.
If the installation of open wiring in the garage is carried out, it is also necessary to calculate the number of fasteners, corrugations or cable channels.According to SNiP 3.05.06-85 (table 2), the fastening step of open wiring in pipes with a diameter of 20 mm is not more than 1 m, 32 mm is not more than 1.4 meters. Such requirements can be applied to cable laying in corrugation. At the same time, there are requirements for fastening a cable without pipes and corrugations with open wiring, they are described in VSN 180-84. clause 7.2., where it is said: "The distance between the attachment points of wires and cables must be at least 500 mm for horizontal installation and 1000 mm for vertical installation." In this case, you need to take into account the requirements, but in fact you need to fix the corrugation every 0.3-0.7 meters, so that it does not sag.

Installation of wiring in a hidden way, we do not recommend using, because. it is more time-consuming and is unlikely to improve the interior of the room. After all the elements are calculated, we proceed to the main process.
How to make wiring in the house with your own hands
Before starting work, read the Rules for Electrical Installations (PUE), which describes the basics of working with equipment.
- Do-it-yourself wiring in a house requires the following conditions:
- free access to metering equipment, distribution boxes, sockets and switches is required.
- they are mounted at a level of 60-150 cm from the floor; opening doors should not block access.
- the cable is fed from above;
- The installation height of sockets varies from 50 to 80 centimeters from the floor. For safety reasons, they cannot be placed less than 50 centimeters from electric and gas stoves, heating radiators, pipes.
- The power supply is from below.
- The number of sockets is determined at the rate of 1 piece per 6 sq.m.This rule does not apply to the kitchen, here they put sockets according to the number of household appliances.
- To power the bathroom, it is better to provide a separate transformer located outside this room (to lower the voltage).
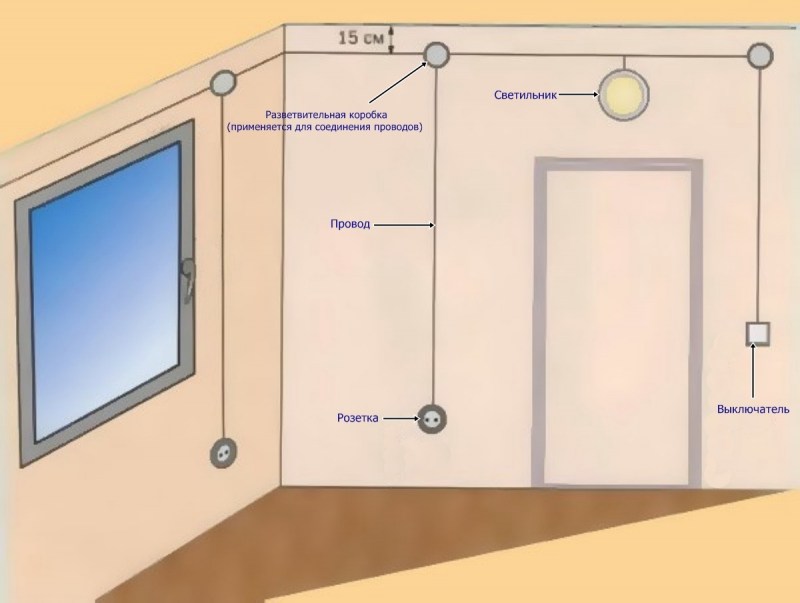
- the cable is laid with strict observance of the vertical and horizontal (without bends and diagonals, so as not to damage it during installation and perforation).
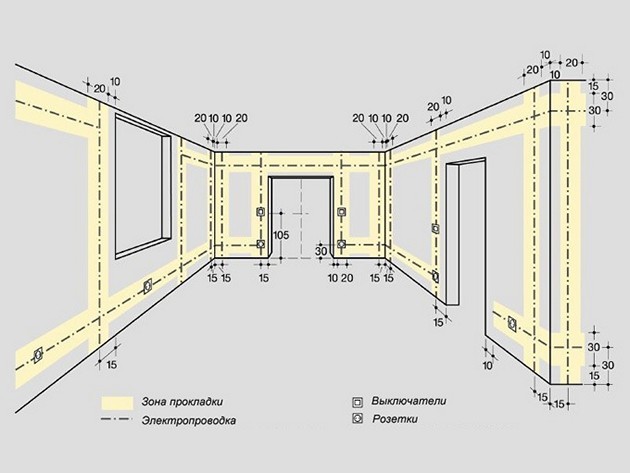
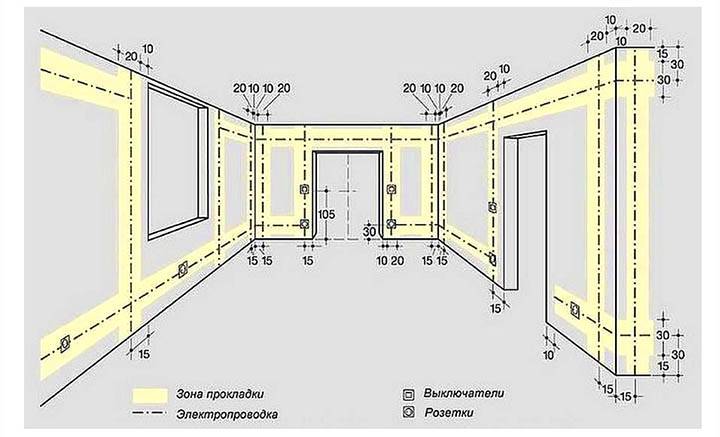
- horizontal are laid at a distance of 5-10 centimeters from ceilings and cornices and 15 cm from the ceiling and floor. Vertically located cables are laid at least 10 cm from the edge of a door or window opening.
- The distance to the gas pipes should not be less than 40 centimeters;
- The wiring must not come into contact with metal building structures.
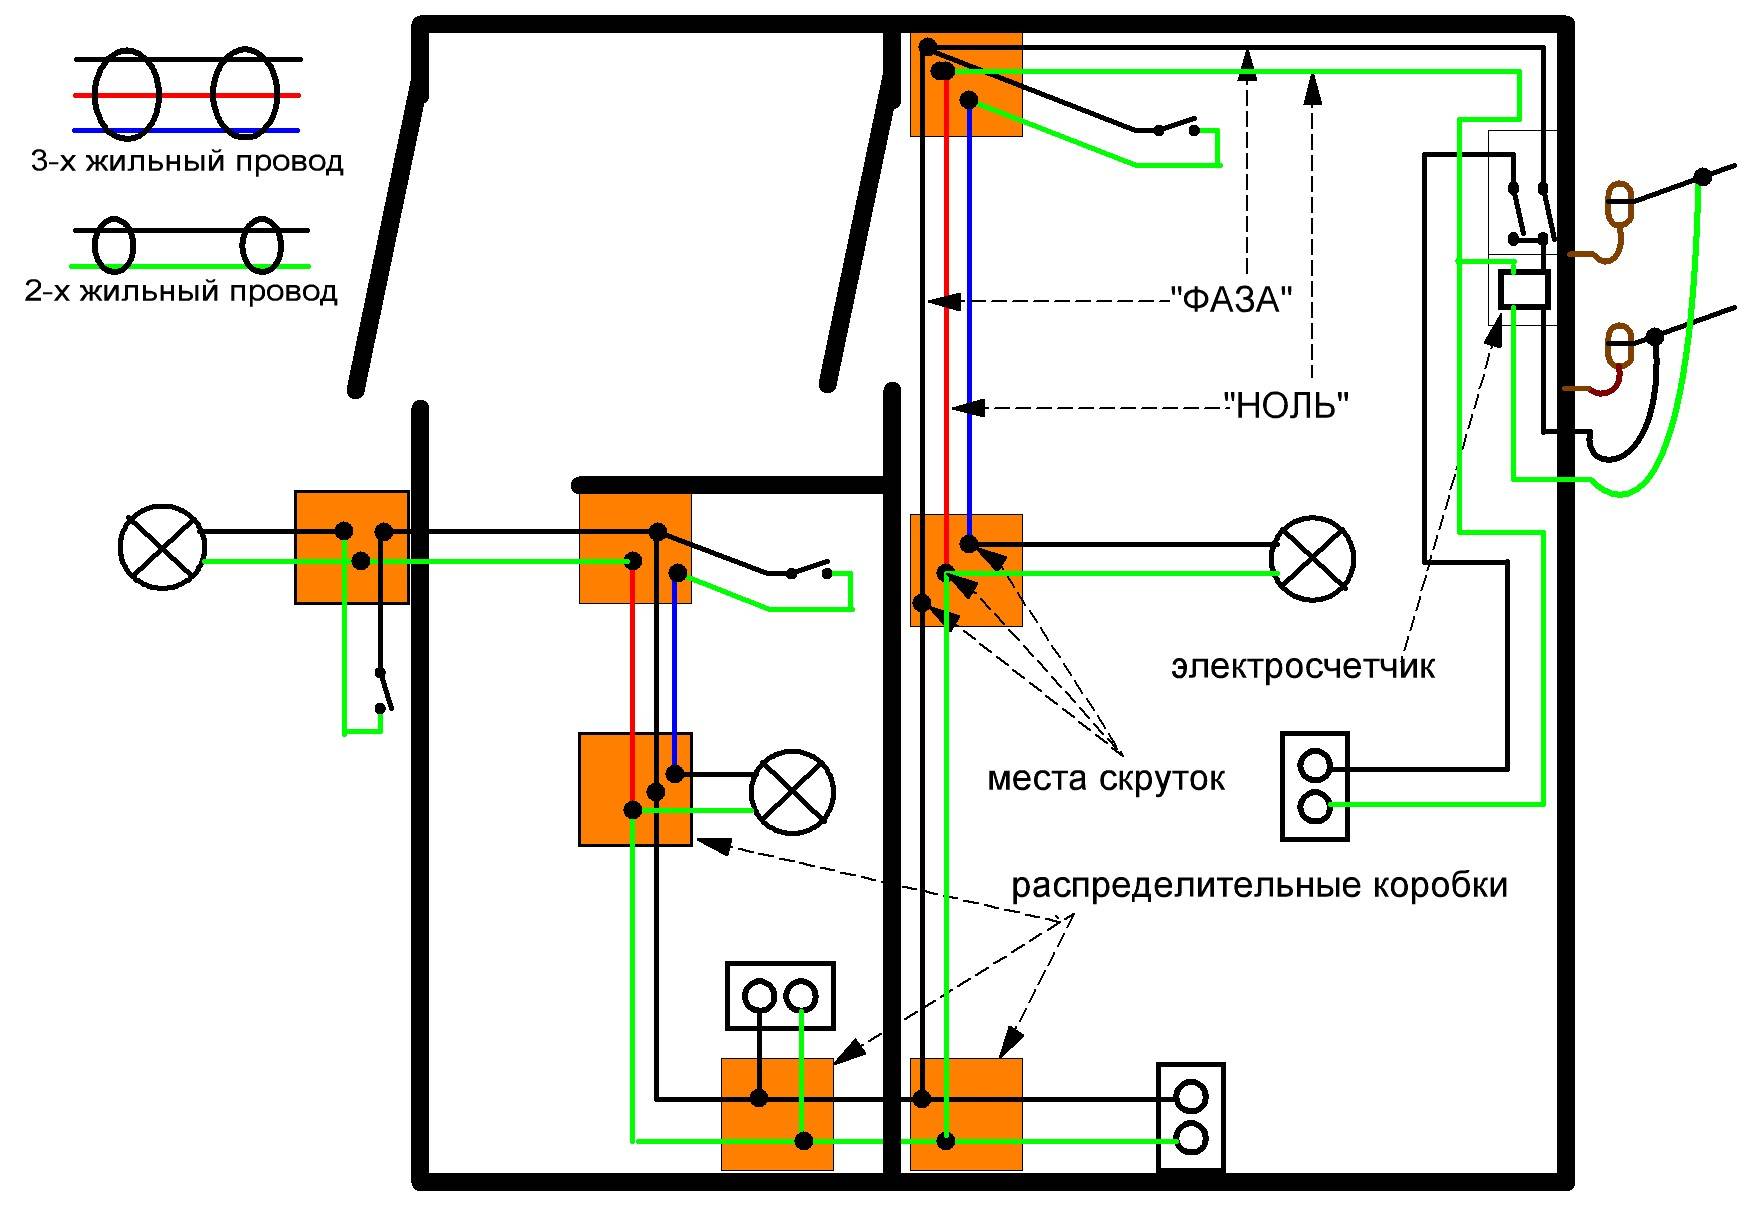
- special boxes are used for wiring and connecting cables. Connections must be securely insulated. It is forbidden to connect copper wires with aluminum.
The initial stage of electrical wiring
In the process of conducting electrical wires, the following standards must be observed:
Ensuring free access to distribution boxes and electrical metering equipment.
Mounting sockets and switches is carried out at a height of one and a half meters from the floor surface, while ensuring free access to them. In order to protect young children, it is possible to purchase special plugs that are installed on sockets.

When opening the doors, the degree of accessibility to the equipment should not be reduced. The installation of one outlet is shown per 6 square meters.

Depending on the number of units of electrical equipment, sockets are mounted in the kitchen.


Cable laying must be clear, respecting the vertical, horizontal and diagonal position, while the power cord must not sag or bend. If this rule is ignored, then it becomes possible to damage the electrical cable during installation and installation work and using a puncher.

When laying horizontal cables, retreat from 5 to 10 centimeters from ceilings and cornice structures. A 15 cm distance is required from the floor and ceiling surfaces.
When installing vertical cables, a 10 cm indent from windows and doors and 40 cm from gas heating pipes is required.

To separate and connect electrical cables, the use of special boxes is shown.

Isolate any conductive electrical connection to help prevent possible short circuits and fires.

The prohibition of the connection of aluminum and copper wires.

House electrical project. What does it include?
Think over the wiring in the house and apartment, taking into account:
- the use of electricity to operate several types of equipment simultaneously;
- without the need to limit network connections and recharge devices;
- convenient placement of sockets and their correct number for each room.
is possible only with the help of calculations of power consumption and a well-designed electrical project.
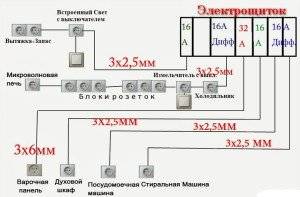
When performing work with an electrician, it is important to know the position of all elements of the electrical system of the house and the layout of the wiring inside the walls. This is necessary, if only because, in the process of redevelopment, repair, important communications should not be touched. It is also necessary if there is one or another malfunction in the network.When wiring electricians, the load on the network in the house should also be taken into account and a cable with the required cross section should be used.
With frequent voltage drops, appropriate protection is installed
When wiring electricians, the load on the network in the house should also be taken into account and a cable with the required cross section should be used. With frequent voltage drops, appropriate protection is installed.


Wiring is divided into several stages:
- drawing up a wiring diagram;
- power calculation;
- procurement of relevant materials;
- installation of wiring, installation of fittings and components.
An Overview of Common Design Mistakes
Defects in the scheme or work planning entail installation errors, and this threatens to disrupt the functioning of the power grid. The result may be the failure of expensive equipment, and even worse, an electrical injury to one of the residents.
What mistakes should be avoided:
- use low-quality products without labeling and certification;
- make one-to-one calculations - any technical products and materials must be purchased with a margin;
- lay in the project the installation of conventional sockets for connecting hobs, boilers, heat guns;
- in wooden houses, plan the use of closed wiring - more complex and subject to the list of requirements of the PUE;
- design switching in one junction box of low-voltage and high-power power wires;
- plan the connection of wires with twists that are dangerous for further maintenance and operation; the best option is ready-made terminals;
- make circuits of aluminum and copper wires, as well as use aluminum wiring.
Some errors relate to incorrect calculations.For example, cable strobes with a closed installation method should be laid to a depth of 2-2.5 cm, no less.
It is impossible to connect the grounding of sockets using a loop, to ground on cast-iron sewer or steel gas pipes.
If you do not know how to properly conduct electrical wiring in the house, contact the design organization. Specialists will go to the site and draw up a wiring diagram based on specific installation conditions.
Features of the power supply of a private house
There are special rules for power supply to a private house. This is due to the presence of utility rooms, street lighting, and other factors. There are several components of the network of individual living quarters.
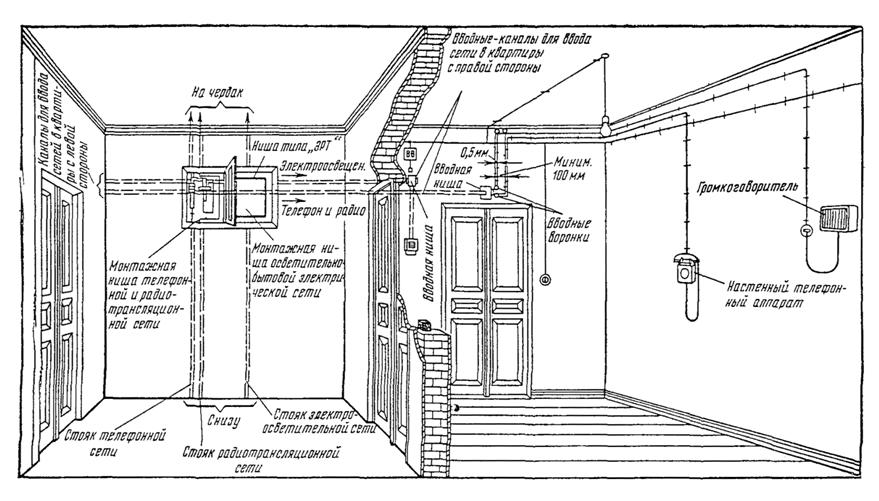
Entering the house.
The power supply company is responsible for connecting the home to electricity. A power supply project is being drawn up, technical specifications are being developed.
IMPORTANT
There are two input methods: air (90%), cable or underground (10%).
The underground option is more expensive, more difficult. A trench is dug 70-100 cm deep for cable laying. Trees are located no closer than 2 m to it, bushes - no closer than 0.75 m. It is forbidden to pull the wire under the building.
The air option when using SIP is easier to check for theft. The method is easy to install and maintain. For conventional input, as a rule, a variant of wires with a cross section of 16 mm 2 is used.
Used parameters at the stage of entering the house.
| Parameter | Norm |
| Distance from pole to house | No more than 25m, with a greater distance, another pole is installed |
| Height of fixings to the house | Not less than 2.75 m |
| The distance of the wire from the visor on the roof | Not less than 20 cm |
| Distance from SIP to blank walls of structures | Not less than 20 cm |
| Distance from SIP to terraces, balconies, window openings | Not less than 100 cm |
It is envisaged to exclude the contact of the wire with metal elements. The possibility of wire oscillation is calculated.
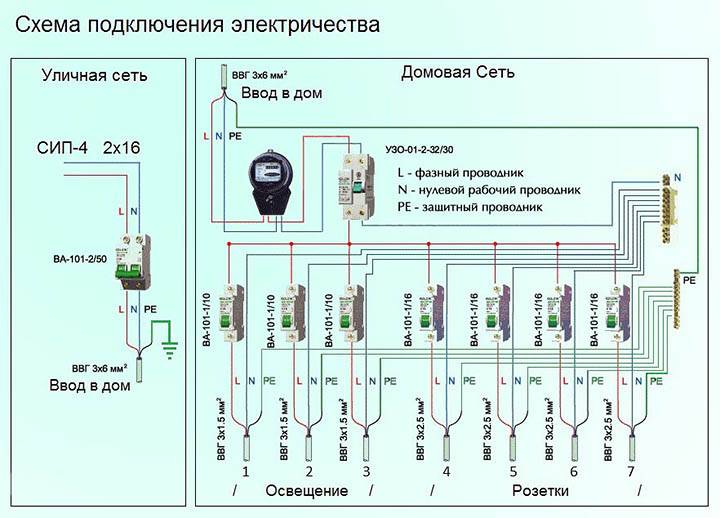
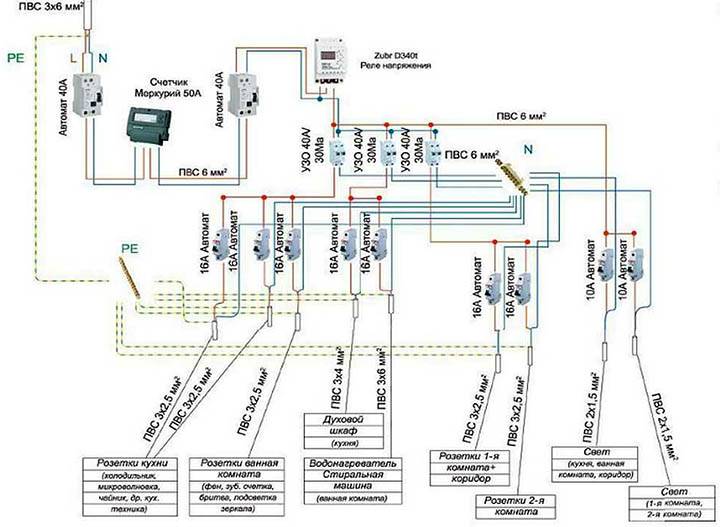
Counter installation.
She practices on the facade of the building. This facilitates the connection to the shield with a convenient cable. Through the outer wall, the wire is pulled in a metal pipe, which excludes the accumulation of moisture. The counter must comply with specifications. In the residential sector, the operating current is not lower than 30 A. The operating current indicators, the number of phases, and other parameters are set individually.
Distribution board.
The shield is called the heart of the home electrical network of a residential building. The shield is locked with a key if a counter is installed in it. Glass is provided for taking readings.


Requirements:
- The place for the switchboard (built-in or hinged) should be convenient, dry, not subject to flooding.
- The shield should be located no closer than 1 meter from gas and water pipes (PUE - 7.1.28).
- Without waterproofing, it is forbidden to place a shield over the bath, bathroom, kitchen (PUE - 7.1.29).
- For combustible walls, fireproof shields are made.
- Separate switchgears can be installed in garages, utility rooms, workshops and for street lighting (PUE - 7.1.22).
From the switchboard, electricity is transmitted to consumers through electrical wiring.
Structural elements of the ASU:
- three-phase or single-phase wires;
- contacts for connecting cables;
- knife switch (automatic switch);
- protective automatics (RCD);
- grounding with a neutral wire.
An input cable passes through the shield, electricity is connected to the house.
Distribution around the house.
Wiring is carried out before finishing work. Basic Rules:
- Wiring along the walls (inside and outside) is laid vertically or horizontally, without coming into contact with metal structures.
- Switches are installed 60-140 cm from the floor. When opened, the door does not interfere with access to them. The wire is laid from top to bottom.
- The distance from the floor to the sockets is 50-80 cm. The wire is pulled from the bottom up. One socket is recommended per 6 m 2, not counting the kitchen. There are no sockets in the toilet. From heating appliances, gas stoves, electrical sockets, they are at least 50 cm away.
- For wire connections, distribution wires and careful insulation are provided.
In some cases, the wires are laid under the floor or under the floor slabs.
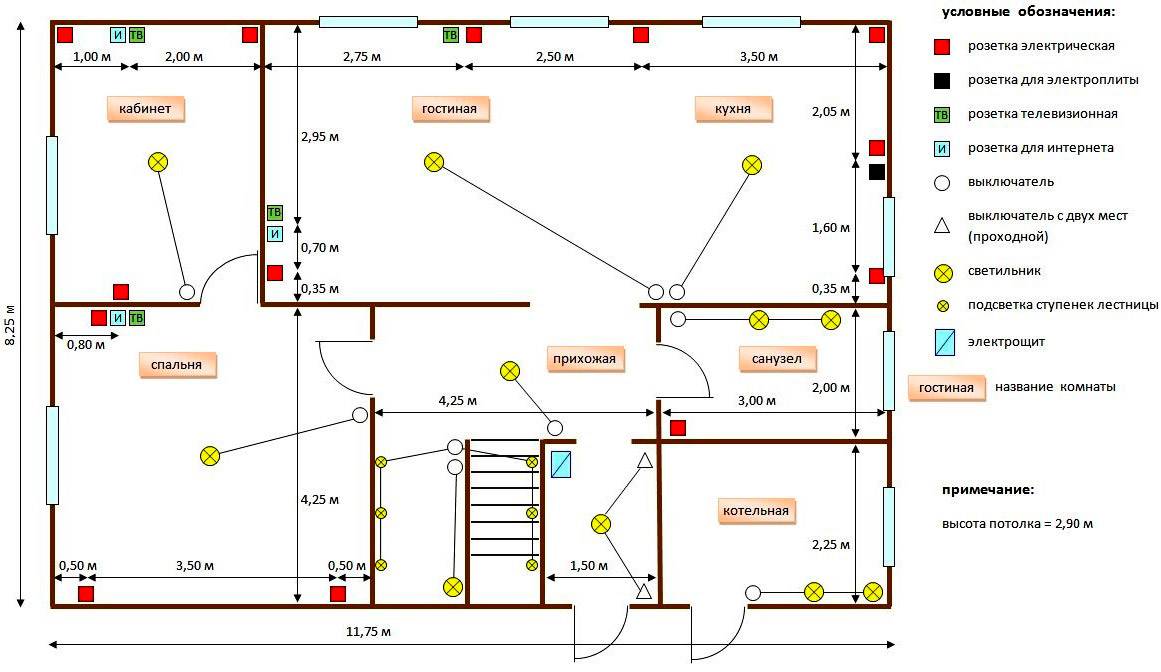
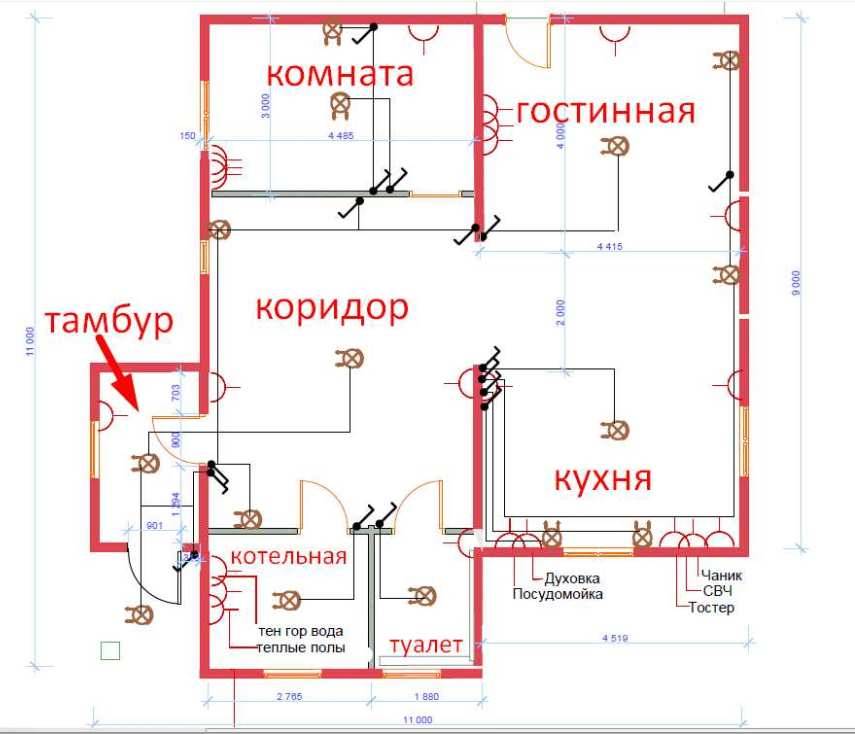
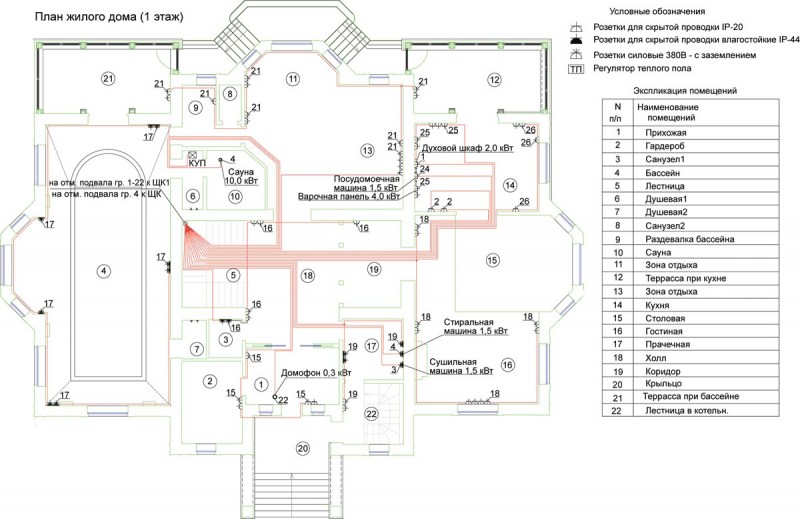
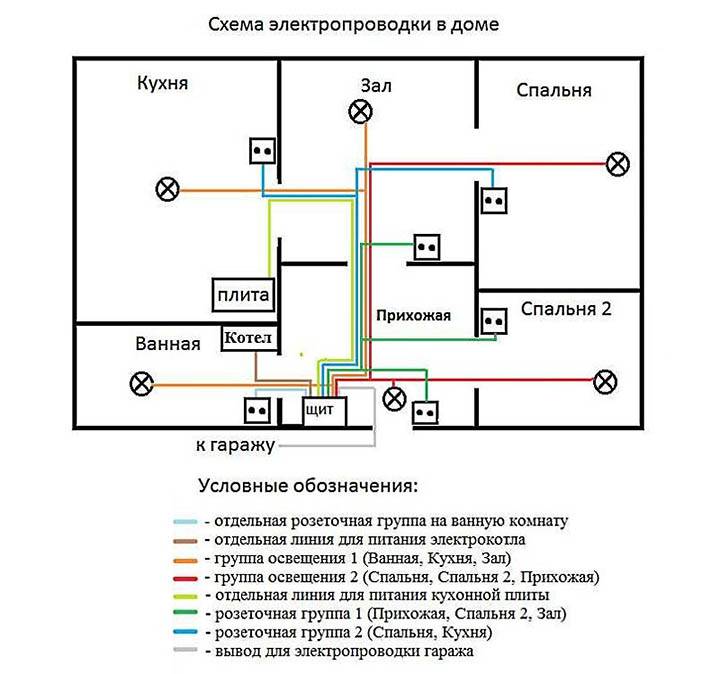
The wiring diagram of the house indicates the location of electrical wires, mounting nodes, power connectors. The kitchen, bathroom are considered energy-intensive, the living room, workshop are quite capacious. Economical premises include children's, bedrooms, bathrooms, utility rooms.
Outside wiring.
Outside buildings, wiring is mounted by a cable or overhead line. A separate section for this is defined in the shield. In garden plots, wiring under the ground is more often practiced.
When wiring along the facade, the likelihood of moisture accumulation (even from dew) is excluded. For this purpose, a drainage system is equipped at ground level.
After the wiring is completed, commissioning is carried out, cable insulation is checked.
Wiring life
To understand when it is time to change the electrical wiring in the house, or to know how many years the replacement work will last, you need to find out its service life. Today's cables and connection systems are much better than they were a few decades ago. Therefore, they will last longer. But everything has its time, and even good wiring will sooner or later require replacement.
The use of RCDs, distribution and junction boxes, terminals and other protective elements helps to extend the life of the electrical wiring at home.
The generally accepted gradation includes three different types of electrical wiring operation duration: nominal, warranty and actual service life. There is a difference between them:
- Nominal - this is the period in which the system performance factors must be observed. For example, a copper cable can function properly for 30 years if the voltage does not exceed 0.66 kV and the temperature ranges from -50 to +50 degrees.
- The warranty period is the period during which the manufacturer (or seller) is ready to be responsible for this cable. For example, if something happens to the wire within 5 years of operation under the agreed conditions, it will be repaired or replaced free of charge.
- The actual term is the time of the system operation, which depends only on the user. It can be less or more than the nominal, depending on the conditions under which the wiring operates.
This is interesting: Do-it-yourself basement siding installation
Do-it-yourself wiring installation
It is customary to start laying electrical wires immediately after the construction of walls and roofs. To do this, you can call an electrician or do everything yourself.If the concept of "electricity" is not something terrible and incomprehensible, then the second option will allow you to save a little on building your house. You just need to have basic skills in handling a puncher, pliers and a screwdriver, and also do not forget about the proper security measures.
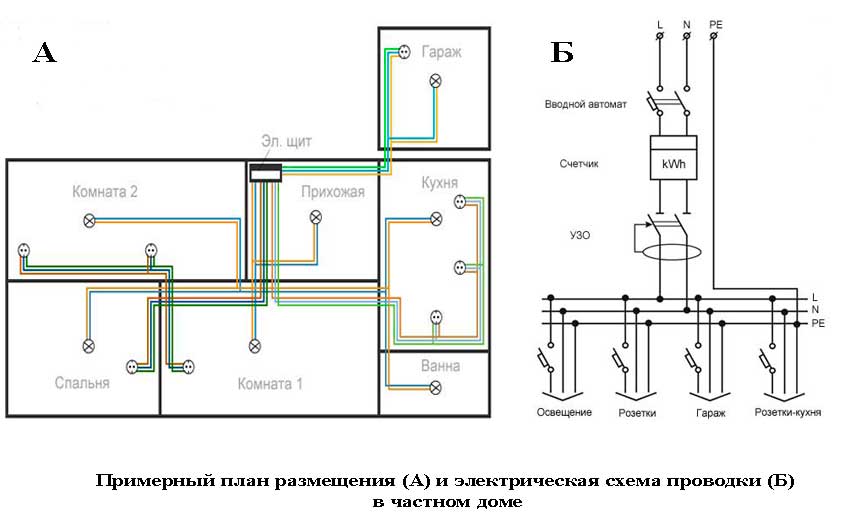
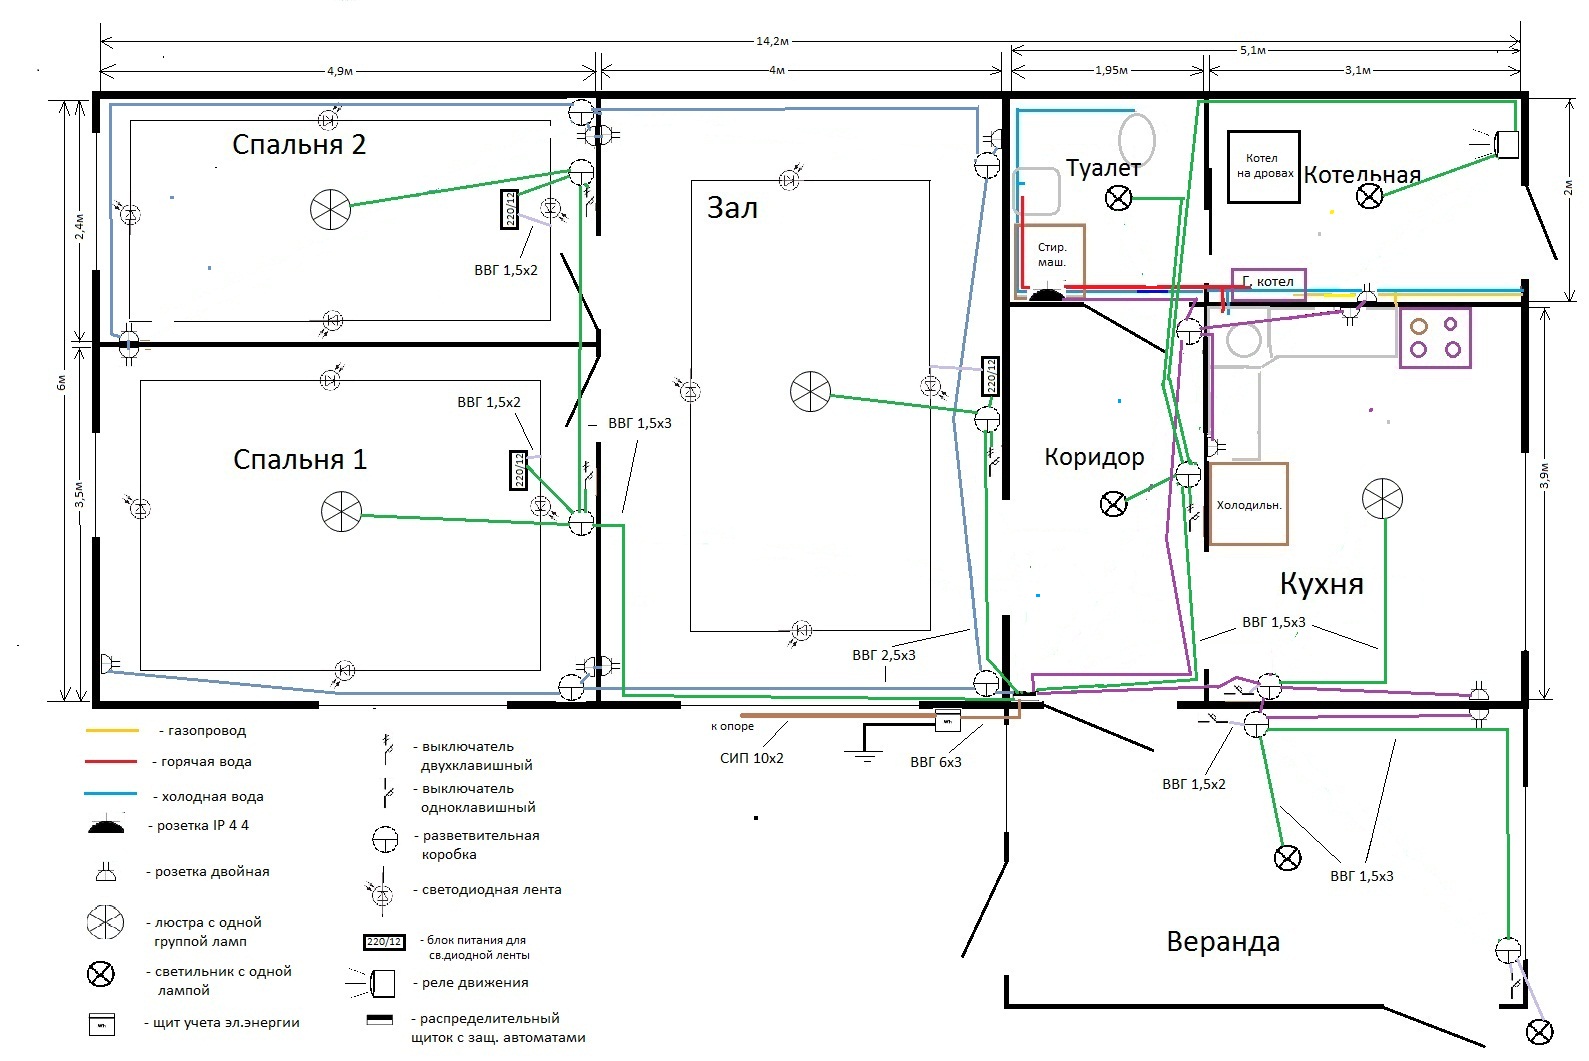
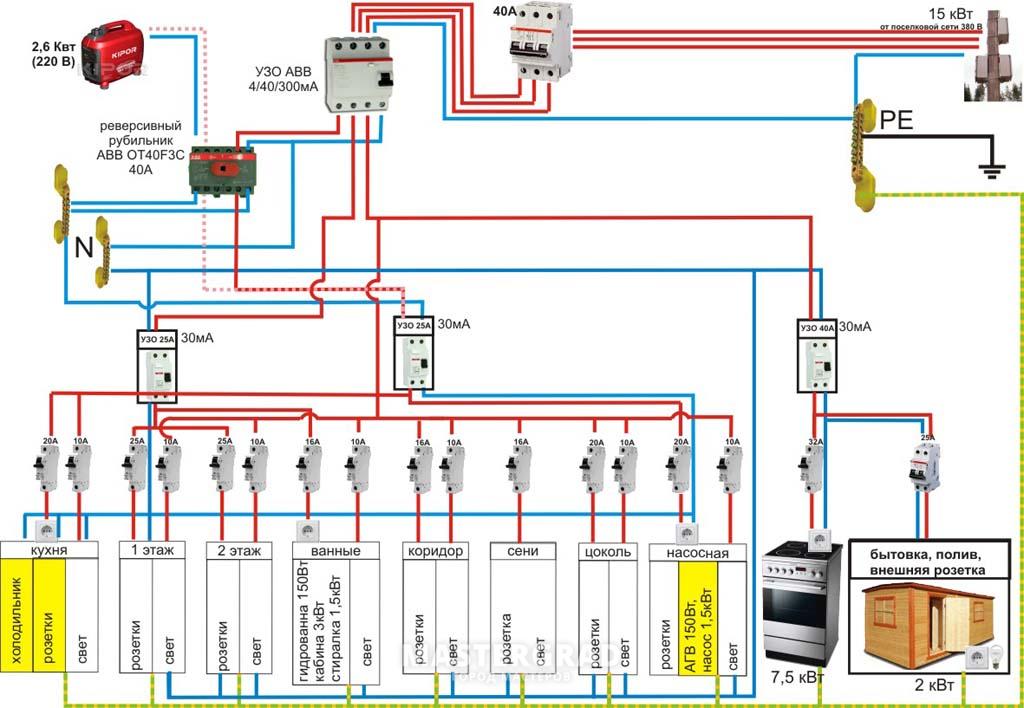
Typical wiring diagram for a private house
However, if there are doubts about your own competence in this matter, then it is better to entrust the installation of home electrical wiring to a professional. The price of a mistake here is too high, a fire that has arisen from a short circuit is able to destroy the entire cottage. Do-it-yourself wiring should be done only with clear confidence in one's own abilities and knowledge. In this case, all wiring diagrams and selected wires must comply with the rules and regulations of electrical installation.
How to calculate the electrical wiring on the site
On the adjacent territory, along the paths, sometimes even in the garden and flower garden, as well as along the perimeter of the site, there is always some kind of lighting. And if it is more convenient for some especially economical owners to use lanterns and decorative solar-powered lamps, then traditionally power lines are stretched to land plots from the nearest substation. It can be an overhead cable or an underground one, in the first case it passes through the insulators on the tops of the poles, and in the second case it goes through a special dielectric pipe buried deep in the ground.
Based on how electricity is supplied, it is necessary to calculate the continuation of the line on the site. The simplest solution is from two wires, one of which is phase and the second is zero, sometimes there may be three wires per house to provide two separate phases.A four-core input is required if there is a need for a three-phase version, if there is an appropriate consumer (industrial and professional equipment, machine). The latter type of connection can only be used after obtaining permission for it from the electricity provider.
So, let's focus on a single-phase two-wire connection to a substation, which still needs to be stretched if you do not want to pay for the work of specialists. Before calculating the electrical wiring, it should be noted that the length of the cable from the common line to your site should not exceed 25 meters, at a greater distance (and in case of strong winds in your area and at a shorter distance) you need to put a support. The height of the cable location above the roadway is at least 6 meters, it is desirable to bring an overhead line into the house at a level of 3 meters.


At the output from the substation where the transformer is located, the current usually already has a voltage of 220 V. But drops in the electrical network are a common thing, and it may turn out that some 160 V is supplied to you. To get the required voltage level, you need to install a stabilizer, as well as machines that will protect the network from overload. Their parameters are indicated in Amperes, that is, they are commensurate with current consumption. Having completed the switchboard, we place it in a place where there is no dampness.
Wires are pulled to all outbuildings, whether it be a barn or a summer shed, this can be done by air and directly, it will be more economical.It is better to provide lighting along the tracks with an underground cable, and the lights should be connected in parallel, and not in series, so that the burnout of one lamp does not turn off the entire circuit. We take a plan, and on it we mark an overhead line connecting the buildings with the distributor, and an underground cable stretching from it along the tracks (and repeating all their bends). We measure the resulting wiring and multiply its length by 2, since at least two wires are needed (double insulation is recommended on the street), for phase and zero.
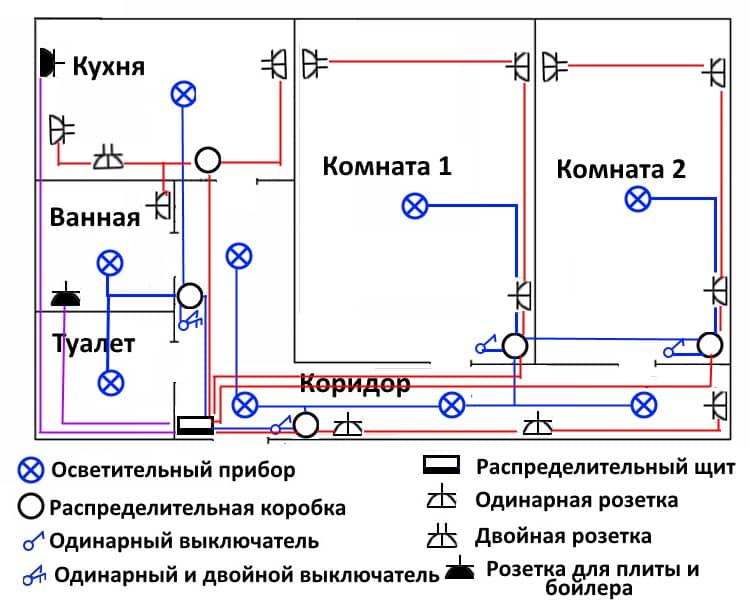
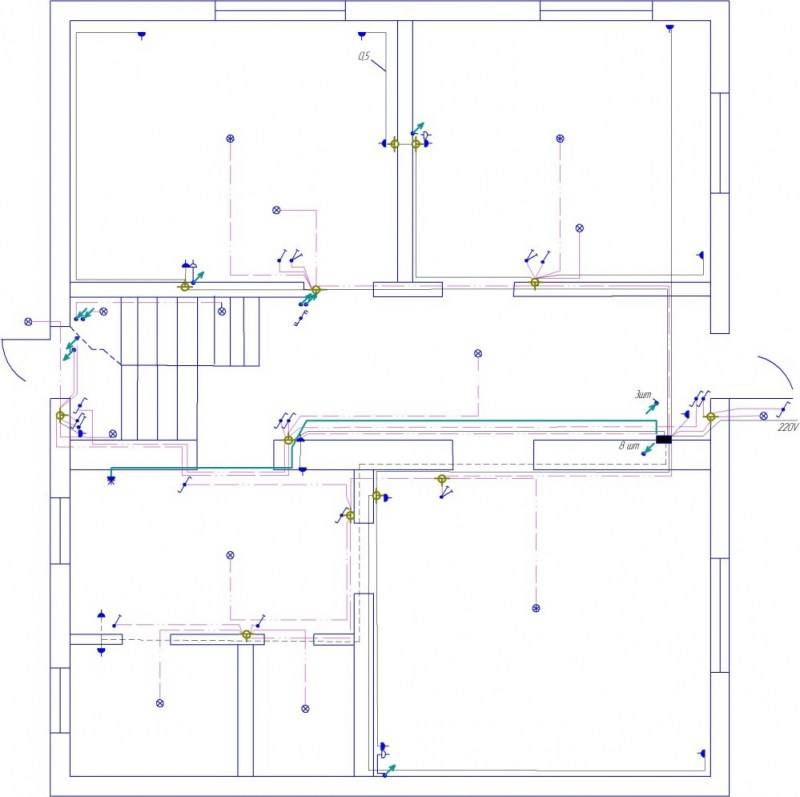
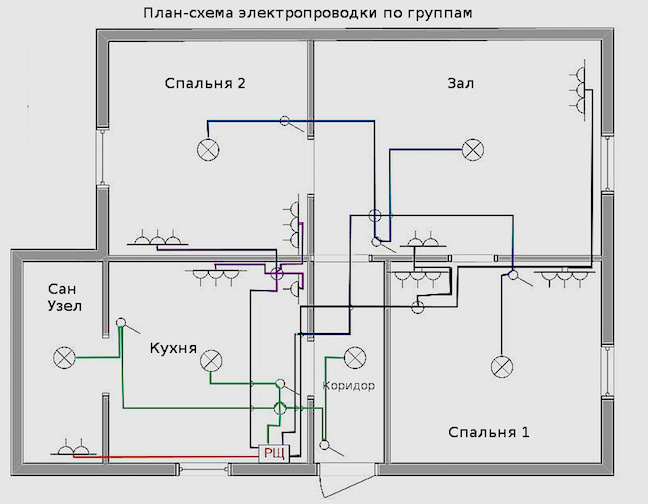
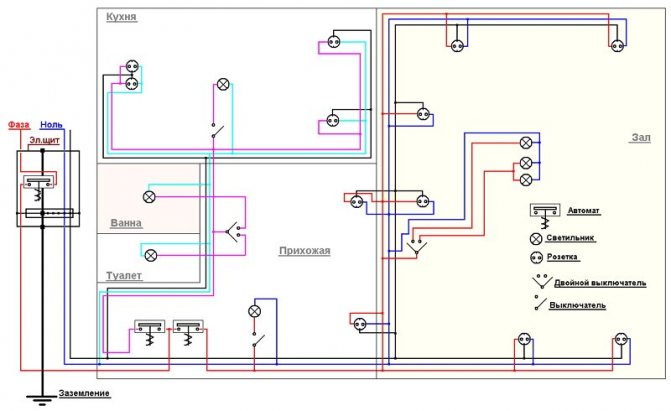
Plan and scheme of electrical wiring in the house. What are they needed for?
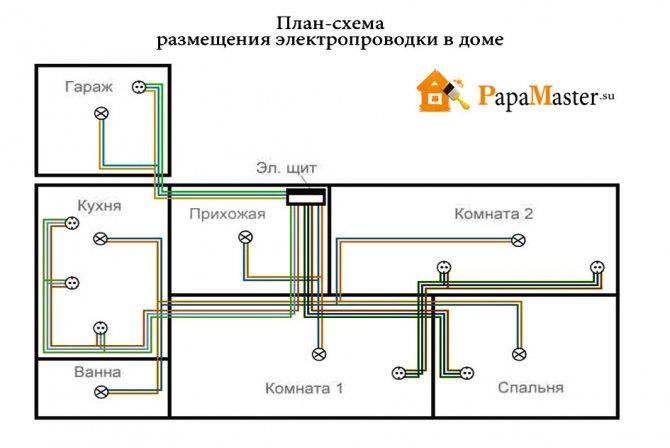
Wiring plans may look different. Most often they are presented in the form of an electrical diagram applied to the layout:

Most often, buyers of housing in multi-storey new buildings: apartments, townhouses face the problem of the lack of a plan and wiring diagram. As for the owners of private houses, they usually have such documentation available.
What should tenants of apartment buildings do? You can contact the housing department, but the best option is when the scheme is drawn up directly by you or with the help of specialists.
To draw up a wiring diagram correctly, you need to have a certain amount of knowledge, as well as at least the basics of information about electrical engineering. If you do not have such knowledge or skills, then it is better to invite a specialist. Electricians will be able to draw up a detailed plan in a short time, which will take into account all the features of your house, apartment or townhouse. In addition, professionals, if necessary, will be able to replace old wiring or an existing malfunction.
If you have an idea of \u200b\u200bwhat you will encounter when drawing up a diagram, or when developing a project, as well as when performing work in an electrical system, then you should consider that there are several options for connecting electrical circuits.
Here are the ways:
- Consistent;
- Parallel;
- Mixed.
With a sequential method, laying electrical wiring in a house or apartment is very simple: each element of the circuit will follow the previous one. This method is characterized by the absence of any nodal connections.
An example of such a connection is a Christmas tree garland, where all the elements are concentrated on one wire. True, this wiring method has a serious minus - if one element is damaged, the circuit is turned off completely.
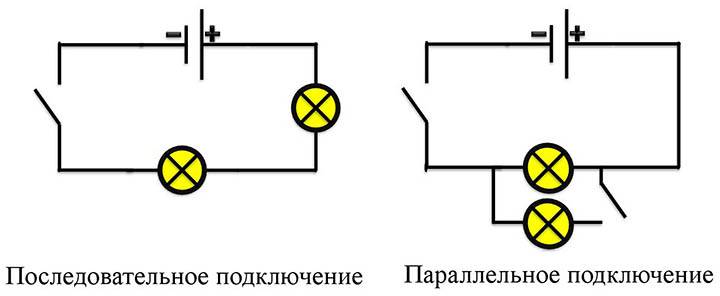
The parallel method implies that when turned on, all parts of the circuit are not connected to each other, since they are connected in two nodes. The main advantage of this method is the continuation of the functioning of the electrical wiring, even if one of the elements fails.
In the mixed method, both types of connections are used in one section of the chain.
It is very important to approach the choice of the wiring method with great responsibility, since this will determine how stable the power supply will function in the premises of the house. The number of sockets in the rooms is determined depending on the wishes of the residents. But you need to remember that one access point to the network will not be enough
Connecting the TV, air conditioner, lamps, chargers provide at least three sockets in each room to avoid the use of extension cords and tees
But you need to remember that one access point to the network will not be enough. Connecting the TV, air conditioner, lamps, chargers provide at least three sockets in each room to avoid the use of extension cords and tees
The number of sockets in the rooms is determined depending on the wishes of the residents. But you need to remember that one access point to the network will not be enough. Connecting a TV, air conditioner, lights, chargers provide at least three outlets in each room to avoid the use of extension cords and tees.
Electrical wiring in the house, first of all, must be reliable. Since the issue of comfort can be adjusted, but safety cannot. Unless you have to replace the cable and accessories, which will lead to additional monetary and time costs.


Therefore, it is not worth saving in this matter - it is better to use only high-quality equipment and hire professional electricians.
Installation of electrical wiring in a wooden house
Installation of an electric cable in a private house will require special security measures, especially if the house is wooden. Wiring in such a dwelling is made taking into account the following requirements: Self-extinguishing wires and cables with excellent insulation are used. Distribution and installation boxes must be metal.
All connections are sealed. Exposed wiring should not come into contact with walls and ceilings. It can be mounted using porcelain insulators. Hidden wiring is carried out through metal (copper) pipes, steel boxes without fail with grounding.
When using plastic corrugations and boxes, they are mounted in plaster.This type of installation is safer and looks more aesthetically pleasing. An additional step to improve the safety of a wooden dwelling is the installation of an RCD (differential relay) that reacts to current leakage and short circuit by turning off the machine.
Conclusions and useful video on the topic
You can draw up a wiring diagram in the form of a drawing made by hand, or using a computer program. An example of wiring for an apartment in a three-dimensional computer image:
Professional advice from practitioners:
The subtleties of various types of connection of sockets and switches:
It is possible to conduct an electrical network in an apartment, protecting all devices and correctly distributing the load, under one condition - if you are a qualified electrician.
It is not possible to work on the switchboard without a special permit. Therefore, you can change the outlet or connect the hood yourself, and it is better to entrust more serious work to specialists.
Do you want to share your personal experience in drawing up a diagram for the modernization or repair of power lines in an apartment? Have questions or valuable advice? Please write your comments in the box below.