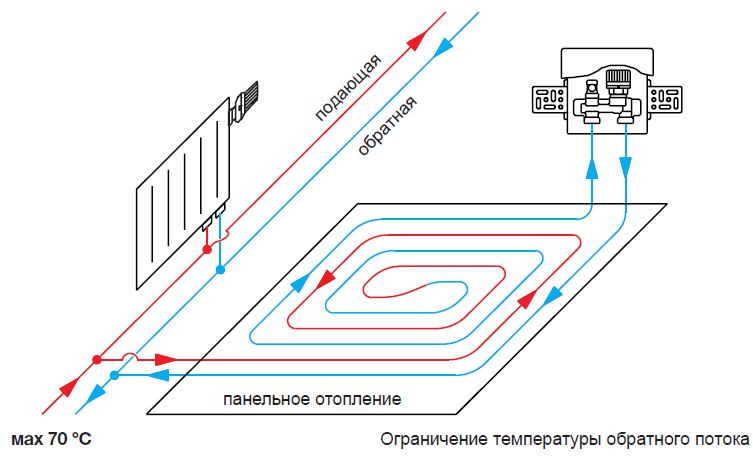
- Restrictions for ECT mounting
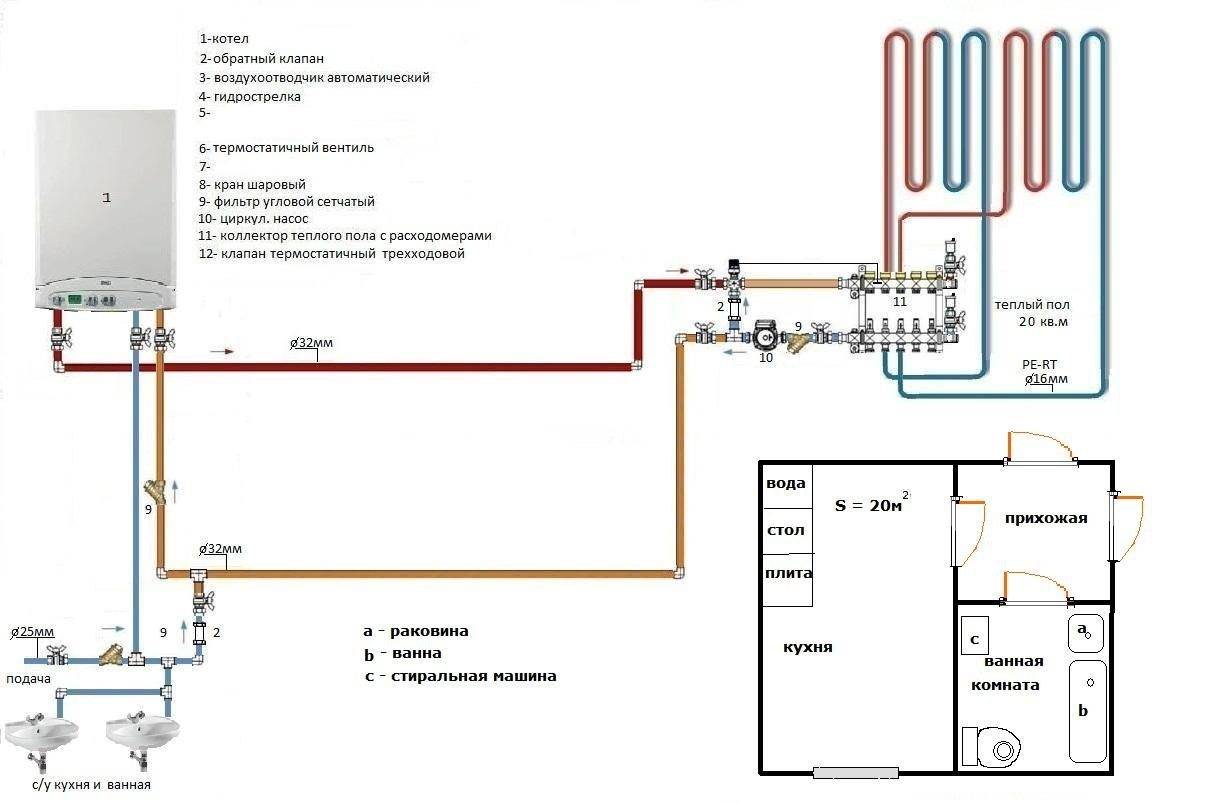
- How to connect to individual heating
- Single pipe
- Two-pipe
- Gravity
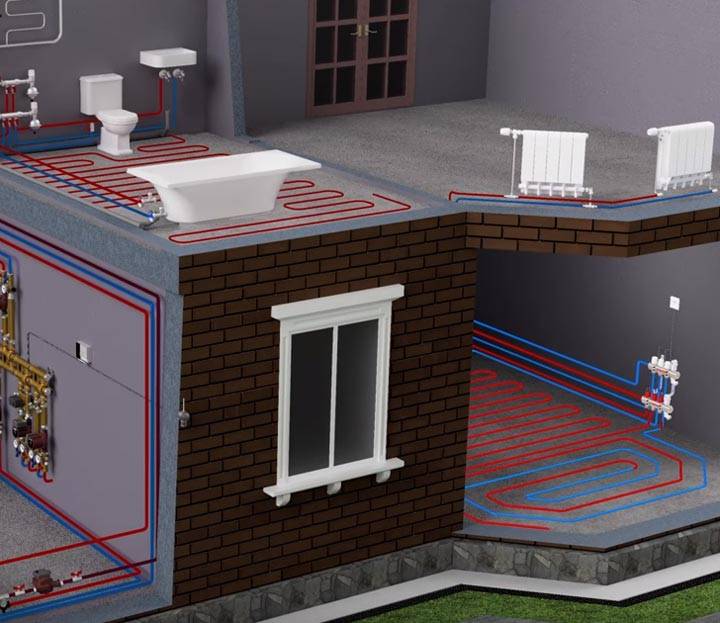
- Combined: water floor and batteries
- Types of warm floors
- The main advantages of underfloor heating:
- Warm floors are divided into 2 types:
- Peculiarities
- pouring concrete
- Serial and parallel mixing type
- Steam heating
- Laying schemes for the water circuit
- Water floor installation
- Sequence of work
- Pipe laying
- System testing
- Finishing screed
- Ceramic tile laying
- The concept of underfloor heating
- We take into account the features
- Laying schemes for the water circuit
- How does underfloor heating work from a heating boiler
- Scheme with a thermostatic kit for one loop
- Established standards for surface temperature of underfloor heating
Restrictions for ECT mounting
Manufacturers of components for underfloor heating (TP) do not always specify whether there are restrictions for installing water systems, but they do exist. In some cases, it is forbidden to mount heating structures.
Where it is not customary to install water floors:
- in apartment buildings. Centralized heating is distributed between the apartments. An additional connection in one of them will lead to heating and hydraulic imbalance.
- In public places.Floor heating is considered inefficient, since heat losses are high, and essentially economical systems become expensive during operation.
- In residential areas with insufficient thermal insulation as the main source of heat. One of the conditions for the installation of underfloor heating in the northern regions is the reduction of heat loss due to the insulation of walls and floors, as well as the installation of radiators around the perimeter of the premises, under the windows.
The combination of traditional radiator heating with underfloor heating is recognized as the most efficient heating system, and radiators remain the main sources of heat.
But sometimes the system hidden under the flooring plays a major role:
Image gallery
Photo from
Spacious rooms with panoramic windows
Children's and playrooms
Heated floors, equipped in compliance with the norms and technological nuances, are safe, hygienic and do not affect the aesthetics of the premises.
And the selected connection scheme is responsible for the functionality and ease of use, the description of which will be discussed in more detail.
This is interesting: A typical wiring diagram in a house - lay out the essence
How to connect to individual heating
There are four types of connection schemes for individual heating: single-pipe, two-pipe, gravity, combined.
Single pipe
Its other name is Leningradka. It is one of the simplest and does not require large financial investments.
To implement this scheme, one main line for hot water is needed, and the circuit increases its total length. The whole process is carried out thanks to the circulation pump.
It is installed in the center of the highway. The water floor heating circuit is mounted after the pump, and the return line is in front of it.
Regulators for control and a mixer for underfloor heating are fixed to open sections of the pipe.
Attention! The length of the circuit used in this scheme should not exceed 20–30 m
Two-pipe
It is considered the most effective for the full functioning of underfloor heating.
Unlike the previous one, this scheme implies the presence of separate pipes connected to the boiler - for supplying hot water and return.
Thanks to the use of ball valves and a mixer in an open area, it becomes possible to commission an underfloor heating system.
The contour used in this scheme should not be more than 50 m.
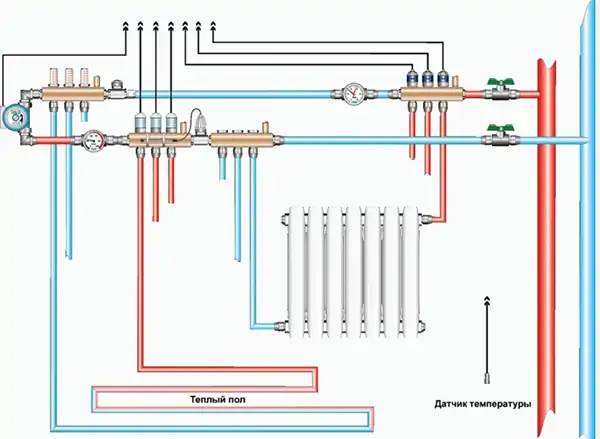
Photo 2. Two-pipe scheme for connecting a warm floor using ball valves, circulation pumps.
Gravity
Water circulates naturally through the pipeline. The connection of the circuit to this floor heating scheme is made in accordance with the main slope. The connection is made at the beginning of the room, and the return line is at the end.
The line pipe parameter should start from 3.2 cm.
The pipeline can run in the form of a snake or a spiral.
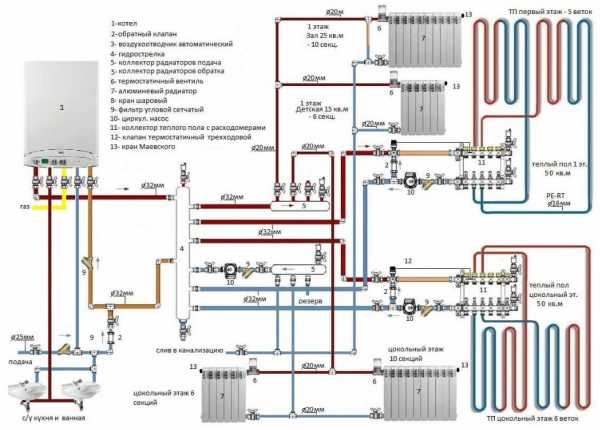
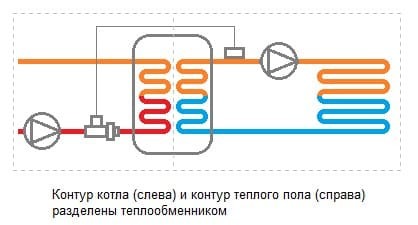
Combined: water floor and batteries
Two properties distinguish such a system: circulating and sealed.
Both components of the circuit are fixed to a common riser. The coolant goes to the floor circuit through the mixing unit. There, to maintain a comfortable floor temperature, cold water can be added to it from the return line.


After that, the coolant is separated into separate branches using collector combs. Heated floors are supplied with their own circulation pump.
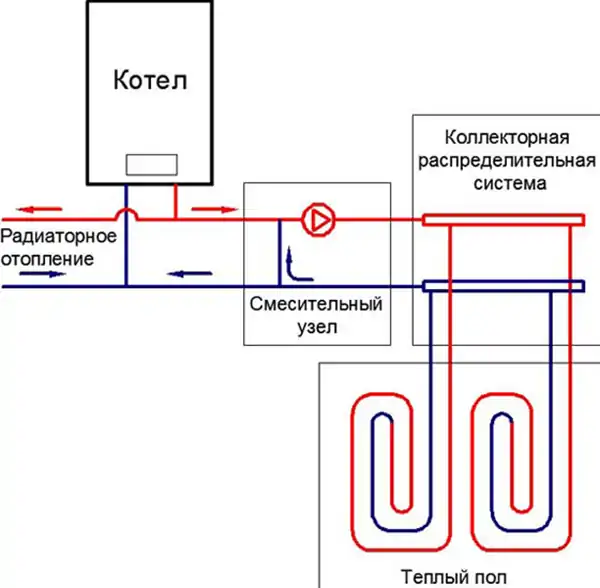
Photo 3.Combined scheme for connecting a floor with heating: with a boiler, batteries, a collector system, a mixing unit.
The nuances of the combined scheme:
- mandatory organization of the presence in the floor heating system and radiators of independent temperature conditions;
- the need to use a large number of additional components of the process;
- control of a combined system implies the presence of mixing units with thermostatic valves, weather-compensated regulation by an external controller, room sensors, etc.
Types of warm floors
Before you make a warm floor with your own hands, you need to figure out what types of heating systems are and which ones are more suitable for a particular home.
The main advantages of underfloor heating:
- uniform heating of the room;
- comfort;
- complete autonomy.
The heat generated by these floors is effectively used for space heating. How to choose underfloor heating for your home? There are different types of underfloor heating, so you can only determine which one is better by knowing all their pros and cons. Some of them are heated with hot water (water), while others are heated with electricity (electric). The latter are divided into 3 types:
- rod;
- cable type;
- film.
All floors have their own advantages and disadvantages. So the advantages of water heated floors include:
- lack of air conversion, creating a more comfortable atmosphere in the house;
- relatively low heater temperature;
- lack of damp corners, which prevents the formation of fungus;
- normal humidity in the room;
- ease of cleaning;
- self-regulation of heat transfer when the temperature changes;
- efficiency, allowing to reduce heating costs by 20-30%;
- lack of heating radiators;
- long service life (up to 50 years).
The disadvantages of water floors can only be attributed to the fact that they cannot be used in an apartment building from a central heating system and permission from the housing and communal services services is required for their installation in such buildings.
The advantages of an electric underfloor heating include the same properties as a water floor, but besides this, they still have the possibility of repairing local faults and installation without special equipment and permits.
Warm floor do it yourself
Many people think about whether laminate flooring is suitable for underfloor heating? What materials are used for floor coverings? The disadvantages of such heating systems include:
- Restriction in choosing the type of flooring. This means that its heat transfer coefficient should not exceed 0.15 W/m2K. For a decorative coating of such a floor, tiles, self-leveling floors, granite, marble, linoleum, laminate, carpet, which have a permissive marking, are suitable. Thus, a warm floor under a carpet or under a carpet can be mounted only in compliance with the above requirements.
- The need to raise the floor by 6–10 cm.
- The inertia of heating for 3-5 hours.
- The use of furniture made of natural wood, since products made of MDF, chipboard, plastic, with constant heating, can release substances harmful to humans.
- Quite high financial costs for electricity when installing electric floors.
Taking into account all the above advantages and disadvantages of underfloor heating, it is preferable to install them in small rooms: in the bathroom, corridor, toilet, kitchen, bedroom, on an insulated balcony. Most often, masters lay a warm floor under the tile. This is due to the good heat-conducting characteristics of ceramics. Water floors are more suitable for round-the-clock space heating.
Warm floors are divided into 2 types:
- Comfortable, slightly warming screed, guaranteeing a pleasant feeling when walking. Along with them, other heating systems are also used.
- Heating, when, in addition to creating comfortable conditions, they are full-fledged heating.
For apartments in multi-storey buildings, it is better to use electric underfloor heating, and in private houses - water. A warm water floor rarely gives a specific power of more than 100 W / m2, so this heating should be used in well-insulated buildings.
It is better to entrust the calculation of a water heated floor or an electrical system to specialists, since not everyone will be able to calculate all the necessary indicators in accordance with sanitary standards. Calculate how much a warm floor costs, everyone can independently, using an online calculator.
Peculiarities
Underfloor heating is a heating system located under the floor covering. It can be used as an auxiliary or main type of heating.
This design consists of several main elements:
Heat pipelines. Depending on the method of heating, they are divided into water and electric. The latter today began to be used much more often, since it is easier to work with them.Water floors are not able to work from electricity directly. The water in them is heated using various types of boilers, which should be properly connected to the pipes.
Installing a water floor is a complex procedure that not every specialist can perform. But, having mounted this system, you will get a durable and economical design.
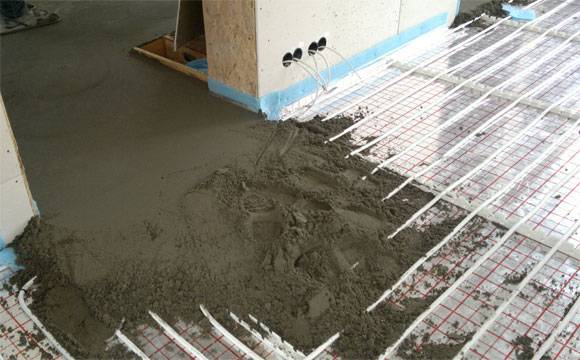
pouring concrete
How to make a warm floor in the garage - installation of electric and water floorsFor this you will need:
- Put a metal mesh on the pipeline, which will be divided into 10x10 cm cells and have a wire cross section of at least a third of a mm.
- The mesh must be mounted in such a way that the places marked with a decompression seam do not intersect with its sheets.
- The reinforcement of the resulting lattice is carried out using polymer or metal fiber, which is added directly to the concrete solution.
- It is a good idea to use self-levelling floor screeds, or a plasticizer with structural concrete, as this will give the mortar elasticity (read: "How to pour underfloor heating: installation subtleties").
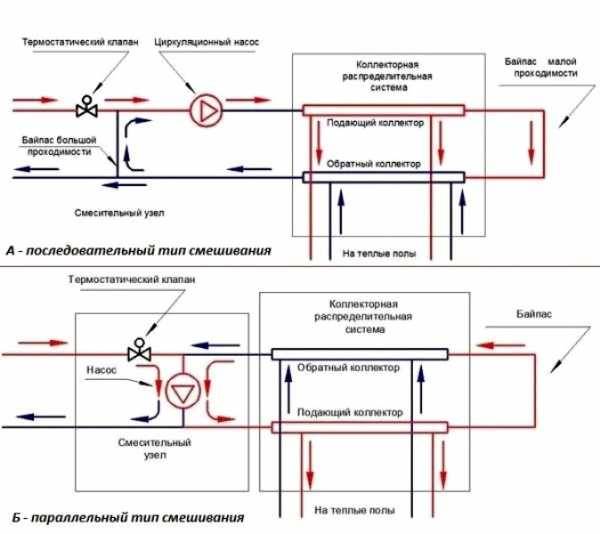
Serial and parallel mixing type
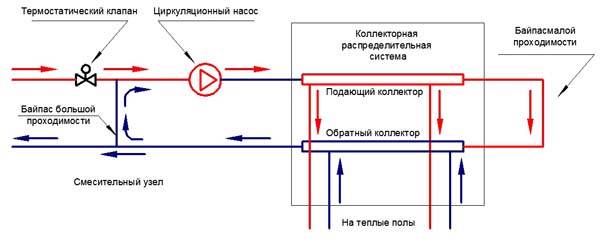
Serial connection
You can also use several types of mixing at once if necessary. Such a scheme for connecting a water-heated floor to a boiler in series has only one advantage. This option is more correct and productive from the point of view of heat engineering, because the outlet flow towards the boiler will be reduced, and its temperature will be the same as at the floor.
Parallel mixing
Another option is parallel mixing. By the way, in any scheme, you can replace the bypass with a bypass valve.It is needed so that when a certain pressure is reached, it begins to pass water through itself.
This allows you not to constantly drive water through the bypass when the circuits are in operation. If all circuits are not available, then the bypass valve opens and starts to let the flow through so that the pump does not work in load and saves electricity.
When might you need to close circuits? For example, in houses where there is climate control, it can block them when the optimum temperature is reached.
When all circuits are shut off, a bypass with bypass valve will help supply the pump with flow. The bypass valve is mechanically adjusted to the required pressure at which it will begin to operate.


Such a system has a drawback: the outlet water will be equal to the temperature entering the warm floor.
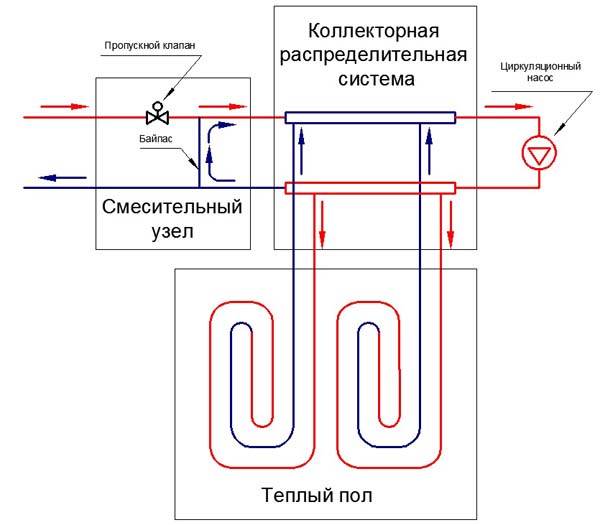
A few more schemes about connecting a water-heated floor to a heating system are shown in the photo:
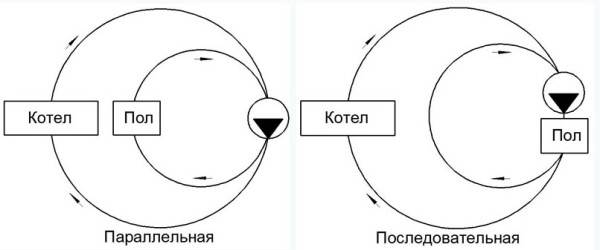
Comparison of two installation schemes
In the diagram, the contour is indicated by the word "floor", and the arrows show the direction of the water flows. Which of the two schemes will be better? The answer is simple: in a serial system, all the work of the pump will be directed to supplying the underfloor heating circuit, and in a parallel one, it will work less efficiently due to the inlet circulation.
If you want to get the maximum effect from the operation of the pump on the circuits, then you should definitely choose the first connection method. Another advantage of the serial connection method is that you can connect many more circuits, and the pump will not share power with other circulation rings.
Steam heating
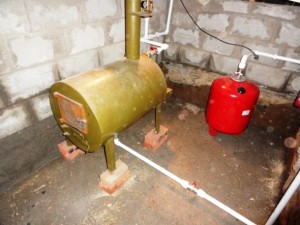
Heating with a membrane tank
Sometimes steam heating is associated with water-based space heating structures.And here, in fact, there is no mistake, but there is one caveat: steam is water heated to a boil.
Thus, the principle of operation of a steam heating system is that the water in the boiler is heated until steam is formed, and then this coolant enters the heating elements through pipes.
Heating system with coolant in the form of steam, consists of the following structural elements:
- a heat generator, presented in the form of a boiler, which heats water and accumulates steam;
- an exhaust valve that controls the flow of steam into the system;
- main pipes;
- heating radiators.
It is important to know: when installing a steam heating structure, the use of plastic pipes is strictly prohibited. As for the classification of steam heating, it is absolutely similar to water heating heating systems. As for the classification of steam heating, it is absolutely similar to water heating heating systems.
As for the classification of steam heating, it is absolutely similar to water heating heating systems.
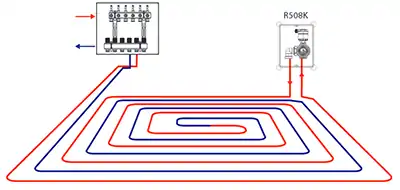
Laying schemes for the water circuit
If the installation of warm water floors is carried out according to the knurled, traditional technology in a clear sequence, then the laying of the heating pipe can be performed in various variations. The main goal pursued when equipping heating floors is to uniformly heat the entire area of the heated room. Laying the pipeline just the way you want means deliberately creating problem areas in the entire structure. The coolant, as it is consumed, tends to quickly lose temperature, so the pipes must be laid, starting from the walls, then moving towards the entrance to the room or to its center.For this, specially designed optimal schemes for laying the water circuit, each of which has its own characteristics.
The mixing unit and manifold are the beginning of the entire heating system. Water circuits are connected in a clear sequence. The beginning of the pipeline is to the inlet pipe, the end of the pipe is connected to the check valve.
You can mount a warm floor with your own hands, water, the contour of which will be laid as follows:
- pipe installation according to the snake scheme "
- laying the pipeline according to the snail scheme;
- combined scheme.
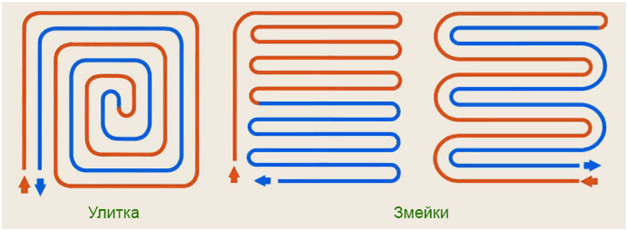
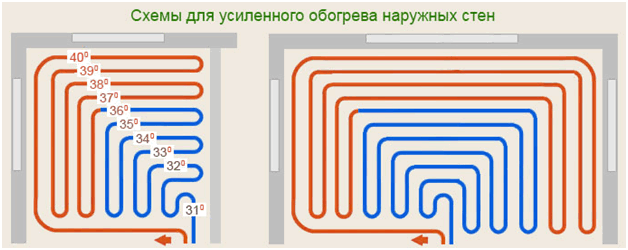
When installing heating in corner rooms, a pipe laying scheme for enhanced heating is used.

In each individual case, we can talk about the advantages of a particular scheme. For example: the snail is the simplest pattern. The bend of the pipe here reaches 900, while in the snake the heating pipe will be bent by 1800.
Where heated rooms have a linear slope, it is better to mount the pipe according to the "snake" scheme. The pipeline is laid in the direction from the mixing unit towards the slope. Air congestion in this embodiment is easily removed, which cannot be said about a pipe laid according to the “snail” scheme. In sloping rooms, removing air pockets can be problematic.
For large areas where it is required to use several water circuits of the same length for heating, the “snake” pipeline laying scheme is very convenient. Thanks to this method of installation, it is possible to achieve a balanced operation of the entire heating system.
The heating pipes laid on the prepared base are connected to a manifold that distributes the coolant supply to the system.The distribution cabinet together with the mixing unit is installed either in the heated room or next to it, which significantly reduces the number of pipes and the consumption of other materials. The bends of the water pipe at the point of connection to the collector are sewn into a special protective box.
In each case, a certain order of laying the water pipe should be followed. When working with the snail scheme, the pipe is first laid along the perimeter of the walls, after which a turn follows from the farthest wall. In the opposite direction, the pipe is laid in a spiral, reaching the center of the heated room. For the snake circuit, the laying of the water circuit is as follows. The pipe lies along the perimeter of the walls, after which uniform bends are made in the opposite direction.
Used in some cases, combined installation schemes for heating pipes for underfloor heating, involve the simultaneous use of both options. One half of the room can be heated by a serpentine water circuit, while the other half of the room will be heated by a volute pipe.
Water floor installation
To install the system with your own hands, you will need the following materials and tools:
- pipes;
- valves;
- fitting;
- clips;
- pump;
- reinforced mesh;
- collector;
- damper tape;
- waterproofing materials;
- thermal insulation materials;
- construction tape;
- fasteners;
- a set of screws;
- perforator;
- roulette;
- building level;
- screwdriver;
- wrenches.
Sequence of work
First of all, it is necessary to clean the surface from dirt, all kinds of bulges and small cracks. The quality of the surface leveling should be checked with a building level, since if the surface is uneven, the balance of heat transfer may be disturbed.
The next step is to install the collector, where the main components of the system will be located. When installing the cabinet, you need to choose the correct height from the floor surface in order to avoid problems with pipe kinks.


Collector for water floor heating
After installing the switch cabinet, you need to start laying the waterproofing. The cheapest cost is polyethylene, which is overlapped. The seams are joined with adhesive tape.
Next is the insulation. As heat-insulating materials, you can use:
- foamed foil polyethylene;
- extruded polystyrene foam;
- foam plastic (thickness in the range of 50-100 millimeters).
After laying the heat-insulating material, you need to decompose the damper tape. It is designed to compensate for the expansion of the screed due to surface heating.
Damper tape laying
Next, a reinforcing mesh is placed. It is needed to strengthen the screed. If you use special plastic puffs, the pipes can be attached to the reinforcing mesh, which will save on the purchase of clips.
Reinforcing mesh for underfloor heating
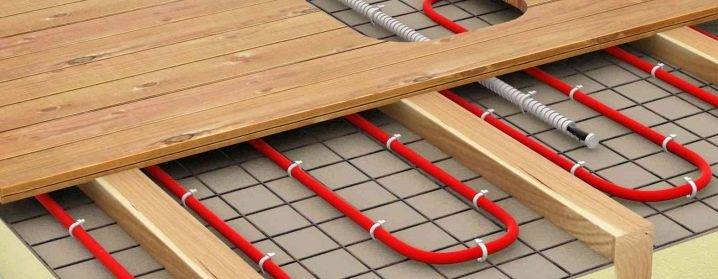
Pipe laying
When laying pipes, you can use one of three main methods: double helix, ordinary helix or "snake". It is better to use a spiral in interior spaces, and where there are windows it is better to use a “snake”. Pipe laying starts from a colder wall - this will allow the heated air to be distributed more evenly.
Underfloor heating pipe laying scheme
For rooms that have a balcony, loggia, veranda or attic, an additional circuit will be required, otherwise there will be serious losses of thermal energy.
During installation, the pipe must be connected to the switch cabinet. Also, the pipe is joined to the return manifold. At the joints of the pipe, corrugated gaskets should be worn.
System testing
After creating a warm floor, it is necessary to carry out a hydraulic test (pressure test). This is necessary to identify defects in the system. To do this, the system is filled with water at a pressure 1.5 times higher than normal. Testing can also be done with an air compressor. The test period is one day. If leaks and other pipe defects are not detected, you can start creating a screed.
Finishing screed
The thickness of the screed under the tile can vary between 3-6 centimeters. Laying tiles can be done only one month after the creation of the screed. To speed up the drying of the screed, you can turn on the heating system, but the temperature should not be higher than 30 degrees.
The screed can be made in one of two materials:
- sand-cement mortar (an economical option, but it will take 25 days to dry such a screed);
- self-leveling mixture (dries 10 days).
Until completely dry, the screed must be under high pressure. After the mortar has hardened, you can start laying the tiles with your own hands.
Ceramic tile laying
Laying ceramic tiles on underfloor heating
The process of laying tiles with your own hands on a water floor is the same as when working with other surfaces. It can only be noted that it is more convenient to use smooth tiles. A layer of glue is applied using a special notched trowel.After applying the tile to the surface, it must be carefully pressed and held for a while. The seams must be very even, so it is better to use special crosses. Grouting is done only after the glue has completely dried, which can take up to 2 days.
During the laying of tiles, the water floor should not be turned on. Its functioning is possible only after grouting.
If you follow the instructions, then creating a warm floor is quite possible on your own. Although this work is very laborious, the result will justify the effort. A properly installed water-heated floor will serve the inhabitants of the house for many years.
The concept of underfloor heating
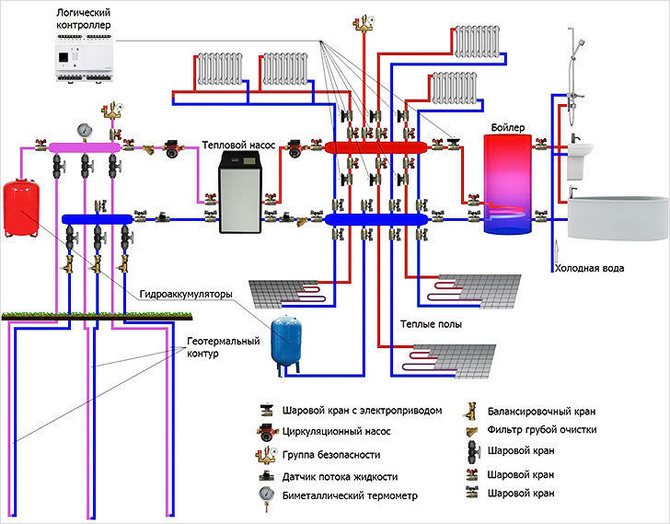
Laying of warm flooring and warm water floors in an apartment in European countries has been done since the 80s of the last century. In Austria, Switzerland and Germany, a water heated floor in an apartment is installed in 60% of houses. Different energy sources are connected to heating for underfloor heating:
- infrared emitters;
- heating electric cables;
- PLEN device, films with built-in electric spiral and others.
The warm floor and the technology of its execution in this case provides for heating through a laid pipeline with a hot liquid, most often it is water, sometimes antifreeze or antifreeze is used. Laying a water-heated floor requires laying pipes evenly over the floor surface.
During circulation, the liquid in the heating system passes through a centralized heating source, gives off heat to the concrete, and then the air is heated. The technology of laying a water-heated floor provides for heating water with an autonomous boiler, or heated floors in an apartment are connected from central heating.In both cases, the inclusion and installation of a water-heated floor can be done by hand.
Modern technologies simplify the installation of a water-heated floor. Pipes are used, the configuration of which is based on the molecular memory of cross-linked polyethylene. This reduced the cost of materials, the connection scheme for a water-heated floor and the installation technology became simpler, and reliability increased.
Installing and pouring a warm floor is not a difficult process; it is quite possible to make a warm water floor with your own hands. For this, several methods and special materials have been developed. People are interested in how to connect the warm floor of the room to the heating system, how to implement this project on their own.


We take into account the features
In order to analyze in more detail the schemes for connecting a warm floor with a liquid coolant, let's recall some of the features of this heating system.
- First, the recommended temperature in the system should be 35-45˚C. Not more. Temperature options in heating radiators for underfloor heating are not suitable. This means that at the water inlet to the system, it is necessary to provide a mechanism for regulating (reducing) the temperature of the coolant.
- Secondly, the circulation of the coolant in the system must be constant. At the same time, the speed of its movement should not exceed 0.1 m per second;
- Thirdly, the temperature difference of the coolant at the inlet and outlet should not exceed 10˚C;
- Fourthly, the water heated floor system should not affect other heating systems, as well as the house's water supply system.
Laying schemes for the water circuit
If the installation of warm water floors is carried out according to the knurled, traditional technology in a clear sequence, then the laying of the heating pipe can be performed in various variations.The main goal pursued when equipping heating floors is to uniformly heat the entire area of the heated room. Laying the pipeline just the way you want means deliberately creating problem areas in the entire structure. The coolant, as it is consumed, tends to quickly lose temperature, so the pipes must be laid, starting from the walls, then moving towards the entrance to the room or to its center. For this, specially designed optimal schemes for laying the water circuit, each of which has its own characteristics.
The mixing unit and manifold are the beginning of the entire heating system. Water circuits are connected in a clear sequence. The beginning of the pipeline is to the inlet pipe, the end of the pipe is connected to the check valve.
You can mount a warm floor with your own hands, water, the contour of which will be laid as follows:
- pipe installation according to the snake scheme "
- laying the pipeline according to the snail scheme;
- combined scheme.
When installing heating in corner rooms, a pipe laying scheme for enhanced heating is used.
In each individual case, we can talk about the advantages of a particular scheme. For example: the snail is the simplest pattern. The bend of the pipe here reaches 900, while in the snake the heating pipe will be bent by 1800.
Where heated rooms have a linear slope, it is better to mount the pipe according to the "snake" scheme. The pipeline is laid in the direction from the mixing unit towards the slope. Air congestion in this embodiment is easily removed, which cannot be said about a pipe laid according to the “snail” scheme.In sloping rooms, removing air pockets can be problematic.
For large areas where it is required to use several water circuits of the same length for heating, the “snake” pipeline laying scheme is very convenient. Thanks to this method of installation, it is possible to achieve a balanced operation of the entire heating system.
The heating pipes laid on the prepared base are connected to a manifold that distributes the coolant supply to the system. The distribution cabinet together with the mixing unit is installed either in the heated room or next to it, which significantly reduces the number of pipes and the consumption of other materials. The bends of the water pipe at the point of connection to the collector are sewn into a special protective box.
In each case, a certain order of laying the water pipe should be followed. When working with the snail scheme, the pipe is first laid along the perimeter of the walls, after which a turn follows from the farthest wall. In the opposite direction, the pipe is laid in a spiral, reaching the center of the heated room. For the snake circuit, the laying of the water circuit is as follows. The pipe lies along the perimeter of the walls, after which uniform bends are made in the opposite direction.
Used in some cases, combined installation schemes for heating pipes for underfloor heating, involve the simultaneous use of both options. One half of the room can be heated by a serpentine water circuit, while the other half of the room will be heated by a volute pipe.
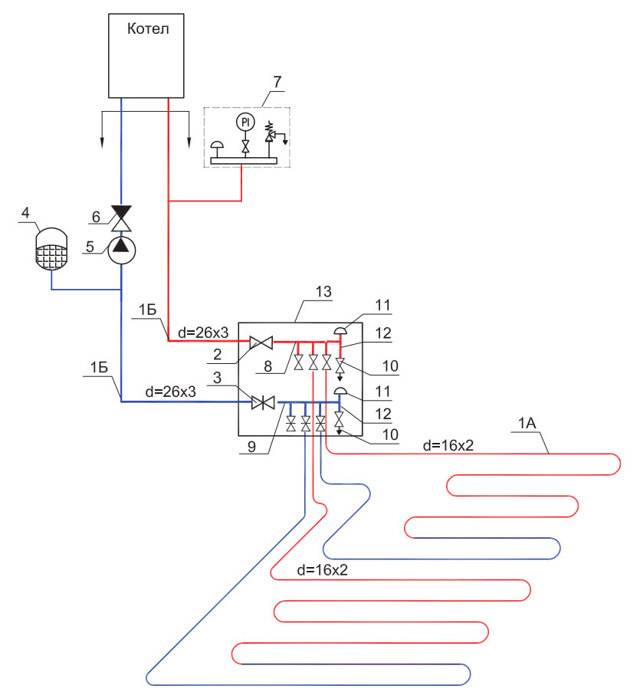
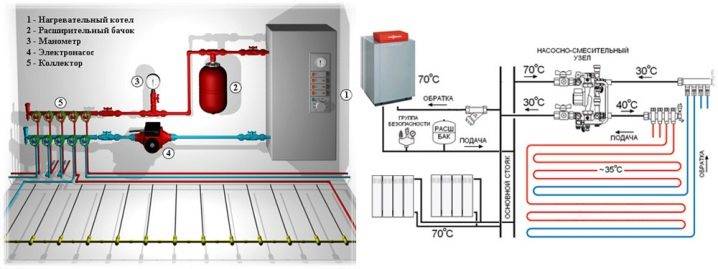
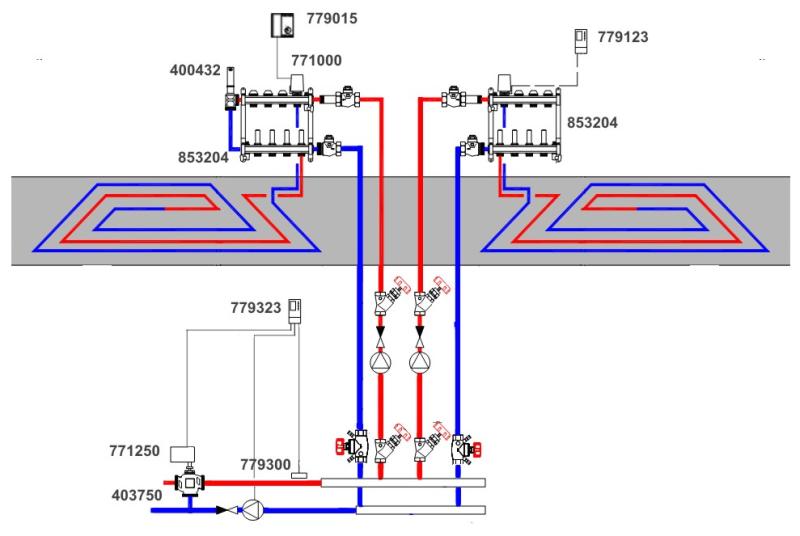
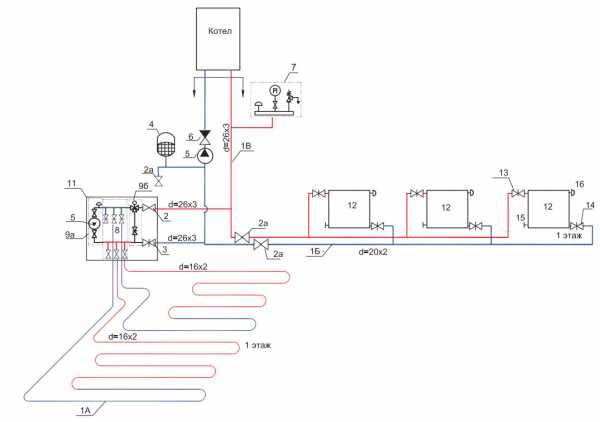
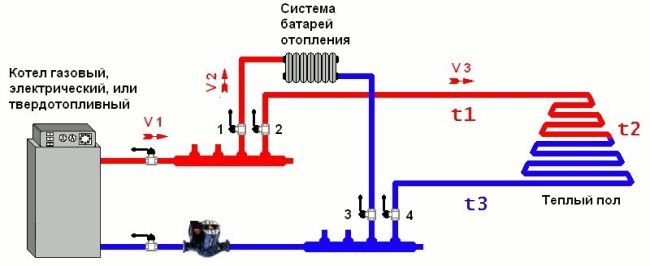
How does underfloor heating work from a heating boiler
The range of work that needs to be done to power the warm floor from the heating boiler is no different from that when crashing into a centralized route
You only need to pay attention to the following factors:
- Presence of a security group. If it is absent in the design of the boiler, then the group will need to be installed in accordance with the design standards for heating networks.
- Insertion of the collector node. This element will allow you to distribute the coolant flow between the radiators and the underfloor heating in the required proportion.
- Installing a circulation pump. If it is not built into the boiler, then you will have to spend some money on the purchase, which guarantees the efficiency of heat supply and its uniform distribution throughout all rooms of the building.
Nuance - any modifications carried out on central heating must be agreed and accompanied by a certain set of documents, one of which is an approved and agreed design solution. Buying a boiler will be an expensive pleasure, but it will allow you to avoid many troubles with licensing authorities.
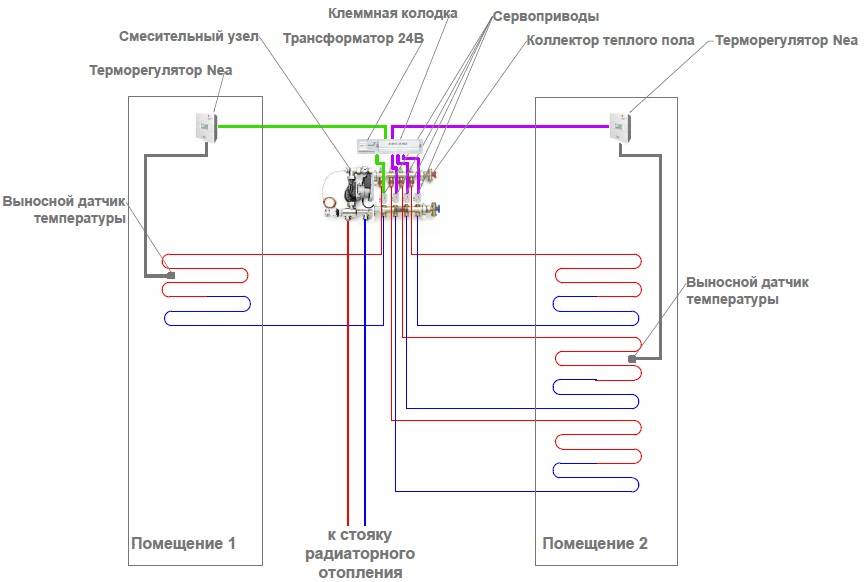
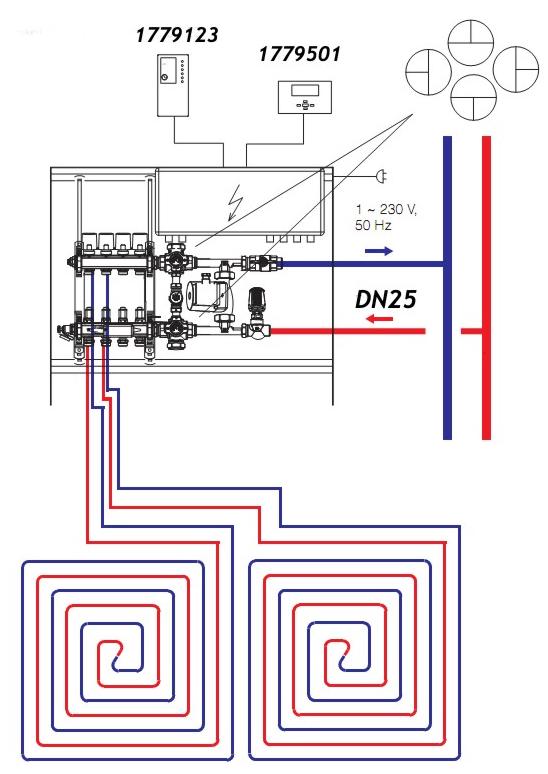
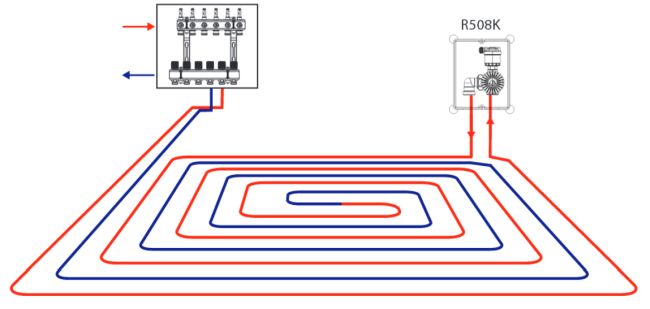
Scheme with a thermostatic kit for one loop
This heating system is implemented using small thermal installation kits. They were originally designed to attach only one single loop.
Here you do not have to fence complex collectors, mixing groups, etc. It is designed for heating rooms with a maximum area of 15-20m2.
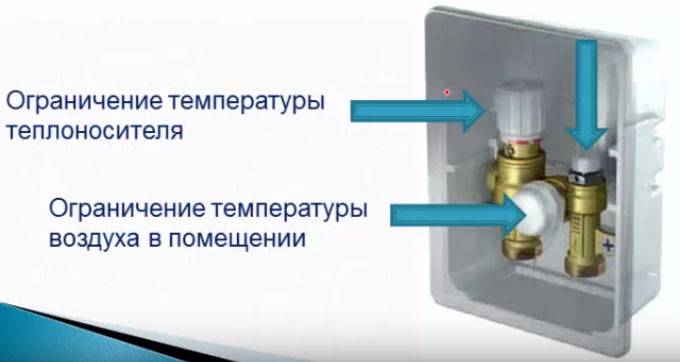
It looks like a small plastic box in which are mounted:

coolant temperature limiter
limiter reacting to the ambient temperature in a heated room
air vents
Most often, people use such kits in 3 cases:
12
In order not to pull one single loop from the first to the second floor, plus use air vents there, you can use this inexpensive solution.
3
Again, as an alternative, you can use a thermostatic kit.
In all three cases, you simply connect it directly to the nearest radiator, riser or heating manifold. As a result, you automatically get a finished floor heating loop.

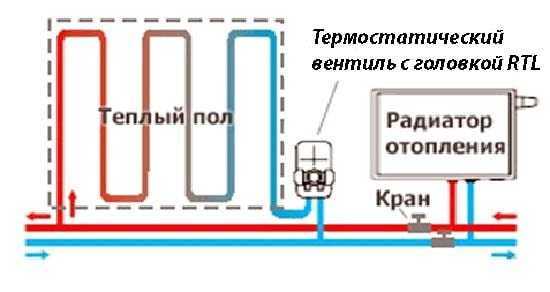


Disadvantages of this kit:
low comfort - if you properly heat the boiler, your floor will be constantly overheated
Of course, you can also supply cooled water from the buffer tank, but then we come to the previously considered scheme No. 1. This kit is designed to be connected specifically to a high-temperature system, with PERIODIC supply of hot water to the warm floor.
A portion of water was served, the thermal head blocked the flow. Then the water cooled in the loop, the next portion was served, and so on. If the coolant is low-temperature, then no kit is needed.
By the way, it can be connected not only to underfloor heating, but also to a system of warm walls, or to separate heating radiators.
More details about the operation of the system can be found in the product passport - download.
the second drawback is that the kit will only work effectively in a two-pipe system
In a single-pipe it will be quite difficult to adapt. You will have to mount a bypass and a balancing valve.
Advantages:
the easiest installation of all the above schemes
Applicability - in small rooms with a rare stay of people. Basically, these are bathrooms, a corridor, a loggia.
To understand which of the schemes is better and most suitable for your case, you can compare all their disadvantages and advantages, brought together in one general table.
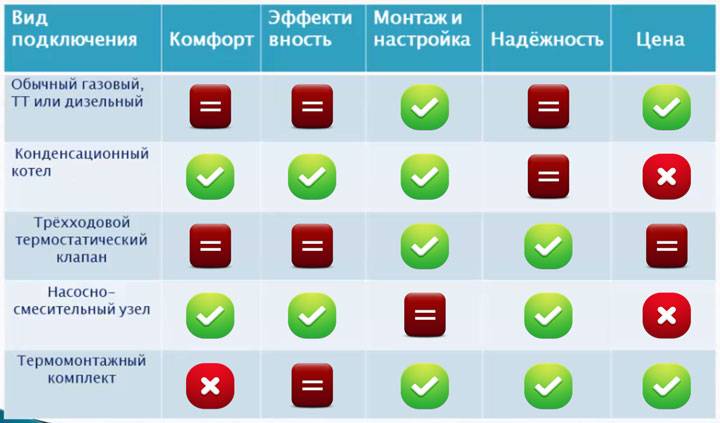
After weighing all the pros and cons, you can choose the one that best suits your needs and capabilities. Then feel free to proceed with the installation or invite specialists to carry out repair work.
Established standards for surface temperature of underfloor heating
In the reference book of Building Norms and Rules (SNiP), strict regulations are established on the account of what the floor temperature should be. According to paragraph 44-01-2003, the maximum and minimum temperature of the warm floor should be in the range of 26 and 35 ° C.
The minimum point of 26°C should only be set if the room is permanently occupied. If visitors rarely enter the room, then the optimum temperature should be at around 31 ° C. This value is usually set for bathrooms, pools and bathrooms, where a comfortable temperature for the feet is most needed. The main limitation is that the temperature along the heating axes should not exceed the allowable 35 ° C, a higher temperature will cause unwanted overheating of the system and flooring.
For a parquet surface, the maximum value is 27 °C. This is due to the characteristics of the material and its thermal properties, overheating of such a floor covering can lead to its deformation.
For a comfortable stay in the room, 22-24 ° C is enough. This temperature is pleasant for the feet and evenly heats the air in the room. Unlike classic batteries, the air temperature will be maximum over the entire height of the site.In practice, a coolant value of 30 °C is rarely achieved.
As a rule, all parameters are calculated at the stage of designing a heated surface. Before installing water and electric heating systems, their tasks and indicators of heat loss in the room should be taken into account.


