- Soldering and assembly of panels
- Necessary materials and tools
- Assembly steps
- Device mount
- Operating rules
- Types
- On/Off
- PWM
- MPRT
- Installation of solar panels and auxiliary electrical equipment
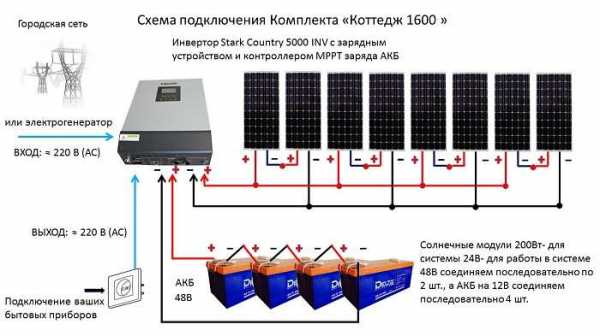
- Connecting solar panels to the network
- Step 5: Inverter selection
- What to pay attention to when installing
- Solar battery connection diagram
- Conclusions and useful video on the topic
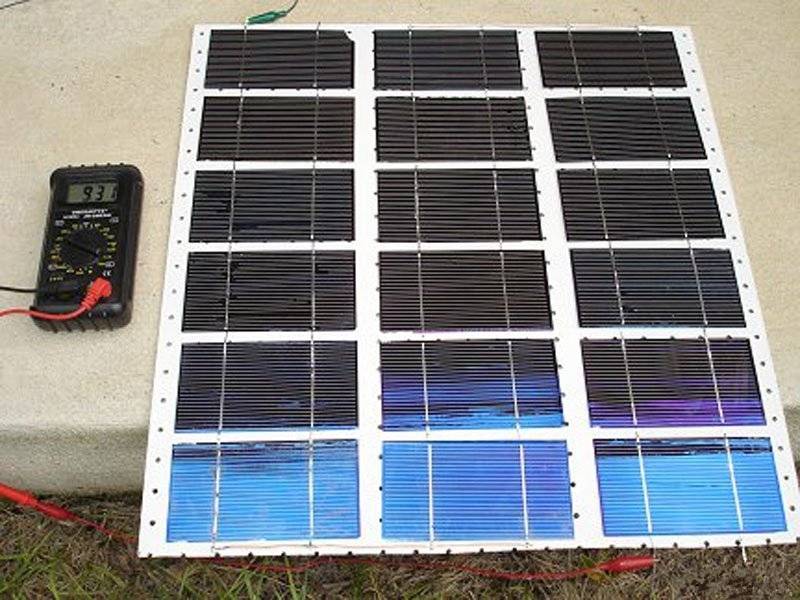
Soldering and assembly of panels
Do-it-yourself solar panel assembly can be divided into three stages:
- Frame manufacturing;
- Soldering photoelectric converters;
- Installing them in the frame and sealing.
The frame can be knocked down from wooden planks or welded from aluminum corners. One way or another, its dimensions, shape and choice of materials for manufacturing directly depend on how it will be mounted.

Necessary materials and tools
For solar panel assembly you will need the following materials:
- aluminum or steel corner section 25x25;
- bolts 5x10 mm - 8 pcs;
- nuts 5 mm - 8 pcs;
- glass or polycarbonate 5-6 mm;
- glue - sealant Sylgard 184;
- glue - sealant Ceresit CS 15;
- polycrystalline converters;
- flux marker (a mixture of rosin and alcohol);
- silver tape for connecting to panels;
- tire tape;
- thin solder;
- foam rubber - 3 cm, sawdust or shavings;
- dense polyethylene film 10 microns.

Tools needed for assembly:
- file;
- hacksaw with blade 18;
- drill, drills 5 and 6 mm;
- wrenches;
- soldering iron.

Assembly steps
The assembly consists of several stages:
First you need to decide on the dimensions of the frame frame. They will depend on the dimensions of the panels themselves and their number. When solar panels are located on the roof, the panels can completely cover the slope or occupy a small part of it - there are no specific rules, so the assembler chooses the width and length of the frame.
It is necessary to install glass on top of the frame in order to protect the photocells from destruction. You can fix it with a thin layer of silicone sealant, but it is better not to use epoxy resin for these purposes, since it will be extremely difficult to remove the glass if repairs are necessary and not damage the panels.
When connecting solar panels to the network, it is better to choose a mixed scheme, since it is optimal. The assembled panels are stacked in a previously prepared frame
At this stage, it is important not to confuse the back of the panel with the front.
To protect the back of the battery during assembly, you can make a foam mat and wrap it in plastic wrap. Sawdust or shavings are also suitable, but the main thing is that their particles do not remain on the elements.
After that, you need to remove the air bubbles that form between the photocells and the glass, as their presence will interfere with the effective operation of the battery. To do this, you need to lay a load on the panel, and a solid sheet of plywood on a soft mat
Thus, the photocells are clamped and so they need to be left for half a day. Then the load is removed, and the plywood and mat are removed.It is still too early to mount the battery after that, it is necessary that the sealant is completely seized.
The last stage is the manufacture of the back wall of the battery from chipboard or fiberboard with a substrate - this will prevent the panels from deforming.
To do this, you need to lay a load on the panel, and a solid sheet of plywood on a soft mat. Thus, the photocells are clamped and so they need to be left for half a day. Then the load is removed, and the plywood and mat are removed. It is still too early to mount the battery after that, it is necessary that the sealant is completely seized.
The last stage is the manufacture of the back wall of the battery from chipboard or fiberboard with a substrate - this will prevent the panels from deforming.
Device mount
 Solar panels connection diagram (Click to enlarge) Solar panels must be fixed at four points in a quality manner, and this must be done on the long side, in order to avoid damage.
You will be able to choose the most convenient way for mounting photocells:
- clamps;
- bolts through the holes at the bottom of the frame.
It is not necessary to make new holes in order to attach the panel, usually the frames already provide for all options. If you damage the panel in any way or drill additional holes in it, your warranty will no longer apply.


This is interesting: Wiring diagram for a single-gang switch: let's learn together
Operating rules
One purchase and installation for happiness will not be enough - you should definitely familiarize yourself with the rules for using solar energy collection systems and batteries. In order to save the energy carrier, it is necessary to ensure the maximum possible transmission of electricity from the solar receiver to the final consumer.Batteries should only be used to store electricity. In this case, the service life will be artificially increased. The same purpose will be protected from shaking and other undesirable influences.
Should be kept temperature controlled batteries. In the event of an increase, it may be necessary to add water or additional maintenance. As a result of lowering the temperature, the electrolyte may thicken. Both options can lead to rapid exhaustion, interruptions in work. This means that the owner is waiting for additional costs for unplanned repairs. Deep discharging and charging the device from the solar panel leads to a reduction in capacity. This causes premature failure of the batteries. You can prevent an unpleasant end with the help of modern components of the system.

Over time, the installed system may need to be upgraded. In this case, you should once again study the technical characteristics of the existing equipment.
It is important to understand what can be reused. Faulty and unusable elements must be replaced either with exactly the same ones or with appropriate analogues.
Do not neglect the possibility of retrofitting and improving the solar system in order to increase efficiency.
About how to choose battery for solar batteries, see the next video.
Types
On/Off
This type of device is considered the simplest and cheapest. Its only and main task is to turn off the charge to the battery when the maximum voltage is reached to prevent overheating.
However, this type has a certain disadvantage, which is to turn off too early. After reaching the maximum current, it is necessary to maintain the charge process for a couple more hours, and this controller will immediately turn it off.
As a result, the battery charge will be around 70% of the maximum. This negatively affects the battery.
PWM
This type is an advanced On/Off. The upgrade is that it has a built-in pulse-width modulation (PWM) system. This function allowed the controller, when the maximum voltage was reached, not to turn off the current supply, but to reduce its strength.
Because of this, it became possible to almost completely charge the device.
MPRT
This type is considered the most advanced at the present time. The essence of his work is based on the fact that he is able to determine the exact value of the maximum voltage for a given battery. It continuously monitors the current and voltage in the system. Due to the constant acquisition of these parameters, the processor is able to maintain the most optimal values of current and voltage, which allows you to create maximum power.


If we compare the MPPT and PWN controller, then the efficiency of the first one is about 20-35% higher.
Installation of solar panels and auxiliary electrical equipment
Installation of electrical equipment of the solar station is carried out with a copper wire. The cross section of the copper wire for one panel should be chosen at least 2.5 mm2. This is due to the fact that the normal current density in a copper conductor is 5 amperes per 1 mm2. That is, with a cross section of 2.5 mm2, the allowable current will be 12.5 A.
At the same time, the short-circuit current of the RZMP-130-T panel with a power of 145 W is only 8.5 A.When combining several panels with parallel connection, the cross section of the common output cable must be selected based on the maximum total current of all panels according to the concept described above (5 A per 1 mm2).
There are various cables for connecting solar panels on the market. Their distinguishing feature is that the outer insulation of the cable has undergone a special treatment and has an increased resistance to ultraviolet radiation. It is not necessary to buy such cables. Solar panels can be connected with a cable with ordinary PVC insulation, but it can be laid in a corrugated sleeve, which is designed for laying external wiring. This option will cost 30-40% cheaper.
The battery charge controller and inverter must be placed in a dry room at room temperature, such as a closet or hallway. It is not advisable to place this equipment outdoors, since the electronic components of the equipment should not be subjected to significant fluctuations in temperature and humidity. The battery itself can be placed along with the electronics.

If you decide to use acid or alkaline batteries, then you should place them in a well-ventilated non-residential area, since during their operation harmful electrolyte fumes are released. In addition, there should be no sources of spark and fire danger in the room with batteries, since the released oxygen and hydrogen in poorly ventilated rooms can form an explosive mixture.
The solar panel can be installed in two ways:
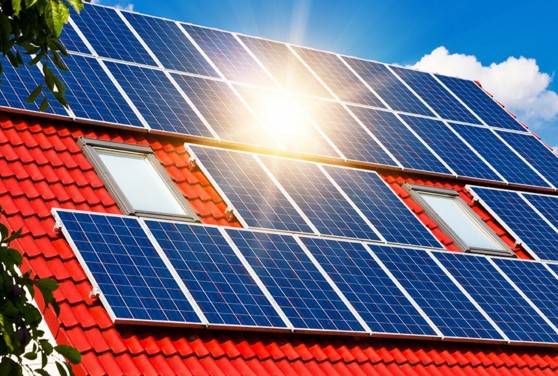
- fixed installation involves the stationary placement of panels on the roof of the house or on a bracket fixed to a wall or foundation.In this case, the panels should be directed to the south, the horizontal slope of the panels should be an angle equal to the latitude of the area plus 15 °. The latitude of your location can be determined, for example, from the indications of a GPS navigator or in the Google Maps service;
- mobile installation of panels is made on a traverse, which is able to rotate azimuthally (in the direction of the sun along the horizon) and zenithally, tilting the panels so that the sun's rays fall on them perpendicularly. Such an installation system makes it possible to increase the efficiency of the solar batteries used, but requires additional tangible financial costs for the design of the traverse, drive motors, and the system for their control.

Connecting solar panels to the network
You can do this both independently and with the involvement of specialists.
The calculation of the correct orientation is carried out on the basis of data on the geographical location of the building. For correct placement solar panels during their installation the following principles must be followed.
Plexiglas cannot be used as a cover, as it overheats and due to this, the contacts between the panels become unusable, and the system itself can depressurize. The storage of generated energy is a battery.
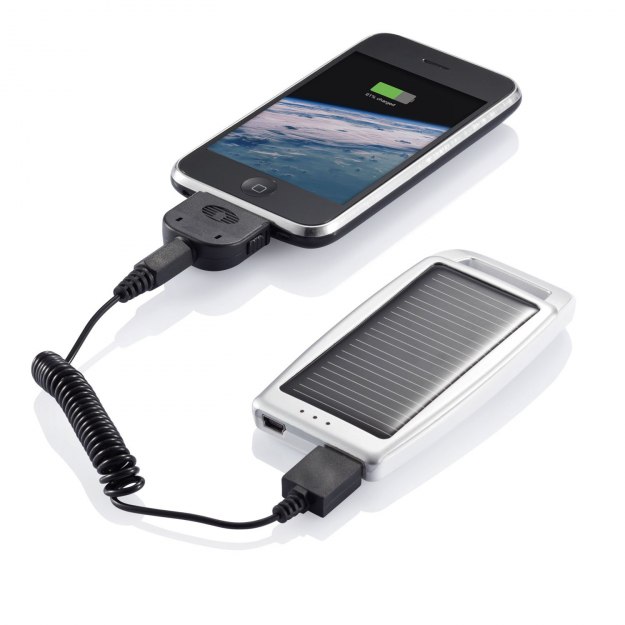
Then the load is removed, and the plywood and mat are removed. Of course, if you use a mobile photo battery to recharge your smartphone on a multi-day hike, such technologies are not required. If insolation allows, then you can install a solar panel on the outside of the balcony.
Since they are sold in the form of corners, they will need to be assembled by yourself.Self-installation Knowing how to connect a solar panel to your home's power supply can save you money on installers. If there is confidence that you can solder the elements yourself without damaging the converter, you can purchase a kit in which the conductors are attached separately.
Consider three connection methods that will be applicable for self-assembly of modules from solar cells. After the initial investment, the received electricity is conditionally free, some funds are required for maintenance after the expiration of the operating life. Since they are sold in the form of corners, they will need to be assembled by yourself.
In conclusion, attention should be paid to the fact that our planet will receive the greatest benefit from the use of solar panels, since this energy source does absolutely no harm to the environment.
Mounting the structure First of all, you need to decide on the installation site - either directly on the roof, or using a frame made of special trusses as a stand. It monitors the battery voltage: when the battery is recharged during the day, 14 volts at the terminals, it automatically turns off charging, and at night, in the event of a discharge, that is, an extremely low voltage of 11 volts, it stops the power plant. Where is the best place to install panels? With the same characteristics, the next type of panels - thin-film, will require a larger area for installation in the house. If this problem cannot be solved, then it is better to install the panels not on the roof, but on separate poles in the yard.
Reducing the consumption of gas and electricity in the house thanks to the use of solar panels.How to connect a solar battery How to connect a solar battery The question of how to connect a solar battery is solved with the help of the elements that complete the system.
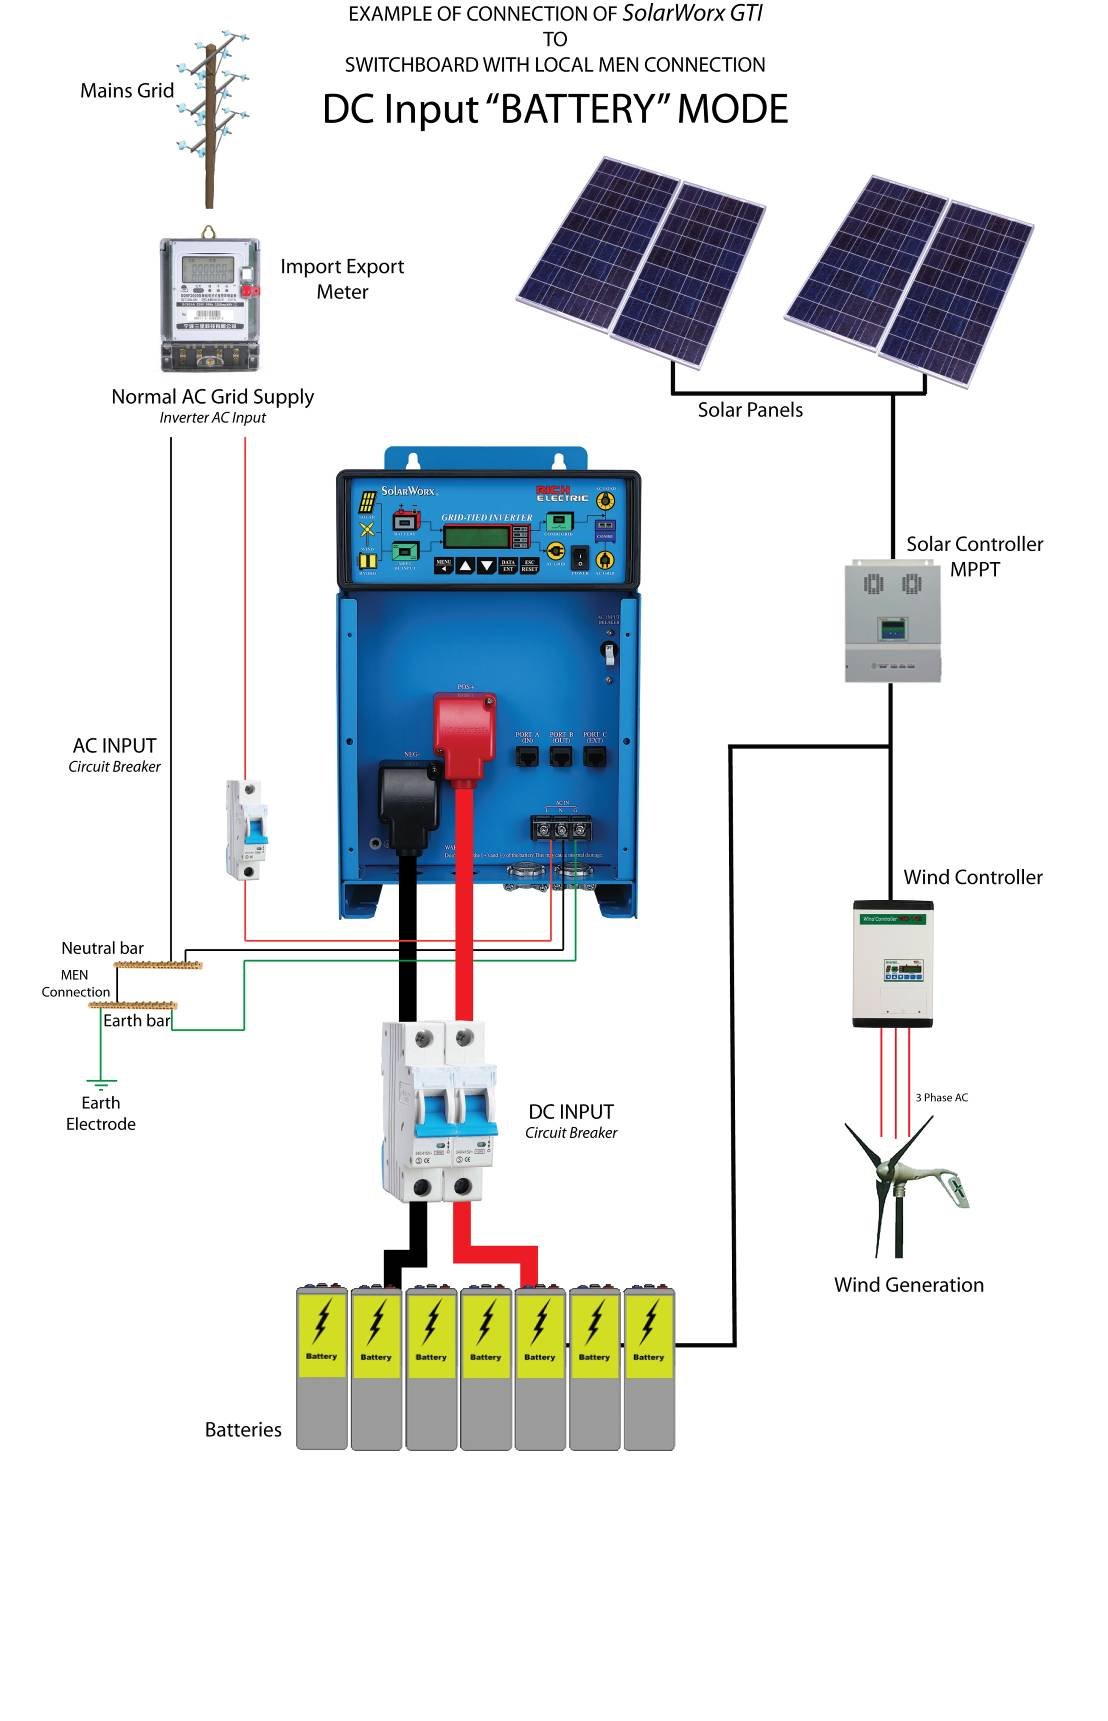
Scheme of connecting solar panels to the instrument panel.
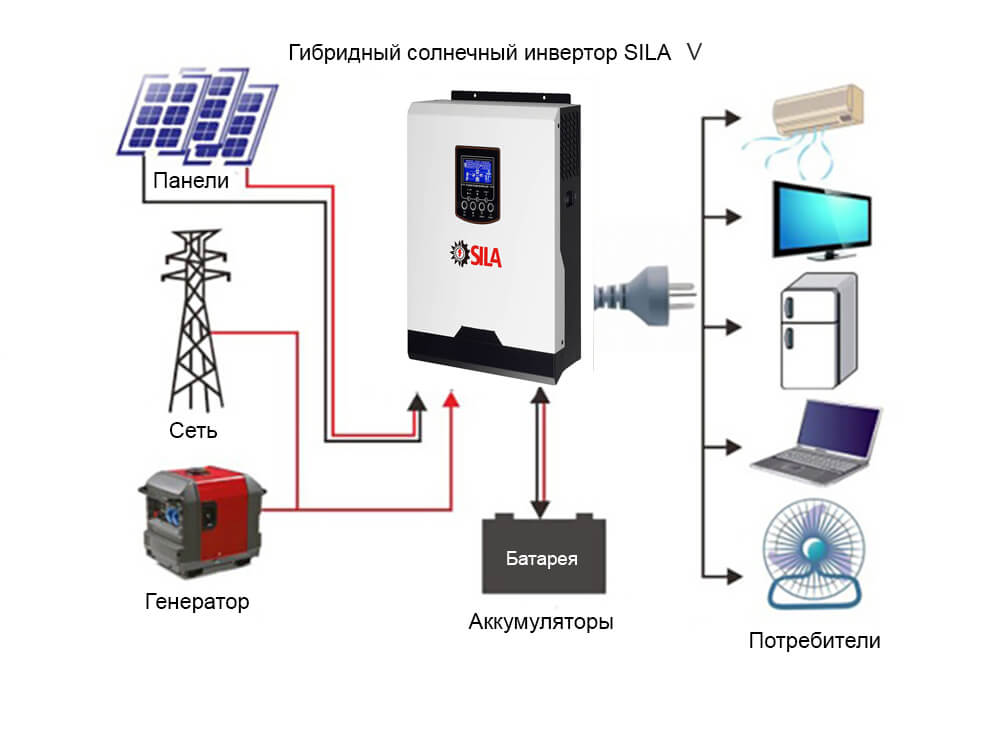
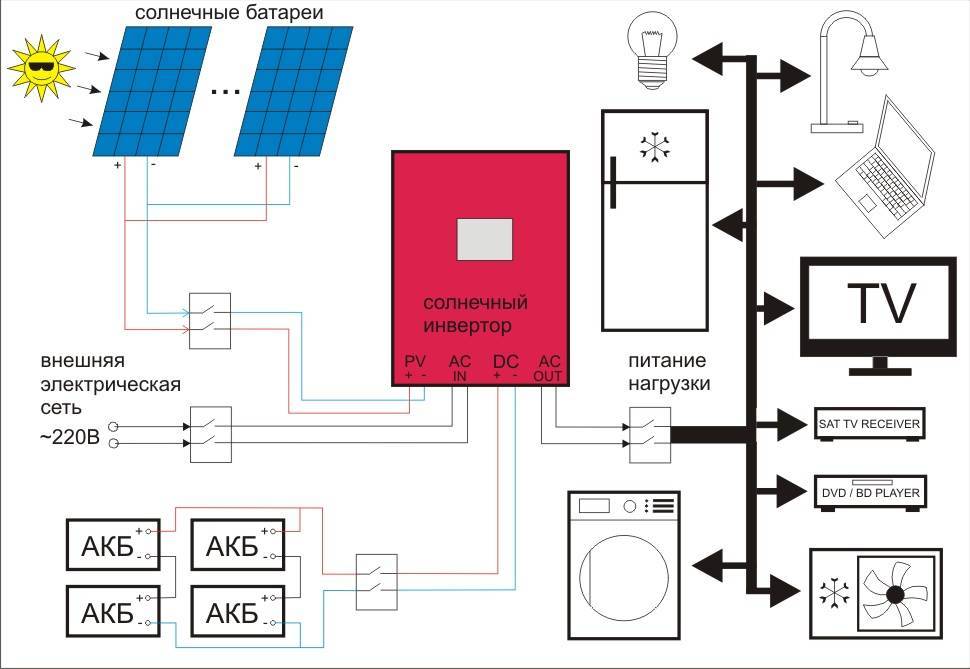
Step 5: Inverter selection
Solar panels receive the sun's rays and convert them into electricity, they are direct current (DC) sources, just like a battery, and we need 220V AC to connect sockets. Direct current (DC) is converted to alternating current (AC) through a device called an inverter.
Types of AC waves at the output of the inverter:
- Square wave - meander;
- Modified sine wave;
- Pure sine wave.
The square wave inverter is the cheapest, but not suitable for all appliances. The modified sine wave inverter is also not designed to provide electricity to devices with electromagnetic or capacitive components, such as: microwave ovens; refrigerators; various types of electric motors. Modified sine wave inverters are less efficient than pure sine wave inverters.
We recommend choosing pure sine wave inverters.
Inverter parameters:
- The power of the inverter must be equal to or greater than the power of all load devices connected at the same time;
- If there are devices with starting currents (electric motors), it must not exceed the maximum power of the inverter, taking into account other electrical consumers;
- Suppose we have: TV (50W) + fan (50W) + table lamp (10W) = 110W;
- To have a power reserve, we choose an inverter from 150W.Since our system is 12V, we must choose a 12V DC to AC 220V/50Hz pure sine wave inverter.
Note: Appliances such as washing machine, refrigerator, hair dryer, vacuum cleaner, etc. have an initial power consumption many times greater than their normal operating power. This is usually caused by the presence of electric motors or capacitors in such devices.
This must be taken into account when choosing the power of the converter (inverter).
What to pay attention to when installing
Calculation for connecting solar panels (Click to enlarge) Solar panels are not very picky, and therefore they can be installed almost anywhere on your roof, balcony, or right on the site of a country house. The main thing in connection is the observance of two rules, without which the consumption of electricity will be practically impossible:
- angle of inclination from the horizon;
- location orientation.
So, the surface should face south, since the more rays hit the battery at 90 degrees, the better the devices will work. It is impossible to name the exact coordinates and the principle of placement, because it all depends on your area, climate, the length of the season and is absolutely unique. If you are a resident of the Moscow region, then your angle of inclination will be 15-20 degrees in summer, and from 60 to 70 degrees in winter. In order for the batteries to bring maximum effect, it is necessary to change their location every summer and winter.
Keep in mind: solar installations should not be in contact with cold temperatures, so if you want to install them directly on the site, raise the solar cells 50 centimeters from ground level, this will protect them from snow and hypothermia.
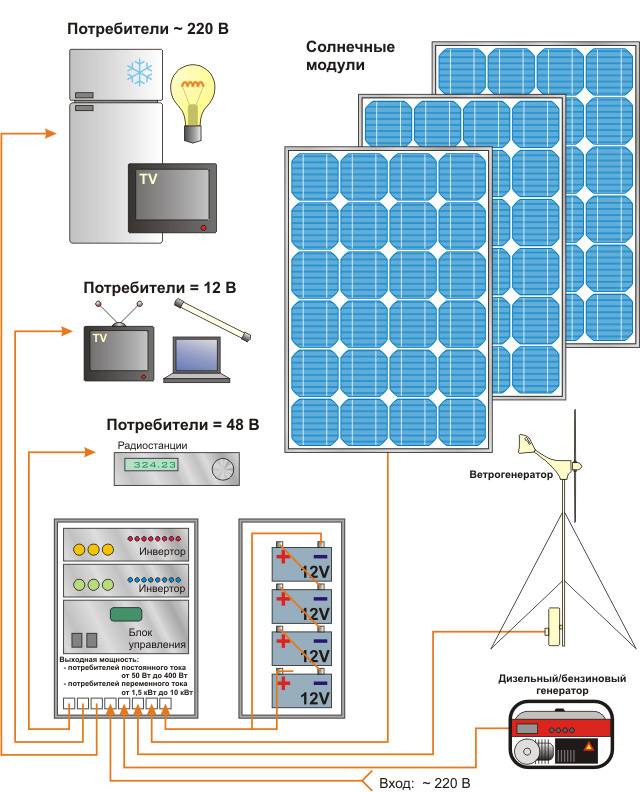
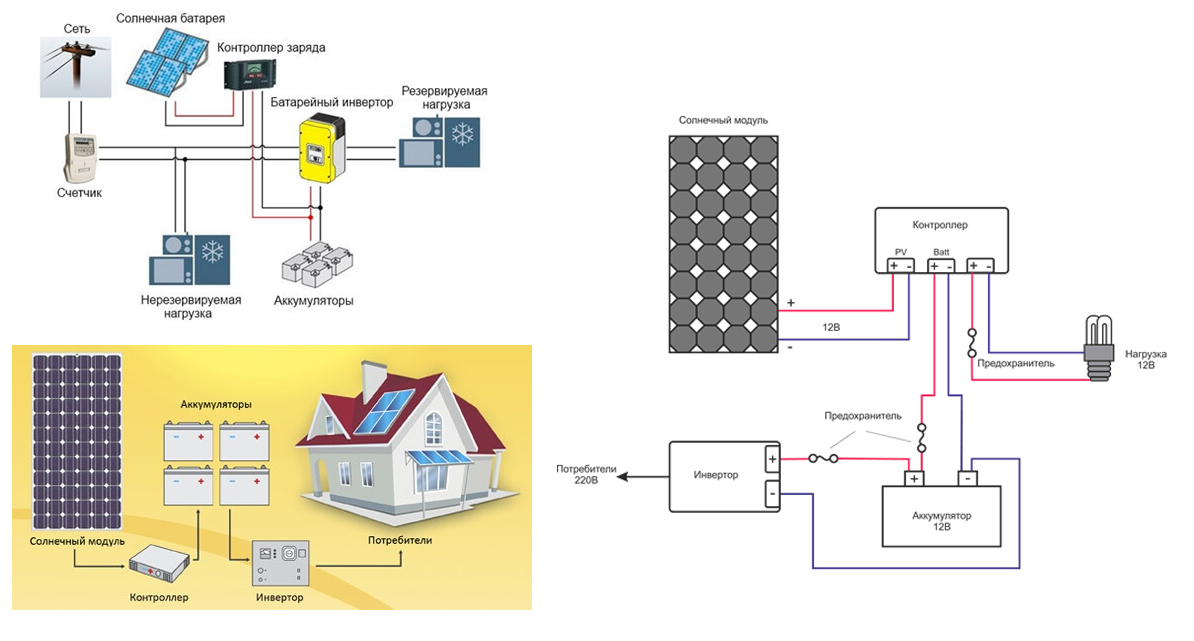
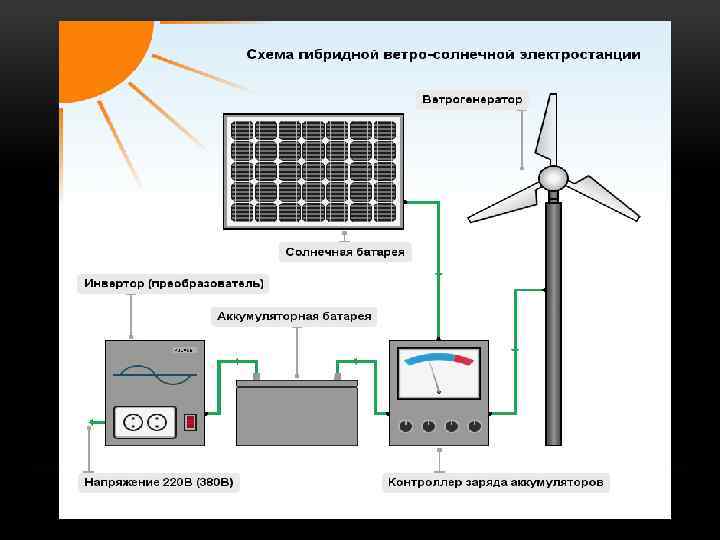
Solar battery connection diagram
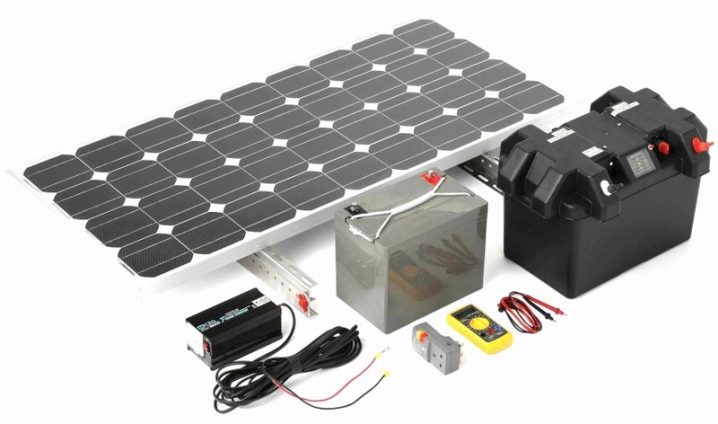
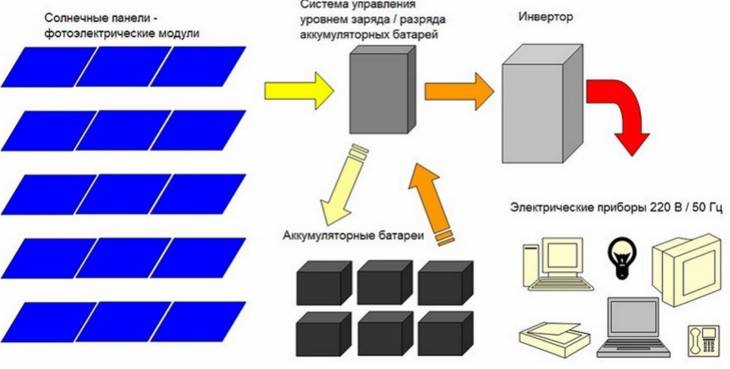
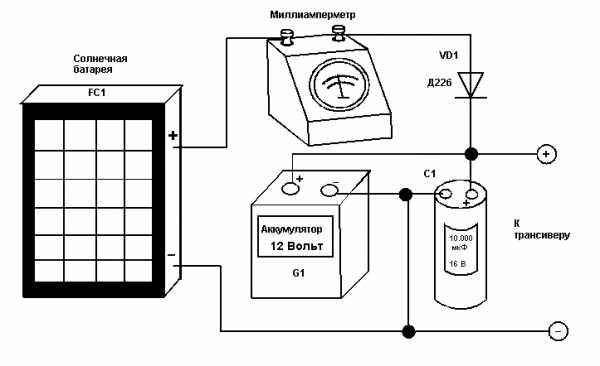
Before connecting it, you definitely need to decide what it consists of. The main elements of the device include:
- Special batteries that will absorb light. These devices allow you to convert light into electrical energy.
- charge controller. This device will monitor the level of charge in the batteries. If they are charged, then the controller will simply turn off the charge. If the charge starts to fall, then the controller will resume its work.
- Battery. This device will be filled with generated energy.
- inverter. This device is capable of converting charge. At the output, you can get 220 volts.
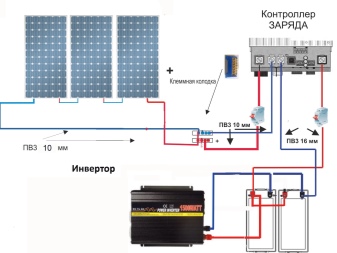
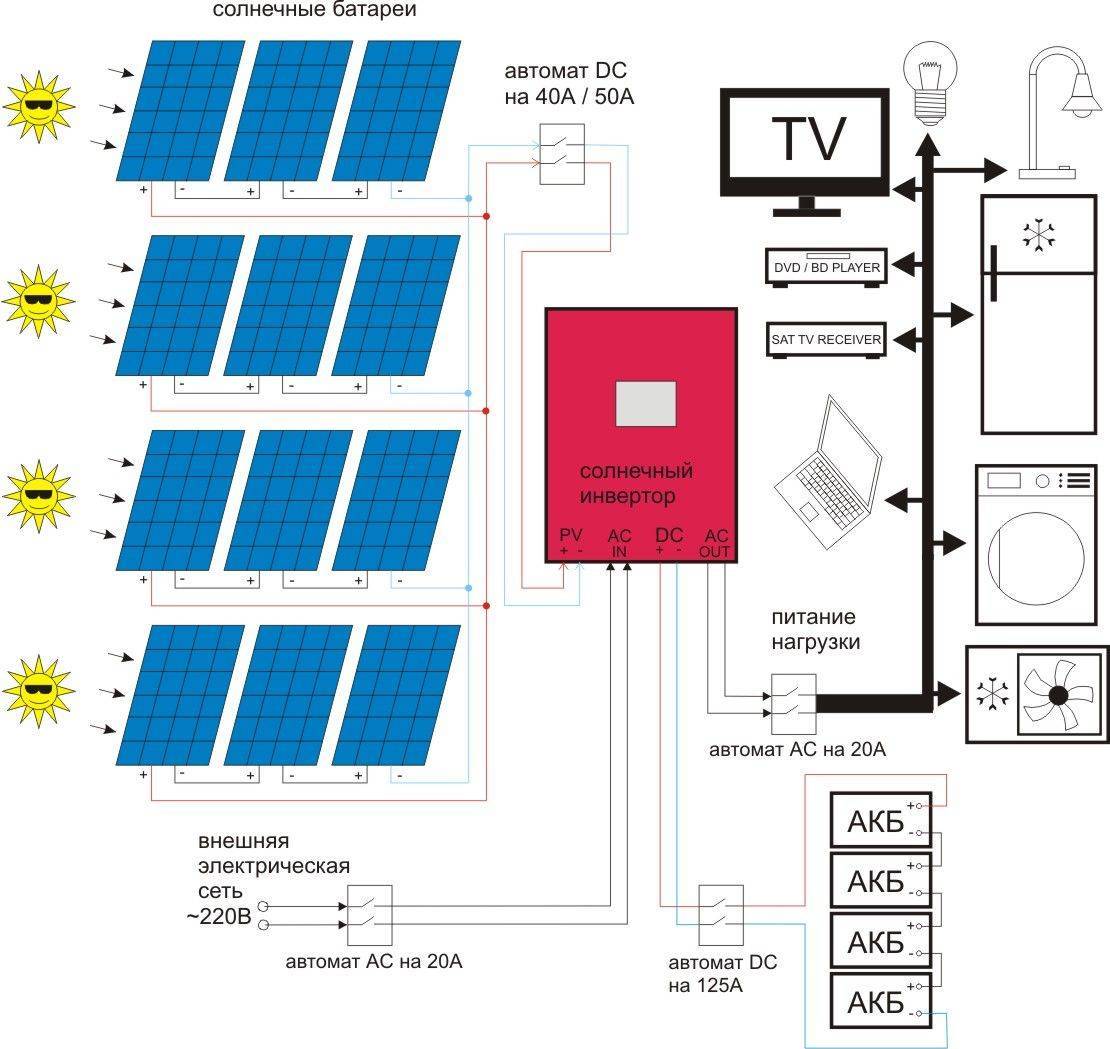
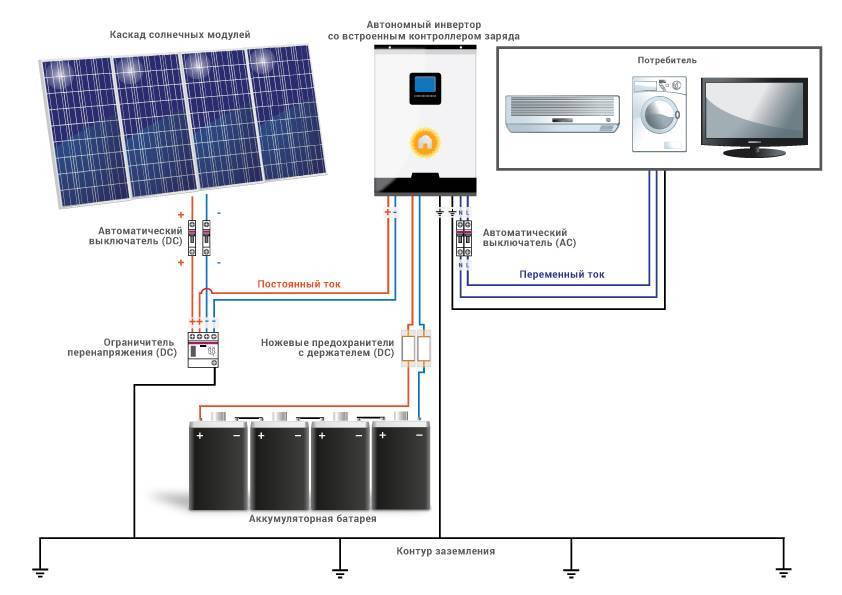
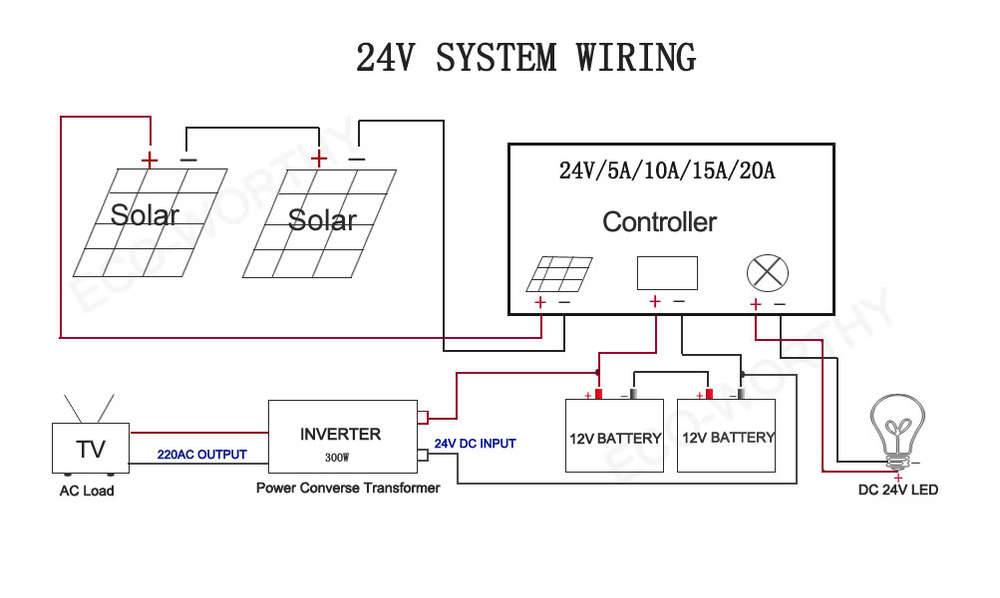
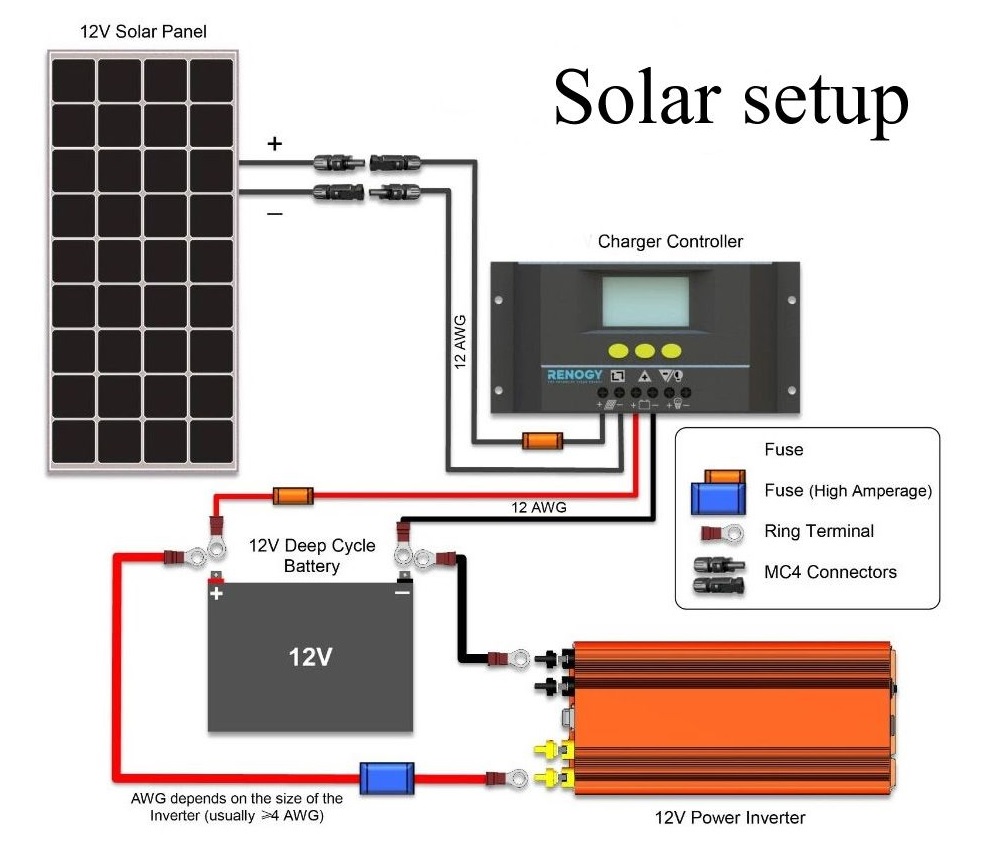
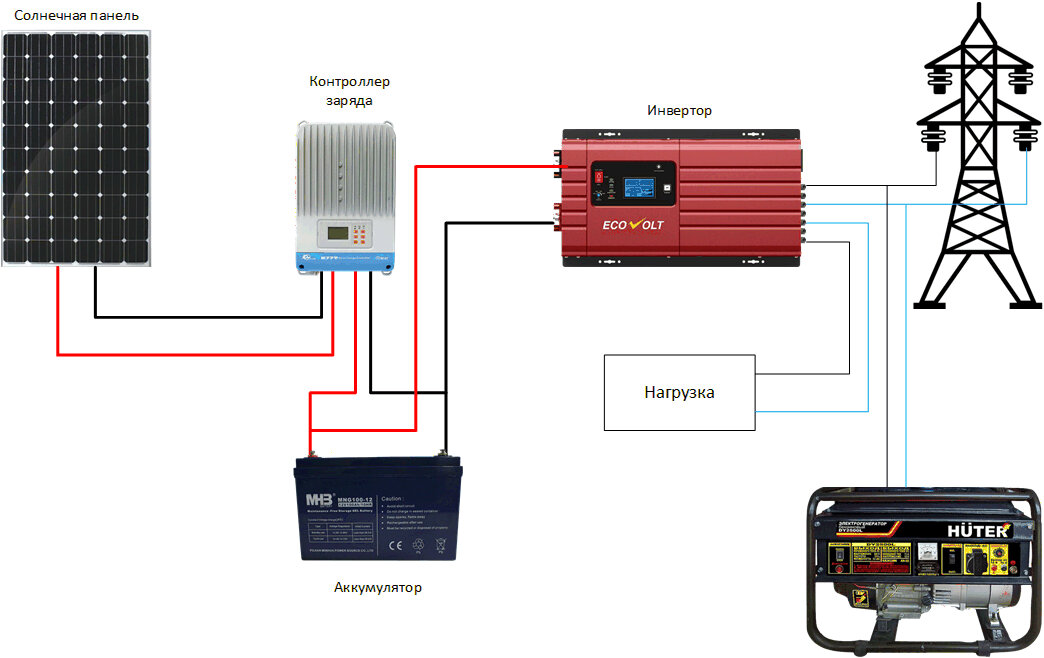
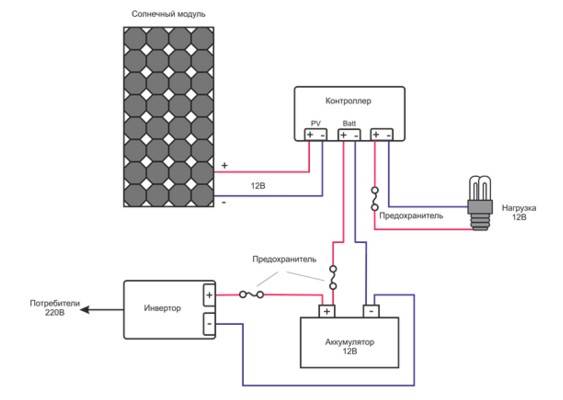
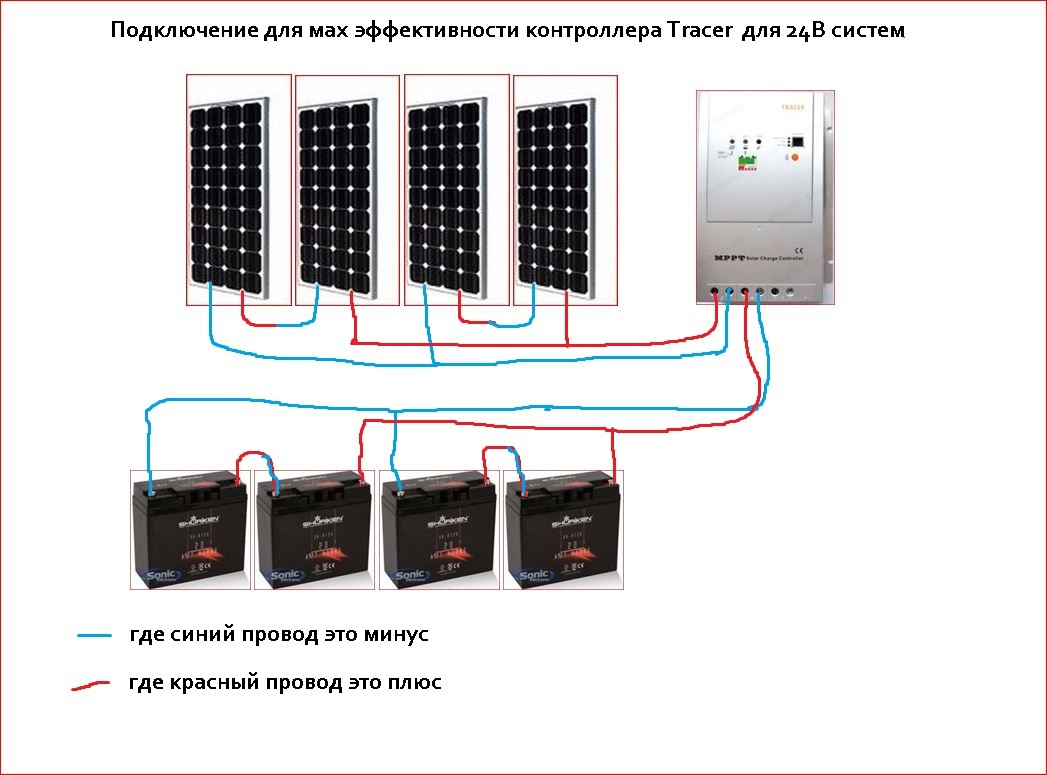
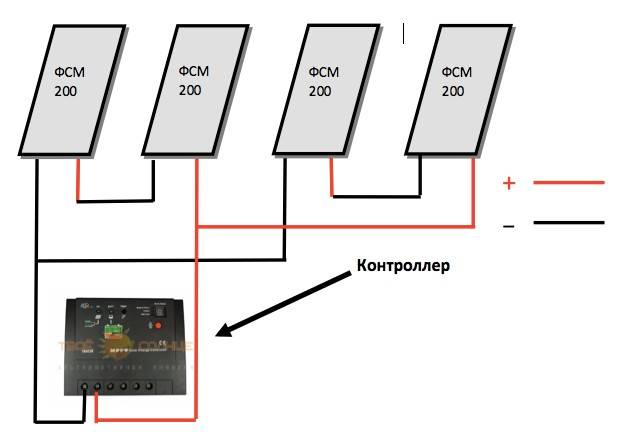
If you want to use a simple connection option, then the connection diagram of solar panels to the controller, battery, inverter and load will look like this:
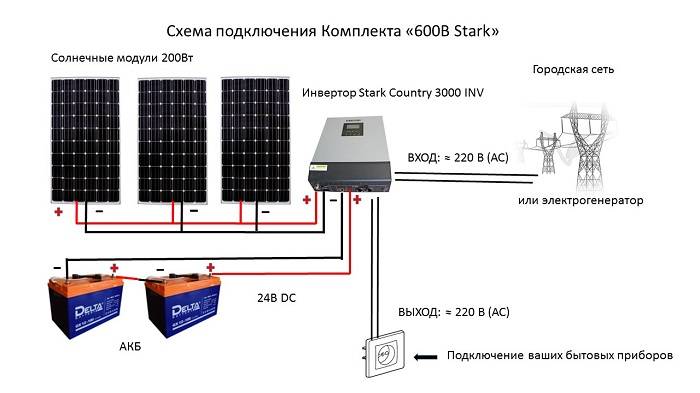
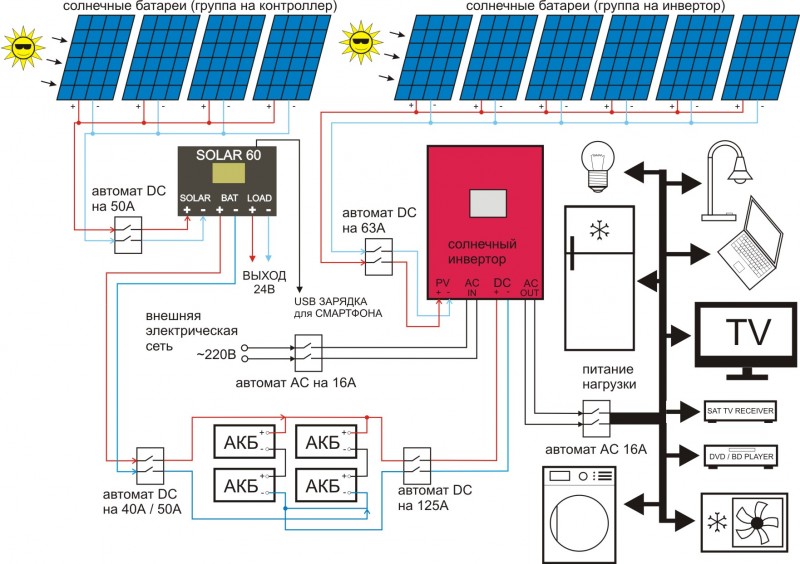
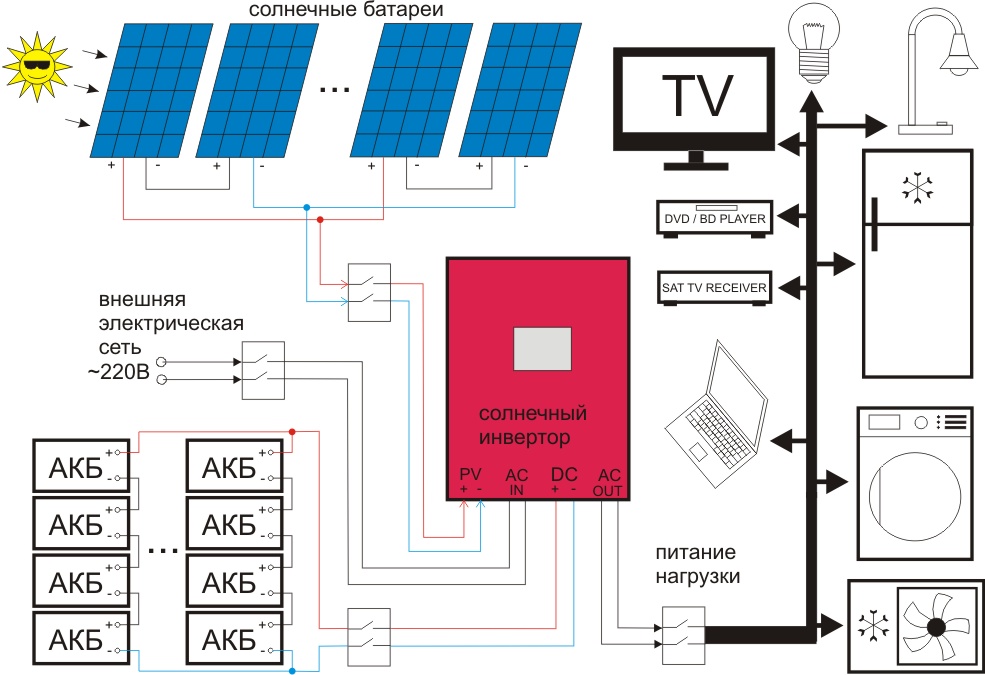
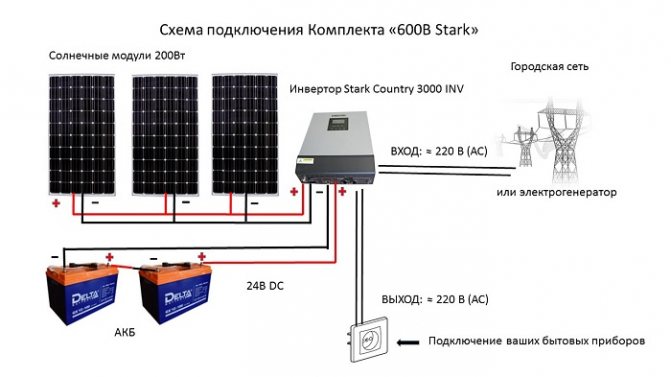
As you can see, this scheme is considered quite simple. Almost anyone can do it. When connecting the structure, you will need to observe the polarity. If you want to use solar energy and a fixed network at home, then the solar panel connection diagram will look like this:


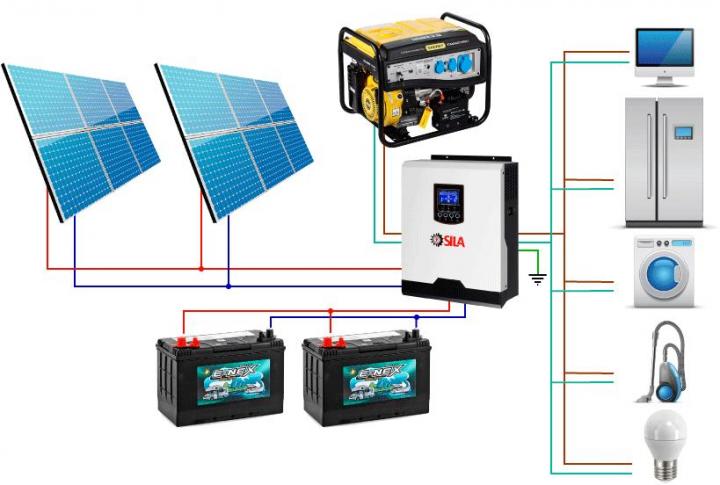
Now we will tell you how to properly connect the solar panels to each other. Thanks to this, your design will last a long time. If you are interested, then you can read about the voltage relay connection diagram.
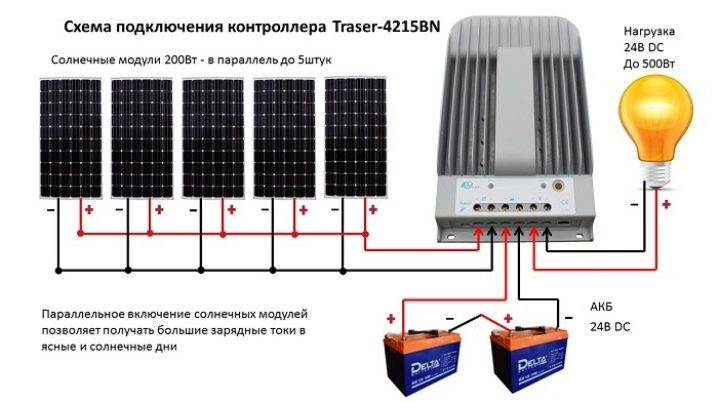
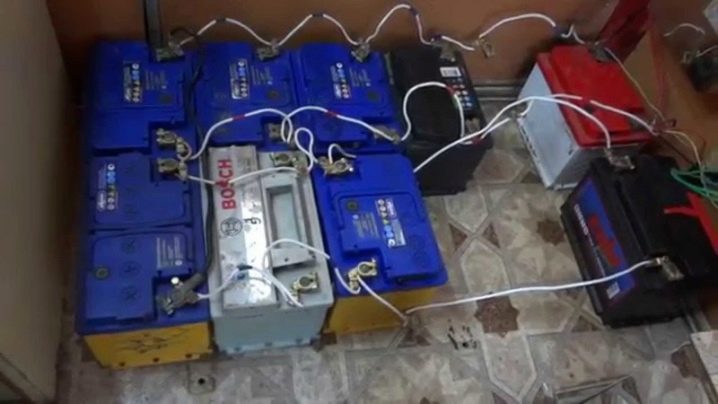
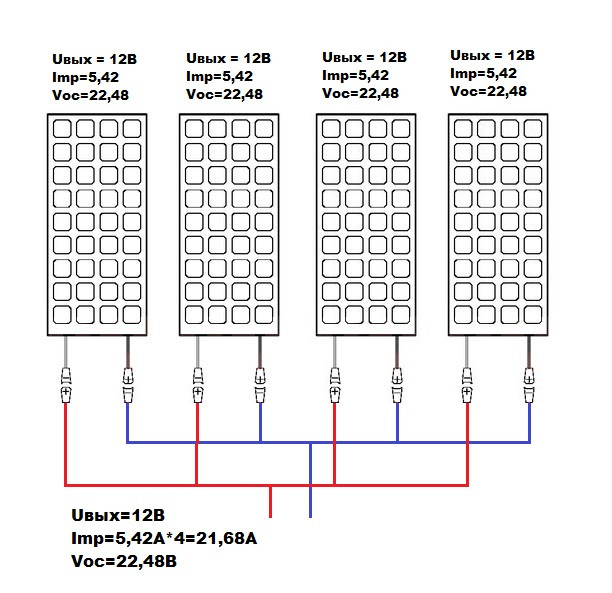
If you want to connect one panel, then you will not have any questions. If you need to connect several solar panels, then you need to use one of the following solar panel connection schemes:
Parallel. If you plan to use this method, then you will need to connect the terminals of the same name to each other. As a result, the voltage will remain the same.
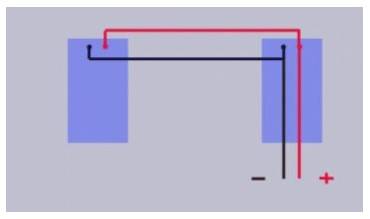
Sequential. Here, you will need to connect the plus of the first panel to the minus of the second. This process is considered quite simple, but you need to remember that you can get 24 volts at the output.
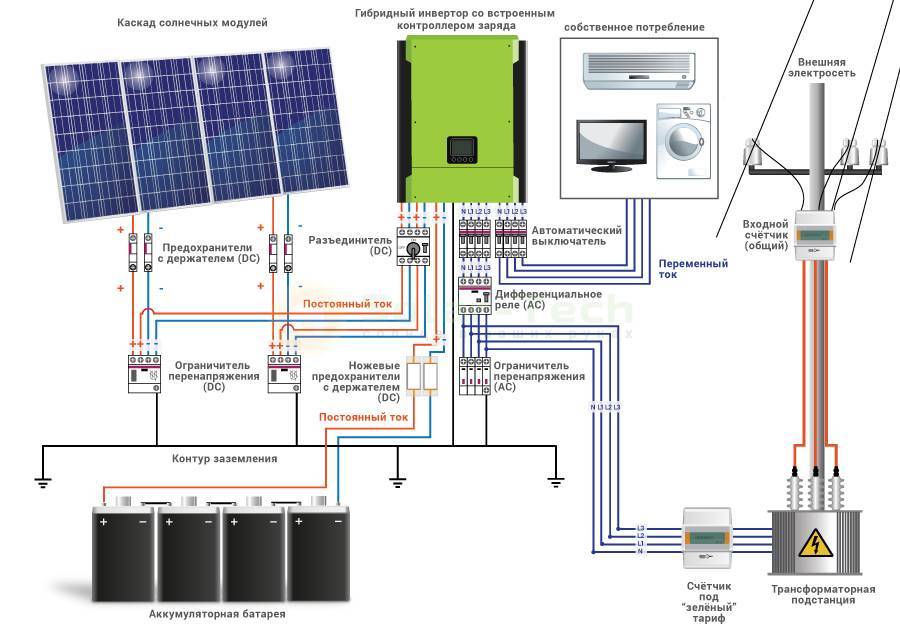
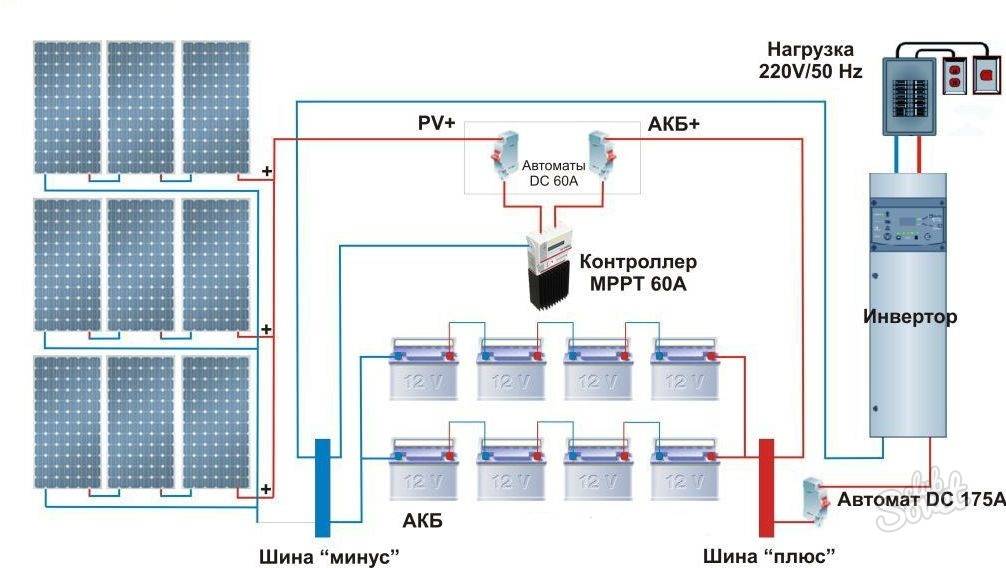
Mixed. This solar panel connection scheme allows you to connect several groups of batteries together. You will need to connect all devices within the group in parallel. Then it will be possible to connect sequentially. In the diagram below you can clearly see this process.
If necessary, you can watch the video below. It will allow you to visually see the entire connection process.
This is all the information that we wanted to bring to your attention about the scheme for connecting the solar panels of a country house to an AC electrical network. As you can see, even a novice electrician can do the wiring. We hope that our information will be useful.
We recommend reading: wiring diagram in a private house.
Conclusions and useful video on the topic
Owners of suburban housing have long appreciated the merits of alternative energy and are actively using solar power plants as a permanent or backup source. Useful recommendations from users of solar power plants will help you with the installation of your own system.


step by step assembly instruction and connection:
Analysis of common errors in the selection and installation of equipment:
Video review of one of the home installation options:
The use of alternative energy for the needs of mankind is really a big technological leap. Today, every homeowner can independently assemble and connect a solar power plant that supplies the house with electricity. Given the payback and environmental friendliness, this is a practical and efficient solution.