- 3 point switch types
- checkpoint
- Scheme of connecting the wires of the pass-through switch in the junction box
- Cross
- Working principle of the cross disconnector
- Using an impulse relay
- Varieties of switches
- Keyboards
- Swivel cross
- The appearance of the rotary switches (photo gallery)
- Overhead and built-in
- Characteristics of cross switches
- Main characteristics
- Cross switch functions
- Through switches
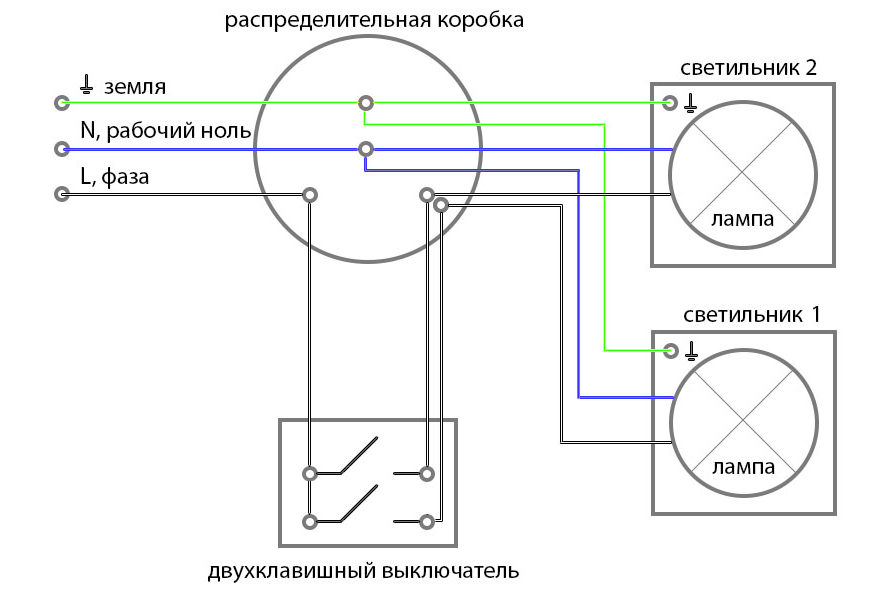
- Wiring diagram with two lighting fixtures
- Switch installation
- Connection diagram of the switch in the junction box
- Design
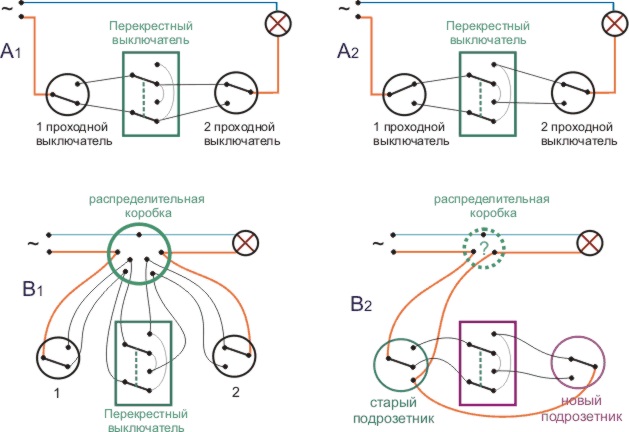
- Wiring diagrams
- Types of electrical switches
- Connecting a cross switch.
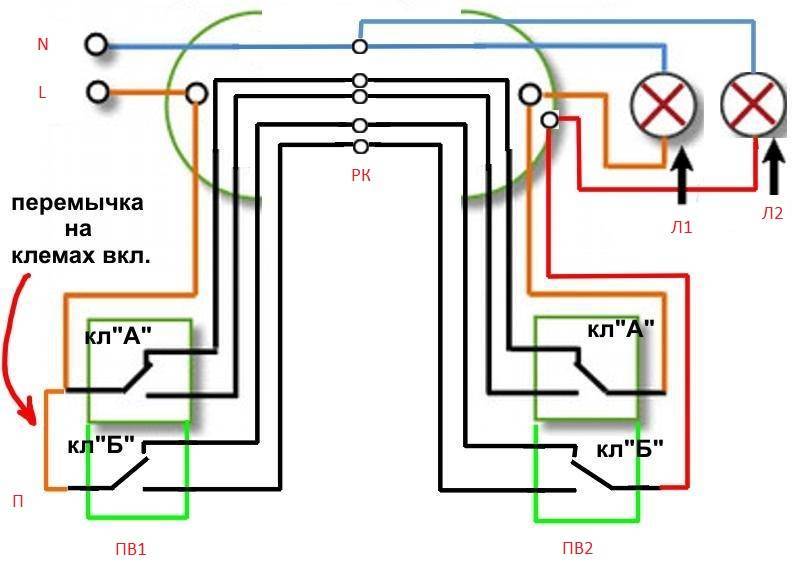
- How 2-key PV works
- Cross switch functions
- Where is the three switch system used?
- Places of use
- Elements and components of the connection diagram
- Finally
- Conclusions and useful video on the topic
3 point switch types
Switches from three places are represented by two types of products: through passage and cross. The latter cannot be used without the former. According to the principle of operation, cross-sections are divided into:
- Keyboards.
- Swivel. A rotary mechanism is used to close the contacts. They are presented in a variety of designs and will cost more than usual.
Taking into account the installation, the cross ones are divided into:
- Overhead. Mounting is carried out on top of the wall, does not require a recess in the wall to install the unit. If the decoration of the room is not planned, then this option is ideal. But such models are not reliable enough, because they are subject to external factors;
- Embedded. Installed in the wall, suitable for wiring work in all types of buildings. A hole in the wall is pre-prepared according to the size of the switch box.
checkpoint
Unlike the classical model, the pass-through switch has three contacts and a mechanism that combines their work. The main advantage of the product is the ability to switch on or off from two, three or more points. The second name of such a switch is "toggle" or "duplicate".
The design of the two-key pass-through switch resembles two single-gang switches independent of each other, but with six contacts. Outwardly, a walk-through switch cannot be distinguished from a conventional switch if it were not for a special designation on it.
Scheme of connecting the wires of the pass-through switch in the junction box
Circuit without a ground conductor. Now the most important thing is to correctly assemble the circuit in the junction box. Four 3-core cables should go into it:
power cable from the switchboard lighting machine
cable to switch #1
cable to switch #2
cable for lamp or chandelier
When connecting wires, it is most convenient to orient by color. If you use a three-core VVG cable, then it has two most common color markings:
white (gray) - phase
blue - zero
yellow green - earth
or the second option:
White gray)
brown
black
To choose a more correct phasing in the second case, refer to the tips from the article “Color marking of wires. GOSTs and rules.”
The assembly begins with zero conductors. Connect the zero core from the cable of the introductory machine and the zero that goes to the lamp at one point through the car terminals.
Next, you need to connect all the ground wires if you have a ground conductor. Similarly to the neutral wires, you combine the “ground” from the input cable with the “ground” of the outgoing cable for lighting. This wire is connected to the body of the lamp.
It remains to connect the phase conductors correctly and without errors. The phase from the input cable must be connected to the phase of the outgoing wire to the common terminal of the feed-through switch No. 1. And connect the common wire from the feed-through switch No. 2 with a separate wago clamp to the phase conductor of the cable for lighting. Having completed all these connections, it remains only to connect the secondary (outgoing) cores from the switch No. 1 and No. 2 to each other
And it doesn't matter how you connect them.
You can even mix up the colors. But it is better to stick to the colors, so as not to get confused in the future. On this, you can consider the circuit fully assembled, apply voltage and check the lighting.
Main connection rules in this scheme you need to remember:
- The phase from the machine must come to the common conductor of the first switch
- The same phase should go from the common conductor of the second switch to the light bulb
- The other two auxiliary conductors are interconnected in the junction box
- Zero and earth are fed directly without switches directly to the light bulbs
Cross
Cross models with 4 pins, which allows you to connect two pins at the same time.Unlike walk-through models, cross models cannot be used on their own. They are installed complete with walk-throughs, they are designated identically on the diagrams.
These models are reminiscent of two soldered single-gang switches. Contacts are connected by special metal jumpers. Only one switch button is responsible for the operation of the contact system. If necessary, a cross model can be made by yourself.


Working principle of the cross disconnector
The pass-through device for turning on and off the light inside has four terminals - it looks the same as ordinary switches. Such an internal device is necessary for the cross-connection of the two lines that the switch will regulate. The disconnector at one moment can make the opening of the two remaining switches, after which they are connected together. The result is turning the light on and off.
Using an impulse relay
The pass-through circuit can also be organized using an impulse relay.
What are the benefits? The main advantage of this scheme is an unlimited number of control points. For each switch
you only need to pull two wires.

What are the disadvantages? You need an installation place in the shield, and accordingly you will have to conduct all the wiring there. AT
switches should be used as switches button type. In general, such a solution is only acceptable
with a large number of lighting control points or for any non-standard tasks.
There are many models of impulse relays and in general the question requires a separate topic, so the details are within the framework of this publication
will not be considered.
Varieties of switches
According to their design, cross switches are divided into 2 types: keyboard and rotary.
Keyboards
Switches of this type are used most often.
Key switches, it is more correct to call them switches, break one circuit and close another. Conventional switches only open or close one circuit. Outwardly, they practically do not differ. They can only be distinguished from the back by the number of contacts:
- a conventional single-key has 2 contacts;
- at the checkpoint -3;
- at the cross - 4.
Key switches can have 1, 2 or 3 keys. Multi-key switches are designed to independently control multiple circuits.
Swivel cross
Switches of this type are installed less frequently than keyboards. Usually they are used in warehouses and industrial premises, for street lighting, as an interior decoration in apartments. The contact groups in them are closed and opened by turning the lever.
The appearance of the rotary switches (photo gallery)
Overhead and built-in
According to the installation method, switches are divided into 2 types: overhead and built-in.
Built-in switches are mounted at the stage of construction or repair in boxes installed in niches. The wires are laid in stubs or attached to the walls. Typically, this method is used before plastering walls or facing them with drywall or other materials.
Overhead switches and wires suitable for them are attached to the wall. In this case, there is no need to scratch the walls and knock out recesses for the boxes. In this way they are usually mounted during cosmetic repairs. Overhead switches create certain inconveniences: dust accumulates on them, people cling to them while driving. In some cases, the owners, on the contrary, prefer this type of switch for interior design.
Characteristics of cross switches
On the market of electrical products there is a wide choice of switches and switches of domestic and foreign manufacturers. The difference in price between different manufacturers is significant, and the dimensions and technical characteristics are similar.
Main characteristics
| Voltage | 220–230 V |
| Current strength | 10 A |
| Material corps | thermoplastic polycarbonate plastic |
Models with housings that protect against moisture and steam are more expensive.
Cross switch functions
The switching device, designed to turn off and turn on the light and called the cross, has become popular due to the creation of comfortable conditions for the consumption of artificial light. But the main reason for the desire of most people to install a cross switch in a house or apartment is that it is possible to save money spent on electricity.

In such places, cross switches are indispensable.
Most often, the discussed switching device is mounted in common areas in residential buildings of 5–9 floors. The need for this arises due to the arrangement of long corridors in such buildings with a large number of doors and the lack of elevators. In such places, cross switches are installed at the exits from the apartments and at the entrance to the common corridor. For example, the owner of an apartment, leaving it, can immediately turn on the light to the entrance by means of a cross switch, and when he comes there, turn it off.
With such a light supply system, the function of cross switches is performed by all switching devices located between the first and last button for supplying current to the lighting device.More than two switches can be installed that allow you to supply light from different points of the house.
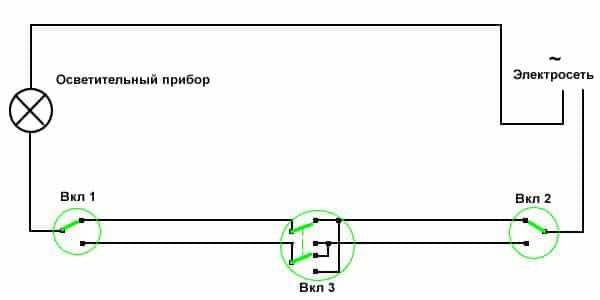
Through switches
Before you understand what a cross switch is used for, you need to understand how a pass switch works.
Wiring diagram for walk-through switches for independent lighting control from two points
The neutral wire is connected directly to the lighting fixture, the phase wire is connected through two switches connected to each other by a two-wire wire.
If contacts 1 and 3 are closed on the switches PV1 and PV2, then the circuit is closed and current flows through the light bulb. To open the circuit, you need to press the key of any switch, for example, PV1, while contacts 1 and 2 will be closed in it. By pressing the switch key PV2, the circuit will close. Thus, the lamp can be turned on and off independently from two remote locations.


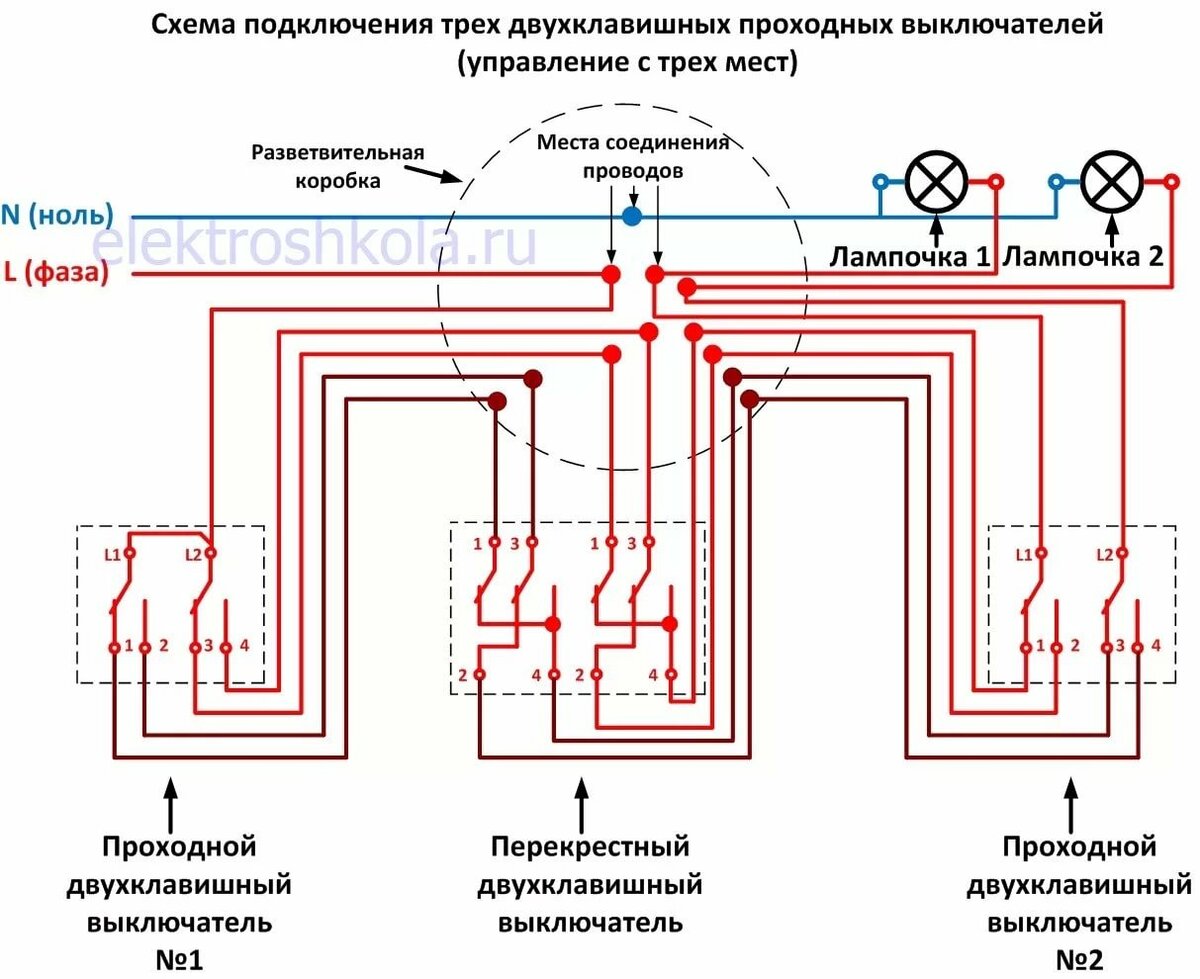
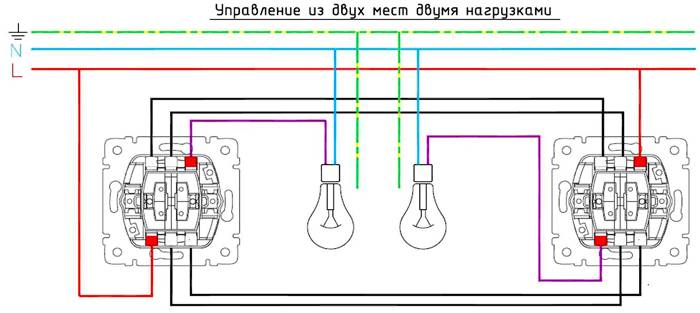
Wiring diagram with two lighting fixtures
Of course, the first option is popular and easy to perform, so it is widely used. However, in a room there are two or three lamps or several light bulbs that are divided into groups, so the standard scheme is no longer suitable here.
If you want to install with two groups of lighting fixtures, you will need to purchase a switch with two keys, where there are six clips.
Switch with two keys, where there are six clamps
Otherwise, in terms of installation method and equipment, this scheme is not much different from the previous one. However, more wiring will have to be laid here. Therefore, in order to reduce the cost of purchasing wires, it is recommended to connect the power conductor to the first switch in the chain with a jumper.After all, otherwise you will have to lay separate conductors from the distribution box.
Switch installation
To ensure the operation of lighting and other devices connected through switches, it is necessary to install them correctly and reliably. Do-it-yourself installation of the switch is quite simple, but it is necessary to follow a certain sequence of work. To install the switch in its place, it must be disassembled.
Switch disassembly procedure:
- remove the switch key by prying it with a flat screwdriver from one side;
- unscrew the screws of the protective frame and disconnect it from the mechanism;
- fix the switch body in the cup holder of the wall using spacer screws;
- loosen the screws for connecting the electrical wires.
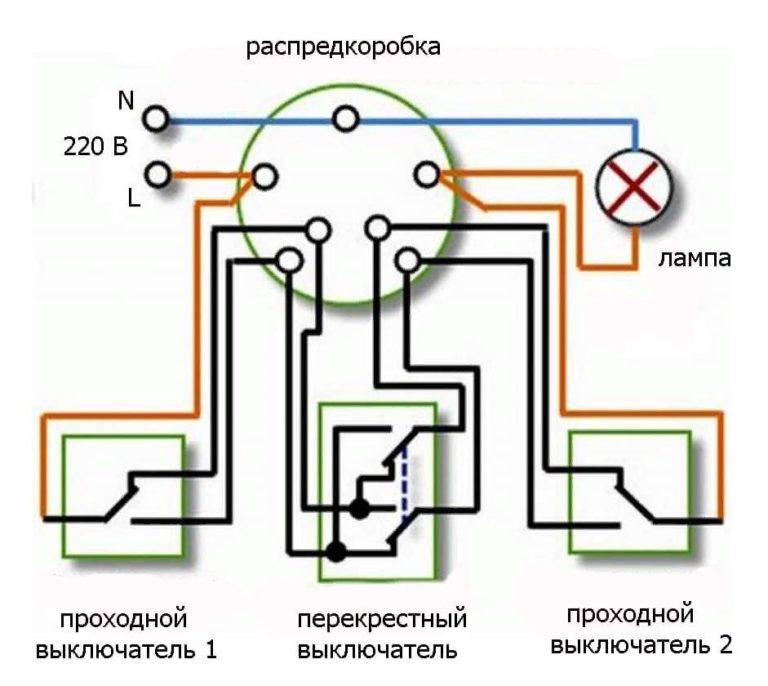
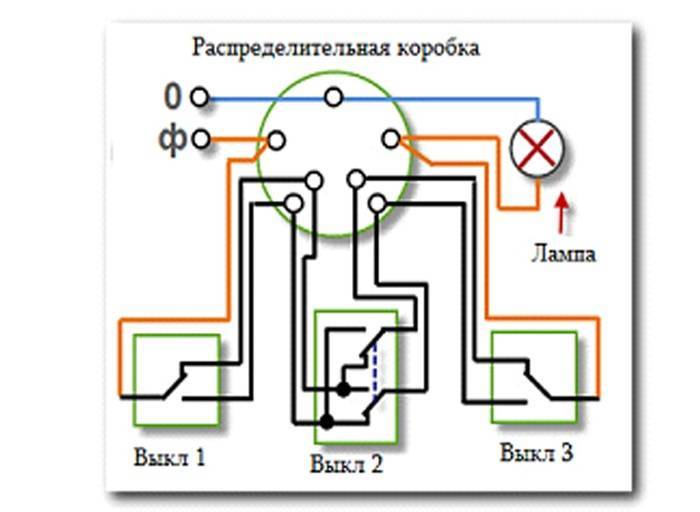
Connection diagram of the switch in the junction box
Look in the figure at the light control circuit using pass-through and cross switches. It is carried out as follows: Install change-over switching structures at the required places Pull out three-core cables from them Mount an electric luminaire, or several connected in parallel connection Pull out a two-core cable from it Install a junction box.
The circuit is simple, and you do not need to have special skills or knowledge to create it. If the switch does not disconnect the phase from the load, but the neutral wire, then the wiring will always remain energized, which is not only inconvenient, but also dangerous. RF domikelectrica.
For any, up to V. Features of cross-type switches: For their connection, only four-wire wires are used.The design of a simple switch with one key: 1 - the key with which the mechanism is activated; 2 - decorative frame; 3 - the working part, which contains the electrical mechanism. Switches are installed in all rooms where there are any lighting devices that are not equipped with a power cable, for example, for floor lamps or table lamps, it is not needed.
In the absence of such a device, it can be made from a two-key pass-through device. An open or closed method of cable installation does not fundamentally affect the arrangement of circuit elements. And this device switches them crosswise with each keystroke.
Design
Only two switches are always needed: at the beginning and end of the chain. We remove the insulation from the cable going to the switch and strip the ends of the wires by mm. There are times when small lighting is turned on in the bedroom - a night light or a sconce, and you have to get out of bed and go turn off the overhead light. Photo - light control scheme from three places Embedded are used for wall mounting.
We put the wires in the switch. In one of the switching positions, it closes the first, and in the other - the subsequent contact. To solve this problem, pass-through and cross switches are used. One group of spotlights or bulbs in a chandelier is controlled by one key, the second group by another. They consist of 4 main parts: a working unit - a metal base with contacts and a push-button drive; fasteners of legs or antennae made of metal connected to a metal plate; decorative design of the panel or frame; dynamic part - a plastic key.
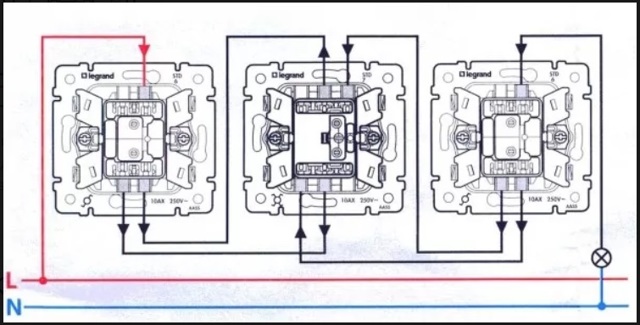
We collect the switch. Connecting these devices is similar to connecting devices from other factories.For two-key, 5 are laid to the first passage, 8 to intermediate and 6 to the second passage.
If everything worked before, and after replacing one, the circuit stopped working, then the wires were mixed up. There are switches with and without illumination. After connecting the wires to the switch mechanism, we insert the working unit into the junction box, put the case on top, fix the key. All circuit elements are connected, it remains to connect the wires in the junction box. Two-gang switches require careful handling.
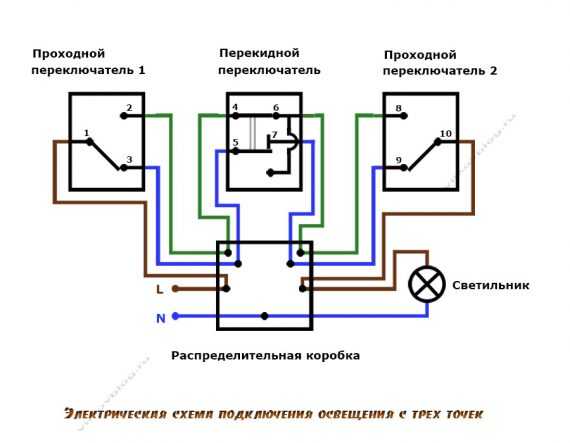
Scheme of connecting switches from 3 places. How to connect a pass switch
Wiring diagrams
If you need to control the inclusion of light from two points, a circuit of two switches for two is used.
directions. Here is a visual diagram, the figure shows the connections in the junction box.
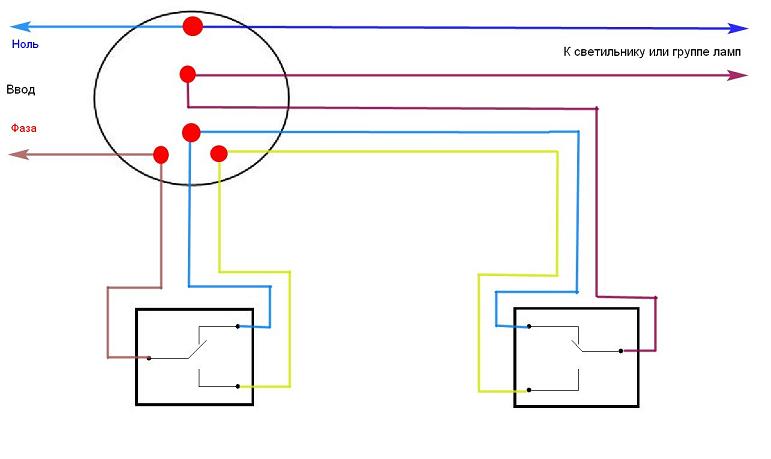
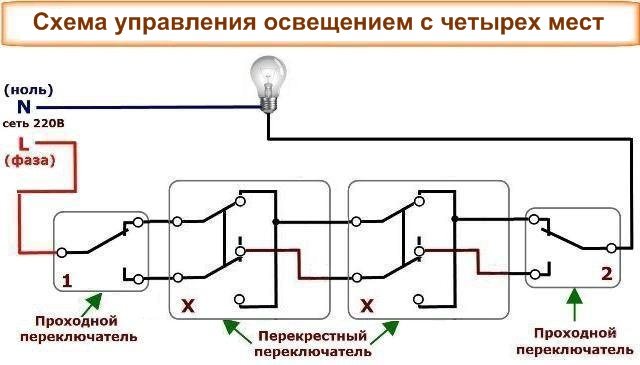
To control the light from three or more points, two conventional switches (two directions) and
one or more crossovers. The number of cross switches depends on the number of control points:
when switching with three switches, one cross is used, then, you can increase the number of cross switches
any number of times.
Here is a control circuit with three switches with all connections in the junction box.
For convenience, the diagram shows the colors of the conductors, with the exception of four conductors per crossover switch.
It will have to pull two two-core cables or another multi-core cable.
The wiring diagram for four switches is identical to the previous one, only one more cross switch.
In this way, you can connect as many switches as you like, the only question is practicality.

Types of electrical switches
The range of electrical devices presented on the Russian market does not allow listing all the names of this product, but absolutely all devices are divided into the following modifications:
- Concealed mounting - this type of electrical switches allows you to save the interior of the room and place an element of electrical fittings inside the wall. Among the disadvantages of this type of elements of electrical fittings, one can name the need for wall chasing, which significantly increases the time spent on installation work.
- Outdoor installation - used mainly in baths and utility rooms. This type of switches is much more convenient to operate and repair, but is significantly inferior to hidden devices in aesthetics.
Installation of these devices takes a little time, but each type has its own characteristics and installation sequence. How install a light switch according to the rules, will be described in detail below.


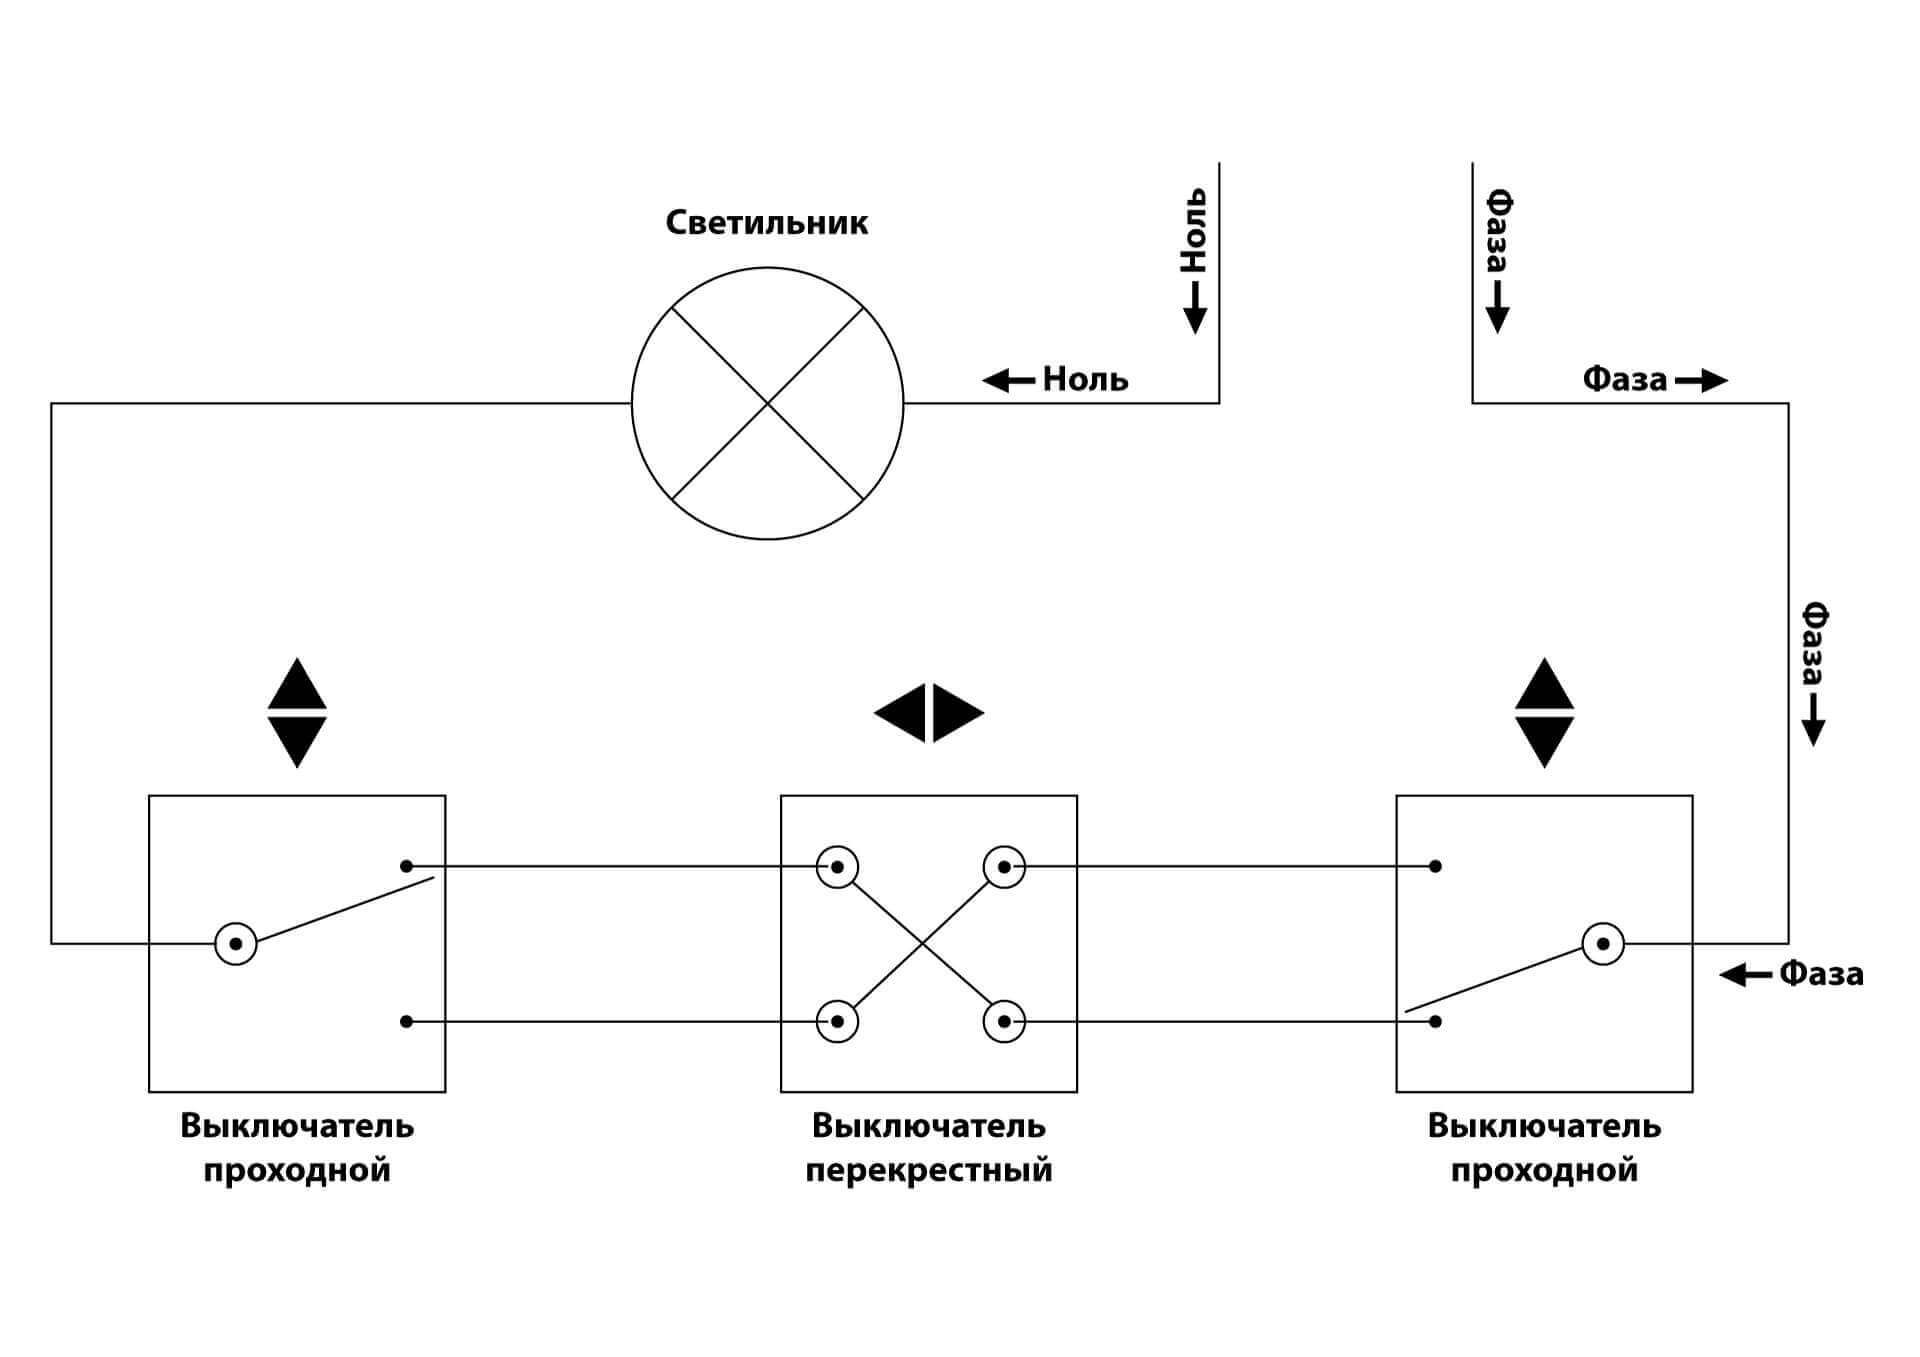
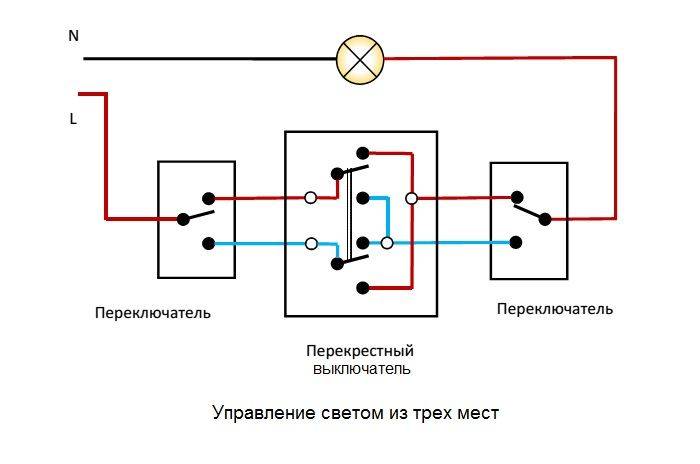
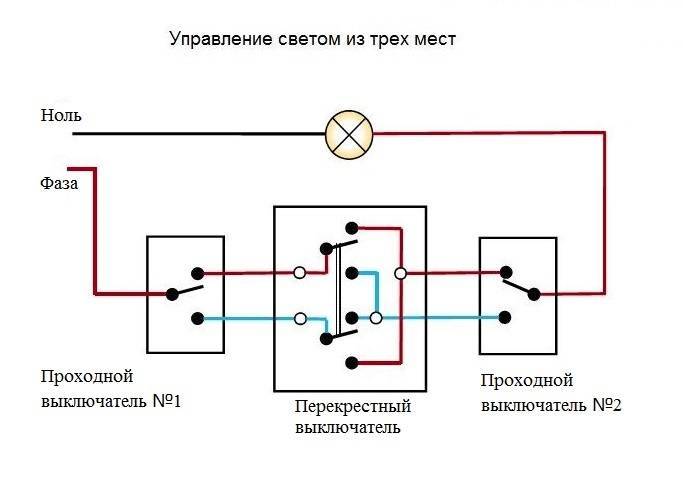
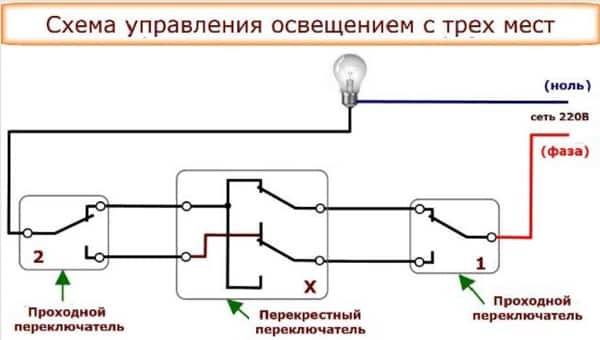
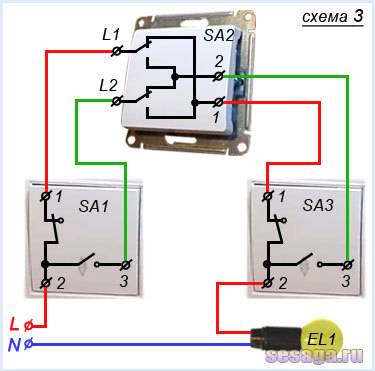
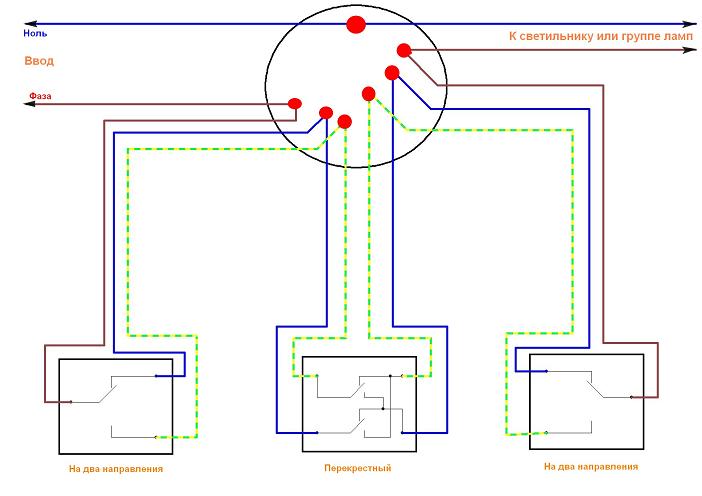
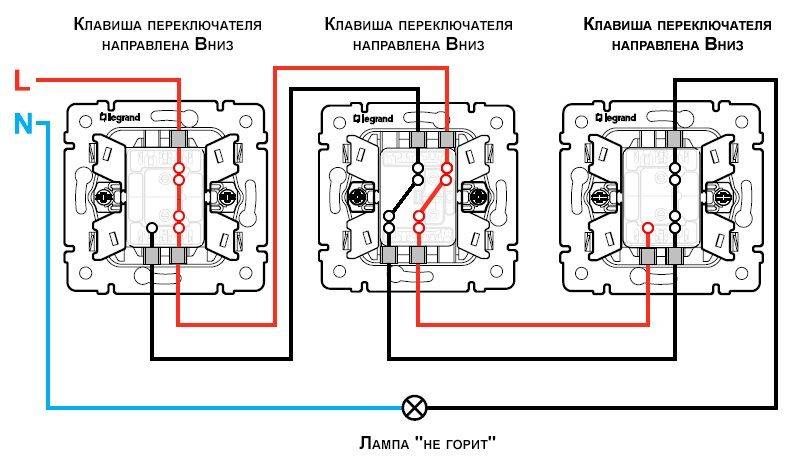
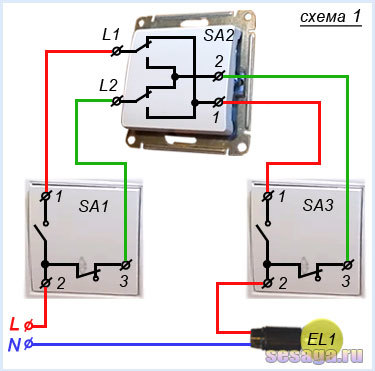
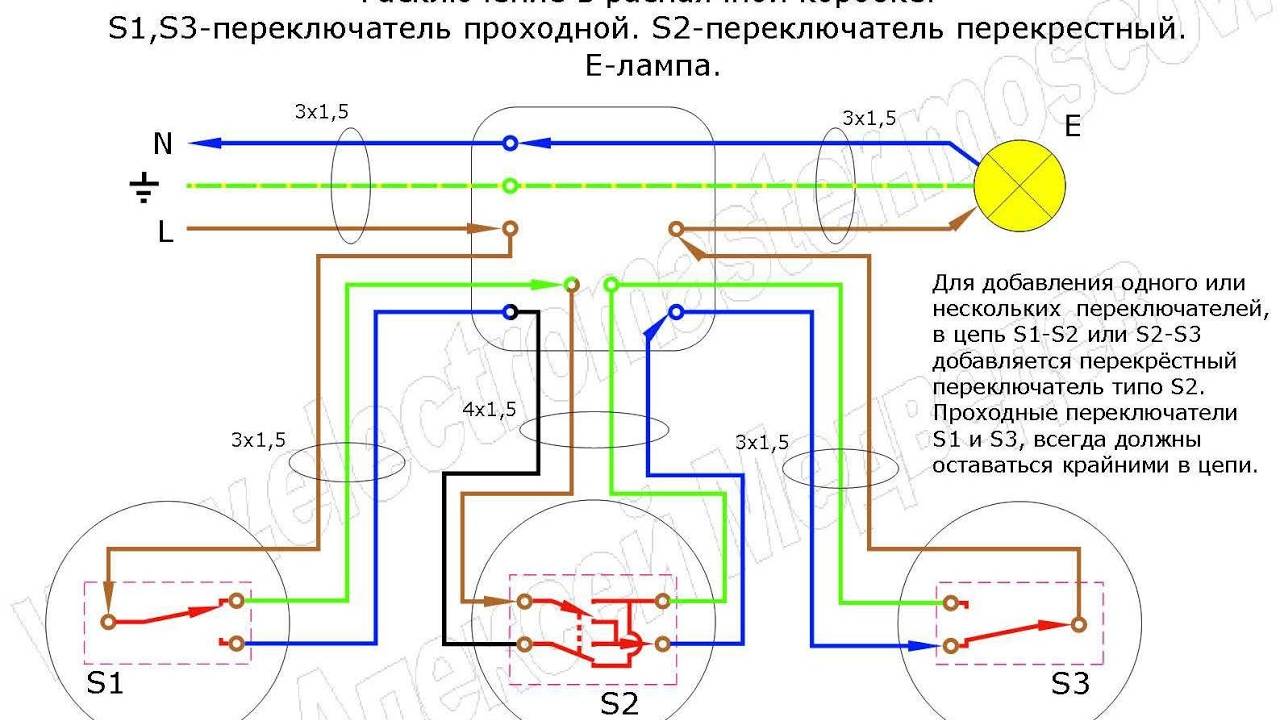
Connecting a cross switch.
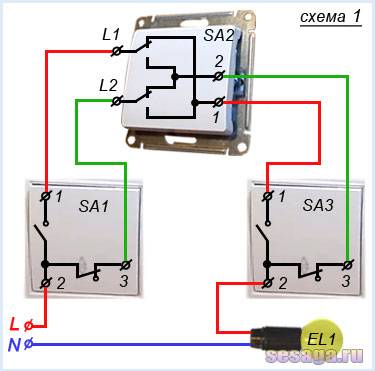
The cross switch works only in combination with walk-through switches and in lighting circuits it is switched on between them. Consider the diagram shown in the figure below.
Phase L connected to terminal 2 pass-through switch SA1. From terminals 1 and 3 switch SA1 phase wires go to the cross switch SA2 and connected to its terminals L1 and L2. From terminals 1 and 2 switch SA2 phase wires go to the second pass-through switch SA3 and connected to its terminals 1 and 3.
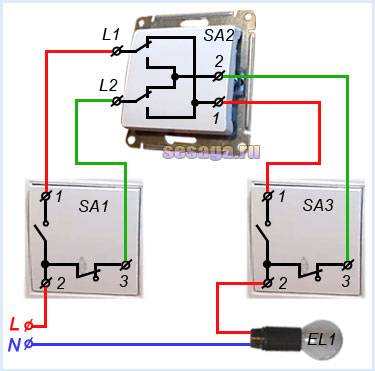
Zero N connected to the lower terminal of the lamp EL1, the upper terminal of the lamp is connected to the terminal 2 pass-through switch SA3.
Let's analyze the operation of the circuit in different positions of the switch contacts:
In the initial state of the contacts shown on scheme 1, the lamp is on.
Phase L through closed contact 2-3 pass-through switch SA1 green wire goes to the cross switch SA2 and through its closed contact L2-2 green wire goes to the terminal 3 pass-through switch SA3. From terminal 3 through closed contact 2-3 phase enters the upper output of the lamp EL1 and the lamp lights up.
Now if you press the switch key, for example, SA1, his contact 2-1 closes, and 2-3 opens and the lamp goes out (diagram 2). In this case the phase L will go through a closed contact 2-1 switch SA1, closed contact L1-1 switch SA2 and stop at the terminal 1 switch SA3, since there is no further movement due to the open contact 2-1.

When a key is pressed, such as a switch SA3, his contact 1-2 closes, and 2-3 opens and the lamp lights up (diagram 3). Here the phase L enters the upper output of the lamp through closed contacts 2-1 switches SA1 and SA3, and closed contact L1-1 switch SA2.

If you need to turn off the lamp again, you can press the switch button SA2.
In this case, it will cross-switch its contacts and output L1 the first contact will close with the output 2 second contact, and the output L2 the second contact will close with the output 1 first contact (scheme 4).
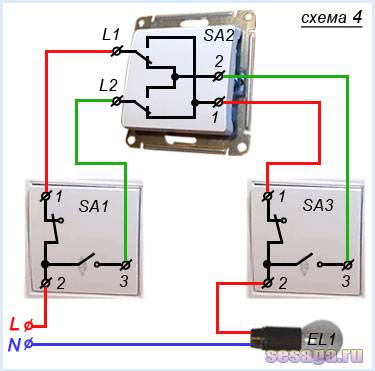
Then the phase L will go through a closed contact 2-1 switch SA1, closed contact L1-2 cross switch SA2 and stop at the terminal 3 switch SA3, since its contact 2-3 open.
As you can see, with any combination of the positions of the switch contacts, we can always turn the light on and off from any of them. This is how the walk-through and cross switches work in conjunction.
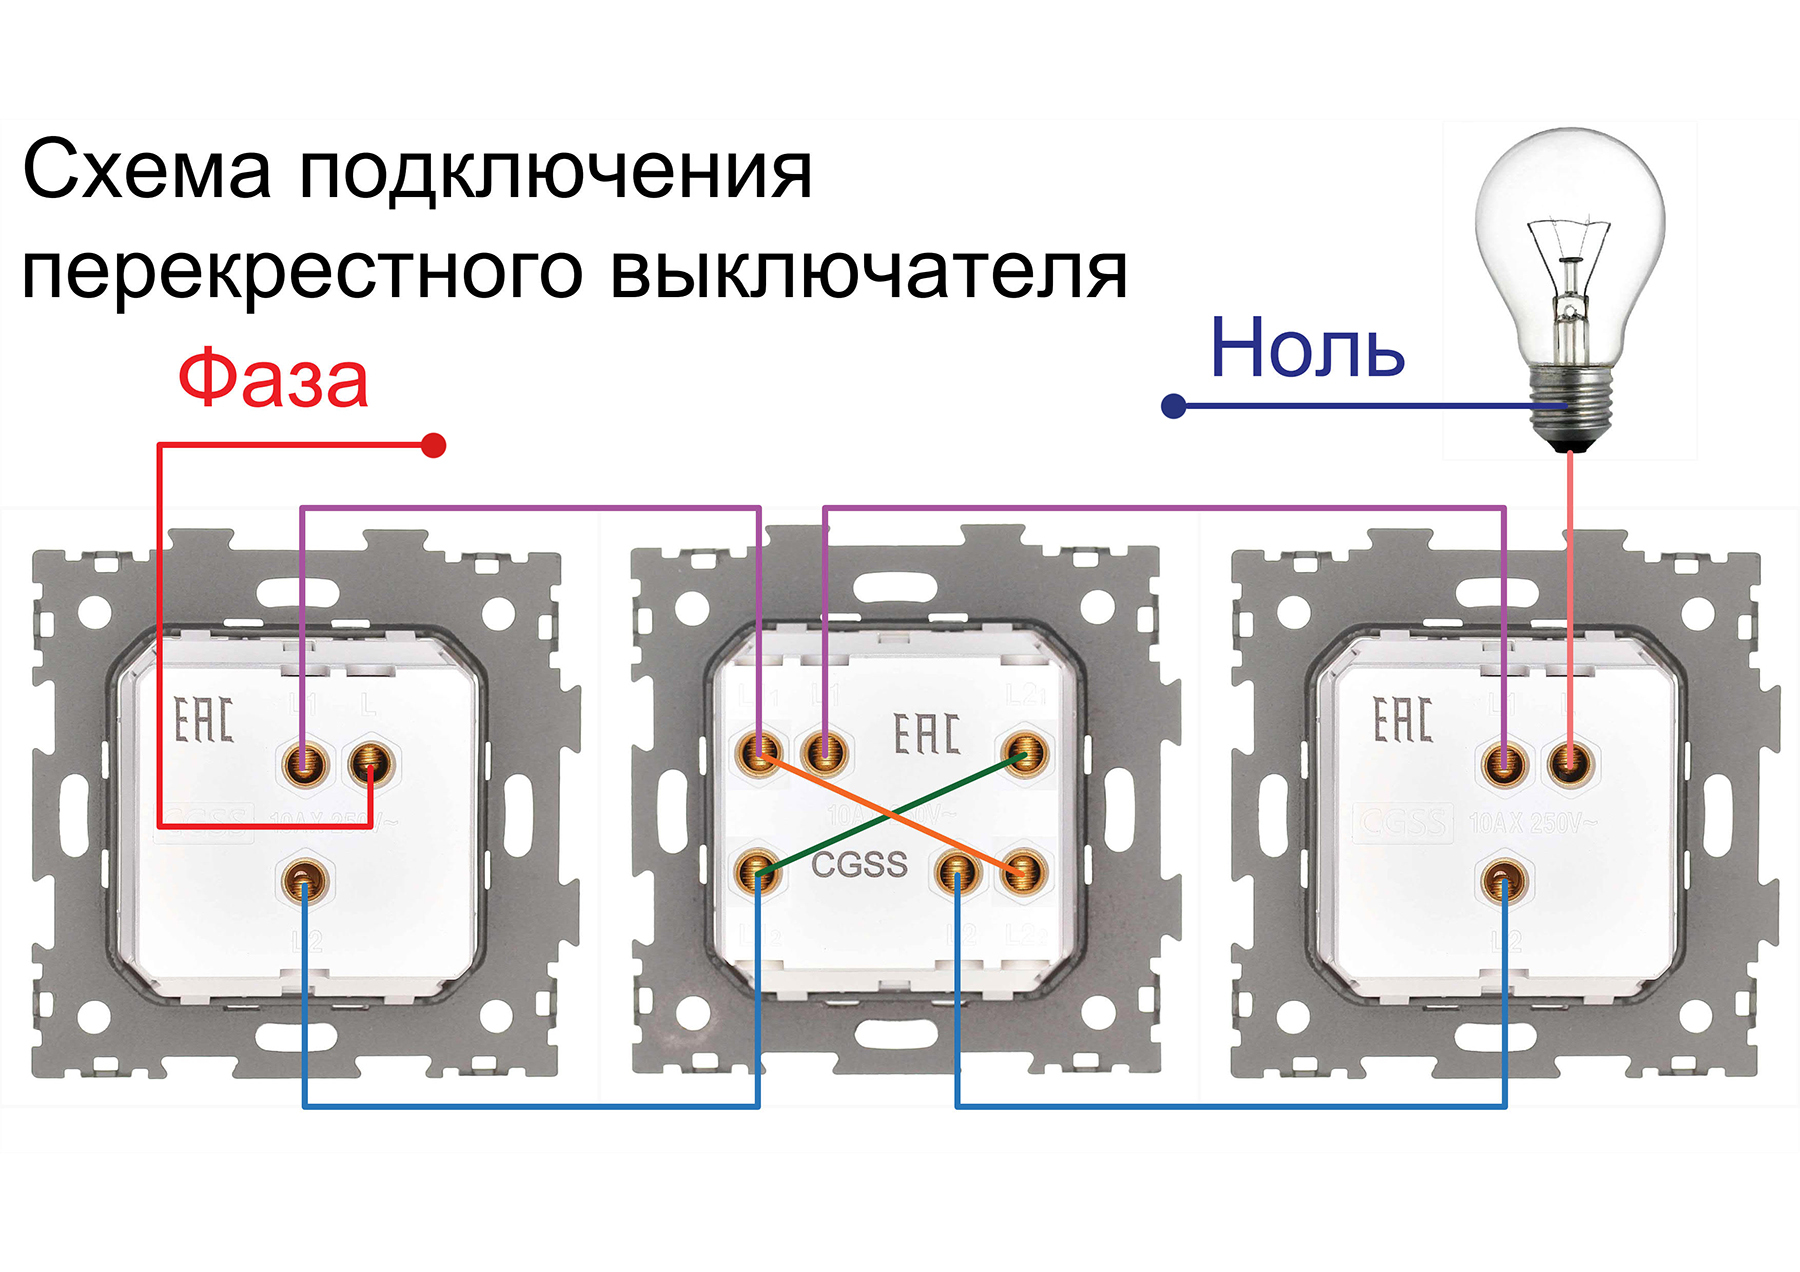
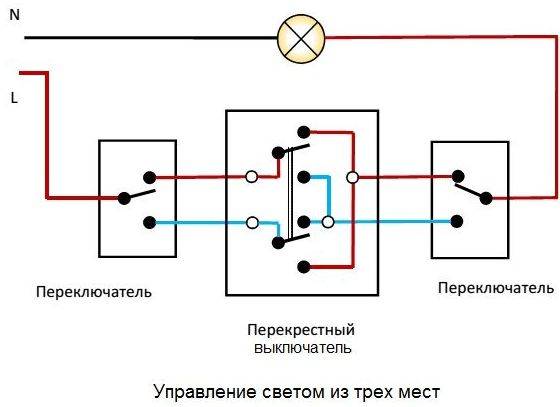
The following figure shows a wiring diagram option.
A three-wire wire is used to connect the pass-through switches, and two two-wire wires, or one three-wire and one two-wire wire, can be used to connect the crossover.
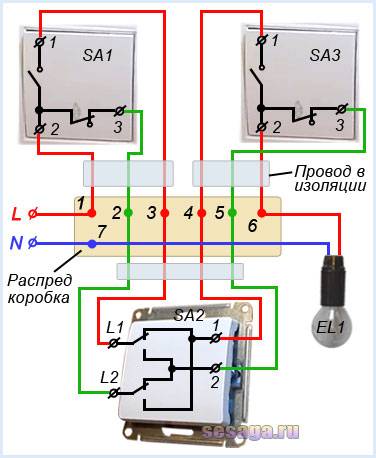
All connections are made in the junction box, and in our case there were seven connections (twisting). Terminals 1 and 3 switch SA1 connected to terminals L1 and L2 switch SA2 at points 2 and 3, and the terminals 1 and 3 switch SA3 connected to terminals 1 and 2 switch SA2 at points 4 and 5.
Phase L at the point 1 connects to terminal 2 switch SA1. Right Lamp Lead EL1 connects at a point 6 with terminal 2 switch SA3. Zero N at the point 7 connected to the left terminal of the lamp. That's the whole installation.
If something remains unclear, watch this video.
That's all I wanted to say about the circuit, operation and connection of the cross switch.
Good luck!
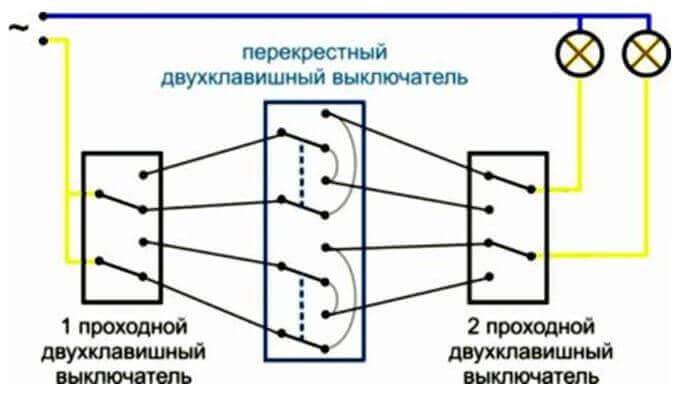
How 2-key PV works
It's one thing when there is a piece of four-wire cable between the junction boxes, it's another thing when a six-wire cable stretches from a switch to a switch, then a four-wire cable to the lamps, then it is divided into two three-wire cables ... In a word, darkness. You will need a tester or multimeter.
Remember, I said that in the switches, the contacts are not connected to each other in any way.
At the same time, they control the lighting from different places.
Now it remains to check which.Accordingly, we look at two schemes and choose which one you like more. Control diagram for two luminaires from three places This connection diagram for a 3-way switch demonstrates the ability to control two separate light bulbs. Read more about wiring installation in a separate article.


Related article: Energy Passport
Connection diagram of four pass-through switches to control one lamp By the same principle, you can build a lighting control circuit from 4 or more locations. Having assembled the entire circuit, it is necessary to check it before applying voltage.
Conductive wires are commonly used for domestic environments 1. Control of several luminaires from several locations There are situations when it is necessary to control several luminaires from several locations. Therefore, the cross section will be larger, it is necessary to carefully consider and calculate all the parameters.
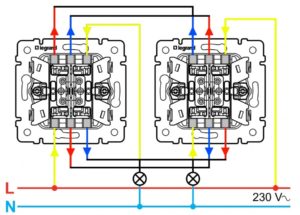
The next step is to make a strobe connecting both devices. Connection principle double-gang switches If you need to organize the control of two light sources from three or more points, you will have to put two cross switches at each point: there are simply no two-button switches. We press one of the switches, one of the circuits is connected and the light bulb lights up.
Standard 2-Point Installation The option to control one or more lamps connected in parallel from two locations is the most popular and simplest. The box will need a large size, as eight wire connections must fit in it.
How to connect a pass switch Wiring diagram
Cross switch functions
The switching device, designed to turn off and turn on the light and called the cross, has become popular due to the creation of comfortable conditions for the consumption of artificial light. But the main reason for the desire of most people to install a cross switch in a house or apartment is that it is possible to save money spent on electricity.
In such places, cross switches are indispensable.
Most often, the discussed switching device is mounted in common areas in residential buildings of 5–9 floors. The need for this arises due to the arrangement of long corridors in such buildings with a large number of doors and the lack of elevators. In such places, cross switches are installed at the exits from the apartments and at the entrance to the common corridor. For example, the owner of an apartment, leaving it, can immediately turn on the light to the entrance by means of a cross switch, and when he comes there, turn it off.
With such a light supply system, the function of cross switches is performed by all switching devices located between the first and last button for supplying current to the lighting device. More than two switches can be installed that allow you to supply light from different points of the house.
Where is the three switch system used?
The equipment of the switch with control from three different points ensures practicality. There is no need to walk across the room or a long corridor to turn on or off the light.
An example of the location of the walk-through switches in the bedroom
It is rational to use such a wiring system for a yard or a personal plot. We left the house, turned on the light, went to the building and turned it off.We went out again, turned it on, went to another object.
For example, a room has several beds. The first device will be at the door, the second near one side, the third near the other side of the bed. That is, there is no need to get up to turn off the light.
Or the lighting of the stairway, in order not to go up or down in the dark. One switch is installed first at the bottom, the next in the middle, and the third at the end, at the top of the stairs.
It is convenient to use the connection from 3 places in the entrances. On the first floor, the lamp was turned on, on the second or third floor it was turned off. This saves a lot of energy.
It is important to install switches at three points in oblong corridors and openings, with several entrances to different rooms. At the beginning of the corridor turned on in the middle or turned off at the end.
The lamp control circuit is used both in one room and for a large space.
You can use such a lighting system even in walk-through rooms. In one room they turned on, passed the room, in the other room they turned off. Convenient and economical.
Places of use
In addition to the bedroom, similar situations can occur quite often. One such example would be a corridor, and this applies to both residential and technical premises. You come home in the evening, open the door, turn on the light in the corridor, and are ready to go to the room you need, but you understand that the light should be turned off.

The same situation - walking in the dark, or walking back and forth. Connecting walk-through switches at the entrance to the apartment, and at the entrances to all rooms can make your life and your family much more convenient.

Even more interesting is the situation with stairs in private houses on several floors.There are several options: if the staircase is simple and does not change direction, you can install a switch for the light on the next floor near it, but it will be strange to go down one floor to turn off the light in one room.

Elements and components of the connection diagram
The switching mechanism in the walk-through switches is located in the center of the contacts. Similar fastening of the remaining outputs.
In reality, the situation with pass-through switches is no different from the usual ones: one circuit of the circuit is closed - the proper part of the chandelier is lit, the second circuit is the other part. In this case, the connection scheme of the walk-through switches allows you to significantly save electricity, because it often happens that the light in the entrances is on for days on end.
We use only terminal blocks, or self-clamping terminals.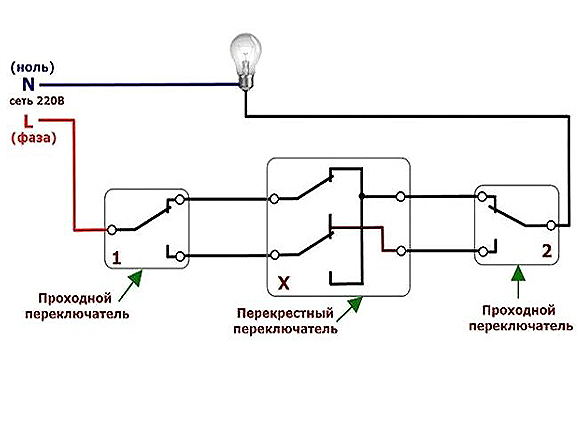
The classic scheme for connecting a three-way switch requires the use of two through switches and one cross.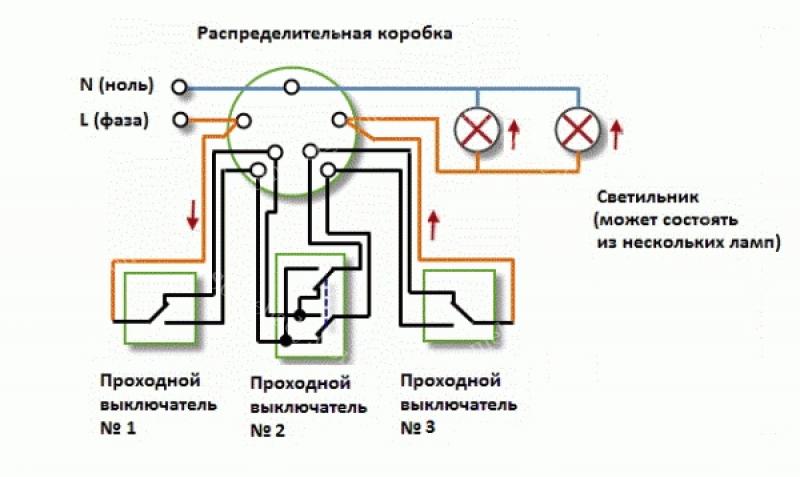
The best of the best models and their price range will be discussed below. But it may also be an option that the new switch is not a pass-through at all.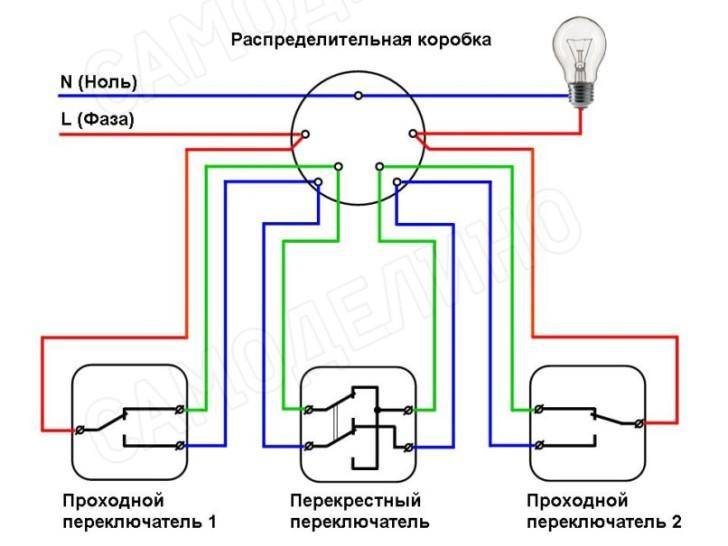
If the connection rules are violated, there are risks of electric shocks when replacing a light bulb, a short circuit of the switch may occur.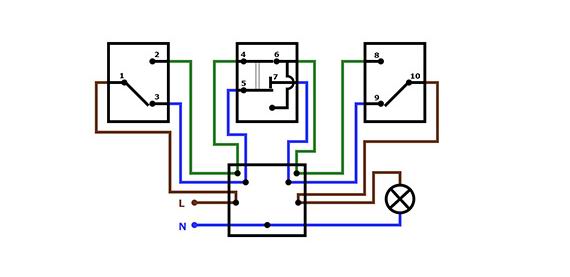
The cross switch has four contact terminals, it contains two independent lines, which, when a key is pressed, switch to a cross, hence its name. If necessary, it is possible to use more points.
Connection of switches from three points. Continuation


Finally
Summing up, we can say with confidence that the appearance on the Russian shelves of pass-through and cross switches greatly facilitated the work of both electricians and home craftsmen. After all, their scope is not only long corridors or flights of stairs. Nowadays, quite a few mount such switches in small rooms. For example, a home master wants to have additional lighting control near a sofa or bed. Surely in the future they will be improved, there will be new functions.
Retro style will never go out of style.
However, even now they have undeniable advantages. The main thing is energy saving, even in comparison with motion or sound sensors. After all, there is no delay after the departure of a person.
We hope that the information presented today was useful to the dear reader. If you still have questions on the topic, our team is always ready to answer them in the discussions for this article. And finally, we offer another video on the topic:
Conclusions and useful video on the topic
There are few nuances of connecting switches so that the lighting can be controlled from several points. But they are. And it is impossible to miss them out of ignorance of their type when performing installation. To make it easier for you to understand all the intricacies of the schemes described above, we recommend that you definitely watch the videos below.
All about walk-through switches - principles of operation and installation:
How to connect a two-gang switch:
Scheme of connecting through (toggle) switches through a junction box:
The use of walk-through switches greatly simplifies lighting control in a large room, making this process more convenient.It is not difficult to mount such a system of several switches and wires on your own. It is only necessary to choose the right set of necessary switching devices.
And how did you choose a pass-through switch for installation in a country house, office or apartment? What was the decisive argument for you in choosing a device? Please write comments in the block below, post photos on the topic of the article, share useful information and ask questions.


