- Switch device with two keys
- Mounting a switch with one key: analysis of the circuit and sequence
- Wiring diagram for a switch with one surface-mounted key
- Where to place the switch: make a choice according to the rules
- Scheme of connecting a pass-through switch from 2 places
- Installation procedure for 2-point walk-through switches: wiring diagram
- Connecting a lamp with a two-gang switch
- Basic recommendations for the installation of two-gang switches
- What is the difference between the elements responsible for connecting the wiring?
- Connection pros and cons
- Connection instructions
- Wiring diagram for a two-gang switch for two bulbs
- The principle of operation of the equipment
- Connection of two-button walk-through switches
- Mounting
- Types of single-key devices and their differences
Switch device with two keys
If you need to connect two bulbs or two groups of lamps, while it is necessary that they turn on independently of each other, you need a two-gang switch. They are very easy to distinguish - two buttons are installed in one case. By the way, the presence or absence of backlight does not affect the connection. Neither the schemes nor the principles change.
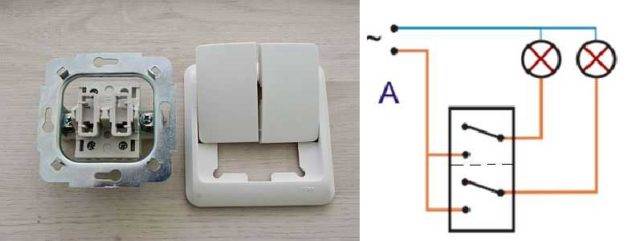
How does a double light switch work
The circuit of a two-key switch is simple: these are two normally open contacts, each of which is controlled by its own button. This means that in the initial state, no current flows through the switch, since the contacts are open. By pressing the key, we close the contacts, the bulbs light up. This is the principle of operation of any switch. The two-key one differs only in that it has two groups of contacts.
If you look at the device of a two-button switch, we see that it has one input and two outputs. A phase is connected to the switch input, wires that go to the light bulbs / chandelier are connected to the output.
Mounting a switch with one key: analysis of the circuit and sequence
It would seem that connecting the wiring in the switch to the existing wiring is a simple matter, however, this work requires theoretical skill and practice, and in order to get it, we advise you to carefully study this section.
First, learn the rules for working with electricity:
- Your hands must be protected, for this use special rubber gloves or assembly gloves for electricians.
- Remember how to behave with bare wires: in no case do not touch them with your bare hands.
- Make sure all wiring is de-energized. For reliability, check the presence of voltage in the intended area with an indicator screwdriver and a multimeter.
- Do not confuse the color of the insulation when connecting conductors. Blue to blue, green to green, and so on.
- Be sure to refer to the installation diagram for the particular type of switch.
It is important to follow these guidelines at all times when dealing with electrical work.It is forbidden to use improvised means for work, you must have: pliers, tongs for cutting insulation, electrical tape or heat shrink tubing, caps to hide switching, a screwdriver with an indicator
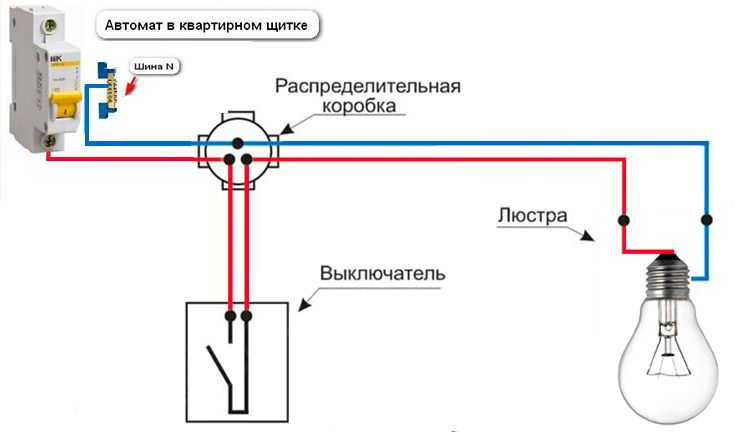
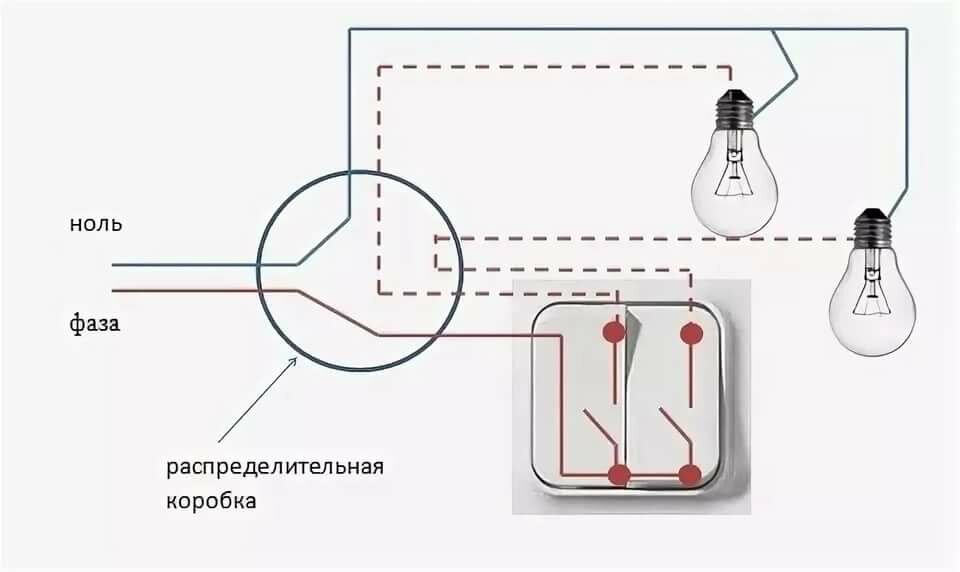
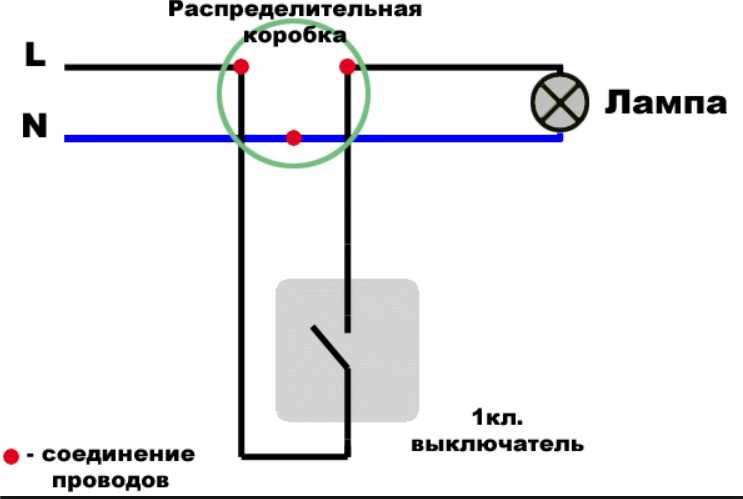
Wiring diagram for a switch with one surface-mounted key
The connection diagram of a one-button regulator is quite simple, since it takes a minimum of time, where there is no risk of making a mistake. Let's consider it in more detail.
Two wires come from the electrical panel to the junction box (L - phase and N - zero). From the switch, the phase wire comes to the junction box and is connected to the L core from the shield. The phase from the switch is also switched in the distributor with the phase of the light bulb, and the neutral conductor from the lamp is twisted with zero from the electrical panel.
NOTE!
The phase of the switch must be connected to break. Otherwise, do not wait for the correct operation of the device.


Where to place the switch: make a choice according to the rules
If you are still not very familiar with the operation of the electrical network, of course, you will not know why it is important to follow the recommendations for the location of the electrical appliance. The principle of location depends on the room in which you want to install. In addition, there are specific rules relating specifically to switches:
In addition, there are specific rules relating specifically to switches:
- It is better to install lighting control devices near doorways, at least 750 mm from the floor and 150 mm from the edge of the wall. This is done not only for ease of use, but also because such a requirement is written in technical regulations.
- Position the one-button switch so that it is on the side of the handle when the door is closed.In addition, try not to block the space to the device with pieces of furniture.
- Light control points in bathrooms, pantries, lavatories should be placed outside at a height of at least 800 mm.
- It is better to install switches in living rooms indoors for the convenience of adjusting sources at a similar height.
- If it is necessary to install pushbutton switches for lighting in the living room, aquariums or other types of decors, the rule is to place them in a convenient place.
USEFUL INFORMATION!
The strobes for wiring from the switch to the distributor must be made at least 1.5 cm deep so that they can be hidden under the plaster without visible defects.
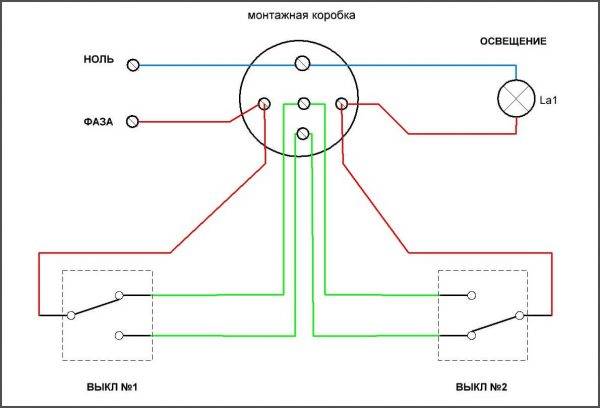
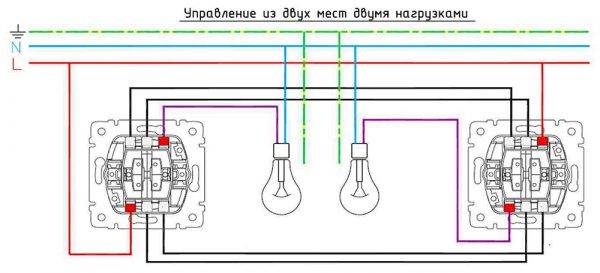
Scheme of connecting a pass-through switch from 2 places
The circuit of the pass-through switch from two places is carried out using two pass-through single-key devices that work only in pairs. Each of them has one contact at the entry point, and a pair at the exit point.
Before connecting the feed-through switch, the connection diagram clearly shows all the steps, you should de-energize the room using the appropriate switch located in the control panel. After that, it is necessary to additionally check the absence of voltage in all the wires of the switch. To do this, use a special screwdriver.
To perform the work you will need: flat, Phillips and indicator screwdrivers, a knife, side cutters, a level, a tape measure and a puncher. To install switches and lay wires in the walls of the room, it is necessary to make the appropriate holes and gates, according to the layout plan of the devices.

Unlike conventional switches, pass-through switches have not two, but three contacts and can switch the “phase” from the first contact to the second or third
Wires must be laid at a distance of at least 15 cm from the ceiling. They can be located not only in a hidden way, but also be stacked in trays or boxes. Such installation makes it possible to quickly perform repairs in case of damage to the cable. The ends of the wires must be brought into the junction boxes, in which all connections are also made using contactors.


Installation procedure for 2-point walk-through switches: wiring diagram
All actions for installing switching devices are carried out on the basis of a connection diagram of 2 places of pass-through switches, which can be found on the Internet. It differs from the installation of conventional switches, since there are three wires here instead of the usual two. In this case, two wires are used as a jumper between two switches located in different places in the room, and the third one is used to supply the phase.

Any type of lamps can be used as a light source in such a scheme - from conventional incandescent lamps to fluorescent, energy-saving and LED
Five wires should be suitable for the junction box: the power supply from the machine, three cables going to the switches, and a connected wire directed to the lighting fixture. When constructing a connection diagram for a single-gang pass-through switch, three-core cables are used. The zero wire and ground are led directly to the light source. The brown wire of the phase, which supplies current, passes through the switches, according to the diagram, and is output to the lighting lamp.
The switches are connected at the break of the phase wire, and zero, having passed the junction box, is directed to the lighting fixture. Passing the phase through the switch will ensure safety during repair and maintenance of the luminaire.
Installing the pass switch consists of the following sequence of actions:
- the ends of the wires are stripped of insulation;
- using the indicator, it is necessary to determine the phase wire;
- using twisting, the phase wire should be connected to one of the wires on the first switch (white or red wires are used here);
- the wires are connected to each other by the zero terminals of the switches;
- connecting a separate wire of the second switch to the lamp;
- in the junction box, the wire from the lamp is connected to the neutral wire;

When installing walk-through switches yourself, you need to take care of safety
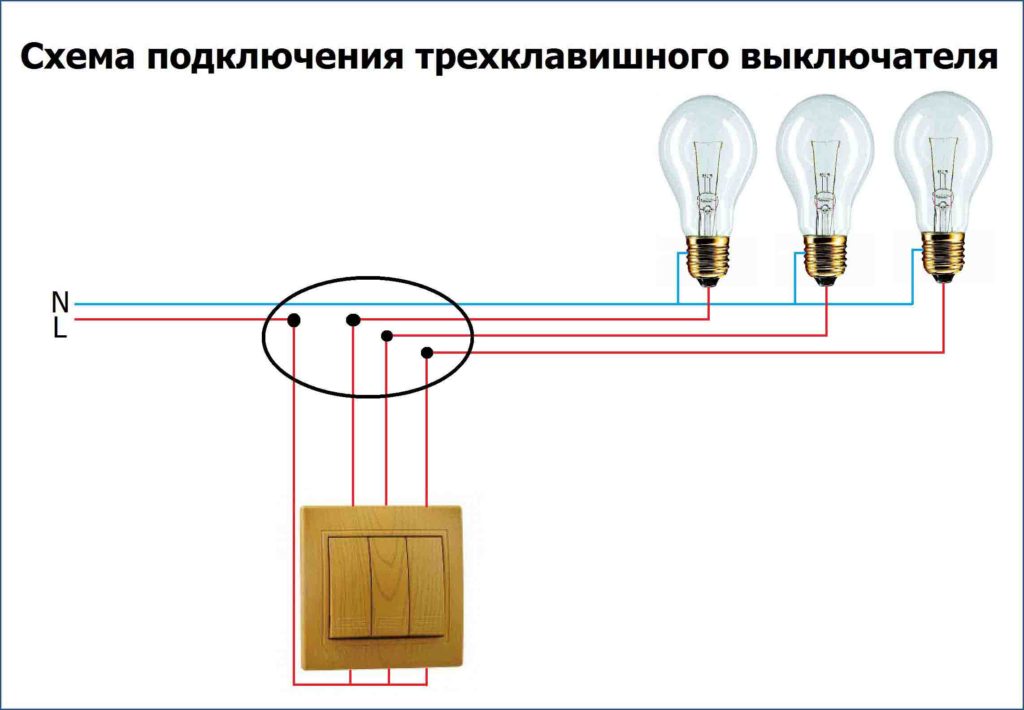
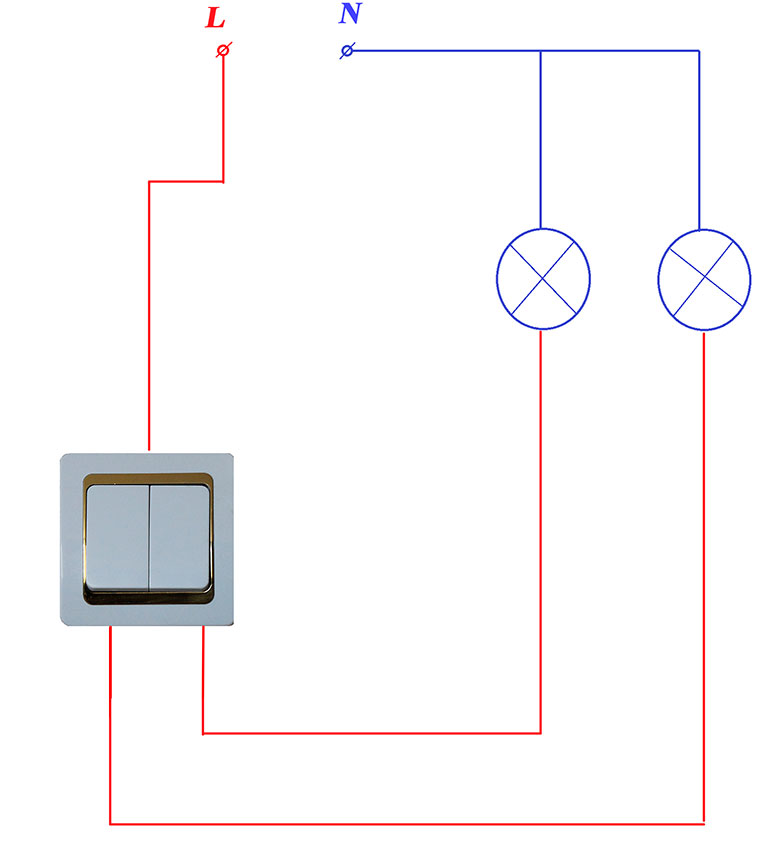
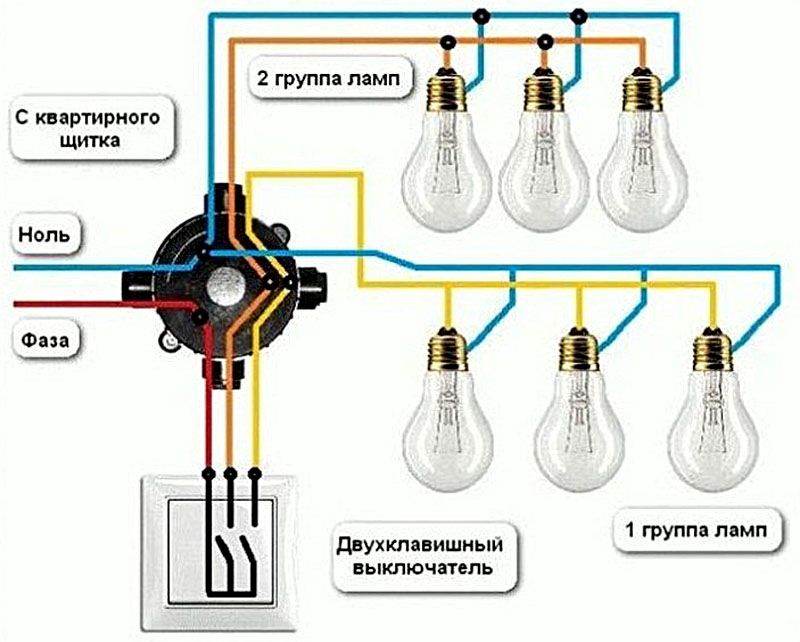
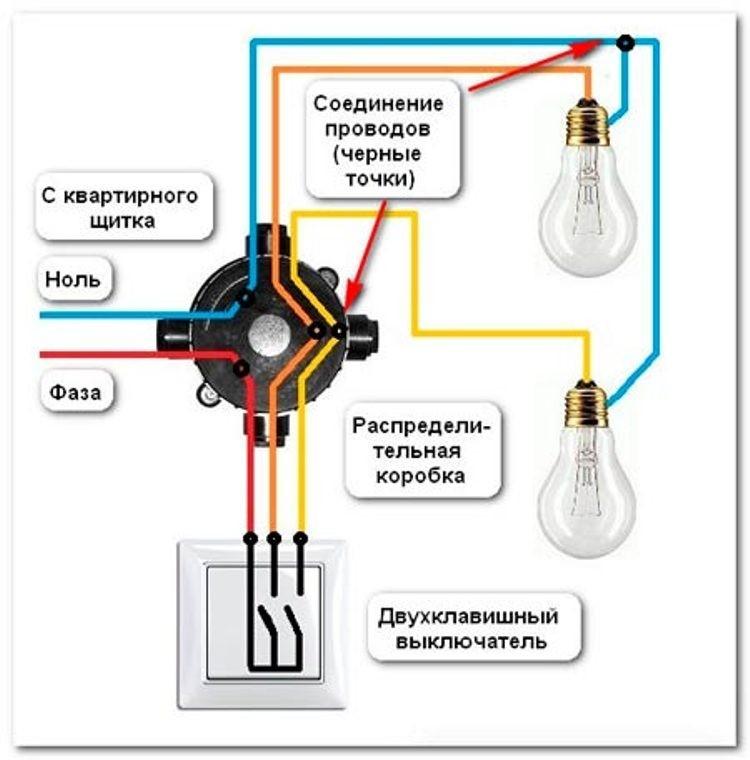
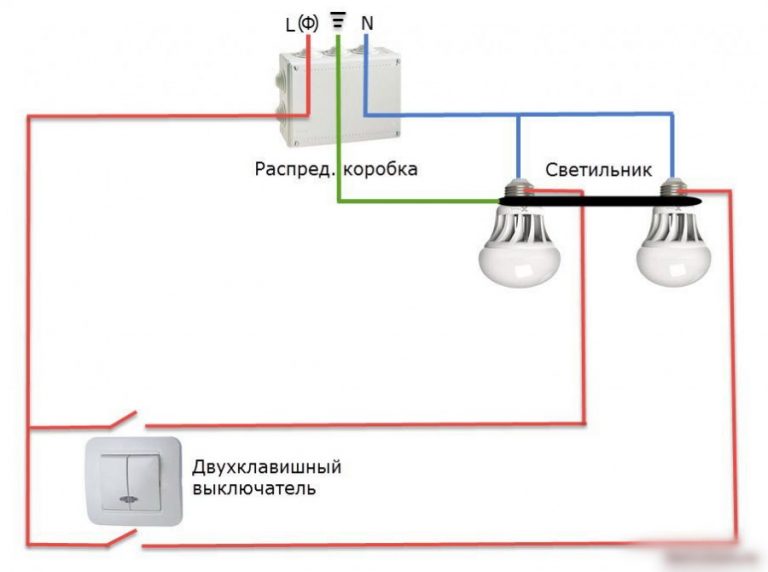
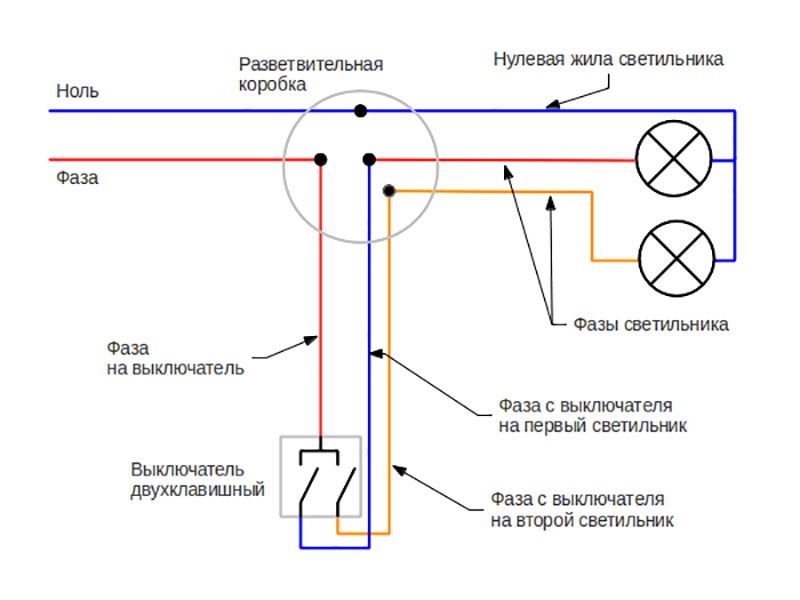
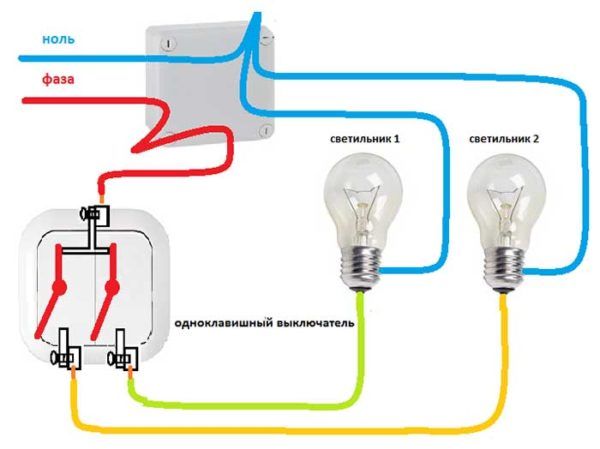
Connecting a lamp with a two-gang switch
Connection to a double switch is carried out in almost the same way as a single-gang switch. In fact, these are two single-key devices placed in a common case. You can also connect two light bulbs to one switch.
Before starting installation, you need to find out where the contacts are located. Sometimes their circuit is located at the back of the device. Dual devices have three pins - a common input and two separate outputs. The input is a phase wire from the junction box or from the outlet. On two outputs, the light bulbs located in the lamps are controlled. During installation, the input is located at the bottom, the outputs are at the top. This connection is well shown by the presented diagram.
A three-key switch is connected in the same way as a double switch is connected, only one more output and an additional terminal in the junction box are added to it.
Basic recommendations for the installation of two-gang switches
When installing both standard and two-button switches, it is recommended:
- The placement height from the floor level should be 90 cm.
- The distance from the door or window opening to the pass switch must be at least 15 cm.
- Junction boxes with switching must be located in a visible place and at the same time they must be placed at a distance of 15–30 cm from the ceiling level.
- It is recommended to use a 3-core flexible cable with a cross section of 1.5 mm² (VVGng, PVSng, ShVVP, and so on) for the installation of walk-through switches.
- Cable and wiring products must be laid in corrugation, in strobes or cable channels.
- All metal surfaces of fixtures must be grounded without fail.
What is the difference between the elements responsible for connecting the wiring?
For work, it is more convenient to use switches equipped with self-clamping terminals. To fix the wire, you just need to strip it and fix it in the terminal. In the clamps, the cable has to be pressed with a screw. Moreover, over time, the connection may weaken. It is necessary to periodically check and, if necessary, tighten the screw.
The switch body can be made of plastic or ceramic. The second option is used for large loads.
In some models of switches, built-in lighting is used.It is convenient if you need to find a device to turn on the light in a dark room.


Connection pros and cons
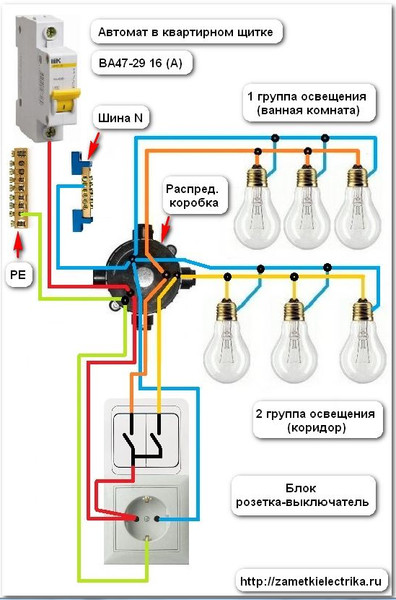
First you should optimize your system of electrical devices that will be connected to the same circuit. For example, people often install lighting in separate toilets and bathrooms by wiring to a two-gang switch. This makes it possible to control the light in different rooms with one switch. It is especially convenient to turn off the light in both rooms at once.
Also, a double switch can be used in a chandelier with two bulbs, which will allow you to adjust the intensity of the light. When both keys are turned on, the light will be as bright as possible, and when one is turned on, it will be dim.
Remember that installing a shared switch in two or more rooms is reasonable if the rooms have adjoining walls. In case the rooms are located remotely from each other, use separate switches.
As you already understood, installing such an electrical system will greatly simplify the management of energy consumption and lighting brightness. Moreover, the installation of an adjacent light control unit will save money on the required materials and installation work.
Connection instructions
The installation of a two-gang switch will be considered on the example of hidden wiring, as the most difficult process.
The work is carried out in several stages:
- A hole is made in the wall using a perforator or a drill with a crown.
- Using a chisel or screwdriver, wall elements are removed.
- Checking that the dimensions of the circuit breaker body match the circumference of the hole.
- Chasing a channel for laying wires.
- Making a hole in the housing for connecting wires to the terminals.
- To increase the adhesion of the building mixture to the surface, the hole is sprayed with water.
- Immersion of the hull and sealing the space with a mixture.
- Cleaning excess mixture with a spatula.
- Leveling and decorative finishing of the wall treated with mortar.
- Putting the body in the finishing position after the mortar has hardened.
Fixing the frame in the hole is carried out using screws and a screwdriver
- Connecting the working elements of a two-key device and mounting them inside the case.
To perform further work, you will need to turn off the mains voltage.
- Using an indicator screwdriver, zero and phase are determined, it is advisable to mark the wires in order to avoid confusion in the future.
The phase wire is inserted into the housing and connected to the terminal of the incoming contact. Two outgoing wires with a phase are connected to the outgoing contact terminals.
Connecting the working elements of the switch to two keys before fixing it to the wall
The working element of the switch is fixed in the housing with a metal frame.
- After installing the keys in place, the device is completely ready for operation.
If the lighting devices are connected to the network, after applying voltage, they will light up, which indicates the correct installation.
Upon completion of the main work, it remains only to install the switch keys in place
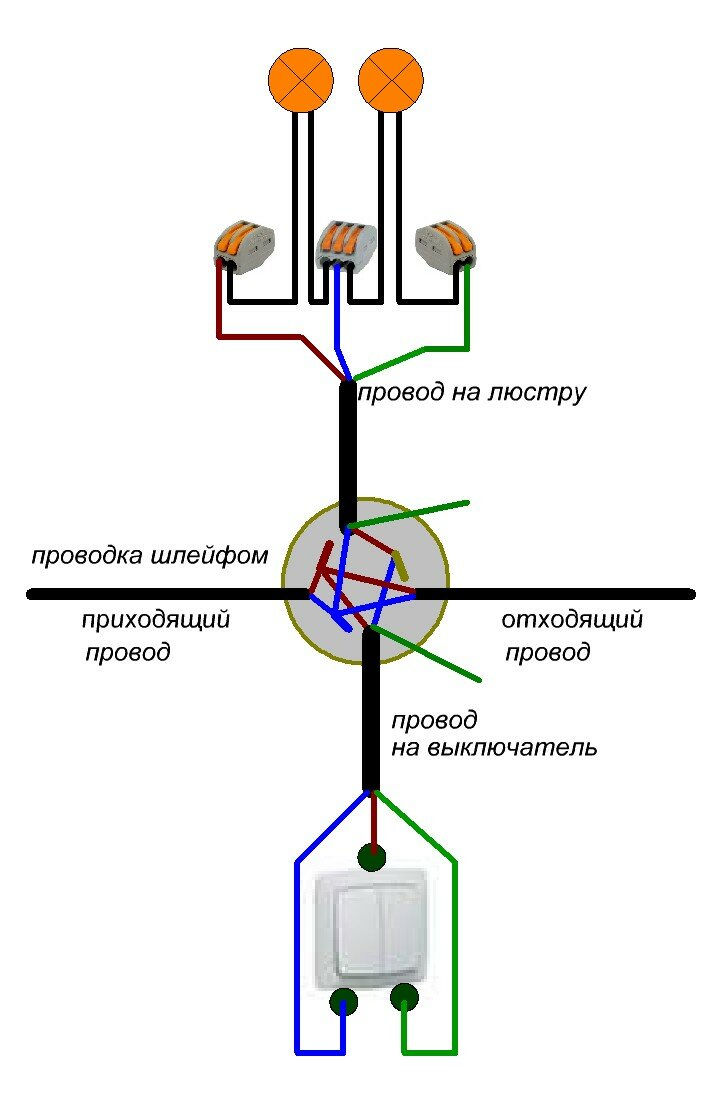
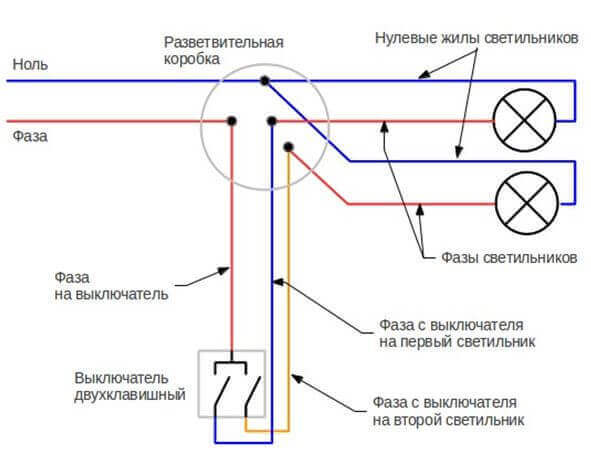
Wiring diagram for a two-gang switch for two bulbs
The classic option for connecting a two-gang switch to a chandelier with two lamps or groups is as follows. Zero is fed directly to the light sources. The phase is switched and sent to the switch. Two wires come out of the switch, each of which is sent to its own lamp.There are two keys on the device - when the first one is activated, the first lamp turns on. When the user presses the second button, the circuit is completed and the second lamp lights up. Both keys can be turned on at the same time - then all the lamps will light up, and there will be a maximum brightness mode.
New wiring must be grounded. A ground wire is also connected to each of the bulbs.
The principle of operation of the equipment
The single pass switch is equipped with three contacts in each of the operating mechanisms. The contacts are the connecting links between the two circuit breakers of the system, with their help the current is transferred from one circuit to the next, as shown in the diagram:
 Scheme of connecting the pass-through switch
After changing the position of the mechanism, the current is directed to a specific terminal. One of them always remains closed.


For the light source to work, both devices must be fixed in the same position.
Elements required to connect a standard feed-through switch:
- junction box (a box into which the ends of the wires are inserted);
- two conventional single-key switches;
- wires (the number depends on the type of connected equipment);
- any lamp, lamp or chandelier.
Grounding from the box is carried out directly to the light source. The phase is combined with the common terminal of one block, and its output contacts are connected to a pair of the same elements of the other. Next, the wire from the second switch goes back to the box, after which voltage is supplied to the lighting device.When installing the equipment, the switches are placed in boxes, after which a lighting device is installed, from which a two-core cable is output. At an accessible distance, a junction box is placed to which the wires are connected.
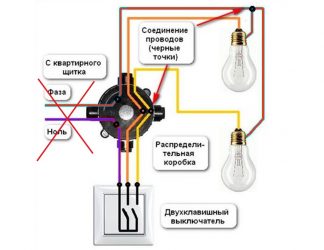
Connection of two-button walk-through switches
The toggle switch with two working keys consists of a pair of single structures, united by a protective housing. The mechanism functions similarly to a single-key device.
 Wiring diagram for a two-gang pass-through switch
The finished device, consisting of a pair of two-key elements, makes it possible to control two light sources independent of each other.
 Wiring diagram for a two-gang pass-through switch from two places
If it is necessary to connect several changeover devices, the choice of a two-gang device will be beneficial due to the savings in cable and junction boxes.
Mounting
Before connecting the circuit breaker, you must print or draw a wiring diagram. With its help, it will be easy to make the necessary connections in the junction box. But ALWAYS turn off the power first!
After that, grooves (strobes) for the cable are prepared with a wall chaser when wiring is closed or cable channels / corrugations are attached - when open. Next, a crown is drilled on concrete and then holes are knocked out in the wall for mounting boxes or socket boxes are screwed to it with an open method.After laying the wires between all points and fixing them with alabaster in strobes or closing the channel cover / fixing them on insulators, we clean their ends by 1-1.5 cm and connect the wires in the junction box using terminal blocks / spring terminals / PPE caps / soldering / crimping sleeves / clip "nut". It is FORBIDDEN to connect the wire with a twist! Especially aluminum and copper.
From the apartment / stair shield to the junction box, as a rule, a cable comes in which there are two wires: “phase and zero”. We determine the energized phase wire with an indicator screwdriver (turning on the light for a short time), mark it (turn off the power again) and connect it to one of the wires of the three-core cable that is laid to the switch. We connect the other two wires from this cable to the wires going to the chandelier. Try to make sure that the wires leading to the chandelier are connected in electrical cartridges with a central contact. We connect the neutral wire from the shield to the neutral wire going to the chandelier.
In the switch (if all the wires are the same color), we find the phase wire with a continuity and insert it into the input terminal. Often it is indicated by the Latin letter "L". If the wires are of different colors, we connect to the input the wire that was connected to the phase wire in the distribution box. The remaining two wires from the cable are connected to the outgoing clamps. They are marked with symbols in the form of outgoing arrows. In the chandelier, if it is three-horned, we connect one phase wire with two wires from the ceiling lights, the second with the remaining ceiling light.
We insert the working mechanism into the socket, fix it with screws, put a decorative frame on top. We turn on the light in the shield and try the keys one by one.From one key, one ceiling should be lit, from the second - two, and when both keys are involved, then all the lamps should light up.
Below is a short video showing the whole process.


Types of single-key devices and their differences
Surely you have seen that the houses are dominated by modern types of dimmers, made in different designs, colors and other features. Switches are usually divided according to the type of installation, the degree of protection, the number of contacts for connection. By type of installation, single-gang switches are:
- overhead (suitable for mounting to external wiring);
- for hidden wiring (suitable for cables that are hidden in the wall);
- built-in (installed on the wires of lamps, sconces);
- walk-through (light control comes from different places).
By security, it is customary to divide switches with one button into devices for:
- wet rooms;
- outdoor installation (on the street);
- closed rooms.
By the number of contacts there are:
- walk-throughs;
- single-pole;
- bipolar.

Single-key switches are most widely used, as they are distinguished by simple installation and ease of maintenance. Even a novice can handle the connection of the device, subject to the instructions and knowledge of the principle of operation of the switches.
USEFUL INFORMATION!
When switching the contacts of the switch and wiring in the room, wear gloves with electrical insulation and be sure to de-energize the electrical network.