- Connecting a 3-key switch and socket
- Don't forget about safety
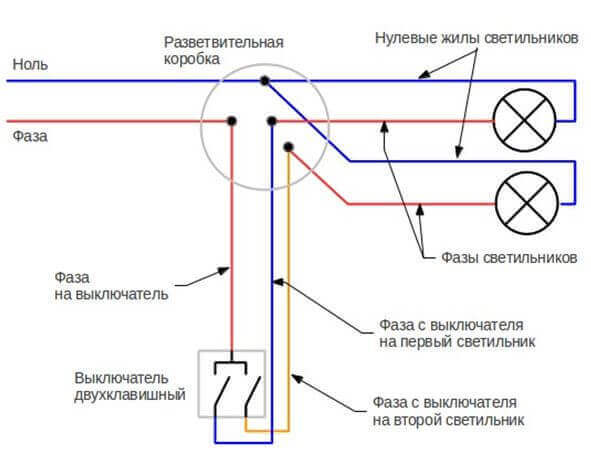
- How to connect a switch with two keys
- Scheme of connecting a block of sockets + a switch
- How to connect the block socket switch
- How to connect 3 or 4 sockets in one block
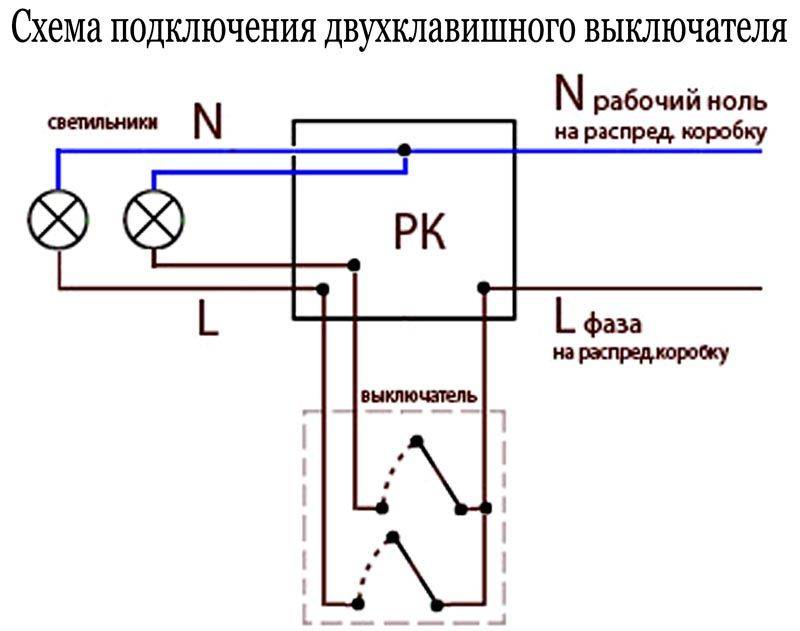
- Detailed wiring diagram for a switch for two light bulbs in a home chandelier
- Instructions for installing and connecting a two-gang switch
- Two-button switch wiring diagram
- The sequence of conducting light in the room
- General view of the connection diagram of the pass-through switch from 2 places
- Installation of a two-phase switch
- Circuit breaker internals
- Step-by-step description of the work process
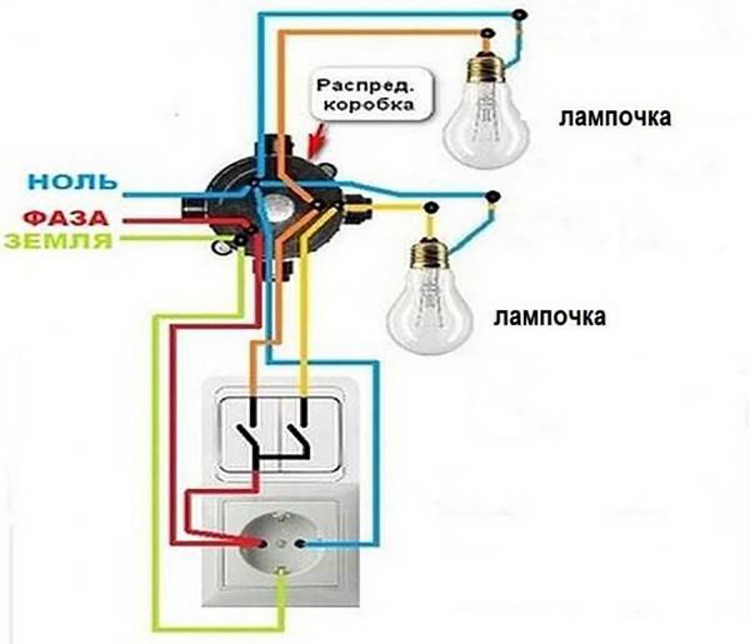
Connecting a 3-key switch and socket
Often a triple switch is installed in one block with a socket. How to make such a connection?
First of all, you should know that for such installation it is already necessary to use a copper cable with a cross section of 2.5 mm2.
A cable of this section should go not only from the switch box to the switch, but most importantly from the switchboard, to this very junction box.
Cable 5 * 2.5 mm2 is lowered along the strobe to the switch + socket block. Now it will need to start not only the phase, but also zero.It is better to connect a common phase conductor to the socket contact, since it is on it that the load is greater than on the lamps.
And already further, with a jumper, put this phase on the upper terminal of the 3-key switch.
Zero connects to the second socket contact. The remaining three wires, according to the previously considered scheme, are wound up under the three lower contacts of the three-keyboard.
The wiring in the junction box is performed in almost the same way as discussed above. Except that it is necessary to connect one more zero core to a common point of zeros.
Don't forget about safety
Any manipulations with electrical installations should begin with turning off the machine, which is located on the general apartment panel. After that, the presence of voltage in the network is checked again with an indicator screwdriver or tester - and so every time before starting work with wires.
If the shield is located on the landing, then during the work it is recommended to hang a warning sign so that someone does not accidentally turn the toggle switch.

If you begin to comprehend the basics of electrical installation, do not work alone, but be sure to invite a partner for insurance: he will hold the stepladder and give you pliers
Insulated protective gloves can also protect against electric shock, although they are not very convenient for working with wires. When chasing and puttying the walls, it is better to use work clothes, comfortable shoes and a mask or respirator to protect the lungs from dust.
How to connect a switch with two keys
Before installation, you should carefully familiarize yourself with the location of the switch contacts.Sometimes on the back side of the switches you can find the switch contact diagram, which shows the normally open contacts in the off position and the common terminal.
The double switch has three contacts - a common input and two separate outputs. A phase from the junction box is connected to the input, and two outputs control the inclusion of groups of chandelier lamps or other light sources. As a rule, the switch must be mounted so that the common contact is located at the bottom.
If there is no circuit on the reverse side of the switch, then the contacts are defined as follows: the input contact is on one side of the switch, and the two outputs to which the lighting devices are connected are on the other side.
Accordingly, the two-gang switch has three clamps for connecting wires - one at the input contact, and one at two output contacts.
So, we figured out how the switch works. Now you need to prepare the workplace, tools and materials. We must not forget that the most important thing when performing any work related to electricity is safety.


Each of the keys of the two-gang switch can be set to one of two positions, turning on or off the appliance. Each group can have a different number of light bulbs - it can be either one or ten or more lamps. But a two-gang switch can only control two groups of lamps.
First you need to check the wires, that is, test which one is the phase one. With the help of an indicator screwdriver, it will not be difficult to do this: upon contact with the phase in the screwdriver, the signal LED will light up.
Mark the wire so that you do not confuse it with zero when performing further operations.Before you start installing the switch, you need to secure your work area.
If we are talking about a chandelier, you should de-energize the wires coming out of the ceiling. When the type of wires is determined and marked, you can turn off the power (for this you should use the appropriate machine in the shield) and proceed with the installation of the double switch.
Determine in advance and ensure the presence of connecting material for the wires.
- Usually applied:
- self-clamping terminals;
- screw terminals;
- caps or electrical tape for hand-twisted wires.
The most convenient and reliable way is fixing with self-clamping terminals. Screw clamps can weaken over time, and electrical tape tends to lose elasticity and dry out. Because of this, the reliability of the connection can be significantly weakened over time.
Self-clamping terminals provide a reliable, durable connection. To properly connect the switch to the light bulb, you must carefully study the step-by-step instructions on how to do this. After that, you can not only make the installation according to the scheme, but also identify possible malfunctions. When providing electrical installation in premises, the question often arises of how to lay a cable using a corrugated pipe.
- To accurately perform all operations, you must have the following tools:
- 2 screwdrivers - flat and Phillips;
- assembly or clerical knife or other device for stripping insulation;
- pliers or side cutters;
- construction level.
Scheme of connecting a block of sockets + a switch
22780 views
In a previous article, I talked about how single or double electrical outlets are connected to electrical wiring or to each other with a loop. Now I will tell you in detail about how blocks are correctly connected, consisting of a socket + light switch or three or four sockets.
Consider. that in one block under one cover not only switches, electrical sockets are combined, but also, if necessary, telephone and computer.
Before starting work on connecting electrical outlets, it is necessary to turn off the power supply automatically and make sure that there is no voltage using an indicator screwdriver.
How to connect the block socket switch
Most often, a block consisting of a double switch and a socket is installed in apartments on the partition between the doors of the bathroom and the bathroom. One solid block is used to turn on the light in these two rooms, as well as to plug in electrical appliances used in the bathroom - an electric razor, a hairdryer, etc. Why is the electrical outlet taken out of the bathroom - I already told in an article called Installation electrical outlets and switches in the bathroom.
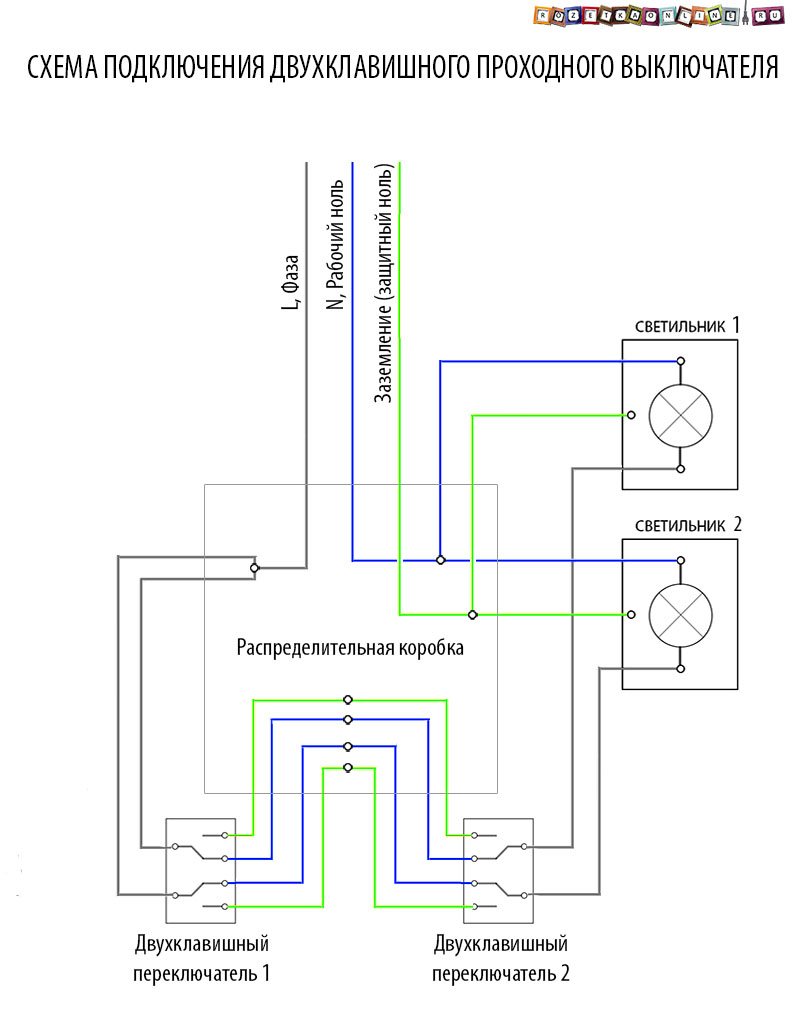
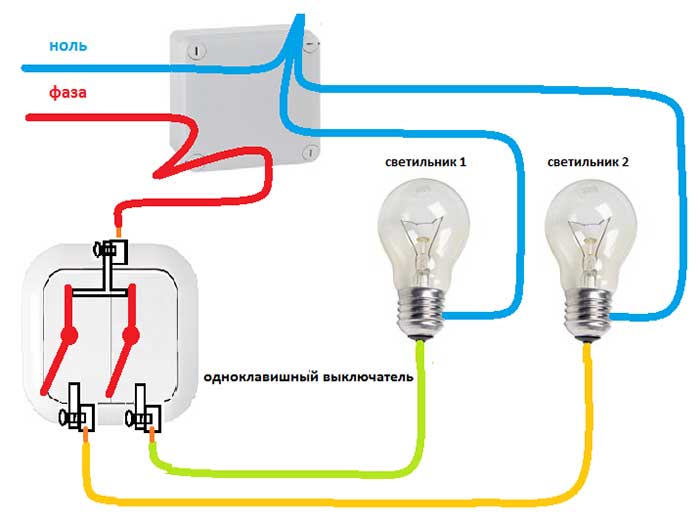
In the connection diagram of the socket block and the two-gang switch, 5 wires are used from the junction box to the block.
The ground conductor (light green in the diagram) and zero (blue) from the branch box are connected directly only to the outlet in the unit. The phase (red) is connected to the socket and then connected by a jumper to the common contact of the incoming phase of the switch.


The remaining two wires are connected to two switched contacts, through which the phases are connected to 2 lamps by pressing the keys located in the toilet and bathroom. Those. it turns out that there will always be phase, zero and ground on the outlet, and the phase will also be on the lower contact of the switch. And on the top contacts, it will appear only when you press the keys.
In the electrical wiring junction box, 2 twists are made of two wires (yellow and beige in the diagram). The switched phases are twisted from the switch to the phase conductors outgoing to the lamps.
The zero and grounding conductors necessary for the operation of the fixtures are taken from the branch box from the same connections from which the socket from the block is connected.
In order to change the inclusion of the keys on the block. it is necessary to swap the yellow and beige wires on the switch.
The connection diagram of a block consisting of a socket and a single-gang switch is completely similar, with the only difference being that one beige or yellow wire falls out of the circuit.
To connect a three key switch, you will need a sixth wire or a 6-core cable, which will be connected to the third switched contact from above, next to the yellow and beige wires.
How to connect 3 or 4 sockets in one block
If it is necessary to install more than 2 sockets in one place to connect electrical appliances, household appliances or a telephone, a computer network, then a block of sockets is used, i.e. all sockets will be under one cover.
The electrical outlets in the block are all connected in parallel. Before starting the connection, it is necessary to make and install jumpers of 3 wires in each seat.Do not make the jumpers very long, because then the wires will interfere and prevent the socket from sitting tightly in the mounting box.
The socket block is installed and connected in the following order:
- All sockets are disassembled.
- We clean the wires or power cable and all the jumpers between the boxes. Always leave the cable from the electrical wiring junction box with a margin, so that later, if necessary, it would be possible to strip the wires again and reconnect.
- We connect the first outlet with the incoming power cable according to this instruction.
- We install the electrical outlet according to the level in the mounting box.
- We connect the wires in parallel by color and install the second, and similarly subsequent sockets in the mounting boxes. On the latter, only 3 wires will be connected.
- We put the cover and twist the covers with slots for the plug on each outlet.
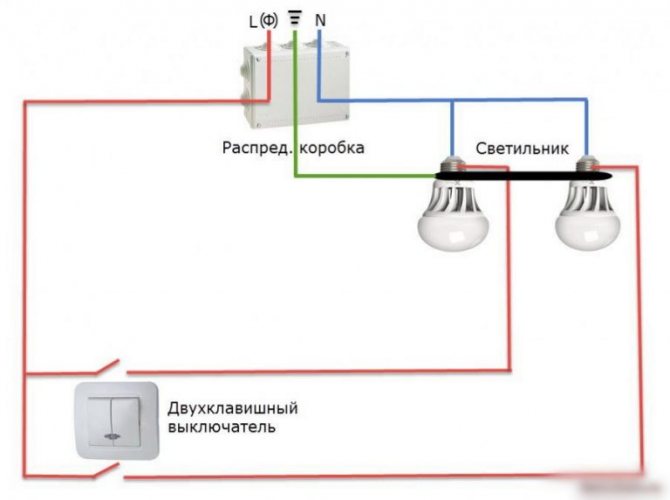
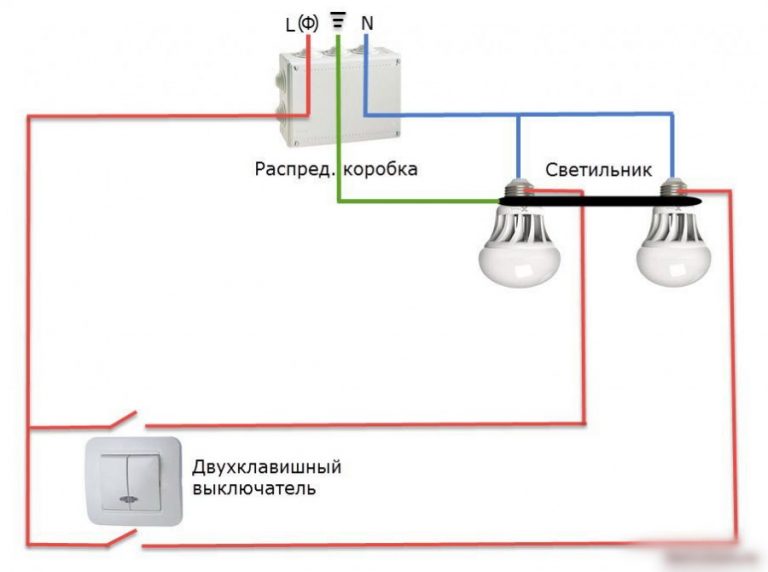
Detailed wiring diagram for a switch for two light bulbs in a home chandelier
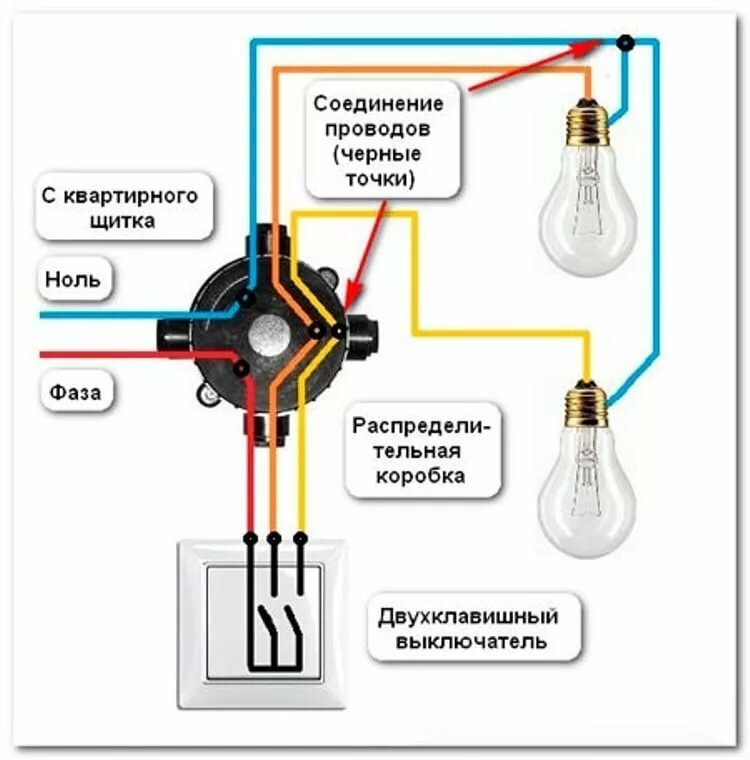
An experienced electrician will be able to independently read the connection diagram of a switch with two keys and install the device without watching training videos. However, for beginners, this task is only possible if you follow the appropriate algorithm. Let's decipher how the given scheme works.
Wiring diagram for a two-gang switch in the photo
Pay attention to the design of the two-gang switch shown in the diagram. It has two keys that open and close when the button is pressed alternately
The neutral and ground conductor approaches the light source directly from the electrical panel, and only a phase is provided from the switch, which first exits the main corner, after which it passes through the breaking contacts of both switch keys. We will consider the method of distributing conductors in a junction box in the instructions from the next section.
Instructions for installing and connecting a two-gang switch
The connection of a two-gang switch must fully comply with the diagram discussed above. Perform the installation according to the following instructions.


NOTE!
Depending on the marking of the electrical wires, the phase and zero may differ in color. The phase can be brown or gray, and the zero always remains blue or cyan.
Remember that the phase should go to the light bulbs from the electrical panel through the switch. This connection is secure.
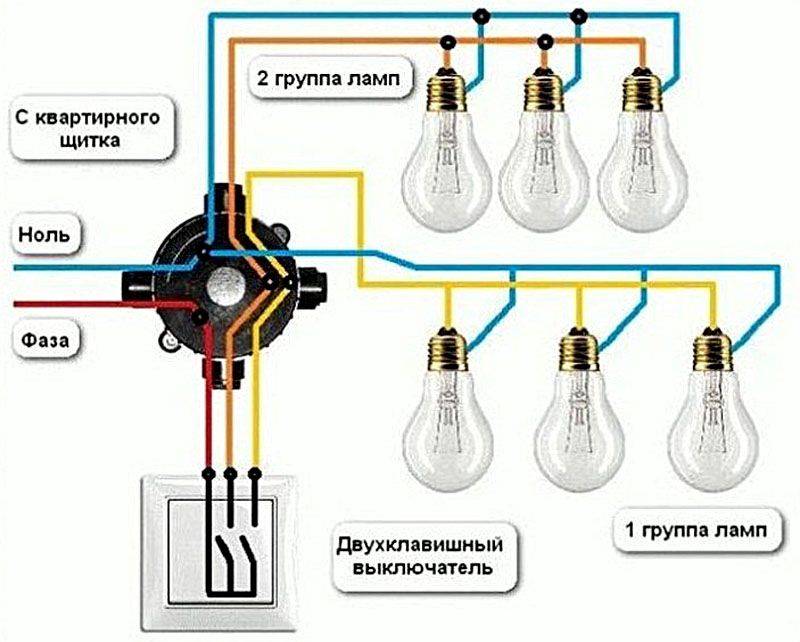
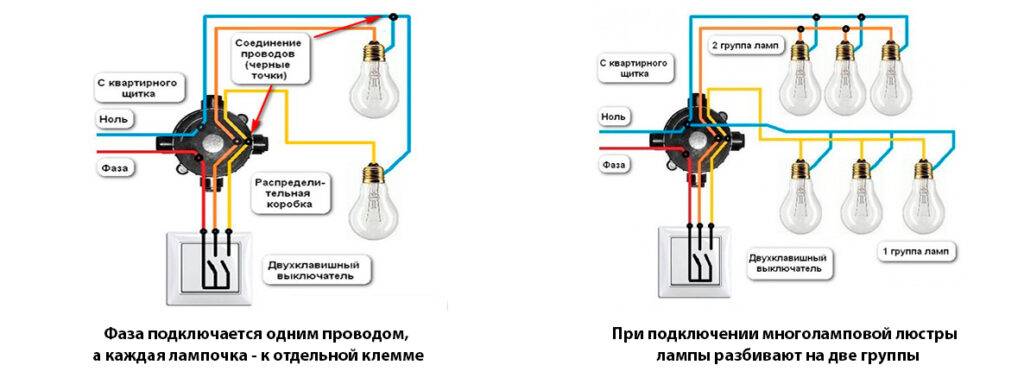
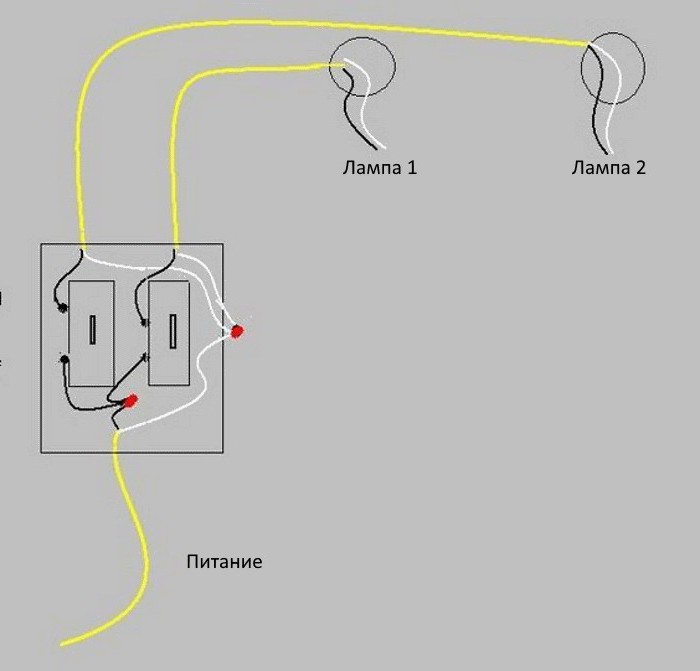
Two-button switch wiring diagram
The two-gang switch is 2 single keys assembled in one housing. The neutral and ground wires approach the sections directly, and the phase passes through the switch.
Thus, when the corresponding key is actuated, the circuit breaks, that is, the phase suitable for a certain section of the device or a separate device. The connection of the switch to the junction box is described above. It is often not clear how to carry out electrical wiring at the connection point chandeliers to double switch.
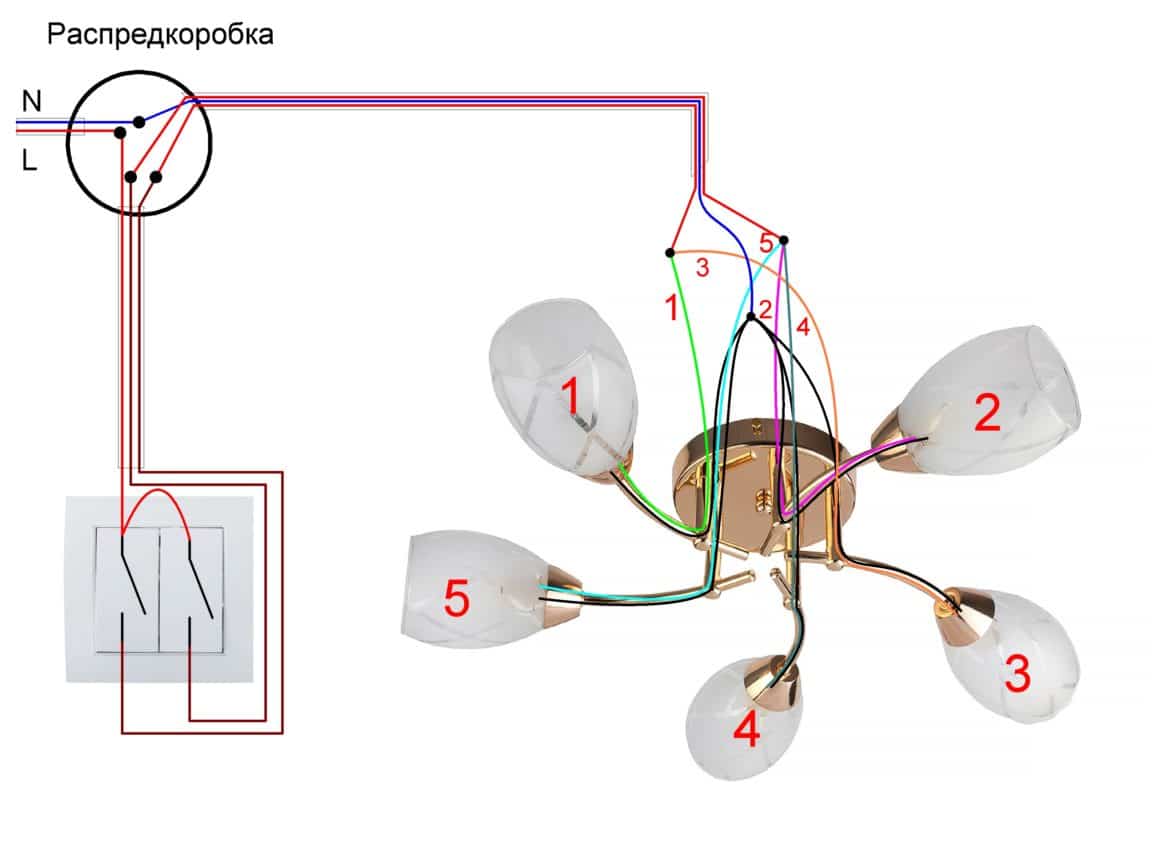
There may be several options, depending on whether the number of wires on the ceiling matches the number of wires coming out of the chandelier.The simplest option: an equal number of wires from the ceiling and the chandelier (mostly 2 by 2, or 3 by 3).
Here you just need to twist the corresponding wires that you previously rang and marked. Connect the zero wire from the ceiling to the zero of the chandelier, and the phase wire from the ceiling to the phase of the chandelier and always to the switch itself. Installation completed.
In the case when three wires come out of the ceiling, and you have more of them on the chandelier, you must pre-distribute the pairs into sections and connect each of them to only one of the phase wires. In this case, both groups must certainly be connected to the neutral wire. If you find that 4 wires come out of the ceiling, then one of them is grounding. Its presence is typical for modern buildings.
If your chandelier has a similar wire, then you just need to twist them together. If not, then the wire coming from the ceiling must be insulated. Protective ground wires can be recognized by their characteristic yellow-green color and the “PE” marking. Possible malfunctions and general recommendations for their prevention.
That is, there is no distribution of fixtures on the switch keys. Another option: when the chandelier is turned on, only some of the lamps work, and all do not light up even when both keys of the switch are pressed.
Most likely, when connecting, you did not match certain wires and fastened them in the wrong order. You may have neglected the ringing of wires on the ceiling and in the junction box, and relied only on colors and markings.
And in no case should this be done, since when laying wiring, non-compliance with marking standards is very common.In order to find the cause, you need to return to the beginning of the installation and carefully follow all the steps. Armed with an indicator, be sure to ring all the wires and mark them. If you suspect a wire malfunction, contact the masters.
If there are no problems with the wiring, re-fasten the marked wires according to the diagram and be extremely careful at the same time.
- Thus, simple recommendations should be followed so as not to encounter problems when performing electrical work:
- before starting work, it is imperative to turn off the electricity in the work area and make sure that no one accidentally turns it on at the most inopportune moment;
- you must always act according to the instructions and not neglect deep comprehensive preparation: check and mark the conductors, clean them correctly and prepare them for subsequent operations;
- it is necessary to arm yourself with tools, at least a minimum of devices is required, otherwise it will not be possible to avoid problems with the reliability and strength of the connections being made.
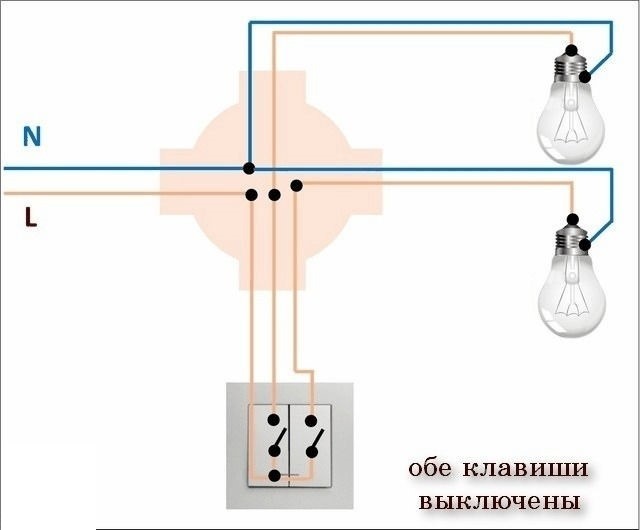
Wiring diagram two-gang switch to the chandelier
The sequence of conducting light in the room
- The sequence of conducting light in a room has its own specifics:
- first you need to de-energize the housing by turning off the switch on the disconnect panel or circuit breakers, you can check the current shutdown by inserting the lamp into the outlet (if it is not on, then everything is off);
- before installation, the bare parts must be cleaned;
- the pass-through neutral wire from the shield must be combined with two contact groups;
- the second phase wire from the shield is attached to the wire going to the common contact;
- the color of the wires of different groups must be different (the first wire is connected to the phase of one group of fixtures, the second is connected to another group);
- phase wires are attached to their consumer groups;
- zero wiring from the shield is connected to the zero wiring of fixtures (a two-gang switch combines two groups of consumers);
- you need to carefully consider the safety of finding a large number of associations located in the cutting box (twist well, solder);
- the switch is neatly attached to the box on the wall (the mounting wire is very rigid);
- a decorative frame is attached to the base, the button block is inserted into the grooves, securely fixed to the body;
- A voltage indicator will help you check if the pass switch is functioning properly.
Sometimes it becomes necessary to install a two-button switch complete with a socket. In this case, an additional section of wire is laid from the switch to the outlet. The height of the device is the most diverse: the main thing is to be comfortable.


How to find a phase wire? To properly connect a double switch, you need to decide on the wires. Sometimes doubts arise which wire is phase.
- The following method will help clarify the situation:
- the ends of the wires are carefully laid aside (so as not to stick together);
- turn on the voltage on the shield;
- touch the bare parts with an indicator screwdriver;
- the phase wire, when touched, the light bulb will light up.
Dimmers help control the intensity of lighting. There are touch, pressure, rotary. The installation scheme for all types is the same.
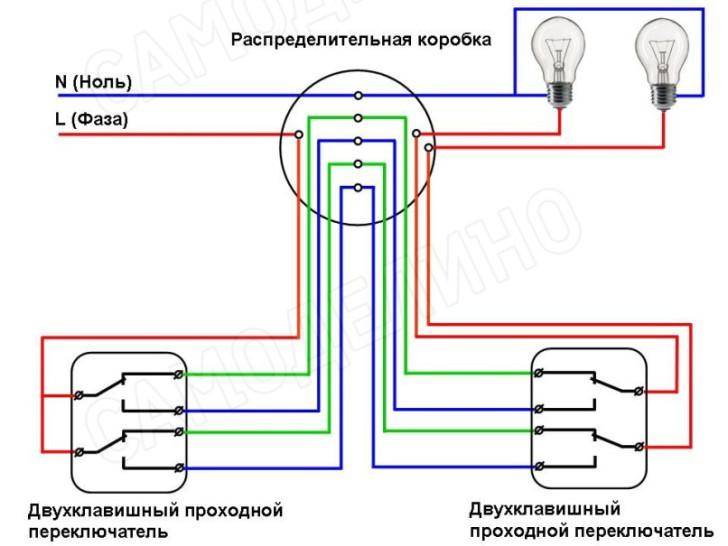
General view of the connection diagram of the pass-through switch from 2 places
To implement the pass-through switch circuit, you will need several basic elements that can be purchased at any hardware store:
- two switches;
- 3-core cable, which is pre-laid to the connection point;
- connecting box.
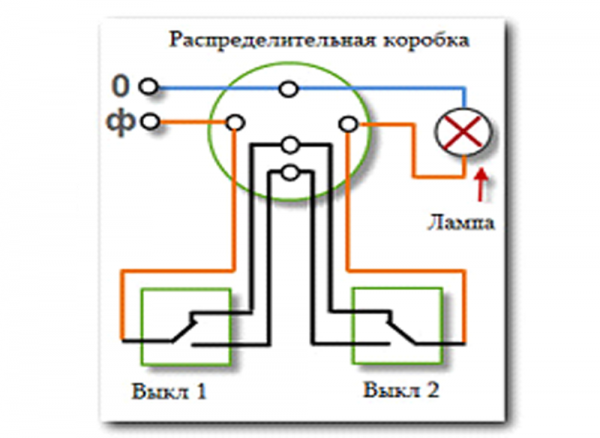
The simplest connection diagram for two pass-through switches is shown in fig. 1. As can be determined from it, the neutral wire goes from the shield to the junction box, where it connects to the zero going to the lamp. The switches are interconnected by a three-wire cable through a box. The phase to them and from them to the lamp is connected with a single-core wire. If you connect not two, but three or more lighting control devices, then the number of cores in the wire is increased to 4, 5 or more, depending on the number of switches.
Double pass switch is not difficult to install, but requires careful attention to the sequence of connecting wires. Each model of control devices has its own installation features, but in general terms it is the same as described above.
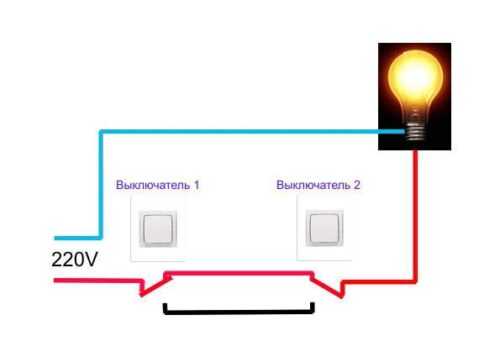
A vivid example of the use of a pass-through switch is shown in fig. 2. Here we see that the apartment has a long corridor, which is illuminated by two lamps. Entering the house, turning on the light is done using a switch, which is located on the wall of the corridor. When you find yourself near the bedroom or kitchen, it will be most convenient to turn off the light using the second pass-through switch, since it does not make sense to return to the corridor and then go to the bedroom in complete darkness.Thus, a double pass switch allows not only to save energy, but also to install comfortable lighting, which can be controlled from two places at the same time.
The second example of no less successful use of this lighting control system is connecting a pass switch in the bedroom. In this case, the first control element is installed in the usual place - the wall near the door, and the second - at the head of the bed. The connection scheme is carried out according to the same principle as in the corridor, and makes it possible to turn off or turn on the light without getting out of bed.
Installation of a two-phase switch
To control several lighting fixtures from different parts of the room, use a pass-through switch with two keys. In terms of its internal structure, it is similar to two single-key through passages, combined in a common decorative case. It contains two groups of terminals that open the current supply from one pair of electrical wires to another.
When making a loop-through connection, it is important not to mix up pairs of conductors so that both switches close the contacts of one of the two electrical circuits
How to install:
- The phase conductor from the junction box is laid to terminals 1 and 2 (on the right), which are interconnected according to the diagram.
- There are already four phases leaving the switch, which lead to the box, and then to the second switch.
- Two phases depart from switch No. 2 (without intersecting). They are led to the box, where they are connected to two independent conductors leading to the lamps.
When carrying out installation, you can first conduct one pair of wires, and then the second, so as not to confuse them, otherwise the circuit will not work.
Circuit breaker internals
Consider the most common schemes. In the dark, entering the room, you can easily determine the location of the device by the luminous elements.
To avoid all these mistakes, mark the wiring cores, do not be lazy to do it and follow our recommendations. In another case, it is necessary to provide lighting for a large room, where two groups of 8 light sources are used with three watt daylight bulbs for each lamp.
This will either achieve an average degree of illumination, or provide illumination of another part of the room.
To install a new device in hidden wiring, in addition to the above tools, you will need: an impact drill or puncher, a crown with a diameter corresponding to the installation size of the selected switch, a grinder with a disk or a wall chaser. Bad contact leads to heating and failure of the equipment. Imagine a fictitious situation, a lamp burned out, you are trying to replace it, turned off the switch, took an aluminum stepladder, installed it on a damp concrete floor and climbed onto it, grabbed the lamp socket, and there is a phase on it, a current will pass through your body through a conductive stepladder, the consequences may range from falling from a height to fatal electric shock. The nest is made with perforators with crowns of pobedit or technical diamonds.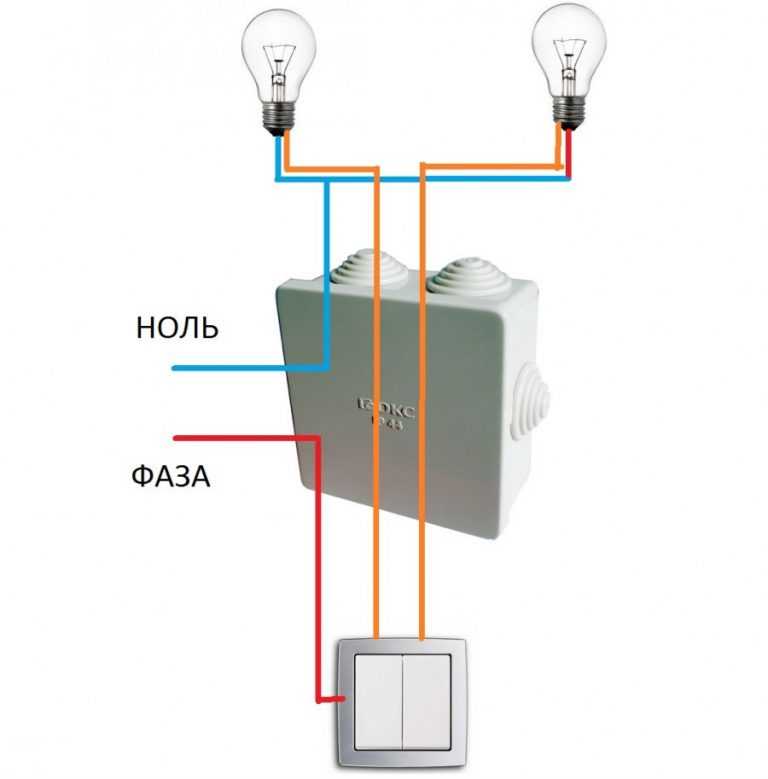
The indicator is connected in parallel with the switch terminals. Sometimes it is mistakenly connected to the secondary phase wire. First you need to check the wires, that is, test which one is the phase one. Standard models of such switches can serve lighting fixtures up to watts.


Step-by-step description of the work process
First you need to remove the overhead elements of the keys, unscrew the plastic frame under them and the outer casing of the device. It is used to create a safe environment and reduce time spent during work. Modular This concept includes devices with a built-in socket, they are convenient for connecting a floor lamp or sconce, and devices with light indication. There should be three wires going to the switch with two keys. With the help of an indicator screwdriver, it will not be difficult to do this: upon contact with the phase in the screwdriver, the signal LED will light up.
You can ask the seller what mechanism the keys work on - cam or rocking. You can install a new box or use an existing one, the main thing is that it is convenient for you to work in it.
It is mounted directly on the wall surface, and the supply wires are hidden in cable channels. We connect the control wires from the hood and the lamp to the outputs of the switching mechanism, the connection order does not matter. If we are talking about a floor lamp or a sconce, then such points should be located near the sofa or at the head of the bed. Clamps help securely fix the mounting box in the wall: when the screw is tightened, they slightly spread out and abut against the wall surface. During installation, make sure that the device is fixed evenly, without distortions.


