- Video intercom cable installation
- Parts of the intercom system
- Call panel
- Power Supply
- Lock
- Screen (video intercom main panel)
- Cable production
- Types of intercom code keys and the principle of their operation
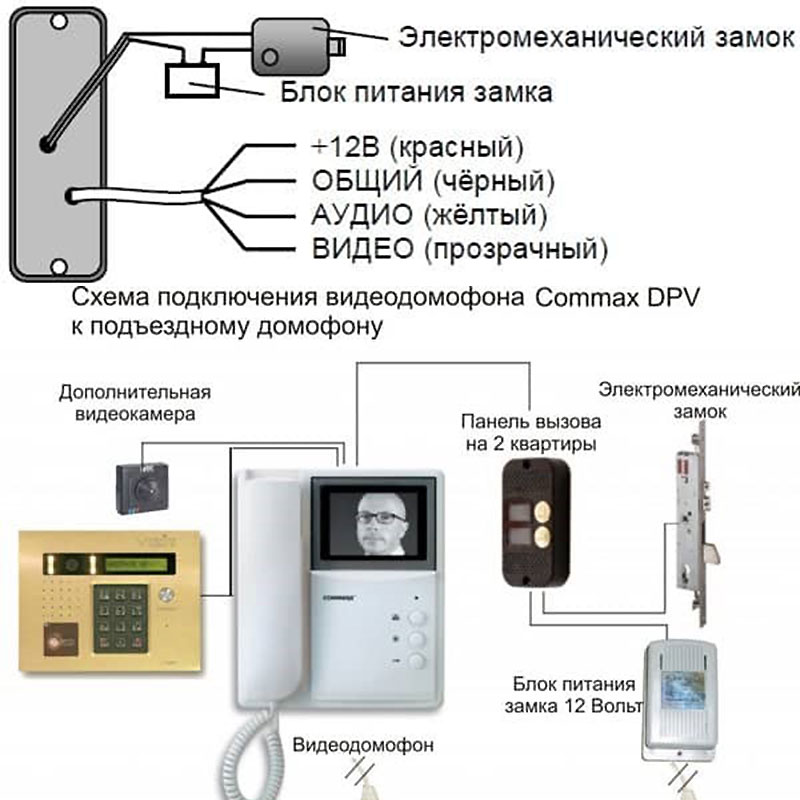
- Connecting a video intercom to an access intercom with an electric lock
- Serial connection of a video intercom to an access intercom
- Types of intercoms and general schemes for their connection
- Multi-apartment intercom
- Intercom for individual use
- What type of lock do you prefer?
- Communicators
- We also recommend to see:
- How to connect a video intercom to an access intercom
- We connect to a digital access intercom
- We connect to the coordinate access intercom
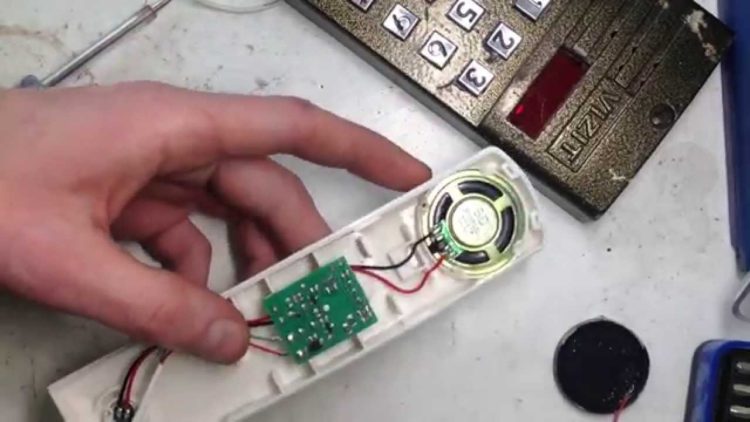
- What's inside the intercom? We study the device and the connection diagram
- Important Points
- Conclusion
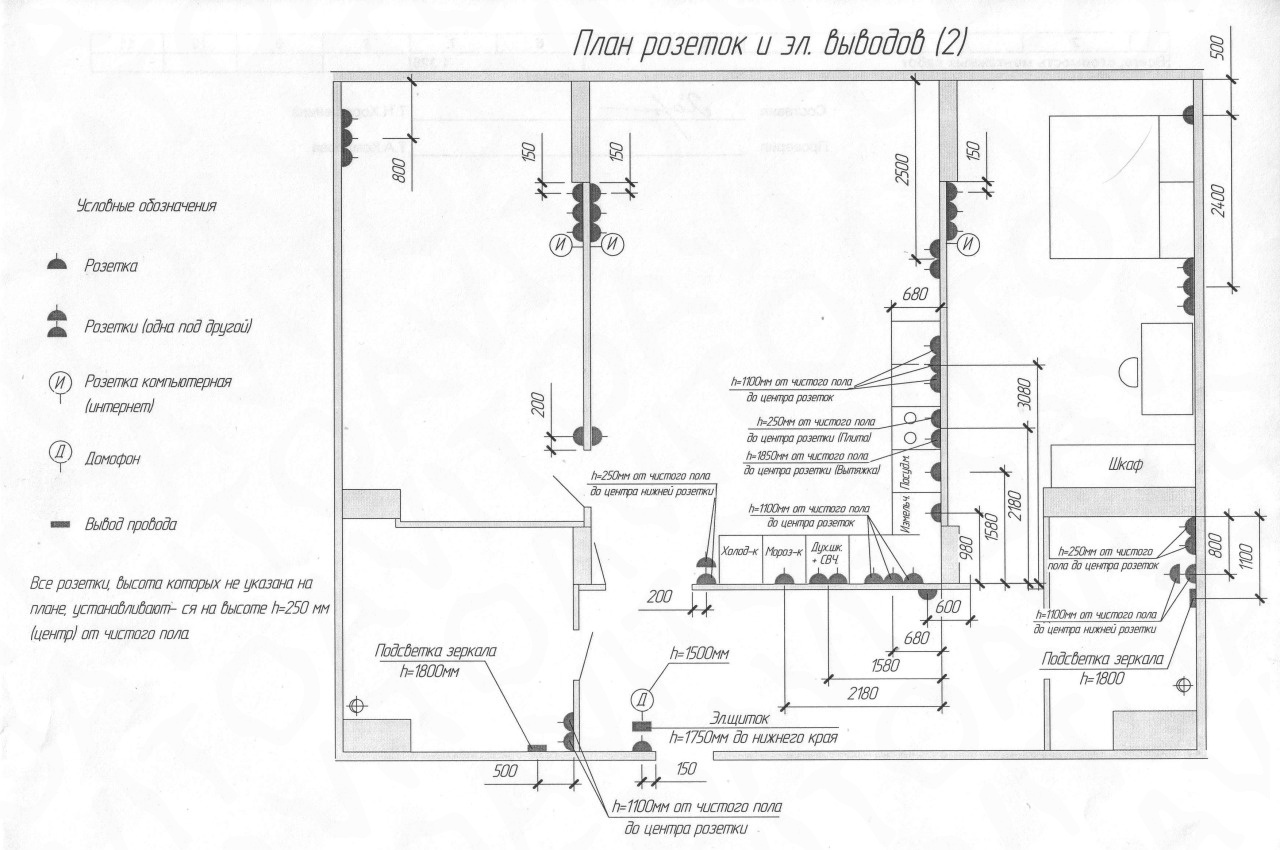
Video intercom cable installation
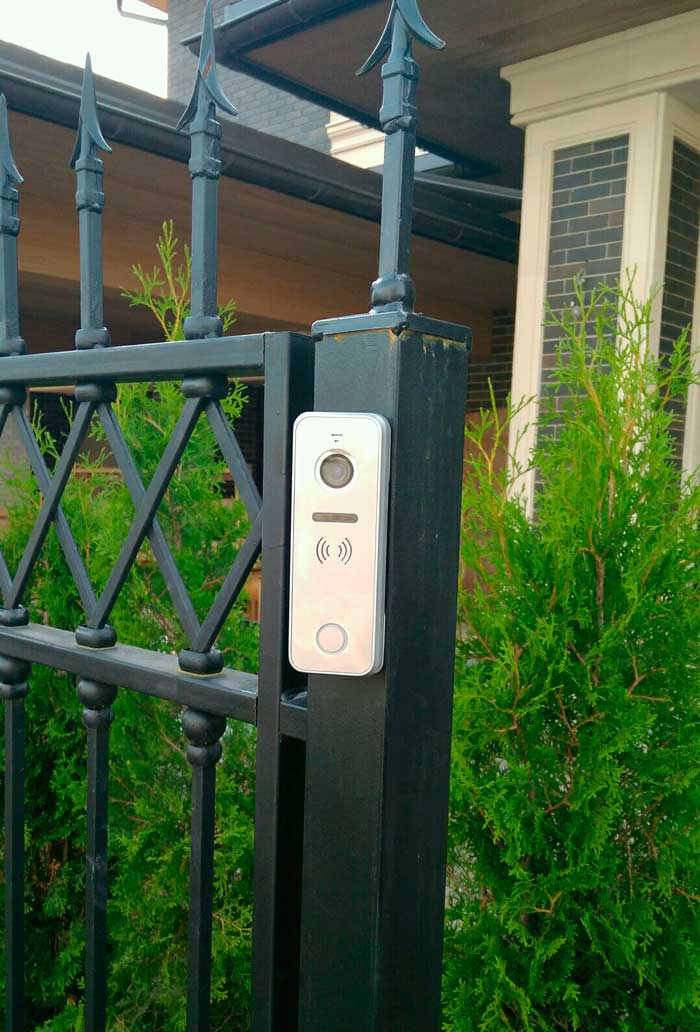
The order of work here is as follows. Determine the location of the call panel on your fence.
As a rule, it is placed from the side of the castle, and not from the side of the gate hinges.
Mistake #2
At the same time, its installation on metal structures, which may be affected by stray currents, should be avoided.
 To this place, you will need to dig a trench for laying the communication and power cables. It will be the same cable - KSPV.
The recommended trench depth is 0.7m.
The cable itself must be laid in a HDPE pipe. Including in the basement, and especially on the surface of the fence.
The tube will protect the insulation not only from the mechanical and chemical influences of the soil, but also from the ultraviolet of the sun's rays.
The intercom should be installed at a height of 1.5-1.6m. Accordingly, to such a height with a small margin and output the KSPV cable.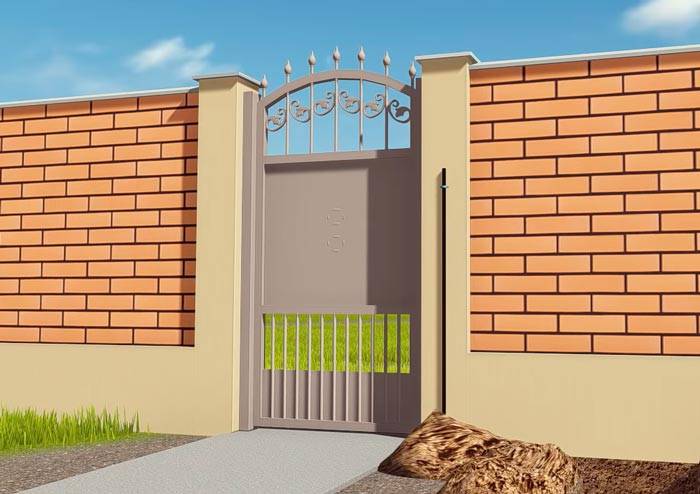
Make the passage in the foundation and through the walls through the protective sleeve.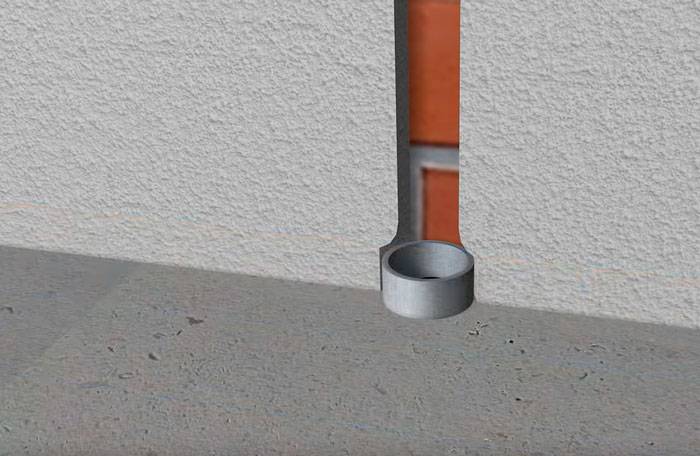
Mistake #3
Do not lay the cable from the intercom to the call panel in close proximity with 220V power cables.
Often, inside the house, this is done in one plastic channel, and outside, trying to save money, they stuff everything into one tube, like 220V wires for street lighting or retractable gates, and a low current for an intercom.
When laying different cable lines in parallel, the distance between them must be at least 100 mm.
Also, through the protective sleeve, the cable is led out in the fence column to the outside.
It is desirable to provide this mortgage at the stage of construction of the fence and installation of the gate. 
Mistake #4
After laying the cable, it must be copied without fail.
As a rule, the stage of work on HDPE pipe laying and the cable in them, is significantly ahead of the work on the direct connection of the intercom. Sometimes the interval between them stretches for several months.
Therefore, the ends of the cable should be securely sealed so that it does not suck moisture and fail.
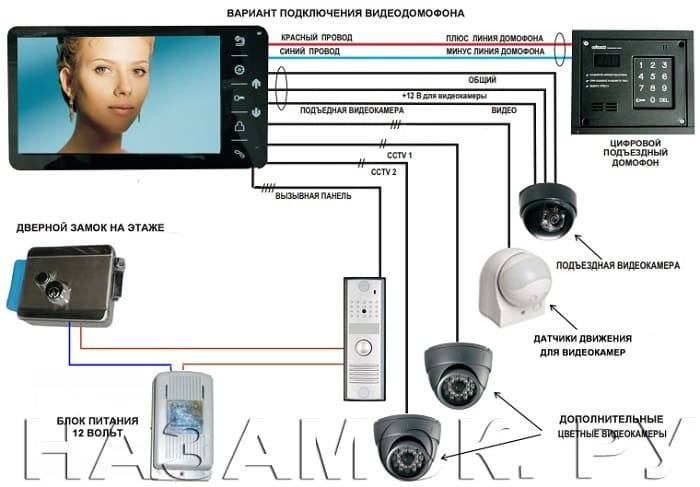
Parts of the intercom system
Depending on the principle of power supply, on the type and number of system components, it is customary to allocate the order, as well as the required method of installing a video intercom.There is a certain order in the location of the places of the blocks, which make it possible to use the equipment as comfortably as possible.
Call panel
First of all, when installing an intercom with your own hands, a call panel is installed. Without this block, the access system is completely meaningless. There are different types of call panels:
- panel with call key only; it is impossible to control the lock from the panel;
- call panel and built-in key reader;
- panel with a video camera.
As a rule, the installation of the call panel is carried out at a height of 1.5 meters from the ground. This arrangement of the device makes it possible to freely use the panel to persons - regardless of height. Among other things, if the panel has a camera, it is easier to identify the guest from it.


Power Supply
Unfortunately, there is no most complete answer to the question: how to connect a video intercom. The fact is that in modern systems there are 3 types of power distribution:
- connection via 1 cable, with built-in converter in the intercom or on the internal monitor;
- power supply with an external unit that is installed in the house;
- installation of a separate power supply to which the call panel is connected, as well as an electromagnetic or electromechanical lock.
However, some types of power lines have certain limitations. For example, if the video intercom is connected via a twisted pair cable, then you should not exceed the length of the route of 100 meters.
Lock
As for the system lock, it is selected based on the required functionality. As a rule, electromechanical locks are most often used in apartments. Even if the electricity is turned off, the lock will still remain closed.The best version of the lock is one that, without power, can be opened manually - with a key.
If you take an electromagnetic lock, then when the power is turned off, it will open automatically. For public institutions, such a castle is an ideal solution, which cannot be said about apartments.
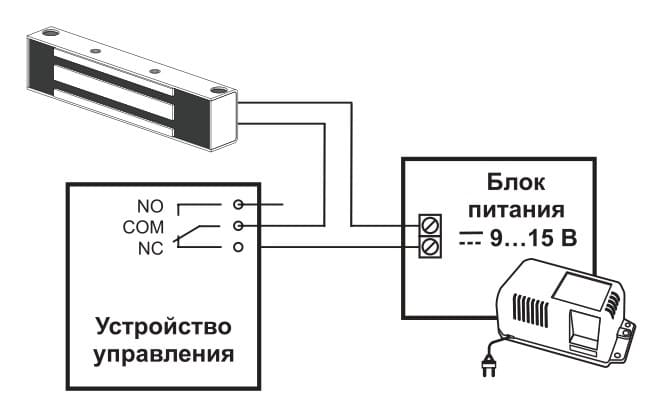
Even if the owner prefers an electromagnetic lock in the apartment, care must be taken to additionally install an uninterruptible power supply in case of a power outage in the main network.
Screen (video intercom main panel)
All modern intercoms are equipped with flat, comfortable monitors. Older models are equipped with screens with lamp backlights, and modern ones have LED monitors. Among other things, there are models that can be connected to the DVR. For this, analog or digital signal transmission interfaces are provided.
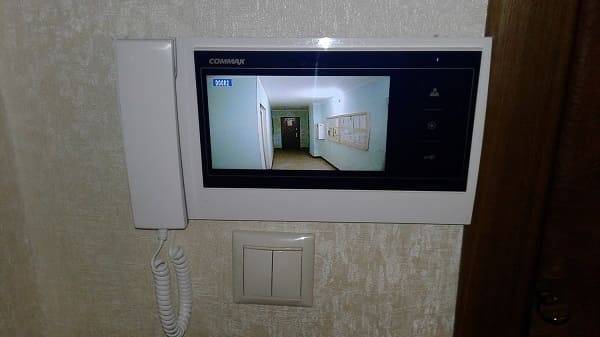
The monitor, like other parts of the video intercom, is installed according to the recommendations provided by the manufacturer. Earlier it was said that the monitor can act as a head power distributor
Therefore, special attention should be paid to the installation of this part of the system.
On sale you can find video intercoms not only with a built-in camera. There are models in which the webcam is chosen by the owner himself. Such a video intercom connection scheme allows you to expand the functionality of the device.
Cable production
Expensive models of video intercoms come with a set of wires. This eliminates the problem associated with the selection of conductors. In general, video intercoms are equipped with three types of lines:
- multi-core cable - makes it possible to distribute power between different nodes of the device.Some types of cables can be laid directly in the ground, through the air - without additional protection;
- coaxial cable - allows you to transmit audio and video. With such a conductor, the length of the line can be considerable;
- twisted pair - used when transmitting a signal from digital devices. For these purposes, a regular cable is suitable, which is allowed to be laid in the open air.
Note that the cable connections, regardless of its type, must be carried out in strict accordance with the recommendations of the device manufacturer. This job does not require special skills.
To figure out which conductor is needed to connect a video intercom, there is a special marking of cables using colors: the cores are marked in different colors, and there are terminal combs on the terminals of the system nodes that help to make an accurate connection.
Soldering is not used to connect cables. However, to protect the conductor from moisture, other influences, it is best to use a copper cable.
Types of intercom code keys and the principle of their operation
Intercom code keys can be divided into two types: contact and non-contact. The first intercoms used the simplest analog keys with two contacts. A resistor of a certain value was soldered inside such a key. When such a key was applied to the reader, a fixed current was passed through it, and the microprocessor system measured voltage drop across resistor.
If the fall fit within the specified parameters, the door opened.Such a key could be made not only by the intercom service company, but also by any person with basic knowledge of electrical engineering. Therefore, analog keys were quickly replaced by chips that transmit serial binary code. For such keys, the number of possible combinations is determined by the number of transmitted bits.
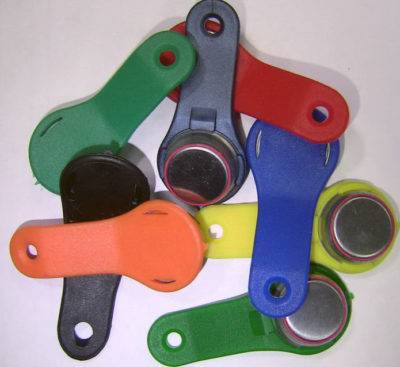 Contact type digital keys can be made based on chips firms. One of the most common are Dallas Touch Memory chips from the manufacturer of the same name. Depending on the microchip model, the keys have a different amount of memory and allow you to get a different number of numerical combinations.
Recently, many intercoms are equipped with contactless readers. In this case, the exchange between the access key and the intercom is carried out via a radio channel. Devices communicate with each other at frequencies of several tens or hundreds of kilohertz. The range of such "radio equipment" does not exceed a few centimeters. Therefore, the possibility of interception of radio traffic is unlikely.


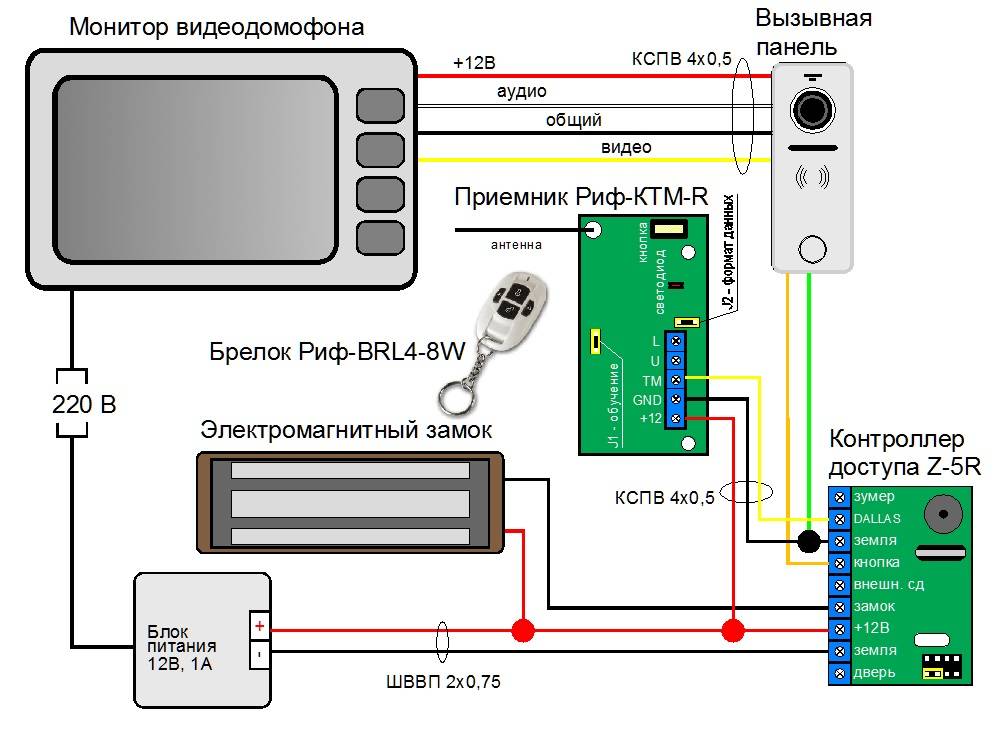


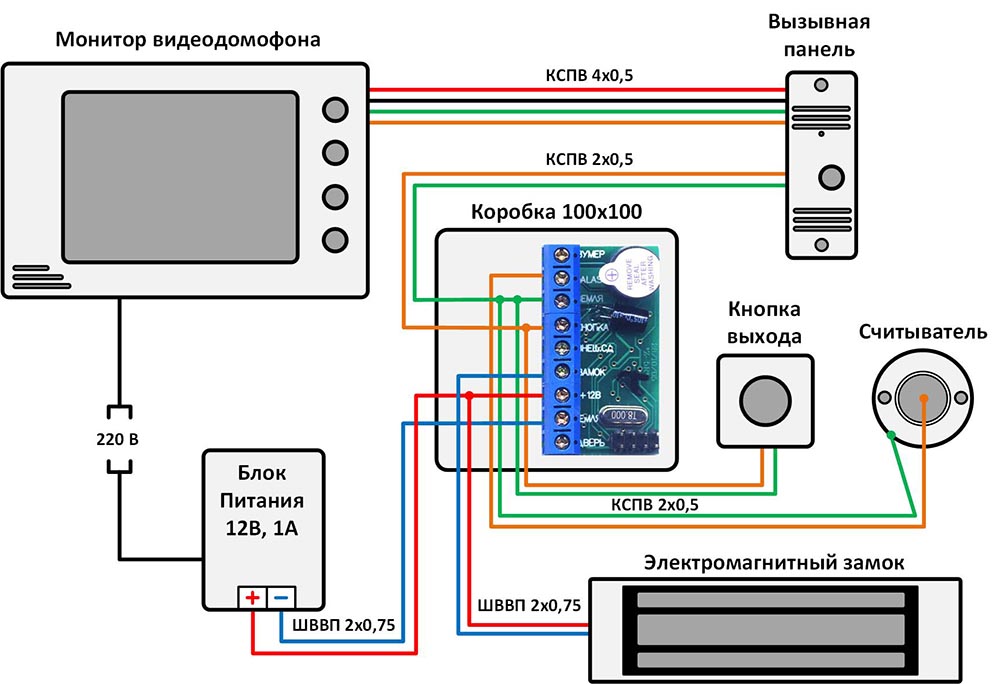
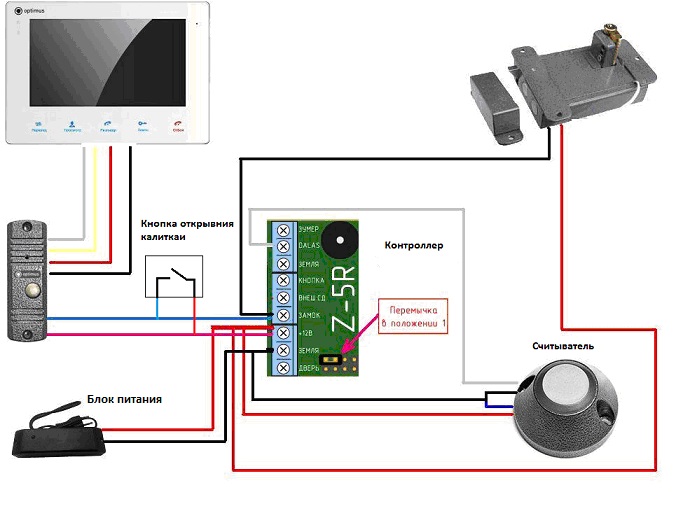
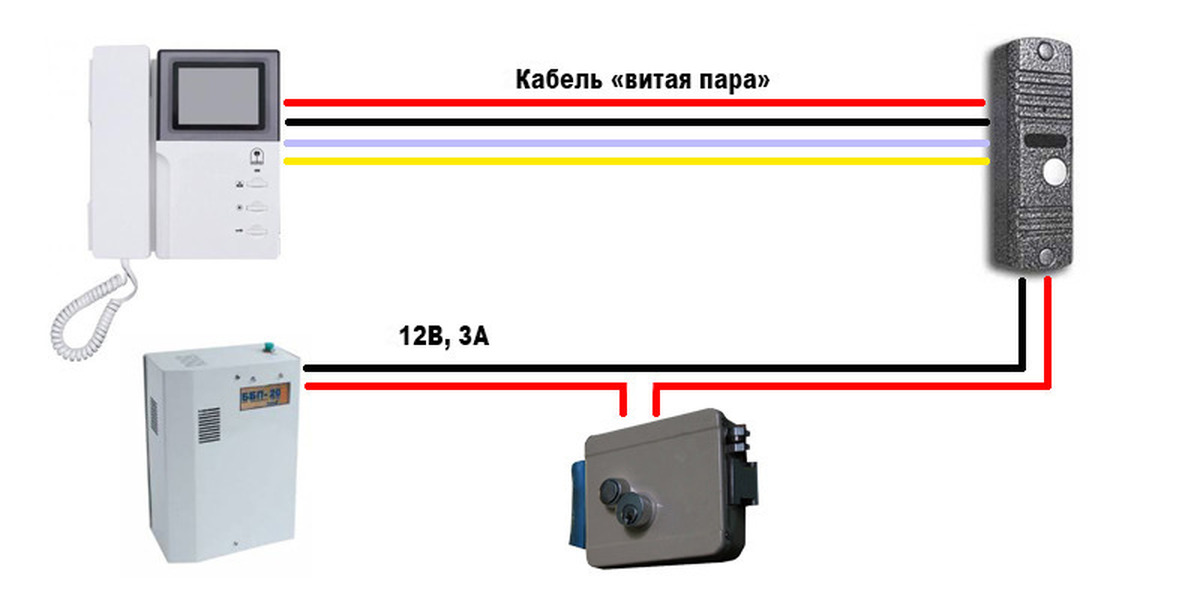
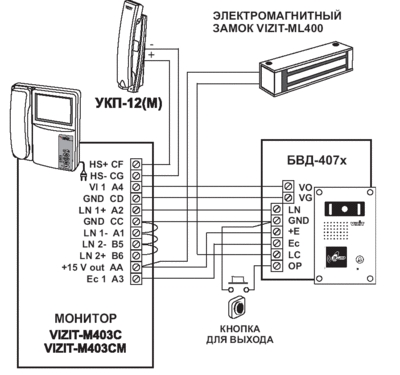
Connecting a video intercom to an access intercom with an electric lock
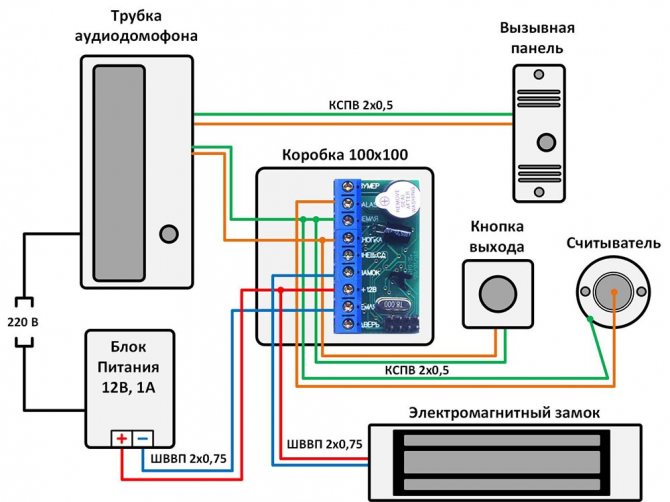
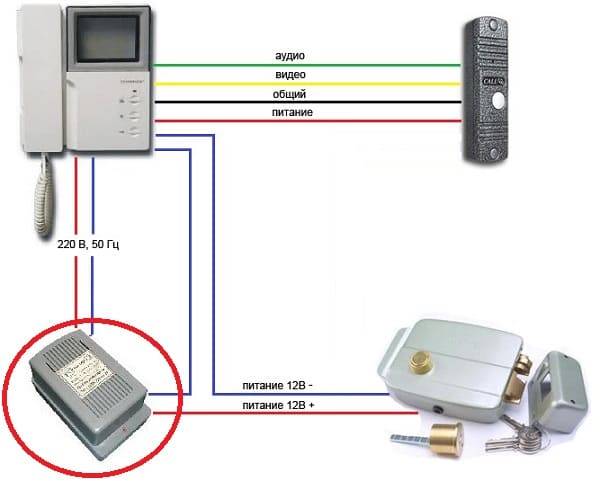
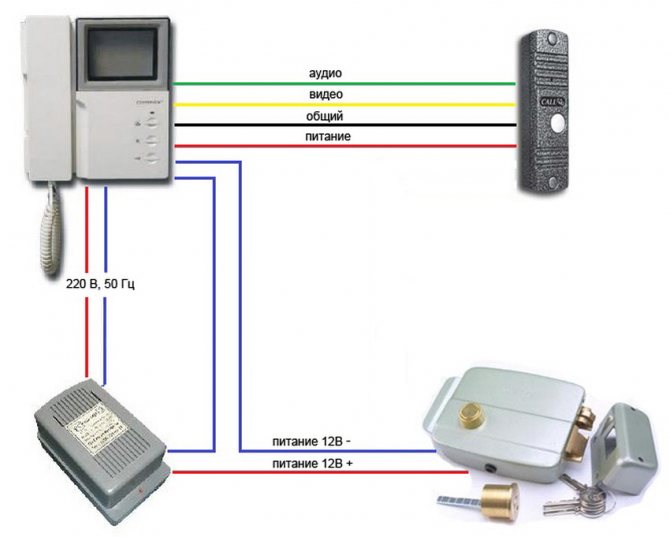
In order not to make a mistake with the wires, there is information with numbering. Without it, it is extremely difficult to figure out the connection, different signals can easily be confused by installing the wrong cable.
Connection is carried out according to the signs and connections of different colors. Each cable is marked to eliminate errors during connection, they determine the place through which the connection to the general control of the intercom is carried out. Number one controls the audio from the call panel. The number two is responsible for general nutrition. Three - plus 12 volts.Number four controls video reception.
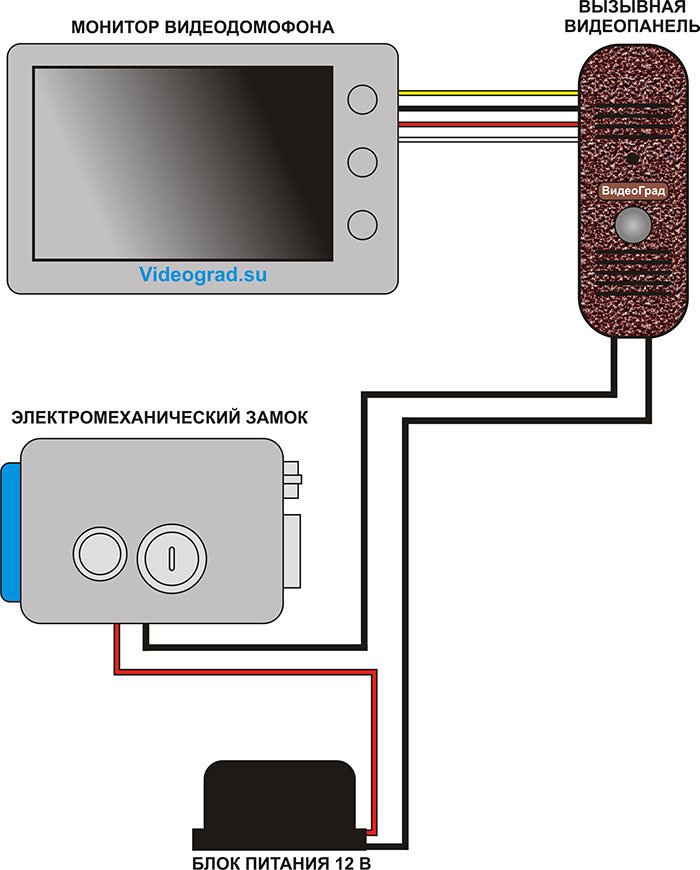
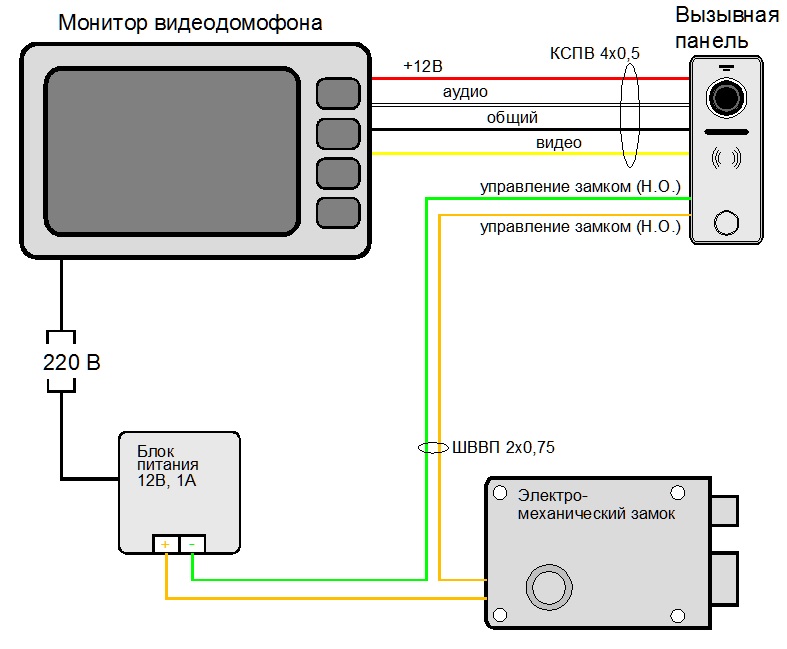
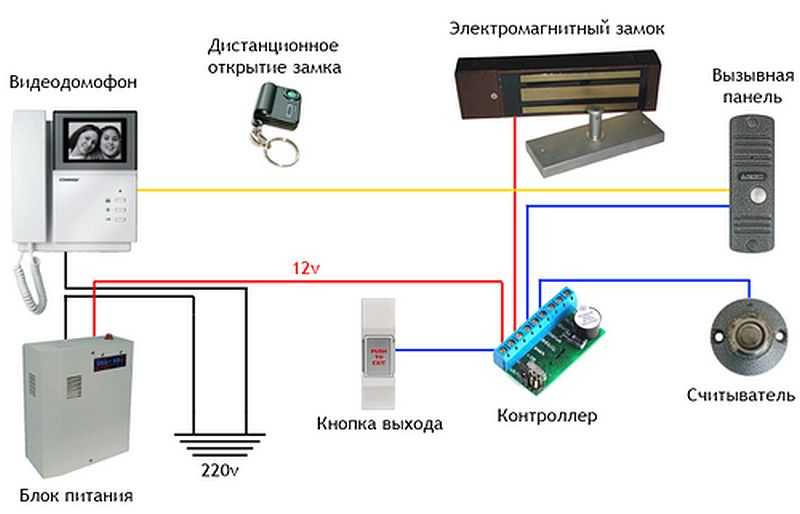
wiring diagram of a video intercom with an electromechanical lock to the driveway
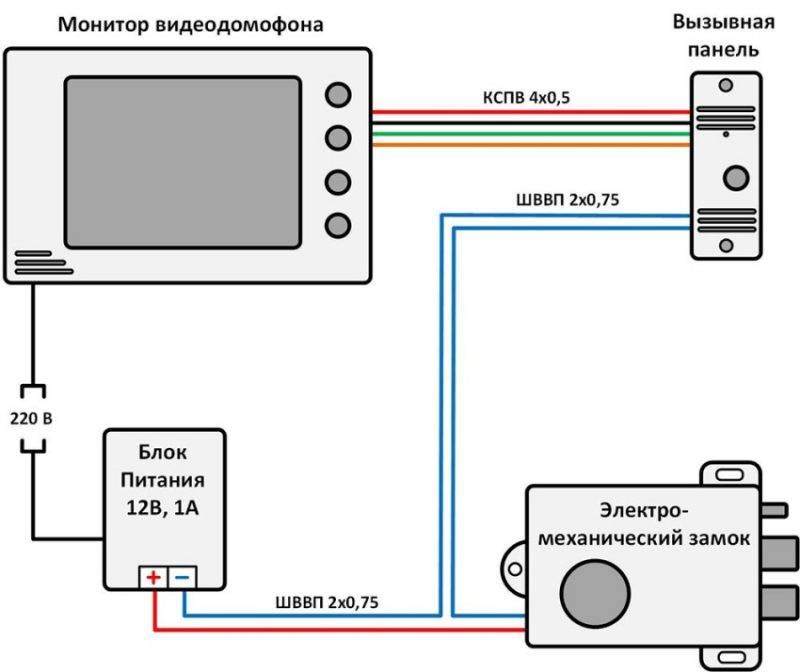
The video intercom system may include an electromechanical lock capable of opening the door, to the same extent as the classic version without a video panel. To connect the lock, you need to perform a number of actions:
- One end of the cable is connected to the electric lock;
- The other end is connected to a common power supply;
- The power supply is connected to the electromechanical lock with a second wire.
It is not difficult to use such a lock. The visitor calls the owner using the video panel, he appears as an image on another panel. After the end of the conversation, the visitor presses the button again, after which the door opens, the panel turns off and you can safely enter the building.
In the same way, the second call panel is connected.
The control takes place between the two video panels and the locks are synchronized. At the entrance, one of the panels is installed, the other is placed near the front door of the owner.
There are other ways to install a video intercom with connection to an access intercom:
- Instead of using two electromechanical locks at once, you can install one, or do without them at all. In this case, the two cables from the panel to the lock are isolated and used.
- There may be options when a simple video camera is used instead of call panels:
- In this case, after pressing the button located on the intercom, once, there is a transition to the first video panel.
- After such a transition, the owner will communicate with the visitor through the handset using an audio channel.
- When you press the next button, the second channel starts to be used, where you can view the image (usually used in narrow corridor passages).
- At the entrance to the room there is a door with the first screen and a lock:
- The guest presses the button, after the end of the connection, the door automatically opens.
- The visitor enters the entrance.
- There is a switch to another panel, to which a video camera is connected, hanging in the corridor, from which the signal goes to the owner.
In the event that the call panel, video camera, or electromechanical lock is not connected to the second line, the intercom will be used as a simple single-channel with a video panel.
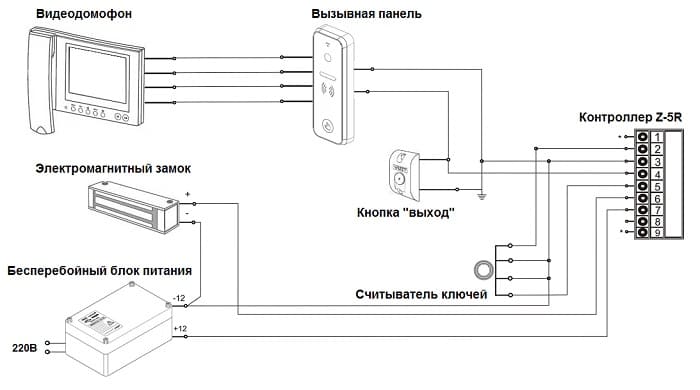
Serial connection of a video intercom to an access intercom
In order to connect to a public intercom, you need to change the audio transmission line from the intercom handset to a video cable.
In practice, several installation options are used, depending on the conditions. One of the best ways is considered to be using a socket (if it was installed during construction), where low current cables come from.
The ends of the cable are ringed, stripped, connectors are connected to them, connected to the intercom, soldered and insulated. Cables leading from the apartment and the entrance are connected to a common board. One of the ends leads to a panel to call a low-current shield in the apartment. The other end leads to the floor riser, where wire is connected common multi-apartment intercom.
1 step. It is necessary to connect all elements of the video intercom system with a video panel, an electromagnetic lock and a controller:
- In the part where the panel is screwed, you need to immediately drill two holes, insert dowels and strip the cables;
- In order for the panel to sit well and not sway, a special recess is made with a jackhammer into which all unnecessary wires are tamped;
- The panel for calls is connected through cables and is established densely on a wall.
2 step. After you can connect the video intercom to the call panel:
- All cables are inserted into the socket. The ends should not protrude more than 10 cm so that everything fits into the hole;
- The video intercom in the room receives power automatically, then the device data is loaded, the panel is tested for all functions of correct operation;
- Together with the intercom, the kit may contain a memory card for storing videos and photos. It is placed in the slot located on the side, after which it can be used.
After the connection has been made, the intercom must be tested for all functional performance.
The call panel is displayed at the entrance to the entrance and in front of the user's apartment. In the main menu, you can change the music of the call, the color scheme of the panel, brightness, contrast. Here you can separately view all the previously shot videos and photos.
The connection differs from the version of the installed video intercom: it can be coordinate and digital.
In the case of the digital type, it is more expensive, while it has a large number of available options and applications, but it is also more difficult to configure.
Just in practice, a coordinate intercom is more often used. Uses two-channel communication with the possibility of attaching two call panels.
Types of intercoms and general schemes for their connection
A modern intercom is a device not only for a conversation between the owner of the home and his guest. Smart communicators provide an opportunity to examine the visitor, ask him questions and get an answer to them, remotely open the lock on the front doors. The full list and level of service depends on the specific modification of the device.


Multi-apartment intercom
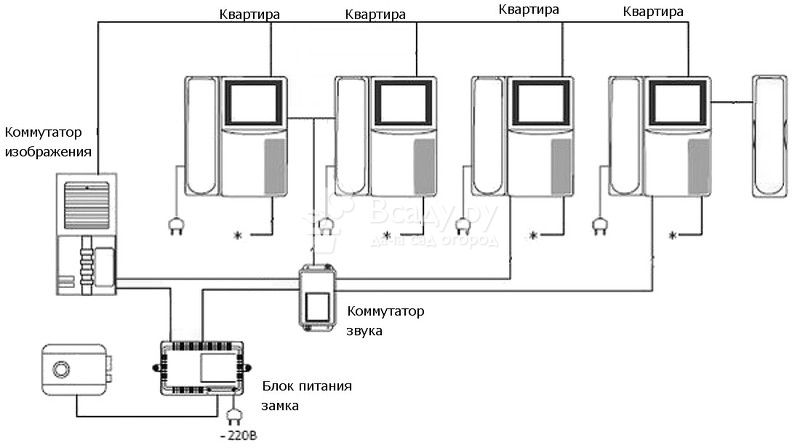
In a generalized form, the intercom connection diagram for an apartment building is as follows:

It can be seen from the figure that in the multi-user version of the intercom system there are additional switches that direct the signal to the required apartment. In addition, the wiring is carried out with a multi-core cable, the number of conductors in which corresponds to the number of connected subscribers. Audio and video signals go through separate wires, and this further complicates the connection of all elements. More advanced systems use multiplexing systems or a digital communication format, which requires fairly high qualifications from installers.
A multi-user system is quite expensive and is usually purchased for collective use in a clubbing. For its installation, specialists are invited who know well how to connect a video intercom to each apartment.
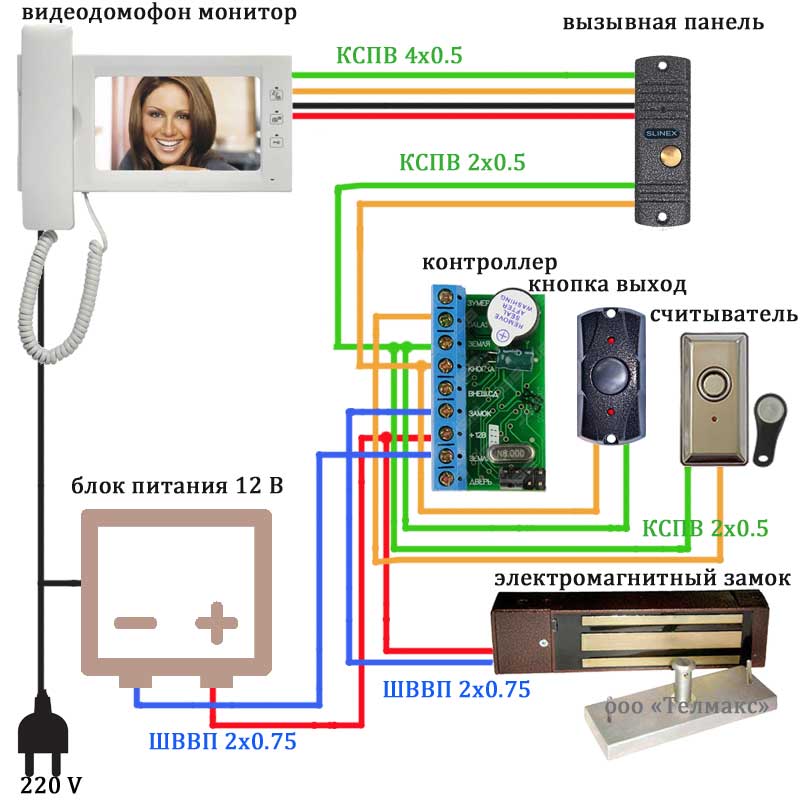
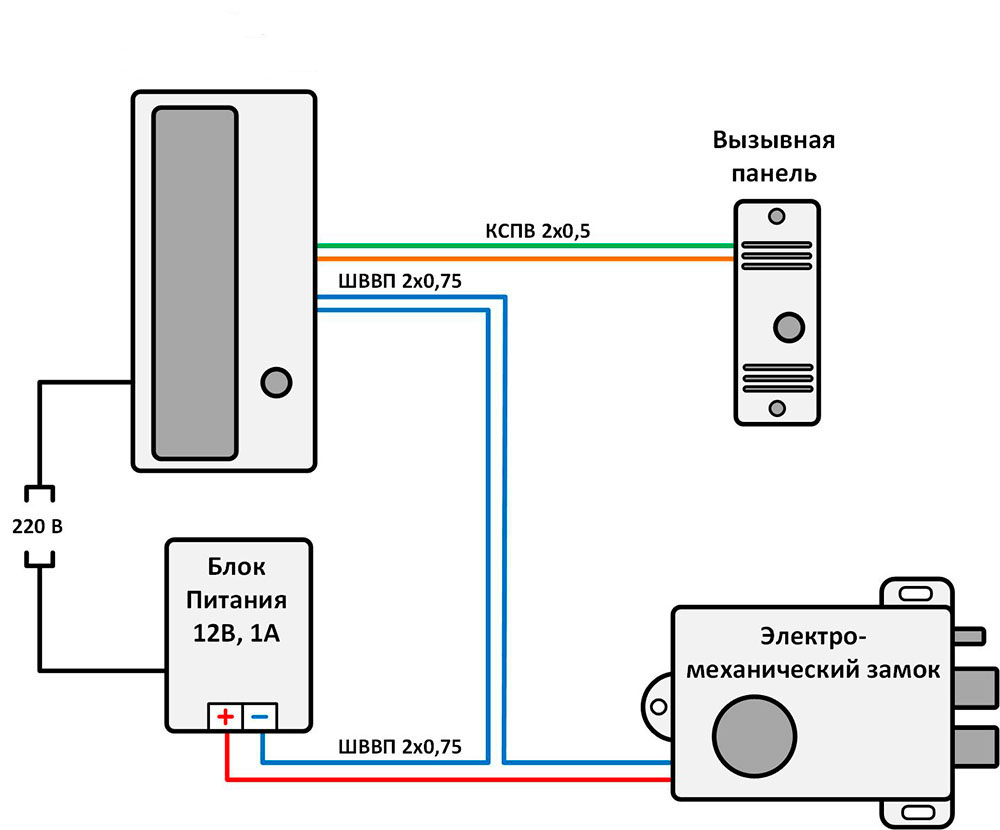
Intercom for individual use
The speaker system is built in a completely different way in individual cottages and private houses. Since only one family owns such a house, only one set, consisting of indoor and outdoor speakerphones, is enough to organize communication.Many modern units allow you to connect an additional handset or a second terminal for placement on the second floor, in the garage or other desired location according to the needs of the homeowners.
Unlike a multi-user system, installing an intercom in a private house is not very difficult and is within the power of any electrician or other person who has the skills of electrical work. How to connect an intercom of a specific model is always explained in detail in the manufacturer's instructions, and such work usually does not cause any particular difficulties.
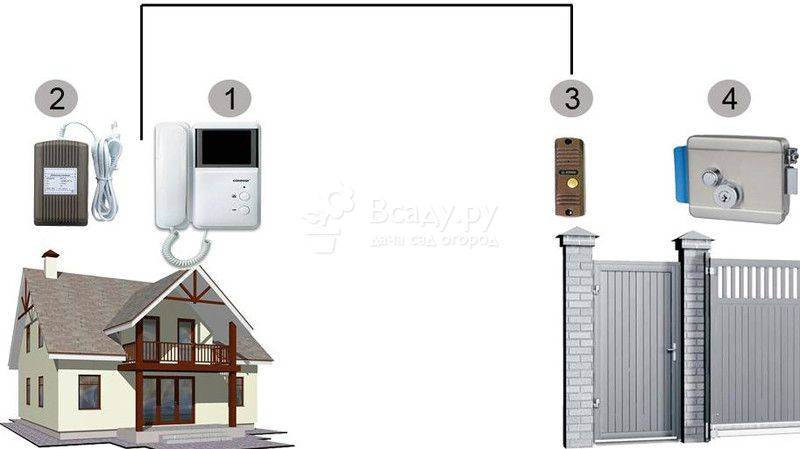
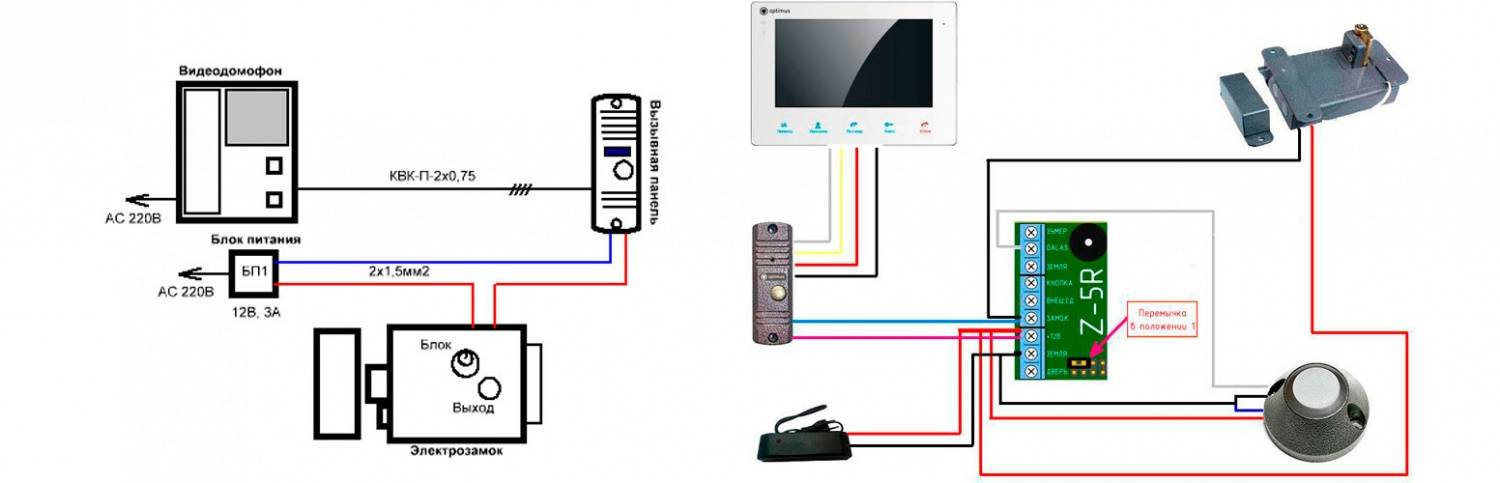
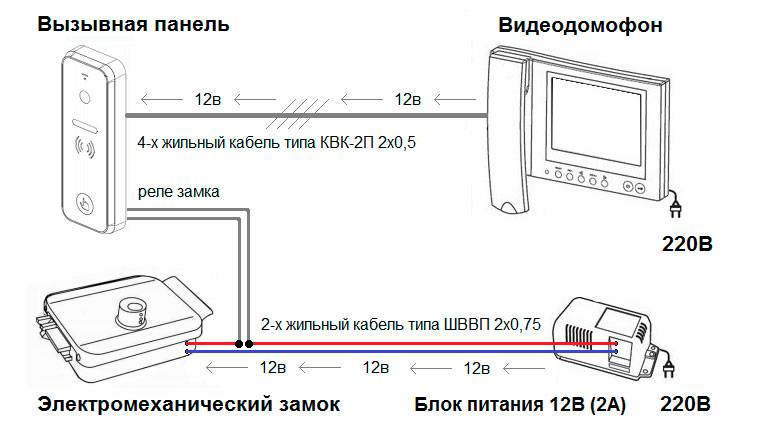
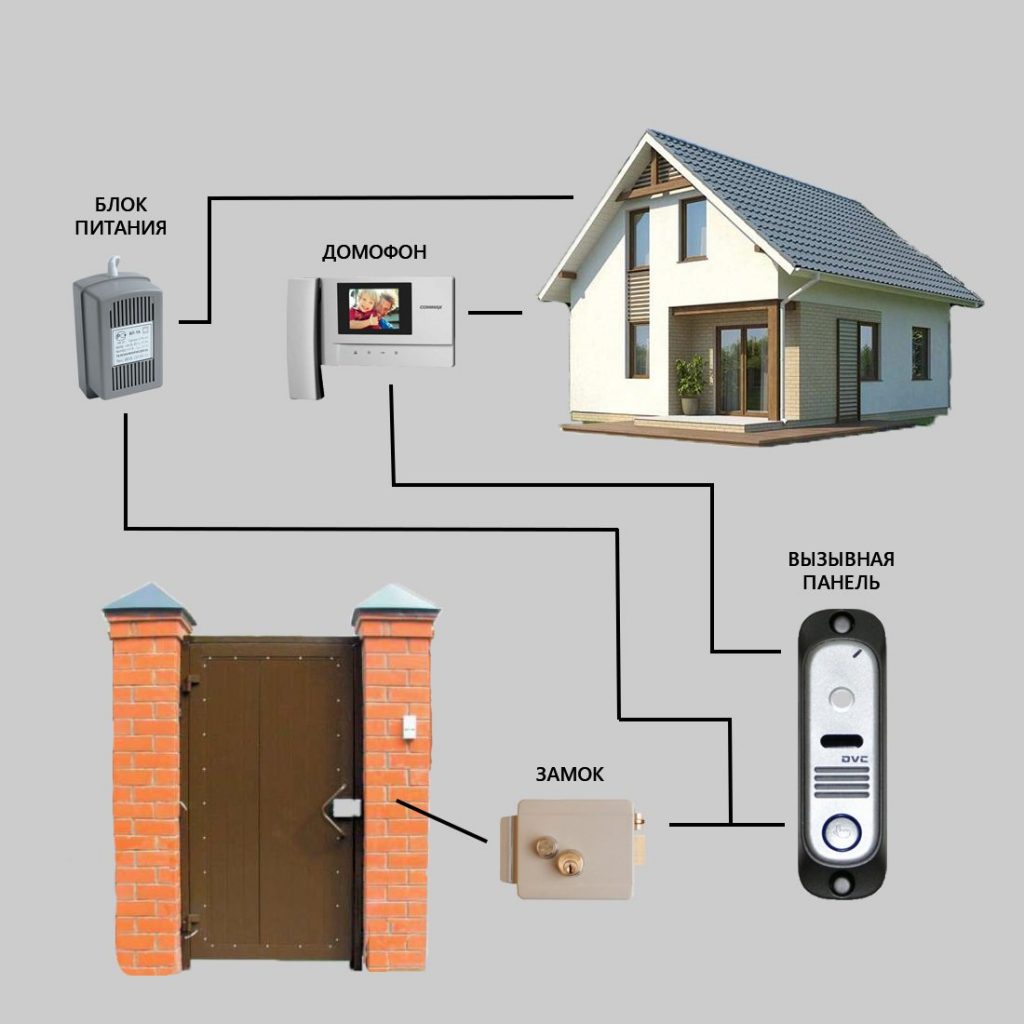
The figure shows all the elements of a simple speaker system for a private house. It clearly shows how to install an intercom in a private house. The system includes:
- home speakerphone (1);
- power supply (2);
- outside calling button-speaker (3);
- electromechanical or magnetic lock (4);
- communication cable.
Depending on the specific conditions and brand of the device, this scheme may be based on different configurations. Consider the main components.
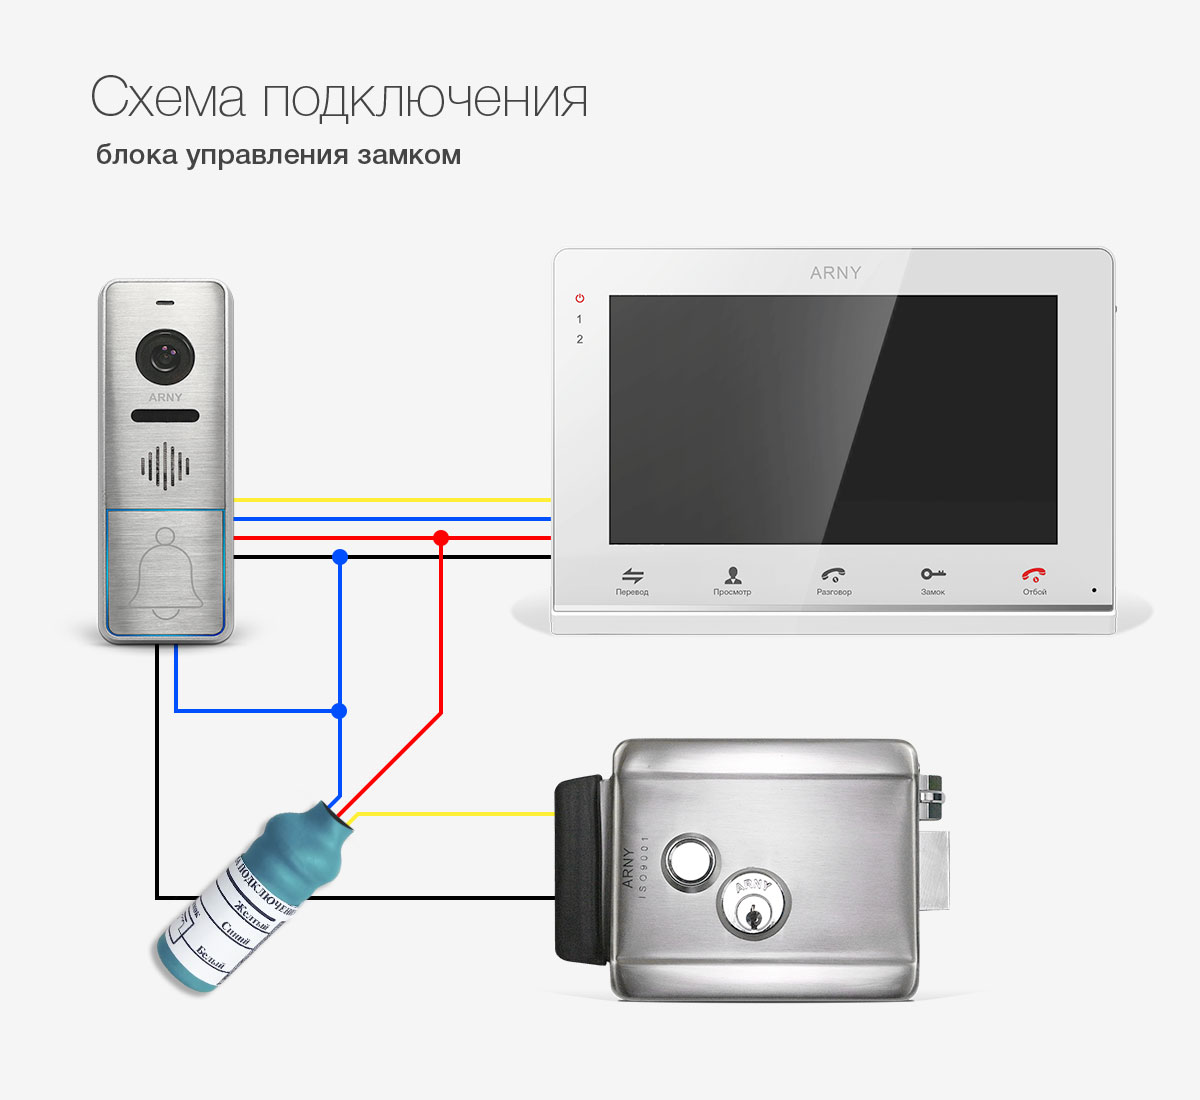
What type of lock do you prefer?
The electromechanical version of the lock is a modification of a simple lock, in which the retractable latch can be opened both with a key and an electromagnet. In the simplest versions, the electromagnet is placed separately from the lock and is connected to it by mechanical traction.
- the gate or entrance doors will be locked even during a power outage;
- in case of breakage, the lock can be replaced with a regular one, similar in design.
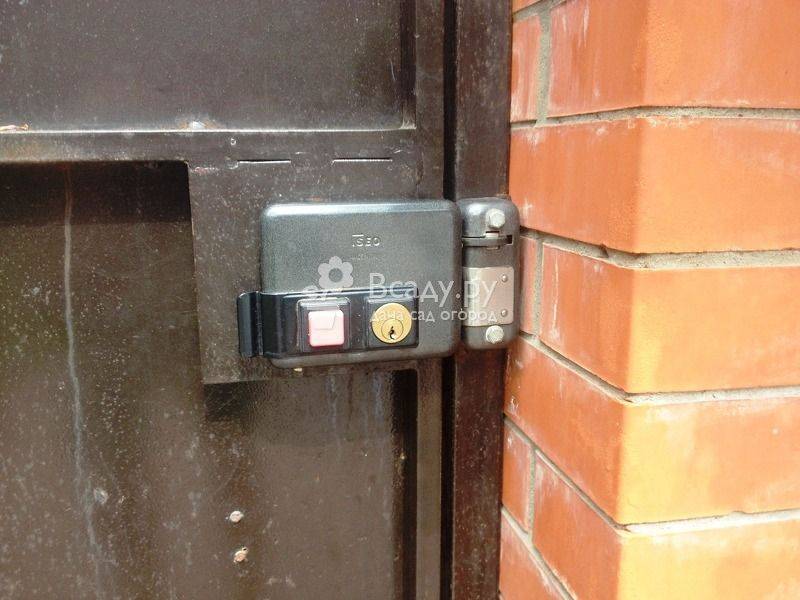
The disadvantage is that, like any mechanism, such a lock requires constant attention, lubrication and adjustment. Given its external use, the life of such a lock is much less than electromagnetic.
The electromagnetic lock is a magnet with a very high pull-out force. It is installed on a fixed part, and a magnetic plate is installed on the door itself, which is attracted to an electromagnet. The force of separation of such a lock is 200-300 kg. When you try to open such a door, the handle will most likely come off, and the lock will still firmly hold the door leaf.
A very weighty argument in favor of an electromagnetic system is its mechanical strength and stability. Since there are no moving parts of the mechanism here, the lock can work forever, and it practically does not require attention to itself.
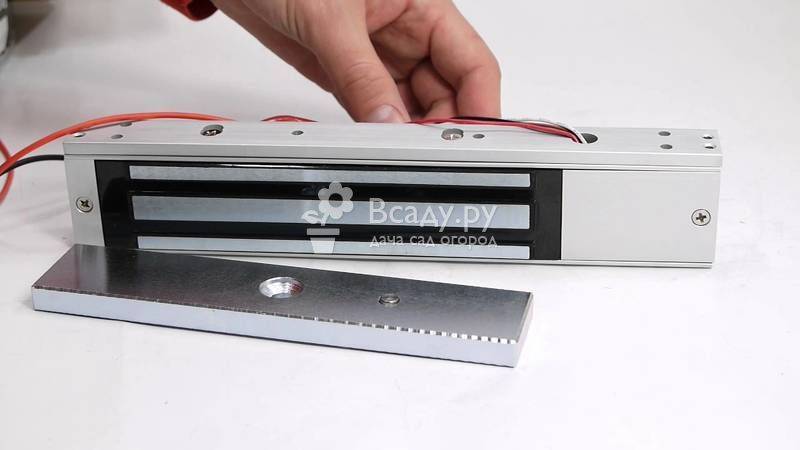
The main disadvantage is that if the power goes out, the door will be unlocked. Therefore, electromagnetic locks are placed on the gate and gate, but not on the front door.
Communicators
External and internal communicators can have only audio or both audio and visual communication channel. An external speaker button usually contains a speaker, a microphone and a camera. The internal speaker also has a screen on which you can see the face of the guest.
Connecting a video intercom to additional outdoor cameras significantly increases the visibility and control of the situation behind the front door. There is a special button on the internal speaker to open the doors. A number of products provide for the possibility of connecting additional tubes, signaling and turning on the alarm.
We also recommend to see:
-
Do-it-yourself country toilet step by step - tips, tricks, options
A toilet in the country is an integral part of comfort, a full existence. When purchasing an absolutely clean piece of land, the first thing we install is this structure. It's not only…
-
Do-it-yourself wooden porch - construction experience
An integral part of every home is the porch. It would seem that the detail is insignificant compared to the foundation, walls and roof, but without it you simply cannot get into ...
-
DIY trellis for cucumbers and tomatoes, photo
Do-it-yourself trellis in the garden, in the greenhouse is easy to do. The support method of growing tomatoes or cucumbers in a vertical plane has several advantages. The trellis allows you to freely walk between…
-
Do-it-yourself polycarbonate gazebo - photo of buildings
A cozy gazebo in the country is not only a place to relax, have picnics with friends. Such a necessary country building can serve as a dining room, summer kitchen, ...
To share with friends:
How to connect a video intercom to an access intercom
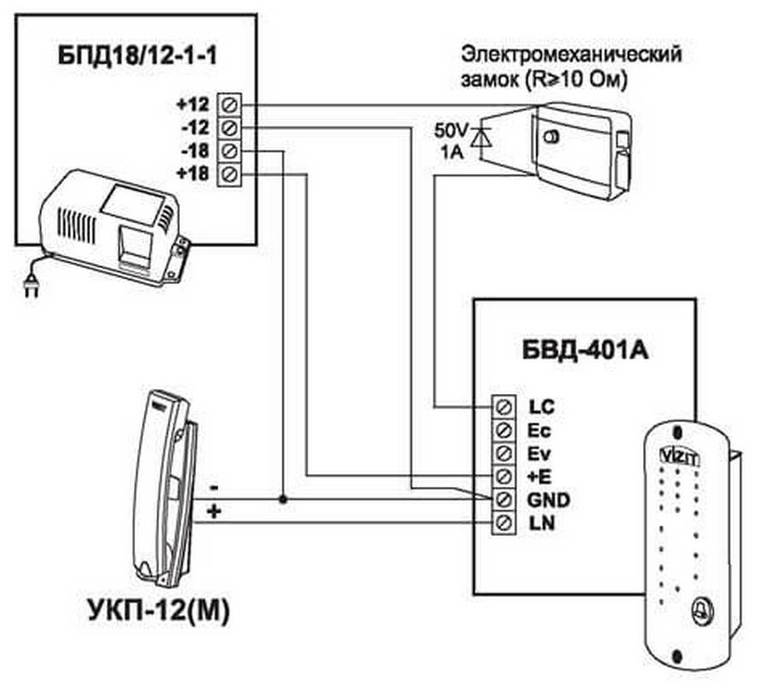
To coordinate the video intercom with the access intercom, special elements are used - MSC / MSC interface modules. These devices are used to coordinate a video intercom with a digital / coordinate access intercom. The adapter is able to support video intercoms from various manufacturers, the manufacturer promises high-quality work with CTV, Commax and Kocom. There are limitations described in the instructions for the device.


We connect to a digital access intercom
Installing the MSC adapter is quite simple. You connect the wires that used to go to the intercom handset. Four wires from the video intercom also lead to the adapter.
The call panel is already connected directly to the adapter, like the camera. To do this, the device provides appropriate outputs.
- The MSC module provides all the basic functions of working with an intercom:
- Organization of two-way audio communication with the visitor.
- Opening the lock on command from the video intercom.
The connection diagram looks like this:
We connect to the coordinate access intercom
The MSK module is needed to work with a coordinate access intercom. Connection and operation is similar to the MSC adapter described above.
The connection diagram using MSC looks like this:
What's inside the intercom? We study the device and the connection diagram
 Intercoms are one of the varieties of access control systems. Older people could first see intercoms in foreign films of the 70s. The heroes of the paintings approached the entrances of houses, chose a button with the name of the person they needed, pressed it, and talked with the tenant. With his permission, the front door was opened, and people went inside the building. In the 90s, a foreign curiosity turned into a familiar attribute of our life. First, apartment buildings, and then private households began to be equipped with intercom systems. The use of intercoms has increased the level of security of citizens.
In this material, we will try to acquaint the reader with the device of intercoms, the principle of operation and the purpose of its main nodes.
Important Points
And now - the promised seven points that you should definitely pay attention to, regardless of whether you will do the installation work yourself or contact the master. This is your checklist to keep in mind.
Well, or in front of your eyes, written down on a piece of paper. Go!
1. Choose a video intercom location that you have easy access to.When we find a panel in a hallway or in another room where we often stop or to which we have easy access, it will be much more convenient for us to use the videophone
It is also worth paying attention to the fact that the videophone monitor is installed at the most convenient level for residents. Visibility of the LCD screen at the right angle
2. Cables must comply with the requirements specified in the manufacturer's instructions (appropriate number of wires, appropriate cross-section, reinforcement). Using multi-core telephone wires is a fairly common build error. Remember that they are very resistant to mechanical damage, they are also not suitable for laying outside, in the ground, even in a protective tube. We must also remember that we must not place cables in easily accessible places. Ideally, if they are shielded, insulated so that they are not subject to mechanical damage or flooding.
3. It must be possible to open the door in an emergency - if we do not foresee this possibility, it may turn out that after accidentally slamming the entrance or losing the keys, we will not get to our house. It is worth installing an additional hidden opening button, especially at the gate. It can also be an external panel with coded access. Input telephone setting
4. Adaptation of the place for mounting the external panel of the intercom or videophone. A mistake, or rather a serious problem, is installing interconnects or videophones in old houses without first preparing niches and places for assembling and protecting wires. The problem arises especially in old houses or their fences.The installation of an intercom or videophone should be planned right away, while still in the home or fence installation phase. Then we can, for example, in a brick rack or at the entrance, make special niches for the panel, an electromagnetic latch and prepare a space for wires. Thanks to this, you can avoid uncomfortable walls. You usually need to run wires inside the walls (controlling the hitch), even if you have a wireless intercom model.
5. Keep proper lighting - this can apply both to the place in front of the gate, and to the entrance to the house. Usually videophones are equipped with diodes that allow you to receive an image even in the dark, but they usually have a small range. Therefore, it is worth adding an additional lamp that turns on after dark, shedding light on people entering. It can be activated using the intercom call button. The video phone lens should not be exposed to direct sunlight because the resulting image will be very blurry. It is worth thinking about connecting to the installation, as well as the function of turning on the lighting of the house, especially when it is quite long. Useful twilight sensor and timer, which limits the time of lighting.
6
Pay special attention to cable routing. The cable connecting the internal and external panel of the intercom or videophone must meet the requirements of the device model (number of cores, minimum cross section, shielding may need to be)
Often, multi-core telephone lines are used for this purpose, which - due to their low mechanical strength - should not be placed directly in the ground, but lead into a protective tube.
An equally good, although more expensive solution is to use a YkY type power cable, eg 3 x 1.5 mm2.
When planning the route of the pipeline, it must be remembered that it will not be in a place where the surface will harden. Possible connections are made in airtight jars at a height that is not prone to flooding.


7. Provide a fence for the call panel. If you plan to install an intercom or video intercom, it is worth adapting to the installation of an external panel during the construction phase
This is especially important for masonry gate posts. When placing the pillars, niches should be made in them under the panel, thanks to which we will avoid cutting bricks
Conclusion
Thus, even a non-professional can independently install a video intercom in a house or apartment. The most important thing is accuracy at every stage of installation. An ideal assistant in this matter is the instruction that is attached to the device by the manufacturer. In no case should you deviate from the stated requirements for the type of conductor used, the length of the line, the power source, and so on.
If all work is done according to the rules, then the video intercom will work properly. Otherwise, interruptions in work, access to the system will be permanent. A person who has certain skills in working with electrical networks will be able to independently perform all the work from A to Z. If you encounter certain difficulties during the installation of a video intercom, it is recommended to contact specialists
It is important to remember that some models of intercoms can cost up to $800-1000.Improper installation of a complex system can adversely affect the functioning of the intercom in the future, leading to financial losses.