- Drafting of drainage systems
- Deep drainage system
- Closed wall drainage
- Where to divert water?
- Regular errors
- Wall drainage device technology
- Installation requirements
- Materials and tools
- Work order
- Features of the foundation and drainage wells
- Drainage system - conditions and rules for installing drainage systems (115 photos)
- When should a drainage system be installed?
- DIY drainage system
- Features of drainage systems
- Arrangement of storm sewers
- Subtleties of system design and installation
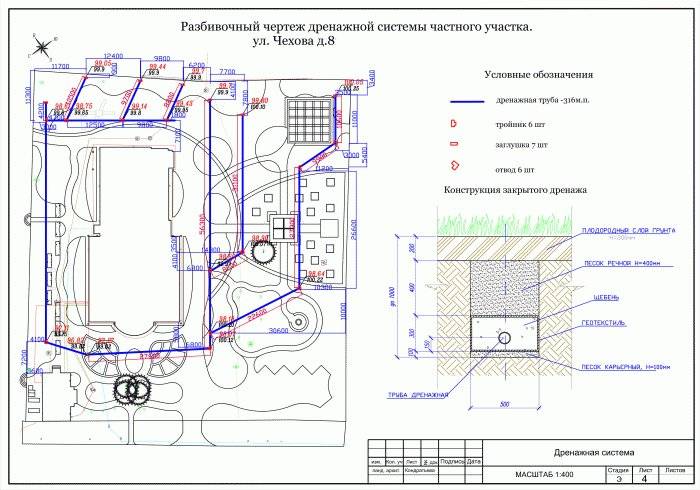
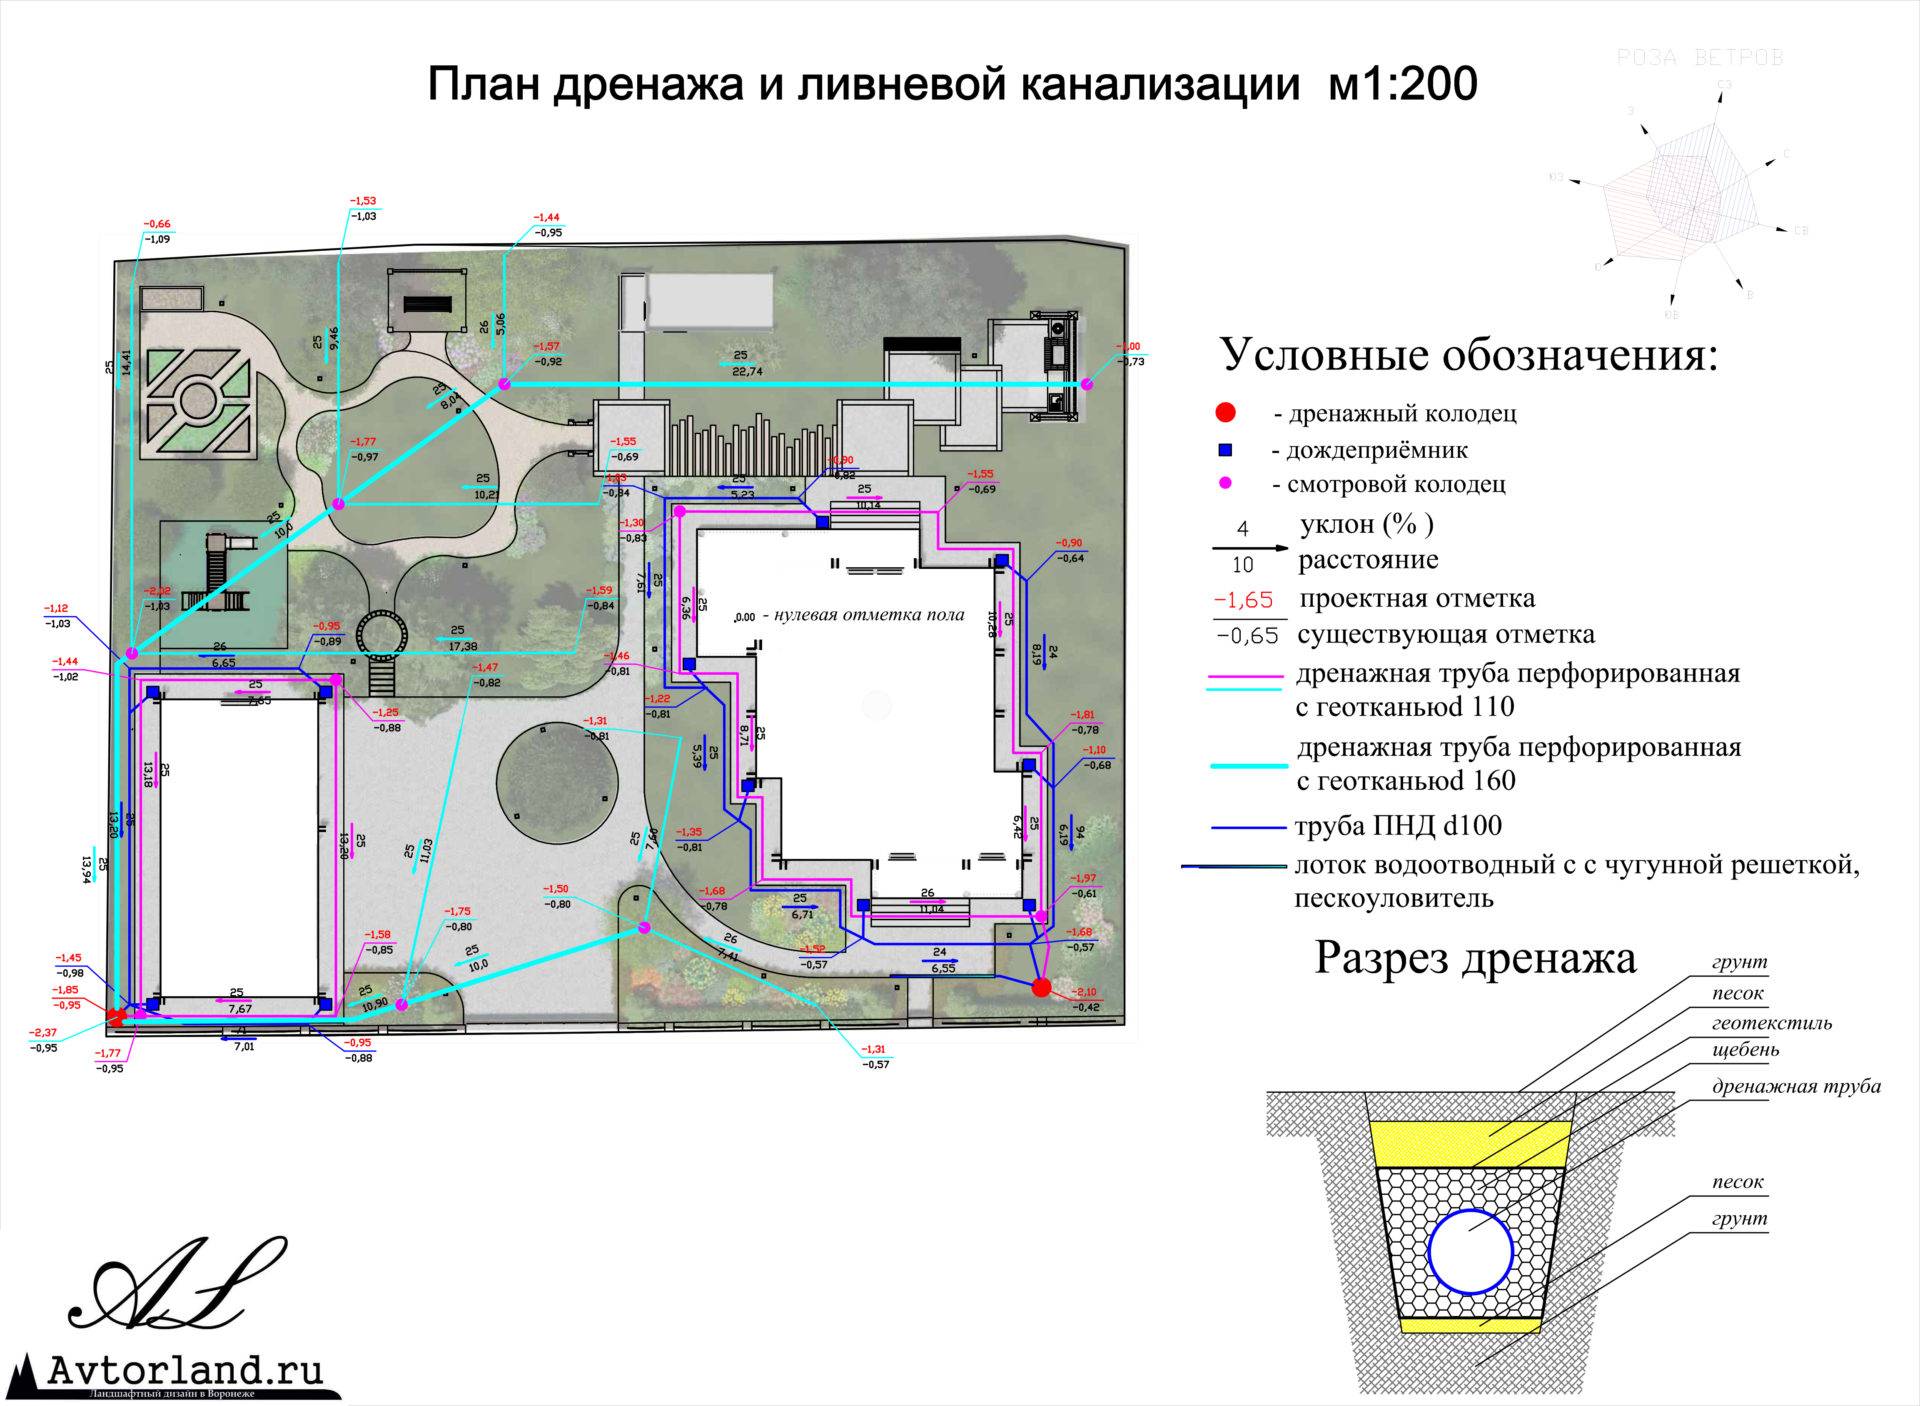
- How is a drainage project prepared?
- Key rules for installing the system
- Do-it-yourself drainage work
Drafting of drainage systems
The design of the system begins with geodetic and hydrological calculations of the site. This work is being done for the purpose of determining the operating conditions, as well as the structure of the drainage system, as well as its key indicators.
The project must contain:
- Schemes and technical drawings of the sewage system and all its components, both on the surface and underground parts
- Installation properties of drainage systems - diameters, dimensions, laying depth and slope of the drainage pipe. SNiP gives norms for these values
- Dimensions of all components that make up the network - wells, connectors, fittings and other details
- Feasibility study of building drainage systems
The project documentation should include the following specifics:
- The geomorphology of this area
- Features of the climate of the territory in which it is located
- Groundwater level marks
- Characteristics and structure of soils
- Distance of water bodies from the construction site
Deep drainage system
If the groundwater level on the site is high, and the house has a basement or underground garage, then you will have to install a deep drainage system.
Signs that it is necessary can be considered:
- High humidity in the basement; - Basement heating; - Rapid filling of the septic tank (cesspool).
It is advisable to equip the underground drainage system of the foundation during the construction of the house. This will be much cheaper than removing moisture from a finished foundation, built without taking into account the actual level of groundwater.
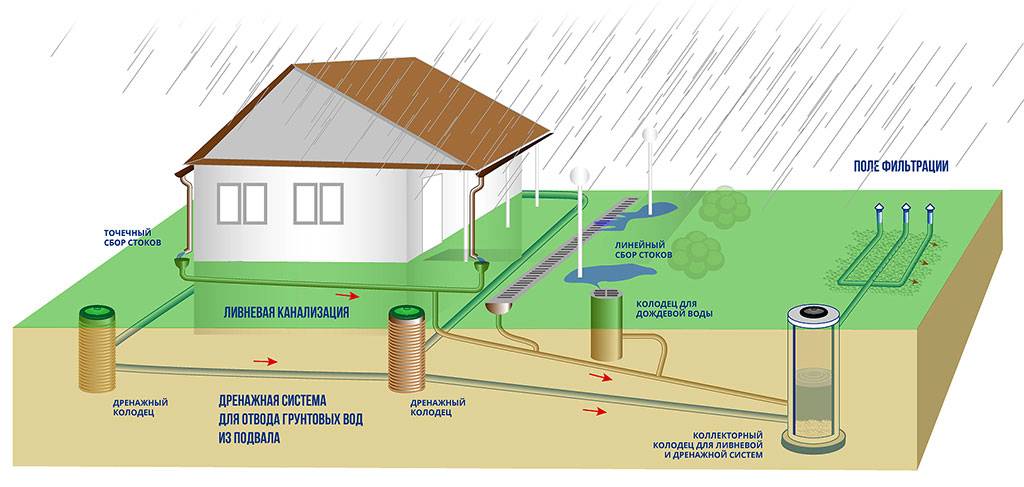
Water is drained immediately into a storm or mixed sewer (by gravity - with a slope of the site is not
The slope can be both natural and artificial - for example, through the use of special concrete pipe-channels with an internal slope or multi-level stepped gutters.
Water collected by surface drainage can also be diverted into the collector, and from there they will fall into the municipal storm sewer or soak into the soil (through the drainage field - a layer of rubble).
Arrangement of a simple drainage system
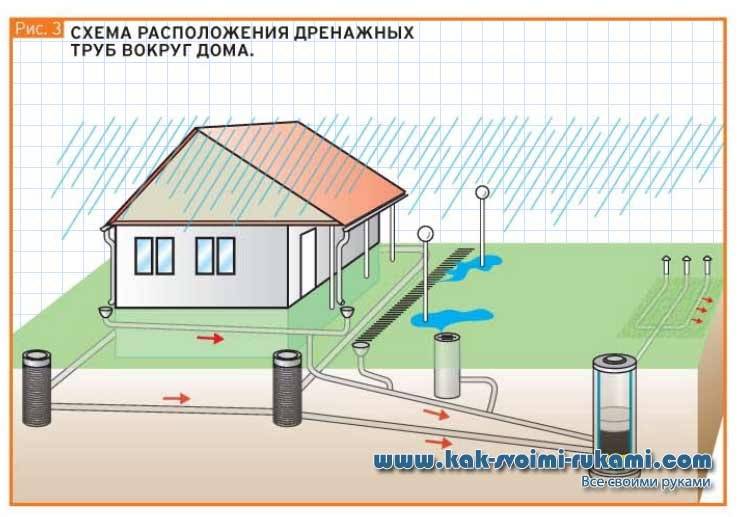
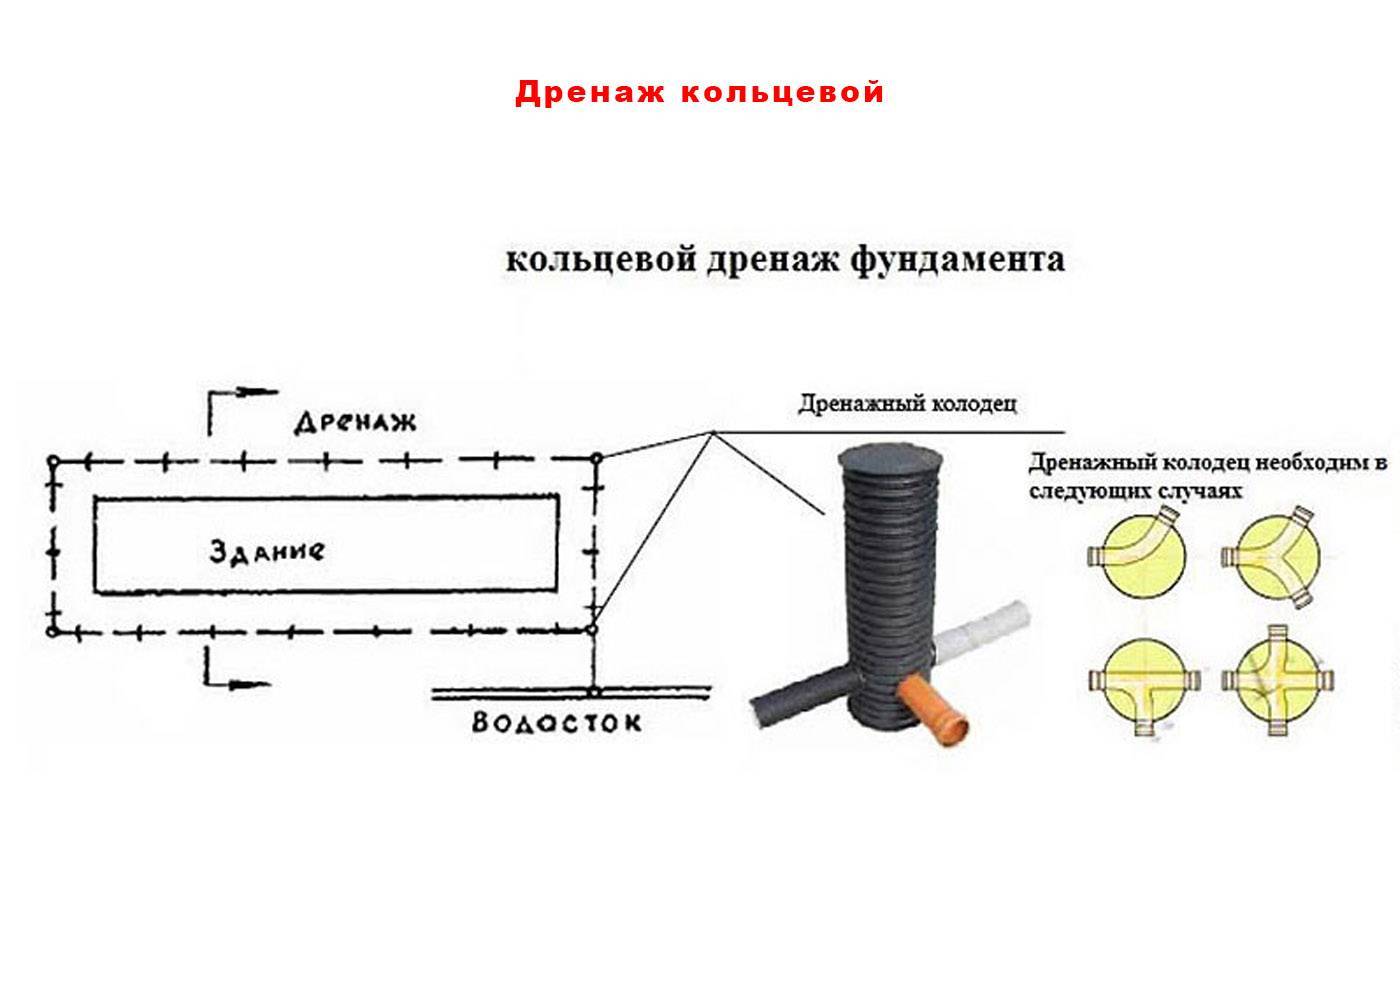
Drainage trench around the house (ring drainage)
The easiest way to drain water and neutralize the impact of ground moisture on the basement and foundation is to install a fairly wide drainage gutter around the perimeter of the building at a distance of one and a half to two meters from it.Its depth should be below the level of the foundation, its bottom is sloped and filled with cement mortar.
The drainage ditch effectively removes moisture from the base of the house, but water from downpipes should not drain into it.
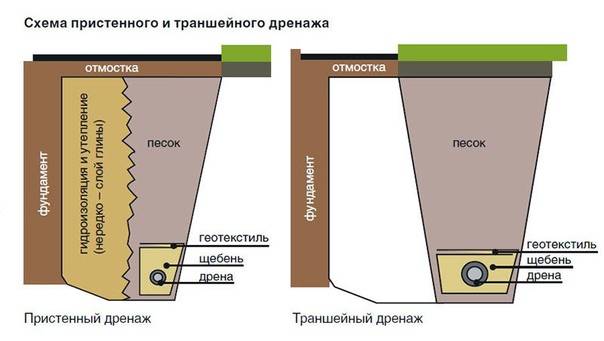
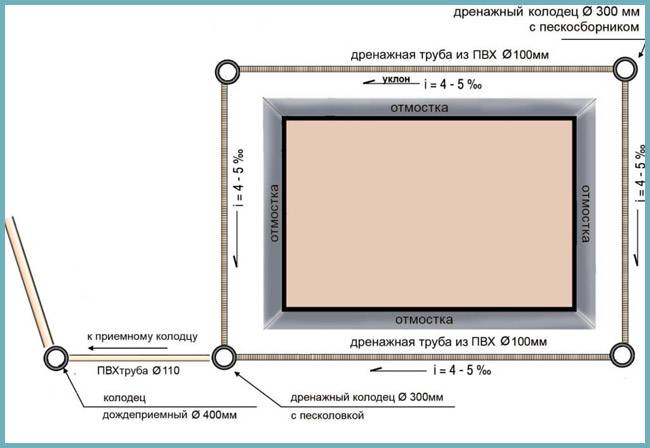
Closed wall drainage
The blind area is not only water drainage. but also the protection of the foundation
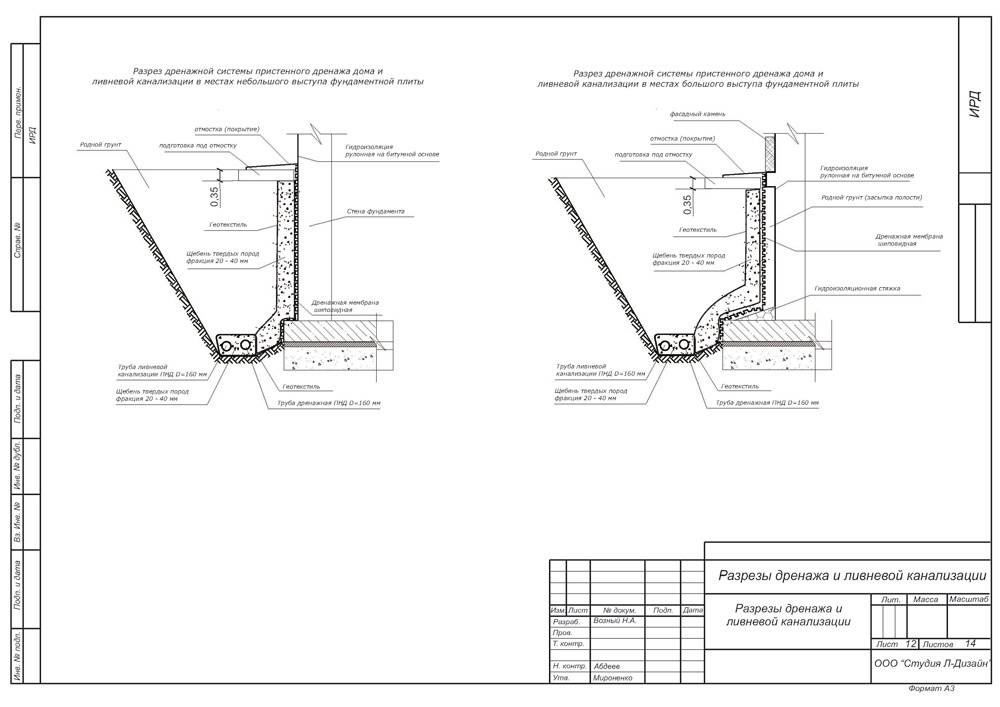
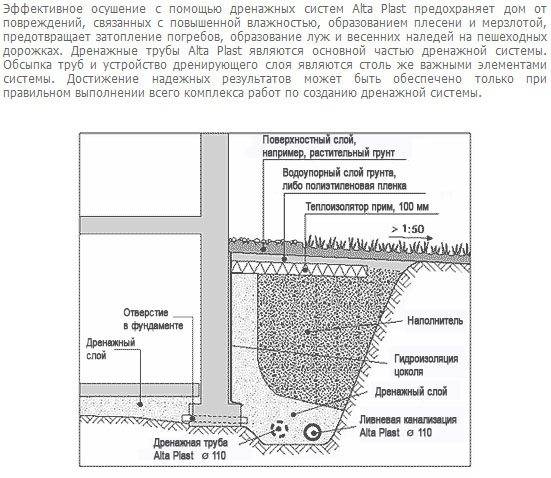
The purpose of this soil drainage system is to remove ground, rain or melt water from the foundation and prevent ground water from rising during snowmelt or heavy rain. It is a closed circuit of perforated (perforated) pipes or gutters with the convex side up, laid at a depth of one to one and a half meters.
Unlike the ring, wall drainage pipes are laid above the level of the base of the foundation. The trench is paved with broken bricks or large crushed stone of several fractions, drains are also covered with crushed stone and wrapped with it in filter material - for example, geotextiles or fiberglass. The filter does not allow the drain holes to become clogged with silt, and the top of the trench is covered with gratings and covered with soil.
At the corners of the building, "rotary wells" are installed - they set the direction of the discharged water. The wells are made of PVC, their diameter is less than half a meter, and their height is from one to three meters.
The ditch with pipes should slope down the slope (and away from the building) and lead water flows below the level of the basement floor. Such a drainage trench pulls, absorbs and removes moisture from approximately an area at a distance of 15-25 meters around it.


Where to divert water?
If the building stands on a slope, as a rule, the drainage trench goes around its “horseshoe” from the side of the hill and has an exit from the opposite side.If there is such an opportunity, water can be drained into a small “technical” reservoir, from where it will be used for household needs - watering the garden, construction and repair, etc.
In other cases, water is either immediately discharged into a general or individual sewer, or enters a storage collector well, where it is absorbed into the soil and discharged by gravity or by a pump to the site.
The arrangement of simple drainage trenches is not difficult, but the arrangement of a full-fledged soil drainage system that connects both the drying of the site itself and the removal of water from the house located on it requires special calculations and professional installation. It is better to entrust it to professionals, since the losses from malfunctions, repairs and alterations will be greater than the costs of the services of specialists.
Regular errors
As you know, the one who does nothing is not mistaken. But we suggest that you err only as much as everything can be corrected. You already know how to make drainage around the house, but let's decide why the completed construct does not work as expected:
- The type of drainage was chosen incorrectly, for example, with groundwater, a tray version of open drainage was arranged.
- The depth for laying drains is incorrectly calculated, as a result, water collection is carried out poorly.
- If the water is close to the entire site, and there is still a slope of the landscape towards the house, drainage arranged only around the household will not cope with the removal of all the water, so you need to think about draining the entire estate.
- Saving on materials, so as not to bury money in the ground. When arranging drainage, it will backfire with problems. Choose only quality materials and save wisely.
- And, oh yes, the choice of a contractor!
If you do not make the system yourself, as often happens, then demand from the performers the mandatory documentation of relations, insist on providing:
- contracts;
- project;
- estimates;
- certificates for materials and equipment;
- test report;
- act of acceptance of work performed;
- warranty for the completed system.
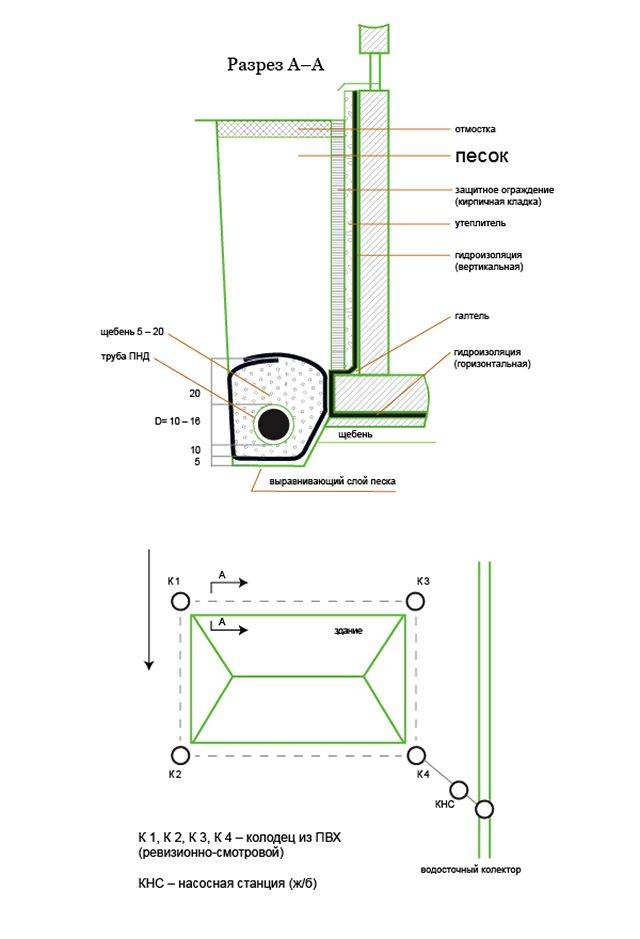
Wall drainage device technology
This system is most common in private housing construction. It is required for almost all objects, since it allows you to avoid trouble during heavy rainfall and in the spring, when the topsoil is abundantly moistened. In addition to the above joint venture, when laying it is also necessary to be guided by SNiP 3.07.03-85 * and SNiP 3.05.05-84.
Wall drainage can be done in two ways, the choice between which depends on the type of foundation:
- linear (according to the joint venture, the effective drainage depth is up to 4-5 m) along the perimeter of the blind area for tape bases;
- layered at the level of the sand cushion under the foundation slabs (according to the norms, they should also include a linear type).
The technology for the most common linear editing is discussed below.
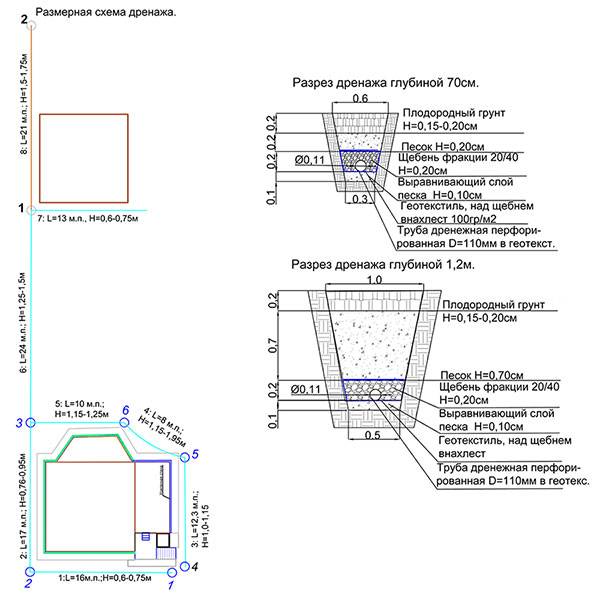
Installation requirements
When designing a drainage system, it is necessary to take into account the requirements for its location:
- wall drainage laying depth - 30-50 cm below the base of the foundation;
- slope towards the watershed - 0.02 (for every meter 2 centimeters);
- the maximum distance from the outer edge of the foundation tape is 1 m.
Before laying pipes, determine the upper and lower points of the system.First, they are determined with the collection point (lower), from which water will be drained from the drainage. After determining this point, the top mark is calculated taking into account the length of the pipes and their required slope.
Materials and tools
To do the job you will need the following tools:
- bayonet and shovel;
- pick;
- electric or pneumatic perforator;
- building level and tape measure;
- wheelbarrow or trolley for transporting soil;
- manual rammer or vibrating plate.
To equip the drainage system, you will also need materials:
- pipes;
- crushed stone or gravel;
- sand;
- geotextile;
- polypropylene rope.
Pipes for carrying out drainage measures according to regulatory documents can be made of asbestos cement, ceramics or plastic. Crushed stone should be selected with a fraction (grain) size of 20-40 mm. Sand is used the same as for backfilling (medium-grained or coarse-grained).
Work order
The arrangement of drainage is carried out in stages:
- Basement wall waterproofing. Most often, bitumen-based mastic is used. It is applied in several layers, if necessary, reinforced with fiberglass. For foundations with a laying depth of up to 3 m, waterproofing with a total thickness of 2 mm is sufficient; for deeper laying, the total thickness of the bitumen layers is increased to 4 mm.
- Excavation of a trench for pipes, taking into account the requirements for the location.
- At the bottom of the trench, a sand cushion is laid, on top of which geotextiles are spread. The width of the web should be such that it is possible to wrap the pipe without gaps.
- A layer of crushed stone 10 cm thick (or gravel) is laid on the geotextile, pipes are laid on top of the crushed stone with the necessary slope for the gravity-fed operation of the system.
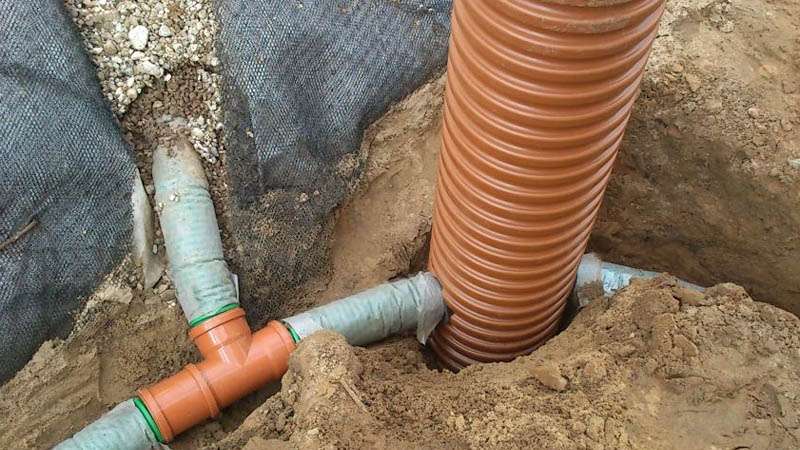
- The pipes are connected.At each turn, a vertical pipe section (manhole) with a lid is provided. This is required for checking and flushing pipes.
- Crushed stone or gravel is poured over the pipes, the layer thickness is 15-20 cm. The bulk material is wrapped in geotextile with an overlap.
- Perform backfilling with sand with layer-by-layer tamping. Compaction can be carried out with a vibrating plate or a manual rammer with moisture.
Some Tips
For proper work, it is necessary to take into account:
- drainage holes in pipes must be smaller than the minimum particle size of crushed stone or gravel;
- after wrapping with geotextile, it is additionally fixed with a polypropylene rope, pieces of rope must be laid under the geotextile in advance;
- with a large number of turns, the norms are allowed to provide manholes through one;
- with independent construction, you can not perform hydraulic calculations, and choose the diameter of the drainage pipes in the range of 110-200 mm;
- draining water from a drainage well (collector) can be performed into a storm sewer or into an open area after filtering through a layer of crushed stone (gravel).
With a careful approach to drainage at the construction stage, it will not cause problems during operation and will last for decades.
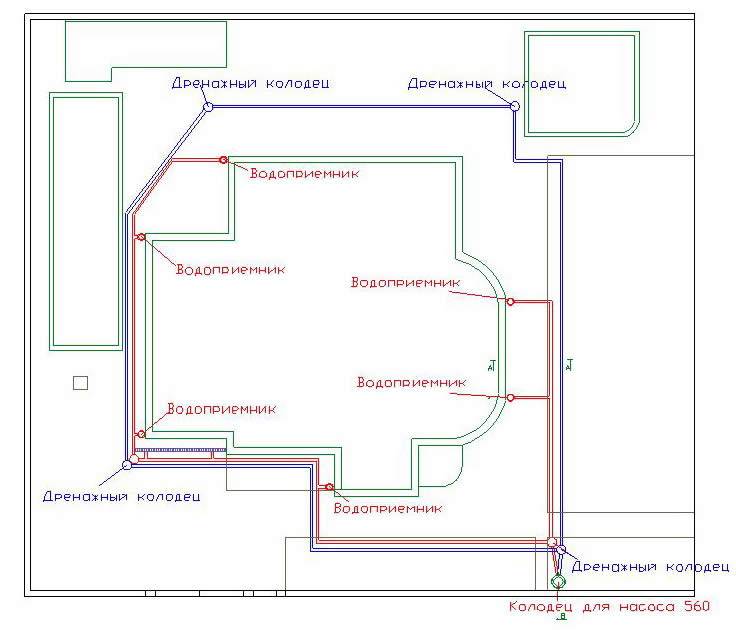
Features of the foundation and drainage wells
When installing drainage, it is required to determine in advance its type, taking into account the type of foundation that is either planned to be built, or it already exists and this must be taken for granted.
If the foundation is slab, and it has not yet been built, then drainage must be done before starting work on the foundation of the house.A closed-type variant is suitable, in which drainage is arranged not only along the contour of the house, but also drainage channels are laid under the future slab at an angle of 45 ° and drains placed along the perimeter of the house are brought into the main contour. If there is already a slab, drainage under it has not been made, and groundwater is close, then you will have to make a wall or ring drainage option.


With a conventional strip foundation and a close occurrence of groundwater, you can also choose a wall, closed or ring version.
The drainage well in our assembled system is the head of everything. And that's the way it is.
They installed it incorrectly or assembled it from whoever gives what, and all the work is in vain. And in the meantime, the house “floats”, the foundation is cracking, in the spring you have to urgently buy and turn on the pump and pump out water from the cellar or underground. We think that such a prospect will definitely not please you.
Therefore, we figure out what a well should be like, acting as a receiver for the collected water. There are two main types of wells. The first is wells with a bottom, they accumulate incoming water, which can be used for their own needs, for example, by watering plants with it. Again, saving on water consumption for irrigation.
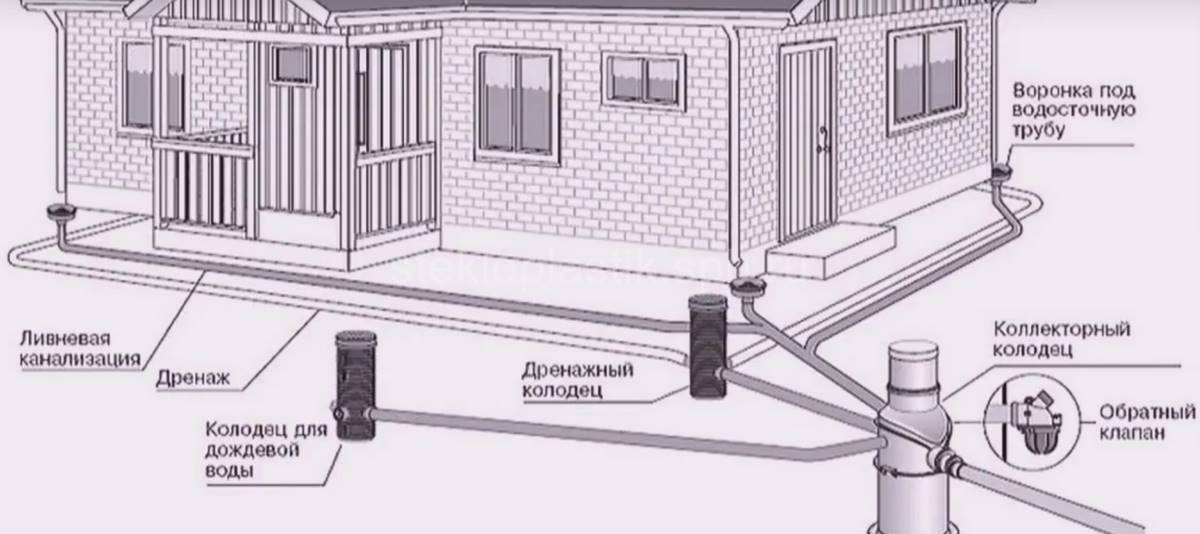
Another type is absorption wells, the water from which goes into the soil. But if groundwater is close, then the well will not give it away, but rather collect it, adding to what comes into it through pipes. And here you definitely need to think about the pump and the release of water into the storm ditch.
On sale there are ready-made wells made of polymers with a built-in check valve necessary for the release of water and an installed pump.
One of the cheapest options is to install a well made of reinforced concrete rings.
But the polymer is more durable and easier to install because it is light in weight. But both in choosing a well and pipes, the decision is yours. And you will have to dig anyway, so get ready for work or look for workers and prepare money not only for the purchase of rings or ready-made receivers.
Drainage system - conditions and rules for installing drainage systems (115 photos)
Many of us know what drainage is only in relation to house plants. The function of drainage is to remove excess moisture from the soil. Few people know that drainage must also be installed during the construction of a building or a private house. Before you make drainage, it is imperative to make a good waterproofing for the basement and basement.
After all, even small drops of water that can seep into the basement can cause great damage to all technical equipment in the building.
The structure of the drainage system is the layout of pipes, trenches, drainage pumps and wells that should regulate the water balance of the soil. In order to understand what it is, you can see a photo of the drainage system.
The device is not very complicated, so it is quite possible to make it yourself.
When should a drainage system be installed?
When buying a plot and planning its development, it is necessary to clarify the following questions with nearby neighbors:
- Do neighbors have cellars?
- if there are basements, is there water in them?
- whether moisture-loving plants grow on the site (such include cattail).
If at least one of the questions you got the answer "yes" - start drafting a drainage system.This system is a network of pipes that will be connected to each other using couplings or must be laid end-to-end.
Pipes must be made from materials that have filtering capabilities. These materials include a polymer that perfectly passes water, while retaining all hard rocks. This allows the pipes not to clog very quickly.
All catch basins should be placed at the lowest point on the site. The slope of the drainage system must be directed to the side. Then excess moisture will drain to the side.
There are situations when the system is not able to independently cope with the drainage on the site. Then you need to help it with the help of drainage pumps. The end of the drainage pump must be immersed in the well.
The pipe should be directed to the water outlet. All models of the drainage pump will differ in the characteristics of the hose - performance and throughput.
DIY drainage system
First of all, you need to understand what drainage systems exist. Almost all of them are similar to each other, but there are slight differences in the materials.


Drainage systems are open, with trenches filled with gravel and sand, with trays made of plastic or reinforced concrete, with perforated pipes.
The cheapest option is open drainage. In order to make it with your own hands, you need to dig ditches no more than 70 cm deep. The width should be about half a meter. The sides must be beveled (about 30 degrees).
The water will be discharged into the sewer. This drainage system is recommended for construction on a site that is located on a slope.
A more attractive option, from the point of view of the landscape, is drainage, with trenches covered with rubble. To do this, it is necessary to pour crushed stone into the dug ditches, and sprinkle sand on top. Trenches can be dug in the form of a Christmas tree.
Drainage with trays helps to divert water from rainfall. Trays for the drainage system must be plastic or concrete.
They must be installed with sides at the level of the soil. From above it is necessary to cover with decorative lattices.
Features of drainage systems
If you decide to study the question of how to organize a drainage system, you must also study the following nuances:
- what is the depth of the drainage system (it should be no less than the maximum depth of soil freezing),
- slope (if the drainage system is not properly placed, it will not help you),
- where excess water will be dumped (often a lake or a ravine is chosen),
- take into account the possibility of pumping water.
Be aware that without a drainage system, your building will be at risk of flooding. That is why it is necessary to consider the issue of establishing a basement drainage system even at the stage of laying the foundation. A quality drainage system will help you avoid flooding problems in your home.
Drainage system - conditions and rules for installing drainage systems (115 photos) Installation features and tips for choosing a high-quality drainage system. Photos of the most reliable materials and their combinations. Review of the best ideas and projects.
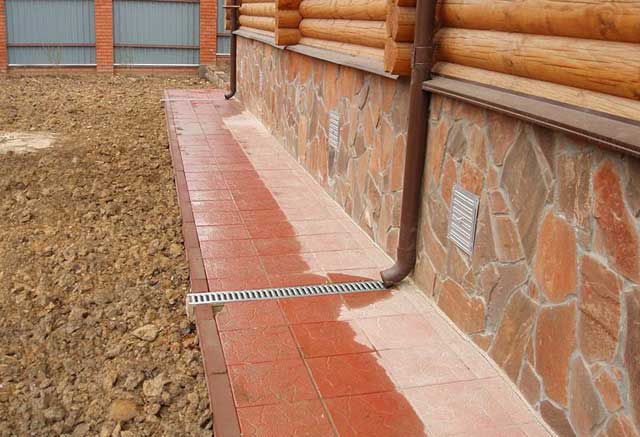
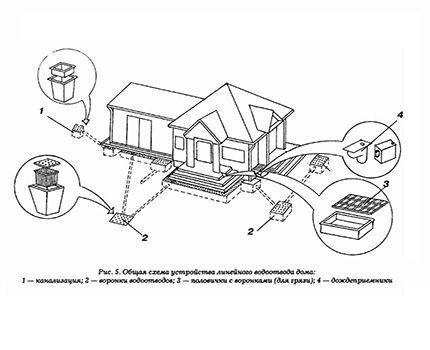
Arrangement of storm sewers
Livnevka is a separate type of sewer system, which is used to collect and discharge precipitation that has fallen on the site.With sufficient skills and knowledge, do-it-yourself stormwater around the house can also be done.
For the arrangement of storm sewers, two types of water collectors are used:
- Point water collectors, which are mounted directly under the vertical risers of the drainage system;
- Linear collectors, which are placed under the slopes of the roof, if it is not equipped with an organized drain.
All water that enters the sump is sent through an open or closed channel to a common well or collector. In the future, all excess moisture moves into the central sewer or ditch.

The design of the storm system, in addition to point water collectors, also includes drains, drains and dampers. If desired, you can look for systems that provide for the possibility of connecting storm water inlets with a roof drainage system and underground drainage channels. Often, such systems are supplemented with sand traps and garbage collectors, which simplify the maintenance of stormwater.
The main structural element of a linear storm sewer is drainage gutters made of durable plastic or concrete. These elements should be installed in places where there is a high probability of accumulation of a large volume of water. This is especially true for situations in which this accumulation is undesirable.
When creating a linear system project, first of all, you need to choose a place where a catchment or collector well will be located. The next stage is the selection of sites for the installation of rotary and revision wells.In many ways, this item is related to how the gutters and sewer lines of the system will be located.
In order for the storm sewer to have an acceptable appearance, it is best to use special trays made of polymeric materials for its arrangement, which are closed with gratings made of plastic or metal. Similar details are produced in different colors, which allows you to choose an option that is combined with the view of the courtyard and buildings located on the site.
If the operating conditions are severe enough, the drainage system trays are best equipped on a concrete foundation. The thickness of the concrete layer is calculated depending on the load on the roadway. A reliable foundation will prevent the destruction of the structure under the influence of external forces.


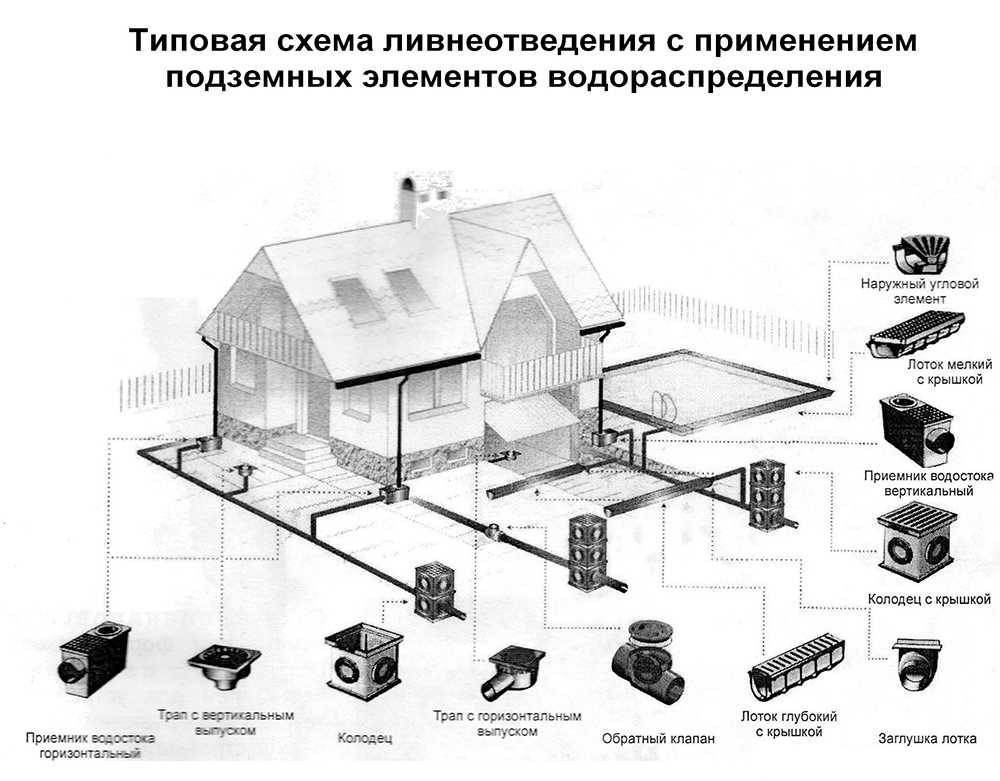


The drainage system assembled around the house with your own hands is connected to the general circuit using sewer pipes. In the areas where the gutters are connected to the pipes, there are revision wells that allow you to clean the system and service it if necessary. For the manufacture of wells, plastic is most often used. In order for the revision well to have sufficient depth, it can be extended using special extensions.
On the market you can find a lot of different accessories for arranging storm sewers. A wide range allows you to design a system without worrying about the lack of parts, and makes it possible to select the optimal elements to create a workable drainage system configuration.
Subtleties of system design and installation
Designing and installing a drainage system is an initial task that must be performed at the beginning of construction
At the same time, it is important to approach the issue of wastewater disposal, both in the city and in a country estate, in a comprehensive manner, taking care immediately of surface drainage, arrangement of storm sewers, household wastewater disposal, and landscaping
How is a drainage project prepared?
When designing a surface drainage system, it will be necessary to take into account a number of factors, including topography, rainfall, soil type, depth of groundwater, type of object, purpose and operating conditions of the object.
To draw up a project, you should contact the design service, whose specialists will draw up a project in accordance with the norms and requirements of SNiP.
Why do you need to submit the following documents:
- General plan of the site, where the dimensions and location of all buildings and structures are plotted.
- Site plan with topographic survey of the area, indicating the location of the storage tank for wastewater / drainage well.
- Technical report on the engineering-geological conditions of the territory.
When drawing up a project, specialists will definitely select the appropriate equipment for arranging the system, indicating the strength class and the required number of structural elements.
 The diagram shows an example of a technical solution for drainage by trays through a ladder using a reinforced series for arranging linear drainage
The design consists in calculating and choosing the optimal place for laying linear drainage.
The project includes the following calculations and schemes:
- Placement of linear drainage trays.
- Calculation of the hydraulic section of the trays, selection of their optimal location.
- Locations of sectional storm water inlets, taking into account the expected points of maximum discharge of effluents.
- Connection points for drainage pipes (their slope angle) and revision wells, indicating their location on the plan.
- Installation schemes for all elements of the drainage system - trays, storm water inlets, revision wells.
- A comprehensive list of all the elements necessary for arranging the system - trays, storm water inlets, pipes, wells, hatches and all accessories.
We have other articles on the site about the design of drainage systems:
- Site drainage project: choice of location, slope, depth, elements of the drainage system
- Calculation of storm sewers: analysis of important design features
Key rules for installing the system
The installation of the system is carried out in accordance with the approved project and taking into account the recommendations of the specific manufacturer from which the elements of the surface-type drainage system are purchased. By the way, it is best to purchase all components from one manufacturer, whose products suit you in terms of their characteristics and price category.
Next, we briefly consider the basic rules and stages of installation of a surface drainage system.
First, with special grips, workers manually lay and seal the water conduits. Then a concrete “pillow” is poured into the trench, the thickness of which is indicated in the recommendations of the manufacturer of the trays. A cord marks the line of laying the trays for assembling the drain.
First of all, sand traps are installed, and then they begin to install the trays, installing them end-to-end. All connection points are sealed.
During installation, it is important to ensure that the edges of all gutters are 3 mm below the coating level. A protective grille is installed on top of them, which is fixed with the bolts / clamps that come with the kit.Connection of a linear drainage system to the general sewerage system is carried out through sand traps
It is also important to provide for point drainage in places where water flows from the pipe.
Connection of a linear drainage system to the general sewerage system is carried out through sand traps
It is also important to provide for point drainage in places where water flows from the pipe.
As for the installation time of the system, specialists, if insignificant amounts of work are expected, can cope even in one day.
Do-it-yourself drainage work
Having decided on the type and type of drainage system, you need to purchase all the components and begin installation work. Knowing the technology, even a novice builder can cope with the task, so it makes no sense to hire professionals, because it’s easy to do everything yourself.


To create a drainage system of any type, perforated pipes will be needed. Experts advise replacing special products, if it is not possible to buy them, with ordinary sewer ones, by making holes in them.
The gravel used for backfilling must be larger than the holes so that it does not get inside
It is important not to forget about the final element, that is, the place where the water will finally fall. This may be a common off-site gutter
You can also create your own drainage well, remove precipitation into a septic tank or into a natural reservoir located nearby.