- The device of a septic tank from eurocubes
- The nuances of making a eurocube
- Advantages of a septic tank from an eurocube
- Do-it-yourself Eurocube installation
- How to extend the life of a septic tank from eurocubes
- Instructions for installing a septic tank
- Mounting
- How to make a septic tank yourself from eurocubes
- Capacity calculation
- Installation of a septic tank
- drainage system
- Assembly, installation of a septic tank
- Do-it-yourself septic tank from eurocubes - instructions.
- Primary stage of work.
- Construction installation.
- Maintenance and care
- How to install a septic tank with your own hands
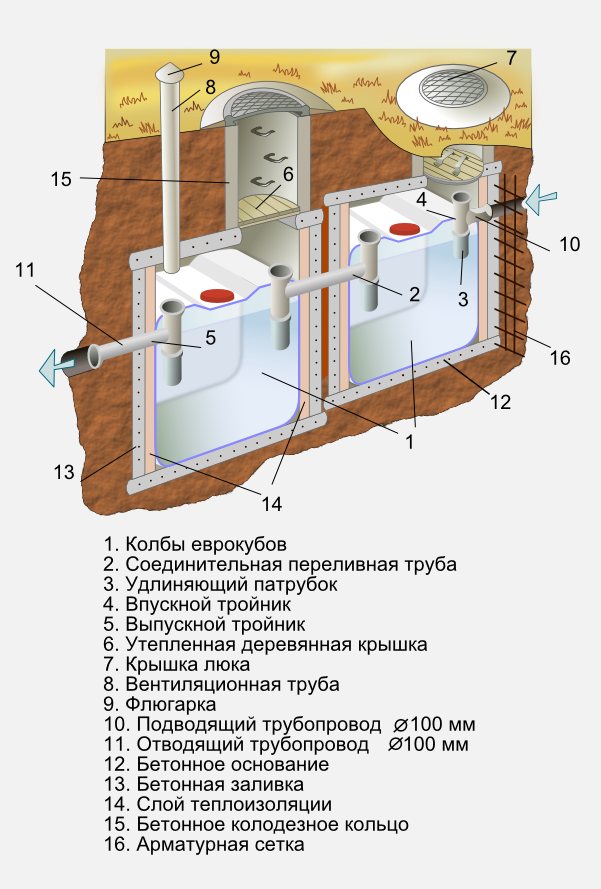
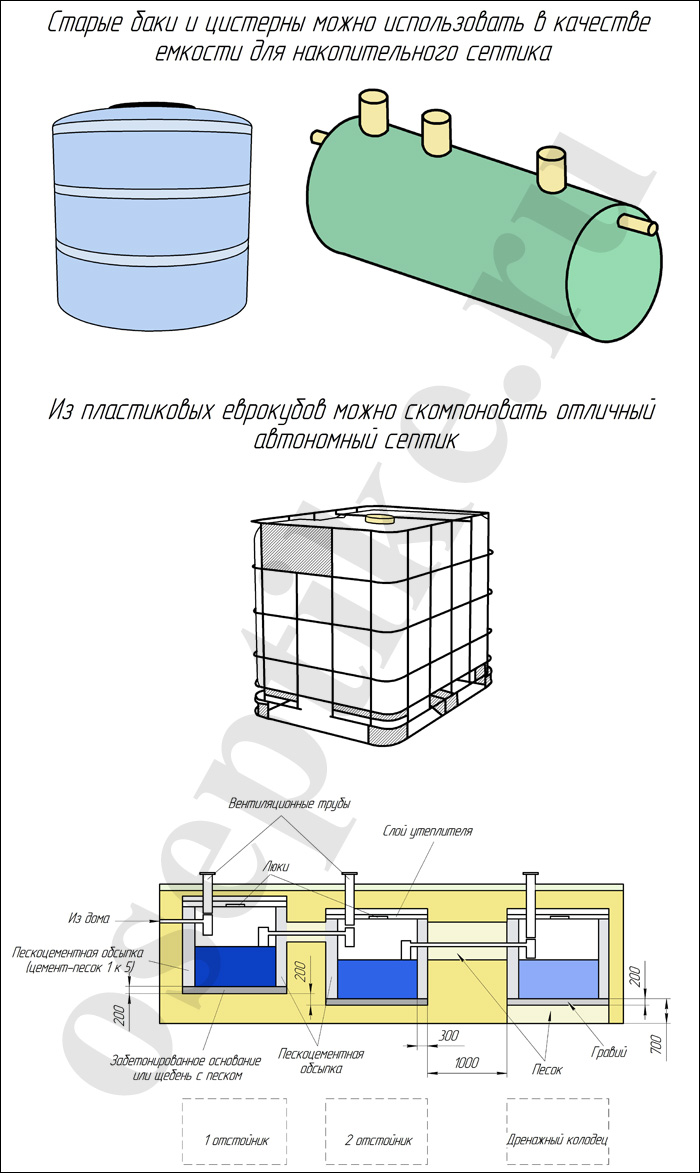
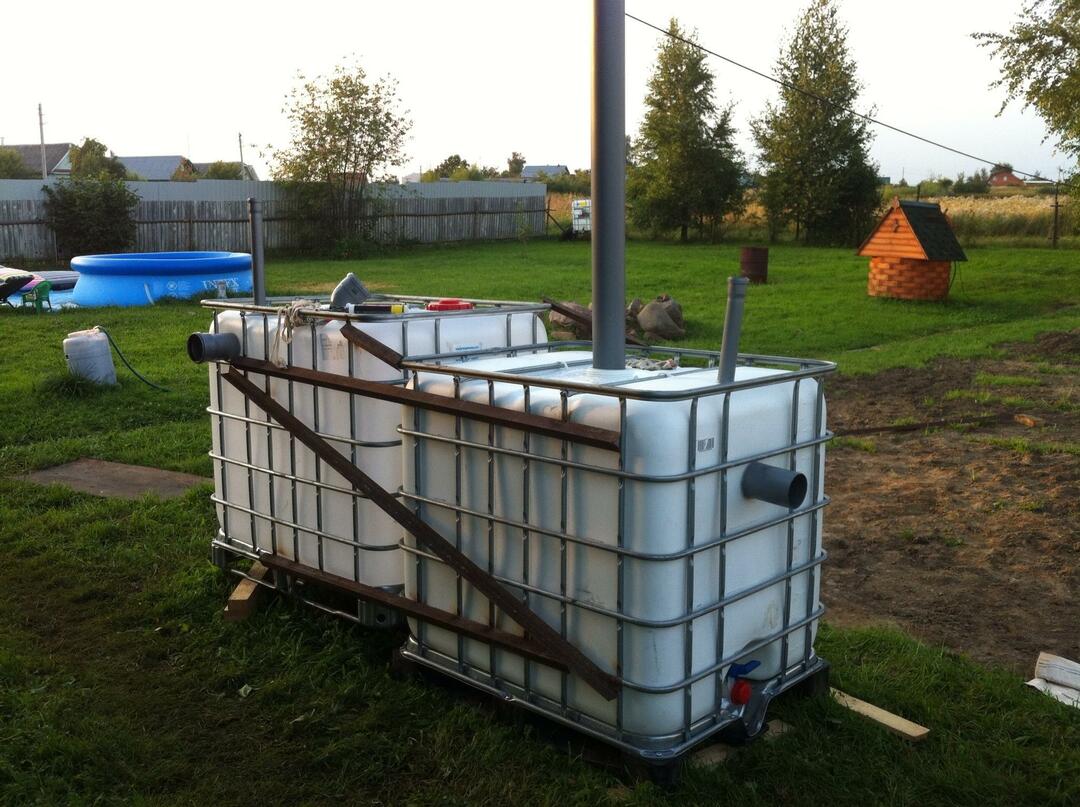
The device of a septic tank from eurocubes
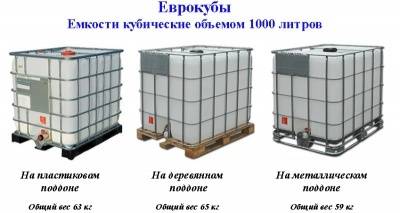
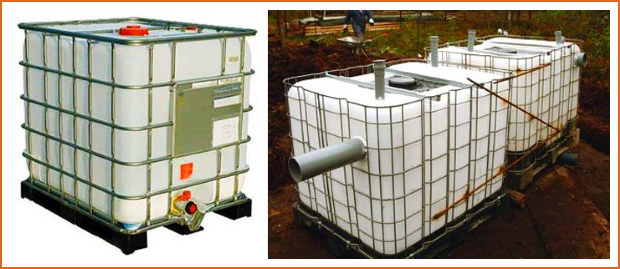
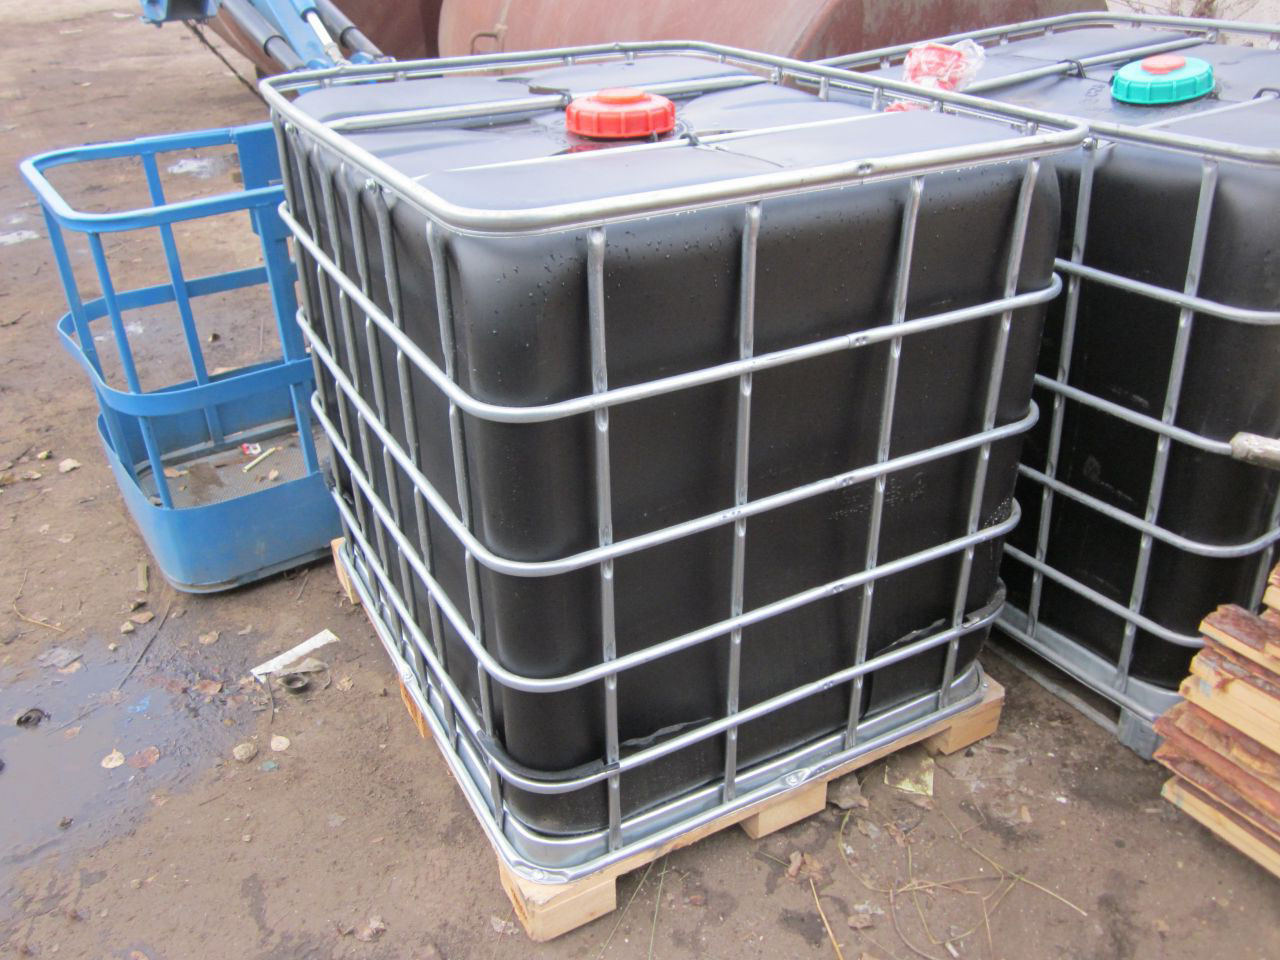
Residents living in a country house always face the issue of disposing of domestic sewer waste. Often the problem is solved with the help of eurocubes - special containers that are used to store water, various liquid substances, including sewage. They are made of polyethylene 1.5-2 mm thick, reinforced with stiffeners. To protect the walls from external influences, the product is enclosed from the outside with a steel mesh. For ease of transportation and installation, the tanks are mounted on wooden or metal pallets.
Tank characteristics:
- Dimensions - 1.2 × 1.0x1.175 m;
- Weight - 67 kg;
- Volume - 1 m3.
The factory-made container for sewer systems is equipped with a cleaning hatch, holes for supplying wastewater, draining clean water and ventilation of the internal cavity, as well as adapters for connecting external communications. Products that are used for transporting and storing liquids do not have technological holes necessary for the operation of the drive, so the openings are made in place. To create a septic tank from European cubes with your own hands, you may need several containers, depending on the wishes of the owner.
Brief information about such structures is given in the table:
| Number of Eurocubes | Application | Septic tank cleaning |
| 1 | For a family of 1-2 people who sometimes live in the house | Sewage is pumped out by a cesspool machine or discharged into a filter well |
| 2 | When creating a non-pumpable septic tank for a family of 3-4 people | Content flows by gravity to filter fields |
| 3 | If it is impossible to remove treated wastewater to the site | Purified water is collected in the third tank and taken out by a sewage machine |
Single chamber septic tank from the eurocube resembles a classic cesspool with sealed walls and a bottom. However, the small volume limits its use in local sewer systems.
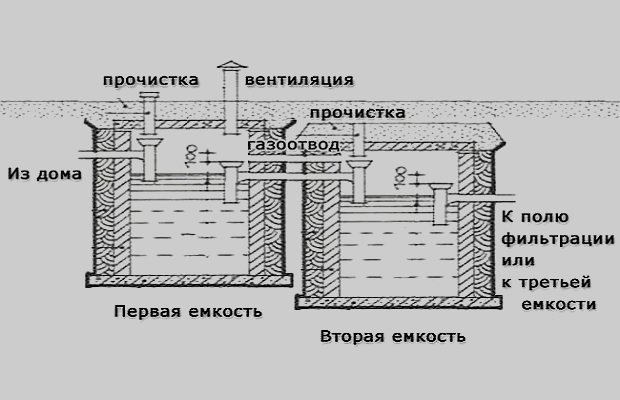
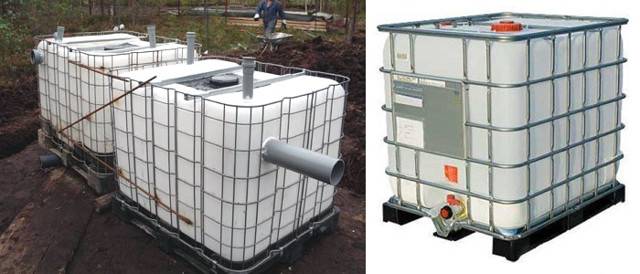
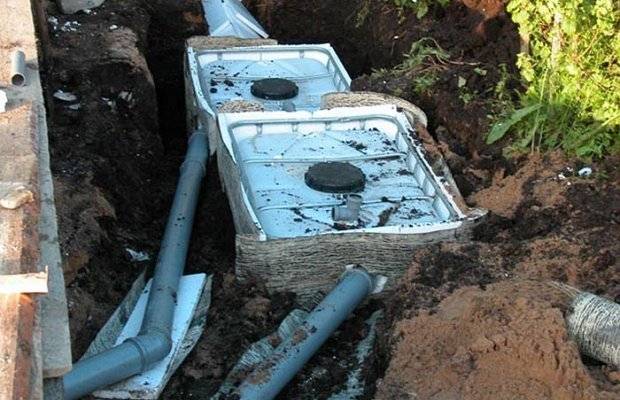
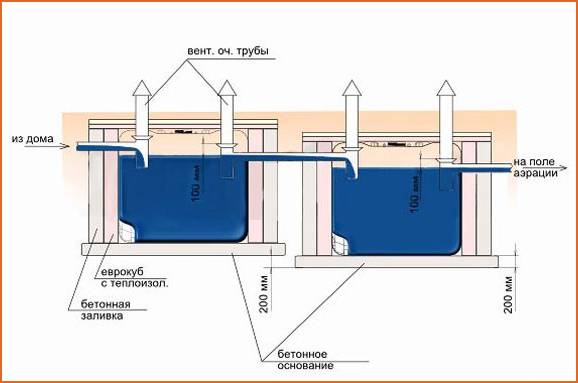
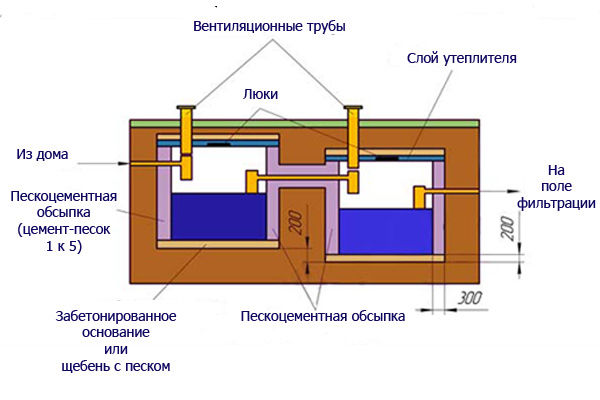
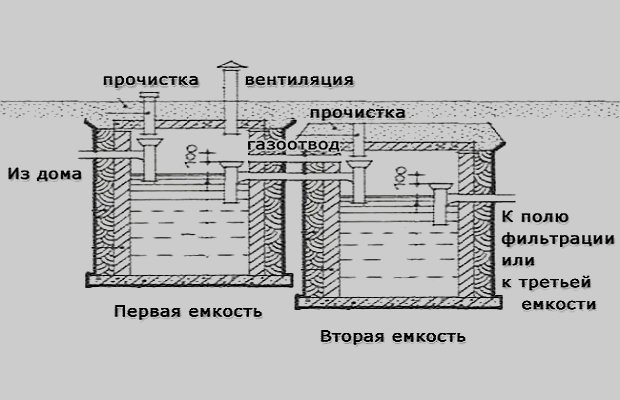
Most often, the owners collect septic tank of two eurocubesenough to serve an ordinary family. The two-chamber device functions as follows:
- Drainage from the house enters the first tank through the sewer pipe.
- Heavy fractions settle to the bottom in this tank, light fractions remain floating on the surface.
- When the liquid level reaches the overflow pipe, the effluents enter the second chamber.
- In it, fragments are decomposed into liquid and gaseous components. The gas exits through the ventilation system, the liquid fractions are removed to the outside through the drainage.
- To improve the rate of organics processing, special microorganisms are added to the second eurocube - bacteria for septic tanks, which are able to live without sunlight and oxygen.
- After the storage tank, the water must be additionally purified in soil filters, which are built nearby.
- Solid fractions from the first container will have to be removed mechanically once a year. The volume of insoluble elements is no more than 0.5% of the total volume of waste, so the tank will not be filled soon.
Third tank used in the scheme of septic tanks from European cups, if the soil in the area is swampy or the groundwater level is very high. The purified liquid is drained into it, which is then taken out by a sewage machine.
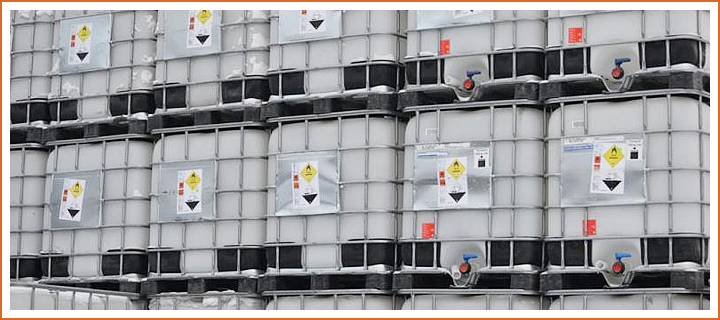
If there are no sewer products on sale, buy a non-food container or used unwashed containers (they will cost less). The main requirement for them is tightness, the absence of cracks and other defects.
The nuances of making a eurocube
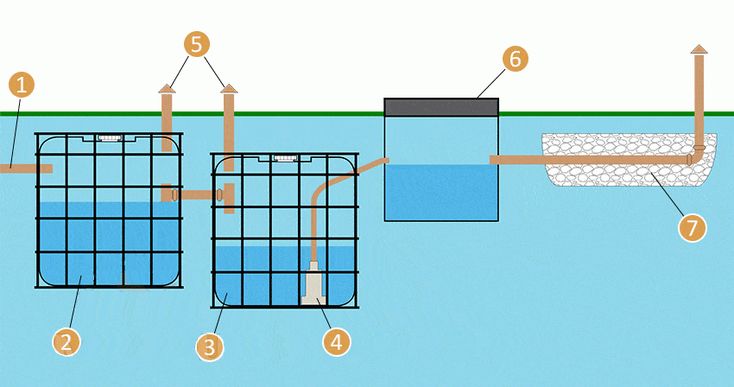
You can make a septic tank with your own hands from 2-3 eurocubes connected in turn.
Eurocubes should be located at different levels, i.e. each will be lower than the previous one, then the drains will flow from one eurocube to another.
During the cleaning process, they will be broken down by anaerobic bacteria.
In order for a do-it-yourself septic tank made of eurocubes to exist for a long time without pumping out, it is necessary to fill in biologically active substances during the installation process, after interacting with which, the purified liquid is absorbed into the soil.
Silt can be removed once every few years, leaving an appropriate hole in the eurocube for this.
Advantages of a septic tank from an eurocube
- Resistant to sufficiently large loads;
- High tightness;
- Ease of installation of pipes in eurocubes;
- Resists the effects of chemicals;
- democratic value;
- Does not require special care;
- Light weight;
- With the accuracy of self-assembly, an excellent septic tank is obtained.
Cons of using Eurocube for septic tanks:
- The need for good fastening of the eurocube in the ground, or concreting, because due to its low weight, groundwater can push it out of the ground to the surface;
- Possible deformation of the eurocube surface, both in severe frosts and at too high loads.
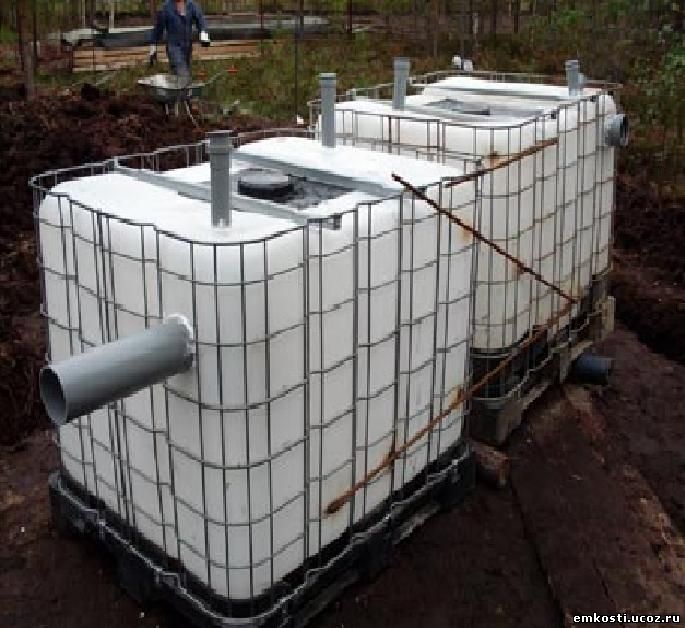
Do-it-yourself Eurocube installation
Self-installation of a septic tank from eurocubes in the country includes several stages:
- It is necessary to calculate the volume of the tank. Since sufficient purification occurs in 3 days, the volume of the tank should include three times the daily volume of water consumption. For example, if 4 people live in a house, who use 150 liters each per day, then 600 liters must be multiplied by 3 and we get 1800 liters as a result. Thus, you need to buy 3 containers for a septic tank from 3 eurocubes with a volume of approximately 1.8 m3 each. You should take a septic tank with a volume slightly larger than calculated if you often have guests.
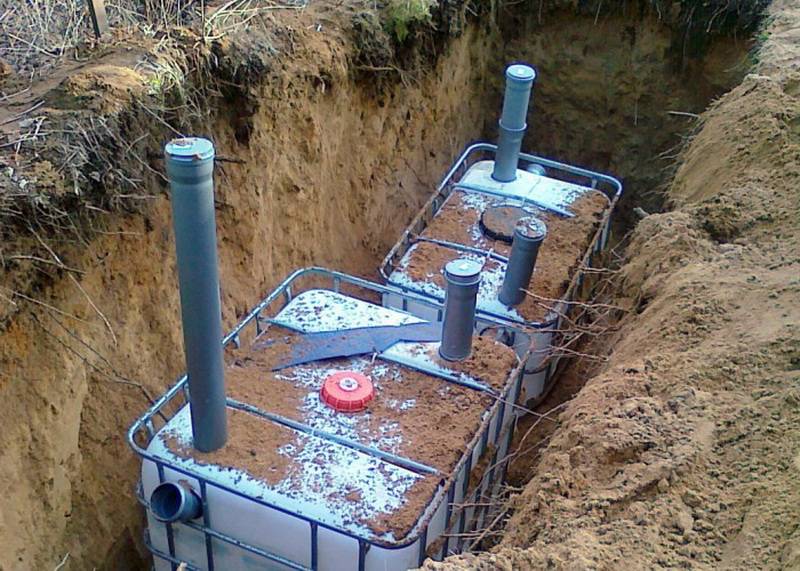
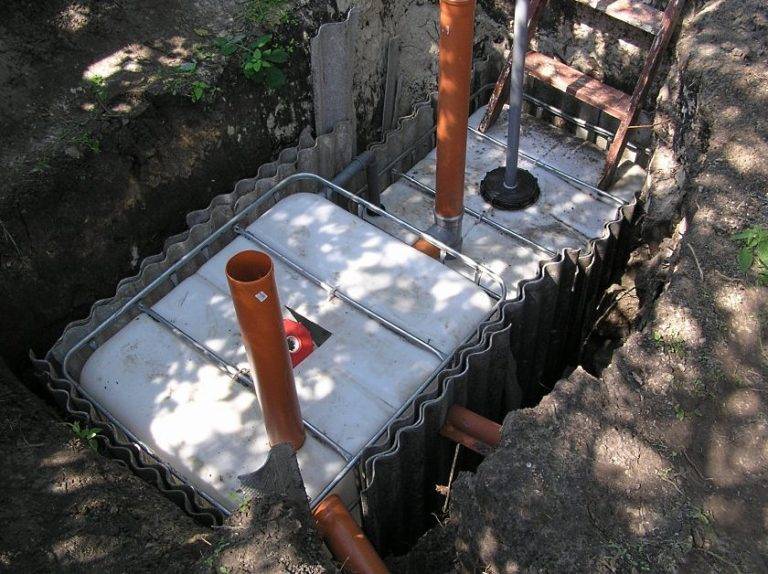
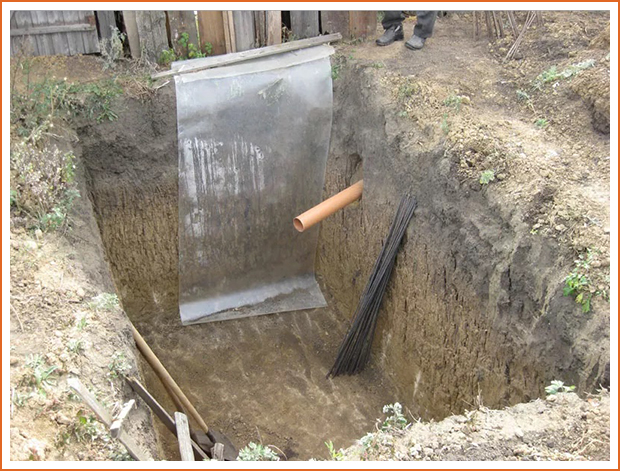
- Excavation. First of all, you need to start preparing trenches for pipes for a septic tank and a pit. Dig a hole 30 cm wider than the Eurocube itself. When calculating the depth, consider the dimensions of the concrete base, insulation and the zero temperature point.It must be remembered that the pipes run with a slope of 3 cm per meter, and also lie below the zero temperature point. The bottom of the pit is poured with concrete and hinges are installed for attaching the eurocube. Before concrete is poured, a sand cushion is usually placed at the bottom of the pit under the septic tank pipes.
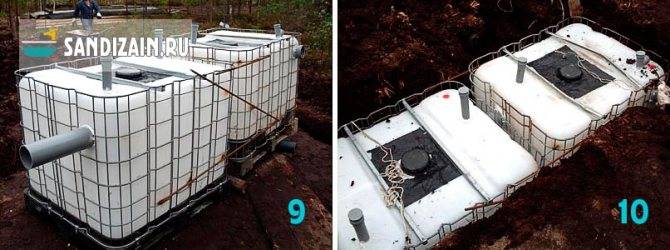
- Construction collection. The first 2 eurocubes are connected to each other and to the sewer pipe, an overflow outlet is placed between the 2nd and 3rd eurocubes. The latter is directly connected to the filter field.
In order to carry out the installation of a septic tank, it is necessary to have eurocubes, several pipes with a cross section of 150 mm (their number varies and depends on the number of ventilation, transitions between tanks), as well as 6 adapters.
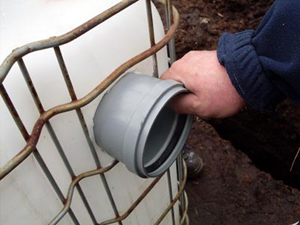
At the beginning, it is required to make cuts for tees in the necks of the eurocube. After 20 cm from the top down, make passages for the outlet pipe, which must be connected to the tee inside the chamber.


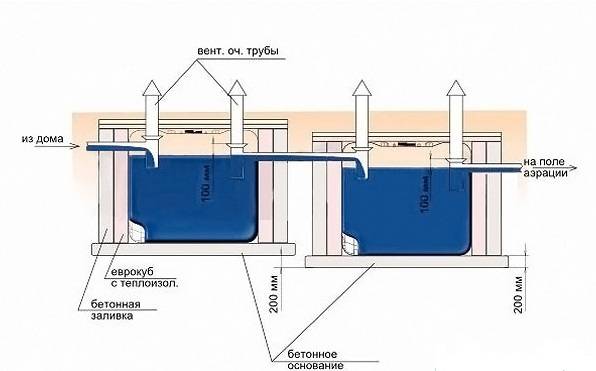


Next, on the opposite side of the eurocube, you need to cut a pass 40 cm from the top. Don't forget to make a slot for ventilation in the lid, and install each camera exactly 20 cm below.
With self-installation of a septic tank, it is necessary to seal the junctions of the pipe with the Eurocube with high quality.
- Pit processing. To protect the eurocube from deformation, a mixture of cement and sand is used 5: 1, respectively. The top of the structure is covered with this mixture several times, it is necessary to press each layer.
In order to prevent deformation of the eurocube walls from soil pressure during installation, fill it with water. You will also need penoizol in order to cover the upper surface of the septic tank.
How to extend the life of a septic tank from eurocubes
The septic tank does not require special maintenance, but some points should be considered in order to extend its useful life:
- Once every couple of years, it is required to remove the sediment from the tank;
- Periodically add supplements.
A do-it-yourself septic tank made of eurocubes is an economical and excellent option for its use in any climate zone.
Instructions for installing a septic tank
The creation and installation of a septic tank from eurocubes includes the following stages of work:
- design work (stage 1);
- preparatory work (stage 2);
- assembly of a septic tank (stage 3);
- installation of a septic tank (stage 4).
At the first stage of work, it is necessary to determine the type of septic tank and the place of its installation. In this case, the following operations are performed:
- Estimation of the required capacity of the septic tank. The size of the septic tank depends on the time the septic tank is used and the number of residents in the country house. During temporary residence in the country in the summer, a small-capacity septic tank is used. At the same time, the required volume of the septic tank V in liters can be determined by the formula: V = N × 180 × 3, where: N is the number of people living in the house, 180 is the daily rate of wastewater in liters per person, 3 is the time for complete wastewater treatment septic tank. As practice has shown, two eurocubes of 800 liters each are enough for a family of 3 people.
- Determination of the location of the septic tank. It is recommended to locate the septic tank at a distance of at least 50 m from the drinking water intake, 30 m from the reservoir, 10 m from the river and 5 m from the road. The distance from the house should be at least 6 m. But too much distance from the house due to the need to slope the pipe causes an increase in the installation depth of the septic tank and an increase in the likelihood of blockage in the sewer pipe.
Stage 2 works include:
- Digging a pit for a septic tank. The length and width of the pit must correspond to the dimensions of the septic tank with a margin of 20-25 cm on each side. The depth of the pit depends on the height of the tanks, taking into account the sand and concrete cushions, as well as the slope of the sewer pipe. In addition, it must be taken into account that the second container is shifted by 20-30 cm in height and, therefore, the bottom of the pit will have a stepped appearance.
- At the bottom of the pit, a sand cushion is laid. If the GWL is high, then a concrete pad is poured, in which loops are installed for attaching the septic tank body.
- Preparation of trenches for the sewer pipe and drainage system. A trench for a sewer pipe is dug, taking into account the slope towards the septic tank. This slope should be 2 cm for every m of pipe length.
At stage 3, a septic tank is assembled from eurocubes.
Materials for creating a septic tank:
- 2 eurocubes;
- 4 tees;
- pipes. Pipes are needed to connect a septic tank and drain treated water, to make ventilation and an overflow system;
- sealant,
- fittings;
- boards;
- Styrofoam.
As a tool at this stage of work, you will need:
- Bulgarian;
- welding machine.
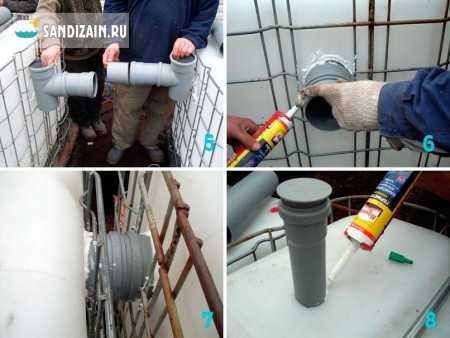
When assembling septic tanks from eurocubes, the following operations must be performed:
- Using caps and sealant, plug the drain holes in both eurocubes.
- Using a grinder, cut U-shaped holes on the container lids through which the tees will be installed.
- At a distance of 20 cm from the upper edge of the body of the first vessel, make a hole 110 mm in size for the inlet pipe.
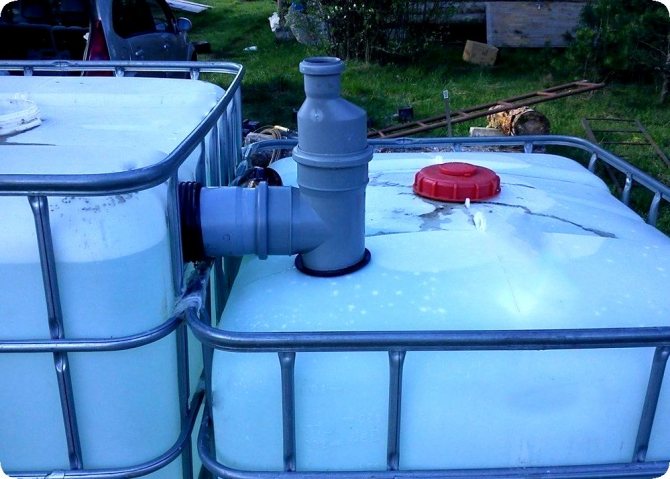
- Insert a branch pipe into the hole, attach a tee to it inside the eurocube, seal the connection of the branch pipe with the body wall with sealant.
- Cut a ventilation hole above the tee and insert a short piece of pipe into it. This hole will also serve to clean the channel.
- Cut a hole for the overflow pipe at a distance on the rear wall of the housing. This hole must be below the inlet.
- Insert a piece of pipe into the hole and fasten a tee on it inside the eurocube. Cut a ventilation hole above the tee and insert the pipe in the same way as in step 5.
- Move the first container 20 cm higher than the second. To do this, you can put under it
- lining.
- On the front and back walls of the second vessel, cut holes for the overflow pipe and outlet pipe. In this case, the outlet pipe must be lower than the overflow pipe.
- Tees are attached to both pipes inside the vessel. Ventilation pipes are installed above each tee.
- Connect the overflow outlet from the first container and the overflow inlet of the second container with a pipe segment.
- Seal all joints with sealant.
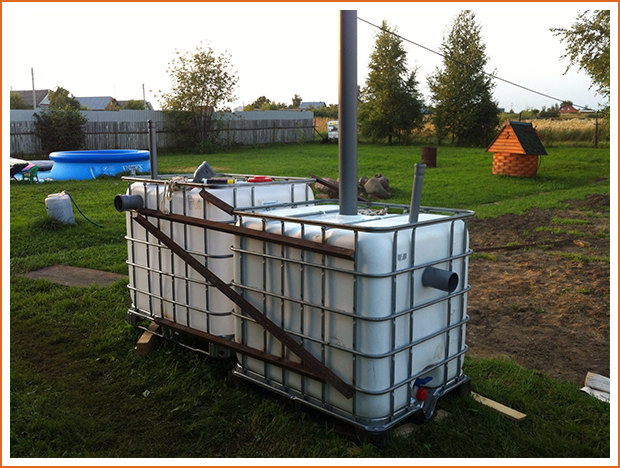
- Using welding and fittings, fasten both bodies into one.
- The cut U-shaped holes in the covers of Eurocubes should be sealed and welded with a layer of waterproofing.
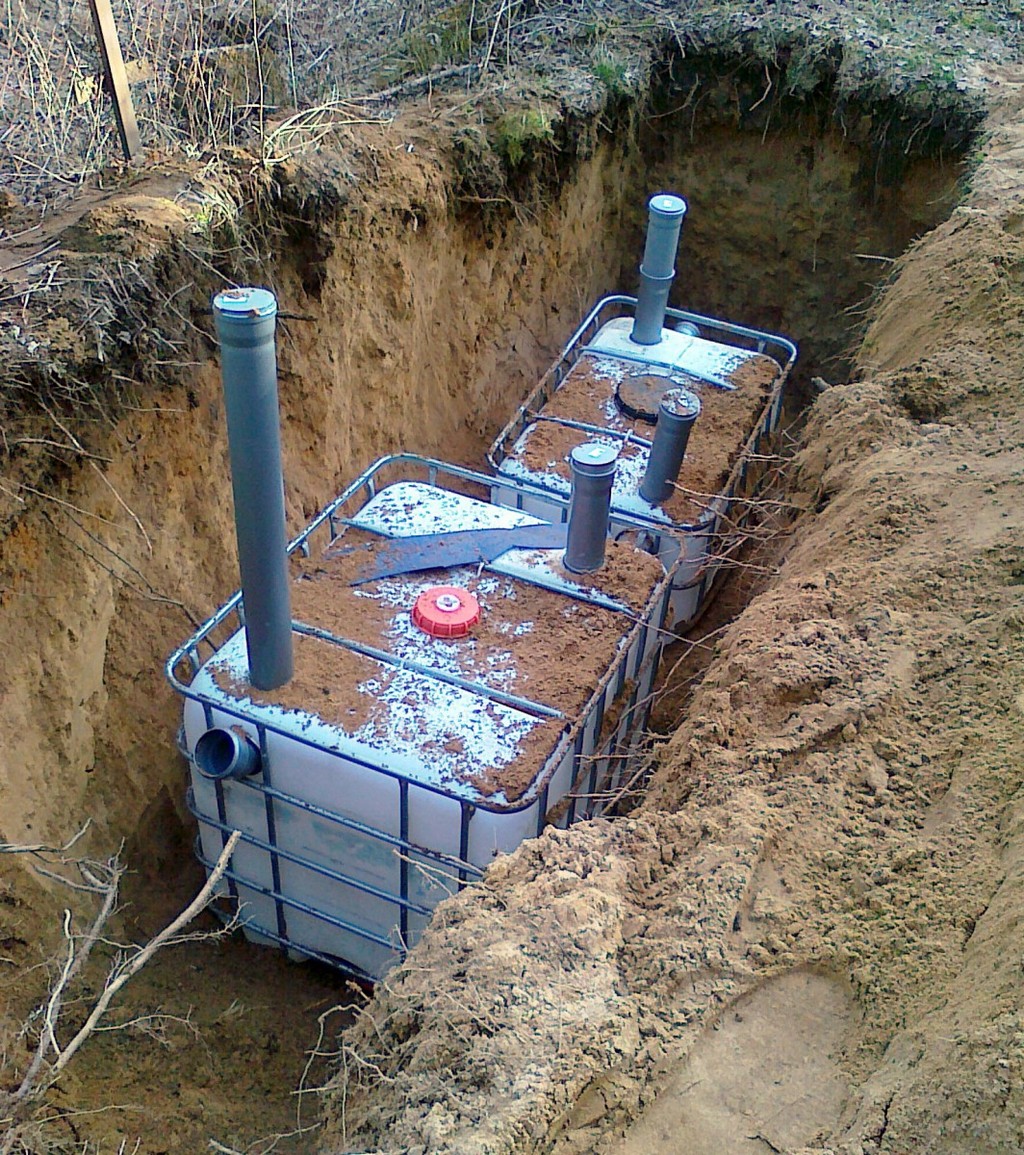
At the 4th stage, you need to perform the following operations:
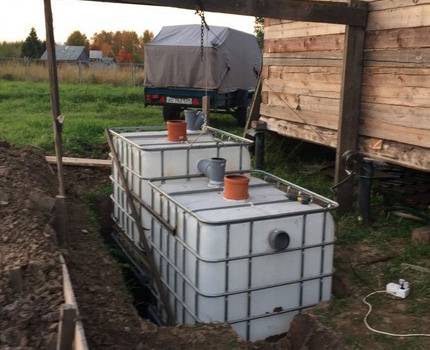
- Lower the septic tank into the pit.
- Connect the sewer pipe and the pipe leading to the aeration field. The outlet pipe is equipped with a check valve.
- Insulate the septic tank with foam or other material.
- To protect the walls of the septic tank, install boards or corrugated board around it.
- Backfill after filling the septic tank with water. In areas with high GWL, backfilling is carried out with a mixture of sand and cement, and in areas with low GWL, soil with sand and tamping.
- Concrete the top of the pit.


Mounting
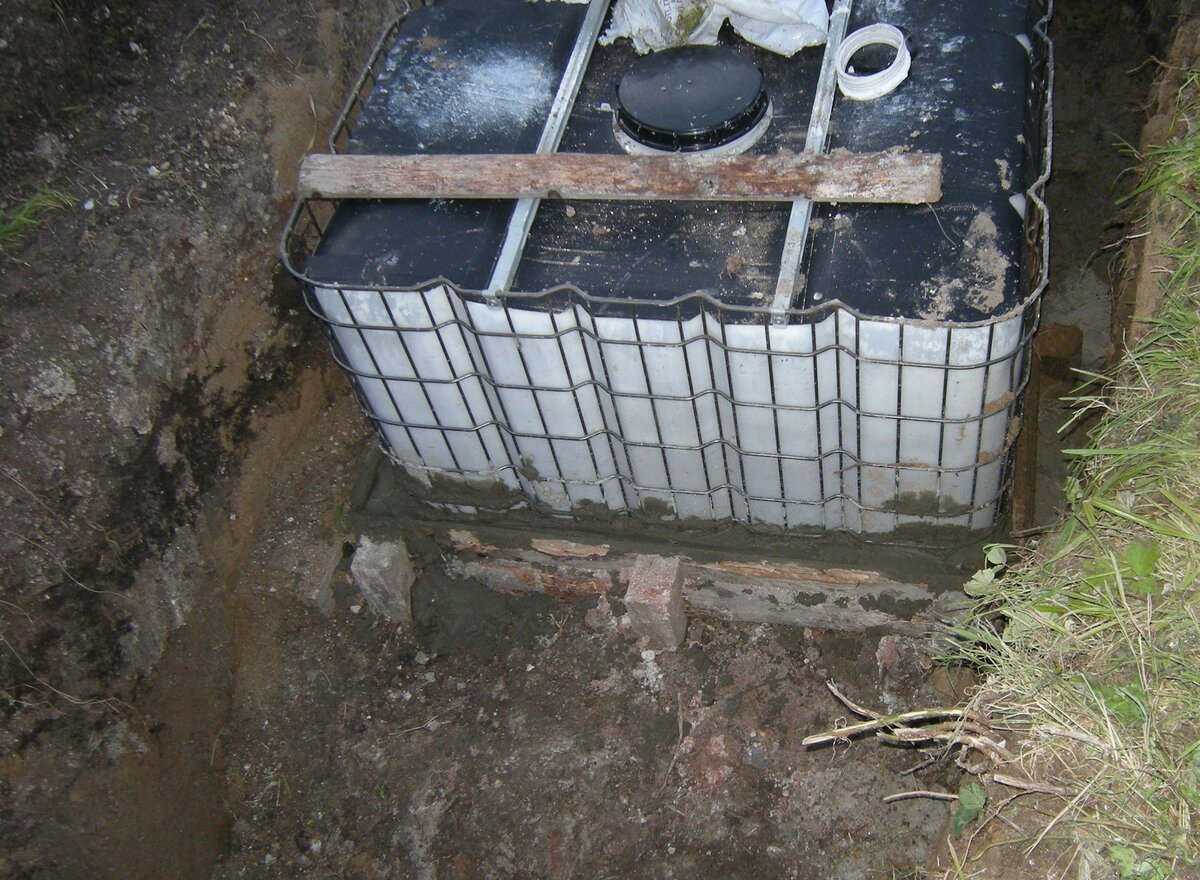
The bottom of the excavated pit is pre-concreted to prevent erosion of the soil under the influence of the huge weight of the structure and the close occurrence of surface water.
After the structure is immersed in the pit, the walls of the septic tank and the pipeline are insulated with foam plastic. A concrete solution is also poured between the walls of the containers and the soil. This procedure can be omitted if the soil is not subject to shedding, erosion. Now water is poured into the tank, and the structure is covered with sand.
It is not difficult to build a post-treatment system, especially in places where there is sandy soil. A semblance of a well up to one meter deep is being built. An outlet pipe is connected to it.
During operation, it is recommended to conduct a periodic inspection, carefully examining the wide pipes that were installed in the septic tanks. Inside can be found polyethylene, fatty substances that contaminate containers, but do not undergo rapid decomposition. If such traces of contamination are found, they are removed using improvised means.
It is also important to check the bottom of the containers with a long pole. If a large amount of solid deposits have accumulated there, they must be removed:
- using the services of special equipment;
- pumping out the contents with a fecal pump.
Sometimes manufacturers recommend purchasing special bacteria for septic tanks, which can significantly speed up the process of decomposition of organic waste. However, as practice shows, you can do without additional costs by refusing to purchase such bacteria.
Nature itself took care of helping summer residents to solve such a problem. Microorganisms that feed on organic matter actively multiply and, without additional “requests” from the owners of summer cottages, resolve the issue of organic utilization.
It will not be difficult to build a septic tank from Eurocubes according to a pre-prepared scheme, if all the work is done correctly and high-quality materials are selected. A self-made sewer device can last up to 10 years without pumping.
How to make a septic tank yourself from eurocubes
When constructing a septic tank, one should be guided by construction, as well as sanitary norms and rules, in order to competently take into account the adjacent buildings and the features of the adjacent territories.
The following are points to consider during installation:
- The septic tank should be installed at a depth below the freezing level of the soil. If this is not possible, it must be insulated.
- The soil around the septic tank must have high permeability. Well suited sandy and gravel soil. If clay inclusions predominate, it is necessary to build a cesspool and install a pump.
- If the soil has poor filtration, an aeration well is constructed.
- The septic tank should be located so that it has access to pumping equipment.
Capacity calculation
Prior to the start of all work, it is necessary to calculate the magnitude of the expected effluents in order to select the appropriate number of containers.
The SNiPs regulating the construction of sewer facilities indicate that one person consumes from 150 to 200 liters per day. This figure is multiplied by the number of family members, then by 3. It is for a three-day period that the water purification cycle in the septic tank is calculated.


Installation of a septic tank
First, they dig a pit corresponding to the size of the eurocubes, making a margin of about 20 centimeters along the entire perimeter, where the heat-insulating material will be laid. You can also install something strong here to counteract the squeezing force.
The depth is made based on the height of the tank and the main slope. The installation of each subsequent Eurocube is carried out below the previous one by 25 - 30 centimeters. The height of the concrete cushion under each container is also taken into account.
It is advisable to attach the container to the concrete base with straps, in order to avoid extrusion by groundwater in the spring months.
drainage system
Soil post-treatment of water can be arranged in different ways.
- First way. Construction of filtration wells. This is done simply and inexpensively. The bottom of the dug well is made as a filtration sand or gravel cushion. This method is not suitable for soil such as sand, sandy loam, loam. Such an installation must be coordinated with the SES, it is difficult to achieve high performance from it.
- The second way. Construction of fields that carry out underground and ground filtration. This is a kind of irrigation system that passes wastewater processed by a septic tank before it goes into the soil. For the system, perforated ceramic or plastic pipes are used, which are laid on the filtrate. Ventilation risers about half a meter high are brought to the ends of the channels.
- The third way. The construction of filtration trenches, that is, meter pits up to thirty meters long, where pipes are laid. Drainage water flows by gravity into the storm drain.
Assembly, installation of a septic tank
The assembly of the septic tank is done focusing on a pre-designed scheme.Each connection must be carefully sealed.

On the first Eurocube, twenty centimeters below the upper limit, a round entrance is made, into which a pipe is stuck, connecting the container with an external sewage system. A round exit is made from the opposite end ten centimeters below the entrance, for pouring drains into the next Eurocube.
At the second eurocube, an entrance is made from the first, not forgetting about the difference in tank levels. From the other end of the cube, a round exit is made, where a second overflow pipe is inserted to divert treated effluents to the filtration fields.

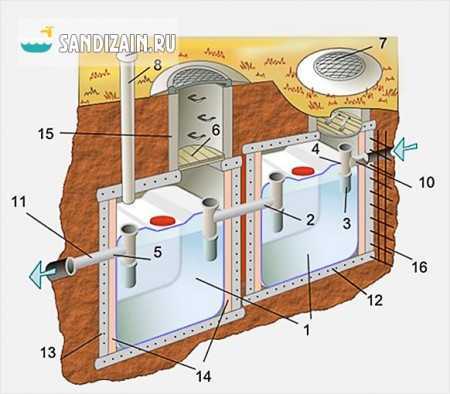
The upper surfaces of the tanks are equipped with openings for ventilation and cleaning. It is possible to perform both functions through one channel. The ventilation pipe is made two meters. Its lower edge is located above the level of the overflow pipe.
Eurocubes are connected with steel elements at a twenty-centimeter distance. For insulation, mineral wool, polystyrene are used.
To combat the squeezing of the septic tank around the perimeter, it is concreted. You can install a wooden box, tamping the ground well.
Do-it-yourself septic tank from eurocubes - instructions.
Primary stage of work.
Before starting work, it is necessary to determine the goals and the desired result of this work. Typically, this process consists of making calculations of the average daily wastewater volume that the septic tank will need to handle during its operation. After you figure out the numbers, you can start acquiring the necessary cubes. When buying them, be guided by the following rule: the volume of the wastewater storage tank must exceed 3 times the daily drains.In addition, the fewer waste containers used, the better, because this will reduce the number of connections between them, which means it will increase efficiency.
At the end of the preparatory stage, you need to dig a pit. By the way, due to the fact that the eurocube is completely sealed, a special drainage system is used to remove sewage, and, therefore, the installation site of such a septic tank is unlimited.
Construction installation.
Having prepared the pit, you can begin work on installing a septic tank. To do this, the bottom of the pit is covered with gravel or sand to create a special pillow. And if there is a high probability of subsidence of the soil under the weight of filled cubes, it is worth playing it safe and making a concrete screed.


Next up is pre-assembly.
To do this, three holes must be made in both cubes and pipes inserted into them, paying special attention to their tightness. If necessary, you can use additional insulation (liquid rubber or special sealant)
The final stage of the installation of a septic tank is the formation of an external wall around it, consisting of a concrete screed, which will serve to protect the cube from the ground pressure arising on it. If the soil at the installation site of the septic tank is relatively loose, it will be enough to simply tamp sand around the cubes or simply install OSP corrugated board, slate or panels.
After that, it is necessary to carry out the final backfilling and insulation (it is necessary only under one condition - when the septic tank is operated in a cold and harsh climate).On this, the process of installing a septic tank from European cups with your own hands can be considered finished.
Maintenance and care
 Home-made septic tanks from eurocubes do not have pumping and are serviced by the owners themselves. At the same time, bacterial starter cultures are used to quickly decompose organic waste.
Also, for the purpose of durable operation of the structure, periodic checks of overflow and exhaust pipes, as well as the ventilation system are carried out.
For efficient operation of the septic tank, the filter is replaced every three years if the chamber is leaky and has no bottom. In general, the timing of such operations depends on how intensively the treatment plant is operated. As a result of the implementation of the rules for the maintenance of a septic tank, it will last for decades and without failures. In case of non-compliance with the operating instructions, the owner of the cottage may find himself in a situation where it is necessary to clean the sludge pits and container walls with the help of an improvised tool.
The sensation of an unpleasant odor indicates a malfunction in the operation of a home-made septic tank from European cubes. In this case, it is necessary to use the services of sewage equipment. First you need to fill the pit with water so that solid large particles liquefy.
After pumping out sewage, microorganisms can be used that will accelerate the process of decomposition of organic substances and after 2-3 days the plaque on the walls of the tank will disappear altogether.
Thus, it is clear that any owner of a country or private house, even those who are not very versed in construction, can make a Eurocube with their own hands. The main thing is to know a few important points:
- Using a Eurocube to build a septic tank will be cheaper than any other options.
- All the necessary work will take about 3 days, even taking into account the fact that the owner himself will be engaged in both the preparation and installation of a septic tank from European cups.
Plastic eurocube has excellent waterproofing and is more durable. Such a septic tank will not need to be additionally equipped with flooring devices, finishing, unlike a septic tank made of concrete rings.
How to install a septic tank with your own hands
The installation of a septic tank begins with determining the location. It must be borne in mind that the distance from the water supply system to the septic tank must be at least 50 meters. You should not build a structure too close to the foundation, but it is not recommended to move too far away either. A distance of 6 meters will be the most optimal.
Having chosen a place, you can begin to prepare the pit for the tank and the base. The volume of the installed chamber will determine the size of the pit itself for the septic tank, taking into account 15 cm from all sides. Accordingly, the depth depends on the size of the tank, as well as the slope of the sewer system.
Scheme of installation of eurocubes under a septic tank underground
The pit is filled with 15 cm of concrete, while loops are made on which the Eurocube will be anchored under the septic tank. Now you can start preparing the trench to the place where the septic tank will be installed. The slope is made towards the container. The trench must be sprinkled with gravel from the sides and insulated.

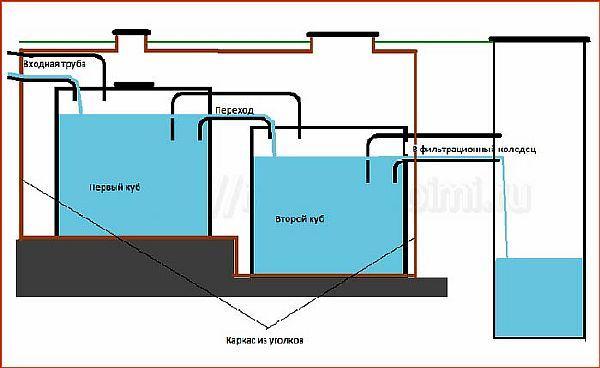


Important! In order for the sewer line to be organized without problems, the pipe must be laid with the calculation of two centimeters of recess per one meter long. Preparing a septic tank for operation
Preparing a septic tank for operation
Before installing the container, it must be prepared.The first stage involves sealing the drain of the container, which is located at the bottom of the tank to prevent leakage of sewage waste. Then ventilation holes are made, as well as the inlets and outlets of the branch pipes, the tightness of which must be verified after completion of the installation work.
One cube must be lower than the other so that the particles, depending on the density, can settle at the bottom or undergo natural cleaning by bacteria. So that there are no leaks at the pipe joints, you can use a sealant or liquid rubber. After carrying out all the necessary operations (preparation and checking of connections), the septic tank is determined in the place allotted for it. Now you can securely fix it with pipes.
Welding of one level of the eurocube below the second and waterproofing
high groundwater level
In this case, the eurocube may float, and at the same time damage the connecting elements. The solution to this problem is quite simple.
A compartment is being constructed in which a pump with a switch in the form of a float is placed. It pumps water into a compartment that is above groundwater.
It happens that the European Cup, having a heavy weight, simply crushes the ground. What to do if the container crushed the soil?
Looseness of the soil can be eliminated by compacting it or installing slate, corrugated board, or OSP panels. Then you can proceed to the final filling of the tank (without forgetting about the insulation of the septic tank). Installation and installation of the sewer line can be considered complete.


