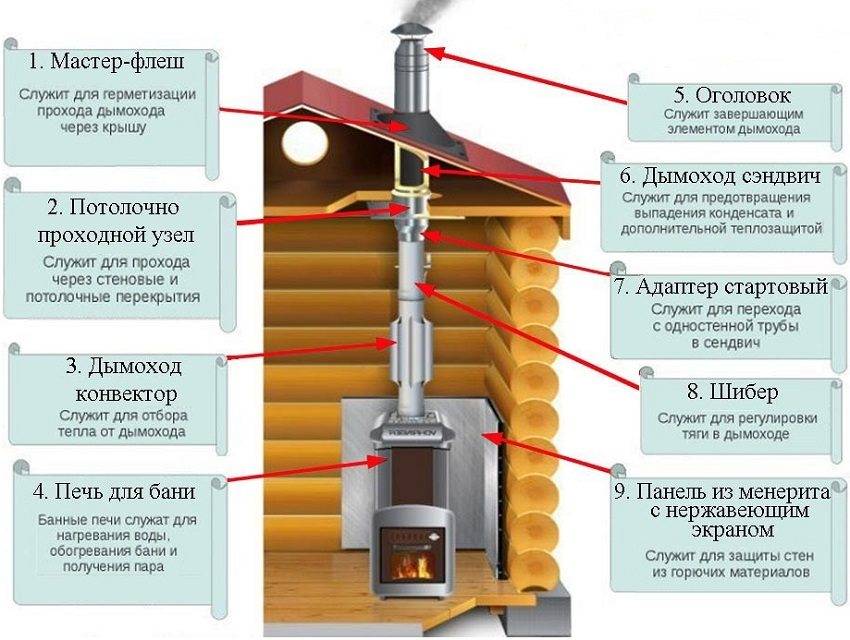
- Sandwich setup diagrams
- preliminary calculations
- Length calculation
- Location
- We install a sandwich chimney in the bath in stages
- Stage I. We connect the elements of the chimney
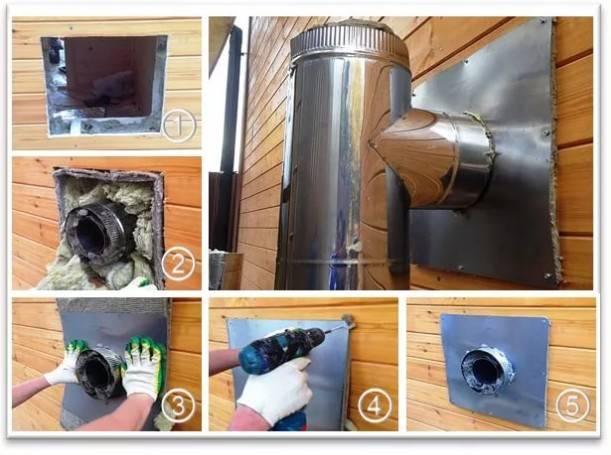
- Stage II. Option 1. We pass the chimney through the wall
- Stage II. Option 2. We pass the chimney through the roof
- Stage III. We fix the chimney
- Stage IV. End of installation
- Operation of chimney sandwich systems
- Gas chimneys
- What materials are suitable for gas chimneys?
- Does the type of boiler affect the choice of chimney?
- How to install a coaxial chimney?
- Is it possible to change the chimney?
- Operation of a sandwich chimney
- We install a sandwich chimney in the bath in stages
- Stage I. We connect the elements of the chimney
- Stage II. Option 1. We pass the chimney through the wall
- Stage II. Option 2. We pass the chimney through the roof
- Stage III. We fix the chimney
- Stage IV. End of installation
- Rules for installing pipes on the roof
- How is a sandwich chimney arranged?
- Elements of modular systems
- How to make a sandwich chimney pipe
- Length calculations
- Assembly
- Video: how to make a sandwich pipe
- Features of the output of the sandwich chimney through the wall
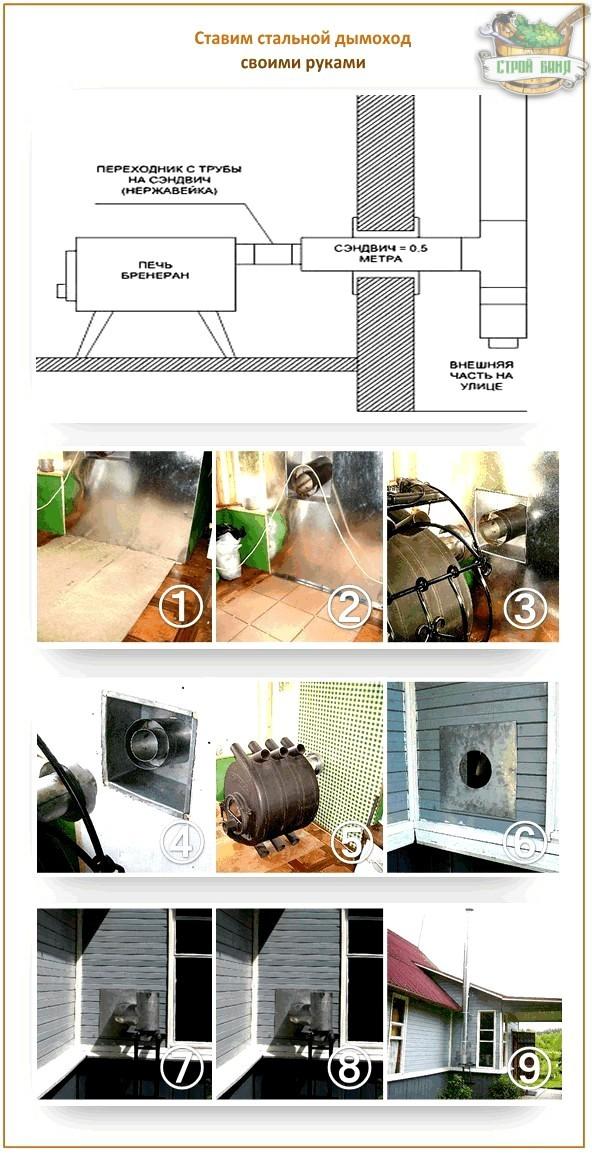
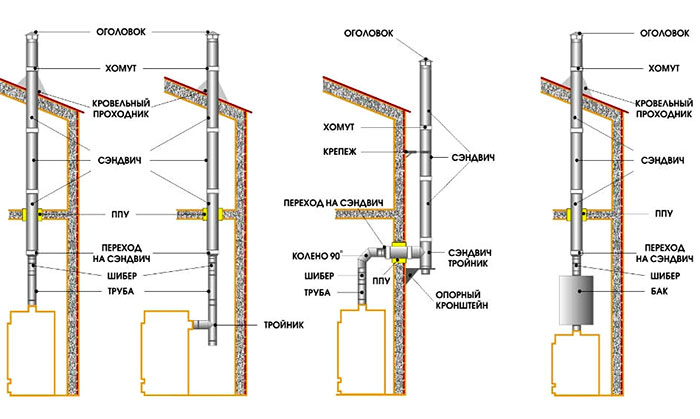
Sandwich setup diagrams
There are 3 ways to make a chimney from modular sandwich pipes:
- The vertical part is located on the street, attached to the outer wall of the building.The horizontal chimney crosses the outer fence, enters the house and is connected to the boiler (furnace) nozzle.
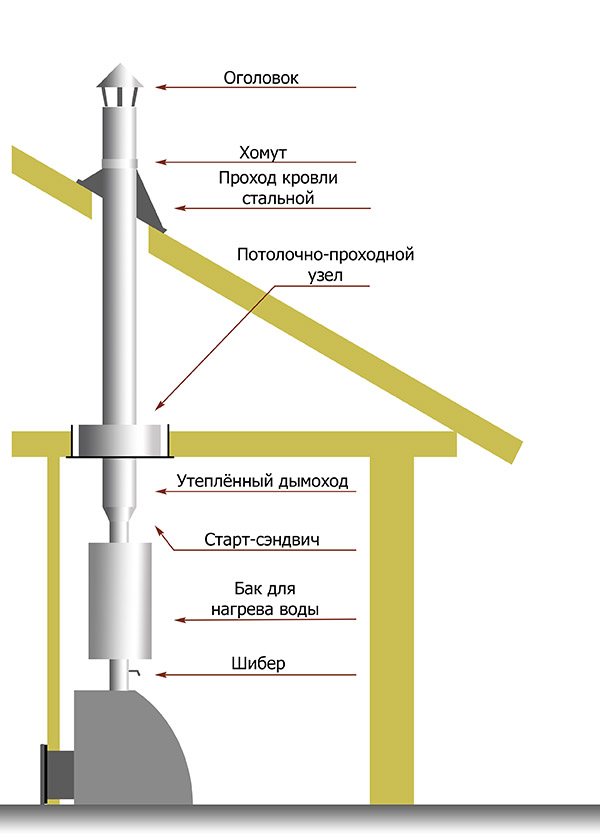
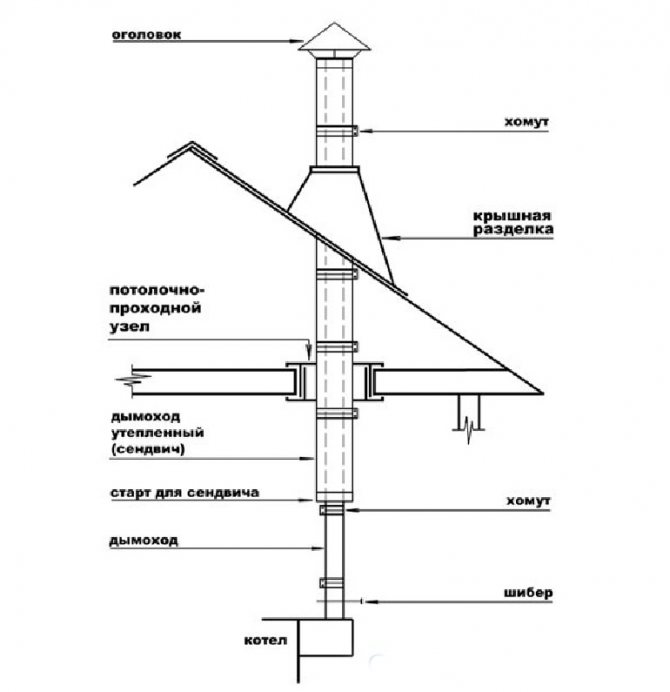
- The vertical smoke channel passes through the roof, descends into the boiler room and ends with a condensate collector. The heat generator is connected to it by a horizontal pipe.
- The shaft again crosses all roof structures, but is connected directly to the heater, without a pocket and horizontal sections.
Installation diagram of a wall-mounted chimney (left) and an internal channel passing through the roof (right)
The first option is suitable for finished houses of any type - frame, brick, log. Your task is to put the boiler against the outer wall, bring the sandwich to the street, then fix the main pipe. In terms of financial and labor costs, this is the most profitable way to install a chimney.
Installing a modular system according to the second scheme is much more difficult. In a one-story house, you will have to go through the ceiling and roof slope, arranging fire cuts. In a two-story house, the pipeline will get inside the room and make you think about decorative cladding. But you do not need to bypass the roof overhang and fix the end of the chimney with braces.
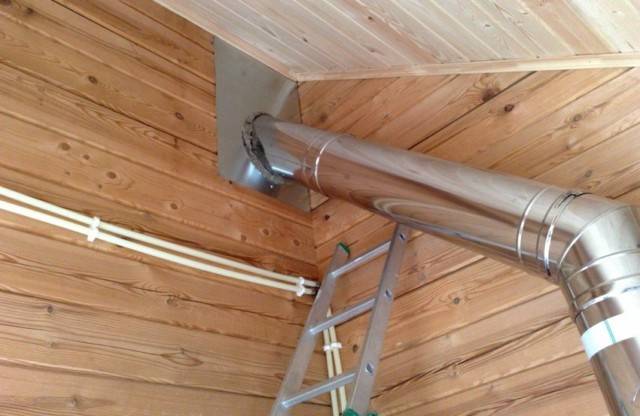
The latter option is suitable for sauna stoves and fireplace inserts. The former are very hot and practically do not condense, the latter are hidden behind a fire-resistant drywall finish. To organize the cooling of the sandwich channel, ventilation is provided in the space between the lining and the pipe. The photo above shows convection grates that remove heated air from under the casing of the fireplace insert.
preliminary calculations
In addition to the section, you should also determine the length of the chimney and its correct location.
Length calculation
There are some requirements here, let's get acquainted with them.
- According to the same SNiP, the minimum height of the chimney should be 5 meters.
- If the roofing in your case is combustible material, then the chimney should rise above the ridge by another 1-1.5 meters.
- If the coating is non-combustible, then this height will be at least 0.5 meters.
Note! If there are extensions to the house, the height of which exceeds its height, then the chimney must be taken out above this particular extension.
Location
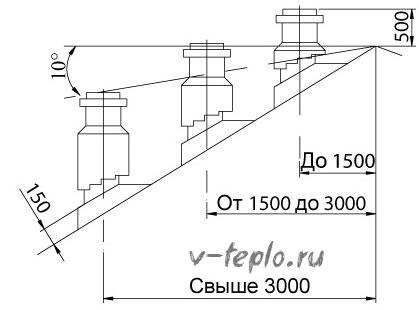
- If the roof is flat, then the pipe should rise above it by at least 0.5 meters.
- If the chimney is less than 1.5 meters from the ridge, then it must rise at least 0.5 meters above the ridge.
- If this distance fluctuates between 1.5-3 meters, then the height of the pipe should be equal to the height of the ridge.
- Finally, if the chimney is located further than 3 meters, then this height should be equal to the line drawn in the imagination from the ridge at an angle of 10 degrees relative to the horizon.
If all these requirements are taken into account, then the installation of the chimney will be performed correctly.
Requirements for a chimney for a gas boiler
How to install a chimney for a gas boiler, their design features and how to choose the right location. You can find answers to these questions here
What else should you know?
Installation of the structure should start from the heater and gradually rise upwards.
Various utilities (such as electrical wiring, gas pipelines, etc.) must not touch the chimney.
It is impossible for there to be ledges in the structure.
The structure must be protected from the effects of atmospheric precipitation.To do this, you need a deflector or any other device.
It is important that such protection does not prevent the free release of flue gases.
The temperature of flue gases moving through the channel should not exceed 50 degrees.
During installation, all the nuances regarding the installation of a sandwich chimney must be taken into account. So, if the roof is made of flammable material, and peat or wood is used as fuel, then spark catchers should be installed, which are usually made from a metal mesh with mesh sizes of 0.5x0.5 centimeters.
Pipe sections that are sloped should not be rough
In addition, their cross-sectional area must at least correspond to the vertical one.
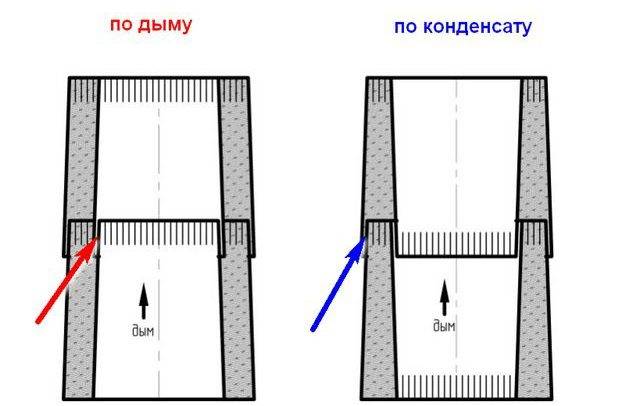
Connection options
There are several ways to connect such chimneys:
- flanged;
- by condensate;
- bayonet;
- by smoke;
- and finally cold.
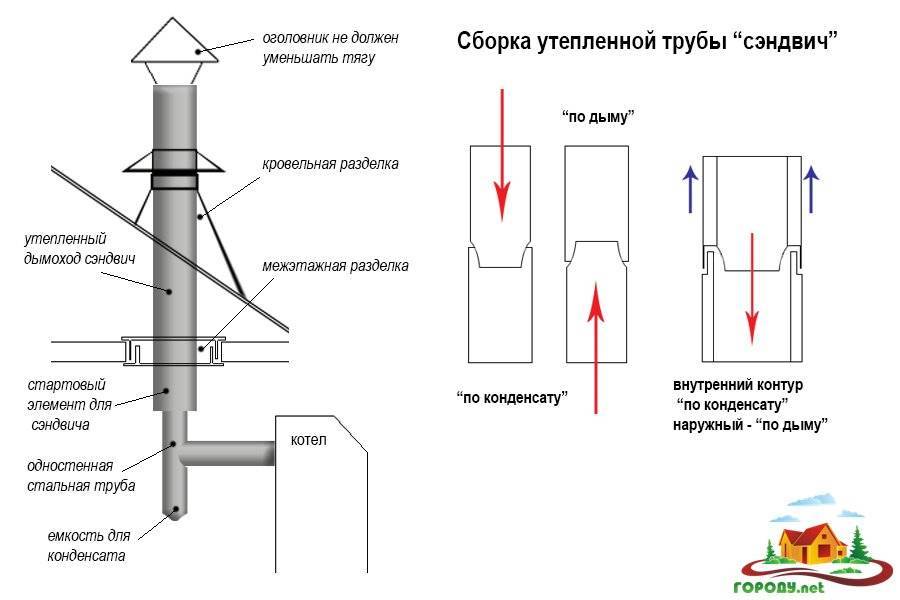
Note! The design is assembled according to the smoke to completely eliminate the penetration of carbon monoxide into the room. But for condensate, so that condensed moisture flows freely along the walls due to the temperature difference
If the installation of the sandwich chimney with your own hands was done in the first way, then the smoky gases will not encounter any obstacles and, thanks to the draft, will be quickly taken out into the street. But if the joints at the same time are sealed poorly, then condensate can penetrate into the structure, which will have a very bad effect on the basalt insulation. In the second case, the inner tube is installed in the socket, so moisture can in no way penetrate inside. But if there is at least a small gap, then the smoke can enter the room.So which option to choose? Condensed moisture harms the insulation, and smoke gases harm human health. The way out is obvious: regardless of the chosen method, all joints and cracks should be carefully sealed.


Note! It is advisable to install the internal pipes of the structure along the condensate, so that it does not get into the joints and does not leak. We also note that even with two layers, such chimneys require good insulation of those sections that are the most fire-resistant - we are talking about the roof, beams and ceiling
Moreover, the sandwich should not be used to connect directly to the heater.
We also note that even with two layers, such chimneys require good insulation of those sections that are the most fire-resistant - we are talking about the roof, beams and floors. Moreover, the sandwich should not be used to connect directly to the heater.
So, you are already familiar with the technology. Now it remains only to purchase all the necessary materials (necessarily high-quality, certified) and get to work!
We install a sandwich chimney in the bath in stages
The installation of a sandwich pipe for a chimney itself is not difficult. Since sandwich pipes are as fireproof as possible, even a person who is very far from construction can connect and fix them correctly.
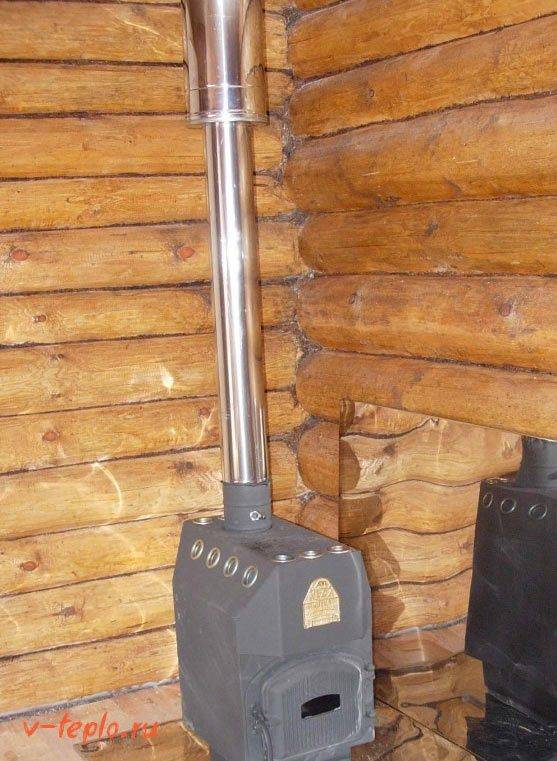
The "sandwich" chimney is mounted from the bottom up - from the stove to the roof, and the outer pipe must be "put on" the inner one. In general, there are several important points for mounting a sandwich. Let's take a closer look.
Stage I. We connect the elements of the chimney
When installing a sandwich chimney, pay attention to the fact that one of the ends of the pipe is always narrowed with a slightly smaller radius.It just needs to be inserted into the previous pipe
Due to the fact that soot almost does not accumulate in such a chimney, it is easy to remove condensate from it - and it is better to install special tees for this.
Stage II. Option 1. We pass the chimney through the wall
If the chimney will go through the wall, it will have to be disassembled and the seats under the bracket should be strengthened. Next, we assemble the outer bracket and attach two corners to it like skids - so that you can move the tee without any problems during the installation of the chimney from sandwich pipes, and nothing gets stuck.
The wall itself can be covered with plywood one centimeter thick and an asbestos sheet can be fixed with screws over its entire area. On top of that - a solid sheet of galvanized metal 2x1.20 cm. In the sheet itself, we cut a square hole for the passage and fix it with screws. Finally, we cover the bracket with metal varnish to protect it from corrosion. Next, we drill the desired hole in the adapter and put a sandwich in it.
They also use such a concept as a concession in the construction of a chimney - this is the space that we specially leave between the smoke channel and the wall.
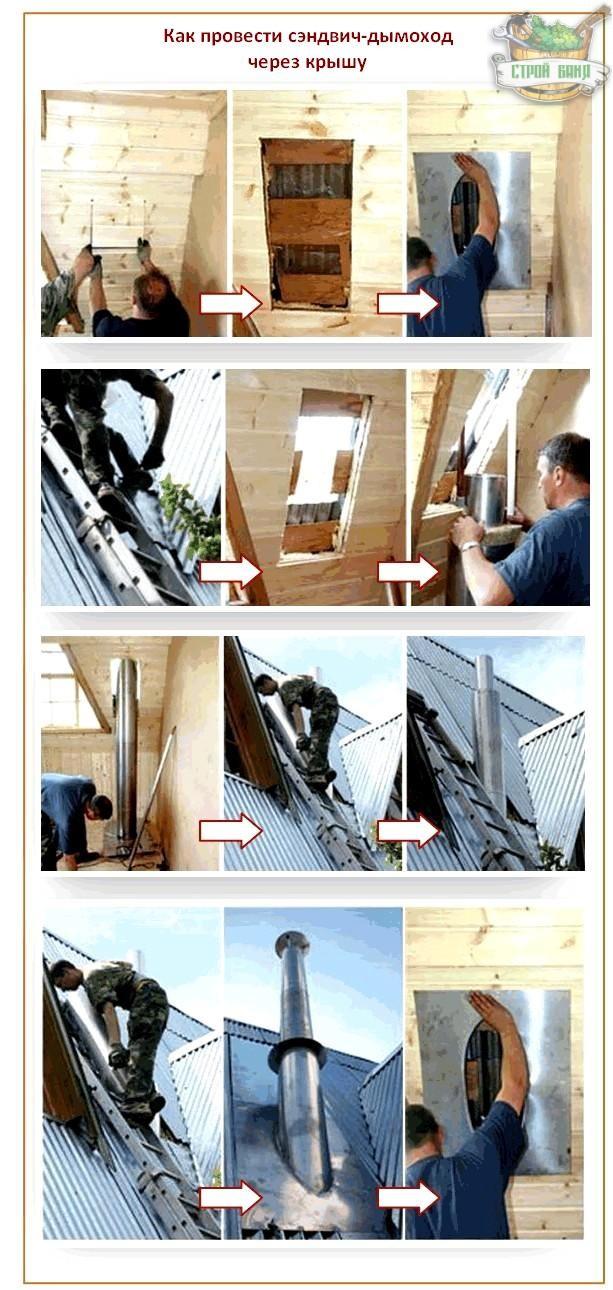
Stage II. Option 2. We pass the chimney through the roof
When passing a sandwich pipe through the roof, you must first take a galvanized steel sheet, attach it from the inside to the hole, and bring the pipe out. Only after that we attach the sheet to the roof. If necessary, it can be additionally brought under the edge of the roof.
If the roof is made of combustible materials, it must be protected from fire.And for this, on a chimney that rises above wooden tiles or bitumen, we install a deflector with a spark arrestor mesh with small cells.
Stage III. We fix the chimney
We fasten all tees, elbows and other elements with clamps, and we fasten the tee with a support bracket. If the upper part of the chimney remains loose, it is better to secure it. At least the same stretch marks of 120 degrees. Here is how you additionally need to fasten the butt joints: sandwich pipes to each other - with crimp clamps, pipes with other elements, such as adapters and tees - with the same clamps, but on both sides.
Stage IV. End of installation
After assembly is completed, be sure to remove the protective film from the pipes
The optimal length of the chimney is 5-6 m from the grate of the furnace to the head - pay attention to this. And seal all seams and gaps
To do this, you will need a heat-resistant chimney sealant that is rated for temperatures of at least 1000 ° C. You need to apply it like this:
- For inner pipes - on the outer surface of the upper inner pipe.
- For external pipes - on the outer surface.
- When switching from a single-walled to a double-walled pipe - outside, around the circumference.
- When connecting a single-wall pipe and other modules - as in the last version.
When everything is ready, be sure to check the most dangerous heating zones of the chimney for temperature. And so that later cleaning the chimney is simple and easy, it necessarily provides for an audit - this is a special removable part or a hole with a door.
Installation of a sandwich chimney is very simple and easy due to the simplicity of design and light weight - if you have already decided on the project and purchased the material, feel free to roll up your sleeves!
Operation of chimney sandwich systems
After installing the chimney, a test fire should be carried out to check the tightness of the joints, make sure that the adjacent structures and materials do not heat up.
During the first use of the system, slight smoke and a specific smell may appear from the heating of oil residues, sealant, dust on the surface of the pipes.
Proper operation involves the timely removal of soot. When cleaning, do not use any detergents. An overview of the best cleaning products and methods is discussed in our other article.


It is better if it is carried out by an organization that has a special license that gives the right to carry out this kind of work.
Gas chimneys
What materials are suitable for gas chimneys?
Due to the characteristics of the chemical composition of the smoke that appears during the combustion of gas, the main requirement for the material is resistance to chemical aggressive environments and corrosion. Thus, there are the following types of gas chimneys:
1. Stainless steel. The best option. Their advantages are light weight, resistance to various corrosions, excellent traction, operation up to 15 years.
2. Made of galvanized steel. Not the best option compared to stainless steel. Provides poor traction, more prone to corrosion. Operation no more than 5 years.
3. Ceramics. Gaining popularity. Operation up to 30 years. However, the high weight of the chimney must be taken into account when laying the foundation. The maximum thrust is only possible with vertical installation without errors.
4. Coaxial chimney. It has increased efficiency and safety, but at the same time a high price. It is a pipe within a pipe.One is for smoke removal, the other is for air supply.
5. Brick chimney. Shows negative qualities when using gas heating. Operation is short. It is permissible to use a brick chimney left over from stove heating only as an outer casing for an insert made of a more suitable material.
6. Asbestos cement. Outdated variant. Of the positive aspects - only low price.
There are a lot of options for holding a gas chimney. When choosing a material, it is worth starting from its quality characteristics. Do not save on your health and the safety of your loved ones.
Does the type of boiler affect the choice of chimney?
The design of the chimney depends entirely on which boiler will be used - closed or open type. This dependence is explained by the different principle of operation of the boilers.
The open type is a burner with a heat carrier coil located on it. Air is needed to operate. Such a boiler requires the best possible traction.
Installation is carried out:
- Outside way. When conducting a chimney, you can use the external installation method by bringing a straight horizontal pipe through the wall, and then lifting it up to the required height. This method requires a high-quality heat-insulating layer.
- In an internal way. It is possible to pass the pipe internally through all the partitions. In this case, 2 slopes of 30° are acceptable.
The closed type is a chamber with a nozzle where air is injected. The blower blows the smoke into the chimney. In this case, the best solution would be to choose a coaxial chimney.
How to install a coaxial chimney?
The main positive characteristics of this type of chimney are:
- Easy installation;
- Safety;
- Compactness;
- By heating the incoming air, it cools the smoke.
Installation of such a chimney is permissible both in a vertical position and in a horizontal one. In the latter case, a slope of no more than 5% is required to protect the boiler from condensate. It should be borne in mind that the total length should not be more than 4 m. For installation, you will need to purchase special adapters and umbrellas.
Is it possible to change the chimney?
Often there are cases when the owner decides to switch from solid fuel to gas. Gas equipment requires a suitable chimney. But do not completely rebuild the chimney. It is enough to sleeve it in one of the ways:
1) Use of a stainless steel pipe. A stainless steel pipe of suitable length is installed inside the existing chimney. Its diameter must be no less than the boiler pipe, and the distance between the pipe and the chimney is filled with insulation.
2. Furanflex technology is more expensive, but more durable. An elastic pipe under pressure is installed in the chimney, where it takes shape and hardens. Its advantages are in a seamless surface that provides complete tightness.


Thus, you can significantly save on materials, while complying with all regulatory requirements.
Operation of a sandwich chimney
At the beginning of the heating season, check the condition of the chimney and, if necessary, clean it. A straight vertical pipe can be examined with a mirror: you need to bring it into the revision hole and evaluate how wide the pipe lumen is. It is quite possible that you will have to climb to the roof: by the end of summer, bird nests are often found in the head.

The chimney should be cleaned before each heating season.
The chimney is cleaned with brushes and scrapers with stackable handles. To reduce the intensity of the formation of soot deposits, it is useful to periodically burn various prophylactic preparations in the furnace, for example, the Chimney Sweep Log, which is popular today.
It is forbidden to burn out the soot accumulated in the chimney, as this, firstly, reduces its service life, and secondly, it can provoke a fire.
We install a sandwich chimney in the bath in stages
The installation of a sandwich pipe for a chimney itself is not difficult. Since sandwich pipes are as fireproof as possible, even a person who is very far from construction can connect and fix them correctly.
The "sandwich" chimney is mounted from the bottom up - from the stove to the roof, and the outer pipe must be "put on" the inner one. In general, there are several important points for mounting a sandwich. Let's take a closer look.
Stage I. We connect the elements of the chimney
When installing a sandwich chimney, pay attention to the fact that one of the ends of the pipe is always narrowed with a slightly smaller radius. It just needs to be inserted into the previous pipe
Due to the fact that soot almost does not accumulate in such a chimney, it is easy to remove condensate from it - and it is better to install special tees for this.
Stage II. Option 1. We pass the chimney through the wall
If the chimney will go through the wall, it will have to be disassembled and the seats under the bracket should be strengthened.Next, we assemble the outer bracket and attach two corners to it like skids - so that you can move the tee without any problems during the installation of the chimney from sandwich pipes, and nothing gets stuck.
The wall itself can be covered with plywood one centimeter thick and an asbestos sheet can be fixed with screws over its entire area. On top of that - a solid sheet of galvanized metal 2x1.20 cm. In the sheet itself, we cut a square hole for the passage and fix it with screws. Finally, we cover the bracket with metal varnish to protect it from corrosion. Next, we drill the desired hole in the adapter and put a sandwich in it.
They also use such a concept as a concession in the construction of a chimney - this is the space that we specially leave between the smoke channel and the wall.
Stage II. Option 2. We pass the chimney through the roof
When passing a sandwich pipe through the roof, you must first take a galvanized steel sheet, attach it from the inside to the hole, and bring the pipe out. Only after that we attach the sheet to the roof. If necessary, it can be additionally brought under the edge of the roof.
If the roof is made of combustible materials, it must be protected from fire. And for this, on a chimney that rises above wooden tiles or bitumen, we install a deflector with a spark arrestor mesh with small cells.
Stage III. We fix the chimney
We fasten all tees, elbows and other elements with clamps, and we fasten the tee with a support bracket. If the upper part of the chimney remains loose, it is better to secure it. At least the same stretch marks of 120 degrees.Here is how you additionally need to fasten the butt joints: sandwich pipes to each other - with crimp clamps, pipes with other elements, such as adapters and tees - with the same clamps, but on both sides.
Stage IV. End of installation
After assembly is completed, be sure to remove the protective film from the pipes
The optimal length of the chimney is 5-6 m from the grate of the furnace to the head - pay attention to this. And seal all seams and gaps
To do this, you will need a heat-resistant chimney sealant that is rated for temperatures of at least 1000 ° C. You need to apply it like this:
- For inner pipes - on the outer surface of the upper inner pipe.
- For external pipes - on the outer surface.
- When switching from a single-walled to a double-walled pipe - outside, around the circumference.
- When connecting a single-wall pipe and other modules - as in the last version.
When everything is ready, be sure to check the most dangerous heating zones of the chimney for temperature. And so that later cleaning the chimney is simple and easy, it necessarily provides for an audit - this is a special removable part or a hole with a door.


Installation of a sandwich chimney is very simple and easy due to the simplicity of design and light weight - if you have already decided on the project and purchased the material, feel free to roll up your sleeves!
Rules for installing pipes on the roof
To install the chimney through the roof surface, you must follow a few simple rules that will allow you to do this work correctly:

For the chimney, it is necessary to provide a foundation or a so-called concrete pad, since the chimney is a very massive structure.
since the chimney is a fairly massive and heavy structure, like the stove itself, when building a house, it is necessary to provide for a separate foundation, the so-called concrete pad;
it is believed that a long pipe provides better traction, but there is one “but” here - the efficiency of the furnace drops dramatically. Therefore, it is necessary to find a golden mean. Therefore, when installing the pipe, you do not need to look for long paths, it is best to lay it directly;
it is recommended to make the pipe exit not far from the ridge if the roof is pitched. Calculating the place is quite simple: you need to draw an angle of 10 degrees from the line horizontal to the ridge, going down. The upper part of the pipe should be 30-50 cm above this line.
Many believe that the location of the chimney is optimal on the roof ridge itself;
it is important to install a special spark arrester at the top of the pipe, which will prevent the ignition of roofing materials and other elements. The design of such an extinguisher can be very different, often it is made of ordinary steel mesh, which prevents burning sparks from leaving the pipe.
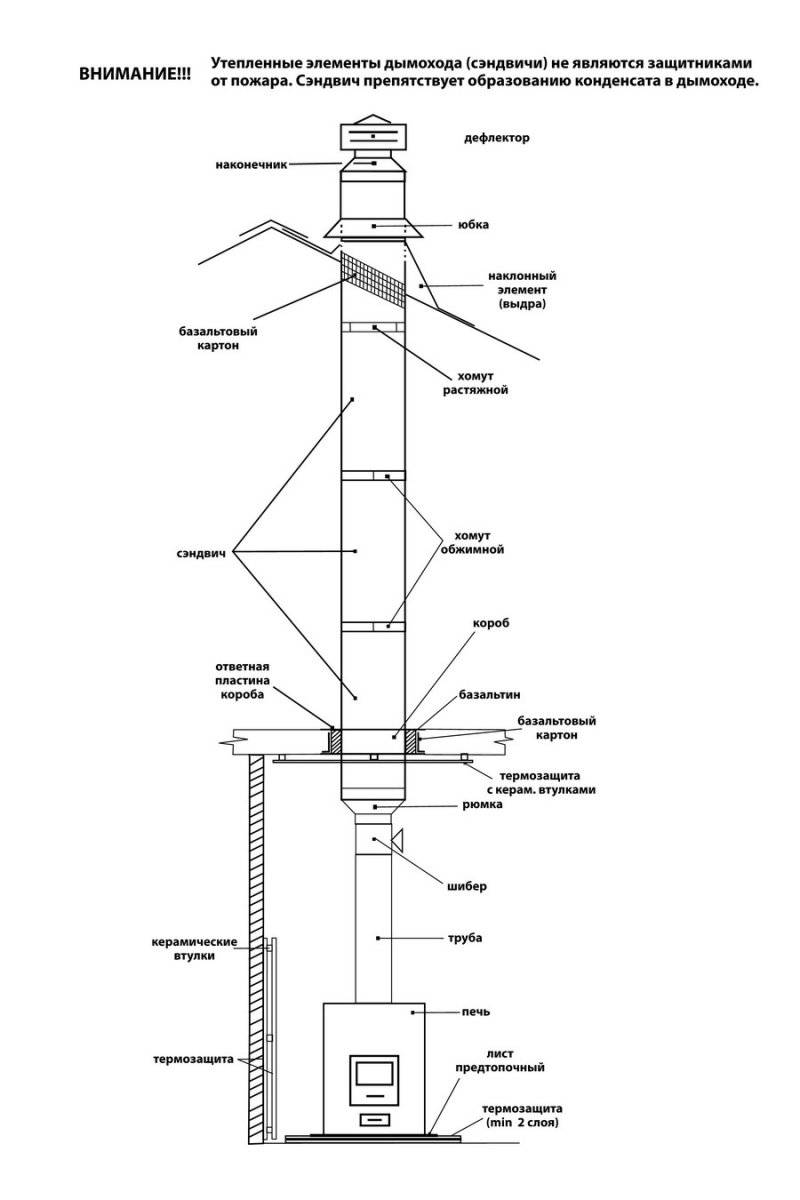
How is a sandwich chimney arranged?
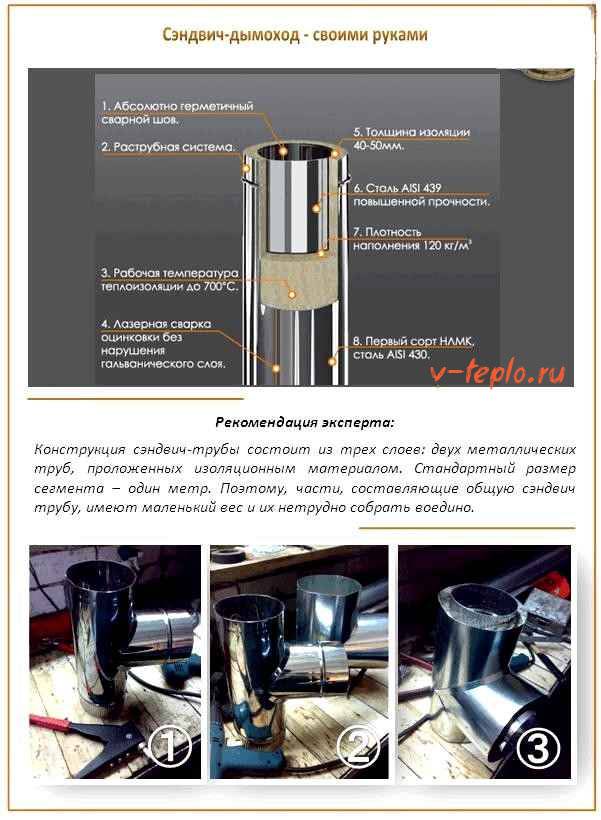
With the light hand of the famous Englishman, any structure that has three layers is called a "sandwich". A chimney with this name is no exception. A layer of heat insulator, usually made of basalt materials, is enclosed between the inner and outer metal contour of the sandwich pipe for the chimney.
A set of chimney sandwich elements, in addition to pipes, includes brackets, clamps, tees, pipes with revision and other details that will ensure the correct operation of the structure
Such a device allows you to effectively remove combustion products from the furnace, because:
- the internal circuit perfectly tolerates heating to high temperatures, as well as exposure to condensate;
- the insulation reliably protects the outer circuit from overheating;
- the design of the sandwich chimney does not allow moisture to enter the insulation;
- the necessary draft and rarefaction of gases in the chimney are provided.
The inner contour of the pipe is always made of stainless steel, which has enhanced anti-corrosion properties. But the outer contour, in order to save money, is sometimes made of less durable galvanized metal. The buyer is forced to choose between a more durable "stainless steel" or the opportunity to save a little. In this case, the material of the inner pipe is selected based on its ability to tolerate elevated temperatures, but the outer contour must be rigid enough so that the configuration of the pipe and the entire structure remains unchanged.
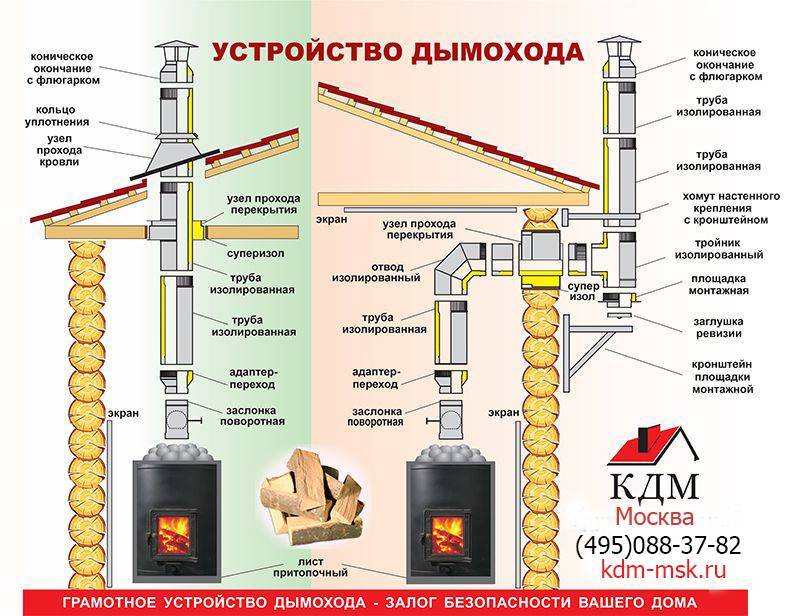
In addition to sandwich pipes, when installing a chimney, the following are used:
- wall brackets that hold the structure;
- a revision with a window for cleaning and a stand for it;
- a set of adapters;
- tees;
- a knee that allows you to change the direction of the structure by 45 or 90 degrees;
- crimp clamps for connecting individual structural elements;
- an unloading platform that allows you to properly distribute the weight of the structure and remove the load from the base;
- rosette, roof and comfrey, which are used when the structure passes through the roof.
The top of the chimney can be decorated with a cone, as well as elements such as a bend or a thermo fungus, a wobbler, a turbovent, a spark arrester (especially important if the roof is made of combustible materials), a weather vane, etc.
The sandwich chimney arrangement provides a sufficiently high thermal insulation so that the chimney can be installed outside the building. However, the removal of combustion products will be more efficient if the structure is located in the house, as close as possible to the center of the building, in order to reduce heat loss.
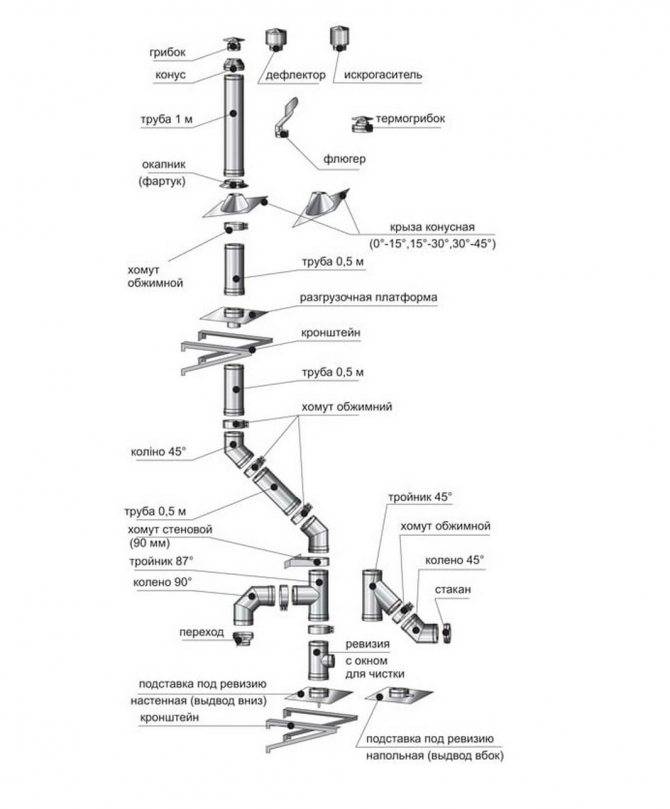
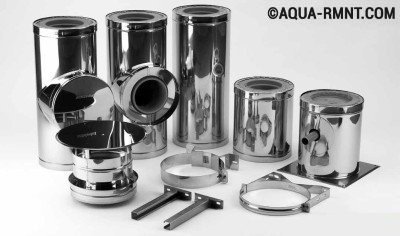
Elements of modular systems
To draw up a wiring diagram, purchase components and subsequent assembly, you need to understand what parts are used in a double-circuit chimney. We list the main elements, accompanied by photographs:
- straight sections of sandwich pipes 25, 50, 100 cm long;
- tees at 45, 90°;
- knees 90, 45, 30 and 15 degrees;
- transitions from a single-wall pipe to a double-circuit one - “start sandwich”;
- rotary gates (flaps);
- condensate collectors and various heads;
- ceiling passage units (abbreviated as PPU);
- support platforms, brackets;
- fastenings - crimp clamps, for stretch marks;
- pitched roof sealing elements called master flash or "kryza";
- end caps, skirts.
Two-layer pipes are connected to other fragments by the method of socket-profile joining. In a more accessible language, the connection is called "thorn-groove" or "dad-mother", as you like. In the manufacture of each shaped part (except for the end parts), a spike is provided on one side, and a groove on the other.
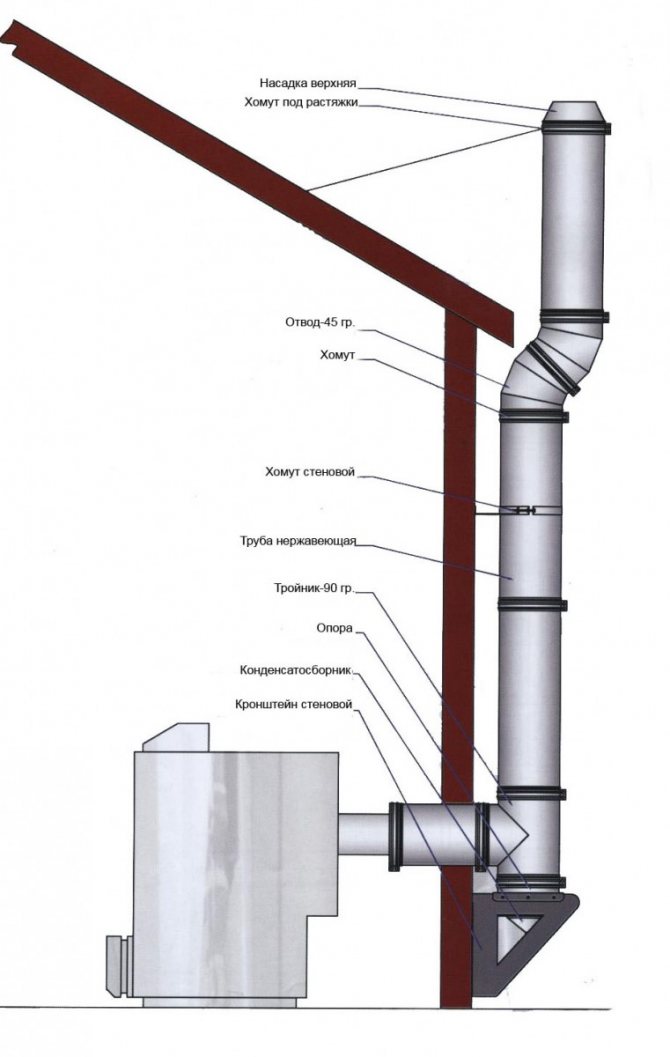
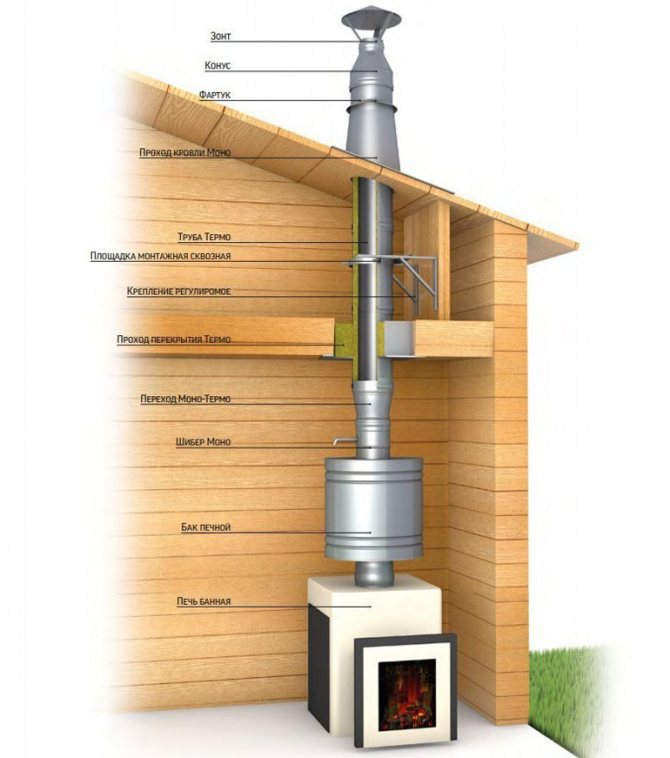
Scheme of installing a chimney along the outer wall of a country house
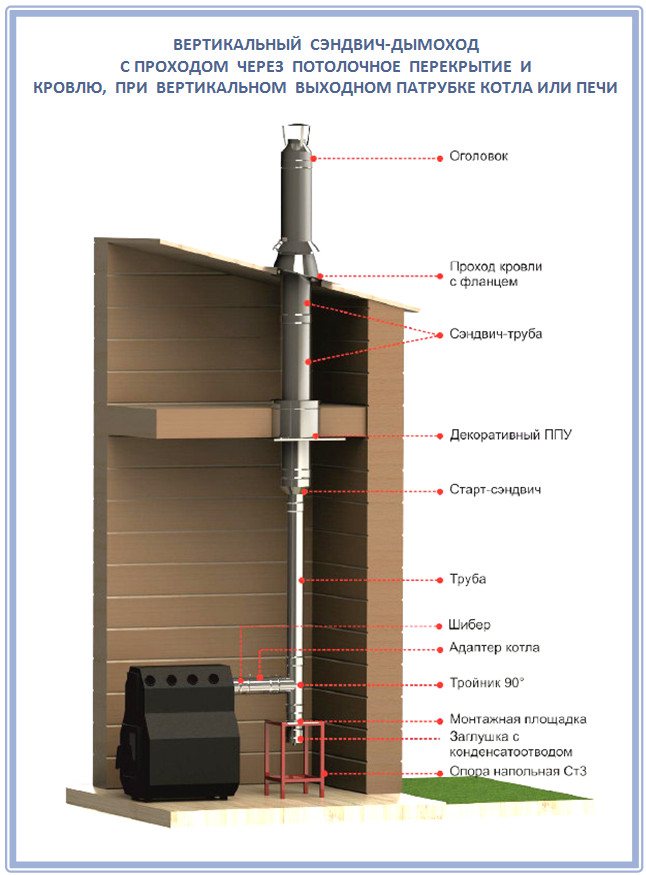
As an example, we propose to consider the assembly scheme of a wall-mounted chimney-sandwich starting from the boiler:
- We connect a single-walled pipe to the outlet of the heat generator through the coupling, then we mount the starting adapter on the sandwich.
- We connect a straight section of a double-circuit pipe facing the street to the transition. There she is inserted into the tee.
- Below the tee we have an inspection section, then a support platform and a condensate collector. The structure rests on a wall bracket.
- From the tee we rise in straight sections, every 2 meters we fasten to the wall with sliding brackets, we crimp the joints of the elements with clamps.
- At the end of the chimney we install a cone without an umbrella (for a gas boiler), a simple cap or a deflector.
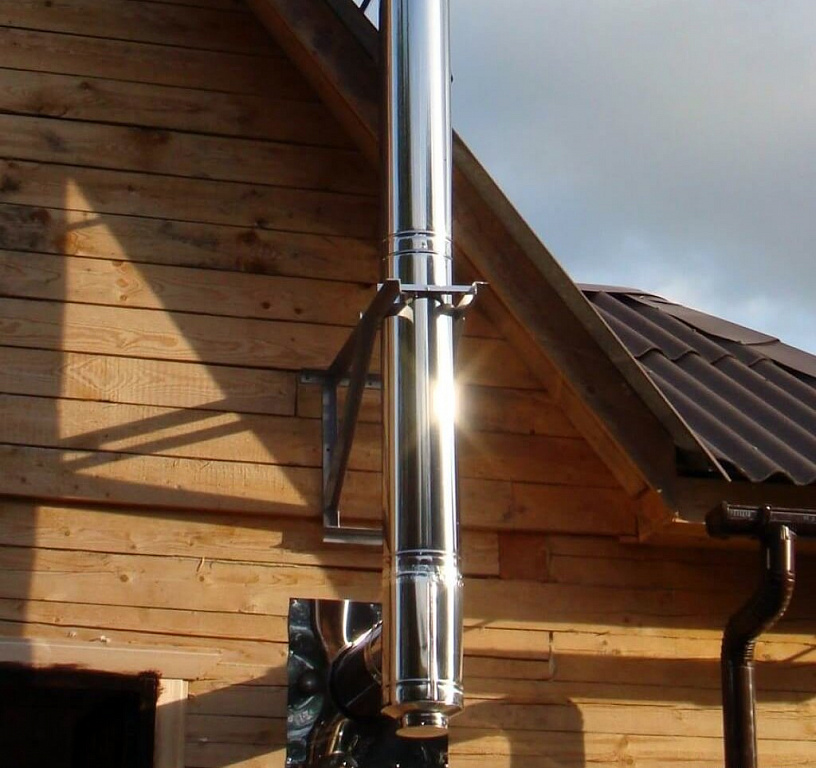
When you need to bypass the roof overhang, we use 2 outlets at 30 or 45 degrees. We fasten the end of the chimney with stretch marks so that it does not sway with the wind, as was done above in the photo. Professional installation of a sandwich pipe for a steel furnace, look at the video:
How to make a sandwich chimney pipe
The first task is to make the correct calculations so that the pipe can withstand the load from the heating system. The calculation requirements are as follows:
- If it is planned to make fireplaces or other stoves with open fireboxes, or gas boilers equipped with an open combustion chamber, the diameter of the inner sandwich pipe must be at least 1/100 of the volume of the combustion chamber;
- If the chimney is installed to a factory-type gas heater, the recommended diameter can be found in the attached documentation for the equipment;
- If a closed furnace is used, in which air is supplied to the combustion chamber by means of a blower, the cross-sectional area of the inner stainless steel pipe must necessarily be greater than the cross-sectional area of air entering when the furnace is operating.
In the case when the desired values are fractional, it is recommended to round the numbers up.
When calculating the appropriate dimensions of the inner pipe in a sandwich chimney, you can focus on the following standards:
- Boilers with a capacity of up to three and a half kilowatts - 196 cm²;
- Boilers with a capacity of three and a half to 5.2 kilowatts - 280 cm²;
- With a boiler power of 5.2 to seven kilowatts - 378 cm².
Length calculations
The height of the chimney above the roof must be calculated no less carefully. The more the sandwich pipe rises above the roof, the more carefully it needs to be fixed. Otherwise, wind currents can harm it. Therefore, mechanical amplifiers, such as stretch marks, will be required. In the same time for industrial boilers developed special calculation algorithms used in design organizations.


It is worth considering the difference in dynamic resistance in square or rectangular chimneys compared to round counterparts. For the former, the cross-sectional area should exceed 1.2–1.4 times the corresponding value for pipes with a circular cross section
Additionally, the height of the chimney is taken into account. With its increase, the traction force also increases when hot gases move through the chimney
And with an increase in traction, the efficiency of the furnace decreases.
 Chimney Height Calculations
The rules for calculating the length of the chimney pipe are as follows:
- The chimney head is located no lower than 5 meters above the ground;
- If the roof of the roof is made of combustible materials, the head should rise above the flat roof or ridge by about one or one and a half meters.
In the case when the roofing material is not combustible:
- On a flat roof, in the absence of a parapet, the head rises half a meter above the cover;
- For the option with a parapet or a sloping roof, the head rises half a meter above the ridge or parapet;
- If the pipe is 1.5 - 3.5 meters from the parapet or ridge, the heads on the non-combustible roof should be at the same height as the parapet or ridge;
- If the distance from the sandwich chimney to the parapet or ridge is more than 3 meters, the pipe head is below the indicated guidelines so that the plane drawn through the parapet or ridge and the pipe head tilts 10 degrees relative to the horizontal.
Assembly
Making a sandwich pipe with your own hands is as follows:
1. Stainless steel sheets are rolled to obtain cylinders with the desired diameter. Joints and seams are connected using locking mechanisms or welding. 2. The resulting inner pipe should be wrapped with insulation. The latter is usually sold in rolls. 3. The resulting structure remains to be inserted into a large galvanized steel cylinder.
Video: how to make a sandwich pipe
Creating a sandwich pipe on your own can be mastered even by a beginner who has recently begun to practice in the construction business. The main difficulty can only lie in the correctness of the calculations according to which the chimney will be manufactured. However, if there is no self-confidence, you can use the help of professionals.
Features of the output of the sandwich chimney through the wall
The passage of the chimney through the wall requires compliance with important rules and safety requirements for the arrangement of smoke channels.
There are two options for mounting the wall structure of the chimney: with raising the channel to the ceiling surface and then bringing it out to the outside, or arranging an outlet at the level of the heater.
Sandwich pipes are connected in different ways: in a flanged way, bayonet and along a “cold bridge”, as well as “under smoke” and “through condensate”.
The chimney is assembled “through the smoke” in order to fully guarantee that no carbon monoxide gases will get inside the house or bath. And “condensate” - so that the condensate formed due to the temperature difference can freely flow down the pipe.
Installation of a sandwich pipe through a wall is carried out as follows:
- Make an exit hole in the wall. The dimensions of the hole must comply with the requirements of SNiP: the distance from the pipe to the wall is up to 50 cm. When the distance is reduced to 40 cm, the hole is sheathed with a metal sheet or a protective box is inserted inside.
- A pipe is mounted in the hole so that the connecting joints are not located in the passage node. The chimney is tightly fixed, and the distance around it is filled with heat-insulating material.
- The hole is closed with decorative grilles, which are supplied as standard with the device.
- Outside, to the wall surface, a mounting bracket and a swivel-type assembly for the outlet channel are mounted.
- Perform the installation of a vertical section of the pipe.