- Advantages and disadvantages
- Suitable materials
- Choosing the inner diameter of the pipe
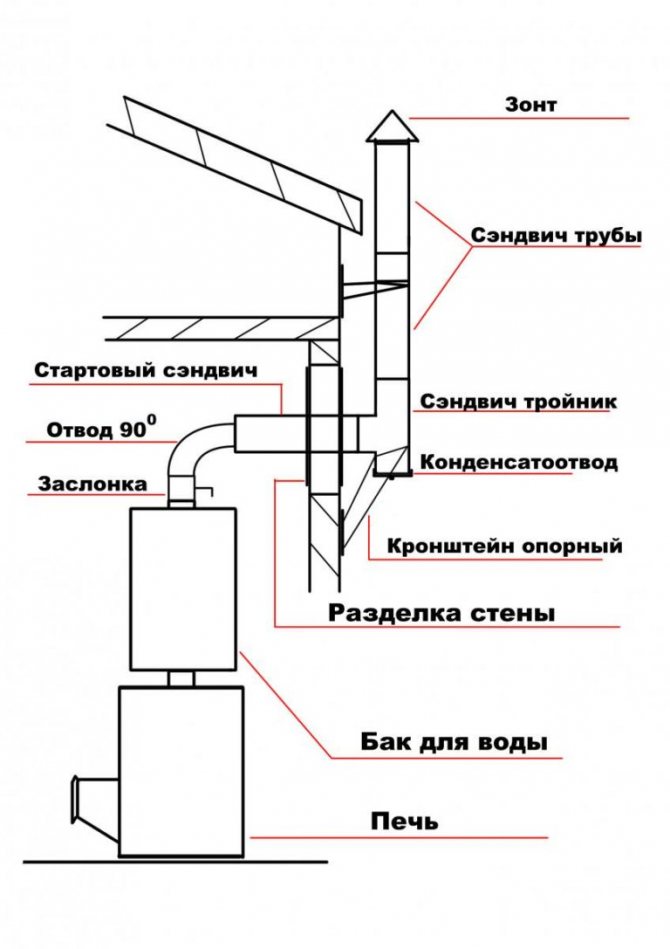
- Organization of the node through the walls of the house or bath
- Where can I buy a sandwich pipe for a chimney
- Stage three. Chimney fixture
- Calculation of the parameters of the chimney
- Rules for selecting the length of the chimney
- Calculation of the section of the chimney
- Manufacturing process
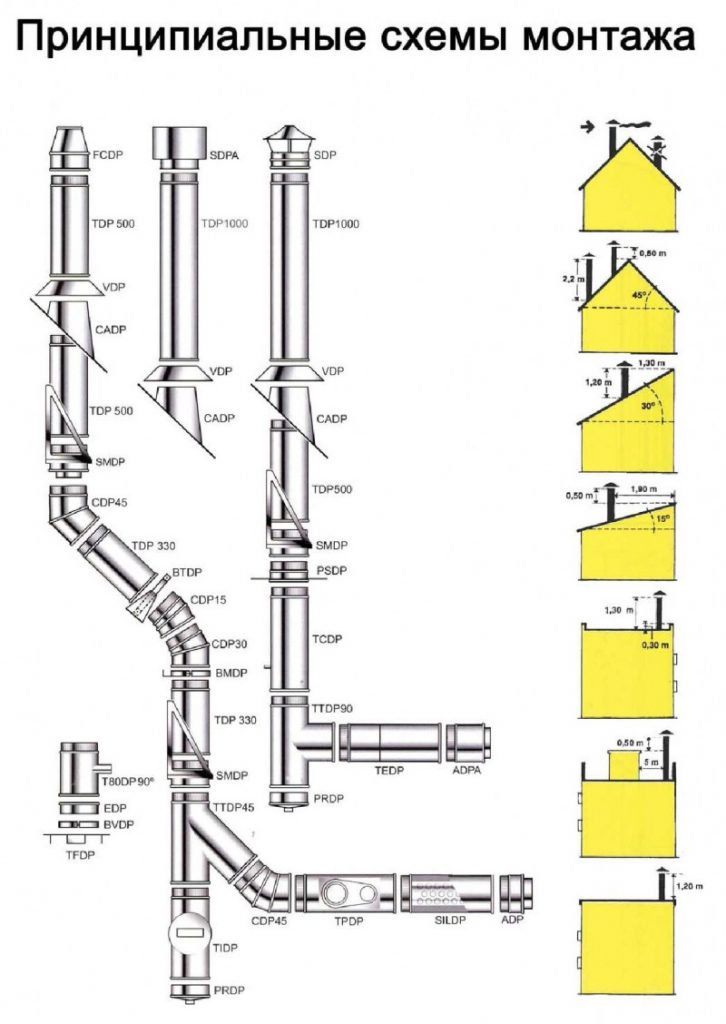
- The main types of chimneys
- How to choose
- Installing a sandwich chimney - tips for beginners and useful tricks +119 photos
- Why is a chimney called a sandwich?
- Installation of a sandwich chimney
Advantages and disadvantages
In industrial conditions, stainless products are used for the inner layer of the sandwich, and pipes made of zinc-coated steel are used for the outer layer. In this case, the inner contour is covered with thermal insulation and placed inside the outer cylinder. As a result, such a structure functions quite efficiently and efficiently.
Installing a chimney made of sandwich products does not take much time and effort - all work can be done in a day. The following are some of the advantages and disadvantages of such pipes.

Among the advantages of such structures are:
- multitasking - you can use such pipes in buildings made of any materials;
- occupy a minimum of space;
- ease of transportation;
- even a beginner in the construction business can install a sandwich pipe, since it is very simple and fast;
- concise and pleasant appearance;
- fire safety is one of the best options for chimneys in this indicator;
- the existing roof truss system does not create any obstacles for the installation of a sandwich pipe;
- due to the presence of several layers, much less soot accumulates in such a pipe and almost no condensate forms, so cleaning it is required much less frequently;
- a sandwich pipe is able to fully protect residents from the effects of toxic combustion products.
But there are very few drawbacks to such structures, although they still exist:
- the price of a sandwich pipe is quite significant;
- the optimal service life of such products is only about 15 years.
If you want to make a sandwich pipe with your own hands, then such a chimney will cost you much less than, say, made of bricks. In this case, a completely reliable chimney will turn out, and there should not be any difficulties with installation and assembly.
Suitable materials
At first glance, it may seem that all sandwich chimneys are exactly the same. However, this opinion is erroneous. It should be noted that such products are produced with different levels of quality. It is not recommended to purchase products, focusing only on their appearance.
It is important to pay attention to the grade of steel and its quality, as well as to consider how suitable it is for the construction of a vertical channel. If you look at sites dedicated to the construction of a pipe device for removing combustion products, you can find many photo examples showing a completely burned-out steel structure. Deformation of such a pipe can lead to a fire or severe carbon monoxide poisoning.
Deformation of such a pipe can lead to a fire or severe carbon monoxide poisoning.
If you look at sites dedicated to the construction of a pipe device for removing combustion products, you can find many photo examples showing a completely burned-out steel structure. Deformation of such a pipe can lead to a fire or severe carbon monoxide poisoning.
Looking at the pictures, we can conclude that the wrong metal was used for the cylindrical product.
To prevent this from happening to you, let's look at the types of stainless steel from which you can mount a sandwich chimney yourself:
- AISI 430. It is considered the cheapest brand of metal. It is good to make the outer casing of the system from it. Such steel is resistant to any weather conditions. However, this material is not suitable for the manufacture of internal channels. The metal does not weld well, so it will be quite difficult to get reliable welds.
- AISI 439. This grade differs from the previous one in its composition: titanium additives are included in it. The material is characterized by increased mechanical strength and corrosion resistance. Chimney pipes made of such steel can be installed in gas appliances, solid fuel stoves, as well as low-power boilers.
- AISI 316. Special alloying additives are included in the composition of the steel, as a result of which the metal has acquired anti-corrosion protection. Nickel with molybdenum protect it from highly aggressive acids. This steel grade has a high heat resistance. Pipes made of this material are suitable for installation in any gas boilers, regardless of their power.
- AISI 304.The steel is similar to the previous grade, however, its composition contains a smaller number of alloying components. The cost of such metal on the market is much lower than its counterparts. The quality of the material is not high.
- AISI 316i, 321. These brands are considered the most versatile. They are not afraid of corrosion and are characterized by high ductility. In addition, these types of steel are able to withstand temperatures up to 850 degrees.
- AISI 310S. This alloy is considered the most expensive and high quality. Steel has high heat resistance and the ability to withstand temperatures of 1000 degrees. Such properties make it possible to use the material in chimneys installed on pyrolysis boilers that develop high power.
Any high quality sandwich chimney always has technical documentation, which necessarily lists all types of steel grades used to manufacture the system.
When such documentation is missing, there is reason to think that the proposed device is a high-quality fake.
There is also another way to recognize stainless steel. If the steel contains a lot of alloying additives, it ceases to attract a magnet: it simply slides over the surface of the product.
If the pipe is magnetic, then you have an ordinary metal that has nothing to do with stainless steel.
Choosing the inner diameter of the pipe
The correct selection of this value depends on the parameters of the heating installation. To determine the cross section of a cylindrical structure, a special calculation method has been developed, in which the thermal power of the equipment is taken as the basis. The calculation formulas are quite complex, so you can simply use the averaged values:


When determining the pipe diameter, it is important to take into account the dimensions of the layer and the type of thermal insulation. The most suitable are heat-insulating materials of one of the most famous manufacturers in the world:
- PAROC ROB 80t;
- MAT 30;
- ROCKWOOL WIRED MAT 80.
All these brands are basalt wool, characterized by fire safety.
The thickness of the insulation is selected depending on the type of heating equipment. In this case, the average heating temperature of the exhaust gases is taken into account.
The table shows some averaged data:
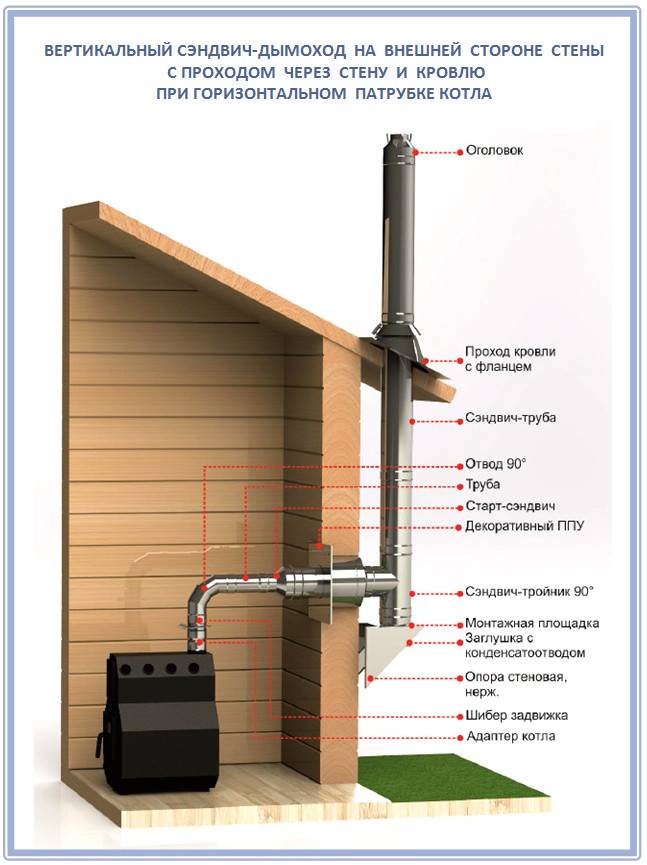
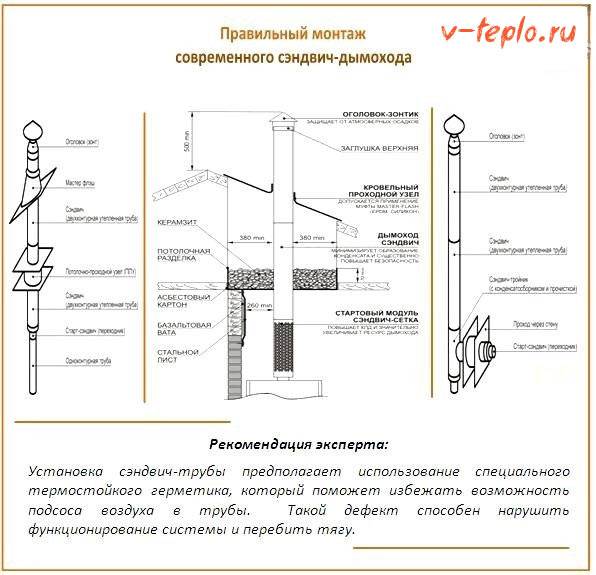
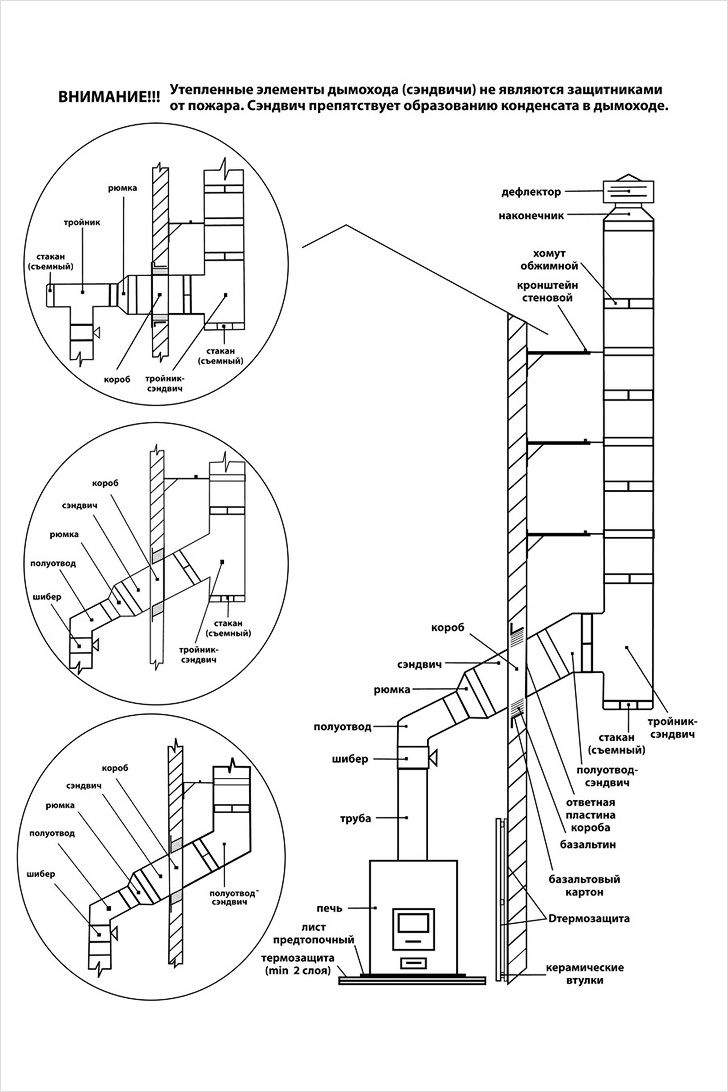
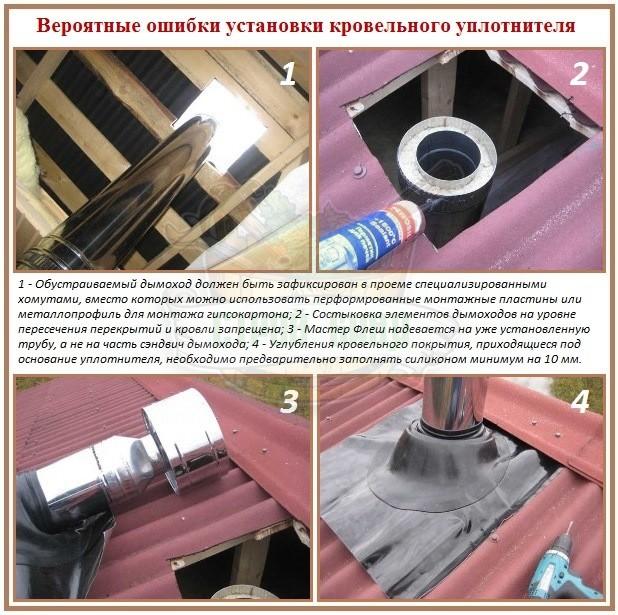
Organization of the node through the walls of the house or bath
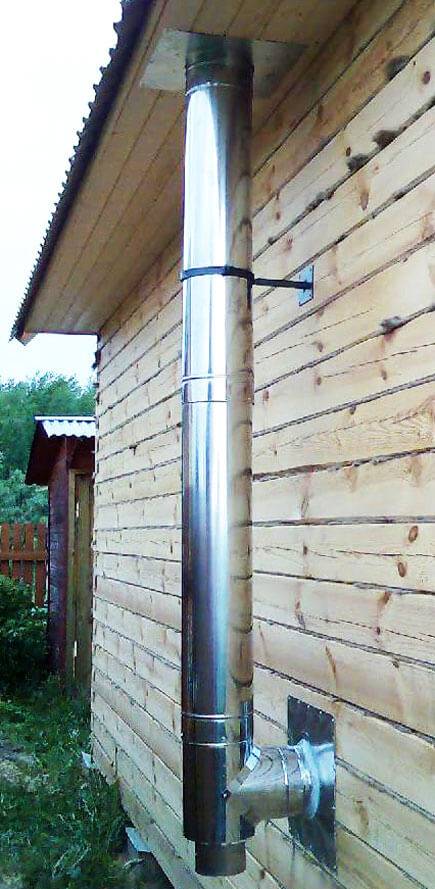
Today, installing a sandwich chimney is practiced in two main ways: inside the house or outside. Indeed, more and more often you can see that chimneys are mounted directly through the wall to the street, and from the first floor - and from there they are already directed vertically upwards. And this makes sense: this way the chimney cools down much faster, and does not pass through fireproof ceilings and roofs. On the other hand, a chimney that rises through the attic usually serves as an additional heating element. But the risk of fire here, of course, will already be higher.
You will be surprised, but in fact, the outer shell of a stainless steel sandwich is not far from the temperature of a single-circuit chimney. After all, in fact, such a chimney was originally designed to improve draft, and therefore the gases that exit the furnace usually have a temperature of 800 degrees Celsius, and the outer casing can warm up to 300 degrees! And this is far from a fireproof surface.
A modern sandwich chimney is led both through the roof and directly through the walls of a residential building:
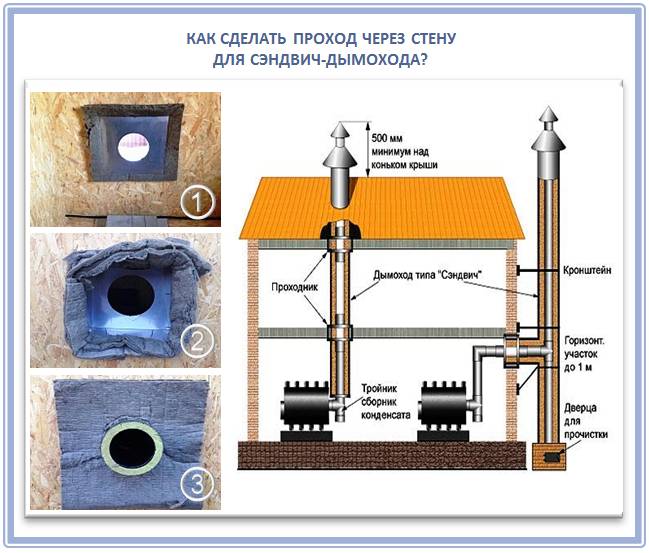
You can see the node in more detail in this illustration:
So, the following step-by-step instruction will help you organize the correct angle of passage of the sandwich chimney through the walls:
- Step 1. Before starting work, be sure to calculate the length of the horizontal sandwich pipe that will need to be passed through the wall. And take into account the tee that you will install. Calculate the slope of the roof so that the chimney does not end up too close to the eaves.
- Step 2. Fill the box that you insert into the wall with non-combustible basalt material.
- Step 3. Close the lid on the pass-through assembly so that the basalt board gasket remains visible.
- Step 4. Close the edges of such an assembly cover with a casing from the components of the exterior decoration of the house, for example, siding.
- Step 5. Treat the edges of the box with a colorless roofing sealant.
- Step 6 Install a revision at the outlet of the chimney from the wall.
- Step 7. Fix the chimney with special wall brackets, one for every 1.5-2 meters.
- Step 8. So, after you have installed the pipe, check its verticality with a level.
- Step 9. Be sure to make sure that the seam is turned towards the house.
After all, the most important rule sounds like this: the chimney passage through the wall of a house or bath should be protected from fire as much as possible. Here is a good example of such a node:
In order for the horizontal element of the sandwich chimney to be installed securely, it must be properly supported with a metal corner:
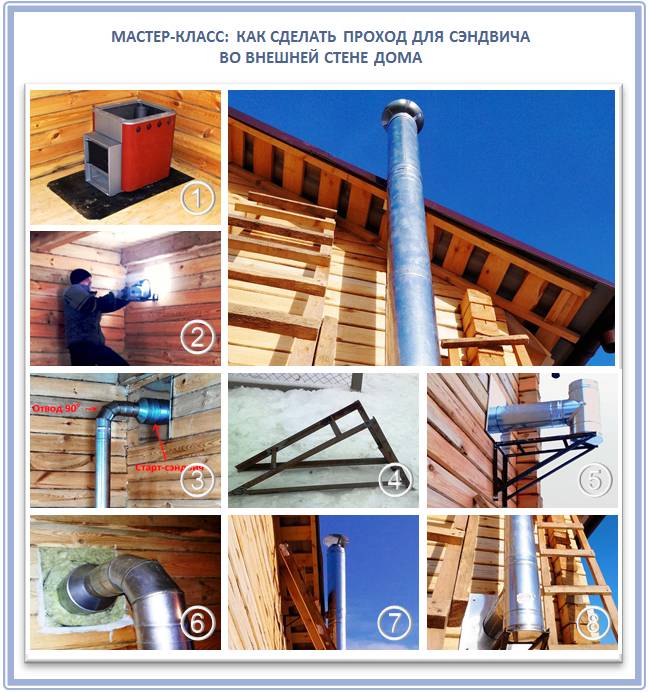
Special designs will also help to fix such a chimney to the wall in a strictly vertical position:
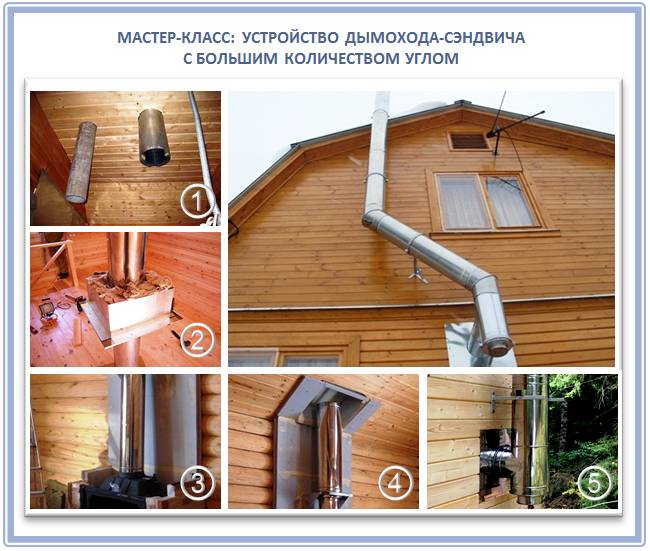
Believe me, at this stage the work is not over yet, especially if your chimney will have a complex design (which we strongly do not recommend to you):
Where can I buy a sandwich pipe for a chimney
Due to the fact that the operation of a gas boiler directly depends on the functioning of the chimney system, it is necessary to purchase high-quality and proven pipes to assemble a sandwich chimney. Only such products will be able to guarantee safe and efficient removal of exhaust gases, eliminating the ingress of smoke into the room and the occurrence of back draft.


It is very profitable to purchase the necessary goods through the websites of manufacturers: you can study the assortment in a relaxed atmosphere, make a comparative analysis of prices from different manufacturers, and most importantly, get expert advice on choosing a model suitable for specific equipment. Many online stores include delivery of goods in their services.
As a rule, many chimney pipe companies offer professional chimney installation services. The price for the work depends on the thickness of the walls, the material from which the pipes are made, the presence of a passage through the wall for the chimney, the configuration and roof covering. The estimated price of installing a chimney from sandwich pipes is 1900 rubles. for 1 running meter Departure of the measurer, connection of equipment, fire protection works are not included in the prices for the installation of chimneys from sandwich pipes.

Stainless steel chimney
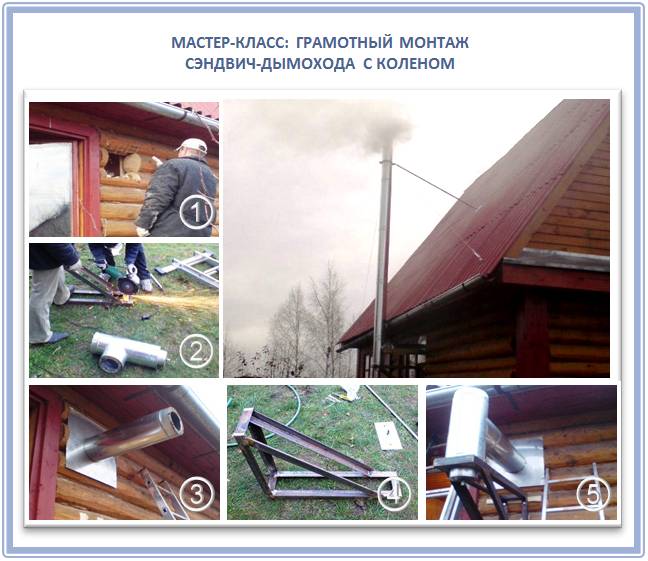
Stage three. Chimney fixture
All elbows and other parts of the structure are connected with clamps, and the tee is additionally fastened with brackets. If the top of the structure is not fixed, then it is additionally insured with at least the same stretch marks.Additional fastening of the docking elements looks something like this: the pipes are fixed to each other by means of clamps, but with other elements (such as, for example, an adapter) are also clamps, but on both sides.
Note! The bracket for the chimney pipe, if desired, can be made with your own hands. For this, a pair of corners is taken (5 and 3 centimeters, respectively) and everything is built using an electric drill, grinder and M-8 and M-10 bolts
Calculation of the parameters of the chimney
The basis for calculating the height and diameter of the chimney is the power indicator.
The height of the chimney directly affects the performance of the boiler or furnace. For household appliances, it is 5 m. This characteristic is provided for by the requirements of SNiP for stoves in residential buildings. The measurement is carried out from the grate of the device to the cap. At a lower height, the natural draft in the furnace will not ensure efficient combustion of the fuel, it will smoke and not produce the optimal amount of heat. However, the possibility of increasing the height is limited. Experiencing the natural resistance of the pipe walls, the air will slow down if the channel is too long, which will also lead to a decrease in thrust.
Rules for selecting the length of the chimney
For a private house, the calculation of the height of the chimney is based on certain rules:
- The pipe must be at least 5 m.
- Exceeding the end of the chimney above a conventionally flat roof by at least 50 cm.
- For a pitched roof, a pipe whose axis is not further than 1.5 m from the ridge, and if there are superstructures, then from their highest point, the excess value is 0.5 m.
- When the distance to the ridge is 1.5–3.0 m, the end of the pipe should not be lower than the level of the ridge.
- When removing the chimney at a distance of more than 3 m from the ridge, in particular, for outdoor installation, the angle between the horizon and the conditional straight line between the ridge and the end of the pipe must be at least 10 degrees.
The height of the pipe depends on its location.
Calculation of the section of the chimney
The following procedure for determining the size of the channel is valid for a circular section. It is the optimal form, since the flue gases do not move in a monolithic straight jet, but the flow is swirled, and they move in a spiral. In rectangular channels, vortices are formed at the corners, which slow down the movement of gases. To calculate the cross section, the result should be multiplied by 1.5.
You will need the following initial data:
- Furnace power, that is, the amount of heat generated by the device per unit time at full load.
- The flue gas temperature at the outlet of the furnace is usually taken in the range of 150–200 degrees.
- The speed of movement of gases through the channel (is 2 m / s).
- Chimney height.
- The value of natural draft (is 4 MPa per 1 m of the smoke channel).
The dependence of the size of the chimney section on the volume of fuel burned is obvious.
Smoke does not move in a straight line
To perform the calculation, you need to use the converted circle area formula: D2 \u003d 4 x S * Pi, where D is the diameter of the smoke channel, S is the cross-sectional area, Pi is the number pi equal to 3.14.
To calculate the cross-sectional area, it is necessary to determine the gas volume at the place of their exit from the furnace into the chimney.This value is calculated depending on the volume of fuel burned and is determined from the ratio Vgas \u003d B x Vtop x (1 + t / 273) / 3600, where Vgas is the volume of gases, B is the amount of fuel burned, Vtop is a tabular coefficient, which can be found in GOST 2127, t is the temperature of the gases at the outlet of the furnace, a value usually taken in the range of 150–200 degrees.


The cross-sectional area is determined by the ratio of the volume of passing gases to the speed of its movement, that is, according to the formula S = Vgas / W. In the final version, the desired value is determined by the relation D2 = Vgasx4/PixW.
Having made the necessary calculations, you will get the result - the diameter of the chimney should be 17 cm. This ratio is true for a furnace in which 10 kg of fuel burns per hour with a moisture content of 25%.
The calculation is made for cases when non-standard heating units are used. If the power of the device is known, it is enough to apply the parameters of the chimney recommended by specialists:
- for devices with power up to 3.5 kW - 140 x 140 mm;
- at 3.5–5.0 kW - 140 x 200 mm;
- at a power of 5.0–70 kV - 200 x 270 mm.
For chimneys of circular cross section, its area should not be less than the calculated value of a rectangular one.
Manufacturing process
The creation of such a structure is available to every person with minimal building skills. To make a sandwich system, you must have:
- metal pipe;
- galvanized steel sheets;
- stone wool.
The design of the device is a cylindrical product, which is closed on all sides with stone wool. From above, the structure is wrapped with galvanized sheets.In most cases, the outer shell of the chimney is prefabricated and consists of several parts. Therefore, the joints of structural elements require increased attention.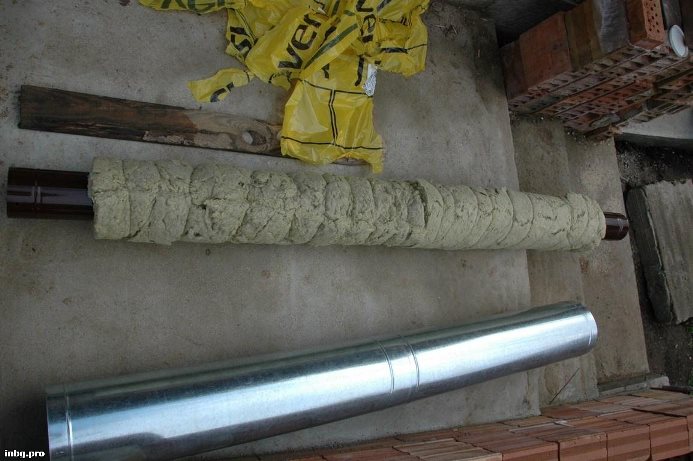
Fixing galvanized iron is carried out with special fleas, but you can also use ordinary screws. The fastening must be complete, that is, not only one sheet is fastened, but also all adjacent metal parts.
In the manufacture of a sandwich chimney, each craftsman independently chooses the appropriate material. In this case, the brand of the fuel unit must be taken into account. For example, domestic hot water boilers maintain the temperature of the outgoing gases within 120 degrees. For such devices, mineral wool can become a thermal insulation material.
Things are completely different when it comes to homemade fireplaces or solid fuel boilers. The heating temperature in such systems can reach 800 degrees. In this case, you just can not do without stone wool. As a substitute, you can use the basalt analogue. In order to avoid rapid burning of the inner pipe, it must have a thick wall.
The ideal material for a sandwich pipe is stainless steel. It has certain properties that allow you to operate such a system for many years. Moreover, the inner surface of the stainless steel pipe always remains smooth. The gases escaping through this product do not affect its walls, which in turn increases the efficiency of the chimney itself.
When joining thermal insulation on the long side, some problems may occur.Fastening should be carried out with an overlap, having previously made an undercut equal to half the thickness of the pipe wall, with an additional overlap of about 10 cm to create an even geometry.
Let's make a small comparison. A high-quality sandwich structure 10 m long can be purchased for 20,000 rubles. An ordinary metal pipe costs 6000 rubles. The price of insulation does not exceed 2,125 rubles. For galvanized sheets you will have to pay 2,500 rubles. The total amount is 10,625 rubles. In this case, a 50% savings is obtained. Of course, unforeseen expenses are also possible, so we will add another 6,000 rubles. But it's still pretty profitable.
In other words, 4000 r. left in your pocket, and a metal pipe with a wall thickness of 3.6 mm is always better than a stainless construction of 0.5 mm. From the above calculation, it can be seen that before starting to build a smoke channel, it is worth considering what it is best to make it from.
The main types of chimneys
Depending on the material of manufacture, chimney systems can be divided into various types made of metal (for example, cast iron or stainless steel), brick and ceramic. A modern chimney can be made of composite materials and have a multilayer structure.
You can choose the modification of the chimney that will most closely match your building.
So, for example, the cheapest option - a metal chimney is best suited for arranging heating systems for boiler rooms or baths, that is, non-residential premises. However, such an economical approach is hardly advisable to use in a home. The metal structure has poor sealing of the joints, as a result of which you will not be able to get rid of the penetration of smoke into the room.Also, the metal does not have the most attractive service life, as it is extremely unstable to atmospheric moisture.
A pipe consisting of composite multilayer materials is more reliable and resistant to aging. But between the layers of such a pipe is placed a heat-insulating fire-resistant material. Due to unjustified savings, many manufacturers place a low-quality insulator in the intermediate layer, which, after a while, may begin to crumble. So when buying such a pipe, carefully follow the reputation of the manufacturer.
The cheapest option is to build a chimney from thin-walled stainless steel. The light weight of such a pipe allows it to be fixed in the structure even with the help of a minimum amount of fixing material. Also, a stainless metal pipe is very easy to process - it can be cut with ordinary metal scissors.
external chimney
A ceramic chimney is very difficult to install, since its installation can only be done together with the whole house. In this regard, it is extremely rarely used, because in order to build it in a finished dwelling, the construction team will need to dismantle part of the floors.


How to choose
When choosing a sandwich pipe, you need to pay attention to the following:
- The quality of the steel from which the product is made. It affects such indicators as heat resistance and service life.
- Thermal insulation material and its density: It must withstand a heating temperature of at least 700 °C.
- The quality of the welds. For solid fuel furnaces (boilers), give preference to products with laser welding - it provides the necessary tightness of the pipes.If the seam is “rolled”, these are pipes for the chimneys of gas boilers.
The inner layer of a sandwich pipe is most often made of stainless steel, as it "accepts" the highest temperatures and is affected by condensate. If the inner pipe is made of galvanized metal, it can be used to remove combustion products from gas boilers.
For solid fuel, and even more so for baths, it is undesirable to use. In principle, it is possible, but very soon you will have to change the entire chimney. The external contour can be made of different materials - galvanized steel, stainless steel, copper, polyester, brass, etc. And again, for furnaces that do not work on solid fuels, it is better to use stainless steel, galvanizing is also acceptable. Other materials are used for lower temperature chimneys or for the construction of a ventilation system.
The best grade of stainless steel for making inner tubes is 316 Ti, 321 and 310S are universal grades of stainless steel. Sandwiches made from them are able to withstand temperatures of 850°C, and the latter - more than 1000°C, have high heat resistance, plasticity and durability. Such elements are desirable in the chimneys of sauna stoves and for heating stoves that work on wood or coal.
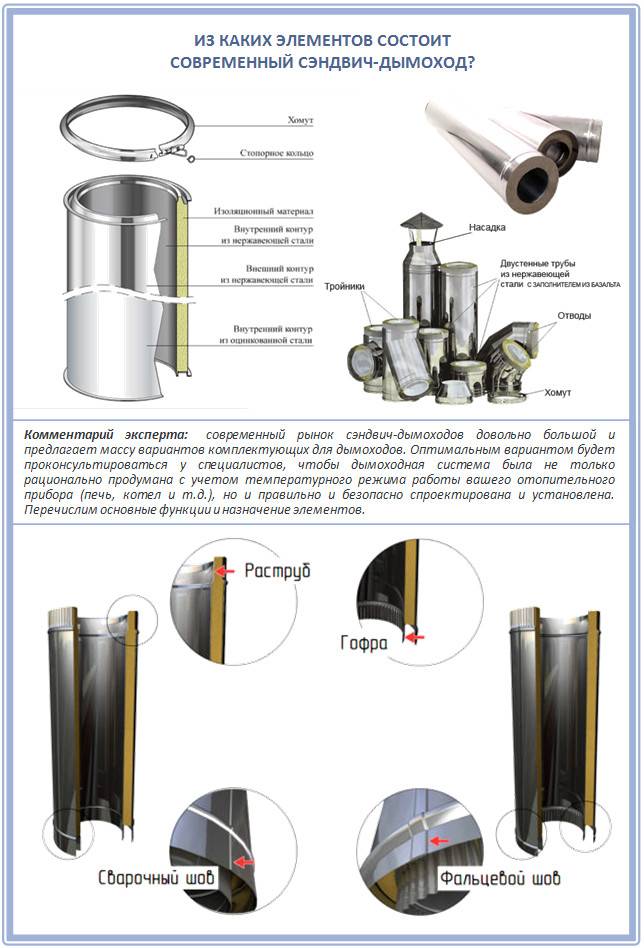
Sandwich chimneys are assembled from modular elements of various configurations
For a chimney from a sauna stove, the preferred option is both pipes made of stainless steel, but the outer casing does not have to be taken from stainless steel. The main one is the inner tube. The wall thickness in stainless steel sandwiches can be from 0.5 to 1.0 mm.For a sauna stove, they are suitable either with a thickness of 1 mm (this is made of stainless steel that is magnetized) or 0.8 mm (this is if it is not magnetized). We don’t take 0.5 mm walls into the bath - these are sandwiches for gas boilers. In baths, they burn out very quickly.
Speaking about the diameter of the chimney, they mean the cross section of the inner pipe. They are also different, but the most common in the construction of bath pipes 115x200, 120x200, 140x200, 150x220 (diameter of the inner and outer pipes in mm). The standard module length is 0.5 m - 1 m. Choose the internal size according to the diameter of the smoke channel outlet on the stove, and the external one depends on the thickness of the thermal insulation.
The thickness of the insulation layer is from 25 to 60 mm. It is clear that the more the better. For sauna stoves, basalt wool should be used as thermal insulation. It's basalt. Glass wool (this is also mineral wool) cannot be taken: it can withstand up to 350 ° C. At higher temperatures, it sinters and loses its properties. In chimneys from bath stoves, temperatures are often higher and 500-600 ° C (depending on the type of furnace and intensity of combustion) is not uncommon.
To determine the length of the chimney, the following rules must be considered:
The height of the chimney depends on where it exits through the roof
- the smoke duct must be 5 meters or more long, if less, an electric smoke exhauster must be connected;
- above a flat roof, the pipe must rise at least 50 cm;
- when the pipe is located less than 1.5 meters from the ridge, its height should be taken 500 mm above the ridge;
- when placing the chimney at a distance of 1.5–3 m from the ridge, it can be installed flush with the upper boundary of the roof, and if more than 3 meters - below its level with a slope of no more than 10 degrees;
- if buildings above the bath are located nearby or adjoin, it is necessary to bring the pipe above these extensions.
Compliance with these rules will help you accurately determine the length of the chimney. Now let's take a closer look at the features of its installation.
Installing a sandwich chimney - tips for beginners and useful tricks +119 photos
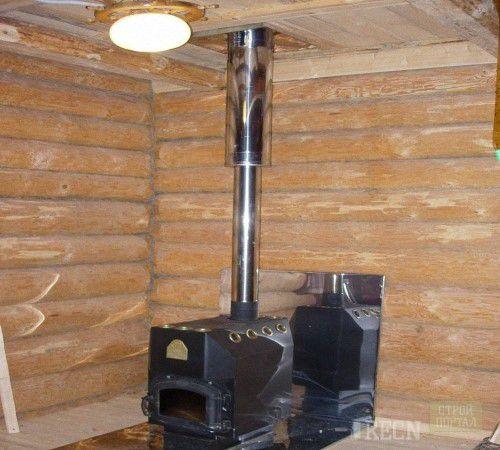
A high-quality chimney gives not only the removal of smoke to the street, but also ensures the safety of the house and people.
Sandwich chimneys have the highest fire resistance, the heat-insulating material keeps the chimney cold enough, and the perfectly matched sections are connected without gaps through which smoke can “siphon”.
Externally, the sandwich pipe is made of stainless steel, which perfectly copes with weathering: the chimney will be like new for another 20 years.
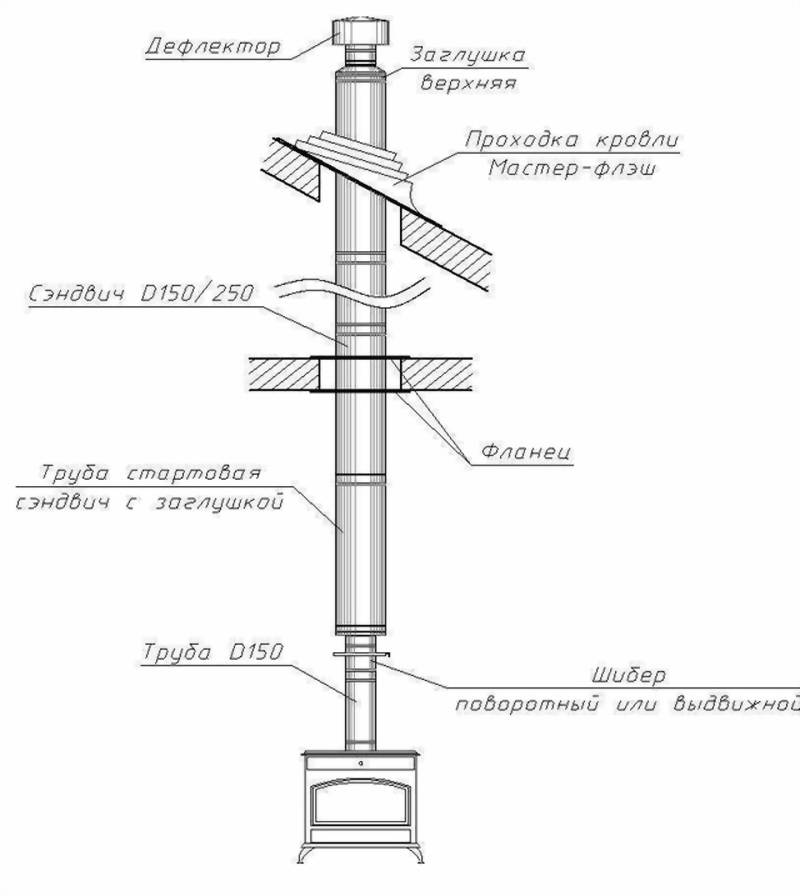
Why is a chimney called a sandwich?
Sandwich chimneys are made in meter sections, where each of them consists of three layers: inner, outer and insulating between them.
For the inside of the chimney, a heat-resistant stainless steel pipe is taken, which includes molybdenum. It perfectly tolerates heat, and anti-corrosion properties do an excellent job with condensate.
The outer layer in a sandwich chimney is not exposed to heat like the inner tube, so less expensive chimneys use galvanized metal for the outer layer, while more expensive ones also use stainless steel, which is more durable.
The insulating layer is made of basalt wool or mineral fiber. Such materials are durable, refractory and do a good job of thermal insulation. Depending on the diameter of the chimney, the insulation layer can be from 25 to 60 mm.


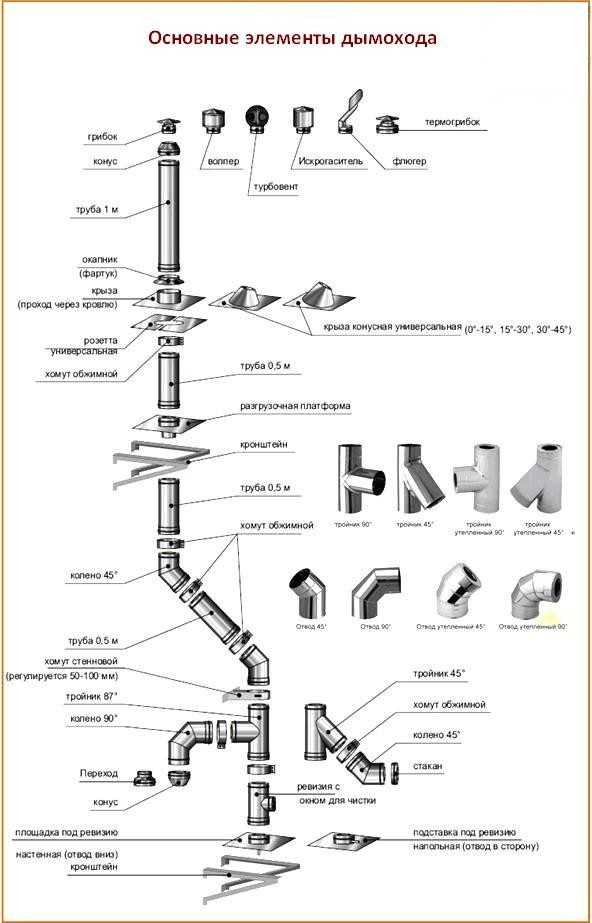
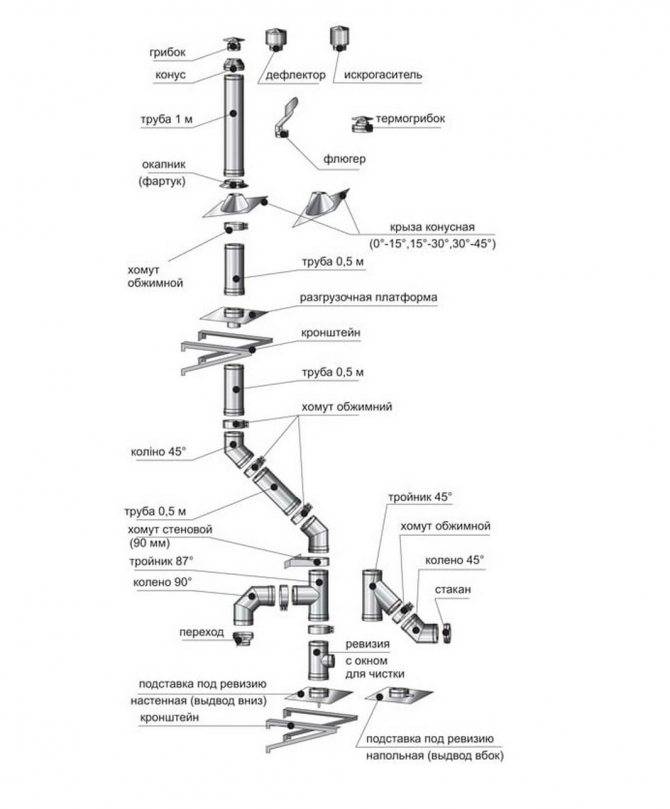
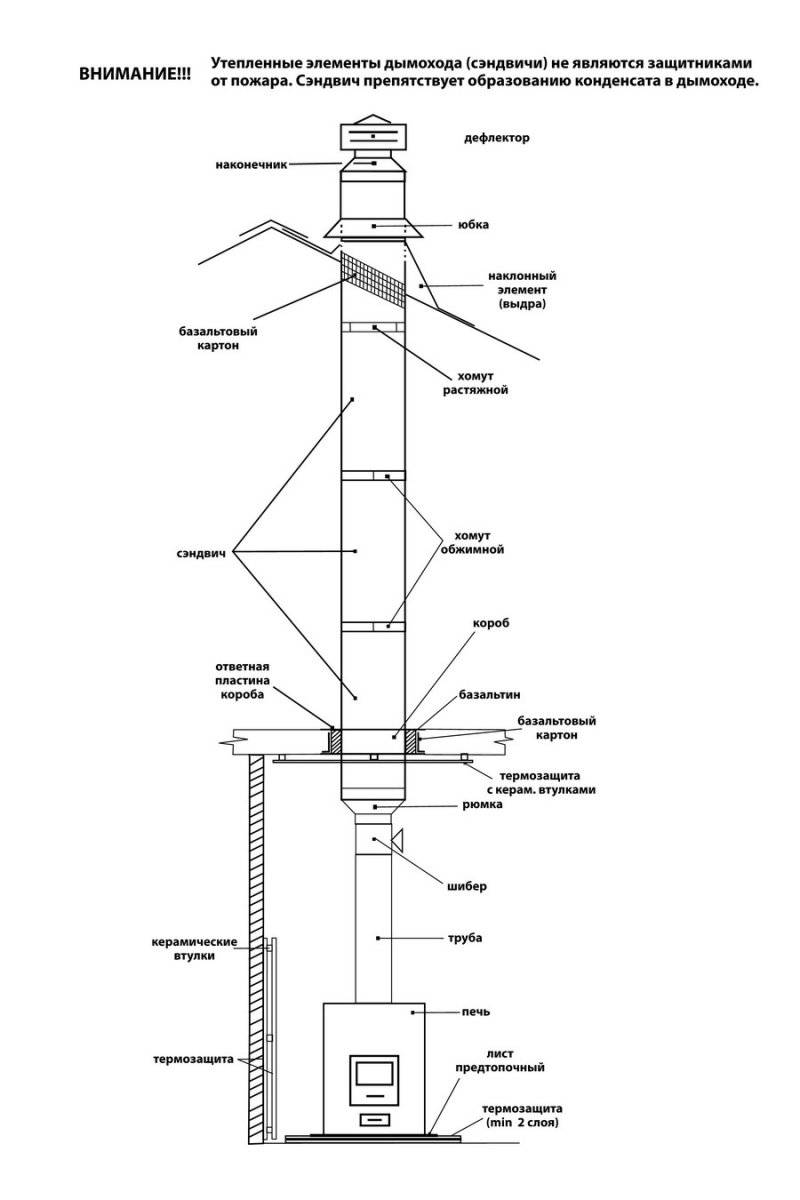
The sandwich chimney consists not only of meter-long straight sections, the structure also includes various adapters, elbows, a “revision” section that has a soot cleaning window, a visor with a spark arrester, various mounting brackets and clamps.
Installation of a sandwich chimney
The design of such a chimney is quite simple, so even a person who is far from construction can handle it.
It all starts with markings, you will need to determine where you need to make a hole in the wall to remove the chimney, as well as measure and select a sufficient number of sections, since the chimney must be at least 5 m long for good draft.
The hole in the wall is made slightly larger than the diameter of the chimney pipe in order to have room for an additional insulating layer between the wall and the chimney - this is especially important when the walls are wooden. Outside, on the street, near the hole in the wall, we install the so-called “audit”, since soot collects in it, which needs to be cleaned, we fix the “revision” in the lowest part of the chimney structure
The fasteners of the “revision” must be taken responsibly, using strong brackets, since almost the entire weight of the chimney will lie on it
Outside, on the street, near the hole in the wall, we install the so-called "revision", since soot is collected in it, which needs to be cleaned, we fix the "revision" in the lowest part of the chimney structure. The fasteners of the "revision" must be taken responsibly, using strong brackets, since almost the entire weight of the chimney will lie on it.
After you need to connect the firebox to the "revision". Since the diameter of the firebox and chimney pipes may differ, adapters must be used.
The primary pipe, which connects the firebox and the "revision", goes without insulating wool, because in this place, due to the close distance to the firebox, the temperature is very high, from which the insulation can petrify and even lead to a fire.
The chimney in the wall is lined with basalt paper and covered with tiles, bricks, wood or metal panels.
After bottom-up, starting with the "revision", you need to stretch the sections to the roof of the house. Each section at the end has a different pipe diameter, so they are connected in series, in the same direction and in the same position. Another mounting bracket is attached to the edge of the roof. There must be a visor at the top of the chimney so that precipitation does not get inside.
The sections are connected to each other with clamps (they are included), and the gaps between the sections are filled with a special layer of fire-resistant sealant. It is necessary to connect the sections to each other very carefully, since poor tightness will reduce traction.
Installing a sandwich chimney - tips for beginners and useful tricks 119 photos In this article, you will learn how to install a chimney sandwich step by step, and how to do it yourself without any extra effort! Photo examples in the gallery ...


