- Connecting the internal equipment of the electrical panel
- Protection of the interior of the electrical panel from repair and finishing work
- Installation of a shield for a country building
- Selection and installation of the switchboard housing
- How do vending machines protect
- Assembling an electrical panel in a private house - general concepts you need to know
- About grounding
- Grounding tasks physical principles of its operation
- What types of grounding systems exist and which ones are applicable in a private house
- TN C system
- TN S system
- TN C S system
- TT system
- IT system
- How to make a ground loop in a private house
- About the potential equalization system
- Features of the electrical panel
- Everything is ready for installation
- Assembling a 220V electrical panel in a private house
- We cut cables and mount modules
- How to choose a good electrical panel?
- How to choose modular equipment in an electrical panel
- Preparatory work
- Project development
- Procurement of cable and related equipment
- Conclusions and useful video on the topic
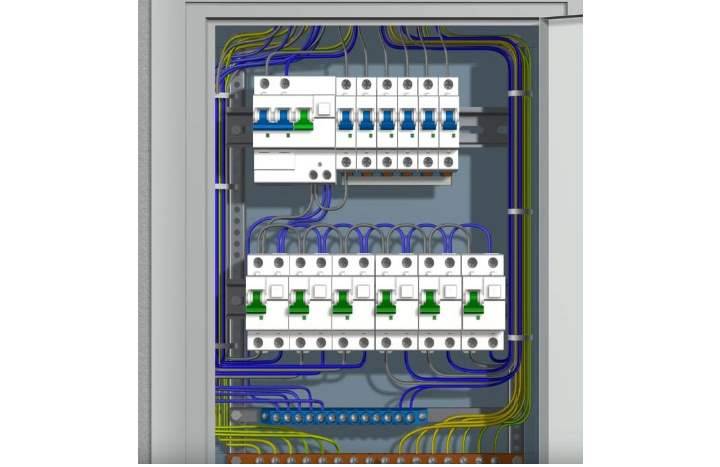
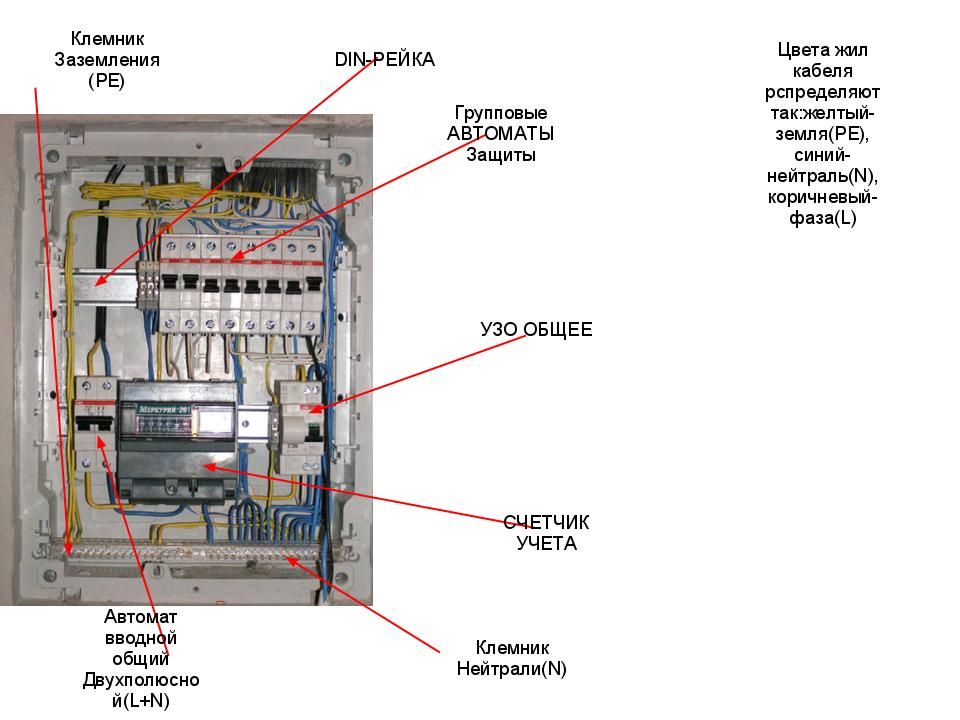
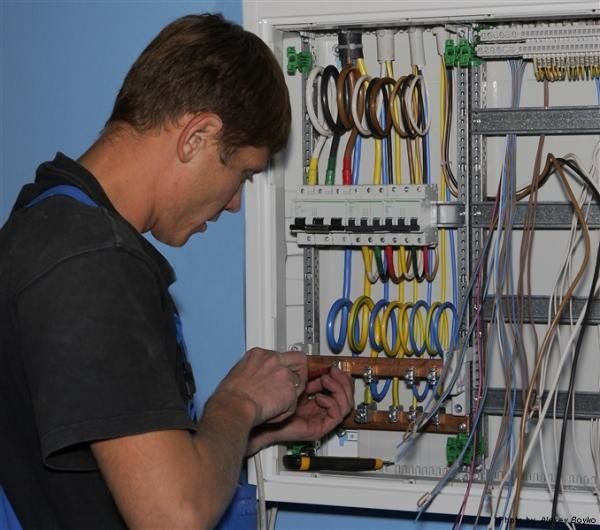
Connecting the internal equipment of the electrical panel
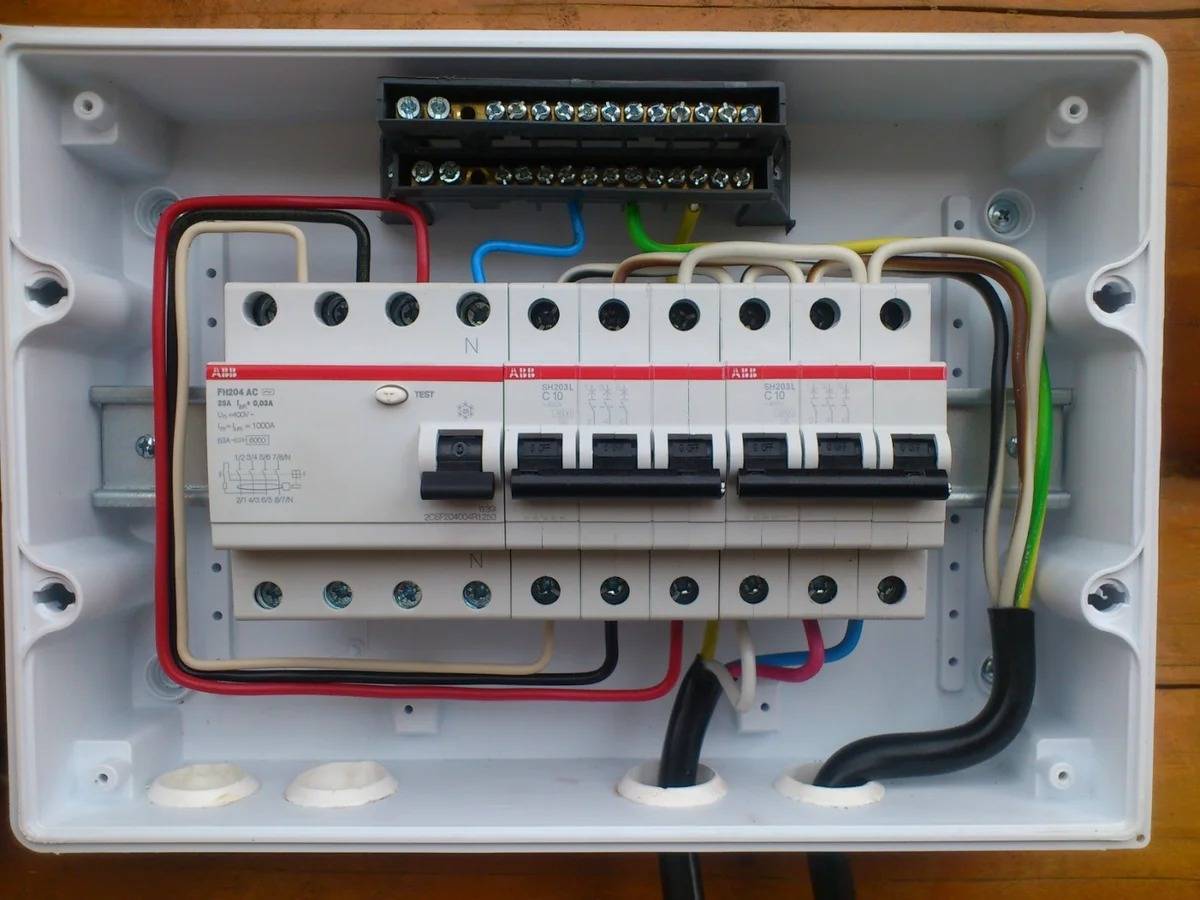
The equipment inside the switchboard is installed, it remains only to connect all the modules and other devices according to the circuit diagram, correctly and without creating a tangled web. It should immediately be said that one wire can be connected to one terminal.If it is necessary to combine several conductors, they should be crimped into a sleeve ferrule and closed with a heat shrink sleeve. The second rule: for all modular devices, most often, it does not matter which terminals are energized and which ones are removed. This makes switching easier.
If the installation is carried out in a panel previously installed in place, then the outgoing wire lines are connected first. They must be passed under the DIN rails and brought to the connection point. Surplus wires should be hidden between the back wall and modular devices. The cores are necessarily combined into loops with polymer screeds. Zero and ground wires are packed separately in a bundle, since they have different wiring routes. The phases are combined in rows and vertically brought to the rail, where they bloom on the sides.
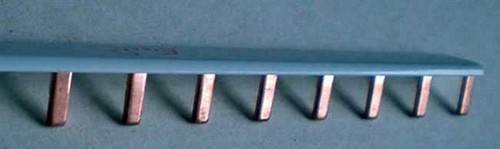
It is more convenient to connect one row of modular devices using a special connecting comb. They exist in two versions: single-row and three-row. If the module needs to be connected to another source, it is enough to remove the comb contact with wire cutters. The use of such simple parts makes it possible to simplify the installation of the switchboard. After connecting all the elements of the electrical panel, check the correctness of their connection. All! All work has been completed, the switchboard can be put into operation.
Protection of the interior of the electrical panel from repair and finishing work
The internal filling of the switchboard is the most expensive part of the device, so it is important to protect it from building dust and other contaminants. For this you should:
For this you should:
- Insulate all ends of the cables with electrical tape or caps from felt-tip pens, pens, etc.
- Frames, doors, other external movable parts of the case are removed.
- Cables are neatly laid inside the shield, counter-clockwise or clockwise, from left to right and without sharp bends.
- The box is closed with a special lid or made independently from cardboard, and around the perimeter of the joint with the wall it is pasted over with masking tape.
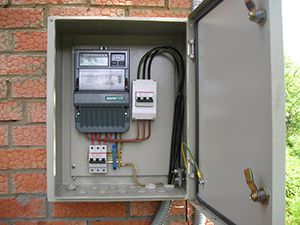
Installation of a shield for a country building
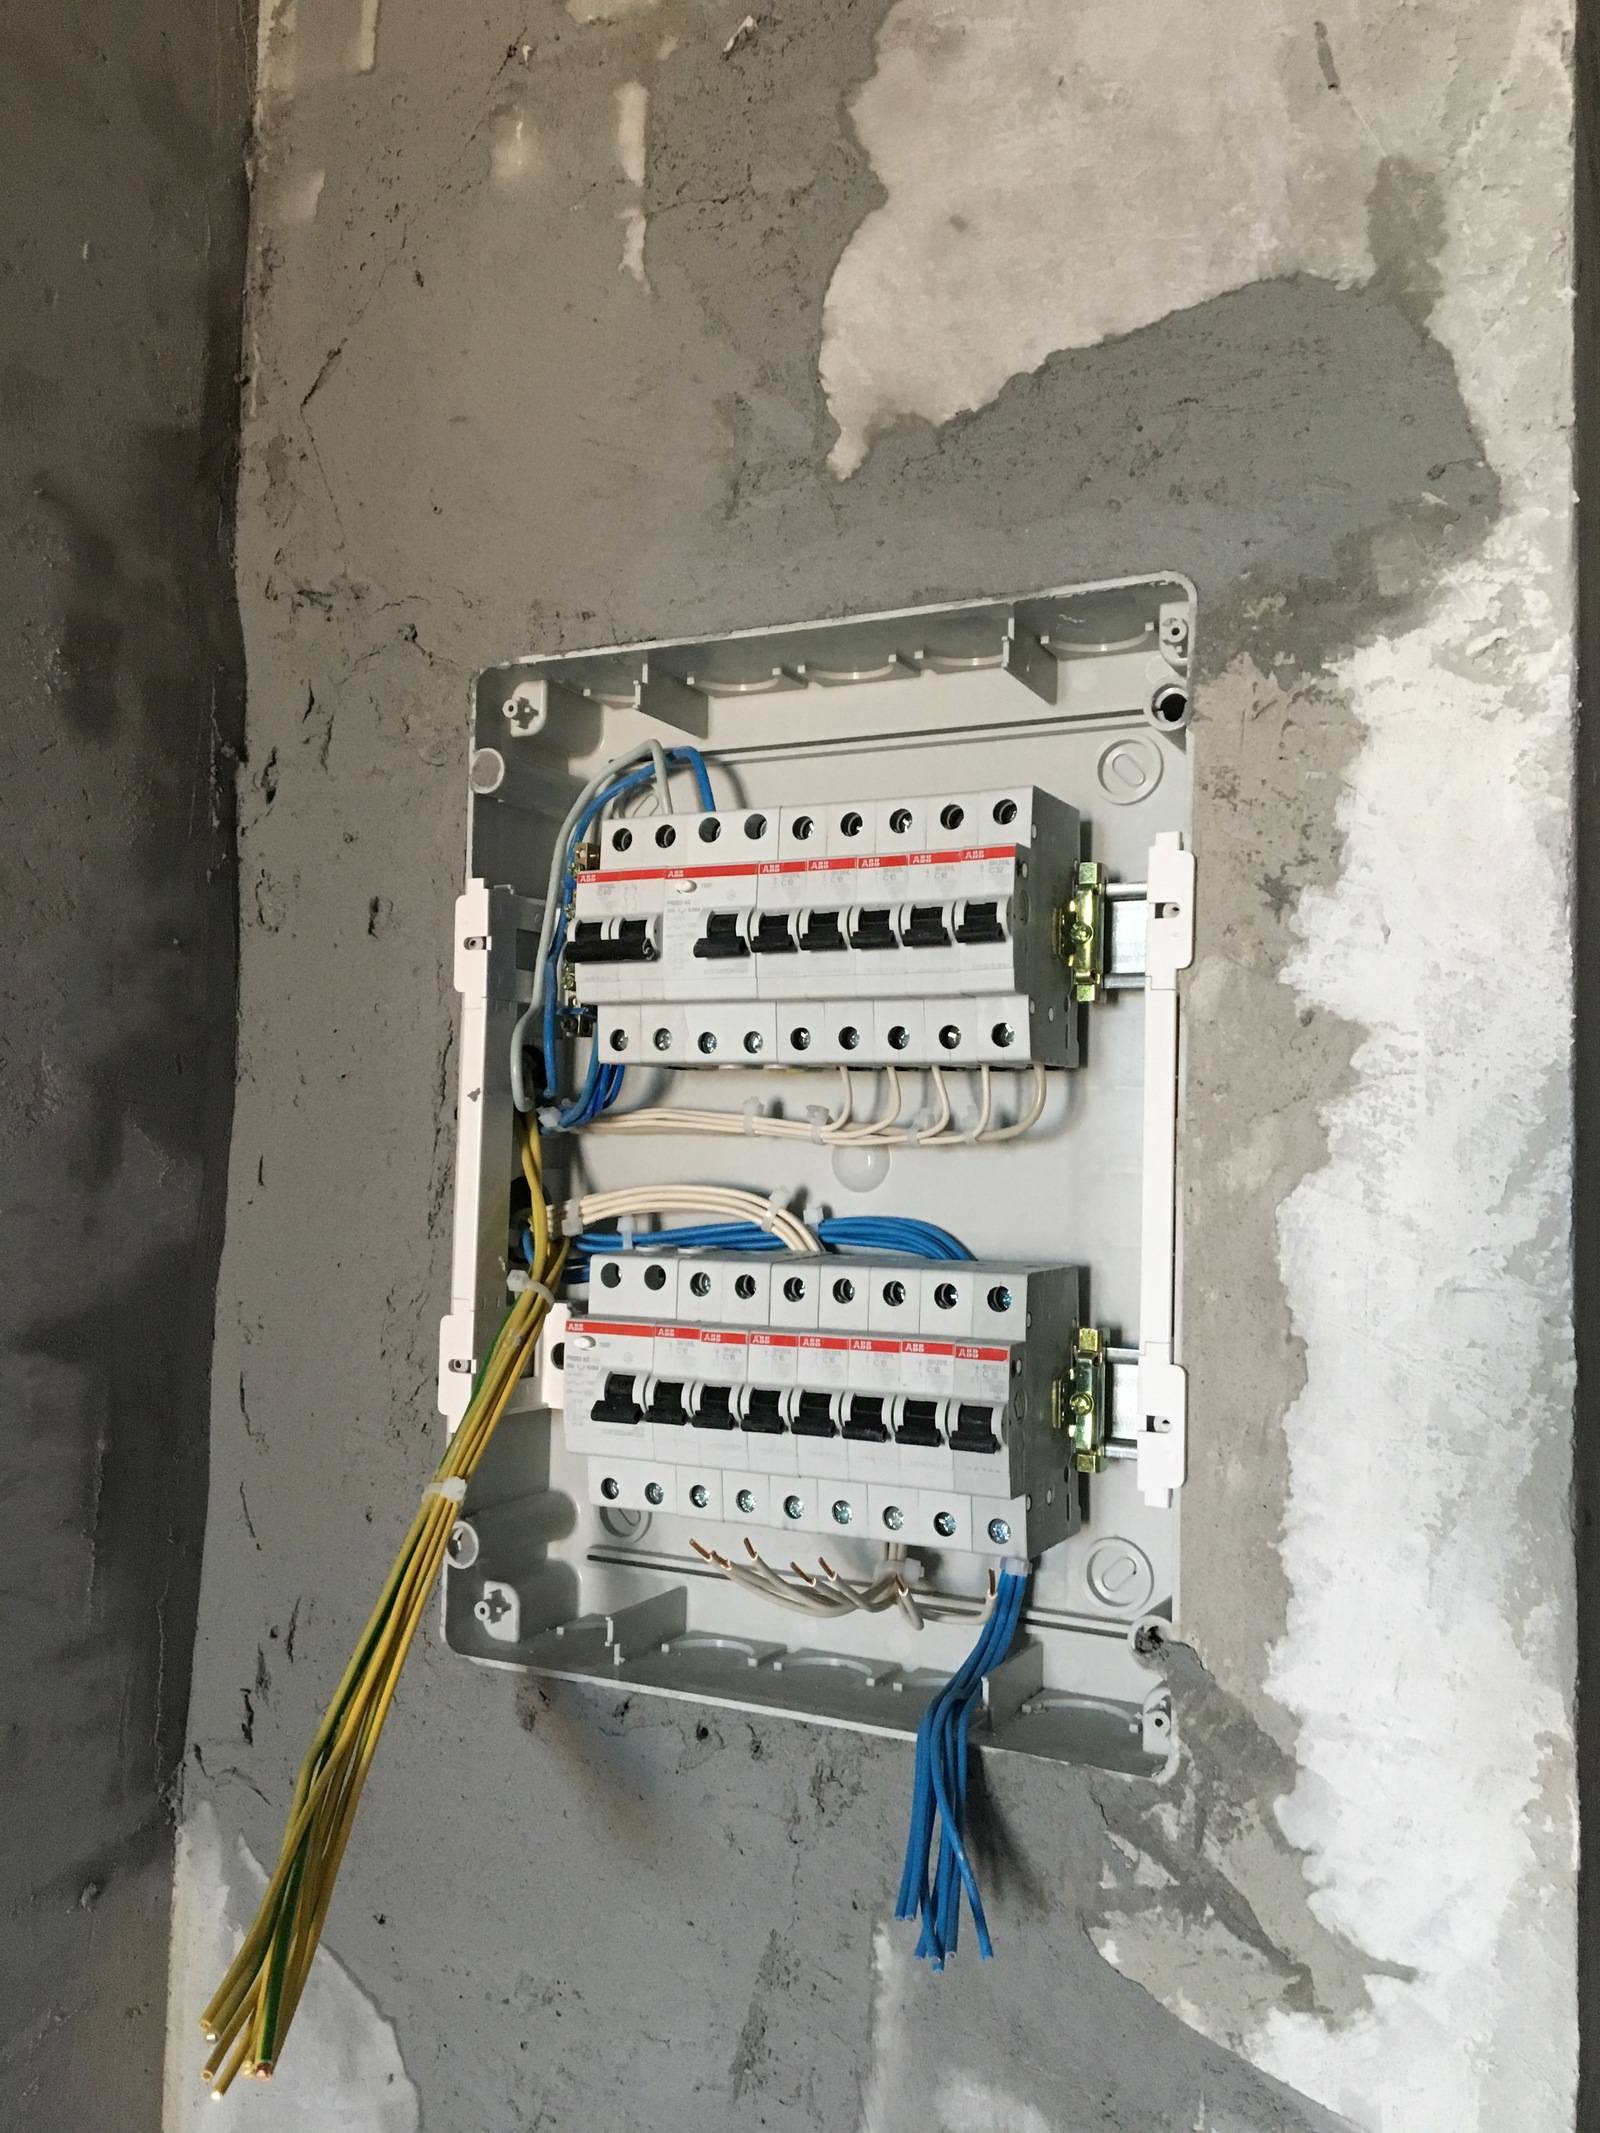
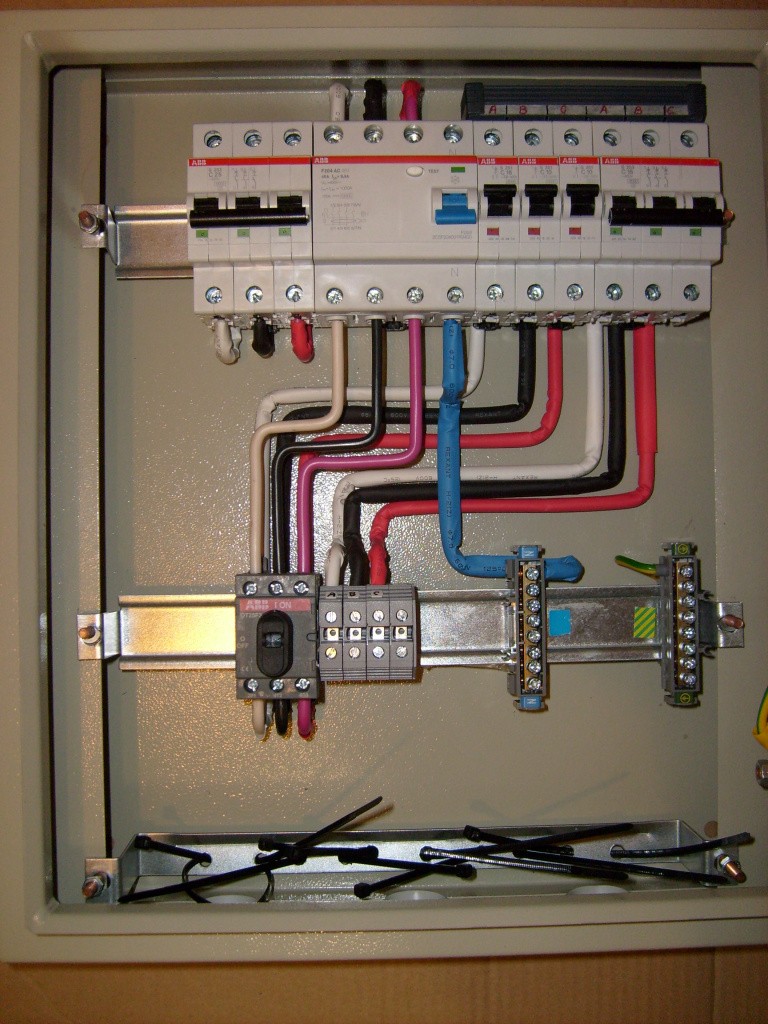
- We install with the help of self-tapping screws Din rails, on which all equipment will be attached. They must be 35 mm.
- We proceed to the installation of equipment according to a pre-made scheme and calculations. we mount automatic machines, RCDs and two separate tires, to which grounding and zero are connected, we install a metering device.
- We connect the phase wires, using a special bus we connect the machines. According to the general rules for connecting such devices, the input should be on top and the output on the bottom.
- We mount protective covers, sign all machines for convenience.
- Then we connect them with a special comb or make jumpers from the wire. If you are going to use a comb, then remember that the cross section of its core must be at least 10 mm / sq.
- We start wires from consumers to machines.
Learn from this video how to properly assemble an electrical panel in a private house for 220 V:
From the following video you will learn how to make a three-phase 380 V switchboard in a private house:
After you have assembled the shield, without closing it, turn it on for several hours, and then check the temperature of all elements.
Do not allow the insulation to melt, otherwise a short circuit will occur in the future.
With a careful consistent approach and compliance with the rules of electrical safety, everyone can independently assemble the ASU on their own. though it will take some getting used to. After completing the installation, it remains only to wait for the representatives of the power grid company, who will check your circuit and organize the connection.
Selection and installation of the switchboard housing
It should be said right away that the switchboard can be assembled in two ways: bench or mounted. The first method involves mounting the shield housing with modular devices pre-installed and connected according to the scheme, but the second is vice versa.
There is no fundamental difference between these two methods - only the sequence of assembly and installation operations changes. We will consider the second method, in which the switchboard housing is first mounted, and then the modular devices are installed, connected to the internal wiring and external cable.
According to the type of housing, the shields are divided into built-in and mounted. We will not describe the advantages and benefits of these two types, we will only say that in each specific case it is necessary to choose the best option. The hinged housing is easy to install, while the recessed housing is compact, but more difficult to install. So, the choice is yours! The size of the chassis depends on the number of modular devices and other equipment that you need to install in it.
That's all! The choice is made, the switchboard housing is installed in the required place, the supply cable and internal wiring wires are inserted into it - it's time to start assembling!
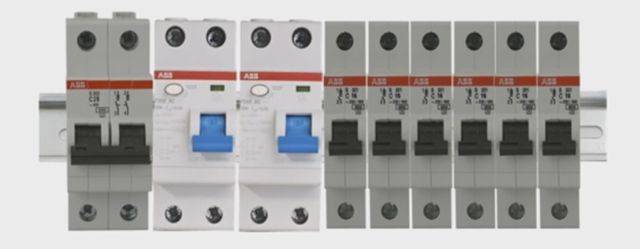
How do vending machines protect
Automatic switches (automatic devices) are selected according to the operating current, which is determined by the total current consumption of the devices of the corresponding group. To determine the current, you need to add up all the power of household appliances connected to this line and divide by 220V. The circuit breaker is selected with some margin so that it does not trip due to overload. For example, with a total power of 6.6 kW (6600W), if divided by 220V, you get 30A.
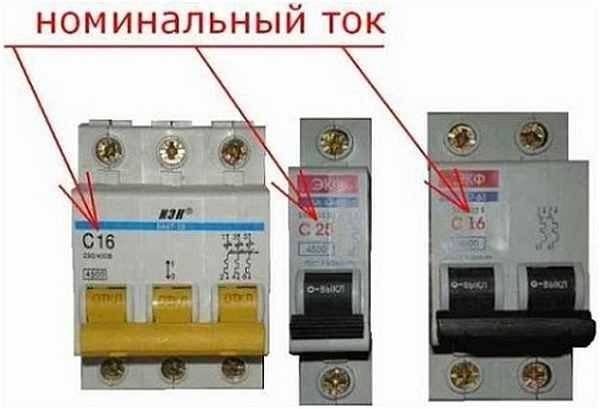
Automatic machines are produced with the following current ratings: 6A, 10A, 16A, 20A, 25A, 32A, 40A, 50A and 63A. Based on the calculations, an automatic machine with a working current of 32A is more suitable, and it needs to be installed.


Assembling an electrical panel in a private house - general concepts you need to know
To assemble a shield with your own hands, you will have to familiarize yourself with some general concepts.
In the previous paragraph, I said that an input cable is brought into the shield and electricity is distributed into groups in it. That's right, such shields are called, ASU (input-distribution devices). They are placed in a dedicated room at home (panel room), they are quite convenient, however, bulky.
But not everything is so rosy. Regional energy organizations that will accept the electrical wiring of the house require, and this is by law, to separate the input shield and switchboard to connect it to the general power grid.
About grounding
Any wiring must perform not only its direct functions, but also be safe. In accordance with the PUE, grounding is the deliberate connection of devices on the site with a specialized mechanism. Thanks to proper grounding, it is possible to use completely safe and functional electrical wiring.
Grounding tasks physical principles of its operation
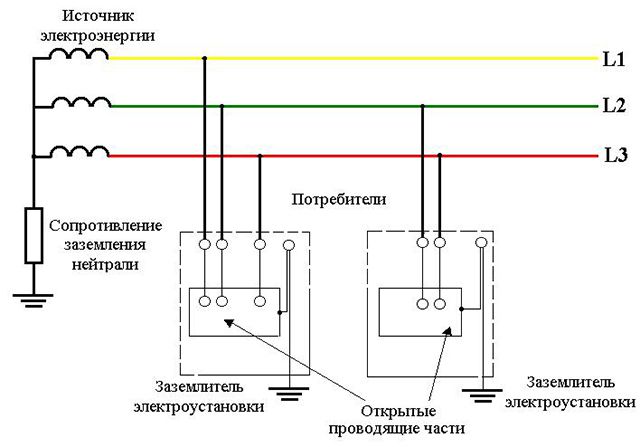
The main purpose is to ensure safety and prevent electric shock. So, by leading wires and cables into the ground, it absorbs any electric current, and therefore, the risk is minimal. The principle of operation is shown in the figure.
What types of grounding systems exist and which ones are applicable in a private house
The system is implemented according to different schemes, taking into account certain technical requirements and conditions. There are several types of systems, denoted by the letters TN. The first letter is the nature of the grounding, the second is the connection option for open conductive parts of various installations and devices with grounding.
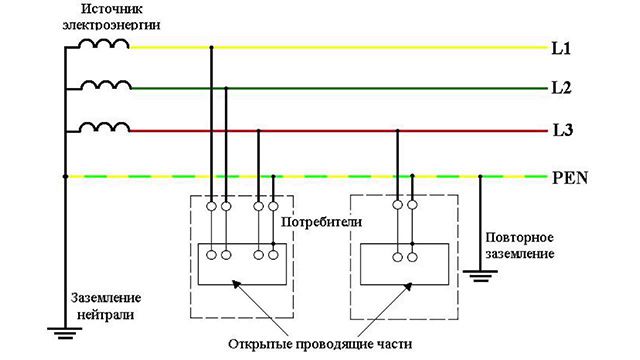
TN C system
It is the simplest scheme. The neutral of the supply sources is grounded, after which the work of zero N and protective PE is combined in a common cable. Conductive elements of installations and zero are connected to it.
TN S system
A similar option is TN C. The neutral of the power sources is deafly grounded, and the protective wires are distributed separately from the ground point to the last place of consumption.
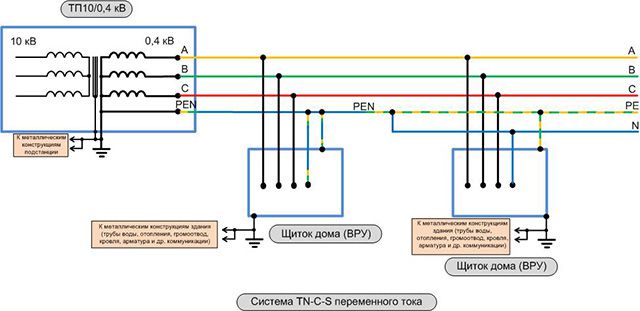
TN C S system
The laying requires the use of one conductor after the neutral is earthed. Before the input shield, a division into several separate N and PE is required for laying in the wiring. An economically viable solution.
TT system
Deaf grounding is made. A separate conductor is led to the points of consumption. Conductive parts are also separately grounded by a conductor connected to the main circuit and not having contacts with a working zero.
IT system
A very specific system. The neutral is completely isolated from earth or connected through high voltage devices. The connection of the conductive part is similar to the previous circuit.
How to make a ground loop in a private house
| Illustration | Process description |
|
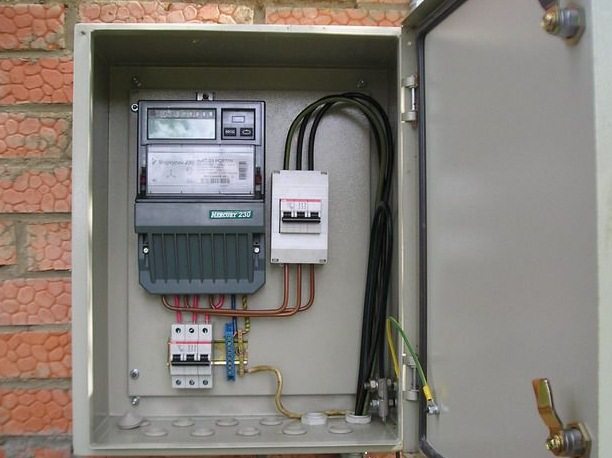
| The shield is equipped on the outside of the building. Ground loop nearby. |
|
| They dig a trench near the shield in a similar way with sides of 1.2-1.5 m at a depth of 50-60 cm. |
|
| Prepare vertical electrodes for the circuit. To do this, you need a steel corner with a thickness of at least 4 mm and a size of 50 * 50 mm. 3 cuts of 2 meters are taken. The ends are driven into the ground and cut with a grinder. |
|
| You need to score with a sledgehammer. The upper ends should be at a distance of 10-15 cm from the bottom of the trench. |
|
| A strip of steel 40 * 4 mm is welded. The vertices are connected. One of the strips is laid in the shield trench. The strip is bent and carried out by 10-15 cm. An M10 stud with a length of 4-5 cm is welded on top. All welding areas are cleaned and coated with an anti-corrosion agent. |
|
| The resistance level is checked. |
|
| The trench is dug in and the soil is compacted. |
|
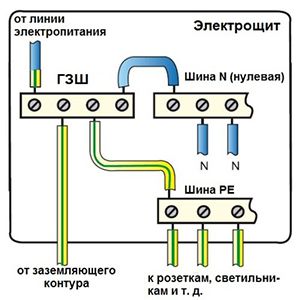
| 3 tires are installed in the control panel: main, zero and protective. Requires crimping of the tip connected to the stud. The wire is brought to the GZSH in the shield and connected. PEN common conductors are connected to the same bus. Create jumpers. Thus N and PE go separately. |


About the potential equalization system
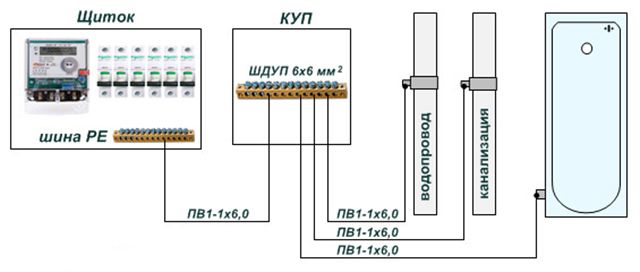
For complete safety, the measures taken are not enough. It is required to provide for a potential equalization system. All elements that conduct current are connected so that this indicator is absent or small
The main SOP includes:
- grounding device;
- main ground bus;
- house metal elements.
If communication structures have a large extent, then a dangerous potential appears. It is this system that helps to prevent various risks.Sometimes it is necessary to withdraw additional SUP.
Installation is quite simple, but it is better to turn to professionals.
Features of the electrical panel
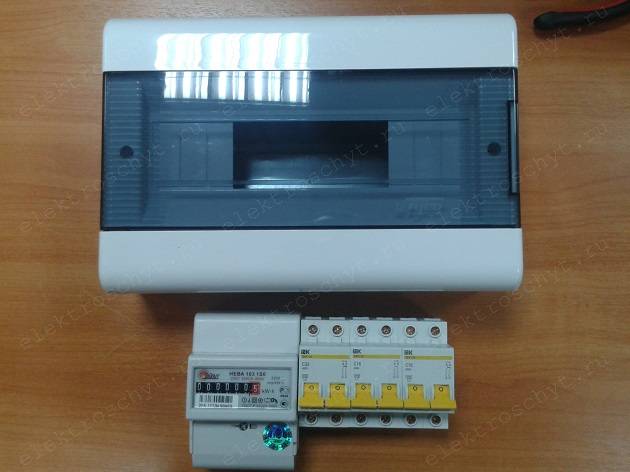
The electrical panel with automatic machines is a box made of plastic or metal in which electrical appliances are placed. Mandatory installation:
- main switch;
- electricity consumption meter.
The input machine, as well as the counter, must be sealed. In addition to the listed devices, the switchboard is equipped with circuit breakers - they protect the home network.


Depending on the method of fastening, switchboards are divided into:
- Overhead. The advantage is ease of installation.
- Embedded. They require the creation of a niche in the wall. The positive side is saving space in the room.
Everything is ready for installation
So, the circuit is drawn up and comprehended, the components are prepared - nothing prevents you from starting the assembly of the switchboard. First of all, the location of the shield is selected, on which the device is attached, as a rule, with self-tapping screws or clamps. The body of the electrical panel is located, as a rule, not far from the entrance to the house or apartment - in the vestibule or hallway. If the owner has expressed a desire to hide the shield in the wall, and the wall turns out to be concrete, you can use a false wall or drywall ledge: the area of \u200b\u200bthe room may decrease slightly.
When choosing a place on the wall for installing an electrical panel, it should be borne in mind that the distance from the device to the nearest doorway must be at least 15 cm, the distance to the floor - 1.5–1.7 m.If necessary, the owner of the home or the called electrician should be able to freely get to the shield: it is strictly unacceptable to place the device inside cabinets or other furniture. The appliance must be located away from gas pipes and flammable materials.
To prevent the electrical panel from being too large or small, you can pre-determine its size, knowing the dimensions of the components that will be located in it. For example, the width of a standard single-pole circuit breaker is 17.5 mm, a two-pole circuit breaker is 35 mm, and a three-pole circuit breaker is 52.5 mm. The remaining components have the following dimensions:
- RCD single-phase two-module - 35 mm;
- RCD three-phase four-module - 70 mm;
- difavtomat single-phase two-module - 70 mm;
- DIN-rail terminal block - 17.5 mm (1 module);
- counter (6-8 modules) - 105-140 mm;
- voltage relay of 3 modules - 52.5 mm; this is not a mandatory element of the shield, but when using it, you can protect equipment from power surges or sags, save household appliances such as a refrigerator, TV, computer and other electronics from failure;
- din-rail socket (3 modules) - 52.5 mm.
The modules are located on the so-called DIN-rail - a special metal plate 35 mm wide. The socket is not included in the number of mandatory elements, but may come in handy when carrying out repair work. If, when summing up the number of components, it turns out that a 20-module shield is needed, then it would be reasonable to install an electrical panel for 24 or even 32 modules - who can know how many household electrical appliances will be added to the house in a year, two or five?
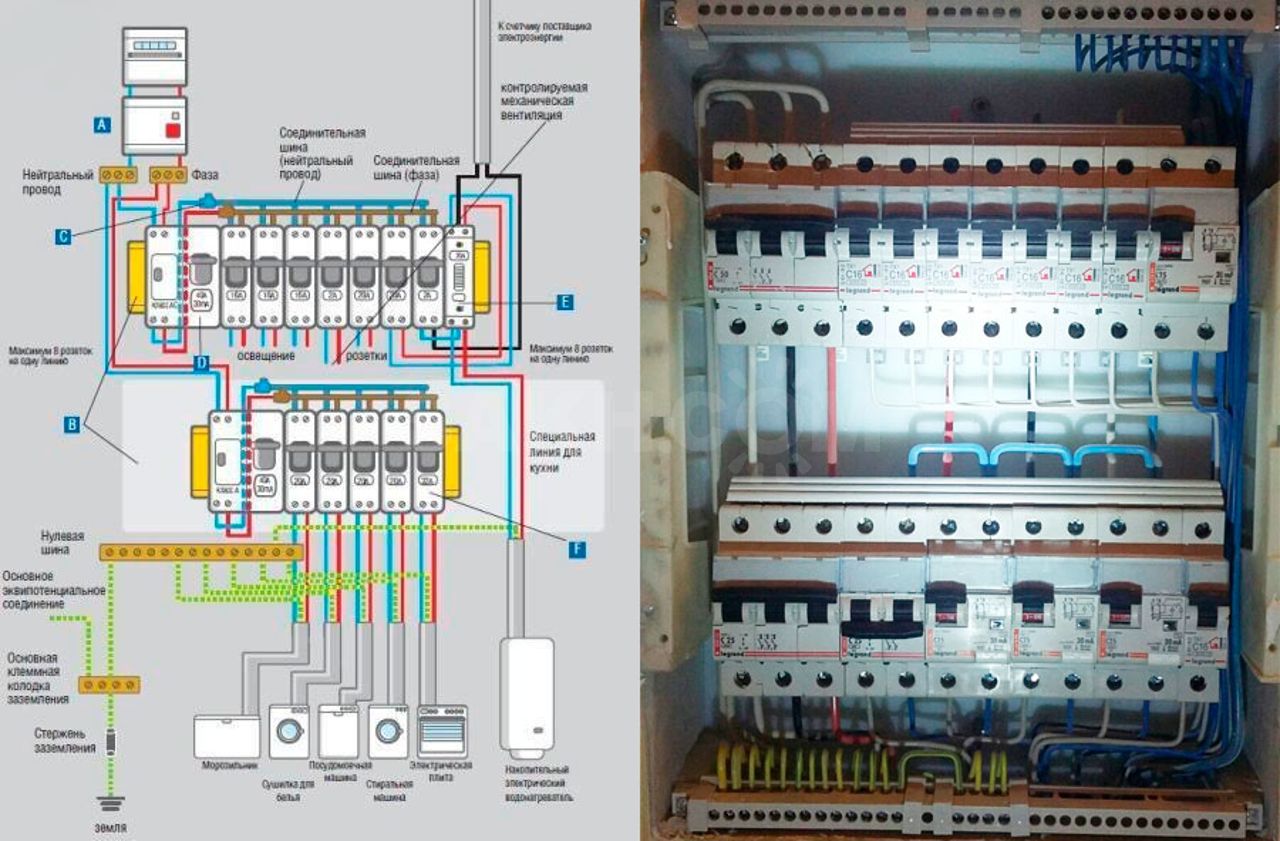
Assembling a 220V electrical panel in a private house
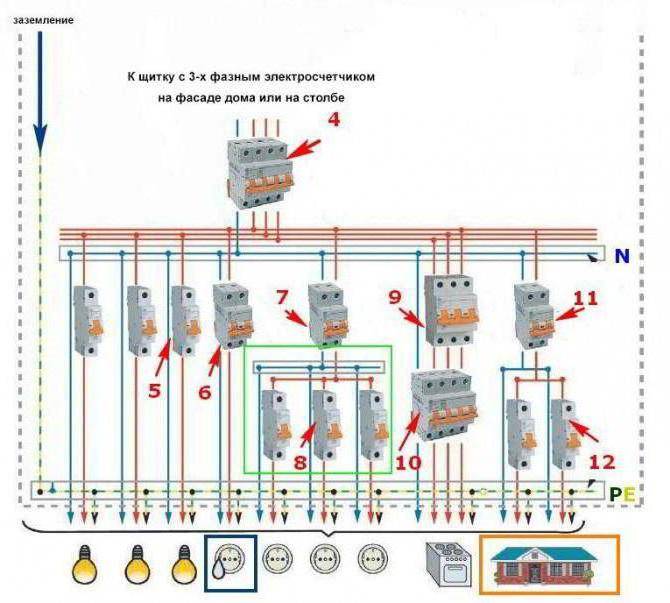
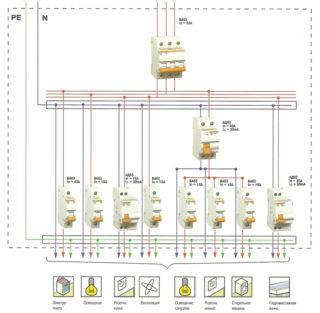 Scheme of the electrical panel of a private house
To properly assemble the electrical panel in your own home, you need to familiarize yourself with the nuances of such a structure:
- the level of power allocated to the project - the choice of an electric meter, automatic machines depends;
- the place of installation of the shield - affects the type of housing;
- number of branches - each will need a separate protective module;
- reliability of the power grid - the quality of power lines, the proximity of large objects, and the like are taken into account.
The electrical panel in the house is installed for a long period of time. It is recommended to carefully approach the choice of elements, calculate and take into account a possible increase in the load: the appearance of additional rooms, appliances. In rural areas, air lines are in average or poor condition, it is better to install more protective blocks.
The electrical panel is the first element of the electrical wiring of a private house, apartment, or other premises. It is not recommended to save on design details, you should choose reliable manufacturers and trusted stores
However, priority is given to the general house level of voltage, power consumption
It is important to install a sufficient number of protective modules, to embed a voltage relay. Attention and observance of the instructions will help to make the electrical panel safe, and the service life is long.
Attentiveness and observance of the instructions will help to make the electrical panel safe, and the service life is long.
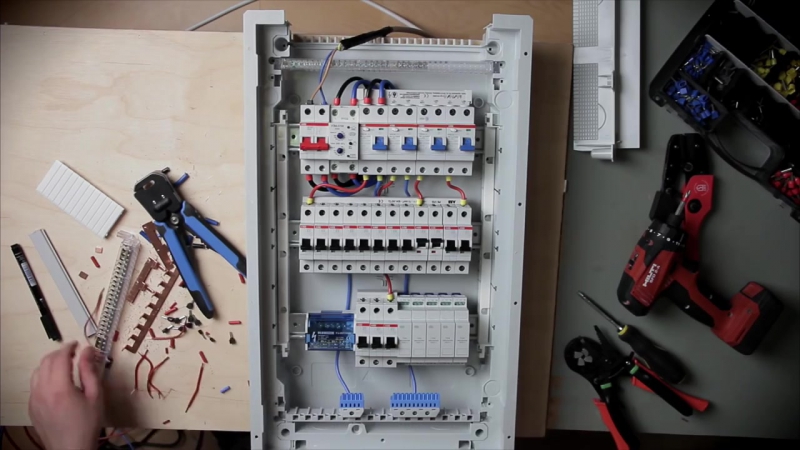
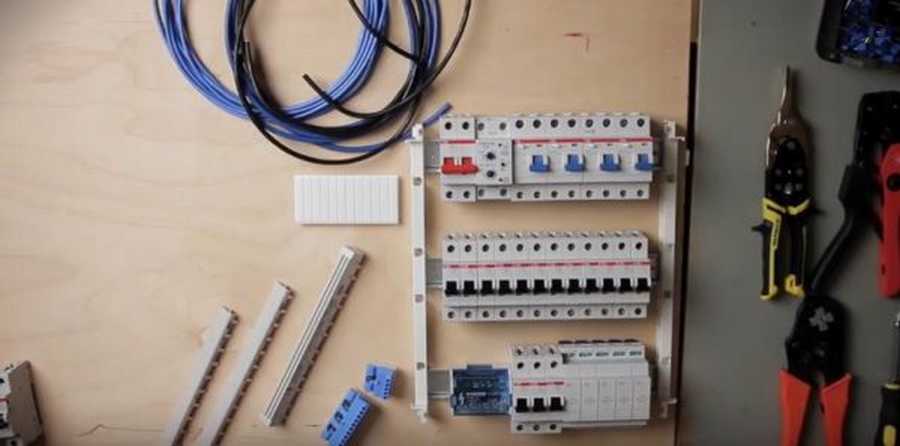
We cut cables and mount modules
Every electrician will confirm that working with a tool specifically designed for a particular operation is easier and more enjoyable. You can cut the cables inside the shield with an ordinary construction knife, but if you do this with a special knife with a heel, everything turns out faster and better.

After cutting the cables, you should re-mark the wires, since there will be a lot of them and if you get confused in them, it will take a lot of time to put things in order. When feeding cables into the shield, you should leave their length equal to twice the height of the shield, that is, pass the cable through the entire shield, and then measure the same amount. Such a measure is not wasteful: the wires inside the shield do not go in a straight line, but along an intricate curved line, and it is better to have a little extra wire than not enough.
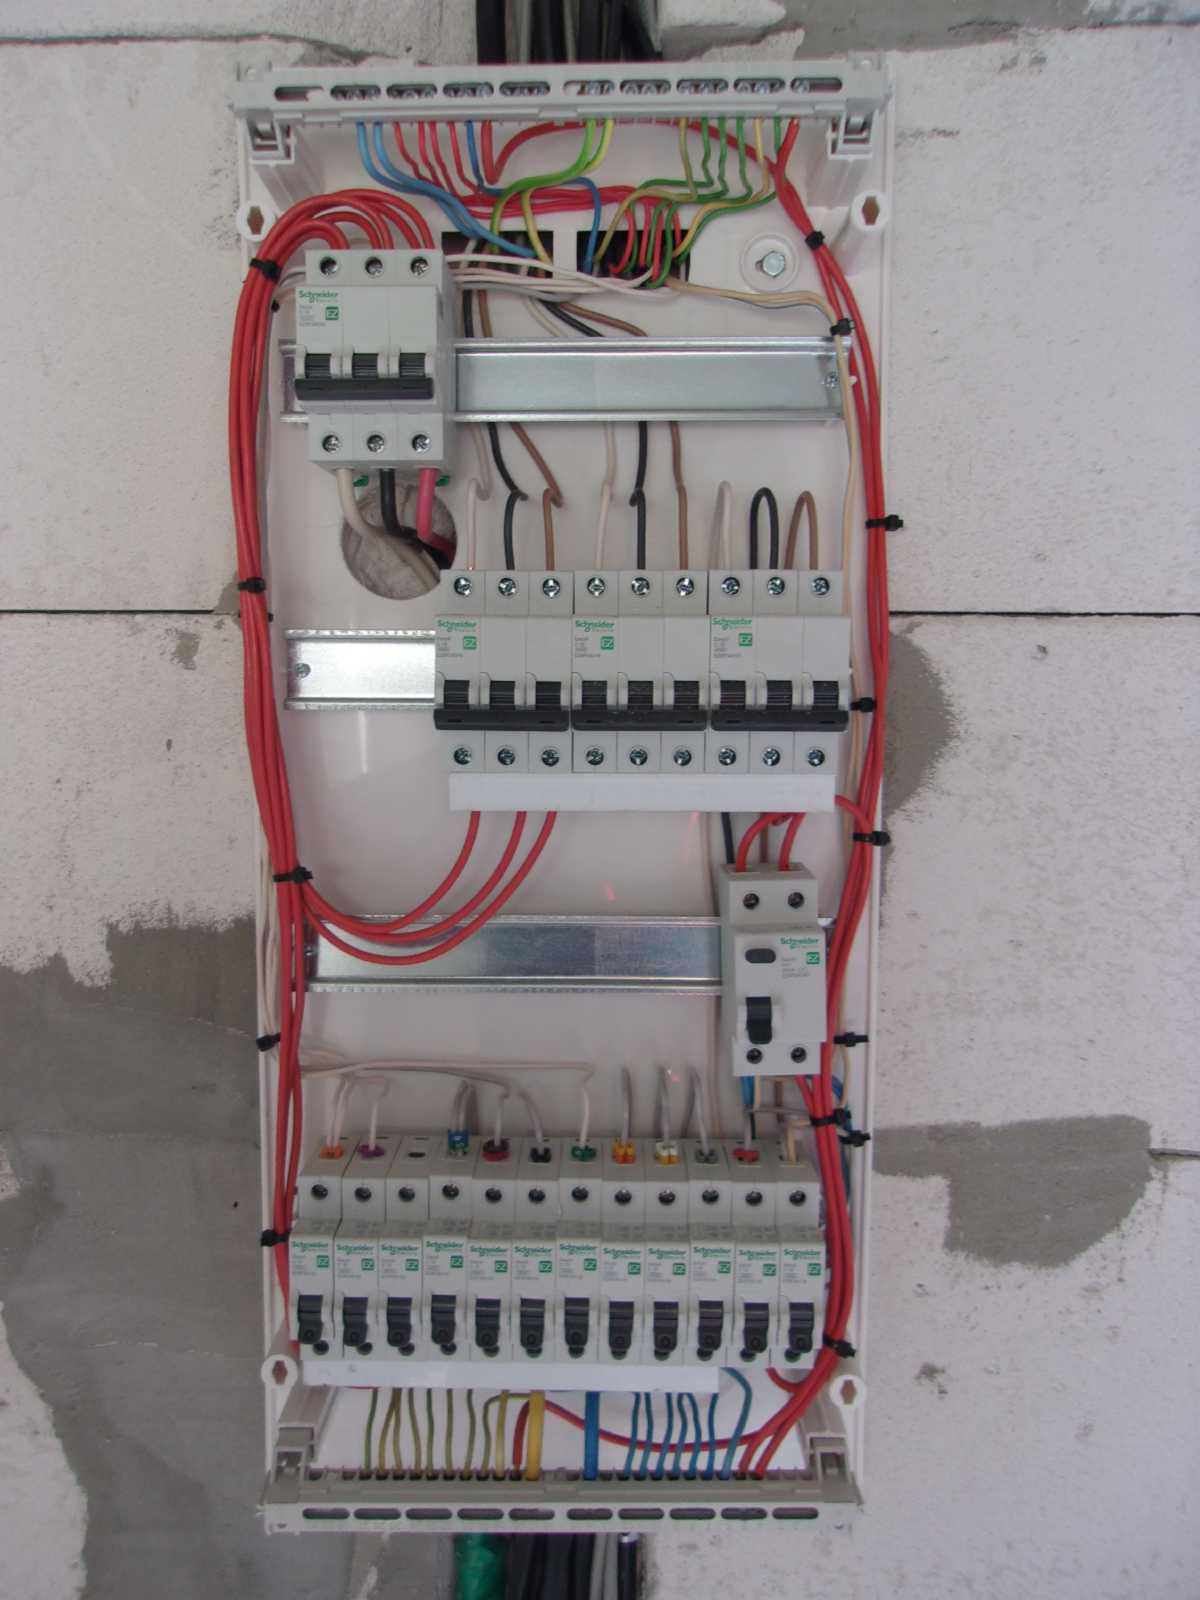
There are no strict rules for the location of modules in the switchboard, however, electricians usually use one of two installation schemes - linear or group. In the first case, all elements are arranged one after the other in the order shown on the single-line diagram: input automat, RCD, difavtomat, consumer circuit breakers. Among the advantages of this arrangement option is ease of implementation, the disadvantage is that it is difficult to find the “culprit” of the emergency.


If a group layout of modules is implemented in the panel, the components alternate in groups of consumers: AV input, RCD, a group of switches associated with this RCD. Next, the next RCD and the corresponding group of circuit breakers are installed. Such a circuit is somewhat more difficult to assemble, but the problem line is immediately visible from the tripped RCD.
How to choose a good electrical panel?
The quality and reliability of the electrical panel in the house depends mainly on the quality of the equipment, but what the switchboard will be like also matters.
There are different types of residential electrical panels. The choice depends on the number of modules and specific conditions. Preference should be given to plastic shields with the following qualities:
- a metal rather than a plastic DIN rail is installed inside - such a bar provides a more reliable fastening of protective equipment;
- hinged lid - additionally protects the machines from accidental activation and mechanical damage;
- there is a terminal block for grounding wires - in its absence and the presence of grounding, the terminal block will have to be installed additionally.
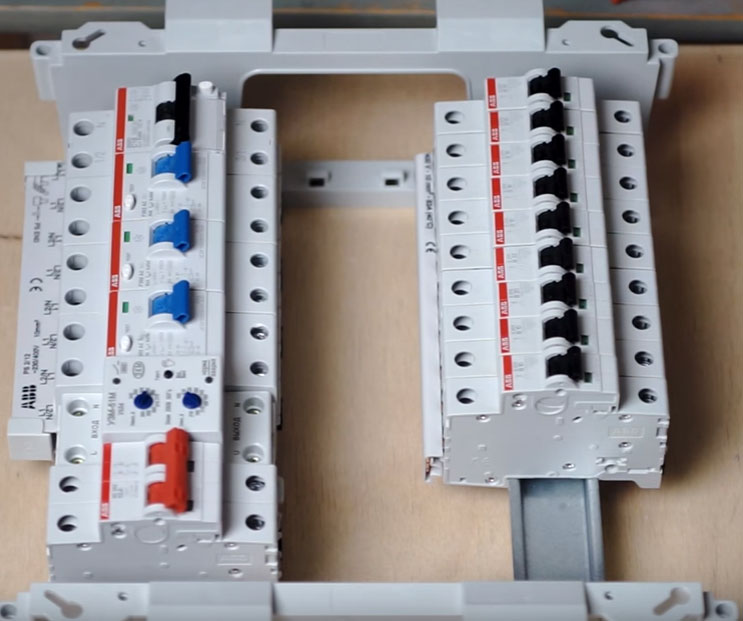
With a significant amount of equipment, preference should be given to boxes, inside of which there is a frame with DIN rails installed on it. If 2-3 machines are easy to mount in the installed switchgear, then it is more difficult to connect 5-10 or more. In this case, the frame is removed, installation and connection are made on the table, and it is installed back.
Watch this video on YouTube
How to choose modular equipment in an electrical panel
The equipment installed in the electrical panel is selected primarily by the total current of the devices connected after specific protection devices.
The current of the circuit breakers must ensure the operation of all electrical appliances at the same time, but not exceed the permissible current for the wiring.
For example, the total power of electrical appliances is 5 kW. The total current of these devices will be, according to the formula, the rated current of the machine should not exceed this value, otherwise there is a danger of overheating of the cables and their failure.
The permissible current of the RCD and voltage relay for reliability is selected more than the current of the circuit breaker, which is in the same circuit with it.
In addition, sockets, ammeters, starters for turning on electric heating and other equipment are installed in the assembled electrical panel.
Preparatory work
Self-wiring in a wooden house is quite a responsible matter. Such structures must have a serious margin of safety, because both the wood itself and wood dust are flammable. The reliability of the entire energy system at home largely depends on how well you prepare for work.
Project development
You should start with the development of a sketch of the project. As a basis, you can take a copied house plan, on which, in accordance with the scale, the location of sockets, lighting fixtures, stationary points of consumption, requiring the laying of a separate line such as an electric furnace or boiler, as well as the cable lines themselves, is applied;
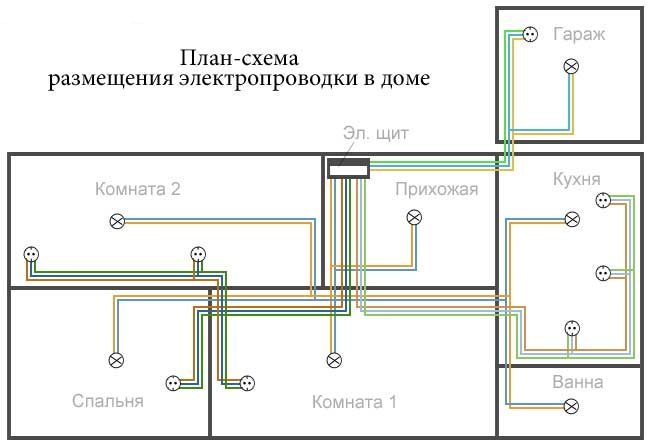
House wiring plan.
As for the circuit diagram, it is better to order it to a professional. Based on the sketch you have drawn up, he will competently draw and paint all the sectors of the wiring, and most importantly, draw up a diagram in accordance with the requirements of the EIC, because do not forget that you still have to approve these documents in Energy Supervision;

Wiring diagram.
- The finished sketch must contain comprehensive information about the length of the lines, the type and cross section of the supply cable, and it must also indicate the estimated design capacity of each point;
- Lighting, sockets and powerful stationary electrical appliances should be divided into separate groups, with installation on each such group of a separate machine. In large buildings, even power supply by floor can be divided into groups.
Procurement of cable and related equipment
Non-combustible electrical panel.
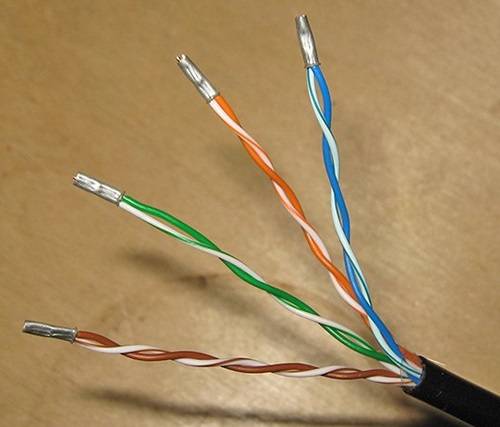
- The power supply of wooden houses is recommended to be equipped exclusively with copper wire. The fact is that aluminum metal is quite fragile and over time such veins can break.Domestic manufacturers make an excellent VVGngLS cable, the presence of the letters “ng” in the marking indicates that the cable insulation does not burn, and the letters LS indicate the presence of two-layer insulation. If you don’t feel sorry for the money, you can buy an imported NYM cable; it is easier to cut it, but the price is also higher;
- The cable cross section depends on the design power of the point. To calculate it, special formulas are used, but it makes sense to apply them to large, responsible objects. In private houses, everything is much simpler, so that it is easier for you to navigate, we provide a table with ready-made data, it will be quite enough.
Choice of cable section.
- Wiring in a wooden house differs from other types of wiring by the obligatory grounding of all points, so all wires must be at least three-core. And if sockets, as a rule, are grounded everywhere, then when installing lighting, this requirement is often neglected, which sometimes leads to fires;
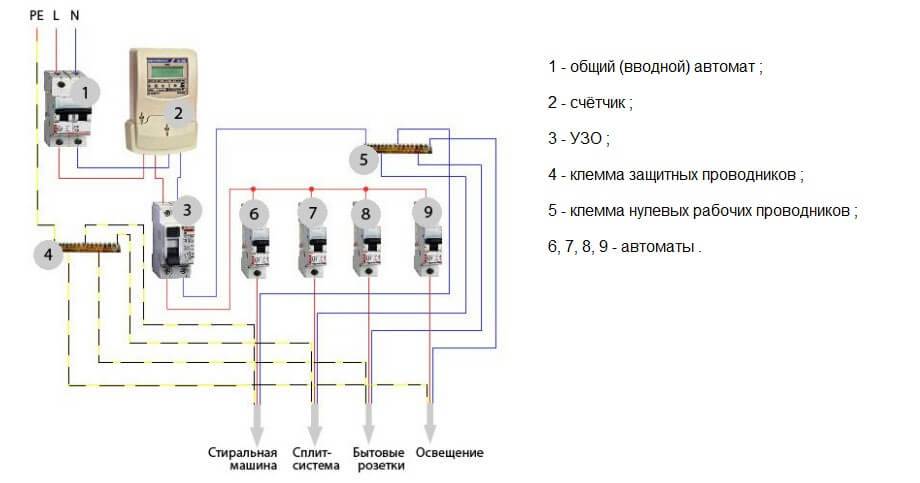
- Experts strongly recommend equipping the power supply system of cottages made of timber and logs with residual current devices, abbreviated as RCDs. This device will protect in case of a breakdown of electricity to the body of the electrical appliance or damage to the cable insulation;
RCD installation diagram.
As for the machines, in addition to the introductory machine, each group or line is equipped with a separate disconnect device. Their power must also correspond to the total load of the line. But from experience we can say that for medium-sized one- and two-story houses, an introductory machine for 25A is often enough, plus 16A machines are installed for each group;


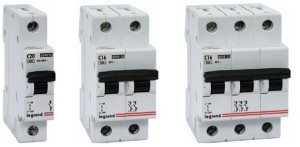
One, two and three-pole machines.
Sockets, switches and junction boxes are taken depending on the type of wiring (as you know, it can be open and hidden).
Conclusions and useful video on the topic
You can learn how to work with tools, wires and various electrical appliances, as well as plan work, by watching a useful video.
Wall chasing and installation ceiling:
An interesting theory about electrical wiring and protection:
Mounting the socket block:
Electrical work is considered completed when the wires are connected and masked, the junction boxes are closed with covers, and the electrical panel is fully equipped. You can replace the socket or install a chandelier at any time - the installation of lighting fixtures and decorative elements is most often done after finishing work.
But with any manipulations with electrics, remember the most important thing - the safety of human life.
Do you have considerable experience in electrical work and have you independently been involved in the design and installation of electrical wiring in the house? If you notice errors or inaccuracies in the instructions given by us, please point them out to us by leaving a comment in the block under this article.
Or are you just learning the installation rules and want to clarify some of the nuances? Ask your questions - we will try to help you.


![Choosing the Best Water Towel Warmers [Our Top 8] | engineer will tell you how to do it](https://fix.housecope.com/wp-content/uploads/2/e/c/2ec9bd33db262982410ba1db2395e9fa.jpeg)