- Step-by-step instructions for wiring a water supply system
- Installation of ball valves
- Installation of meters for hot and cold water
- Mounting of gearboxes
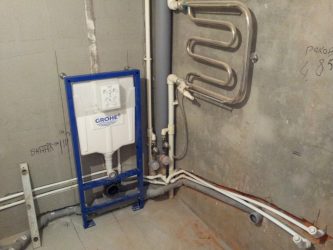
- Manifold installation
- Installation of water pipes
- How to draw up a diagram
- What plumbers call a dot
- Do-it-yourself plumbing installation in an apartment
- Choosing a plumbing layout in an apartment
- Consistent plumbing in the bathroom
- Collector type wiring
- Common installation errors
- Installation of wash basins of various types
- We are planning the wiring
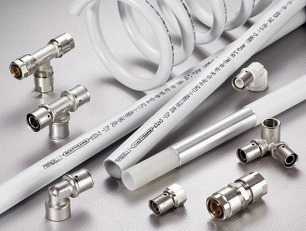
- Selection of pipes for water supply
- Installation of external water supply
- Freezing depth
- Pipe diameter
- Warming
- Preparatory work for creating a plumbing system
- Tools for laying plumbing
- Drawing up a wiring diagram, taking measurements and mathematical calculations
- The right choice of materials
Step-by-step instructions for wiring a water supply system
Do-it-yourself water supply wiring in an apartment always begins with drawing up a detailed water supply scheme on paper. It should provide for the smallest nuances, since it will be the basis not only for the work, but also for the acquisition of the required amount of materials.
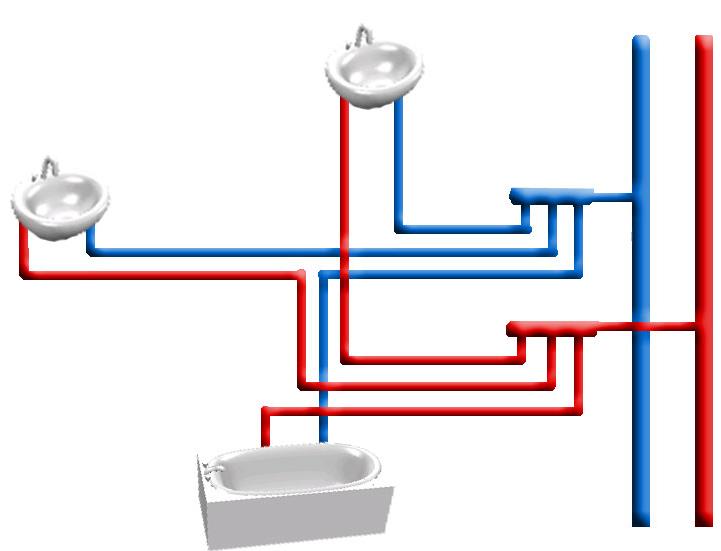
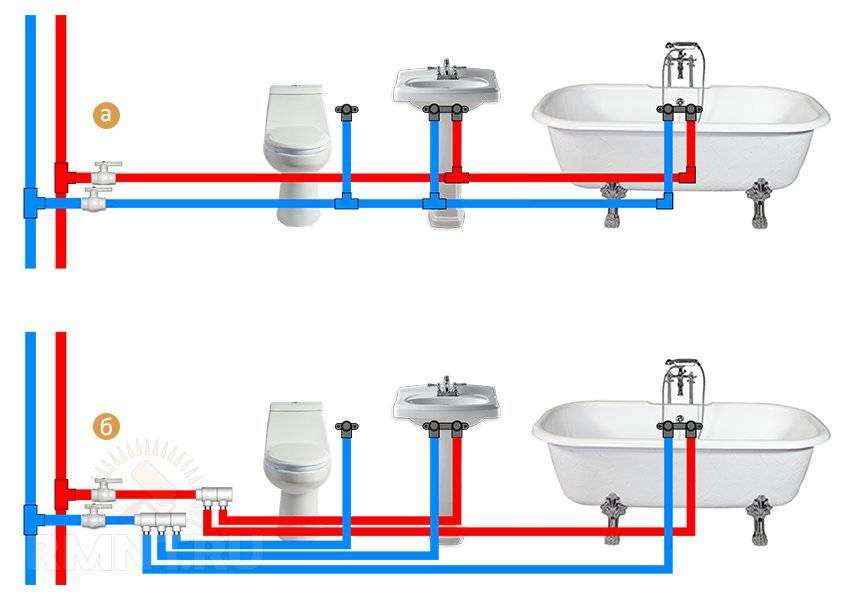
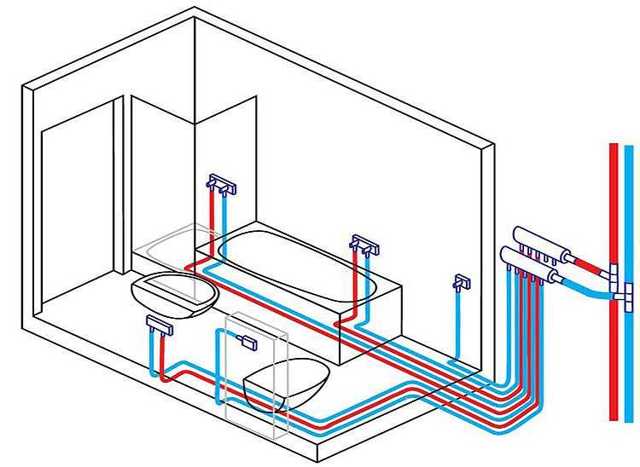
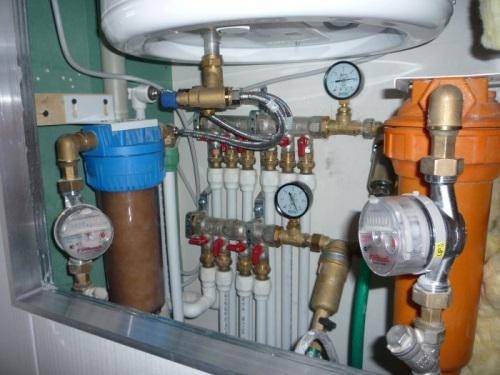
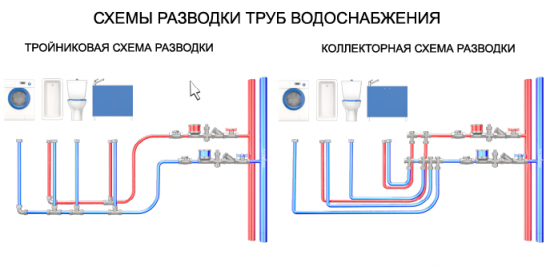
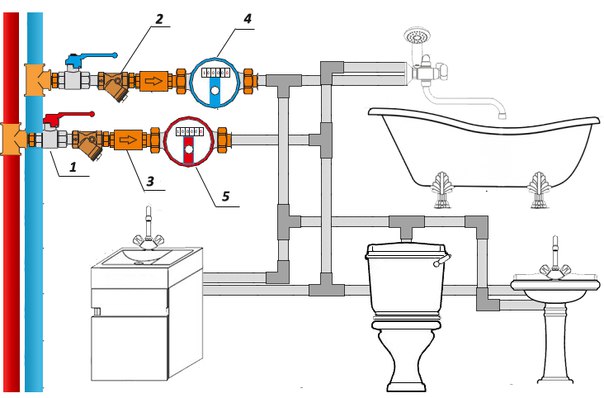
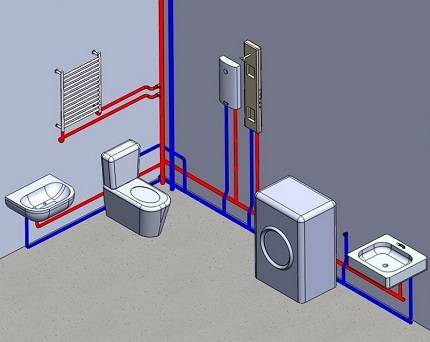
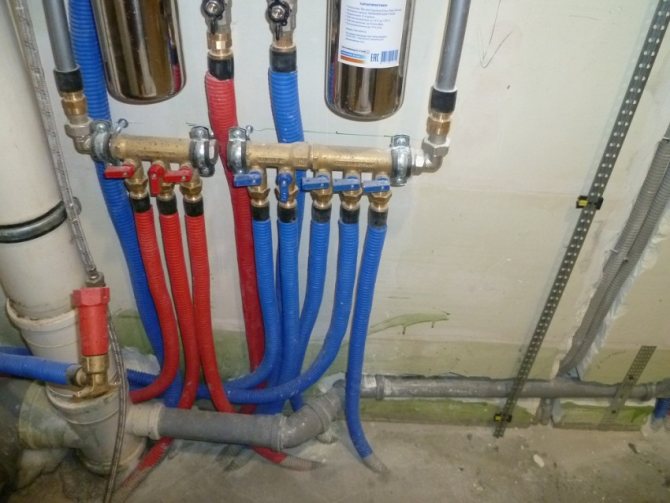
Attention! The scheme should be drawn up with a minimum number of joints, connections and bends - this will significantly increase its operational reliability. If the space of the room allows, then the best option is the collector wiring of water supply pipes, an example of which is shown in the figure below.
If the space of the room allows, then the best option is the collector wiring of water supply pipes, an example of which is shown in the figure below.
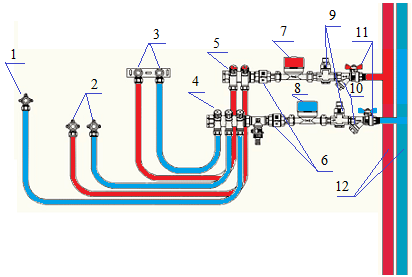
The referenced positions refer to the following elements:
- 1,2,3 - ball valves at the inlet of the washing machine, sink and bath mixer;
- 4.5 - collectors for cold and hot water;
- 6 - check valves;
- 7.8 - hot and cold water meters;
- 9 - reducers for pressure normalization;
- 10 - filters providing rough cleaning.
- 11 - emergency cranes.
- 12 - cold and hot water risers.
The most acceptable option for organizing a do-it-yourself plumbing system is to use plastic pipes. They are easy to install and can be used for a long time. The optimal pipe diameter is selected according to the total length of the pipeline in order to provide the required pressure. To do this, you can use special tables that can be found on the Internet or consult with experts.
Attention! If the distribution of water pipes is carried out in an old house, then you should pay attention to the condition of the main riser. It may first need to be replaced, and this event should only be carried out by specialists.
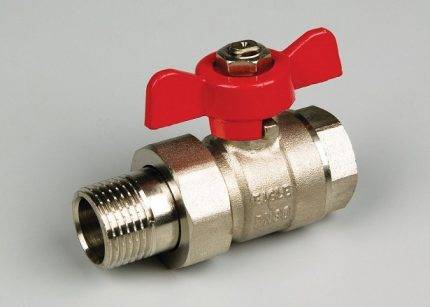
Installation of ball valves
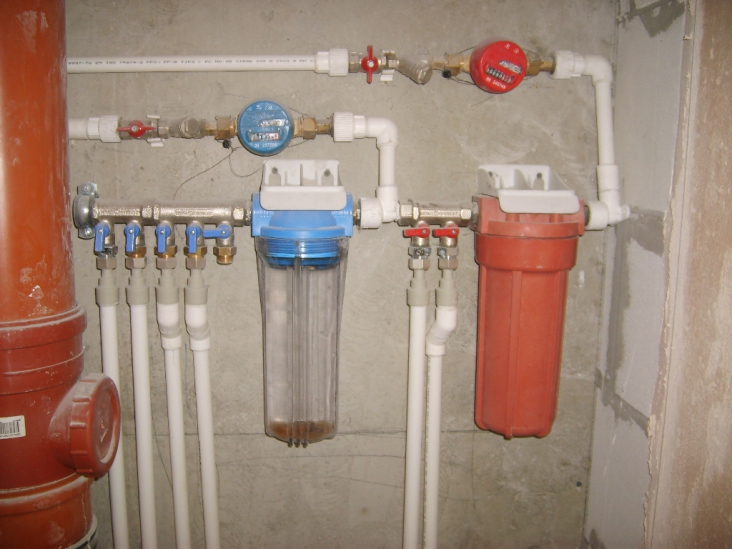
Installation of emergency ball taps at the entrance from the main risers and installation of filters.The taps at the inlet to the water supply system have been reassigned to quickly turn off the water supply when a leak is detected.
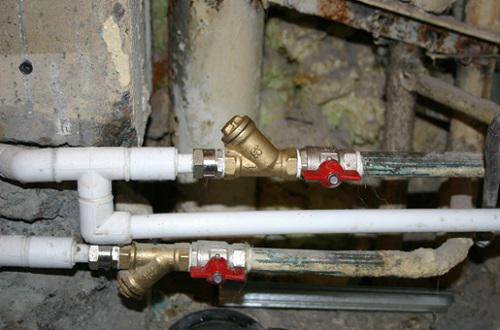
Be sure to turn off the water before starting installation. It is recommended to use ball valves that operate under pressure up to 60 atmospheres and temperatures up to +150˚С. Coarse filters are connected to the installed ball valves.
Installation of meters for hot and cold water
As a rule, union nuts are included with the meter, which allow, if necessary, to disconnect the meter without violating the integrity of the system.
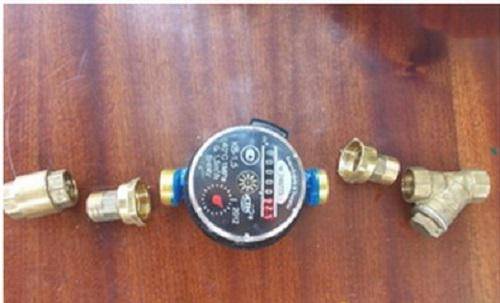
Important! When installing the meter yourself, you need to pay attention to the directional arrows that are placed by the manufacturer on the device. They indicate the direction of water movement.
Remember! After starting the system, the installed devices must be registered with the water supply organization.
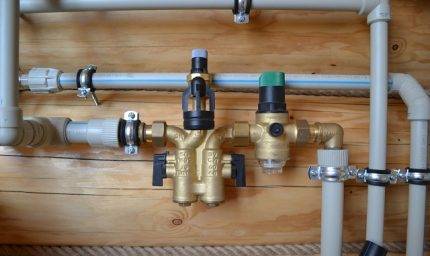
Mounting of gearboxes
Installation in the water supply system of reducers that will prevent damage to pipelines in the event of pressure drops. It is imperative to install these devices if the water pressure in riser significantly exceeds the throughput plumbing devices. It is good if, under excess pressure, excess water will be drained into the sewer, so if possible, a special drain should be provided.


Basic rules for installing the gearbox:
- The pressure regulator gauge must be mounted vertically;
- During installation, shut-off valves must be provided;
- Be sure to take into account the direction of the water in accordance with the indicated arrow on the device.
Manifold installation
As a rule, these devices are equipped with a maximum of four outputs.Therefore, to connect a larger number of consumers, it is necessary to install several collectors.
Important! Ball valves should be installed at the inlets of all consumers to be able to turn off specific devices in case of an accident.
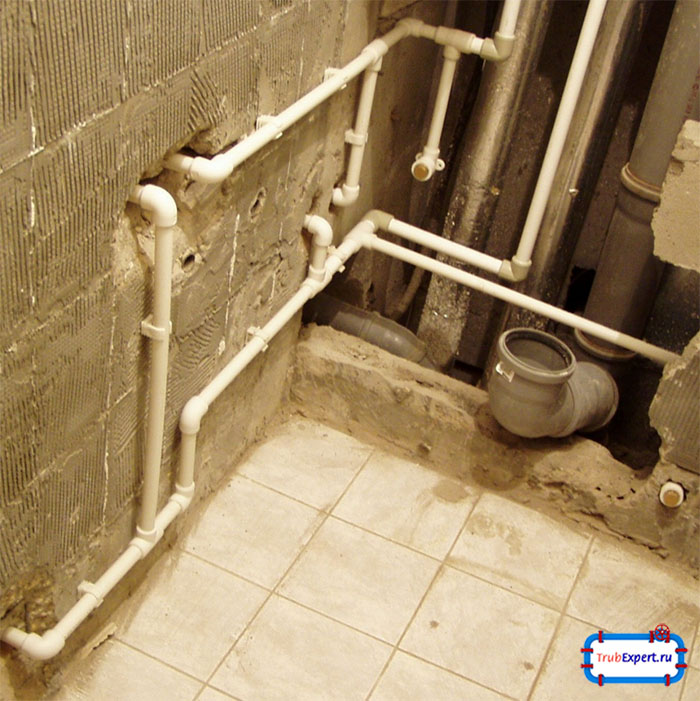
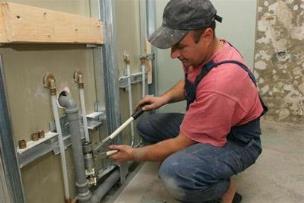
Installation of water pipes
Direct installation of water pipes. To do this, purchased plastic pipes must be cut to size in accordance with the wiring diagram. The joints are welded using a special apparatus, which is quite easy to handle. This technology is described in detail in the article Polypropylene pipes - do-it-yourself installation.
You can start operating a self-installed water supply system only after checking, which is best done with an assistant. This will quickly shut off the water supply if a leak is detected due to poor assembly.
How to draw up a diagram
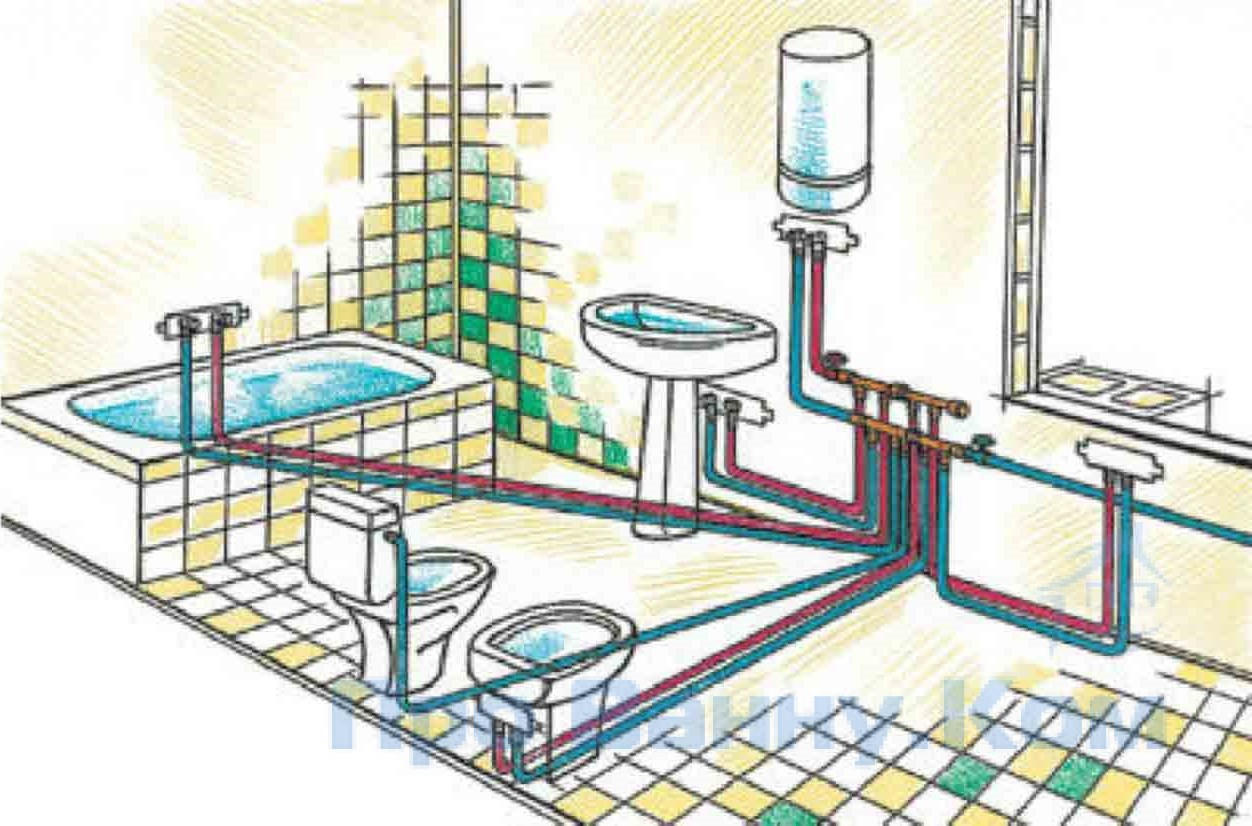
With a properly arranged wiring, water is distributed between the faucet, shower, toilet bowl, bidet, washing machine, etc. In this case, each device receives a sufficient amount of liquid. Water distribution should be shown on the drawing. It also indicates the types of connections, laying methods, installation features, and so on.
Before drawing up a wiring diagram, you need to decide on the materials that the pipes will consist of:
- Plastic;
- Metal-plastic;
- Copper;
- Steel.
When developing an apartment water supply scheme on your own, you have to build on generally accepted norms and rules. It's better when experts take over. In this case, in addition to graphic display, the document contains important information:
- list, marking and quantity of all household plumbing products;
- information about pipe materials, diameter, length;
- the intended purpose of the pipeline and the direction of flow;
- list of necessary shut-off and control devices;
- location of protective and measuring devices.
But this does not mean that the quality and information content of the self-developed plumbing scheme of an apartment will be lower. It all depends on care and accuracy.
What plumbers call a dot
Plumbers use the term “point” when they refer to a plumbing fixture inlet or outlet. When making an estimate, it should specifically describe how much money it will cost to connect each point.
You need to understand that connecting a shower with a hydromassage or a jacuzzi is much more difficult than a regular sink or toilet. “Point” can be double if for its operation it is necessary to supply cold and hot water.
Workers are responsible for laying pipes, connecting and starting the system. Landscaping is not included in the standard range of services. The price of laying a pipeline also depends on the complexity of the work.
Do-it-yourself plumbing installation in an apartment
Before you install plumbing in an apartment on your own, you need to draw up a work plan and piping. There is a difference between repairing and doing new plumbing, for example in a new building. This difference lies in the cost of equipment that must be purchased before installation.
The cost of contacting a specialist will depend on several factors:
- The number of installed nodes and elements.
- Plumbing type.
- Difficulty of work and time.
If the installation of plumbing is done by you, then you spend money only on the purchase of equipment.
The difficulty that you may encounter when choosing materials is their variety.
The following materials are on the market today:
- Cink Steel;
- Stainless steel;
- Copper;
- Polymers.
It can be argued that steel pipes are already obsolete as a material for plumbing work. They cause a lot of trouble with welding and carving.


Metal-plastic pipes are convenient in terms of working with bends. If you want to stretch long communications, then it is enough to bend the pipes at the corners. The problem with these pipes is the need to constantly tighten the fittings. Accordingly, they are only suitable for an open type of communication.

Polypropylene pipes are one of the most reliable, as they can withstand fairly high temperatures, do not corrode, and do not
flow at the joints, due to the lack of threaded elements. It is convenient to connect polypropylene pipes using a special welding machine that can be rented if you do not plan to use it in the future.
Choosing a plumbing layout in an apartment
There are two types of plumbing connection schemes in an apartment or house:
- tee (serial);
- collector.
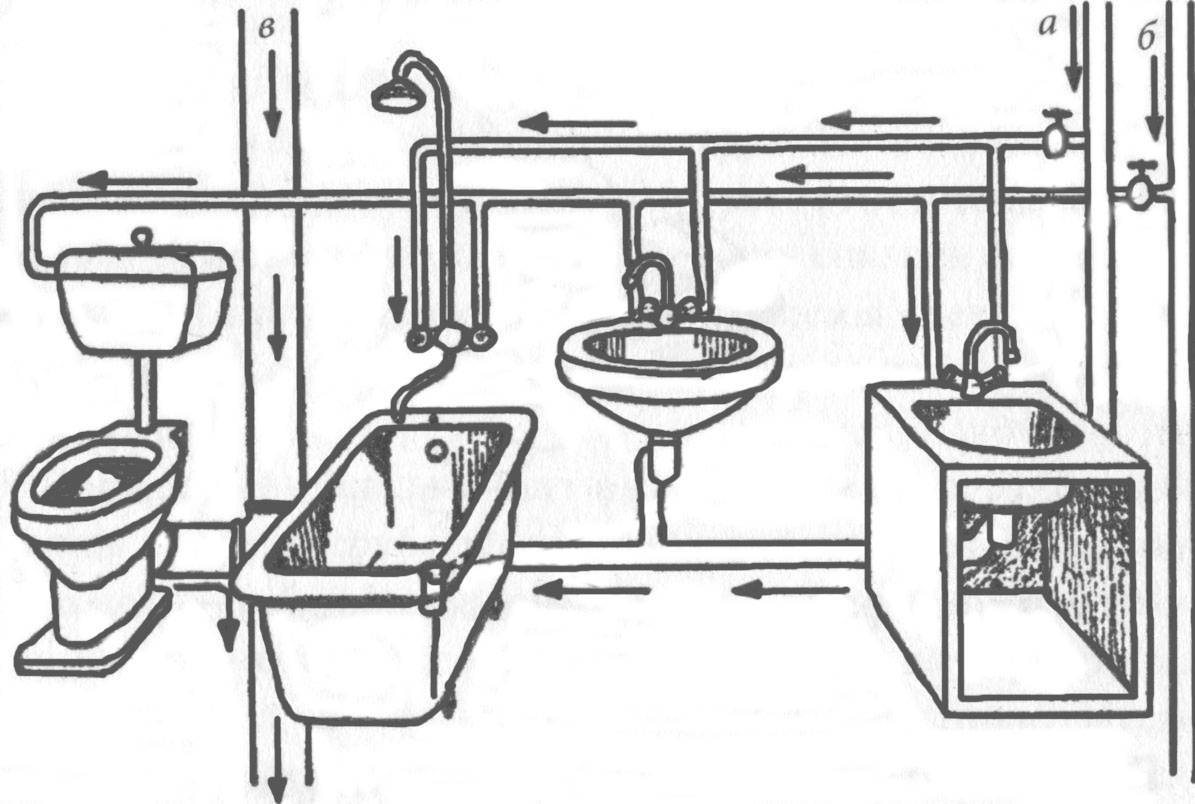
In the first case, one water supply pipe is connected to the riser, and the necessary plumbing equipment is connected to it using tees. With collector plumbing wiring in an apartment, a collector is mounted to the riser, to which each element of plumbing is connected with a separate outlet. In fact, these methods are similar to the series and parallel connection of electrical appliances and have similar features, advantages and disadvantages. Let's talk about them in more detail.
Consistent plumbing in the bathroom
A tee or series wiring diagram was usually used in Soviet standard apartments. So its shortcomings are known to everyone who lived in serial houses or Khrushchevs. Firstly, it is the inability to shut off the water in any particular section of the water supply.
It doesn't matter if you need to fix the toilet or replace the faucet in the kitchen: in any case, the whole apartment remains without water.
The second important drawback is the dependence of the water pressure at each point of analysis on the number of active points. In other words, when turn on the tap kitchen, the pressure in the bathroom drops noticeably. And if you also turn on the washing machine or dishwasher at the same time as the tap, it will become completely inconvenient to use the water supply.
 The third drawback is the large number of tees through which plumbing is connected. Wiring around the apartment with a large number of connections becomes very unreliable, since the risk of leaks increases. This makes it difficult to install hidden pipes: you will have to use a large number of inspection hatches, which can greatly harm the design of the room.
Therefore, this scheme makes sense to apply only for small apartments, and provided that they have 2-3 parsing points that do not involve simultaneous use. Also, during installation, it should be borne in mind that the main supply pipe must be larger in diameter than the pipes to which plumbing fixtures are connected. And, of course, you should take into account the level of pressure in the plumbing system at home. If it is low, the output will be the plumbing collector wiring in the bathroom: with your own hands or with the involvement of specialists.
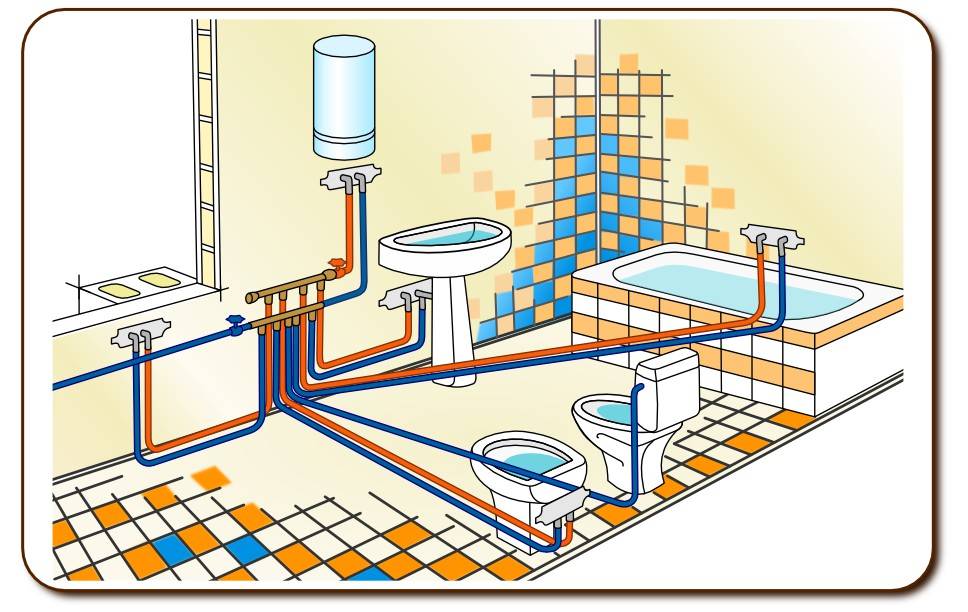
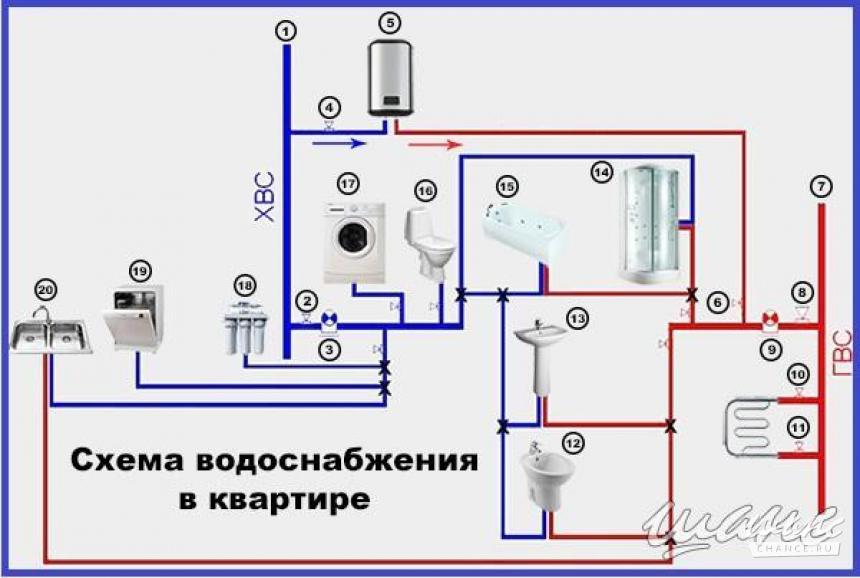
Collector type wiring
 If it is assumed that a variety of modern plumbing will be installed in the bathroom, piping according to the collector principle will be more convenient. It allows:
- maintain a stable level of pressure in the water supply, regardless of the simultaneously turned on devices;
- provide independent repair of pipeline sections and plumbing equipment;
- minimize the number of piping connections;
- to make hidden installation of pipes.
For bathrooms of a large area, where a variety of plumbing is installed, the scheme collector type wiring will be especially convenient. It allows you to install plumbing fixtures at a great distance from the riser without compromising the quality of their work. In addition, for each device with this type of connection, individual filters, meters or pressure regulators can be installed.
In addition, plumbing arranged in this way is much easier to maintain. In the event of a malfunction, it is quite easy to determine the location of the damage. To repair a particular plumbing fixture, you do not have to leave the entire apartment without water. And in case of leaks, it will not be necessary to completely dismantle the pipeline: it is enough to carry out repairs on its specific section.
Among the shortcomings of the system, one can name its high cost due to the large number of consumables (pipes, valves, etc.). The second serious disadvantage is the complexity of installing a water supply system according to this scheme. Collector wiring of plumbing in a new building with your own hands without the appropriate experience is unlikely to work. You should enlist at least the theoretical help of a specialist.
Common installation errors
The drafting of a plumbing system, both collector and tee, is best entrusted to professionals who are familiar with building codes and are able to perform hydraulic calculations. But even the best project will be useless if mistakes are made in its implementation.
Stopcocks are part of any water supply scheme: both sequential and manifold. They are installed at the entrance to the plumbing system, as well as in front of each plumbing fixture.
For example, some unfortunate craftsmen, driven by the thought of unreasonable savings, neglect the requirement to insulate hot water pipes that are laid under the floor or in the thickness of the walls.
As a result, part of the thermal energy is transferred to the materials surrounding the pipe, which degrades the quality of the water. In addition, condensation from the surface of pipes without thermal insulation can damage the finish of the room.


During installation work, experienced craftsmen recommend closing the ends of pipes that have not yet been installed so that debris does not get into them. The absence of this protective measure can lead to the fact that immediately after installation, the water supply system will have to be thoroughly and for a long time flushed or even repaired.
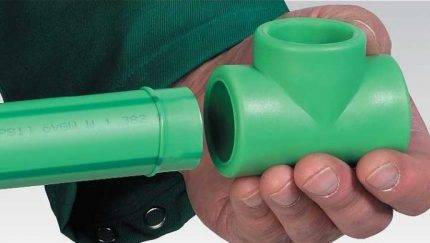
When soldering polypropylene water pipes, remember that small dirt or moisture at the soldering point can significantly impair the quality of work.
If soldering of plastic pipes is necessary, all work should be carried out in a clean room, to avoid pollution. It is also unacceptable to solder pipes on which even a small amount of moisture is present.A drop of water or debris at the soldering point can significantly weaken the connection and degrade its quality.
It is not necessary to design the plumbing system in such a way that all pipes pass through the ceiling through one common hole. This may degrade the performance of the plumbing. Professional designers never make such mistakes.
When drawing up a wiring plan, it is necessary to ensure that the pipes do not block access to the joints. This will greatly facilitate the repair in the event of a leak.
An insufficient number of locking devices can also cause a lot of trouble during installation work. Such fittings must be present in front of each device to which water is supplied, as well as for each riser. If the house has not one, but several bathrooms, you can install a shut-off valve for each of them.
Simultaneously with the plumbing system, sewers are usually designed and arranged. It must be ensured that pipes and risers of individual systems do not overlap each other. In the future, this will facilitate maintenance and repair work.
Installation of wash basins of various types
The installation location of the washbasin largely depends on the type of its design, size and location of the communication systems. Before installing plumbing in the bathroom, you need to familiarize yourself with its dimensions, take into account generally accepted standards and the average height of each family member. The most common mistake is when pipes are first laid in the wall, and then they decide how to hide the plumbing in the bathroom and try to find a washbasin or toilet bowl of the desired design.
To date, there are several of the most common models of washbasins, which differ in the type of installation and design. These models include:
- wall-mounted washbasins mounted on the wall through special holes in the bowl or on special brackets;
- washbasins with a pedestal or “moidodyr”, which is also part of the furniture interior;
- a washbasin mounted on a special pedestal, also called a "tulip".
Below are the standard sizes of plumbing in the bathroom, which must be considered when planning space.
 Standard dimensions of the main types of washbasins
For example, wall-mounted washbasins are designed for a sewer outlet in the wall, while tulip or moidodyr type washbasins can be installed with a sewer coming out of the floor. Installation should be carried out in such a way that it gives free access to all major communication nodes, making it possible to carry out plumbing repairs in the bathroom or maintenance.
We are planning the wiring
Having decided on the laying method and the wiring diagram, knowing the overall dimensions of plumbing fixtures, you can draw on paper the pipe layout, which you need to do with your own hands. The diagram defines the installation locations of all plumbing equipment, which includes:
- Cranes;
- Toilet;
- Bath;
- sink and so on.
All measurements must be made carefully with the highest possible accuracy. In this case, it is desirable to adhere to the following recommendations in the scheme:
- Try to avoid crossing pipes.
- Pipes of water supply and sewerage should be laid side by side as close as possible, so that later they can be closed with one box.
- Don't over-complicate the wiring.Try to keep everything as simple as possible.
- If the main pipes are located below the floor, the water outlets through the tees must be drawn perpendicularly upwards.
- Vertical outlets of sewer pipes are replaced with flexible hoses that are inserted into tees.
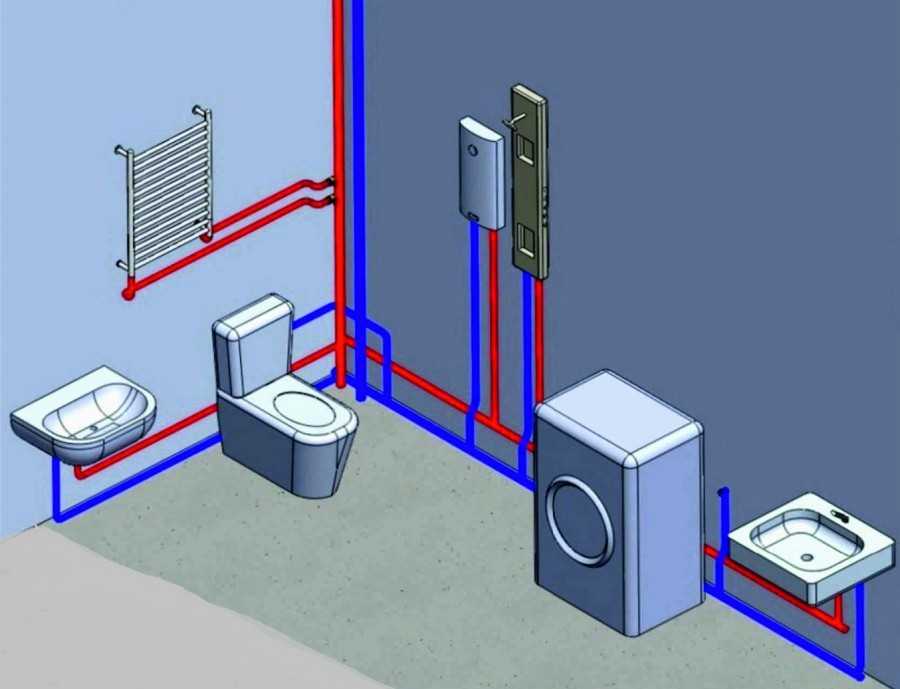
- For wiring, professionals advise using polypropylene pipes. They work great in cold and hot water systems; heating and sewerage. According to the technical parameters, these products are characterized by high strength, durability, ease of installation. In addition, they are available in a price range. Connect them using special welding.
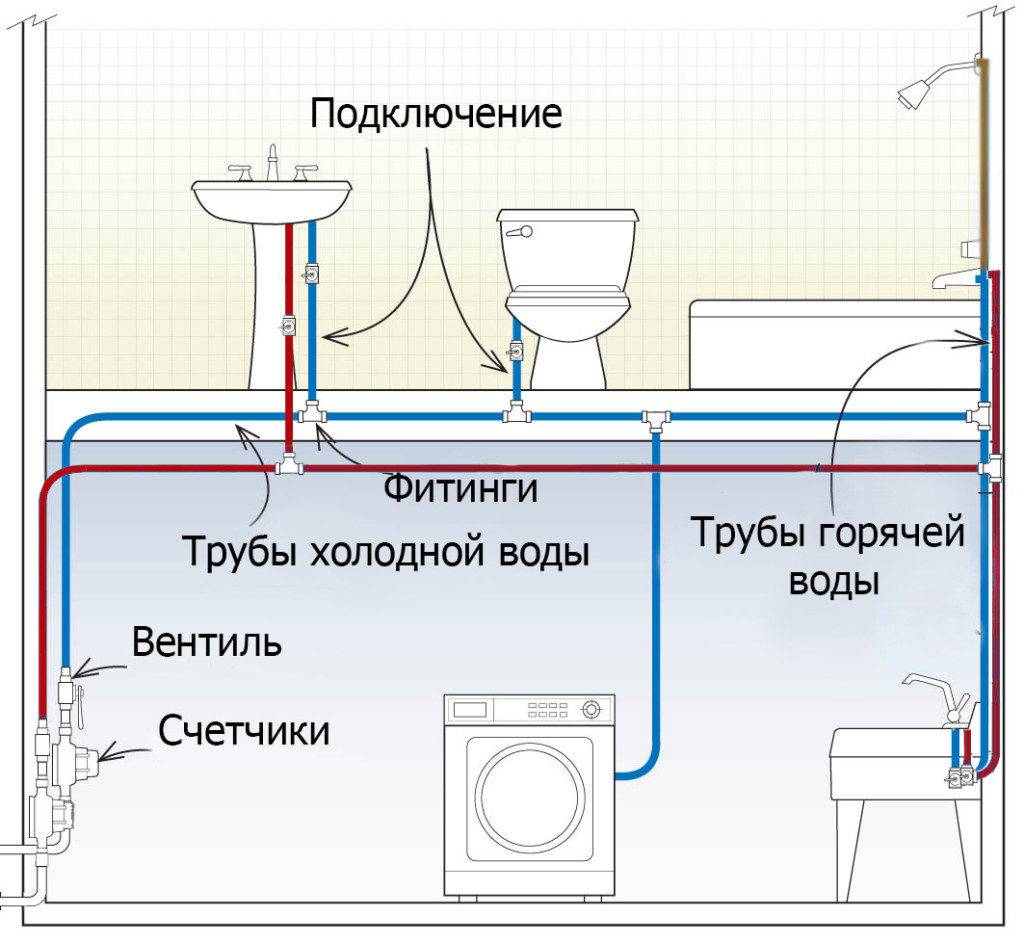
Selection of pipes for water supply
If, nevertheless, you have decided to do the plumbing in your house with your own hands, after developing the scheme, you should choose the appropriate for water supply system pipes. First of all, it is necessary to accurately determine the number of pipes for the water supply. At the same time, in the process of calculating the diameter and length, it is necessary to take into account all the turns and slopes that will occur during the distribution of the water supply and the installation of various elements.
As for the diameter of the pipes for the water supply, the minimum diameter of the pipes that can be used to install the water supply system in a private house should be 32 mm. The minimum diameter of pipes for water supply of 32 mm is selected regardless of the material from which the pipes are made. In other words, whether it is polypropylene pipes or traditional steel pipes - in any case, the diameter of the pipe for plumbing in a private house should be at least 32 mm.
In addition to the diameter of the pipes and their length, pay attention to the method of connecting the pipes to each other.Remember that absolutely all connections between water pipes must be tight and reliable. If you plan to do the installation of water pipes with your own hands, ask yourself the question: will you be able to make a reliable connection of water pipes?
If you plan to do the installation of water pipes with your own hands, ask yourself the question: will you be able to make a reliable connection of water pipes?
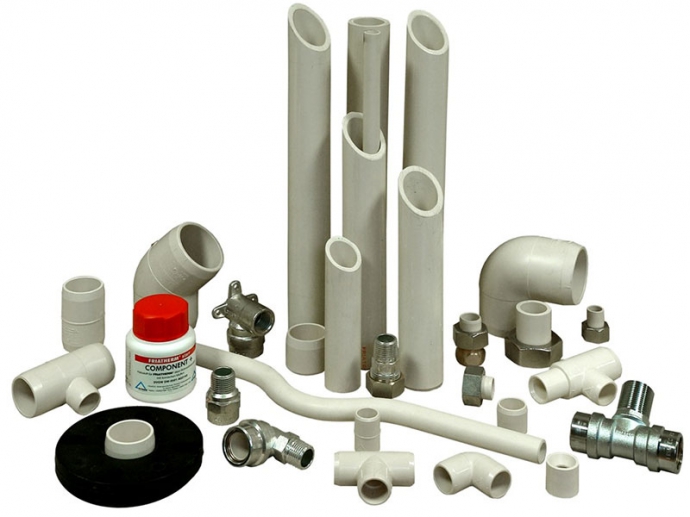
So, for example, if you chose polypropylene pipes for installing a water supply system at home, you should understand that you will need a special soldering iron to connect them, the principle of which you yourself will have to understand. In addition, for soldering pipes of different diameters, in addition to the soldering iron itself, you will also need special nozzles of various diameters. soldering iron for welding pipes of different diameters shown in the photo:


Among other things, when choosing pipes for do-it-yourself plumbing, you must consider the following points:
- When choosing pipes for plumbing in a private house, be sure to check that they are designed for food water supply systems of a private house from a well or well. The diameter of the pipes for the water supply does not matter here - both larger and smaller pipes must be food grade.
There are cases when not entirely conscientious sellers sell pipes for technical purposes, passing them off as pipes for food water supply. Of course, the price of technical pipes is an order of magnitude lower than the price of food pipes, but savings in this situation are simply inappropriate.
- Since when connecting the water supply at home to a centralized water supply system or a pumping station of a well or well in the case of autonomous water supply, pipes will be laid in dug trenches, it is necessary to think about pipe insulation. To insulate water supply pipes during the installation of a water supply system, as a rule, special mineral wool is used.
- If, during the installation of a water supply system, its pipes will be laid above the ground without placing them in trenches, insulation will also be required. For ground-based wiring of the water supply system, in addition to mineral wool, other heaters can be used. If the laying of the water supply system is carried out in a region with very low temperatures in the winter season, in addition to insulation, it is recommended to use active heating of the house's water pipes in the form of a heating electric cable. The price of a heating cable is quite high, but its use will completely eliminate the possible freezing of the water pipes at home.
Installation of external water supply
Consider the main criteria for installing an external water supply
Freezing depth
Communications supplying water, as a rule, are laid at a depth. To do this, organizing the water supply of a private house, it is necessary to excavate a trench
It is important to take into account the level of its depth when preparing. It directly depends on how deep the soil freezes, as well as on the temperature that each specific region is usually exposed to at different times of the year.
In order to additionally protect water supply pipes from freezing, it is recommended to use a special heat-insulating layer.

Typical trench for laying water pipes
It is necessary to carefully consider in this matter the point of withdrawal of the pipeline and take into account the following nuances:
- It is recommended to make a small gap, approximately 130-150 mm on all sides in the place where the hole for installing and welding the water supply pipe is located. The destruction of communication will be minimal if the wall sags or deforms.
- Additional thermal insulation is necessary where the pipe passing between the communications is in the open air as a result of an insufficient joint.
Pipe diameter
Choosing a pipe of the correct diameter will make the installation of water supply more economical.
It is necessary to calculate the parameters of the lines that will supply cold water supply and the hot water supply branching off from it and to consumption points from the starting point - the total length of each line.
Often a pipe with a diameter of 32 mm is laid to the house. In rare cases, a larger diameter is used.
Warming
In order to insulate the pipeline, it is necessary to use special building materials intended for such work:
- foam insulation;
- glass wool;
- Polystyrene "shell";
- Basalt wool in cylinders.
- foam rubber
These are the main materials, the choice of which depends on the weather conditions in each individual place, personal preferences and price category.
Preparatory work for creating a plumbing system
The first stages involve the preparation of the installation site, tools, material and accurate mathematical calculations.
Tools for laying plumbing
The required set of tools includes:
- scissors for the process of cutting pipes;
- welding soldering iron;
- pliers;
- adjustable wrenches;
- roulette;
- knife;
- marker (for marking).
Drawing up a wiring diagram, taking measurements and mathematical calculations
The layout of modern apartments involves the preparation of two methods for diluting pipes (at the user's choice):
- Collector. This method is the most practical in terms of subsequent operation, but its installation requires a professional approach. During installation, an individual pipe is supplied to each equipment.
- Tee. In this case, each new branch requires the installation of an individual stainless steel shut-off valve. The main advantage of the scheme is that there is no need to turn off the entire system in the event of a breakdown in a particular plumbing fixture.
Pipes are purchased only after mathematical calculations. This process requires measurement of all areas where the pipes will run, including branches and bending angles. It is recommended to purchase pipes with a margin of 1-2 m.


Before starting installation work, you should accurately determine the location of each equipment. After choosing a site, you need to measure the place and the plumbing fixture. The results obtained must be compared with each other to determine the correspondence between the dimensions of the plumbing and the allocated space.
The right choice of materials
The quality of the plumbing system and its service life depend on the choice of components. Therefore, it is better not to save money and buy quality materials. After all, the consequences can cost more. Pipes must be made of high quality polypropylene. Fittings are recommended to be taken from stainless steel or high-quality plastic.Buy sealants from trusted manufacturers, as after a while a low-quality sealant can leak. According to SmartInox experts, stainless steel taps are one of the main elements in the plumbing system, since taps are exposed not only to water, but also to mechanical ones when opening and closing. Buying faucets made of poor quality steel has a higher risk of corrosion and a greater chance of breaking under mechanical stress.


