- Independent connection of the dishwasher
- What you need to connect
- Organization of electrical wiring
- Plumbing work
- Drainage work
- Sewer connection
- How to connect a dishwasher with your own hands
- Power supply
- Connecting the dishwasher to the water supply
- Sewer drain preparation
- Possible embedding options
- Solution #1 - embed in a cabinet
- Solution #2 - Standalone installation
- Solution #3 - Niche Mounting
- Decision #4 - if embedding doesn't work
- General recommendations and rules
- Water connection
- Possible realization of connection to hot water
- Choosing a location based on the installation method
- Wiring connection
- We determine the place and calculate the dimensions
- We prepare tools and accessories
- Preliminary work before installation of PMM
- Choosing a place based on dimensions
- Preparation of tools and materials
- Dishwasher on the table
- ***
Independent connection of the dishwasher
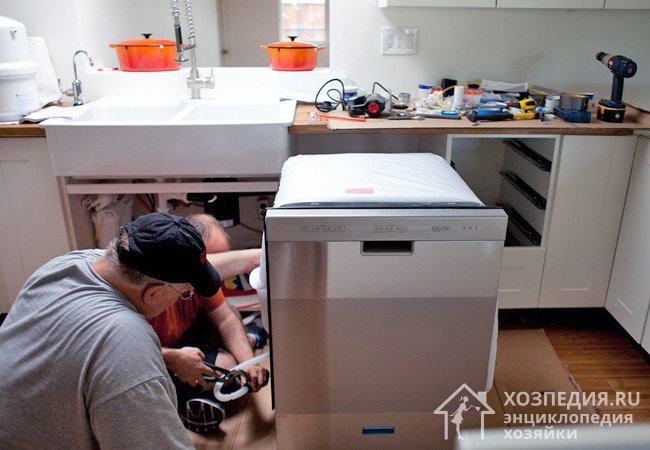
It is recommended to immediately install the machine on site, and then deal with the connection. But in the case of the built-in model, it is more convenient to first connect the hoses, and then mount the machine in a niche or cabinet. How to install an embedded PMM, read our separate article.
What you need to connect
Accessories:
- euro socket with a moisture-resistant housing and grounding;
- copper three-core cable (for organizing wiring);
- stabilizer;
- brass tee with stopcock;
- clutch;
- corner tap;
- extension cord and additional hose;
- siphon with two outlets (for connecting a dishwasher and washing machine at the same time);
- hose "Aquastop" (if not available);
- fum tape for sealing joints;
- filter;
- clamps, gaskets.
Tools:
- pliers;
- screwdriver;
- wrench;
- level.
Organization of electrical wiring
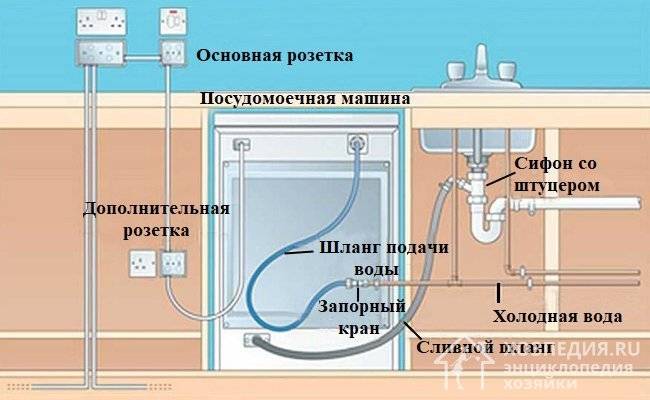
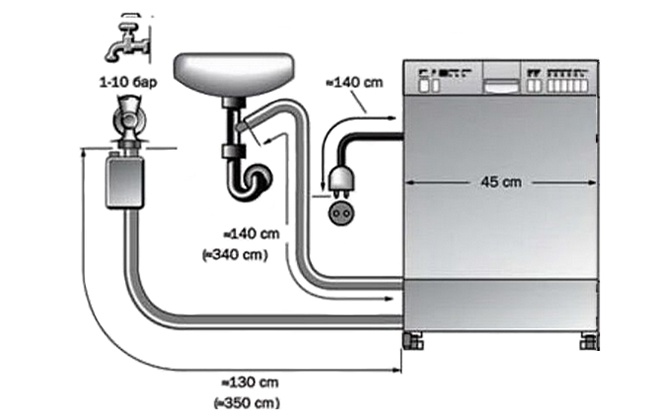
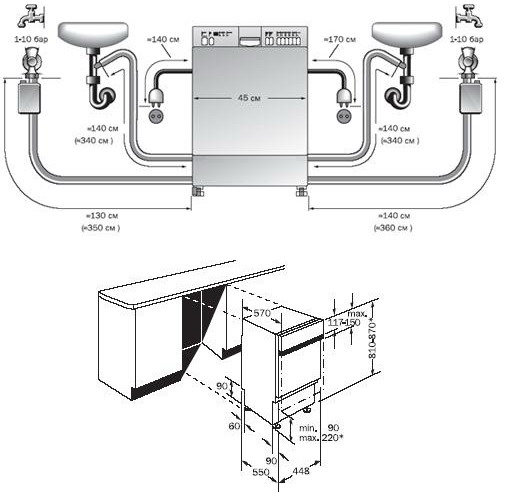
The dishwasher cord is specially made short. The European type plug can be connected to a special socket, which is located no higher than 45 cm from the floor.
How to organize the electrical connection correctly:
- Drill a channel in the wall, lay a copper wire.
- Arrange a moisture-resistant socket with grounding.
- Connect the outlet through a 16-amp difavtomat. For safety, it is recommended to install a voltage stabilizer. How to choose a dishwasher stabilizer, read in a separate article.

Plumbing work
You know how to install and connect the electrical part of the machine. Any model of PMM Korting, Hansa, Gorenje, Beko, Ikea, Ariston is connected to the water supply in the same way. The easiest solution is to connect through a mixer. But if you install the equipment far from the sink, then the method of tapping into a cold water pipe is suitable.
To connect to a water pipe:
- Using a grinder, cut a piece of pipe.
- Install the release clutch.
- Screw a tap with a shut-off valve onto the coupling.
- Connect the dishwasher hose to the faucet outlet.
Through mixer:
- Disconnect the mixer hose from the pipe outlet.
- Install brass tee.
- Connect a mixer to one outlet.
- To the other - a coarse filter and the end of the inlet hose.
Now take care of the water.
Drainage work
Where to connect the drain? There are also two options to choose from here:
- Directly to the sewer.
- through the siphon.
Why do experts not recommend connecting directly to the sewer? Because it is difficult to remove the blockage. Another thing is the siphon, where you can unscrew the lid and clean it.
To connect to the sewer, it is enough to install an adapter on the outlet, to which you can connect the drain hose of the dishwasher and washing machine. Connections are carefully sealed.
When installing through a siphon:
- Remove the old and install a new siphon.
- Connect the dishwasher drain hose to the outlet.
- Be sure to fasten the connection with a clamp. With strong pressure, the hose can be torn from its place, which will lead to leakage.
As you can see, you can organize the installation of PMM "Hans", "Burning" and other brands yourself. When the work is finished, run the test program without dishes to check the strength of the connections and the operation of the nodes. How to run the dishwasher for the first time, read the article.
The video will help you install the dishwasher yourself:
Sewer connection
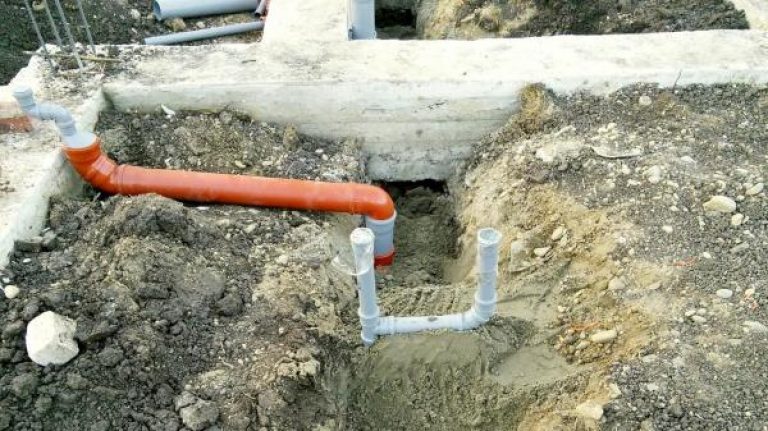
And you can make changes inside yourself. For example, in most cases, the side of the countertop adjacent to the kitchen backsplash has a significant overhang - about 5 cm. This is enough to bring the pipe almost anywhere. It is only required to drill a hole for the outlet with a crown.
However, everything is not always so convenient, because there may be no space between the wall and the back wall of the headset. In this case, the sewer for the dishwasher is laid inside it.The preparation is as follows:
- Interfering boxes from the headset must be removed, the doors should be dismantled for convenience.
- Focusing on the socket of the sewer pipe, where the outlet for draining the sink is inserted, we make a pencil marking for the pipe with a cord or rail along the outer ends of the walls of the headset. Be sure to take slope into account.
- After we transfer it to the back wall of the headset - we get the exact position of the pipe.
- After that, you can drill holes for it with a crown.
Looking ahead of the curve, we may need to trim the back of the shelves or shorten the drawers. The backs of them are not visible, so everything can be done by hand. The main thing is not to forget to waterproof the cuts, for example, with sanitary silicone. The main problem can be retractable fittings. Here, each case is individual: somewhere it is enough just to cut the length, for some it will be possible to cut out a part and splice it right on the headset wall, but it may also be necessary to replace it with a shorter one.
Why such difficulties, because you can simply set the hoses, without even climbing into the sewer pipes, but making a simple connection - right into the sink siphon. Yes, it will work with extended hoses too. However, it is problematic to withstand the slope with a flexible hose - there will be sagging. And these are potential places for blockages. If you just put it on the floor, you get a very voluminous water seal. By driving water through it, the drain pump will work with increased load.
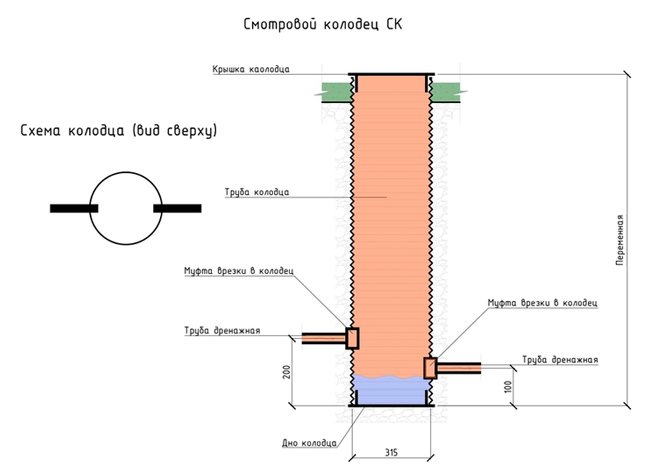
Since we are talking about a water seal. The instructions for connecting and operating each dishwasher indicate recommendations for the position of the drain hose.In addition, for reinsurance and guaranteed "separation" of the machine from the sewerage system, a water seal can be made directly in the pipe. This requires 2 45° elbows and the shortest tube:


- Putting it all together. Outlet - tube - outlet.
- Install in an inclined position. To facilitate the flow, but to get a full-fledged water seal.
Please note that it will not work to connect with a single pipe inside the headset - the walls of the sections will interfere. Therefore, before buying materials, you need to estimate in advance the length of the component pipes.
Important: for the installation of sewage, it is generally desirable to carry out “smooth” turns, connections. To do this, it is good to use bends and tees at 45 °
This will provide a faster, more precisely directed outflow of water. Therefore, sewer pipes do not clog longer. Use 90° bends and tees as a last resort - for installation in very cramped conditions or for the purpose of "austerity".
How to connect a dishwasher with your own hands
Self-connecting a dishwasher will save owners money and time. Read the instructions carefully before installing the dishwasher. As a rule, a short step-by-step guide is attached to all models of well-known brands. In most cases, you will have to install the PMM in four stages:
- Install the dishwasher in the niche and securely fasten it there.
- Connect a 220 V network and install a socket in the wall next to the machine body.
- Connect PMM to the water supply.
- Connect the unit to the sewer.
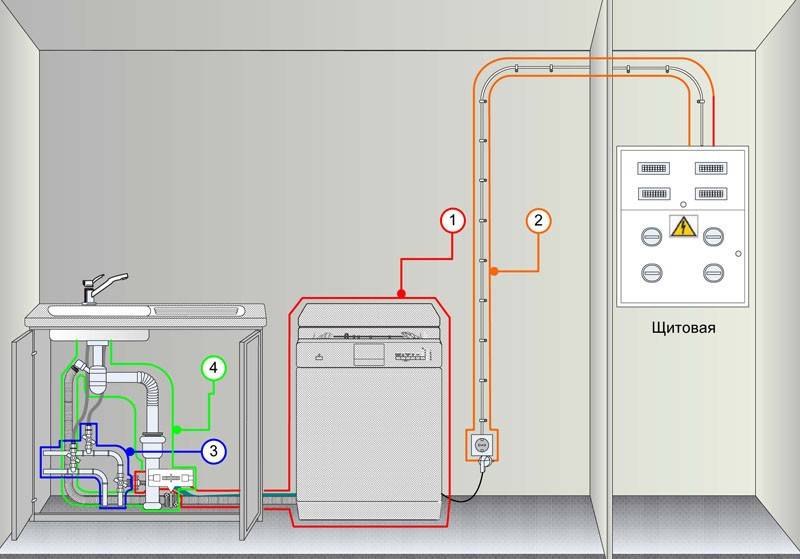
Power supply
It is good if, at a distance of up to 1 m from the PMM case, there is a socket with grounding in the wall, designed for a current consumption of 16 A.Then the wiring can not be done. Otherwise, you will have to call the master or supply electricity with your own hands.
For wiring, use a copper cable with three cores, the cross section of each of which must be at least 2 mm. At the entrance, in a junction box or panel, the cable must be connected to a circuit breaker rated for 16 A.
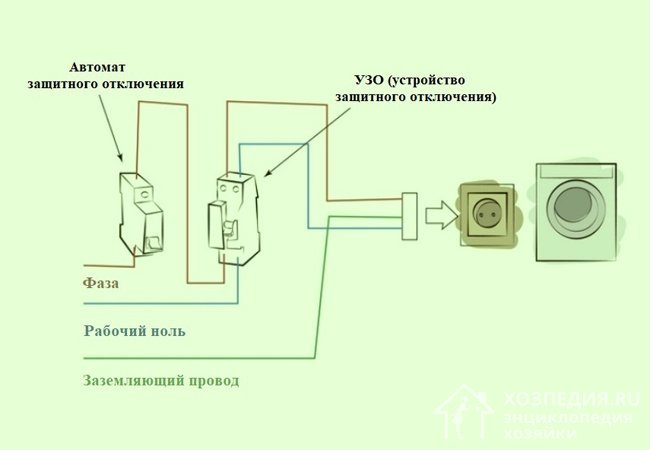
In addition, it is advisable to connect an RCD to the cable line - a residual current device, rated for a current of 16 A, with a leakage current of 30 mA (see photo).
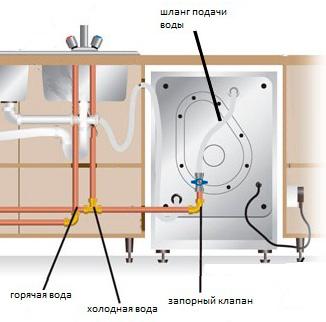
Connecting the dishwasher to the water supply
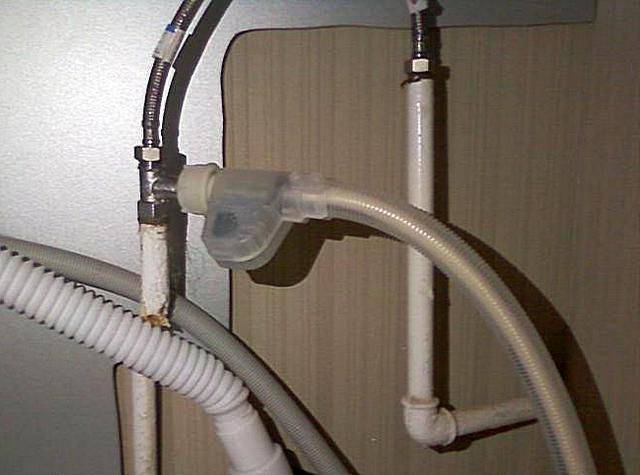
The best option is to connect to the sink faucet located next to the PMM. To do this, turn off the cold water supply and find the place where the flexible hose from the mixer is connected to the cold water supply pipe. At this point, loosen the fastener and unscrew the nut that secures the connection of the flexible hose to the pipe, then remove the hose.
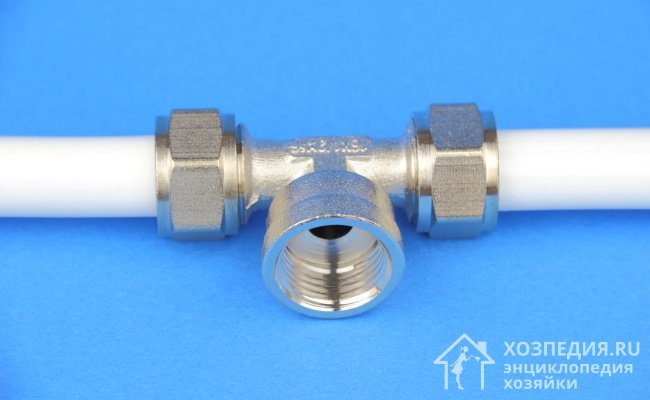
Install a tee at the connection point, the outlets of which are connected to the flexible hose of the mixer and the stopcock. Connect the coarse filter and the PMM inlet hose to the latter. Do not forget to pre-wrap the fum-sealing tape on the threads of all connections.
If you can’t connect to the plumbing under the sink, you can crash into a nearby water pipe. For tapping into a metal pipe, it is best to use a compression sleeve. First, a hole must be drilled in the pipe to drain the water.
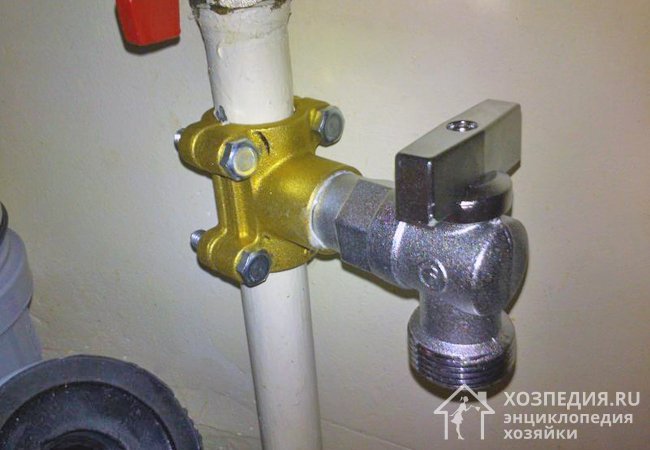
If the water pipe is made of metal-plastic, a piece equal in length to the tee to be installed must be cut out of it.Then install a tee at the cut point, to which then connect the shut-off valve, filter and PMM inlet hose.
Sewer drain preparation
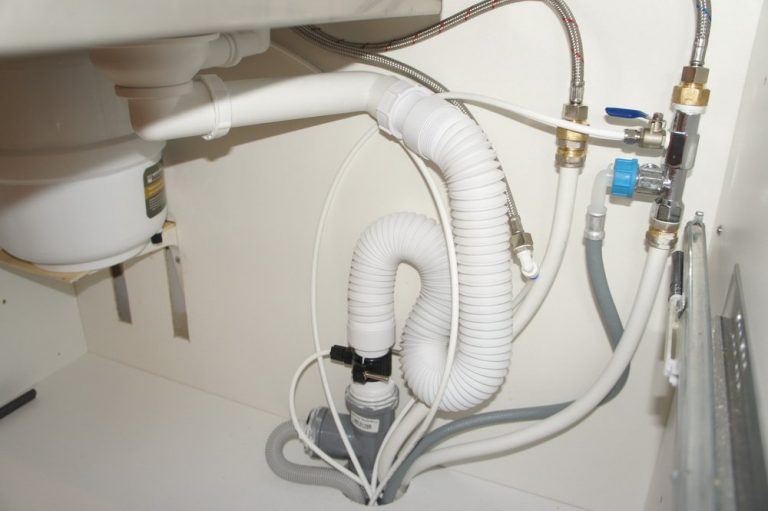
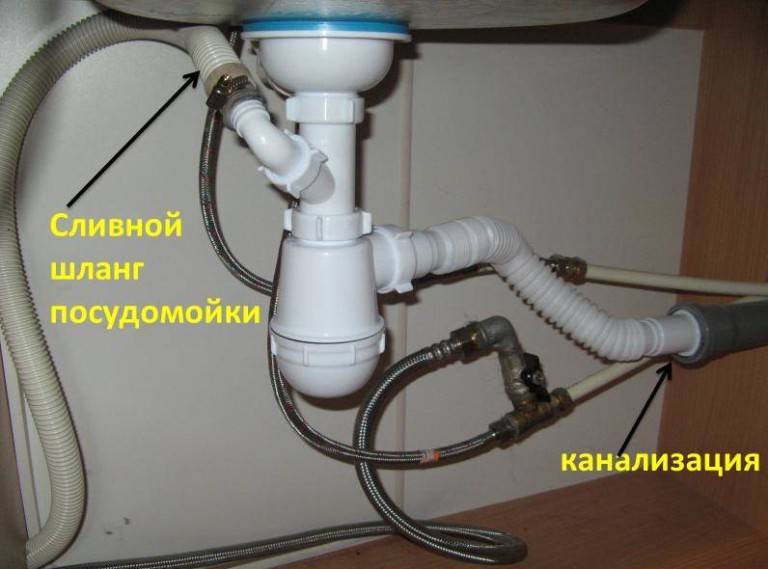
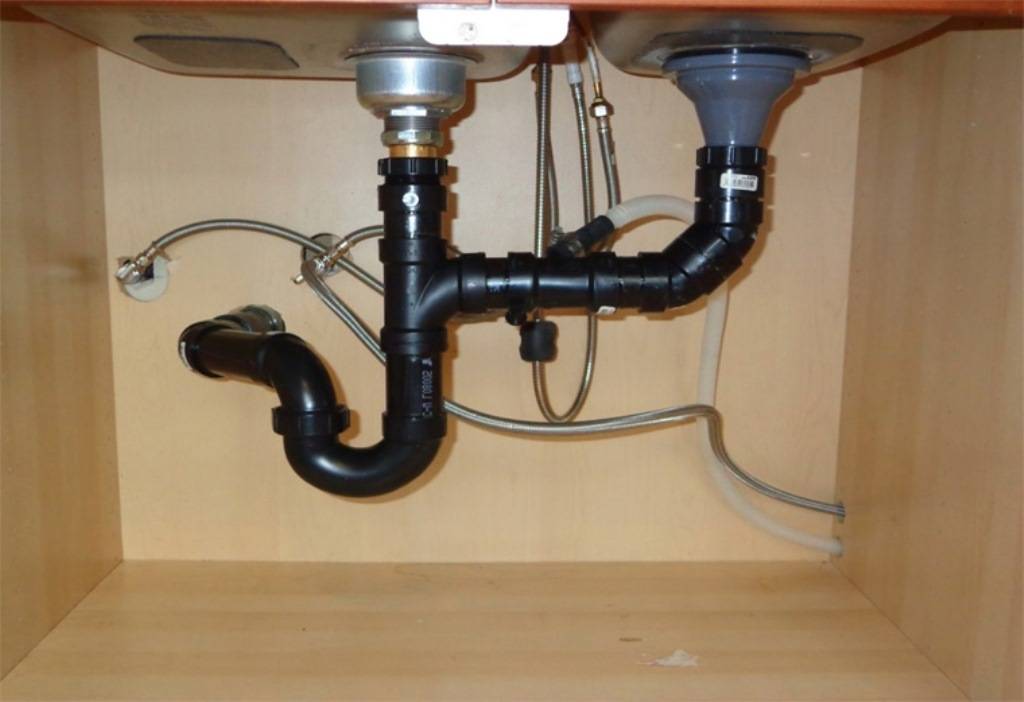
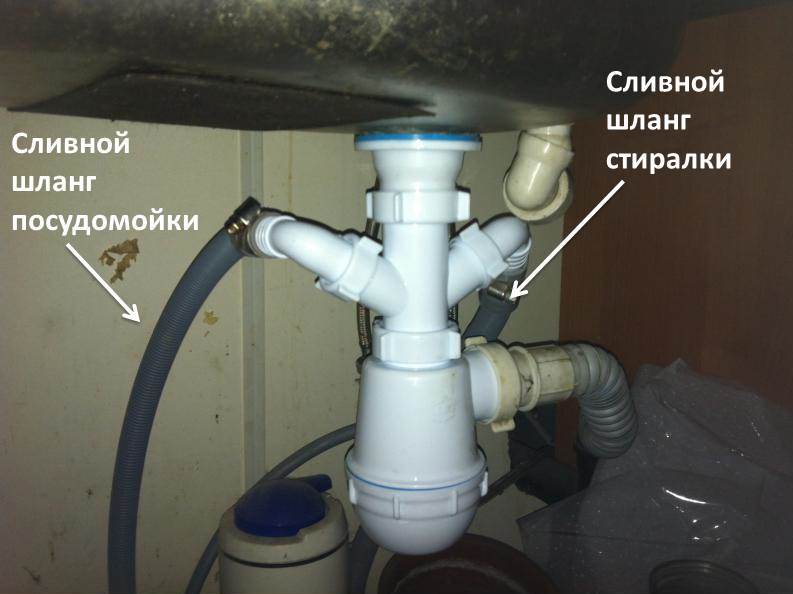
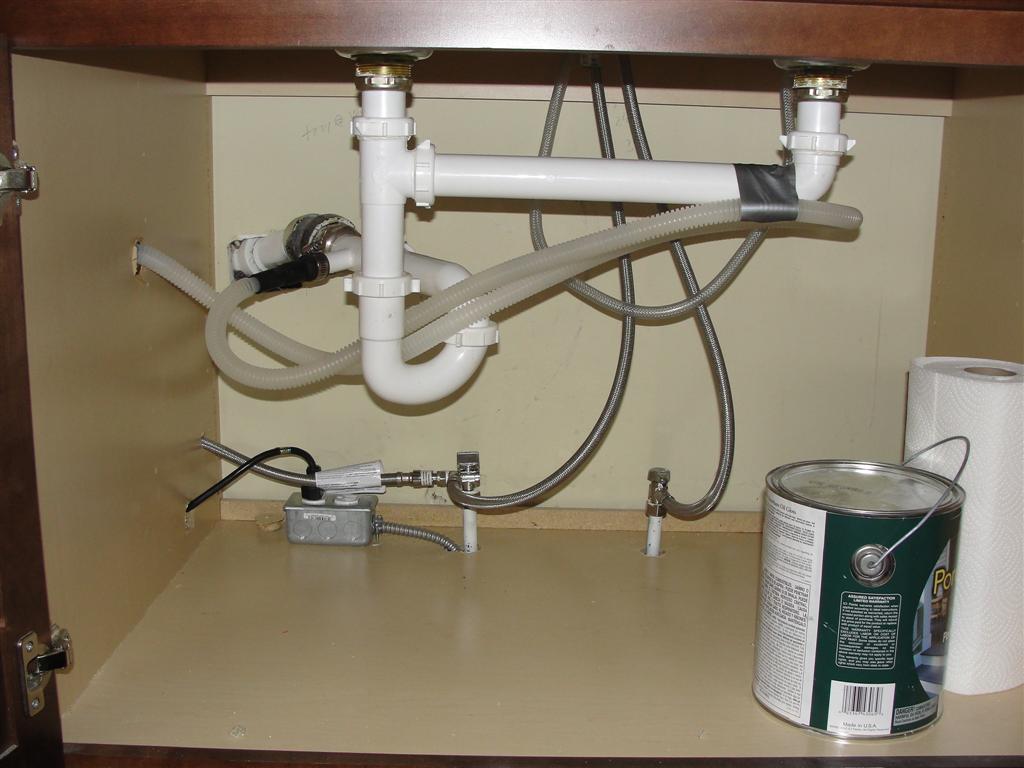
In the event that the sink is located next to the dishwasher, align their drains by installing a drain siphon with an additional outlet under the sink. Water from the sink will flow through the main channel, and spent liquid with PMM will flow through the additional channel.
On sale there are options for siphons with one and two outlets. Two additional outlets are convenient when a washing machine is planned to be placed next to the dishwasher. For information on how to properly install the washing unit, read our article.
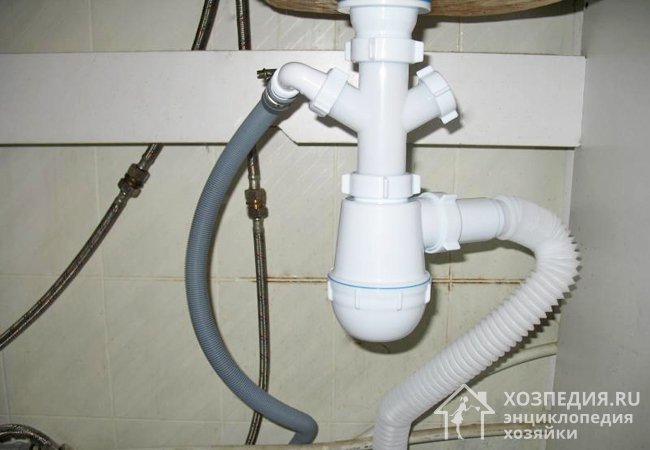
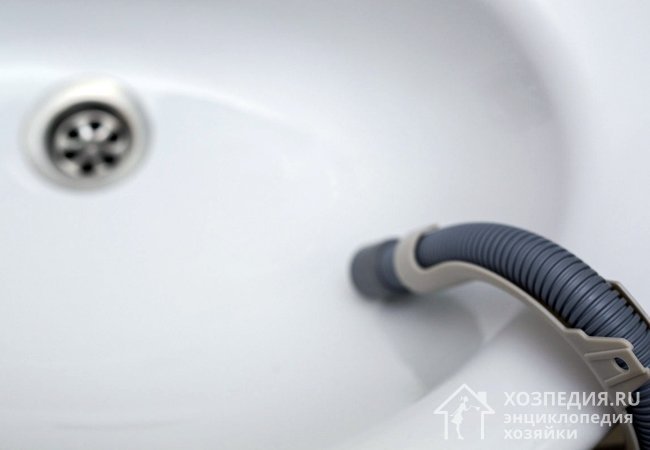
To prevent water from the siphon from entering the drain of the machine, the drain hose must be connected through a small kink connected directly to the siphon branch.
Another option is to install a tee at the entrance to the sewer, connect a kitchen sink to one of the outlets, and PMM to the other. To prevent unpleasant odors from spreading throughout the kitchen, the holes are sealed with rubber or plastic cuffs.
The easiest way is to organize a drain from a desktop PMM. To do this, simply attach the drain hose to the sink sink
Particular attention should be paid to the reliability of fastening, as a hose escaping from the sink can flood the floor in the kitchen with liquid.
As you can see, it is quite possible for everyone to organize the connection of a dishwasher. You only need to have a small set of tools and improvised materials with you. If you need to embed dishwashers in a niche, follow the instructions supplied by the manufacturer with the PMM.


Possible embedding options
Cabinet for embedding PMM may look different.We offer to consider several popular options that are convenient for installation.
Each type of installation is associated with difficulties
To minimize them, it is important to comply with the above conditions and the requirements specified by the manufacturer in the instructions. We offer several recommendations for installing a dishwasher in different places.
Solution #1 - embed in a cabinet
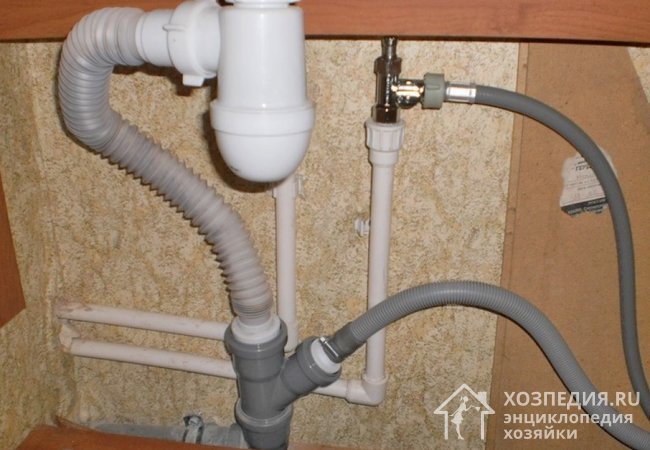
If there is a cupboard with a width of more than 45 cm next to the sink, then it can be used to install a dishwasher. The advantage of installation close to communications is the possibility of integrating the hoses of the machine into an already installed system under the sink.
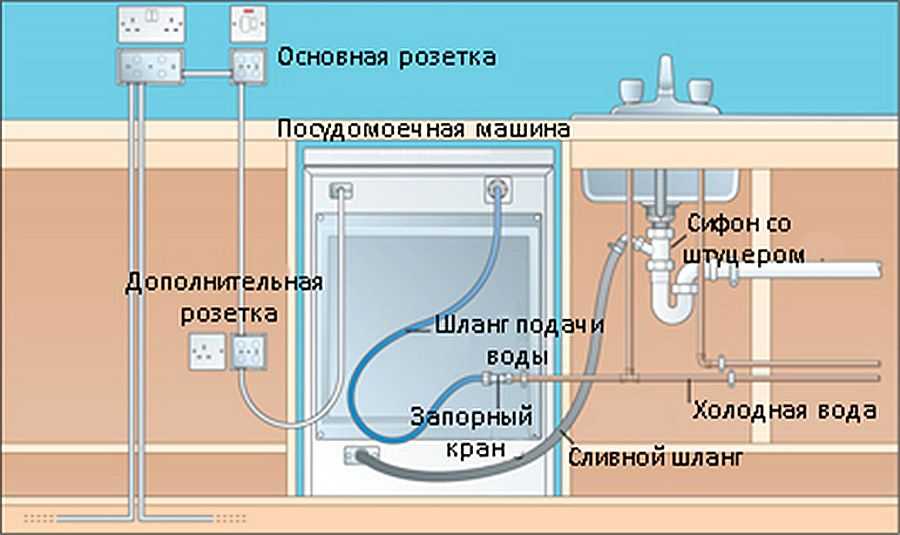
Dishwasher connection option: extended cold water supply pipe with shut-off valve, drainage hose outlet to the washing siphon, separate electrical socket
You will have to remove the shelves and the back wall from the cabinet, if necessary, the bottom panel. The built-in housing must be brought to a strictly vertical position, for this, adjustable legs are used.
Then you need to alternately connect the machine to communications: sewerage, water supply and power supply. If necessary, install an additional water trap with a drain pipe.
The decorative front panel, which is mounted on the door of the machine, is usually assembled from the removed cabinet doors or ordered additionally. Partially built-in models do not need to be decorated, so their installation is a little easier.
Solution #2 - Standalone installation
If there are no free cabinets for new equipment, but there is enough space in the kitchen, you can order a separate module, but you need to install it near the communication nodes.
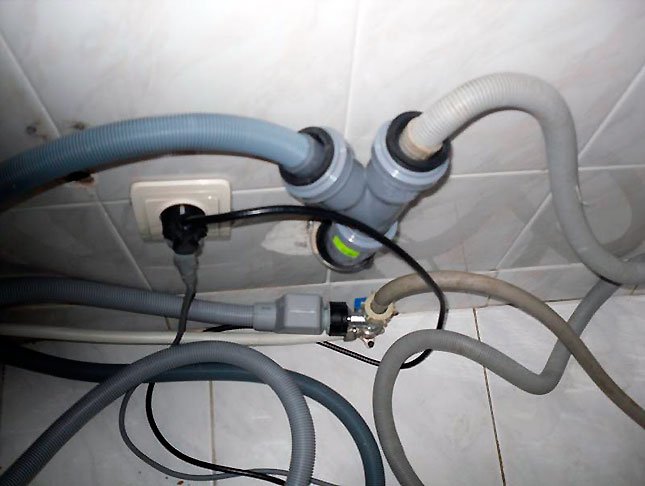
Cabinet for additionally purchased equipment - a compact washing machine and dishwasher.The module is installed as close as possible to the sink, which facilitates connection
It is important to level and secure the unit so that it does not vibrate during operation and does not move the cabinet. Hoses and pipes run along the wall but are easier to access
To get to communications, you can not dismantle the machine, but simply move the cabinet away from the wall.
If the dishwasher is installed under a common kitchen worktop, it must be dismantled for maintenance, otherwise you cannot reach the hose connections.
Solution #3 - Niche Mounting
If the kitchen has a niche for installing a microwave, oven or other small-sized equipment, it can also be used to mount a dishwasher. The dimensions of the compact model, together with the drawings, can be found in the installation instructions.
If the niche is located far from communications, you will have to stock up on long flexible hoses for supplying cold water and draining used
Built-in compact models should not be confused with freestanding models. The latter do not have to be placed in a niche - any horizontal surface is suitable for their installation. So that the dishwasher is not conspicuous and hidden, like the rest of the appliances, the front part is covered with a decorative overlay in the style of the facade.
Developers usually think over various options for installing equipment, therefore, drawings and diagrams with dimensions, useful tips, and technical recommendations are placed in the installation instructions.
It is easier to find a place for a compact model, but do not forget that a mini-machine is not able to serve a large family.
Decision #4 - if embedding doesn't work
What to do if there is no place at all in the kitchen to install a built-in model? It remains to consider free-standing options, the design of which does not require special installation.
They can simply be installed on the floor, countertop or in a niche, aligned, and then connected.
There are still ways to fulfill your own dream of installing a built-in dishwasher - installing a facade on a free-standing model, a complete reorganization of the kitchen set, with possible repair or transfer of communications. It is more expensive, requires not only financial investments, but also time.
General recommendations and rules
So that the machine does not cause complaints during use, does not require repair and frequent maintenance, it is necessary to consider the procedure for its installation.
The following connection procedure applies to all types of dishwashers:
- Checking the completeness and integrity of the equipment after transporting it to the house.
- Installation on a predetermined place on a table, floor or in a furniture module.
- Connection to the sewerage using a drain hose that is inserted into the sink or connected to the siphon using an adapter.
- Connection to the water supply using a water supply hose.
- Installing a separate power outlet or using a pre-installed one.
If there are difficulties with connecting hoses or a socket device, then the connection order can be changed, however, you will need to complete each item from the list.
Access to the side walls of built-in dishwashers is not possible, but desktop, attached and freestanding models have it. Ensure protection against burns - the sides become very hot during the washing process.To do this, you need to install side covers sold by service centers
![[instruction] do-it-yourself dishwasher connection](https://fix.housecope.com/wp-content/uploads/3/8/0/3803920864084c5bd5ed7f554c02180c.jpeg)


There are a number of rules, the implementation of which will help to avoid problematic and emergency situations.
Usually they are listed in the instructions, so the most important requirement is a careful study of the documentation.
Gallery of imagesBefore connecting, be sure to carefully examine all the elements of the machine and check the body for scratches and dents. A device with deformed walls must not be operated. If a marriage is found, be sure to demand a replacement of the deviceBefore any installation, repair, replacement, be sure to disconnect the equipment from the mains. If there is no power point near the chosen place, it must be brought up and placed in an area that is easily accessible for disconnection. It is better to pull the wiring for the power outlet in a separate line from the shield; it is necessary to provide the branch with its own automatic machine. The most powerful equipment is usually installed in the kitchen, and water heaters, microwaves, dishwashers, and electric stoves have to work “next door”. Be sure to make sure that there is no equipment that generates heat in the immediate vicinity of the dishwasher. All categories of machines should be level. For freestanding, you need to provide a perfectly flat installation site, and if necessary, adjust the legs. Built-in models should be firmly fixed inside the furniture modules using brackets
It is not recommended to put the dishwasher near the radiator: the heat radiated by the battery negatively affects its “well-being”.If the machine is built in next to the refrigerator, on the contrary, it will “suffer”.
Make sure that the power cord is also not exposed to heat, otherwise the insulation will melt and a short circuit or current leakage may occur - both are dangerous.
If you have not previously installed or repaired home appliances, if a large number of questions arise, it is better to combine your own efforts with the services of a service center. Intervening on your own will only hurt.
After installation, be sure to check if the door opens well, if the boot module (modules) is working properly. If there is not enough space, then the open door will create a shortage of space - do not forget about this during further use and try to arrange the furniture so that it is easy to service the machine.
Water connection
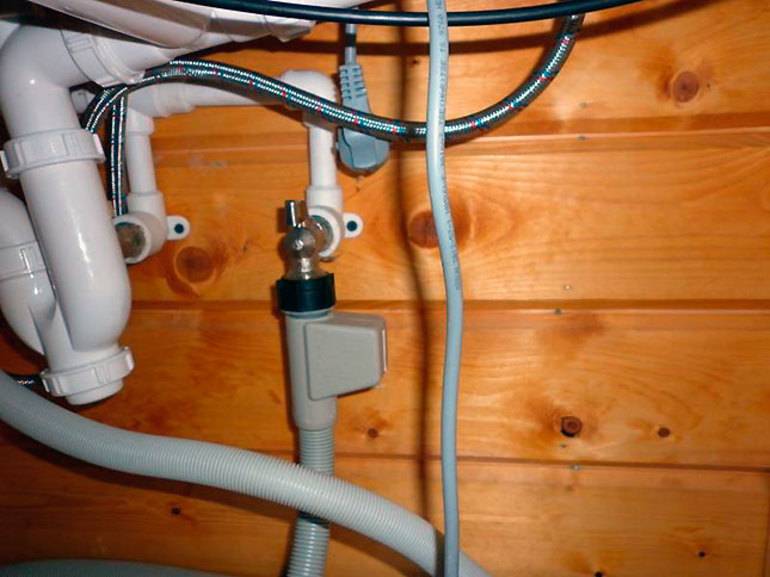
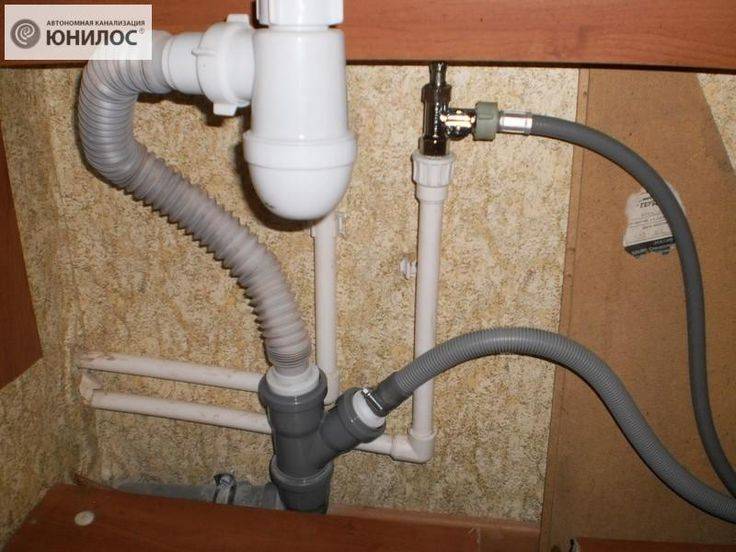
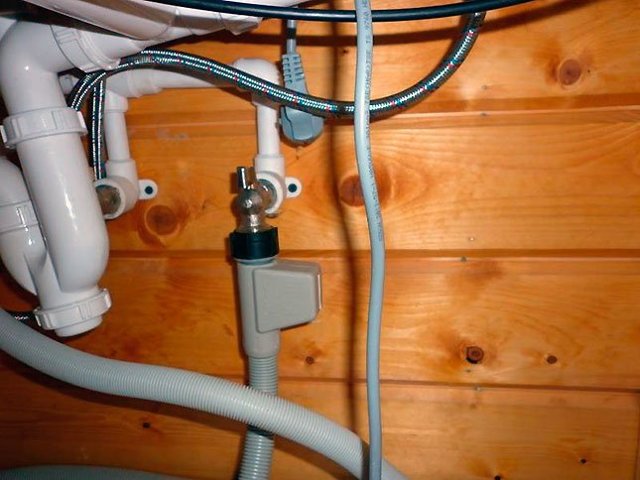
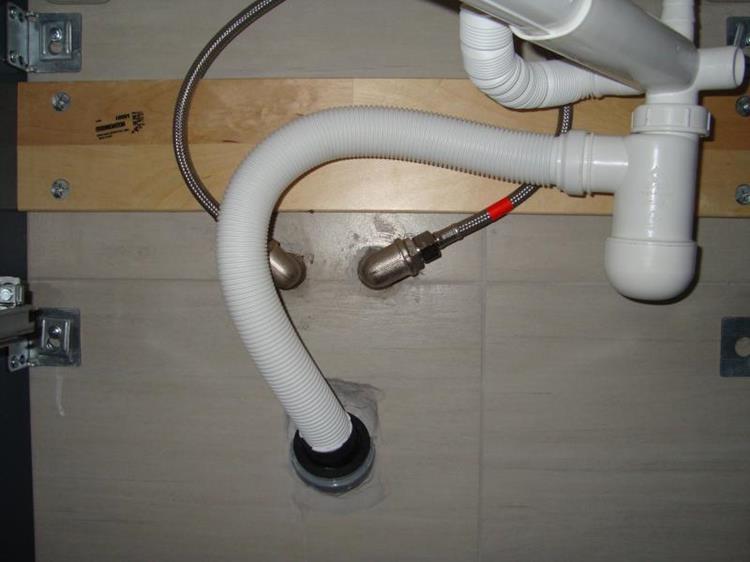
The length of the water supply hose is also limited - no more than 1.5 m. It can be installed with a metal-braided water hose. It's easy, you need an angled tee tap and the hose itself. But in order to reduce the risks of flooding, to get a more reliable, and therefore durable result, we will do it differently - we will run a water pipe parallel to the sewer pipe. For self-fulfillment, the most accessible water connection to the dishwasher metal-plastic pipe - for it requires a minimum of tools. The procedure is the same for any connection:
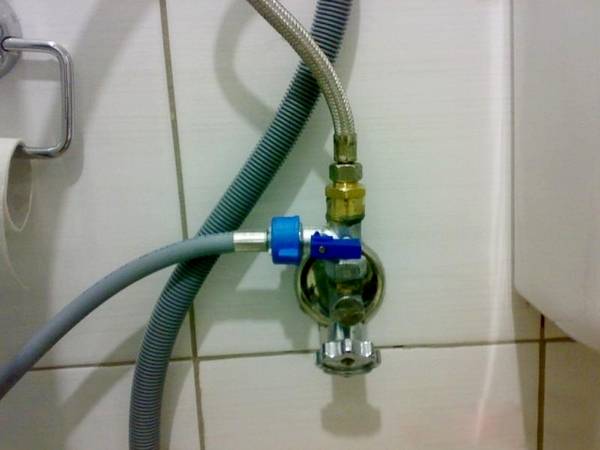
- The cold water hose of the kitchen faucet is unscrewed.
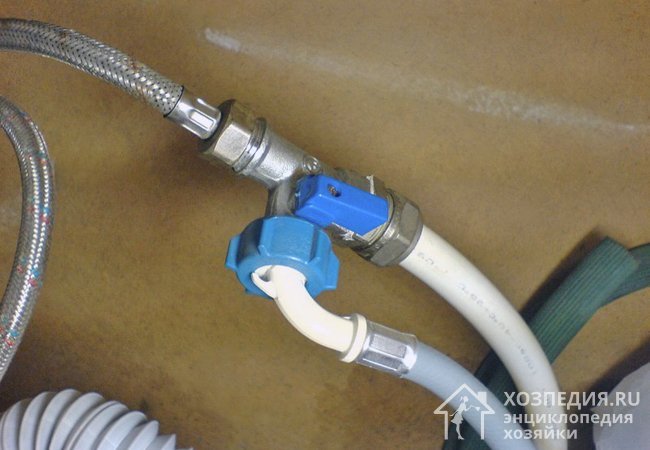
- An angle valve turns on. More precisely - a tee with a ball valve for connecting household water consumers.
- The mixer is reconnected, and a fitting for a metal-plastic pipe is screwed onto a threaded connection that is locked by a tap.
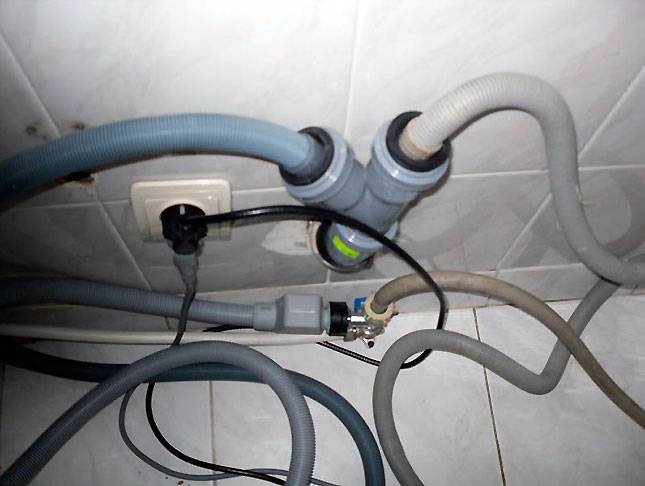
For ease of revision and maintenance, it is necessary to make connections with the inlet and drain hoses of the dishwasher in one, relatively easily accessible place, but not hide behind built-in appliances. To be able to inspect them at any time, without dismantling the machine.
Important: threaded connections with rubber rings do not require additional sealing, they are wrapped with a “hand-tight” force, in case of doubt, they can be tightened by ¼ turn. With the correct gasket position, this is usually more than enough.
The rest of the threaded connections require "winding":
- The older generation may advise flax - do not give in, it is more justified for other purposes.
- Tape-FUM is a more suitable option, but its use requires skill - experience in use. Rewinding with a “fumka” is performed “one-time”: rewound, twisted and that’s it. If you made a mistake or leaks - unwind, remove the tape squeezed by the thread and wind it with a new segment.
- The thread "Tangit unilok" is the most convenient to use. It allows you to adjust the position of the crane to a more convenient one. Instructions for use on each package. Once having tried it, few people return to linen or FUM tape. This happens only for a specific use or total economy.
For an error-free selection of the valve position, it is recommended to screw it “dry”, without a tape, calculate the number of revolutions, unwind and assemble it already with winding.
Possible realization of connection to hot water
Most dishwashers require a cold water supply.Let's figure out how to connect the dishwasher to hot water - after all, some models have such functionality. The instructions for installation and operation of such machines indicate:
- It is allowed to connect to hot water, its temperature must be between 40 ° - 60 ° C. You can connect to alternative, for example, energy-saving systems.
- The functionality of the aquastop safety device allows a maximum supply water temperature of 75°.
Therefore, the connection of such machines to hot water supply is quite possible. But the realities are quite different. The hot water supply system in comfortable apartments is unstable - the water temperature can easily be higher than the established norm. This is fraught with damage to the control equipment and the gradual destruction of internal elements.
The conclusion suggests itself that connecting a dishwasher to a hot water supply is most appropriate in private houses, where it is implemented by a gas boiler. Because:
- Heating water with gas is actually cheaper than electric heating.
- It is possible to set and control the maximum water temperature.
However, in some models, in particular the Bosch brand, a heat exchanger is implemented for drying dishes. This is a completely different principle, which has nothing to do with the common hot air drying. Its meaning is that at the beginning of the drying process, the space between the walls of the machine is filled with cold water. Due to the rapid cooling, moisture condenses on the inner wall, evaporating from the surface of the hot dish. This achieves energy savings and implements a gentle drying mode that is harmless to dishes. That is, it is obvious that cold water is fundamentally necessary for the operation of the machine.
Choosing a location based on the installation method
The sooner you think about purchasing appliances, the less hassle will be with the further improvement of the kitchen.
The ideal option is a comprehensive repair, including:
- drafting a project;
- laying of pipes for water supply and sewerage;
- conducting separate power lines for powerful units;
- decoration of the premises;
- installation of furniture and appliances.
In this case, the risks that there is not enough niche for the dishwasher or that its dimensions do not fit is reduced to zero. Walls with output connectors for connection look neat, safety requirements are met.

The place of installation depends on the type of machine, respectively, on how it is installed.
All devices are usually divided into two categories:
- free-standing, portable, representing a mobile unit;
- built-in, stationary, for the installation of which a cabinet is required.
For proper installation, the size of the dishwasher is also of great importance. Allocate a subcategory of compact machines, with reduced dimensions.
Among them there are both free-standing devices designed for installation on a countertop or in a cabinet niche, and built-in ones.
You need to think about how and where to install the dishwasher in advance. Mainly, you should correctly position the unit relative to communications - bring it as close as possible to the pipes.


![[instruction] do-it-yourself installation and connection of the dishwasher: to the water supply, sewerage and electricity | photo & video](https://fix.housecope.com/wp-content/uploads/e/1/e/e1e0de3b21e4a0c35f749d5039424159.jpeg)


We also recommend installing cabinets for dishes and other utensils in the accessibility zone, which are intended for washing in the PMM.
The cleaning process will be much faster if the plates are cleaned from large pieces, the dishes are loaded into the dishwasher trays, and the clean dishes are put on the shelves from the same place.
Wiring connection
This stage is the simplest, if everything is ready for you to turn on, then just insert the plug into the outlet. No special wiring diagram is required when installing a dishwashing machine. But certain conditions must be met.
The wiring must be designed for the power of the PMM, it is advisable to power the machine in general through a separate line that is connected to the RCD in the electrical panel. Sockets for connecting the PMM must be waterproof (IP44) with grounding. Note that according to the operating rules of such devices, it is prohibited to use them without connecting to protective ground.
Related video:
It is impossible to connect to the pipes of engineering communications for grounding, this is guaranteed to lead to a breakdown of the device and may threaten your life.
If you are not sure that you have met all the conditions, then it is better to consult a professional on this issue.
We determine the place and calculate the dimensions
The installation of a built-in dishwasher must be planned immediately, along with the entire interior of the kitchen - this will be an ideal option. Take my word for it, it is much more difficult to find a place and install an embedded car already in the finished kitchen, therefore, the sooner you think about the need to install a dishwasher, the better. Plan ahead and draw a sketch of your future kitchen. Try to take into account the location and size of all household appliances.
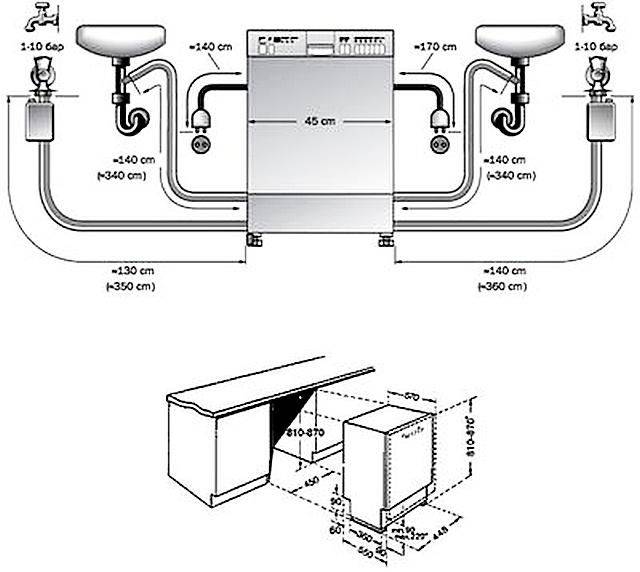
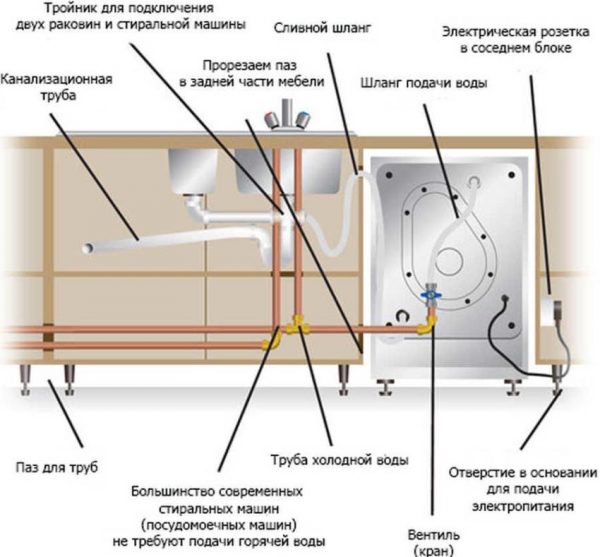
In addition, depict on the sketch the location of all electrical and plumbing communications. In this case, each outlet, each pipe outlet will be in its place and will not interfere with the installation of household appliances in the future. You can see an example of a kitchen sketch in the picture below.

Some believe that before ordering furniture for the kitchen, you need to buy household appliances, and only then, focusing on their dimensions, make a drawing of the future set. This is not to say that this is the wrong approach, rather inconvenient and expensive.
- Firstly, in order to buy all the equipment at once, you need a lot of money at once, and then, almost immediately, you need to pay for kitchen furniture.
- Secondly, the purchased appliances will need to be stored somewhere until the kitchen interior is formed, and this can take several months.
- Thirdly, even if you buy appliances in advance, this also does not guarantee that the furniture makers who will make the set will not miscalculate somewhere in size.
In general, experts say this, first look at the built-in dishwasher model at the outlet, measure its exact dimensions, and do the same with the rest of the built-in and non-built-in appliances. Further, give all the dimensions, together with the sketch, to the furniture makers, if they miscalculate somewhere, then you can try to fix this drawback by buying smaller equipment. For a built-in dishwasher, do the calculations like this.
- For example, a built-in dishwasher has dimensions WxHxD 450x820x550 mm.
- You will need to separate the space for the cabinet in which the installation will be carried out, taking into account the thickness of the material.
- You also need to leave a gap between the walls of the dishwasher and the walls of the cabinet at least 5 mm.
As a result, for example, the thickness of the material is 20 mm in total (on both sides), plus a 5 mm gap (on both sides), which means we add 450 + 30 = 480 mm to the width - this is the final width of the cabinet with the dishwasher. In height, we leave the gap only from above, but take into account the height of the legs. That is, the height of the legs is 60 mm, we add the total material thickness of 20 mm and the gap of 5 mm, we get 820 + 60 + 20 + 5 \u003d 905 mm - the minimum height of the cabinet with a dishwasher.
When calculating the depth of the dishwasher, it is necessary to leave room for hoses and electric wire, somewhere around 80-100 mm, the cabinet may not have a back wall, so the thickness of the material does not need to be included in the calculation. We get 550 mm + 100 mm = 650 mm. As a result, the dimensions of the cabinet with a built-in dishwasher will be at least WxHxD 480x905x650 mm. Successful connection and installation of the "dishwasher" depends entirely on how correctly you calculate everything.
We prepare tools and accessories
Before connecting the dishwasher with your own hands, you need to prepare tools and accessories. The composition of these tools and components will depend on the features of the kitchen set, the removal of communications and other factors. It is best to select everything you need immediately before installing the dishwasher, when there is a clear plan, a finished sketch and a partially formed interior. Approximately the following tools may be required: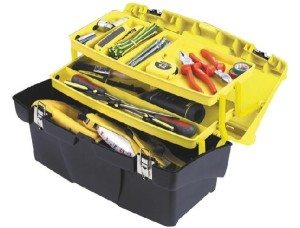
- small wrench;
- flat and Phillips screwdrivers;
- roulette (preferably laser);
- pliers;
- perforator;
- screwdriver;
- chisel.
As you can see the list is short. Indeed, special tools are not needed to install the “dishwasher”, but quite a lot of components may be needed.
- European sockets.
- Socket boxes.
- Copper two-millimeter cable with three cores.
- Tee for a metal-plastic water pipe.
- Fumka type "Tangit".
- Tap on the inlet hose.
- Difavtomat.
- Set of rubber gaskets.
- Siphon with at least two outlets for drain hoses.
- Set of plastic clamps.
Sockets, difavtomat and wire will be required if you are preparing electrical communications for kitchen appliances. Take sockets of the highest quality possible, with protection from moisture. For information on how to choose the right outlet, read the article How to choose and install an outlet for a washing machine. Although this text refers to sockets for washing machines, the features of choosing a socket for dishwashers are absolutely identical.
Preliminary work before installation of PMM
There are two options for installing a dishwasher: independent and with the help of specialists. In the first case, you run the risk of connecting the car incorrectly; in the second, you will have to part with part of the family budget.
The skills of one master are sometimes not enough, you have to call a team of specialists: furniture assembler, plumber and electrician.
Services for the installation of built-in appliances are offered by companies that sell it. For a certain fee, at the appointed time, the master wagon comes, carries out all the work on the connection and checks the health of the machine
However, if you carefully study the installation instructions, consider connecting hoses, find or install an additional outlet, you can save money and acquire new skills by doing everything yourself.
Choosing a place based on dimensions
An important step is the choice of a place for installation.For the built-in model, furniture modules of the first level are suitable, that is, cabinets standing on the floor.
But if you liked a compact mini-dishwasher, then installing it is a little easier - this technique can be inserted at the level of the belt or chest (for ease of maintenance).
There are several conditions for choosing a good place. If they are not observed, in the future you may encounter problems with the supply / drainage of water or maintenance of the PMM.
Image gallery
Photo from
The furniture module adjacent to the washing unit is the most suitable place, since the water supply and drain units are located nearby, so it is easy to connect the hoses. The length of the hoses should not be large, otherwise the supply and removal of fluid is difficult, which often leads to breakdowns.
Prudent owners, even at the stage of interior planning or repair, are thinking about holding several sockets with grounding for powerful household units. If there is no free electric point, you will have to pull an additional line
The machine must be freely placed inside the furniture module, with a margin of 5 cm on each side - more accurate information is indicated in the instructions. The walls of the cabinet must be strong and withstand the fasteners and the weight of the dishwasher. Back wall not included


Do not hope that the machine is mounted once and for all. Sooner or later it will be necessary to replace parts, reconnect hoses or clean some elements. Therefore, the installation is carried out in such a way that possible dismantling is easy, and access to communications is open.
Built-in dishwasher next to the sink
Separate earthed socket for dishwasher
Appropriate dishwasher cabinet
Dishwasher maintenance
A lot of installation difficulties arise when the dishwasher is integrated into an already installed kitchen set. You have to adjust the cabinets to size, and sometimes dismantle and redo some of the furniture.
We recommend that you take care of the place for installation even before buying furniture. This also applies to other household appliances that require embedding. Usually, the models you like are first chosen, and when drawing up a sketch of the headset, their location and exact dimensions are taken into account. We have given recommendations for choosing a built-in dishwasher in this material.
Preparation of tools and materials
Built-in PMM manufacturers sometimes list in the instructions which tools may be useful during the installation process. However, they expect that the preliminary work has already been done.
If measures are required to lay an electric line or tie into a pipe, then the list of necessary items will increase.
To insure and save time, stock up on the following tools:
- puncher or powerful drill;
- wrench;
- a hammer;
- a set of screwdrivers, including flat and Phillips;
- chisel;
- pliers;
- laser level;
- tape measure, square, pencil;
- screwdriver
In addition to tools, you will need parts for connection. It is not recommended to use used elements - this will reduce the service life.
To install the outlet, you need to buy the electric / installation product itself, the socket for it, a three-core copper cable, and an additional automatic protective device.
Special requirements are imposed on the socket: it must be of a “European” type, with grounding, preferably with moisture protection, fully functional, without damage
To connect the water, you will need a metal tee for tapping into the water supply, a fum-tape, a tap to cut off the water, rubber gaskets, clamps or ties for fasteners.
If the siphon is not provided for connecting another drain hose, then it will also have to be changed.
If the mains voltage often fails, we recommend purchasing a stabilizer. It can be installed on multiple devices at once.
Dishwasher on the table
If the dimensions and layout of the kitchen allow, then installing a dishwasher on the table provides a lot of advantages and saves money:
- All problems with the drain disappear: it can be simply drained into the sink without fear of a flood, and no miasma will penetrate into the machine.
- No need to change the existing siphon and generally mess with plumbing.
- It is possible, without fear of flooding the electrical wiring, to get by with an existing wall outlet (but still - euro with grounding). In this case, the general apartment machine or plug machines will perfectly cope with the duties of an emergency disconnector.
- And most importantly, the drain from the car will actually flow by itself. This will unload the most flimsy part of the washing machine - the drain pump, and will greatly increase the reliability and life of the dishwasher as a whole.
***
Even a white-handed person can install a dishwasher on their own. In addition to supplying power to it, this work should be done by an electrician.