- How to install a dishwasher in the kitchen
- Useful tips for choosing and installing PMM
- Door and front dimensions. Canopy and mount
- The sequence of work when hanging
- Dishwasher installation dimensions
- What do we need
- What characteristics should you pay attention to when buying
- How to choose an integrated dishwasher
- The nuances of installing embedded technology
- Chassis Installation
- How to install a dishwasher under the facade
- Life hacks from experts on installing and connecting PMM
- Design features of built-in PMM
- Types of dishwashers
- Helpful Hints
- Connection Features
- Communications
- Water
- Electricity
- Do-it-yourself facade installation instructions
- Stage # 1 - determine the dimensions of the decorative panel
- Stage # 2 - choose the right fixation method
- Stage # 3 - sequentially perform the installation
- Conclusions and useful video on the topic
How to install a dishwasher in the kitchen
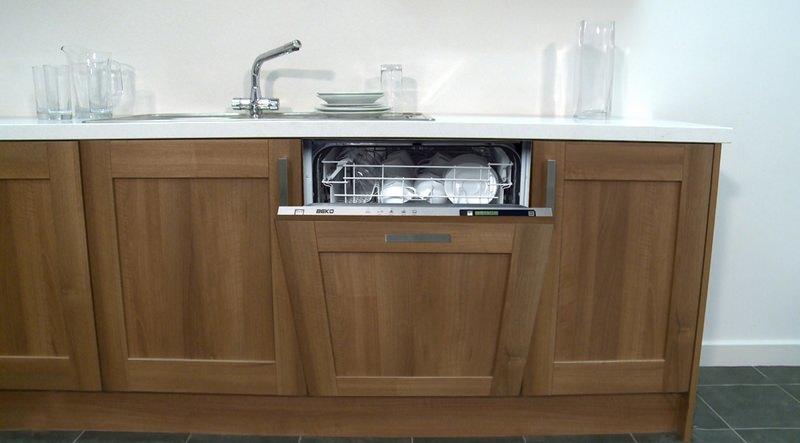
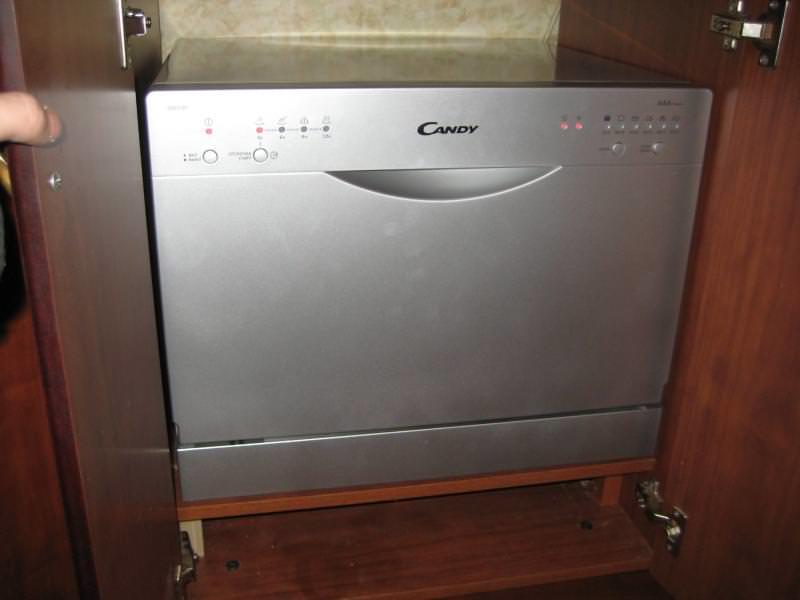
There are two options for installing PMM: in a finished kitchen or in a pre-designated place in a kitchen set. Dishwashers vary in type and dimensions:
Compact. Holds from 3 to 5 sets of dishes. Dimensions 50x60x50 cm. Mounted on the countertop or under the sink.
Narrow. Width 45 cm, capacity from 6 to 10 sets. Can be fully or partially built-in.
Full size.Dimensions 65x65x90 cm, holds from 10 to 15 sets of dishes. Can be built-in or freestanding.
Usually, manufacturers in any kitchen set provide a place to place appliances. For this, the dimensions of a narrow dishwasher are taken, 5-10 cm are added to them from all sides. If your kit does not have a special cabinet, then it is better to choose a freestanding machine. You can install it in any convenient place, even between the cabinets.
If you have prepared drawings in advance for placing a Samsung, Miele or other brand dishwasher, there will be no installation problems. Otherwise, for embedding, pick up a cabinet near the sink. Keep in mind that the distance from the PMM case to the back wall must be at least 5 cm for normal ventilation.
If you have a small family, and the area of \u200b\u200bthe kitchen does not allow you to install a full-sized model, choose the desktop version. You can put it under the sink, and the connection rules do not differ from other models.
Useful tips for choosing and installing PMM
- Before buying built-in appliances, measure the dimensions of the kitchen cabinet.
- Dishwasher legs can be adjusted in height. Use a level to level the machine. Some Hotpoint Ariston, Whirlpool models are very sensitive to tilt even as low as 2 degrees. This may affect their future work.
- Mount the machine near a sink. This will make it easier to connect the drain and water without having to extend the hoses. Experts say that lengthening the hoses can lead to leakage, as well as create a large load on the drain pump.
When building into furniture, install a metal plate under the countertop to protect the wood from steam. In built-in models, the plate is included.
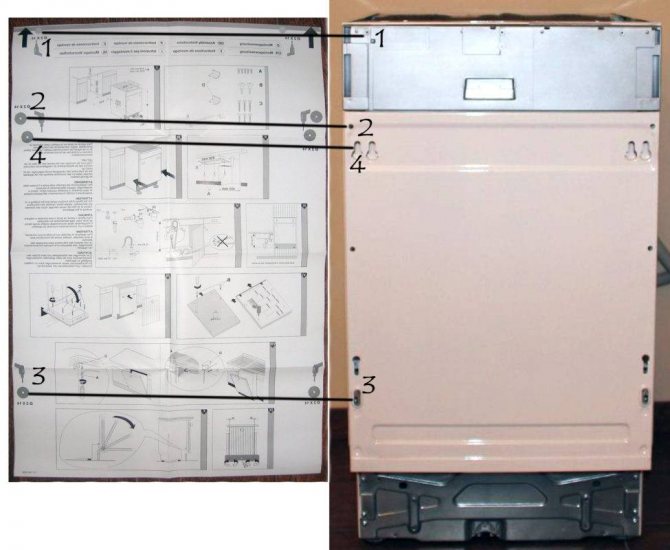
Door and front dimensions. Canopy and mount
The dimensions of the decorative panel depend on the size of the dishwasher. It can be narrow - 45-60 cm, full-size - from 60 cm or compact equipment - height 50-60 cm.
What to do if the dishwasher front is too long? It will not be possible to cut it, because you will spoil the appearance of the headset, because it is laminated on top and covered with a decorative film.
What you need for work:
- Screwdriver Set;
- roulette;
- fasteners;
- door handle.
Manufacturers Bosch (Bosch), Siemens are enclosing a full-size template drawing, screws, self-adhesive, fasteners. You can figure out how to fix the panel, according to the instructions. It will take no more than 10-15 minutes for an experienced master.
The sequence of work when hanging
- Install the dishwasher in the prepared niche.
- Attach the cabinet to the cabinet panels.
- Connect to drain and water supply.
- Prepare the holes for the handle using a Phillips screwdriver and an awl.
- After fixing the handle, you need to calculate the distance (Z), which will help to put the facade flush with the rest of the doors of the kitchen set.
- Take a tape measure and measure the distance between the adjacent cabinet door and the countertop as shown in the picture (X).
- Then measure the distance from the mount to the countertop (Y). Calculate: Z = X-Y.
- Place the template on the inside of the door.
- With an awl, mark the places for the location of the fasteners.
- To make the fasteners more secure, drill holes ¾ of the door.
- How to remove old screws? Sometimes the panels are pulled together with short screws, but their length is not enough to fasten the facade. Therefore, you need to hang the panel, unscrew the old screws and install long self-tapping screws.
After installing the dishwasher under the facade, try closing the door. If the decorative part rests on the base, then there was an error in the calculations. In this case, you can make a gap in the basement as thick as the facade.
You can hang a decorative panel on Hansa, Miele appliances yourself.
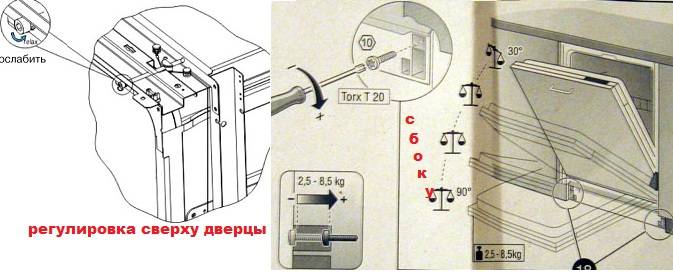
Adjust the mechanism: tighten the bolt that secures the tension cable. Since the door is mounted on hinges, it should close easily with a light push of the fingers.
The video will help you make the right hanging:
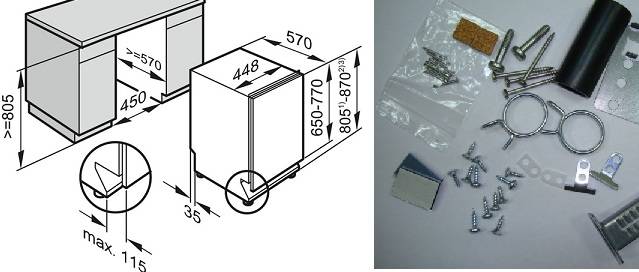
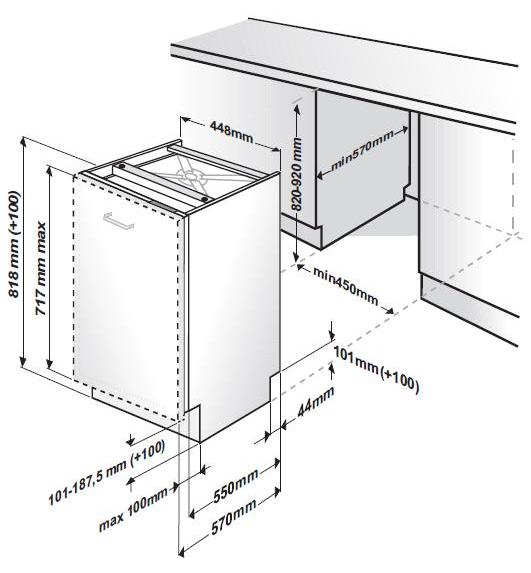
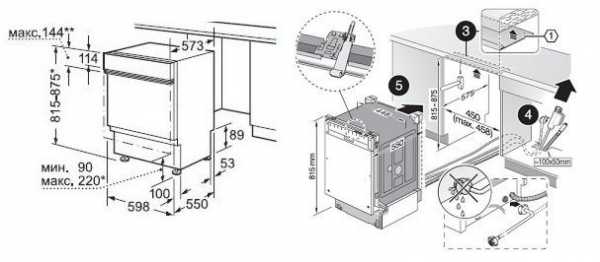
Dishwasher installation dimensions
You can choose the dimensions even before purchasing on the website of the store or the manufacturer. They must be a multiple of the height and width of the countertop, as well as all the parameters of a niche or cabinet, if the equipment needs to be hidden behind the door. Instead of a regular door, a decorative shutter is often used, designed in the same way as the entire facade.
There are several standard solutions. The standard depth is 0.55 m. This leaves enough space of just under 50 cm for piping and air cooling. For kitchen sets designed for standard apartments, narrow models are produced with a width of 0.45 m. It can vary up to 0.65 m. Most often it is 0.6 m. The height ranges from 0.815 to 0.875 m. It is a multiple of the height of ordinary countertops.


There are dishwashers with minimum dimensions for embedding. They are installed not only under the countertop. They are located even in the upper modules. The upper cabinets are narrower, and their depth is less than an average of 15 cm. In this case, there should be no problems with draining even at a considerable distance from the siphon.It will only be necessary to hide the drain pipe, connect the device to the water supply and resolve the issue with the electrician. Such devices have a small capacity, but they are compact and consume less water and electricity.
Kitchen furniture manufacturers make a small margin by adding 2 mm on each side inside the modules. Built-in appliances, on the contrary, are slightly smaller than the declared dimensions. This is necessary so that it enters the niche prepared for it, even taking into account small irregularities.
Built-in dishwasher dimensions are one of the most important selection criteria. If it does not fit in size, it is better to refrain from buying and continue the search.
What do we need
Before you install a dishwasher in a niche under the countertop or connect a stationary model, prepare the tools and plumbing fittings.
Tool:
- Pliers, and preferably an adjustable wrench;
- Insulating tape (vinyl or cotton), it is wrapped around a metal thread on pliers so as not to damage the fasteners when tightened;
- FUM tape for waterproofing;
- Knife;
- Drill;
- Clamps.
Plumbing fittings:
- Waste siphon with 1 or 2 fittings - 2 fittings will allow you to immediately connect the washing machine;
- Tee, thread ¾;
- The filter providing rough water purification;
- ball valve;
- Hank connecting pipe.
What characteristics should you pay attention to when buying
First you need to decide which model you want to purchase. There are two types:
- fully built-in dishwashers, the control panel of which is completely hidden;
- partially embedded.
Among the latter, there are also devices that are not installed in the finished kitchen, but are designed to be placed next to other furniture.One of the most important characteristics is the width of the dishwasher. If a large number of people live in the house, then you should purchase a device with a capacity of 12 sets of dishes. In the case when capacity is not of great importance, models designed for 9 sets are purchased. There are also machines for 6 sets of dishes.
How to choose an integrated dishwasher
In order for the purchased device to please its owners, its choice should be approached more carefully. To do this, it is enough to evaluate several parameters. One of them is the availability of programs. Mandatory modes include:
The choice of programs depends on the degree of soiling of the dishes and their type. There is also the option of choosing a delicate wash designed for fragile items.
Number of blocks: 12 | Total number of characters: 11751 Number of donors used: 5 Information for each donor:
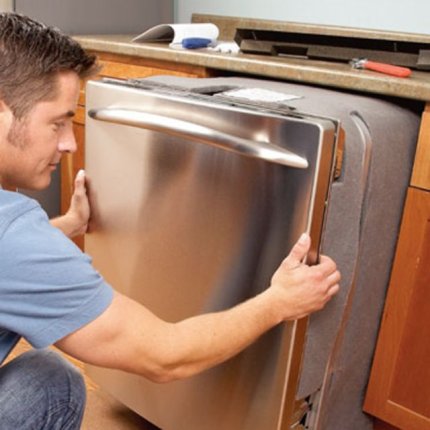
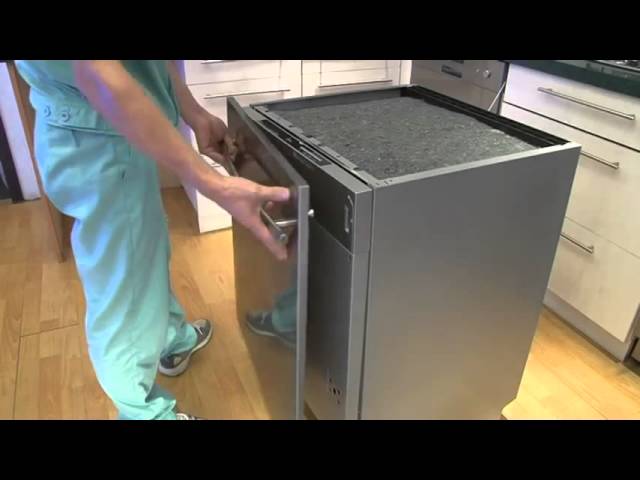
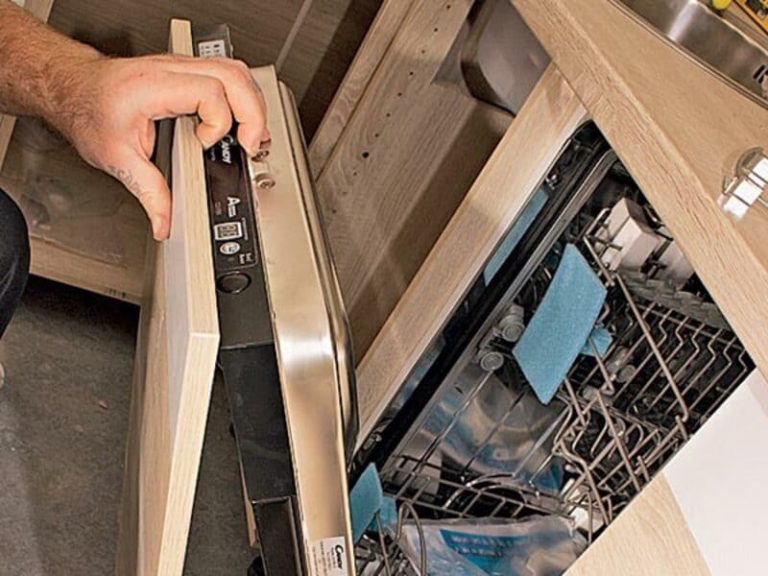
A dishwasher is an absolutely indispensable thing in a large family or a house where they like to receive guests. Many owners, when buying a dishwasher, tend to install it themselves. And here the question arises not only about how to connect the unit, but also about how to attach the door to the dishwasher. The videos that we have collected in this material will help solve the problem.
This video shows how to install an Electrolux built-in dishwasher. It also shows you how to attach the door.
The author of this video installs a Bosch dishwasher. The video does not show only the process of connecting the machine, all other stages can be seen.
The difference between installing a built-in dishwasher and a freestanding model is that it requires additional design of the front wall - the machine door.
It is assumed that the decorative panel is chosen for the surrounding interior, and then the facade is installed on the dishwasher.
If experienced craftsmen cope with this operation quickly, then for beginners the task seems quite difficult. To understand the features of the installation of the facade, you should carefully study the instructions and get acquainted with some of the nuances of installation. And we will tell about all this in detail in our article.
The nuances of installing embedded technology
Free-standing units are simply installed in the place provided for them, then they are connected. Embedded models need to be integrated into the furniture set.


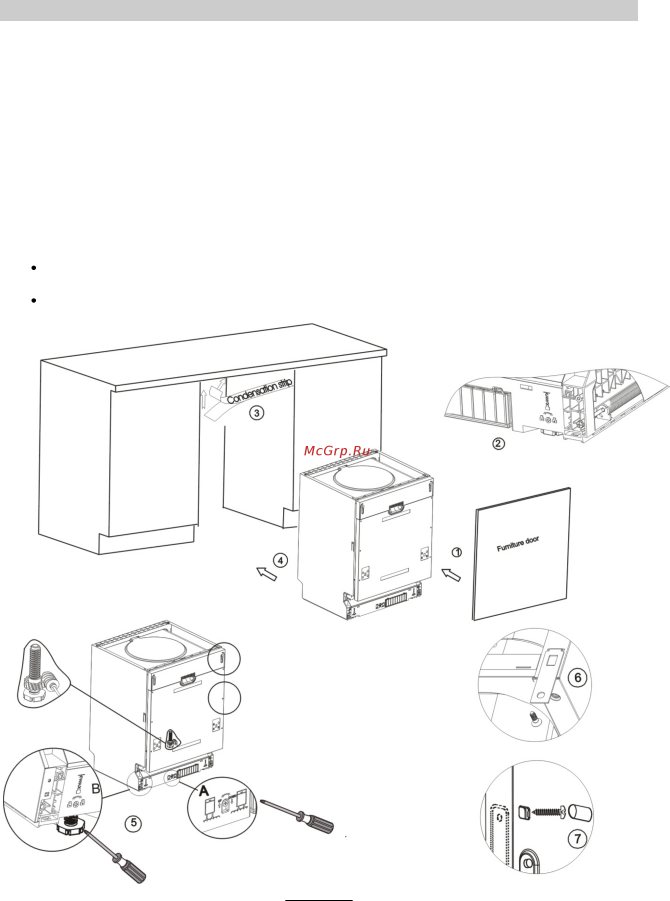

Here are some useful tips that may come in handy during the installation of embedded appliances:
- the dimensions of the built-in cabinet must correspond to the dimensions of the dishwasher body; for comparison, you need to refer to the diagrams provided by the manufacturer;
- be sure to use the protective devices that are included in the kit - a metal bar to strengthen the countertop, a vapor barrier film;
- to align the body, twist the legs, usually there are three of them - two are in front and one is in the back;
- do not forget to insert the side bushings and fix the body with self-tapping screws;
- fix decorative panels strictly according to templates or stencils, which are also included in the delivery.
Dishwashers from different manufacturers may have structural differences, so you should rely only on the instructions for a particular model.
This article clearly outlines how to properly install the dishwasher, in what order you need to perform the steps to installation and connection of communications.
Chassis Installation
After connecting to the mains and communications, the dishwasher is leveled by adjusting the height of the legs. Before integrating it into a furniture set, it is necessary to make a test run without dishes, but with detergent
To properly install the dishwasher, you should pay attention to some points:
It is recommended to paste over the furniture case from the inside with a vapor barrier to extend its service life.
In the event that the support of the machine is not the floor, but the base of the headset, it must be solid and installed on a horizontal level.
It is not recommended to install the dishwasher box near the hob or electric oven.
When setting the height of the machine, it is important to take into account the fact that the height of the dishwasher must match the level of the countertop.
 For normal operation of the dishwasher, its body must be strictly level.
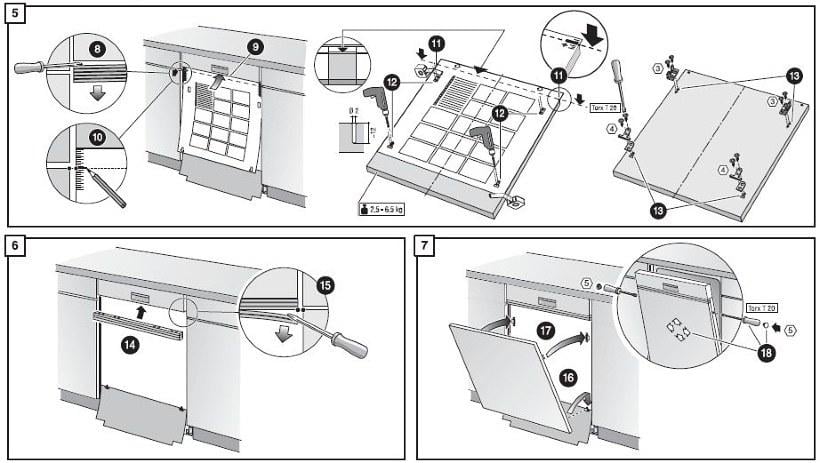
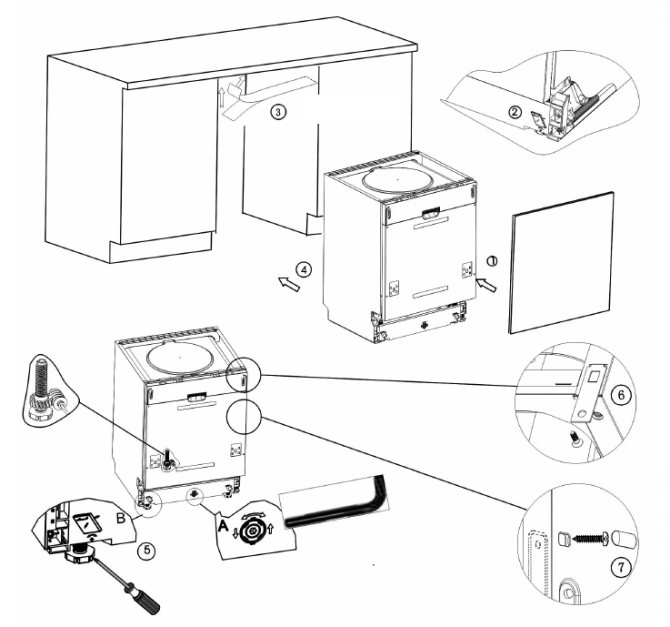
To hide the dishwasher from prying eyes, a decorative facade is mounted to the machine door. The package with built-in dishwashers includes special templates, according to which the facade is fastened. Fastening elements are installed in the grooves on the machine body and a decorative panel or door is mounted.
How to install a dishwasher under the facade
Before starting work, study the installation instructions, make sure that the case is on the shoulder. Remember to follow safety precautions. It is useful to view the actual video, for example
To begin with, the installation of communications is carried out: water supply, sewerage, electrical network. Only after a test check, the PMM can be fixed in a niche, under the table top, and a decorative panel can be hung. Fasteners are made with bolts (screws, self-tapping screws) that come with the kit. Along with fasteners, gaskets, instructions, you will find a stencil. Attaching it to the walls of the cabinet, the tabletop (depending on the PMM model), draw the locations of the holes for fastening. They are easy to make with a perforator. Do not make through holes, it will be enough to drill ¾ of the wall thickness. It remains to fasten the protection for the countertop, put the dishwasher in the cabinet. Last steps:
- Attach fittings, slider mechanism (if necessary).
- After attaching the stencil, determine the attachment points on the inner surface of the facade.
- Drill points with a narrow bit, not through, so as not to damage the exterior finish.
- Remove the transport screws from the door (if present).
- If you are working without an assistant, try temporarily fixing the front on the door with double-sided tape to screw in the fixing bolts in the right places without any problems.
- Check the fit, the quality of fixation, blocking, the presence of interference when opening, closing.
Household appliances are purchased, built-in and connected to the power grid and communications. It remains to complete the work and hang the facade. How to attach it, read the article.
Install the facade on the dishwasher according to the instructions and the attached template.
There are three main types of dishwashers:
- Freestanding.
- Partially embedded.
- Fully built-in.
If freestanding machines are placed anywhere in the kitchen, then the other types of PMM "Electrolux", "Ikea", "Gorenie" and other brands are built into the furniture set.Initially, decide on the installation site and prepare a niche for the dishwasher. How to connect PMM correctly,
read one of the previous articles.
The advantage of the built-in PMM model is that it is completely hidden behind the door, being part of the interior.
- This option is easier to choose, you do not need to look after the design of the case, which will fit into the kitchen set.
- The hidden control panel is a big advantage if there are small children in the house.
- Reduced noise level. It is hidden by the cabinet panels where the equipment is attached.
The decorative panel can be screwed to the door, hiding the equipment from prying eyes. Most often, the hinged part is made of the same material as the rest of the kitchen: for example, Leroy MDF.

Life hacks from experts on installing and connecting PMM

- A detailed algorithm of work and installation rules are always indicated in the manufacturer's instructions;
- The machine remains stable when each point along the perimeter of the bottom of the equipment is in contact with the floor;
- When connecting the water supply, install cleaning filters - they will extend the life of the machine, save the heating element from scale;
- The drain pipe is best placed under the countertop of the sink;
- Use a separate grounded socket for the dishwasher;
- The niche must correspond to the size of the equipment;
- The power supply and connectors must be protected from water;
- In order not to overload the pump, do not extend the drain pipe by more than 2.5 m;
- For a natural drain of water, the bend on the coupling of the pipe and the siphon is made V-shaped.
Watch a video on how to connect a dishwasher
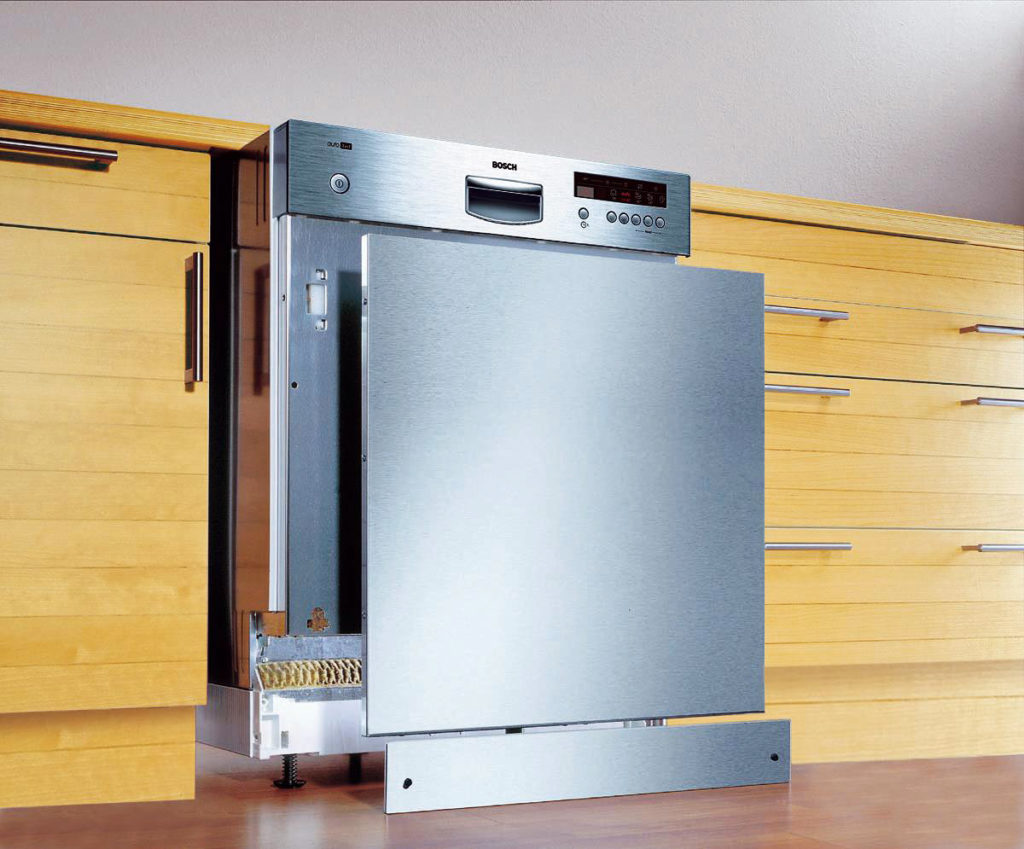
Design features of built-in PMM
The range of models integrated into kitchen sets is much wider than free-standing counterparts. This is explained by the principles of ergonomics and space saving, incorporated in the concept of building a kitchen interior. To see the best brands specializing in the manufacture of built-in PMM models, please follow this link.
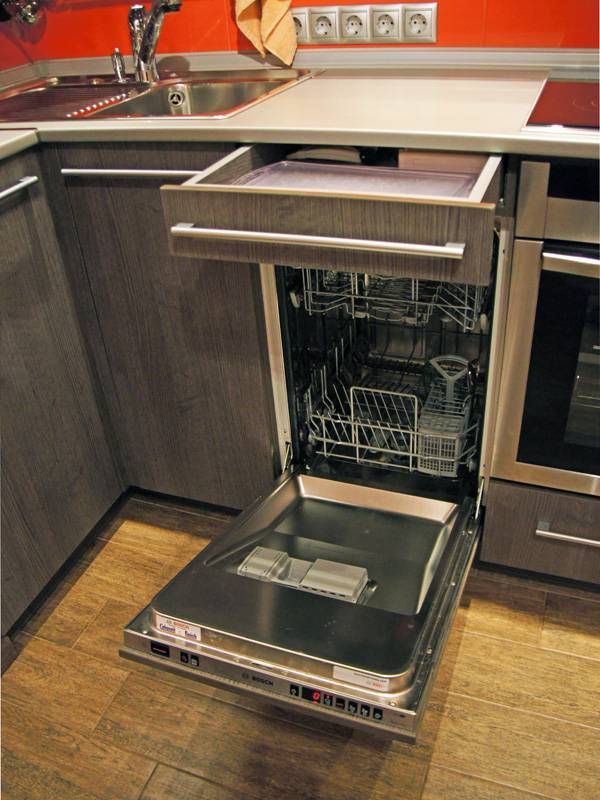
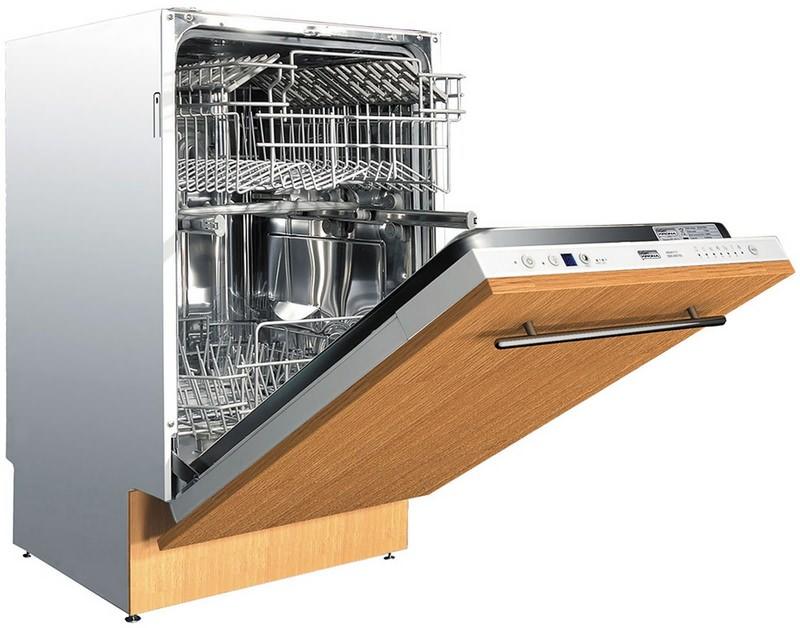
To install the built-in dishwasher, you will need a separate cabinet, or rather, a niche in the headset. It differs from an ordinary kitchen cabinet in that it does not have a back wall and a bottom.


The machine is installed directly on the floor, on 3 or 4 support legs. The absence of a rear wall allows you to freely position the hoses - water supply and drain.
The cabinet must have reliable walls to which the dishwasher body is attached, and the “roof” is the countertop. The front panel is fixed not to the walls, as in conventional cabinets, but directly to the car door.
You don’t need to experiment with fasteners: manufacturers have provided for installation features and prepared special holes for self-tapping screws. Detailed installation instruction built-in model of the dishwasher we have given here.
What is a facade for PMM? This is a decorative panel, most often made of the same material as the front surface of the entire kitchen set. It is made of MDF, plastic, laminated chipboard, solid wood or combined materials.
Where do you get decorative panels?
There are several ways to make it:
- ordered together with a kitchen set, if the dimensions of the machine are known in advance;
- do it yourself from the doors of a disassembled kitchen cabinet;
- if there is no suitable "extra" facade, they are selected in a similar style and color scheme.
The first method is considered the most practical: when ordering, all dimensions of the machine are taken into account, so the facade “gets up” perfectly. But this method is not always applicable. We recommend that you familiarize yourself with the options for embedding a dishwasher in a finished kitchen.
Types of dishwashers
Modern dishwashers are divided into three main types:
- Desktop;
- Stand alone;
- Embedded.
The smallest machine belongs to the desktop models. Its dimensions allow the installation of the unit directly on the countertop. Free-standing models require only connection to the mains and communications, they are installed as a hotel module or in the niches of a kitchen set. Most of the difficulties in installing communications and installing the machine itself are delivered precisely by built-in models, which will be discussed later.
 A desktop dishwasher can be hidden in a kitchen cabinet
 Freestanding dishwashers are mounted under the countertop
The advantage of a built-in dishwasher over other models is that they do not destroy the integrity of the designer's idea or simply do not violate the aesthetics of the interior of the room. Built-in dishwashers are hidden under the box, which is part of the kitchen set, and their facades are covered with decorative facades. If your kitchen is small, then the built-in model is just for you.
We recommend watching a video about the types of dishwashers and their features:
Even when placing an order for a new kitchen, the installation of a built-in dishwasher can be ordered from specialists. But this is not always convenient due to extra costs.In addition, in order to correctly accept the work in order to avoid further troubles, the nuances of the installation should be delved into carefully.
 Do-it-yourself dishwasher installation implies knowledge of all the nuances of its installation
Helpful Hints
To your attention are some useful tips that will not only allow you to properly connect the dishwasher, but also extend the life of the equipment:
- Installing a drain hose in a sink is extremely unsafe, although it greatly facilitates the connection process. The danger is that the waste water outlet may fall out of the sink and flood the neighbors from below.
- Electrolux equipment is very demanding on installation rules. The maximum slope to one side should not exceed 2 degrees, so be sure to check this moment with a building level.
- If you decide to buy any model from Siemens, be sure to look at the dimensions of the case and check with the standards for manufacturing the furniture in which the installation will be carried out. Very often, Siemens ignores technical standards and creates non-standard dimensions, which makes it difficult to install a dishwasher in a finished kitchen.
- Never connect a ground contact to gas or water pipes. Grounding must be connected to the grounding bus of the apartment shield. We talked about how to make grounding in an apartment in a separate article.
- The air gap between the wall and the rear wall of the equipment should be at least 5 cm, which is quite enough for air circulation.
- The kit necessarily contains connection rules and a visual diagram for a specific model. You need to rely only on it, because.all conditions are purely individual, although they have much in common.
- It is not recommended to use network filters (extension cords), because they are very often the cause of accidents and fires. If there is no other way to supply power, it is recommended to make an electric extension cord yourself. This method of connecting the dishwasher through an extension cord can be used, as an exception.
- If you decide to put a free-standing dishwasher next to the stove, refrigerator or oven, bring a separate line from the junction box to each appliance so as not to overload the outlet installed near all devices.
We also recommend watching a visual video instruction on the proper operation of the dishwasher:
Dishwasher Tips
That's the whole instruction on how to connect the dishwasher to the water supply, electricity and sewerage with your own hands. We hope that the information was useful and interesting for you. We also recommend that you familiarize yourself with the main malfunctions of dishwashers, so that in the future you will be familiar with how to repair appliances at home!
Connection Features
So, step by step instructions on how to connect the dishwasher in stages:
- If you are installing a built-in PMM, then first you need to prepare a niche, which, as a rule, should be 60 cm wide, and for narrow models 45 cm. You can level the machine with the level of the cabinets by removing the countertop and adjusting the legs of the lower cabinets. You also need to drill holes in the cabinet body for drainage, water intake hose and electrical wires.


- Installing a dishwasher under the hob is prohibited;
- The place for installation is chosen so that the length of the drainage hose does not exceed 1.5 meters. It is allowed to increase the length up to 5 meters, but in this case it will be difficult to guarantee the stable operation of the equipment.
- The next step is connecting to electricity. Please note that the socket must be of the "euro" type. You need to replace the socket if it does not meet the standards (but not the plug of the machine). Do not forget that when connected, we ensure safety, and the dishwasher is characterized by significant energy consumption. This determines the ban on the use of tees and extension cords. Installation of the outlet involves the use of a wire with a diameter of more than 2 mm. In addition, a 16A circuit breaker is additionally mounted in the electrical panel. Grounding is also performed using a 3-core wire, and it cannot be brought out to the pipes.
- Next - connect the dishwasher to the water supply. To do this, the water is shut off, a tee is connected to the pipe, then a filter, a ball valve and a hank. All threaded joints are insulated with a fumka - it must be wound at least 10 layers.
It is also mandatory to install a coarse filter, as it will prevent sand and rust from entering the machine from the water pipe.
- As for connecting the equipment to the sewer, here you can go the simple way by installing a siphon with an additional outlet and valve. In order to protect the device from water ingress from the sewer pipe, it is necessary to place the drain hose in a special way - at the exit to the sewer network it is placed at a height of 600 mm along the wall, and then bent to ensure water flow.
- The final step in connecting the dishwasher is to check the device for operability.In this case, the machine is tested idle, controlling the rate of water inflow, its heating, as well as operation in the drying mode. The check is carried out without dishes, but with the obligatory addition of regenerating salt and detergents.
- How to choose a dishwasher - getting ready to buy
- How to choose built-in kitchen appliances
- Common dimensions of dishwashers
- Dishwasher broken - can I fix it myself?
- Using the dishwasher correctly
- Major cleaning of the dishwasher in 7 steps
Communications
A standard dishwasher needs three things in terms of switching:
- Water supply.
- Drain.
- Electricity.
Water
As for water, you will need a drain from the kitchen faucet. A standard tee will do. Where to install - is decided depending on the specific case. Sometimes it is better to place the part under the sink. Traditionally, there is a flexible pipe connection. Insert a tee with a branch between them. Sometimes there is a place under the mixer. In this case, the tee is mounted there.
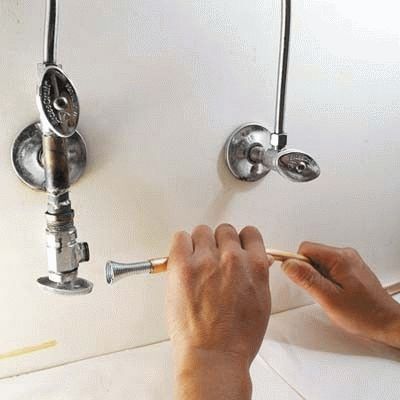
Before installation, the taps for supplying the apartment with cold and hot water are blocked. For safety. The de-energized system is disassembled with a dishwasher tee insert in the selected location. Ultimately, the bending radius of the liner should not be less than the maximum allowable for the selected hose model. A faucet is built into the water supply path to shut off the water if necessary.
Drainage of water is carried out in a similar way. The only thing, in some dishwashers, we meet bends with U-shaped pipes at the end, easily clinging to the edge of the sink.This is a good way out of the situation if there are no prejudices against the hose sticking out in plain sight, which, by the way, is easy to remove after the cycle is completed.
Similarly to the water supply, a drain cuts in. A splitter is bought and mounted under the sink. The dishwasher hose is connected to the corresponding tee fitting. Drainage and water intake are located nearby. Accordingly, it turns out two hoses running side by side.
The car wash is not easy to get to. At least two methods have been found:
- remove the back wall of the cabinet compartment where the dishwasher is built in;
- drill holes in the side walls before washing.
The first method is good when there are cutouts for hoses in the transverse partitions on the back of the furniture from the bottom. In reality, they are designed for a plinth, but they are quite wide. In extreme cases, you will have to expand a little, this is better than drilling holes in the walls for installing a dishwasher.
The action is performed by an ordinary grinder. Move the furniture away from the wall. In order not to break off pieces of polish, the direction of rotation of the sanding disc should press the varnish layer against the board. You will have to work on both sides, carefully. Before starting, you should consider in detail the location of the dishwasher hoses and draw the sewing lines with a pencil. It is permissible to use a drill, electric jigsaw, other carpentry tools.

The same goes for the walls. Grind the holes made with special drills with abrasive. When installing, make sure that the minimum bending radius of the hoses in the retracted position of the dishwasher does not exceed the established limits.
Electricity
Unlike most appliances of this type, built-in dishwashers are supplied with cords with plugs. You will need to hold the outlet within the radius of reach of the plug. A piece of cable for 230 V and a socket will do.
It is difficult to drag communications through the threshold. Just nailing the wire with studs with clamps will not work. The feet of passing people will wear out the cord. Someone gets electrocuted while washing the floor.
If access to the central network is on the other side of the doorway, it is better to lay the cord behind the trim or nail it with small nails. Or, using an angle grinder, cut a groove the size of a wire on the back of each casing.
The dishwasher socket is attached to the baseboard. Where it's easy to get to when the furniture is finally in place.
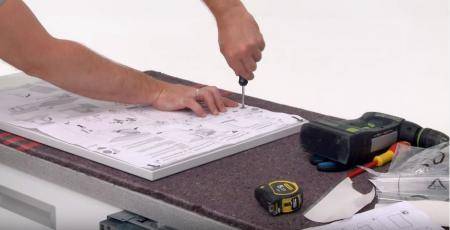
Do-it-yourself facade installation instructions
Having chosen the right time and prepared the tools, you can proceed with the installation. However, during the installation process, they often encounter unpleasant nuances that can delay the installation of the facade for an indefinite period.
Consider the installation features that are best considered before starting work.
Stage # 1 - determine the dimensions of the decorative panel
To find out the exact dimensions of the front panel, you do not need to make calculations and draw diagrams - the manufacturer did everything for us. The instructions indicate all the indicators of interest - length, width, thickness, allowances.
A variant of the scheme by which you can determine the size of the decorative overlay. General drawings allow you to compare the dimensions of the machine and cabinet in order to install the unit as level as possible
The width of the panel often coincides with the width of the dishwasher, since the door on the sides repeats the parameters of the body.For example, for standard 60 cm models it is usually 598 mm, for 45 cm models it is 448 mm (there are exceptions).


However, the height may vary. It depends on how the facade of the adjacent kitchen cabinets is located.
The most practical version of the kitchen facade - a decorative plinth is stretched along the floor throughout the entire set, covering the legs of furniture and appliances
It is allowed to use a panel a few mm longer than the recommended length, if the interior requires it. The main thing is that the extra millimeters do not interfere with opening the door at a right angle.
If the overlay touches the base, then it is left unchanged, and the edge of the base is cut out along the contour of the facade.
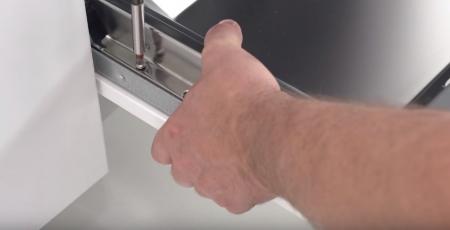
Stage # 2 - choose the right fixation method
It is forbidden to ignore the manufacturer's recommendations and experiment with ways to attach the lining. If you fix the facade in your own way, it may eventually fall off or “move out” to the side.
Traditionally, self-tapping screws are used to fasten the decorative panel. They are good because, if necessary, they can be quickly unscrewed, and the lining can be removed and replaced.
If you use nails instead of self-tapping screws, then there will definitely be problems with dismantling. Expensive appliances have been serving for decades and can "survive" a kitchen set.
To replace the overlay with a panel from new furniture, you will have to tear out the nails at the risk of deforming the surface of the door.
It is a mistake to fix the facade with glue. Two extremes can occur: either the glue will quickly lose its properties from temperature changes, or it will “tightly” fix the pad on the machine. Both options are impractical.
Leaving pieces of adhesive tape as fasteners is also frivolous - the panel will fall off under its own weight at the very first vibrations of the unit.
Stage # 3 - sequentially perform the installation
Before you start hanging the facade, you need to check how evenly the dishwasher is installed relative to adjacent cabinets and countertops. A tilted position may cause the panel to be attached crookedly.
The second point concerns the dimensions - once again, you should check whether the length and width of the lining are exactly adjusted. If all is well, you can proceed.
Work order:
If, when closing the PMM door, no large gaps and backlashes are formed, we tighten the fasteners, and this work can be considered completed.
Rubber apron - an element of the installation kit. It performs a protective role, but some dishwasher owners ignore its installation. We advise you to fix the apron in the designated place, according to the instructions.
After decorating the front side of the dishwasher, do not forget to make side fastenings of the case.
To fix the side fasteners, you must first remove the upper basket for loading dishes, and then find the mounting holes and screw self-tapping screws suitable in length from the side of the washing chamber into the side walls.
Conclusions and useful video on the topic
Tips for installation and replacement decorative panel:
Recommendations for connecting to sewerage and water supply:
The rules for self-connecting the dishwasher are shown in the following video:
The complete set and documentary support assume the independent installation of the dishwasher by the owners. However, the owners of a new car do not always have enough skills or knowledge for do-it-yourself installation.
If you doubt your own skills, it is better to ask for help in integrating the dishwasher into the kitchen set and connecting it to a service center or to a trusted private trader.
Do you want to talk about how your dishwasher or a neighbor's unit was installed in the kitchen module? Do you have useful information on the topic of the article that is worth sharing with site visitors? Please write comments, ask questions, post photos in the block below.


