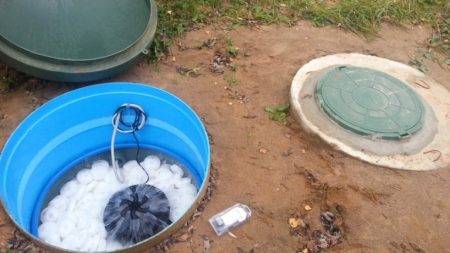
- Instructions for installing a septic tank
- How to choose the right place for a septic tank
- Installation of a septic tank: some nuances of construction work
- Barrel preparation
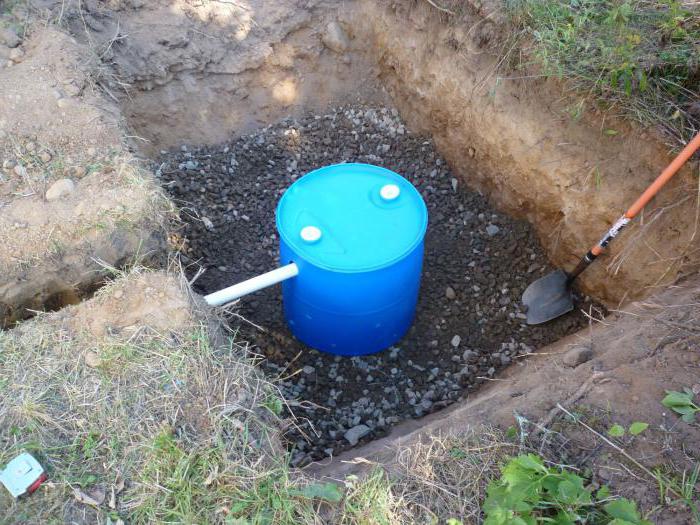
- Pit preparation
- How to choose a place to install a septic tank
- Septic tank device
- How does it all work?
- Features of the installation work
- Stage # 1 - sizing and excavation
- Stage # 2 - installation of plastic containers
- Stage # 3 - filter field device
- Varieties of designs and schemes
- How to make a septic tank from concrete rings?
- Choice of material metal or plastic
- Installation work
- Preparatory stage
- Assembly
- We build a septic tank from barrels with our own hands
- Advice from professionals
- Cleaning plant from metal barrels
- Conclusion
- DIY photo of septic tanks
Instructions for installing a septic tank
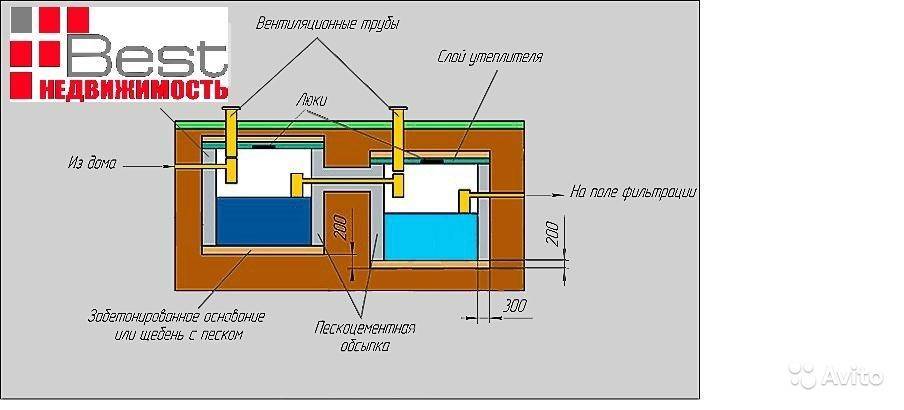
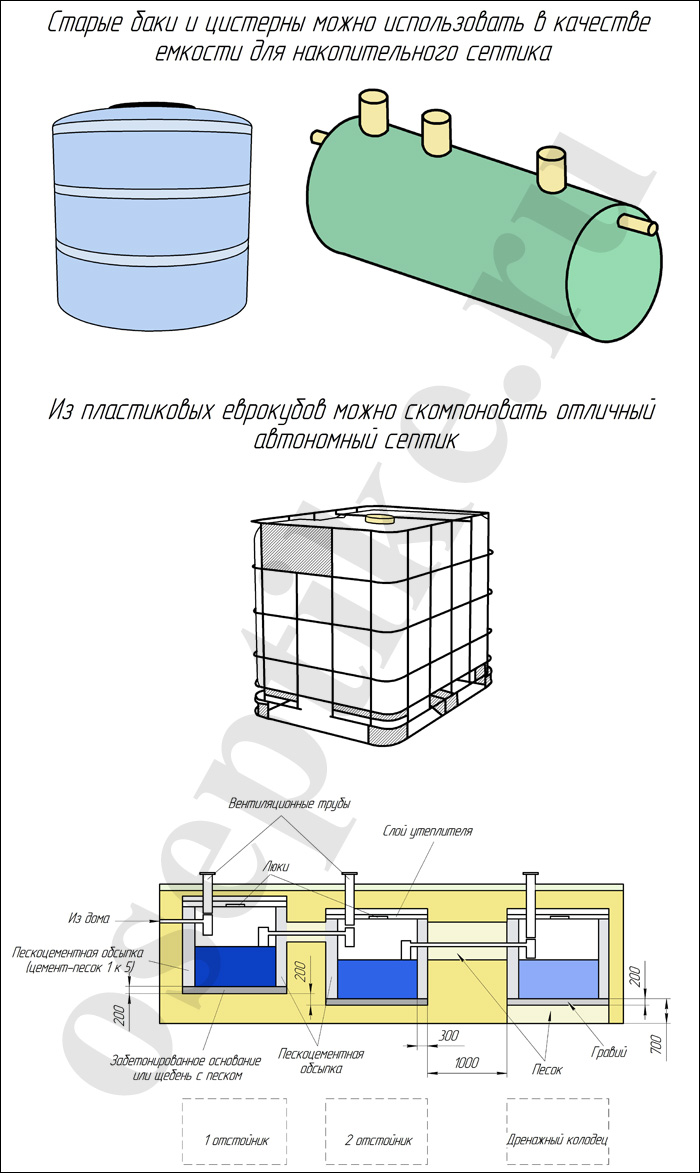
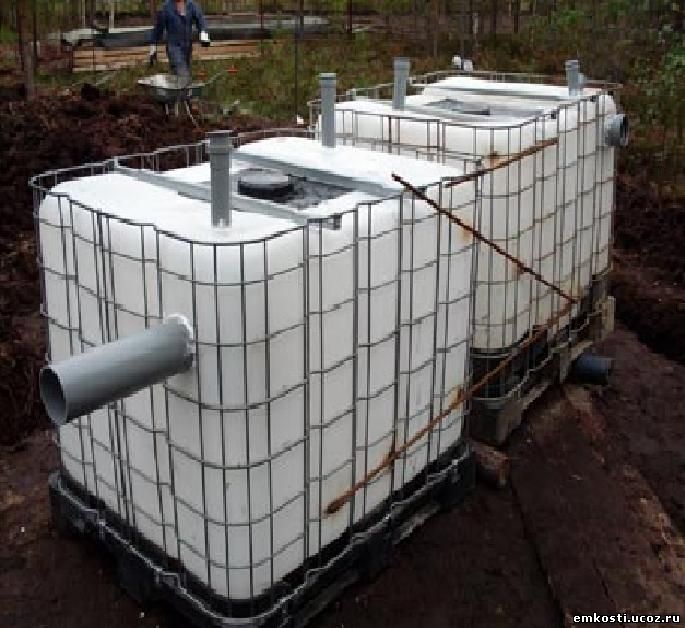
The creation and installation of a septic tank from eurocubes includes the following stages of work:
- design work (stage 1);
- preparatory work (stage 2);
- assembly of a septic tank (stage 3);
- installation of a septic tank (stage 4).
At the first stage of work, it is necessary to determine the type of septic tank and the place of its installation. In this case, the following operations are performed:
- Estimation of the required capacity of the septic tank. The size of the septic tank depends on the time the septic tank is used and the number of residents in the country house. During temporary residence in the country in the summer, a small-capacity septic tank is used.At the same time, the required volume of the septic tank V in liters can be determined by the formula: V = N × 180 × 3, where: N is the number of people living in the house, 180 is the daily rate of wastewater in liters per person, 3 is the time for complete wastewater treatment septic tank. As practice has shown, two eurocubes of 800 liters each are enough for a family of 3 people.
- Determination of the location of the septic tank. It is recommended to locate the septic tank at a distance of at least 50 m from the drinking water intake, 30 m from the reservoir, 10 m from the river and 5 m from the road. The distance from the house should be at least 6 m. But too much distance from the house due to the need to slope the pipe causes an increase in the installation depth of the septic tank and an increase in the likelihood of blockage in the sewer pipe.
Stage 2 works include:
- Digging a pit for a septic tank. The length and width of the pit must correspond to the dimensions of the septic tank with a margin of 20-25 cm on each side. The depth of the pit depends on the height of the tanks, taking into account the sand and concrete cushions, as well as the slope of the sewer pipe. In addition, it must be taken into account that the second container is shifted by 20-30 cm in height and, therefore, the bottom of the pit will have a stepped appearance.
- At the bottom of the pit, a sand cushion is laid. If the GWL is high, then a concrete pad is poured, in which loops are installed for attaching the septic tank body.
- Preparation of trenches for the sewer pipe and drainage system. A trench for a sewer pipe is dug, taking into account the slope towards the septic tank. This slope should be 2 cm for every m of pipe length.
At stage 3, a septic tank is assembled from eurocubes.
Materials for creating a septic tank:
- 2 eurocubes;
- 4 tees;
- pipes.Pipes are needed to connect a septic tank and drain treated water, to make ventilation and an overflow system;
- sealant,
- fittings;
- boards;
- Styrofoam.
As a tool at this stage of work, you will need:
- Bulgarian;
- welding machine.
When assembling septic tanks from eurocubes, the following operations must be performed:
- Using caps and sealant, plug the drain holes in both eurocubes.
- Using a grinder, cut U-shaped holes on the container lids through which the tees will be installed.
- At a distance of 20 cm from the upper edge of the body of the first vessel, make a hole 110 mm in size for the inlet pipe.
- Insert a branch pipe into the hole, attach a tee to it inside the eurocube, seal the connection of the branch pipe with the body wall with sealant.
- Cut a ventilation hole above the tee and insert a short piece of pipe into it. This hole will also serve to clean the channel.
- Cut a hole for the overflow pipe at a distance on the rear wall of the housing. This hole must be below the inlet.
- Insert a piece of pipe into the hole and fasten a tee on it inside the eurocube. Cut a ventilation hole above the tee and insert the pipe in the same way as in step 5.
- Move the first container 20 cm higher than the second. To do this, you can put under it
- lining.
- On the front and back walls of the second vessel, cut holes for the overflow pipe and outlet pipe. In this case, the outlet pipe must be lower than the overflow pipe.
- Tees are attached to both pipes inside the vessel. Ventilation pipes are installed above each tee.
- Connect the overflow outlet from the first container and the overflow inlet of the second container with a pipe segment.
- Seal all joints with sealant.
- Using welding and fittings, fasten both bodies into one.
- The cut U-shaped holes in the covers of Eurocubes should be sealed and welded with a layer of waterproofing.
At the 4th stage, you need to perform the following operations:
- Lower the septic tank into the pit.
- Connect the sewer pipe and the pipe leading to the aeration field. The outlet pipe is equipped with a check valve.
- Insulate the septic tank with foam or other material.
- To protect the walls of the septic tank, install boards or corrugated board around it.
- Backfill after filling the septic tank with water. In areas with high GWL, backfilling is carried out with a mixture of sand and cement, and in areas with low GWL, soil with sand and tamping.
- Concrete the top of the pit.
How to choose the right place for a septic tank
According to legislative documents in the Russian Federation, during the construction of a treatment facility, it is necessary to maintain a distance of at least 5 meters from the dwelling to it, the same rule applies to the road. The distance to the neighbors' plot should correspond to 4 meters, this will allow you to maintain good relations with the nearest neighbors. For the garden, it is necessary to provide a distance of 2 meters from green spaces and shrubs so that plant roots do not damage your treatment plant.
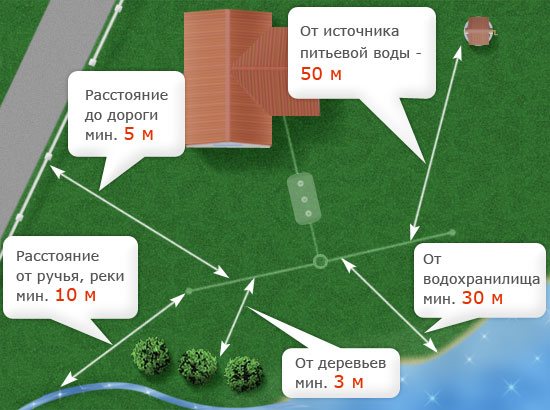
If there is a well or an aquifer on the site, then the minimum distance from the septic tank they should be 20 meters away if there are no connections with the layers that are responsible for filtration and carry water. If there is a place to be their intersection, then you need to contact a special service that will determine the required distance on the spot.
Installation of a septic tank: some nuances of construction work
Consider how the installation of a septic tank assembled from barrels should take place.
Barrel preparation
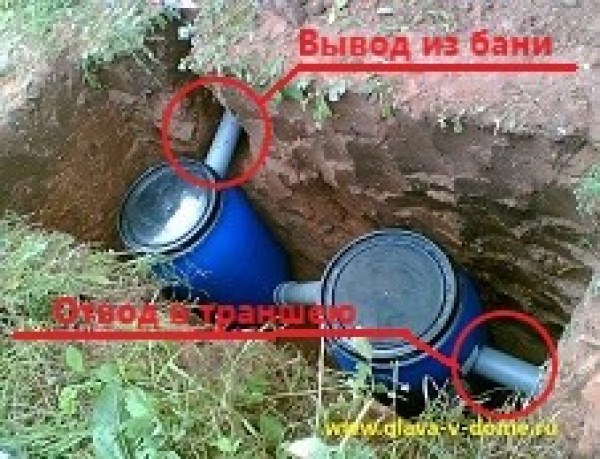
It is necessary to prepare a hole for connecting incoming and outgoing pipes. In the first barrel, you need to make a hole for the incoming pipe at a distance of 20 cm from the top cover of the barrel. The inlet is made on the opposite side of the barrel, shifting it 10 cm down relative to the first.
In addition, in the first barrel you need to make a hole for the ventilation riser. The lid of the first barrel is best made removable, since it is in this chamber that solid waste will accumulate the most, so it will need to be cleaned regularly.
In the second settling barrel, the inlet pipe hole is made at a distance of 20 cm from the top cover. The outlet pipe is located on the opposite side of the barrel, 10 cm above the opening of the inlet pipe.
If drainage pipes leading to the filtration fields are connected to the barrel, then it is better to make two holes in it located at an angle of 45 degrees to each other.
Pit preparation
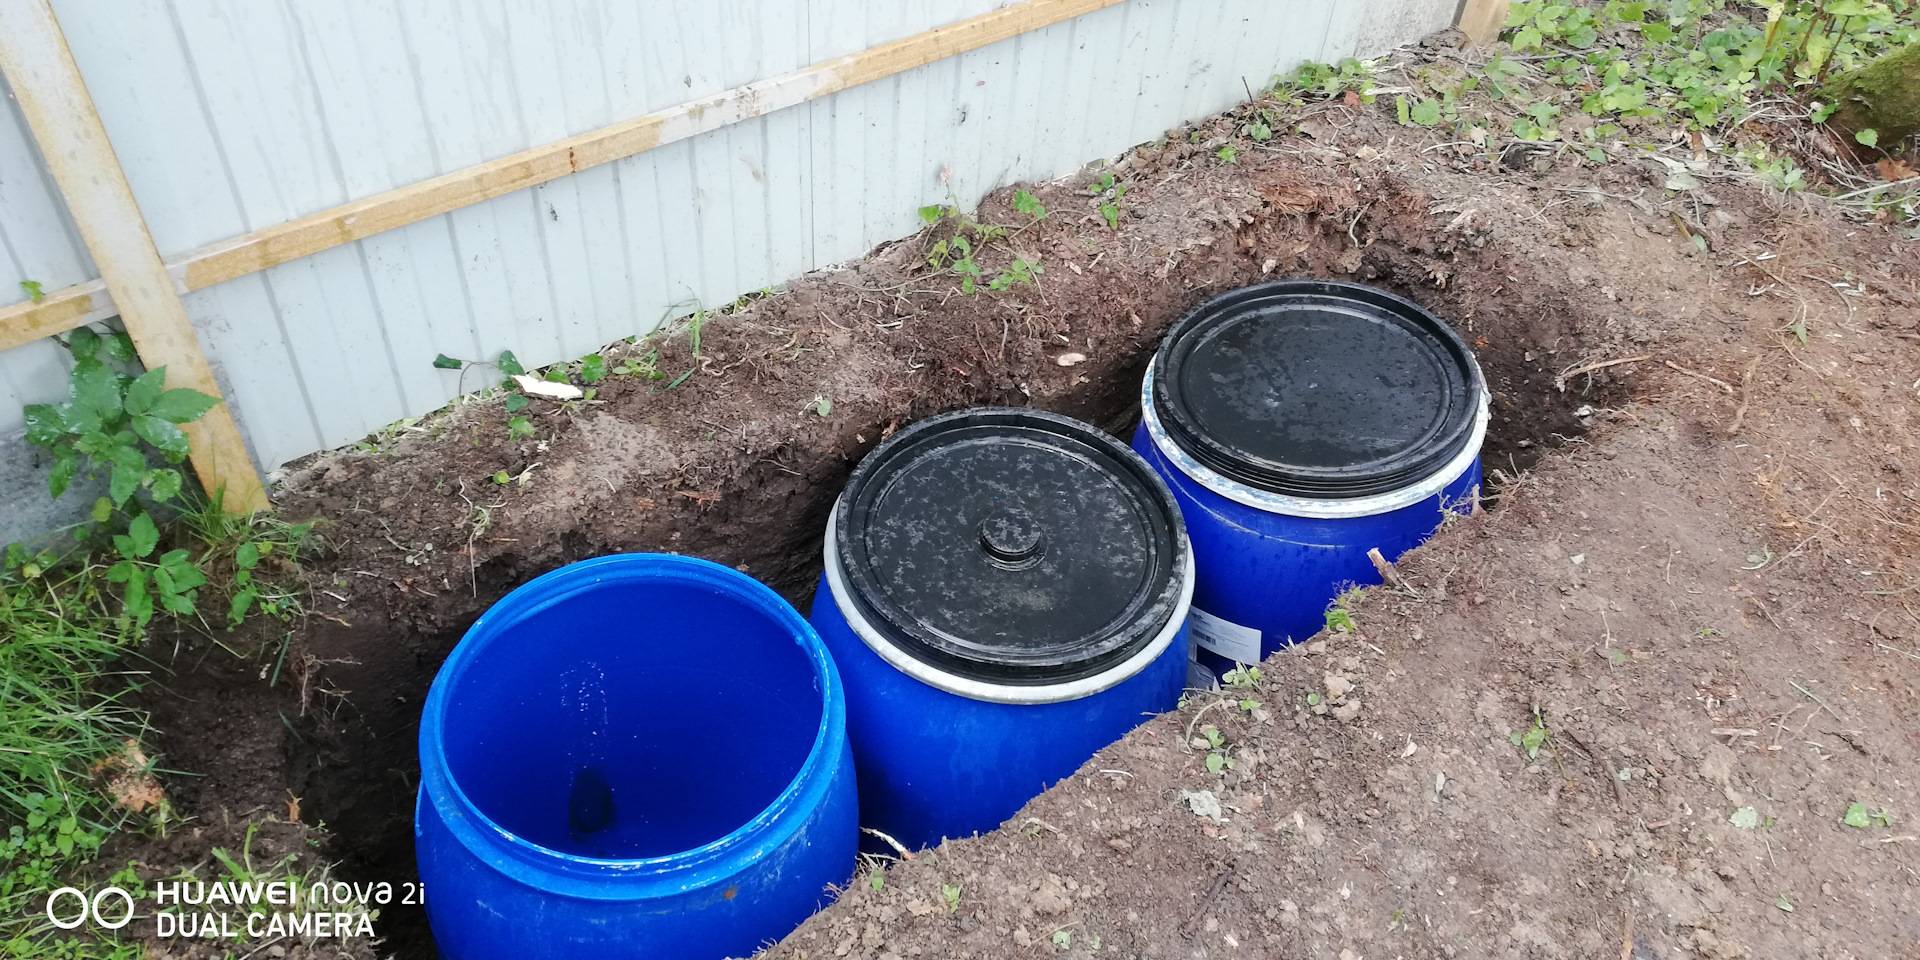
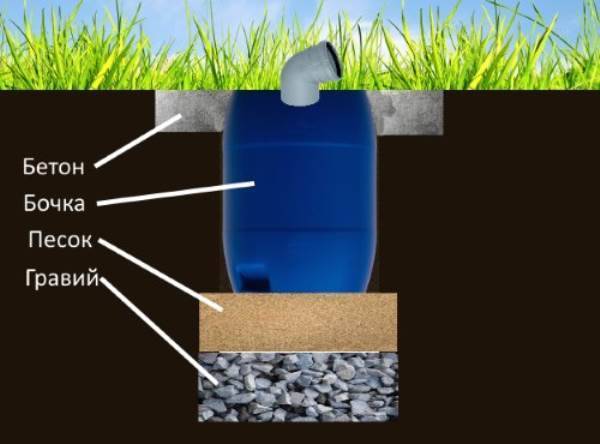
The pit must be larger than the barrels. The gap between the walls of the barrels and the sides of the pit should be about 25 cm around the entire perimeter.
The bottom of the pit must be well compacted, after which a sand cushion should be made, 10 cm high.
If possible, fill the bottom of the pit with concrete mortar. Embedded metal parts with loops for fixing barrels should be installed in concrete.
When preparing the pit, it must be remembered that each subsequent chamber was located below the previous one. That is, the outlet pipe of the previous chamber must be at the level of the inlet of the next one.
How to choose a place to install a septic tank
If you decide to install a septic tank from barrels in the country with your own hands, choose the right place. The structure must be removed from:
- Wells, wells and other sources at 30-50 m;
- The foundation of buildings - 5-10 m;
- Green spaces: shrubs / trees - 3-5 m;
- Underground pipelines - 10-15 m;
- Basement and garden beds - 10-20 m.
Wastewater enters the system in small portions, because the owners of suburban real estate do not visit the dacha every weekend. It is always necessary to adhere to building and sanitary restrictions. Any sanitary norm has its own reasons, its violation will lead to problems with health and the law.


When equipping a homemade septic tank from plastic barrels, do not place the object near the foundation, the treated drains will begin to destroy its foundation. When choosing a location, the following factors are taken into account:
- The composition and properties of the soil - sandy soil easily passes water, clay, loamy and other dense soils are unsuitable for absorbing large amounts of moisture, so they build storage tanks or expand the drainage system with the addition of a large amount of sand and gravel.
- The relief of the site - the house should be placed above the sump, and not vice versa, because the process occurs by gravity and the slope in the opposite direction will not allow wastewater to move in the right direction.
- Groundwater Depth – Closely lying groundwater may be polluted by runoff or the ground near the tanks will become waterlogged due to excess moisture. In this case, the concreting of the drain pit is carried out.
- Climatic conditions - it is necessary to ensure that the chambers do not freeze at low temperature indicators. If the pipe is installed above the freezing level, it is insulated with waterproof insulation.
- Free access for sewers - you need to create access roads for the car to extract sewage.
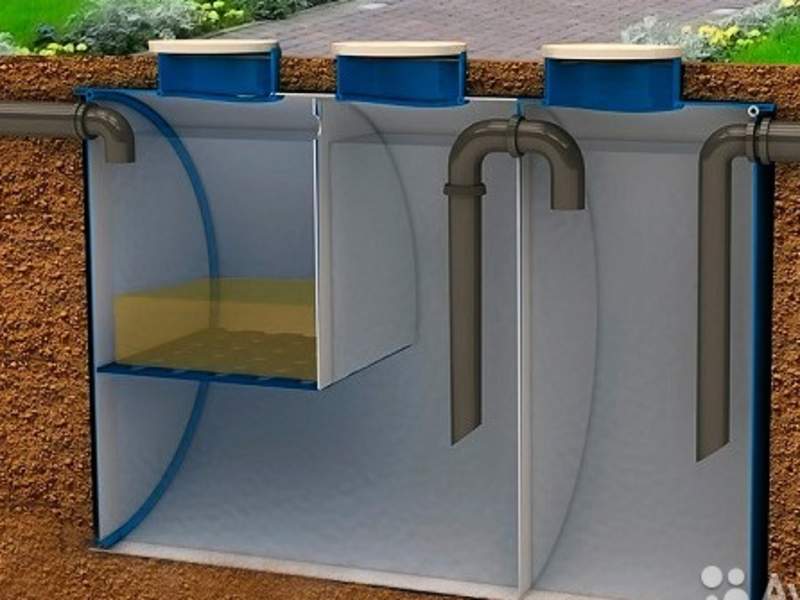
Septic tank device
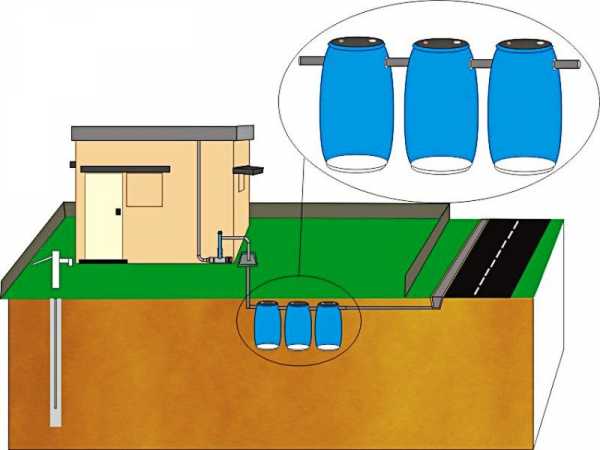
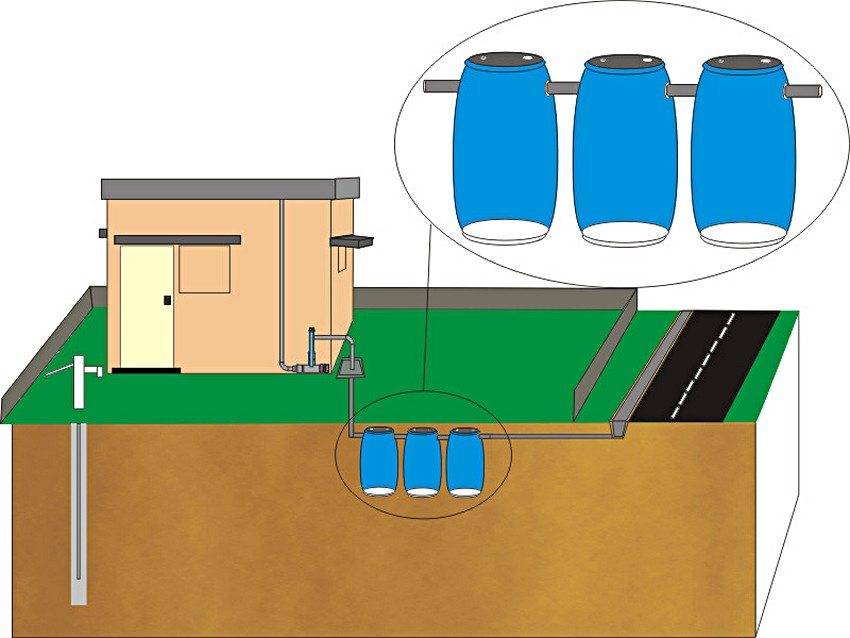
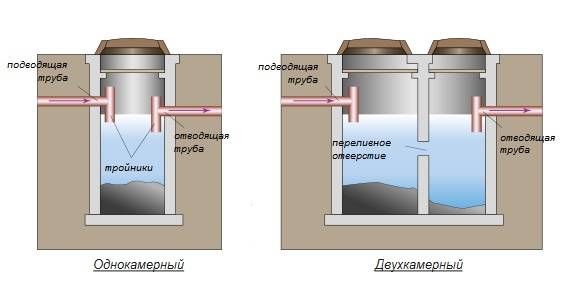
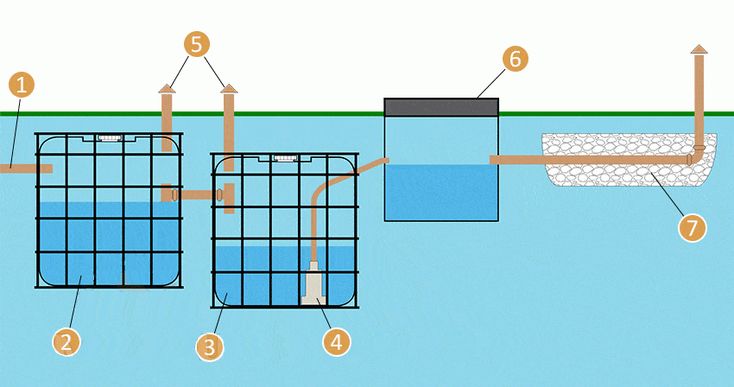
Consider how to make a septic tank from a barrel. To install a septic tank, you will need three barrels, which will be connected in series with pipes. The first two barrels will have bottoms, and the last one will need to be cut off - the purified water should go into the ground. With a high level of groundwater in the area, a special structure will be needed to organize the flow of treated water - a filtration field, also called an aeration field. We will describe below what it is.
A septic tank built according to this scheme is called a three-chamber. The effluents coming from the house in the first chamber (barrel) are settled and at the same time decomposed by special bacteria into simple non-toxic substances that will settle to the bottom.
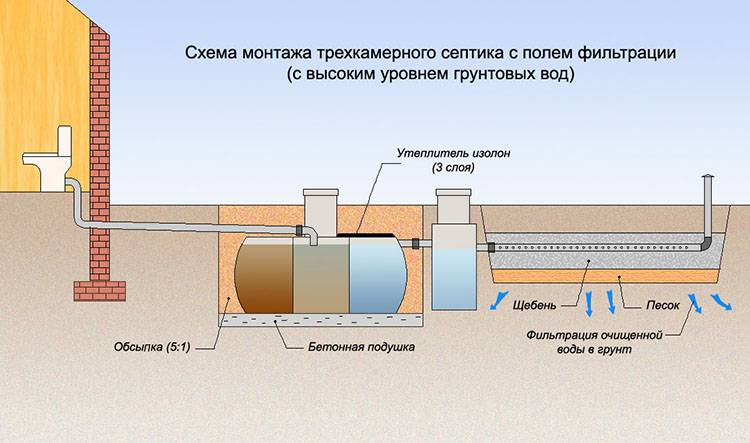
Arrangement and installation of a three-chamber septic tank with a filtration field
As the chamber fills, the clarified water that appears on top will flow through the pipe into the next container, where it will pass the second stage of purification with the participation of bacteria of a different species. After that, again through the overflow pipe, the liquid enters the filtration well (barrel without a bottom) or into the aeration field. After such purification, no more than 5% of contaminants remain in the water, which makes it possible to use it even for watering a garden or vegetable garden.
If the second stage of cleaning is not provided and the septic tank consists of only two barrels, it is called a two-chamber. It will be less effective, but easier to install.
The main advantage of a septic tank is that it has to be pumped out much less frequently than a cesspool.In addition, if bacterial cultures are chosen correctly to populate the treatment plant, their waste products can be used as fertilizer.
How does it all work?
The left barrel is the last one! All water from it is pumped out by a drainage pump into a pit on the street (or a filtration well / filtration field - according to the circumstances). And the first barrel on the right goes there from the toilet bowl, everything in it floats that does not sink, and sinks what turned into silt.
To speed up biological processing in the first barrel, constant aeration is carried out with an aquarium compressor (you can use something more productive - then the design will begin to strongly resemble a full-fledged automatic cleaning station, such as Unilos Astra). It will also be useful to periodically add bacterial cultures through the toilet (there are a large selection in stores).
When summer comes, I will insert the pump into the first barrel and throw the end of the hose into the garden, clean the bottom of the silt and then return everything to its place.
the pump is necessary or drainage with a float (price 1,500-2,500) or to make a float for the baby so as not to run around with the pump all the time!

Features of the installation work
First, using a jigsaw, holes are cut in the barrels for installing overflow pipes and a ventilation riser. The hole for connecting the incoming pipe to the chamber is made at a distance of 20 cm from the upper edge of the container. The outlet is made on the opposite side of the chamber below the input by 10 cm, that is, at a distance of 30 cm from the top edge of the barrel.
Installing the overflow pipe into the hole cut in the first plastic sump drum and filling the gap with a two-component epoxy sealant
The ventilation riser for the removal of gases is mounted only in the first settling barrel. It is also desirable to provide for this chamber to have a removable cover, which makes it possible to periodically clean the bottom of settled solid particles. In the second settling tank, two holes are made at the bottom, located relative to each other at an angle of 45 degrees, for connecting drainage pipes laid along the filtration field.
Important! The gaps in the holes, which are formed due to loose contact between the pipes and the walls of the barrel, are filled with a two-component epoxy sealant.
Stage # 1 - sizing and excavation
When calculating the dimensions of the pit, it is assumed that between the barrels and its walls there should be a gap of 25 cm around the entire perimeter. This gap will later be filled with a dry sand-cement mixture, which serves to protect the walls of the septic tank from damage during seasonal soil movement.
If you have finances, the bottom under the settling chambers can be filled with concrete mortar, providing in the “cushion” the presence of embedded metal parts with loops that will serve to secure the plastic containers. Such fastening will not allow the barrels to “float” with a vein, and, thereby, disrupt the equipped autonomous sewage system.
The stepped bottom of the pit must be leveled and covered with a layer of compacted sand, the thickness of which must be at least 10 cm.
Stage # 2 - installation of plastic containers
Barrels are installed on the prepared bottom of the pit, fixed with straps to metal loops immured in concrete. Connect all pipes and seal the gaps in the holes.The remaining space between the walls of the pit and the tanks is filled with a mixture of cement and sand, not forgetting to carry out layer-by-layer tamping. As the pit is filled with backfill, water is poured into the containers to prevent deformation of the walls of the barrels under the pressure of the sand-cement mixture.
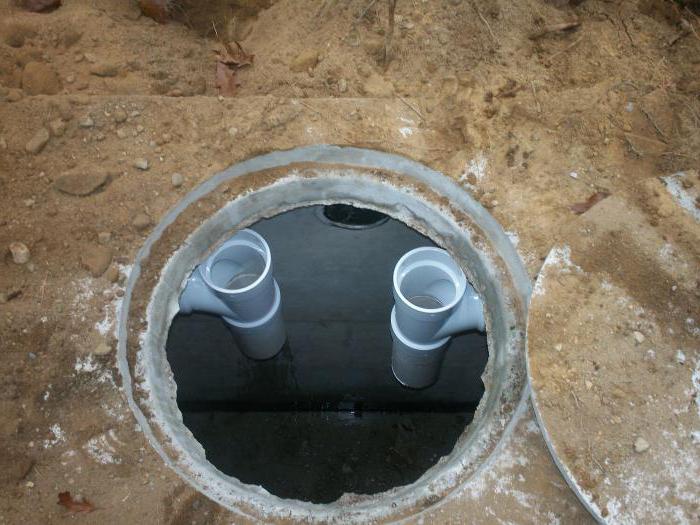
Preparation of a hole in the second settling barrel for connecting an overflow pipe. In this version, the flange is connected not from the side, but from above
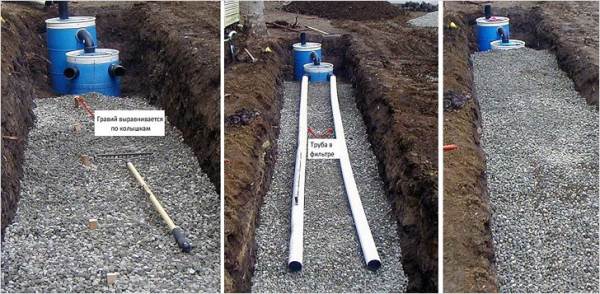
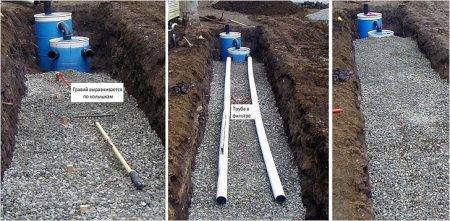
Stage # 3 - filter field device
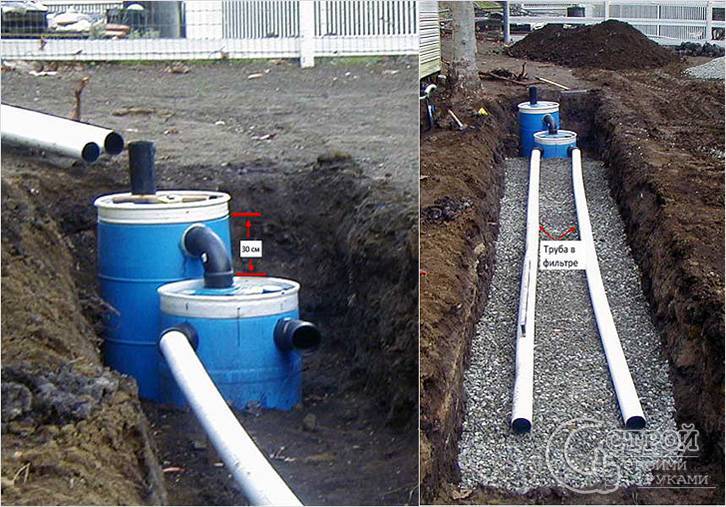
In the immediate vicinity of the septic tank, a trench is dug 60-70 cm deep, the dimensions of which should allow the placement of two perforated pipes. The bottom and walls of the trench are lined with a geotextile fabric with a margin, which is necessary to cover pipes covered with rubble from above.
A 30-cm layer of crushed stone is poured onto the geotextile, the bulk material is leveled and rammed
Drainage pipes with perforation in the walls are laid, which are connected to the second settling barrel. Then another 10 cm of crushed stone is poured on top of the pipes, leveled and covered with a geotextile cloth so that the edges overlap each other by 15-20 cm. Then it remains to fill the filtration field with soil and decorate this place with lawn grass.
As you can see, any summer resident can make a septic tank from barrels. It should only be remembered that this facility is designed for the collection and disposal of a small amount of liquid household waste.


Somehow I didn’t think that I could make a septic tank with my own hands, I’ve been wanting to go to the country for a long time, but it’s a little expensive. I looked - at least 25,000 rubles, and then if you put it yourself. And it will only be used for 3 months in full. Here it is also necessary that the hands be inserted with the correct end.A neighbor in the dacha bought it ready-made, did everything according to the instructions, there it must be walled up in the solution. I did it, I walked proudly for 2 weeks, like you are all the old fashioned way, but I have civilization. And then from this civilization such a smell went that at least run. So he just didn’t do anything and foam it and wrap it with a film, in short, he practiced with him all summer. After all, you can’t pull it out of concrete already. That's it.
Site navigator
Hello! Cold water leaking from single lever mixer. I changed the cartridge but nothing changed.
How to determine if it fits shower system to the mixer? I have a bath faucet.
Hello! Such a problem. Bathroom ceiling leaking room when the upstairs neighbors are active.
Varieties of designs and schemes
A home-made septic tank constructed from barrels consists of several containers (chambers) installed in a given order. They are connected in series with each other by branch pipes so that the filling of the sections is carried out in a strictly defined order. This is achieved by installing cameras at different height levels.
The principle of operation of a multi-chamber septic tank is similar to the principle of operation of a cesspool with overflow. The entrance and exit of pipes into the chambers is done in such a way that water begins to flow into the next tank before the water level rises to the inlet pipe.
Gradually accumulating in the chamber, the water settles. The heaviest particles of pollution settle on the bottom of the tank, smaller and lighter ones continue their way through the system.
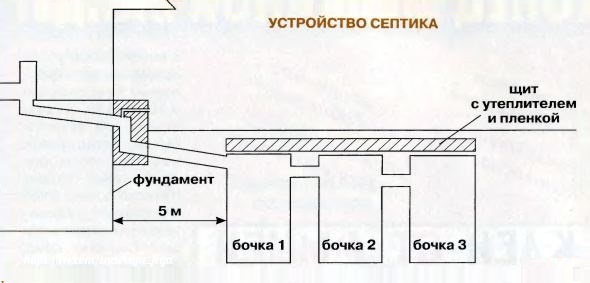
Diagram of a septic tank device from used barrels
For the free flow of sewage to the septic tank and from chamber to chamber, the sewer line is arranged with a slope. The slope must be observed at each site, including the sections between sections of the septic tank.
In order for the methane formed during the processing of wastewater to be freely removed from the system, it is necessary to arrange ventilation. It is installed vertically at the exit from at home or at the exit of their last section of a makeshift septic tank.
In addition, on the drain of water from plumbing fixtures, sinks, toilets, showers, etc., it is necessary to provide a siphon - at least made in the form of a “knee” - so that an unpleasant smell does not poison the existence.
The principle of operation of the septic tank is based on the gradual separation of solid insoluble components and the liquid component of wastewater. The more sections the sewer passes through, the higher the final degree of cleaning.
The most common is a three-section septic tank scheme used for processing gray and brown waste streams. However, if it is necessary to purify the contaminated water coming from the bath or kitchen, the use of one or two barrel sections will be enough.
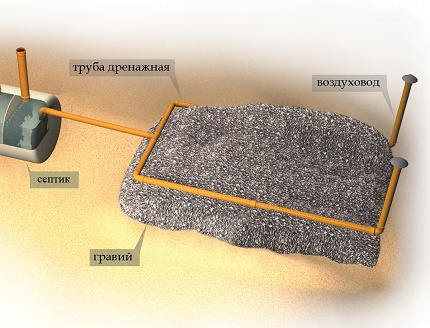
Scheme of the filtration field for a homemade septic tank from barrels
Purified and clarified effluents from the septic tank flow into the soil post-treatment system, for example, it is disposed of through the filtration field.
From the last barrel, they arrange an exit to the filtration field, which completes the cleaning process. This post-treatment system is an underground structure assembled from perforated pipes - drains.
The drainage pipeline is laid in trenches specially selected for them, lined with geotextile, on top of which pipes are laid and sand and gravel mixture is covered.
The function of ground aftertreatment of gray drains supplied by bathhouses, washing machines, kitchen drains, etc., can be safely entrusted to an absorption well built in the last barrel of the sewer system. In this case, the bottom is cut out from the tank, and it is filled with gravel and sand so that the layer of this backfill is at least 1 meter.
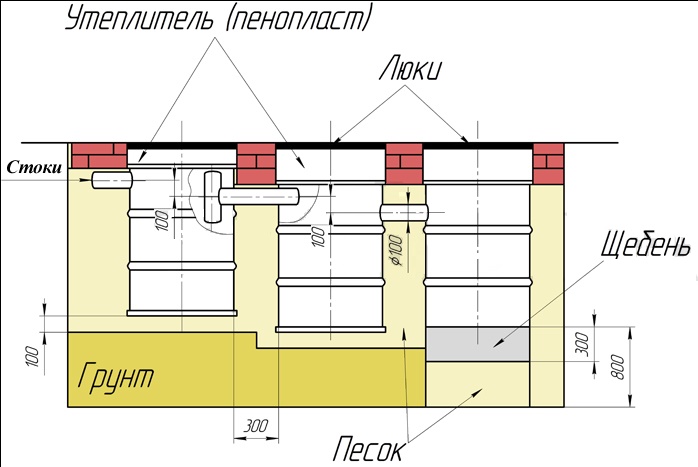
Diagram of a septic tank from barrels with an absorption well
If the amount of runoff does not exceed 5–8 m³ / day, then a third section without a bottom, filled with a layer of 1 m of sand and gravel, can be used as a soil post-treatment system. Absorption (filtering) wells are arranged using this method.
As you can see, the scheme is quite simple, but its implementation in practice will require a lot of physical effort. Particularly labor-intensive work is associated with the development of a pit for sections of a septic tank and trenches for a sewer pipeline.
Scheme of septic tanks with one and two chambers
The calculation of the volume of wastewater is based on the rate of wastewater disposal per person in l / day. A single-chamber septic tank is built with a waste mass volume of up to 1 m³ / day, a two-chamber septic tank is built at 5 - 8 m³ / day.
How to make a septic tank from concrete rings?
One of the most popular options for a homemade septic tank is the construction of concrete rings. Prefabricated concrete structures greatly facilitate the installation of the device compared to, for example, pouring concrete.


The process of creating a septic tank consists of the following steps:
- Marking a place for a septic tank.
- Digging a pit.
- Installation of concrete rings.
- Concreting the bottom of the pit.
- Connecting sewers and overflows.
- Sealing and waterproofing joints.
- Backfilling of the pit.
- Installation of the top floor with a cover.
But before buying the necessary components, it is advisable to draw up a septic tank diagram and deal with the installation features. The following photo selection will help to visualize the process of building a septic tank from concrete rings:
Under the concrete rings, of course, you need a cylindrical pit. Such pits will need two or three, depending on the number of septic tank chambers. When it comes to servicing a small cottage, you can get by with just two cameras.
In the first one, sedimentation and bacterial processing of wastewater will be carried out, and in the second, clarified wastewater will be disposed of through a sand and gravel filter.
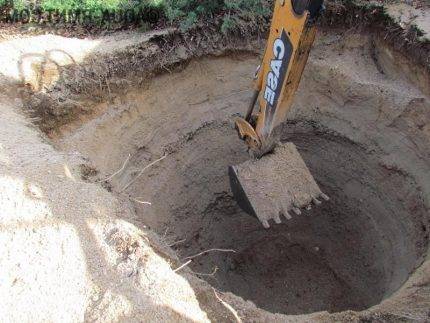
The easiest way to make a pit for a septic tank is with an excavator, although if desired, these works can be done with a conventional shovel.
For a private house in which several people live, it makes sense to build a three-chamber structure. The first two chambers will be almost identical in design.
In the first, a sewer pipe leading from the house is inserted. The distance between the individual parts of the septic tank should be about 50 cm.
The depth of the pits is determined by the height of the rings and the thickness of the bottom, although the bottom does not need to be concreted in the last pit.
For excavation, you can use an excavator or carry it out manually, although this method is quite laborious. On dense clay soils, you can first dig a pit, and then install rings in it.
On sandy soils, rings are usually placed in a selected place and the soil is selected from the inside of the circle so that the ring gradually sinks down.
Then the next ring is installed, and so on.This method is very effective in building wells, but septic tanks are usually not that deep, so you can choose the most convenient method.
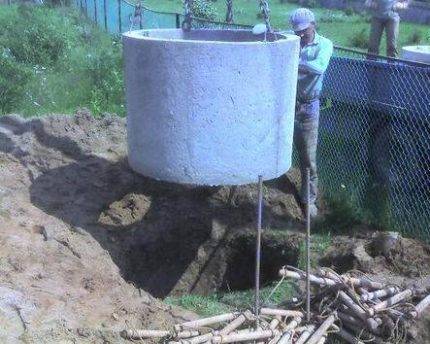
To lower the concrete rings in the pit for a septic tank, it is most convenient to use special equipment, such as a crane or winch
The pit is dug, the rings are lowered, now you can start concreting the bottom. To do this, use a mixture of cement, sand and water in a ratio of 2:2:1. The composition is poured to the bottom of the structure. Before using the septic tank, you need to wait for the screed to dry, this will increase its strength.
The joints between the rings are sealed inside and out with cement mortar. It is recommended to use dry building mixes, which are intended for use in places with high humidity. After sealing the seams, they are treated with coating waterproofing.
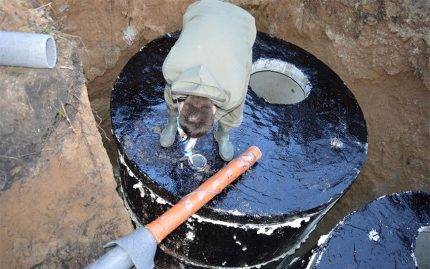
Outside, the septic tank is covered with a layer of waterproofing. Some masters recommend lubricating not only the joints, but the entire capacity of the device
The trench for the sewer pipe leading from the house to the septic tank without pumping and odor is laid with a slight slope. At the junction of the septic tank and the pipe, a hole of suitable size is made in the thickness of the concrete.
In the same way, overflow pipes are installed that connect the individual parts of the septic tank. All junctions of the septic tank with pipes must be sealed and covered with a layer of waterproofing.
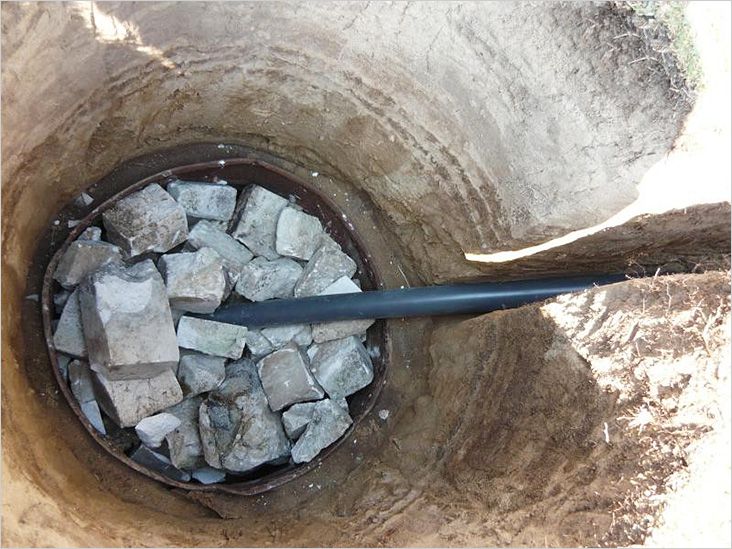
At the bottom of the last section of the septic tank, instead of cement mortar, a gravel-sand filter is laid. First, they fall asleep and level the sand, and then a layer of gravel.
It is also allowed to use crushed stone of a suitable fraction for these purposes. The thickness of the filtration layer should be approximately 30-40 cm.
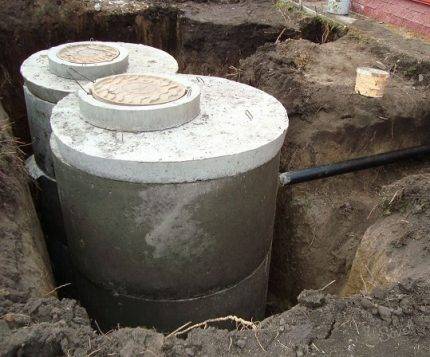
As the top floor of a septic tank made of concrete rings, a special round slab of a suitable size with an airtight lid is used.
After all the compartments of the septic tank are ready, you need to cover them with round concrete slabs, which can be purchased from reinforced concrete manufacturers complete with concrete rings.
These lids have holes with sealed concrete lids. It remains to backfill the pits, and the septic tank can be considered ready for operation.
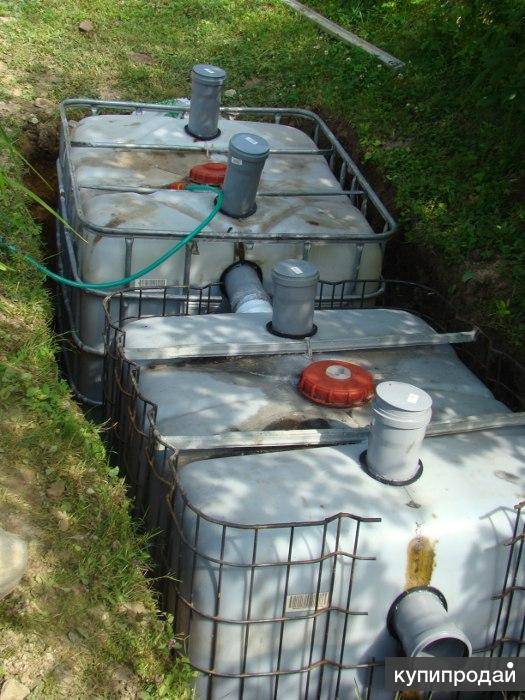
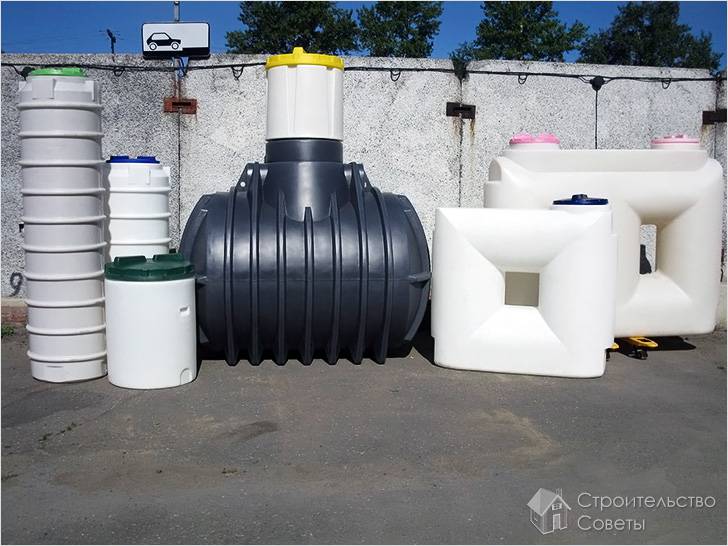
Choice of material metal or plastic
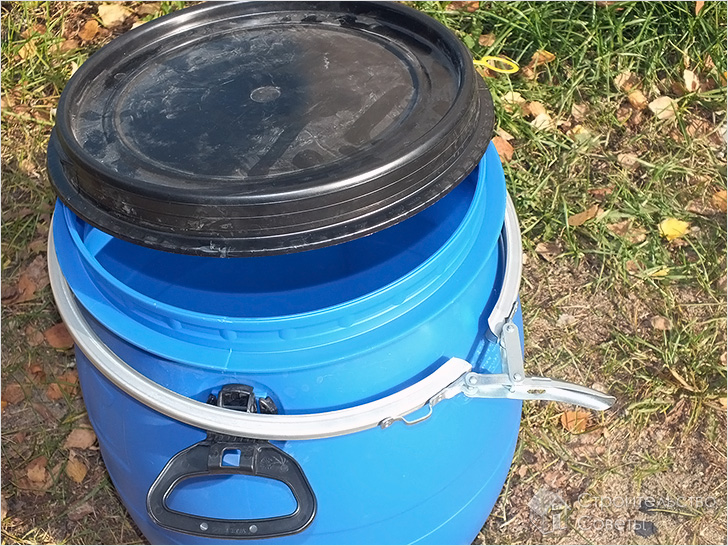
In order to save money, very often a septic tank in a country house is made from barrels that previously performed a different function. For example, they could be used to store grain, sand, cement and other bulk substances. The container can be metal or plastic, the main thing is its tightness.
If, nevertheless, the question arose of buying a barrel, then it is better to give preference to plastic. And that's why:
- wider range on the market;
- resistance to corrosion and aggressive effects of effluents;
- absolute tightness over a long period of operation;
- installation without the involvement of lifting equipment due to low weight.
To be completely objective, it should be clarified that the last point is only partly an advantage. A small mass of plastic makes it necessary to attach the container to a concrete base to level the buoyant effect of groundwater. In this regard, a septic tank made of iron barrels is considered more preferable, since it does not need anchoring.
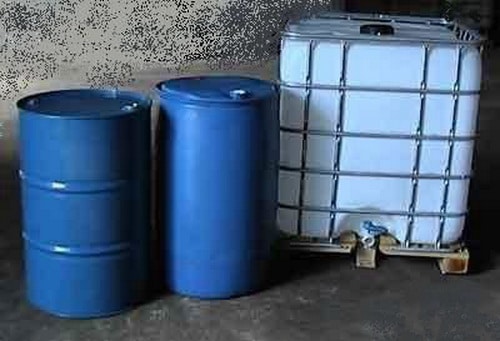
Any barrel that meets the tightness requirements can be used for a sewer sump.
Installation work
Let's figure it out how to do it yourself septic tank from a couple of barrels.We will make a septic tank without pumping out, so in addition to two barrels for settling chambers, we will need another container without a bottom.
Preparatory stage
It’s worth starting with earthworks, you need to prepare:
- a trench 1 meter wide, it must connect the place where the sewer pipe exits from the house and the place where the septic tank is installed. The trench is dug with a slope so that the liquid in the pipes moves by gravity, for each meter of the main line (110 mm in diameter), the slope should be 2 cm;
- a pit, the dimensions of which should allow the installation of barrels. At the bottom of the prepared pit, you need to make a step, since each subsequent chamber should be located 10 cm lower than the previous one.
At the bottom of the pit and trench, it is necessary to lay a layer of sand 15 cm high and compact it well. If it is necessary to fix the barrels (at a high GWL), then you need to make a concrete screed with the laying of reinforcement (loops). If a septic tank is being built without pumping out, then a twenty-centimeter layer of crushed stone and a ten-centimeter layer of sand should be poured under the installation site of the filtration well.


Assembly
Now you can start assembling a septic tank from barrels. You need to perform the following operations:
- install the barrels that will serve as settling tanks in a row so that the previous barrel is 10 cm higher. This arrangement will allow you to fully use the entire volume of the barrels;
- distance between barrels - 10-15 cm;
- in the first barrel, you need to make a hole with a diameter of 110 mm, and attach a tee to the chamber. The connection point must be sealed using a rubber seal and sealant.Subsequently, a supply pipe will be connected to the tee, as well as a ventilation pipe;
- opposite the hole made, you need to make another one, which will be used in order to make an overflow. This hole should be 10 cm below the first one. It is necessary to insert a seal and a fitting in the form of a corner (90 degrees) into the overflow hole;
- in the upper part of the second barrel we also make a hole into which we insert the corner fitting;
- opposite the hole made, we perform another one, it is necessary to bring water into the drainage well, which will make it possible to make a septic tank without pumping out;
- a barrel without a bottom is installed above a pre-made filter made of sand and gravel and connected by a pipe segment to the second chamber;
- in the upper parts of the first and second barrels, it is necessary to cut holes and equip them with removable hatches, as well as install ventilation pipes with a fungus. The presence of the fungus will protect against ingress of rainwater and debris;
- the septic tank installed in place must be fixed on concrete slabs; for this, barrels are attached to the loops of pre-reinforced reinforcement with belts;
- then you need to connect the pipe of the external pipeline to the tee introduced into the first barrel;
- then fill the barrels with water, after which you can begin to fill the pit;
- you need to fill it with sand mixed with dry cement (the addition of cement is 20% of the weight of the sand);
- it is necessary to pour the mixture in layers about 20 cm high, each layer is compacted and spilled with water;
- it is recommended to lay foam in the upper part of the barrel, this will protect the septic tank from freezing;
- after backfilling is completed, only manhole covers should remain on the surface.
Now you can start our septic tank without pumping it into work.Periodically, it is necessary to remove the sediment that accumulates at the bottom of the first and second barrels, this can be done using a fecal pump. You can additionally use biological additives for anaerobic septic tanks, this will reduce the amount of sediment.
So, a septic tank from barrels is an installation that can be used as a treatment plant in the local sewerage system of an object with a small flow of water. You can assemble such a septic tank yourself using plastic barrels.
We build a septic tank from barrels with our own hands
As you know, the treatment plant has become an integral part of the sewer system, which makes living in a country house, village, country house or cottage more comfortable and not much different from city life.
But when installing a septic tank, it is necessary to take into account all sanitary, technical, legal and state regulations. With certain skills and desire, it is possible to make a septic tank with your own hands from barrels - as this is one of the tested options and is suitable for a summer cottage.
Advice from professionals
Before installing such an installation, it must be borne in mind that:
- They cannot be used for permanent residence in the country,
- It is better that feces merge into them, and not household drains (for which it is better to install tanks),
- The volume of the selected barrels depends on the number of people living in the house.
Required material
- It will take two or three barrels (200 l). They must be made of a material that is not susceptible to corrosion, but must withstand the effects of chemicals and caustic substances,
- Fan pipes, drainage pipes, fittings,
Operating procedure
- From above in the barrels, cut holes with a diameter equal to the size of the pipes, on the side - a hole in diameter equal to the fan fittings,
Septic tank from plastic barrels
The scheme of a septic tank from barrels
Sewer connection
Such a station needs the services of a sewage truck (after about 3-5 years of operation) and therefore it is necessary to choose a place so that, if necessary, its entrance is possible. Consider how to properly lay the drain pipe from the bath to the installation:
- To connect to the sewer, dig a trench (30 cm deep). If you live in a region where there are severe frosts, then it is necessary to insulate the pipes and the trench with a layer of rubble, sand and roofing felts (with such a “coat”, the drains will not freeze),
- It is better to equip the sewerage in winter, but if the deadlines are supported, then you should not wait for the earth to begin to thaw,
- The slope of the pipe to be connected to the septic tank must be 2 cm per pipe meter, and the pipe turns must be done at a right angle (90 degrees). To clean them, a rotary well should be built,
- At the bottom of the trench, pour a layer of fine gravel and sand (cushion) and carefully tamp, this option is more economical,
- If there is a financial possibility, then lay out the walls of the trench with red brick, and this work must be carried out during heavy rain so that the pipe does not move,
- So that in the future, when working on the site, you do not accidentally damage the sewer system, draw up a plan for laying it and install bright beacons up to 10 cm high along the pipes,
- After the septic tank for giving from barrels is connected to the sewer, concrete the floor in the bath, while observing the slope towards the installation,
- Close the outlet of the drain pipe with a fine mesh (so that there are no blockages),
- After the screed dries, cover the floor in the bath with ceramic or tile, and you can replace the mesh with a ladder.This will give the room a beautiful, well-groomed look,
- Such a floor does not need to be insulated, since when the bath is heated, it also heats up and does not let cold air in from the outside,
Cleaning plant from metal barrels
We looked at how you can make a homemade septic tank from plastic barrels, now we will study the installation instructions for the station from 200 l of metal barrels:
- On the side of each of them, using a grinder, cut several holes in a checkerboard pattern (at a distance of 15 cm from each other),
Barrel septic tank
Advantages of plastic containers
Of these, you can make one, two or three chamber treatment plant.
Barrel septic tank
Conclusion
In order for the arrangement of the sewerage of a country house not to be very expensive, you can personally build a septic tank from plastic barrels, which will last a long time. Also, there will be no need to use the services of specialized companies (for pumping it out), since it is self-cleaning and after about 5 years it will be necessary to call a sewage truck for the first time.
To install the installation, it is not necessary to have special skills, just follow the instructions and advice of specialists, you can use the material at hand, which is always found in a suburban area, and this will save a certain amount.
If you doubt that you can carry out these works, then buy an expensive industrial septic tank. Although you will use a self-made and assembled sewer system for a long time.
We build a septic tank from barrels with our own hands How you can make a septic tank with your own hands from barrels, as well as the necessary material, work procedure and installation instructions.
DIY photo of septic tanks


We also recommend viewing:
- DIY mill
- Do-it-yourself motoblock
- Do-it-yourself gate
- Do-it-yourself summer shower
- DIY garden figures
- Do-it-yourself swing
- DIY toilet in the country
- DIY garden paths
- Do-it-yourself playground
- DIY veranda
- Do-it-yourself barn
- Do-it-yourself pond
- DIY beds
- DIY chicken coop
- DIY flower garden
- Do-it-yourself fountain
- DIY tire crafts
- Do-it-yourself cellar
- DIY fly trap
- DIY aviary
- DIY pool
- Do-it-yourself canopy
- DIY garden
- Do-it-yourself porch
- DIY paving slabs
- Do-it-yourself smokehouse
- DIY crib
- Do-it-yourself barbecue
- Do-it-yourself barrel
- DIY hammock
- DIY landscape design
- DIY flowerbeds
- DIY greenhouse
- Do-it-yourself Alpine slide
- Make a cage with your own hands
- How to decorate the yard with your own hands
- Watering with your own hands
- Do-it-yourself drinker
- Do-it-yourself change house
- DIY fishing rod


