- Self-made spiral drill
- How to work with a spiral drill?
- Drill making
- Materials used
- Cutting elements and their fastening
- Some modifications
- Types of Boers
- Well Depth Determination
- Types of water intake workings and soils
- Tips & Tricks
- Model overview
- Types of drills for soil
- Spiral
- spoon
- Shock
- The easy way
- Varieties of drilling rigs
Self-made spiral drill
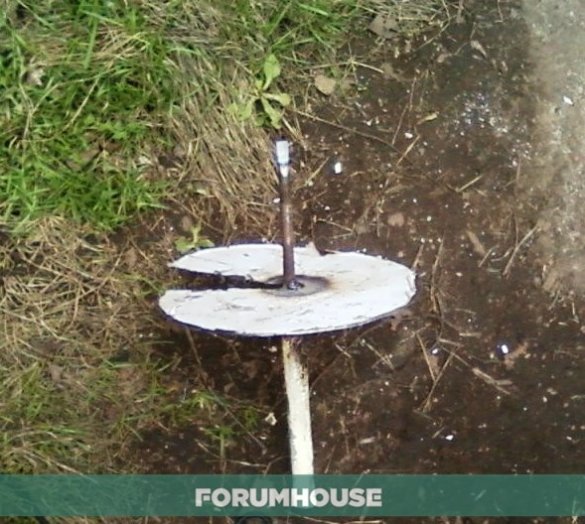
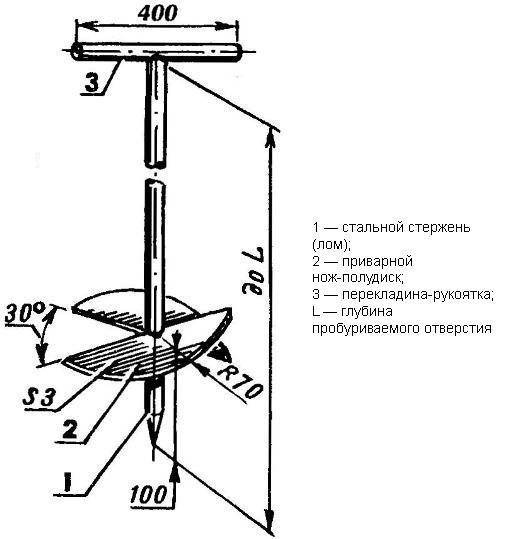
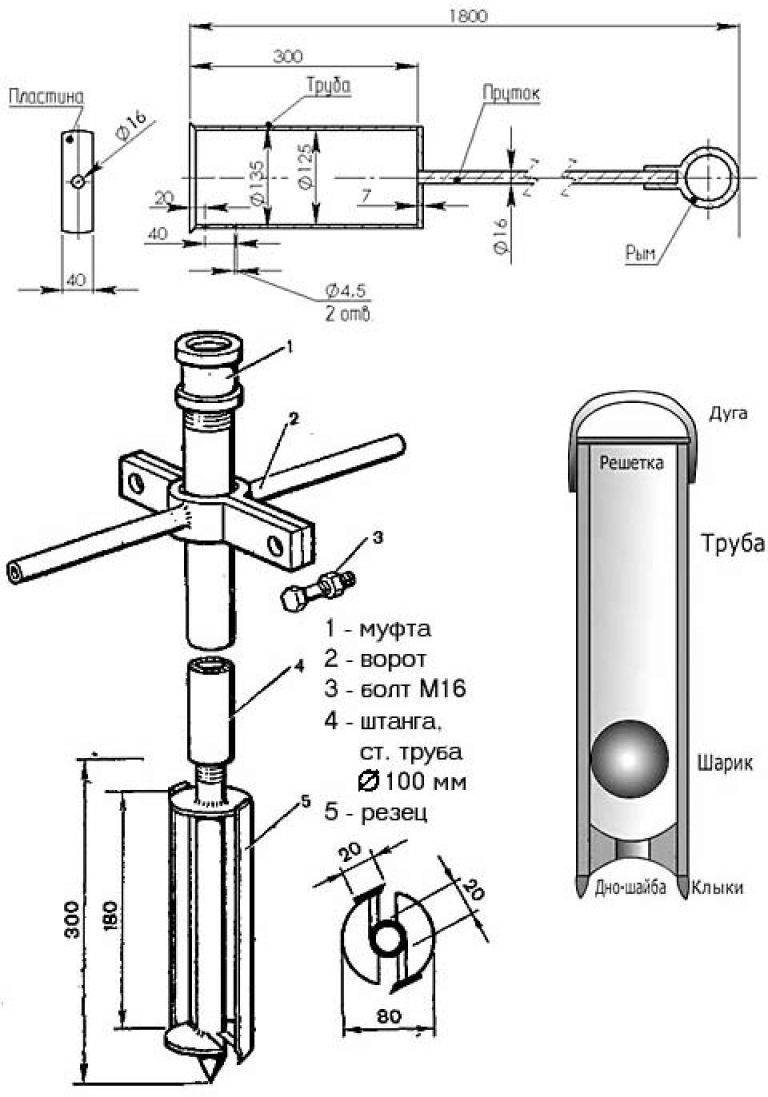
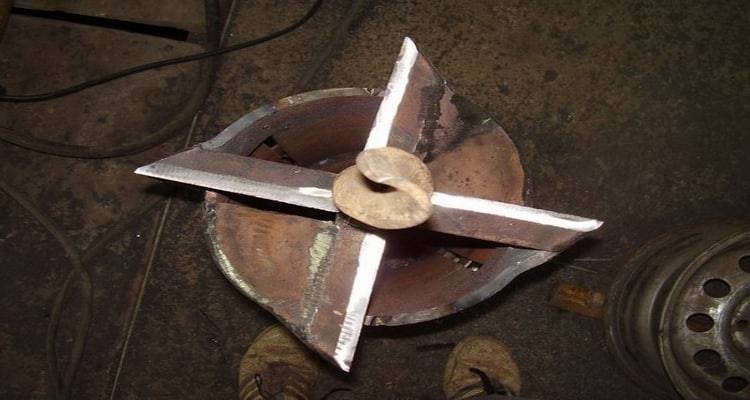
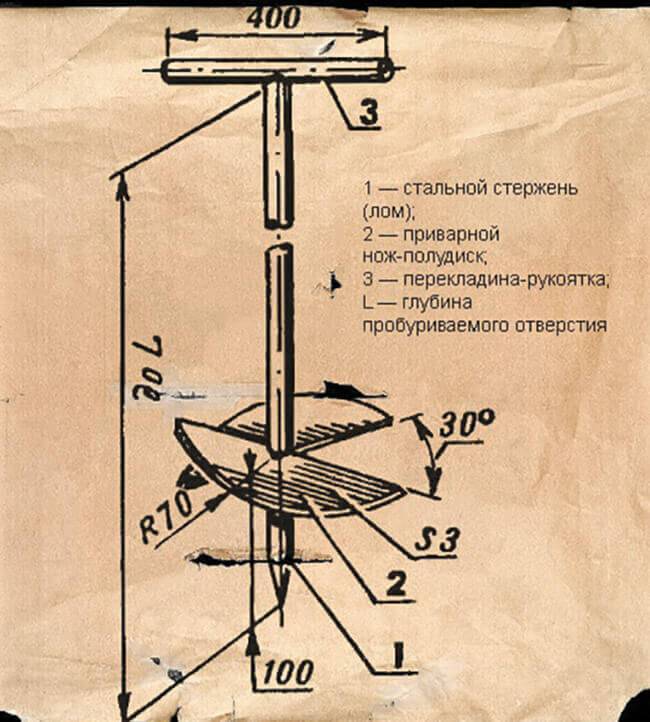
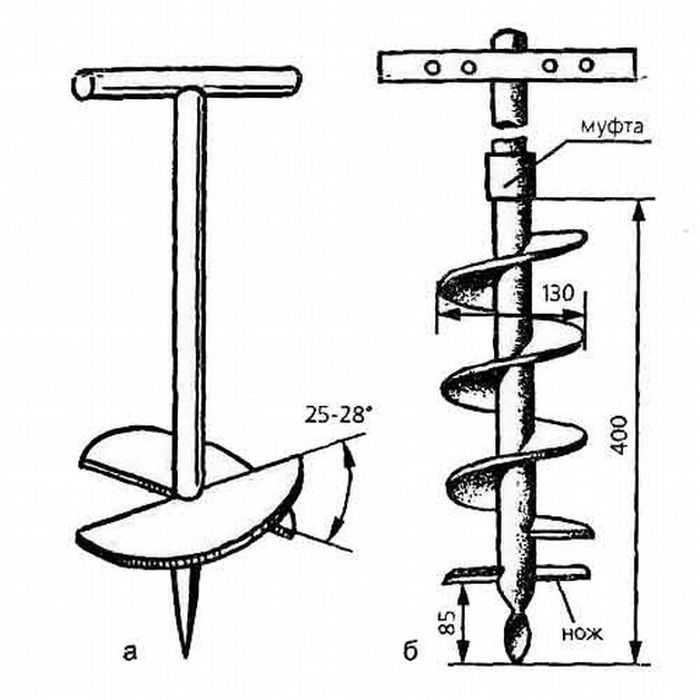
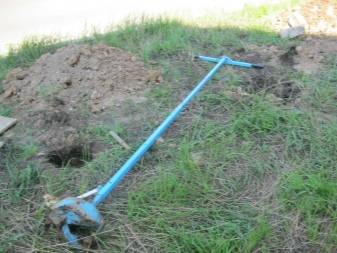
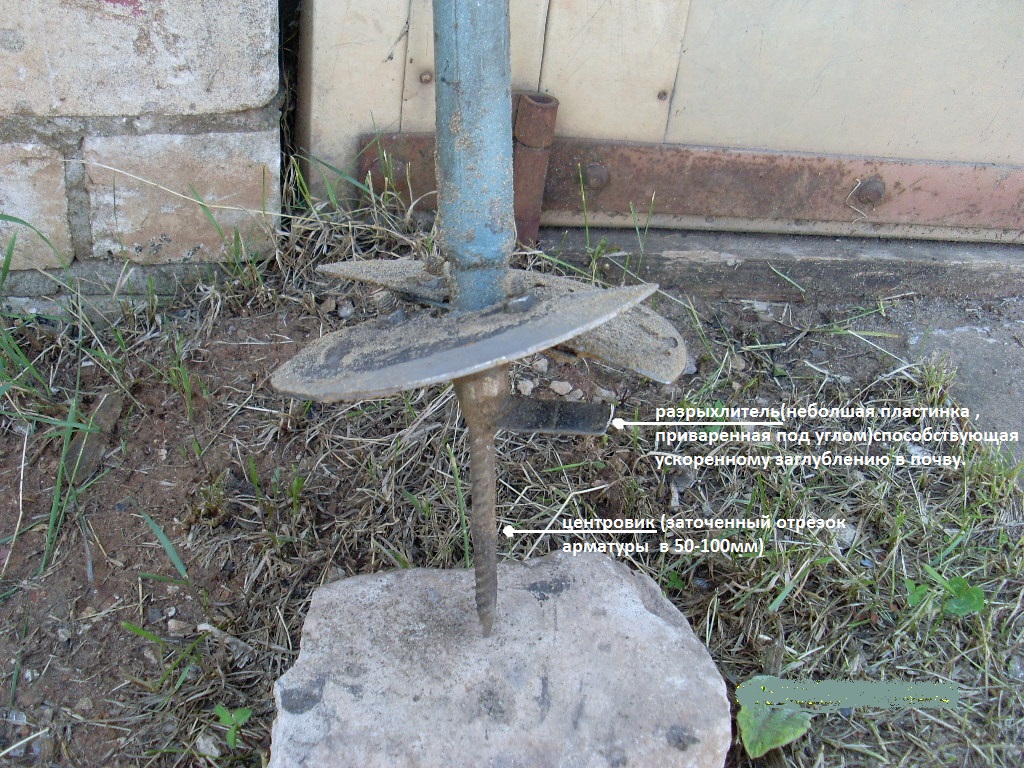
In the simplest version, a spiral drill is made in the form of a metal rod with a well-pointed end. A pair of knives is welded 200 mm from the point of the tip. For the manufacture of knives, halves of a steel disk are taken, 100-150 mm thick. Blades are welded to a metal rod at a slight angle, the value of which is no more than 20 degrees to the horizontal. In this case, the halves of the steel disk should be located opposite each other. As a result, the angle between the welded knives is 40 degrees.
The lower edges of the cutting elements of the hand drill for drilling wells are also well sharpened. The speed and ease of cutting the tool into the ground depends on how sharp the knives are.
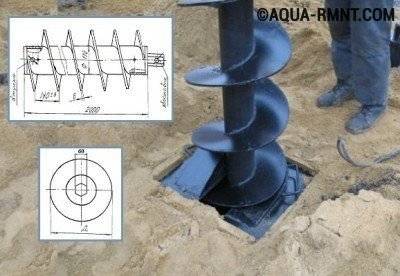
A prefabricated spiral drill is made from special tool steel, which is heated, and then twisted into a spiral and hardened
Industrial models of drills of this type are manufactured at the factory from a strip of tool steel, heated and twisted into a spiral. The pitch of the spiral turns is equal to their diameter. After twisting, the steel is hardened.
How to work with a spiral drill?
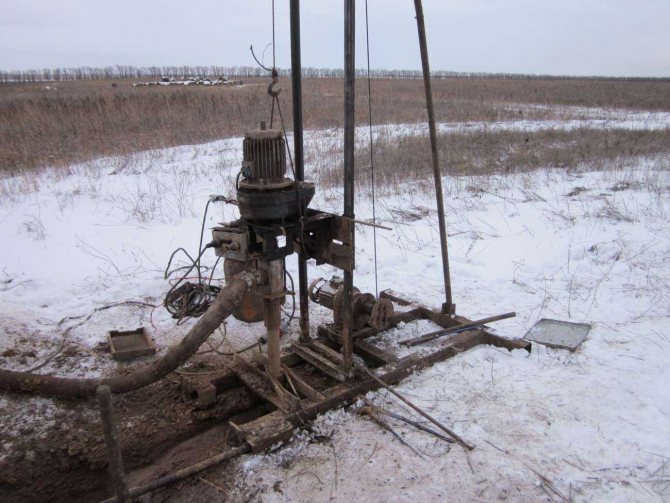
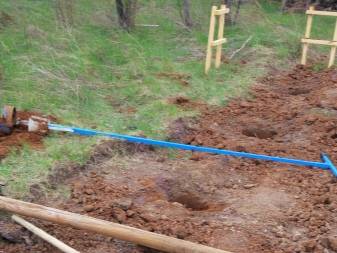
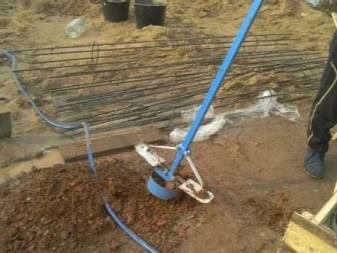
A home-made tool, during the rotational movement made by the worker with the help of a handle, cuts into the soil layer thanks to sharpened knives. Then a hand drill for wells is pulled up along with the cut soil. The earth is poured out away from the drilling site. The operation is repeated again.

Cleaning of a self-made spiral drill from the soil raised from the wellbore upwards is carried out near the work site and is taken out of the site on a trolley
With an increase in the depth of the structure, the tool rod is built up. In this case, the constituent elements are fixed to each other using a threaded or sleeve type of connection. To secure against separation of the components of the rod, their connections are additionally fixed with cotter pins.
Raising the elongated tool up, the additional links of the rod are removed. The spiral drill does an excellent job with clay soils, as well as fine gravel that comes across on the way of its advancement deep into the mine.
Drill making
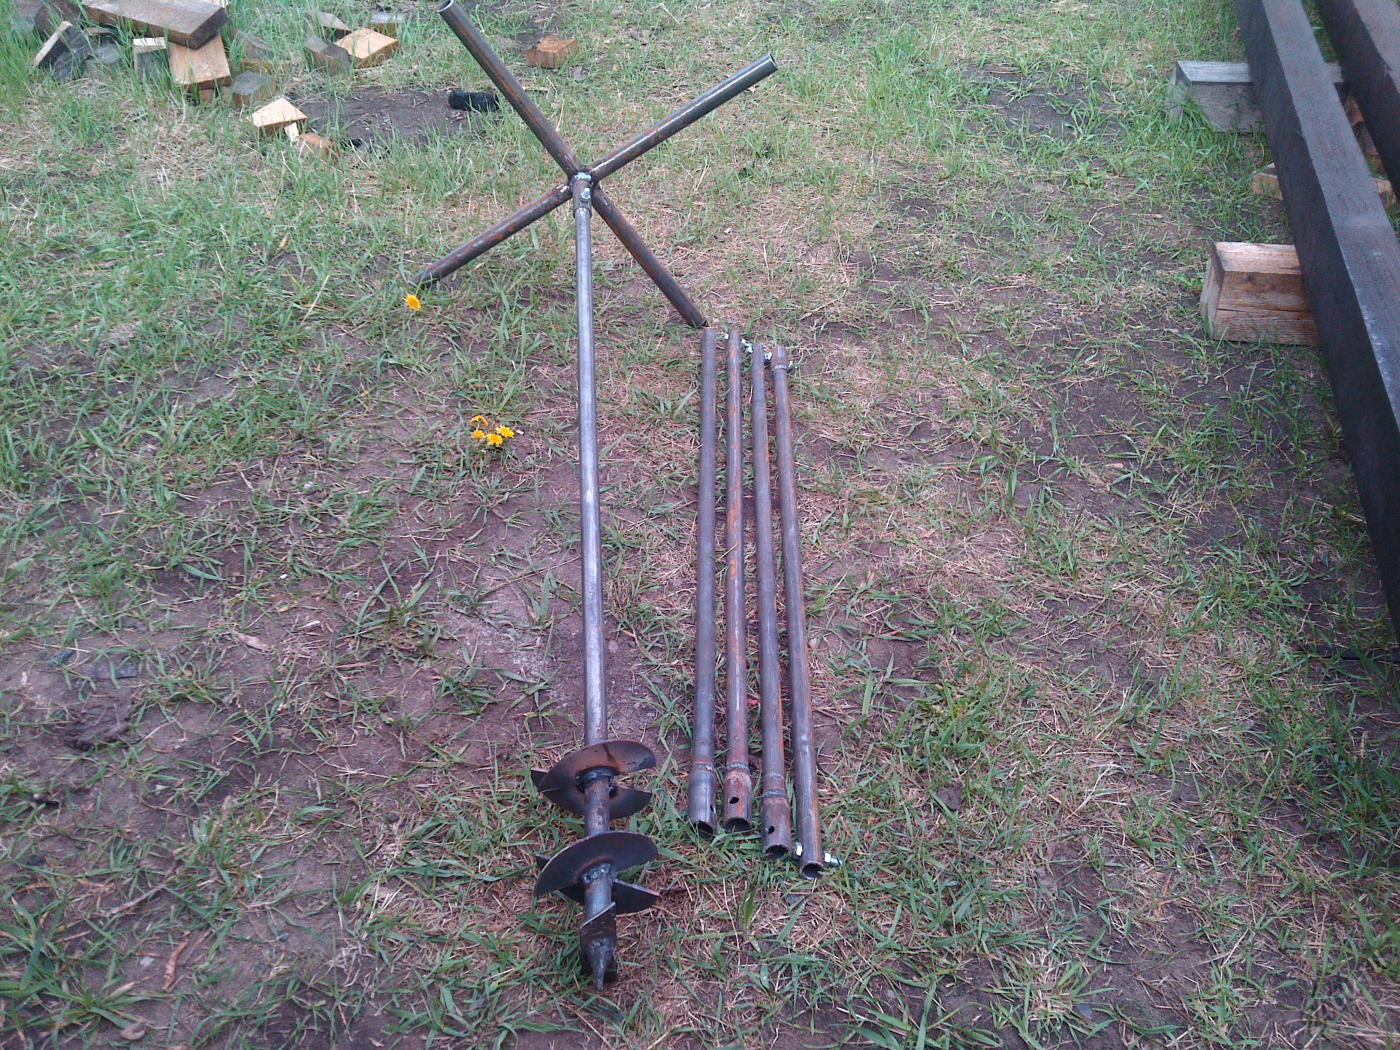
The main tools for self-manufacturing a drill are an angle grinder and a welding machine. The process begins with the selection and preparation of the main tool axis. A round (diameter 26.8-48 mm) or profile (20 × 20-35 × 35) pipe is suitable for this role.
The required length is calculated by adding 50-60 cm to the depth of the future well. If the final value exceeds one and a half meters, you will need to make the bar collapsible. The connection mechanism can be any (threaded, cotter pin or other), the main thing is to withstand the load during rotation with resistance.
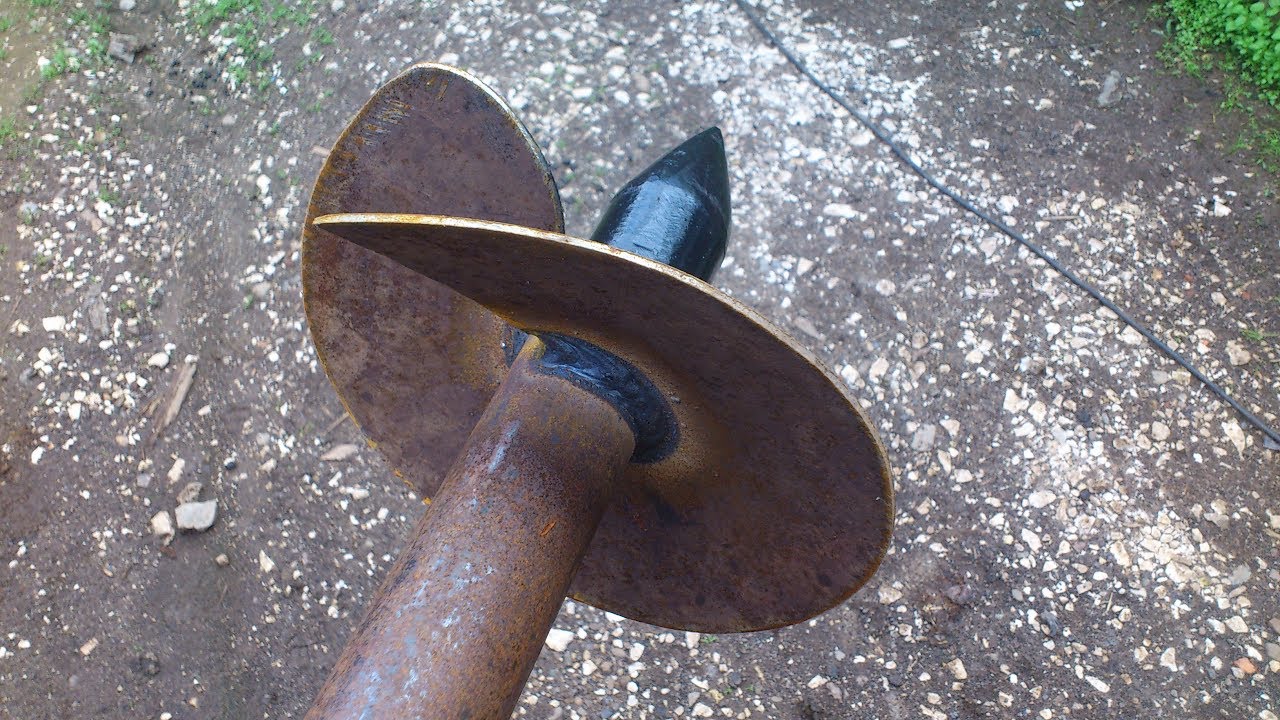
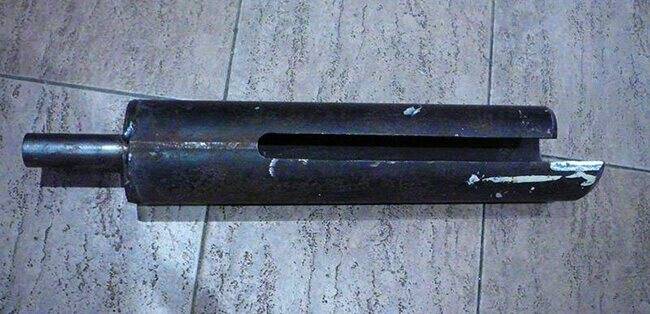
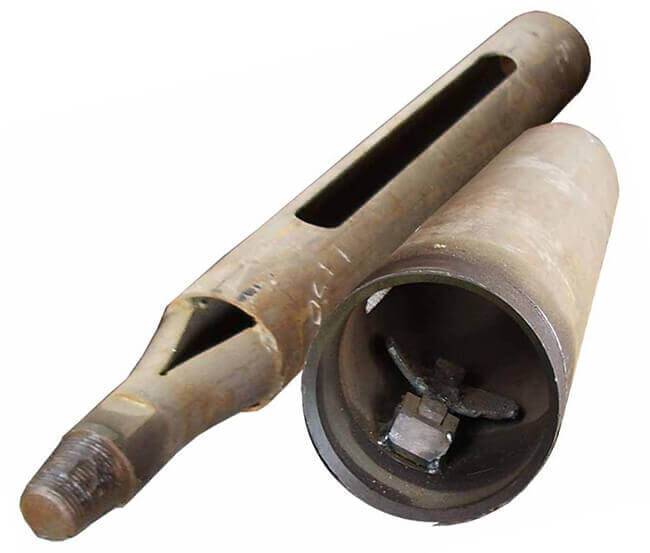
Pika, as a rule, is made separately. From a piece of pipe, the inner diameter of which is equal to the outer one, you can simply make a sharp tip or flatten the pipe, and then roll it into a spiral of one or two turns or sharpen it in the manner of a wood drill tip. Other options include soldering a narrow spiral auger. Good results are shown by the use of a fortieth diameter wood drill. In this case, the diameter of the end drill must exceed the outer diameter of the rod.
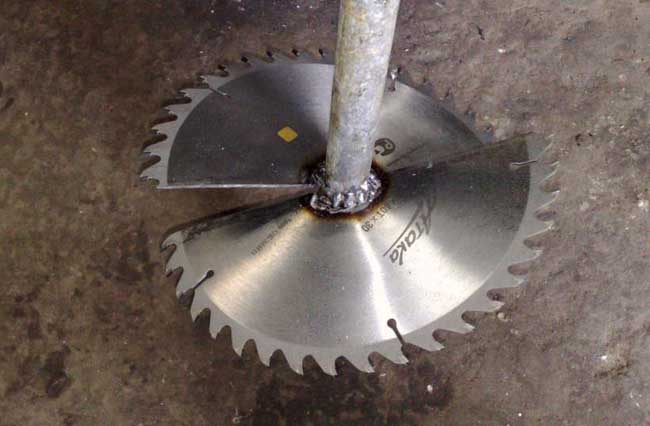
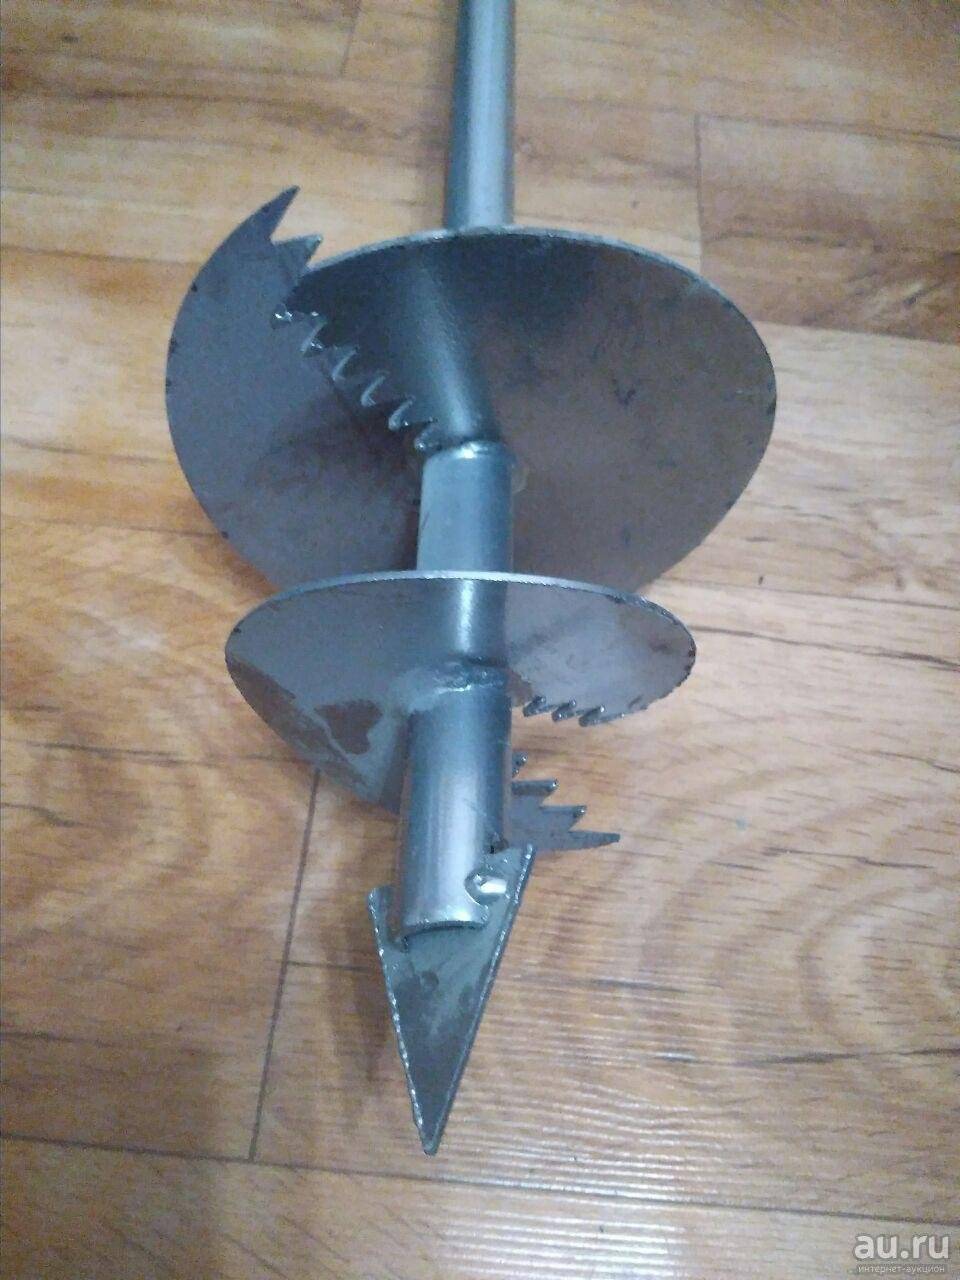
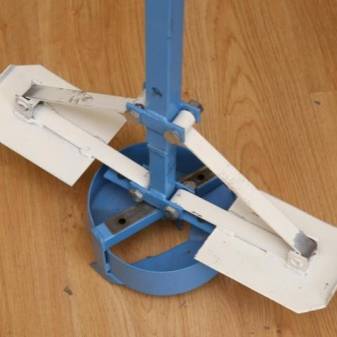
After the peak is welded to the axial rod (or its lower segment), you can proceed to the device of the main cutting part. To do this, the old saw blade from a circular saw, the diameter of which corresponds to the parameters of the required hole, is cut into two equal halves. The resulting blades are welded to the main rod above the peak. The preferred angle to the perpendicular axis is 30-40 degrees, to the vertical - strictly 90. The cutting edges are sharpened.
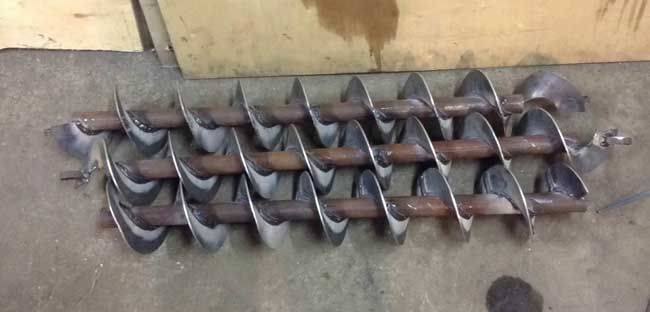
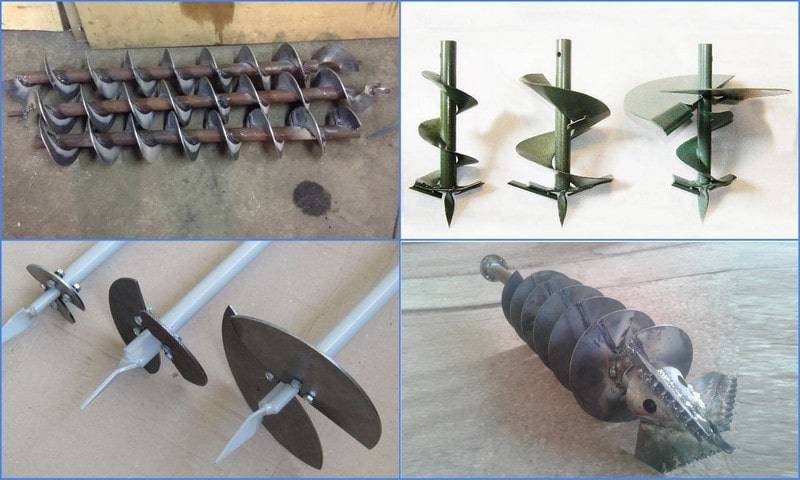
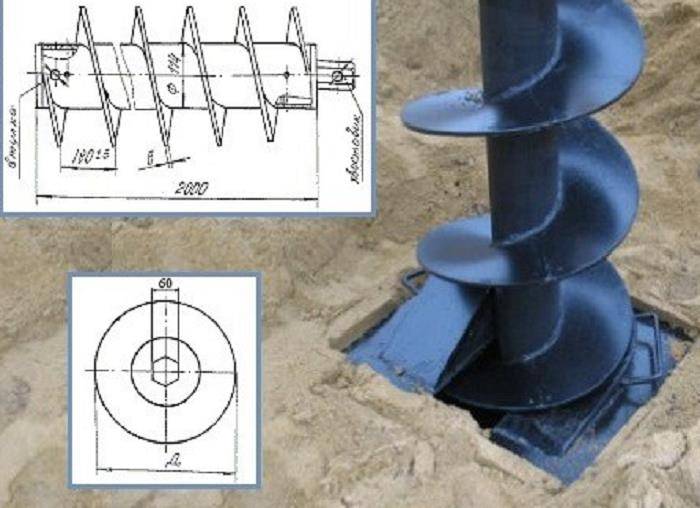
Another, more productive option is to make a screw. For him, circles are cut from sheet iron, the diameter of which corresponds to the parameters of the required recess. The number of disks is equal to the number of turns of the future spiral (at least three). The blanks are stacked, after which a hole is drilled in their center, commensurate with the outer diameter of the pipe.
After that, a small segment is cut out of the disks.The resulting parts must be welded so that a spring is obtained. Then it is stretched on a winch, the seams are welded between the turns on the reverse side and attached to the axle.
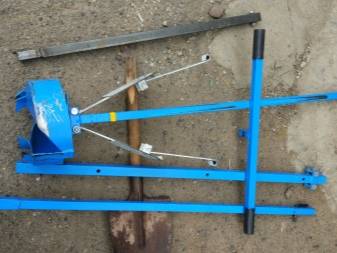
The final touch is the handle. It is made from a piece of the same pipe that was used for the axle rod or a diameter more suitable for the arm. Mounting method depends on personal preference. The handle can be welded to the axle, reinforced with additional crossbars or made in a removable form.


Materials used
Depending on the type of drill being made, different materials are used, but the basis is always round or shaped pipes and sheet metal (used saw blades).
Pipe segments, parts of broken wood drills, metal plates are used as peaks. Or models without peaks are made. Studs and nuts are used to articulate the rod segments.
In general, the range of necessary and acceptable materials depends on the chosen design. It must be considered before work begins.
Cutting elements and their fastening
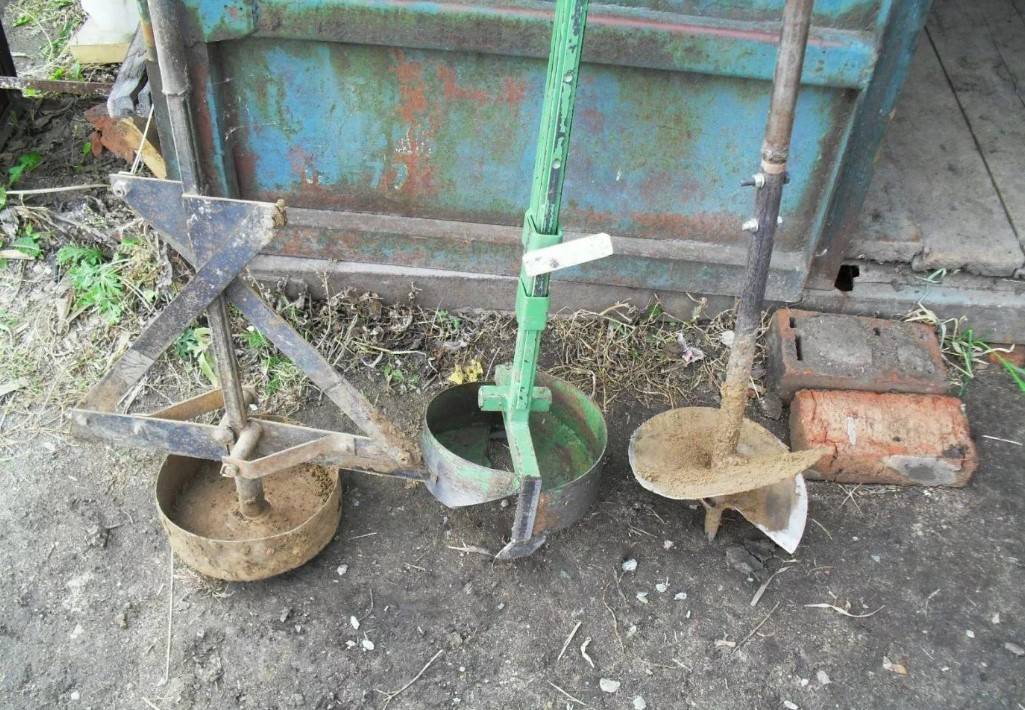
The cutting part of earth drills can be removable or non-removable. However, detachable fastening is only allowed on half-blade or saw blade or sheet metal versions. To do this, shelves are attached to the main rod, located at the same angle as the blades. 2-3 holes are drilled in the shelves, to which, with the help of bolts and nuts, the cutting parts are attached.
Interchangeable bits can also be made for drills with a land receiver. To do this, in the reinforcing arc that attaches the bucket to the rod, it is necessary to make a flattening, drill a hole and cut a thread in it.
Screw cutting parts are rigidly attached to the axis. For drilling holes of different diameters, it makes sense to make several nozzles for one handle.
Some modifications
- Straight crushing blades between lance and cutting edge.
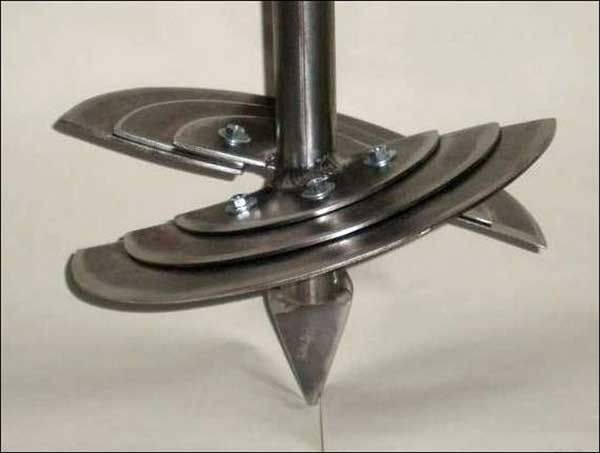
- Tiered arrangement of blades with gradually increasing diameter.
- Power ribs between the corners of the blades and / or the axial rod.
- Digging box for picking up more soil in one go.
- Additional blade with 2-3 teeth for easier drilling in dense soils.
- Removable blades for quick replacement during work.
- And many others, the number of which is limited only by personal ingenuity.
Types of Boers
A drill is a type of construction equipment, the function of which is to make a hole of the desired size. It is used in various fields. For example, in the construction of bridges and fences, for gardening (when planting trees and other vegetation).
They can be divided into:
- Hand drills. Often used in everyday life by both beginners and advanced gardeners.
- Designs with automatic drive. Upgraded hand drills. A motor is installed on them.
- Mounted. These are the same mechanized drills, only with the possibility of installation on special agricultural equipment (tractors, walk-behind tractors, etc.).
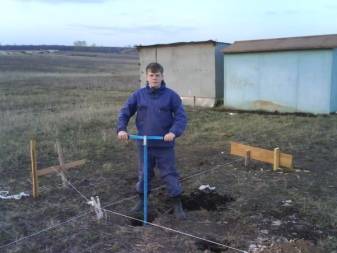
The first have the weakest design and purpose. They drill holes of small diameter and depth. Without the efforts of the worker, such a tool is useless. But its advantage lies in its compactness, as it is small and light. It is quite convenient to transport it. With the help of such a tool, you can easily make a hole for a fence or seedlings.
In this video, we will look at how to make a hand drill:
It consists of a rod and a T-shaped handle on top of the structure. Below there is a metal tip that performs the function of centering the tool. A little higher is the drilling mechanism itself, designed in a spiral form. Often consists of 2-3 rows of metal round cutters. Alternatively, use a saw blade as the cutting part.
Mechanized drills are made with a drive system. The design is more complex, but most summer residents can make such a manual drill for poles on their own. The drill also has a metal pipe with a handle, a tip and a cutting part. But in addition, a motor with a gearbox and a drive part is installed. The screw (cutting) part moves due to rotational movements transmitted through gears from a gearbox with a motor.
This design is more powerful, but its strength depends directly on the performance and strength of the motor. In this case, the hole can be made deeper, up to 3 meters.
Mounted drills are designed to perform more complex work. The width and length of the holes are much larger. Often they are used for the construction of bridges, railway stations and other industrial purposes. With their help, you can make sheet piling for pits and trenches. Thanks to attachments, the cost of construction work is significantly reduced, as they have greater productivity and power.
Well Depth Determination

A medium-deep well (up to seven meters) will allow you to have drinking water. To make a drilling rig with your own hands, in addition to the drill, you will need a shovel and time to equip the pit. A pit measuring 2x2x2 meters is used to facilitate the process of drilling to great depths.To facilitate the work, it can be fixed with boards or plywood. After completion of work, the pit falls asleep. Water is taken in by a pump.
A deep well (more than seven meters) will make it possible to fully cover the need for water for all residents of a cottage or private house. Moreover, there will be enough water not only for individual use, but also for technical purposes, irrigation, sanitary requirements, maintenance of a pond or pool.
In general, the choice of the type of water intake will be determined after a geological survey of the well construction site. We propose to study in more detail the last option - the construction of a deep well with your own hands, as the most difficult of those described.


Types of water intake workings and soils
Before starting drilling, you should study the composition of the soil at the site in order to at least roughly imagine your future well.
Depending on the characteristics of the aquifer, there are three types of wells:
- Abyssinian well;
- filter well;
- artesian well.
The Abyssinian well (or well-needle) can be arranged almost everywhere. They punch it where the aquifer lies relatively close to the surface and is confined to the sands.
For its drilling, driving technology is used, which is not suitable for the construction of other types of wells. All work can usually be completed within one business day.
This scheme allows you to study the features of the device of various wells in order to better understand the technology of their drilling and choose the appropriate method (click to enlarge)
But the flow rate of such wells is small. To provide the house and the plot with enough water, it sometimes makes sense to make two such wells on the site.The compact dimensions of the equipment make it possible to arrange such a well right in the basement without any problems.
Filter wells, which are also called "sand" wells, are created on soils where the aquifer lies relatively shallow - up to 35 meters.
Usually these are sandy soils that lend themselves well to drilling. The depth of the filter well usually varies between 20-30 meters.
This diagram clearly shows the device of the filter well. A filter must be installed at the bottom of it to prevent sand and silt from entering the water.
Work in a good scenario will take two to three days. The filter well needs good maintenance, since the constant presence of sand and silt particles in the water can cause silting or sanding.
The typical life of such a well can be 10-20 years. The period may be longer or shorter, depending on the quality of the well drilling and its further maintenance.
Artesian wells, they are wells “for limestone”, are the most reliable, since the water carrier is confined to bedrock deposits. Water contains numerous cracks in the rock.
Silting of such a well usually does not threaten, and the flow rate can reach about 100 cubic meters per hour. But the depth to which drilling is to be carried out usually turns out to be more than solid - from 20 to 120 meters.
Of course, drilling such wells is more difficult, and it will take much more time and materials to complete the work. A professional team can cope with the work in 5-10 days.But if we drill a well on the site with our own hands, it may take several weeks, and even a month or two.
But the effort is worth it, because artesian wells can last half a century, or even more, without problems. Yes, and the flow rate of such a well allows you to supply water not only to one house, but also to a small village. Only manual drilling methods are not suitable for a device of such development.
The physical and mechanical properties of soils are also of great importance when choosing a drilling method.
In the course of work, it may be necessary to go through a variety of layers, for example:
- wet sand, which can be drilled in almost any way relatively easily;
- water-saturated sand, which can only be removed from the trunk with the help of a bailer;
- coarse-clastic rocks (gravel and pebble deposits with sandy and clay aggregates), which are drilled with a bailer or a glass, depending on the aggregate;
- quicksand, which is fine sand, supersaturated with water, it can only be scooped out with a bailer;
- loam, i.e. sand with abundant inclusions of clay, plastic, well amenable to drilling with an auger or core barrel;
- clay, a plastic rock that can be drilled with an auger or a glass.
How to find out what soils lie under the surface, and at what depth is the aquifer? Of course, you can order geological studies of the soil, but this procedure is not free.
Almost everyone chooses a simpler and cheaper option - a survey of neighbors who have already drilled a well or built a well. The water level in your future water source will be at about the same depth.
Drilling a new well a short distance from an existing facility may not follow exactly the same scenario, but it will most likely be very similar.
Tips & Tricks
For those who are serious to create a well on your own, the following tips and tricks will be useful:
- To ensure that the water is always clean and fresh, it is recommended to equip the well in such a way as to ensure air circulation.
- Before using well water for daily needs, it is recommended that it be analyzed. As a rule, when the water quality is poor, it is necessary to select a suitable filter.
- And finally, water should be taken for analysis of the composition and domestic needs no earlier than a few days after completion of the work, otherwise the results may be unreliable.
Before using the well, it is important to equip it with a filter.
Model overview
TISE FM 250 is an excellent hand drill for poles. This product is equipped with a pair of high quality blades. The description notes that the control of the expansion mechanism has been perfected. One of the plows is located on the side. As a result, the drilling process is accompanied by the appearance of asymmetric loads.


The side walls of the storage device largely compensate for this pressure. The second blade at the expander appeared, however, only after modernization in 2011.

The technical parameters of the 250th version are as follows:
-
passage with expansion up to 2200 mm;
-
passage without expansion up to 3000 mm;
-
curb weight 9.5 kg;
-
section 250 mm (hence the name);
-
handle width 700 mm;
-
option of independent turning of the plow (independence in relation to the movement of the head is most effective when driving with the expansion of the lower zone);
-
increased productivity;
-
the ability to lay holes for the fence and under the piles for the house, even where there are pebbles with a cross section of up to 50 mm;
-
manufacturing of blade rods with the expectation of the least resistance during drilling;
-
suitability for drilling operations under pole and pole-strip foundations, regardless of the degree of load that the built house will have;
-
suitability for the Far North and areas unfavorable in seismic terms.
In many cases, TISE FM 200 is used. Its intended purpose is drilling according to technology with the expansion of holes in the ground for strip-pillar and clean pillar foundations. Standard dimensions are 1.34x0.2 m. The weight of the product is 9 kg.
For the most serious work, it is more correct to choose a reinforced drill TISE FM 300. It will cope even if you have to prepare the foundation for a stone or brick private house with concrete floors. The well itself is passed strictly with the plow removed. The expansion at the bottom of the channel is provided with the same power and quality, regardless of the type of land on the site. The depth of the recesses reaches 3 meters.
But drills for earthwork are necessary not only for builders. Such devices are also very valuable in garden plots, since no other tool allows you to prepare holes as well. You can successfully:
-
put up a strong and solid fence;
-
prepare for planting a bush or tree;
-
feed tall plants;
-
prepare drainage systems for operation.
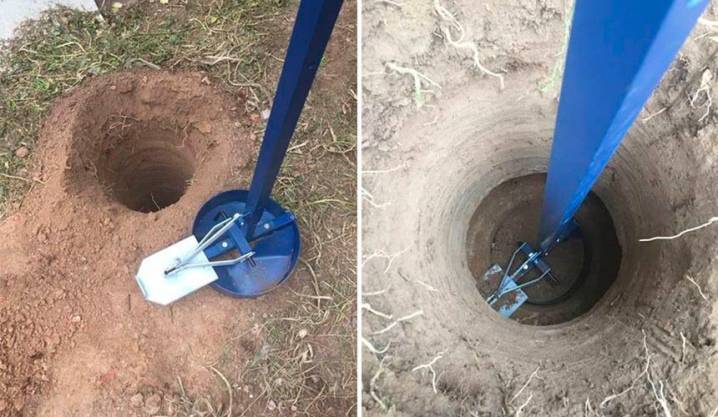
Theoretically, you can take drilling tools of other brands.However, TISE has a clear advantage over them - it does not cut through, but delicately plows the soil. A special cup simplifies the extraction of crushed soil mass. It also significantly increases the stability of the tool.


Types of drills for soil
The three most common are:
- Spiral.
- Spoon.
- Shock.
Each of them has its own characteristics. First, we will consider them, and then we will find out the manufacturing technology.
Spiral

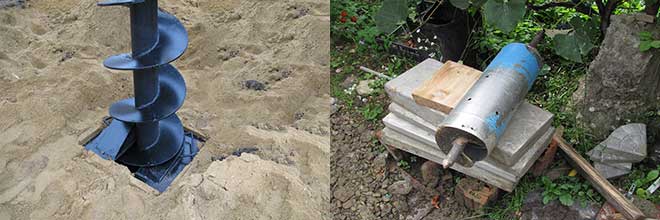
Homemade spiral product is mainly used in dense loose loam. It may also include fine gravel. The principle of drilling is reduced to rotational movements. At the bottom of the drilling tool is a knife. As the boom rotates, the knives on the spirals cut into the soil. After that, the structure rises and is released from the ground. As you go deeper, the bar can be increased.
In the manufacture, you can use halves of disks that are welded against each other. Available cutting blades must be well sharpened and hardened. When manually rotated, a pipe handle is welded perpendicular to the rod.
Advantages:
- It can be carried out independently in the manufacture of small wells of several meters.
- Ability to drill a mine in a few hours. Provided that the earth layer is soft.
- If it is equipped with an electric motor, the drilling process will resemble drilling.
Flaws:
Not effective on boulders or hard rock.
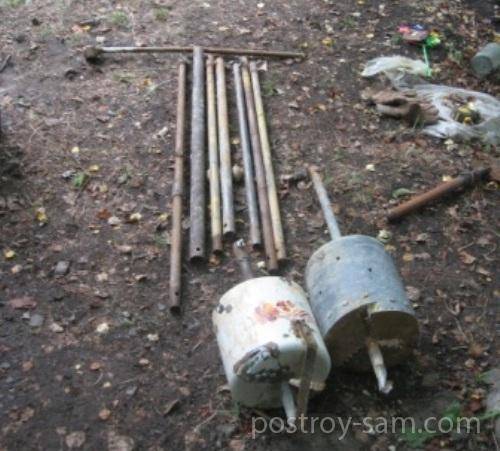
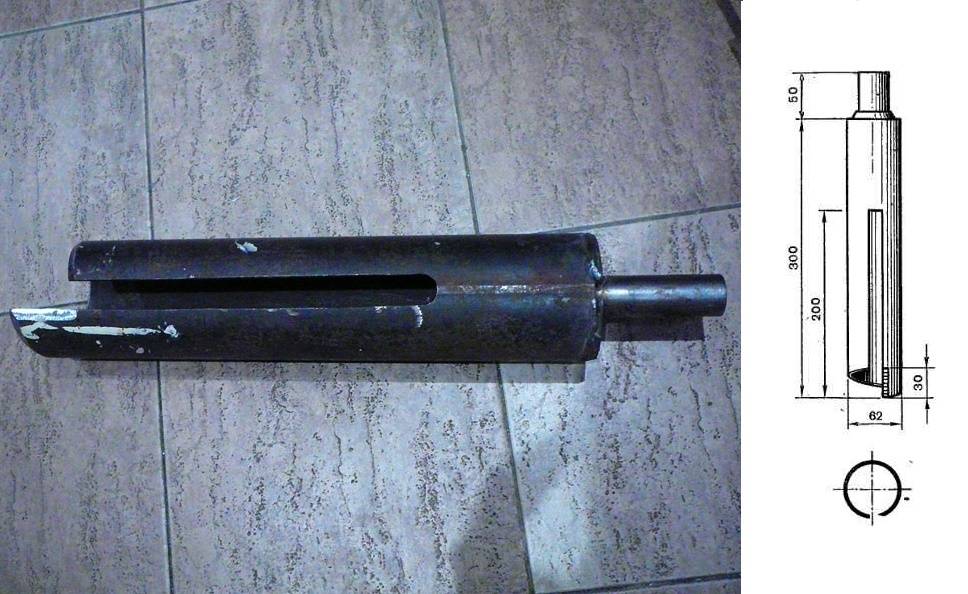
spoon
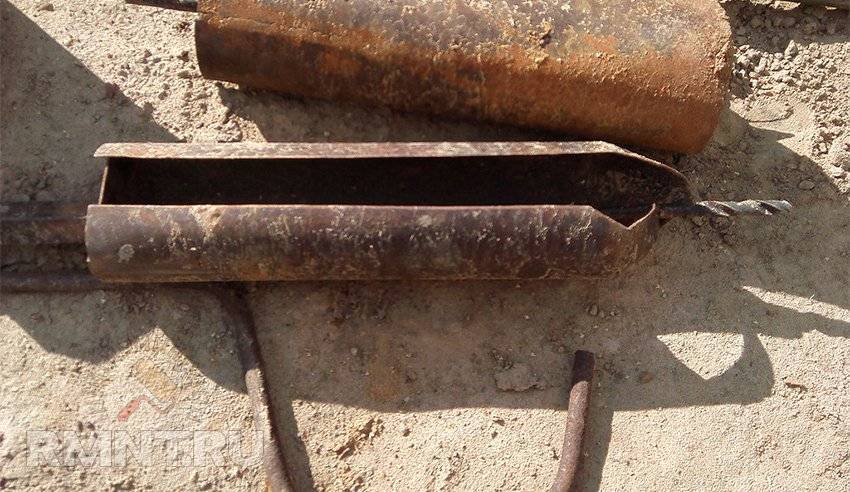
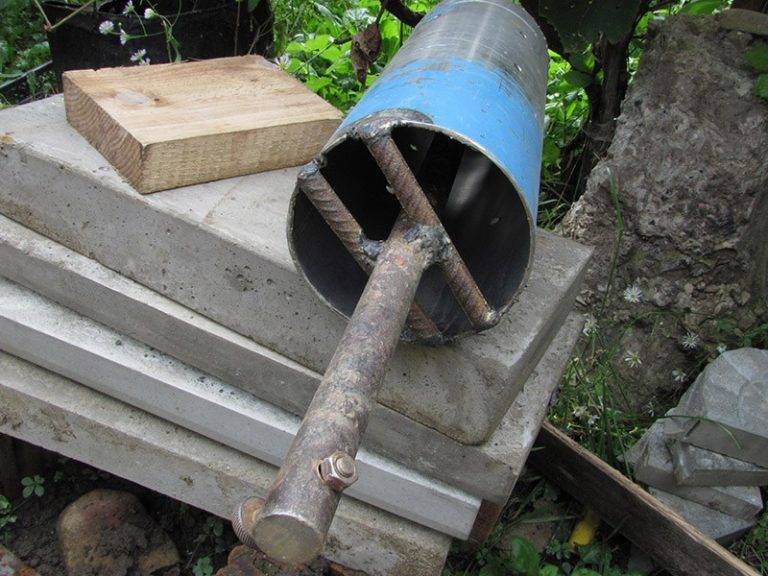
It is used in conditions of wet clayey low-flowing rock. It is made from a steel cylinder, steel sheets can be used.In the lower part there is a special compartment having a spiral or longitudinal shape. The main working element is a spoon. In the process of rotation, the cutting and vertical edge pick up the soil. Thus, the earth fills the entire interior of the cylinder.
Advantages:
- It is quite possible to make your own.
- Unlike a spiral, a spoon drill will drill a hole in the ground much faster.
- It is possible to automate the process when lifting the structure from the soil.
Flaws:
- Need an assistant.
- Serious labor costs.
Shock
It is suitable for different types of soils:
- soft.
- Viscous.
- Solid.
- With boulders.
Depending on the type of soil, a different percussion tool is used. When drilling in soft soil - a wedge-shaped chisel, in viscous - an I-beam, in hard - cross and so on. The principle of operation is the same as for cable drilling. The only difference is that the structure itself is located in the ground and its weight ranges from 0.5 to 2.5 tons. The blows are carried out by a special block. After a passage of half a meter, the chisel is removed from the soil and cleaned of the soil.
Advantages:
- Used for land of different composition.
- It is possible to drill an Abyssinian spring in a short period of time.
Flaws:
- The process of drilling a well is laborious and requires additional equipment.
- A drilling system (tripod) is required.
- You can't do without help.
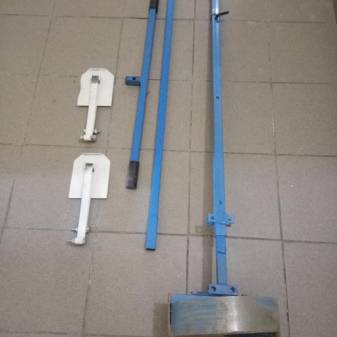
The easy way
There is a very easy way to quickly assemble a homemade twin-bladed auger. These elements will perfectly crash into the ground. The only negative is that they can only work at a shallow depth, no more than 10 m.
The screw is manufactured according to the following technology:
- We take a pipe with a length of 100 to 140 cm, it all depends on the height of the worker.In its upper part, we weld an oblong nut that will fit the bolt. Can be replaced with two standard ones. If you take less, then the design will not hold securely.
- In the lower part, we weld a metal sleeve or thick fittings - this element will play the role of an adapter to the drill. We buy a chisel ready-made or we make it ourselves from a steel strip 30 cm long and 3 mm thick. It is first thoroughly calcined, and then cooled in boiling lead or oil. We fix this spiral in the sleeve, and then carefully sharpen it.
- We take two discs from the grinder: one with a smooth edge of 150 mm, the other notched - 180 mm. We saw these discs in half, in which case the central part expands and coincides with the main pipe. We install them one by one: at first the smaller one, and 10 cm higher - the larger one. We make the location of the parts strictly at an angle of 35 degrees to the ground. In this case, the efficiency is increased with minimal effort.
- Next, we make tubular elements for extension. To do this, we take a pipe with the same diameter and length of 100-140 cm. Then we insert a bolt from below and weld it. In the upper part, we install and weld an oblong nut.
Varieties of drilling rigs
Mini drilling rig
The aggregates under consideration are classified according to the peculiarities of well drilling methods.
So, when percussion-rope drilling is performed, the soil is destroyed by a heavy load tied to a support frame, the ribs of which in most cases are connected into a pyramid. The load is simply lifted up and thrown down as many times as it takes to create a recess of the desired size.


Drilling wells by shock-rope method
Rotating drills are both simpler and more difficult to handle. Such equipment requires much less physical effort on the part of the performer, but the design of such drilling rigs is more complex - many of the components of the system simply cannot be made by hand without special equipment and appropriate skills.
Well drilling scheme
As a result, some of the necessary elements have to be bought or ordered. However, the cost of this is still significantly lower when compared with the cost of installing a factory assembly.
In general, there are 4 main types of drilling rigs, namely:
- units operating according to the shock-rope method. Externally, this design has the form of a frame with a triangular base. A strong cable with a bailer is attached directly to the frame;
-
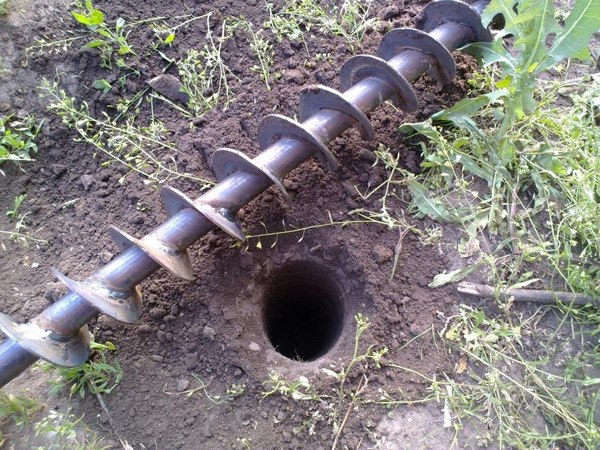
screw type installations. In the case of using such equipment, excavation is carried out using a special auger. The recess in the ground during the drilling process is not washed;
-
rotary units. Operate using the principles of hydraulic drilling;
-
rotary hand mechanisms. The easiest type of installation. The design does not include an electric motor - physical force is used instead. It requires irrationally large labor costs, therefore it is used extremely rarely.


