- Varieties of ejector pumps
- Choice of built-in or external
- Making an ejector with your own hands
- Connection
- The principle of operation of the ejector
- Ejector design option 1
- Features and types of design
- Internal ejector
- External ejector
- Water connection
- How to do it yourself
- Options for installing a pumping station
- Features of choosing the location of the pumping station
- Options for connecting a pumping station
- Ejector design (option 1)
Varieties of ejector pumps
An injection pump is a useful thing in the household, especially if there are deep wells on the site. To make it convenient to use them, you need to choose the option of pumping equipment that suits you.
There are several types of ejector pumps, they are divided according to the principle of operation and device:
- The steam jet pump pumps out gaseous media from confined spaces. Due to this, a discharged environment is maintained. Such ejectors are used quite often.
- A jet steam ejector sucks out gases or water from a closed space due to the energy of steam jets. In this case, the jets of steam exit the nozzle and cause the water to move, which exits the annular channel through the nozzle.
- A gas (or air) ejector compresses gases that are already in a rarefied environment with the help of highly directional gases. This process takes place in the mixer, from which water flows into the diffuser, where it slows down, and the voltage increases.
Ejector pumps have excellent performance properties
Also, ejectors differ in the place of their installation:
- The built-in water ejector is installed inside the pump or next to it. Thanks to this arrangement, the device takes up a minimum of space and is not afraid of dirt. In addition, such devices do not require the installation of additional filters. They are used for wells, the depth of which is not more than 10 meters. In addition, built-in ejectors emit a lot of noise during operation and require a powerful pump.
- The device, which is called remote (or external), can be installed at some distance from the pump, but not more than 5 meters. They are often placed in the well itself.
All types of ejectors are suitable for use in a private home. They help to quickly pump water out of the well, despite its depth.
Choice of built-in or external
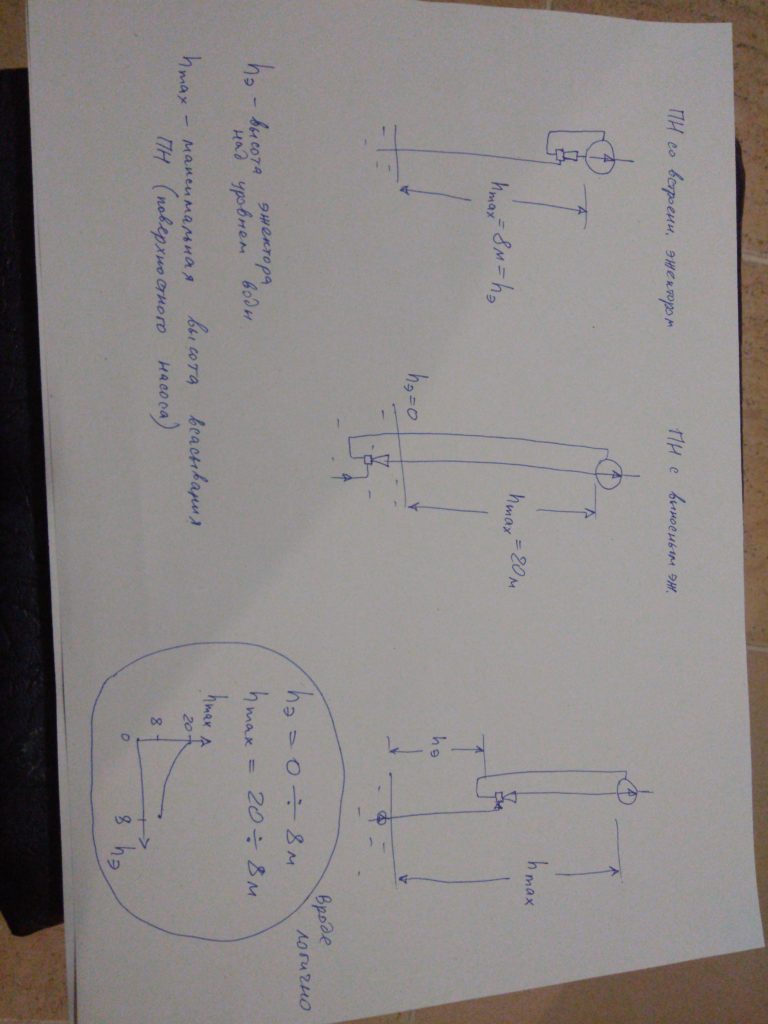
Depending on the installation location, remote and built-in ejectors are distinguished. There is no big difference in the design features of these devices, but the location of the ejector still affects in some way both the installation of the pumping station and its operation.
So, built-in ejectors are usually placed inside the pump housing or in close proximity to it. As a result, the ejector takes up a minimum of space, and it does not have to be installed separately, it is enough to perform the usual installation of a pumping station or the pump itself.
In addition, the ejector located in the housing is reliably protected from contamination.Vacuum and reverse water intake is carried out directly in the pump housing. There is no need to install additional filters to protect the ejector from clogging with silt particles or sand.
However, it should be remembered that such a model demonstrates maximum efficiency at shallow depths, up to 10 meters. Pumps with a built-in ejector are designed for such relatively shallow sources, their advantage is that they provide an excellent head of incoming water.
As a result, these characteristics are enough to use water not only for domestic needs, but also for irrigation or other business operations. Another problem is the increased noise level, since the sound effect from the water passing through the ejector is added to the vibration of the running pump.
If a decision is made to install a pump with a built-in ejector, then you will have to take care of sound insulation especially carefully. Pumps or pumping stations with a built-in ejector are recommended to be installed outside the house, for example, in a separate building or in a well caisson.
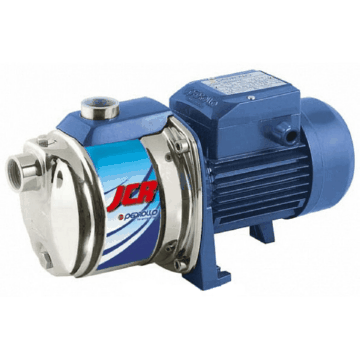
The electric motor for a pump with an ejector must be more powerful than for a similar non-ejector model.
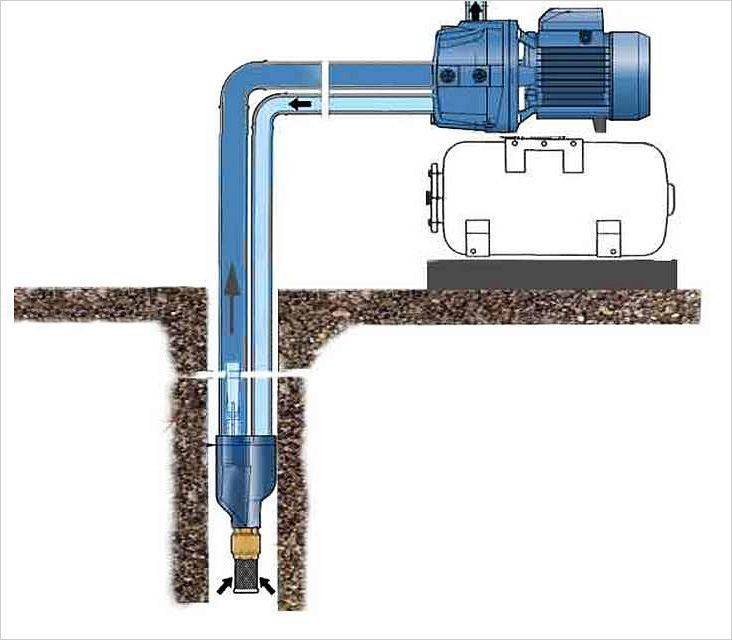
A remote or external ejector is installed at some distance from the pump, and this distance can be quite significant: 20-40 meters, some experts even consider 50 meters acceptable. Thus, a remote ejector can be placed directly in a water source, for example, in a well.
Of course, the noise from the operation of an ejector installed deep underground will no longer disturb the residents of the house. However, this type of device should be connected to the system using a recirculation pipe, through which water will return to the ejector.
The greater the installation depth of the device, the longer the pipe will have to be lowered into the well or well.
It is better to provide for the presence of another pipe in the well at the design stage of the device. Connecting a remote ejector also provides for the installation of a separate storage tank, from which water will be taken for recirculation.
Such a tank allows you to reduce the load on the surface pump, saving some amount of energy. It is worth noting that the efficiency of the external ejector is somewhat lower than that of the models built into the pump, however, the ability to significantly increase the depth of the intake forces one to come to terms with this drawback.
When using an external ejector, there is no need to place the pumping station directly next to the water source. It is quite possible to install it in the basement of a residential building. The distance to the source can vary within 20-40 meters, this will not affect the performance of pumping equipment.
Making an ejector with your own hands
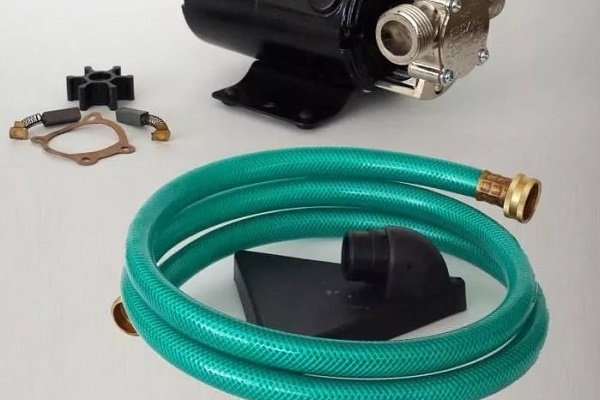
To make the device yourself, you will need the following parts:
- The tee will act as the basis for the device.
- The fitting will become a high pressure flow conduit.
- With the help of couplings and bends, the ejector will be assembled and connected to the system.
The above parts for assembling the device with your own hands are assembled in a certain order:
- You need to take a tee with ends designed for threaded installation. The thread must be internal.
- In the lower part of the tee, you need to screw the fitting up with the outlet pipe. It is necessary to screw the base of the fitting into the tee, placing the outlet pipe inside the base of the device. In this case, the branch pipe should not stand out on the opposite side of the tee.If it is very long, then they resort to turning it.
- The short fitting is extended using a polymer tube. The interval from the end of the tee to the end of the fitting should be about 2-3 mm.
- An adapter is attached to the upper part of the tee located above the fitting. Its one end is designed for external thread, it is attached to the base of the future device. The second side is equipped as a compression fitting for a metal-plastic pipe; water from the well will circulate through it outside the device.
- Another fitting must be installed in the lower part of the tee, where the fitting is already located. This will be a corner (bend), a recirculation line pipe will be installed on it. Therefore, before installation, it is required to grind the lower threaded part of the fitting to 3-4 threads.
- A second corner is attached to the side branch, which ends with a collet clamp for installing a supply pipeline through which water flows from the well.
- Threaded connections are installed on a polymer seal. If polyethylene moldings act instead of pipes, then crimp elements are used as collet fittings for metal-plastic, which are designed for reverse shrinkage of polyethylene. XLPE pipes can be bent in any direction, which saves on corners.
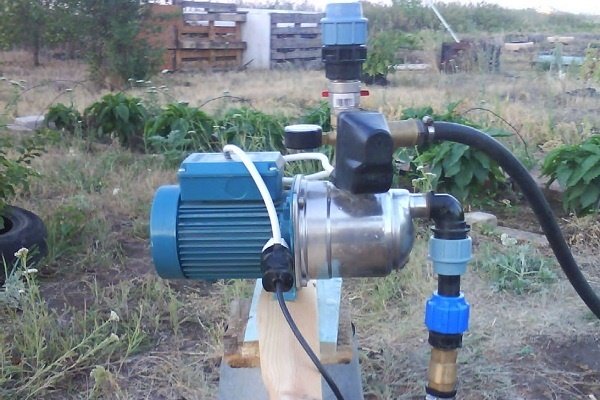
After assembling the ejector, it is required to connect it to pumping station for at home. If the device is connected outside the well, then the pumping station is with an internal device, if the ejector goes down into the mine under water, then the equipment is with an external unit.


Then, in the latter case, three pipes will need to be connected to the assembled device:
- One of them will join the side end of the tee. Its immersion will occur almost to the very bottom, its end must be provided with a strainer in the glass case. This pipe is needed to organize the flow with pressure.
- A second pipe should be attached to the lower end of the tee. It should be connected to the pressure line that comes out of the pumping station for the house. Due to this, a stream will be created in the ejector, which will move at high speed.
- A third pipe is attached to the upper end. It must be brought to the surface by connecting to the suction pipe of the pump. Thanks to the ejector, a flow increased by pressure will flow through this pipe.
An ejector is an indispensable device for creating a good water pressure, as well as for protecting the supply equipment from idle operation. You can buy it together with a pumping station or assemble it yourself. It will work effectively for a long time, providing uninterrupted water supply even from a deep source.
Connection
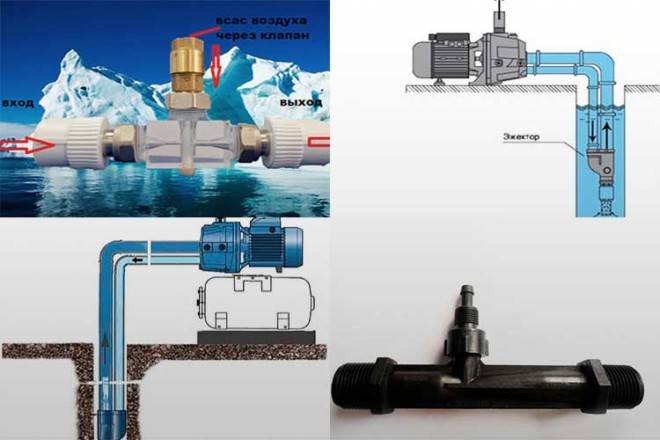
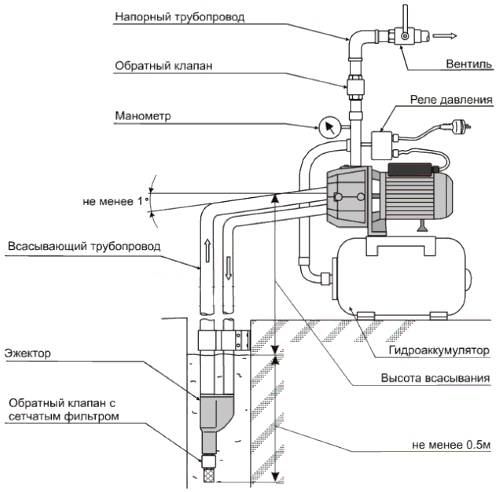
Installation of a pumping system with an internal ejector is almost no different from installing a non-injector pump. It is necessary to connect the pipeline from the source to the suction inlet of the device, as well as equip the pressure line with the necessary equipment, in particular, a hydraulic accumulator and automation, which will control the operation of the entire system.
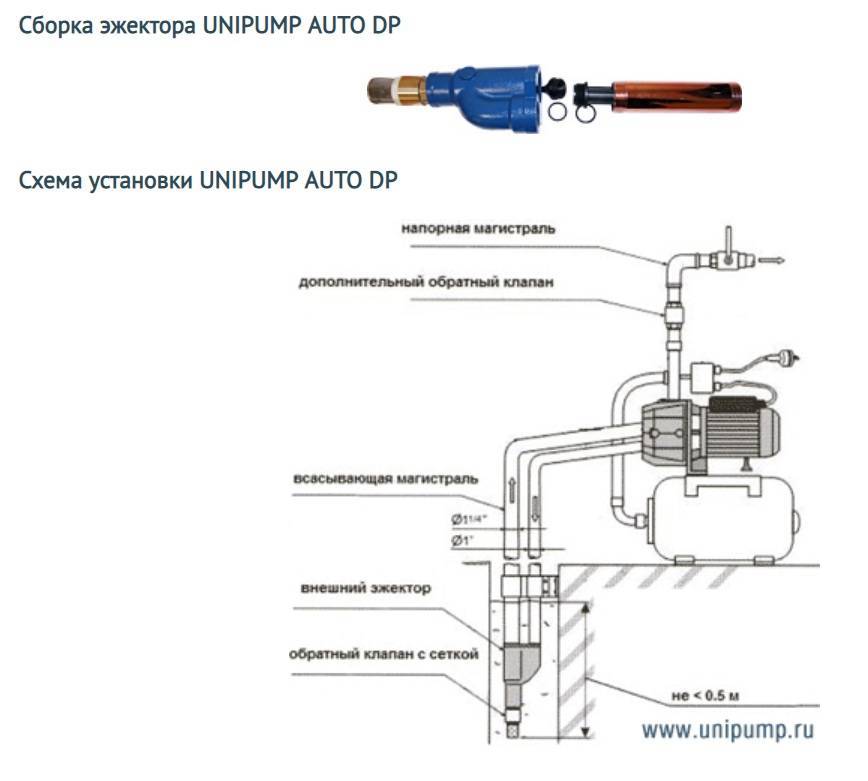
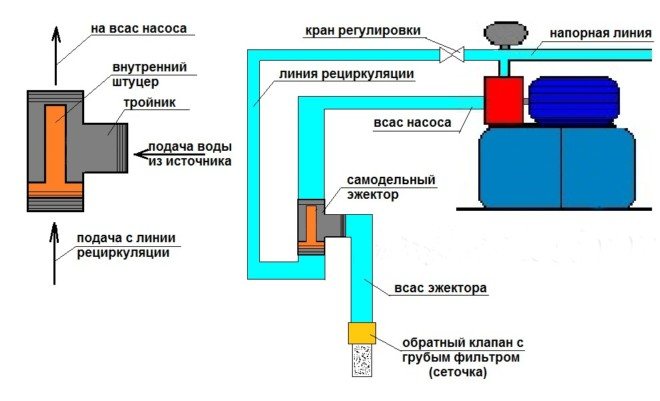
For pumping stations with an internal ejector fixed separately, as well as for devices where an external ejector is present, two additional steps are added: An additional pipe for recirculation is required, it is pulled from the pump pressure line to the ejector. From it the main pipe is connected to the suction pump. Having a check valve and a coarse filter, a pipe for raising water from a source is connected to the ejector suction.
If required, a valve is installed in the recirculation line for adjustment. This is advantageous if the water level in the well is significantly higher than the pumping station is designed for. The pressure of water in the ejector can be reduced, due to which its supply in the water supply system will increase. Some models are equipped with a built-in valve for this setting. The instructions for the equipment indicate its placement and adjustment.
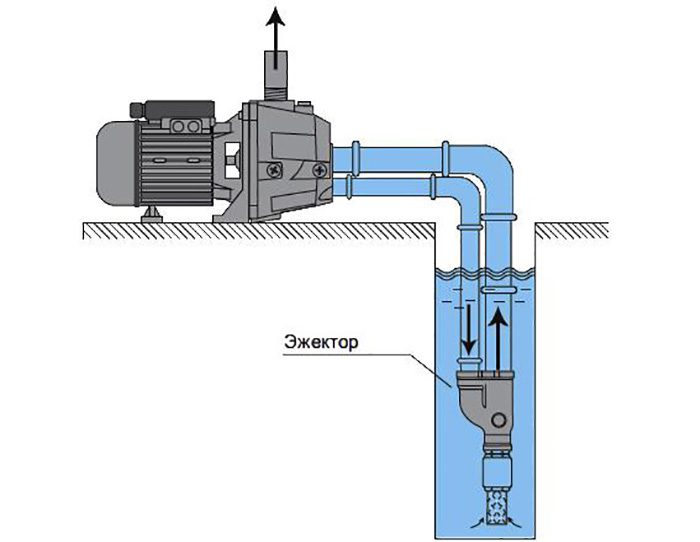
The principle of operation of the ejector
The deeper the water is, the more difficult it is to raise it to the surface. In practice, if the depth of the well is more than seven meters, the surface pump can hardly cope with its tasks.
Of course, for very deep wells, it is more appropriate to purchase a high-performance submersible pump. But with the help of an ejector, it is possible to improve the performance of a surface pump to an acceptable level and at a much lower cost.
The ejector is a small but very effective device. This knot has a relatively simple design, it can even be made independently from improvised materials. The principle of operation is based on giving the flow of water an additional acceleration, which will increase the amount of water coming from the source per unit of time.
Image gallery
Photo from
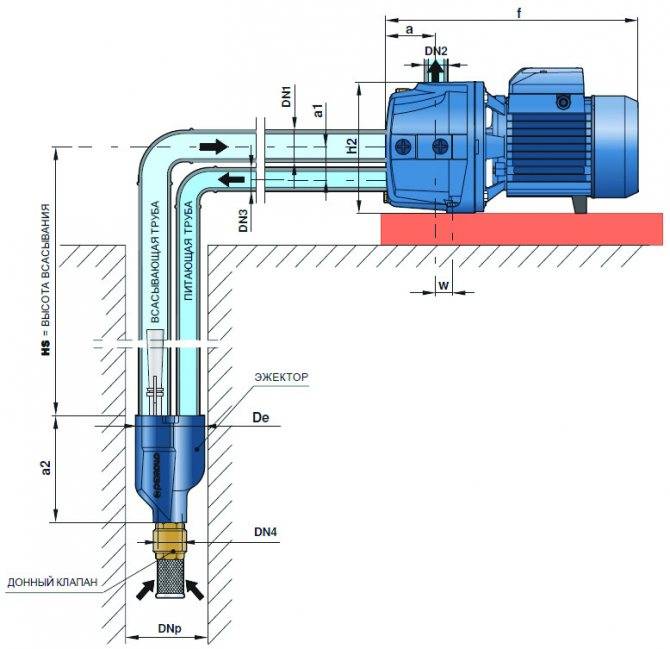
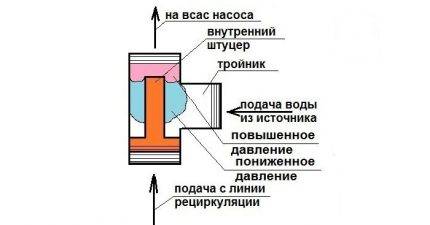
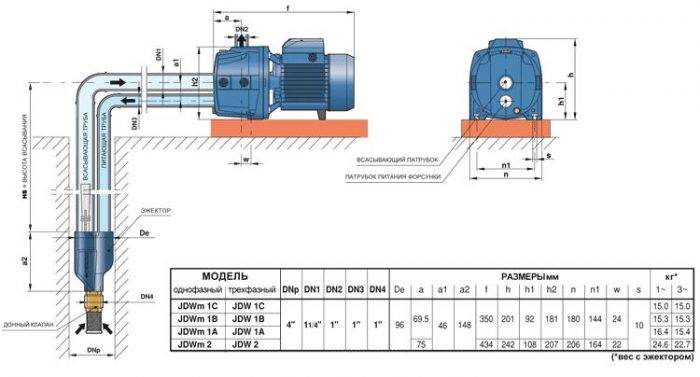
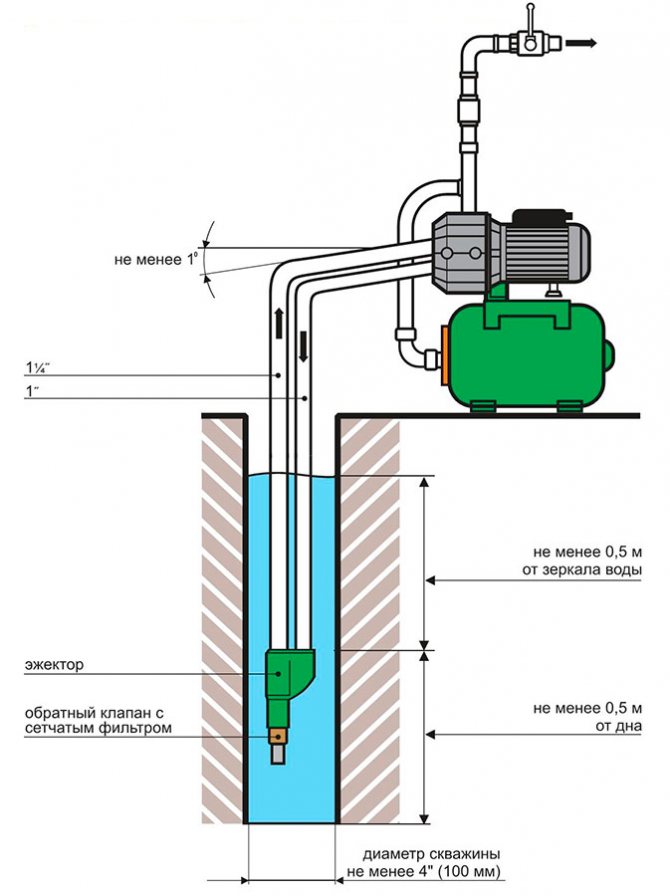
Ejector - a device required to raise water with a surface pump from a depth of more than 7 m. They are used to form pressure in the suction line
Ejectors are divided into built-in and remote varieties. Remote devices are used to lift water from an average depth of 10 to 25 m.
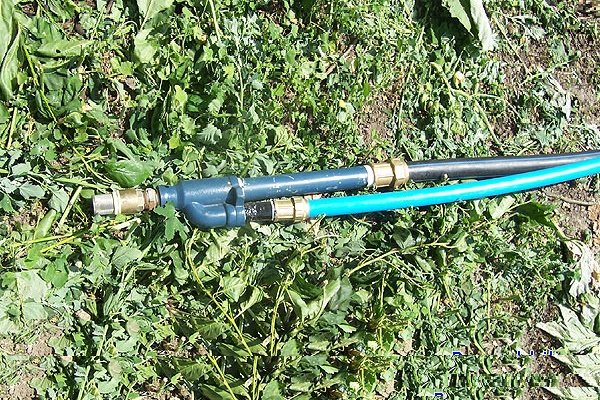
Two pipes of different diameters are connected to the ejector device, due to the pressure difference in adjacent pipes, pressure is created
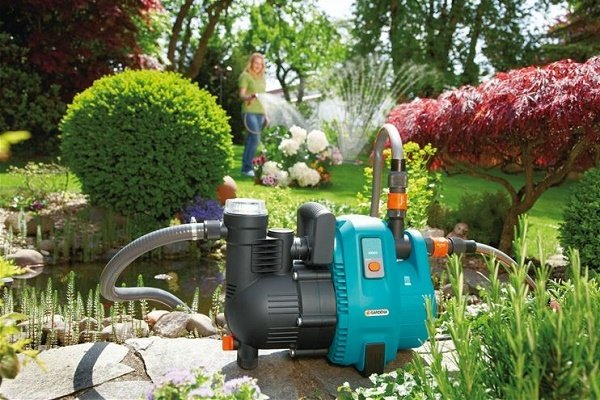
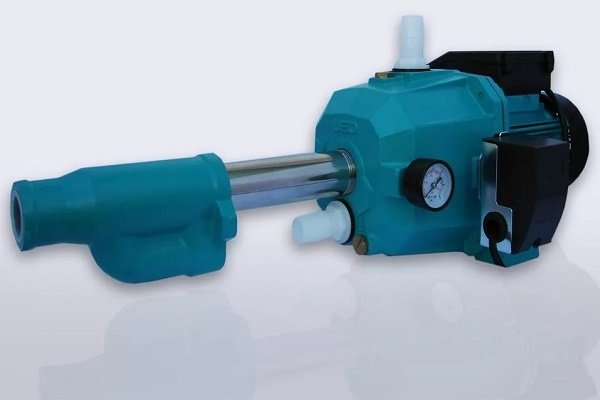
Factory-made ejectors are supplied to pumping stations and automatic pumps
Devices are used in landscaping schemes requiring pressurized water supply for sprinkler systems, fountains and similar structures.
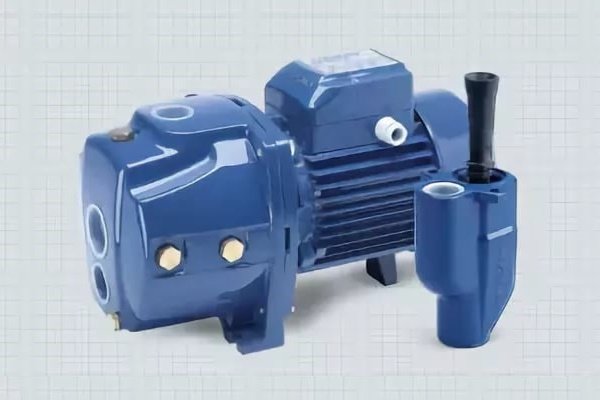
To install the ejector, the pump unit must have two inlets
Using the schemes and dimensions of factory-made ejectors, you can make a device that is useful in pumping out with your own hands.

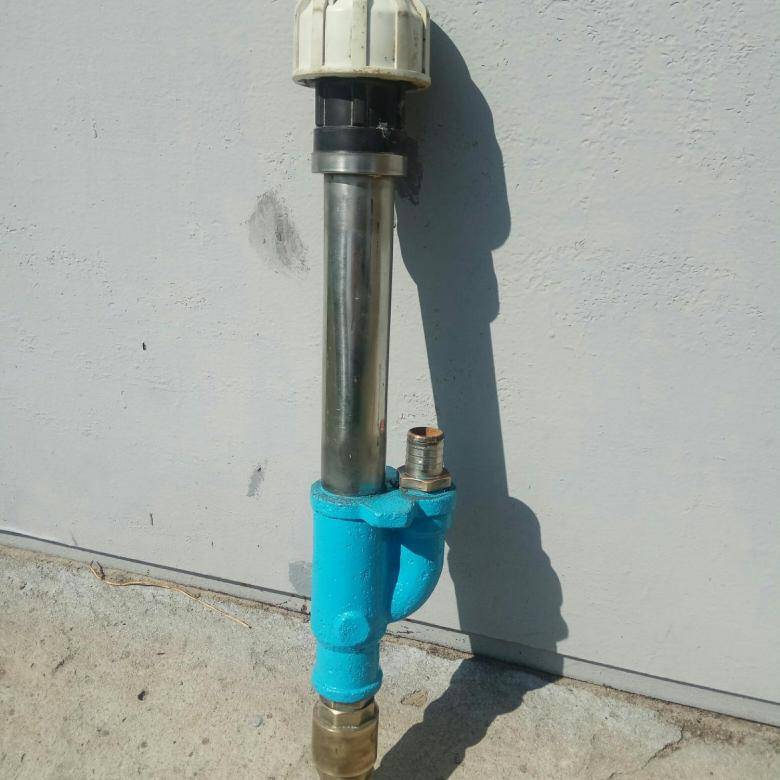
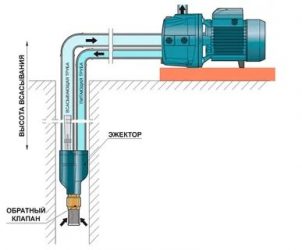
A reverse strainer valve, ensuring normal circulation during pumping
This solution is especially convenient for those who are going to install or have already installed a pumping station with a surface pump. The ejector will increase depth of water intake up to 20-40 meters. It should also be noted that the purchase of more powerful pumping equipment will lead to a noticeable increase in electricity consumption. In this sense, the ejector will bring noticeable benefits.


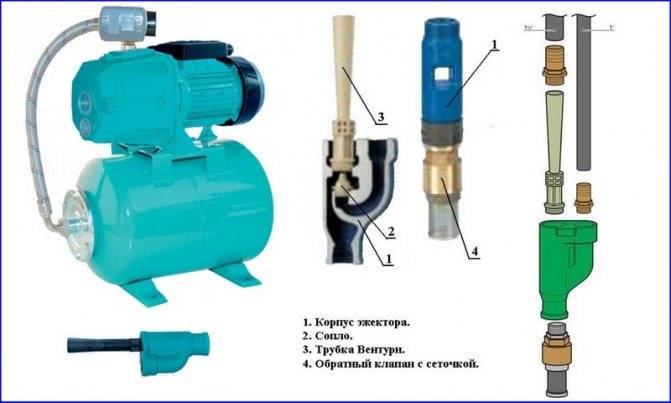
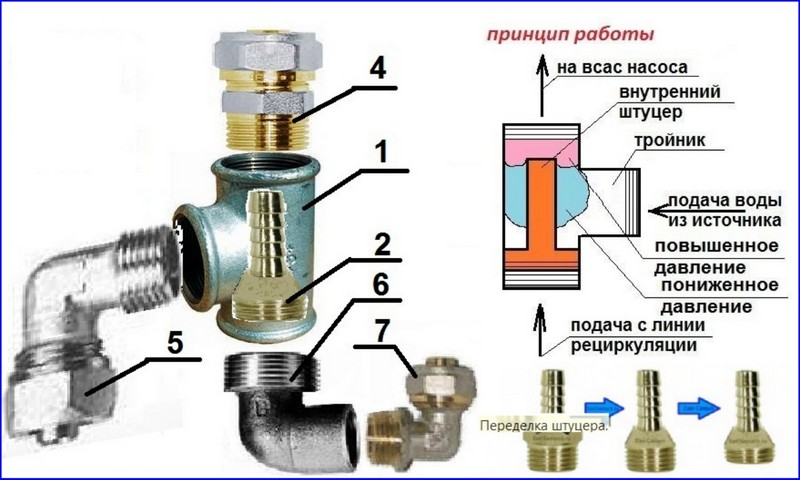
The ejector for a surface pump consists of the following elements:
- suction chamber;
- mixing unit;
- diffuser;
- narrowed nozzle.
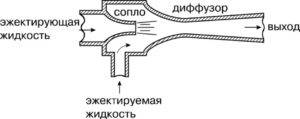
The operation of the device is based on the Bernoulli principle. It says that if the speed of the flow increases, an area with low pressure is created around it.In this way, a dilution effect is achieved. Water enters through a nozzle, the diameter of which is smaller than the dimensions of the rest of the structure.
This diagram allows you to get an idea of the device and the principle of operation of the ejector for a pumping station. The accelerated reverse flow creates an area of low pressure and transfers kinetic energy to the main water flow
A slight constriction gives a noticeable acceleration to the flow of water. Water enters the mixer chamber, creating an area with reduced pressure inside it. Under the influence of this process, a stream of water at a higher pressure enters the mixer through the suction chamber.
Water in the ejector does not come from a well, but from a pump. Those. the ejector must be installed in such a way that part of the water raised by the pump returns to the ejector through the nozzle. The kinetic energy of this accelerated flow will be constantly transferred to the mass of water that is sucked from the source.
To create a rarefied pressure area inside the ejector, a special fitting is used, the diameter of which is smaller than the parameters of the suction pipe.
Thus, a constant acceleration of the flow will be ensured. Pumping equipment will need less energy to transport water to the surface. As a result, its efficiency will increase, as will the depth from which water can be taken.
Part of the water extracted in this way is sent back to the ejector through the recirculation pipe, and the rest enters the house's plumbing system. The presence of an ejector has another "plus". It sucks in water on its own, which additionally insures the pump against idling, i.e. from the “dry running” situation, which is dangerous for all surface pumps.
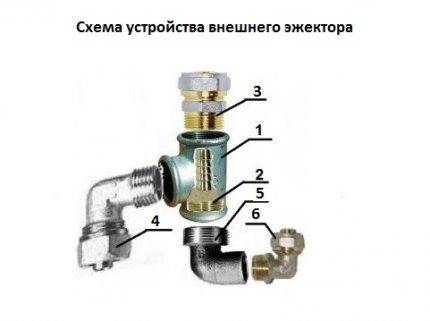
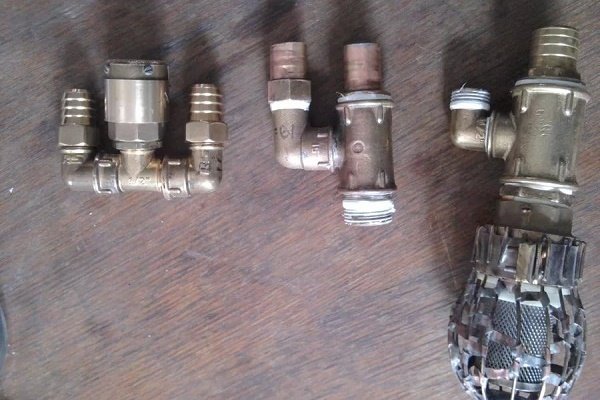
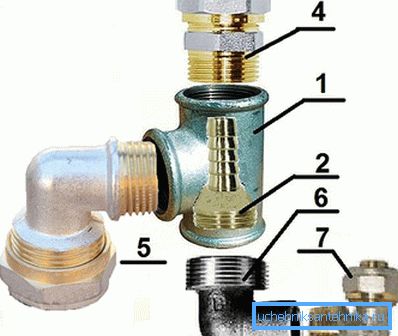
The diagram shows the device of an external ejector: 1- tee; 2 - fitting; 3 - adapter for a water pipe; 4, 5, 6 - corners
To regulate the operation of the ejector, use a conventional valve. It is installed on the recirculation pipe, through which water from the pump is directed to the ejector nozzle. Using a tap, the amount of water entering the ejector can be reduced or increased, thereby reducing or increasing the reverse flow rate.
Ejector design option 1
The simplest ejector can be assembled on the basis of a tee and a fitting - these parts will perform the function of a Venturi tube in a very simplified version. Shaped elements for the ejector can be used from various materials (metal, plastic). In this case, the ejector design is assembled from a brass tee and collet fittings. for metal-plastic pipes.
The diameter of the fittings for the design of the ejector is taken depending on the performance of the pumping station and the diameter of the suction and recirculation pipelines, the diameter of the suction pipeline cannot be less than 25 mm. In our design, a tee with a diameter of 20 mm will be used with a 26 mm suction pipe and a 12.5 mm recirculation pipe connected to it.
- Tee ½" mm.
- Fitting ½ "mm and with a 12 mm outlet.
- Adapter 20×25 mm.
- Angle 90º (external/internal) for metal-plastic pipe ½"×16 mm.
- Angle 90º (outer/inner) for a metal-plastic pipe ¾ "×26 mm.
- Angle 90º (external/internal) ¾"×½".
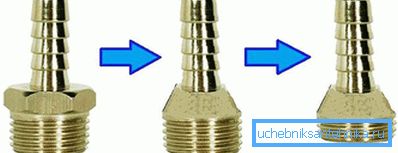
The lower base of the resulting cone should have a diameter a few millimeters smaller than the outer thread diameter of the fitting, and its thread must also be shortened so that a maximum of four turns remain. With the help of a die, you need to drive the thread and cut a few more turns on the resulting cone.
Now you can assemble the ejector. To do this, we screw the fitting (2) with a narrow part inside the tee (1) so that the fitting extends 1–2 mm beyond the upper edge of the side branch of the tee, and so that at least four turns remain on the internal thread of the tee in order to be able to screw the branch (6). If the remaining free thread of the tee is not enough, it will also be necessary to grind off the threads of the fitting; if the length of the fitting is not enough, you can put a piece of the tube on it. A non-return valve must be connected to the outlet (5) through which water will be sucked in, so that when the system is started, water does not spill out of the suction and recirculation water supply, otherwise the system will not start. You also need to seal all threaded connections with any sealant.
Such an ejector will not have a high ejection coefficient due to the imperfect design of the Venturi tube, so it can be used to lift water from a depth of no more than 10 m.
Features and types of design
The ejector type pump is of two types:
- with an external location of the ejector;
- with an internal (built-in) location of the ejector.
The choice of one or another type of ejector layout is determined by the requirements that apply to pumping equipment. To suck air from different containers, another type of such units is used - an air ejector. It has a slightly different principle of operation.In our article, we will study devices for facilitating the pumping of water.


Internal ejector

Pumping equipment with a built-in ejector has a more compact size. In addition, the creation of liquid pressure and its intake for recirculation occurs inside the pumping equipment
Pumping equipment with a built-in ejector has a more compact size. In addition, the creation of liquid pressure and its intake for recirculation occurs inside the pumping equipment. This pump uses a more powerful motor that can recirculate fluid.
The advantages of such a constructive solution:
- the unit is not sensitive to heavy impurities in the water (silt and sand);
- the water entering the equipment does not need to be filtered;
- the device is suitable for lifting water from a depth of not more than 8 m;
- such pumping equipment provides sufficient liquid pressure for domestic needs.
Among the shortcomings, it is worth noting the following:
- this pump makes a lot of noise during operation;
- for the installation of such a unit, it is better to choose a place away from home and build a special room.
External ejector
To perform outdoor installation of the ejector next to the pumping equipment, it is necessary to equip a tank into which it is worth drawing water
To perform an outdoor installation of an ejector near the pumping equipment, it is necessary to equip a tank into which it is worth drawing water. In this tank, a working pressure and the necessary vacuum will be created to facilitate the operation of pumping equipment. The ejector device itself is connected to that part of the pipeline that is immersed in the well. In this regard, there are restrictions on the diameter of the pipeline.
Advantages of a remote ejector:
- thanks to this design, it is possible to raise water from a considerable depth (up to 50 m);
- it is possible to reduce the noise from the operation of pumping equipment;
- such a design can be placed right in the basement of the house;
- without reducing the efficiency of the pumping station, the ejector can be placed at a distance of 20-40 m from the well;
- By having all the necessary equipment in one place, it is easier to carry out repair and commissioning, which contributes to a longer service life of the entire system.
Disadvantages of the external location of the ejector device:
- system performance is reduced by 30-35 percent;
- restrictions in the choice of pipeline diameter.
Water connection
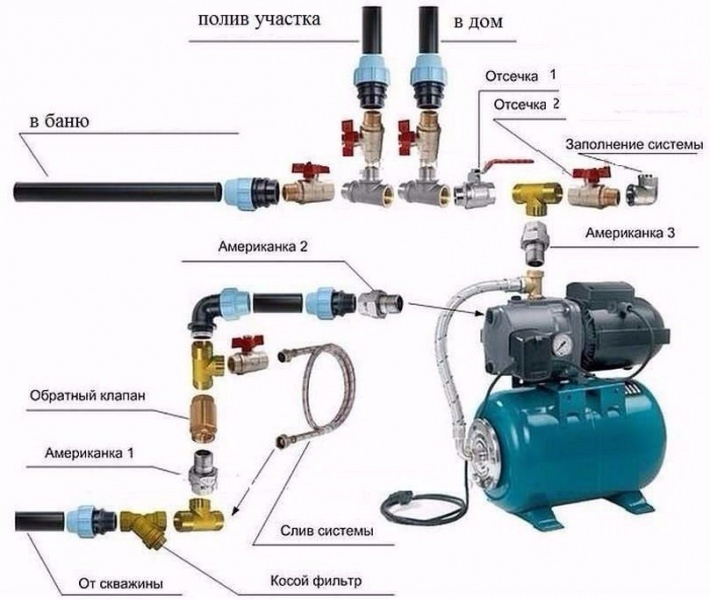
Connecting the pumping station to the water supply. (Click to enlarge)
As a rule, the pumping station is connected to the water supply in the event that there is not enough pressure for the heating equipment.
In order to connect the system to the water supply, you need:
- The water pipe must be disconnected at a certain point.
- The end of the pipe that comes from the central line is connected to the storage tank.
- The pipe from the tank is connected to the inlet of the pump, and the pipe that is connected to its outlet goes to the pipe that leads to the house.
- Lay electrical wiring.
- Equipment adjustment.
How to do it yourself
To manufacture the device, you will need available parts in the form of interface elements and fittings:
- metal tee - serves as the main part;
- high pressure water conductor in the form of a fitting;
- bends and couplings - elements for mounting the device and connecting it to the water supply.
To seal all threaded connections, FUM tape is used - it is an easy-to-use and plastic sealant made of polymeric material, vaguely resembling white insulation.
If the plumbing system consists of metal-plastic pipes, installation must be done with crimp elements. You do not need to purchase bends if the water pipes are made of cross-linked polyethylene - they easily bend at the desired angle.
Of the tools you will need:
- plumbing keys;
- vise;
- grinder or emery for grinding.
The order of work is as follows:

A tee with an internal thread is taken and a fitting is screwed into its lower hole. The outlet pipe of the fitting is located inside the tee
Particular attention is paid to the size of the fitting - all protruding parts are carefully ground. And short fittings, on the contrary, are built up with polymer tubes
The required size of the part of the fitting protruding from the tee should be no more than three millimeters. An adapter with an external thread is screwed to the top of the tee. It will be located directly above the fitting. The male thread is used as a means of connecting the adapter to the tee. The opposite end of the adapter is intended for mounting a water pipe using a crimp element (fitting). A branch in the form of a corner is screwed to the lower part of the tee, which already has a fitting, to which a narrow recirculation pipe is subsequently attached using a compression nut. Another corner is screwed into the side hole of the tee, designed to connect a water supply pipe. The pipe is fastened with a collet clamp.After complete assembly, the device is connected to a pre-selected place in the plumbing system, which the owner considers optimal for himself. Mounting near the pump makes the handicraft ejector built-in. And placing it in a well or well will mean that the device works according to the remote principle.


Must know how to choose a pumping station for a private home!
If immersion in water is practiced, three pipes are connected to the device at once:
- The first sinks to the very bottom, is equipped with a mesh filter and connects to the side corner on the tee. She will take water and transport it to the ejector.
- The second one comes from the pumping station and connects to the bottom hole. This pipe is responsible for the occurrence of high-speed flow.
- The third is brought into the plumbing system and connected to the upper hole of the tee. Already accelerated water flow with increased pressure will move along it.
Options for installing a pumping station
Stations of pumping equipment, regardless of the location of the water source, can be installed in three main places.
- In the basement of a private house. This installation option facilitates the maintenance of equipment, you get free access to the mechanisms for their maintenance or repair. However, pumping equipment is a rather noisy thing, so when choosing this option, it is necessary to provide for the issue of sound insulation.
-
In a separate building located above the wellhead or well. With all the obvious benefits of such a choice, the construction of a separate building for technical facilities is a rather costly exercise.
Station in a separate building
-
In a caisson - a structure resembling a container, the bottom of which is located below the freezing line of the soil. There are options for building quite extensive caissons in which equipment can be placed.
Basement pump station
Features of choosing the location of the pumping station
- The pumping station must be installed on a solid foundation to avoid excessive vibration. The lack of a solid foundation and reliable fastening of the pumping equipment station can lead to the formation of backlashes at the joints of the pipelines, which will lead to a leak. In this case, the pumping equipment should not touch the walls or ceiling.
-
The station of pumping equipment must be located either in a heated room, or must be reliably isolated from negative temperatures. Lowering the temperature of the equipment below zero leads to damage to almost all of its components.
Soil freezing line
Options for connecting a pumping station
Depending on the configuration of the water supply system, you can choose one-pipe and two-pipe pumping station connection diagrams equipment. A two-pipe system is used to increase the depth from which the pumping equipment station can lift water.
The device of the station of pumping equipment with a two-pipe water suction scheme
Connection of a pumping station according to a single-pipe scheme
A single-pipe scheme is used with a well depth not exceeding 10 meters. If the suction depth of the pumping station exceeds 20 meters, then it is preferable to use a two-pipe scheme with an ejector.
The composition of the pumping equipment station
Complete set of pumping station
This is interesting: Do-it-yourself pumping station repair - popular malfunctions
Ejector design (option 1)
The simplest ejector can be assembled on the basis of a fitting and a tee - these details will make the function of the Venturi tube in a very simplified version. Shaped elements for the ejector can be used from different materials (metal, plastic). In this case, the ejector design is assembled from collet fittings and a brass tee for metal-plastic pipes.
The diameter of the fittings for the design of the ejector is taken depending on the performance of the pumping station and the diameter of the suction and recirculation pipelines, the diameter of the suction pipeline cannot be less than 25 mm. In our design, a tee with a diameter of 20 mm will be used with a 26 mm suction pipe and a 12.5 mm recirculation pipe connected to it.
- Tee? mm.
- Union ?" mm and with a 12 mm outlet.
- Adapter 20 × 25 mm.
- Angle 90? (external/internal) for a metalplastic pipe?? 16 mm.
- Angle 90? (external/internal) for a metalplastic pipe?? 26 mm.
- Angle 90? (external/internal) ???.
The difficulty in this design can be the fitting, it will have to be slightly modified, in particular, to grind the hexagon to a cone-shaped state.
The lower base of the cone that appears should have a diameter a couple of millimeters smaller than the outer diameter of the thread of the fitting, in addition, it is necessary to shorten its thread so that a maximum of four turns remain. By means of a die, it is necessary to drive the thread and cut a couple more turns on the taken cone.


Now it is possible to assemble the ejector.To do this, we screw the fitting (2) with a narrow part inside the tee (1) so that the fitting goes 1-2 mm beyond the upper edge of the lateral branch of the tee, and so that at least a few turns remain on the internal thread of the tee so that it is possible to screw in the branch (6 ). If the remaining free thread of the tee is not enough, it will also be necessary to grind off the threads of the fitting; if the length of the fitting is short, it is possible to put a piece of the tube on it. It is mandatory to connect a non-return valve to the outlet (5) through which water will be sucked in, so that when the system is started, water does not spill out of the suction and recirculation water supply, otherwise the system will not start. In addition, it is necessary to seal all threaded connections with any sealant.
Such an ejector will not have a large ejection coefficient due to the imperfection of the design of the Venturi tube, so it can be used to lift water from a depth of no more than ten meters.
There is another option, how to make an ejector, this design is more efficient in view of the more ideal Venturi tube, it is more difficult to manufacture, but the ejection coefficient will be higher than in the previous model.
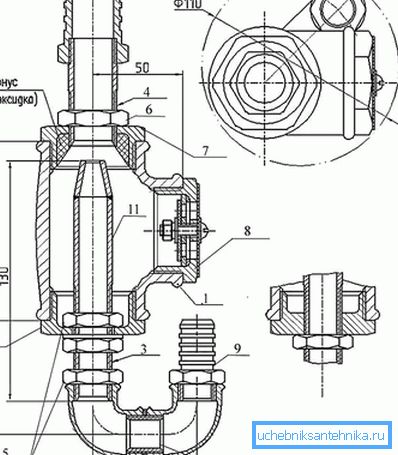
- Tee? 40 mm.
- Withdrawal 90? 1/2″ mm.
- Drive 1/2″ mm.
- Squeegee 3/4″ mm.
- Locknut 1/2″ mm.
- Locknut 3/4″ mm.
- Stub.
- Check valve.
- Fitting 1/2″ mm.
- Fitting 3/4″ mm.
- Nozzle 10 mm.
- Threaded 1/2″ mm.
Such an ejector is made of metal fittings. It is possible to use a bronze tube as a nozzle (11), make longitudinal cuts in it, compress it, and solder the seams.In the plugs (7) it is necessary to make holes of a suitable diameter and cut the thread in order to screw in the horns (3 and 4) and fix them with lock nuts. The nozzle will need to be fixed in the drive by soldering.


