- Dirty water drain
- Size and design
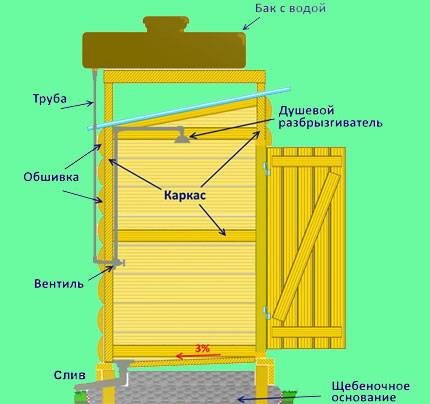
- Organization of water heating
- Why do you need a summer shower to give
- Purchase of necessary materials
- Installation of a frame for a temporary shower stall
- Soul Requirements
- Summer shower installation
- Regarding the water tank
- How to make a summer shower with a toilet: the nuances of construction
- Construction of a summer shower of a capital structure
- Choosing a place on the site and arranging a base for an outdoor shower
- Pros and cons of a summer shower
- Do-it-yourself summer shower
- Feature of plastic flat shower tank
- Heated plastic shower tanks
- Plastic shower tanks without heating
- How to choose the right plastic shower tank
- Tricks from the experts
- Installation of a summer shower with heating
- Foundation laying
- cabin construction
- Tank installation
- Finishing
- Conclusions and useful video on the topic
Dirty water drain
The flow of water is organized in different ways. Some summer residents do not care about him at all. The most civilized way of all to divert used water is to connect to a central sewer, but not every summer resident has such an opportunity.
So, the drainage of water from the shower to give can be done in several ways:
- into the central sewer;
- into a drainage hole;
- into a septic tank or sewer;
- to the garden.
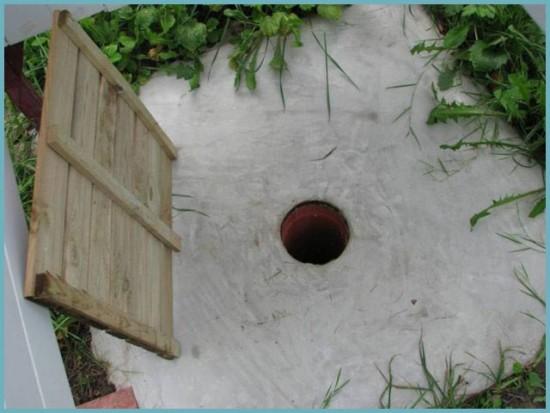
When building a shower for a summer residence with your own hands, drainage and waste pits are the best options. Under conditions of a drainage pit, water goes into the deep layers of the soil. Its construction does not require serious expenses. This is a convenient and reliable way to drain used water in a summer cottage.
Drainage can be located both under the shower itself, and not far from it, if the territory allows. To begin with, a hole is dug with a side of no more than a meter and a depth of 50 cm.
 Water drain equipment
When the top layer of soil is removed, the preparation of the pit begins. First you need to tamp the visible layer of the earth, then half the pit is covered with coarse gravel, broken bricks, pieces of concrete, etc. are also suitable, crushed stone is laid on top and rammed again. On top of everything, a wooden, plastic or steel pallet and a shower frame are installed.
Some summer residents are sure that soapy water does not harm plants. If, when building a do-it-yourself shower for a dacha, a decision is made to divert wastewater directly to the garden, you should choose a piece of land for this that is well lit by the sun, otherwise you will get a dirty swamp with croaking frogs in your dacha.
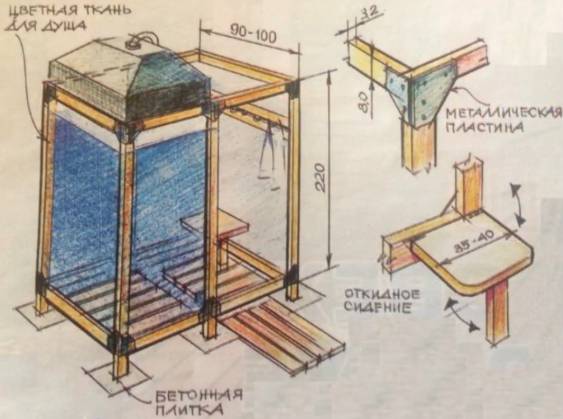
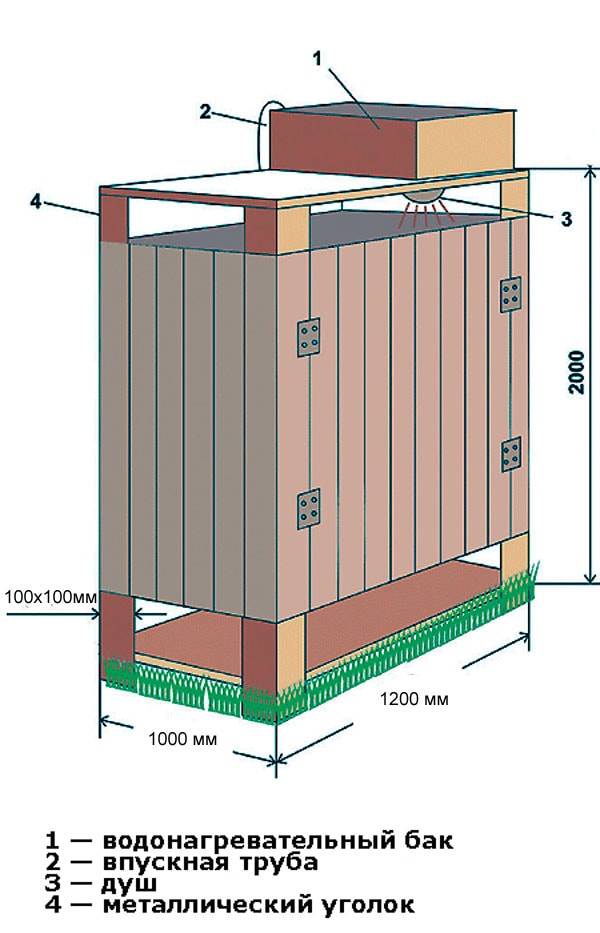
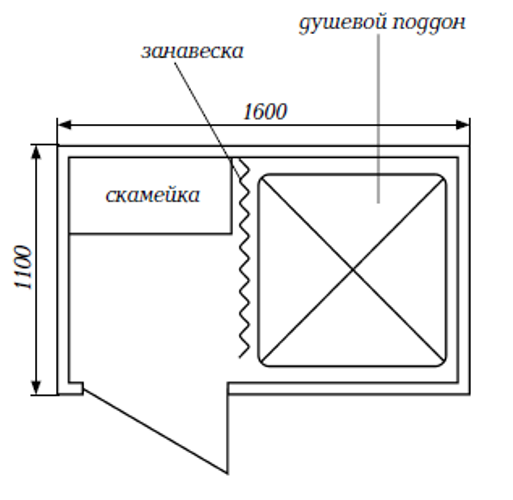
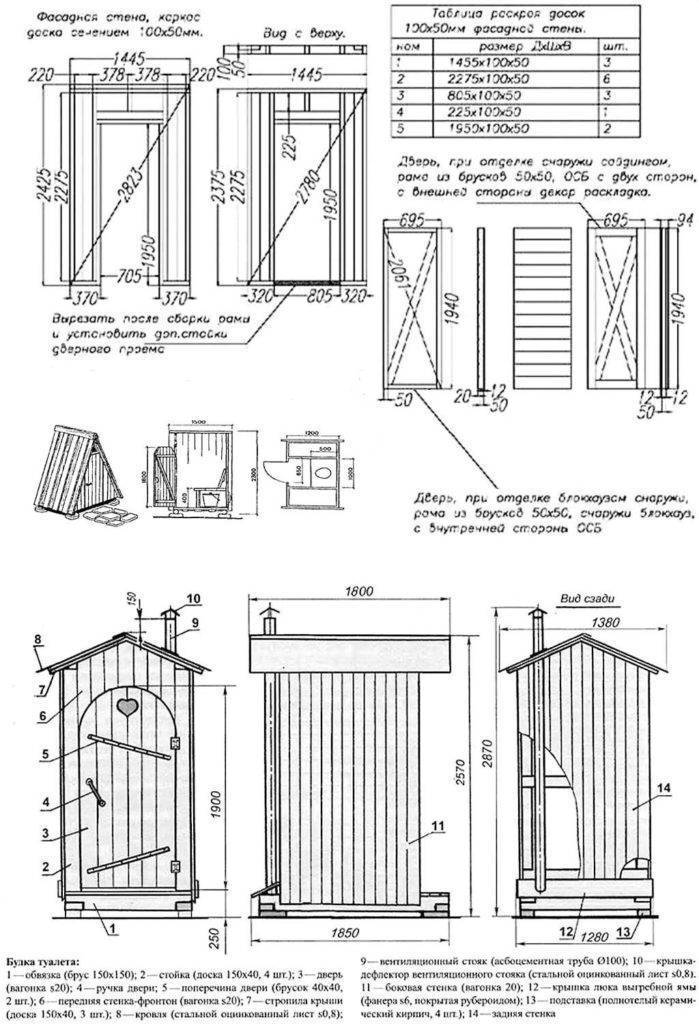
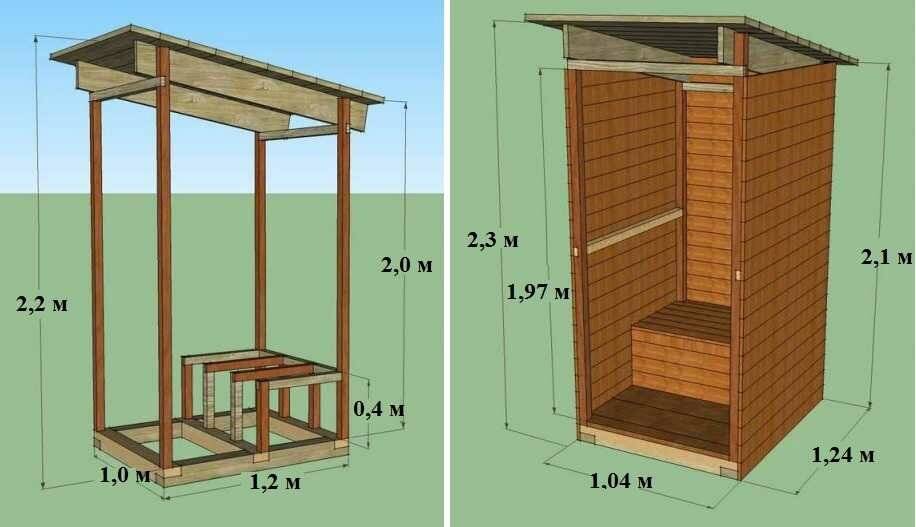
Size and design
Before starting construction of the object, you will need to draw a drawing. It is better to make a cabin roomy, at least 1.5 × 1.5 m. Its minimum allowable size is 1 × 1 m. It is necessary to provide for a locker room, 1.5 × 0.6 m is enough for this. construction, including the width of the timber and boards. Pipes are installed in the corners. The upper part of the structure is easier to assemble on the ground, and then attach to the side bars. All axes must match.For the final design, strength and reliable fastening are important, you need to take into account the load from a 150-200-liter tank. Between the pillars make mowing. They should be placed in the thickness of the wall. For the floor, it is preferable to install a pallet, a large selection of which is available in hardware stores. It is placed on a raised sand and gravel platform. There are gaps in the floor for drainage. Given these nuances, the foundation should have a height of 20-30 cm. If there is no such foundation, the water will eventually make a deepening.
Organization of water heating
A water tank on a sunny hot day warms up quite well, but if the shower is in the shade or the weather is cool, additional heating is required. For this, electric heaters, stoves, solar collectors, etc. are used.
The simplest and most accessible heating is with the help of a “wet” heating element. The element is mounted inside the tank and connected to an external power supply.
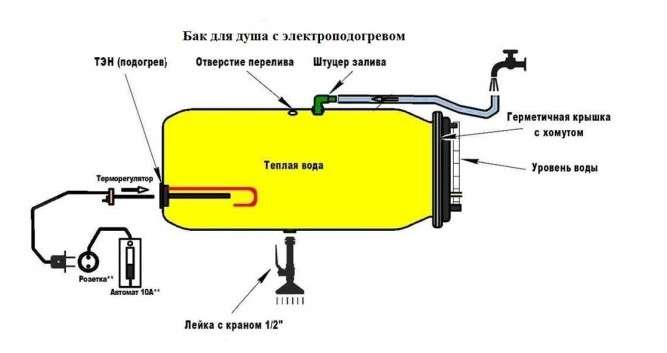
RCD will help protect yourself from electric shock. There is another effective way - to build a bright signal light into the network. Before you go to wash, the entire system must be de-energized.
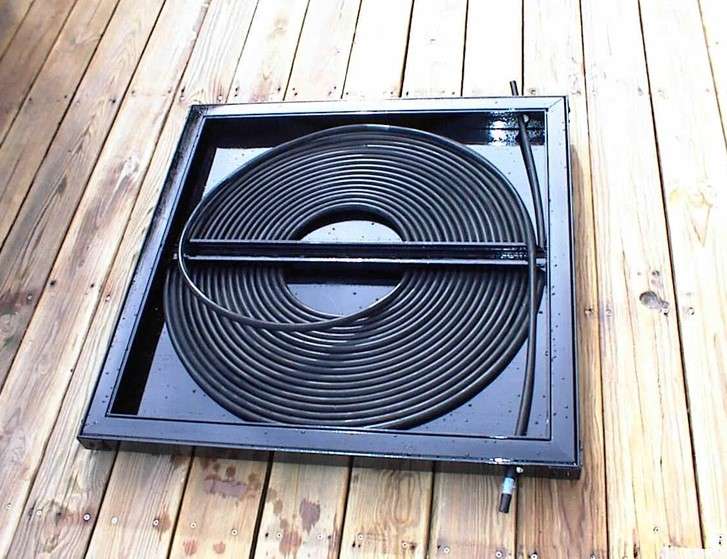
Solar collectors are safe, but only work well on a clear day. They can be made from a regular black hose. It is rolled into a flat skein and placed on the shower roof. Both ends are connected to the tank. Due to the temperature difference, the water circulates intensively and gives off heat to a colder environment.
Why do you need a summer shower to give
A dacha is a place where some people go to relax and enjoy nature, while others go to work on the land, get vegetables and fruits with their own hands.No matter how comfortable you make a country house, the feeling after taking a pleasant cool shower, almost in the middle of a natural oasis, cannot be compared with anything. A summer shower for a summer residence is excellently refreshing in the summer heat. This option of pleasant cooling of the body is much cheaper than a pool or pond. In addition, there is not always a place for them, and as for the pool, it also requires regular maintenance.
Glazed veranda with bath and shower
Pay attention to the mechanism of folding doors - this veranda can be made completely open

Practical, modern and beautiful plastic lining
It is also an excellent option if there is no hot water supply, and indeed water in the house. In this case, only with the help of a summer shower you can provide yourself with almost ideal conditions even in a country house that is very far from “civilization”.

The second life of a surfboard: a popular DIY mosaic project

A combination of natural and synthetic materials in a luxury shower near a Mediterranean-style country house
Purchase of necessary materials
In addition to the manufacture or purchase of a heating tank, it is necessary to purchase plastic water pipes D 50 mm. It is convenient to use a flexible silicone hose for water supply.
To equip a system of materials, you will also need:
- gutter reinforced with metal mesh;
- ball valve;
- float valve;
- divider.
To make a foundation pour when arranging a cesspool, you will need cement with markings from M150 and above. The drain can be covered with waterproofing roll materials or hydroglass.


For the manufacture of a wooden floor in the shower, it is best to use a tongue-and-groove board "forty", treated with a water-polymer emulsion or oil white.
For the final finish and arrangement of the bathroom, you will need paint for exterior and interior work, spacious shelves for bathroom accessories and hooks for clothes
For the construction of the structure you will need the following tools:
- building level;
- roulette;
- corner;
- screwdriver;
- self-tapping screws.
For preliminary marking of the territory, it is also necessary to stock up on a skein of twine and wooden pegs.
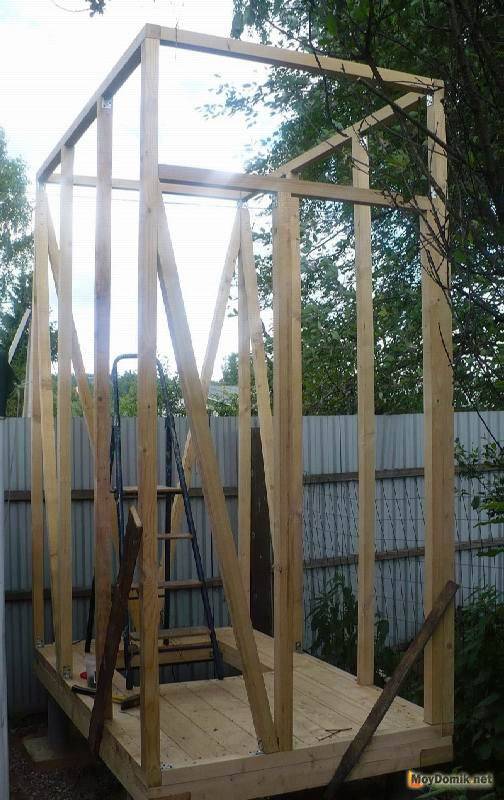
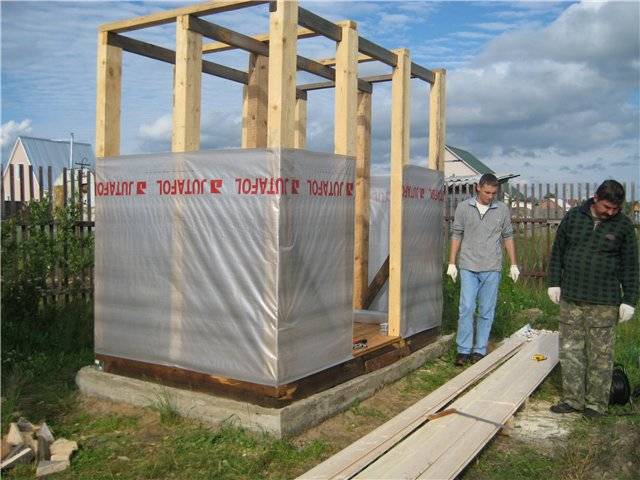
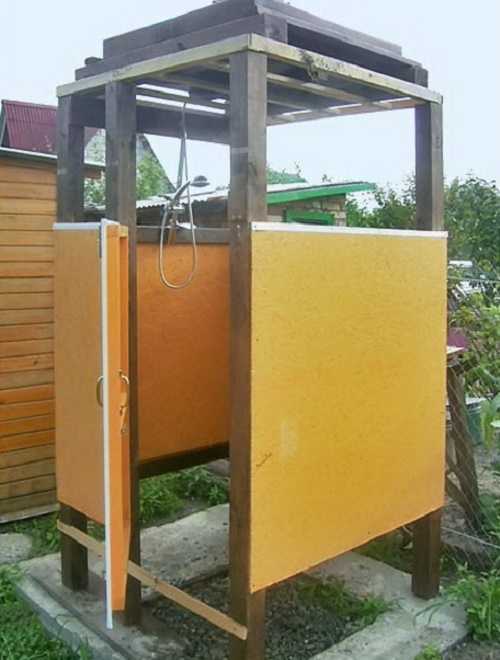
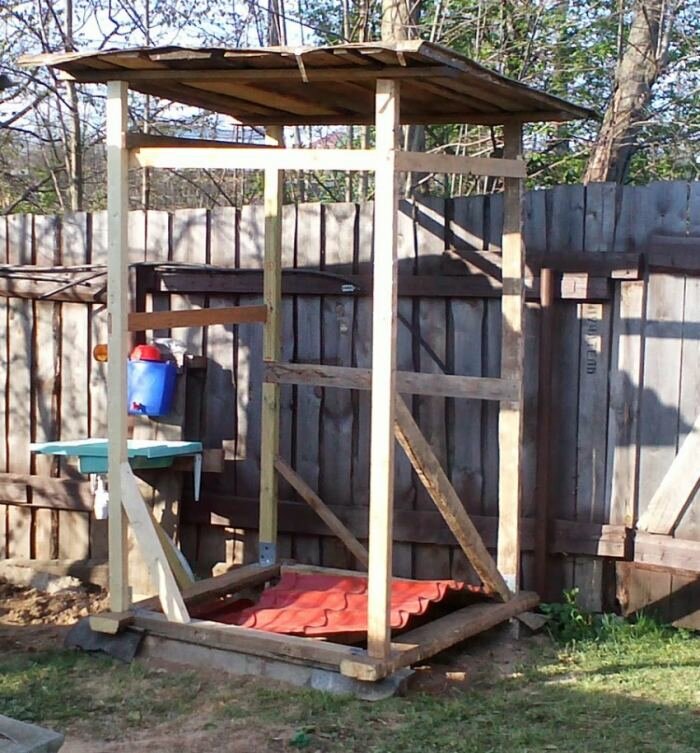
Installation of a frame for a temporary shower stall
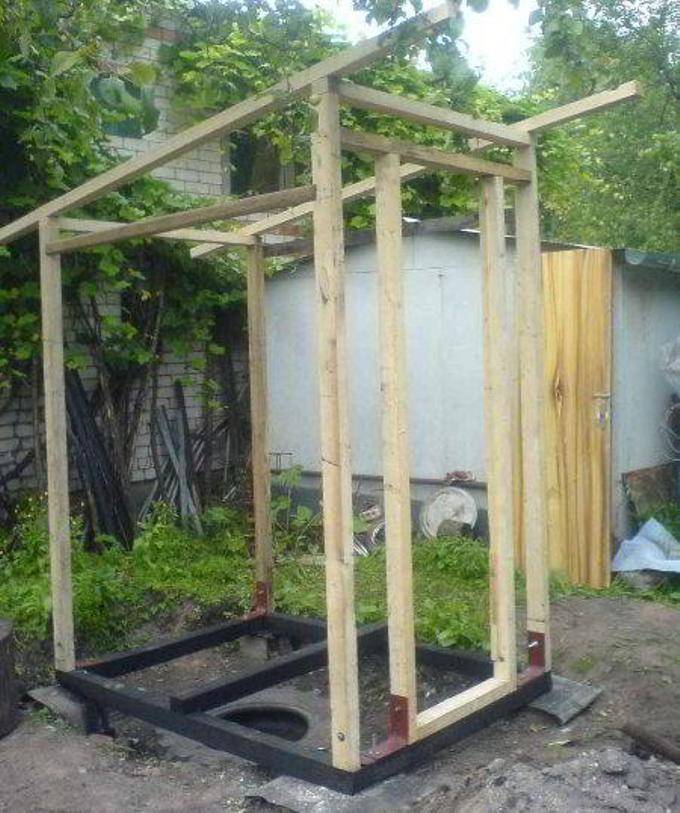
If brickwork is performed for a capital structure, then a frame is usually installed for a temporary one: metal or wooden. In the latter case, the tree should be treated with special impregnations that will protect it from insects and moisture, preventing the formation of fungus and mold.
Wooden frame for summer shower
- Marking is done - a rectangle is indicated right on the ground, the sides of which correspond to the dimensions of the future country shower.
- Wooden bars are installed, the width of which reaches up to 10 cm.
- Ligation is performed - starting from the top, the structure is securely fastened with bolts, after which the beams-basis of the shower walls are connected.
- Walls are equipped, for the construction of which you can use both boards and slate or plastic panels.
- Piping is in progress - the plumbing is installed so that the outlet of the pipe under the shower hose is higher than the level of the head (this will provide the necessary pressure for the movement of water). For runoff, a conclusion is made to a sump or to a specially equipped septic tank.
- A tank is installed - a tap is made with a thread, a tap with an appropriate nozzle is placed, after which the barrel rises and is fixed.
Soul Requirements
A shower cubicle should not only be stylish in its design, but also be safe for a person. When carrying out construction work, it is necessary to follow a number of requirements:
- Compactness. The installation should not occupy more than 1 / 2 of the area in the room.
- The strength of all materials used.
- Resistant to moisture, high temperatures.
- Compliance of the new structure with the characteristics of GOST. A do-it-yourself shower cabin in a private house and apartment must fully comply with the safety parameters.
- The surface of consumables must be resistant to the development of a pathogenic fungus that prefers to develop in damp, warm rooms.
- When using ceramics for interior decoration, a system of handrails should be considered that will prevent injuries and falls.
- The floor must have a non-slip mat.
The booth should have shelves, holders, hooks and organizers made of durable, moisture-resistant materials. Separately, you should deal with the issues of summing up communications, supplying warm and cold water, drainage and ventilation directly in the booth itself.
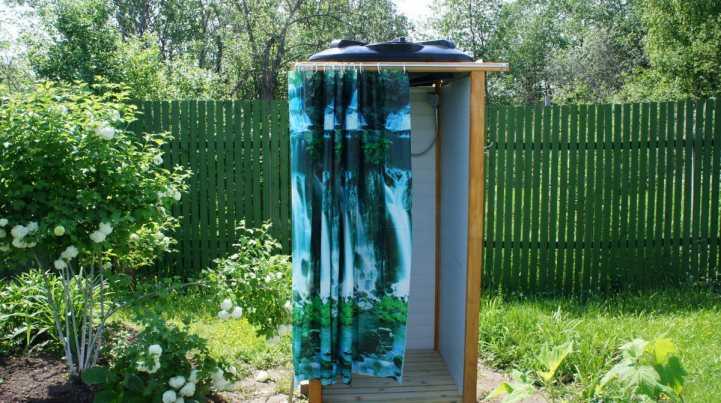
Summer shower installation
A supply pipe with a water tap, hose or watering can is installed on the wall. A pipe in the form of a ring is placed on top, limiting the shower space.
A special curtain clings to the pipe, hiding a person from prying eyes.If there is no running water in the country, then a tank of a suitable size is placed - this solves the problem with water supply.
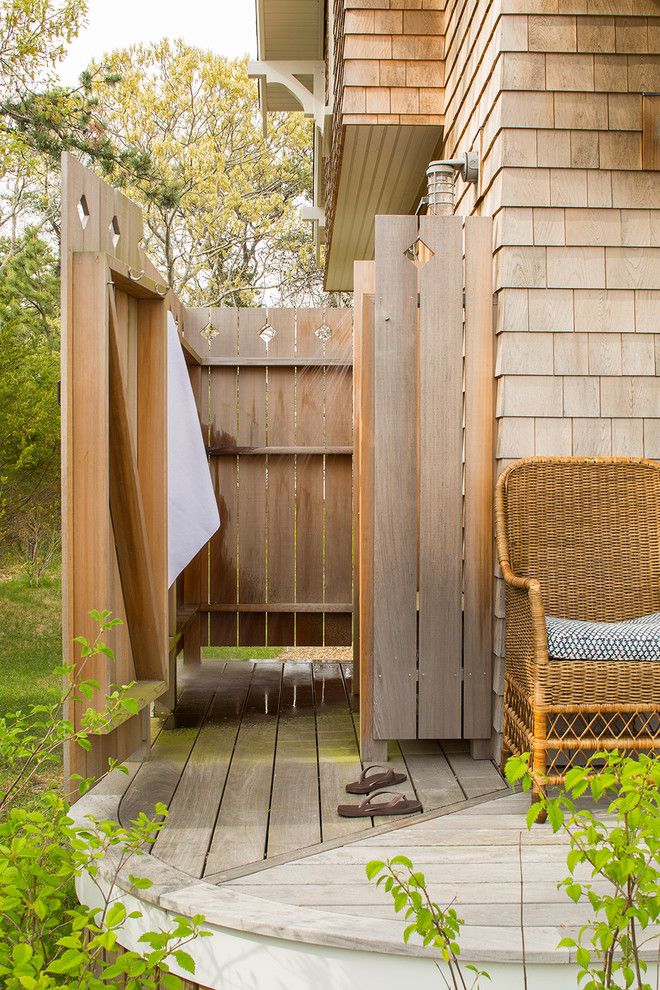
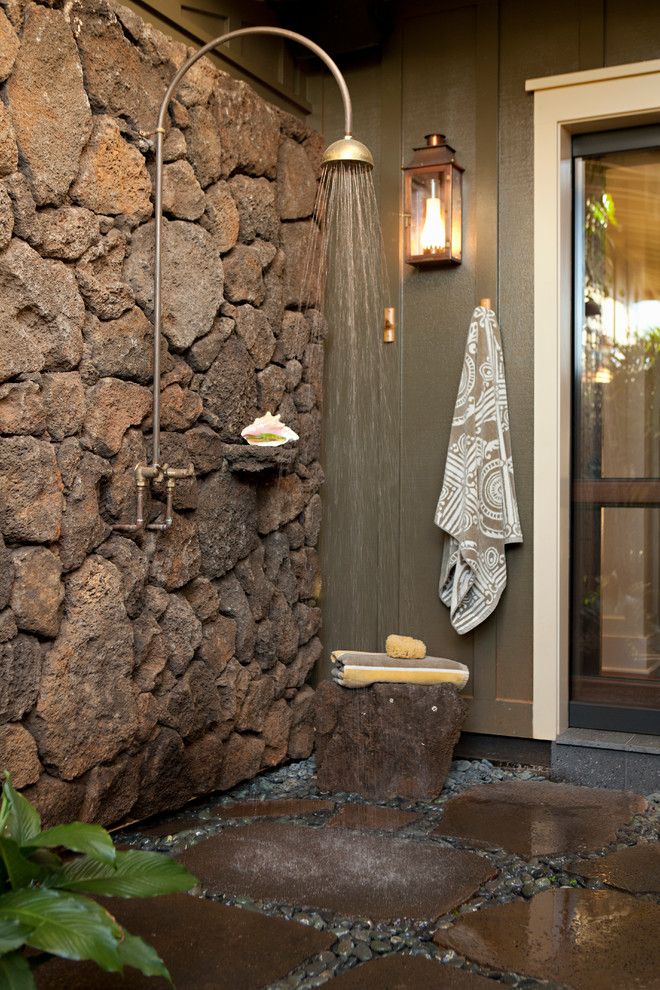
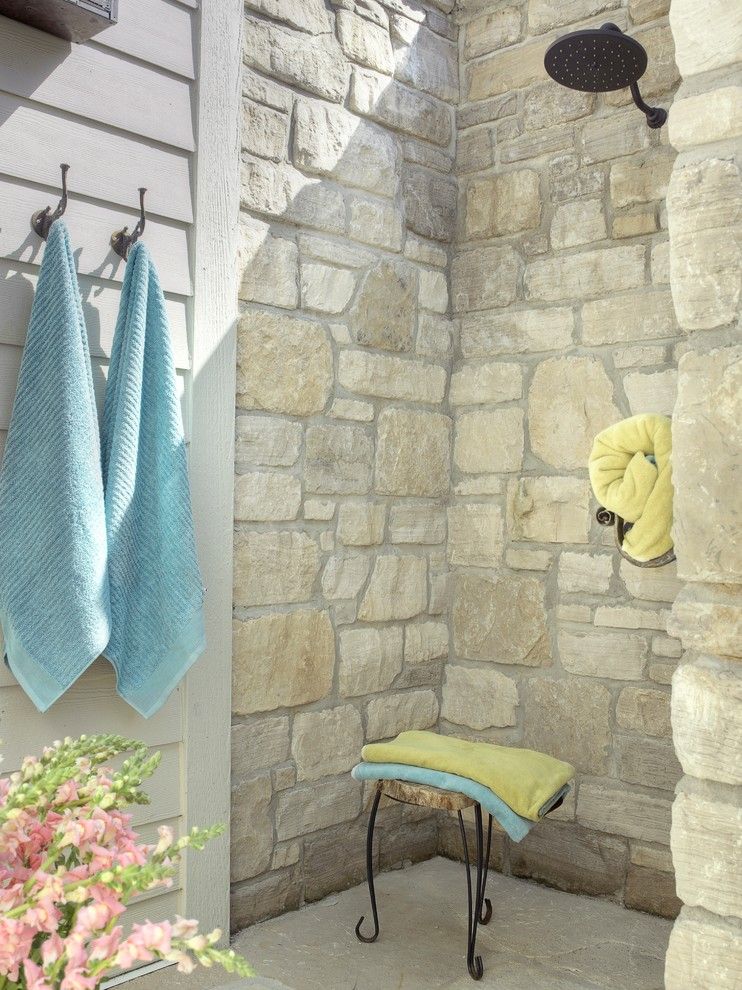
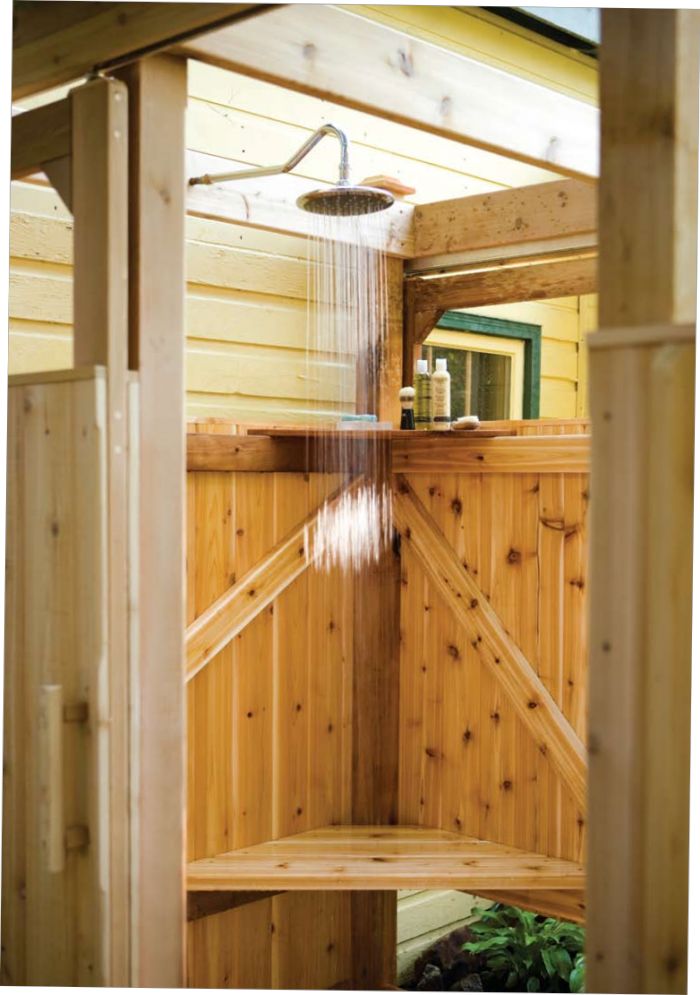
To protect the wall from destruction caused subsequently by water procedures, surface cladding is performed. As you can see from the photo of the shower inside, the walls are lined with stone, tiles and other water-repellent materials.

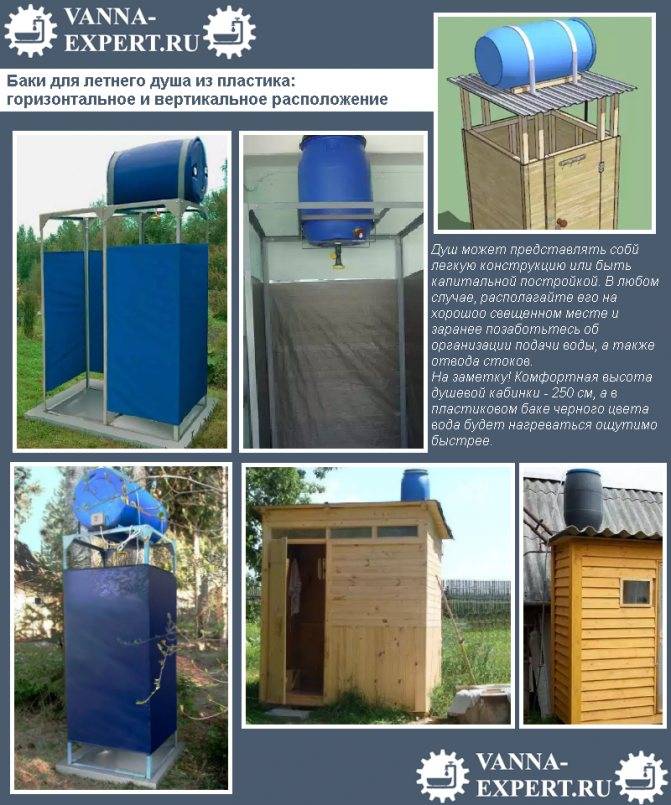
Regarding the water tank
You can buy a water tank or build your own. Each of the materials and options has its pros and cons.
-
Plastic. Plastic shower tanks are available at any hardware store, are inexpensive, and fairly easy to install. Of the minuses - as they say in the saying "the miser pays twice." A lot of reviews say that low-quality Chinese-made plastic tanks can easily be deformed under the influence of sunlight, burst and become completely unusable. Therefore, if you take a plastic tank, then only high-quality, preferably Russian or foreign production.
-
Metal. There are also metal water tanks on sale. These can be both light options made of a thin sheet of stainless steel, and more durable ones made of steel. However, they are expensive, and with straight arms you can make a much better and more durable option yourself. The design of the tank is quite simple - it is a metal bath with a central drain, at the end of which there will be a tap in the future. The walls and "ceiling" should not be too thick (so that the sun has time to heat the water), but not too thin (so as not to get a flimsy tank). Such a tank is brewed in about 30-40 minutes.
Also, as a future tank, you can easily use some kind of metal barrel, having previously cleaned and washed it from dirt and sediment. If you decide to make the tank yourself, after all the welding and cleaning work, do not forget to paint it black. As you know, black surfaces heat up much faster than painted in a different color.
The volume of the tank must be calculated based on the needs of the family. For one or two people, 40-50 liters is enough. If in the evening 3-4 people want to rinse, then it is worth looking after a tank with a volume of more than 150 liters. Also, do not forget to compare the dimensions of the tank with the approximate dimensions of your future shower.
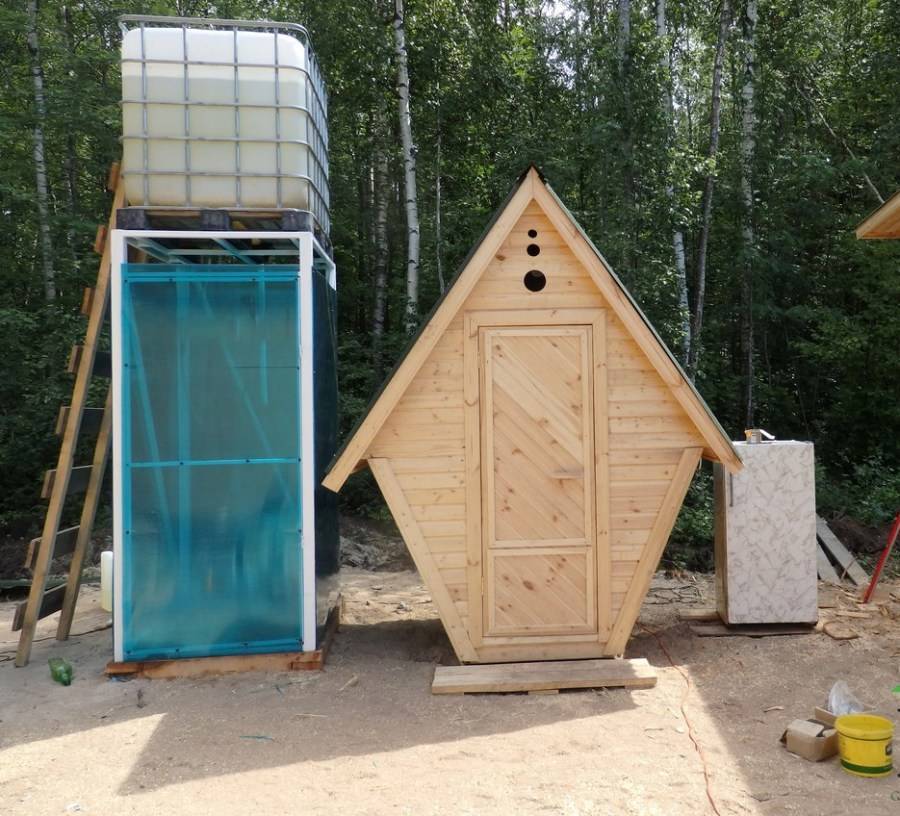
How to make a summer shower with a toilet: the nuances of construction
To save space on the site, as well as time and materials, many people want to build an outdoor shower together with a toilet. This has certain advantages - construction is carried out quickly, it is profitable on the budget, the premises are located compactly and conveniently, but some nuances must be taken into account.
The first is the sewerage system. It is not recommended to combine a septic tank for a toilet with a drain of water from a shower. The tank will quickly fill up, and you will have to pump out effluents much more often. Therefore, there must be a separation: a septic tank for a toilet, a drainage pit for a shower.
The second is smell. To get rid of it, the partitions are made as airtight as possible, and each room has its own ventilation. You can block the shower and toilet with a storage unit for inventory, placing it in the center of the complex.
Third, runoff can pose a hazard to drinking water wells. Therefore, the norms establish a minimum distance between objects of 20 m, and 10-12 m to a residential building.
Construction of a summer shower of a capital structure
If there is a desire, opportunities and a need to build a capital shower on the site with your own hands, then you will need to make much more effort. After all, a properly installed shower can become, if not a masterpiece of architectural skill, then an attractive element of landscape design for sure.
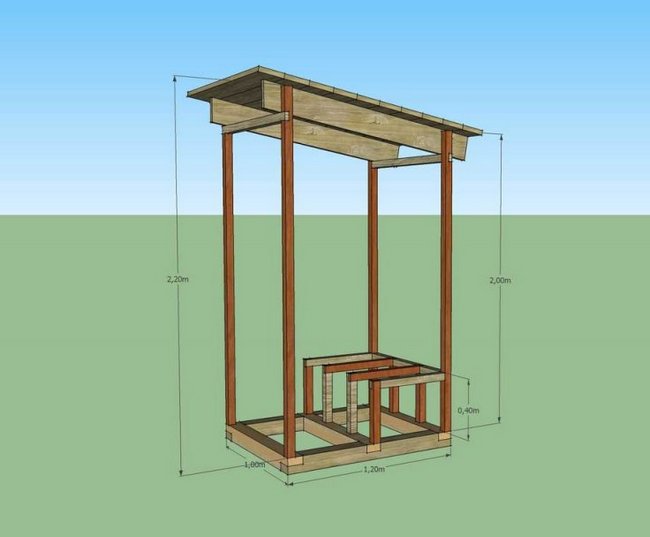
First of all, you will need to draw up a project for a shower structure - for this you do not need to involve specialists, everything can be done independently. For bathing one person, a room measuring 100x100 cm is enough, do not forget to provide a small space for clothes - you will need to undress / dress somewhere after water procedures! For this, 60 cm is quite enough, so the final dimensions of the shower on the site will be 160 cm x 100 cm, and the height, as a rule, is standard - 230 cm.
And then everything is done according to the instructions:
- Make a markup. On the ground, at the place of the future location of the shower, markings are made according to the precisely planned / calculated dimensions in the project.
- Set up the foundation:
- piles are driven into the ground at the corners of the marked rectangle;
- asbestos-cement pipes are installed in such a way that they protrude above the ground by no more than 30 cm;
- recesses are made for installing a drain pipe;
- the drain pipe is inserted into the prepared recess;
- piles are poured with standard cement mortar;
- the resulting surface is leveled with a rake or mop;
- everything is left alone until completely dry.
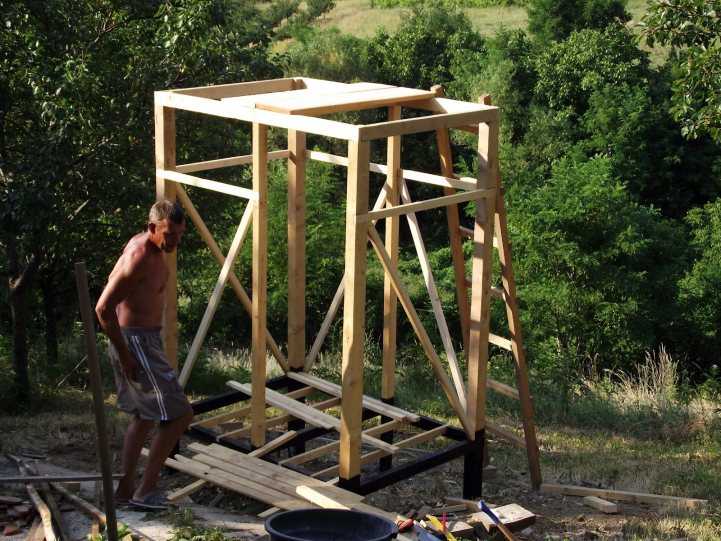
- Erection/installation of the shower frame. It can be done in different ways:
if an unhewn beam is chosen as the main material, then the assembly of the frame begins with the installation of vertical beams at the corners of the proposed structure, and then makes the “dressing” with other wooden elements from top to bottom;
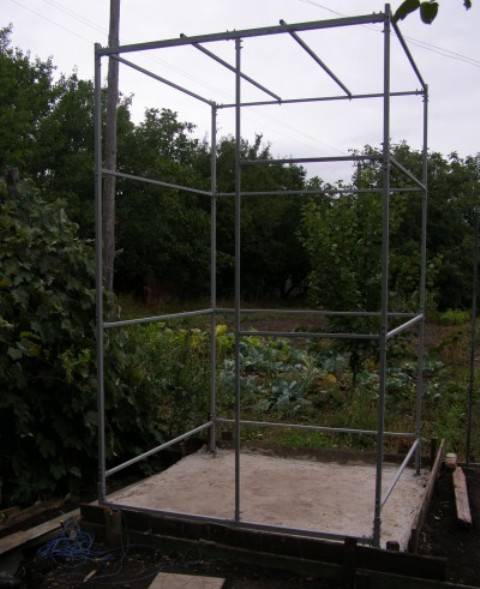
if it is supposed to make a shower frame from a metal profile, then all the parts are welded together on the ground and the finished structure is already installed on the marked place (for this you will need to involve several assistants in the work);
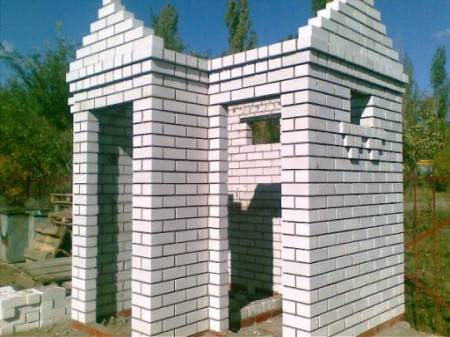
you can lay out the building with bricks - ordinary masonry, without carrying out any waterproofing work, you can use bricks already in use, but then you will also need to carry out finishing work.
Please note: all connections of the main beams and "dressings" must be very strong - you can use special metal brackets, overlays and large / powerful bolts. This requirement must be met not only for the stability of the entire structure, but also for the possibility of installing a capacious water tank on top of the shower.
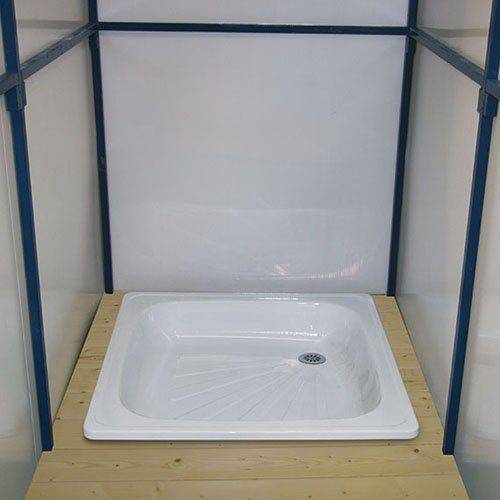
- Floor arrangement. This task can be done in two ways:
- just put a wooden flooring - there will be gaps between the boards through which water goes into the drain pipe;
- install a shower tray designed specifically for outdoor structures.
In the first case, there will definitely be a problem of drafts and discomfort - the wind will blow through the cracks in the wooden flooring and coolness will penetrate. The second option is preferable - it is practical and convenient: the feet will not be slippery, it is easy to maintain the floor within hygienic limits, there is no stagnation of water and unpleasant odors.But if a shower tray is installed, then you will need to take care of the proper arrangement of the drain system - you will not only have to install the pipe at a slope, but also install a siphon to trap dirt.


![[instruction] do-it-yourself shower in the country: dimensions and drawings](https://fix.housecope.com/wp-content/uploads/8/b/7/8b71f381491764dce1822fc6c8e6da07.jpg)

- Installing a water tank. Everything is simple here, it is only necessary that the roof of the capital shower be strong - either thick boards or a sheet of flat slate are placed on top. Just do not forget to make a hole in the roof - a crane will go down there and it is preferable to choose a ball type.
- Door installation. There is nothing complicated here, you just need to install rubber seals around the perimeter of the door leaf - this will ensure that the door closes tightly and prevents it from opening in the wind.
 If you plan to use the shower even in the cool season, then it is worth insulating the walls of the building - this can be done with foam plastic or mineral wool. If desired, you can also install water heating, but such a "luxury" will be available only if there are electrical networks on the site.
Do-it-yourself decorative shower decoration is a purely individual process. Someone disguises the shower as a fairy-tale tower, someone tritely paints the surface of the building with bright colors, some plant it with climbing plants, and after a couple of years it is impossible to determine the location of the shower on the go.
The availability of finishing / building materials allows anyone to build a shower on the site with their own hands without the involvement of specialists. And the process itself is not distinguished by technological subtleties, so you can safely get to work.
Choosing a place on the site and arranging a base for an outdoor shower
When constructing a summer shower in the country, special attention is paid to the choice of location. It is worth considering some factors:
- Water should warm up well. Therefore, the structure is mounted in a sunny place. Trees and buildings will cast a shadow on the cabin, which will negatively affect solar heating.
- When choosing a place, it is worth considering your preferences. So, the structure can be placed near the house, in the garden or near the pool, if there is one on the site.
- It is better to install a shower cabin on a flat area, near which there is a place for water discharge. Otherwise, you will have to do complex wiring.
- The structure should be located near the house.
To make the right choice, you need to carefully inspect your site. It is also worth considering the features of the construction of the soul. First of all, this concerns the need to build a base for the cabin.
It makes sense to install an outdoor shower only in an open sunny place
The foundation for an outdoor shower is arranged when it comes to a stationary structure that has significant weight. First of all, this applies to buildings made of bricks, blocks and other materials. A popular option is the arrangement of a tiled foundation, which will also serve as a floor in the cabin. The build process looks like this:
- Marking and cleaning of the place from thickets and debris.
- The pit breaks out. If we are talking about the construction of a brick cabin, then a pit 15 cm deep will be enough.
- A sand cushion no more than 5 cm high is laid on the bottom. It is carefully compacted.
- Concrete is being poured. The surface must be carefully leveled to avoid the need for floor screeding.
Also, for the construction of a summer shower, you can use a columnar and strip foundation. In the first case, with the help of a drill, holes are made with a depth of 1 m, into which support pillars are subsequently installed. If hollow pipes are used for this, then they are poured with concrete mortar.
The foundation must provide holes for draining and supplying water.
As for the strip foundation, here we are talking about a shallow structure. For the arrangement, you need a trench 40 cm deep and 20 cm wide. When pouring, reinforcement is performed with several reinforcement bars. This will give the structure durability and strength.
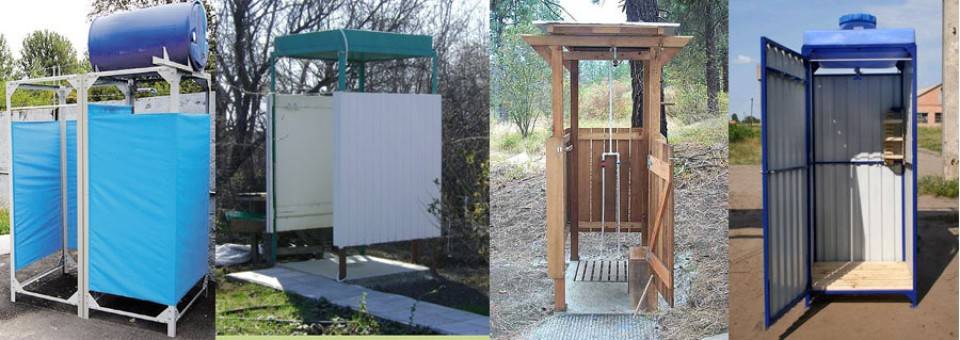
Pros and cons of a summer shower
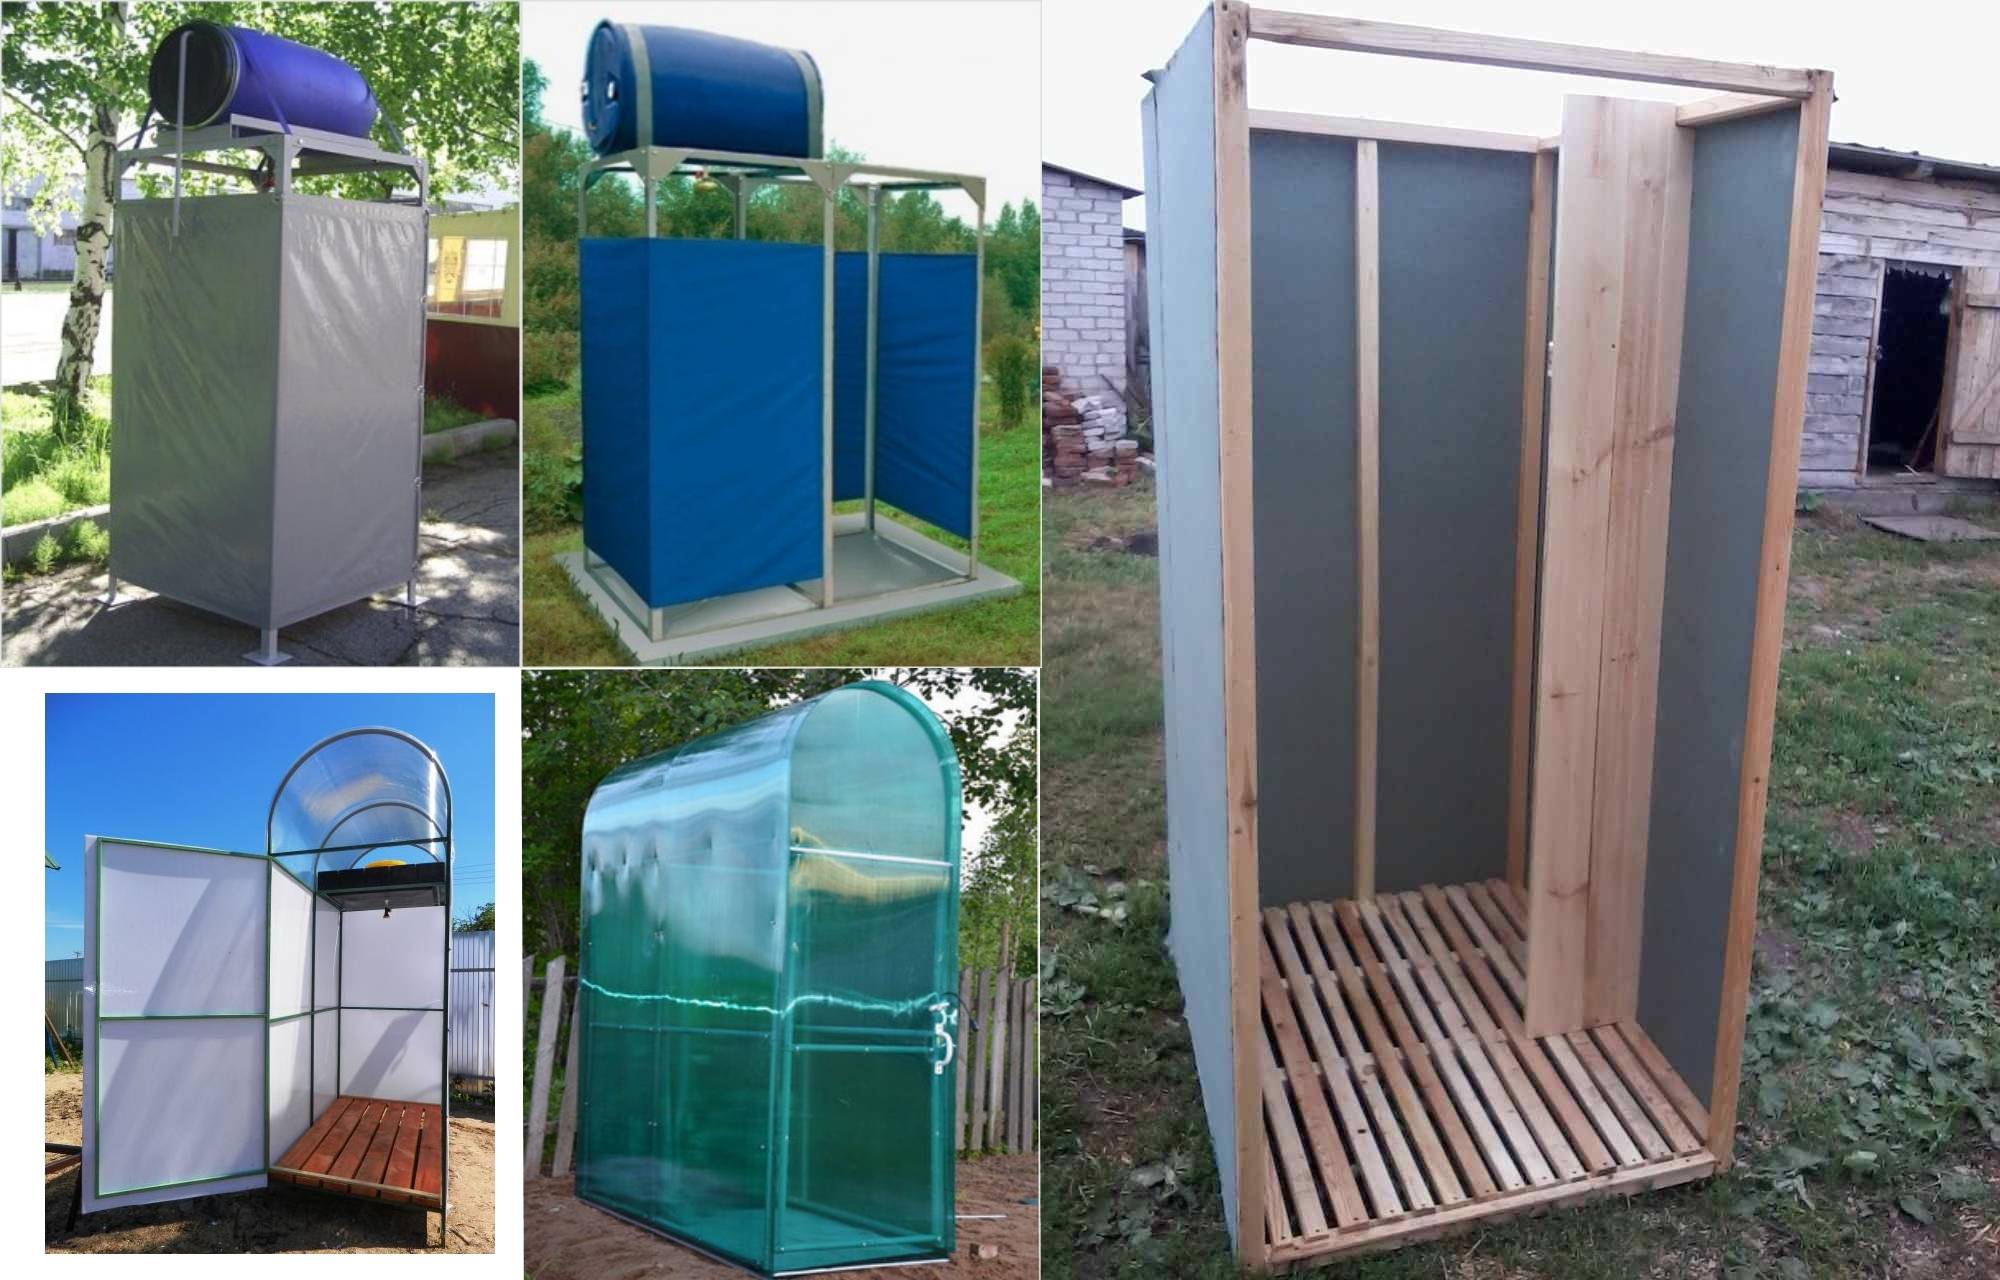
Today, for arranging a summer cottage and at home, a summer shower of various designs is used. Each of them has its own advantages and disadvantages. This should be taken into account when choosing a design. Popular options include:
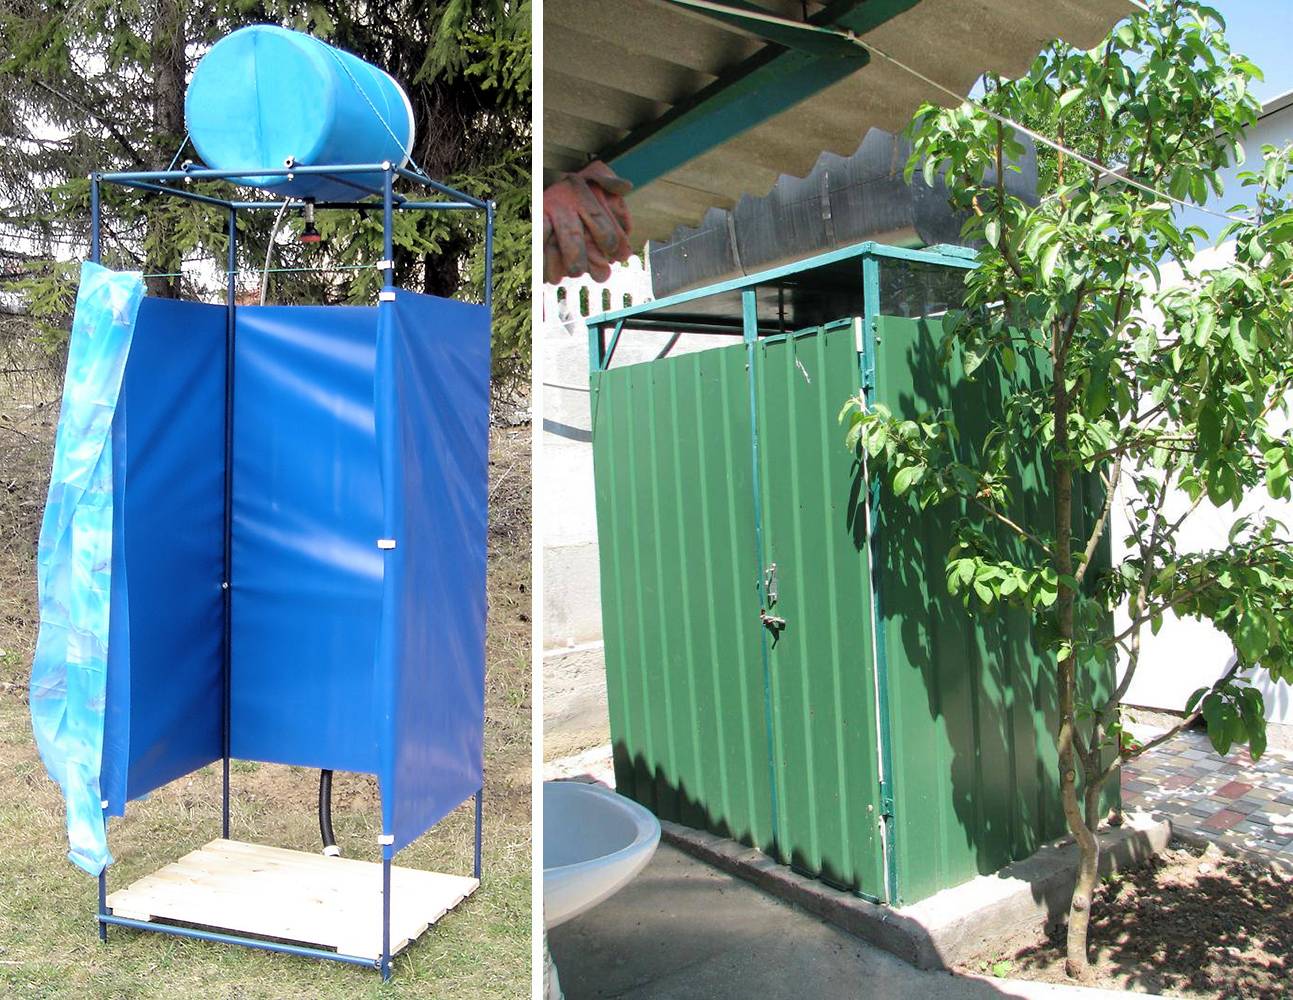
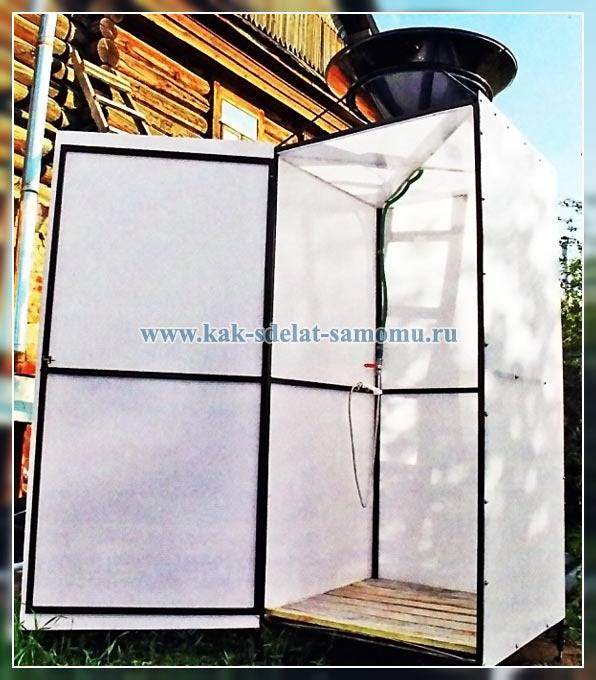
- Film shower. The design consists of metal and wooden elements, which are tightened with a film. The disadvantage of such a soul is its fragility. As for the pros, here you can highlight the ease of installation and mobility. If desired, it can be easily rearranged from one place to another. Often, metal corners are used for construction.
- Frame construction. The shower is a stable and monolithic product that has a long service life. The design is well ventilated, and the water heats up quickly. It is easy to apply and also comes off quickly. As for the shortcomings, it is worth highlighting the vulnerability from negative environmental factors. During operation, the design loses its attractive appearance.
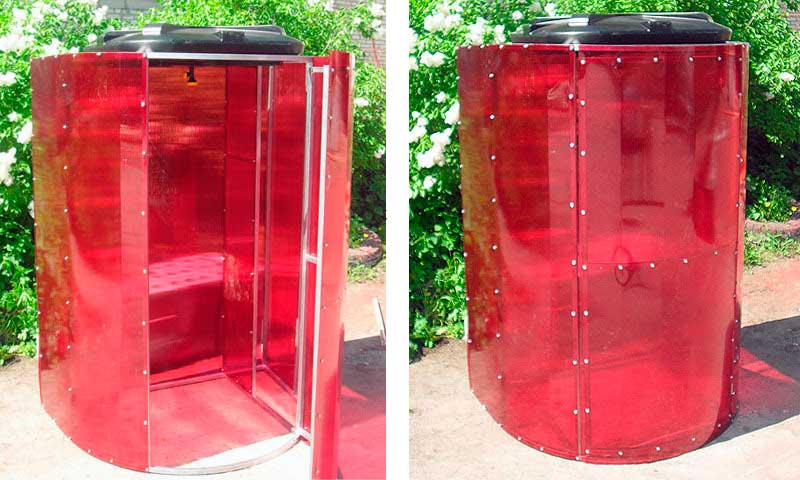
One of the most durable solutions is a polycarbonate outdoor shower. So, after analyzing all this, we can note several main advantages of a summer shower:
- profitability;
- ease of installation;
- practicality.
As for the shortcomings, among them one can distinguish the limitation of use. The fact is that in such structures water heating is most often carried out from solar energy. Therefore, they cannot be operated in the cold season or in bad weather.
Do-it-yourself summer shower
The simplest designs of a summer shower were erected on six acres by our grandparents. Today, when new technologies, materials, and the dachas themselves have stepped over the status of tiny panel houses, the appearance of shower cabins has also changed. With a strong desire, you can aim at a capital summer shower for a summer residence with heating, on a solid foundation and with a large shower. You can limit yourself to a light frame option, using improvised means.

Already in early spring, you can start planning the construction of a shower, so that it will be ready for a warm spring and a hot summer.
And yet, which design option is preferable if you are planning to build an outdoor shower yourself. The choice depends on three main factors:
financial opportunities

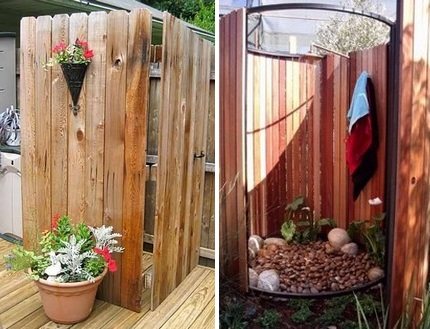
Beautiful shower with decorative pebble walls
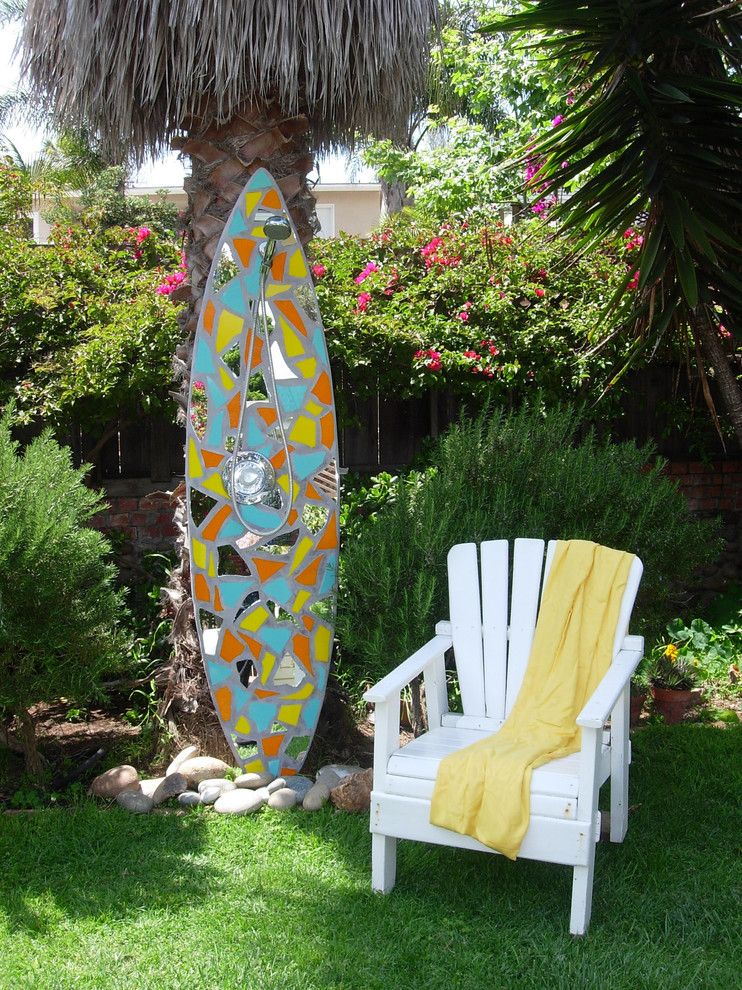
Interesting summer shower in the form of a surfboard
- construction skills
- dacha status
If you want to save money or realize your creative ideas, then build a summer shower in the country with your own hands

Summer shower in modern style
The simplest summer shower in the country can be assembled from metal pipes, bathroom curtains and a plastic barrel.
The stationary option involves the construction of a solid shower cabin made of wood, with the construction of a drain and a connection to the water supply. You can assemble a shower from a wooden frame covered with a film. In addition, the shower can be freestanding or attached to the house. And here, too, there are a lot of options.


Depending on your wishes and possibilities, you can build both a simple and complex version of the shower.

Small homemade outdoor shower
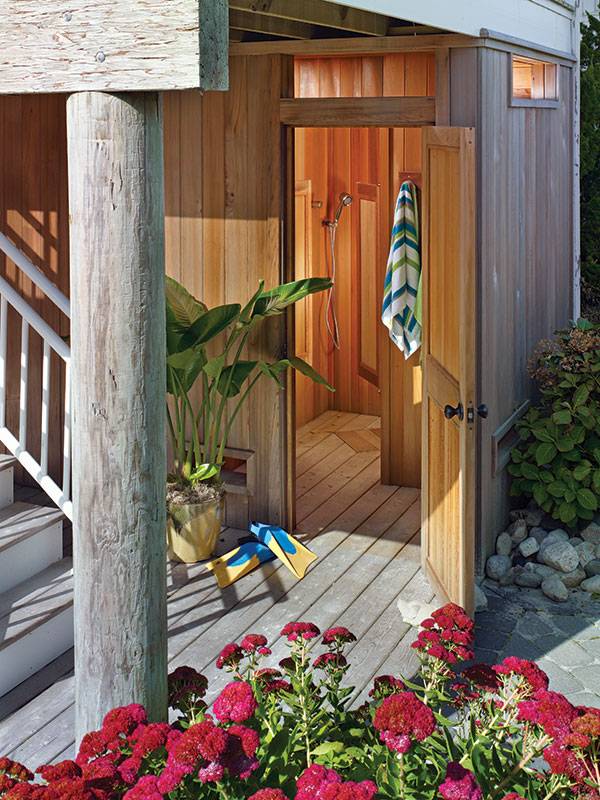
The simplest design connected to the house looks like this: a water pipe brought out to a part of a brick wall, a wooden pallet with a drain, and the top of the shower is made of a metal arc attached to the wall and hung with a curtain for the bathroom.

The simplest design of a summer shower connected to the house
If you bring the shower to the corner of the house, then it remains to build only two walls and close the booth from prying eyes.
In the design of man-made showers, be guided by your own preferences and the materials that you have.
Wooden summer shower
Summer outdoor shower
Summer shower in classic style
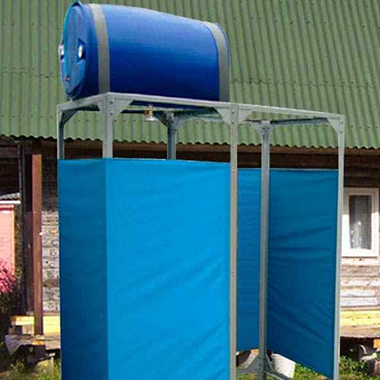
Feature of plastic flat shower tank
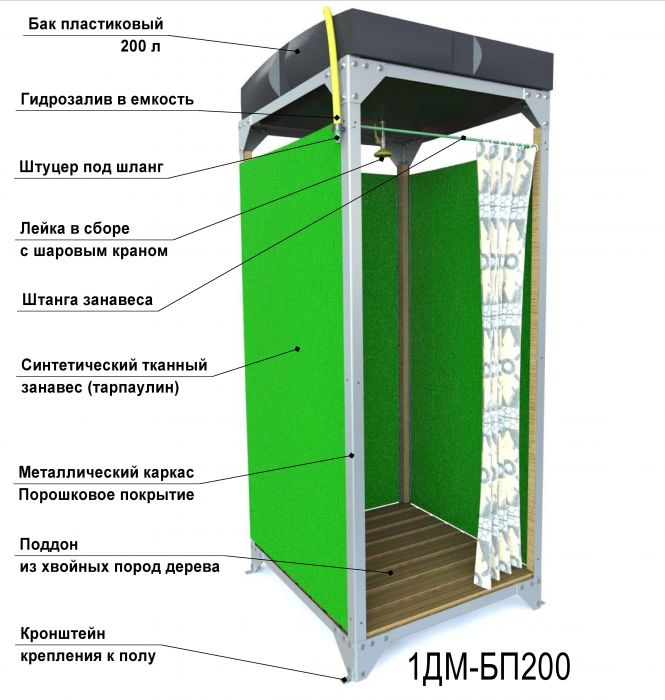
The flat shape contributes to the rapid and uniform heating of water. Thanks to this design of the tank, in addition to its direct purpose, it also serves as a shower roof. To do this, the frame of the product is assembled and a plastic flat container is installed on top.
The plastic container has a special “breathable” lid that does not allow water to stagnate when the shower is not operating. The container can hold 20-200 liters of liquid. If it is folded for transportation, it will fit in an ordinary plastic bag. The polymer material of the tank has high strength.In addition, it is not able to deform under the influence of high temperatures.
Plastic tanks are available with and without heating. This design is produced most often in black, so direct sunlight is not terrible for it, and it heats water well under their influence.
Such products are made from special polyethylene, which has the following positive qualities:
- not affected by sunlight;
- very durable;
- eco-friendly.
Such material prevents water from blooming, even if it was poured into the tank a very long time ago. Unlike metal structures, plastic structures are not subject to corrosion and therefore can last a very long time.
Flat shower tanks can also be made from polymer fabric. The advantage of this material is that at the end of the summer season, the water from the container is drained, and it is neatly and compactly folded for storage in the winter. Such a tank can hold a large volume of water - about 400 liters, so it is used not only for taking a shower, but also for storing liquids and drip irrigation of the garden.
Heated plastic shower tanks
The sun does not always shine in summer, and there are often cloudy days. The water in the tank in this case does not warm up. To solve this problem, a heating system is built into the tank, which has a heating element - a heating element. The main advantage of this design can be considered the possibility of heating water to the temperature that is required. However, a shower with a heated plastic tank should be installed near a power source. To control the degree of water heating, it is also necessary to build in thermostats and temperature sensors.
It has a plastic heated shower tank and disadvantages:
- electricity is constantly required;
- it is necessary to control the degree of filling the container with water, because if it is too small, the heating element may burn out;
- for the timely supply of water to the tank, a connection to the main water supply is required.
By the way, a plastic tank with a heating element allows you to take a comfortable shower even in late autumn after harvesting.
Plastic shower tanks without heating
If such a tank is not equipped with a special heating device, then the water is heated from the sun's rays. This process is not controlled by man. If you want to maintain a certain temperature of the water, then the container should be covered with a transparent film. However, in cloudy weather, such protection will not save, and the water will cool. In such conditions, taking a shower will be extremely uncomfortable.
How to choose the right plastic shower tank
When choosing a tank, pay attention first to its volume and weight. Plastic barrels have a huge advantage - no matter how roomy they are, they do not have too much weight.
And this significantly affects how the installation and further operation of the structure will be carried out.
After that, pay attention to the color of the container, because it directly affects the speed of heating water. If the plastic is black, then the water will quickly heat up under the rays of the sun and its comfortable temperature will remain for a long time.
But if the plastic is light in color, then the water heats up very slowly and you will have to rinse under a cool shower.
Also pay attention to the form. Most often on sale there are tanks of square and round shapes.
But it is better to pay attention to a flat tank - it is very convenient for installation and can be installed on any type of roof. Such a tank can serve as a roof for the shower. In addition, a flat tank allows the water to warm up quickly and evenly under the sun's rays.


Tricks from the experts
You may have already guessed that the water will heat up much faster if you choose an outdoor shower tank in dark shades. After all, we all know that the sun's rays are ideally attracted to black or brown colors.
You can use one side of the house to add a shower cabin to it
It is important to treat the wall with a special moisture-resistant agent. Photos of such a shower inside and out can be viewed on the Internet in order to easily realize your ideas.

Having an old tree in your summer cottage that you have long wanted to cut down - do not rush to do this! With the help of such a natural element, you can beat an interesting idea. For example, bring a shower hose to a suitable height and secure it.


You can specially plant weaving plants (lianas, clematis and others). With this solution, you will close the outer walls of the cabin and fill your yard with additional comfort and aesthetics.

Installation of a summer shower with heating
Foundation laying
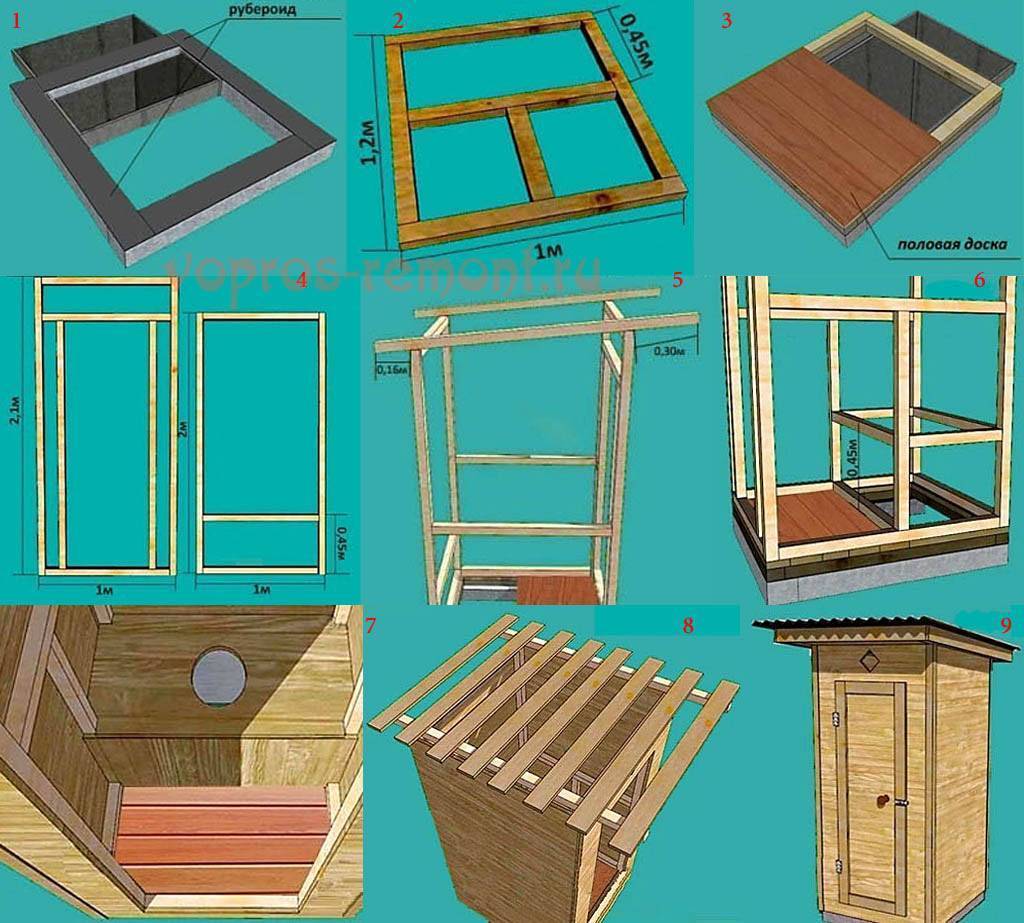
First you need to decide on the type of future soul. The construction of a light frame structure will not be difficult. First, about 15-20 cm of soil is removed from the intended area, leveled and sprinkled with sand. For the construction of a capital structure, you will need to go deep to half a meter. Foundation laying includes the following steps:
- Carrying out the marking of the territory. Stakes are hammered in the corners, a rope is pulled between the threads;
- Digging a hole.Depending on the type of building to a depth of 15-50 cm;
- Conducting trenches for laying pipes or gutters for the outflow of water to the drain pit.
- Installation of pipes and gutters (do not forget to arrange a slope).
- At the end, if necessary, concrete work is carried out.
If the summer shower frame will consist of natural wood, it is desirable to treat it with special water-repellent impregnations, drying oil or paint. In addition, it is desirable to raise the structure by 20-30 cm from ground level. To do this, you can use a columnar foundation.
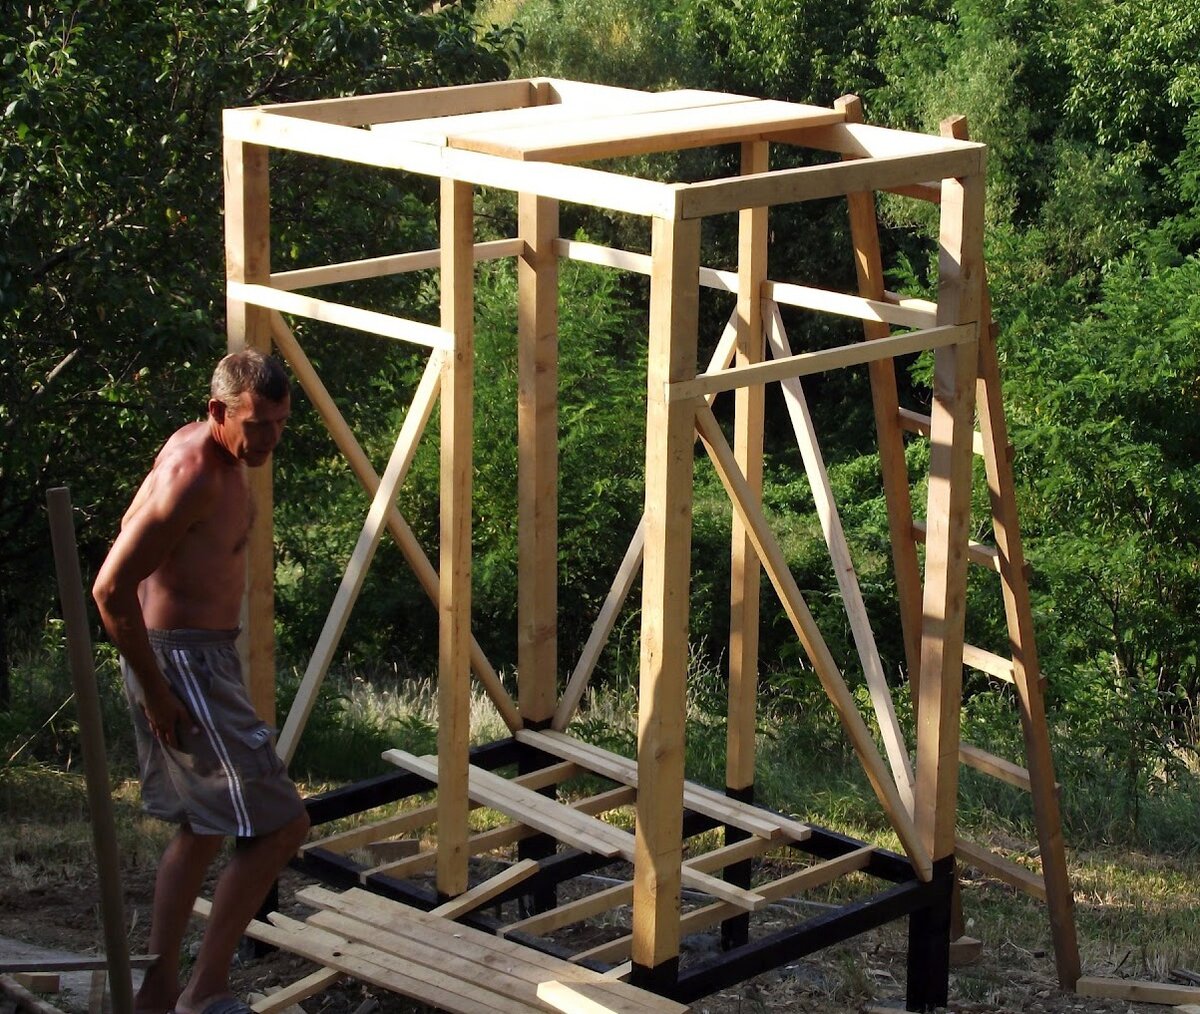
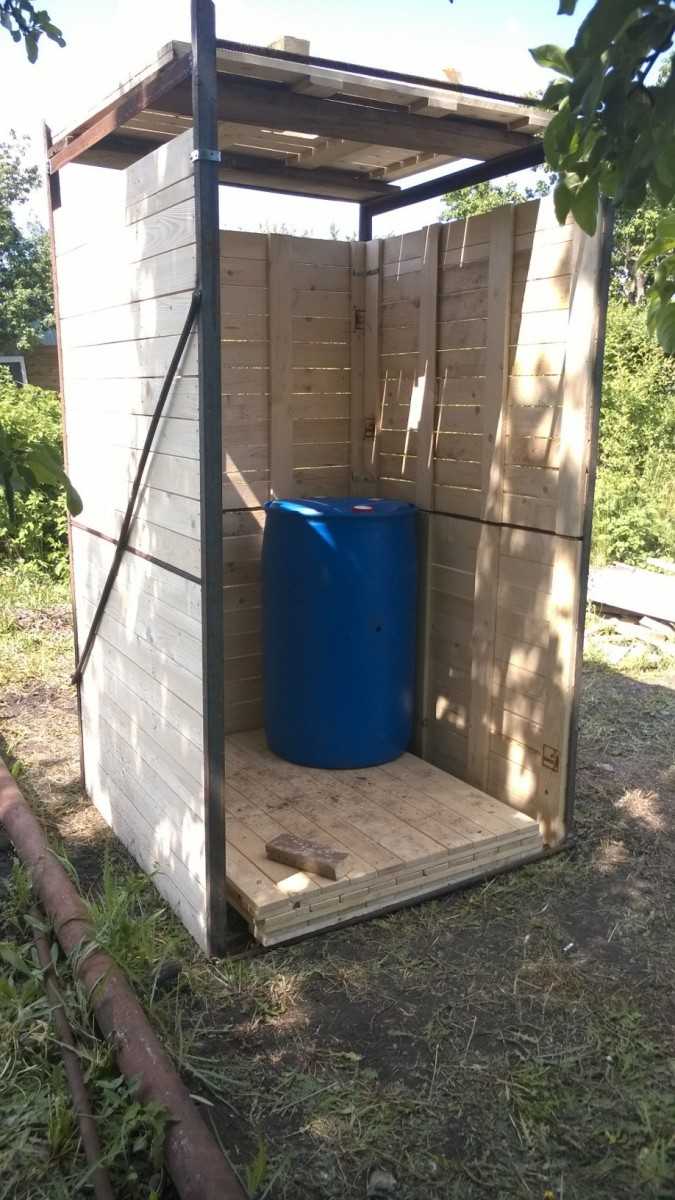
cabin construction
This stage is largely determined by the type of structure. For the construction of a frame-type structure, first of all, it will be necessary to lay the support posts, they must be as strong as possible, since they must withstand the weight of the filled storage tank. For the manufacture of supports can be used:
- A bar with a cross section of at least 100 × 100 mm;
- Aluminum profile;
- Metal poles.
If you plan to use a timber, it should first be treated with a water-repellent agent, the lower part, which will be in the ground, with bituminous mastic. The use of an aluminum profile is the most common option, it is a lightweight durable material, the installation of such a frame is not difficult.
Supports are mounted in the corners, as well as every one and a half meters. They are installed in pre-made holes (it is convenient to use a garden drill for this) with a depth of 60-80 cm and a size slightly larger than the racks themselves. If it is planned to equip the door, two supports are located from each other at a distance equal to its width. Attached to them is a door frame. After you can install the horizontal jumpers of the frame, they must be in the lower and upper parts of the structure.
Tank installation
In order for the water in the tank to be heated from solar heat as efficiently as possible, it is advised to paint the container black. In addition, since the heating element can quickly become unusable from operation without water, its level must be controlled. To do this, a plumbing valve is installed on the tank. The tank can be installed on a prepared roof, on special holders or directly on a profile, in which case the frame must be exactly adjusted to the size of the tank. Water is being poured, a heating element is connected and a trial run of the system is being carried out.
Finishing
As a material for wall decoration can be used:
- Polycarbonate;
- Metal profiled sheet;
- Flat slate;
- Lining;
- Film;
- Wood;
- Moisture resistant plywood;
- Brick.
The most commonly used metal galvanized profiled sheet or polycarbonate. These are lightweight durable materials that are not afraid of any impact. Such a summer shower will be easy to install and unpretentious to use. Wood and wooden lining look very aesthetically pleasing, however, they require treatment with water-repellent agents. Racks can simply be covered with a moisture-resistant material, for example, with a dense plastic film. This option is suitable for the warm season.
It is necessary to organize the floor of the cabin, it can be made of wood, in this case the usual flooring is mounted, however, in cold weather there will be an unpleasant feeling of a draft. Another option is a concrete floor, in which case a screed is installed, and a wooden grate with a rubber mat is placed on top of it. The third option is to use a ready-made pallet (most often these are models with a low steel bowl). In the latter case, do not forget to install a drain hose.The pallet can be attached using ordinary mounting foam.
If you plan to use the shower in cool weather, the walls should be additionally insulated, for this you can use polystyrene sheets. Do not forget about the organization of ventilation, for this, a gap is left in the upper part so that the air circulates freely.
Conclusions and useful video on the topic
Some interesting ideas for arranging a country shower are presented in the following videos.
Video #1 Beautiful combined shower/toilet in marine style:
Video #2 Bright design with a shower for relaxation:
Video #3 Assembling a polycarbonate booth:
To freshen up in the country, it is enough to design and install a light wooden structure or, if desired, a more serious structure with a toilet and water heating. Building a shower is not much different from building another household building, but you need to take care of the water supply and sewerage.


Tell us about how you or your neighbors built the soul of their own summer cottage. Share important technological details not covered in the article. Please write in the block below, ask questions, post photos on the topic of the article.


