- Step 3. Laying thermal insulation
- How to pour underfloor heating
- Pipe laying
- Do-it-yourself warm water floor
- How to install the heating elements yourself (with and without a coupler)?
- Features of the installation
- Rules for the device cable version
- Installation of infrared film floor
- Floor water heating system
- What should be the room, preparation and leveling of the floor
- Requirements for the premises
- Foundation Requirements
- Boiler installation
- Materials for a warm water floor
- Underfloor heating pipes and laying schemes
- Screed
- Concrete floor device with heating function
- Heat insulating materials
- Pipe selection
- Screed material
- Upper layer
- Pipe selection and installation
- Screed
- Why do I need to fill the warm floor with a screed?
- Preparatory work and calculation of materials
- What kind of flooring is suitable for underfloor heating
- Underfloor heating base
- What else you need to consider in the process of designing a warm floor
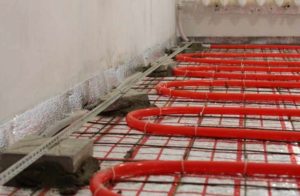
Step 3. Laying thermal insulation

The previous steps were necessary for you so that you could lay the insulation. In view of the fact that the insulation sheets are quite large, they can lie unstable on the hillocks, and they can sink in the recesses.
Expanded polystyrene with a density of 35 kg/m3 is used as insulation. This is the same foam, only of greater density. This density is needed so that the insulation under the weight of the screed does not decrease in thickness.
The thickness of the insulation for the first floors should not be less than 5 cm. If it is possible to lay the insulation thicker, it is better to use this opportunity. The thickness directly affects the downward heat loss. We do not need to warm up the lower layers. All heat must go up.
How to pour underfloor heating
How to properly fill a water heated floor - there are three methods that can be used. All of them are simple in technology, their process is similar, although each method has its own characteristics.
| Floor pouring method | Description | pros | Minuses |
| Concrete | A common option, a cement-sand composition is used. To give greater strength to the floor structure, sand is replaced with filler. It does not allow the base to crumble when heated. In addition, when using a filler, the thickness of the mortar layer decreases from 50 to 30 mm. | Strength, durability and uniform heating of the floor surface. | Significant floor weight and a long curing period. |
| Semi-dry composition | The main difference is that it contains less water than in the first composition. Mandatory presence of polymer additives and fiber fibers. | Increased floor strength, dries much faster, has less shrinkage and the resulting surface from such a composition is practically not subject to cracking. | Less plastic, because of this, voids may appear. The resulting base after drying, should be protected from water. |
| Self-leveling compounds | The composition resembles a cement-sand mixture. From it you can make both a rough base for the floor and a topcoat. But only a coarse leveler is suitable for pouring a screed of a warm water floor. It comes with different bases: gypsum and cement.Both types can be used to fill underfloor heating. | It has the greatest plasticity, quickly hardens, does not require careful alignment, as it spreads under its own weight. | High price. |
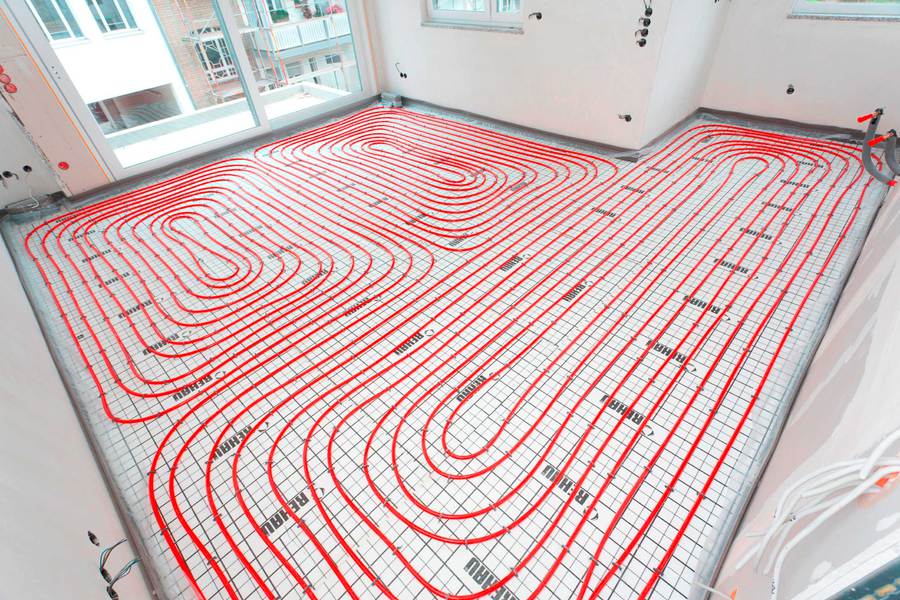
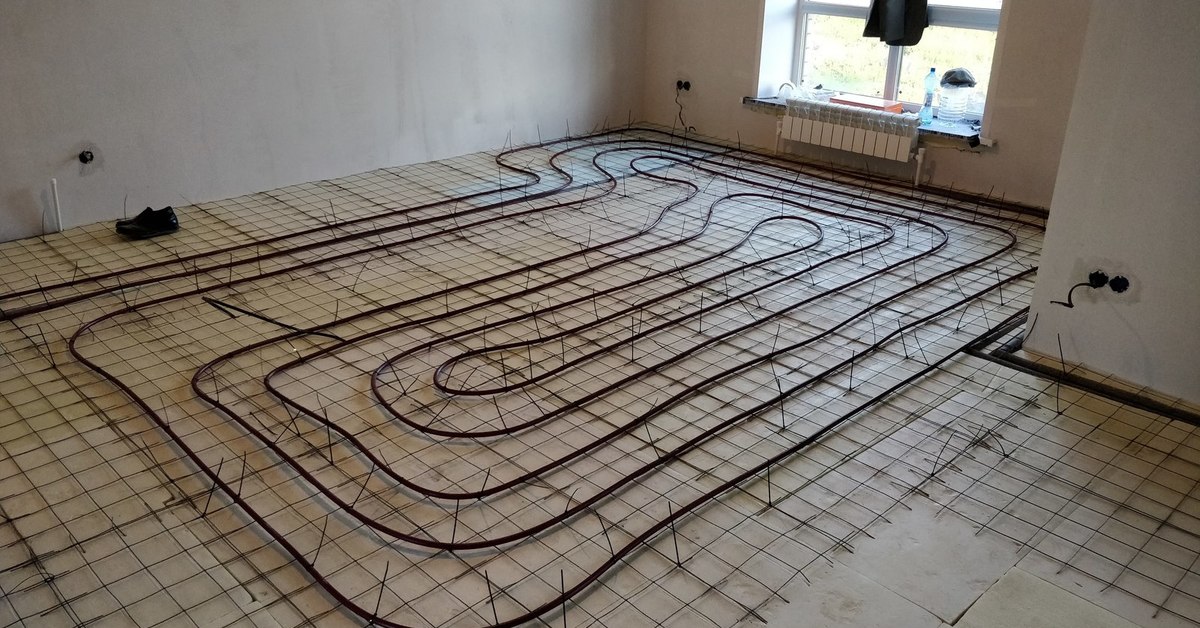
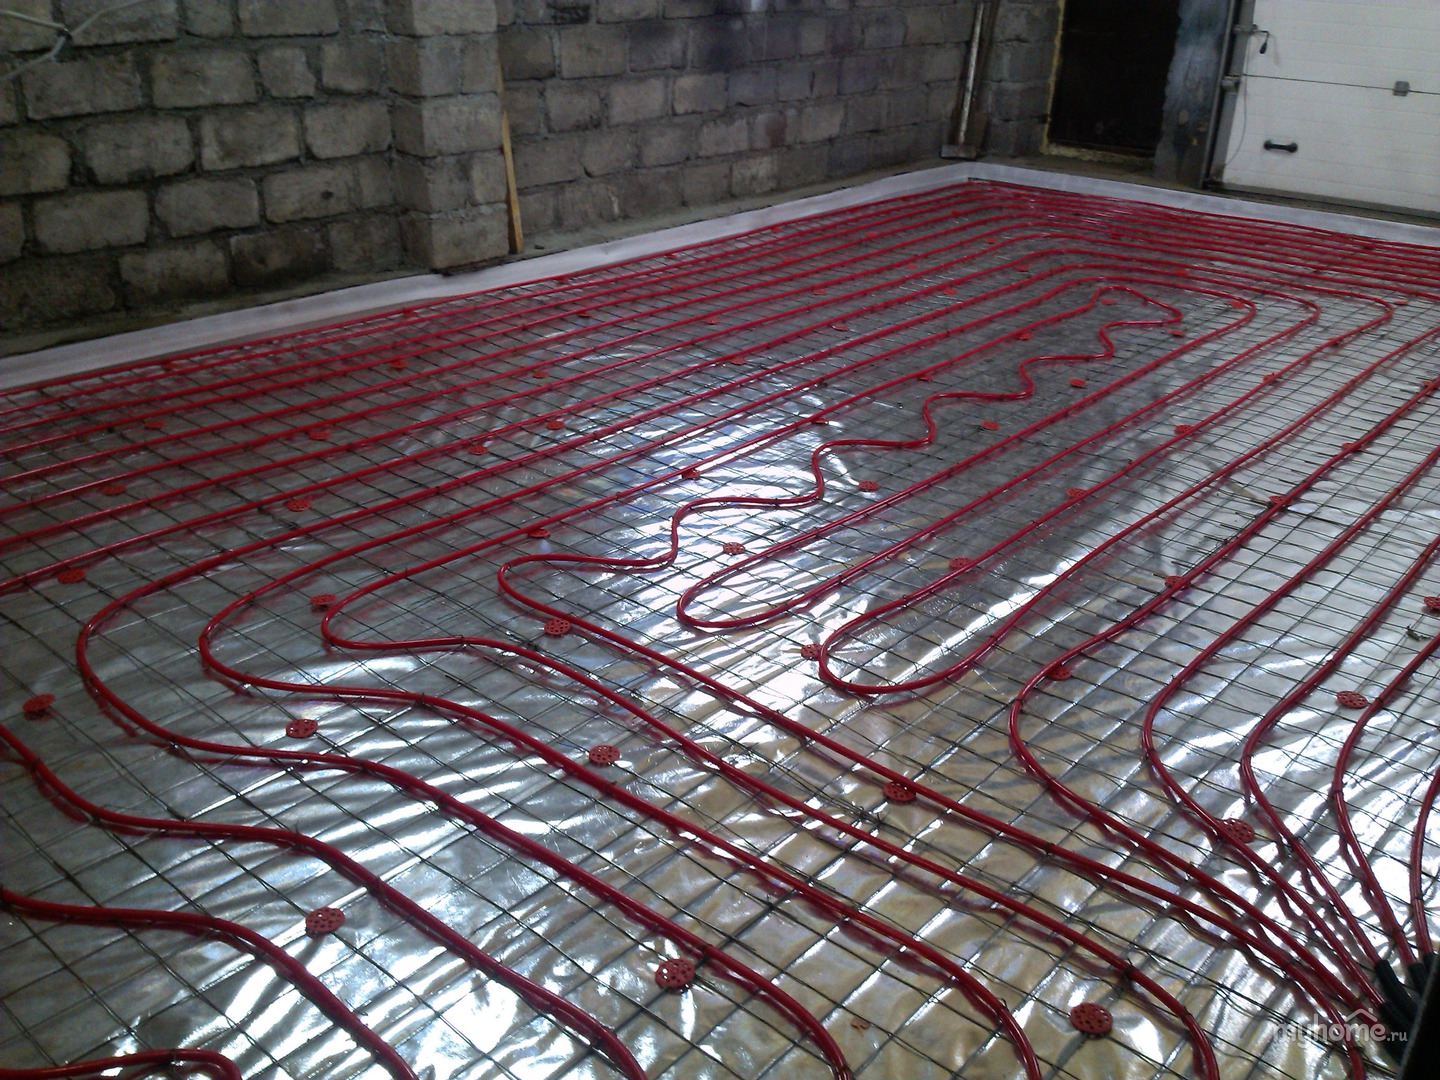
Pipe laying
The selection of the correct pitch between the turns of the pipes and the calculation of the length of the pipes will allow you to correctly calculate the amount of heat distributed throughout the room. If you successfully calculate these parameters, then cost savings are guaranteed.
Requirements for the rational use of the design:
- The length of the liquid circuit is in the region of 70 meters, preferably no more.
- The alternation of cold and hot water flows leads to economical use of water.
- Determination of the location of furniture where the floor does not need heating. Calculation of the pitch between the turns of pipes and keeping the distance when installing the system.
- After heating the pipes to the maximum mark, the temperature is reduced by 20 degrees. This move allows you to save more while maintaining the desired room temperature.
- Exclusion of improvisation and strict adherence to instructions.
Do-it-yourself warm water floor
Do-it-yourself warm water floor
The preparation stage includes leveling the surface. Sometimes it’s enough just to remove the dust with a powerful vacuum cleaner and close up the cracks, but to correct serious irregularities, it’s better to first make a screed. Next, waterproofing is required.
Thermal insulation. Optimal indicators: density - 35 kg / m3; thickness - from 30 mm. Usually polystyrene or foam is taken. The material is supplied in rolls or in the form of mats with a special relief coating. The plates are fixed in grooves, and the upper part serves as the basis for laying pipes.
A damper tape is spread along the perimeter along the walls, separating the partitions from the thermal insulation layer and the screed. The part of the tape that is above the floor is cut off at the end of the work.
Protection. A film or multifoil is placed under the fittings for pipes.
Underfloor heating rolled VALTEC multifoil 3mm
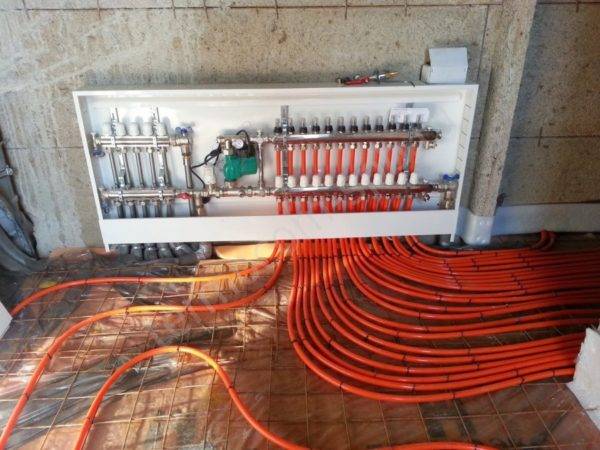
Installation of a manifold cabinet, where there is a place for pumping and mixing unitbrought together with the collector block. Further, the structure is connected to a high-temperature circuit.
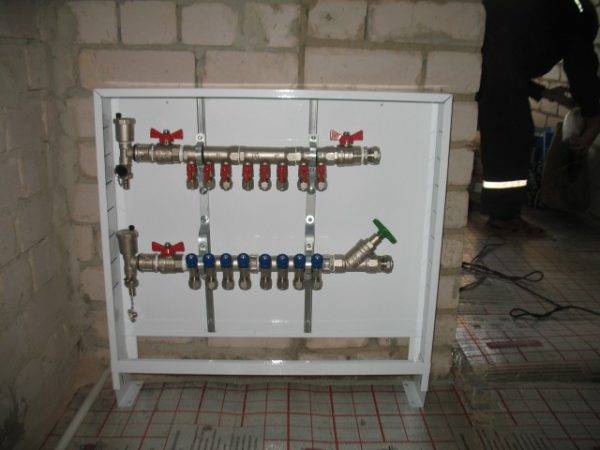
Manifold cabinet installation
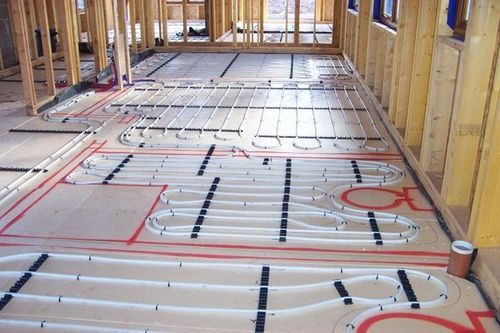
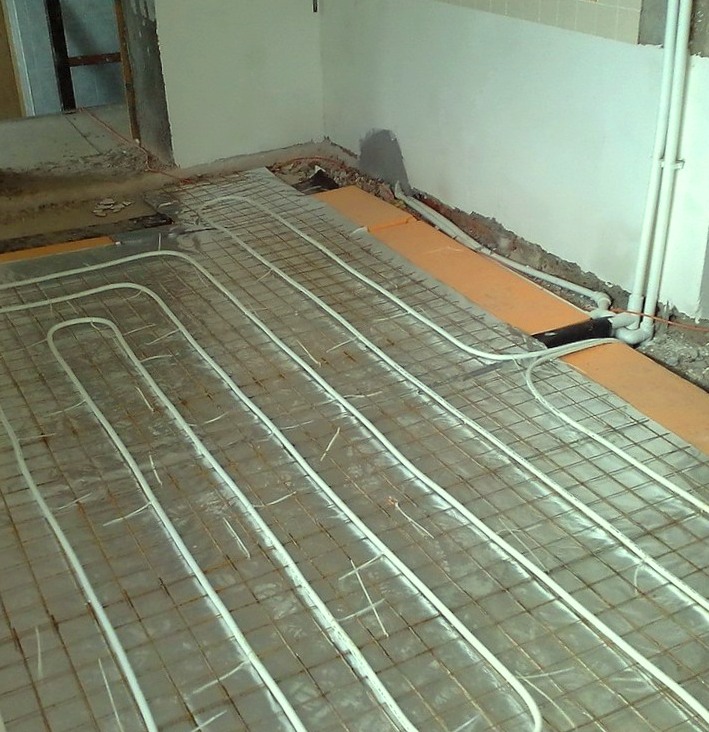
Laying of metal-polymer pipes. The main options: "snake" or "snail" (spiral).
Laying of metal-polymer pipes
Requirements:
- the length of the entire circuit - no more than 90 m;
- for every 1 m2 there should be 5 m of pipe;
- laying step - about 20 cm;
- for rooms with a large area, several separate loops of the thermal circuit are laid.
Connecting pipes to distribution manifolds. To do this, chamfers are removed from the pipe, a crimp connector is put on it, and when connected, the Eurocone is tightened with a wrench. Servo drives are placed on top, thanks to which during operation it will be possible to regulate the temperature with a thermostat.
Connecting pipes to distribution manifolds
Connection of servomotors and room thermostats to the communicator.
Checking the system for strength and tightness. Water is supplied to the pipes, the pressure of which should be slightly higher than the working value (about 1.5 times or 0.6 MPa). Pressure testing of the system is carried out within 24 hours by an air compressor or hydraulic press. This allows you to identify problems and fix them before the pipes hide in the cement mortar.
Concrete screed.The solution is poured onto warm pipes so that they do not burst during expansion during operation. However, it is impossible to let water through the pipes before the concrete is completely dry.


Concrete screed
Primary requirements
| Grade of cement | Not lower than M 300; |
| Amount of plasticizer in solution | 0.6-1 l/m2. |
| Thickness over pipe | Not less than 3 cm |
As a coating for a warm floor, you can take ceramic tiles - it has excellent heat dissipation, it is wear-resistant and the design is easily selected for any type of interior. Often, a laminate, linoleum or carpet is laid on top of the floor heating system. Parquet is very capricious in this regard - it quickly loses its properties due to temperature changes.
As for power, the average value is 150 W / m2. Linoleum is characterized by increased heat dissipation, so 120 W / m2 is enough for it.
How to install the heating elements yourself (with and without a coupler)?
Electric underfloor heating installed on the base heating wire or mat, both under tiles, laminate, and under another surface, requires the installation of a temperature sensor in a corrugated tube. To do this, a small recess must be made in the heat-insulating layer, into which a tube with a diameter of 20 mm is placed. One end of it is tightly clamped with a heater, and the other is brought out above the floor level, but in the same place where it is planned to bring out the wires.
Attention
After placing the temperature sensor at the end of the tube, make sure that it can be easily removed from there. This must be done in order, if necessary, to be able to replace the sensor after pouring the floor with a screed. When installing an infrared electric floor, the sensor is placed in a recess in the center of the film strip
The screed is not poured, it is possible to replace the sensor at any time, even before the installation of the heating elements, even after the completion of work
When installing an infrared electric floor, the sensor is placed in a recess in the center of the film strip. The screed is not poured, it is possible to replace the sensor at any time, even before the installation of the heating elements, even after the work is completed.
According to the manufacturer's scheme, you need to connect the heating wire and the temperature sensor to the thermostat. The whole system then needs to be connected and checked for functionality. The system must be connected to an automatic residual current circuit breaker with a leakage current setting of about 30 mA.
It is forbidden energize the system until the screed is completely dry. The integrity of the insulation, the correctness of the connection is checked by measuring the resistance of the warm floor and checking it with the norm values.
Features of the installation
Having learned how much it will cost to make a warm floor, many people think about how to do this work on their own. There is a rational grain in this desire, but in reality one will have to face rather difficult tasks of a technical nature that will require both knowledge and practical skills. Due to the technological differences between different types of underfloor heating, their installation is also different. We offer to understand the features of arranging a warm floor in each case.
Any of the above systems will consist of heating elements, temperature sensors and thermostats. Installation is more convenient to perform either immediately during the construction of the house, or during major repairs.
Rules for the device cable version
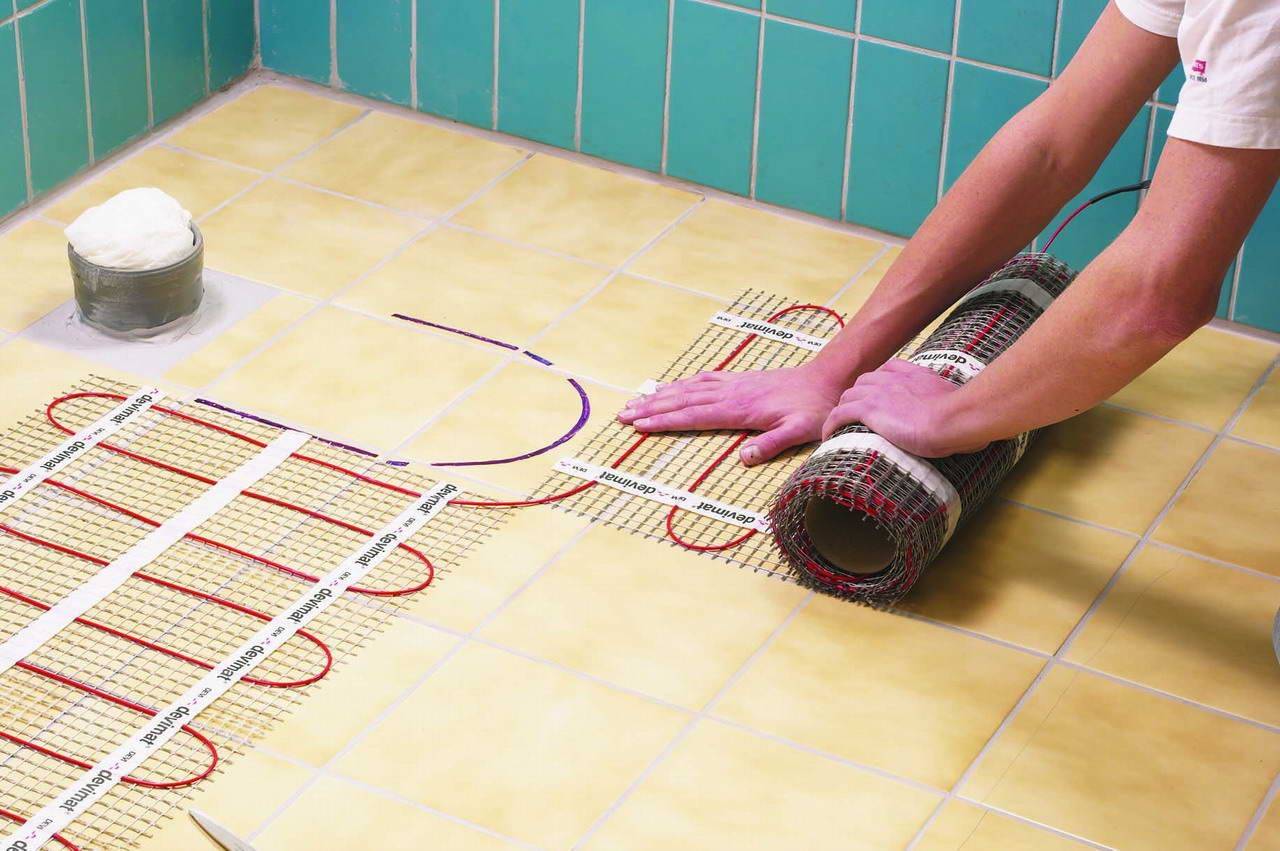
As mentioned above, different types of cables serve as a heating element in this system. They are laid either in a screed or in a layer of tile adhesive if a cable fastened with a special mesh is used. Installation is carried out in the following sequence:
- At the initial stage, a cable laying diagram is drawn up and the location of the sensor, thermostat, as well as the connection point for the underfloor heating is determined.
- Next, thermal insulation with a reflector is mounted on the base.
- Then, according to the scheme, cables are laid and a thermoregulation system is installed, which will protect the system from overheating.
- After that, the floor is filled with cement mortar. The main requirement at this stage is to avoid the formation of voids.
- After 30 days (at least) after the screed is completed, the system is checked for operability.
Cable underfloor heating is laid either in a screed or in a layer of tile adhesive
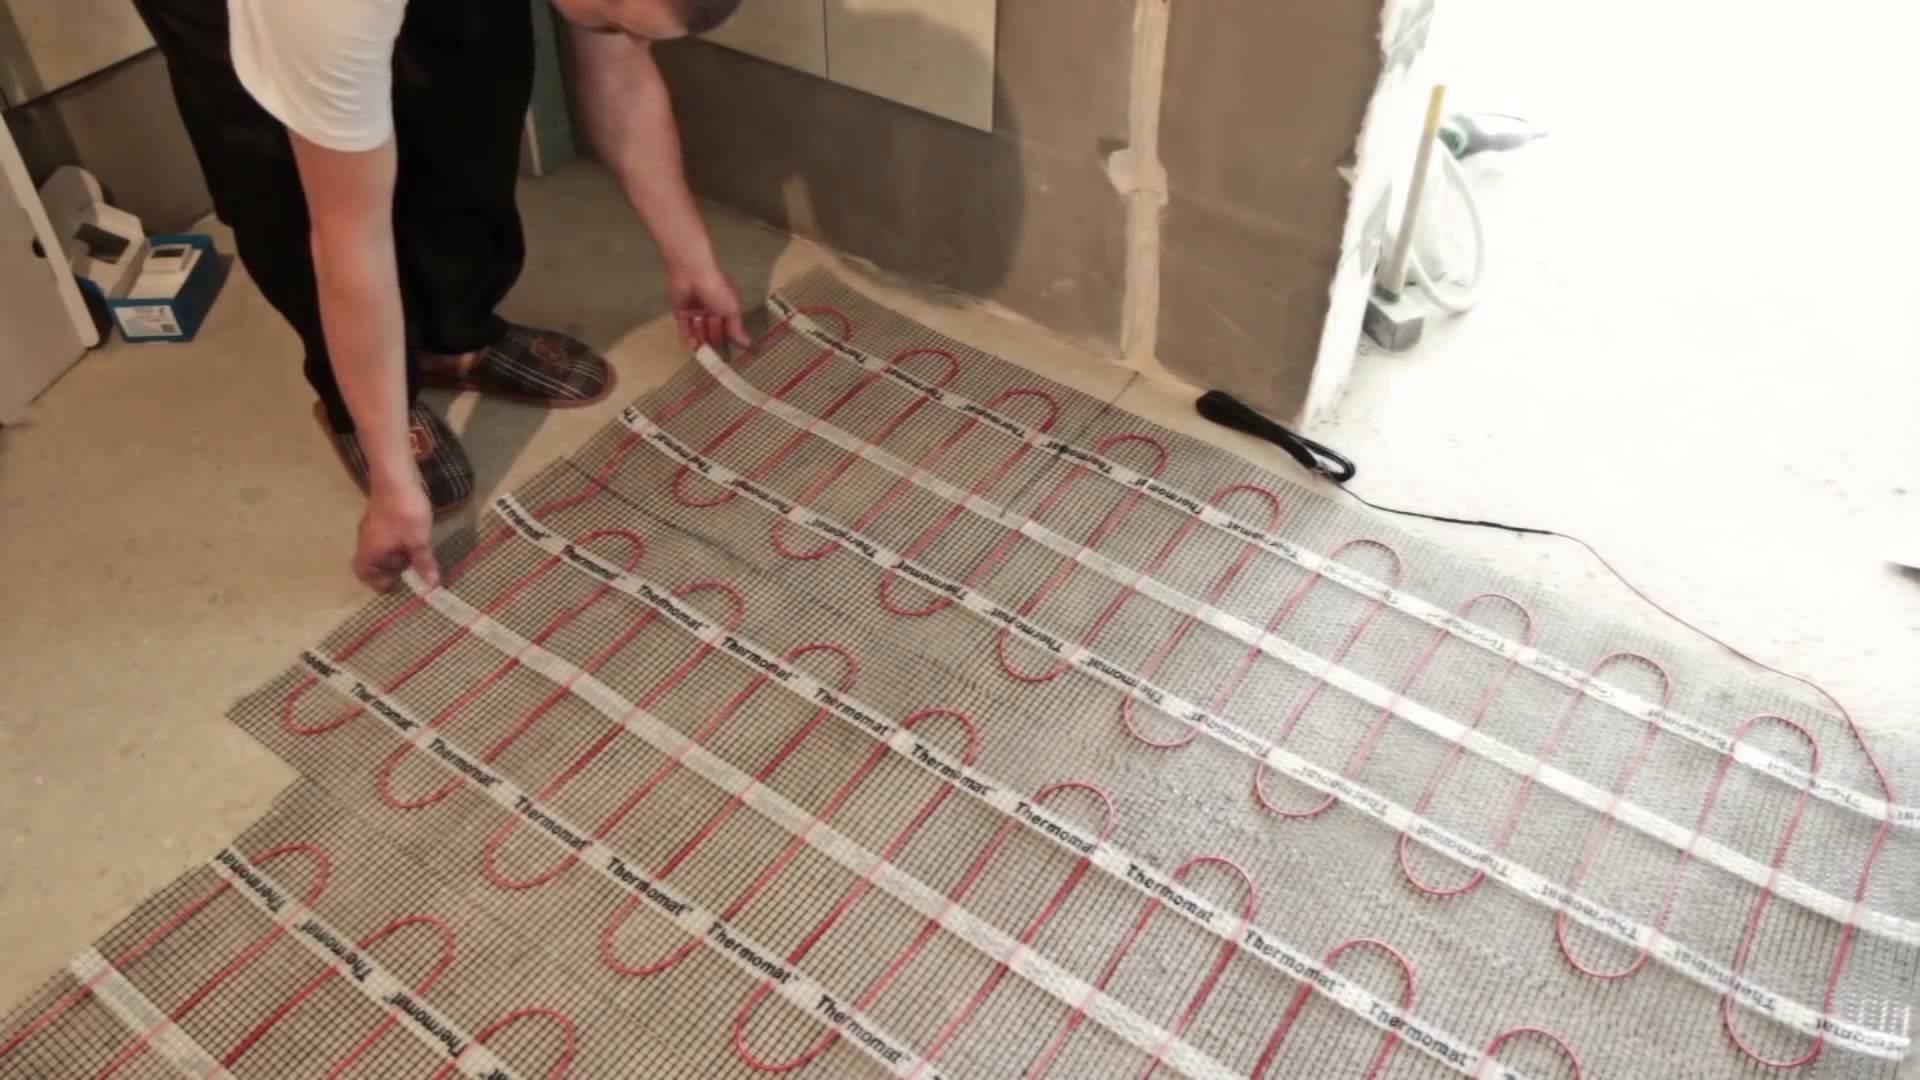
Installation of infrared film floor
Installation of this system is perhaps the best option for those who do not know how to do it. wooden floor warm, although for concrete floors - this is also an excellent way out. It is also captivating that you can lay on top of it those types of floor coverings that you like, without limiting your imagination. And the best part is that even a person who is not very experienced in repair matters will cope with the installation.
Main stages of work:
- Dismantling of existing flooring and preparation of the base. In case of serious surface defects, it is better to make a screed and wait for it to dry completely.
- Next, a film with heating elements is laid and a thermostat and sensor are connected.
- The next step is to check the performance of the system and troubleshoot if any.
- After checking, the thermal elements are covered with a protective film (dry installation) or filled with a solution (wet). When pouring, you must wait a month until it dries completely.
- The final stage is the installation of flooring, according to the technology.
This is just a brief description of the process, a specialist consultation will provide much more information, but if this is not possible, then it will be useful to watch the video below:
Floor water heating system
This option of underfloor heating, although captivating with its practicality and efficiency, is not very common in apartments, since the coolant (hot water) is taken from central water heating pipes, which can negatively affect the temperature of the radiators. In addition, this type of underfloor heating is quite laborious in terms of installation, requires professional skills and serious material costs. Another small minus, which can also play a role - when performing a screed, up to 10 cm of the height of the room is hidden.
Installation of a water heated floor is quite laborious, requires professional skills and serious material costs.
If you are still interested in how to carry out all the work, then we will list the main stages:
- They all start with the installation of a polypropylene riser, if the replacement has not been completed before.
- Next, a piping layout is drawn up.
- After that, another important point is the laying of a special reliable waterproofing, the strips of which are best overlapped, and the seams are connected extremely tightly.
- Next, a rough screed is made, the level of which should be approximately 5 cm below the expected level of the finished floor, and allowed to dry.
- The next stage is foil insulation, the joints of which must be glued with aluminum tape.
- And, finally, the installation of a polypropylene pipe according to the scheme, connecting it to the supply and return risers through a control valve.
- Checking the system for leaks. Then the water must be drained.
- Perform the final screed, which should be perfectly even. Let it dry and acquire the necessary strength.
What should be the room, preparation and leveling of the floor
Due to the fact that the structure is heavy, with a large length of pipes and connecting nodes, the installation has its own technological features.
As a result, it is necessary to lay each layer strictly according to the instructions. But first, we will analyze the features of the preparation of the premises.
Watch the video
Requirements for the premises
A water heated floor is recommended for construction in private buildings - find out how to install it yourself on a concrete floor. In multi-storey buildings, in addition to the heavy load on the floors, there is a risk of flooding the apartment from below.
In addition, the coolant circuit is connected to a common heating system, but it is most often not intended for this purpose. This can lead to cold risers in your apartment or in a neighboring apartment. With this, the reluctance of the relevant authorities to issue permits for the installation of this system in multi-storey buildings is connected.
The ideal solution is to make a water-heated floor yourself, even at the time of building a house. When installing a structure in a finished house, you should consider:
- the height of the ceilings, since such a construction leads to a significant decrease in them;
- size of doorways - their required height is not less than 210 cm;
- base strength.
In addition, the heat loss rate should not exceed 100 W/m2.
Foundation Requirements
As it is correct when mounting a water floor, a prerequisite is the presence of an even and clean rough coating. If the housing is old, you need to dismantle the old floor screed and level the base.


The process is complex and time-consuming, but it is necessary. After that, the base is thoroughly cleaned of debris and dust.
In order for the water floor to work well, you need a horizontal base without drops, deviations of no more than 10 mm are permissible. If cracks or flaws are found, they must be repaired.
If you are the owner of a new housing with panel ceilings, then the installation of heating elements can be done directly on them.
Boiler installation
For the "warm floor" system, a boiler is selected depending on the coolant. If there is gas in the house, then it is advisable to choose a gas boiler. It is installed indoors. Coolant costs will be minimal. Equipment with outlets for hot water supply and for a water floor line is required.
If a solid or liquid fuel stove is installed in the house, then a separate boiler room is equipped for heating equipment. The disadvantage is that you have to constantly monitor fuel consumption.

The water in the heat exchanger heats up to a high temperature, you will need to additionally install radiators, towel dryers, you can bring individual circuits to a bathhouse or garage. These measures are necessary to withstand a certain pressure and water temperature in the floor line.
Materials for a warm water floor
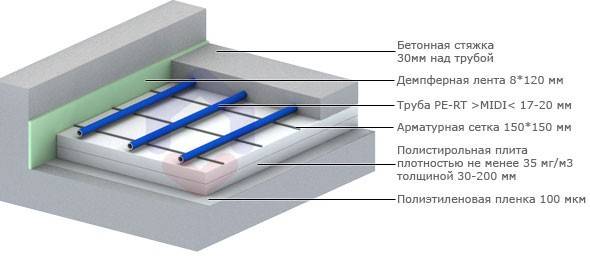
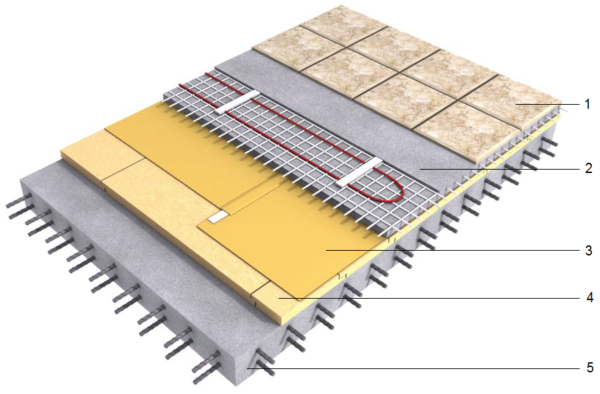
Most often they make a water-heated floor in a screed. Its structure and necessary materials will be discussed.The scheme of a warm water floor is presented in the photo below.
Scheme of a warm water floor with a screed
All work begins with leveling the base: without insulation, heating costs will be too high, and insulation can only be laid on a flat surface. Therefore, the first step is to prepare the base - make a rough screed. Next, we describe step by step the procedure for work and the materials used in the process:
- A damper tape is also rolled around the perimeter of the room. This is a strip of heat-insulating material, no more than 1 cm thick. It prevents heat loss for wall heating. Its second task is to compensate for the thermal expansion that occurs when materials are heated. The tape can be special, and you can also lay thin foam cut into strips (no more than 1 cm thick) or other insulation of the same thickness.
- A layer of heat-insulating materials is laid on the rough screed. For underfloor heating, the best choice is polystyrene foam. The best is extruded. Its density must be at least 35kg/m2. It is dense enough to support the weight of the screed and operating loads, has excellent performance and a long service life. Its disadvantage is that it is expensive. Other, cheaper materials (polystyrene, mineral wool, expanded clay) have a lot of disadvantages. If possible, use polystyrene foam. The thickness of the thermal insulation depends on many parameters - on the region, the characteristics of the foundation material and insulation, the method of organizing the subfloor. Therefore, it must be calculated for each case.
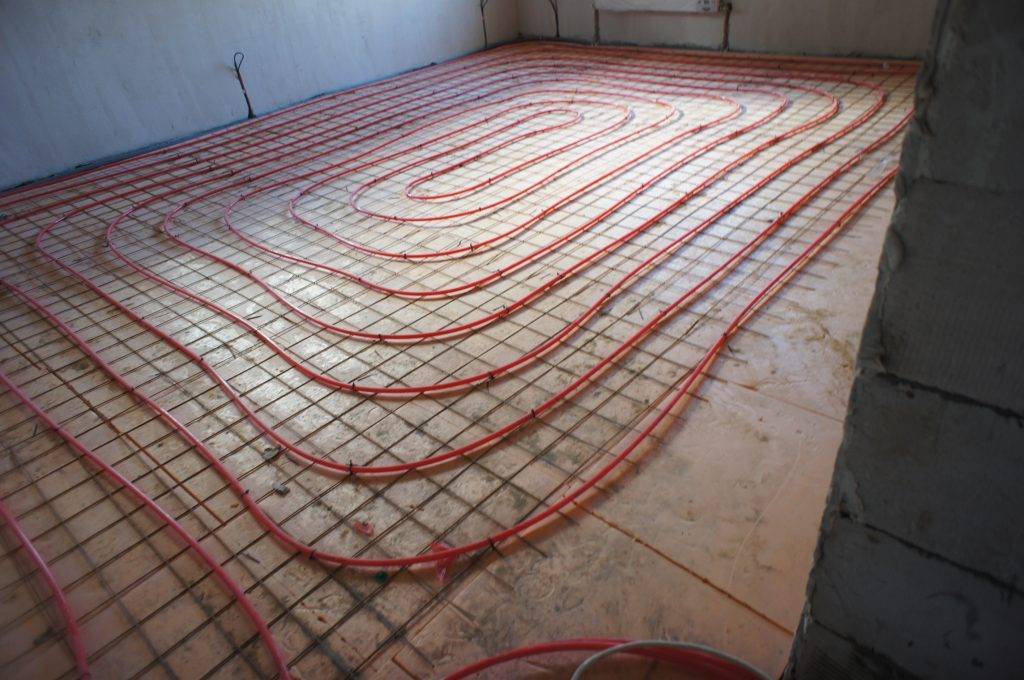
- Further, a reinforcing mesh is often laid in increments of 5 cm. Pipes are also tied to it - with wire or plastic clamps.If expanded polystyrene was used, reinforcement can be dispensed with - you can fasten it with special plastic brackets that are driven into the material. For other heaters, a reinforcing mesh is required.
- Beacons are installed on top, after which the screed is poured. Its thickness is less than 3 cm above the level of the pipes.
- Next, a clean floor covering is laid. Any suitable for use in an underfloor heating system.
These are all the main layers that need to be laid when you make a do-it-yourself water-heated floor.
Underfloor heating pipes and laying schemes
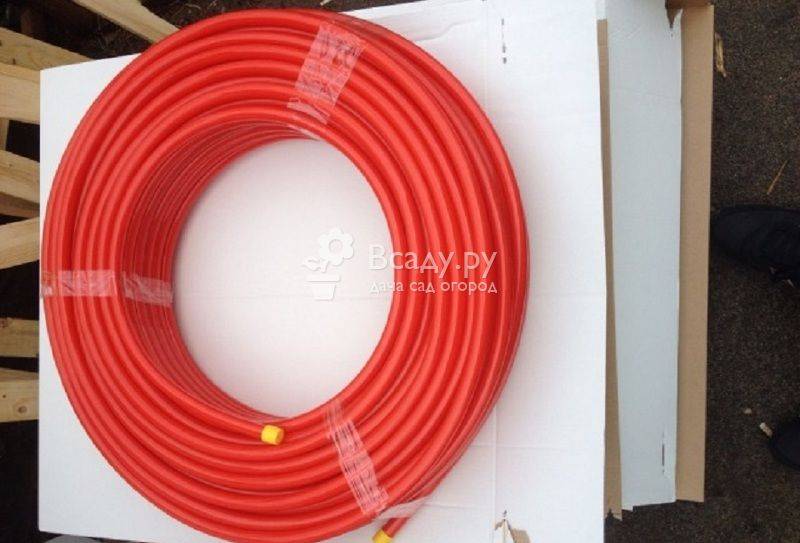
The main element of the system is pipes. Most often, polymeric ones are used - made of cross-linked polyethylene or metal-plastic. They bend well and have a long service life. Their only obvious drawback is not too high thermal conductivity. This minus is not present in the recently appeared corrugated stainless steel pipes. They bend better, cost no more, but due to their low popularity, they are not often used yet.
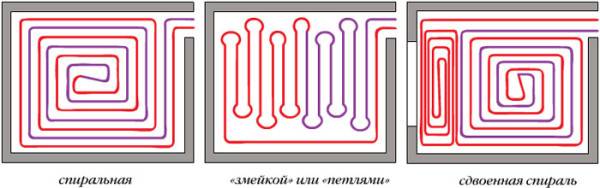
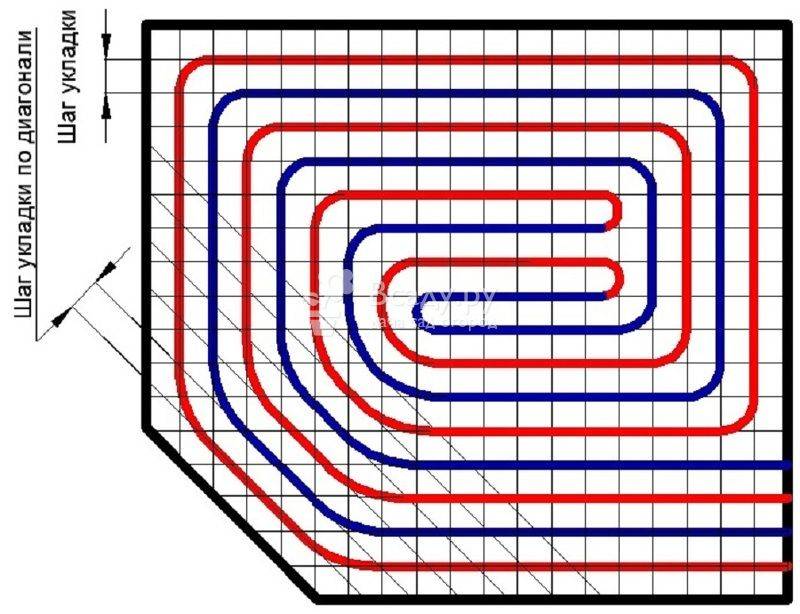
The diameter of pipes for underfloor heating depends on the material, but usually it is 16-20 mm. They fit in several schemes. The most common are spiral and snake, there are several modifications that take into account some features of the premises.
Schemes for laying pipes of a warm water floor
Laying with a snake is the simplest, but passing through the pipes the coolant gradually cools down and by the end of the circuit it is already much colder than it was at the beginning. Therefore, the zone where the coolant enters will be the warmest. This feature is used - laying starts from the coldest zone - along the outer walls or under the window.
This drawback is almost devoid of a double snake and a spiral, but they are more difficult to lay - you need to draw a diagram on paper so as not to get confused when laying.
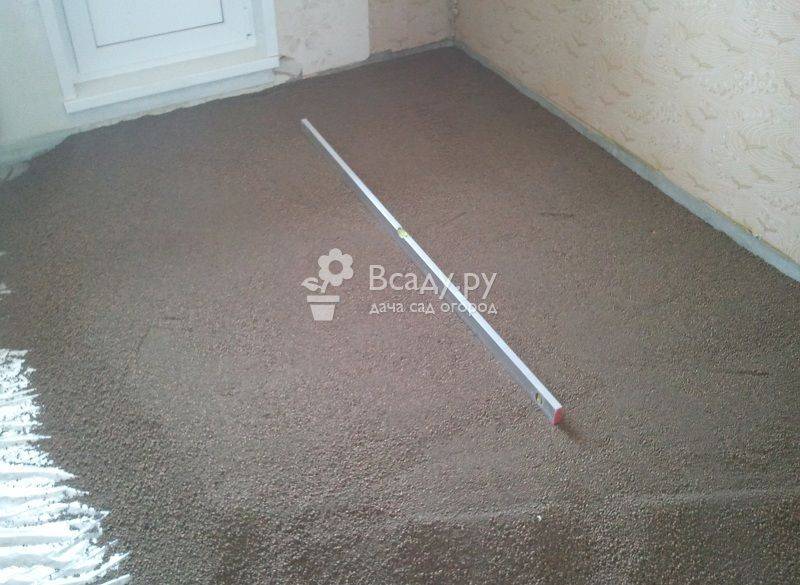
Screed
You can use a conventional cement-sand mortar based on Portland cement to fill a water-heated floor. The brand of Portland cement should be high - M-400, and preferably M-500. Concrete grade - not lower than M-350.
Semi-dry screed for underfloor heating
But ordinary “wet” screeds gain their design strength for a very long time: at least 28 days. All this time it is impossible to turn on the warm floor: cracks will appear that can even break the pipes. Therefore, so-called semi-dry screeds are increasingly being used - with additives that increase the plasticity of the solution, significantly reducing the amount of water and the time for "aging". You can add them yourself or look for dry mixes with the appropriate properties. They cost more, but there is less trouble with them: according to the instructions, add the required amount of water and mix.
It is realistic to make a water heated floor with your own hands, but it will take a decent amount of time and a lot of money.
Concrete floor device with heating function
Underfloor heating device
Such a system is installed on reinforced concrete capital floors with the future creation of a cement-sand screed. Among the masters, this option is called "jellied" or "wet". The reliability and efficiency of the method in practice is manifested in a high heat input and excellent strength characteristics.
The traditional warm water floor combines the following components:
- pipes;
- waterproofing;
- overlap;
- reinforced screed;
- heat-insulating material;
- finish coating.
In its total thickness, this device is from 7 to 15 cm.Along the entire perimeter of the room, experts recommend laying a damper tape, which will prevent heat loss and strengthen the screed at the junction with the walls. On floors with uneven surfaces or in rooms that have an oblong shape, it makes sense to make an expansion joint that compensates for the expansion of the screed with increasing and decreasing temperatures. For private houses, it is usually performed along the line of the doorway, right under the threshold.
As can be seen from the figure, the scheme for installing water-heated floors is not so complicated.
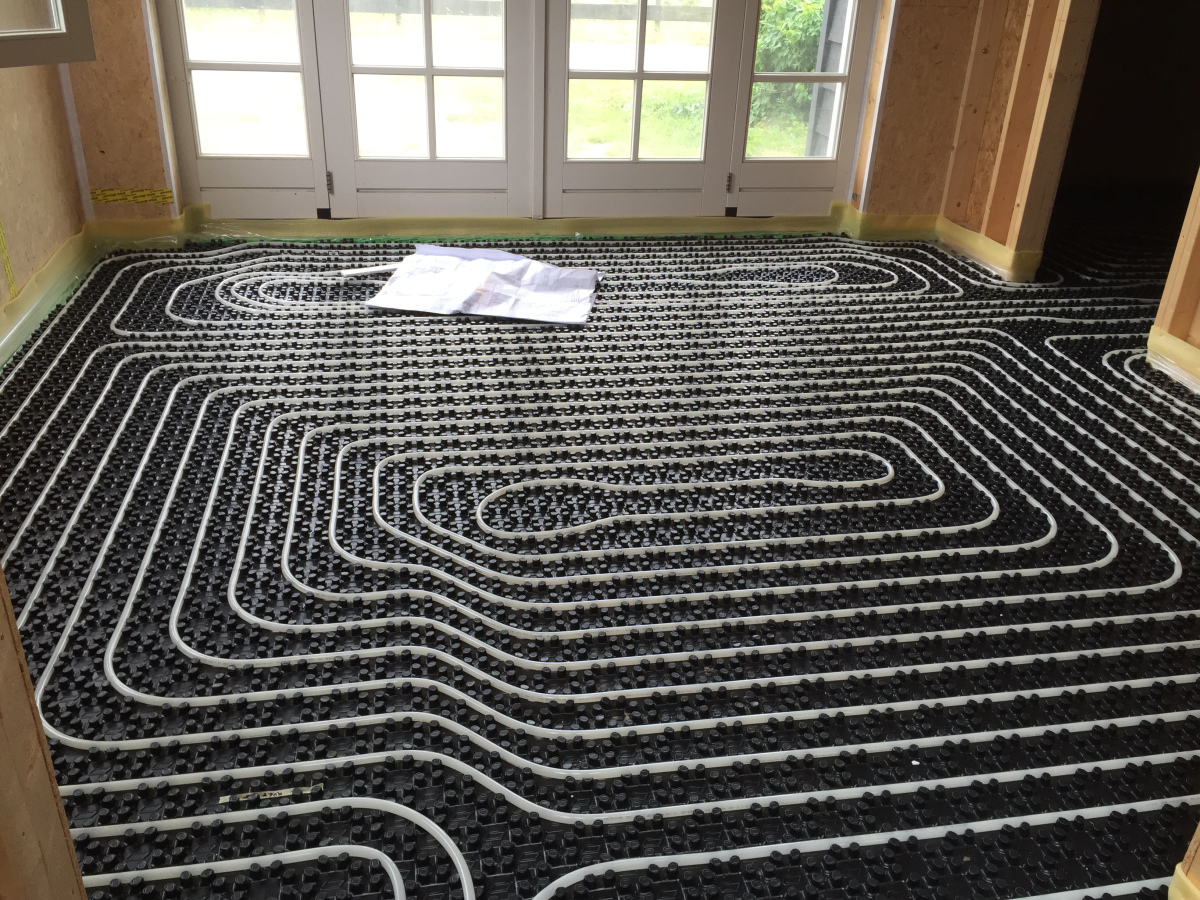
Heat insulating materials
For the device of thermal insulation, you can take the following materials:
- polypropylene;
- cork backing;
- expanded polystyrene;
- profiled polystyrene.
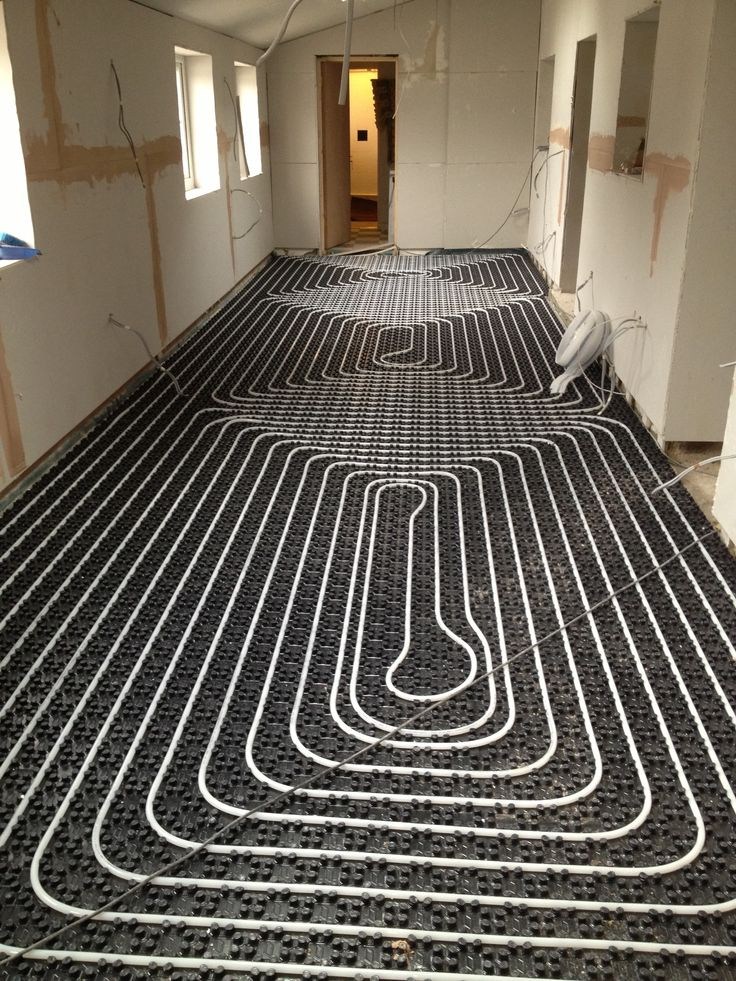
In most cases, profile material with a vapor barrier film is now used, which includes special “bosses” made to fix 18, 17 and 16 mm pipes. The plates include side locks that make it easier to connect the panels. The material itself is expensive, but at the same time it is very convenient to work with.


Pipe selection
Pipes are the main component of the entire heating system. The duration of service and the quality of functioning of the whole water structure depend on them. PE-Xc pipes are considered the most environmentally friendly.

PE-Xc pipes are considered the most environmentally friendly
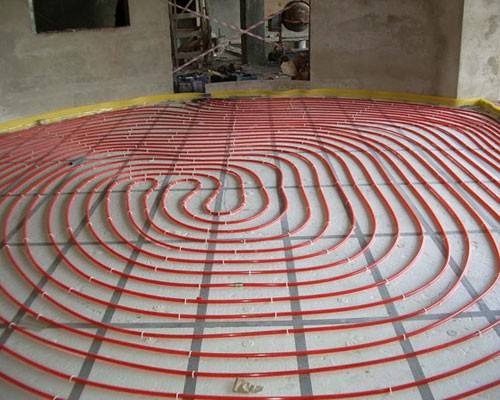
Laying the heat transfer pipe is carried out in two ways: serpentine or spiral. According to the installation technology, the second method is simpler and requires less pump work. In houses where there is a linear slope, it is better to use the first option, since this will make it easier to remove air from the hose.
Screed material
During the preparation of a mixture based on cement and sand for a screed device, it is recommended to use plasticizing agents.If you do not use them, you will have to lay a layer of at least 5 cm in thickness, and if applied, this value can be reduced to 3 cm. In order for the structure to serve for a long time and reliably, you need to use a reinforcing mesh. In the case when the area of \u200b\u200bthe room is more than 40 sq.m, it is advised to take polypropylene fiber as a reinforcing layer.
Polypropylene fiber
Upper layer
If we talk about decorative flooring, then ceramics and stone provide the most efficient return of thermal energy. The top element of the entire “pie” can be polymer and textile materials, the thickness of which does not exceed 10 mm.
The use of parquet is also allowed, but here it is worth taking into account the humidity standards, since you may encounter swelling and drying out of the tree.
Pipe selection and installation
The following types of pipes are suitable for a water-heated floor:
- Copper;
- Polypropylene;
- Polyethylene PERT and PEX;
- metal-plastic;
- Corrugated stainless steel.
They have their strengths and weaknesses.
| Characteristic Material | Radius bending | Heat transfer | Elasticity | Electrical conductivity | Life time* | Price for 1 m.** | Comments |
| Polypropylene | Ø 8 | Low | high | Not | 20 years | 22 r | They only bend with heat. Frost-resistant. |
| Polyethylene PERT/PEX | Ø 5 | Low | high | Not | 20/25 years | 36/55 r | Can't withstand overheating. |
| metal-plastic | Ø 8 | Below the average | Not | Not | 25 years | 60 r | Bending only with special equipment. Not frost resistant. |
| Copper | Ø3 | high | Not | Yes, requires grounding | 50 years | 240 r | Good electrical conductivity can cause corrosion. Grounding required. |
| Corrugated stainless steel | Ø 2.5-3 | high | Not | Yes, requires grounding | 30 years | 92 r |
Note:
* characteristics of pipes are considered at operation in water heat-insulated floors.
** Prices are taken from Yandex.Market.
The choice is very difficult if you try to save on yourself. Of course, you can not take copper for consideration - it is very expensive. But corrugated stainless steel, at a higher price, has exceptionally good heat dissipation. The temperature difference in the return and supply, they have the largest. This means that they give off heat better than competitors. Given the small bending radius, ease of operation and high performance, this is the most worthy choice.
Pipe laying is possible with a spiral and a snake. Each option has pros and cons:
- Snake - simple installation, almost always there is a "zebra effect".
- Snail - uniform heating, material consumption increases by 20%, laying is more laborious and painstaking.
But these methods can be combined within the same circuit. For example, along the walls "looking" at the street, the pipe is laid with a snake, and on the rest of the area with a snail. You can also change the frequency of turns.
There are generally accepted standards that professionals are guided by:
- Step - 20 cm;
- The length of the pipe in one circuit is not more than 120 m;
- If there are several contours, then their length should be the same.
Under stationary and large-sized interior items, it is better not to start pipes. For example, under a gas stove.
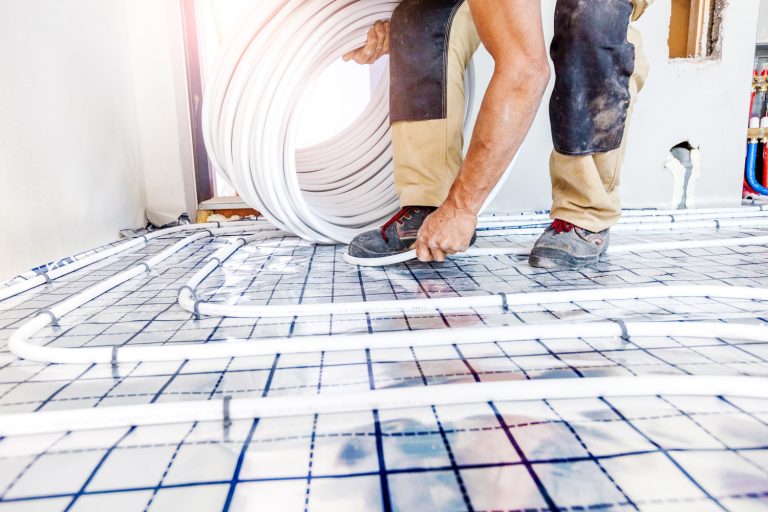
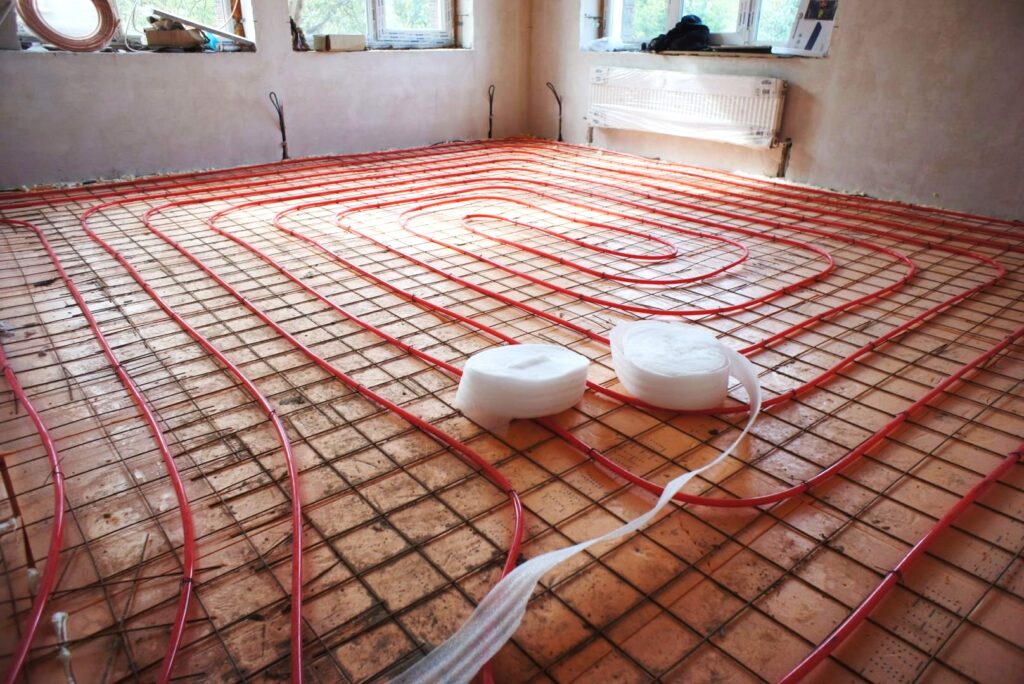
IMPORTANT: be sure to draw the laying diagram to scale. Laying starts from the collector
Unwinding the bay fix the pipe according to the scheme. For fastening it is convenient to use plastic clamps
Laying starts from the collector. Unwinding the bay fix the pipe according to the scheme. For fastening it is convenient to use plastic clamps.
Corrugated stainless steel is produced in coils of 50 m.For its connection, branded couplings are used.


The last element laid between the turns of the pipes is the temperature sensor. It is pushed into the corrugated pipe, the end of which is plugged and tied to the mesh. The distance from the wall is at least 0.5 m. Do not forget: 1 circuit - 1 temperature sensor. The other end of the corrugated pipe is brought to the wall and then, along the shortest path, is brought to the thermostat.
Screed
IMPORTANT: the top layer of the screed is poured only when the contour is filled. But before that, metal pipes are grounded and covered with a thick plastic film.
This is an important condition to prevent corrosion due to electrochemical interactions of materials.
The issue of reinforcement can be solved in two ways. The first is to put a masonry mesh on top of the pipe. But with this option, cracks may appear due to shrinkage.
Another way is dispersed fiber reinforcement. When pouring water heated floors, steel fiber is best suited. Added in the amount of 1 kg/m3 of solution, it will be evenly distributed throughout the volume and qualitatively increase the strength of the hardened concrete. Polypropylene fiber is much less suitable for the top layer of the screed, because the strength characteristics of steel and polypropylene do not even compete with each other.
Beacons are installed and the solution is kneaded according to the above recipe. The thickness of the screed must be at least 4 cm above the surface of the pipe. Considering that the ø of the pipe is 16 mm, the total thickness will reach 6 cm. The maturation time of such a layer of cement screed is 1.5 months
IMPORTANT: It is unacceptable to speed up the process including floor heating! This is a complex chemical reaction of the formation of "cement stone", which occurs in the presence of water. Heat will cause it to evaporate
You can accelerate the maturation of the screed by including special additives in the recipe. Some of them cause complete hydration of the cement after 7 days. And besides this, shrinkage is significantly reduced.
You can determine the readiness of the screed by placing a roll of toilet paper on the surface and covering it with a saucepan. If the ripening process is over, then in the morning the paper will be dry.
Why do I need to fill the warm floor with a screed?
Water pipes are laid on the base or ceiling, in the utility rooms there are additional utility communications. This "pie" is filled with a monolithic screed.
It is carried out after laying and checking the systems, provides:
surface strength;
protection of heating elements from load from above and damage;
important properties are accumulation, distribution, uniform heat transfer upwards, which reduces energy costs;
solid foundation for flooring.
The thickness of the monolithic screed is 70-100 mm, the thickness of the water pipes is not included in this calculation. In the room where the heating installation will be carried out, a double screed is carried out: rough (20-30 mm) under the pipes, finishing (30-40 mm) above them. The thicker the layer, the more stable the heating regime.
Pouring a water heated floor
A rough screed is applied to level the base on which the heating system will be laid.
Preparatory work and calculation of materials
Such responsible work as the installation of a warm floor with your own hands should begin with the preparation of materials and planning.Strictly speaking, only specialists who have information about the level of heat leakage in a given room can make an accurate calculation. But for individual needs, approximate calculations are often used that satisfy the requirements.
First you need to draw a plan for the placement of pipes. The clearest and most obvious thing will be a diagram drawn on paper in a cage, on which a warm floor can be calculated based on the quadrature of the room. Each cell will correspond to a step - the distance between the pipes.
For the temperate zone:
- With good insulation of the house and windows, the distance between adjacent turns of the pipe can be made 15-20 cm;
- If the walls are not insulated, 10-15 cm.
- In spacious rooms, where some of the walls are cold and some are warm, they take a variable step: near the cold walls, the distance between adjacent turns of pipes is small, and as they approach warm walls, they increase it.
What kind of flooring is suitable for underfloor heating
A big mistake is made by those who plan to lay parquet or thick wood flooring on a warm floor. Wood does not conduct heat well and will prevent the room from heating up. The efficiency of such heating may even be lower than that of a radiator, and heating costs may be too high.
The ideal flooring for underfloor heating is stone, ceramic or porcelain tiles. When heated, it will keep warm perfectly, and this is the best option for the kitchen or bathroom. In rooms where the floor is warm, children are very fond of playing, and it is more pleasant to walk barefoot there than on wooden parquet.
A slightly worse flooring option, but more suitable for a guest room or bedroom, is linoleum and laminate. These materials conduct heat well., and will not reduce the efficiency of water heating. In this case, the laminate should be chosen with a minimum thickness, and linoleum - without an insulating substrate.


Important!
When heated, many synthetic materials can release harmful fumes. Therefore, floor coverings with chemical components must necessarily have a manufacturer's mark on the possibility of their use in residential premises on a warm floor.
Underfloor heating base
If we are talking about a house with concrete floors, then the most affordable common option is a concrete screed with water heating. The same method is used for the first (basement) floors of private cottages, if the base of the floor is on a sand cushion, which is located directly on the ground.
In houses with wooden floors, this option is not applicable. Wooden floor beams simply cannot withstand the enormous weight of the concrete screed, no matter how thin it may be. In this case, a lightweight version of the underfloor heating is used, which will be discussed in a separate section.
Do-it-yourself installation of a warm floor begins with the preparation of the base. The basis for creating a warm floor should be flat, without protrusions and depressions. The maximum allowable difference is 5 mm. If the depth of surface defects reaches 1-2 cm, then it will be necessary to fill and level a thin layer of granite screenings (fine crushed stone) with a grain size of up to 5 mm. On top of the leveling layer, you will have to lay a film and, when laying thermal insulation, walk on wooden boards. Otherwise, the leveling layer itself will become a source of irregularities.
What else you need to consider in the process of designing a warm floor
In the process of developing a project for a warm floor system, it is recommended to make a schematic drawing indicating pipe laying, basic dimensions, distances and indents, and furniture arrangement.
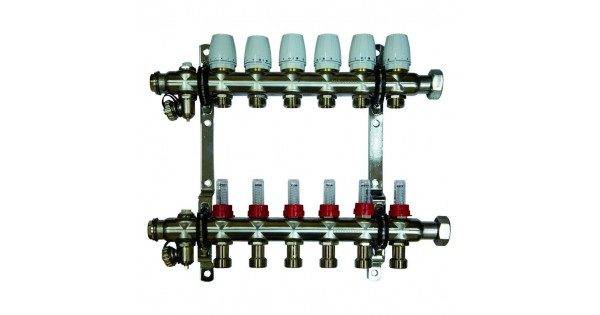
Collector group
At the design stage, the type of coolant is determined: in 70% of cases, water is used, since it is the most accessible and cheapest substance. Its only drawback is the reaction to temperature changes, as a result of which the physical properties of water change.
Floor pie with pipes in screed
Antifreeze based on ethylene glycol or propylene glycol with special additives that reduce the chemical and physical activity of liquids are often used as a heat carrier for underfloor heating. In any case, the type of coolant must be taken into account at the design stage, since its properties form the basis of hydraulic calculations.
Antifreeze as a coolant
You will also need to take into account the following nuances:
One circuit is laid per room.
To place the collector, choose the center of the house. If this is not possible, then to adjust the uniformity of the coolant flow through circuits of different lengths, flow meters are used, which are installed on the collector.
The number of circuits connected to one collector depends on their length
So, with a circuit length of 90 m or more, no more than 9 circuits can be connected to one collector, and with a circuit length of 60 - 80 m - up to 11 loops.
If there are several collectors, each has its own pump.
When choosing a mixing unit (mixing module), it is important to take into account the length of the circuit pipe.
A more accurate calculation will be based not only on data on heat losses in the room, but also on information on the influx of heat from household equipment and appliances, from the ceiling, if a warm floor is also installed on the upper floor. This is relevant when calculating for a multi-storey building, which is carried out from the upper floors to the lower ones.
For the first and basement floors, the thickness of the insulation is taken at least 5 cm, for the higher floors - at least 3 cm
Insulation on the second floor is used to prevent heat loss through the concrete base.
If the pressure loss in the circuit is more than 15 kPa, and the optimal value is 13 kPa, it is necessary to change the coolant flow in the direction of decrease. You can lay several smaller circuits indoors.
The minimum allowable coolant flow rate in one loop is 28-30 l/h. If this value is higher, then the loops are combined. Low coolant flow leads to the fact that it cools down without passing the entire length of the circuit, which indicates the inoperability of the system. To fix the minimum value of the coolant flow in each loop, a flow meter (regulating valve) installed on the manifold is used.
Connecting pipes to the manifold


