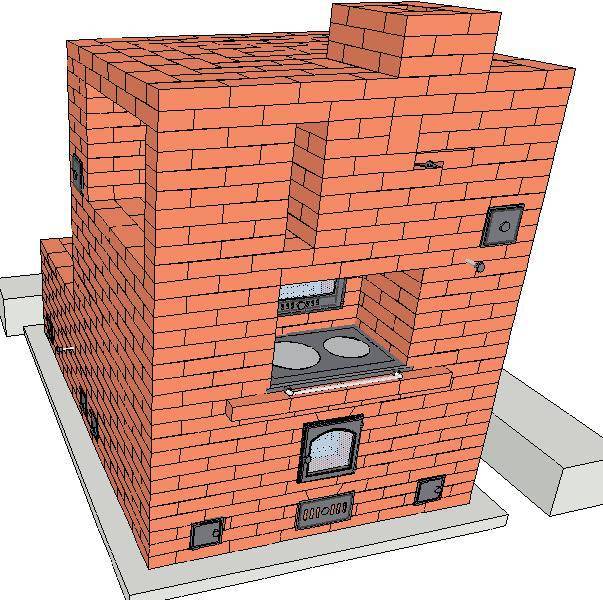
- Firebox, shield and chimney
- masonry process
- Features of laying a brick oven with your own hands
- Materials that will be needed for laying the furnace.
- The design of the Russian stove
- Option for beginner stove-makers: a stove with a cast-iron firebox
- How to build a brick heating and cooking stove with your own hands
- Equipment and materials
- Masonry features
- Step-by-step instruction
- The choice of location and type of foundation for the stove
- Fireplaces and combined fireplace stoves
- Device elements, drawings
Firebox, shield and chimney
The main differences between a rough stove and a solid fuel stove are a more powerful firebox and the absence of a pass (smoke tooth) in the furnace part. The tooth retains hot gases under the hob, which in the summer stove allows you to reduce fuel consumption for cooking. In rough it is not needed, because. excess heat will be used for heating.
The coarse furnace should have a more powerful firebox because the shield provides additional resistance to the flow of flue gases. A chimney with enhanced draft will not help here: the gases in the shield will immediately expand and cool down. Their thermal energy will turn into mechanical energy, which will successfully fly out into the pipe. Figuratively speaking, a firebox with a chimney in a stove with a shield works according to the push-pull principle, and “push” here is a firebox of greater power.This is the reason for the special requirements for the firebox and furnace fittings of coarse, see below.
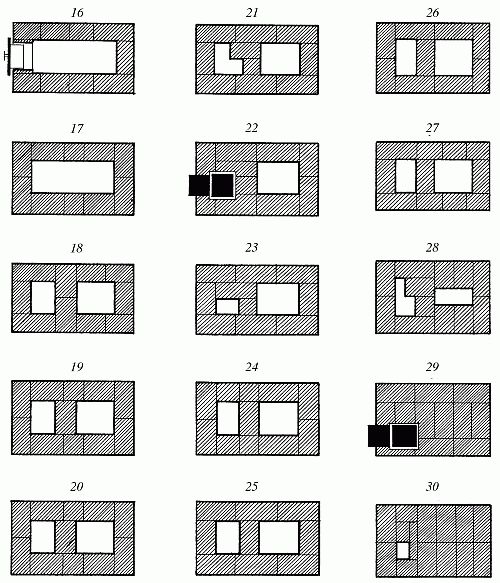
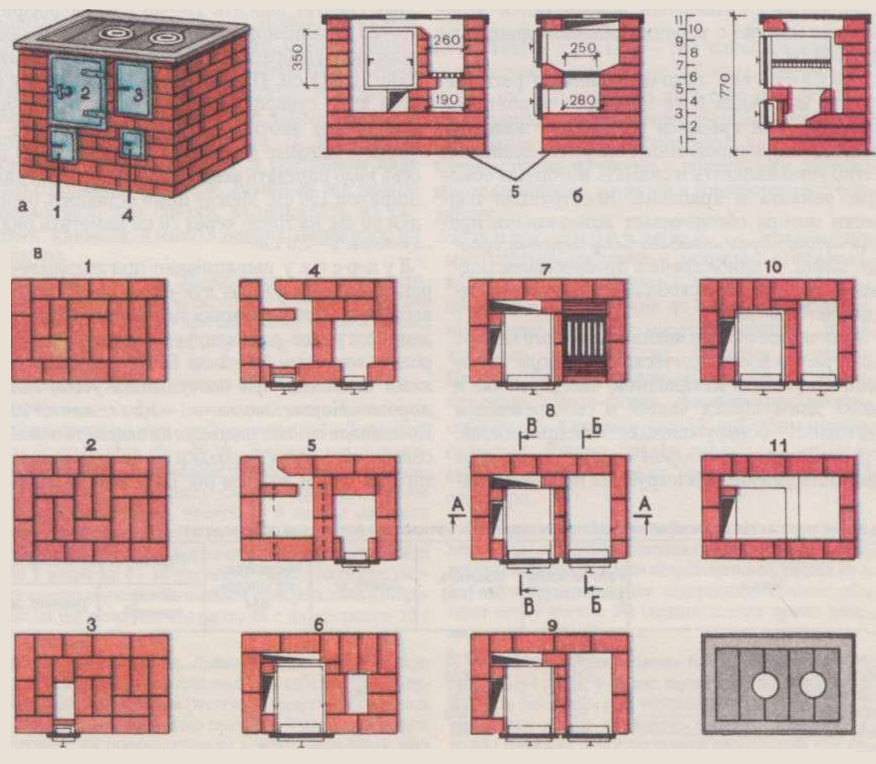
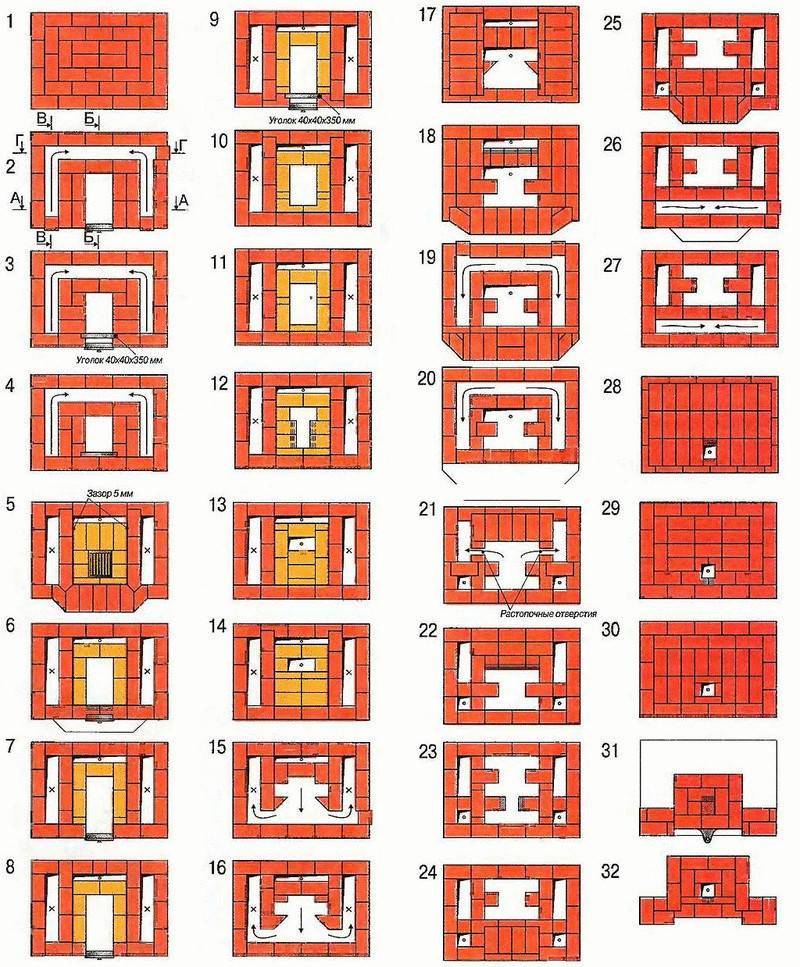
Depending on the purpose, heating shields for them are of different types. Schemes of heating shields for furnaces are given in fig. below; the fuel part is shown conditionally everywhere.

Schemes of heating shields for furnaces
- Consistent stroke with short vertical channels. The least material-intensive and the easiest to build. The resistance to the current of gases is the greatest. The compactness and heat efficiency of the furnace are average. The most commonly used scheme;
- Sequential course with horizontal channels. The mass and dimensions of the furnace are the same as in the previous. case, but building a shield with horizontal channels is much more difficult. Gas flow resistance approx. 1.5 times less. As a result, the heat efficiency of the furnace is higher. It is possible to arrange a couch, i.e. the upper channel does not get very hot;
- Consistent stroke with long vertical channels. Thermal efficiency is like that of a shield with horizontal channels, technological complexity is like that of a shield with short vertical channels. It occupies the smallest area, but requires a lot of materials and a good foundation (see below) due to the high specific pressure on the support. The best option for a house heating stove for 2-3 rooms, see below;
- Parallel move. The highest thermal efficiency, the smallest mass per unit of thermal power. The occupied area and technological complexity are the greatest. Use with a fire chamber of the reduced power is possible. Optimum for an extension to an existing slab without altering it.
Note: there are also series-parallel or chess shields. The most complex, but also the lightest, resistance to the flow of gases is the least.The only possible option for being rude to a house with a heated attic, see below.
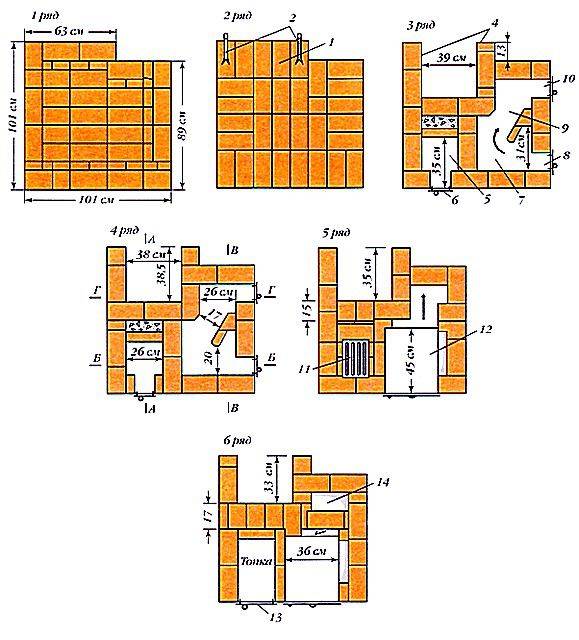
masonry process
The masonry mixture is prepared from sifted sand and clay. Clay is left in water for a couple of hours, after which it is sifted through a sieve. Currently, there is no need to prepare this mixture yourself. A number of companies offer ready-made masonry mixtures of various packaging. The use of such masonry mixtures is preferable to their own production.
Industrial sieves sift a finer fraction of sand and clay, which makes it possible to obtain a more plastic and homogeneous mixture. Such a mixture will eliminate the formation of voids and air bubbles in the seams during laying.
The first rows are built with solid bricks. The sutures of the first row require dressing. After the first rows are ready, the brick will have to be cut.
The chopped side of the brick should be inside the masonry. This rule is also used in the construction of smoke paths. The chimney is built of red burnt bricks. And the opening of the firebox is created using a metal corner, a “castle” layout.
Before the first fire, it is recommended to wait 3 weeks.
Features of laying a brick oven with your own hands
What are the nuances you need to know before proceeding with the laying of the furnace?
The foundation for the furnace must be strong and solid. But at the same time, in no case should it be connected with the main foundation for the house.
The fact is that the house shrinks over time, which is reflected in the foundation, so it is very important to separate these two elements. With seasonal shifts of the soil and general shrinkage of the house, the design of the furnace may suffer.
The foundation must exceed the dimensions of the furnace by 15-20 cm on each side.It can be made of ordinary concrete, cement mortar or made of concrete blocks.
For laying the furnace, it is necessary to purchase 2 types of bricks: ordinary solid ceramic and fireclay (refractory), from which the firebox, smoke channels and all heated elements will be folded
The cost of such material is much higher than the price of ordinary red brick, so usually only those surfaces that will have direct contact with fire are laid from it.
All other elements are laid from solid red brick, while using a solution based on red oven clay. The composition of such a solution must necessarily include heat-resistant cement. But between ceramic masonry and fireclay bricks, it is imperative to maintain a gap of 5 mm. When heated, fireclay bricks will expand. Therefore, in order to prevent deformation of the furnace structure during operation, this gap must be taken into account.
All purchased elements for the oven (grate, door, hob, oven, etc.) are set in accordance with the general scheme and purpose of the oven
It can be made of ordinary concrete, cement mortar or made of concrete blocks.
For laying the furnace, it is necessary to purchase 2 types of bricks: ordinary solid ceramic and fireclay (refractory), from which the firebox, smoke channels and all heated elements will be folded. The cost of such material is much higher than the price of ordinary red brick, so usually only those surfaces that will have direct contact with fire are laid from it.
All other elements are laid from solid red brick, while using a solution based on red oven clay. The composition of such a solution must necessarily include heat-resistant cement. But between ceramic masonry and fireclay bricks, it is imperative to maintain a gap of 5 mm. When heated, fireclay bricks will expand. Therefore, in order to prevent deformation of the furnace structure during operation, this gap must be taken into account.
All purchased elements for the oven (grate, door, hob, oven, etc.) are set in accordance with the general scheme and purpose of the oven.
Grate
When inserting the door of the combustion chamber or ash pan, it is necessary to tie it with annealed steel wire. In this case, one end of the wire is inserted into a specially designed hole, and the other end is twisted into a bundle and laid between the bricks, tightly clamped with mortar.
When installing a cast-iron firebox or cast-iron stove, it is imperative to lay an asbestos cord between the brick and the metal element to compensate for the different thermal expansion of materials.
The chimney for the stove can be made of red ceramic bricks, or you can use a ceramic block chimney, which is purchased ready-made.
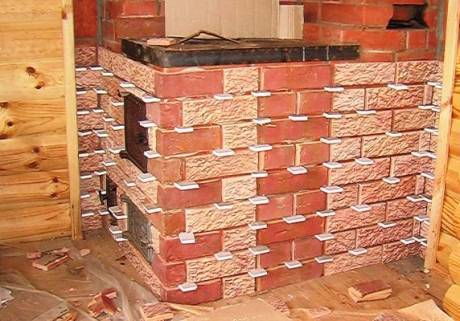
Facing is the final stage in the construction of a brick oven. To give a beautiful aesthetic appearance, the stove can be lined with red ceramic bricks, clinker (under wild stone), decorative tiles. This coating gives a unique authentic look to the stove, and also protects it from the negative effects of the environment.
Materials that will be needed for laying the furnace.
-
Red solid ceramic brick (M-150.)
M 150
- Chamotte (refractory) brick.
- Masonry mortar (sand, red oven clay).
- Foundation material (cement, graphite, sand).
- Ruberoid.
- Asbestos cord, galvanized wire.
- Boards for creating formwork.
- Reinforcing mesh.
- Grate.
- Cooking surface (stove).
- Ash pan and ash pan door (blew).
- Furnace door.
- Chimney flue.
- Chimney valve.
Tools that will be needed for laying the furnace:
- Building level.
- Owl shovel.
- Construction marker.
- Measuring tape (roulette).
- Construction slope.
- Goniometer.
The design of the Russian stove
 The drawings of Russian stoves can be very different, because the structures differ from each other very much.
Depending on the size of the furnace can be: small, medium and large.
The Russian stove is used for heating, cooking, has an oven and a stove bench. To build such a structure, it is necessary to study its structure.
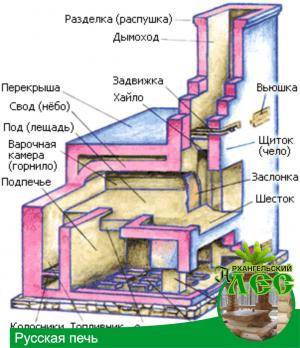
The scheme of the device of a traditional Russian stove consists of the following departments:
- podpeche - used for drying firewood. In many furnace structures there is no such department due to its lack of demand;
- cold stove - they store dishes in it. It is also not always built;
- six - represents a niche in front of the crucible. It has a cooking stove. And if the stove is in another place, they put food in the hearth so that it does not cool down;
- under - this is the bottom of the furnace. It must be installed with a slight slope to the entrance to the chamber, so that it is easier to move the dishes in it. The surface of this element should be sanded;
- crucible or cooking chamber - used for laying firewood and installing heat-resistant dishes. The vault of the chamber should also be made with a slight slope towards the entrance.Thanks to this configuration, hot air accumulates under the ceiling, warming up the bench and the walls of the stove on the sides;
- overtube - this is a niche above which the chimney pipe begins;
- view - is a window with a door, with which the chimney is blocked. Through it they get to the damper, with which they regulate the draft;
- stove bench - located behind the chimney, above the crucible. When the stove starts to heat, it warms up well.
 Modern Russian stoves are complemented by elements such as a stove for cooking and a tank for heating water. In addition, in this building, the heating section is heated, which is why the furnace reaches the required temperature much faster, which means that the room will also warm up quickly.


Due to the presence of various departments in this building, there is no need to heat the entire room in the summer, but only use the hob to cook food. This creates a normal microclimate in the house and saves fuel. In winter, all departments are heated in the oven, which contributes not only to heating the water, stove and oven, but the entire room.
To make a Russian oven with your own hands, they carry out preparatory work, starting with choosing a place.
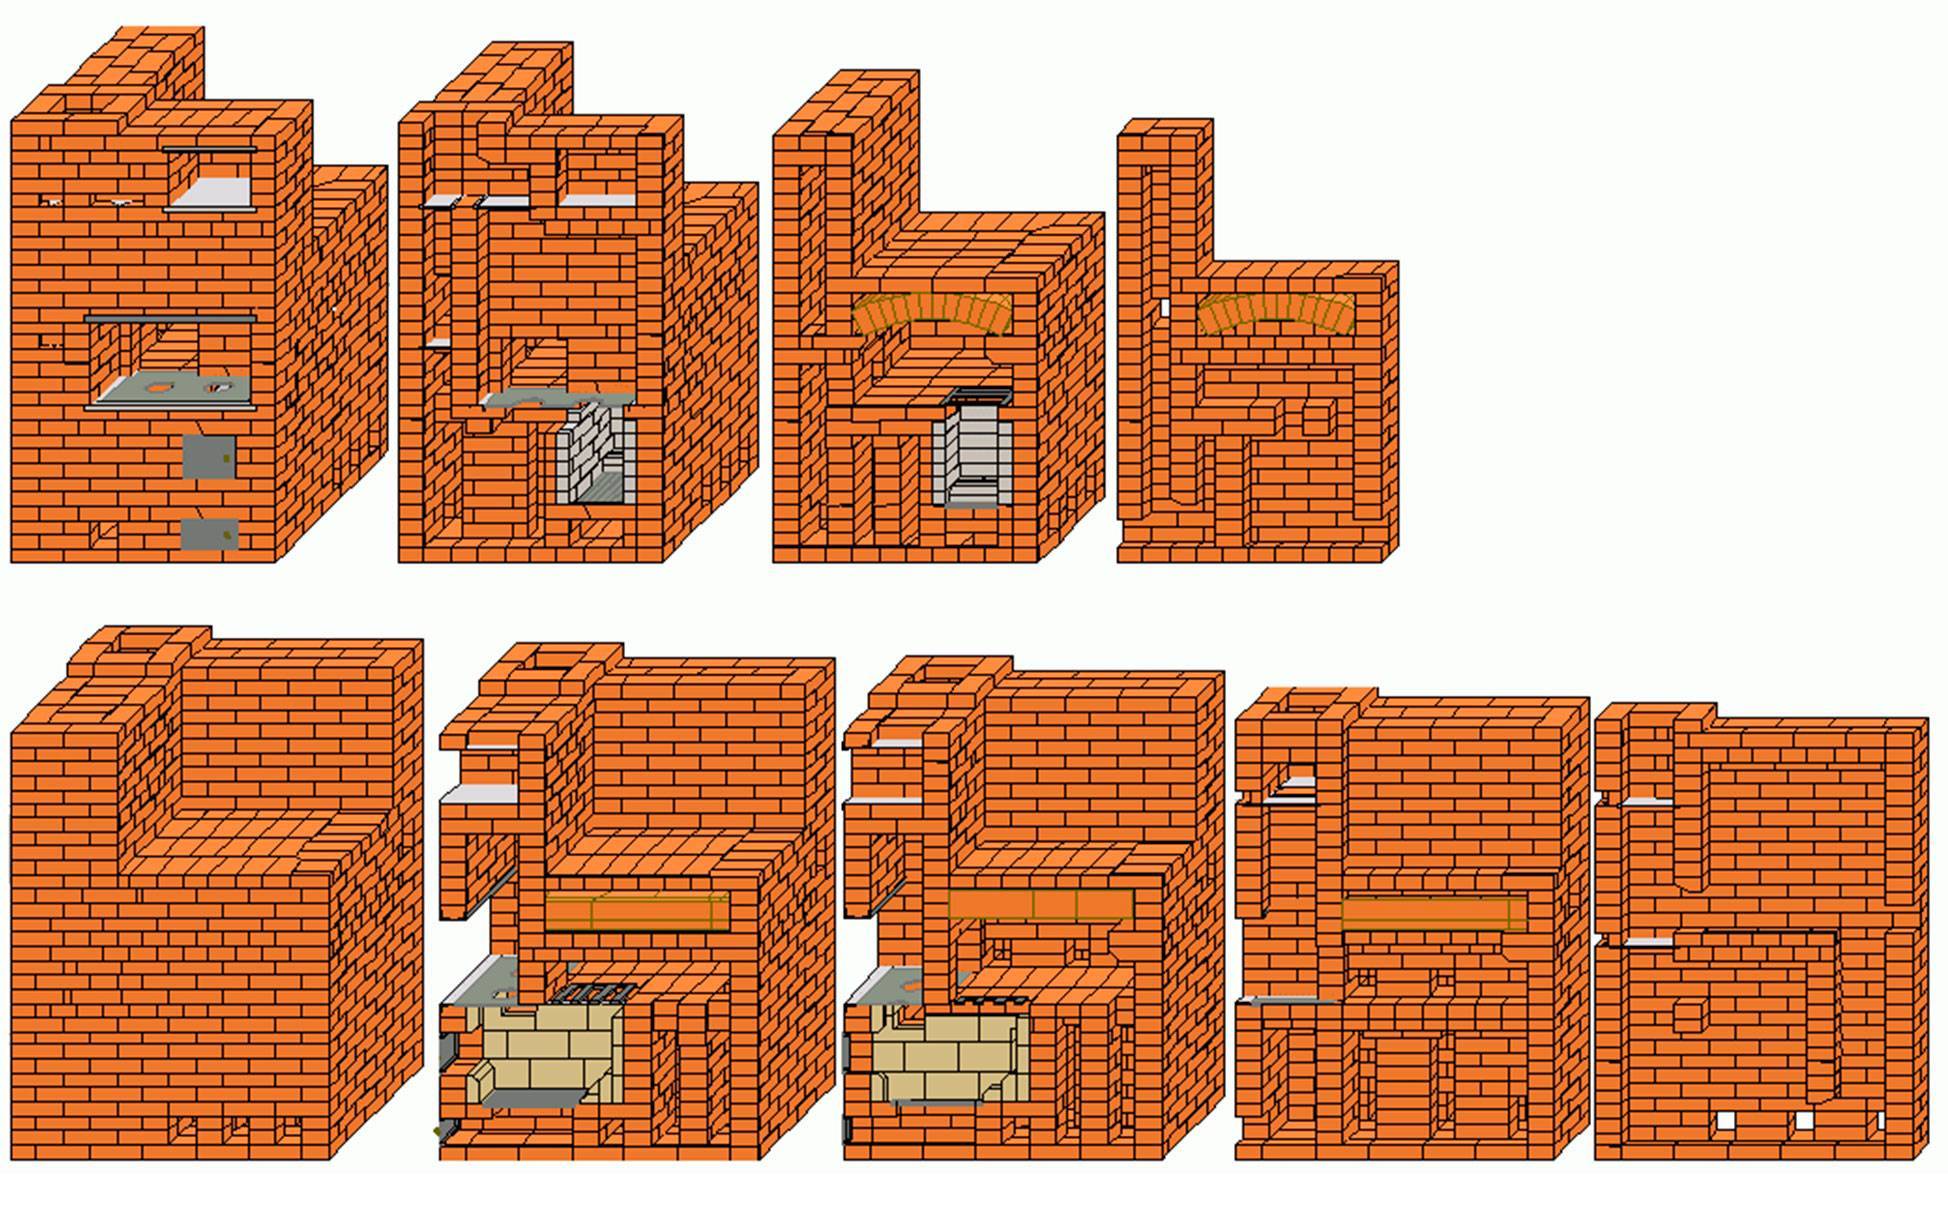
Option for beginner stove-makers: a stove with a cast-iron firebox
A brick mini-oven can be built with your own hands based on a finished cast-iron firebox. Cast iron fireboxes are durable - they do not crack or burn through. This option is more suitable for beginners, since the design already provides for all the basic elements. The combined furnace heats up quickly and cools down for a long time, due to which the efficiency of the hearth increases significantly.If desired, you can choose a hearth of a fireplace type with a fireproof glass door - such a model will not only warm, but also decorate the room.
Before starting work, prepare a solid and even base. To do this, you can pour a small concrete podium. The lining of the cast-iron firebox is made in half a brick, leaving an air cushion between the walls and the lining with a thickness of 1 to 10 cm. Additionally, it is necessary to provide small ventilation holes in the lower part of the building - they will ensure the exit of heated air and improve heat transfer.
An example of a cast iron firebox
You can start building a mini-oven with your own hands only with firm confidence in your knowledge and skills. Any doubts are a good reason to postpone independent work and entrust the construction to a professional stove-maker.
How to build a brick heating and cooking stove with your own hands
Equipment and materials
For work you will need:
- solid red brick (for the stove and chimney);
- refractory brick fireclay or white refractory Gzhel (for firebox);
- clay-sand mortar (as a binder);
- cement mortar (for the foundation);
- cast iron parts: grate, stove, valves, doors, oven (if necessary);
- thick wire;
- thermal insulation (for the chimney);
- roofing material or bituminous mastic.
Masonry features
Bricks should be dipped in water before laying. This will clean them of dust and improve adhesion. Just do not leave the bricks in the water, even for a short time, otherwise they will absorb excess moisture. Because of this, the furnace can quickly collapse during operation.
By the way, you can determine the quality of a brick by the pure sound that is emitted when tapped. When dropped, it should not crumble, but may break into large pieces.


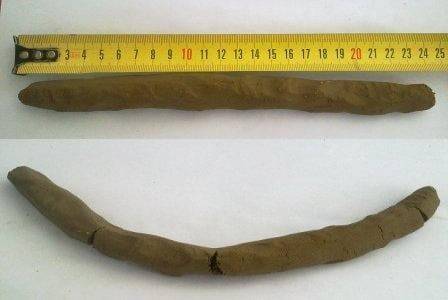
For refractory bricks, the solution is best done on fireclay clay. Sand must be sifted through a sieve with cells of 1.5 × 1.5 mm. Clay is also better to sift (cell 3 × 3 mm), then soak for 2 days. The ratio of components should be 1:1 or 1:2, depending on the fat content of the clay. To check the quality, it is necessary to mold flagella about 250 mm long. They need to be twisted, bent or stretched. If at the same time practically no cracks form, and when stretched, the tourniquet gradually thins, then the quality of the solution is suitable.
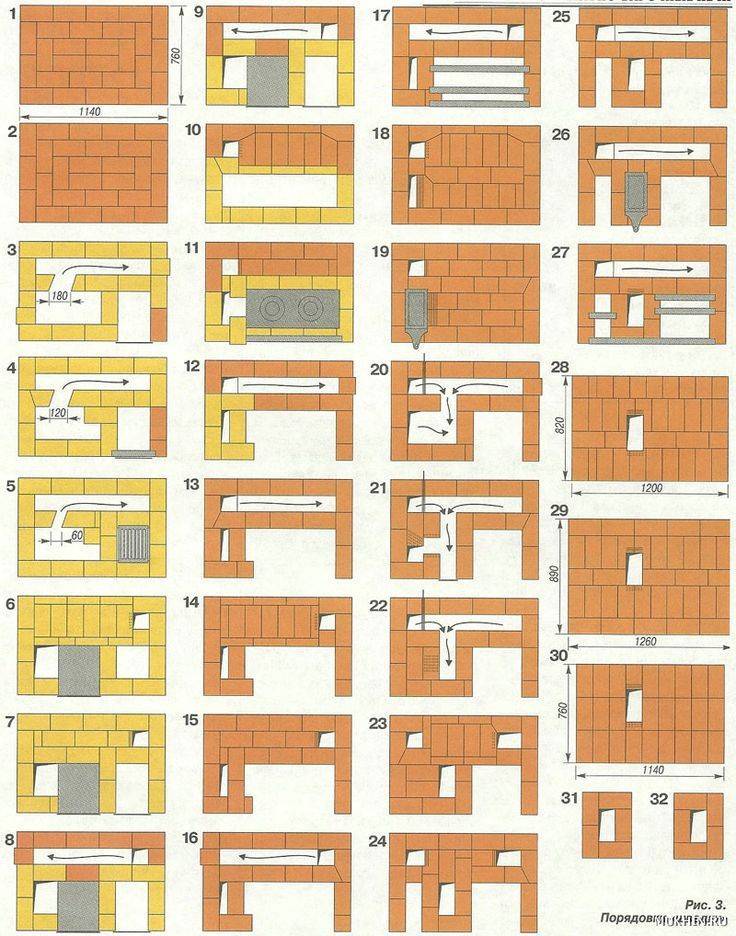
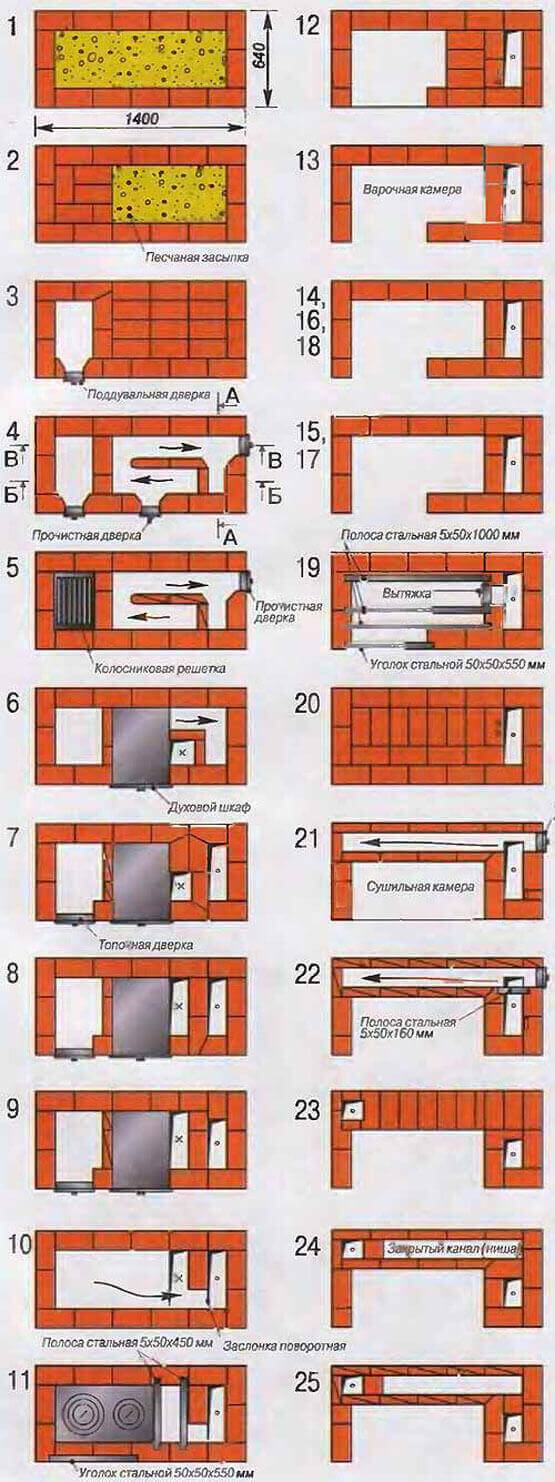
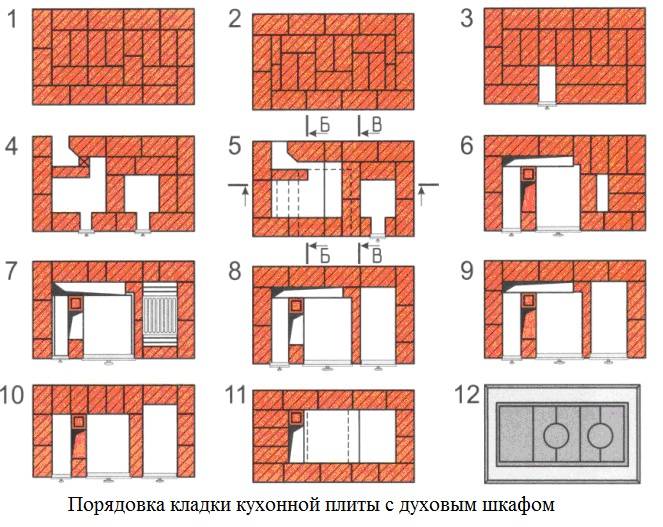
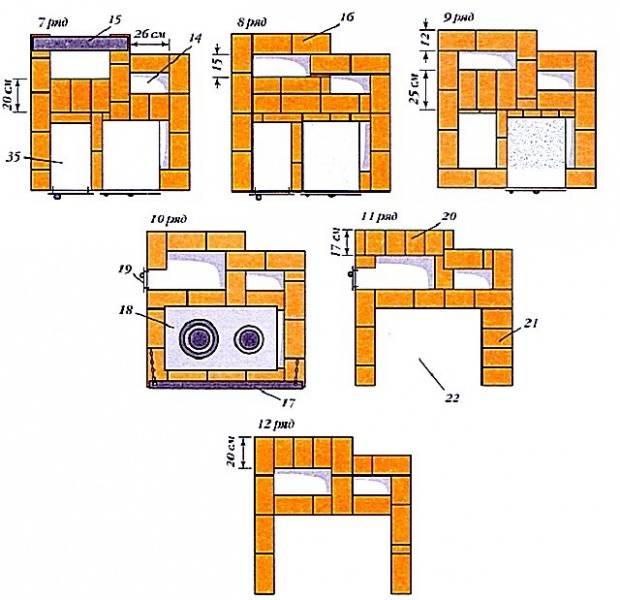
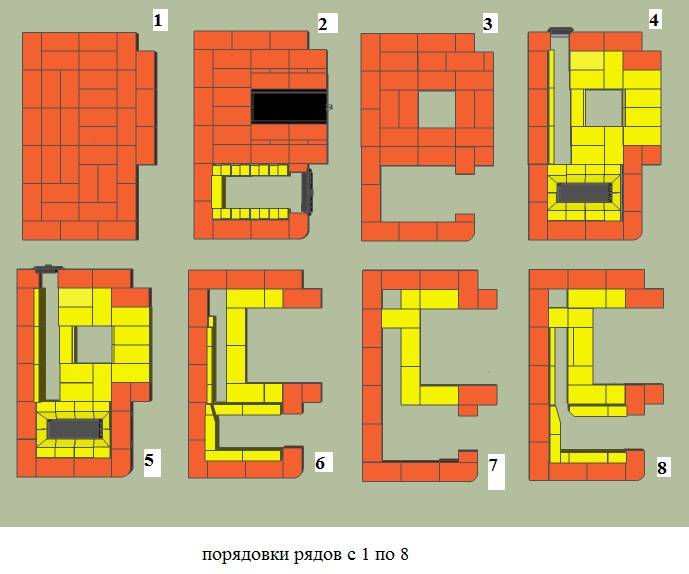
Step-by-step instruction
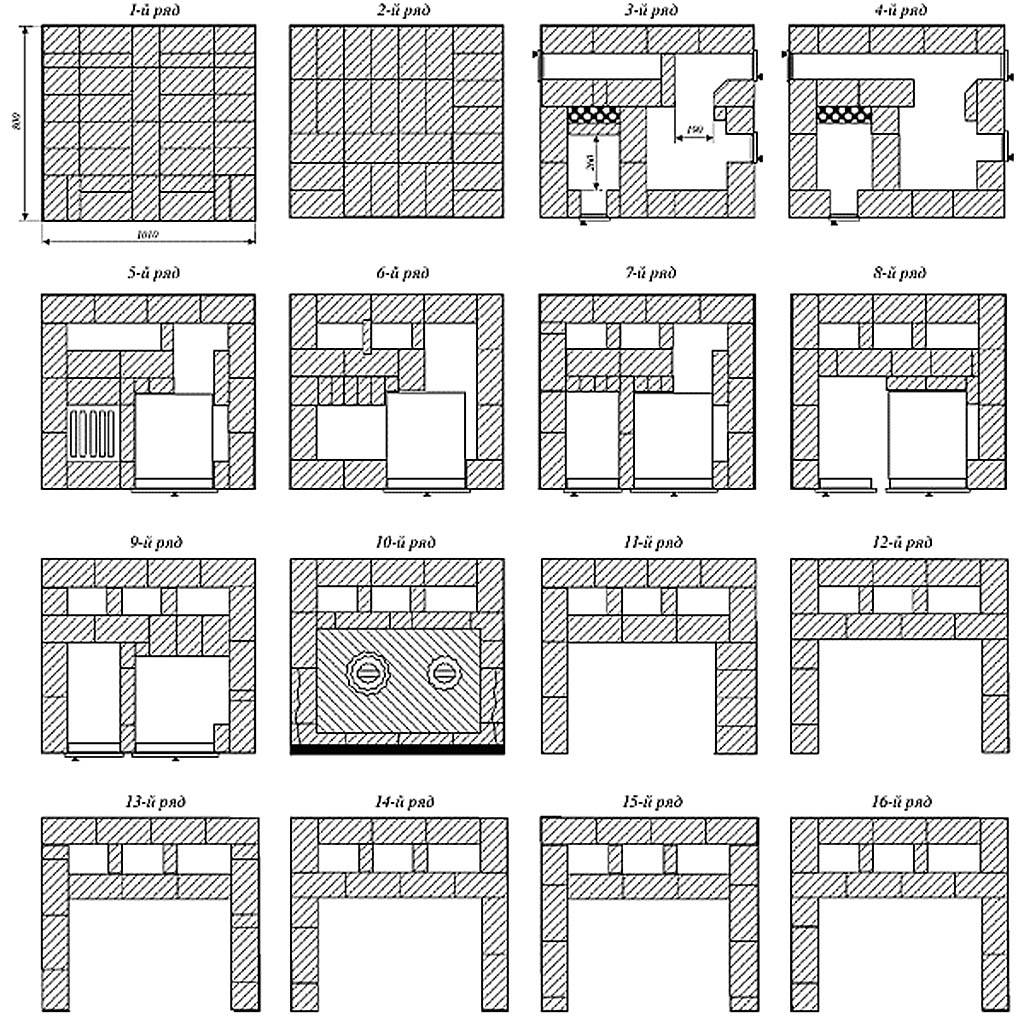
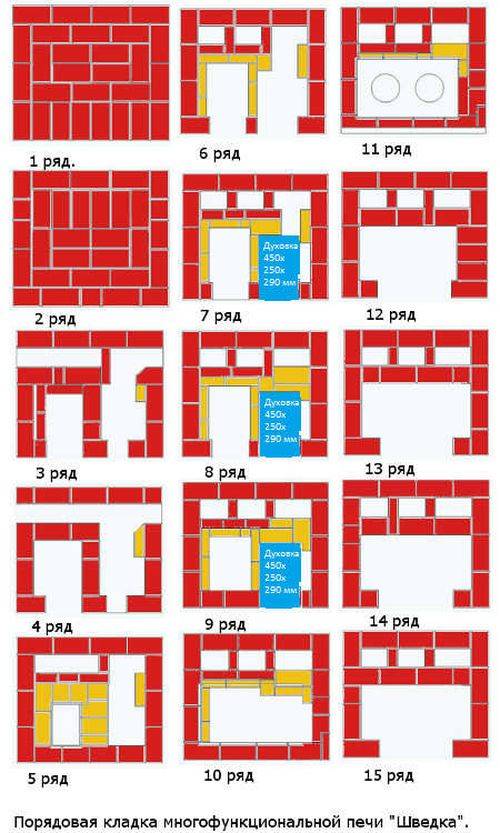
It is better to install a monolithic concrete foundation under the furnace so that it protrudes at least 50 mm on each side. It should be perfectly even (this can be checked by the rule). Further:
- you need to lay a continuous row of bricks;
- carefully fill the seams with cement mortar;
- lay waterproofing on top;
- then put the second solid row;
- in the 3rd and 4th row, a blower door is installed and a place is left for the ash pan; all are recordedthe oven doors are simple - they are screwed onto the internal protrusions using a thick wire, which is then laid between bricks and mortar;
- in the 5th row a grate is placed;
- from the 6th to the 9th, a firebox and a door under it are arranged; if an oven is supposed, then the box is installed nearby (in the figure on the right);
- 10th row - the box is covered with a steel grate;
- in the 11th, a place is being prepared for the hob;
- in 12, a cast-iron panel with burners is laid;
- further on, a chimney is built over the furnace.
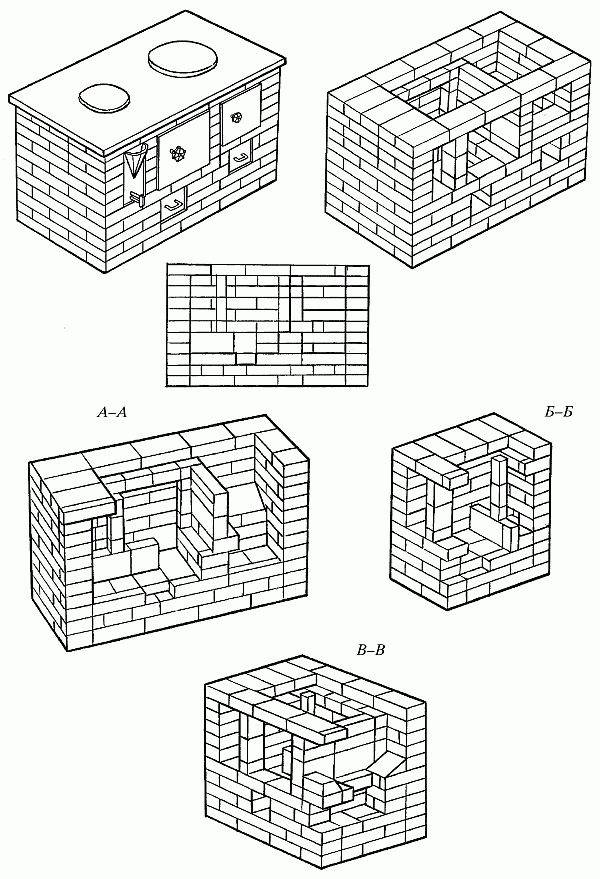
A visual diagram of the laying of a heating and cooking stove made of bricks
The choice of location and type of foundation for the stove
Scheme of laying the foundation for the furnace
Before starting the laying of the furnace, pay due attention to finding a place to place it. For example, if the unit is placed in the middle of the room, it will be able to give off much more heat, warming up from all sides and evenly heating the air around. If you place the stove against the wall (and this option is used most often), cold air will constantly “walk” near the floor
Therefore, in this regard, you need to make your own decision.
If you place the stove against the wall (and this option is used most often), cold air will constantly “walk” near the floor. Therefore, in this regard, you need to make your own decision.
Pre-determine the installation location of the furnace door. This element must be installed so that in the future you can load fuel into the stove as conveniently and quickly as possible without spreading garbage from firewood or coal throughout the house. Usually the furnace door is located on the side of the kitchen or some little-visited room.
The finished brick stove will have a fairly impressive weight. In order for the device to stand as reliably and as long as possible, it is necessary to prepare an individual concrete foundation for it.

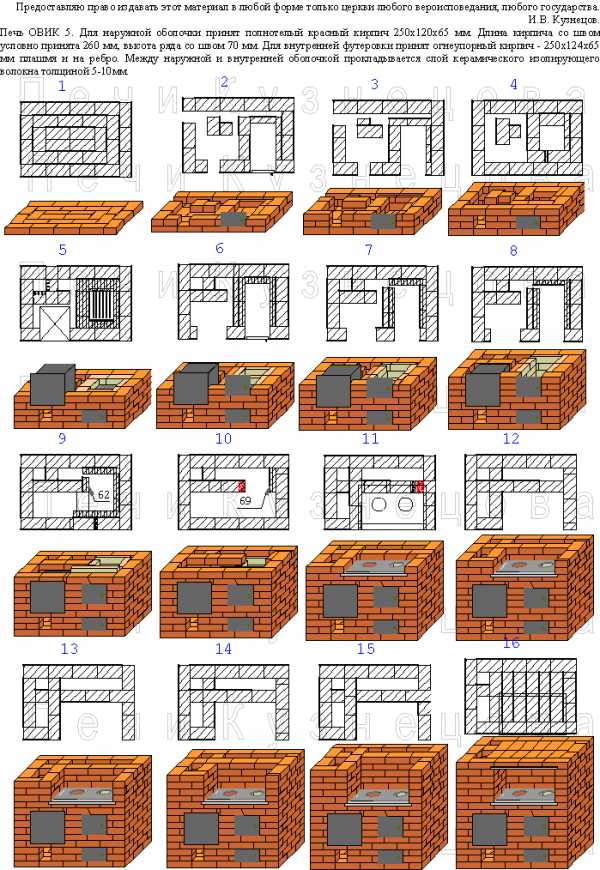


Fireplaces and combined fireplace stoves

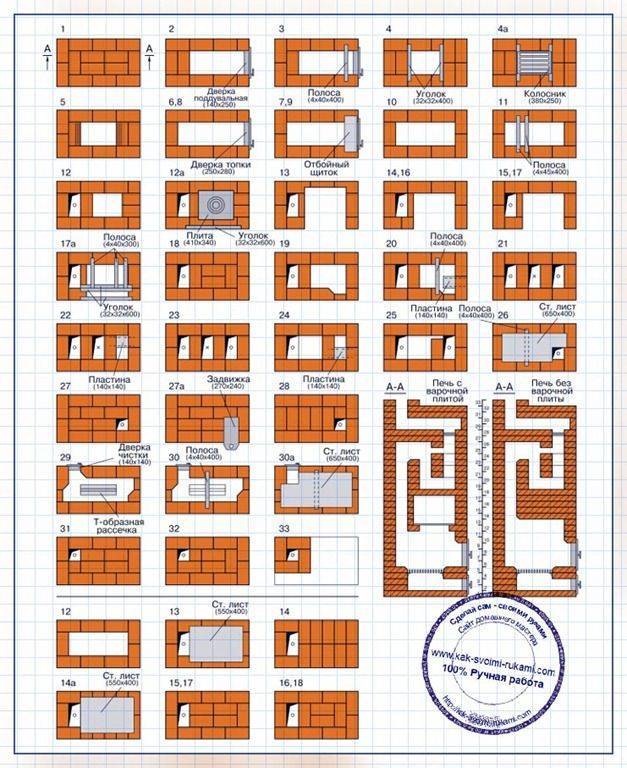
Scheme of the device of the furnace.
If we talk about fireplace stoves, then a certain brick building immediately appears, which serves as an decoration for the apartment. However, a decorative fireplace and a fireplace stove are not the same thing. Considering the devices associated with the word "fireplace", the following varieties can be distinguished: a decorative (artificial) fireplace, a working fireplace and a fireplace stove. An artificial hearth is a design element, not an equipment for heating a living space. A real fireplace consists of a portal, a firebox and a chimney.Putting it together won't be too hard. Depending on the installation method, there are 3 main types:
- Corner fireplace. It is installed in the corner of the room. This arrangement allows you to heat several rooms at once.
- Closed fireplace. It takes up very little space, as it is located in the wall of the house. Installation of the furnace is carried out during the construction of the building.
- Open fireplace. Usually it is arranged in the middle of the room in a large area. In this case, the chimney is suspended using special chain fasteners.
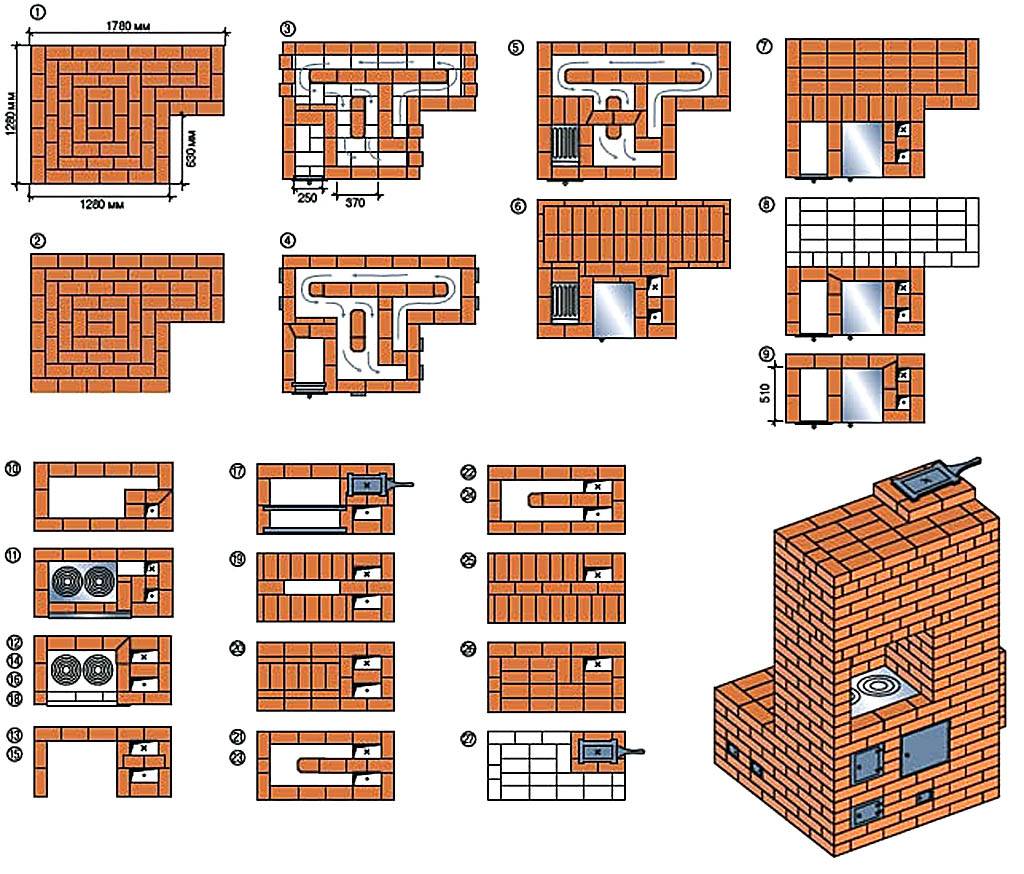
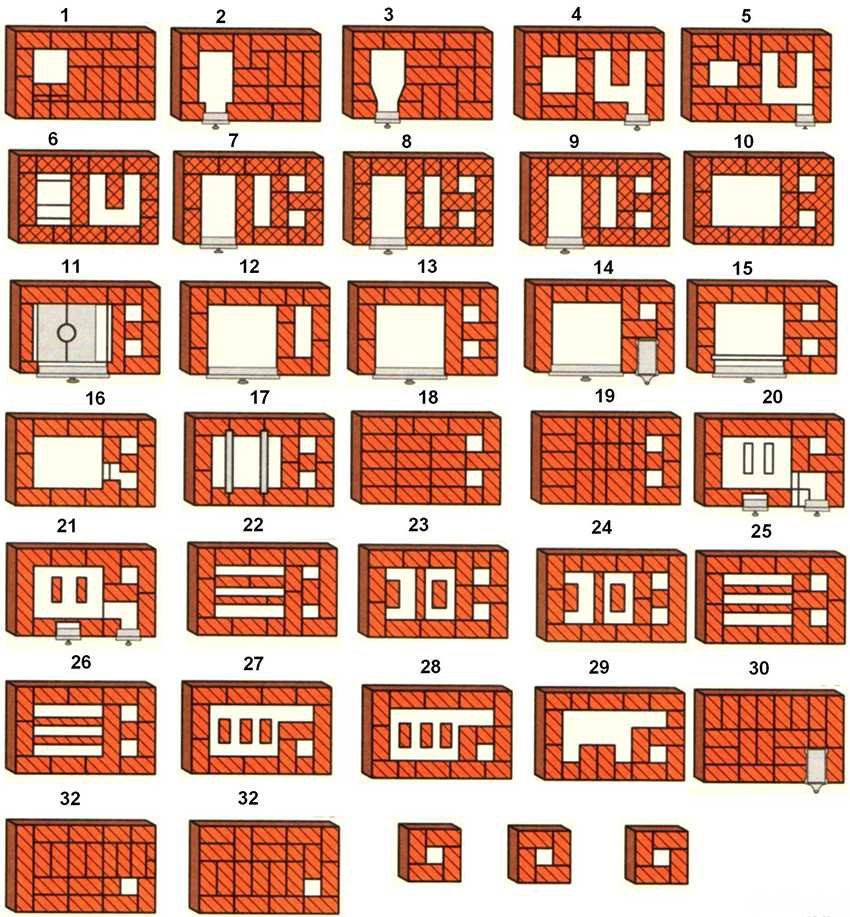
Brick stoves-fireplaces can have various shapes according to the chosen style. The classic version is a U-shaped design with decorative elements. D-shaped building is typical for country style. The hearth of a rectangular or semicircular shape reflects the Art Nouveau style.
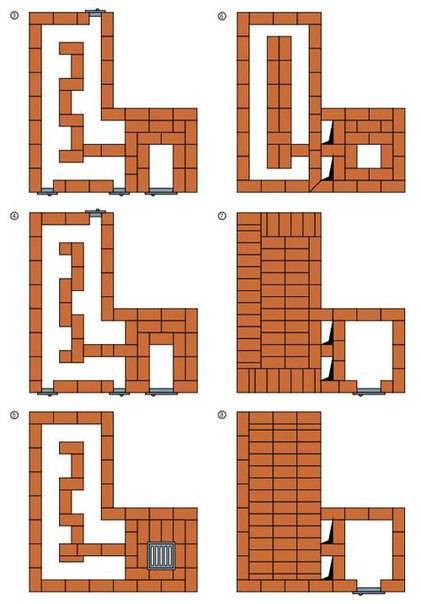
A fireplace stove is a kind of hybrid of a household stove and a fireplace. The device quickly heats up the room and is suitable for cooking any dishes, heating water and food, drying mushrooms and fruits. Masters of furnace art offer a number of different designs that are conveniently placed in a house of any layout (Fig. 6). In inclement weather, a brick stove creates a special comfort in the house.
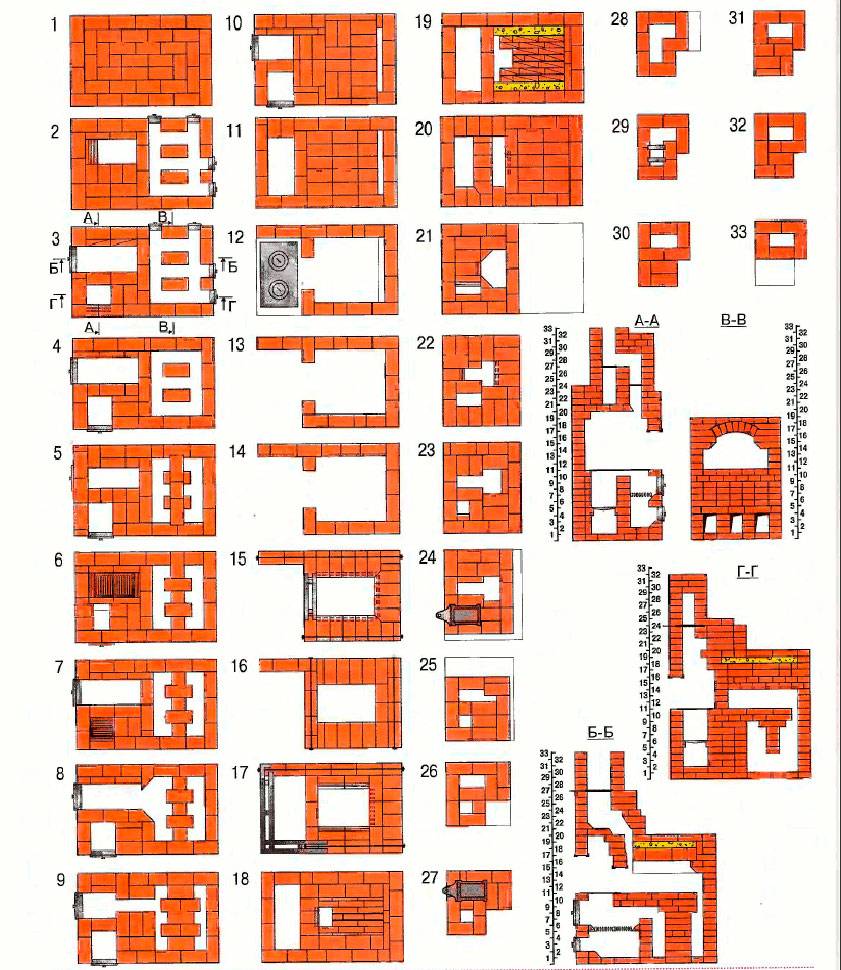
Device elements, drawings
- The mouth is an opening in front of the combustion chamber.
- Crucible - a chamber where fuel (firewood) burns.
- Below is the base of the crucible, fuel is laid there, some dishes are prepared there.
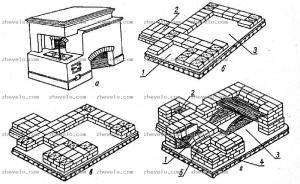
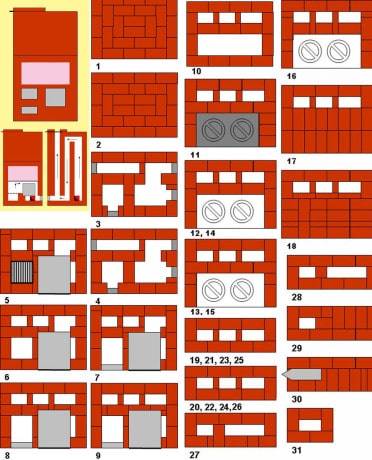
Photo 1. Drawing of a Russian stove with a stove bench and a hob. The device of the stove is clearly shown from different sides.
- The damper is a mandatory element that tightly closes the entrance to the crucible, blocking the flow of air.
- Shestok - a platform in front of the mouth, convenient for placing heavy hot pots taken out of the oven.
- Bed - beds, traditionally located at the height of human growth.
- A chimney is a vertical pipe that carries smoke and hot air outside.
- Gate valve - partially blocks the chimney if necessary, increasing traction.
- The shield is a smoke box leading to the chimney. It is also used to further increase the heat capacity of the furnace.
Photo 2. Drawing of a Russian stove with a brick bench. The device is shown from the side and front, its dimensions are indicated.
To build a traditional version of the stove in compliance with all the rules, you will need the help of a professional stove-maker. Modern models are often built according to simplified schemes, made smaller to facilitate work - this option is available for DIY construction.


