- Do-it-yourself mini-Russian stove: photo
- Russian stove with a do-it-yourself stove bench
- Foundation
- We prepare materials
- List of tools
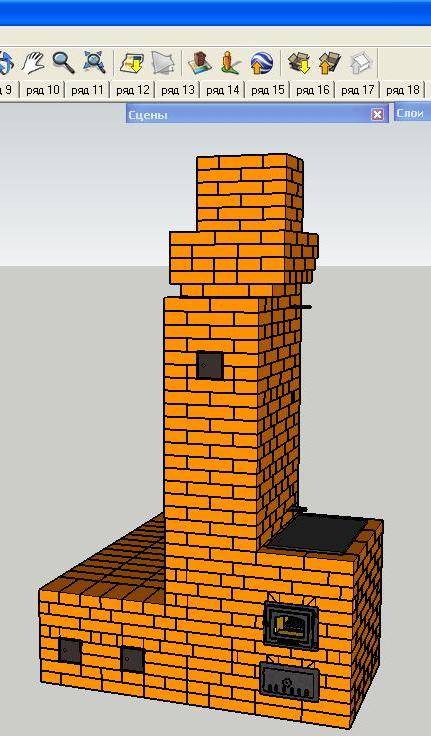
- Project of a standard Russian stove
- Dimensions
- Blueprints
- Description of masonry
- Features of brick wood stoves
- Advantages of bell-type furnaces
- Laying order and ordering
- The device of the Russian stove
- How to choose the location of the furnace?
- Furnace device
- Drying
- What does it consist of
- Traditional Russian ovens
- With a bed
- with stove
- With water box
- Tips for the construction and operation of the furnace
- Procurement of materials
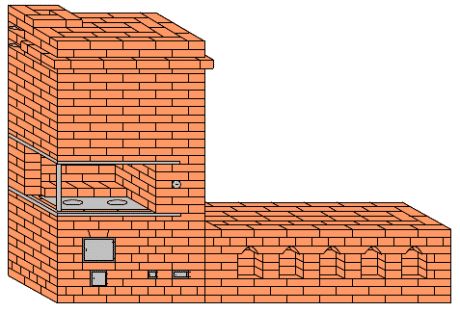
Do-it-yourself mini-Russian stove: photo
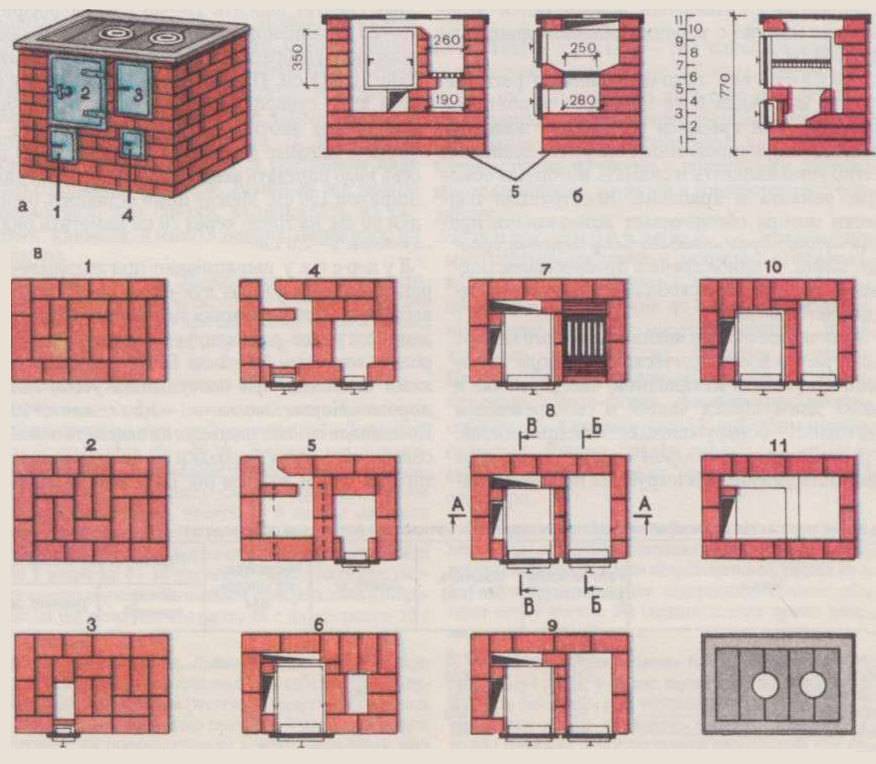
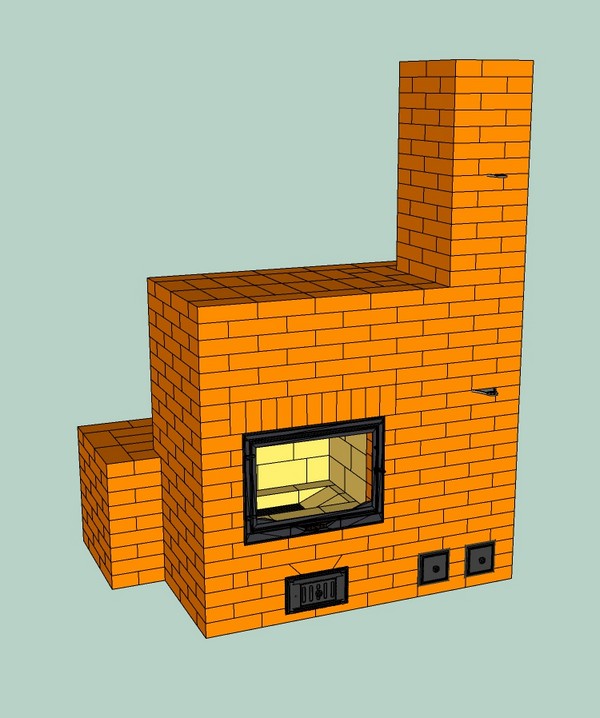
Today, the dimensions of private houses, dachas and cottages do not always make it possible to practically accommodate a standard Russian stove in the kitchen. If there is no room for a sufficiently large structure, then instead of a traditional oven, you can put a “Swede”. Such a stove will take no more than one square meter, and at the same time it will perfectly cope with heating a room measuring 30 square meters. There are several modifications of the "Swede".
The most common options are a mini-oven with a cast-iron hob built into the oven and a full-fledged three-turn oven with a fireplace, hob, oven and a drying niche.
It is quite difficult to build a “Swede” yourself.In order for the building to effectively cope with its cooking and heating functions, only high-quality materials should be chosen for work. Step-by-step instructions and recommendations from experienced stove-makers will help you complete the masonry.
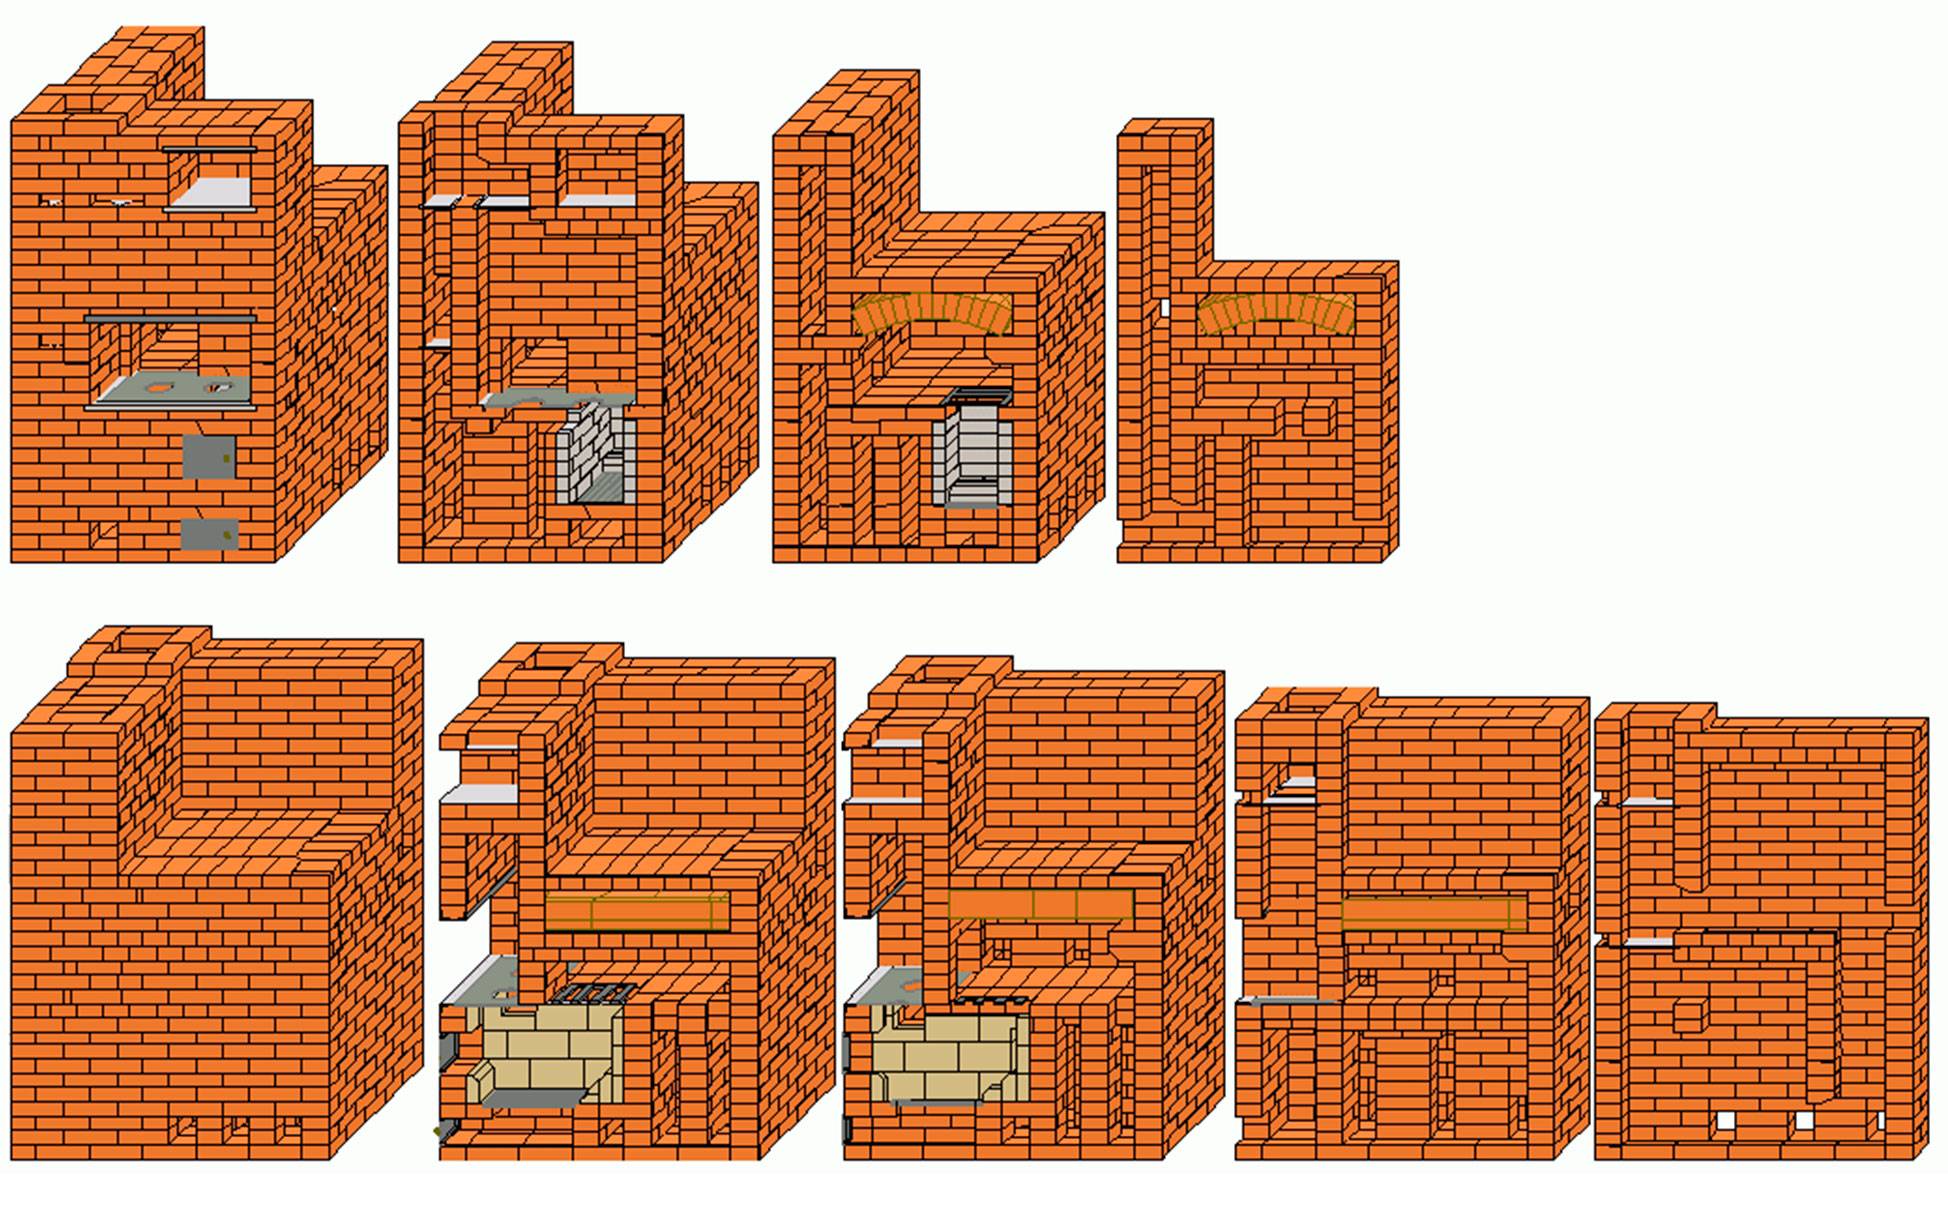
We make the first two rows of masonry solid. At the same time, in the 2nd row we install a grate under the fireplace. In the 3rd row of the furnace we build an ash chamber, a vertical channel and a place for the oven, lay out a fireplace firebox. We put the next row as the 3rd, and in the 5th we equip a place for mounting the grate. We block the passage between the oven and the vertical channel in the 6th row.
At the same time, it should be borne in mind that we always put bricks on edge between the oven and the firebox.
In the 7th row above the firebox we put metal strips (2 pcs.), And we do the 8th and 9th rows in the same way as the previous one. We equip the chimney for cleaning the fireplace together with a place for installing a hob in the 10th row. We form the crucible in the 11th row. The front wall of the fireplace in the 12th and 13th rows is laid out with obliquely cut bricks. In order to make a shelf in the 14th row, we extend the bricks by 2.5 cm. We finish laying the cooking niche in the 16th row, and make the next two rows the same.
We lay out the subsequent rows in the same way, and in the 26th row we connect the vertical channel with the chimney. In the 30th row, we push the bricks from all sides 30 mm outward, and we start laying the pipe from the 32nd row.
Russian stove with a do-it-yourself stove bench
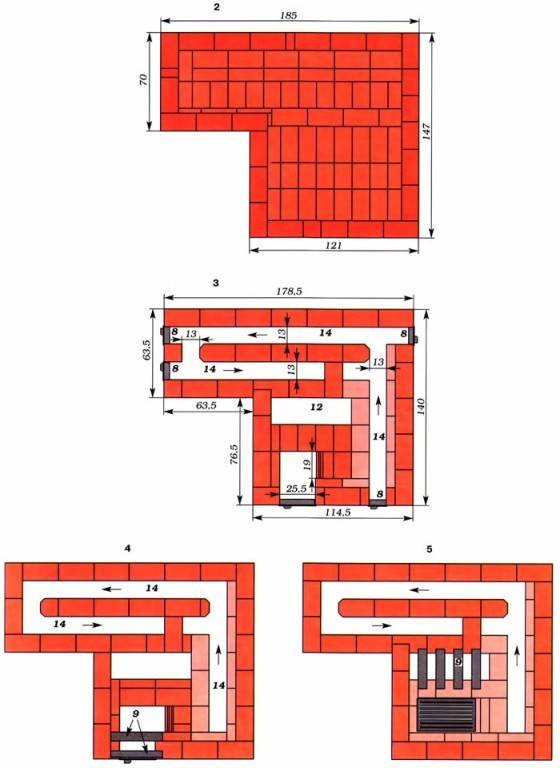
Before engaging in the preparation of materials and tools, we prepare drawings with order. The drawings should reflect the number of bricks, fittings, dimensions.
Foundation
Foundation options:
- rubble concrete;
- brick;
- reinforced concrete from blocks 40x20x20;
- monolithic reinforced - the most common and simple.
1. We dig a foundation pit. The size of the foundation is equal to the size of the base of the furnace, plus 15-20 cm.
2. Lay the filter pad. We lay wet sand on the bottom of the pit. We tamp it until it stops settling, periodically pouring a new portion.
3. We lay gravel on a layer of sand, medium-sized pieces of broken bricks, again a thin layer of sand, moisten, tamp. Next, we pour another layer of rubble about ten centimeters thick, we tamp it down.


4. We cover the rubble with two sheets of waterproofing.
5. Install the formwork. To do this, we install boards or plywood in the pit. At the same time, we leave a distance of 10 cm between the walls of the pit and the “box”. We insure the boards with supports and strongly moisten them so that the wood does not draw moisture out of the solution.
6. To lay the reinforcement, pour 4-5 cm of cement mortar into the formwork. While the cement sets, we tie the metal rods with wire strictly perpendicular. The distance from the ends of the rods to the formwork is 1-2 cm.

7. We knead a solution of cement (1 part), sand (3 parts) and crushed stone (5 parts). The solution is poured in layers of 20 cm. We tamp each of them using a vibropress or a manual tamper.
8. When the solution sets, cover it with waterproofing (tarpaulin, roofing felt, etc.).
We prepare materials
In order to build a classic stove, you will need: about eighty buckets of cement, the corresponding amount of fine sand, clay, 1700 bricks, a view with a half-door and a valve (the hole inside is 26x24 cm).
List of tools
For the convenience of doing work when laying a Russian stove with your own hands, you need to prepare working and measuring tools in advance. A set of working tools should consist of:
- bayonet shovel;
- containers for the preparation of masonry mixture. It should be wide enough and have low sides;
- a shovel and two metal sieves with mesh sizes of 2x2 and 1x1 mm. With this tool, clay and sand are sown;
- trowels - a special trowel, which is used to take the mortar and distribute it over the masonry elements, and also remove excess mixture that protrudes beyond the seam;
- hammers - picks. They can divide a whole brick into several parts and trim the resulting surfaces;
- jointing, which contributes to the sealing of masonry joints and giving them the desired shape;
- scrapers - a rubber plate with a handle. It cleans the inner surfaces of the masonry from excess mixture and seals the seams in hard-to-reach places;
- saws - grinders. It can be more accurately cut and fit bricks for laying curved structural elements;
- rules - to align the upper plane of the foundation.
The control of the verticality and horizontality of masonry joints, the geometric parameters of the entire furnace structure is carried out using:
- bubble level;
- plumb;
- square;
- roulette.
Project of a standard Russian stove
Do-it-yourself ordering drawings for a Russian stove and a description of the masonry are a necessary part of future work
It is important to understand that the device of even a typical oven was born as a result of the experience of generations of craftsmen. Not all the subtleties and nuances of the future hearth will be clear to the beginner
Therefore, making changes to the instructions that are not provided for by the project is an unreasonable step.Deviation from the drawing may result in the already erected furnace cracking during kindling or not providing traction. Then the work will have to be redone completely.
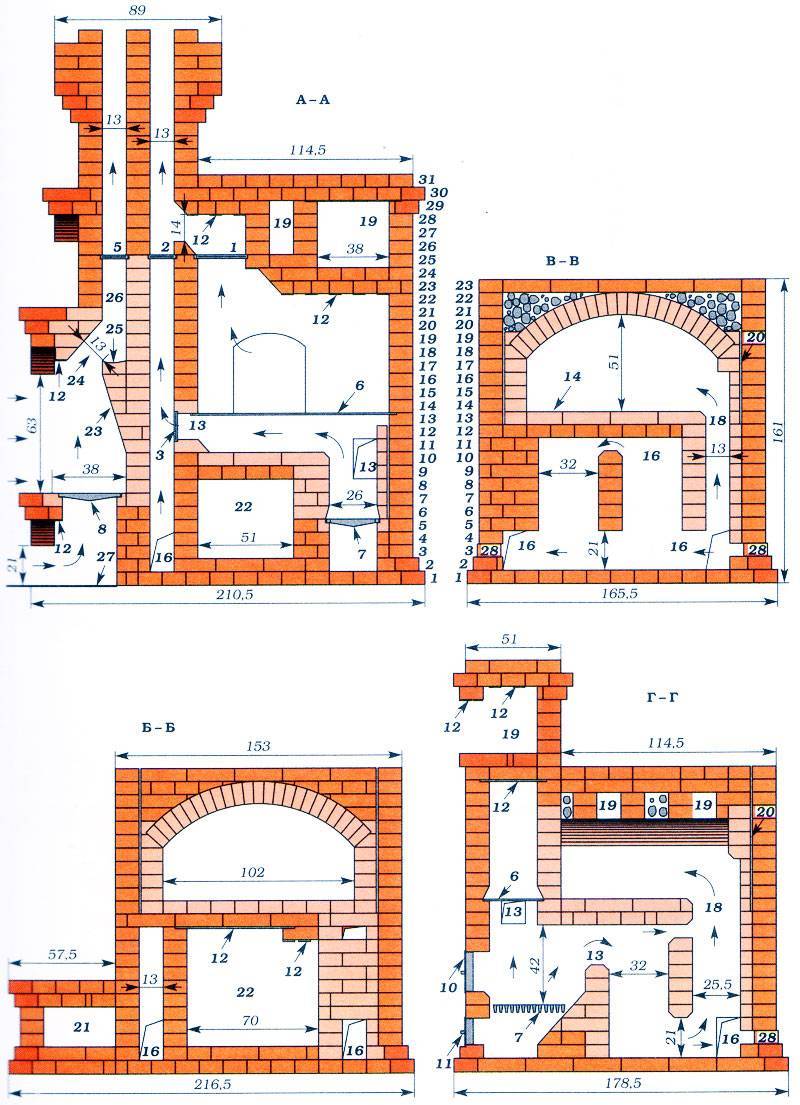
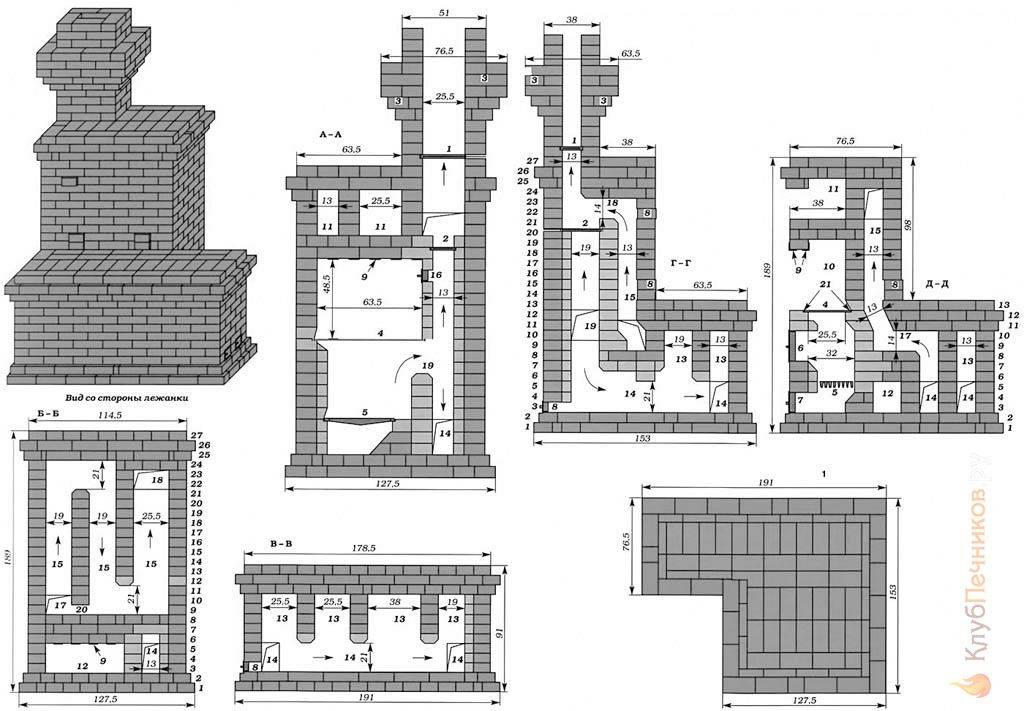
Dimensions
The classic scheme of laying a Russian stove for a house assumes the dimensions of the unit itself in terms of 1270x1660 mm. The foundation is wider by 10-15 cm. The height of the facade is 2380 mm, the level of the couch is 1540 mm. The main masonry of such a furnace, excluding the chimney, consists of 32 rows of bricks.
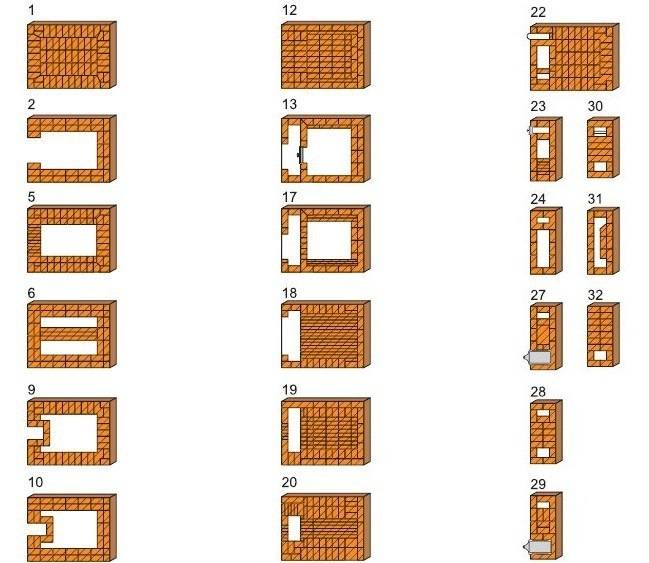
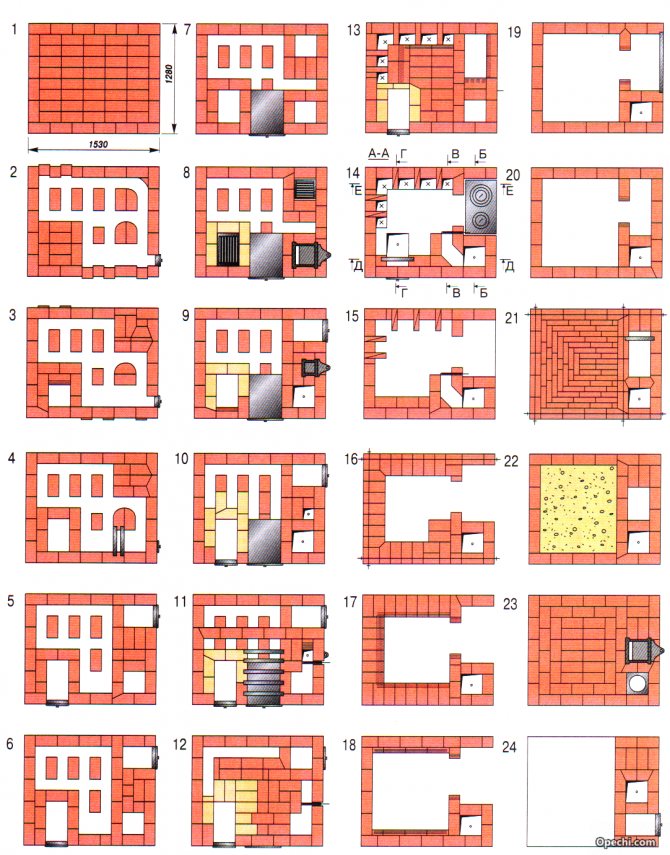
Blueprints
The layout of the masonry with a decoding for each row and cross sections showing the internal structure of the unit is shown in the figure.
Scheme of laying the furnace with decoding for each row and cross sections
Description of masonry
The design of the furnace must be completely sealed, otherwise there is a danger of being poisoned by combustion products. Therefore, only whole bricks are used in the work and the seams are carefully filled with mortar. Internal coating of the seam with clay is not recommended due to the deterioration of heat transfer and the accumulation of soot on the surfaces.


Features of brick wood stoves
Heating in our homes runs on natural gas, as gasification is gradually making its way even to the most remote and deaf regions of Russia. But there are settlements in our country where there is still no gas - here people use alternative heat sources. This occurs even in gasified settlements, when people simply do not have enough money to connect to the main.
The fuel consumption of a wood burning stove is quite high. You will need to take care of its timely and voluminous replenishment.
The main alternative fuel for home heating is the most ordinary firewood. They are equipped with compact purchased stoves, home-made units of all formats and sizes, fireplaces, as well as solid fuel boilers. One truckload of firewood is enough for the whole winter, and more than enough. But some people give their preference to traditional wood-fired brick stoves - a kind of massive heating units that delight with pleasant warmth.
Wood-burning brick stoves are good because they create real comfort in households. Perhaps no other heating units are capable of this. It is not for nothing that a special spirit of comfort reigns in old Russian huts and old houses, and an impressive wood-burning stove becomes the central part of the whole dwelling. And today, some people are happy to return to heating with wood stoves.
brick ovens, wood-burning, are used:
- For heating private households - this is an excellent alternative to classical heating;
- For heating temporary suburban housing - for example, you can lay out a heating brick stove for a summer residence in which there is no gas;
- For kindling baths - a stone sauna stove will become a more pleasant and cozy alternative to infrared and electric units;
- As a home decoration - lovers of antiquity will certainly like a beautifully folded Russian stove;
- For cooking - a brick oven with a wood-burning stove will allow you to try out dishes that you cannot cook in an ordinary city apartment or on a conventional gas oven.
A brick oven in the house will become a luxury item and will certainly attract the attention of guests. And on cold winter evenings, she will gather household members around her.Culinary lovers will be able to cook old Russian dishes in a massive stove using no less old cast-iron pots and soft wood-burning heat.
In other words, this is a great thing for those who understand what it is about.
Culinary lovers will be able to cook old Russian dishes in a massive stove using no less old cast-iron pots and soft wood-burning heat. In other words, this is a great thing for those who understand what its essence is.
If you build a stove in your house with your own hands, then you will have at your disposal a unique source of heat. Moreover, its heat is surprisingly soft, not like other heating units. The stove creates an incomparable comfort in the house, making you remember the good old days when it was in almost every home. Yes, it melts for a long time and requires special attention, but there is something attractive and magical in it, which modern boilers and radiators do not have.
The main features of wood-burning brick ovens:
When heated, the microporous body of the furnace emits moisture vapor into the air of the heated room, and when it cools, it absorbs them.
- They can be used not only for heating, but also for many other purposes - for example, for cooking;
- Only firewood is used as fuel - other types of fuel are not suitable;
- In order to make a stove with your own hands, you will need extreme patience - the task is quite laborious.
Making stoves with their own hands, professional stove-makers spend up to several weeks on this. But the results are worth it.
Advantages of bell-type furnaces
- Kuznetsov's stoves are devoid of most of the shortcomings that overshadow the operation of channel stoves, and, in addition to high efficiency, they have a number of advantages:
- bell-type stoves can run on any solid fuel - coal, wood, pellets and briquettes;
- the temperature in the furnace is high, from 600 to 800 degrees, so the fuel burns out completely, leaving a minimum of ash, and the absence of bottlenecks and long channels helps to avoid soot deposition. As a result, the oven rarely needs to be cleaned;
- a “gas view” is formed at the outlet of each hood - streams of warm smoke do not allow a counterflow of cold air to occur, so the stove does not release heat after the firebox even with the damper open;
- for laying bell-type furnaces, a smaller amount of bricks is required due to the free internal space;
- heating modifications of stoves with compact dimensions can heat a large area;
- Using this technology, it is possible to lay stoves for various purposes, with an original shape and design, while minor design changes do not affect the performance and efficiency of the stove.
At first glance, it seems that these stoves are completely devoid of shortcomings, however, when laying them, the following requirements must be observed:
- The masonry is carried out strictly according to the scheme, otherwise the stove may collapse during the firebox.
- The firebox and part of the lower cap, combined with it, are made of fireclay bricks that can withstand high temperatures. The laying of the firebox is carried out using a special solution based on fireclay clay.
- The furnace is made floating, without a rigid connection with the rest of the structural elements. This requirement is due to the different coefficient of linear expansion for fireclay and ceramic bricks.
- The space of 5 mm between the firebox and the walls of the stove is called a dry joint, the remains of the solution are completely removed from it and filled with mineral cardboard gaskets.Some types of ovens require a dry joint to be left unfilled for the unhindered movement of cold air flows.
- When laying the walls of the furnace, to increase strength, every third row is reinforced with masonry mesh.
- The doors of the furnace and ash pan, as well as other cast-iron elements, are installed with a gap of 5 cm with asbestos expansion gaskets.
- The furnace firebox begins after the masonry mortar has completely dried, gradually increasing the temperature regime.
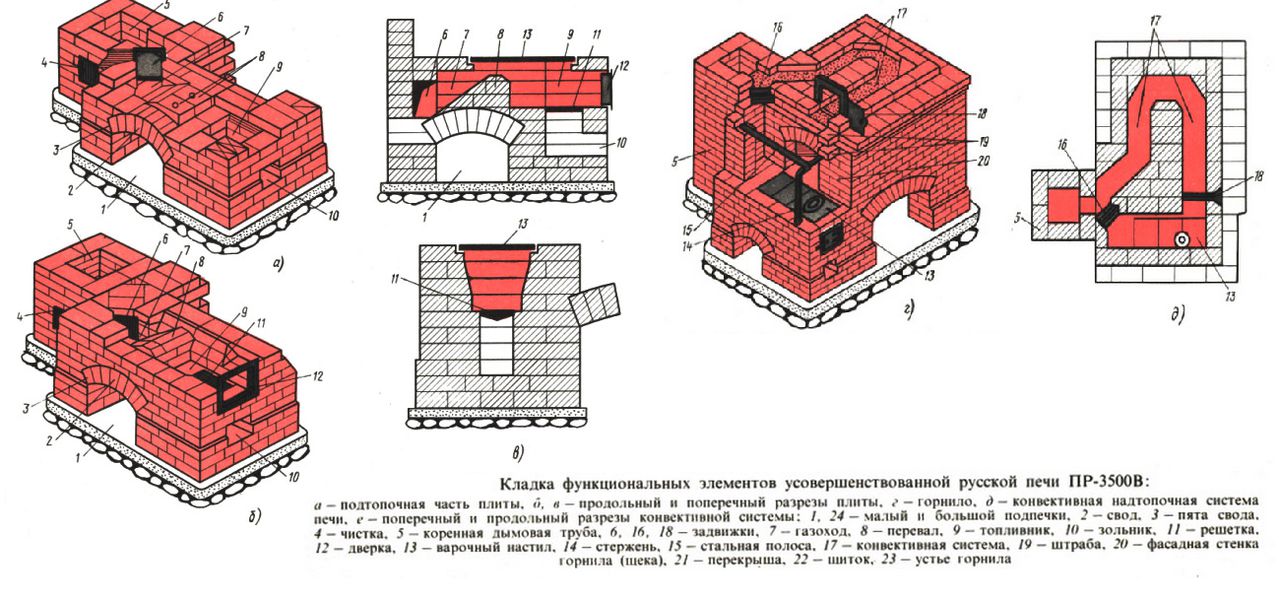
Laying order and ordering
The laying of the Russian stove is performed, taking the order as a basis:
| row number | Ordering the laying of a Russian stove with a firebox |
| 1 | The brick is laid solid: first they form the outer perimeter, and then fill the inner part |
| 2 | They form the bases of cleaning channels, furnace walls, ash pans |
| 3 | The laying of the second row is repeated, with the difference that the seams overlap in whole blocks. The doors of the blower and the cleaning chamber are fixed in the masonry. To do this, use a steel wire, one end of which is attached to the door frames, and the other is laid in the seam between the bricks. |
| 4 | Completely repeats the pattern of the third row (in dressing) |
| 5 | Continuation of the formation of channels, laying the grate and installing the furnace door |
| 6 | Laying the firebox with fireclay bricks and installing a water heater |
| 7,8,9,10 | Repeats the pattern of the sixth row |
| 11 | The furnace firebox is framed with a corner and a hob is mounted |
| 12,13,14 | Formation of the furnace chamber and the base of the chimney |
| 15,16, 17 | Formation of the crucible chamber, extension of the chimney channel |
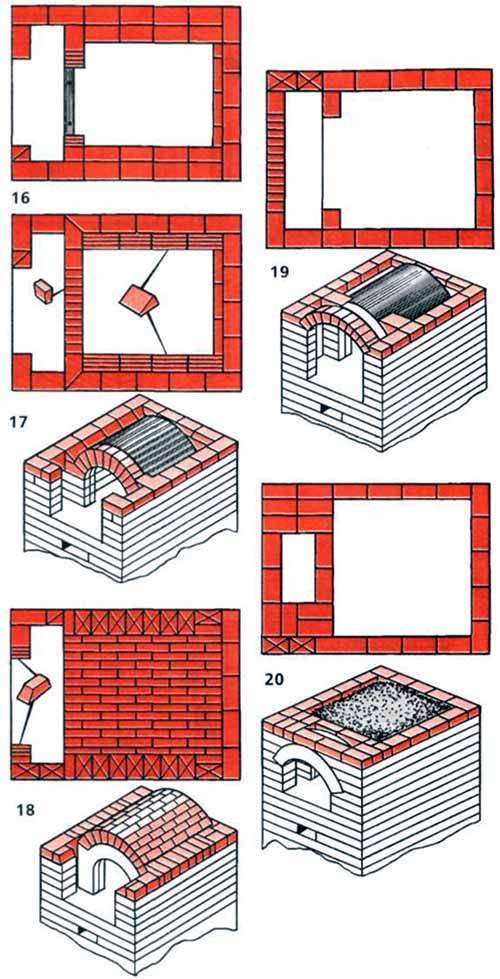
| 18 | Formation of the arched vault of the furnace |
| 19; 20 | Furnace wall extension |
| 21,22 | Formation of the overlap, the beginning of the narrowing of the overtube |
| 23 | A chimney door is installed in the chimney |
| 24 | Mounting the damper for draft adjustment |
| 25,26 | Blocking the space above the damper |
| 27, 28, 29 | Combine the overtube with the chimney channel |
| 30,31,32 | Form the flue duct of the furnace |
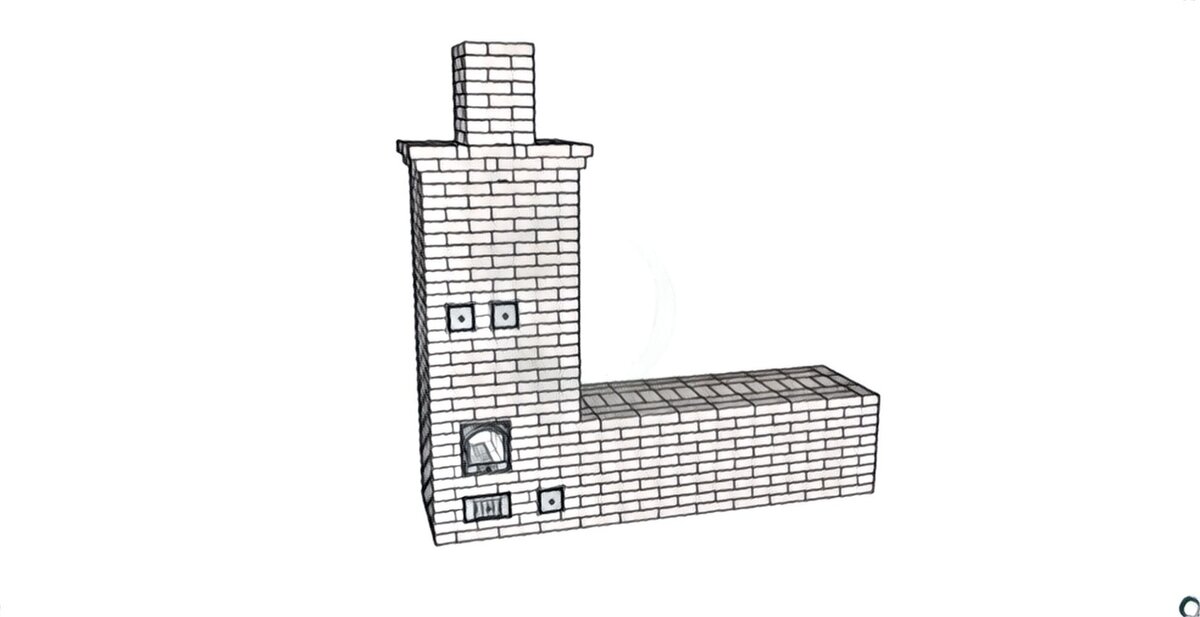
Finished design example
Example 2
The device of the Russian stove
Even in ancient times, when these heat sources were used everywhere, it was difficult to find two identical stoves. One and the same furnace master, taking into account the wishes of the owners of the house, could improve or change his brainchild in every possible way.


However, the principle of action, invented by an unknown master and who came to us from the darkness of centuries, has always been and remains unshakable. The method of burning solid fuel, taking heat and removing flue gases in a Russian stove with a stove bench is the only one of its kind.
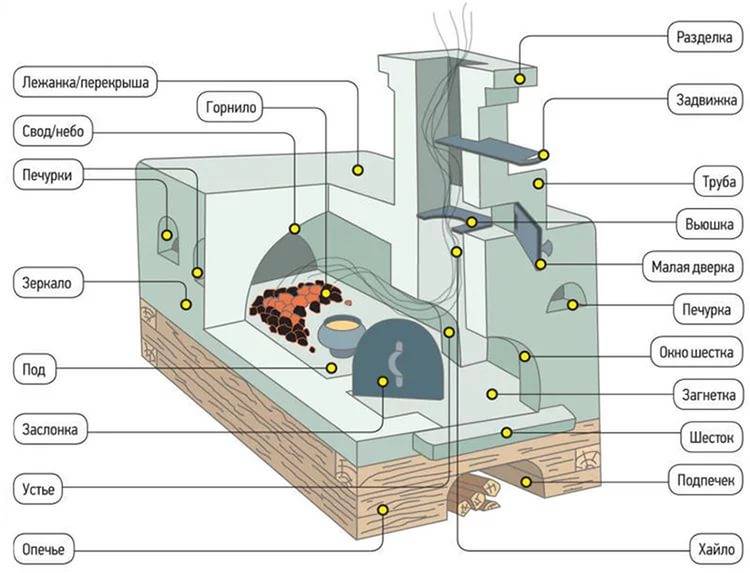
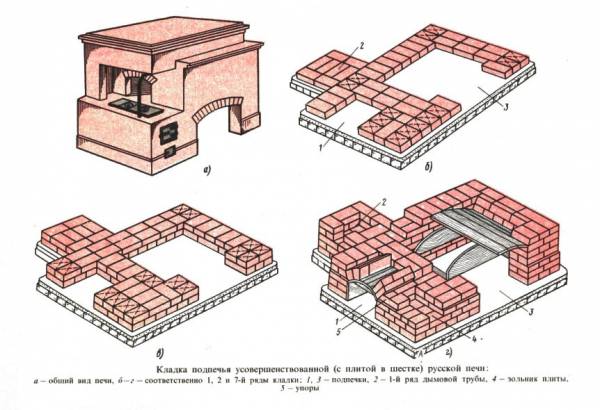
So, in order to understand how this ancient and unique heater functions, you should first study the structure of the Russian stove. Nowadays, there are many designs of furnaces with various modifications and improvements, but they are all based on the traditional design shown in the figure:
The whole structure rests on a foundation, spaced from the nearest wall at a certain distance, as a rule, at least a quarter of an arshin (about 17 cm). The overall dimensions of the furnace were observed as follows:
- width - 2 arshins (142 cm);
- length - 3 arshins (213 cm);
- the height from the floor to the top of the couch is 2.5 arshins (178 cm).
The lower part of the building (guardianship) is hollow from the inside; earlier it was often made of wooden beams, now it is only made of bricks. To access this space from the front side, a special opening is made - the under-heater. Its purpose is to store household equipment or store and dry firewood. Above the stove there is a separate opening - the undercoat.The vault of the guardianship is laid out in the form of a brick arch, which is covered from above with any heat-intensive material, most often with sand.
On top of the backfill, it is laid under the crucible of bricks without the use of mortar. The bottom and vault of the crucible are made with a slight slope (about 50-80 mm for the entire length) towards the entrance to the firebox - the mouth. In the figure, which shows the scheme of the furnace, it is clearly seen that the space above the inclined arch and the walls of the furnace is also covered with sand. Only in some places, at the discretion of the owners, stoves are arranged. These are openings adjacent directly to the crucible through a half-brick wall. Stoves allow you to quickly warm up the room and dry small things.
2 more rows of bricks are placed above the stoves, and then a stove bench is arranged, it is located directly above the furnace. The latter has an outlet to the hearth - the mouth, and the walls on the sides of it are called cheeks. In front of the mouth, above the hearth, there is a hailo - a bell expanding downwards, where smoke goes during work. The chimney itself was built above, a view with a half-door and a valve are installed in it to block the channel.
How to choose the location of the furnace?
It is very important to decide on the choice of the place where the Russian stove will be installed. If its location is in a wooden room, be sure to make the distance between the walls of the stove and the house approximately 20 cm.
It is best to protect wooden walls for safety, using non-combustible material, such as asbestos boards. The gap made will allow for an audit of the walls of the furnace, which is done before the onset of the heating season.
If the stove is installed in an opening between two rooms, then it is lined with brickwork, at least 20 cm thick.Between the masonry and the wooden wall, an asbestos sheet gasket is made.
Furnace device
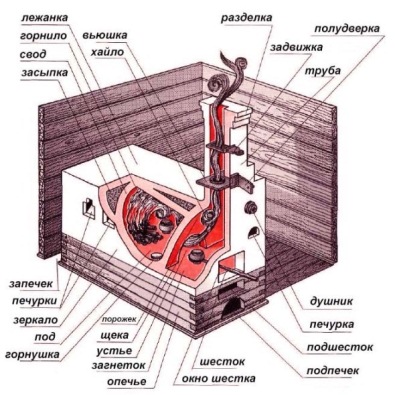
The device of the Russian stove includes a very large number of elements.
We list only the main details of the design:
- Khailo, that is, the mouth of the furnace. This is the sector located above the cooking chamber, which connects the oven with the smoke ducts.
- A gate valve or gate valve is a special element that allows you to regulate the movement of gases through the outlet channels (in more detail: “Why do you need a chimney valve - what is a gate valve, types, installation rules”). A small furnace may have one valve, but there are models with three and four valves.
- Chimney pipe.
- Fluff is a special heat-insulating belt around the chimney, placed at the points where the pipe passes through the ceiling or attic.
- View - a small hatch that allows you to control the draft in the combustion chamber and, if necessary, completely block the chimney.
- Chelo - a section of the facade located above the cooking chamber.
- The damper is a metal cover that closes the entrance to the crucible.
- Shestok - the area above the crucible. In modern ovens, a hob is mounted in this place.
- Box for heating water.
- Columns are brick elements that form treatment channels.
- Borehole - a recess in the cooking chamber, through which gases from the crucible enter the side flue channel.
- A firebox is a chamber in which fuel burns. In a modern Russian oven with a stove, there are 2 such chambers - one under the crucible, and the second - under the hob.
- The grate is an element located at the bottom of the fuel chamber through which air from the blower enters the furnace.
- Under-heater or woodshed - a place for storing and drying fuel (firewood).
- Under - the bottom of the furnace.
- Crucible, that is, in fact, the cooking chamber.
- The sky is the vault of the furnace.
- A lounger is a characteristic element of a Russian stove. It can be quite spacious or small.
Drying
After the Russian oven with do-it-yourself bed finished, the structure should be dried. This is the most difficult stage, requiring attention and compliance with the conditions for preparing the structure for operation.
After finishing work, you should wait for the solution to dry, then light a small fire on the grate, heat it for one and a half to two hours. The appearance of smoke indicates the airing of the chimney. You can remove the cork by kindling a very small fire from the chips on the view.


The procedure is carried out in the evenings for at least a week, when wet stripes disappear on the brickwork and the walls of the structure become uniform in color, the preliminary fire can be stopped. With further operation, microcracks may appear, which must be slightly expanded with a sharp knife and covered with clay mortar.
You can start decorating after the mortar has dried. At first, it should be heated carefully, the logs should be laid out near the mouth, and then pushed into the crucible with the help of a poker. Raw firewood must first be dried, a large amount of fuel is not recommended.
Examples of finished structures in the photo:
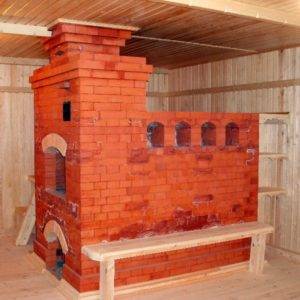
Photo 1
Photo 2
What does it consist of
Before proceeding with the laying of the Russian stove, it is necessary to figure out what it consists of. According to some names, modern man does not understand why they are needed, we tried to figure it out.

- Podpechek is a small niche at the very bottom. Used to dry firewood.
- guardianship.You can call it the foundation. In the old days it was covered with boards. In modern construction, it is made of stone or concrete. Above is under.
- Under is the bottom.
- Six is a small niche in front of the crucible. Traditionally used for cooking and heating food.
- The furnace is the heart of the furnace. This is the place where heat-resistant dishes were placed and food was cooked.
- Zagnetka - a place where burnt coals were raked. It is located on the side of the pole.
- The pole window is a hole located directly above the pole.
- The stove is a recess in the oven. There may be several. Traditionally used to dry small wet items.
- A small door leads to the chimney and is used to clean it.
- Khailo is a smoke passage located between the mouth and the pipe, necessary for the proper circulation of smoke.
- View - it closes the pipes after heating, to preserve heat.
- Gate valve - a metal plate for traction control.
- The pipe is intended for the exit of smoke.
- Cutting is a thickening in the wall of the pipe at the place of its passage through the ceiling, in order to prevent fire.
- Mirror - side wall. Sometimes she goes into the next room for better heating of the house.
- The mouth is the entrance to the crucible, covered with a damper.
- The gate is a metal cover that closes the mouth.
- The vault is a furnace floor, it is made in the form of an arch on the ceiling of the furnace.
- Bed - located above the arch. The warmest and most comfortable place in a Russian hut.
In addition, the furnace can be equipped with a firebox. A separate firebox that allows the furnace to operate in 2 modes - winter and summer.
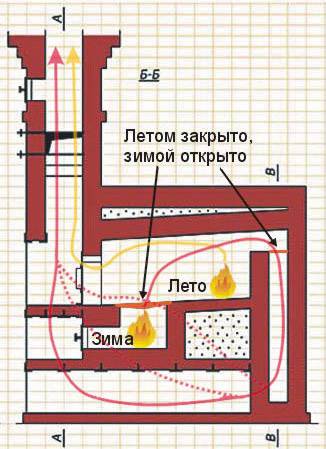
The bottom line is that in the winter mode, the smoke travels a greater distance and gives off heat to the walls of the furnace, thereby it heats up more themselves and heats the room better. In summer mode, the smoke is blown directly into the chimney along the shortest path, thus, it does not get so hot in the house, but you can still cook food. In the figure above, the yellow color indicates the path of smoke from the furnace to the chimney in summer, and the red path from the fire to the chimney in winter.
Traditional Russian ovens
Despite all the variety of devices of Russian stoves, there are several of their main types.
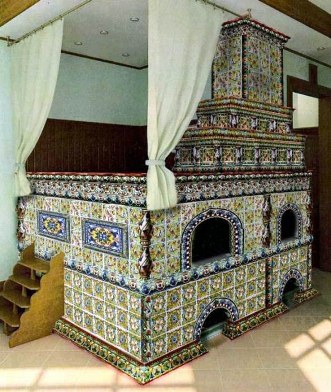
With a bed
In the Russian hut on stoves in the cold season, heated sleeping places were arranged. While the thermal insulation of the walls was not reliable, they tried to make such beds as high as possible, where warm air was collected under the ceiling. On the floor you had to climb a ladder. They accommodated from 2 to 6 people.
Traditional Russian oven with stove bench
Later, the design of the buildings improved. The beds were attached to the stoves on the side, passing inside the smoke channel for heating. The height from the floor did not exceed 0.5 m.


with stove
If a heated bench is not attached to the stove, a cast-iron stove is placed above the firebox. It acts as a cooking surface. Covered burners (usually two) are factory cast in the stove. If necessary, the lid can be removed and installed in the opening of the cauldron with food.
With water box
A heating box for water with a collapsible tap is built directly into the masonry. As an option, a metal riveted or welded case is mounted, where a box with water is inserted.
Tips for the construction and operation of the furnace
- An indispensable element of the Russian stove are dampers that ensure its operation in winter and summer.
- Due to the instability to high temperatures, cement mortars are not used in the furnace masonry. Bricks are placed on a mortar of clay.
- The doors are planted on a wire that is mounted during the brickwork process and wrapped at the ends.
- Under the stove bench, it is precisely the caps that maintain the temperature of the horizontal surface longer. It is created at a height of about 90 cm from the floor.
- In the construction of the Russian stove, only refractory bricks are used, which guarantees its durability and strength.
Procurement of materials
To build a Russian stove with a stove and a stove bench, you need a high-quality solid ceramic brick without chips and cracks. Quantity - at least 2000 pieces, excluding the construction of the pipe, the solution will require about 100 buckets. The quality of the latter should not cause the slightest doubt, therefore it is best to purchase a ready-made building mixture in a distribution network, clay from the nearest ravine is definitely not suitable. In addition, the following elements and accessories are needed:
- cast iron stove for 2 burners;
- firebox door 140 x 250 mm;
- blower door 130 x 130 mm;
- grate 260 x 280 mm;
- gate valve with a hole 260 x 240 mm - 2 pcs;
- view with a hole of 220 mm;
- steel water tank 400 x 260 x 280 mm;
- corner, strip and roofing steel.


