- Foundation for the Russian stove
- Do-it-yourself ovens: diagrams and drawings
- Characteristic features of the stove
- What is the oven made of?
- Pros and cons
- Do-it-yourself modern Russian stove: recommendations
- Drying
- Preliminary work
- Masonry mortar
- Foundation manufacturing
- Modern warm beds
- The device of the Russian stove
- Russian oven masonry: technology and construction tips
- Do-it-yourself oven with a stove bench: drawings and videos
- Formation process
- Foundation and base
- Basic structural elements
- Shutdown
- We lay out the design for cooking
- A few nuances when choosing a material
- Construction
- Choosing a project from which you can build a stove
- Building a Russian stove with a stove bench with your own hands
- Masonry scheme
- Step-by-step instruction
- How much does it cost to build a Russian stove with a brick bench
- Conclusions and useful video on the topic
Foundation for the Russian stove
Since the furnace is a massive and heavy structure, it needs a separate foundation. Therefore, it will be problematic to start building a furnace in an already erected house - this should be thought about in advance.
An ideal option in terms of reliability would be a slab monolithic foundation made of reinforced concrete. The sole of the furnace foundation is not connected with the foundation of the house and is an independent structure. Its construction is carried out according to standard technology. Cutoff, i.e.the protrusion formed by the upper edge of the foundation and the first row of masonry must be at least 50 cm. Before the start of masonry, waterproofing is laid on the foundation - roofing material, folded in two layers.
Most often, the furnace is located near the inner wall, which has a shallow foundation. In this case, its sole should be flush with the sole of the furnace base. To ensure the independence of the foundations, a gap of at least 5 cm is left between them, into which sand is poured. The upper edge of the furnace foundation does not reach the level of the finished floor by 14 cm.

In cases where the furnace is placed against the outer wall, under which there is a buried strip foundation, its foundation pit is expanded and sand and gravel backfilling is carried out with careful layer-by-layer tamping. After that, a slab foundation of the furnace is arranged with a gap of 5 cm from the base of the house - a retreat, while the depth of the sole of the furnace foundation is at least 50 cm. Sand is poured into the retreat, and its end walls are formed by brickwork.
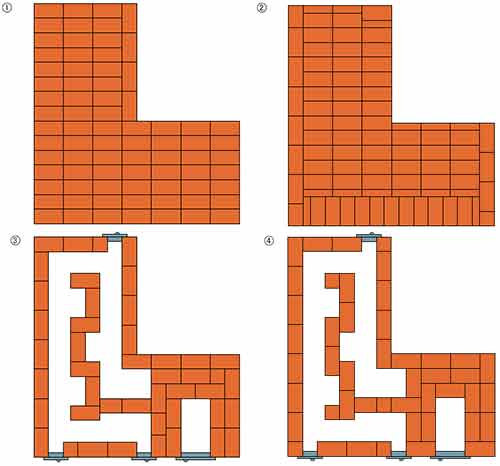
Do-it-yourself ovens: diagrams and drawings
The construction of any furnace begins with drawing up a detailed layout and appearance of the structure. Ordering drawings (ordering is an exact description of the placement of bricks in each row of masonry) can be found on the net. But before that, you should decide on the type and size of the structure, its location in the house.
In addition, one should not forget about ceilings: the stove should be positioned so that its pipe does not fall on the beams. The size and type of construction largely depend on the area of \u200b\u200bthe house. Almost any furnace project can be reworked to fit your needs. In this case, the structure of the furnace will be the same.
So, Russian stove of any kind comprises:
- Foundations (in the form of a separate foundation);
- Ash pan, which will provide air flow to the combustion chamber and accumulate ash;
- Firebox with a door for loading firewood;
- The chimney, which is responsible for the removal of combustion products (one of the main roles here is played by a metal damper that will block the hole between the chimney and the crucible);
- Smoke circuits - channels that connect the firebox to the chimney.
Characteristic features of the stove
The design was invented by the inhabitants of the Scandinavian countries more than a hundred years ago, but even today they do not stop using it.
The stove is most often placed in the walls. She has:
- equipped cooking surface;
- one or two ovens;
- heated bed.
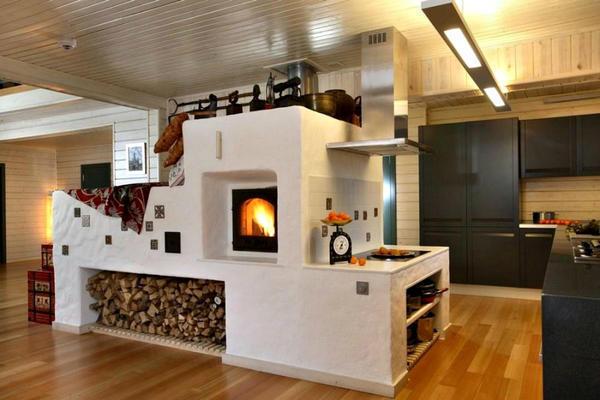
A stove with a stove bench is best placed between the living quarters and the kitchen. Most often, the area of \u200b\u200bthe kitchen does not allow you to fully make the stove, so there are only an oven and a hob (HP) in it. But the kitchen does not lose anything from this, because when cooking, the Swede manages to warm it up.
 Swede with a bed
What is the oven made of?
The Swede is not in vain considered compact. From the furnace to the chimney, gases move through the channel chimney. Heat exchange takes place in the hoods.
The design features of the Swedish include:
- Large oven. It is better to make it from cast iron. The oven is designed more for heating the room, but you can bake bread in it. Since the stove has a hood, during the chemical pyrolysis of firewood, thermal energy is released in a large volume. She immediately approaches the walls of the oven, located nearby. With the oven doors wide open, after five minutes you will feel a strong hot stream coming from below.
- An upper niche where you can dry winter shoes and clothes.Completely wet clothes will dry in five hours. It is heated by the first and secondary heat, so it remains warm even after the fire is stopped.
- Bottom niche. It is a recess directly on the hob. Kind of a thermos. You can put a hot supper here and it won't get cold until morning.
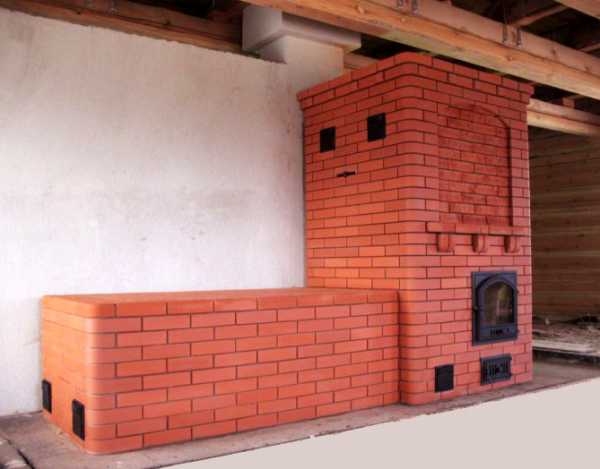
The back of the stove is located in the adjoining room. You can attach a fireplace or a stove bench to it. The traditional size of the couch is 180 centimeters long and 65-70 centimeters wide.
Pros and cons
The list of advantages of the stove is presented:
- small size;
- multifunctionality: the stove is suitable for cooking, heating the house and for drying wet things;
- high heat transfer coefficient and efficiency;
- the ability to attach additional elements (couch);
- simple masonry: you just need to follow the step-by-step instructions;
- high aesthetics: the stove can decorate any interior;
- the presence of summer and winter regime;
- fast heating;
- the ability to process any solid heating material;
- no need for frequent maintenance: with proper operation, the stove does not cause any trouble.
The disadvantages of the plate include:
- when working, only high-quality materials should be used;
- only chamotte clay is suitable for masonry;
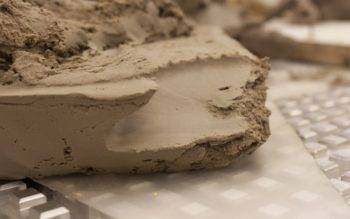 Chamotte clay
- the door of the combustion chamber (TC) must be made only from cast iron, since other material will not withstand strong thermal loads;
- not suitable only for seasonal use: if the stove is rarely used, it will begin to dampen and collapse.
But if you use it constantly, then you will not find a more successful heating system.
Do-it-yourself modern Russian stove: recommendations
In order for the stove to come out reliable, attractive and serve the owners for a long time, it is important not only to follow the instructions for laying the rows, but also to know some tricks that experienced stove-makers use in their work
So that the masonry comes out strong and reliable, and the stove is efficient and safe, it is necessary:
- Select high-quality brick without chips and cracks, which, before laying, must be soaked.
- At the installation sites of cast elements, a technological gap should be left between the brick and the plates to expand the metal.
- Every 5-8 rows make a fire cut in half a brick. If there is not enough space for a brick, then materials with low thermal conductivity (vermiculite, supersil, calcium silicate) should be chosen for cutting.
- Seams in masonry should be no thicker than 7 mm.
- To organize the firebox, it is better to use refractory fireclay (yellow) bricks that can withstand temperatures up to 1600 ° C.
Before you start laying the stove yourself, professionals advise you to study the relevant literature, if possible, then watch the work of the stove. Preparation for work should be approached responsibly and thoroughly, because an improperly folded stove can cause fire hazards, endanger the life and health of all residents of the house.


Drying
After the Russian stove with a do-it-yourself stove bench is finished, the structure should be dried. This is the most difficult stage, requiring attention and compliance with the conditions for preparing the structure for operation.
After finishing work, you should wait for the solution to dry, then light a small fire on the grate, heat it for one and a half to two hours.The appearance of smoke indicates the airing of the chimney. You can remove the cork by kindling a very small fire from the chips on the view.
The procedure is carried out in the evenings for at least a week, when wet stripes disappear on the brickwork and the walls of the structure become uniform in color, the preliminary fire can be stopped. With further operation, microcracks may appear, which must be slightly expanded with a sharp knife and covered with clay mortar.
You can start decorating after the mortar has dried. At first, it should be heated carefully, the logs should be laid out near the mouth, and then pushed into the crucible with the help of a poker. Raw firewood must first be dried, a large amount of fuel is not recommended.
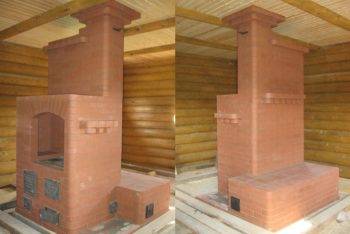
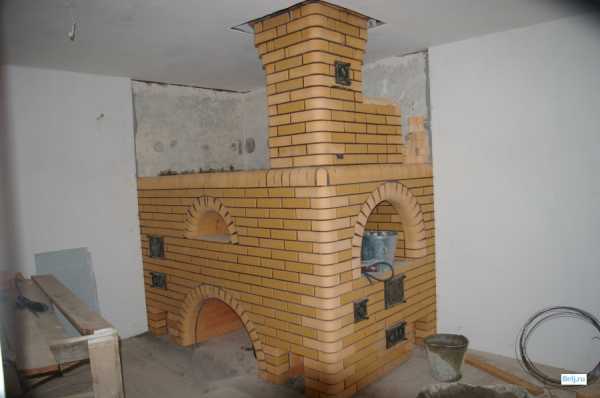
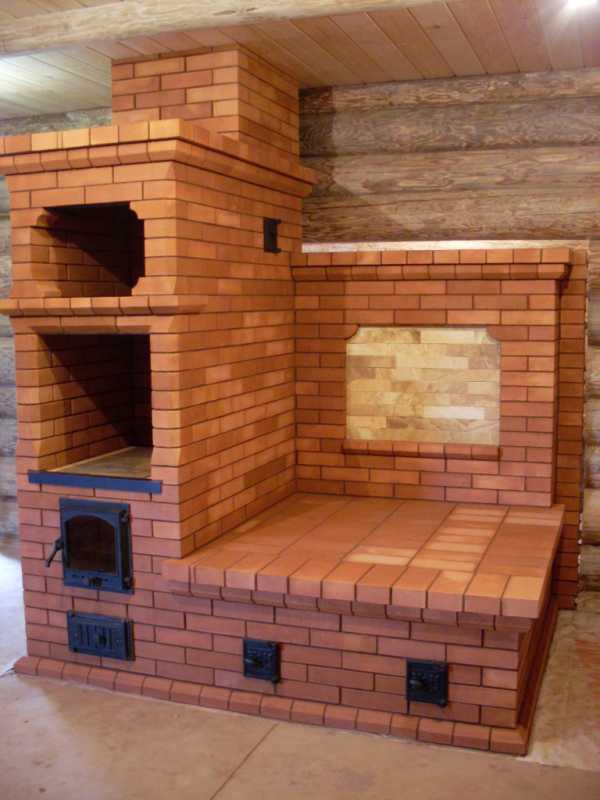
Examples of finished structures in the photo:
Photo 1
Photo 2
Preliminary work
Masonry mortar
The process of preparing a mortar for laying a furnace is much more complicated than a conventional cement-sand composition. Fatty clay acts as the main component in it. First of all, it is cleaned of large foreign inclusions. Then soak for at least 24 hours. When the clay particles swell, it is rubbed through a metal sieve.
Another component is washed river sand, which is preferably calcined before being added to the mixture.
On average, for 2 parts of clay, you need to measure 1 part of sand, but the percentage of fat in clay is always different, so it is better to determine the correct proportions empirically. To do this, in three small jars, a solution is kneaded with a different amount of components and rolled into cakes.

Comparison of solutions
After 3 days, they look at which of the samples had fewer cracks - this means that the entire masonry mixture must be kneaded in these proportions.
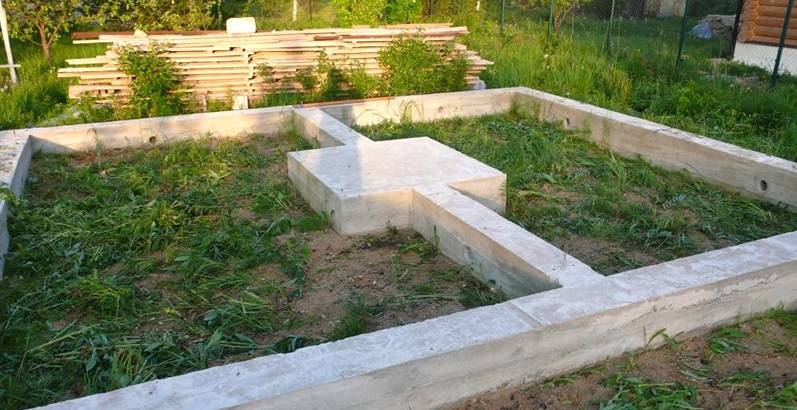
Foundation manufacturing
Such a massive structure, like a Russian stove with a bench and a stove, should have a reliable support under it, not connected with the foundation of the main building. Therefore, it is much more difficult to install the device in an already built house than at the stage of its laying.
The most reliable support for a Russian stove is a monolithic reinforced concrete slab. It is built according to standard technology. The level of penetration of its sole should correspond to the level of occurrence of the sole of the foundation of the inner wall, near which the device is installed.
Between the walls of these structures there should be a gap of 5 cm, which is filled with sand. The upper plane of the slab should be 15 cm below the floor level. If a place is chosen for the construction of the Russian stove near the outer wall, under which there is a deeper foundation, then the foundation structure for the stove should be expanded.

Foundation scheme
The process of making the foundation itself is as follows:
Modern warm beds
A heating stove with a stove bench in those days was considered truly royal. Not surprising, because it allowed to simultaneously solve many issues in the household. Today you can even find a fireplace stove with a stove bench.


Now, when high technologies are being introduced into our lives everywhere, many no longer think of it without computers, telephones, refrigerators and televisions, but the Russian stove has not lost its relevance.
The thing is that brickwork accumulates heat well, and then gives it evenly for a long time. It is safe to say that the Russian stove surpasses any modern design in this indicator.
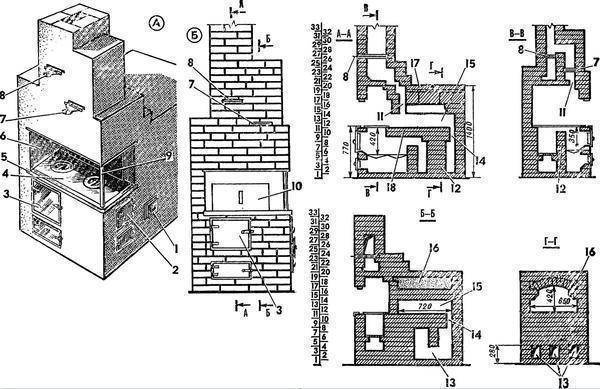
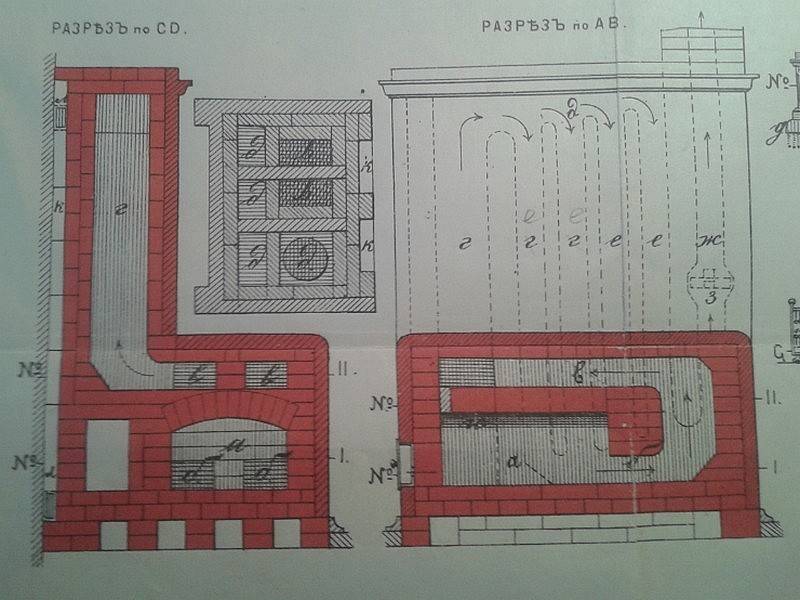
The device of the Russian stove
Even in ancient times, when these heat sources were used everywhere, it was difficult to find two identical stoves. One and the same furnace master, taking into account the wishes of the owners of the house, could improve or change his brainchild in every possible way.
However, the principle of action, invented by an unknown master and who came to us from the darkness of centuries, has always been and remains unshakable. The method of burning solid fuel, taking heat and removing flue gases in a Russian stove with a stove bench is the only one of its kind.
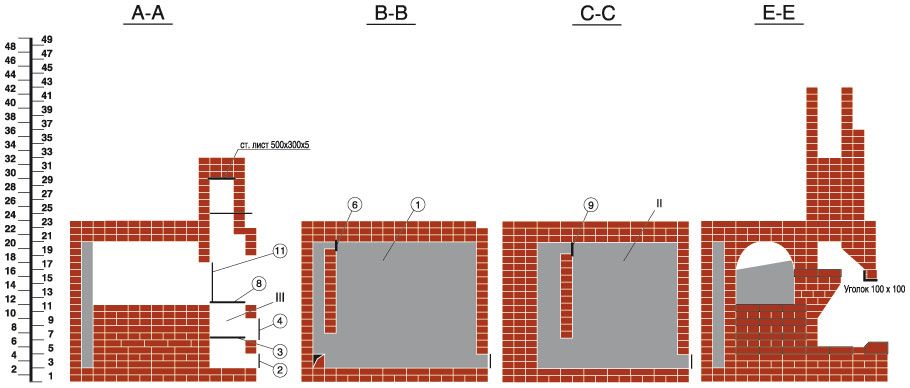
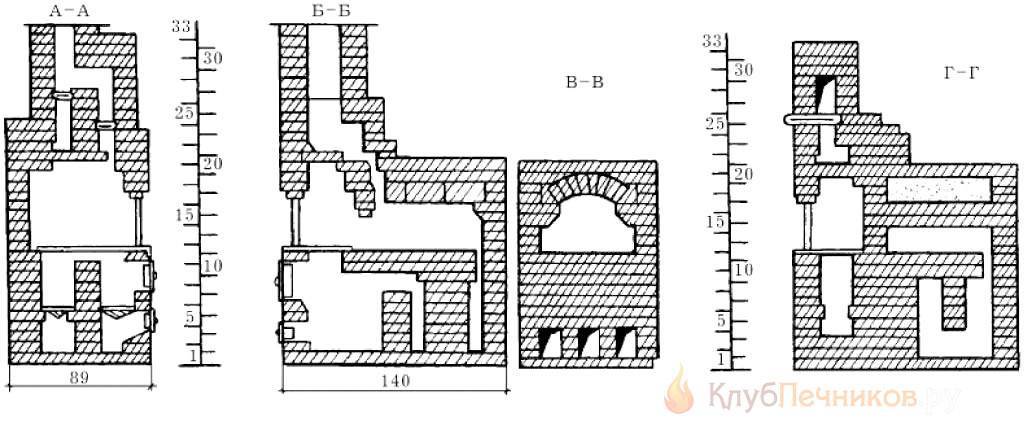
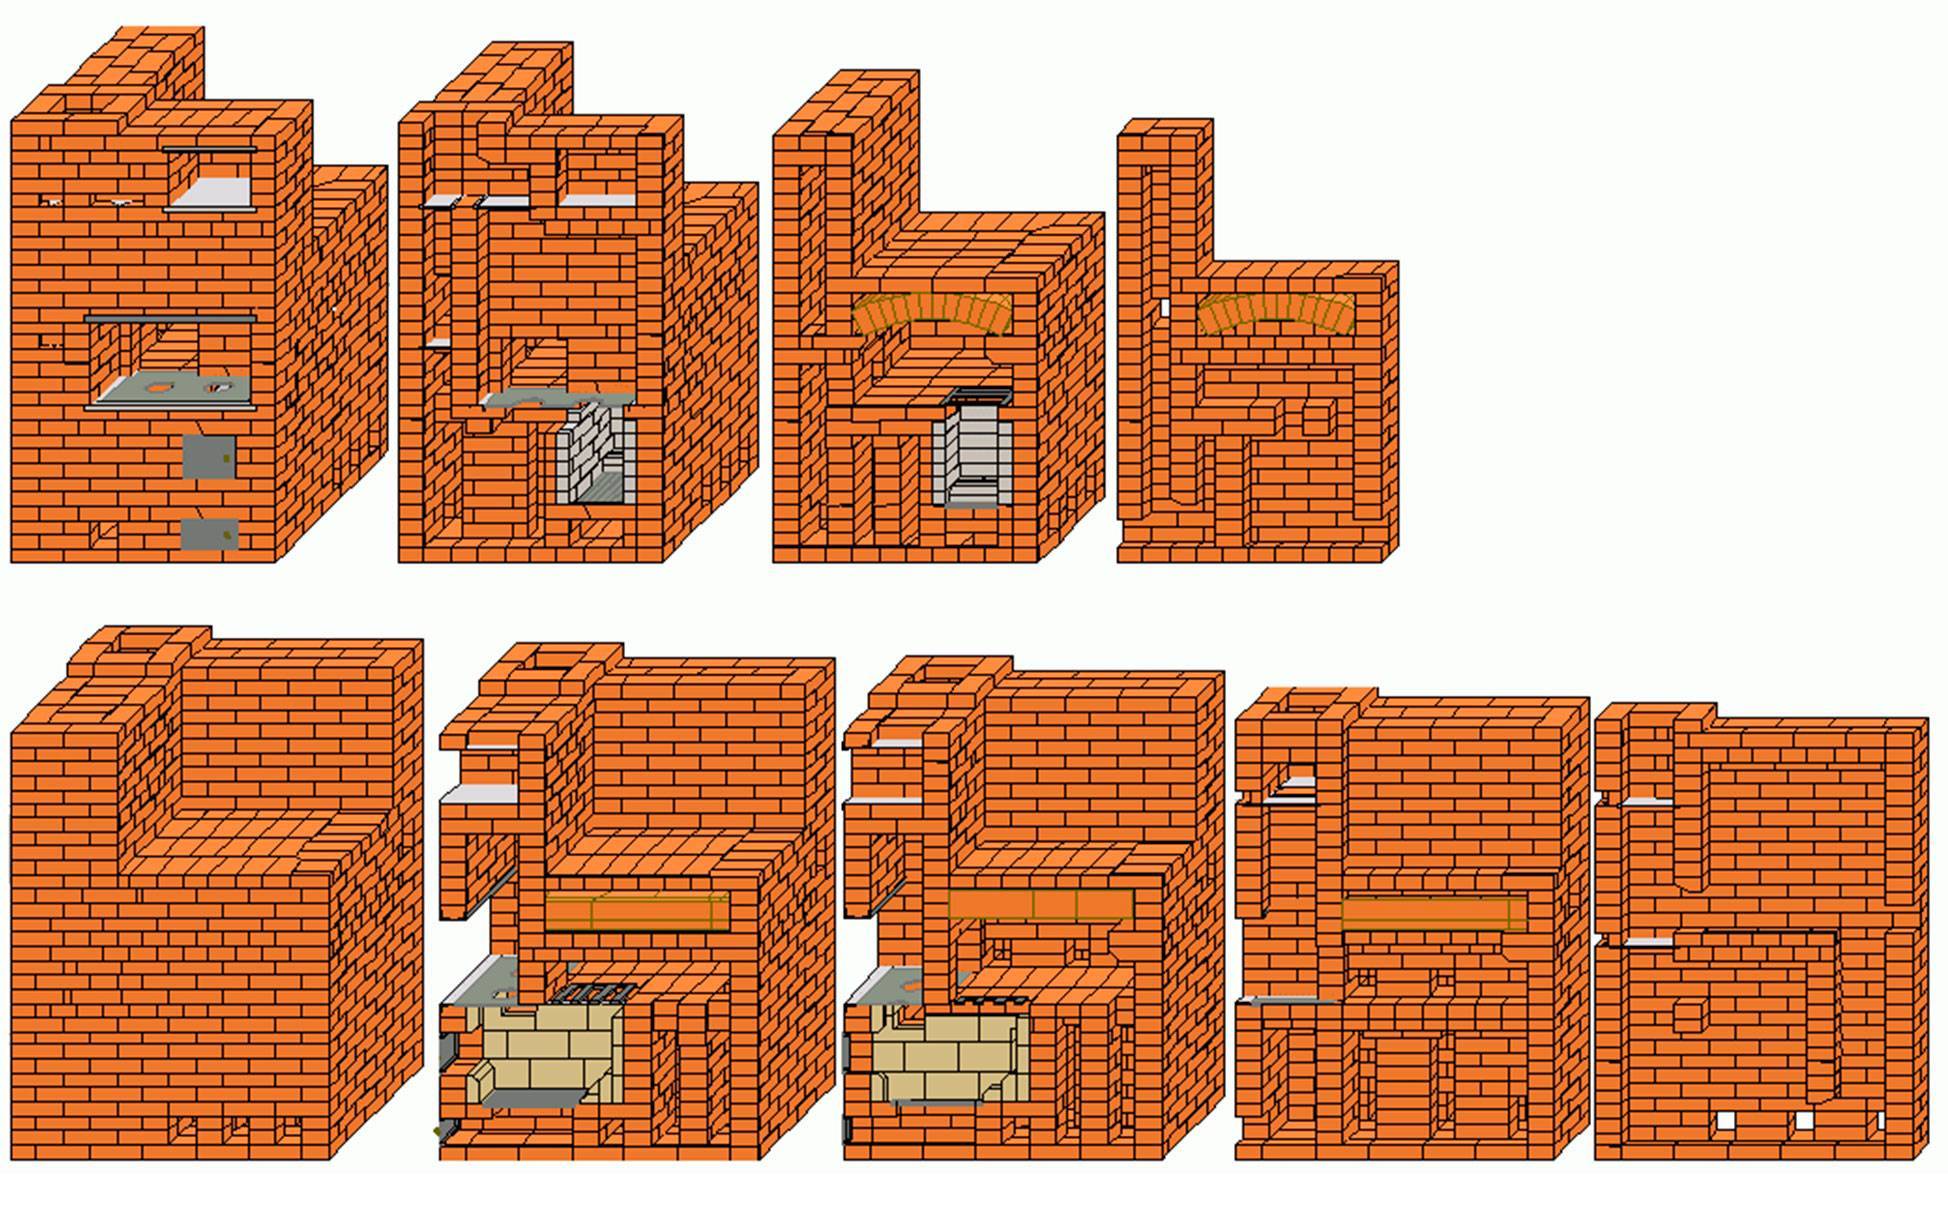
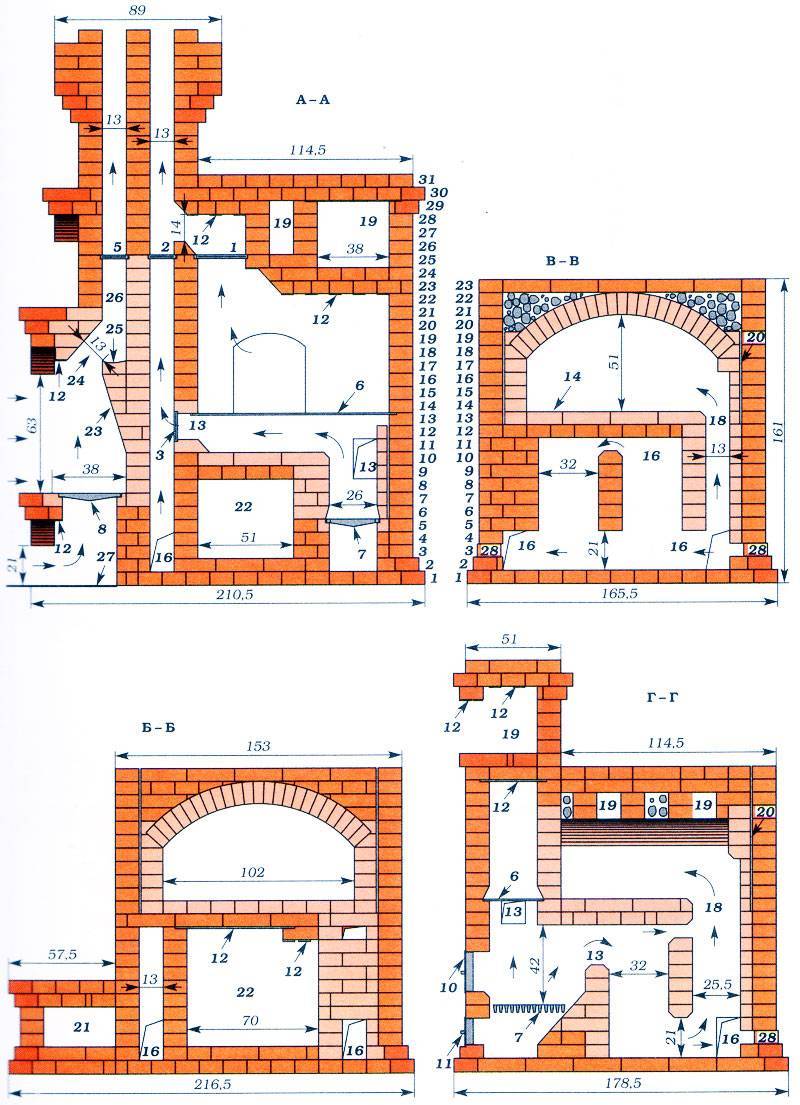
So, in order to understand how this ancient and unique heater functions, you should first study Russian oven device. Nowadays, there are many designs of furnaces with various modifications and improvements, but they are all based on the traditional design shown in the figure:
The whole structure rests on a foundation, spaced from the nearest wall at a certain distance, as a rule, at least a quarter of an arshin (about 17 cm). The overall dimensions of the furnace were observed as follows:
- width - 2 arshins (142 cm);
- length - 3 arshins (213 cm);
- the height from the floor to the top of the couch is 2.5 arshins (178 cm).
The lower part of the building (guardianship) is hollow from the inside; earlier it was often made of wooden beams, now it is only made of bricks. To access this space from the front side, a special opening is made - the under-heater. Its purpose is to store household equipment or store and dry firewood. Above the stove there is a separate opening - the undercoat. The vault of the guardianship is laid out in the form of a brick arch, which is covered from above with any heat-intensive material, most often with sand.
Note.The vaults over the openings in the Russian stove with a stove bench were traditionally laid out only from an odd number of bricks.
On top of the backfill, it is laid under the crucible of bricks without the use of mortar. The bottom and vault of the crucible are made with a slight slope (about 50-80 mm for the entire length) towards the entrance to the firebox - the mouth. In the figure, which shows the scheme of the furnace, it is clearly seen that the space above the inclined arch and the walls of the furnace is also covered with sand. Only in some places, at the discretion of the owners, stoves are arranged. These are openings adjacent directly to the crucible through a half-brick wall. Stoves allow you to quickly warm up the room and dry small things.
2 more rows of bricks are placed above the stoves, and then a stove bench is arranged, it is located directly above the furnace. The latter has an outlet to the hearth - the mouth, and the walls on the sides of it are called cheeks. In front of the mouth, above the hearth, there is a hailo - a bell expanding downwards, where smoke goes during work. The chimney itself was built above, a view with a half-door and a valve are installed in it to block the channel.
Russian oven masonry: technology and construction tips
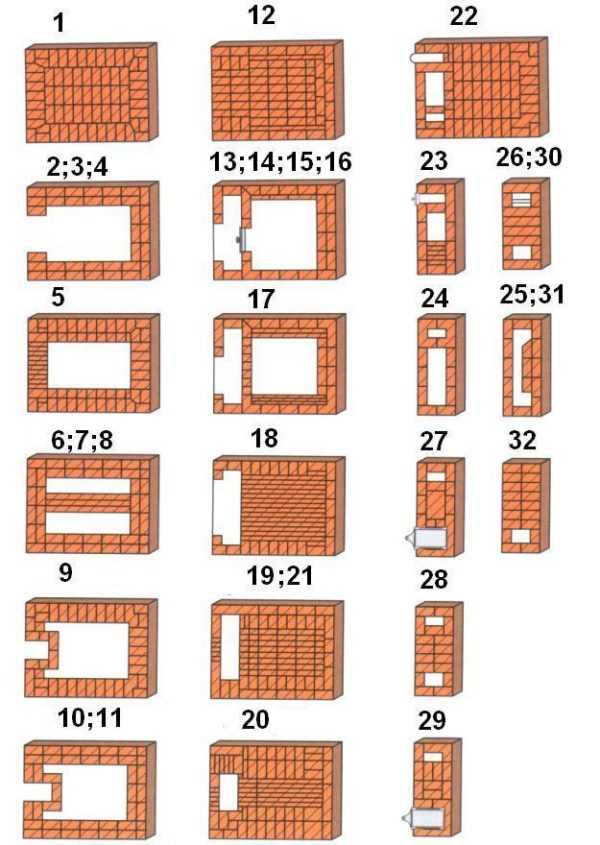
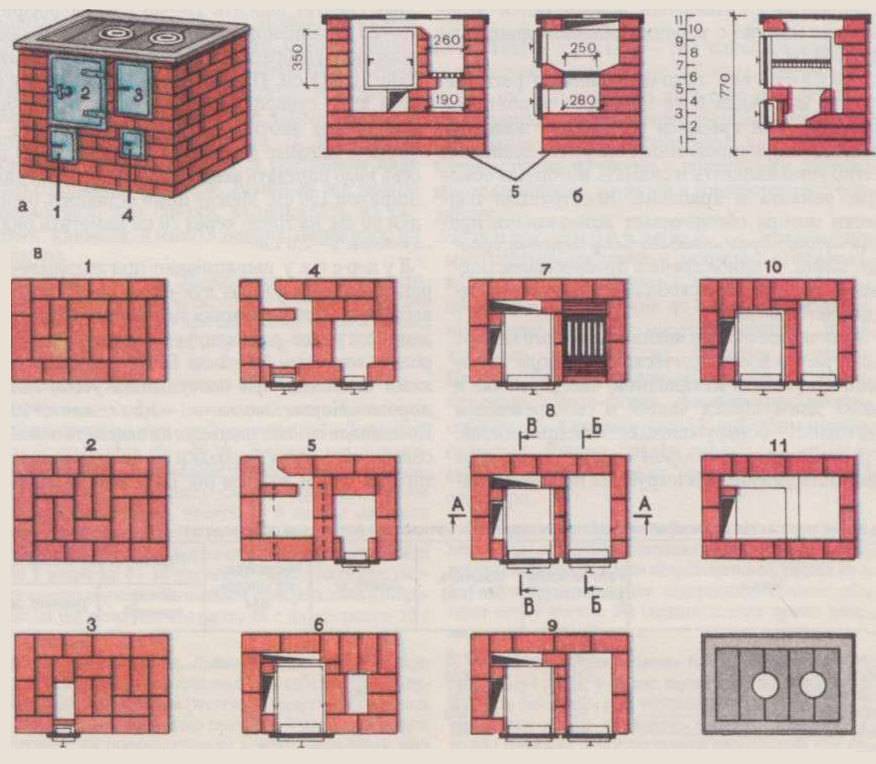
In order to fold a simple Russian stove, you need from 1.5 to 2 thousand bricks. Bricks are stacked in rows. A standard oven includes 25-31 rows (excluding chimney).
It is better to lay the first row of the furnace with waterproof overheated bricks. We lay down the walls of the crucible with a thickness of one brick, and the front of the hob - half as much. In the opening of the furnace, usually, a formwork made of wood is placed. When laying the vaults of the furnace and the furnace, it is best to use wedge-shaped bricks.They can be easily made with your own hands, as the manufacture includes the processing of ordinary bricks.
Do-it-yourself oven with a stove bench: drawings and videos
The stove with a bench in its unique combination of space heating and cooking will give an extraordinary spirit of Russian traditions. The stove runs on wood, it is often installed in country houses and cottages.
According to its design, a stove with a stove bench is mainly of several types: traditional Russian, a heating stove, Kuznetsov's stove. In the structure of all these models, the following elements are distinguished:
- couch;
- oven for heating;
- hob;
- oven;
- ash pan;
- woodcutter;
- place for kitchen utensils.
Formation process
This design can be done with your own hands, using the prepared drawings. The material used is fire-resistant ceramic brick of high standard. All drawings and diagrams are made in advance. After completing the order, you can determine the required number of bricks. How to develop a plan for the construction of the stove - we suggest watching in the video presented.
Foundation and base
The mortar mix can be bought ready-made in bags or kneaded with cement, sand and clay with your own hands. In accordance with the design, a cast-iron stove for cooking, firebox doors, valves, and a grate are purchased in advance.
Like all furnaces, the unit requires a separate foundation, because the total weight reaches 10 tons. You can do it yourself by calculating the depth of the pit, provided that every 5 cm corresponds to 1 ton of weight, and the foundation area should be 15 percent larger than the base of the furnace. A layer of sand is poured at the bottom of the pit, it is rammed, covered with rubble, reinforcement is installed and concrete is poured below the floor level.The hardening of the foundation requires at least two weeks, after which waterproofing is done to prevent moisture from entering the furnace. A good example of creating a foundation in the video instruction.


 Based on the developed order, the base of the stove is first laid out. It should be from several rows of bricks, horizontally aligned, with right angles. The distance from the masonry to the wall must be at least 15 cm. In the next row, a blower and air ducts are laid.
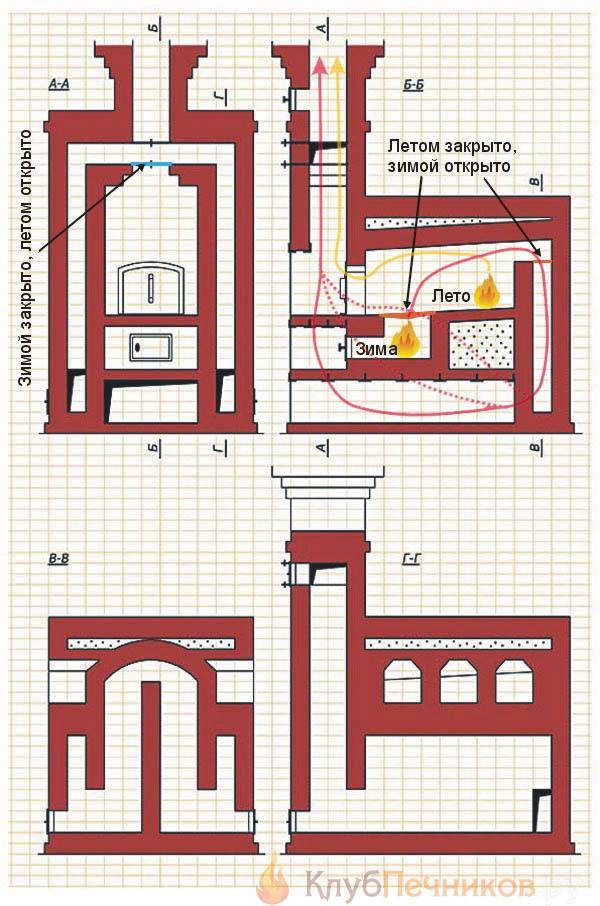
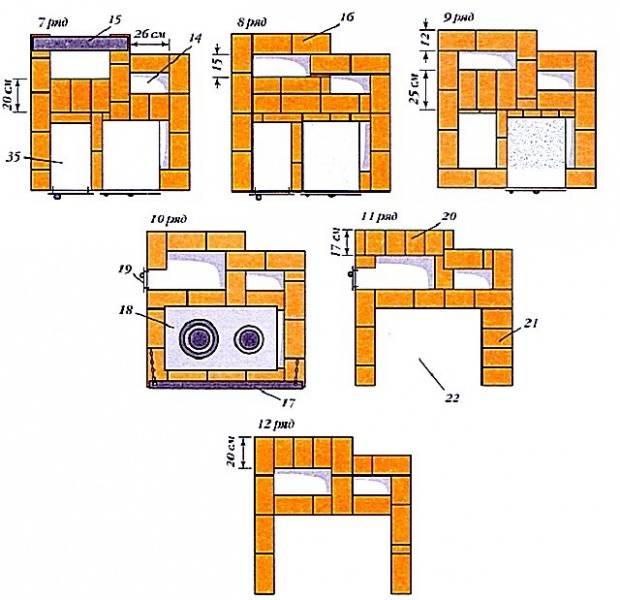
Basic structural elements
 Due to the serpentine winding air duct, the air heated in the furnace rises, passes through the entire body of the furnace and heats the stove bench. On the eighth to ninth row, an overlap is made on a bench and a firebox. Then the rows for the oven and hob are reported, as well as the row separating the hob from the wall. After that, jumpers are laid out. Above the oven, simple or figured masonry (arch, wedge) is used, and metal corners are used above the casing of the stove, a decorative shelf is made.
The next rows combine all the chimneys into one, and windows are made on the walls, next to the oven - a “letnik” to maintain combustion in the warm season, and those located above - for stronger heating of the room in the cold season. The pipe is laid out higher, has a square section, the best masonry size is 2.5 bricks. The ceilings through which the chimney passes are insulated with basalt slabs in several layers.
Shutdown
It is better to lay out the outer part of the chimney from silicate brick, it is more resistant to temperature fluctuations and precipitation. After the chimney is built, all cast iron and other fittings are installed.For the accuracy of work, each layer of brick is compared with the ordering drawings, which can be hung near the construction site. An example of creating a simple oven with a stove bench is shown in the video.
If simple brickwork is planned, then it will be enough just to clean the surface of the furnace with a stiff brush and align the seams. A brick oven can be painted with heat-resistant paint in the desired color and add Russian traditional ornaments and hand-made drawings.
 A stove with a bench, decorated with tiles, has a very rich look and will become the main decoration of the house. The cost of such finishing depends on the quality of the tiles. In addition to their decorative function, tiles retain heat well and are easier to care for than other coatings.
The stove has a high level of efficiency (up to 60 percent), it evenly heats one or more rooms, is safe to use, has a long service life, and produces a healing effect.
Getting started, you need to evaluate your strengths, because the construction of a stove with a stove bench is not cheap. A good home master can go through many steps in building with his own hands, but a professional stove maker will correct the work or, based on his experience, help correct the mistakes made.
We lay out the design for cooking
The walls of the structure necessary for cooking are lined up in the 13th row. The brick lays down in ¾. In other words, the outer part of the wall is made of bricks laid flat, and the inner part is made of bricks. placed on edge. The shield and the front wall of the hob with a place for firewood or coal are also mounted. The 14th row is laid according to the order and formwork is formed on the hearth, which must be covered with paper.15th row - the beginning of the arch. To do this, the brick is placed with an edge and wrapped step by step, due to which the outer seam thickens. The next two rows must be built according to the ordering scheme.
A few nuances when choosing a material
Both self-production of solutions and the purchase of a ready-made mixture are allowed. The latter option, by the way, is more attractive for lazy people. No need to worry that you will make a solution with the wrong proportion. The range of mixtures today is very large, so there should not be any problems with the choice. The main thing is to follow the technology.

If you choose the right solution and materials, then you will ensure full compliance with all fire safety standards. In addition, the whole structure will be strong and stable.
When buying materials, pay attention to their quality. The brick should have the most accurate dimensions, the surface is perfectly flat. There should not be any foreign inclusions
There should not be any foreign inclusions.
Clay is only plastic and red in color, without the slightest amount of impurities. Before proceeding with the manufacture of the solution, the clay must be soaked in water and rubbed through the mesh. Sand should be taken fine-grained, the particle size is not more than 1.5 mm.
Construction
First, find the location of the future device. Usually the structure is erected in the largest room, located at a distance of one and a half to two meters from the outer walls.
For the construction of the stove, a powerful foundation is needed, the presence of a stove bench and the possibility of cooking do not affect its thickness. The foundation is poured below the freezing level of the soil in the region.
Attention! The foundation of the furnace is not connected with the main foundation of the house
Choosing a project from which you can build a stove
On the Internet you can find many schemes of the Russian stove, but in matters of construction it is better to trust the invited master.
The stove with a stove bench consists of the following elements:
- Body. It is made of brick, and includes a system of smoke channels.
- The main firebox or chamber where firewood and its substitutes are burned.
- Crucible.
- Ash collection chamber.
- A place to store dishes and other things.
- Couch.
- Chimney.
There are several types of bricks that can be used during the construction of the appliance:
- ordinary clay brick;
- clay solid brick;
- fireclay bricks.
A brick is laid on the body of the furnace on a clay-sand mortar; ordinary cement mortar with the addition of lime can be used for cladding and pipes.
The total number of bricks with standard oven sizes is 650-800 pieces. The consumption of the solution is approximately 20-25 buckets.


After the construction is completed, the stove is dried, then the device is heated for 2-3 days. After burning the first small batch of firewood, the doors are opened, then the amount of furnace material is increased until the furnace is fully loaded. At this time, it is necessary to monitor the integrity of the walls, the appearance of the smallest cracks on the body of the structure is a sign of poor quality work.
Building a Russian stove with a stove bench with your own hands
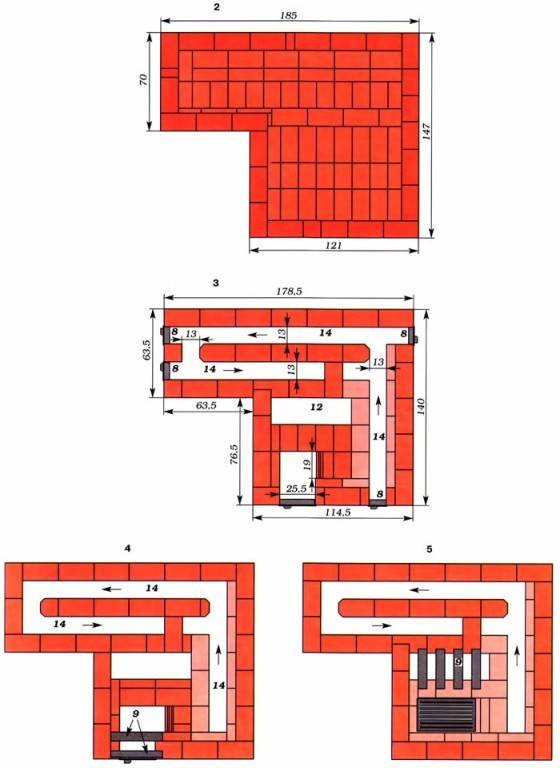
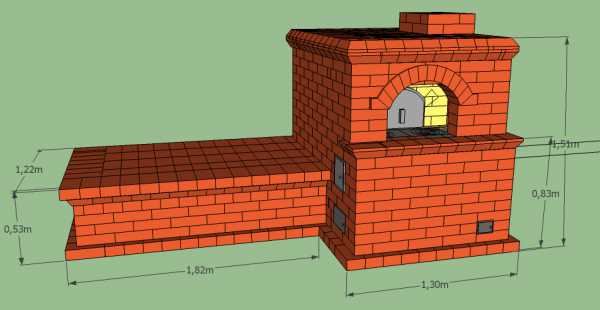
Consider the construction of a furnace for heating a room with an area of 45-50 m2. The size of the building is 127x166 cm with a bench height of 147 cm.
Step-by-step instructions for a Russian stove with a do-it-yourself stove bench provide for consumption (in pcs.):
- red brick - 1800;
- fireclay refractory bricks - 50.
Other materials (sheet steel, mortar raw materials, reinforcing mesh) - as needed. Approximate consumption of sand - about 300 kg, purified clay - 250 kg.
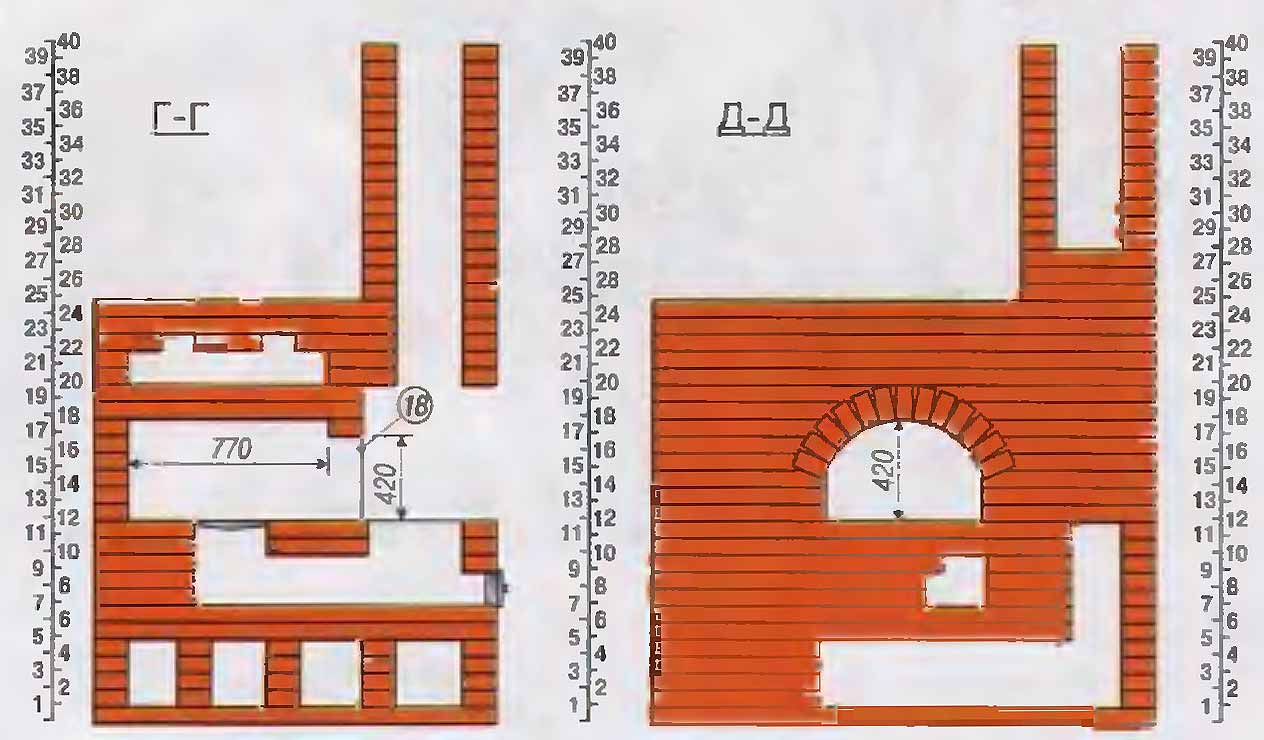
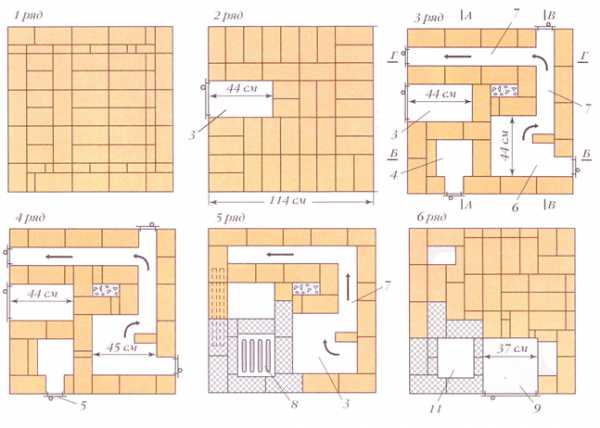
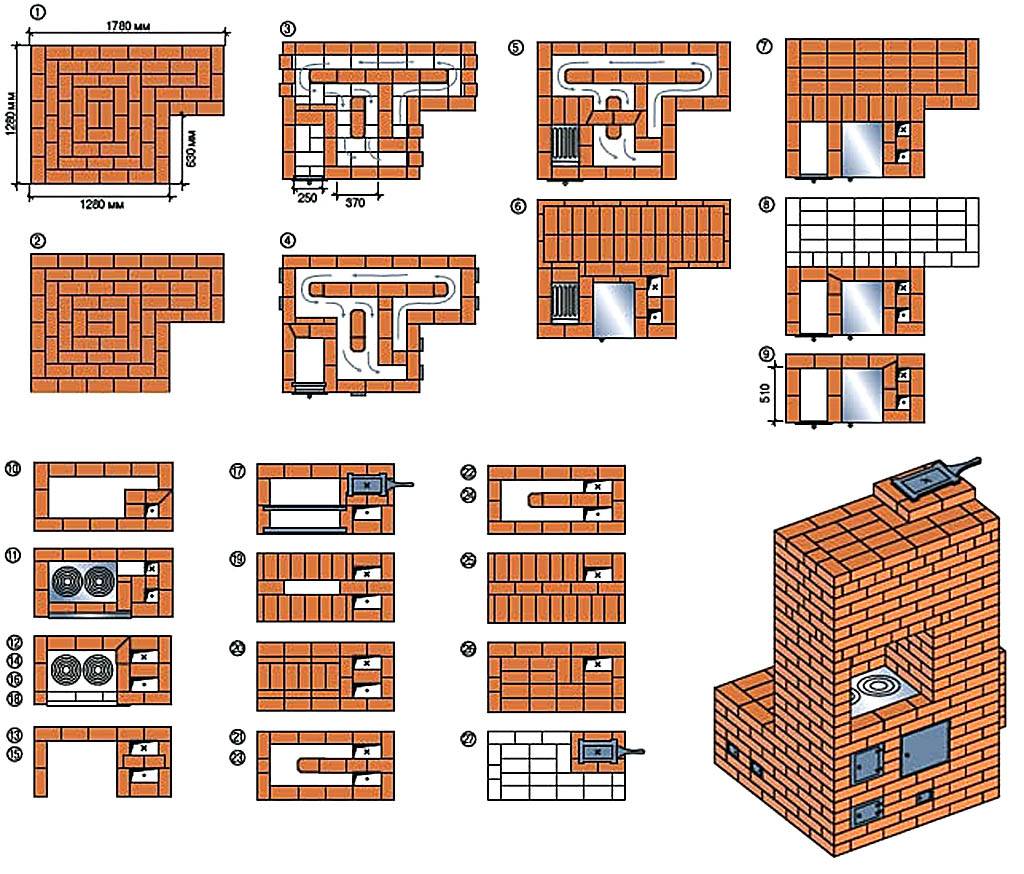
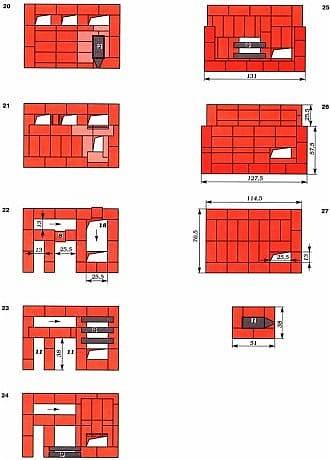
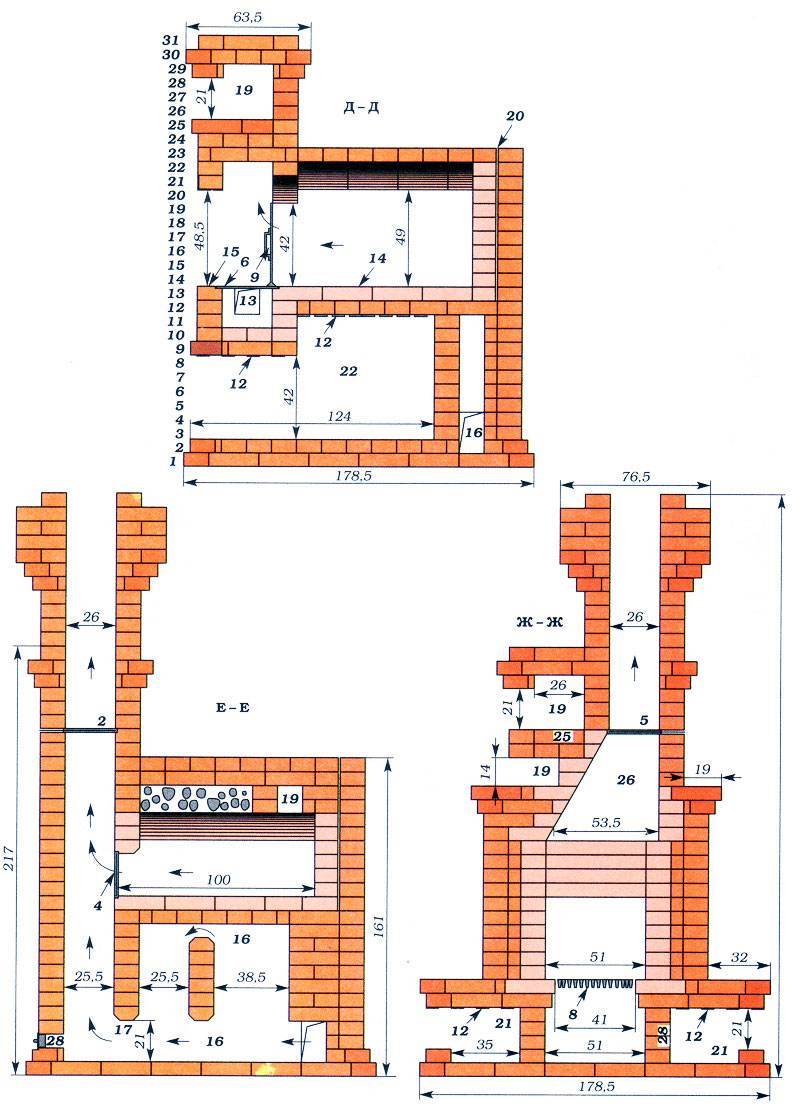
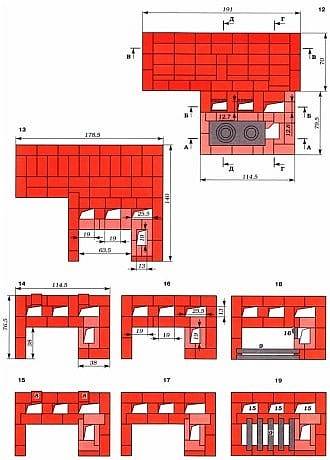
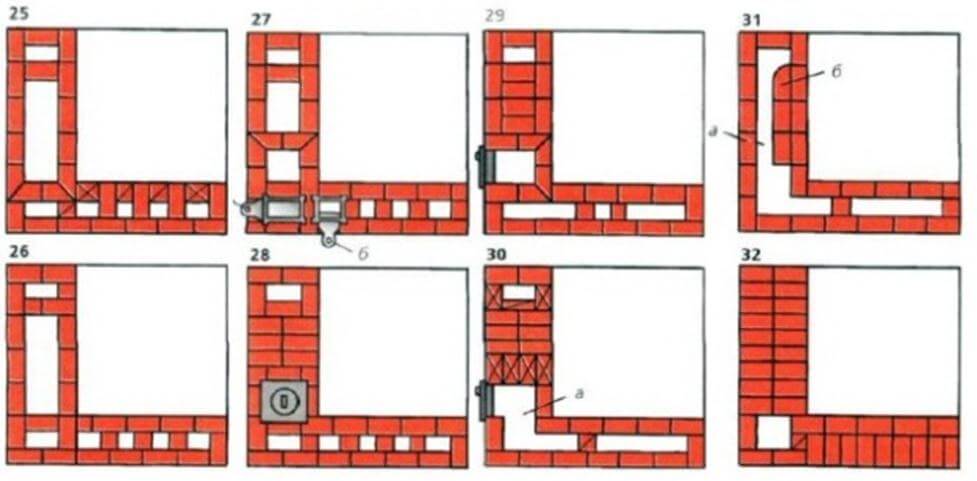
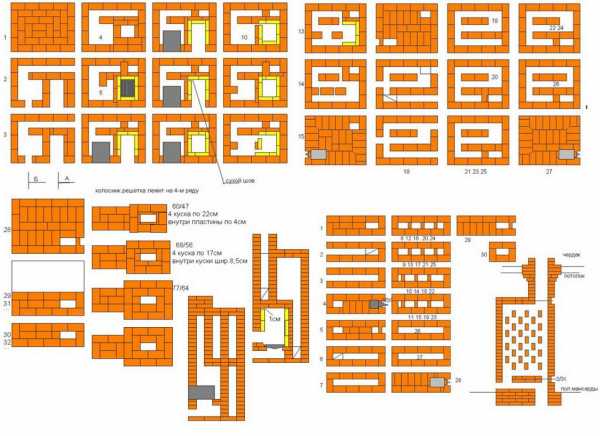
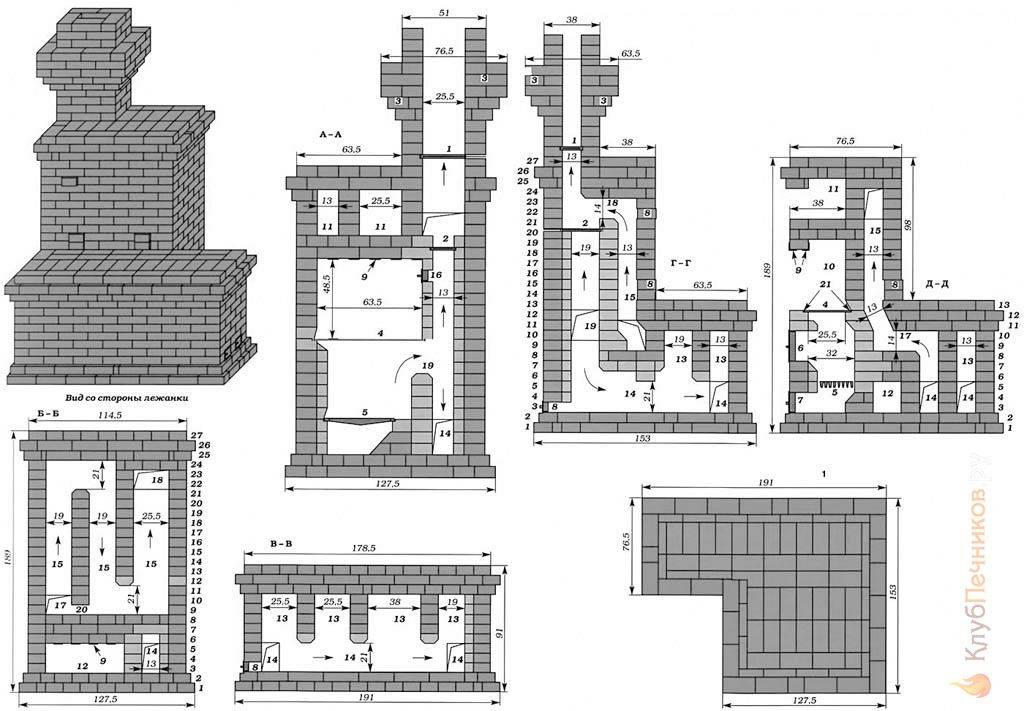
Masonry scheme
The general arrangement of each row can be seen in the diagram:
Masonry scheme
Carefully follow the instructions, otherwise you will not be able to make hidden internal channels for hot air.
Step-by-step instruction
An example of laying out by rows (in brackets - the number of the row):
- (1) Placed directly on foundation waterproofing.
- (5) Base for vault arch.
- (6) Installation of grates, the cleaning channel is narrowed.
- (7-8) Lay the steel sheet on top of the hearth.
- (10-11) The same, but with the installation of the hob.
- (12-16) The same, on the 15th row they raise the arch.
- (17-18) A knitting wire is laid between them. There is a narrowing of the arch.
- (19-21) Finish the couch device.
- (22) From here the rise of the chimney begins.
As can be seen from the diagram, there is nothing in this work that requires special knowledge and a cunning tool.
How much does it cost to build a Russian stove with a brick bench
To build a Russian stove with a sun lounger with your own hands, it is enough to know the price of the materials used:
- The need for bricks for such a hearth, which heats an area from 30 to 50 m2, is 1800 pieces. With an average price per unit in the range of 22-25 rubles, the cost of masonry material is 45 thousand rubles.
- Fireclay bricks for the firebox (50 pcs.) - 3 thousand rubles.
- A set of metal parts - 25 thousand rubles.
Total purchase costs - 73 thousand rubles.
If you order work from a master stove-maker, the 2020 prices for masonry are approximately 110 rubles per 1 piece. bricks. The specialist will need to pay another 198 thousand rubles.
Conclusions and useful video on the topic
Video layout of the Russian stove with order:
The process of dismantling the old and building a new furnace:
One of the options for a Russian stove with order:
If you build a Russian stove correctly, you can immediately get an almost “eternal” heating device and excellent kitchen equipment for cooking. However, for this, the device must fully comply with the order, and the technology for laying bricks and mixing the mortar must comply with generally accepted standards.
And before you make a project of a Russian stove, it is better to consult with qualified stove-makers.
Please write your comments in the box below. Tell us how a Russian stove was built in your dacha or country house. Ask questions, share information useful for site visitors interested in the topic, post thematic photos.