- Russian stove with a firebox: how to masonry
- Preparatory work
- The device of a traditional oven
- Foundation
- What materials will be needed for construction
- Design features of the furnace
- Possible difficulties in manufacturing
- Brick ovens
- Advantages and disadvantages
- Place for arranging the furnace
- The nuances of drying the laid out stove
- Foundation for the Russian stove
- Preparation of mortar for laying the furnace
- The device and principle of operation of a home-made furnace for working out
- Building a Russian stove with a stove bench with your own hands
- Masonry scheme
- Step-by-step instruction
- How much does it cost to build a Russian stove with a brick bench
Russian stove with a firebox: how to masonry
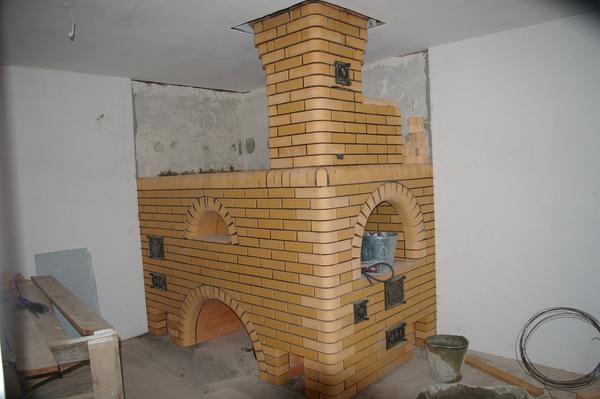
The Russian stove with a firebox is a modern, reliable design aimed at performing several functions. The device of the furnace with a firebox allows you to cook food both on a cast-iron stove and in a crucible, heat a room with an area of up to 60 square meters. m. It looks traditional, which makes it most suitable for rustic-style interiors.
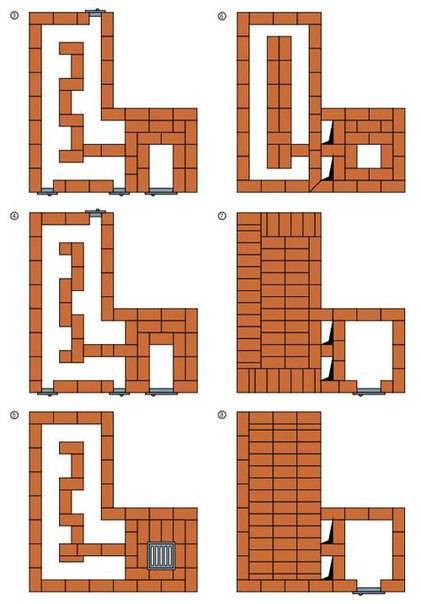
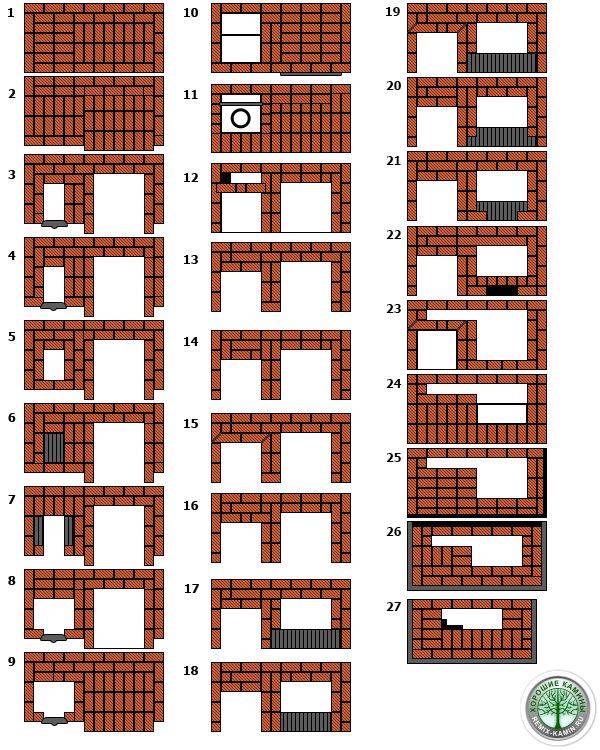
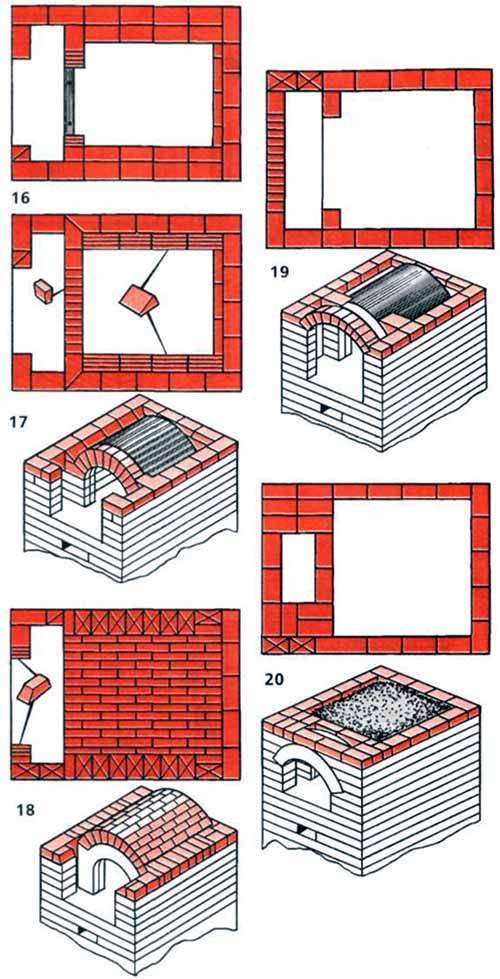
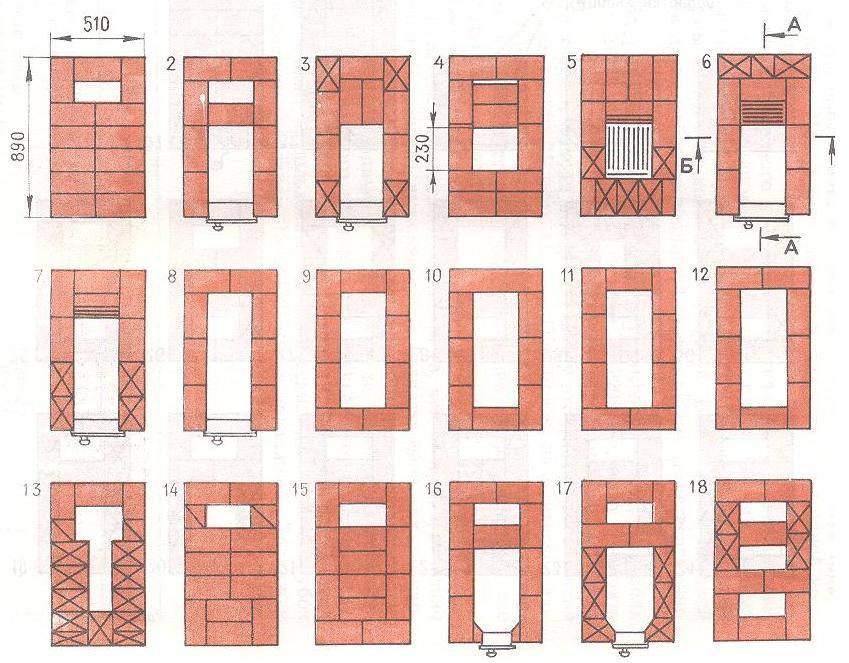
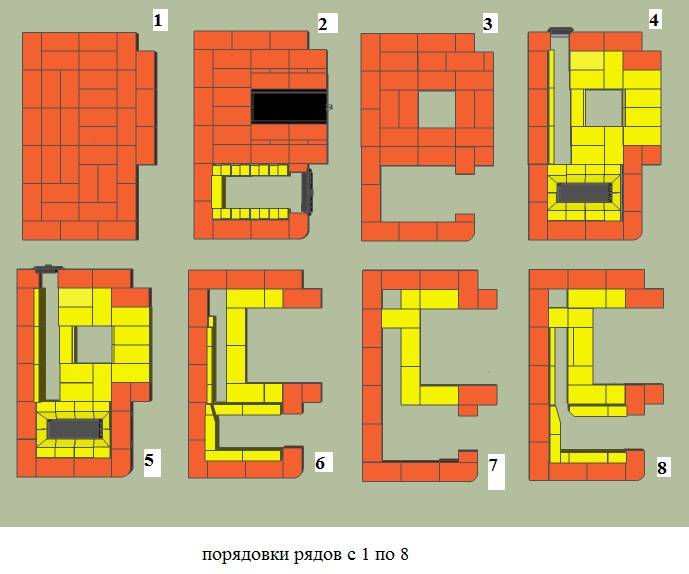
In order to assemble a Russian stove with a firebox, you must:
- Lay out in the first row the base of the pipe, small and large undercooking.
- Form the second and third row in the same way with a place for an ash pan in the last one.
- Start the laying of the fourth row from the ledge (as in the usual design).
- In the fifth row, the ash pan should be closed, and in the sixth row, a grate should be installed, a gas duct should be laid (if the stove is both wood-fired and gas-fired).
- Form a place under the firebox in the seventh row.
- Lay out the eighth and ninth rows with hewn bricks.
- Block the chimney in the tenth row.
- Lay out the pipe.
Finishing the finished furnace may include painting. You can paint a firebox or a crucible vault so that the stove turns out to be fabulous. It is better to use traditional colors and motifs.
Preparatory work
The first thing the work begins with is the choice of a place. The distance from the outer walls of the heater to the wooden wall must be at least 25 cm, the walls must be insulated with non-combustible material for protection. For heating, the stove is placed so that it goes into two rooms at once, for example, into the kitchen to heat and cook, and with its side part into the room for heat transfer
When working with your own hands, it is important to take into account their location, the rooms must be adjacent, and their floors must be protected by refractory material
Next, you need to lay the foundation, it must be strong and reliable, it is best to lay it at the same time as the foundation of the house. It is necessary to supplement the housing project with a heating device
Since it is important to take into account fire safety measures when working with your own hands, ignoring them is unacceptable
Before starting work, it is better to take care of having all the necessary tools, this will avoid some mistakes and save time. For masonry, you must have:
- trowel for applying the solution;
- hammer-pick for splitting and hewing bricks;
- level and plumb to check the evenness of the masonry and the evenness of corners and walls;
- an order that will allow you to maintain the verticality of the masonry;
- rule for the evenness of the foundation.
You should also stock up on materials in advance. In order to choose it and not make a mistake with the dimensions, you need to correctly complete the drawings and diagrams. The drawing must be made from different angles of the unit and in section, indicating the exact dimensions and numbering of the rows. They are prescribed side by side and duplicated with chalk during construction, so as not to get confused when doing the work with your own hands.
Required material:
- fireclay and refractory bricks for the firebox;
- clay and sand for mortar, or ready-made brick refractory mixture;
- wire for fastening;
- grate;
- valve;
- asbestos cord;
- doors.
The device of a traditional oven
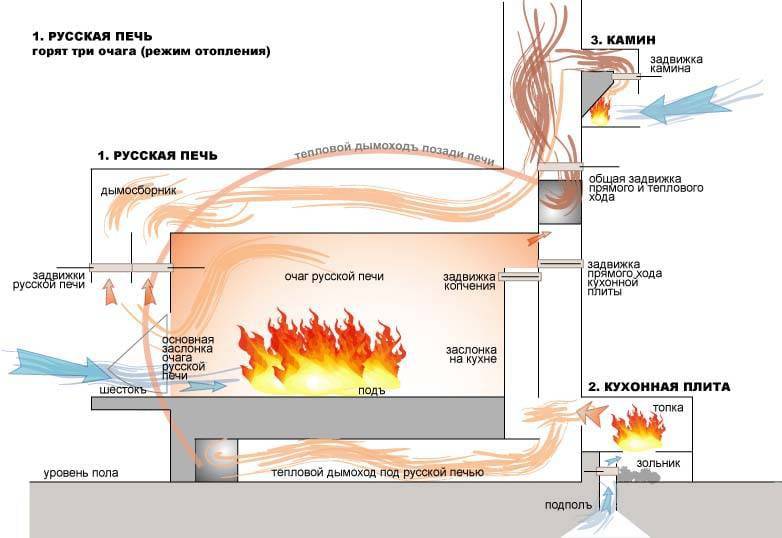
We will not describe the history of the Russian stove and its role in a village house - the topic is widely disclosed in fiction and technical literature. Let's get straight to the point - let's briefly analyze the traditional design shown in the figure below:
- The lower part of the building - guardianship - was built of stone or wood - cedar, larch. The walls of the base form a niche - the stoves, where firewood was dried and household utensils were stored.
- On top of the guardianship, the first arched vault and a large firebox of the furnace - the crucible were built. Under and the second arched vault was made with a slope towards the forehead - the front part of the structure.
- Over the crucible, a ceiling was arranged, where the stove bench was located. The cavity between the second vault of the firebox and the ceiling was covered with sand to increase the heat capacity.
- In front of the mouth of the crucible, a special niche was provided - a cap, ending on top with a hail (smoke box) and the chimney itself. The horizontal shelf at the bottom of the opening - the hearth - has a semicircular window that goes out.
- Stoves were arranged in the side walls of the brick heater - small niches for drying clothes and other things. The chimney was equipped with a valve and a view located above the hail.
A real Russian stove is fundamentally different from other brick heating structures in the following ways:
- deep vaulted firebox, made with a forward slope;
- the chimney is located in front - in the center or in the corner of the building;
- an indispensable attribute is a couch arranged above the fuel chamber.
Now consider the principle of operation of the stove, shown in the diagram:
- Firewood is laid closer to the back wall of the furnace and kindled. Combustion air enters through the outer hearth window and the mouth of the firebox, and moves above the bottom of the chamber.
- The heat generated during combustion heats the body of the furnace - the side walls, sand filling and stove bench.
- Light products of combustion rise to the vault of the firebox. The slope does not allow the gases to immediately leave the chamber - at first they give off heat to the ceiling, then they become heavier and are displaced by a new hot stream.
- After passing under the arch of the crucible, the combustion products exit through the upper zone of the mouth, rise into the smoke collector and leave the stove through the chimney.
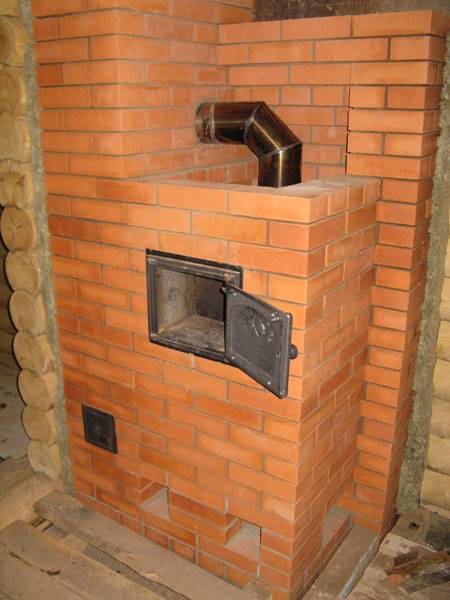
Brick heater with access to 2 rooms of a wooden house
Despite its many advantages, a Russian stove with a stove bench is rarely built in a traditional design. The usable area in a modern interior is worth its weight in gold, and a classic heater takes up a lot of space, while slightly warming the lower area of the room. For construction, it is better to consider projects of modernized structures, where this problem is solved.


Foundation
The stove has impressive dimensions, it weighs a lot, therefore it needs a reliable support.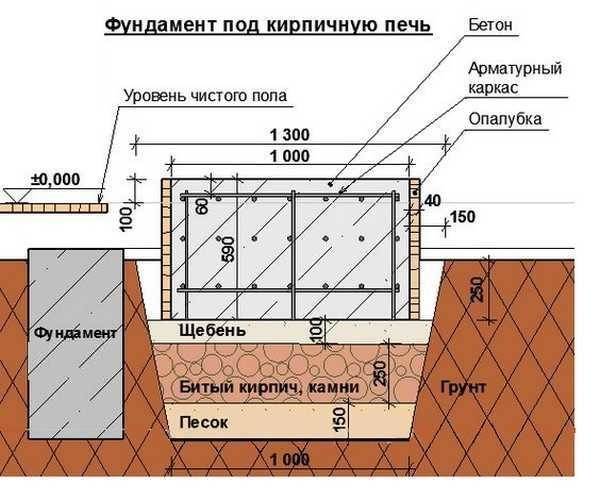
The work algorithm is as follows:
- Prepare the pit. Calculate dimensions according to the furnace base. On each side you need a margin of 15 cm. Go deep by 50-70 cm.
- Pour sand, pour water, tamp so that the thickness of the waterproofing becomes 15-20 cm. Pour more sand, pour water and level.
- Lay out the roofing material in 2 layers.
- Install the formwork, cover it with foil.
- Mix cement, sand and gravel 1:3:5. Use water to get a semi-liquid mixture.
- Pour cement mixed with gravel into the formwork, height 20 cm. Pierce this layer several times to release air, tamp.
- Before the solution has hardened, install the fittings. Height above concrete 5-7 cm.
- Pour another layer of 10-15 cm, when it sets, lay the reinforcing mesh.
- Fill the entire formwork with mortar, level it.
- Lay roofing material in 1 layer.

If a small oven is planned, then a guardian base is allowed. Install it on the floor beams. Such a base is a frame made of timber or logs in 2 crowns. To strengthen the beams and the stability of the furnace, intermediate piles are driven into the center. A bottle is poured into a free place, felt soaked in liquid clay on top. Such a base can withstand construction up to 700 kg. If the weight is greater, then a slab foundation is needed.
What materials will be needed for construction
- red brick - 750 pieces;
- chamotte clay;
- sand;
- felt or asbestos fiber for insulation;
- roofing material on the bottom layer also for heat and waterproofing;
- fasteners;
- metal corner, sheet and steel wire;
- grate - 2 pcs.;
- doors for the combustion chamber and blower - 2 pcs.;
- damper - 1 pc.;
- valve - 1 pc.
... and tools:
- building level;
- spatulas;
- Master OK;
- drill with a nozzle mixer for mixing the solution;
- buckets;
- sieve for sifting clay and sand.
Do not forget about the tools: spatula, trowel, drill with a mixer. Additionally, have buckets or tanks, a sieve on hand. To make the oven even, use a level.
Design features of the furnace
A distinctive feature of the housekeeper's oven is its small size. The width of such a device is usually no more than one meter, and the height is up to two meters. Thanks to these parameters, the installation of furnace equipment can be carried out in rooms with a small area.
The structure of the housekeeper is almost the same as that of a traditional Russian stove. The main distinguishing feature is the presence of heating in the lower part of the structure, which makes it possible to completely warm the air in the room. The heating and cooking device operates using various types of fuel.
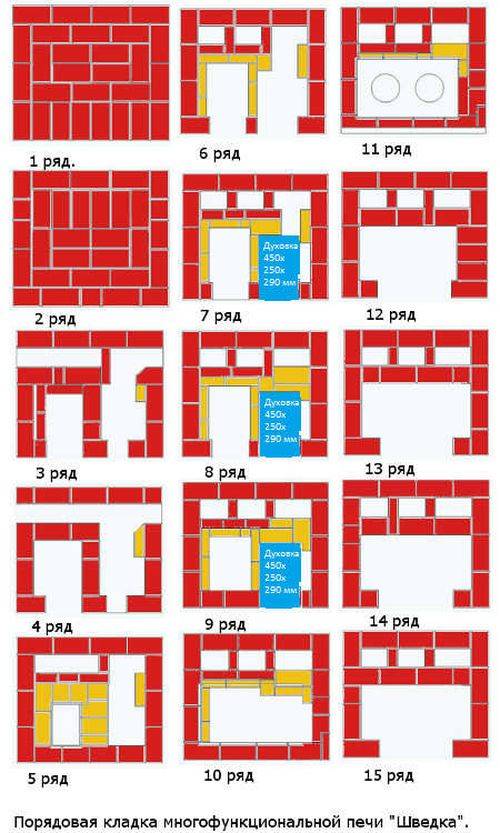
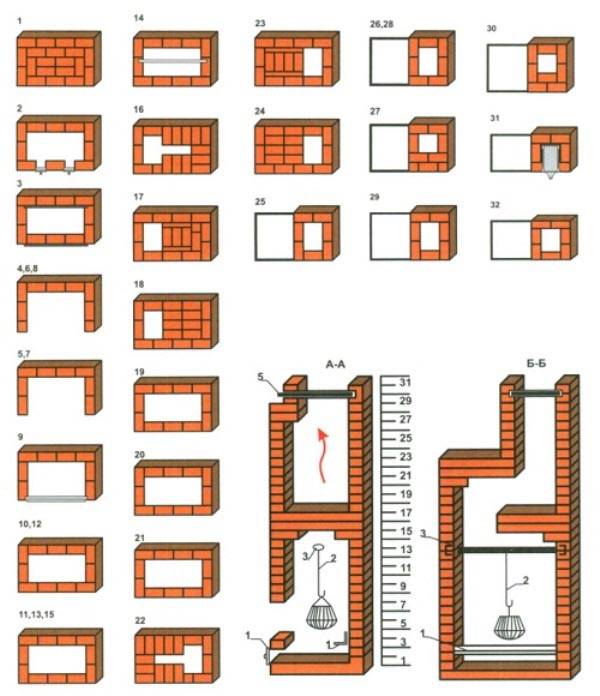
A feature of the structure of the housekeeper furnace is:
- Two separate fireboxes. One combustion chamber is used for both heating and cooking. The second is only a cooking room, which is used in the summer. The fireboxes have separate blowers, ash pans and grates located parallel to them. Compartments for fuel are connected in one flue that allows a joint exit of gases. The doors of the combustion chambers are located on adjacent walls of the furnace.
- Cooking panel. The housekeeper stove has a large cooking chamber, in which the horizontal cooking baffle is not adjacent to the rear wall. At the same time, a compartment remains that allows hot gases to enter before exiting through the chimney system into the cooking chamber.
- revision slots. There are four recesses in the design for cleaning the chimney channels of the firebox.
 An example of a Russian housekeeper stove
The oven is equipped with two cooking zones. The device can be supplemented with a special box for heating water.
Possible difficulties in manufacturing
When building a furnace, difficulties and incomprehensible moments very rarely appear. Quite a few questions arise for beginner stove-makers at the preparatory stage, during the drawing up of a product drawing.
For adequate heat transfer, the height of the ceiling is necessarily taken into account, but the ceilings in each house are different, therefore, when working with a preliminary drawing of the building, I.V. Kuznetsov proposed the following calculation scheme: for 1 sq. m. in warm weather, 0.5 kW is released, and in frost - 0.76 kW. The material from which the firebox is made is taken into account. Steel sheets burn out quickly, for durable use it is better to purchase cast iron material.
When buying material, there are also many questions. There are special formulas that allow you to calculate the number of bricks in a row. But unfortunately, the error in them is as much as 15%, so it's easier to count the brick of one row manually and multiply by the number of rows.
Brick ovens
A small brick oven for summer cottages is used quite often.
But when installing, you will need to consider the following points:
The stove can be installed in such a way that it will distribute heat to several rooms without heating circuits. If the furnace was brought out correctly and the valve was installed, it is considered fireproof, but for this building it will be necessary to create a strong foundation that will be isolated from the foundation of the walls. This is a bathroom condition, if you do not comply with it, then the masonry may lose its integrity, because when the foundation of the house shrinks, it can begin to pull the base of the furnace;


It is precisely because the brick is afraid of dampness that such stoves are mounted in the country house only when they live in the house most of the time and there is the possibility of a firebox;
Residents of private houses consider only those buildings that are made of brick useful and real. At the same time, heating devices made from other materials are not recognized at all. In fact, such a stove will give the room a special coziness and a unique atmosphere.
And more importantly, they are multifunctional. Professionals in the furnace business have developed a huge number of different models from which you can choose for a specific option.
Advantages and disadvantages
The Russian stove has a lot of positive qualities, but at the same time, it cannot be called an ideal device.
It is worth noting the positive aspects of use:
- Available execution materials.
- Profitability.
- You can use any type of solid fuel for heating.
- Multifunctionality. It can be used not only for heating the room, but also for cooking, relaxing.
- It is simple to use, it is only necessary to heat the stove once a day so that the house is warm all day.
- Safety. The furnace is located deep inside, which does not allow fire, sparks, coals to fall outside of it. With qualified use, its service life is long.
The disadvantages can be called:
- Use only long-burning solid fuel. In no case should gas burners and nozzles for liquid fuels be placed inside.
- What remains is solid waste. But ash can be used as fertilizer.
- It can only be used in one-story houses, as it gives a large load on the floors. Requires the creation of a high-quality capital foundation.
- Bulky, takes up a lot of usable space and space.
- The chimney can provide smoke exhaust from only one structure, as a result of which it cannot be used in apartment buildings.
- It heats up for quite a long time. Especially after a long break.
- Automation of its work is completely excluded, it requires the participation of a person in its work.
Place for arranging the furnace
Choose the optimal location for the heating stove. For example, a stove installed in the center of the room will give off heat as efficiently and evenly as possible. However, such placement of the furnace is not always convenient.

Oven in the center of the room
If the stove structure is placed against the wall (this option is the most popular and often used), cold will go on the floor of the house.
Select in advance the location of the furnace compartment door. Design the stove so that later on you don't have to carry fuel around the room, spreading dirt around the room.
The heating stove is located against the wall
The best option is to arrange a firebox in a little-visited room.
Recommendations regarding the foundation are standard - an individual concrete base is being equipped. It cannot be connected to the main foundation.


Calculate the design of the foundation in such a way that it is able to withstand the load not only of the furnace itself, but also of the smoke exhaust structure, which is also strongly recommended to be built of brick.
The nuances of drying the laid out stove
The laid out oven should dry well.
There are several nuances:
drying is needed even before the construction of the chimney;
you cannot immediately fully heat the stove - there is a risk of loss of tightness, the appearance of stains;
for at least 10 days, drying should be natural, with doors and valves open;
the first time you need to heat it carefully - use a little firewood, open the smoke dampers, and close the fireboxes;
For 1-1.5 weeks, the stove is heated every day, starting with 3-4 kg of firewood and increasing their amount daily by 1-1.5 kg;
a full-fledged furnace is allowed when, after 2 hours from the beginning of the furnace, there is no condensate on the metal elements at all.

Foundation for the Russian stove
For furnaces, the foundation is made in the form of a slab, which is isolated from the foundation of the building. Before determining the depth of the pit, they make drawings of the furnace with dimensions, determine its location in the house, evaluate the type of soil and its level of freezing, as well as the height of groundwater. For example, in the Moscow region, the level of soil freezing is about one and a half meters. Therefore, it is recommended to make three rows of FBS (with a block height of 60 cm).
The foundation of buta and reinforcement is cheap, reliable, but it is necessary to let it dry for two to three weeks. Another variant - FBS foundation (foundation block wall). It is convenient, durable, but somewhat more expensive than a concrete foundation.
- We calculate the number of blocks. We compare the dimensions of the foundation and the dimensions of the blocks that are indicated in the marking (24-4-6, respectively, the length, width and height are indicated in decimeters).
- Digging an oblong pit. Its depth should be 25 centimeters more than the depth of soil freezing.
- We lay waterproofing in the pit, then a layer of crushed stone (10 cm) and sand (5 cm), compact them.
- We knead the concrete and pour a thin layer, no more than two centimeters. We are waiting for the concrete to dry.
- Next, you need to build a foundation that will protect the structure and prevent the foundation from sinking. We lay out a series of pillow FBS, starting from the corners. We fasten the joints with a solution of cement.
- We check the construction level for the absence of distortions.
- In subsequent rows, we put each new block at the junction of two lower ones. In the case of the formation of voids in which the block does not fit, we lay bricks there.
Preparation of mortar for laying the furnace
Choosing clay
- for red brick we take clay and sifted sand in a ratio of one to two; - if it is planned to use refractory bricks, the clay must accordingly be refractory; - for fireclay, fireclay powder (3-4 parts) and refractory clay based on bentonite or kaolin (1 part) are mixed;
- when erecting pipes, bricks are laid on a mixture of cement and sand.
We soak the clay in a barrel or iron tub for two days. The volume of water from the ratio 1 part of water 4 parts clay. Then add sand to the mixture. It is very convenient to mix the composition with your feet in rubber boots. The solution must be homogeneous, without large inclusions and lumps.
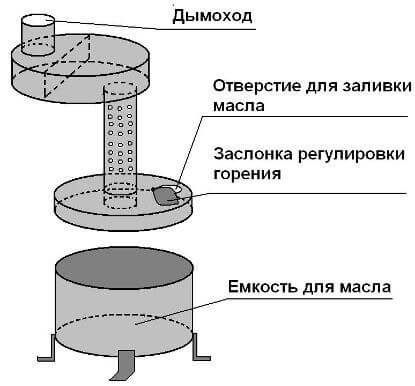
The device and principle of operation of a home-made furnace for working out
According to its principle of operation, the mining stove is similar to the operation of the pyrolysis unit. The combustion process in it occurs in two stages - in the first of them, the vapors of used oils burn, resulting in the formation of combustible gases. In the second stage, these gases burn out at high temperatures.Due to the fact that mining burns out completely, the smoke from the stove practically does not contain toxic impurities that are harmful to health, despite the fact that the efficiency of this heating unit is high. In order for the used oil to completely burn out, you need to follow all the recommendations on how to make a working stove.
This heating unit must have the following structural elements:
- the lower combustion chamber, low-temperature, which is combined with a tank and equipped with a hole for regulating the air supply. Fuel is also poured through it and the device is set on fire;
- middle chamber - gases mixed with air burn in it. It has the form of a pipe with holes to ensure the supply of the required amount of air;
- the upper chamber - afterburning of the remaining gas occurs in it and smoke is formed. A pipe led into the chimney is connected to this part of the device.
You can see what the scheme of the stove looks like in working out in the photo. The chimney for a unit operating on such an energy source must be at least 4 meters long. The horizontal location of the flue duct is not allowed. The fact is that as a result of using used oil, a considerable amount of soot is formed that settles in the pipes, so the horizontal parts of the chimney are quickly covered with a layer of soot.


For this reason, combustion products can enter rooms, and people in them can get seriously poisoned. The smoke channel within the premises is laid at an angle of 45 - 90 degrees, and outside them - exclusively strictly vertically. The upper part of the pipe should be protected with a cap from wind blowing and precipitation.
When home-made furnaces are made for mining, not only sheet iron is used, but also pipe cuts with different diameters.Of the tools and other materials you will need:
- grinder plus cutting and grinding wheels;
- sheets of metal;
- welding machine plus electrodes;
- corner for the manufacture of legs;
- paint for metal, able to withstand high temperatures.
Building a Russian stove with a stove bench with your own hands
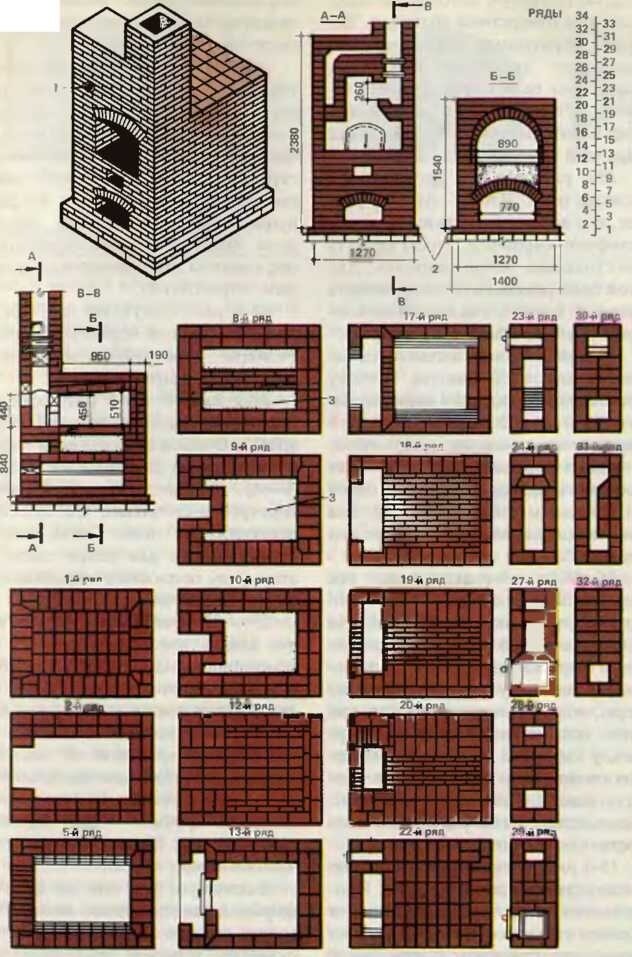
Consider the construction of a furnace for heating a room with an area of 45-50 m2. The size of the building is 127x166 cm with a bench height of 147 cm.
Step by step instructions for Russian stoves with their stove bench hands provides for consumption (in pcs.):
- red brick - 1800;
- fireclay refractory bricks - 50.
Other materials (sheet steel, mortar raw materials, reinforcing mesh) - as needed. Approximate consumption of sand - about 300 kg, purified clay - 250 kg.
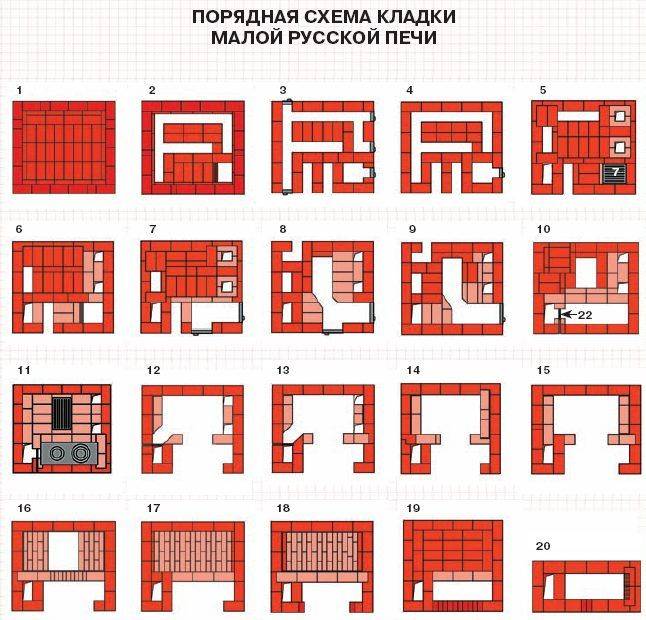
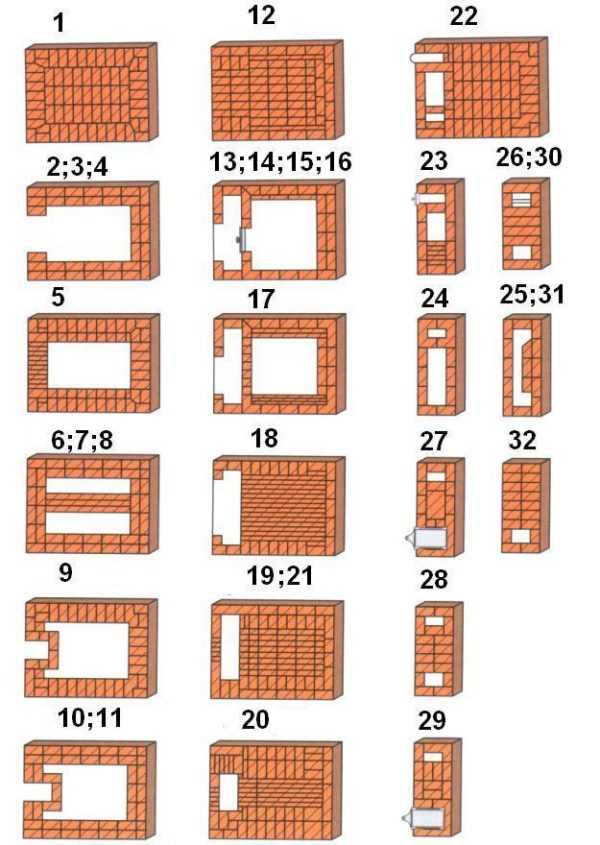
Masonry scheme
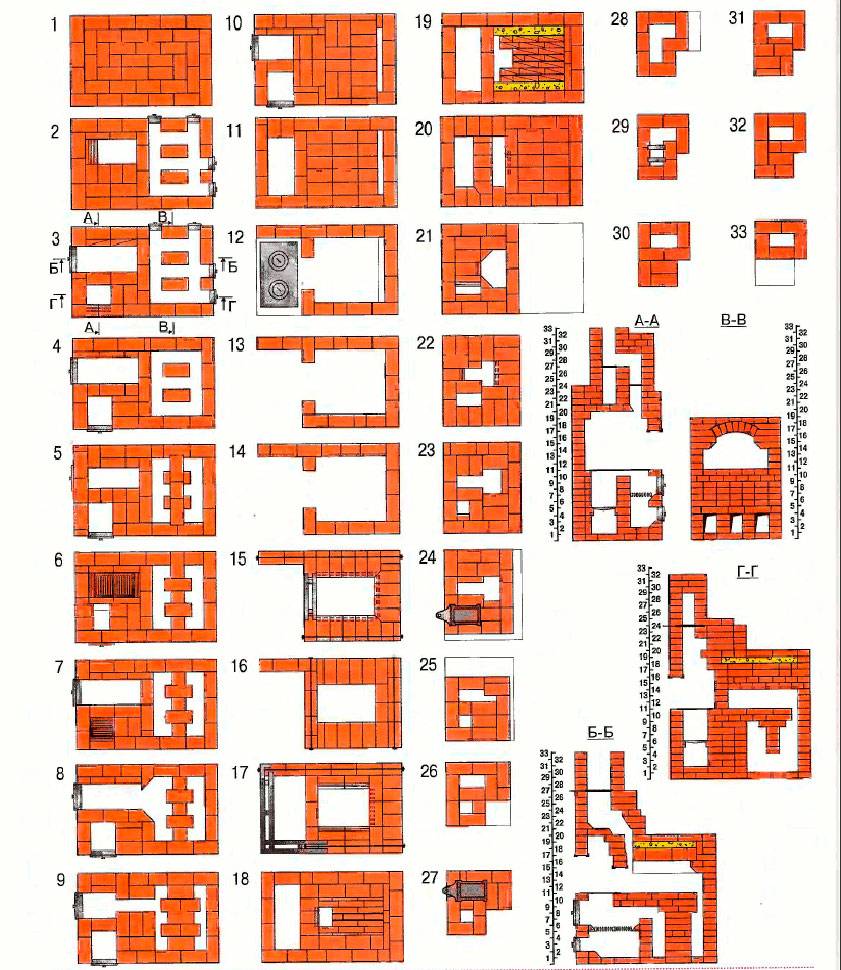
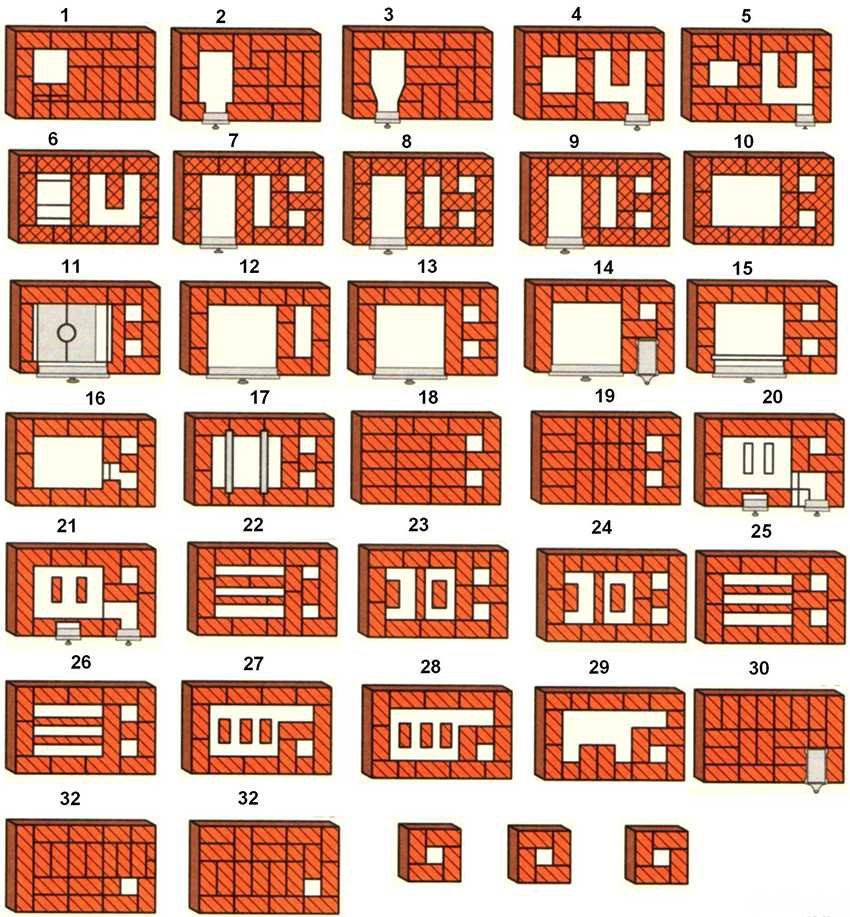
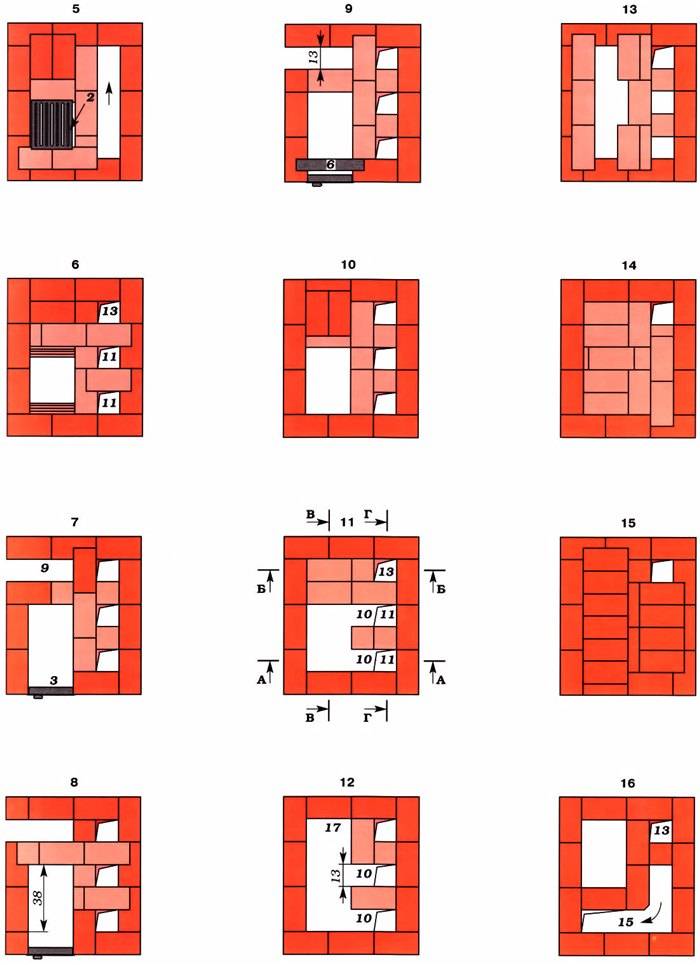
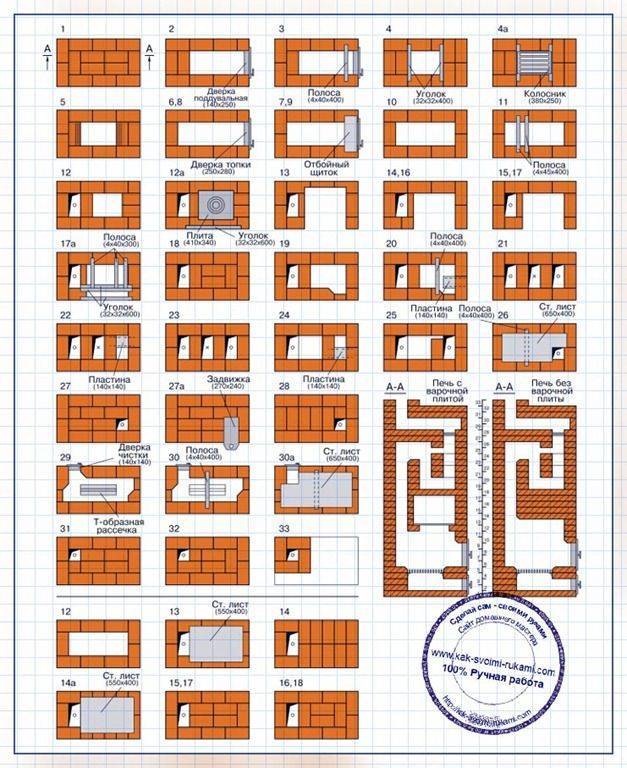
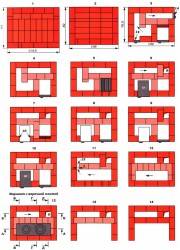
The general arrangement of each row can be seen in the diagram:
Masonry scheme
Carefully follow the instructions, otherwise you will not be able to make hidden internal channels for hot air.
Step-by-step instruction
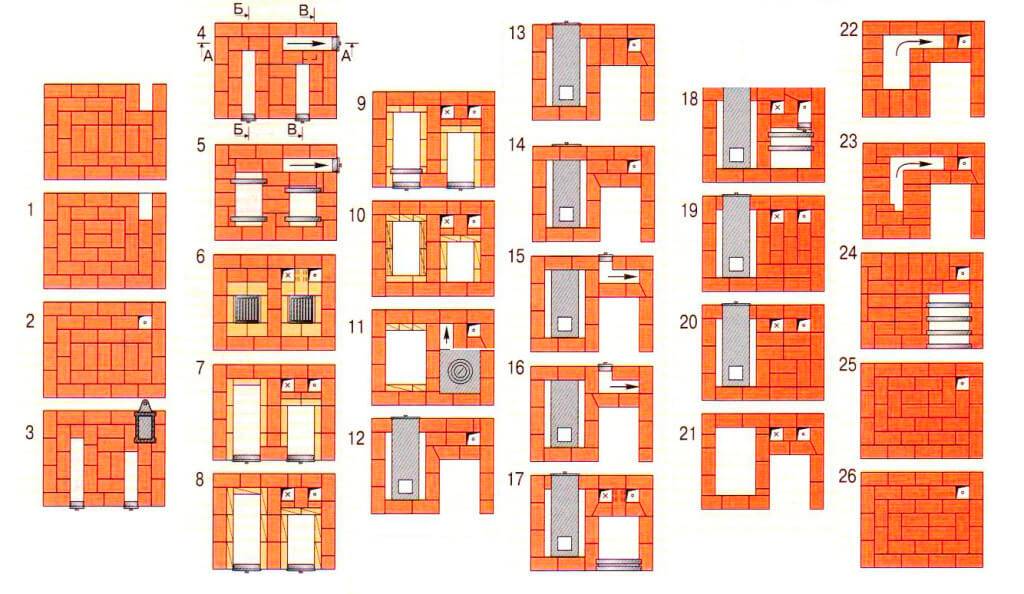
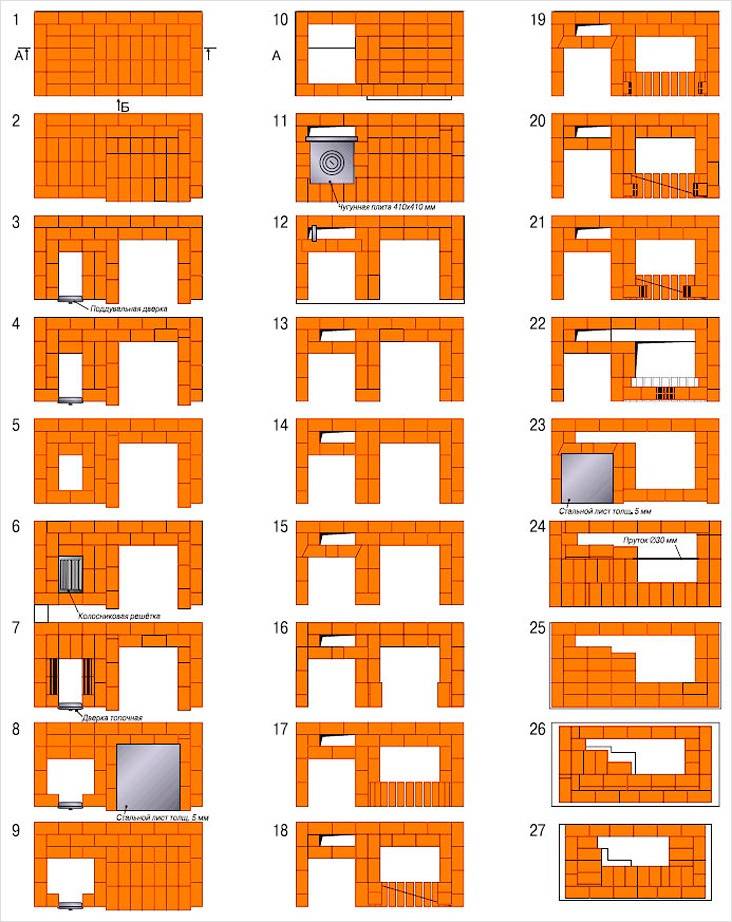
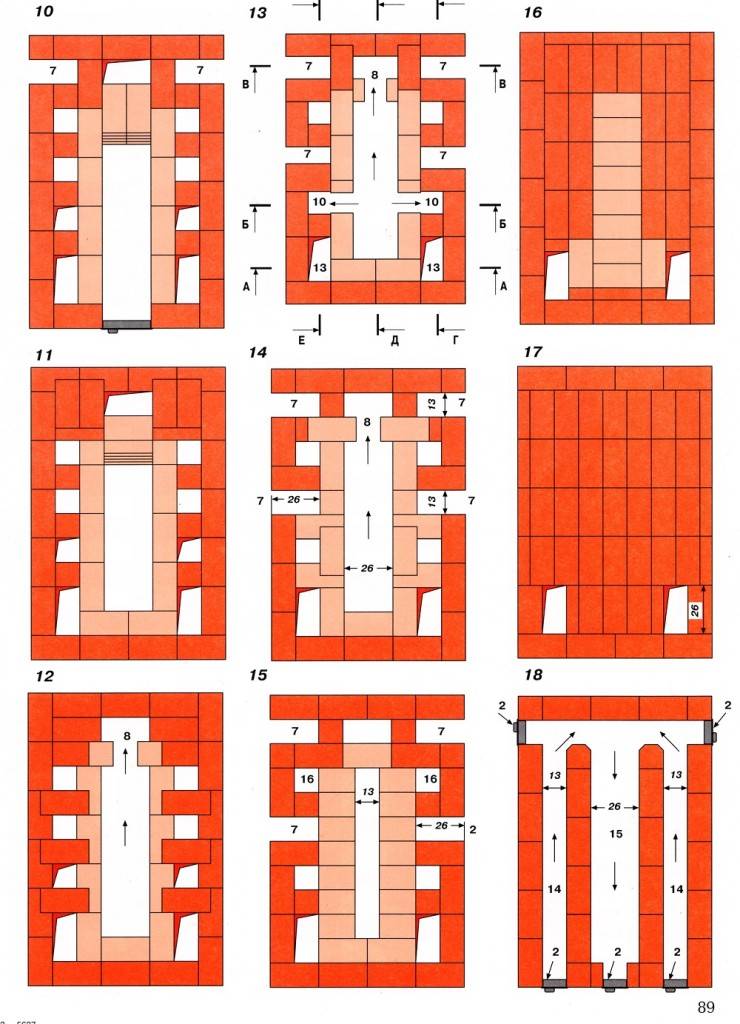
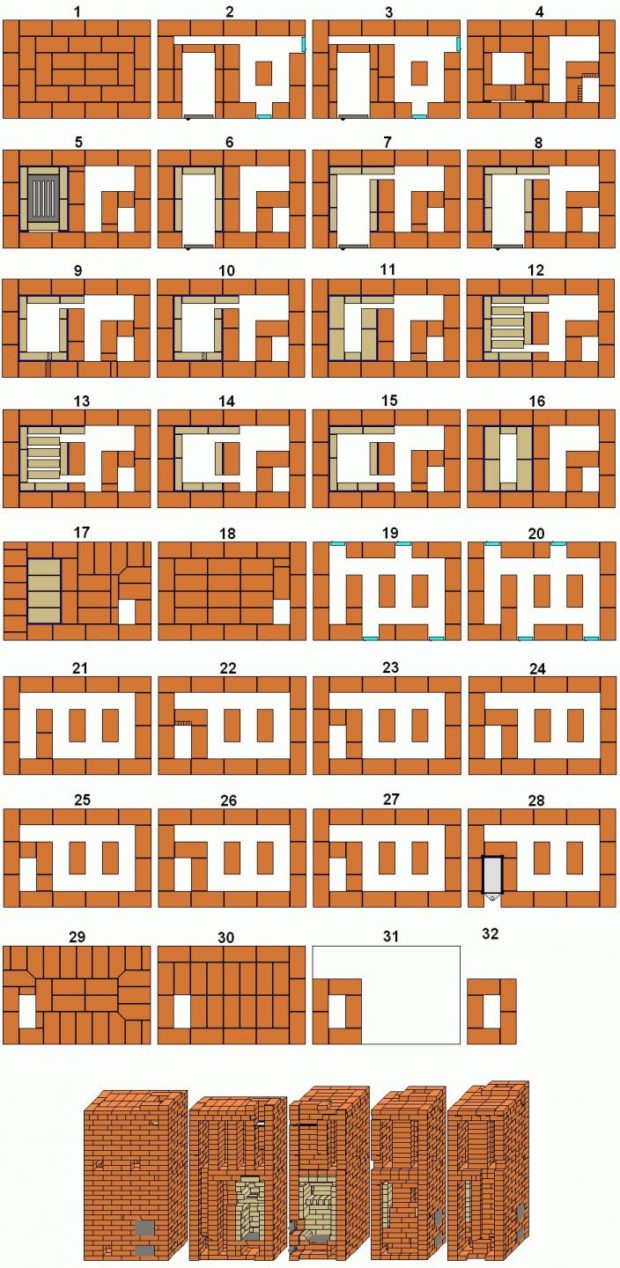
An example of laying out by rows (in brackets - the number of the row):
- (1) Placed directly on foundation waterproofing.
- (5) Base for vault arch.
- (6) Installation of grates, the cleaning channel is narrowed.
- (7-8) Lay the steel sheet on top of the hearth.
- (10-11) The same, but with the installation of the hob.
- (12-16) The same, on the 15th row they raise the arch.
- (17-18) A knitting wire is laid between them. There is a narrowing of the arch.
- (19-21) Finish the couch device.
- (22) From here the rise of the chimney begins.
As can be seen from the diagram, there is nothing in this work that requires special knowledge and a cunning tool.
How much does it cost to build a Russian stove with a brick bench
To build a Russian stove with a sun lounger with your own hands, it is enough to know the price of the materials used:
- The need for bricks for such a hearth, which heats an area from 30 to 50 m2, is 1800 pieces. With an average price per unit in the range of 22-25 rubles, the cost of masonry material is 45 thousand rubles.
- Fireclay bricks for the firebox (50 pcs.) - 3 thousand rubles.
- A set of metal parts - 25 thousand rubles.
Total purchase costs - 73 thousand rubles.
If you order work from a master stove-maker, the 2020 prices for masonry are approximately 110 rubles per 1 piece. bricks. The specialist will need to pay another 198 thousand rubles.


