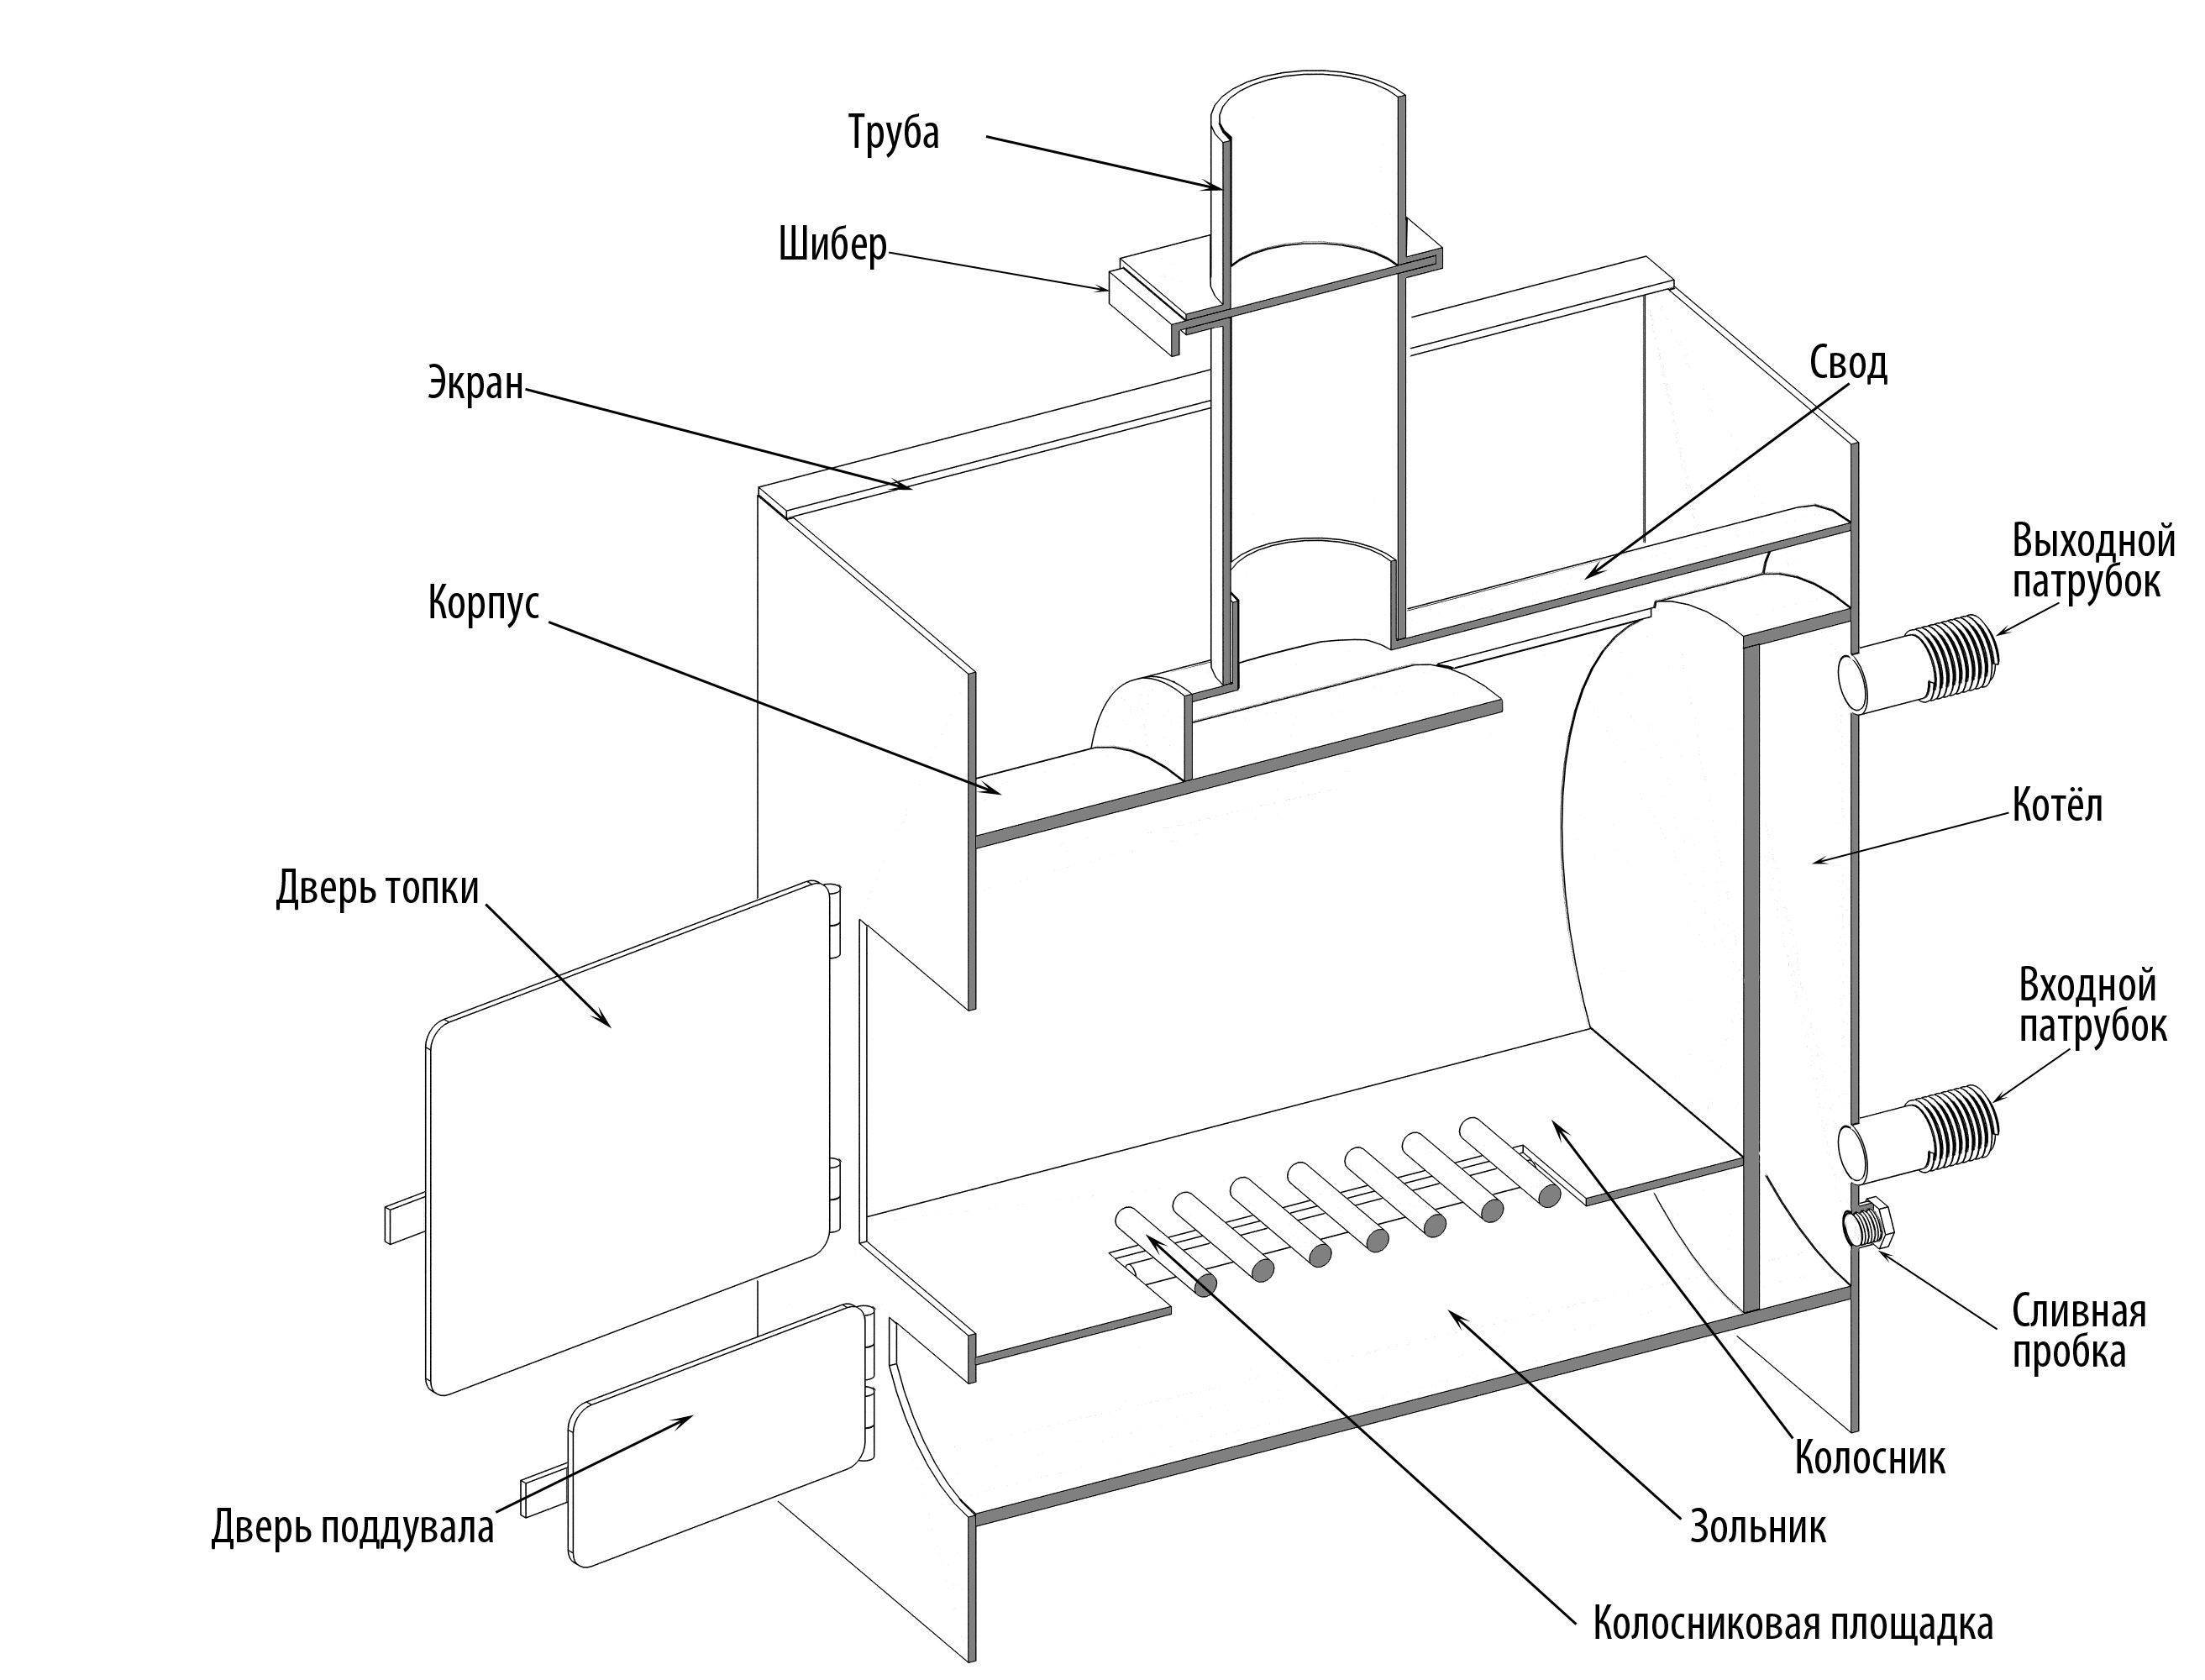
- materials
- Brick
- Solution
- Step by step bricklaying oven
- Bricklaying from the 1st to the 7th row
- Bricklaying from the 8th to the 23rd row
- Installing an iron stove: choosing a base
- Reload
- Additional fire barriers
- Features: pros and cons
- Furnace construction
- Foundation
- brick oven
- Installation of a metal furnace
- Rules for choosing the place of installation of the stove for baths and saunas.
- Criteria for selecting the point of installation or construction of the furnace.
- Requirements of SNiP when installing the furnace.
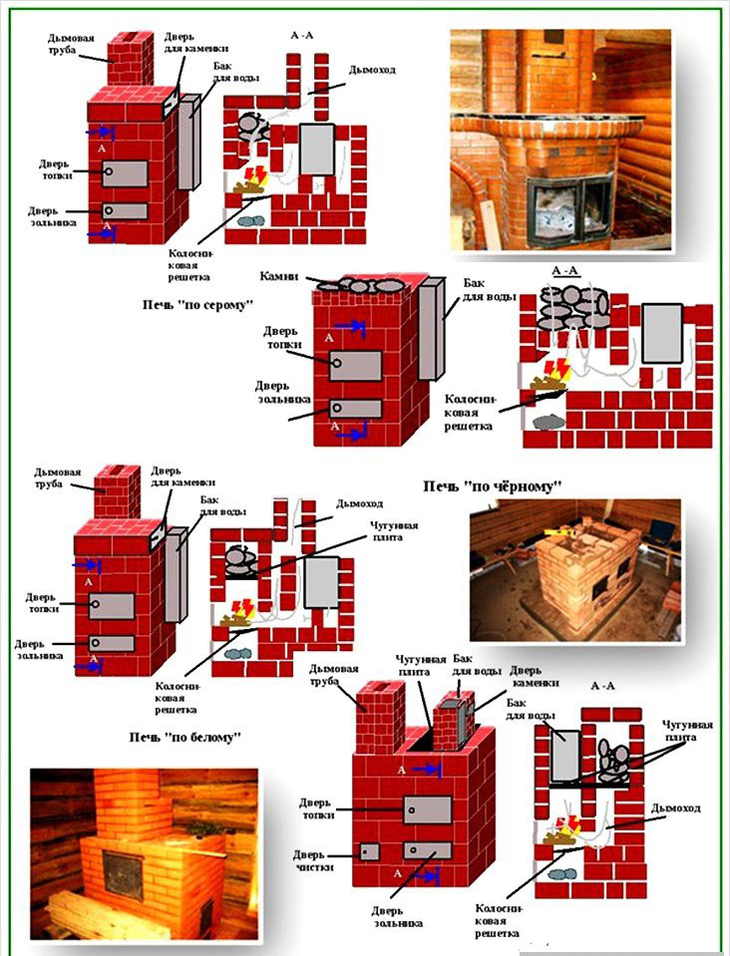
- The sequence of the construction of the sauna stove
- Table. The procedure for the construction of a sauna stove
- Foundation masonry
- About foundation mortar
materials
After you have decided everything with the dimensions, found a suitable drawing, chosen the option of erecting and placing a thermal structure, you need to think about the selection of high-quality materials. Let's analyze the most popular.
Brick
When building bath stoves, many make a mistake when choosing the main element - brick. The masonry must be fireproof, since the combustion temperature can reach 1400 degrees. Often, sellers in stores give out ordinary goods as fire-resistant. To test the material for strength and suitability, check it for chips and cracks. If the surface is uneven, with many defects, then it is not suitable. You can also try hitting it with a hammer.The tool will bounce off a quality product, while making a thin sound. There is another simple way to check - drop it. If the building material crumbled into small pieces, then you should not take a large volume.
Instagram @_elit_kirpich_
Give your preference to fireclay bricks, which have increased fire resistance and impact resistance. But it should be borne in mind that they are much more expensive than ordinary types.
To reduce costs, we advise you to lay out with them only those areas that will be exposed to the highest temperatures. For all other elements, including cladding, ordinary building materials of this type are suitable.
Solution
Clay mortars are usually used for laying brick sauna stoves. However, even here there are subtleties. For example, building material and mortar must withstand the same temperature, so it is advisable to select them according to their components. Also, the composition of the solution necessarily includes sand, which must be sieved.
Pay special attention to the purity and freshness of the water
 Instagram@tdmodulstroy
Before kneading, put the clay in a convenient container, grind it and fill it with liquid so that a homogeneous substance is obtained. Then mix the resulting solution well, thus getting rid of lumps, and leave the mixture for 24 hours. The next day, all that remains is to strain the building material, rub the lumps with your hands and pour sand into it.
Pay attention to the proportions: one bucket of water usually has a bucket of sand.To build a brick oven for a bath with your own hands, you will also need a concrete mortar, which will need to be prepared from one part of cement, three parts of sand and 4 parts of crushed stone and water in proportions equal to half the weight of cement
To build a brick oven for a bath with your own hands, you will also need a concrete mortar, which will need to be prepared from one part of cement, three parts of sand and 4 parts of crushed stone and water in proportions equal to half the weight of cement.
After everything is prepared, you can start building.
Step by step bricklaying oven
The procedure for erecting brick walls for a bath is determined by the construction scheme - ordering. The proposed step-by-step instruction considers an alternate brick layout.


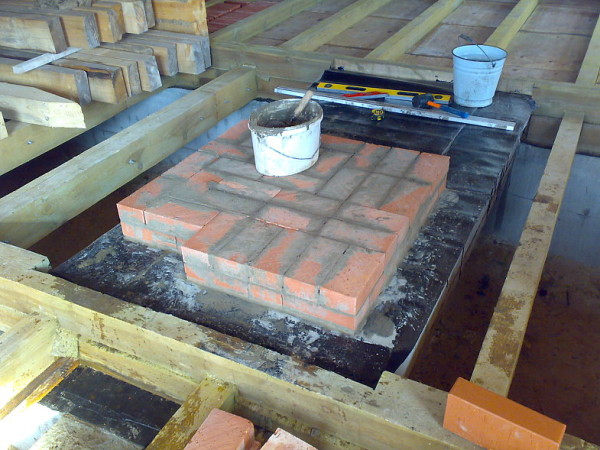
Bricklaying from the 1st to the 7th row
For beginners, a completely logical question arises: how to fold the stove from the foundation (the first 7 rows)?
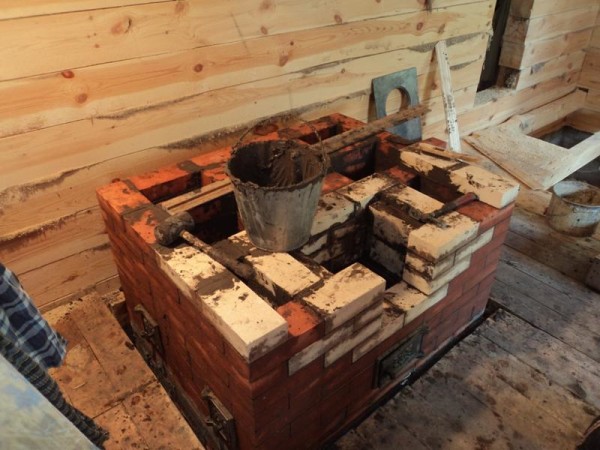
- The first row is laid out immediately on the waterproofing layer of the foundation. Bricks are pre-wetted with water. Corner elements are made at a right angle, which is checked by a corner. The edges require careful measurement, which will prevent unwanted gaps in the furnace structure. In this case, the thickness of the finished joints between the bricks should not exceed 6 mm. To better lay down the bricks, you need to perform the correct mixing of the mortar.
- The second row of bricks is laid out in a similar way, while each subsequent element should be located at the junctions of bricks from the bottom row. According to the same scheme, bricks should be laid out for the third row. A blower door should be installed here. It is fixed with thin wire and steel strips.
- Before proceeding with the laying of the next row, it is recommended to check the evenness of the walls being erected vertically and horizontally, as well as the accuracy of the angles. In this row, wells for ash and grates for air ducts are installed. To do this, small holes are made in the elements of 1 cm each with gaps for mounting the grate. Under the installed grating, the back wall is made slightly rounded.
- In the sixth row, the installed blower door is fixed, and in the seventh row, the installation of the grate and the door for the furnace is completed. To ensure safe heating of the steam room, the stove door must be made of cast iron. At the moment it is the most durable and heat-resistant material.
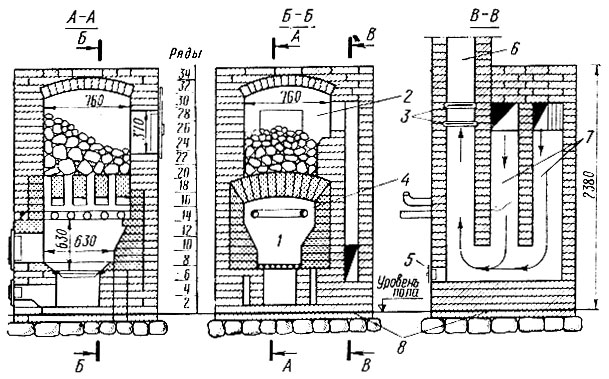
Bricklaying from the 8th to the 23rd row
- How to fold the stove from the 8th row and before installing the chimney? When forming the eighth row, a partition is installed, which serves as the basis for arranging the chimney. By a similar principle, brickwork is carried out up to and including the 14th row, on which metal channels will be installed. At the same time, it is necessary to equip a small opening in the front wall of the furnace for vertical installation of the water tank so that it is in full contact with the channels.
- For laying out the fifteenth row, ½ bricks are used, which are placed at a slight angle between themselves. This will serve as the basis for the dividing wall. Until the 18th row, the laying of bricks is carried out by analogy with the first rows of the structure.
- When laying the nineteenth row, a steam outlet door is installed. Next, metal strips are installed, with further laying of the remaining rows.This is necessary to securely fix the door frame for steam outlet and install a hot water tank, which is lined with brickwork.
- From the 23rd row, a chimney pipe is installed, which determines the final height of the structure.
Installing an iron stove: choosing a base
Nobody puts a metal stove just on the bath floor. And here's why: the thing is heavy, and therefore it would simply begin to sag on the floor over time. And I would do it unevenly. And when the oven is not level, it can crack. Therefore, either a brick base is made under it, or even a separate foundation with horizontal lines adjusted to the level in order to prevent the destruction of the furnace.
To decide whether you need a lightweight or a full-fledged base, you must first calculate the mass of the furnace with everything due to it. You will learn how to do this from our article - reluctance to repeat, and everything is described in detail there.
Reload
Solid fuel long-burning appliances are designed in such a way that one bookmark is enough for a long time. For ordinary wood-burning stoves, one portion is enough for a short time. At best, not 6-8 hours. Therefore, to maintain the operating mode, it is necessary to re-bookmark. It is performed when the tree is almost burned out, but a bluish light flame remains.
In the process of laying a new portion, two important conditions are observed. First, carbon monoxide must not be allowed to enter the room. Secondly, you need to maintain a high temperature, which will greatly facilitate re-kindling. Therefore, do everything as quickly as possible.They begin with the fact that the smoldering remains of firewood and coals are carefully raked into the center of the chamber. So that they are in the middle of the new bookmark. Then everything is done in the same way as the first time.
Additional fire barriers
To protect wooden partitions, ceilings, wood trim in the steam room, they make “cutting” of fireproof products. They lay high-quality brickwork, while the system is not tied to the stove masonry. Cutting is carried out in the following areas:
- the flue located horizontally passes through overlapping. Brickwork is tied to the laying of a stone chimney;
- next to the brick stove, which will occupy the space in the interior wall, fire gaps should be filled. Cutting is carried out vertically along the entire height of the thermal unit and its chimney;
All gaps around the stove in the interior wall must be filled
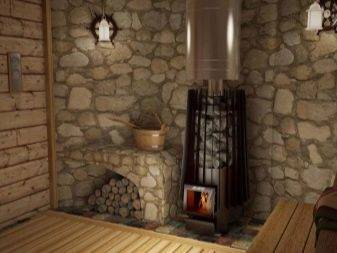
the heat generator is located in the bath, and its door goes into the next room, protective building materials are also mounted around the furnace channel.
For laying the smoke channel, ceramic products, metal, asbestos-cement and concrete panels are used. They use a passage tube or mount a box, fill them with non-combustible material - basalt wool. In the lower zone, the iron node of the pipe passage is hemmed with stainless steel.
Features: pros and cons
A real connoisseur of the Russian bath will, of course, prefer a brick stove, it keeps heat for a long time, with its help the air in the bath is created more humid. These characteristics have a beneficial effect on human health, which is undoubtedly the advantage of the Russian bath. To melt such a stove with wood to the desired temperature is a troublesome business and it will take from 3 hours to a day.It requires serious, regular care, it must be cleaned every year, sorted out, lubricated at least once every 2-3 years, this also requires a specialist and a lot of money. A solid supply of firewood is also needed.
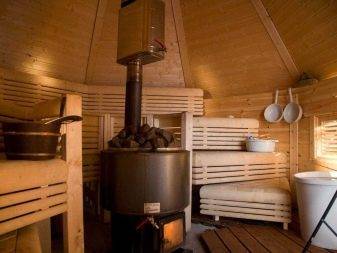
Home-made stoves are diverse in their design and depend on the size of the bath, imagination, capabilities, and most importantly, on the preferences of the owner. In the Finnish bath, the air temperature reaches 85 degrees, and the air humidity is low - from 5 to 15%. In a Russian traditional bath, the air temperature should be kept at 55-65 degrees, and the air humidity should be up to 60%. It is on this that the design features of these products for the bath will depend.


In a Finnish bath, for optimal heating of the room, a large furnace part is needed, which heats the air around it. For such a stove, a heater it is not necessary to do it, and if they do it, then it is small and not closed, because you don’t need a lot of steam in such a bath.
In a Russian bath, on the contrary, the stove should produce a kind of fog at a temperature of 150 degrees. You can get this effect with the help of stones heated to at least 500 degrees, preferably in a closed large heater, arranged on top of the firebox.

What result should be obtained from a metal stove:
- the speed of heating the steam room;
- keep warm in the stove and bath longer - this will help to increase the size of the firebox and (or) create a heater, arranged inside or outside the stove;
- saving space in the steam room;
- safety.
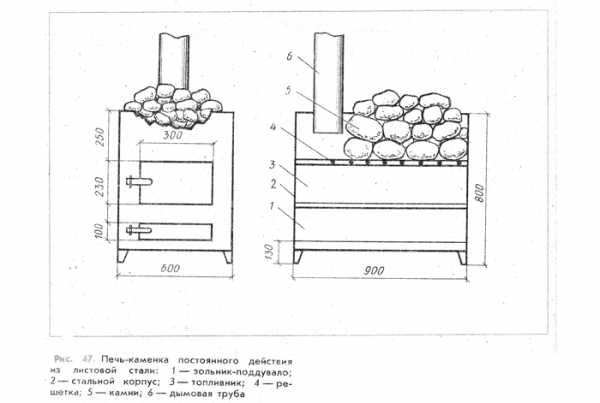
Furnace construction
Fireclay firebox
- The stove must be installed on a non-combustible material that will insulate its heat from nearby wooden structures.
- It is necessary to lay a metal sheet around the furnace door to protect the wooden floor from fire.
- Usually, a chimney is not included with the heaters, so you will have to do it yourself. Most often, the pipe is made of metal and equipped with a damper. The fewer bends the pipe has, the better. The chimney can be led either into the roof or through a hole in the wall.
- In small baths, the stove should be placed in the middle of the room, so it will heat it evenly.
- Refractory fireclay bricks are used for laying. To save money, you can lay out only a firebox with them, and do the rest from ordinary red brick.
- Laying is done only on clay mortar, as cement does not withstand high temperatures. To prepare it, you need to mix clay and water 1 to 2.
Foundation
Foundation for a stove in a wooden house
To solve the question of how to put the stove in the bath securely, you need to make a separate foundation for it.
If the stove is not too heavy, you can do without it, but it is recommended to strengthen the floor in this place with additional supports or logs.
- To do this, a pit is dug in the right place, a little deeper than the freezing level of the soil. A sand bedding with a layer of 15 cm is filled up and compacted to the bottom, and then the same number of stones or brick battle. After reliable ramming of the stones, a backfill of crushed stone is made from above.
- Next, formwork is made and concrete is poured, just below the floor level.
- When the concrete hardens, the formwork is removed and waterproofing is done on the sides of the tar. If there are still gaps between the concrete and the ground, they are covered with sand. A roofing material waterproofing layer is laid on top of the foundation.
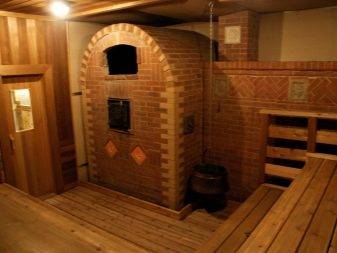
brick oven
The laying is done according to the scheme you have chosen.
If you have little experience, then it is best to use ready-made orders, an example of one of them is shown in the photo.
Ordering the sauna stove
- The first 1-2 rows are laid completely on the foundation, as a base.
- Then a door is made for the blower, it is needed to create reverse thrust.
- After that, a grate is laid so that the firewood from the firebox does not fall down, and air enters the firebox from below.
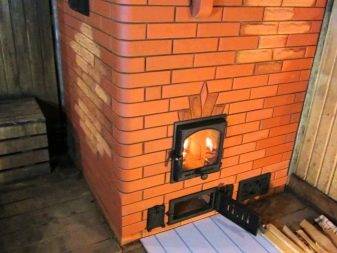
- After the grate, rows are laid for installing the furnace door. It should be 2 times the size of the blower.

Installation of furnace doors
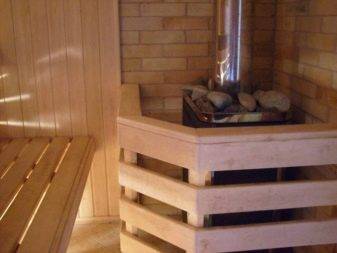
- A cast-iron stove is laid on the firebox, and ordinary stones are laid on it. When the stove is hot, it will be enough to pour water on them to create steam.
- However, it is best to install a steam generator. It will allow you to heat the steam room much faster, give more temperature and produce soft, dry steam that is healthy for your health.
- The water tank is installed depending on the scheme you have chosen.
To speed up drying, it can be heated with small portions of small chips 6-7 times a day. Such procedures will speed up the drying of the stove up to 2-3 weeks.


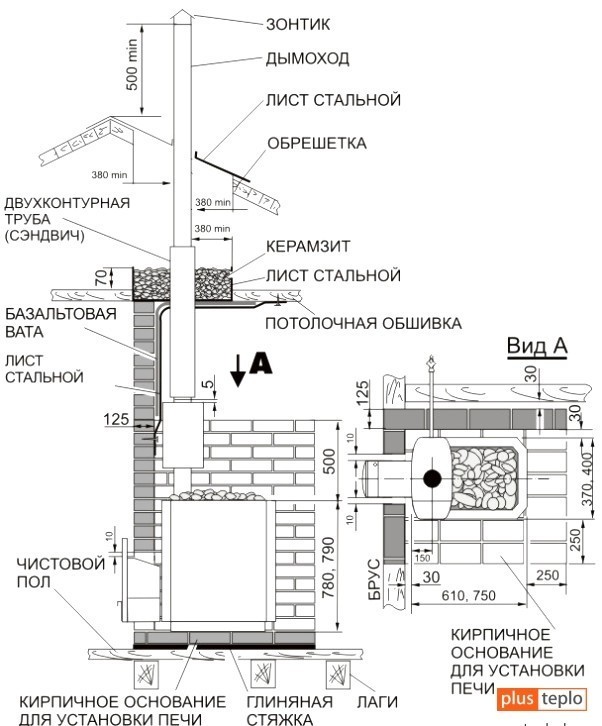
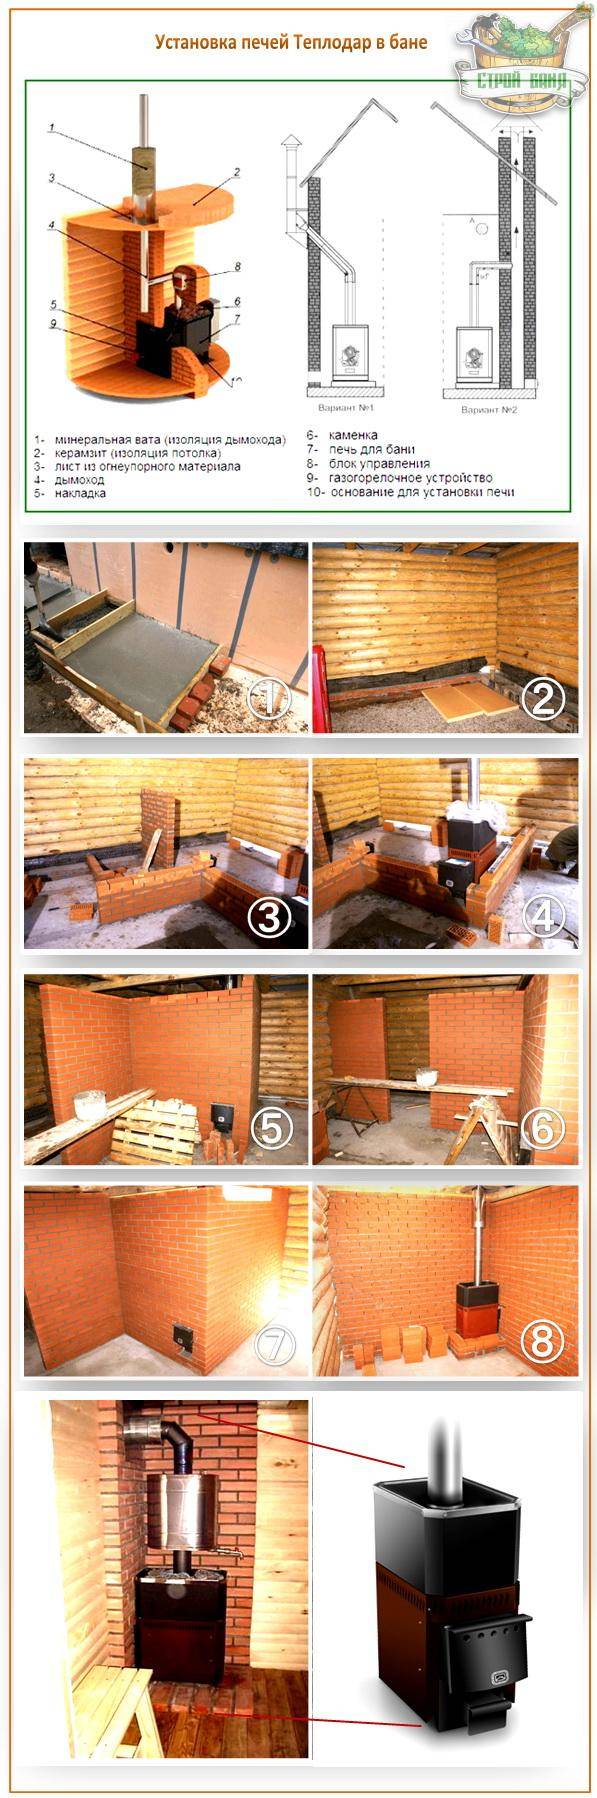
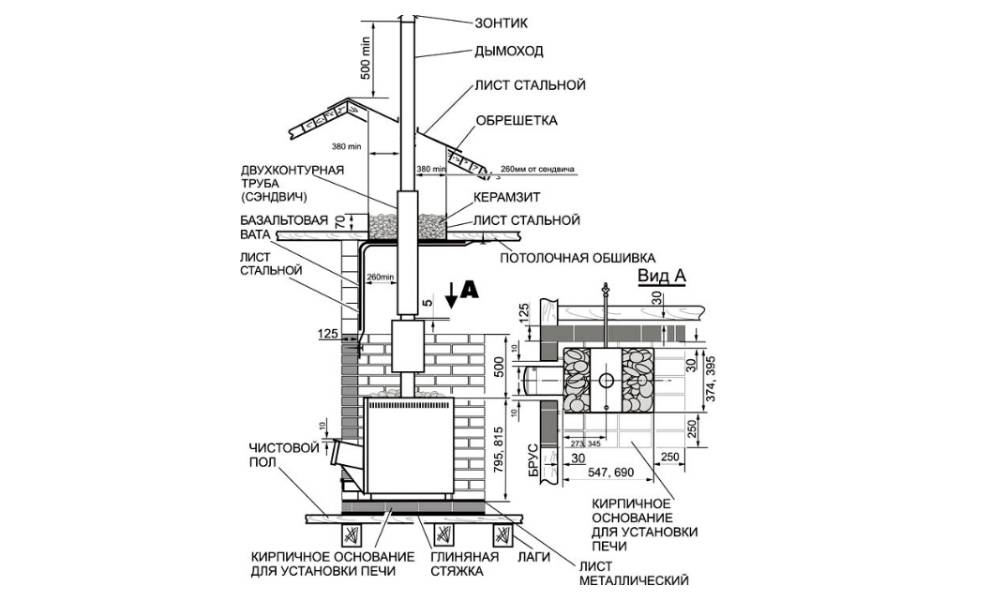
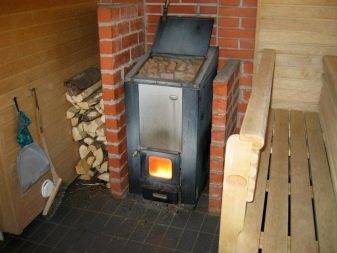
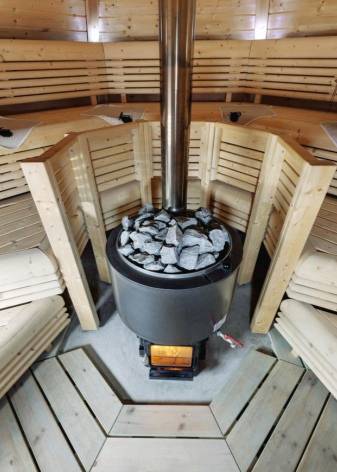
Installation of a metal furnace
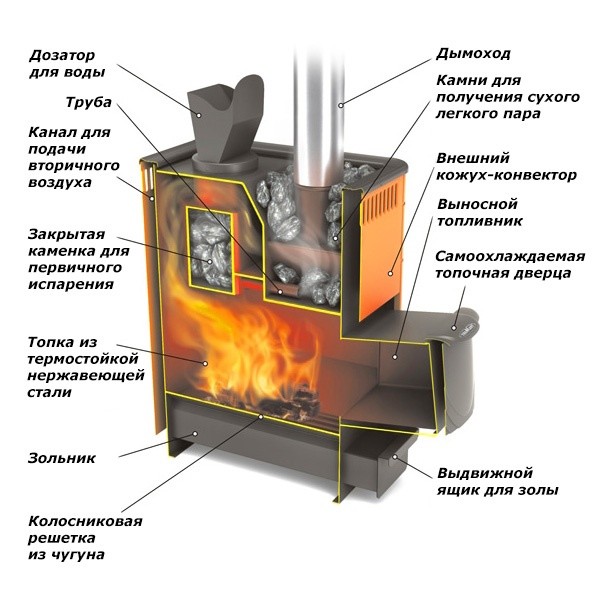
Sauna oven device
Now about how to put a ready-made stove made of metal in the bath.
- First of all, you need to prepare a place for its installation. As a rule, a separate foundation for such species is not required. However, the place around the installation of the stove in wooden baths must be lined with brickwork and a gap of at least 5 cm must be made.
- From above, you can fix asbestos-cement sheets and tile the walls and floor in the hot zone.
- Then the stove is installed on a flat, stable base and a chimney is connected to it. It can go into a cutout in the wall, or through the roof.Thermal insulation must be fixed around the pipe to prevent fire. To do this, you can make a homemade tin box and a decorative nozzle.
- The joints of the chimney must be treated with a heat-resistant sealant.
- Refractory bricks and washed stones are laid inside the metal sauna heater.
- After installation, a metal screen is put on the furnace to reduce heat radiation.
Rules for choosing the place of installation of the stove for baths and saunas.
Russian baths are a structure made of timber or brick with a wooden finish on the inside of the building. Therefore, the installation site is the main stage of preparatory work. This applies mainly to steel stoves, but there are also SNiP rules for brick heaters.
Criteria for selecting the point of installation or construction of the furnace.
Before starting work, it is important to responsibly approach the choice of the installation site of the stove, as well as the choice of the stove itself for the steam room according to the following criteria:
- unit power. This characteristic affects the dimensions of the firebox, the overall design and the size of the stones. For the calculation, they use a simple rule - for heating each m2, a furnace power equal to 1 kW / h is required;
- the design of the furnace and the exit point of the chimney. The horizontal section of the exhaust gas pipe must be no more than 1 m;
- wall, ceiling and floor material. The choice of material and the distance from the furnace to flammable surfaces depend on this;
- the material from which the stove is made. The minimum distance to a wooden wall from a brick oven is 30-40 mm.
Requirements of SNiP when installing the furnace.
Where to install a stove in a bathhouse - the rules require that you maintain minimum indents from flammable surfaces when installing metal structures:
one.The minimum distance from a wooden or other wall made of flammable materials to a steel wall with unprotected safety screens is from 800 mm.
2. When the firebox passes through the wall, it must be made of non-combustible material and protected with a thermal insulation layer of 120 mm.
3. The minimum dimension from the plastered ceiling to the top of the heater is 800 mm. This dimension increases to 1200 mm if the ceiling is made of combustible materials.
4. The distance from the lower edge of the furnace to the wooden floor, protected by a protective screen with a layer of thermal insulation - 130 mm.
5. When installing a steel heater, the foundation or protective screen for the floor must exceed the dimensions of the stove - at least 100 mm.
6. 1250 mm is the minimum dimension from the furnace compartment door to the opposite wall.
If the stoves are equipped with water tanks that are installed on the chimney pipe or hanging nets with stones, the distance to the walls is measured from these devices.
The buyer must check the quality certificates and the passport for heating equipment, which must indicate the manufacturer, batch number and a special holographic sign.
Everything is clear with theoretical questions, now you need to familiarize yourself with the answer to the main question of the article - how to properly install a stove in a bath?
The sequence of the construction of the sauna stove
Regardless of the chosen configuration of the brick sauna stove, the procedure for its construction remains identical for all situations: from the foundation to the arrangement of the chimney and finishing. In the following table, you can find important information about each stage of the event in question.
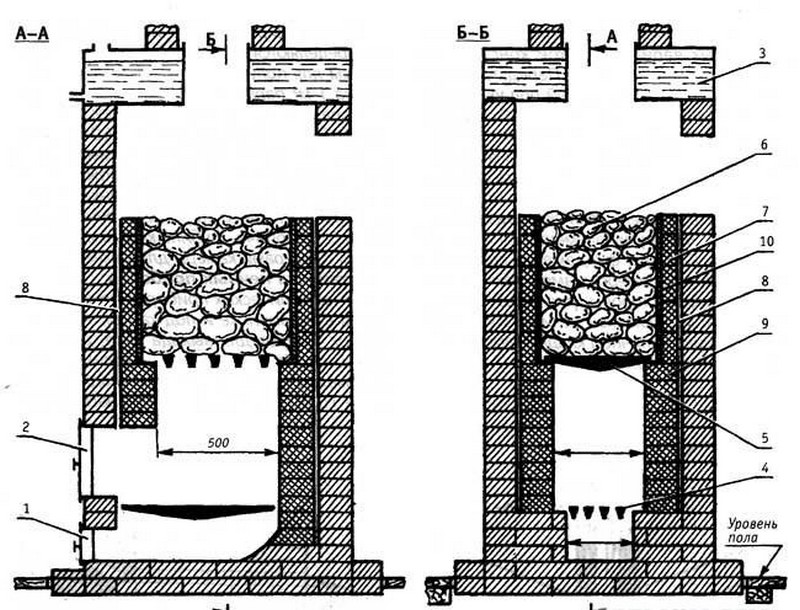


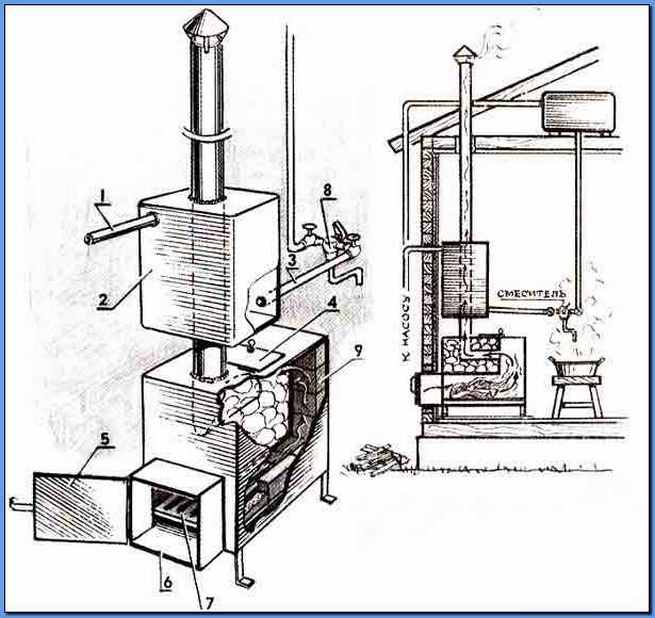

Table. The procedure for the construction of a sauna stove
| Stage of work | Description |
|---|---|
| Foundation arrangement | There are several types of foundations for a sauna stove. You are offered the most optimal and popular option. Do the following: - mark the site for the future foundation by driving in pegs in the corners and around the perimeter of the base to be equipped, and pulling a rope between them to make it easier to navigate. Select the site dimensions in accordance with the design dimensions of the furnace base; - dig a pit with a depth of about 60 cm. At the same time, expand the lower 10-15 cm in relation to the main part of the pit by 5-10 cm in each direction. After concreting, such a platform from below will provide a higher resistance of the entire structure to ground movements; - fill the lower expanded part of the pit with sand and tamp, spilling it with water for better compaction; - pour a 10-centimeter layer of gravel or broken brick on top of the sand and tamp it down as well; - mount the formwork along the contours of the pit. To assemble it, use wooden boards and screws; - lay a reinforcing mesh in the pit. For its assembly, it is optimal to use steel rods with a diameter of 1-1.2 cm. The rods are tied into a mesh with cells of 15x15 cm. At the intersections, the reinforcement is fastened with knitting wire or special modern clamps, which is more convenient. Between the walls of the pit and the reinforcing mesh, an approximately 5-centimeter gap is maintained. A similar gap must be maintained between the bottom of the pit and the reinforcing mesh. The most convenient way to do this is with the help of special clamps-stands; - pour a concrete mortar into the pit, prepared from 1 share of cement (from M400), 3 shares of clean sand, 4-5 shares of gravel and water in an amount corresponding to about half the mass of cement.The concrete is poured in an even layer to such a height that the pouring is approximately 150 mm below the ground surface on the site. Be sure to align the “top” of the fill with a level; - let the pour stand for 3-5 days (preferably 7-10) to gain strength and dismantle the formwork. Fill the resulting voids with compacted fine gravel; - cover the hardened concrete pad with molten bitumen and lay a layer of roofing material on top, carefully leveling it and pressing it to the binder. Then repeat the procedure again. The resulting two-layer waterproofing will provide reliable protection of the brick oven from ground moisture. The previously mentioned 15 cm gap between the upper edge of the foundation and the ground surface will be leveled by means of a starting solid row of bricks. |
 Preparation of mortar for masonry | Detailed recommendations for this stage were given earlier. |
| Furnace laying, installation of additional elements | The laying of the bath stove is carried out in accordance with the previously prepared order - the main component of the project of the unit in question. The step-by-step procedure for building a brick oven will be discussed further in the corresponding section. The arrangement of additional elements (in this case, it is a chimney, since it will be proposed to make the water tank built-in) depends on the specifics of a particular project and is considered individually in each case. |
| Drying the sauna stove | A fully laid out oven cannot be immediately put into permanent operation: the device must be given time to dry. During the drying period, the doors and windows in the room should be open - the stove will dry faster.After 4-5 days after the completion of the laying of the furnace, it can be started to heat with small chips for a maximum of 10-15 minutes daily. The furnace is performed 1 time per day. Escaping condensation indicates that the unit is not yet completely dry. |
| Finishing | At the request of the owner, finishing can be done. There are enough options. The most popular are the following: - tiling (clinker, majolica, terracotta or marble). One of most popular options. Differs in rather low cost and simplicity of implementation; - brick cladding; - stone trim. Well suited porcelain stoneware, granite, marble or serpentine; - plastering. The primordially Russian method, which is concurrently the most elementary and budgetary; - tiling. A labor-intensive finishing method that allows you to get truly unique design compositions. |
Foundation masonry
Since the weight of a brick stove exceeds half a ton, the foundation for it must be made appropriate.
We mark the future section of the concrete base on the ground (it should be half a brick larger than the size of the furnace). The depth of its laying should be below the actual level of soil freezing.
The foundation for the "heater" should be located at least 10 cm from the foundation of the bath building, and should not (even partially) be tied up with it. The gap between them is further filled with dry sand and well tamped.
If the walls and walls of the bath are built of combustible material, the site must be secured.Sew up the opening for the firebox and part of the wall behind it with asbestos cardboard, and place a sheet of metal at least 4 mm thick on top of it. The minimum distance to walls not protected by asbestos and iron sheets should be 350 mm, and protected, about 200 mm.
About foundation mortar
You can bookmark on a lime, cement or combined mortar.
- Lime (proportions): 1 part slaked lime / 2 parts sifted sand;
- Cement (proportions): 1 part cement / 2 parts sifted sand;
- Combined (lime-cement): 1 part cement / 6 parts slaked lime / sifted sand, depending on the brand of cement and fat content of lime.
- Fill the bottom with clean (without debris impurities) sand for ≈ 15 cm. Lightly soak it with water and tamp well;
- Pour crushed stone or broken brick over ≈ 20 cm on top and tamp tightly;
- Place the formwork along the walls of the excavated pit so that it is about 5 cm above the ground.
- Line the pit with roofing material or waterproofing film, so that it overlaps by 10-15 cm and extends beyond the edges of the formwork by 5-10 cm;
- Lay a reinforced frame at the bottom. It must be metal (not polymer). Usually a bar of at least ø 12 mm, with a square cell of 10 cm;
- Fill with concrete mortar and pierce the screed several times with a metal rod (to prevent the formation of hidden air cavities), carefully level it with a rule and check the uniformity of the horizontal level. If necessary - "drive out" the solution.
- Cover the concrete with any film and periodically moisten it so that there is no cracking from drying out;
- After the concrete has set (≈3-5 days), dismantle the formwork, and cover the edges of the screed well with bituminous mastic (tar). After it hardens, fill the gap between the foundation and the ground with clean sand and tamp;
- It remains to make waterproofing. For this we use ruberoid. It is spread in two layers, and the second layer must be laid with a perpendicular pattern of stripes with respect to the first. Pieces of roofing material must overlap by at least 10 cm and extend beyond the boundaries of the foundation by 5 cm.
Foundation work indoors is always a messy process. Therefore, cover the bath floor with plastic film. And better reinforced. It is durable and will definitely last until the end of the work.
Pay attention to the photo - this is the wrong foundation. I don’t know how it works inside, but the fact that the furnace foundation is tied up with the main one is unacceptable
The "general design" promises problems with strength and durability.


