- Laying wires
- Installing a one-key block
- Installation sequence
- Connection from a one-key block
- Scheme of connecting a block of sockets + a switch
- How to connect the block socket switch
- How to connect 3 or 4 sockets in one block
- Mounting Features
- Device selection
- Installation of a single-key block
- Connecting the cable to the contacts
- Phase connection
- grounding
- Zero connection
- Signal (outgoing) conductor
- Features of sockets: their design and purpose
- Installation
- Single key block
- Two-key device
- Varieties
- What are the advantages and disadvantages?
- Types of devices and their features
- Main popular types
- Replacing an outlet with a switch
- Conclusions and useful video on the topic
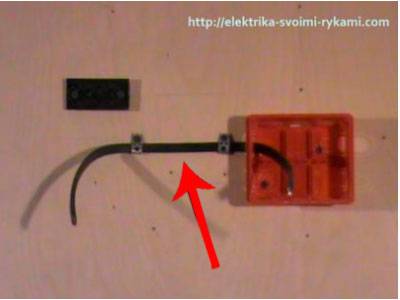
Laying wires
First of all, we will bring the wire supplying the junction box. In our example, we use a wire of the VVGngP brand; a three-core wire with a cross section of 2.5 squares is used as a power supply. The cross section was selected by the method of calculating the load on the chain, you can easily perform these calculations on your own. Here, you will find a detailed description of how to independently calculate the wire cross section, I assure you there is nothing complicated here.
On both sides, it is necessary to leave a supply of wire for connecting electrical wiring elements (machine, socket, switch) 10-12 centimeters, in a junction box 10-15 centimeters. Too short wires will be inconvenient to connect and connect, so it's better not to save much.
Next, let's connect the wire to the outlet.
Here you need a wire with a cross section of 2.5 squares.
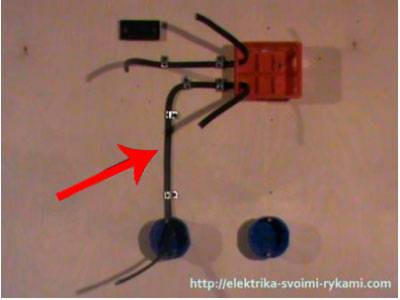
On the switch 1.5 squares.
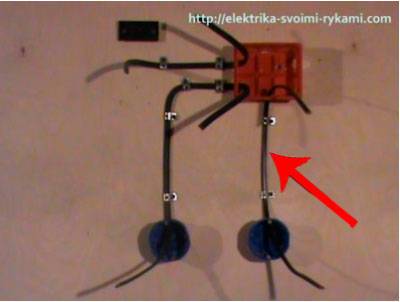
Now, we are laying a wire for lighting, we have a light bulb with a cartridge.

We have laid all the wires necessary to complete the circuit, we are moving on to the third stage.
Installing a one-key block
Instruction:
- When carrying out installation work on the installation of a single-key device, 2 socket boxes are used, which have a design that allows them to be combined into one unit. The socket boxes are installed in a recess in the wall, a 3-wire wire is inserted from the side of the socket, and a 1-wire wire from the side of the switch.
- The socket boxes are fixed in the recess with a gypsum mortar.
- When the solution is completely dry, a 3-wire wire is connected to the socket. In this case, you should carefully consider the phasing of this wire and connect the ground to the appropriate terminal. The phase wire must be connected to one of the socket terminals and brought to the switch input. "Earth" is connected to the third free terminal of the socket.
- Switch output a single-core wire is connected, which will be directed to the lamp along the gate.
- After the wires are connected, it is necessary to install the inner part in the socket boxes and securely fix it in the inside of the socket boxes with the help of a screw sliding mechanism.
- Then the final stage of installation of such a device is carried out. The decorative plastic overlay is screwed to the inside with bolts. On the side of the switch, fastening is often carried out by means of a latch.
Installation sequence

There are no fundamental differences in connecting conventional and combined electrical fittings. For most modern interlocked electrical appliances, the fit size of the internal part of the block intended for flush wiring corresponds to the dimensions of single sockets and switches.
The only thing that may be required when wiring a cable of a larger cross section, which is necessary to connect three sockets at the same time, is punching a strobe of a larger cross section.
The approximate sequence of operations when connecting the combined unit is as follows:
- A marking is made for laying the wire (cable) indicating the installation locations of the mounting boxes into which the interlocked electrical fittings will be attached.
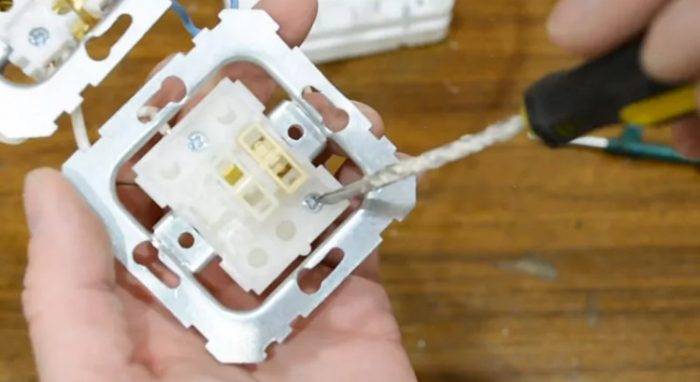
- A hole is drilled at the installation site of the box with a drill bit installed in an electric drill.
- In the box, it is necessary to break out the perforated plugs of the holes in the cable entry points.
- The stripped ends of the wire are wound inside the boxes.
- The boxes are fixed in the wall panel.
- After removing the cover from the socket block, connect the wires to its terminals.
- The block is installed inside the box and fixed in it.
- To mask the mounting gaps, a decorative panel is installed on top of the installed and connected socket-switch block.
When choosing a specific model, there may be some installation features, however, the connection sequence does not differ from that described above.
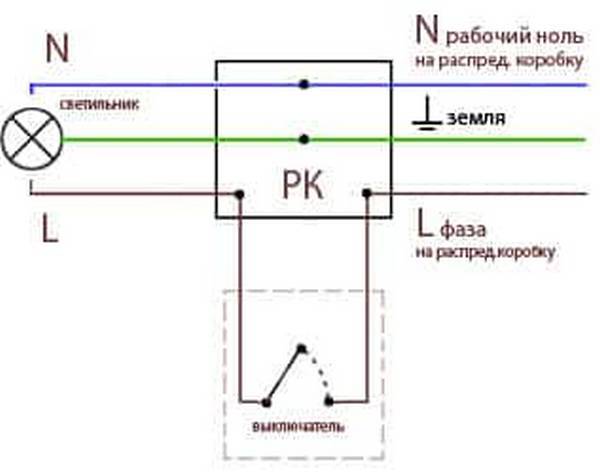
Connection from a one-key block
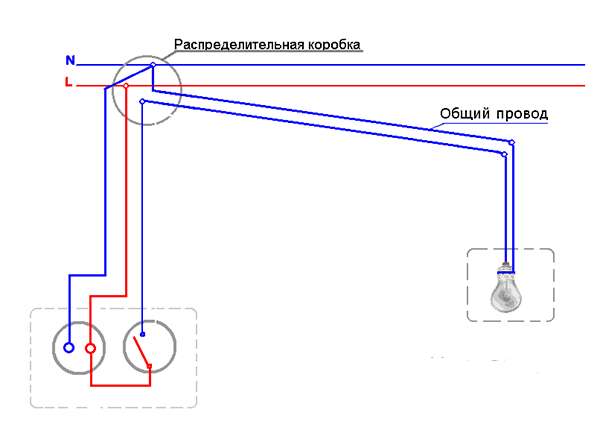
Wiring diagram for a socket with a single-gang switch
The most widely used blocks of electrical fittings, in which one or more sockets are interlocked with a single-gang switch.
In most models, several sockets have a single connection - a group of two terminal clamps for phase and zero, and the phase terminal has a jumper on one of the switch contacts.
The sequence of operations is as follows:
- From the apartment distribution box to the junction box, a two-core cable is supplied, supplying phase and zero.
- Three wires from the “socket-switch” block and two wires from the lighting device must be brought into the same box.
- In the junction box, the phase wire is connected to the wire coming from the socket terminal.
- The neutral wire from the lighting device is connected in the box to the "zero" from the switchboard, and the second wire from the lamp is connected to the conductor connected to the free contact of the switch.
- If the socket in the block has a grounding (“European standard”), then for it it is necessary to lay a separate wire to the pinching contact in the junction box.
Connecting a multi-key switch will differ only in the number of conductors connecting the switch contacts to the lighting fixture.
Blocks with LED illumination of circuits are technically no different from conventional interlocked electrical fittings. At the same time, the power supply circuit of the LED is built into the design of the device and does not require any additional connection.
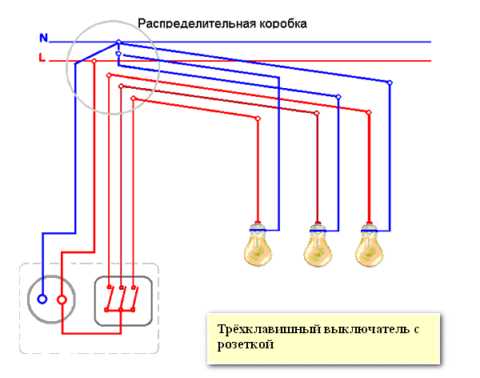
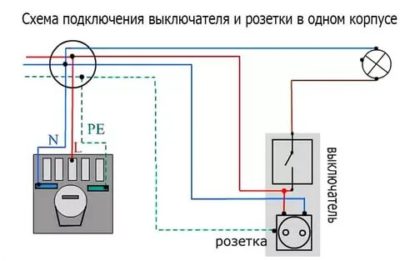
Scheme of connecting a block of sockets + a switch
In a previous article, I talked about how single or double electrical outlets are connected to electrical wiring or to each other with a loop. Now I will tell you in detail about how blocks are correctly connected, consisting of a socket + light switch or three or four sockets.
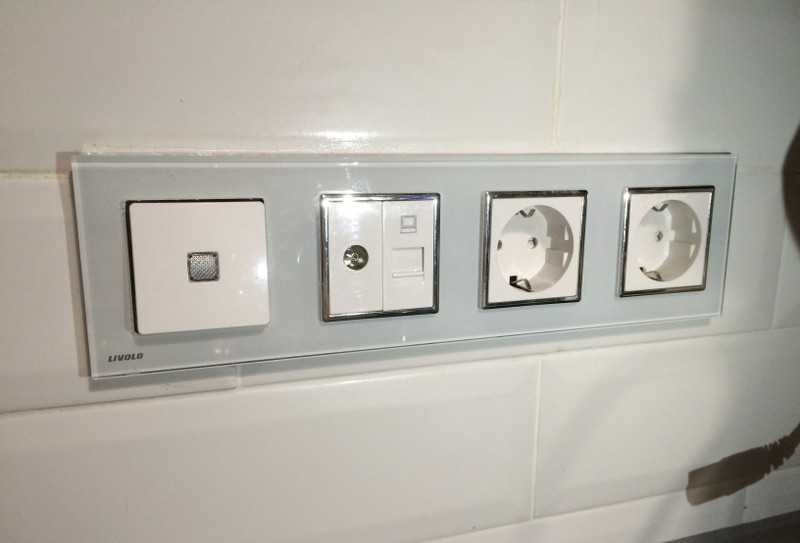
Consider
. that in one block under one cover not only switches, electrical sockets are combined, but also, if necessary, telephone and computer.


Before starting work
for connecting electrical outlets - it is necessary to turn off the power supply automatically and make sure that there is no voltage using an indicator screwdriver.
How to connect the block socket switch
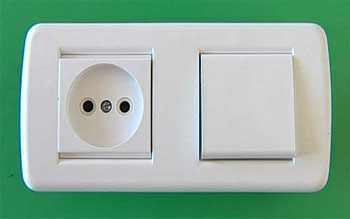
Most often, a block consisting of a double switch and socket
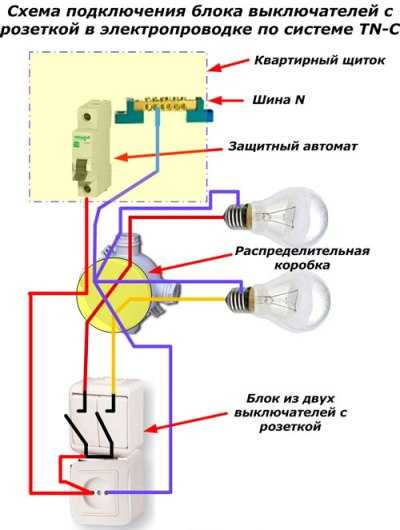
is installed in apartments on the partition between the doors of the bathroom and the bathroom. One solid block is used to turn on the light in these two rooms, as well as to plug in electrical appliances used in the bathroom - an electric shaver, a hairdryer, etc. Why is the electrical outlet taken out of the bathroom - I already told in an article called Installation electrical sockets and switches in the bathroom.
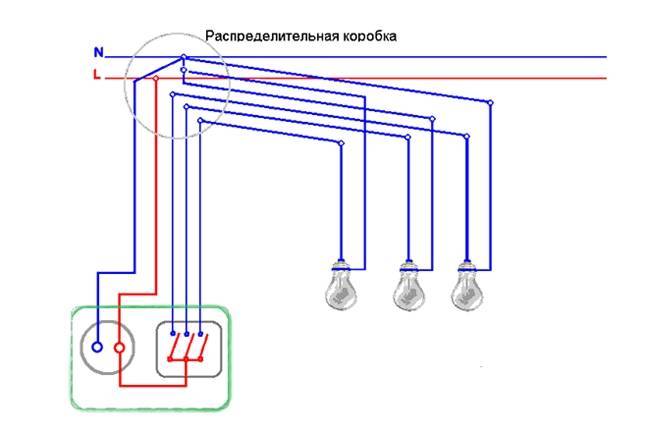
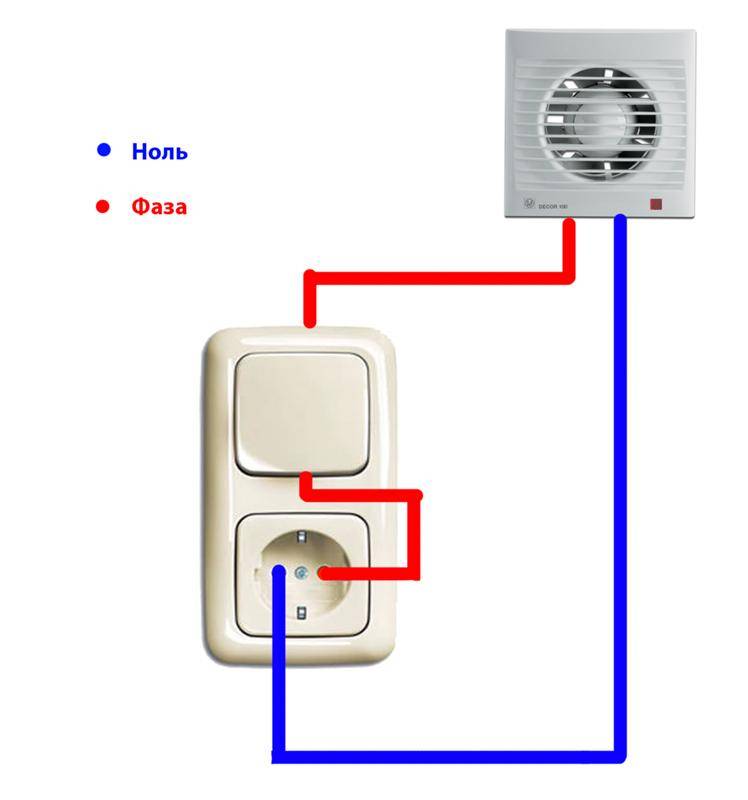
In the connection diagram of the socket block and the two-gang switch
5 wires are used from the junction box to the unit.
Grounding conductor (light green in the diagram) and zero (blue)
from the branch box are connected directly only to the socket in the unit. The phase (red) is connected to the socket and then connected by a jumper to the common contact of the incoming phase of the switch.
The remaining two wires are connected
on two switched contacts, through which the phases are connected to 2 lamps by pressing the keys located in the toilet and bathroom. Those. it turns out that there will always be phase, zero and ground on the outlet, and the phase will also be on the lower contact of the switch. And on the top contacts, it will appear only when you press the keys.
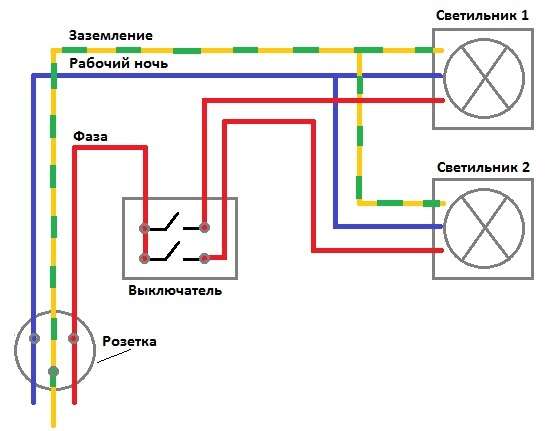
In junction box
electrical wiring is made 2 twists of two wires (yellow and beige in the diagram). The switched phases are twisted from the switch to the phase conductors outgoing to the lamps.
Necessary for the operation of lamps zero and grounding conductors
are taken from the branch box from the same connections from which the socket from the block is connected.
In order to change the inclusion of keys on the block
. it is necessary to swap the yellow and beige wires on the switch.
The connection diagram of a block consisting of a socket and a single-gang switch is completely similar, with the only difference being that one beige or yellow wire falls out of the circuit.
To connect a three key switch, you will need a sixth wire or a 6-core cable, which will be connected to the third switched contact from above, next to the yellow and beige wires.
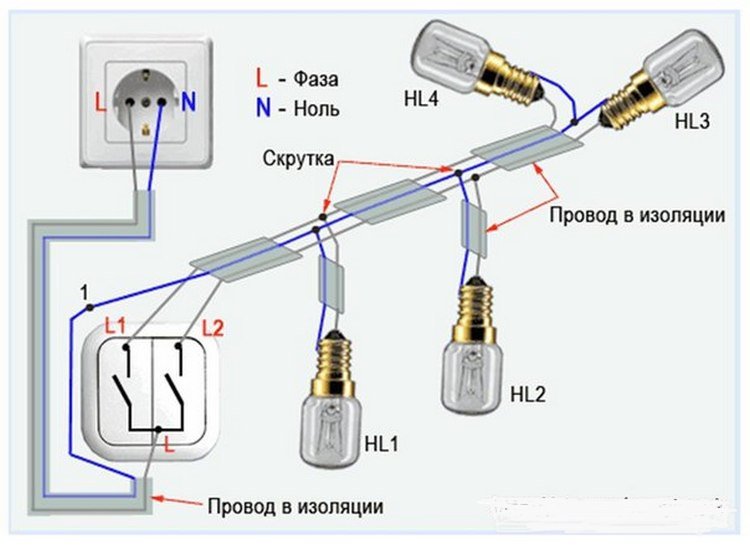
How to connect 3 or 4 sockets in one block
If in one place you need to install
more than 2 sockets for connecting electrical appliances, household appliances or a telephone, a computer network, then a block of sockets is used, i.e. all sockets will be under one cover.
The electrical outlets in the block are all connected in parallel.
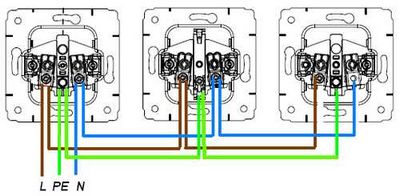 Before starting the connection, it is necessary to make and install jumpers of 3 wires in each seat.Do not make the jumpers very long, because then the wires will interfere and prevent the socket from sitting tightly in the mounting box.
The socket block is installed and connected in the following order:
Mounting Features
block
It will not be difficult to install a combined unit without the involvement of a professional electrician, since a minimum of wires is required to connect modern models.
The installation process will have only a few features that you need to consider:
- You need to prepare the necessary tools in advance, they will not require so much: an electric drill with a drill column; several screwdrivers of different sizes; pliers and nippers.
- To ensure safety during work, make sure that the handles of all tools are insulated.
- Some modern varieties are designed for outdoor installation, that is, when installing them, you can completely avoid drilling holes in the wall surface.
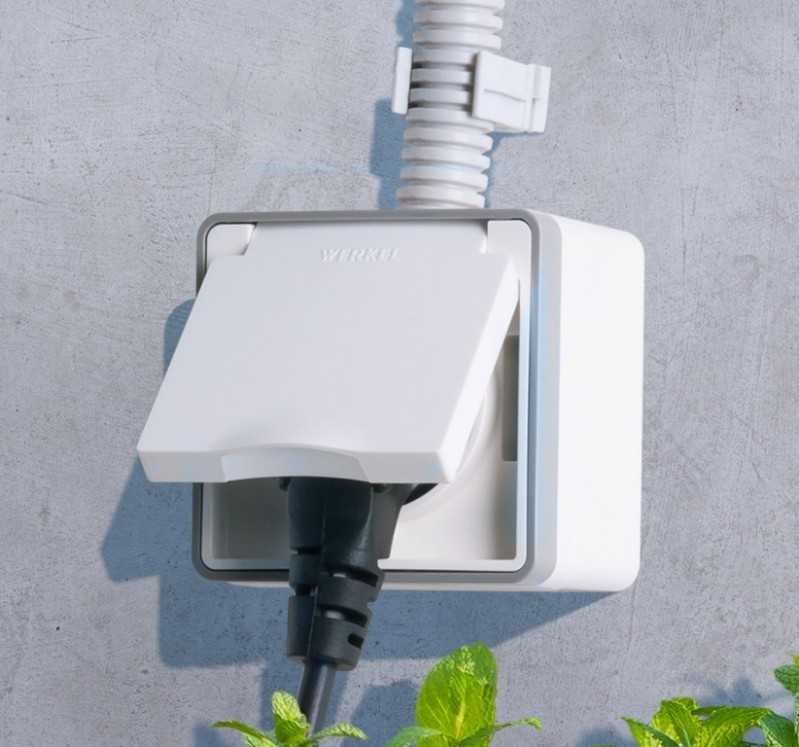
- You can choose a variety with an increased level of protection from environmental conditions, such models can be installed not only indoors, but also outdoors. Such devices have an additional element in the form of a special cover in the design, which helps to avoid the ingress of liquid into the device.
- All modern types of blocks are adapted for installation in walls of any material and regardless of the type of finish.
Device selection
Since the choice is large enough, you can find a model that matches the interior of the room.. The devices also differ functionally:
- Ordinary switches.
- Devices with an indicator that can turn on in the dark to indicate its location or indicate which key is on.
- Pass switches. They are installed in different places of long corridors or passages, on stairs, different floors, etc. Through them, one or a group of lamps can be controlled from different places.
The body of the product must be free of scratches, burrs, abrasions and other damage. The keys should be easy to switch with characteristic clicks, and the terminals should firmly fix the connected wires. Self-clamping terminals work reliably, more convenient to use. It is enough to insert the wire into the hole, and it will be fixed
Here it is important to correctly remove it if necessary. For this, the device has special latches that are wrung out. If you pull the wire out of the hole, the connector may fail.
Pulling the wire out of the hole may damage the connector.
Installation of a single-key block

First, the power is turned off. Before work, preparation is carried out: markings are made on the wall section for installation. Holes are drilled at the marked points with a crown, then a niche is made. Perforated elements for pulling the cable are removed from the mounting box, then inserted into the hole made.
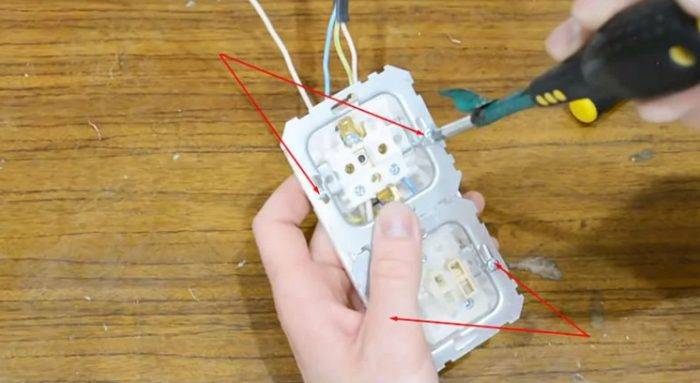
A socket with a single-key block is the easiest option. First of all, the parts that fix the decorative trim are removed from the device. First, the screw is unscrewed from the center of the socket, then the key is removed using a screwdriver with a thin sting. If there are difficulties, then it is changed to a knife. The plastic plate under the key is also removed. Then the socket and switch are released from the housing. To do this, the side screws are loosened, but not completely unscrewed. The elements are rotated a little, then pulled out of the box.
Connecting the cable to the contacts
Before you connect a socket with a switch, you need to figure out the number of cores required for the device. In our case (with grounding), four wires are required to connect this unit to the network. Three of them will be incoming: this is the ground, zero and phase. One is outgoing, through it the power will go to the lighting fixture. If there is no grounding, then a three-core cable is sufficient. Each additional block key implies an increase in the number of conductors per core.


If a ready-made device is purchased, then the socket with the switch is already connected by a phase conductor
You need to pay attention to this when assembling the block yourself. The passage of the neutral through the switch is prohibited
This is dangerous: both during operation and at the time of servicing devices (replacing light sources).
The work takes place according to the following scenario: connection of phase, protection, neutral and signal core.
Phase connection
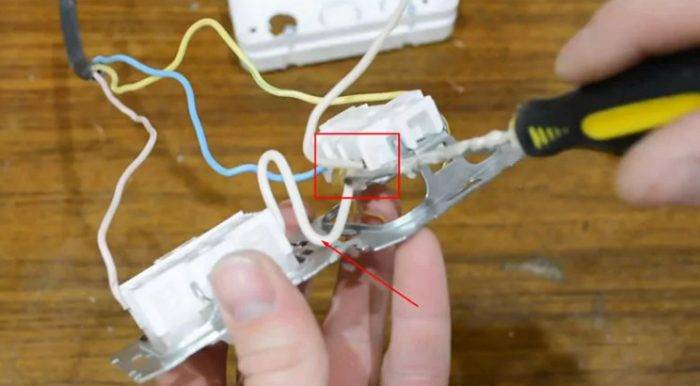
The phase wire is connected to the contact on which the jumper is located. This solution allows you to power both elements of the block at once - a socket and a switch. To simplify the work, it is better to use a four-core cable.
In this case, it is easy to understand with the help of color coding. Any conductor can become a phase, except for blue (zero) and yellow-green (ground). The two remaining cores will be phase: their usual colors are white, brown, red. One of them is intended for the incoming, the second for the conductor going to the lighting fixture. It's called a signal.
grounding
If the parting provides a contact or a grounding bracket, then a yellow-green (solid yellow or green) conductor is connected to it
In this case, it is necessary to “wind on the mustache” that only the socket needs such a precaution, the switch does not need to be grounded
When work is carried out in a private house, grounding must be provided without fail
In the houses of the old fund, it was not taken into account, so there is only one alternative - protective zeroing. With a correctly performed operation and the installation of an RCD or a difavtomat, there will be no danger
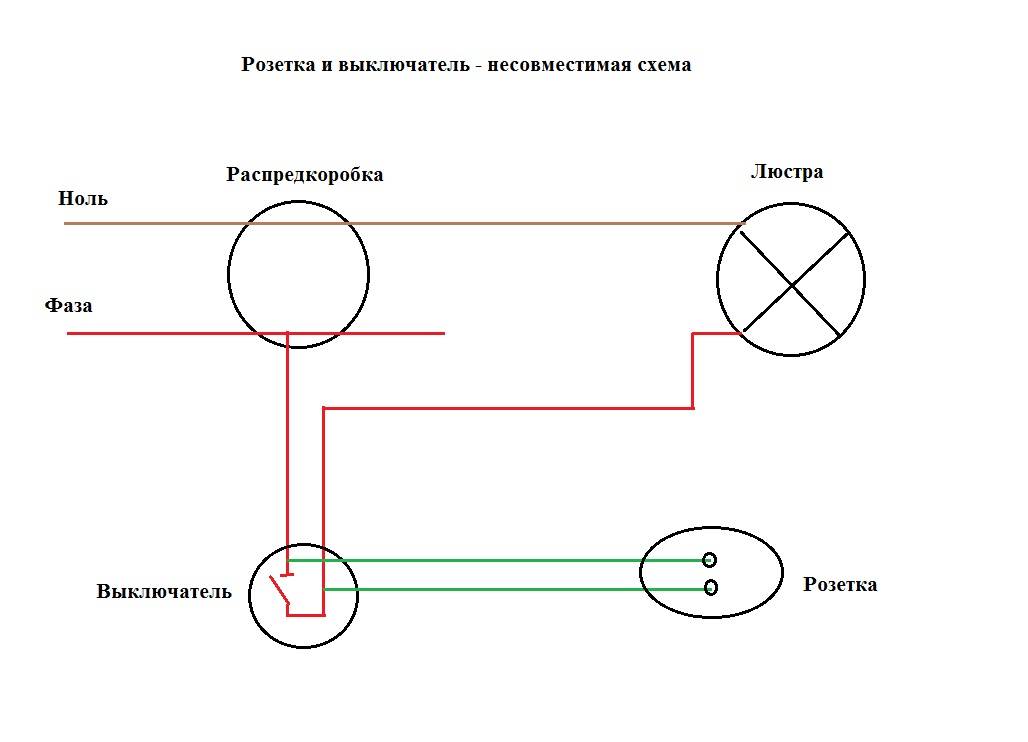
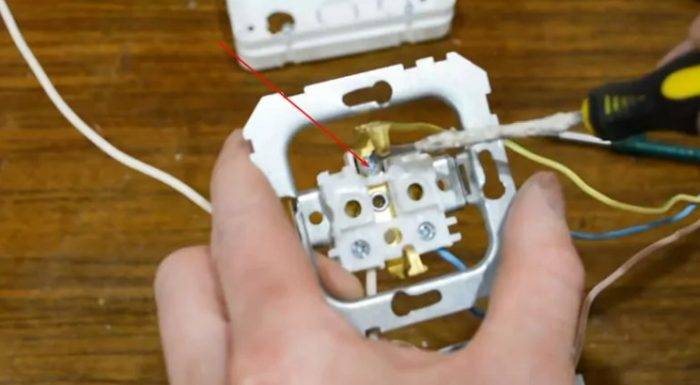
Zero connection
In this case, use the blue (blue) wire. It is connected to the only socket contact left free. It does not go anywhere else, because it is not needed to switch the switch.
There is another opinion on how to connect an outlet with a switch
Some masters believe that it is not too important which conductor goes to the switch (zero or phase), because the light will go out anyway. Delusion is dangerous
When such a lamp is turned off, the voltage remains on it. If the master touches the cartridge, he may receive an electric shock.
Another negative point is energy-saving lamps, which often blink when the switch is open. In their circuit there is a capacitor that accumulates voltage coming from the phase wire. When the capacitance limit is reached, the device delivers a discharge to the emitter.
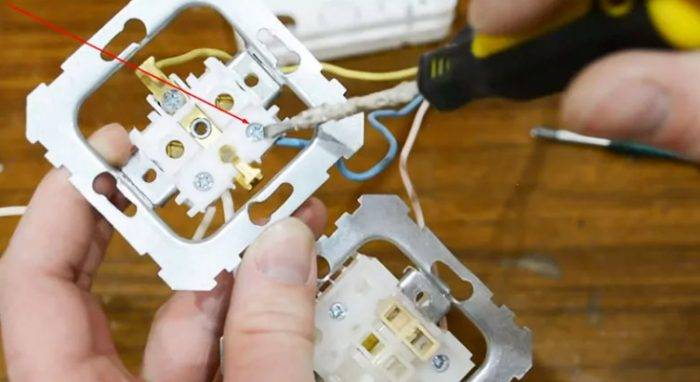
Signal (outgoing) conductor
This element is connected last. For ease of installation, the core should have a slightly longer length. The outgoing conductor is attached to the remaining contact of the switch. Its standard location is the lower part of the combined block.
After fixing the last conductor, the operation called "How to connect a socket with a switch" can be considered almost complete. The last steps are assembling the device, fixing it in its rightful place.
Features of sockets: their design and purpose
Before buying an outlet, to begin with, we will analyze the first option, what are the designs:
Overhead sockets are used in the presence of external wiring, installed on the wall itself. Mounting this type of device is not difficult, since you do not need to make a large recess in the wall. The disadvantage is that the design protrudes noticeably from the wall, this option is not always convenient.
Built-in (hidden). From the name you can guess that the whole mechanism is inside the wall in the prepared hole, along with the connected wires.

Sockets with screw clamping terminals. A similar version of the electrical wires is installed in the middle of the corresponding plates and secured with a screw designed for this. The structure is considered the safest and most popular among consumers.


The purpose of sockets is also different, let's take a closer look at several existing types:
The socket with grounding is equipped with special antennae, to which the ground wire is attached, this will allow you to protect the body of the device from breakdown current.
Closed outlet type. Often used by parents in their children's rooms so that a small child does not have access to dangerous electricity. They can be equipped with protective shutters or covers.
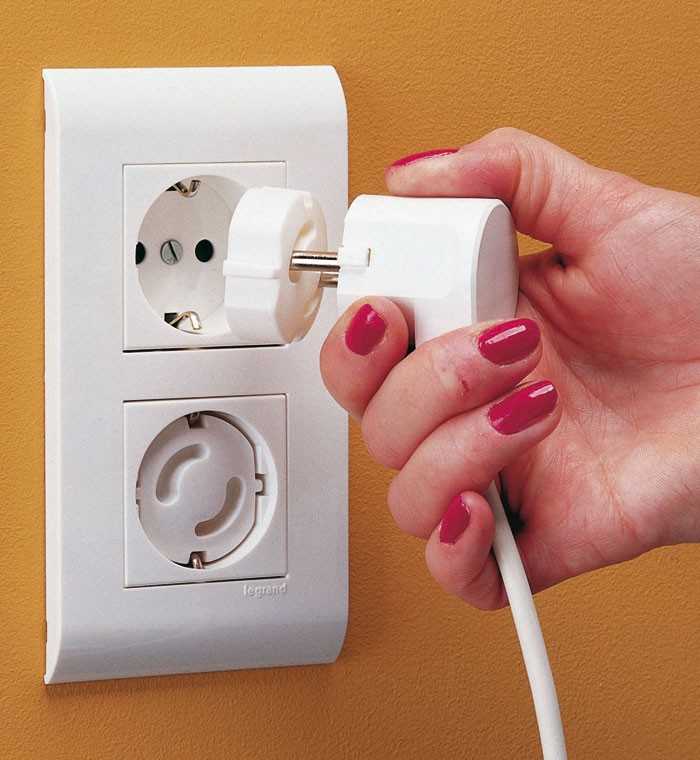
Socket with plug ejection function. The case includes a button, when pressed, the plug is easily pushed out.Useful if you often use different electrical appliances, such as in the kitchen.
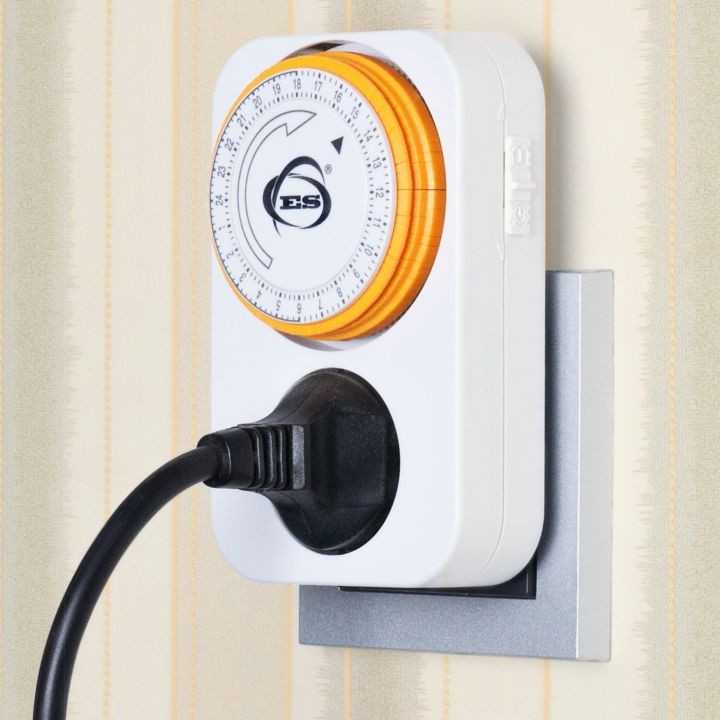
A device with a timer will allow you to adjust the operating time of the appliance. The timer is installed immediately with the entire structure.
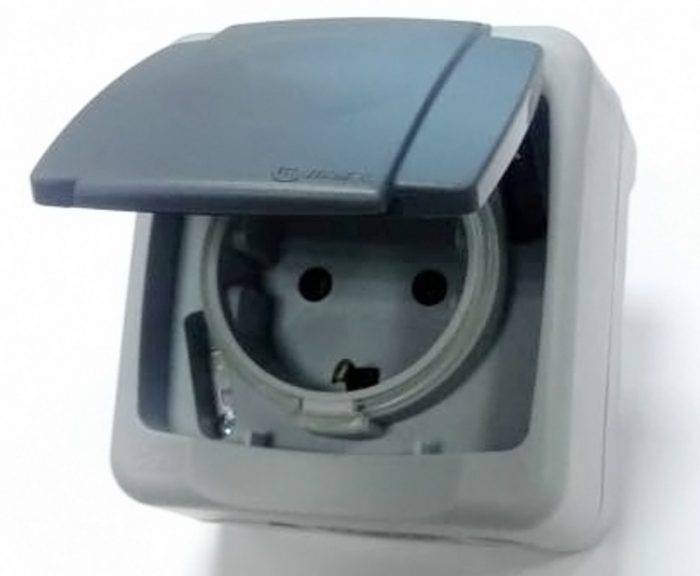
Outlets for outdoor and bathroom require increased protection against moisture and dirt, usually equipped with a cover for safety.
Installation
If the master decided to carry out an independent installation, he does not need to have any special specialized tool. It is enough that he had:

electric drill;
drill bit;
1-2 screwdrivers (handles must be insulated);
pliers;
wire cutters (side cutters).
Preliminary preparation for all structural variants of these blocks is as follows.
Power must be turned off. Appropriate markings are made at the place chosen on the wall. At the right points in the wall, mounting holes are drilled with a crown, after which a niche is made (with hidden wiring). Perforated holes for cables break out on the box body.
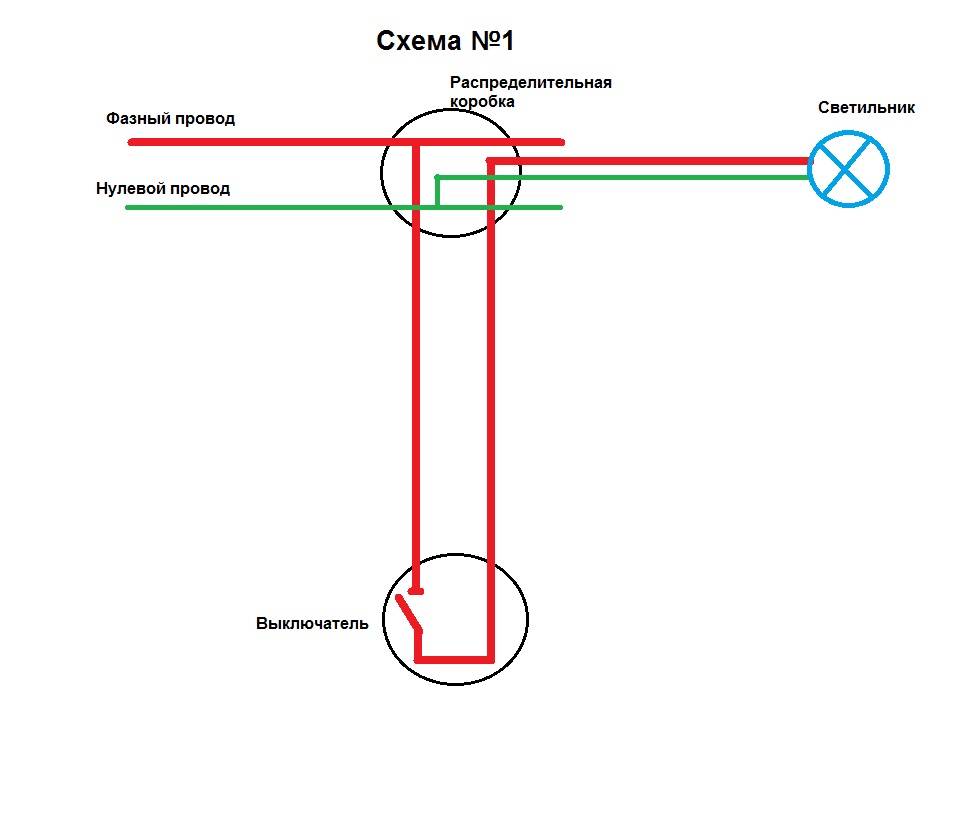
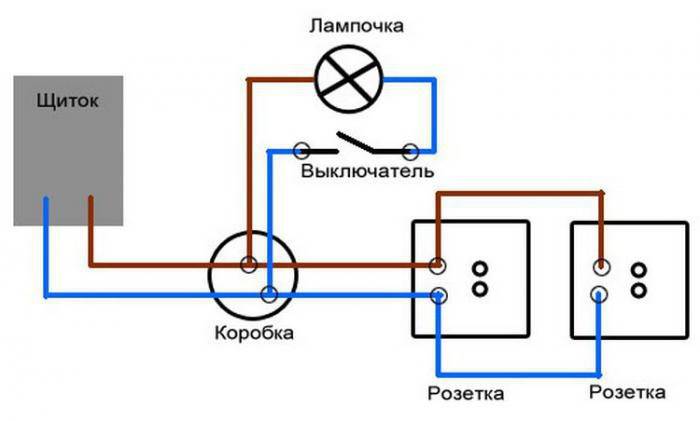
Single key block
The socket combined with a 1-gang switch in one housing is the most popular. The connection of such a pair occurs as follows (diagram 1):
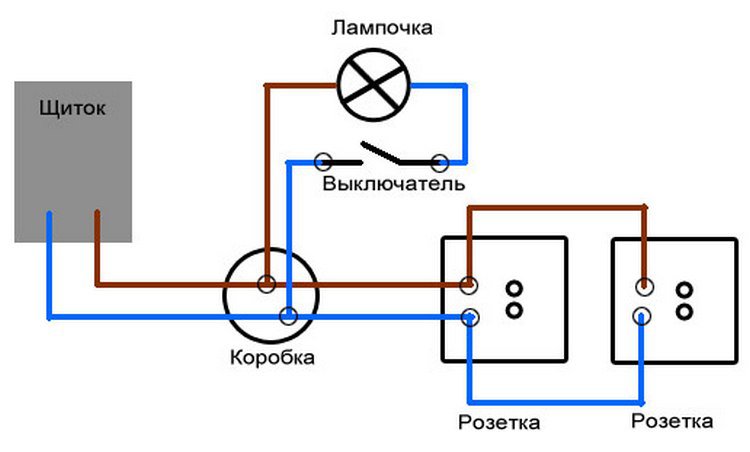
- The apartment shield is connected with a two-wire cable ("phase" and "zero") to the junction box.
- A double wire connects the light source to the junction box.
- 3 wires from the twin socket-switch are brought into the box.
- It is necessary to make sure that the wire goes from the phase terminal in the box to the socket terminal, and from the socket to one of the switch contacts.
- The lighting device connected to the junction box is connected with one of its wires to "zero", and with the other it goes to the free terminal of the switch.
- If grounding is provided in the Eurostandard block, it must be connected to the ground terminal in the box.
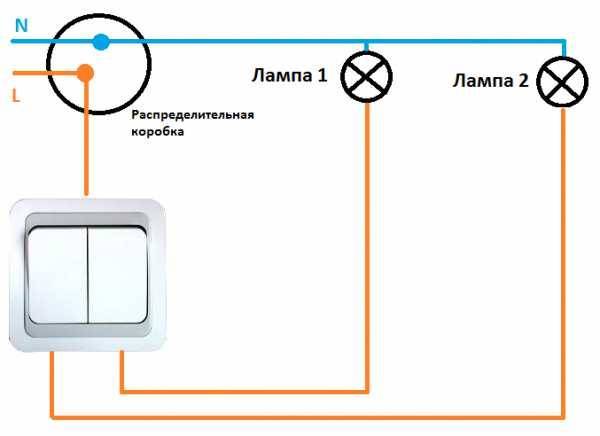
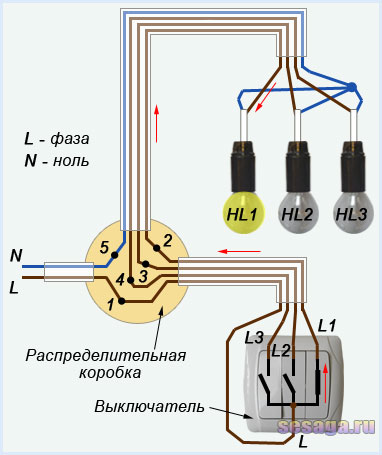
Two-key device
When installing such a unit, it becomes possible, in addition to connecting any consumers through a socket, to control the light in at least two different rooms or different light sources in a common room.
To perform such an installation (diagram 2), you must do the following:
- From the junction box, 5 wires are connected to the twin unit.
- Only the neutral wire and the ground wire are connected to the outlet.
- "Phase" on the double switch is supplied through a special jumper in the switching unit.
- 2 free wires are connected to 2 switching terminals of the switch.
- In the distribution box, twists are made from the wires supplying the "phase" and the wires going to the lamps in different rooms.
We bring to your attention the connection diagram in the junction box of a two-gang switch and two sockets:
Whatever configuration the master chooses, he must thoroughly study and work out the schematic diagram of all connections and connections before starting installation.
As a result, the correct installation of an outlet connected to a switch is not only a high-quality work of electrical appliances, but also the safety of the house and the person.
Varieties
Differences between modules can be made by:
- structural features;
- design;
- component material.
If he talks about the second element of the highlighted list, then the design is a personal matter and everyone chooses what he likes best in terms of color or design that this or that company has developed. The interior of the various modules is also different. This, for example, concerns the base where the contacts are fixed. Previously, its manufacture from ceramics was popular. But finding really good products with ceramic inserts is quite difficult. In most cases, over time, it begins to crumble and weakens the contacts.


The best option that is used everywhere is ABS plastic. Sockets and switches use this type of base, which is refractory. Even with a short circuit, there is no ignition, but only melting of the insert
It is also worth paying attention to the metal from which the contact group is assembled. Copper is considered the best, which can be identified by a characteristic reflection, but you should be careful, because
j. unscrupulous manufacturers cover ordinary metal with a paint similar in color to copper, to determine whether this is so, it is enough to scratch the contact a little.
The question of differences in design features is more complex. According to the method of association, they distinguish:
- single body models;
- with installation in a common frame.
Single-case models have one factory case, in which there is a common filling for two elements. The disadvantage of this option is that the switch can be powered through the outlet, which loads it additionally in addition to the connected consumer. The second option is used more often. It involves the purchase of absolutely equivalent modules, each of which has its own filling.Before installation, a single frame from the socket and switch is dismantled, and they are installed in a common frame, which can combine up to 12 or more elements, if necessary. The correct connection method in this case will not be parallel, but the supply to each switch or each socket of its conductor. Outwardly, this version of the design looks more elegant than the previous one.
According to the installation method, the following types are available for sale:
- internal;
- outdoor.
Outdoor sockets, which have a common housing with a switch, can be installed in any required location. They are fixed by the overlay method. There is no need to prepare holes for this. This option is more suitable for utility rooms or for residential as a temporary solution. Internal modules require drilling a hole and installing a special box in which the core of the socket or switch is fixed.
The designs also differ in the way they are assembled. If we talk about options that are mounted in one frame, then there are only two solutions: vertical and horizontal arrangement of the frame. When buying, you should be careful, because mounts are different for each of these frames. In the case of single-shell solutions, the variety is greater, since the switch can be the same size as the socket, or smaller than the socket. In the second version, the switch can be located in any position and have any shape: round, rectangular or square. Some modules are assembled in such a way that the presence of a switch is not immediately obvious.
The difference may lie in the number of keys on the switch, which is combined with the outlet. In some cases, there are three or four of them on one element. Some switches may be backlit to make them easier to use in the dark. According to the method of operation, the switch can be set to break or be through. In some cases, a switch mechanism is used in which the key does not occupy its extreme position, but returns to its original position. Wireless switch options are also available, which require an additional light receiver to be installed.
Note! Outdoor units can be protected against moisture ingress, which allows them to be mounted in basements, cellars, garages or other areas where there may be high humidity.
What are the advantages and disadvantages?
The main advantage of such a device as a socket and a switch, combined in one housing, is the saving of labor and material costs. If you installed these devices separately, you would have to mount two holes for mounting boxes in the wall, buy and install two sockets, and lay two separate two-wire wires to the switch and socket. In the case of installing the unit, you will need one three-wire wire and one socket (only it will not be round, but of a special oval shape), which will at least slightly reduce your time and labor, as well as financial costs.
Sometimes an additional advantage of a device in which a socket and a switch are combined in one housing is the same height of their location.
The disadvantage of this combination is that if any one device fails, the entire unit must be replaced.
Another disadvantage is that it is problematic to install a block of switches combined with a socket in a concrete wall. For such a device, the hole will need not be round, but oval; it will be more difficult to knock it out in concrete.


Types of devices and their features
There are quite a few varieties of plug sockets and blocks. Each type has its own design features and purpose.
- Hidden appliances are mounted directly into the wall - in special sockets.
- Open devices are produced for those apartments where the wiring is not hidden in the wall.
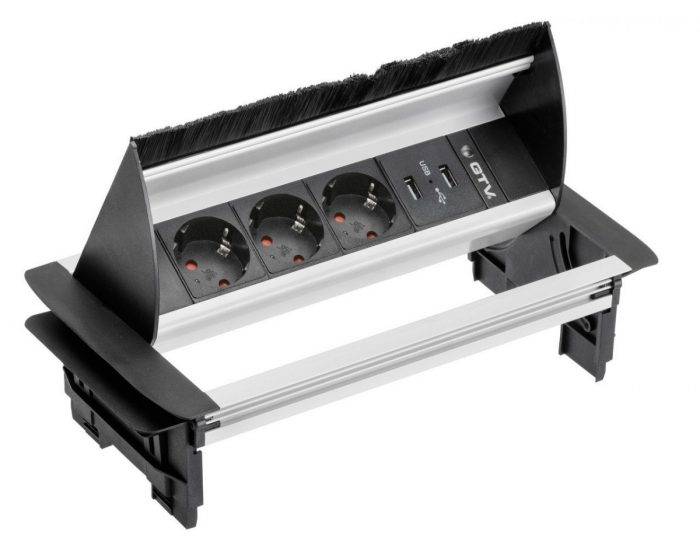
- Retractable socket blocks are mounted on a table or other furniture. Their convenience is that after operation, the devices are easy to hide from prying eyes and playful children's hands.
The devices differ in the method of clamping the contacts. It is screw and spring. In the first case, the conductor is fixed with a screw, in the second - with a spring. The reliability of the latter is greater, but it is not so easy to find them on sale. Devices are fixed on the walls in three ways - with serrated edges, self-tapping screws or a special plate - a support that facilitates both installation and dismantling of the outlet.
In addition to conventional, inexpensive devices, there are models equipped with grounding contacts. These petals are located in the upper and lower parts, a ground wire is attached to them. To ensure safety, outlets equipped with shutters or protective covers are produced.
Main popular types
These include:
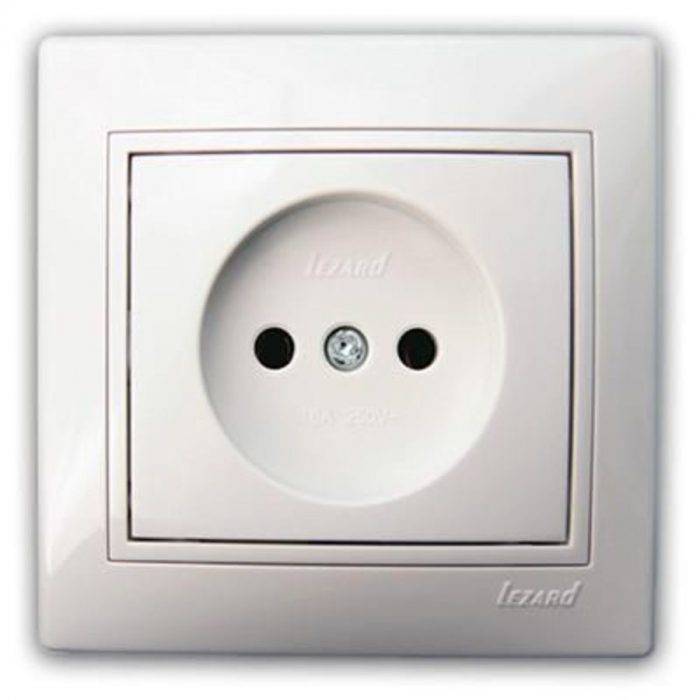
- type "C", it has 2 contacts - phase and zero, usually bought if it is intended for low or medium power equipment;
- type “F”, in addition to the traditional pair, it is equipped with another contact - grounding, these sockets are becoming more popular, since the ground loop has become the norm for apartments in new buildings;
- View "E", which differs from the previous one only in the shape of the ground contact, is a pin, the same as the elements of the socket plug.
The latter type is less common than the others, since it is less convenient to use: turning the plug 180 ° with such an outlet is impossible.
The security of the case is the next difference between the models. The degree of security is indicated by the IP index and a two-digit number following these letters. The first digit indicates the class of protection against dust, solid bodies, the second - against moisture.
- For ordinary living rooms, IP22 or IP33 class models are sufficient.
- IP43 is recommended to buy for children, as these outlets are equipped with covers / shutters that block the sockets when the appliance is not in use.
- IP44 is the minimum required for bathrooms, kitchens, baths. The threat in them can be not only strong humidity, but also splashes of water. They are suitable for installation in basements without heating.
Installing an outlet on an open balcony is a sufficient reason to purchase a product with a higher degree of protection, this is at least IP55.
Replacing an outlet with a switch
Of all the operations reviewed, this procedure is the most simple. After removing the old outlet, a trinity of cables remains - phase, zero and ground. It is necessary to identify each of the elements by the color of the protective winding. For reliability, you need to use a multimeter (it will be able to show the phase - the cable through which current flows when connected to the probes of the device), since during installation work, the regulation of wire colors is sometimes ignored.In apartments of the old layout, where the power grid was not modernized, instead of three conductors, there will most likely be two (phase and zero), since grounding was almost never used before.
Having determined which wire performs which function, you need to connect the phase component to the input of the switch, and zero to the output. Then work is carried out in the distribution box: zero, which previously stretched to the socket housing, is turned off and then connected to the phase of the lamp. Grounding is not involved in the operation, regardless of whether it was used in the previous outlet or not. After that, the zero cable of the chandelier or sconce is connected to the network.
Conclusions and useful video on the topic
The video materials we have proposed will clearly help you understand how to properly install the power outlet block.
Video #1 Arrangement of socket boxes for the socket panel:
Video #2 Instructions for installing a five-socket block:
Installing a socket block is not much more difficult than connecting a conventional or double socket
Having shown attention and maximum accuracy, installation is quite within the power of any owner who has only basic skills in electrical work.
Do you want to talk about your personal experience in installing and connecting group sockets? Do you have any useful information or questions while reading the article? Please write comments in the block below.


