
- Rules for installing an outlet in the bathroom
- Special rules for installing sockets in the kitchen
- PUE requirements and other standards
- Classification of sockets by design features
- Threaded models
- Crimp water sockets
- Self-locking
- Solder sockets
- How to connect the washing machine to the water supply?
- Socket outlet in accordance with regulations
- Wiring Requirements
- Mounting options for different conditions
- Installing a car in a private house
- Installation of appliances in the kitchen and in the hallway
- Placement on laminate or wooden floor
- Embedded machine installation features
- Installing the machine over the toilet
- Installing a new outlet
- Advantages of installing waterproof sockets
- General rules (if you want - traditions) for installing electrical equipment in a room, according to the PUE and common sense
- Washing machine installation options
- Installation in a private house
- Installation of the machine in the kitchen and in the hallway
- Placement on a wooden floor or laminate
- The specifics of the installation of embedded technology
- Installation above the toilet
Rules for installing an outlet in the bathroom
1
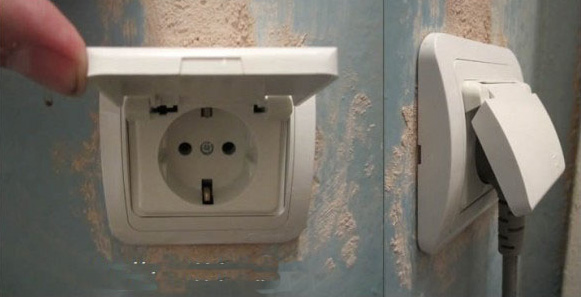
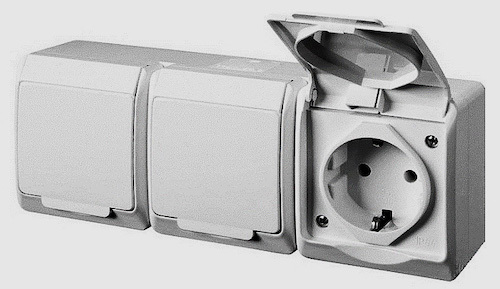
It is allowed to use at least IP44. The number 4 means that the outlet is not afraid of splashes of water pouring from any side. That is, it should have all sorts of rubber bands and a lid. Plus there are shutters on the contact holes for the plug.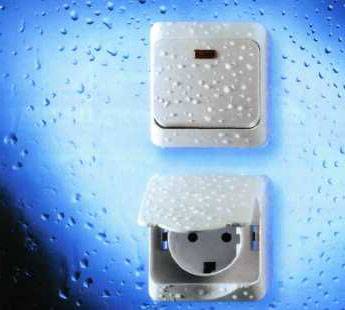
Of course, with the plug on and the lid open, most outlets will no longer provide the original level of protection. But you are unlikely to wash and bathe at the same time.
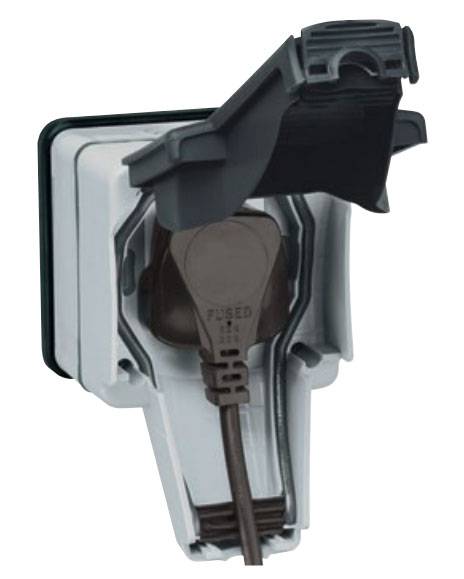
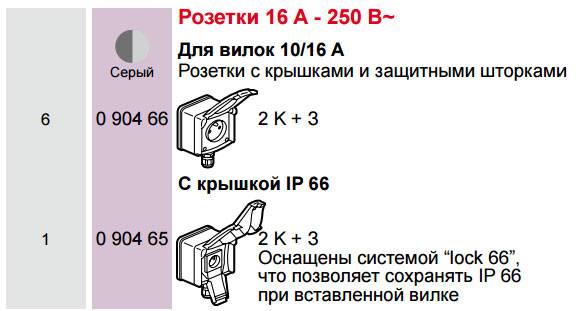
However, there are models that, even with the plug inserted, are capable of full splash protection and maintain IP66 protection! For example Legrand Plexo.
2
 Moreover, it cannot be mounted in metal pipes. It is also forbidden to fasten the cable with steel clips.
Directly under the bathroom, the installation of open wiring is also prohibited, even in the corrugation, as this is also considered an open laying.
3
The recommended cable section is 2.5mm2.
At the same time, do not try to use the ground conductor of another line group or from another cable.
 The ground conductor must not be common to different groups.
4
But it is best to use a 10mA protective device. Of course, it will be much more sensitive and more expensive, and it is likely that you will have to make an order, since in free-selling stores, mainly from 30mA and above. And if you also have an old washing machine, then it is possible that the RCD will turn off.
The leakage current of a washing machine, even with a working heating element, can be 1.5 mA per 1 kW of power. And if this heating element is already damp, but still works, then a couple of tens of milliamps.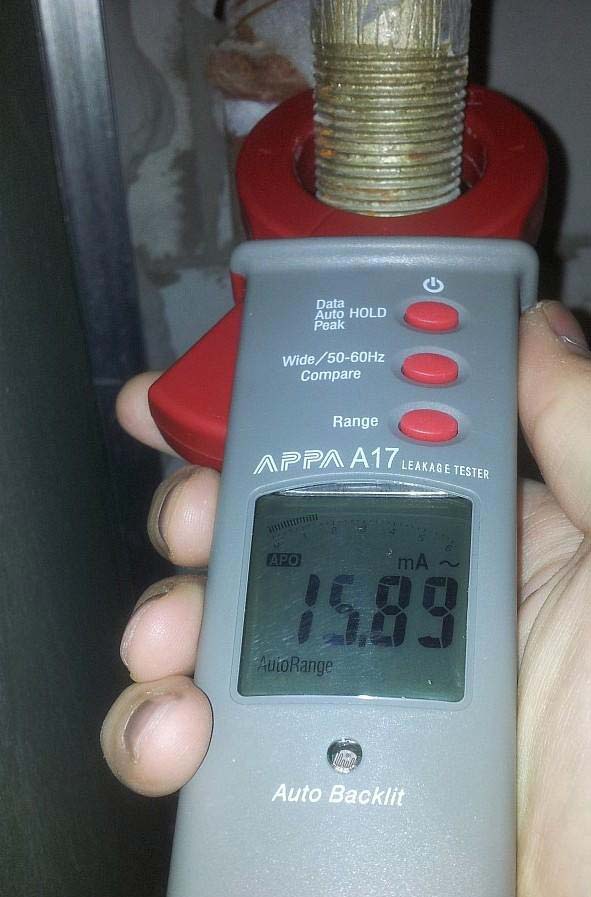
A 30mA RCD will not work with such a leak, but when you wash your hands, you will feel it to the fullest. 
In addition, such a leakage current, although insignificantly, affects the corrosion of pipes at the exit points.
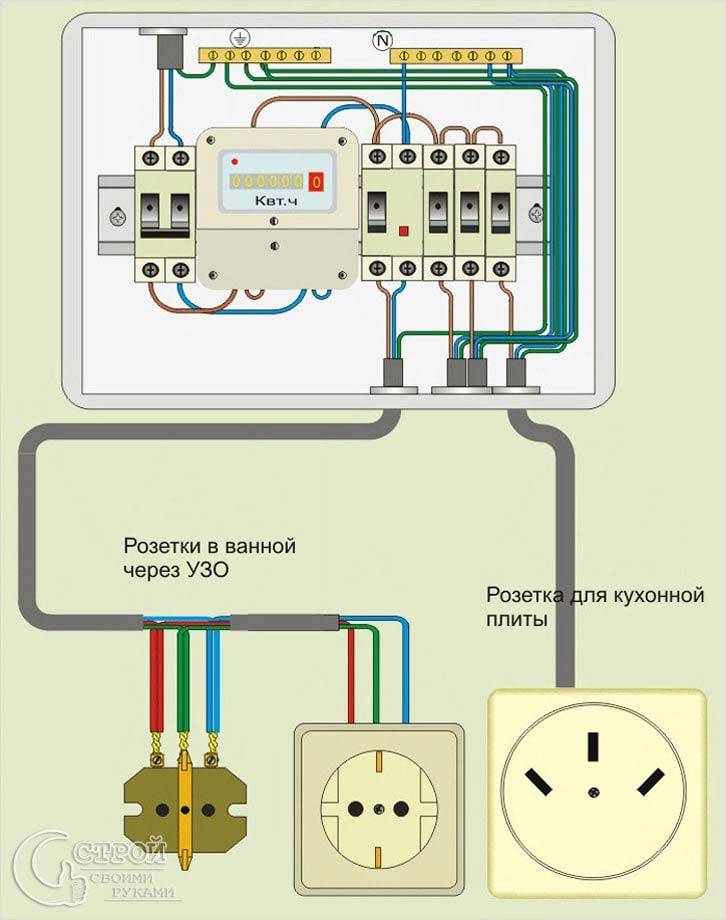
If you do not have an RCD in your electrical panel, and you intend to use a socket, in this case, use portable RCDs for sockets. 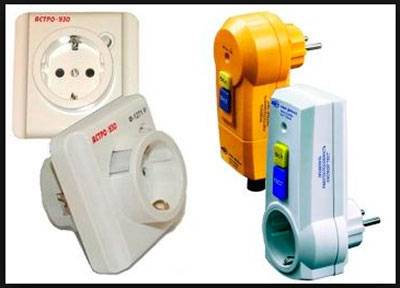
The rules also talk about the possibility of connecting sockets through an isolating transformer.However, in real life conditions, no one will put such a "bandura" at least under 10 kg in weight in the bathroom.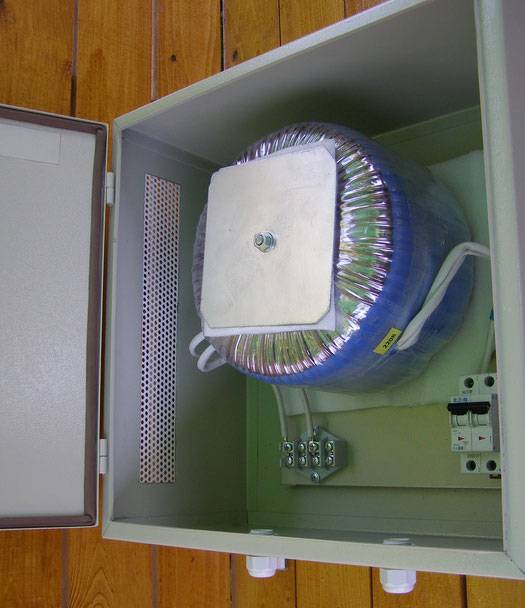
Namely, of this size, you will have to mount a transformer to power, for example, a hair dryer with a power of 1-2 kW. So installing an RCD is the easiest and most profitable option.
5
 And regardless of the presence or absence of outlets there. It means that all metal elements in the bathroom must be grounded (sewerage and plumbing from metal pipes, cast-iron bath, shower, etc.)
Special rules for installing sockets in the kitchen
The kitchen is one of the main rooms in the house. It is worth seriously considering where to install sockets in the kitchen, because there are always a lot of household appliances here. You need to start designing with the placement of all electrical appliances in order to understand how to install sockets in the kitchen.

The most functional are socket modules
On all kinds of repair forums, you can find a lot of questions about where to install sockets in the kitchen. The most popular of them:
Where to install the socket for the oven? For built-in models in the kitchen, the ideal way to locate outlets would be a place behind the wall of an adjacent cabinet. Placement of power connectors behind electrical appliances is prohibited for safety reasons.


Where to install the socket for the fridge? For a refrigeration device, the same recommendations are provided as for built-in appliances. With only one difference, the owner can choose the height of the outlet from the floor on his own.

By imagining the placement of all electrical appliances in the kitchen, you can understand where to install sockets
What is the height of the outlets in the kitchen? Focusing on the standards of kitchen appliances and furniture, the following placement option by levels has appeared:
- the first mark is 10 - 15 cm from the floor. At this distance, it is convenient to install sockets for a stove, refrigerator, dishwasher, etc. This placement is optimal, since it will be easy to get to the sockets from below.
- the second mark is 110 - 130 cm from the floor. It is convenient to install power connectors for electrical appliances located in the working area. You can also focus on the value of the height of the sockets from the countertop in the kitchen, which is 30 cm, in order to comfortably arrange small household appliances.
- third mark 200 - 250 cm from the floor. This is the height of the outlet for the hood in the kitchen.
Can double sockets be used to connect electrical appliances? Yes, but it is worth remembering that it is unacceptable to connect the hob and oven using such an outlet. The voltage will be high, which may affect the operation of household appliances and the power connector.

The recommended height of the sockets from the countertop is 30 cm
What sockets are installed in the kitchen? For this room, the following types are relevant:
- single;
- double;
- socket group or module;
- retractable;
- electrical boxes.
The most functional are socket modules. It may include: "signal" sockets (telephone, television, Internet); timer; a special disconnecting device that turns it off when touching a phase contact, etc.
The most dangerous, but at the same time popular, is a retractable outlet. Many install it solely because of the aesthetics of the look, it is "drowned" in the kitchen set. But this type of power connector is far from safe.
Speaking of boxes, it is worth noting that the requirements for laying cables are quite stringent. When installing, you must carefully follow the legend.

Due to the aesthetics of the look, the "retractable" socket is very popular.
PUE requirements and other standards
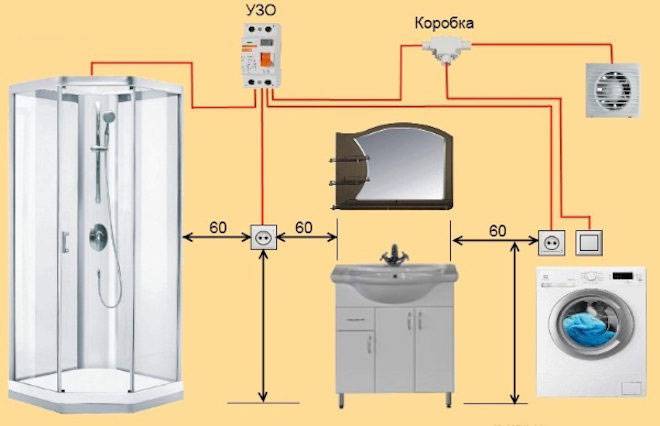
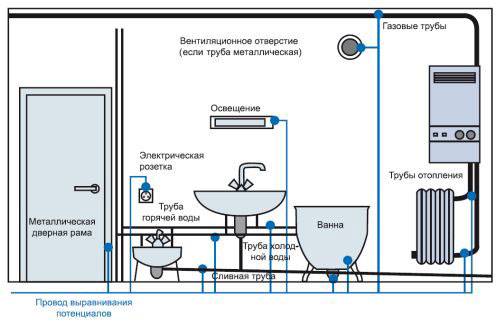
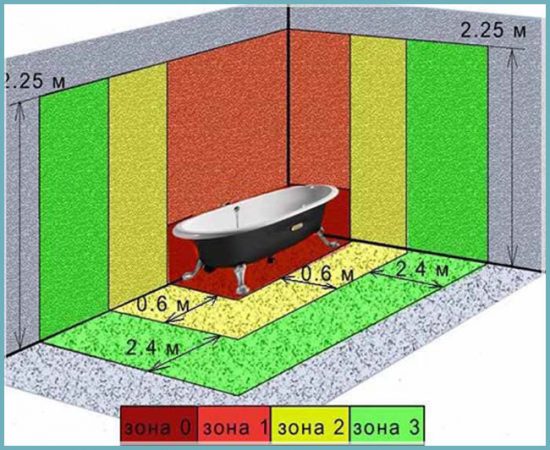
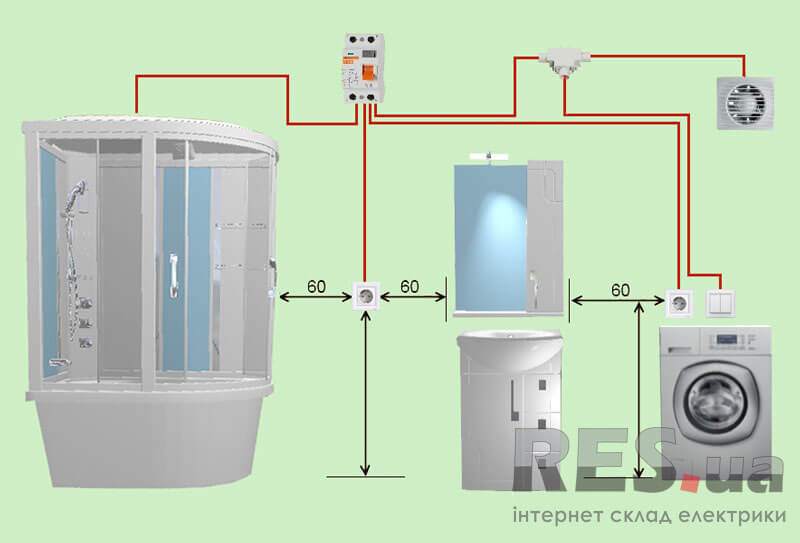
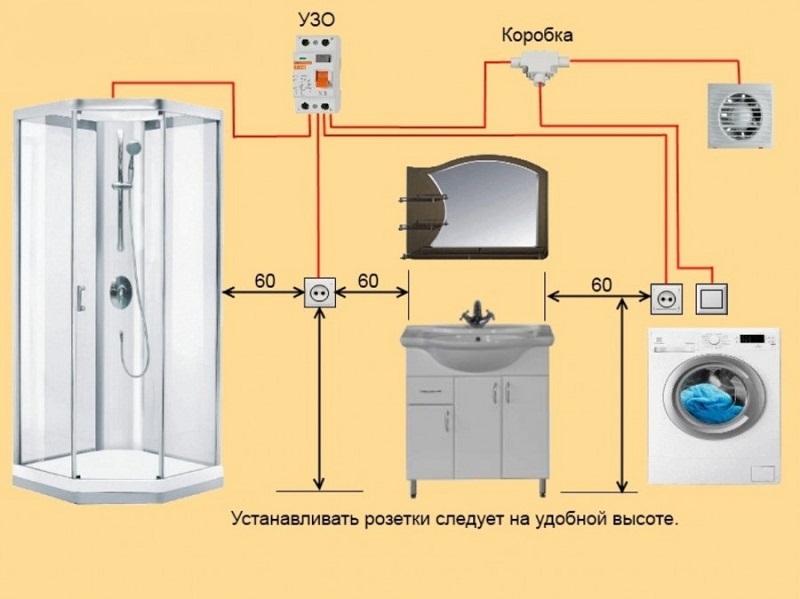
The bathroom is divided into zones, which indicate the admissibility or inadmissibility of installing electrical equipment in them. The figure below shows briefly schematically these zones and the distances to the elements of the bathroom - a bathtub, sinks, etc. Read more about them in GOST R 50571.11-96 (IEC 364-7-701-84) Electrical installations of buildings. Part 7. Requirements for special electrical installations. Section 701 Baths and showers.
Bathroom zones for electrical safety:
- 0 - this is directly where there is water (sink, shower tray, etc.).
- 1 - surrounds the previous area, usually adjacent walls.
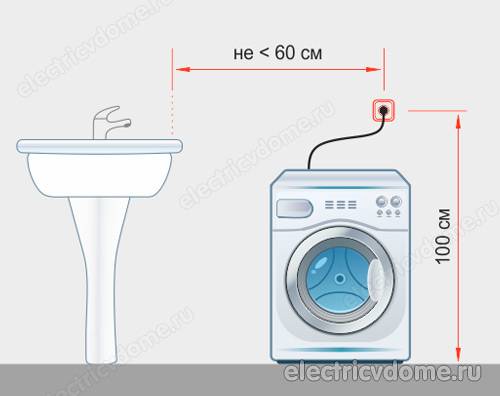
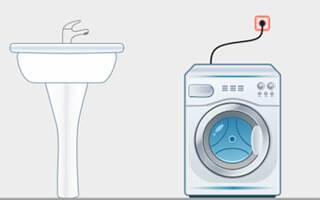
- 2 - located at a distance of 60 cm, and for a shower cabin and similar non-rectangular containers within a radius of 60 cm from the edges of zone 0.
- 3 - conditionally safe. It is located outside the second, that is, more than 60 cm from washbasins and other things.
You can find a more detailed description in the above mentioned GOST. And what do the requirements of the PUE tell us? To do this, let's move on to paragraph PUE 7.1, and consider some excerpts from the text:
7.1.40 describes the wiring requirements. It states that both open cabling and hidden wiring are acceptable. The permissible temperature of their insulation must be at least 170 °C.
7.1.47 describes the permissibility of installing certain products in the bathroom, in the relevant areas (the table is compiled according to the text from the original):
| Zone | Security class | What can be used |
| IPX7 | electrical appliances with voltage up to 12 V, and the power source must be located outside this zone; | |
| 1 | IPX5 | only water heaters |
| 2 | IPX4 (IPX5 for public areas) | water heaters and lighting fixtures protection class 2 |
| 3 | IPX1 (IPX5 for public areas) | All the rest |
*in zones 0, 1 and 2 installation of junction boxes, switchgears and control devices is not allowed.
7.1.48 is considering installing electrical outlets in the bathroom in general. It refers to the fact that sockets cannot be installed in public showers, but in bathrooms of apartments or hotel rooms it can only be installed in zone 3, according to GOST R 50571.11-96. At the same time, they must be connected through isolating transformers (which is not convenient and expensive in most cases), or through RCDs and difautomats with a trip current of not more than 30 mA. Also, electrical installation products are installed at a distance of not less than 0.6 meters from the doors of the shower cabin.
So, to summarize, where to install sockets in the bathroom and how to connect according to GOST?
According to the PUE and GOST standards, they must be connected through an RCD with a trip current of not more than 30 mA, located no closer than 60 cm from the doors of the shower cabin and located in zone 3. In this case, the wiring can be hidden and open. Place junction boxes at the same distance, and even better outside the bathroom.
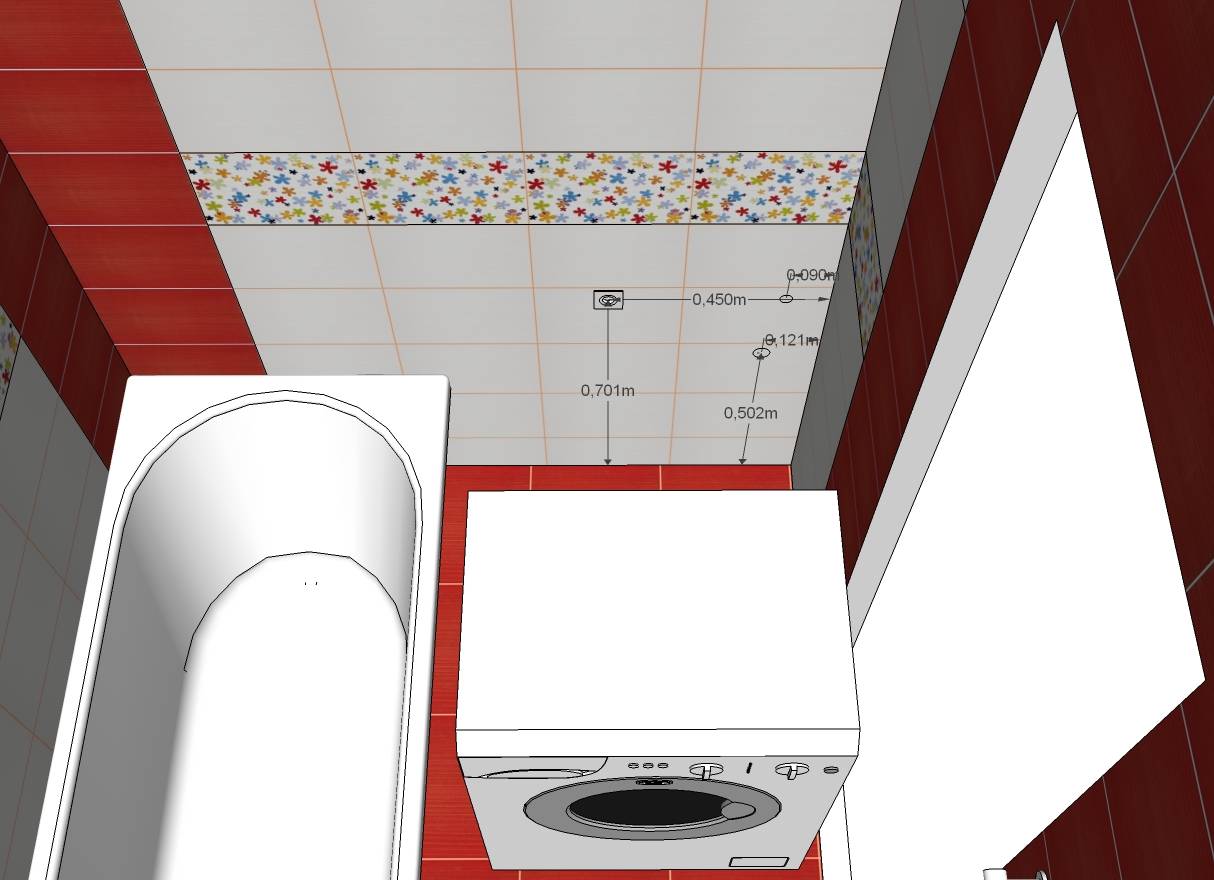
It also follows from this that the location of the electrical points is selected only according to the zones.At the same time, it is not regulated at what height from the floor or what distance from the ceiling is permissible. Install them so that it is convenient to connect and disconnect electrical appliances. Also consider the possibility of splashes or streams of water on electrical appliances and their connectors for connection - it should be excluded.
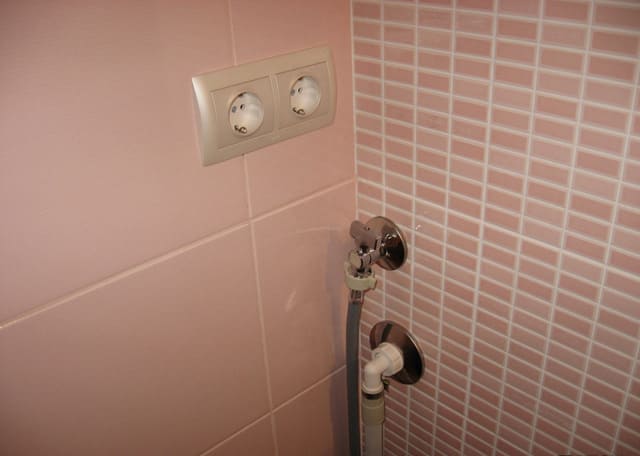
This means that the installation of sockets at the washbasin in the bathroom is also prohibited. It is necessary to take them out to zone 3, i.e. 60 cm from it, and if closer, then in this case it is necessary to use the product with IPx4 protection, that is, with a protective curtain. An excellent example is the Legrand Plexo series of high-quality overhead electrical installation products:
Even such protected products should not be installed either above or under the sink, since you cannot foresee where the water will flow if the plumbing elements are damaged somewhere. Compliance with the requirements of the PUE is your safety.
You can learn more about the degree of IP protection by going to the article we linked to.
Classification of sockets by design features
To the question of how to choose a water outlet for a washing machine, the answer has long been found. It is necessary to take into account all their technical characteristics: shape, type, material, but first of all, the method of connection with the highway. Here you need to focus on the configuration of your water supply, pipe material and the presence of a special tool.


Threaded models
As the name implies, threads are used to connect these products. This is the time tested method. Made of high quality material, this socket is guaranteed to last more than one year. Threaded water outlet is:
- long service life;
- excellent indicators of tightness;
- strength and reliability;
- ease of installation.
Installing a threaded water socket does not require special tools, even a novice master can handle it. An additional plus is the collapsible connection. The socket is easy to disconnect from the pipeline, dismantle, replace if necessary.
Crimp water sockets
The connection of the water supply is carried out by crimping. The basic part of the product is a collet, a special bushing that ensures the reliability and tightness of the joint. Such models have been used relatively recently, however, they have a number of significant advantages:
- low cost;
- long service life;
- ease of installation;
- a wide range of models;
- possibility of dismantling and re-installation.
Installation of such a water outlet is somewhat more complicated than working with its threaded counterpart, but it also does not require special tools.
Self-locking
This type of socket is distinguished by ease of connection. For fixing, various locks are used, which are easy to close, securely hold the pipe, and, if necessary, are easily separated. The advantages of such products:
- fully collapsible design;
- the possibility of reconnection;
- ease of installation;
- versatility.
After connecting these parts, it is imperative to check the reliability of the joint. Inspect carefully for leaks, if necessary, use a napkin.
Solder sockets
These water outlets are attached to a plastic pipe using a special soldering iron. The joint is even, smooth and reliable. The advantages of this method:
- minimum used parts;
- compactness;
- long service life;
- tightness;
- low cost;
- versatility.
This is one of the easiest mounting methods, but it also has disadvantages.First of all, the connection is non-separable; if replacement is necessary, the pipe will have to be cut. In addition, special equipment is required for installation.
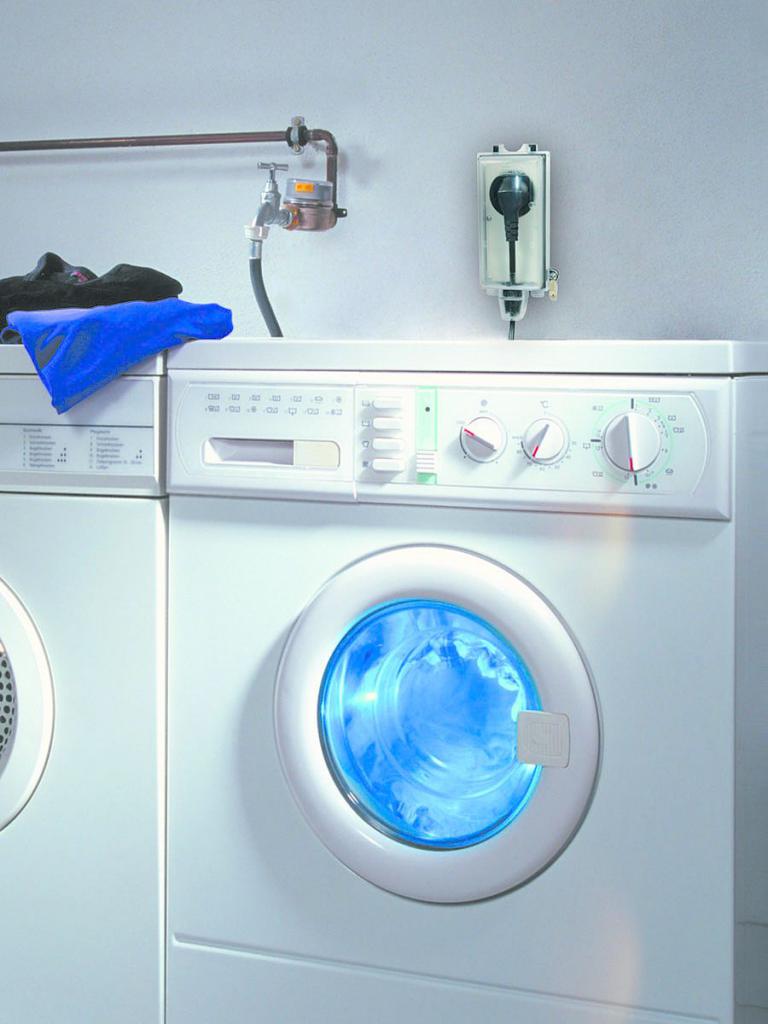
How to connect the washing machine to the water supply?
As for connecting the washing machine to cold water, below will be presented step-by-step instructions with which you can connect yourself:
Scheme of connecting the inlet hose of the washing machine through a tee to the water supply
- First you need to choose a place to connect. Of course, the best place will be the area where the connection of the metal-plastic pipe with the flexible hose of the mixer is marked. In principle, it is also possible to connect to a shower tap;
- then unscrew the flexible hose;
- then we wind the fumlent on the thread of the tee and, directly, install the tee itself;
- also, a fumlent is wound on the remaining two threads and flexible hoses from a washing machine and a washbasin faucet are connected;
- Finally, you need to tighten all threaded connections with a wrench.
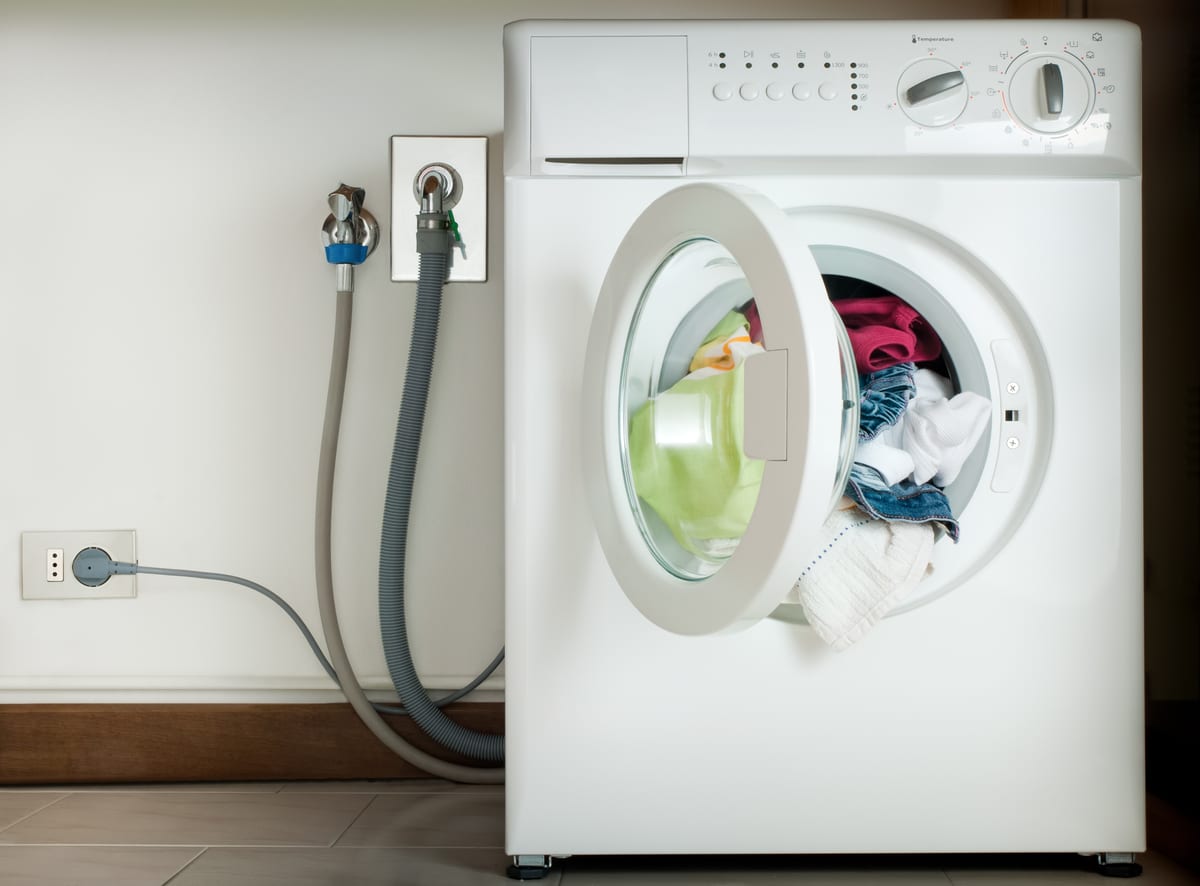
Connecting the washing machine to the plumbing system
It is worth noting that it is imperative to check the presence of o-rings at both ends of the inlet hose, since it is they who prevent the flow of water at the joints.
Another option for connecting the washing machine hose to the water supply
There is another option for connecting the machine to the water supply, by connecting the inlet (inlet) hose to the drain tap in the bathroom or sink.
If you decide to use this method, then you will need a longer inlet hose. One end of the hose in this case is screwed to the tap after the gander is disconnected.People who choose to connect this system claim that the process itself takes a little over a minute.
At the same time, they are completely sure that they avoid water leaks during the downtime of the machine, because the connection of the supply hose was not carried out permanently.
Special attention deserves the moment that today many modern automatic units are equipped with a special system that blocks the water supply to the disconnected machine.
Such equipment is equipped with an inlet hose, which has a block of electromagnetic valves at the end. These valves are connected by wires to the machine, which, in fact, carry out control.
If desired, you can buy a special inlet hose with automatic leakage protection
The whole system is inside a flexible casing. That is, when the machine is turned off, the valve automatically shuts off the flow of water into the device.
This is very convenient and reliable, because, for example, when the light is turned off, you will be sure that when the machine is turned off, it will not continue to pump cold water into itself from the water supply.
As you can see, connecting the washing machine to the sewer and water supply is quite feasible on your own. The main thing is to follow the established rules and follow the instructions that come with the equipment.


A properly connected washing machine will serve you for a long time and faithfully.
If suddenly you doubt something or are not sure about the correctness of your actions, then you can always seek help from specialists. Of course, a specialist will cope with the installation of the device much better and faster, but he will have to pay for this.
The equipment will work smoothly and for a long time only if all the necessary installation measures are carried out as expected and in accordance with the standards.
It is worth saying that if you purchased a dishwasher, then its installation is carried out according to the same principle. All installation activities are identical to those when installing a washing machine.
Naturally, in this case, it is also necessary to first read the instructions for the equipment, which must necessarily go to it when selling.
Socket outlet in accordance with regulations
It is better to install sockets and change the wiring during the overhaul of the bathroom. This will make it hidden from view. Of course, GOST also allows open wiring, but its appearance will not be particularly aesthetic. Gosstandart classifies electrical appliances for the bathroom by zones:
 Bathroom areas
- In the zero zone (sink, shower and bath), it is allowed to install equipment with a voltage of not more than 12 V.
- In the first zone, the installation of a boiler is allowed, but 220 V sockets are prohibited.
- The second zone is 60 cm from the first. It is allowed to install sockets of the 4th class of moisture protection.
- In the third zone, sockets can be installed provided they are connected to the RCD. Any electrical appliances can be installed.
Wiring Requirements
According to the requirements of regulatory documents on electrical safety (PUZ - rules for the installation of electrical installations), bathrooms are classified as premises with increased danger. It is generally forbidden to install sockets in them, but an exception is made for domestic premises subject to certain requirements.One of the requirements states that the wiring in the bathroom should only be done in a hidden way to prevent direct water ingress.
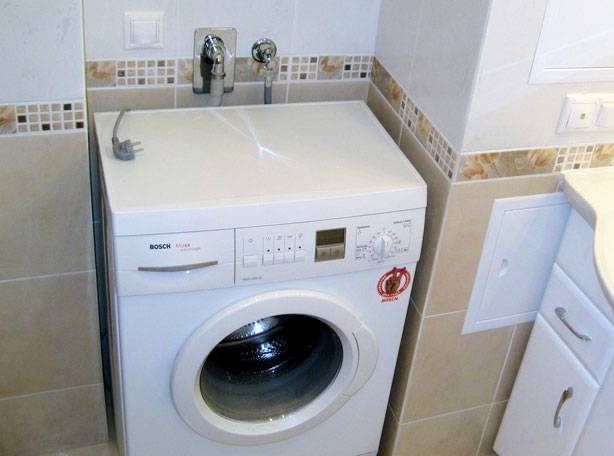
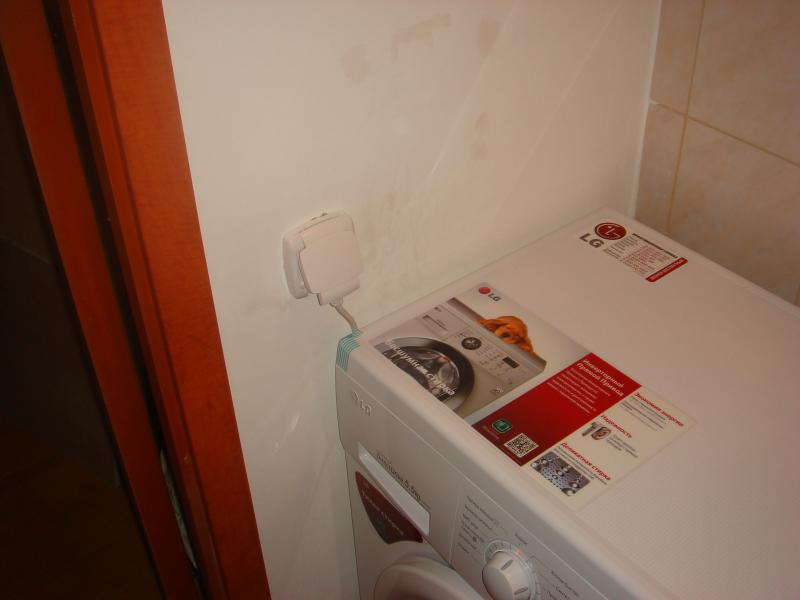
Socket for washing machine in the bathroom
The cross section of the wires must be designed for the current consumed by the washing machine with some margin.
Since the current value is usually not indicated in the passport data, you can calculate it yourself, knowing the power of the device using a simple formula:
I=P/U,
where P is the nameplate power of the washing machine;
U- mains supply voltage.
For example, if the power of the washing machine is 2.2 kW, then the current consumption will be 10 A.
This is quite significant. Too thin wire will overheat until the insulation melts and burns out.
Many sources provide voluminous tables for determining the allowable wire size, but most of the information in them is redundant. With sufficient accuracy, the wire cross section can be calculated at the rate of 2 kW of power per 1 mm2 of copper wire. Thus, to connect a washing machine with a power of up to 5 kW, it is enough to take a copper wire with a cross section of 2.5 mm2 or an aluminum wire with a cross section of 4 mm2. If a boiler or other powerful load is additionally installed in the bathroom, then the cross section must be taken more, again, based on the total power consumption.
The best option is to lay a separate cable for the outlet of the washing machine. If this option is chosen, then only copper wire should be taken for work, since aluminum is needed with a larger cross-sectional area. Such a cable is quite rough, hard, hard to work with.And most importantly, its strength is much less than copper, which, even being stranded, is very difficult to damage, even without special experience in installation work.
Note! The examples and recommendations refer to the cross section of the wire, not its diameter! You can determine the cross section, knowing the diameter, using the well-known school formula. For stranded wires, the total cross section is the sum of the cross sections of all elementary wires
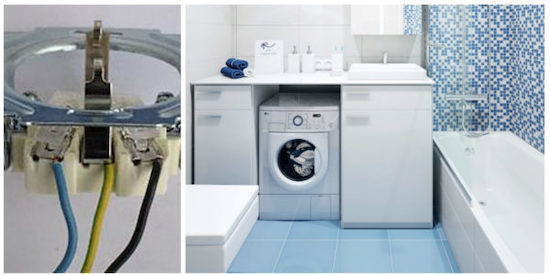
A three-wire electrical cable must be used for wiring. The colors of the veins may be different, but one of them will definitely be yellow with a green longitudinal stripe. This is a ground wire.
Mounting options for different conditions
Before installation, you need to consider in what conditions and mode the machine will operate. Based on this, measures are taken to eliminate problems in operation in the future.
Installing a car in a private house
The scheme of electrical cables and piping must be considered at the stage of construction or repair.
If the washing machine is located in the basement, its connection will be 1.20-1.50 meters below the sewer level. The problem is solved by installing conventional pumping equipment
The dry basement of a private house is the best place to install washing and drying equipment. Residents of the house in this case do not feel noise, smells and dampness.


Installation of appliances in the kitchen and in the hallway
Washing does not go well with cooking and eating. However, very often the machine is installed in the kitchen, as its design fits perfectly into the interior.
In the kitchen, the machine can be placed anywhere in it. The most convenient option is to install under the countertop or in a cabinet where it can be hidden behind the doors.
When installed in a corridor or in a hallway, it is better to place the machine near the wall behind which the bathroom is located. This will simplify the connection of the unit to the water supply and sewerage.
You can rarely see her in the hallway. It is difficult to find a place for such an installation and it will be necessary to solve the issues of laying communications in the floor or walls. You will also need to hide the machine behind a curtain, place it in a built-in closet or under a worktop.
Placement on laminate or wooden floor
The ideal surface for a washing machine is hard and rigid concrete. The wooden floor enhances the vibrations that destroy the surrounding objects and the unit itself.
Anti-vibration mats are made of various materials, they are diverse in structure, but serve the same purpose - to protect the unit from vibrations and prevent its breakdown.
The floor can be strengthened in several ways:
- concreting a small foundation;
- arrangement of a solid podium on steel pipes;
- using an anti-vibration mat.
These methods will help reduce unpleasant vibrations, but they cannot be compared with a concrete screed.
Embedded machine installation features
The built-in model is an ideal option that will fit into any interior. Hoses and wires are hidden behind the cabinet, and its front door is identical to the headset.
In built-in machines, only a front-loading option is provided. In this case, it is necessary not only to install the machine, but also to provide space for opening the hatch
This type of equipment is more expensive than usual, so many are interested in whether and how it is possible to install or integrate the machine into a cabinet.
The task is solved, it is performed in several ways:
- by installing under the countertop;
- placing a compact model in a finished cabinet;
- installation in a specially made locker, with or without a door.
To prevent vibration from adjacent cabinets, the base must be solid.
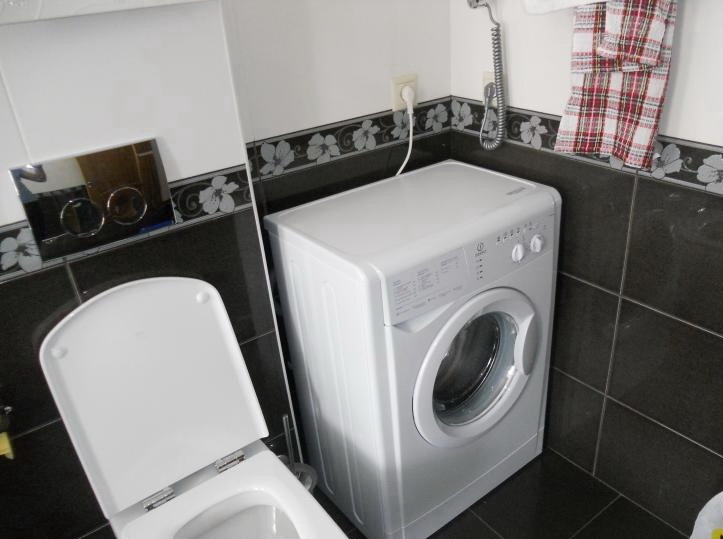
Installing the machine over the toilet
For owners of small toilets, the idea of installing a washer above the toilet may seem strange. But there are enthusiasts who can solve even such a difficult task.
The design for installing the washer should be as thoughtful and reliable as possible. European manufacturers produce powerful fasteners, but their cost is very high.
When planning the installation, pay attention to the following points:
- If the quality of the walls is in doubt, a steel structure is made, resting on the floor.
- A hanging shelf is made of a durable metal profile.
- The shelf is equipped with a safety edge so that the machine does not slip from it under the influence of vibration.
- The sliding shelf will not allow the linen taken out of the machine to fall into the toilet.
- The mounting height is made such that the toilet drain digger remains in the access area.
- It is more convenient to place the machine not above the toilet, but behind it.
- It is more expedient to choose a model with a shallow depth.
In order for the unit to stay on weight and not fall on its head at the most inopportune moment, it is necessary to adhere to safety precautions.
It should be remembered that if repairs are needed, the heavy machine will have to be lowered to the floor and then returned to its place.
Installing a new outlet
We repeat once again that only specialists should be engaged in setting up a new power line.It is better for “beginners” not to climb into the shield and sockets - without experience and knowledge of safety precautions, you can seriously suffer. You can't risk it, the stakes are too high. If there is no doubt about your own strengths and skills, you can proceed to install the outlet. The first step is to think over a plan for laying communications and apply appropriate markings to the wall. We determine the height of the future strobe and the location of the hole for the point. The lines should be bold and visible.
Then we proceed like this:
- de-energize the apartment;
- install the nozzle under the socket on the puncher;
- we drill a "niche" for a future outlet;
- with a grinder, a puncher or a chisel we make strobes of a suitable depth;
- in the shield we install an RCD or an automatic machine for a washing machine;
- we fix the cable channel in the strobe;
- we stretch the wire along the strobe channel from the shield to the hole for the socket;
- we lay the hole with a thin layer of cement and fix the “glass” under the outlet on it;
- we stretch the wiring into the socket (it is recommended to leave a margin so that in the future not to increase the cores when replacing);
- we mount the socket mechanism in the glass;
- we hook the wiring to the socket terminals;
- snap on the outer casing of the socket.
The final stage is the sealing of the strobe with cement and the alignment of the walls. As soon as the construction work is completed, you can start checking. Turning on a washing machine to a new point is too risky, it is better to “sacrifice” a less valuable electrical appliance. We restore the current supply to the apartment and insert the plug into the socket. If everything is in order, then we start the machine. UZO did not respond? Then the installation was successful - the adjustment of the power line was completed.
Share your opinion - leave a comment
Advantages of installing waterproof sockets
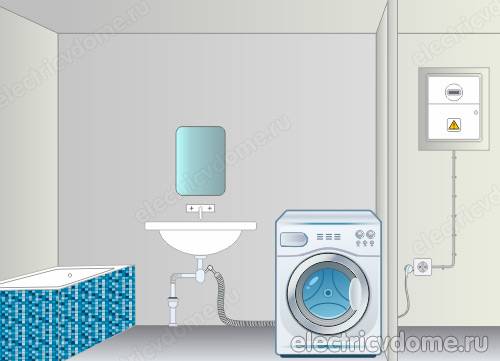
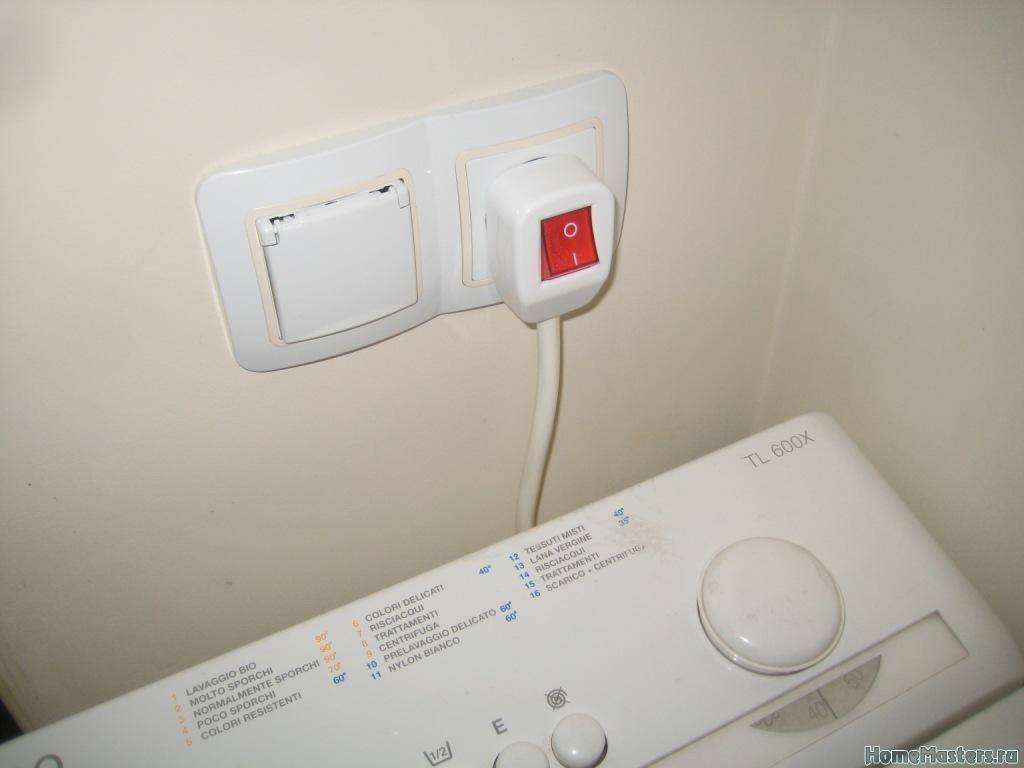
If a couple of years ago, sockets were not mounted in a room with high humidity. They were taken out for installation outside. The advent of modern moisture-resistant devices has changed the situation. Now there is no fear of passing the cord through the doors, because it had to be laid along the floor to the outlet from the same washing machine. The door of the room closes, and the working equipment does not make noise throughout the house.
In this case, not just a single point is installed, a whole block of devices plus a switch is mounted. This allows you to turn on several household units at once. For example, a washing machine starts up, a hair dryer turns on, at the same time a water boiler (powered by the mains) heats up the water.
General rules (if you want - traditions) for installing electrical equipment in a room, according to the PUE and common sense
It makes no sense to quote in the material the Rules for the installation of electrical installations, and SNiP. Many people get confused by the definitions. And then, performing the installation of electrical wiring in the bathroom, they make mistakes at the cost of a lifetime.


Therefore, we will consider the basic concepts stated in simple language:
- In a room with a bath or shower, there are two sources of moisture: water directly in the container or from the shower head, and dense water vapor. Water is known to be a good conductor. If a wetted surface occurs that touches live parts, there is a risk of electric shock.
- Connected electrical appliances with a long power cord should not reach zone 0 or 1. A hair dryer that has fallen into the water turns the bath into an electric chair. Even if you are reasonable and responsible about safety, there are children in the house.
- It is advisable not to install switches in the bathroom.No one will install sealed keys with IP × 7 protection, and a wet hand + tiled floor = an excellent circuit for the flow of electric current through the human body.
- If the dimensions of the room allow, it is desirable to exclude the possibility of simultaneous contact with electrical installations and structural elements that have a connection with the natural earth. For example: mixers, pipelines, heating radiators.
- There should not be any junction boxes, introductory shields, circuit breakers in the bathroom.
- The use of any stationary electrical installations (boiler, heated towel rail, washing machine) without grounding and a connected potential equalization system is unacceptable.
- Installation of sockets in the bathroom only in zones No. 2 and 3, with a protection class of at least IP × 4.
- The exhaust fan is also located in zones no. 2 or 3, protection class IP×1.
Dealt with electrical equipment. But any electrical installation is connected to something. Of course, the ideal option for the bathroom is electrical appliances with a supply voltage of 12 volts, and power supplies installed outside. But in reality, the electrical wiring in the bathroom still has a voltage of 220 volts.
Washing machine installation options
Before installing the washing machine, you need to consider in what conditions and in what mode the equipment will work. Depending on this, measures are taken that can eliminate the problems that arise during use.
Installation in a private house
The layout of pipes and electrical networks should be known at the initial stage of construction.
If the machine is located in the basement, then its connection will be approximately 1.5 m below the sewer level. To eliminate the problem, a conventional pumping unit is installed.
A dry basement is the best choice for placing a washing machine. There will be no noise, dampness and unpleasant odors in the residential area.
Installation of the machine in the kitchen and in the hallway

When there is not enough space in the bathroom for a washing machine, it is often placed in the kitchen. You can place it anywhere in the kitchen. The most comfortable option is under the countertop or in a cabinet with doors.
In the corridor, it is better to put the machine near the wall, behind which there is a bathroom. This will greatly simplify the connection to utilities.
Placement on a wooden floor or laminate
The ideal surface for a washing machine is a hard and hard concrete floor. The wooden floor increases vibrations, which have a destructive effect not only on equipment, but also on surrounding objects.
In order not to destroy the washing machine and what is near it, it is necessary to strengthen the floor. How to do it:
- concrete a small foundation;
- mount the podium on steel pipes;
- lay down an anti-vibration mat.
These methods will help reduce vibrations, but they cannot be compared with a concrete screed.
The specifics of the installation of embedded technology

Built-in washing machine is perfect for any design project. Hoses and wires can be hidden behind the cabinet, and the doors can be picked up under the headset.
In the built-in machine, you can only load clothes from the front. Therefore, not only the correct installation is important, but also the provision of sufficient space for opening the machine door.
Built-in appliances have a higher price than conventional units. Many people wonder if it is possible to build a car into a cabinet. Of course, the answer to this question is yes. Some possible placements:
- installation under the countertop;
- placement in a finished cabinet;
- installation in a specially made cabinet with or without a door.
In order for the vibration not to affect the objects surrounding the machine, a solid base should be provided.
Installation above the toilet
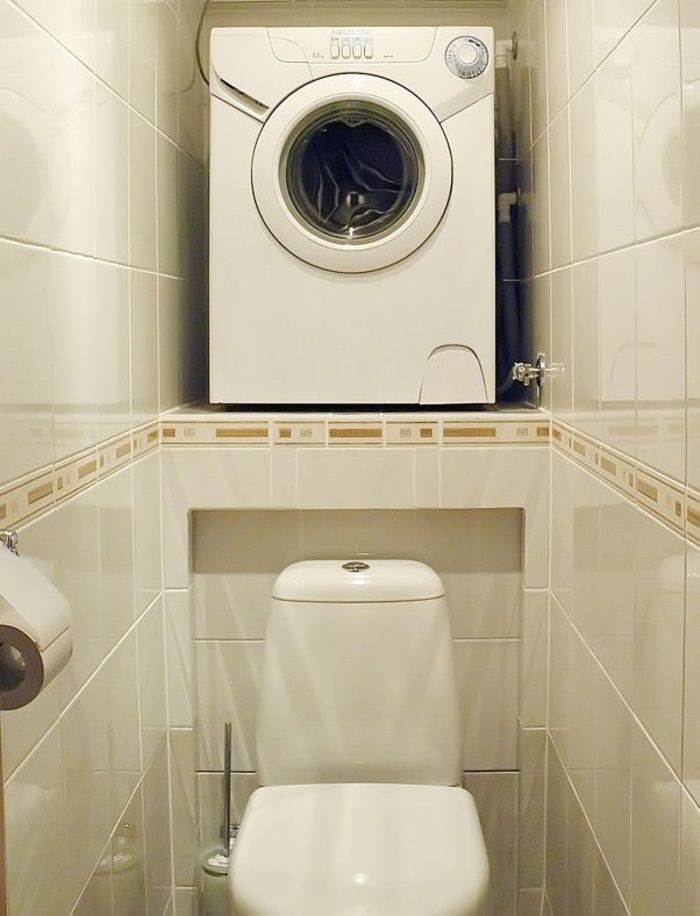
Even if the toilet is small in size, then a washing machine can be placed in it. This seems strange, but it's a perfectly doable solution.
When planning, it is worth considering:
- If there is no confidence in the quality of the walls, then it is necessary to make a steel structure resting on the floor;
- The hanging shelf is made of high strength metal;
- A special side is installed on the shelf so that the machine does not slip during vibrations;
- The mounting height must be such that the drain button remains accessible;
- It is convenient to place the machine behind the toilet.
In order for the washing machine to stay on weight and not fall on someone's head, you need to familiarize yourself with the safety precautions and follow it.


