- How to connect an induction hob: an algorithm of actions
- Connection instructions
- Connection via socket
- Terminal connection
- Wiring diagrams
- Connection types
- Switching via terminal box
- Switching on via socket
- Socket for oven and hob
- Wiring Requirements
- CONNECTING THE ELECTRIC STOVE TO THE OUTLET
- Wiring Requirements
- Is it possible to bring two kitchen devices to one power socket
- Electrical connection requirements
- Types of wires
- Socket installation
- Socket selection
- Schemes and ways to connect the stove
- Connection methods
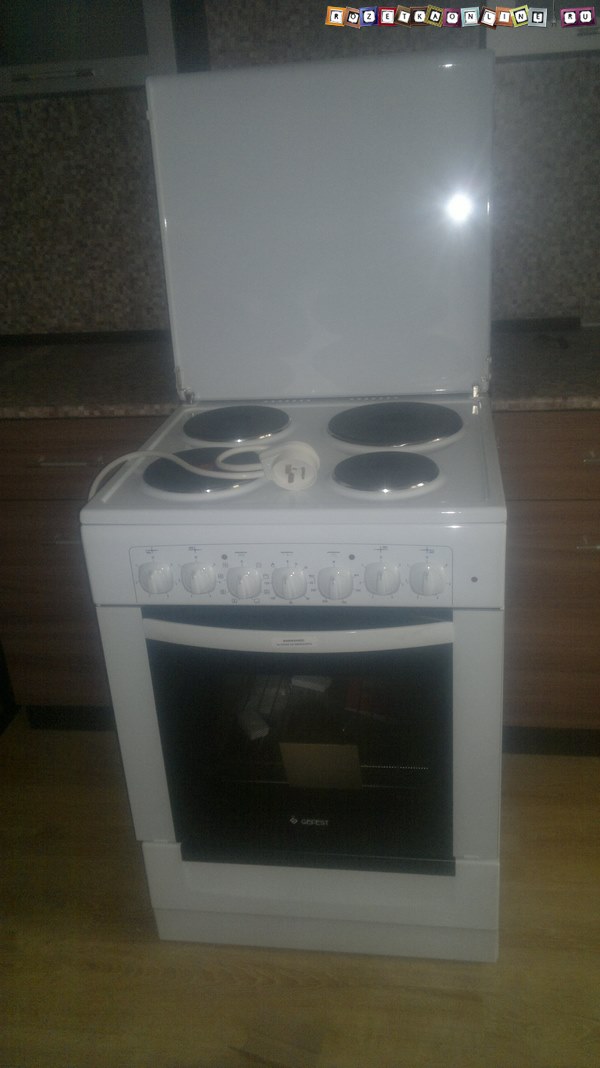
How to connect an induction hob: an algorithm of actions
Connecting an induction hob resembles a similar process involving an electrical panel. However, there are some nuances that require consideration. First of all, you need to prepare the tools and materials necessary for installing the device.
The connection of the induction device begins with the wiring of an independent power line from the junction box. Next, install the socket. Correct height selection is very important here.
The next step in connecting the induction hob is to connect the cable from the device to the shield. The connection is made to a separate circuit breaker.Do not forget about the ground loop, which is very important in this case.

For sealing, you need to glue the seal supplied by the manufacturer
After the installation of the socket box, it is necessary to strip the ends of the cables. Next, they need to be inserted into the socket terminals and fixed in this position with the help of special clamps. Then you need to install the power outlet for the hob in the socket. The plug of the integrated brewing unit is connected in a similar way.
For a single-phase network, the voltage of which is only 220 V, copper jumpers are used. Alternatively, parts made of brass are suitable. Before you start connecting the device, it is recommended to draw your own diagram that meets your specific conditions. Compliance with the pairing of cables is a mandatory rule when connecting an induction hob. How is the connection process completed?
The three phase lines are interconnected. The same must be done with the two wires corresponding to zero. After connecting all the cables, you can close the terminal box
It is very important to check the device at the end of work
Connection instructions
Connection via socket
Such an installation will require a special power outlet with grounding, rated for power from 30 watts. By connecting the wires to the socket and the pins, the connection of the wires that are connected on the machine and the electric stove to the phase, zero and ground, to the correct terminals, is checked.
Completion of all work - fixing the rear protective panel of the stove and turning it on to the mains.
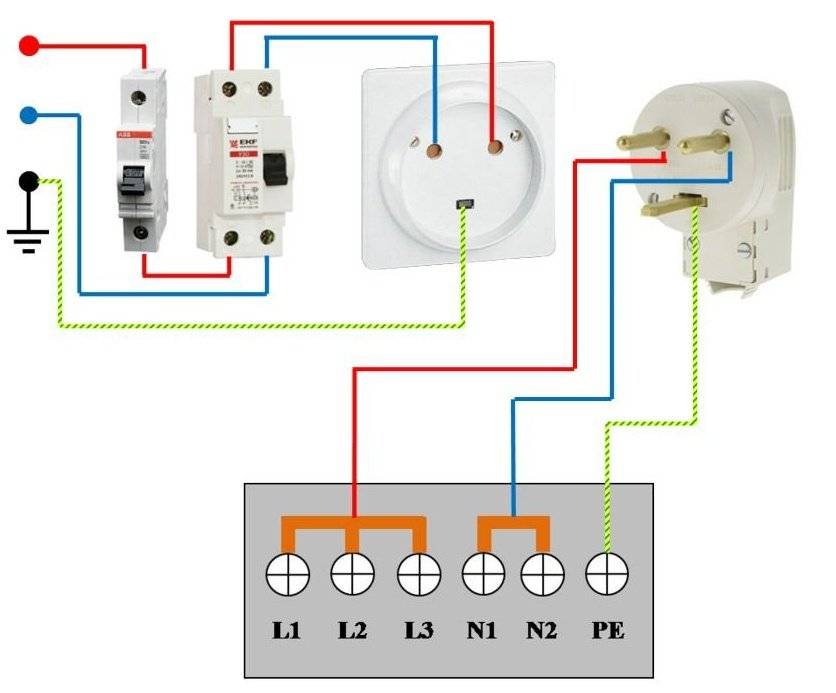
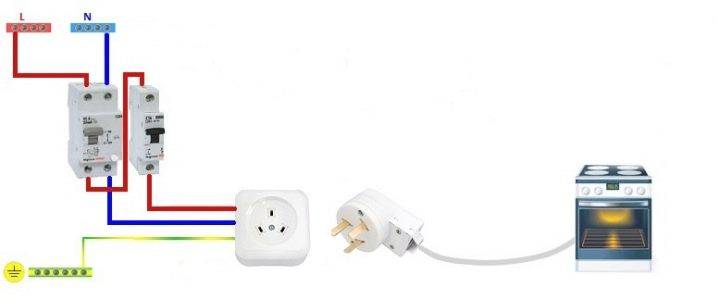
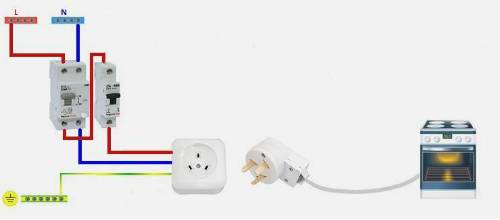
Detailed instructions for connecting a stove that runs on a single-phase 220 V network with a separate power line for it:
- The beginning of the working process is the mandatory de-energization of the switchboard.
- Initially, the wire cable is connected to the circuit breaker on the switchboard.
- The phase and zero wires are connected to it, the earth is connected to the housing ground.
- This is followed by a serial connection of the RCD immediately after the automatic fuse and its fastening.
- After that, the cable is laid to the location and the socket is installed. For this, an open installation method is possible using a corrugated tube or a PVC box.
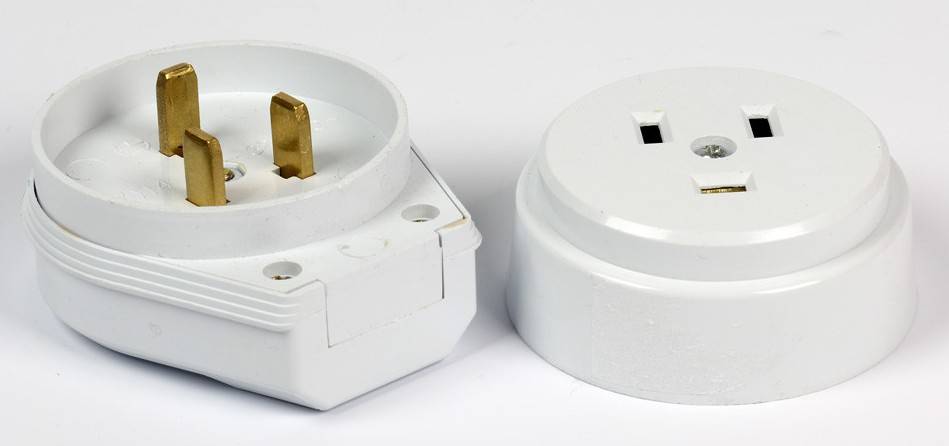
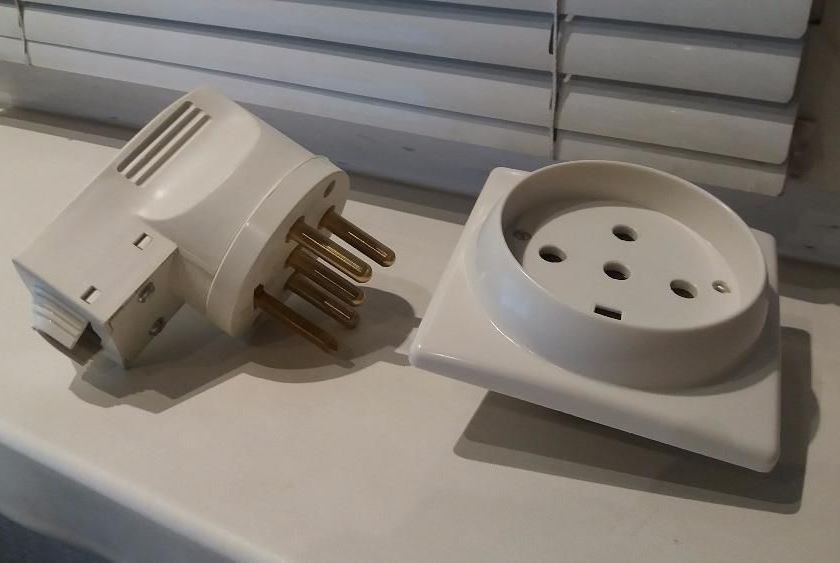
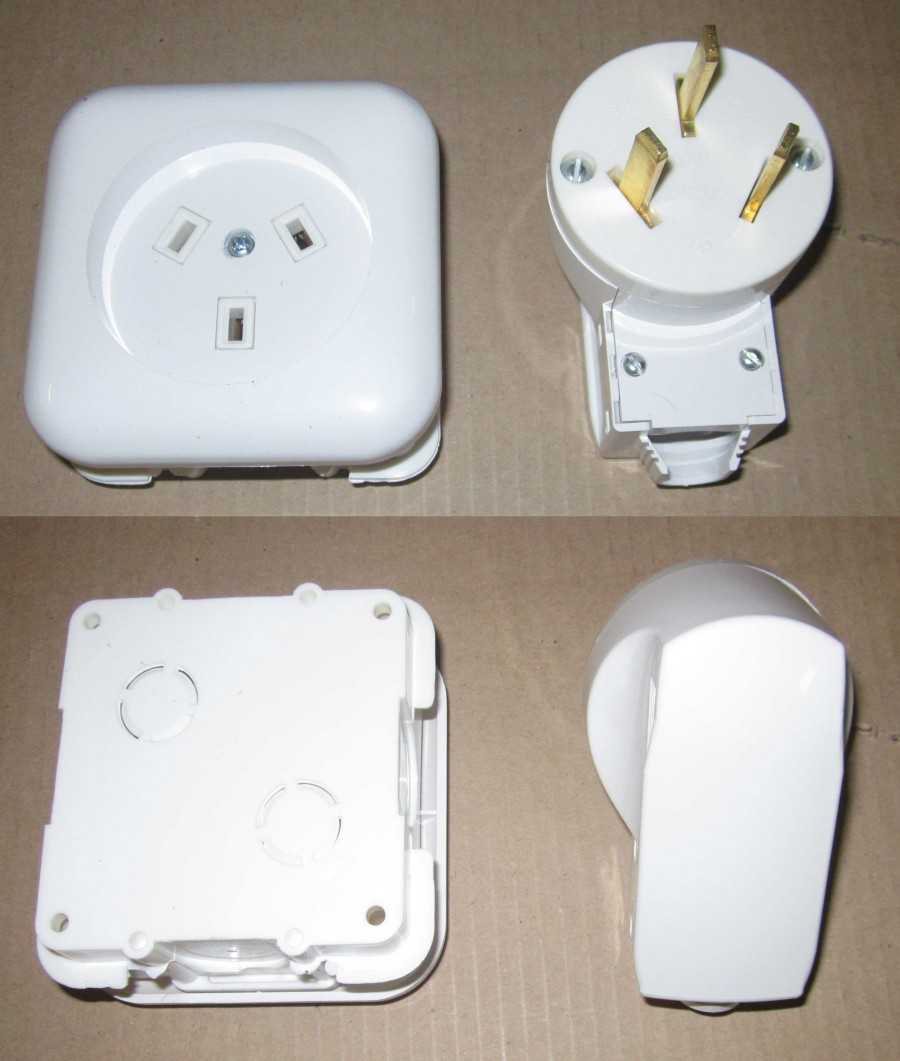
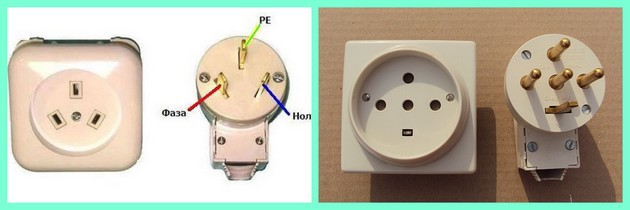
- Three-prong power socket and pins for a single-phase network are selected.
- The confusion of electrical contacts when they are connected to the outlet is unacceptable. Grounding must be connected to the ground contact, 0 to zero, and phase to phase. The correct connection of the cable from the electric stove to the plug is also subjected to a thorough check.
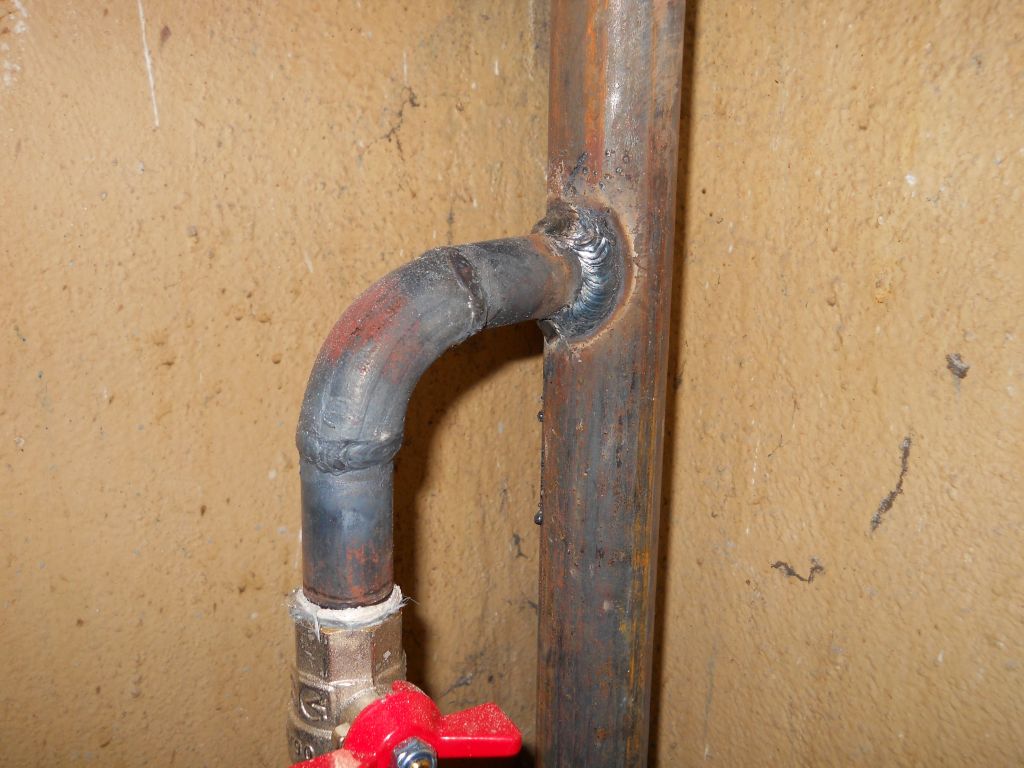
- The socket is mounted on a wall plane, the location of which should be away from metal structures inside the house (water and gas pipelines or heating system batteries) so that it is not affected by heat sources and water.
- Next, the power cable is turned on with the plug already connected to the electric stove.
- After carefully checking all connections for their thorough tightening and secure fastening of the circuit elements, a trial inclusion of kitchen equipment is carried out. The machine is switched on, after the protective device, and, accordingly, the electric stove.
- First, the electric stove is turned on at full power, after which everything is turned off and all elements are checked for their heating capacity.

By connecting the wires to the socket and the pins, the connection of the wires that are connected on the machine and the electric stove to phase, zero and ground is checked, to the correct terminals
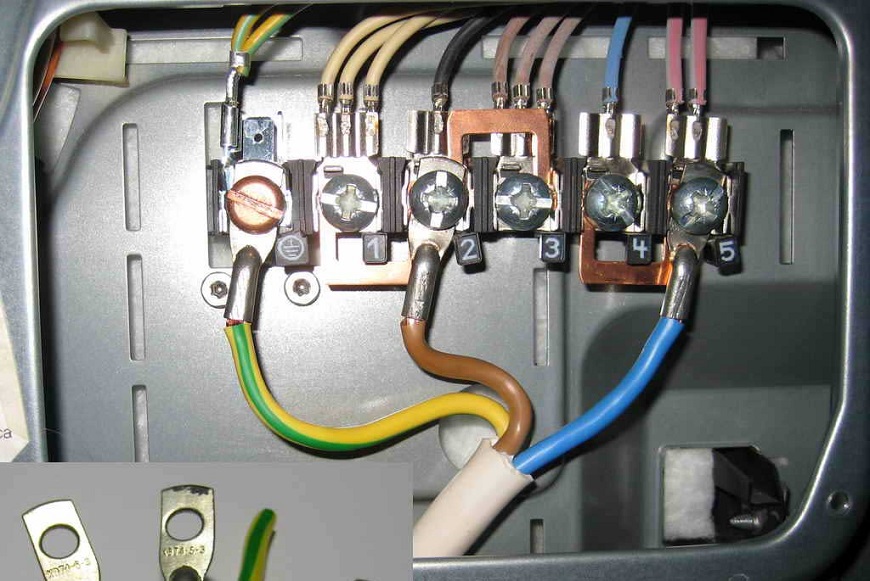
Terminal connection
The terminal strip is fastened to the wall surface. After that, on the one hand, the wire of the power line of the network is connected to this bar, and on the other hand, the power cable of the electric stove. When connecting everything to the terminal strip, you should make sure that the wires of a certain color are connected to the corresponding terminals on the electric stove itself.
Connection to the terminals is similar to the operation using a socket:
- The electrical wire is connected to the machine, after which a protective device is installed, and the electrical wire is pulled to the future location of the electric stove.
- A recess is made in the wall surface for installing a protective box for placing the terminal block.
- To the terminal strip, an electrical connection is made and the electrical wire is connected from the switchboard and the electrical cable from the connected electric stove.
- Their fastening in the terminal strip must be done without tangling electrical wires.
- Upon completion of these works, the protective box must be closed with a lid. The last step is to check the functionality of the kitchen equipment.
Terminal block to which the electrical cord must be connected
Wiring diagrams
Usually, all electric stoves go to stores with an outlet already connected, but it happens that you need to connect it yourself.It won't be a problem if you have the information.
First you need to understand how the electric stove will be powered, because the single-phase and three-phase connection scheme will differ
It is important to understand here that electric furnaces can work both from a 220 volt outlet and from a 380 V outlet.
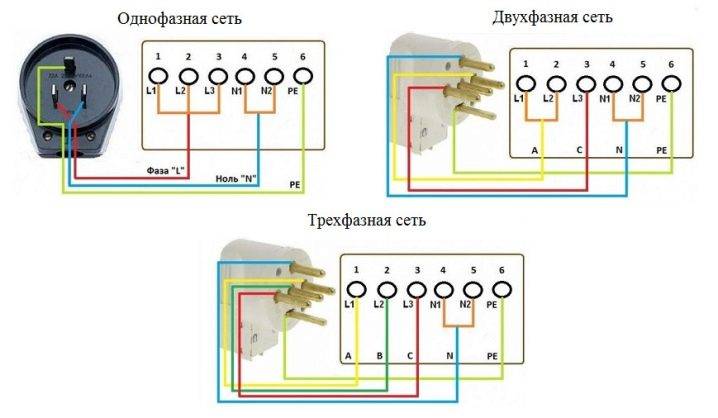
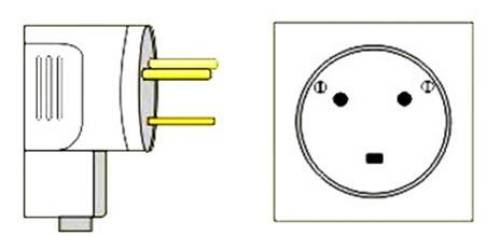
The most common will be a 1-phase connection scheme, so we will consider it first. The plugs will then have 3 outputs, where the contact is a phase cable, another one is zero, and the remaining one is protective.


If the socket has already been installed, then you should find each of the indicated cables, and connect the cables located on the plug to the necessary contacts.
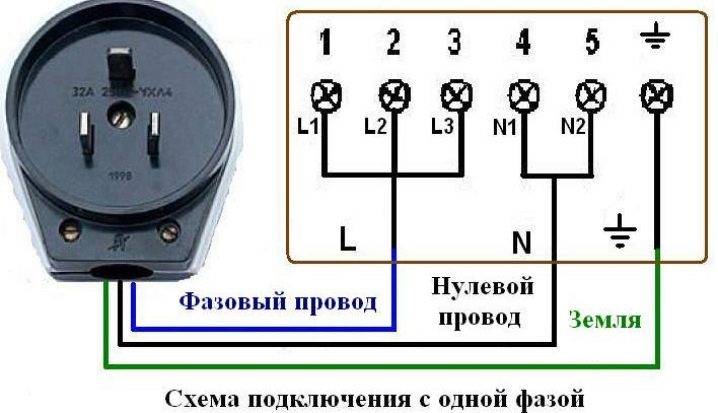
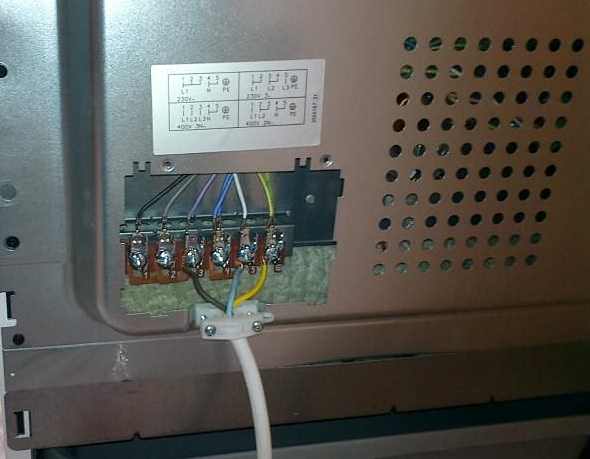
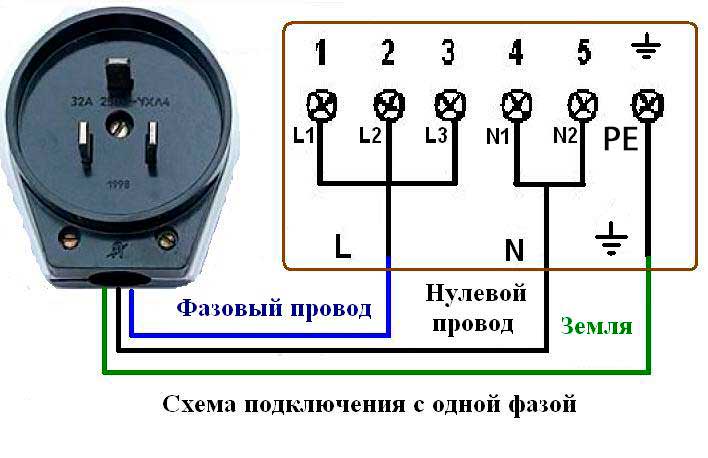
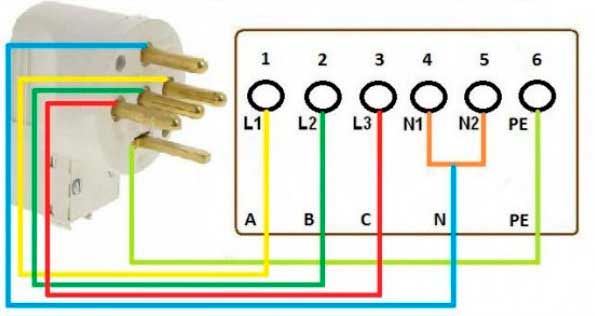
The next step is to connect the technology in question. A person who has little experience can be puzzled by as many as 6 contacts, but there is nothing difficult about it. Contacts with the designation 1-3 and L1-L3 are needed to connect the phase wire. If it is single-phase, then a jumper should be mounted between the indicated terminals and a phase cable should be installed. A number of manufacturers supply devices with a jumper mounted.
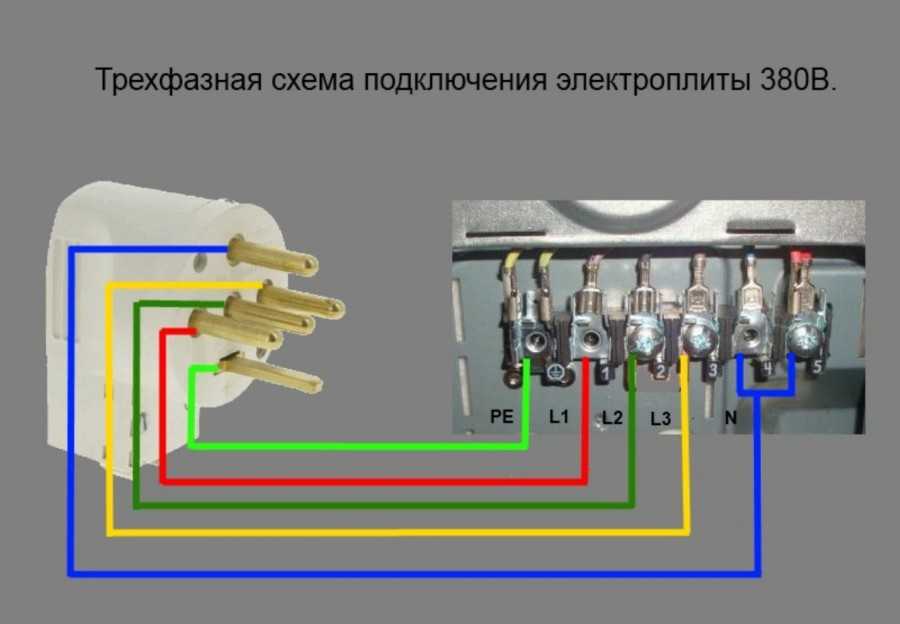
Let's see how to make a three-phase connection correctly. The installation of the outlet for the purpose in question will be slightly different. There will be 5 pins on the plug and on the socket. And in this case, 1 wire will be protective, 1 - zero and 3-phase. Then the latter will be connected to contacts located with each other, the contact of the neutral wire will be located on top, and on the bottom - for the protective one.
Connection types
You can connect the stove to electricity in several ways: directly to the shield, through a box with terminals, or using a socket and plug.
Switching via terminal box
Connecting the stove through a terminal box is a common option. The point at which the connection is made can be hidden in the wall or installed outside. The box is placed a couple of meters from the stove, while the distance from the floor should be more than sixty centimeters.
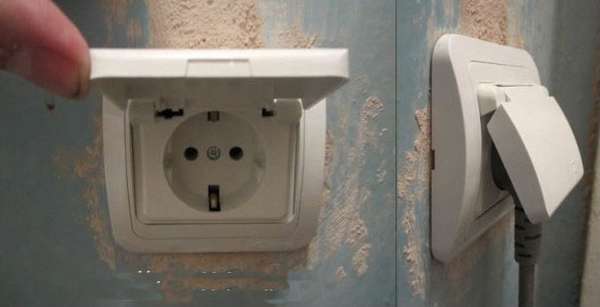
Switching on via socket
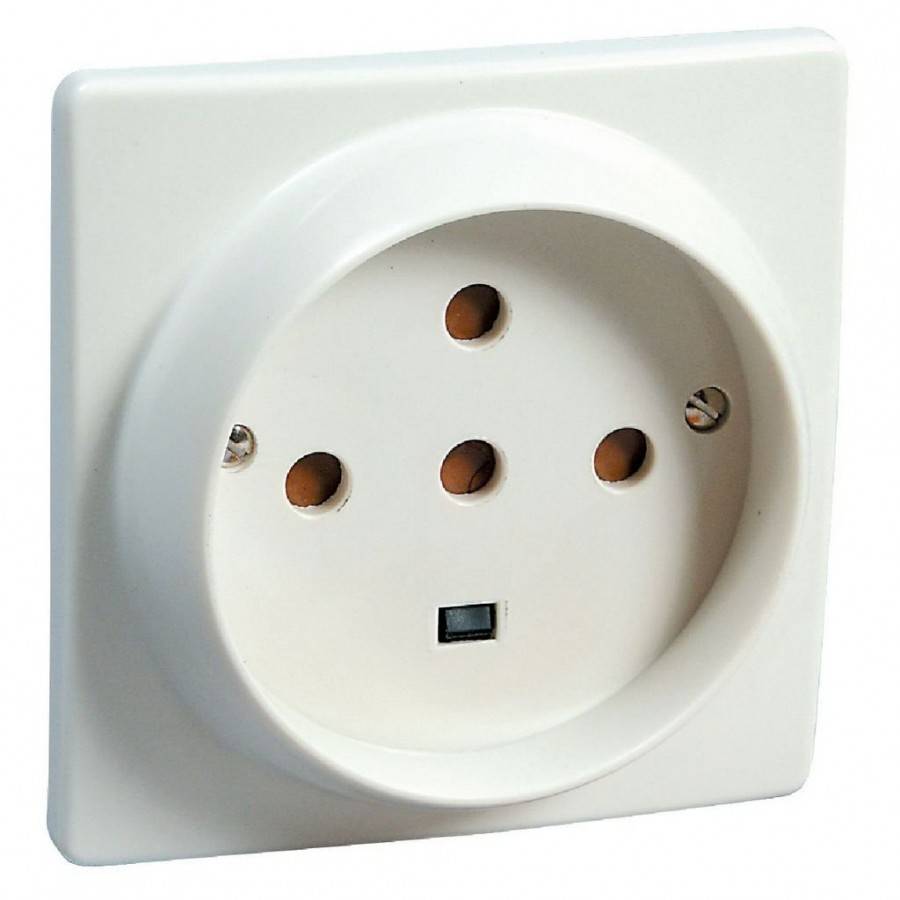
The third type of connection to the network is the use of a grounded socket. It is not recommended to install ordinary sockets, because they are not designed for such powerful electrical appliances, which means they will constantly fail.
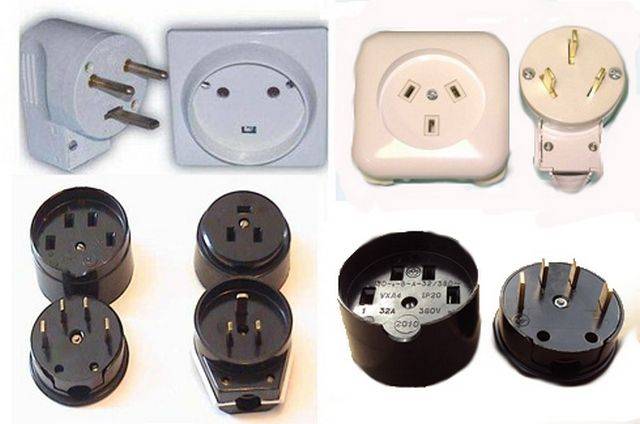
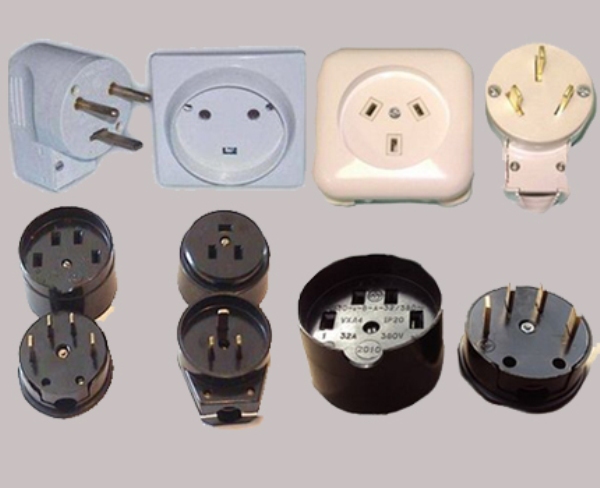
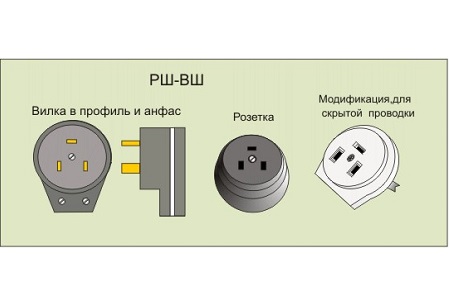
There are three types of power outlets:
domestic, the grounding of which is from above at an angle of 90 ° relative to zero and phase;
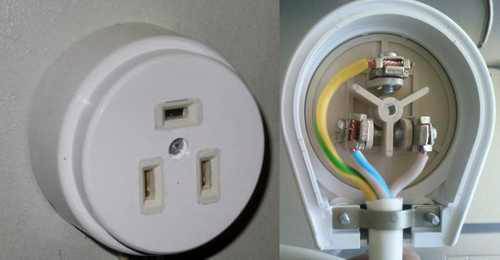
Belarusian, in which the contacts are at an angle of 120 ° with respect to each other;
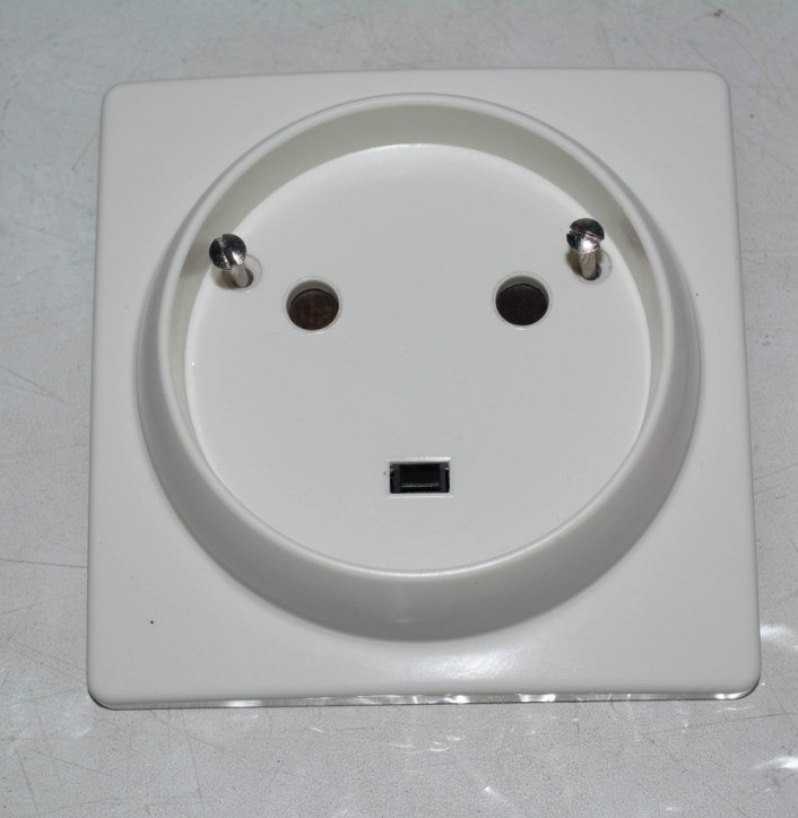
European ones, the grounding contact of which is flat and located at the bottom.
Socket for oven and hob
Electric hobs and ovens consume a lot of power (from 2.5 to 10 kW). Therefore, according to modern electrical safety rules, an oven outlet requires a separate dedicated power line from the shield.
Moreover, if the hob and oven provide for independent installation, then they will require two sockets, with individual connection points on distribution board.
Many people have a question, is it possible to connect an electric oven from an existing conventional outlet that was previously installed in the kitchen for a kettle, microwave, etc.?
- It is possible, the main thing is that 3 conditions are met:
- the oven should be no more than 3.5 kW;
- the socket is connected with a three-wire copper cable from the shield with a cross section of at least 2.5 mm2;
- in the electrical panel, replace a conventional machine with a thermal release with a differential machine with a rated current of not more than 16 A.
Under the third condition, some may experience inconvenience and minor problems. As a rule, many still have one machine for 16 A - 25 A for the entire socket group, plus one more for lighting.
When replacing the only machine for sockets with a differential 16 A and connecting an oven through it, it will be practically impossible to use other electrical appliances while the oven is working and food is being prepared.
Here, you yourself will have to make a choice, either in favor of savings (not laying new wiring, a separate outlet, etc.), or in favor of comfort and convenience. It is not recommended to leave a conventional modular machine in the shield without protection against leakage currents when connecting the oven to an old outlet.


The installation height of a new socket under the oven should be no more than 90 cm from the floor. Although it is also often placed at the level of the legs of the kitchen.
The most important thing here is ease of use. For safety reasons, when wet cleaning and wiping the oven with a wet cloth, it must be unplugged from the mains.
And climbing every time under the very bottom of the kitchen to pull out the plug is not always convenient. In addition, it is necessary to take into account such possible situations as water leakage and flooding of the kitchen. Therefore, 5-10 cm above the floor, the socket should still be raised.
The main requirement for the placement of the outlet is not to place it directly behind the oven. You can install it on the left, right, or as mentioned above - under it, directly near the floor.
When you have decided on the location of the outlet, you need to connect it.
Connect the phase and neutral core of the cable to the outer contacts of the socket
In this case, it does not matter at all where the phase will be located, and where zero is on the right or left. Connect the ground wire (yellow-green) to the ground terminal (usually the middle one)
Replace the frame or decorative cover.
Wiring Requirements
Particular attention should be paid to the quality of electrical wiring, on which the safety and correct functioning of the entire system depend.
The following factors are taken into account:
The oven and hob are connected through grounding. There must be 3 or 5 pins in the plug or socket for the oven (in the first case for a 220 Volt network, in the second - for 380 Volt)
In the tasks of the old building, this condition was not always adhered to. However, modern requirements are different, so a new cable will need to be laid.
The electrical wiring is connected to the junction box only through an RCD (residual current device).
Small power equipment (up to 2.5 kilowatts) is connected to the existing power grid (if it meets modern requirements). To connect powerful equipment, you need a dedicated line.
The optimal cable cross-section is 6 square millimeters. A wire with such a cross section can withstand a continuous load of 10 kilowatts. The recommended protection class of the machine is C32. If the panel power does not exceed 8 kilowatts, a cable with a cross section of 4 millimeters and a machine with protection class C25 will suffice.
The correct choice of cable is VVGng or NYM. When purchasing a cable, take into account the diameter of the conductor.For a wire with a cross section of 4 millimeters, the diameter will be 2.26 millimeters, and for a 6 mm conductor - 2.76 millimeters.
The data for the residual current device is one point higher than the rating of the circuit breaker. For a 32 Amp device, you will need a 40 Amp RCD.
CONNECTING THE ELECTRIC STOVE TO THE OUTLET
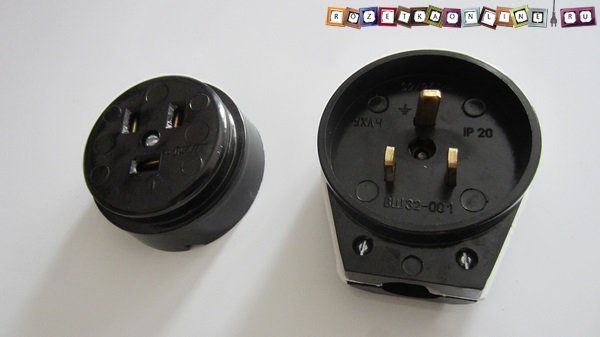
Initially, most electric stoves have a power cord, at the end of which a 32A - 40A power plug is installed, the type adopted in our country.
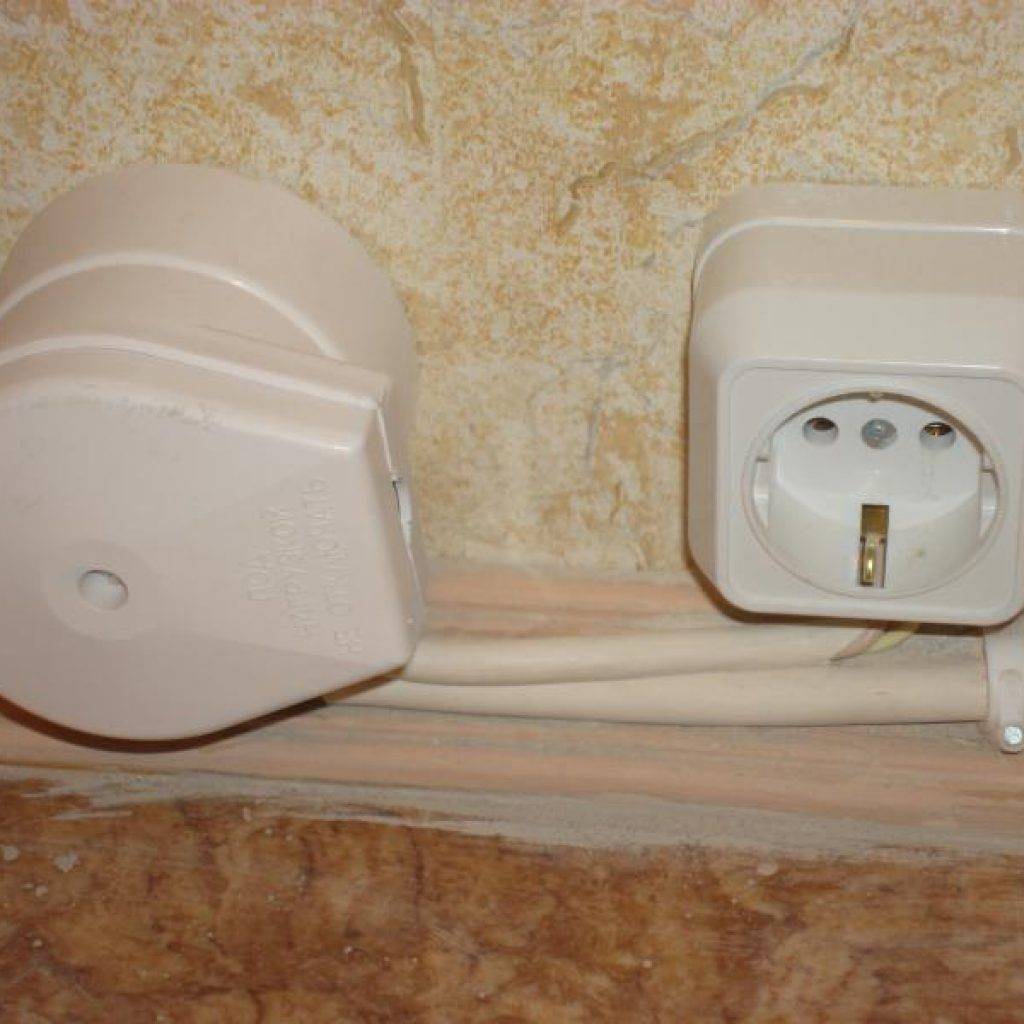
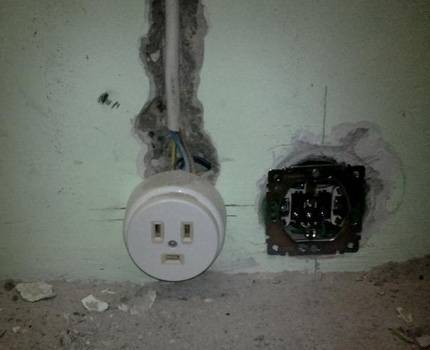
If you already have an appropriate outlet installed on your kitchen wall (see image below), you just need to plug the plug into the outlet and slide the electric stove into place, on which the whole connection will end.
But, unfortunately, things are rarely that simple. The fact is that in the kitchen, for connecting an electric stove, there is often only a cable outlet, sometimes it is hidden in a junction box, but usually wires just stick out of the wall. In addition, the outlet or socket for the electric stove is not always where you need it, about how you can easily move it yourself - read HERE.


In addition, the plug installed on the stove may not fit your wall outlet, because there is no single, unified standard for power connectors for kitchens. Often, even the same connectors from different manufacturers do not fit together. Let's figure out how best to perform installation in such conditions.
Wiring Requirements
According to the requirements of regulatory documents on electrical safety (PUZ - rules for the installation of electrical installations), bathrooms are classified as premises with increased danger. It is generally forbidden to install sockets in them, but an exception is made for domestic premises subject to certain requirements.One of the requirements states that the wiring in the bathroom should only be done in a hidden way to prevent direct water ingress.
 Socket for washing machine in the bathroom
The cross section of the wires must be designed for the current consumed by the washing machine with some margin.
Since the current value is usually not indicated in the passport data, you can calculate it yourself, knowing the power of the device using a simple formula:
I=P/U,
where P is the nameplate power of the washing machine,
U- mains supply voltage.
For example, if the power of the washing machine is 2.2 kW, then the current consumption will be 10 A.
This is quite significant. Too thin wire will overheat until the insulation melts and burns out.
Many sources provide voluminous tables for determining the allowable wire size, but most of the information in them is redundant. With sufficient accuracy, the wire cross section can be calculated at the rate of 2 kW of power per 1 mm2 of copper wire. Thus, to connect a washing machine with a power of up to 5 kW, it is enough to take a copper wire with a cross section of 2.5 mm2 or an aluminum wire with a cross section of 4 mm2. If a boiler or other powerful load is additionally installed in the bathroom, then the cross section must be taken more, again, based on the total power consumption.
The best option is to lay a separate cable for the outlet of the washing machine. If this option is chosen, then only copper wire should be taken for work, since aluminum is needed with a larger cross-sectional area. Such a cable is quite rough, hard, hard to work with.And most importantly, its strength is much less than copper, which, even being stranded, is very difficult to damage, even without special experience in installation work.
Note! The examples and recommendations refer to the cross section of the wire, not its diameter! You can determine the cross section, knowing the diameter, using the well-known school formula. For stranded wires, the total cross section is the sum of the cross sections of all elementary wires
A three-wire electrical cable must be used for wiring. The colors of the veins may be different, but one of them will definitely be yellow with a green longitudinal stripe. This is a ground wire.
Is it possible to bring two kitchen devices to one power socket
With proper electrical wiring, these devices are connected to the outlet for the electric stove. Often, craftsmen resort to cutting off the plug from the oven and connecting the device to the mains using terminals. The disadvantage of this method is that in this case the oven warranty is lost due to damage to the plug.
Another way to connect these two devices is to install an additional socket on the oven and on the hob separately. But this must be foreseen at the stage of repair. Not all homeowners think through such things at the renovation stage without planning the location of the headset items in the kitchen.
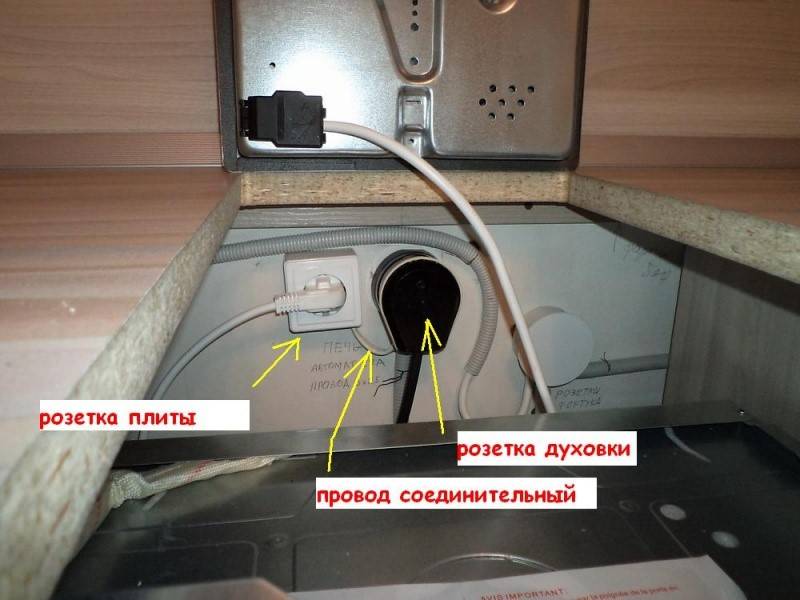
The third method is able to solve these inconveniences simply. In this case, there is no need for preliminary preparations, installation of auxiliary sockets or damage to the plug feeder. In this case, there is no need to remove the power feeder.To connect the hob and oven, a composite socket is used, where the power electrical connector for the electric stove and the classic euro socket for the electric furnace are combined.

This outlet model is superimposed on top of the standard one. The dilemma looms, what kind of cable is needed to connect it? The answer is an ordinary electric cable of a cooking device, where you can immediately connect a baking cabinet, but its power cannot exceed 3 kW. Simply put, they are connected to one cable.
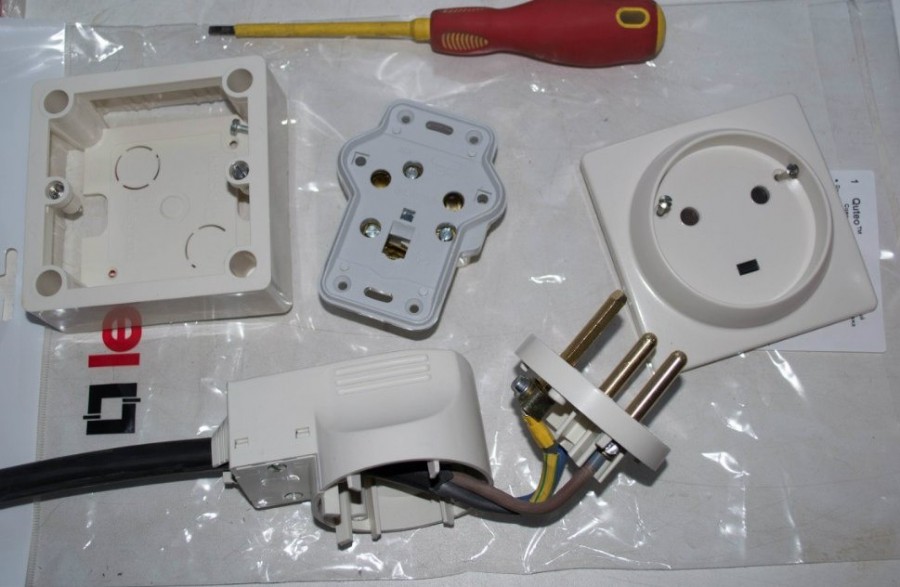
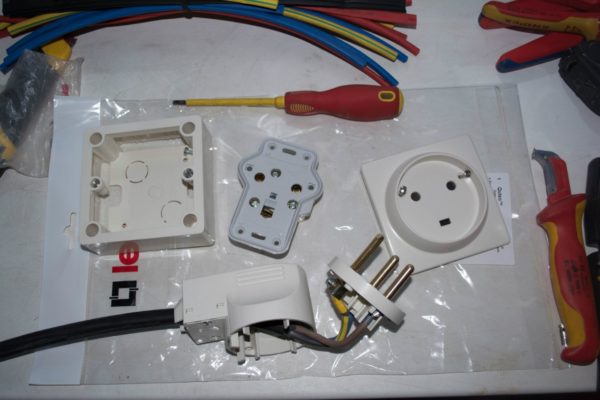
The factory feeder is equipped with marked conductors: white, blue and yellow-green. To power the oven from electricity, you will also need:
- Socket box.
- Socket for electric oven.
- Plug (not included).
To avoid the possibility of an electric shock, control is entrusted to a circuit breaker and an RCD. It is better to pre-purchase for the shield. If it is necessary to connect the oven and hob, a differential switch is used that can withstand the total load. It is necessary to install the socket at an optimal and accessible height (a meter from the floor), but it cannot be installed behind the oven. The best option is on both sides of the device.


Electrical connection requirements
Almost all electric stoves, regardless of the variety of models and brands, are connected in the same way. The difference is insignificant when turning on electric stoves for 220 and 380 V.
Primary requirements:
- The need to lay a separate electrically conductive line using a copper stranded wire with a cross section of 6 mm or more to withstand significant loads;
- Supply of the line with an auxiliary automatic fuse in the panel with a capacity of 25 to 40 A.In this case, the automatic device must have a current strength parameter greater than the same parameter of the electric stove by 1 rating to prevent critical loads;
- Supply of the connection power line with a differential automatic device or emergency shutdown;
- Proper switching on is done directly in the absence of a complete set of power cable - then the wiring is pulled from the automatic fuse to the electric stove without additional connections, reliably and safely through the terminals to withstand heavy loads - this connection is not detachable and the electric stove is de-energized when the machine is turned off, or through a specially designed for this power outlet - this requires grounding;
- Parameters are taken into account - phase, zero and grounding.
Types of wires
In the case of a brand of wire, the best solution would be the PVA or KG option. The first type stands for vinyl connecting wire. This product has conductors made of copper, each protected by insulation and all of which are in a white sheath. Such a power wire can withstand voltages up to 450 V, and the insulating material does not burn, which allows the wire in question to be heat-resistant.
It also features high strength and excellent bending resistance. Can be used even in unheated and damp buildings, where it will last 6-10 years, depending on operating conditions. Great for connecting electric stoves.
If we talk about the wire type KG, then its name stands for flexible cable. Its shell is made of a special type of rubber. In addition, the same sheath protects tinned conductors made of copper.Between the wires there is a special film that performs a protective function. It should prevent strands from sticking together due to heat from use.
Usually the KG wire contains from 1 to 5 cores. As you can understand, the core section determines the power that the cable can withstand. This cable is operated in the temperature range from -40 to +50 degrees. The KG cable can withstand voltage up to 660 V. Usually this wire has the following designation: KG 3x5 + 1x4. This means that there are 3-phase conductors with a cross section of 5 square meters. mm, and one grounding conductor with a cross section of 4 sq. mm.
Regardless of which wire will be selected to connect the electric stove, it should be bought with a margin of length so that you can move the product. In addition, the wiring going inside the premises and at the entrance to the apartment must be of high quality, which should also be checked before starting the connection.
Socket installation
After connecting the plug to the electric stove, you can begin the direct installation of the outlet. For a device with one phase, the phase, zero working and ground wires are connected, the left terminal becomes phase, the right terminal becomes zero, and the lower one serves to turn on the ground cable.
Connecting a three-phase power outlet is more difficult, because, as we already know, it contains 5 pins. We connect the phase leads to the three contacts located in the same line, to the terminal located at the top - zero, at the bottom - a protective ground wire.

Having decided to independently install a power source for an electric stove, be sure to thoroughly study the main stages of this process, carefully understand the scheme of such a connection, and strictly follow the safety requirements.

Seriously approaching the process of electrical installation, even a person who does not have experience with an electrical network will be able to safely and correctly cope with the work.

Socket selection
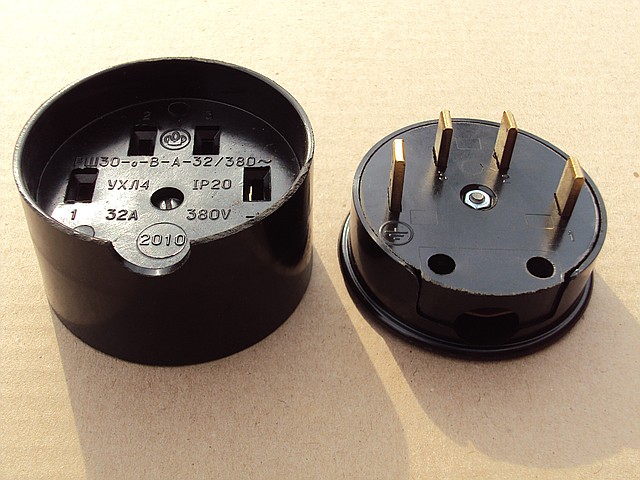
According to technical standards, the electric stove must be plugged directly into the socket. Connection via an extension cord is not permitted for electrical safety reasons. An ordinary socket cannot be used to connect an electric stove, since it is not able to withstand a high load. For high-power electrical household appliances, special sockets are required, designed for a power of 7 kW or more. When choosing such an outlet, it is necessary to focus on the maximum value of the rated current.
Power sockets can be made of carbolite and high quality plastic. Sockets of the first type are presented only in black and have a lower cost. Plastic sockets are made mainly in white. They are of high quality and a high level of wear resistance, and therefore are more expensive than carbolite.
Power sockets are available for open and hidden installation. If the outlet is installed directly behind the stove, which stands near the wall itself, then it is better to use a model for hidden installation, in which the working mechanism is completely hidden in the wall.
It is also necessary to take into account the number of phases in the home network and the presence of a grounding contact in the outlet.
Starting to install the outlet, you must first turn off the power in the apartment. Then, using a perforator, a hole is made in the selected place for the socket glass.A power wire is threaded into the socket, from which the protective braid is removed. The ends of the released wires in multi-colored insulation are carefully cleaned to a length of up to one centimeter. Then they are connected to the socket contacts.
In this case, it is very important to correctly connect all the wires. The yellow-green wire must be connected to the grounding contact of the socket, which is located in the center, and the phase and neutral wires are connected to the extreme contacts
It is very important that when you connect the outlet, zero must fall to zero, and phase to phase. Otherwise, a short circuit will occur. Therefore, it is very important to check the correctness and quality of the wire connection. After checking, the socket box is tightly fixed in the wall using gypsum or alabaster mortar. In conclusion, it is necessary to check the operation of the outlet and connect the stove itself.


Sometimes it is not possible to install a power outlet for an electric stove. In this case, the stove can be connected directly to the power cable. The cable is placed in a junction box and all its wires are connected to the corresponding terminals of the block. In some cases, the box is not used and the power cable just comes out of the wall.
When connecting the stove to a cable without an electrical outlet, unscrew the plug on the stove power cord. Then the split end of the cable is inserted into the plug body and all its wires are connected to the wires of the cord. At the same time, it is necessary to carefully ensure that the wires are of the same color, that is, the blue wire of the power cord of the stove is connected to the blue wire of the power cable, yellow-green with yellow-green and red with red.Of course, all work related to the connection of electrical equipment should be carried out with the home electrical network turned off.
Connecting the plate directly to the power cable is considered more reliable, since in this case there is a minimum number of contact points, which increases the reliability of the connection. But this method is not entirely convenient, since you can only turn off the power supply of the stove using the machine.
In the event that the apartment already has a socket for an electric stove, it is necessary to check where the phase, zero and ground are located and, accordingly, connect the wires in the plug. To determine the phase in the outlet, you can use the voltage indicator in the form of a screwdriver. This is done quite simply: the indicator is installed in the place of the expected phase. If the LED lights up on it, then there is voltage and this is a phase. If the LED does not light up, then there is no voltage and this is zero. Land is defined even more simply. This is usually the contact at the bottom or top of the outlet.
Schemes and ways to connect the stove
 If the electric stove is not equipped with an electric power cable, it will need to be connected independently, for which the rear protective cover of the kitchen equipment, which is bolted, is removed.
In this case, single-phase (220 V), two-phase or three-phase (380 V) connection is possible. To find the wire connected to the phase, an electrical tester is used, which allows you to ring the network.
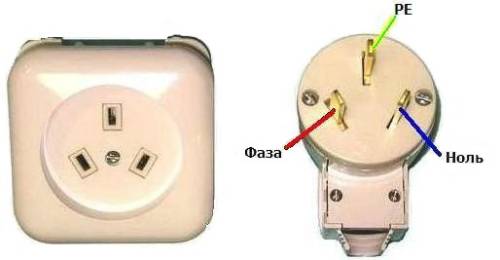
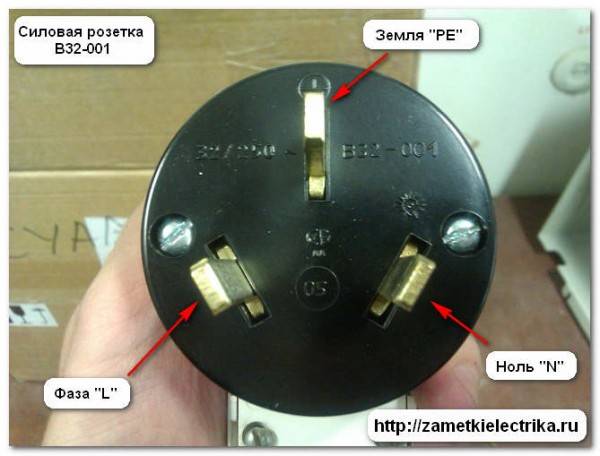
Marking of terminal clamps at the plate:
- L - phases;
- N is zero;
- And grounding, marked with a special sign PE.
In the absence of jumpers between the terminals for single-phase and two-phase connection, they are made from small cable pieces.
Connection to a single-phase network:
The location of the contacts in the electric stove to turn on the wire is under the protective panel.
A three-core cable is selected: 1 core - coffee, gray or black phase wire, 2 - blue or blue zero, 3 - yellow-green ground.
The electric stove has more connecting contacts
Paying attention to the marking of the conclusions, the cable is connected.
If there are several outputs "L" and the 1st phase in a single-phase network, jumpers are used, complete with an electric stove.
Initially, grounding is carried out to the “PE” terminal, and after zero to “N”. If there are several leads, a jumper is used to connect the wires to each other and a blue wire is connected to one of the leads.
The phase connection is carried out last - the jumper connection of all terminals marked "L" and after connecting the phase wire.
Connection to a two-phase network:
- It is rare and it is desirable to use a four-core cable: 2 cores for phases, the other 2 - zero and ground.
- First, a ground connection is made.
- After using a jumper for zero terminals, a zero is connected.
- If there are three phases in the electric stove, two of them are connected by a jumper and connected to one of the outputs of the first phase, and the remaining one will become the second phase wire.
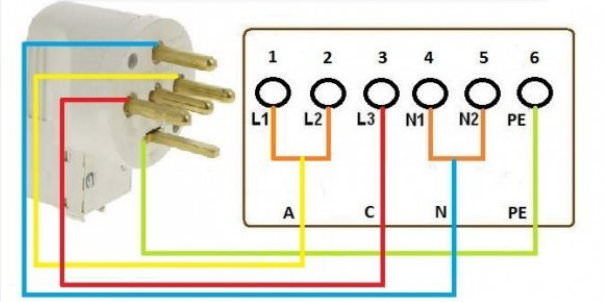
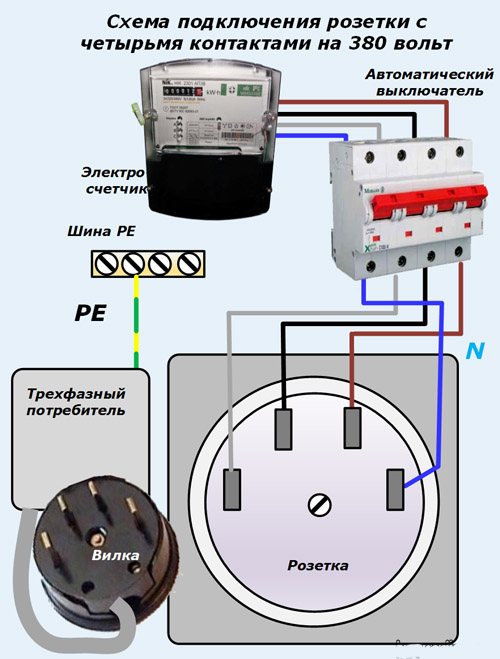
Connection to a three-phase network:
- You will need a five-core cable: three cores for phases, the other two are ground and zero.
- Initially, ground and zero are connected, if there are several zero terminals, they are preliminarily closed with a jumper.
- Each phase is connected to the three phase terminals separately.
Connection methods
To power the stove, you can use one of the following schemes:
- Single-phase. It is carried out when installing equipment in apartments where there is only a single-phase network with a voltage of 220 V.
- A two-phase or three-phase connection used to increase the power and at the same time increase the efficiency of this equipment.
It is not possible to determine in advance one of the schemes according to which the connection will be made. Therefore, manufacturers do not equip the hob with a standard electrical plug.
As for less powerful consumers, which are ovens, they are designed to operate from a 220 V household power supply. Therefore, such equipment is equipped with a standard Euro plug, which provides for grounding contacts in its design. This configuration is possible for ovens whose rated current does not exceed 16 A.
The cross section and materials of wiring in new buildings are already designed for the operation of devices with high energy consumption.
To install the stove with your own hands, as well as connect especially powerful models of ovens, use a power outlet with a rated current of 32 A, which is necessarily equipped with a grounding contact. In appearance, such a device resembles a three-phase electrical installation product.