- Types of materials
- Rubber seals
- Silicone fittings
- Polyvinyl chloride seals
- Thermoplastic profile
- The nuances of installing fittings on glass
- Instructions for replacing the seal
- How to choose a sealant for a shower cabin?
- Replacing the seal of the shower cabin
- Stage one
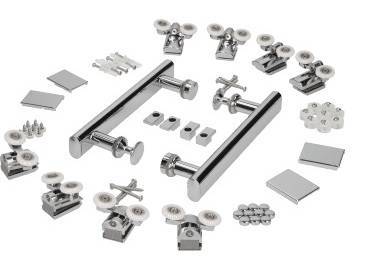
- Mandatory accessories that all shower cabins have
- Accessories that depend on the configuration of the shower cabin
- How to choose rollers
- Common causes of failure
- Seal care
- 2. Assembly of Timo rectangular shower enclosures.
- Stage 1. Pallet assembly
- Installing a drain on a pallet
- Rectangular pallet alignment
- Stage 2. Assembly of the front frame
- Stage 3. Connecting the front frame and end windows
- Stage 4. Rear wall assembly.
- Stage 5. Roof installation
- Stage 6. Door installation.
- Stage 7. End of assembly.
- Why do doors fall off
- Types and technical features of rollers
- Rules and sequence of installation
- Supply of communications
- Shower wall assembly
Types of materials
One of the main characteristics that should be considered when choosing a sealant is the material used to make the profile (usually rubber, silicone, PVC, thermoplastic elastomer), since each of them has its own advantages and disadvantages.
Rubber seals
Rubber compressor
Fittings for shower cabins made of rubber - the simplest and most inexpensive option. In terms of durability and abrasion resistance, it is inferior to modern materials, and in addition, it can accumulate dust and dirt, but it is not without some advantages. Rubber does not pass water, is resistant to humidity, most chemicals and withstands temperature extremes from -50 to +100 degrees.
Silicone fittings
Sealant (silicone) for glass in the shower
Silicone products have good performance properties, including strength, high temperature resistance, durability and elasticity. They are resistant to mechanical damage, do not crack and do not cause metal corrosion, fit well to the cabin structure, ensuring its tightness, but they are more expensive than rubber fittings.
One of the varieties of silicone sealing profiles is magnetic seals. They are produced in the form of strips of a certain shape, which are equipped with magnetic elements along the entire length. Such seals are installed on the cabin doors to securely fix them in the closed position. When buying magnetic products, it must be taken into account that each of them is designed for doors that close at a specific angle (90, 135 or 180 degrees). If none of the profiles fits, it is recommended to purchase fittings with a latch, the angle of which can be adjusted independently.
Magnetic seal for the shower cabin
Silicone magnetic seal
It should be noted that the installation of a magnetic seal on the ends of the door necessarily implies the presence of hinges without fixation and a closing closer.If the design is equipped with hinges with a closer and a fixed “zero” position, then the so-called thrust profile can be used to protect against leaks. It serves both as a stop for swing doors and as a protection against splashing water.
Profile for fixing shower glass to the wall
Polyvinyl chloride seals
PVC profiles have almost the same advantages as silicone profiles. Most often they are installed on moving parts of the cab to ensure a snug fit. Polyvinyl chloride seals are not subject to deformation under the influence of high temperatures, are safe for health and do not change their color during operation. A wide range of PVC seals allows you to choose a product of the desired width with any section.
PVC seals
Thermoplastic profile
Thermoplastic elastomer is a synthetic polymer material of the latest generation. Under normal conditions, it has the characteristics of ordinary rubber, but when the temperature rises, the products soften and resemble a thermoplastic. The material has a smooth surface and a homogeneous structure, and after deformation it acquires its original appearance. Thanks to this, sealing profiles made of this polymer are durable (on average, the service life is 10 years), are not subject to cracking or mechanical damage, and are practical to use. The only drawback of profiles made of this material is the high cost.
Thermoplastic seals
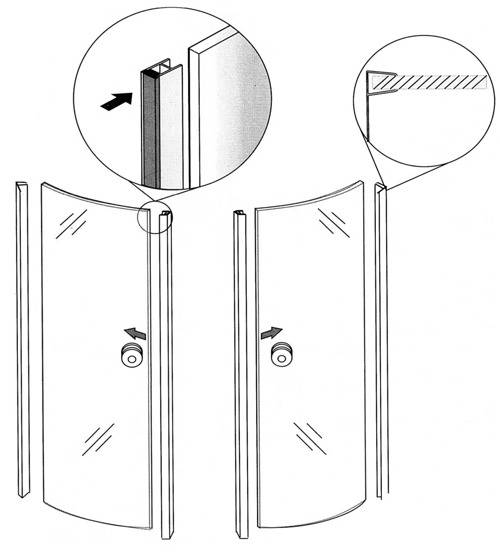
The nuances of installing fittings on glass
For glass construction, fittings of an overhead installation type and a mortise type are used.
Overhead elements are installed in their place without drilling the canvas.In order for the parts to fit exactly into place, markings are first made on the doors for individual fittings. It is not recommended to apply markings on the glass sheet for all fittings.
It is better to carry out the work in stages, including marking. A gasket is placed between the glass and the parts. This is a must, because it serves as a protection for the glass. The fittings are attached to the glass surface with clamping devices. With its fastening, the main thing is not to overdo it so that the glass does not burst.
If it is not difficult to install overhead fittings, then mortise fittings will require skills in working with glass. A special tool is being prepared. At the initial stage, the places of docking of collapsible components are marked. Using a thin drill, a hole is made. Everything is done with millimeter precision. Sometimes such holes are already available on the glass sheet when the structure is sold. They are drilled in production.
Instructions for replacing the seal
To replace the shower cabin seal, you will need the appropriate fittings, a simple set of household chemicals (degreasers, solvent), as well as a special sealant, the choice of which also needs to be given special attention.
How to choose a sealant for a shower cabin?
Shower Cabin Sealant
In order for the sealant to fit as tightly as possible to the structural details, it is imperative to use a sealant during installation. There are several options for sealants that are used to treat showers.
Polyurethane-based compounds are very popular today, but it is important to remember that some components can hopelessly ruin an acrylic or plastic surface.
Another option is acrylic sealant, but it is not recommended to use it in wet areas. The best solution for shower cabins is silicone sanitary sealant. It not only seals all cracks and joints well, but also prevents the development of fungus and mold. The best composition for sealing a shower cabin should contain at least 45% silicone rubber, the same amount of hydrophobic filler, a plasticizer, as well as special additives (fungicides, etc.).


Silicone plumbing sealant
Replacing the seal of the shower cabin
In order for the sealant to fully fulfill its functions and last as long as possible, it is necessary to correctly perform work on replacing old or worn-out fittings.
Seal that needs to be replaced
Step 1. Remove the old seal
This can usually be done by hand, but sometimes you have to use a knife (in this case, the work must be done carefully so as not to scratch the cabin panels)
The seal can be removed from the door glass very easily.
Step 2. The sealant on which the old seal was glued must be removed. The most effective and safest way is to use alcohol or solvents based on it. The entire area to which the material is applied should be blotted with a cloth soaked in alcohol, after which it will become jelly-like and easily cleaned from the surface. If yellow stains remain on the panels after this procedure, they can also be easily removed with alcohol.
How to remove the sealant at the junction with the walls
You can wipe the joint with the wall using an old toothbrush.
Step 3. Rinse the treated surfaces well, treat with a degreasing agent and dry.In this case, it is unacceptable to use soap solutions, as they impair the adhesion of fittings to structural details.
Wait until all surfaces are dry or dry them with a hair dryer
Step 4. First, the seal is mounted on the inside of the cabin. In order not to damage the panels, their edges must be covered with masking tape or film.
Left - dismantled seal, right - new
Step 5. The places where the seal will be laid should be lubricated with a thin layer of sealant. Remove excess material immediately with a rag, otherwise it will be almost impossible to get rid of stains later.
Squeeze out the seal, guiding it along the seam
Distribute the seal at the seams
Step 6. Place the fittings tightly in the prepared places, press well against the surfaces.


The seal is put on with a dropper towards the cabin so that drops of water flow into the pan
Move the seal until it reaches the desired position on the glass
Step 7. After laying the seal inside the cabin, you need to seal it from the outside in the same way.
Step 8. After installing the fittings around the entire perimeter of the cabin, the joints between the panels, the pallet, the floor and the walls of the bathroom must be treated with sealant again.
After the sealant dries (the time is indicated in the instructions for the material), you need to check the tightness of the seals to the cabin parts. To do this, a jet of water should be directed to the joints - if it does not seep through the circuit, then the installation was performed correctly. If leaks are found, problem areas should be cleaned again and treated with sealant.
Glass door seal
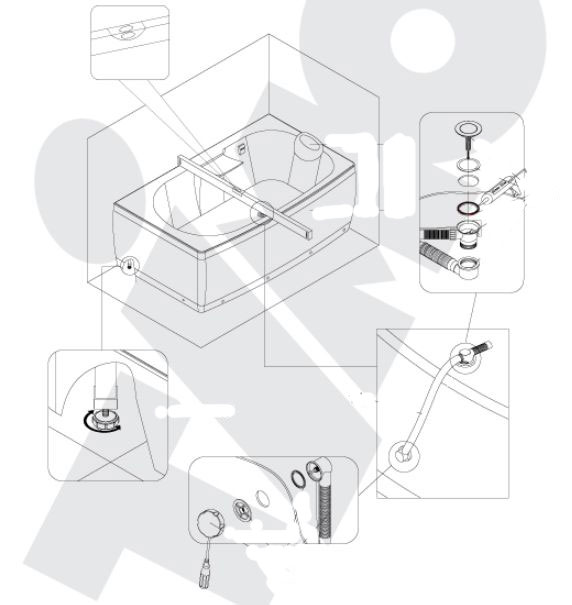
Stage one
First of all, before assembling the shower enclosure, unpack all the boxes and take out all the components and accessories.
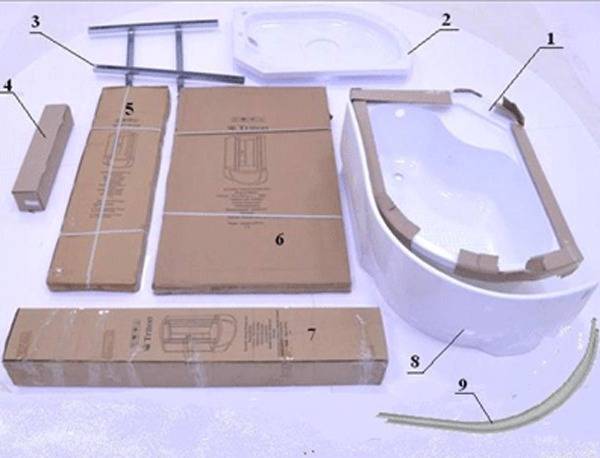
Lay them out and check if all the components are in place.
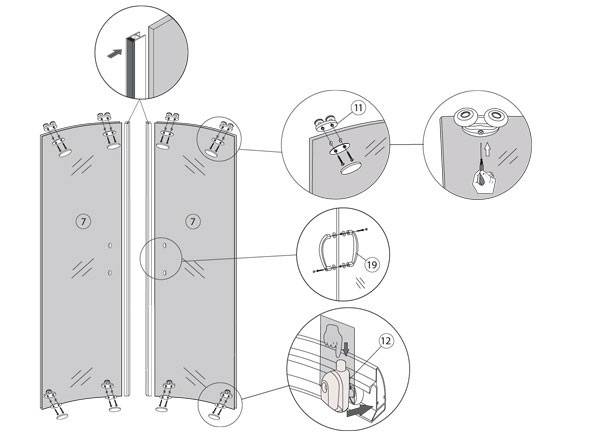
A standard shower enclosure with a glass back wall consists of the following assembly units
Pallet (some manufacturers supply the pallet assembled, if your pallet is not assembled, then in the box with the pallet you will have the following spare parts)
- Pallet
- Roof
- Front decorative screen
- Horizontal profiles-2 pcs (upper and lower)
- frame
- Accessories for assembling the frame and fastening the decorative panel (studs, bolts, legs)
Very often, all of the above components are in one box. This is the biggest box. Also, inside there may be a box with all the accessories, where you can find everything for assembling a shower cabin.
If you can't find threaded studs for the legs and frame, shake the frame itself, some manufacturers put studs inside the frame.
Back wall
Two glasses of the same size
They can be immediately framed with aluminum profiles, or just two glasses if the back wall is assembled on the corners.
These two walls differ from one another by the presence of holes already drilled in them for accessories. Such as shelf, mirror, foot massage, hand shower and others.
To understand which glass is right or left, look at the image of the product on the instructions or on the Internet. There you will see the complete set of your shower cabin, and on which side the options are located.
Front glass
- Fixed glasses-2 pcs
- Doors-2 pcs (curved glass with holes for rollers and handles)
- Horizontal profiles - 2 pcs.
- U-shaped seals (2 or more pieces)
- Magnetic seals on the door - 2 pcs (may already be fixed on the doors)
- L-shaped cut-offs (2 or 4 pieces)
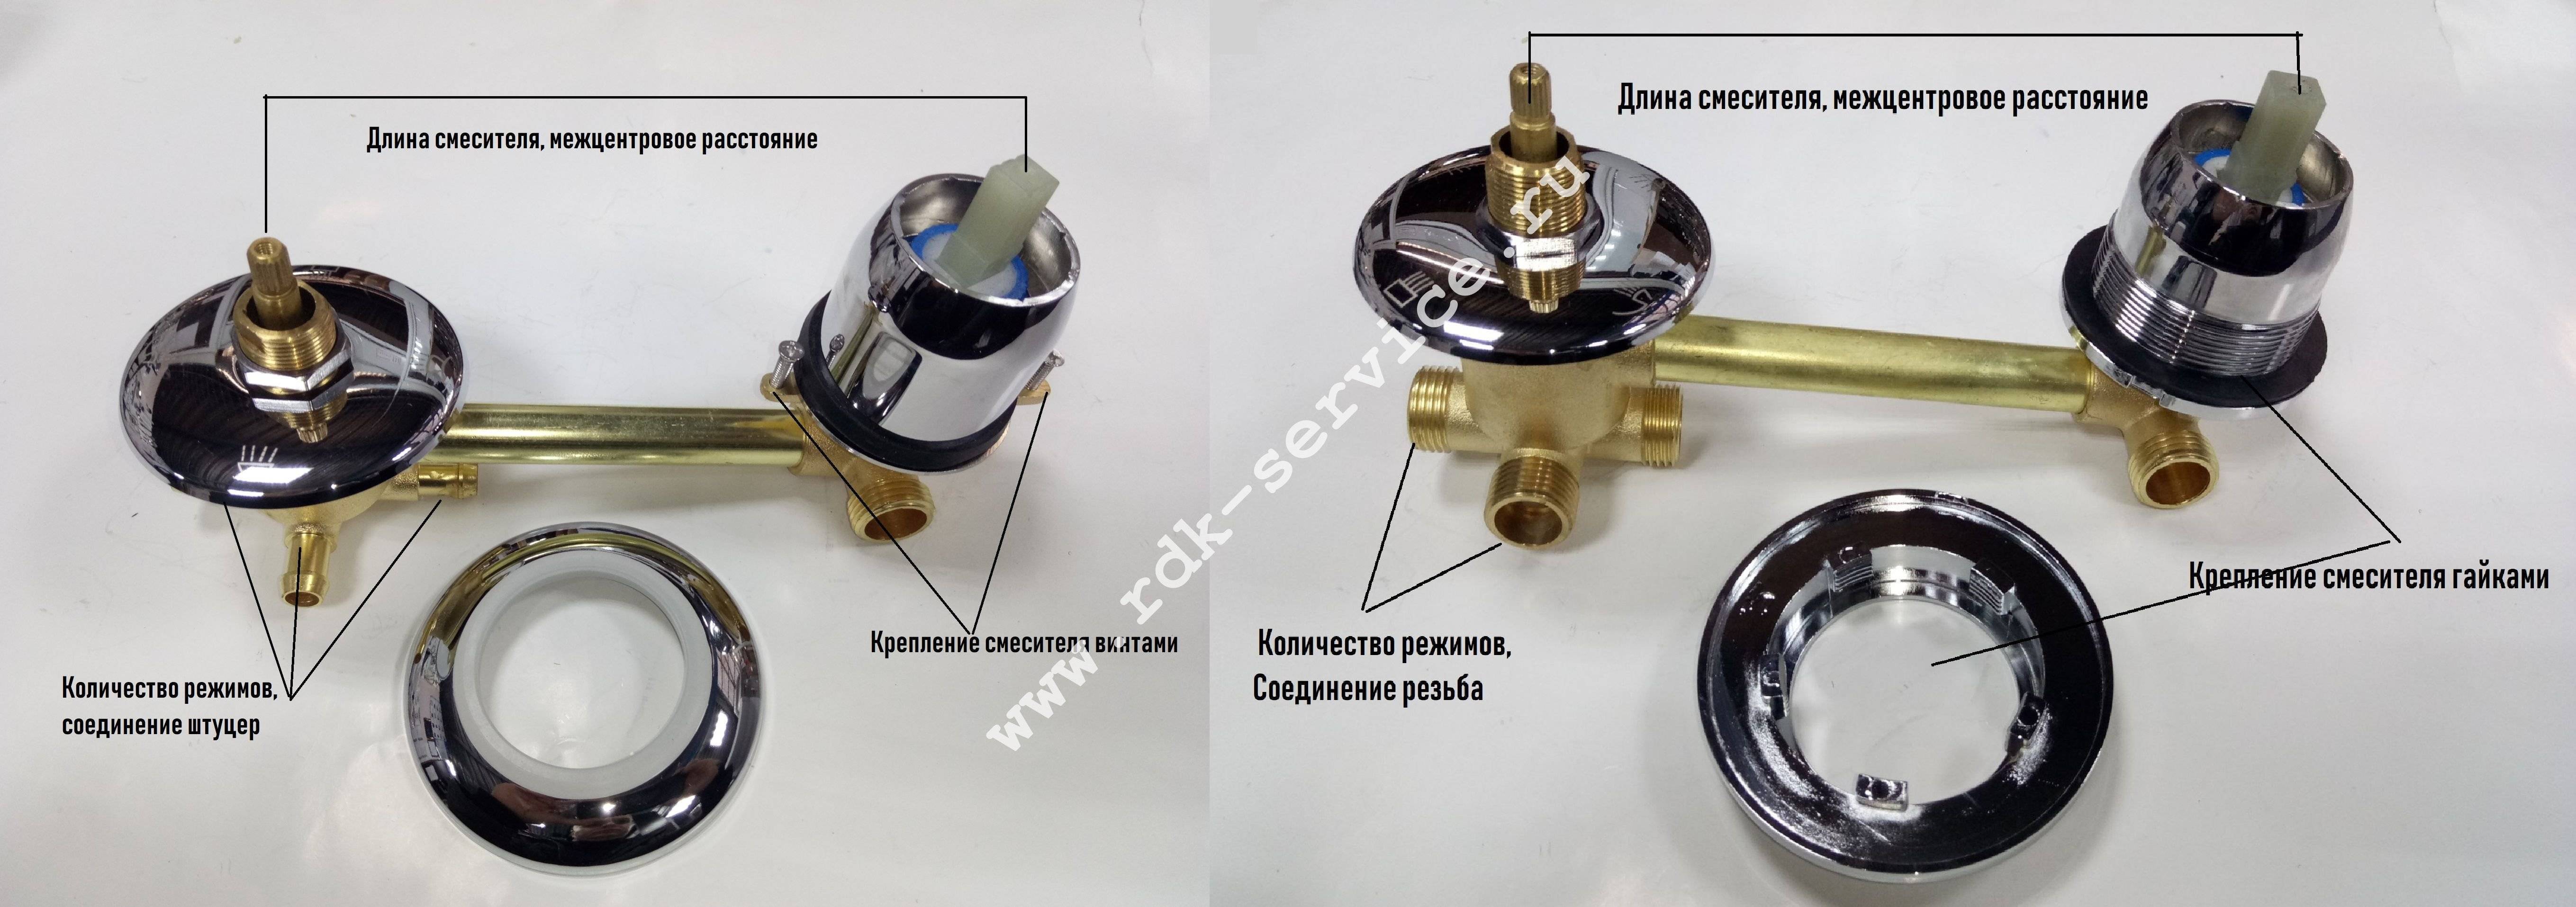
B-pillar
It can be with options already screwed on, such as a mixer or lighting. Also, very often inside, on the reverse side, various seals and other small spare parts are placed directly into the panel.
Video instructions for assembling shower cabins
Accessories
Mandatory accessories that all shower cabins have
- Door rollers
- Pens
- Mixer
- Hand shower
- Hand shower holder
- Siphon drain
- Side window holder corners
- Fasteners (self-tapping screws, bolts, washers, clamps)
Accessories that depend on the configuration of the shower cabin
- nozzles
- rain shower
- Options control panel
- radio speaker
- backlight bulbs
- Power Supply
- Foot massager
- steam generator
- Seat
- And so on
That is, at this stage, knowing the complete set of your shower cabin, you can visually inspect and understand before assembly what is screwed where, or suddenly something is missing.
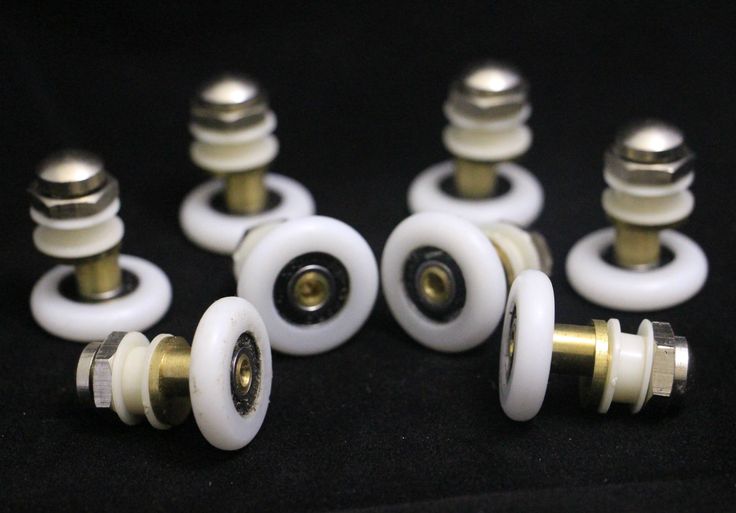
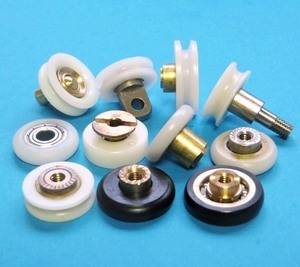
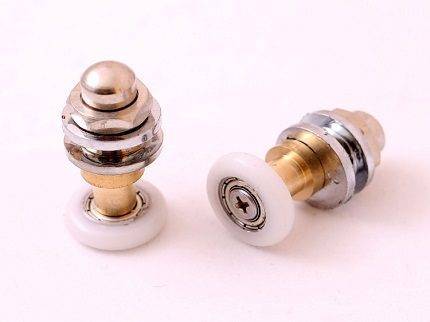
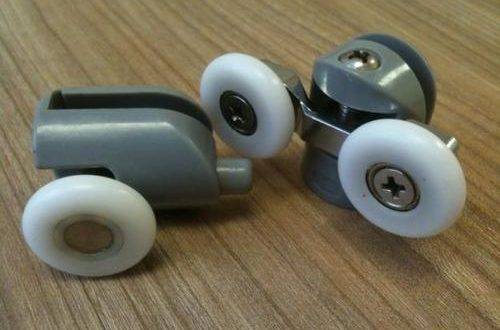
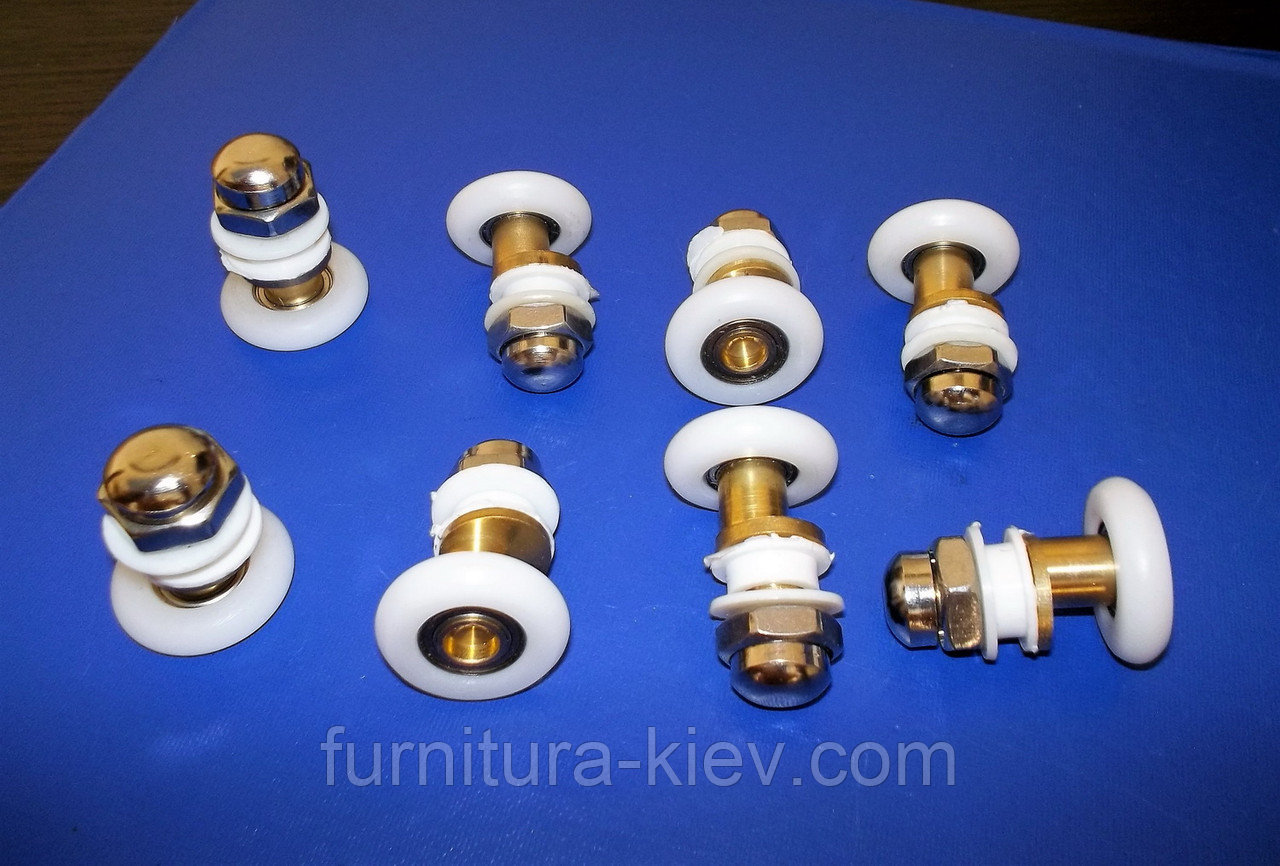
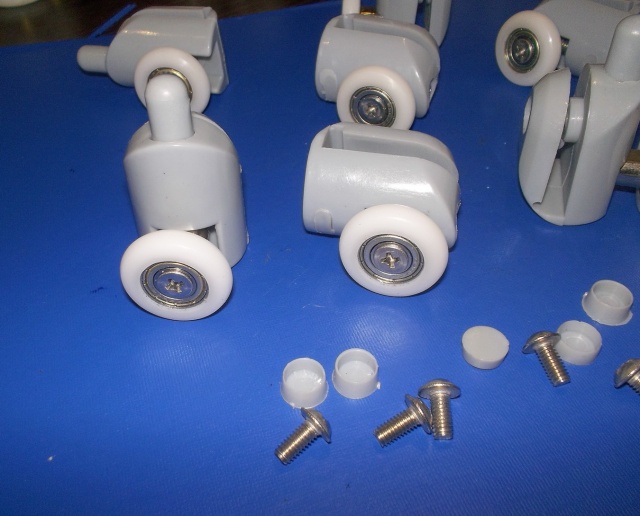
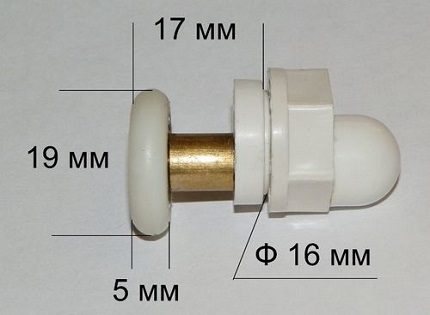
How to choose rollers
To choose the right rollers, you need to know the cab manufacturer (marking). The analogue is selected according to the dimensions of the wheel, the thickness of the glass, the departure from the glass or profile. To accurately determine the size of the roller, you will need to measure the diameter of the wheel, the diameter of the hole in the glass or in the guide, depending on the place of its attachment, and the departure from the base of the attachment.


The most common causes of roller breakage are:
- natural wear - the roller is subjected to a very high load, so the more often the cabin is used, the faster the rollers fail;
- improper operation - careless opening / closing, loads on the canvases;
- incorrect roller selection - if the roller does not fit, then the mount will either be too loose or too tight. This will lead to mechanical damage to the bearings and housing during operation;
- incorrect installation - if the installation was performed with violations (the case is skewed, the screws are tightened);
- lack of care;
- poor water quality, leading to salt deposits that settle on the rollers, form deposits and clog holes;
- aggressive chemistry: chemically aggressive components can corrode the material, wash out the lubricant, which contributes to the formation of corrosion. This applies to chlorine-containing products and alcohol-based products;
- sudden changes in temperature;
- small debris in the grooves - specks, dust, grains of sand can penetrate the rollers, getting stuck in the bearings. This can impair the mobility of the mechanism and increase the load on the roller.
These factors accelerate the depreciation of parts and lead to their premature wear. A broken roller for a sliding door can lead to rather unpleasant consequences - for example, the door can suddenly come off. Therefore, it is necessary to immediately check the rollers if the door leafs ceased to close tightly, began to make a rattle during operation or move in jerks.
How to choose videos:
- When selecting rollers by diameter, it is permissible to purchase rollers of a slightly smaller diameter if the difference is within 2-3 mm. You should not take wheels of a larger diameter, even if the difference is small, since the rollers are installed in the cab without a margin in width.
- The second selection parameter is the size of the openings in the sashes. Each glass door has openings at the top and bottom, into which the roller bushings are inserted during installation.It is allowed that the diameter of the sleeve is 2-3 mm smaller than the opening of the sash, but not more. If there are 2 fasteners on the roller, you should measure the distance between them, and then the distance between the holes in the sashes. These parameters must match completely, otherwise there will be difficulties with installation.
- Roller stem length is important for rounded cabs: if the stem does not match the curve, the door will jam.
- The glass thickness parameter is only important in the case of non-standard glass sheets. The rollers are equipped with an adjustment function, which is sufficient for installation on standard blades.
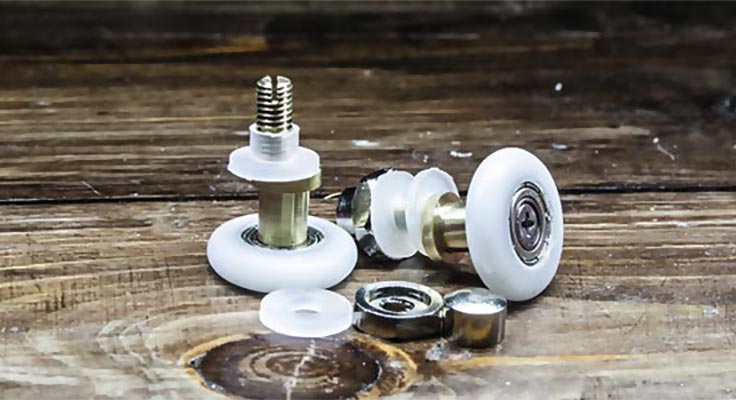
- The durability of the mechanism depends on the bearing. The best option for shower enclosures is ceramic or bronze single row radial bearings. Steel ones begin to corrode quickly, quickly rust and cease to function. Ceramic ones are not afraid of moisture and are not erased, but they are expensive. The best option is closed-type bronze bearings with a plastic casing.
When repairing the mechanism for opening a shower cabin, it is better to completely replace the rollers. For replacement, it is better to buy a kit, since you can easily make a mistake with the diameter of the wheel.
Common causes of failure
Repair of shower rollers is carried out due to the negative impact of the following factors:
- natural wear. The most probable cause, since research has shown that on average a family of three opens / closes the cubicle doors at least 8 times a day. Only replacing the rollers will help to fix the problem;
- poor quality of installed fittings.Cheaper showers tend to come with low-quality handles, hinges, and roller mechanisms, resulting in faster wear, cracking or chipping, and warping;
- mechanical impact can also cause a breakdown. In most cases, door strikes, sudden opening or closing cause chips and cracks;
- using hard water or chemical agents to clean or care for plumbing fixtures. Limescale, rust, interaction with cleaning agents lead to rapid wear of the fittings.

Sliding mechanism to be replaced
In most cases, it will not be possible to repair sliding fittings and a complete replacement will be required.
Seal care
In order for the seal to last long enough, it requires proper care. To do this, you must adhere to the following rules:
-
regularly clean the fittings from soap deposits, for which you should use mild household chemicals;
- if a rubber profile is installed on the cab, it is not recommended to use aggressive chemicals, otherwise it may harden and crack;
-
the bathroom should be constantly ventilated or high-quality ventilation should be installed in it to prevent the formation of fungus and mold;
-
when operating the shower cabin, do not direct the water jet directly to the places where the seal is laid, as this will reduce its service life.
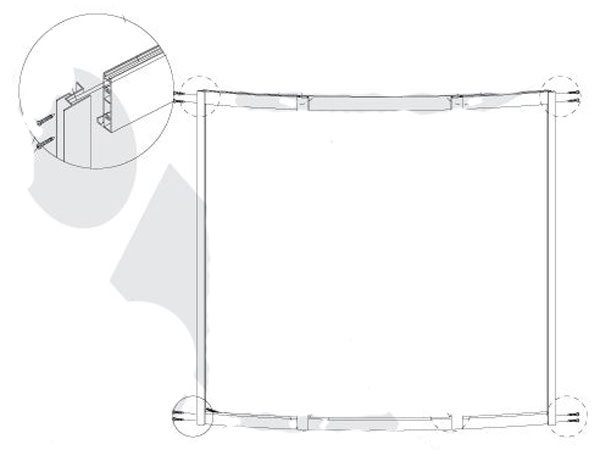
2. Assembly of Timo rectangular shower enclosures.
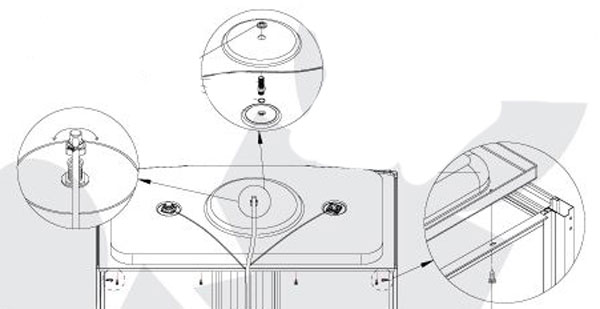
Stage 1. Pallet assembly
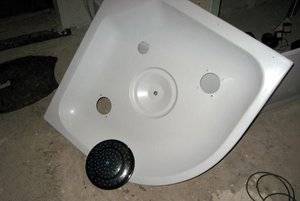
Since the shower tray is delivered assembled, at this stage we need to screw the drain or overflow drain to the tray (depending on the configuration)
In general, at this stage, you should remove the front decorative panel, and then put it back at the end of the assembly and checking all the functions of the shower enclosure.
The drain should be screwed on using sealant, treated before installation from the underside of the pallet.
Installing a drain on a pallet
Usually, a rectangular tray comes with an overflow drain, you still need to screw on the overflow siphon.
Then the pallet should be moved to the installation site, and using the level and rotation of the legs of the pallet, align the pallet on all sides in a horizontal plane.
Rectangular pallet alignment
Stage 2. Assembly of the front frame
You will definitely need an assistant to assemble the front frame. He will need to connect the vertical and horizontal profiles at an angle of 90 degrees, and you will need to screw in two self-tapping screws from each edge of the structure with a screwdriver. It is advisable to screw it with a screwdriver so that there is no overtightening of the screws.
Then it is necessary to insert the front fixed windows into the horizontal side and central profiles. To do this, put on the rubber seal, cutting off the required amount with scissors, onto the glass from the edge of the horizontal profile and from the bottom of the glass.
After inserting the glass into the horizontal profiles, install the central profiles and screw them on with self-tapping screws.
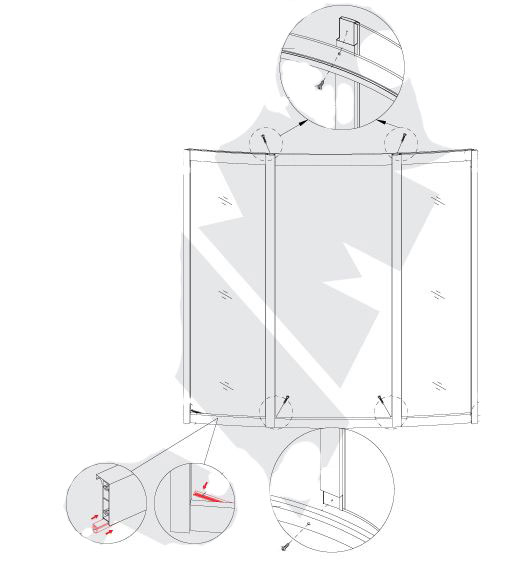
Stage 3. Connecting the front frame and end windows
Install the front frame on the pallet, insert side profiles from each edge into the grooves of the front frame profiles, and end glasses in them.If you do not have a silicone seal on the end glasses, then install it. Fasten the front wall, side profiles and end windows with self-tapping screws.
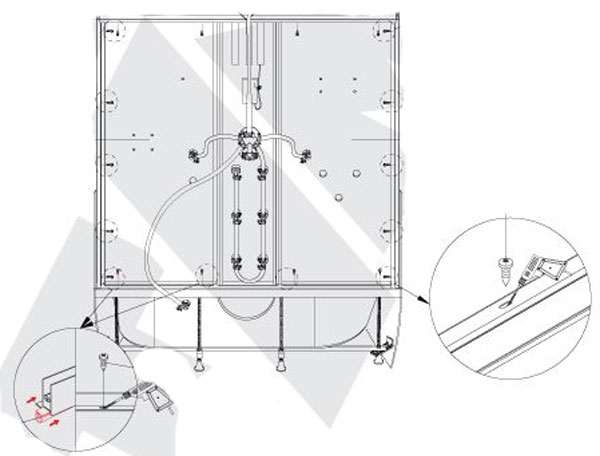
 Stage 4. Rear wall assembly.
Install the rear wall glass and center panel on the pan.
Bolt together the center panel and rear windows.
Then, screw the back wall to the structure standing on the pallet, as well as to the pallet itself. To do this, it will be necessary to align the structure along the edges, and drill holes with a drill. Then, using self-tapping screws and a screwdriver, fix the entire structure.
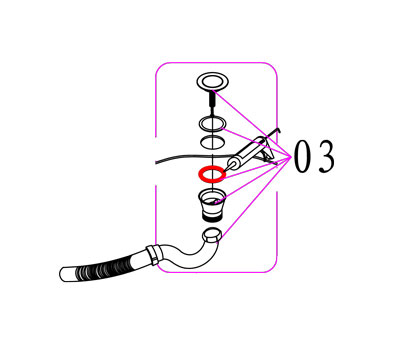
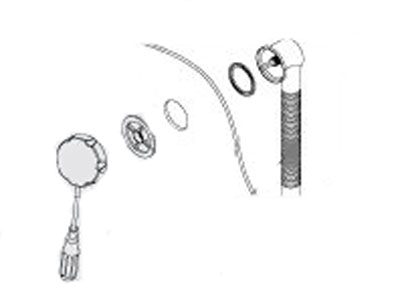
Stage 5. Roof installation
Screw a rain shower, radio speaker and exhaust fan onto the roof. Also screw decorative caps on the inside.


Connect the hose from the faucet through the L-bracket to the rain shower.
Attach the entire structure on the shower enclosure to the back wall using self-tapping screws.
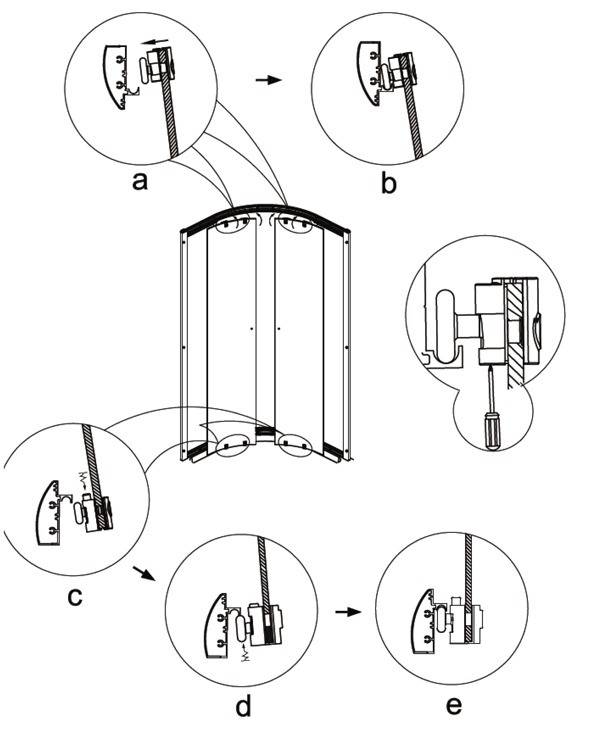
Stage 6. Door installation.
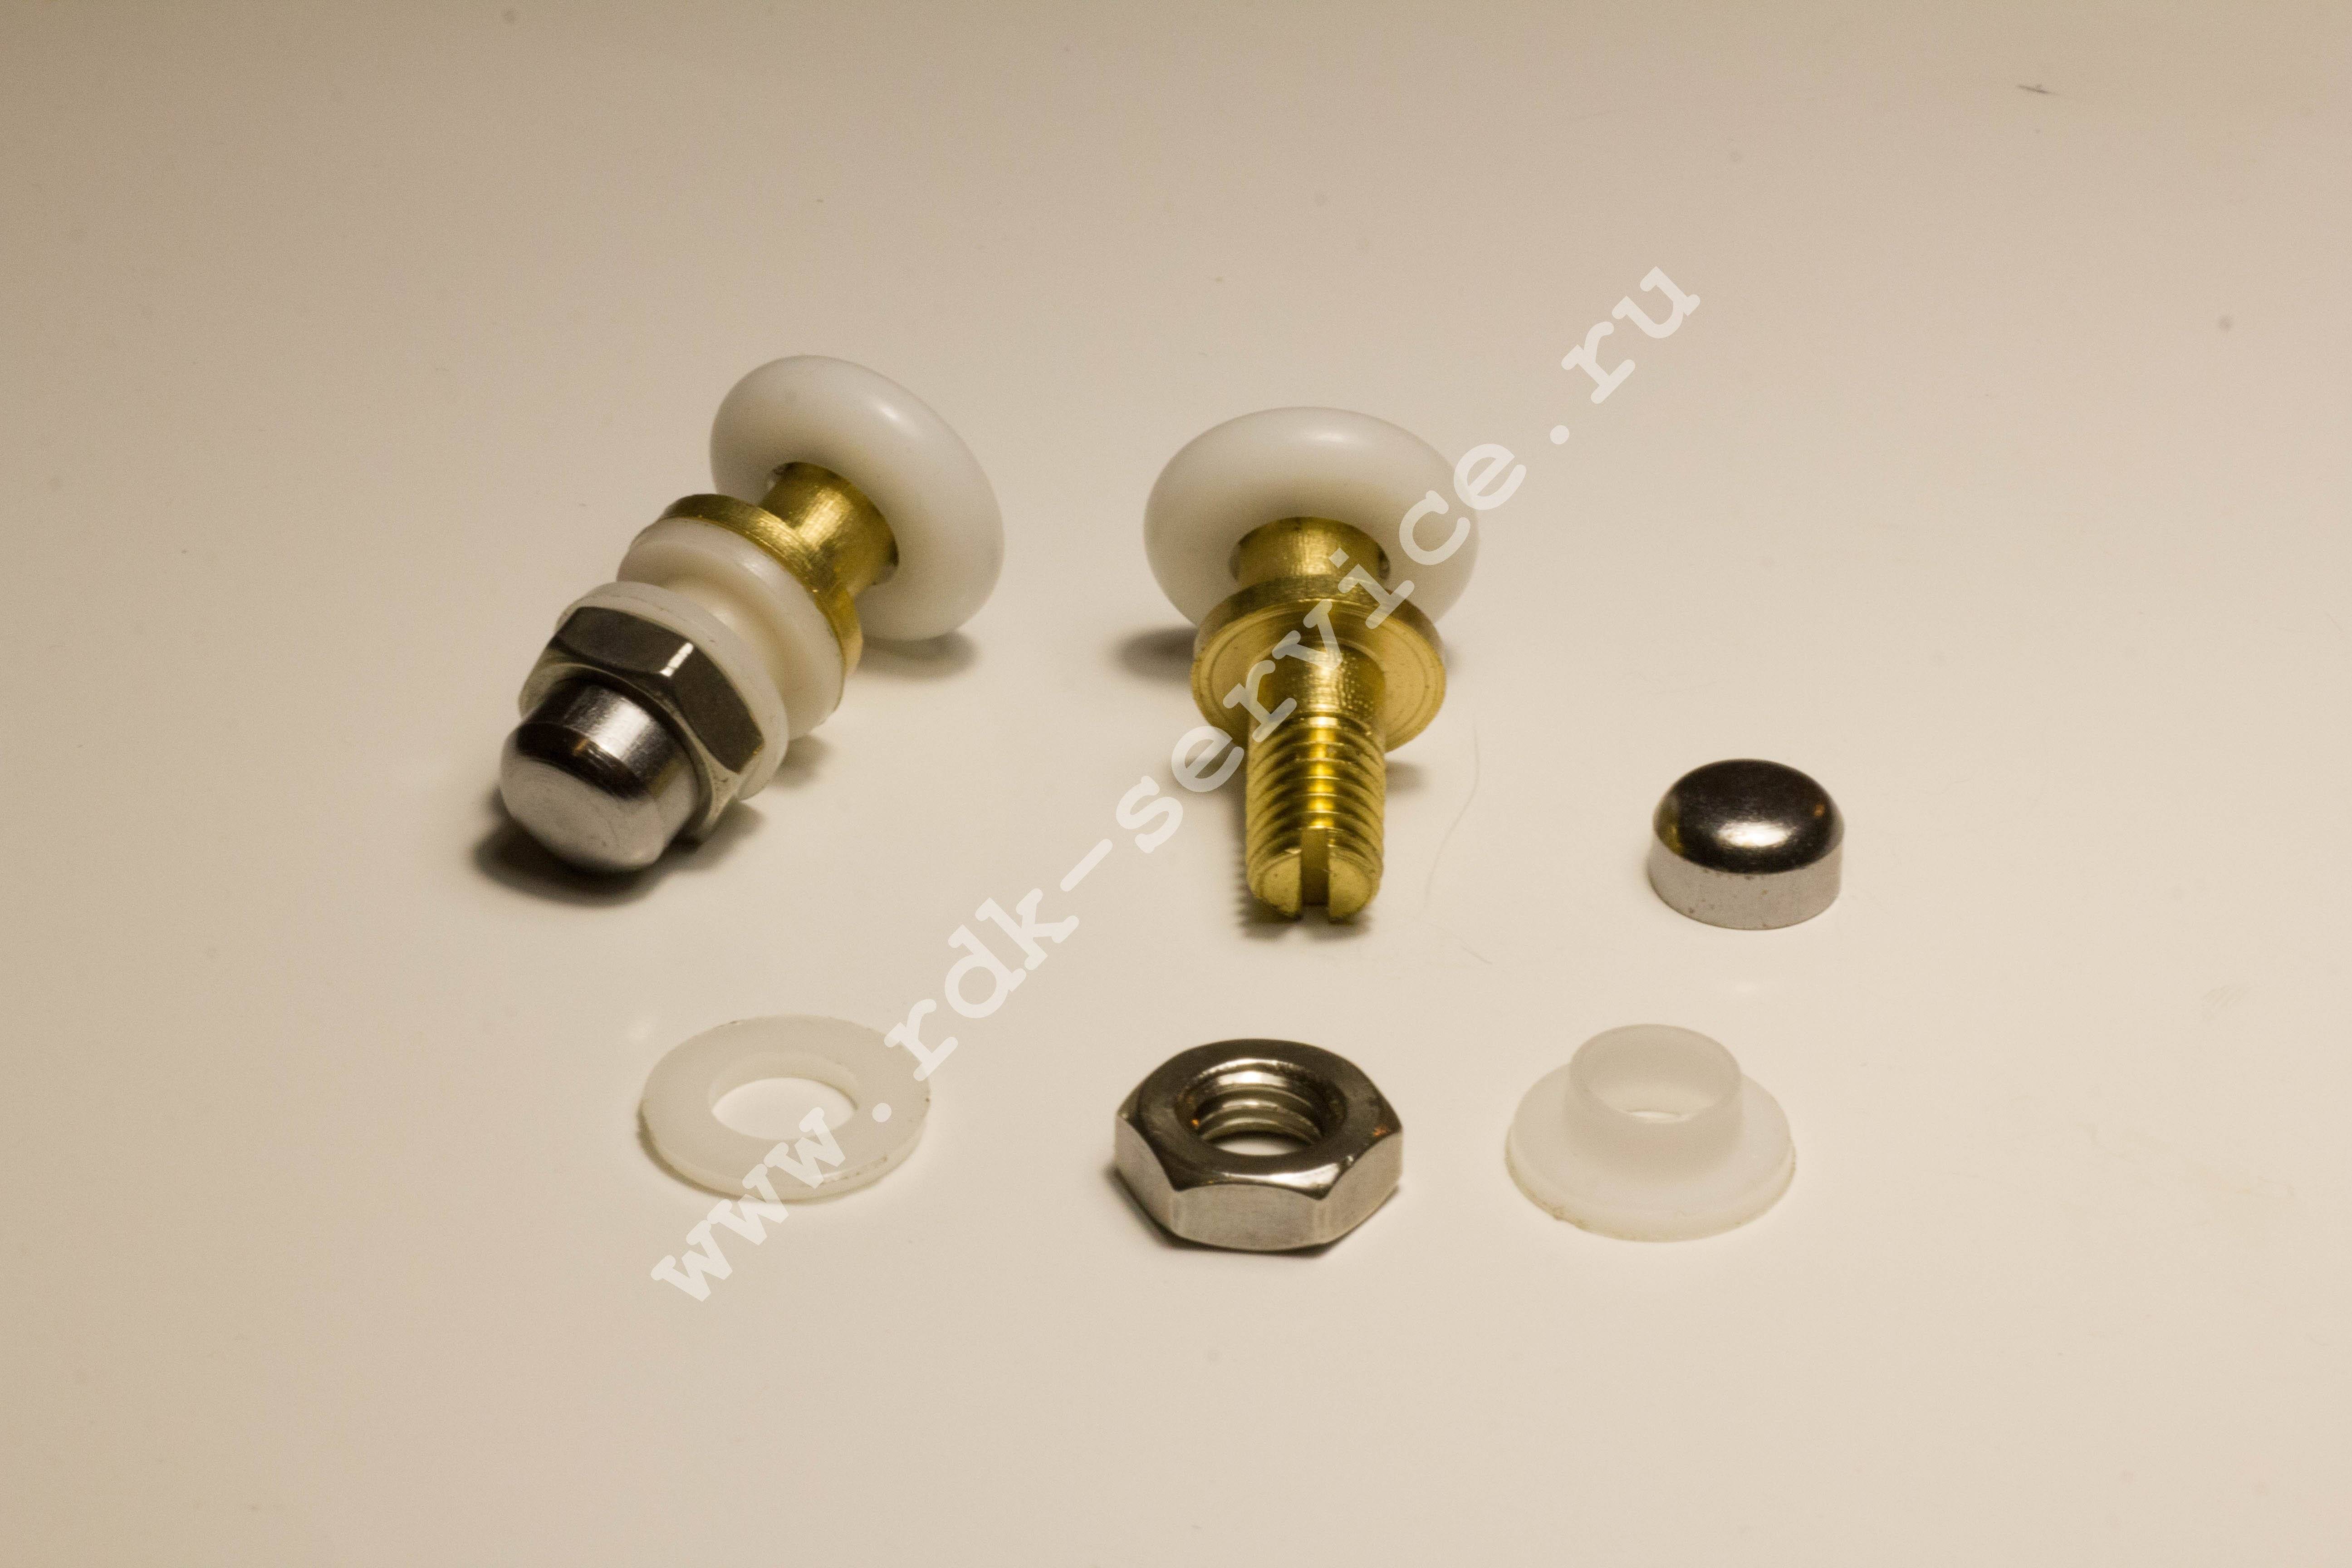
Install handles and rollers on the door glass, rollers with an adjustment button are installed from below.
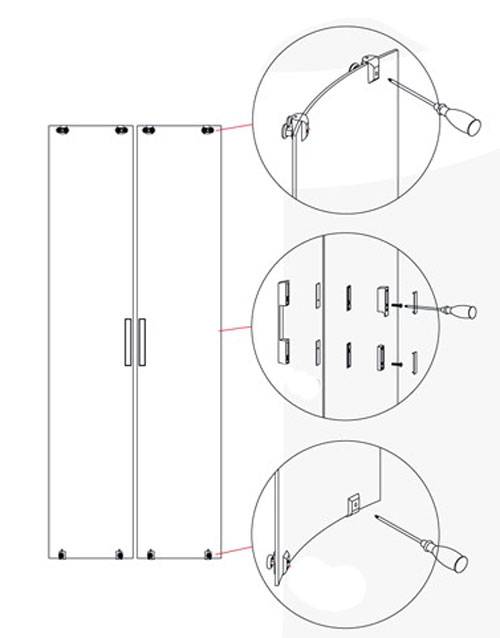
Then put on the magnetic seals and water cutters.
Hang the doors on the shower cabin by first sliding the upper rollers into the grooves, and then the lower rollers into the grooves by pressing the buttons on the rollers. Adjust the doors so that the doors close tightly by turning the adjusting screws on the rollers with a Phillips screwdriver.
Stage 7. End of assembly.
At this point, we are connecting all communications to the cockpit. We connect all the hoses and wires together.
Then, we move the cabin to the installation site and connect it to the sewerage, hot and cold water, as well as to electricity.
Check all cabin functions. After that, move the cab to the installation site.Using the shower, check the tightness of the seams. If necessary, apply a small amount of sealant to the joint seams.
After 24 hours, after the sealant has completely dried, you can use the shower.
As you can see, there is nothing difficult in assembling Timo shower enclosures, the most important thing is to be careful and not rush during assembly, and then you will succeed.
Why do doors fall off
- Loss of shape of roller parts. You can fix it by replacing the old videos.
- Formed rust on poor quality construction. In this case, damaged parts should also be replaced.
 ?
?
Photo 3. Under the influence of water, rust and corrosion of the bearing is formed. Because of this, the movement of the door is accompanied by a creak, and its opening is difficult. In this case, the rollers are replaced.
- Wear or loosening of holders. It is worth carefully inspecting the hinges. If a screw is loose on the door hinge, it can be tightened with a screwdriver or wrench. The damaged part must be replaced.
- Roller tire damage. In place of the used part, you can temporarily glue a new tire or replace the roller opening.
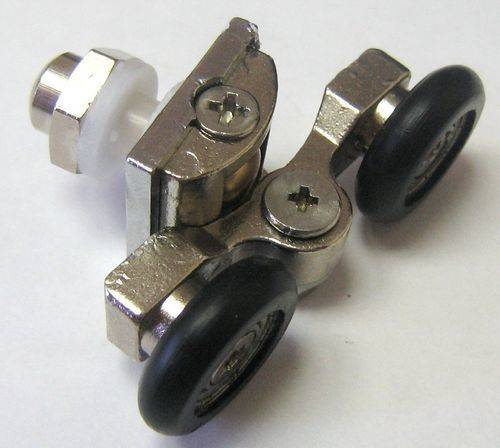
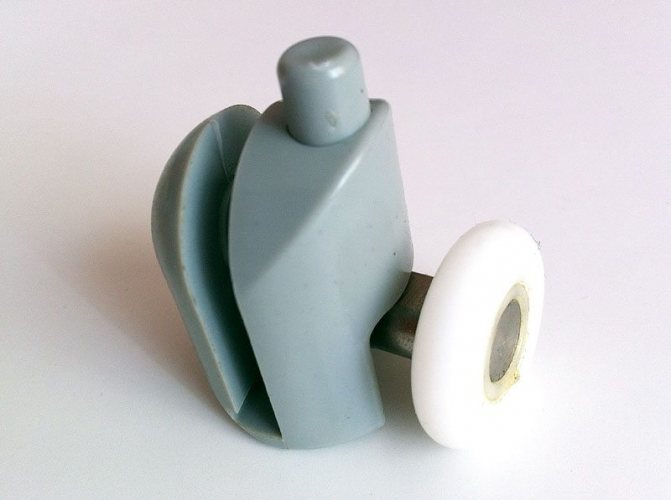
Types and technical features of rollers
Rollers for glass shower cubicles are interchangeable fittings produced on the basis of plastic, rubber and metal elements in a variety of standard configurations. They are used not only in purchased models of booths, but can be useful when making a do-it-yourself shower booth if the owner decides to equip his homemade with sliding doors.
The main functionality of the rollers is the stability in the smooth opening / closing of the hydrobox door leaves.The “heart” of the roller is a ball bearing, because the service life of this product directly depends on its quality. By type, bearings are divided into 2 types: rolling and sliding. They are made of ceramic, bronze, stainless steel.
The body of the parts consists of ABS plastic or brass rollers according to the design are:
- Eccentric. The main elements in them is an eccentric with a main screw, on which the bearing is fixed. Eccentric rollers are single and double. They mutually replace each other and are divided into upper and lower.
- Stretch. They contain special slides, a rolling bearing, mounting and adjusting screws. Tension models come with one and two wheels, lower and upper.
Mounting options for roller supports may also differ, depending on the shape of the door panels: for straight lines, ordinary fixation is required, and for rounded ones, you need to purchase products equipped with a swivel mechanism.
The nominal value of the wheel diameter must be equal to the outside diameter of the bearing + twice the thickness of the spacer. As a rule, the diameter of such wheels is 19-23 mm
During the installation of roller mechanisms, it is necessary to adhere to their factory dimensions, because in practice the wrong selection of these products or surface mounting can lead to the fact that the fastening of moving elements is either too tight or too loose.
In these cases, mechanical damage to the roller housing and its bearings cannot be avoided.
Incorrect installation of the rollers, excessively tightened fixing screws 100% guarantee the misalignment and deformation of the moving product, because of this, careless operation of the shower cabin is possible.

When dismantling the lower rollers, the door leaf will hang on the upper ones. If necessary, the door can be removed with support from the guide rails
Rules and sequence of installation
 check the package
The whole process consists in installing the pallet on special metal legs. On the part itself there are places for landing studs, they have a long vertical shape, they are screwed in until they stop, you need to screw nuts, and pucks on top.


The frame support is put on these nuts metal plate up and across. Under the support it is worth enclosing a small layer of penoplex, which compensates for all the irregularities.
The support has a short part with a welded nut, it is to this place that the central leg must be attached. The process itself includes leg installation, fastening with a washer and then a lock nut, this should be screwed in until it stops, and another nut is put on top.
In fiberglass pallet filled wooden bars, on them it is necessary to attach special fastening beams.
After all fasteners are well tightened, you can put the pallet and align the legs. The structure must stand firmly on a flat surface. Brackets are usually placed under the legs, which perform support rolefor shower tray screen.
Supply of communications
The next step is to connect the drain to the pallet. This is easy to do, the main thing is to check for leaks. All mounts sealed with fum tape or sealant, for the best quality, it is always worth using clamps. It is necessary to check the length of the drain hose so that it is sufficient, and its slope, for easy water flow into the sewer.
Also, we must not forget about the water supply to the shower and its power supply.It's running last and does not require special skills. All water connections must be sealed and checked carefully. for leaks during the trial run of the structure.
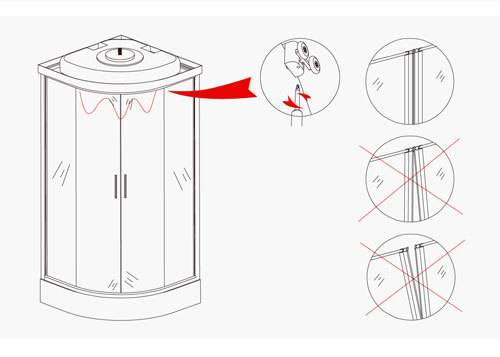
Shower wall assembly
Now you need to move on to assembling the railings and the rear wall of the cab. If a glasses are not marked, then you can determine their top by the number of holes, there are much more of them. The guides also do not always have marks, usually the thinner one is the lower one, and the wide and massive one is the upper one. Glasses have a special edge with grooves for fastenings to arches fences. To do it, you need to lift the glass, coat it with sealant and then install it back. excess material usually cleaned by hand in a soapy solution, and then everything is wiped with a dry cloth. Next, the screw in the presser foot is twisted.
Glasses in racks to the arch of the fence are mounted quite simply, they have special grooves,
are fastened together with self-tapping screws. It is necessary to put on a special silicone sealant on the glass
Next, the pan under the guide is smeared with sealant, and the glass of the fence is placed.
It is not required to fasten them with screws directly to the pallet, it is also important to ensure that the silicone does not cover the drain recess
water
Next, you need to install the side panels, for this, the place of their junction with the pallet and the already installed guides lubricated with silicone. They are attached not only to the sealant, but also to small self-tapping screws with nuts. Do not rush and tighten the screws immediately until they stop, not all holes can perfectly match each other, so you should first leave a little space for further alignment.To the pallet, the back walls are also attached to self-tapping screws Everywhere there are holes ready for this. A second side panel is also installed, it remains only to fix back shower cabin. It usually contains everything you need. It is installed similarly to the side ones, on self-tapping screws, having previously treated everything with a sealant.


