- Floor without flaw
- Mounting Features
- Sanitary hatches for tiles
- SANITARY HATCHES AVAILABLE
- Floor without flaw
- Video tutorial on the installation of inspection hatches
- Design features of models
- Varieties of secret hatches
- The nuances of choosing the right hatch
- Kinds
- How to choose an inspection hatch?
- Inspection hatch size
- What is the hatch made of?
- What to look for when choosing
- Plastic hatches for tiles series LP
- Finish lining
- Installation of inspection hatches
- Hygienic simplicity
Floor without flaw
Additional requirements are imposed on the design of floor hatches, the strengthening of the bearing parts and the cover requires attention. These structures must withstand the load from heavy objects that can stand on the hatch during operation. Floor hatches have a hidden design and a massive box. The installation of the hatch box is carried out during the period of the finishing floor screed. The door should not be higher or lower than the floor level. Such hatches are installed for access to pipes, as a hidden entrance to the basement. The material for the manufacture of hatches is steel for painting, ceramic tiles or any other decor. Hinged opening mechanism.

When choosing a hatch for access to communications, pay attention to each indicator of quality and comfort of use, ease of operation and manufacturer's warranties. A plastic sanitary hatch, the dimensions of which correspond to your needs, is the most popular opportunity to gain access to communications, while maintaining the aesthetic perception of the interior
Mounting Features
 Installation of products
The weight of the plastic structure is small, so it can be installed in the opening not only of the main walls, but also of lightweight structures made of drywall, wood, and plastic. The frame is fixed with self-tapping screws or fixed with liquid nails. Some use silicone, but this option does not guarantee a strong connection.
Required tools:
- jigsaw;
- drill, hammer and screwdriver (screwdriver) or construction gun, depending on the chosen method of attachment;
- roulette;
- level;
- pencil or marker for marking;
- construction knife.
The overhead plastic inspection hatch must be installed so that there are no noticeable gaps between the frame and the wall:
- Measure the product.
- A contour corresponding to the size of the plastic hatch is applied to the drywall box.
- Cut a hole with a jigsaw (you can make the opening 1-2 mm larger).
- Perform wall decoration, for example, tile and grout the seams.
- Install the frame in the opening and fix it with self-tapping screws.
- If mounting holes are not provided, fix with glue or mounting foam. The composition is applied to the inner surface of the casing or end frame. Insert the frame into the hole and press it against the wall surface. With a dry cloth, immediately wipe off the excess composition that has come out.
- Install a lock if needed.
- If necessary, paint the hatch. Waiting for the paint to dry.
The plastic hatch under the tile is installed in a different way. The hidden structure is called LSIS. It is produced by VS Group.
It is not necessary to buy a hatch that exactly fits the size of the hole in the wall. You can purchase a slightly larger size, because it is more convenient to cut it on three sides, fitting it to size:
- In the prepared opening, the lower and upper guides are installed on the glue. The corner shelf of the rails makes it easy and correct to install them.
- The guides are level.
- Try on the manhole cover and adjust the dimensions in place.
- Make a markup for the installation of the lock.
- From the side of the installation of the lock, stiffeners are cut down by 1.5-2 cm and the surface is cleaned with a construction knife.
- They are installed so that the groove of the lower part of the shield fits into the lower rail, and the upper part of the shield, where the bracket with the lock mechanism was previously installed, is snapped into the box of the upper rail.
- Glue is applied pointwise to the finishing tile and glued to the installed shield. Align the finish in the general plane of the wall.
- After the adhesive has completely hardened, the seam along the LsIS perimeter is filled with a colored sealant.
- After the sealant dries, cut one side of the sealant seam from the side of the main wall with a blade or a wallpaper knife.
- The sealant, in addition to the decorative function, performs the function of a sealant.
Sanitary hatches for tiles
In our store you can buy sanitary hatches for access to communications with Free Shipping to any city in Ukraine. We ship even on the day of order until 14:00.
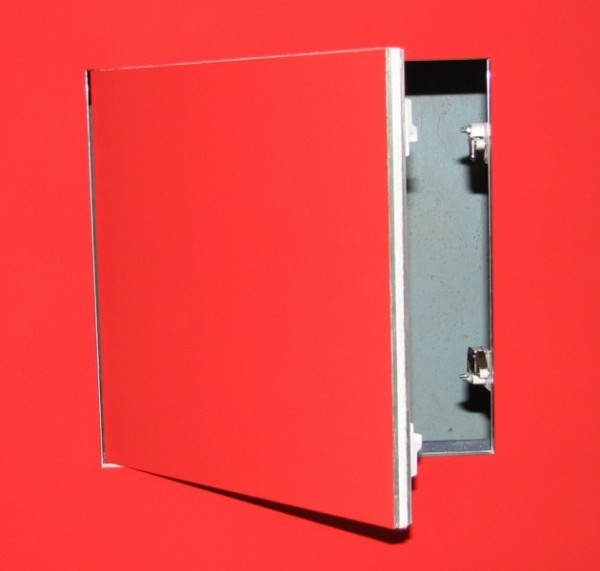
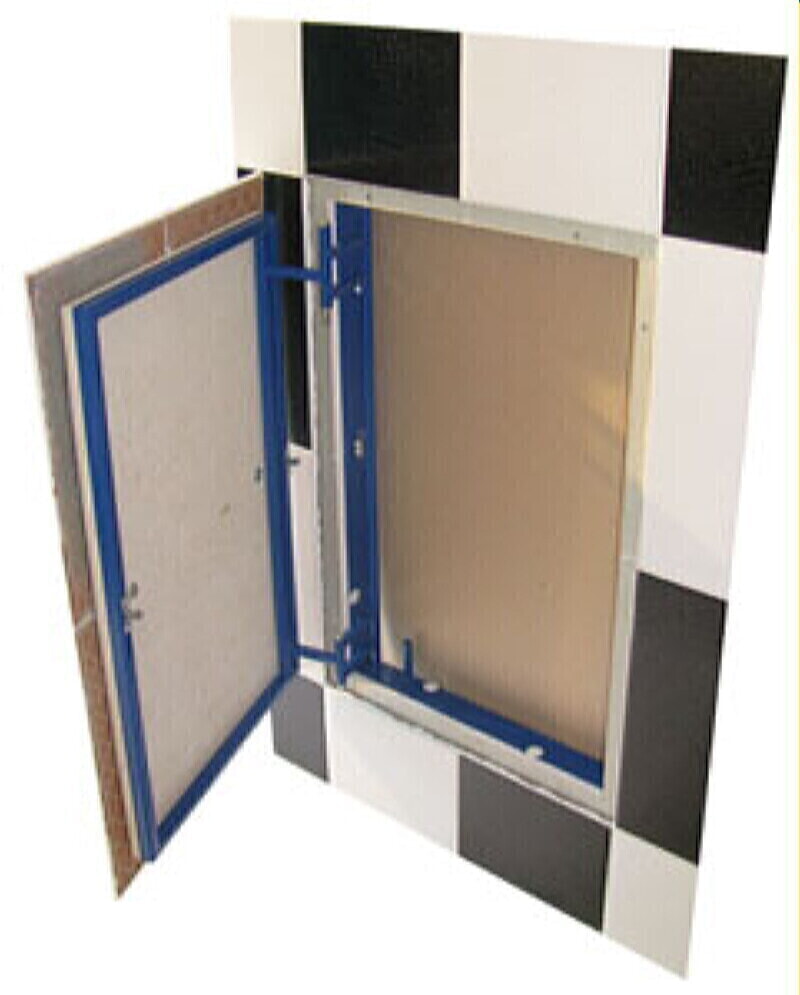
Installation of sanitary hatches is carried out in a hidden way, which makes it possible to maintain the impeccable appearance of the bathroom. The hatch door is displayed on the same level with the entire wall and pasted over with a whole tile, so the effect of invisibility is achieved.
SANITARY HATCHES AVAILABLE
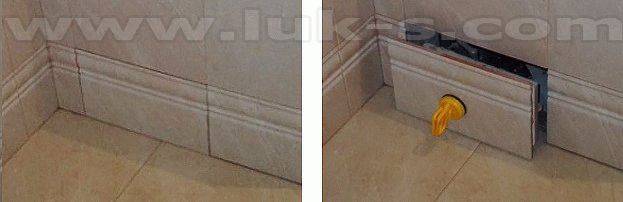
opening with suction cups
PRICES ARE CURRENT FROM January 15, 2018
PRICES ARE CURRENT FROM January 15, 2018
You can buy sanitary hatches of all standard sizes indicated in the table. Availability is guaranteed and continuously maintained. Non-standard hatches will be made to order. We ship on the day of order on weekdays until 14:00 or the next day.
- Delivery across Ukraine - FREE OF CHARGE!
- Standard sizes can be paid upon receipt
- Same day shipping on weekdays
Get advice or place an order in any convenient way:

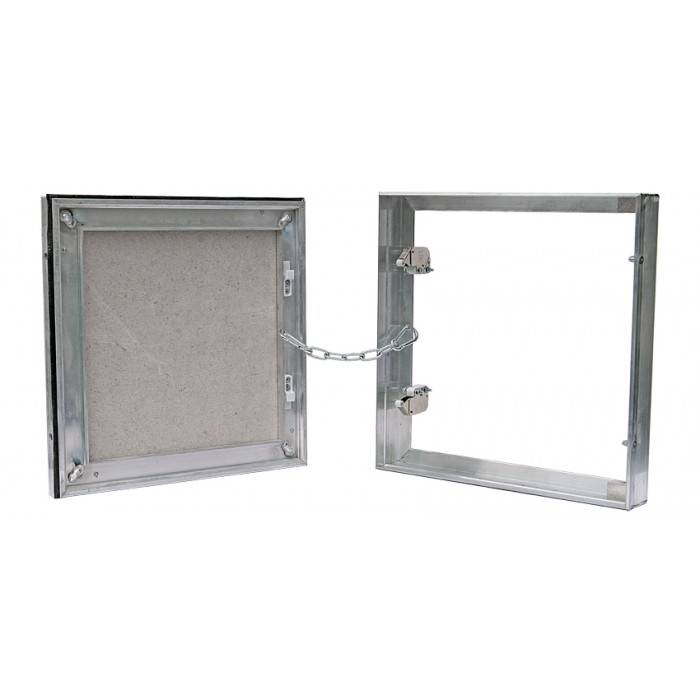
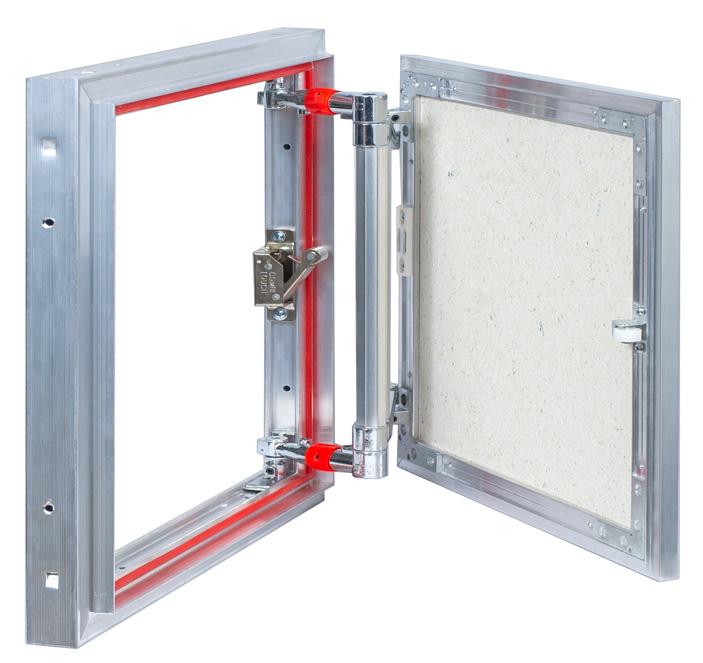
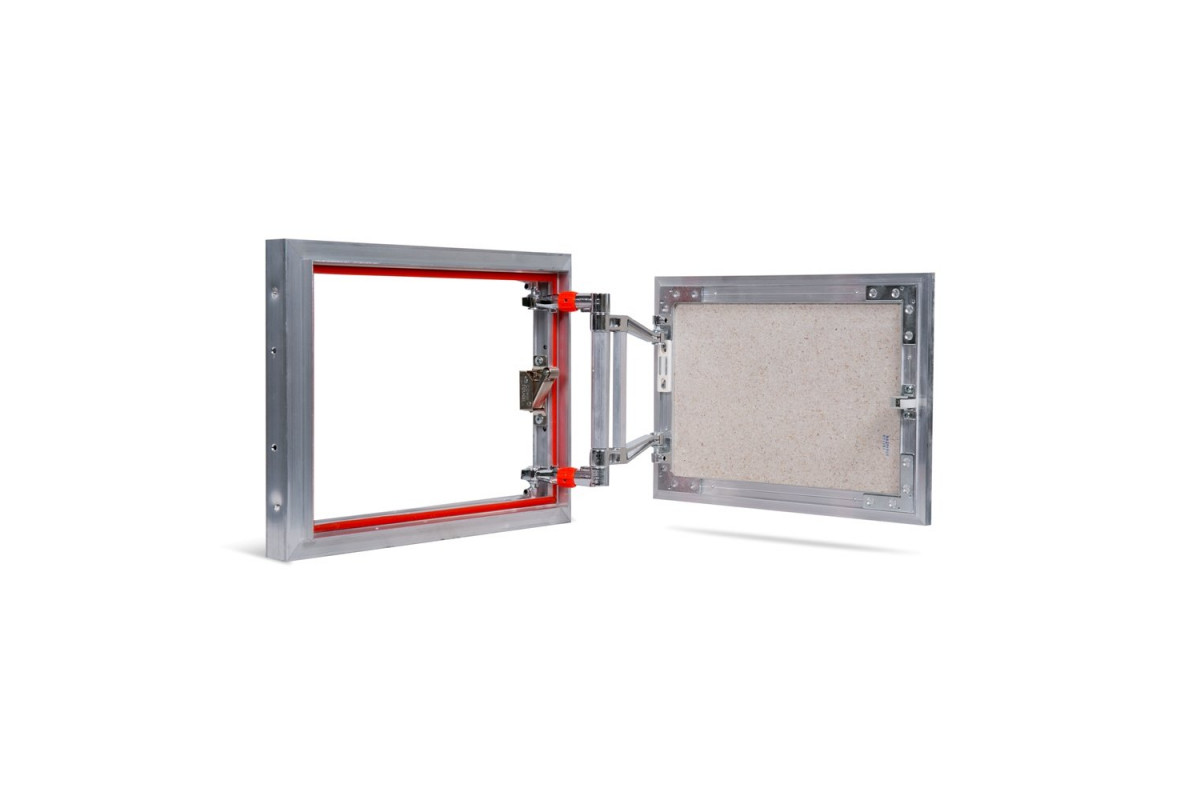
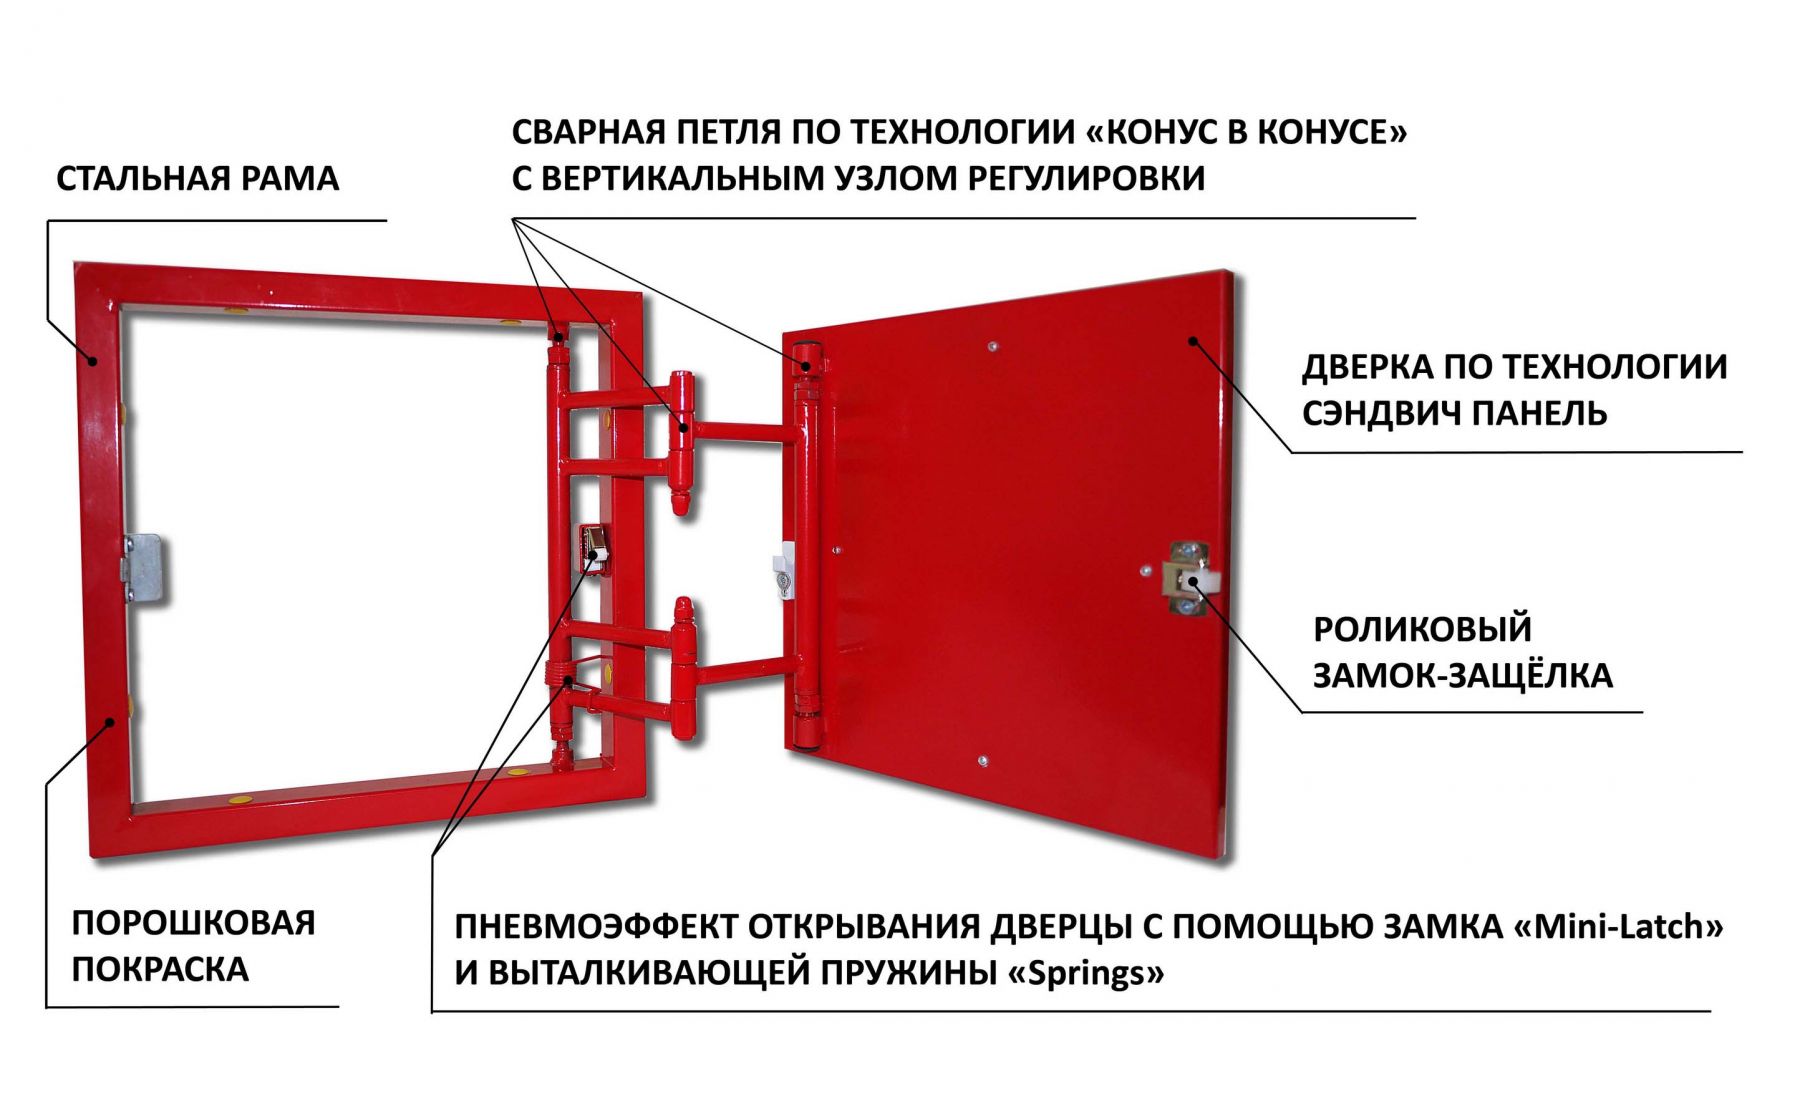
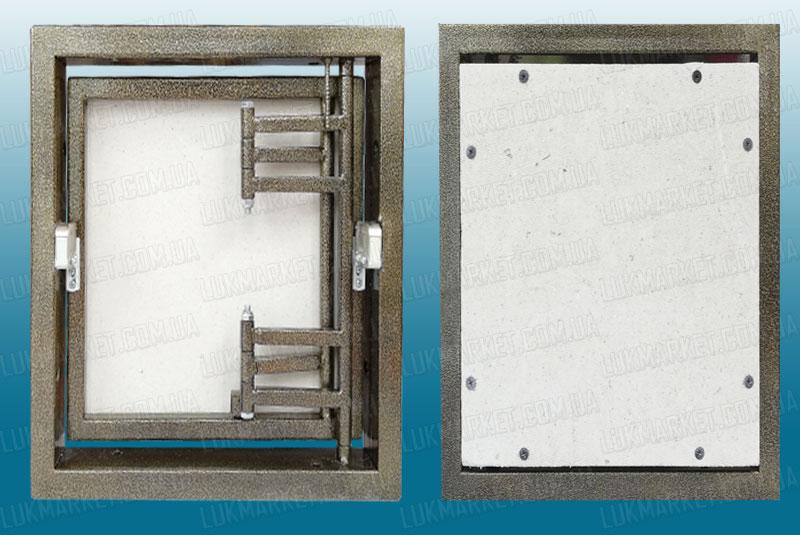
FEATURES OF THE DESIGN OF SANITARY HATCHES
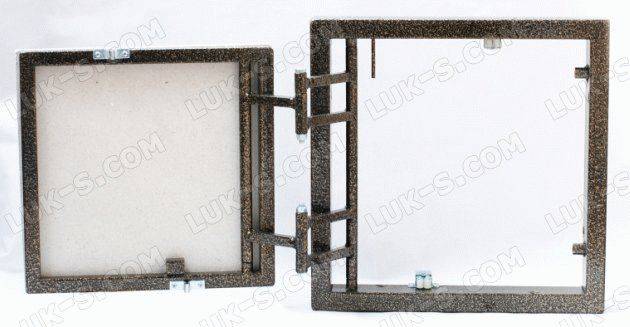
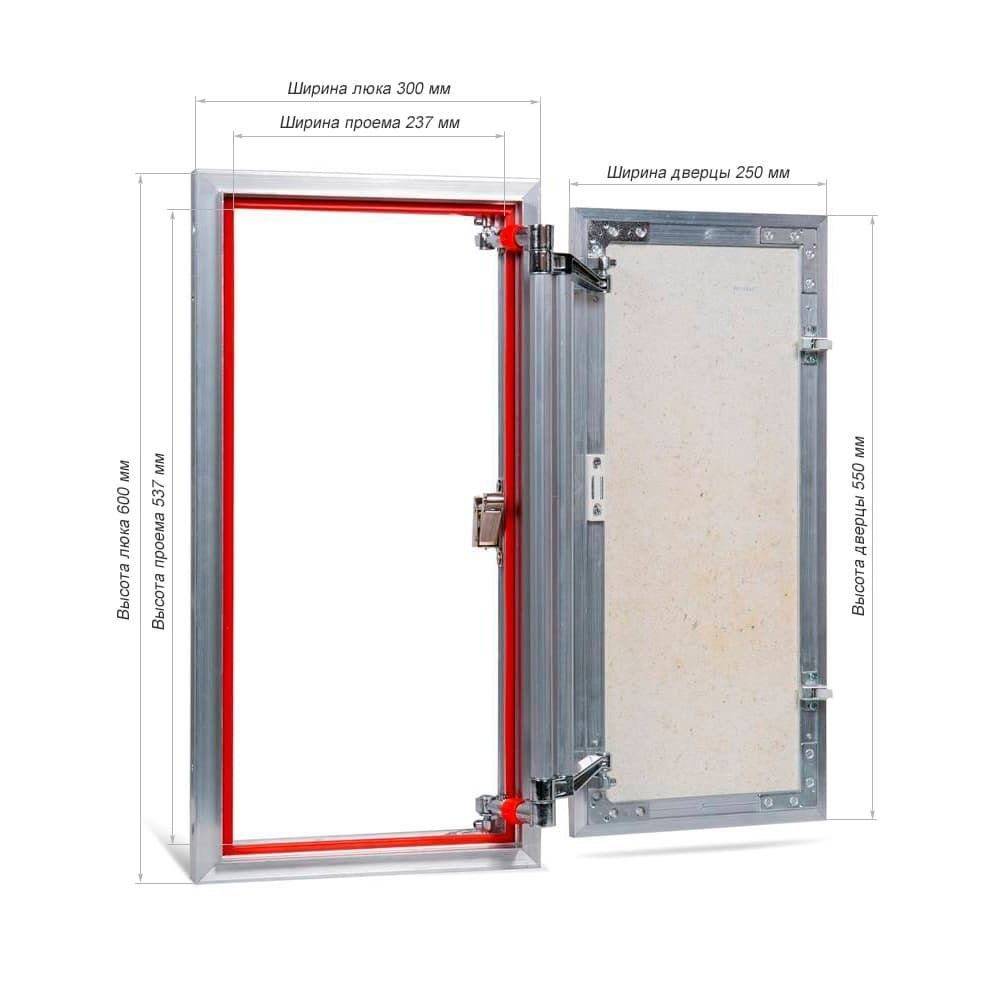
- Dimensions are indicated according to the external landing dimensions of the sanitary hatch (Width x Height)
- External frame material - steel profile with a section of 20x40 mm
- The hinged door is made of a profile with a section of 15x15 mm
- Profile thickness - 1.2 mm
- Loop design - front swing
- Hinges welded to steel axles
- Steel coating - high quality polymer powder paint
- Type of latch for the suction cup model - wedge roller
- Latch type for push-open model - Mini Latch push mechanisms
- The depth of the hatch without taking into account the point protrusion of fittings is 50 mm.
- The maximum opening angle of the hatch depends on the overhang of the tiles outside the door on the hinge side
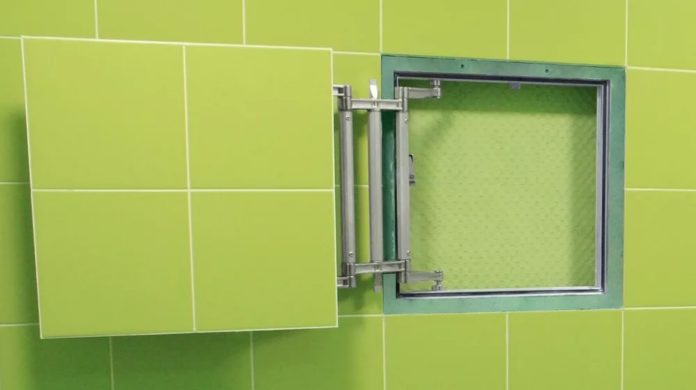
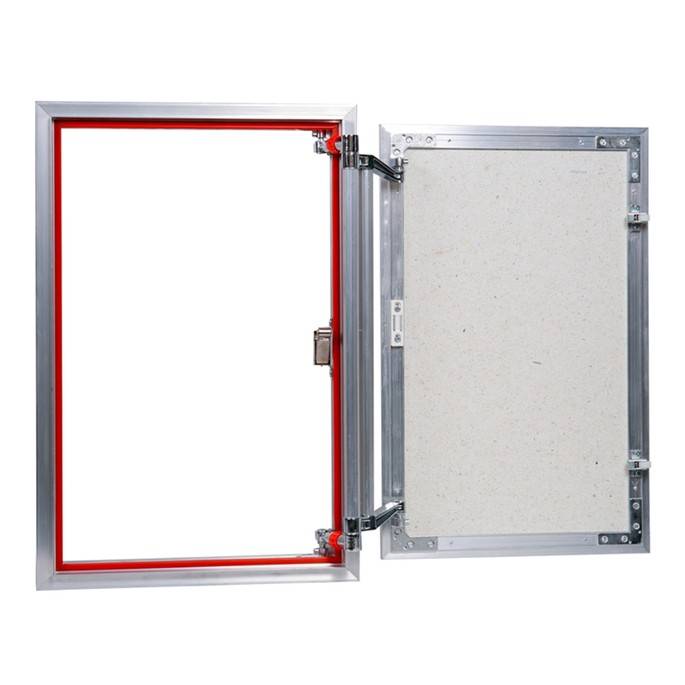
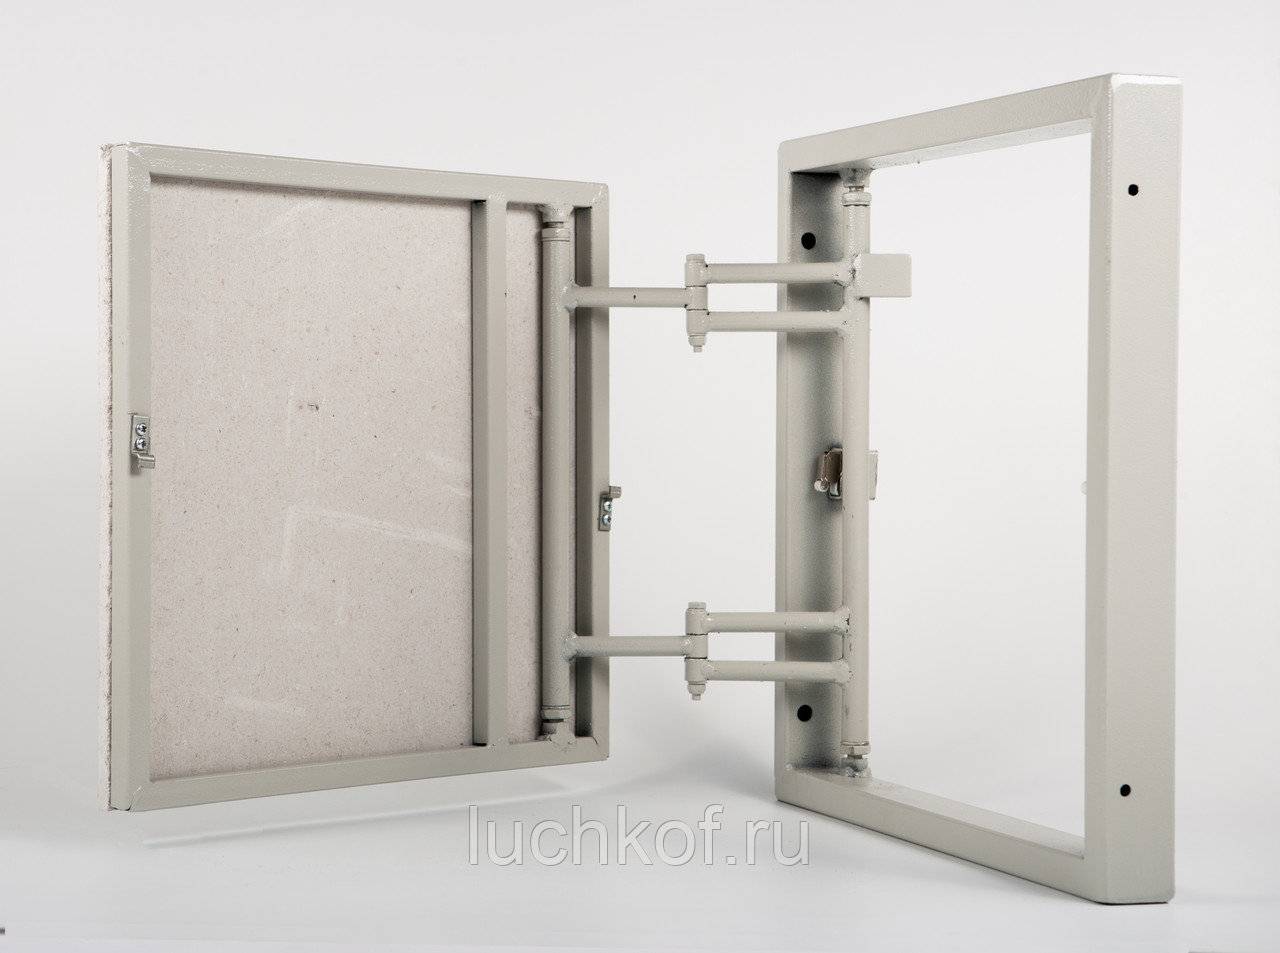
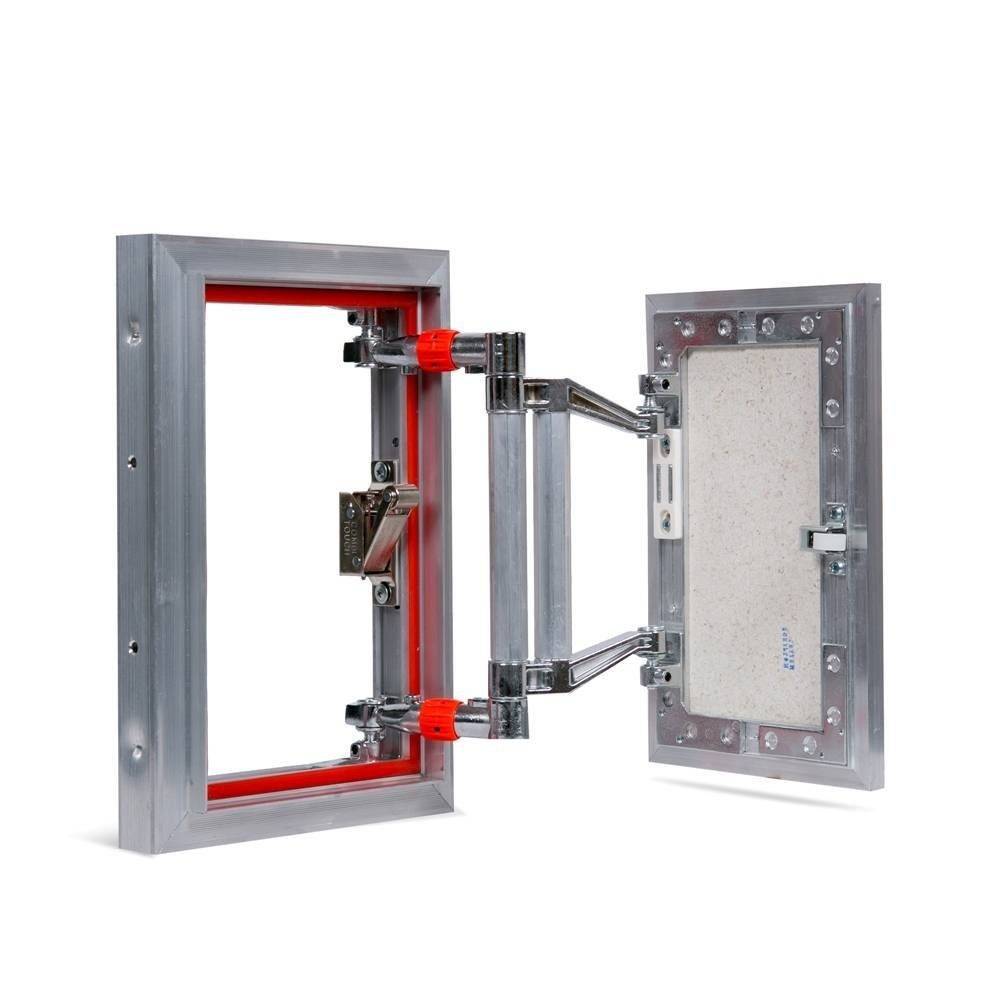
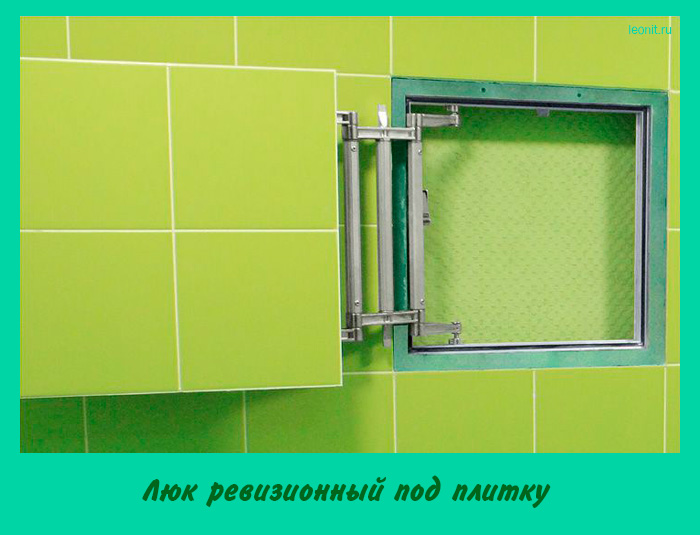
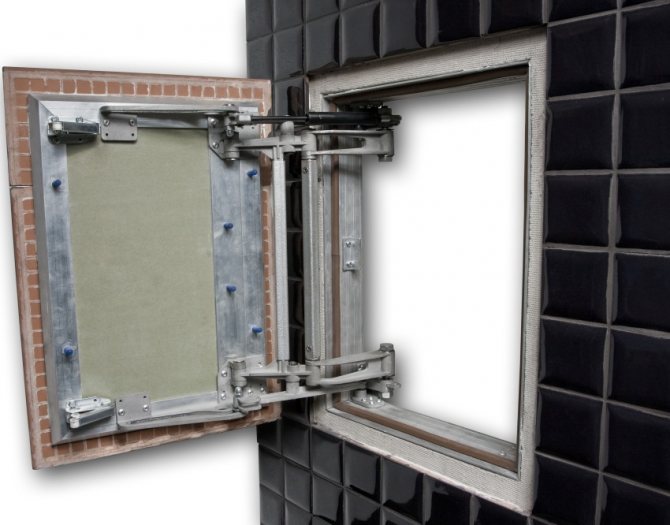
FRONT - HINGED DOOR OPENING PRINCIPLE
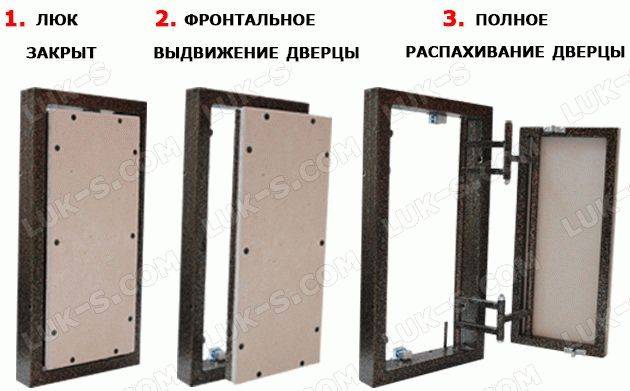
The design of the hinges of our hinged sanitary hatches consists of 2 links, which allows you to open the door in two simple movements: frontal extension from the wall and subsequent swinging to the side. It is the frontal removal of the whole tile from the wall that allows you to save its edges from creases against the wall.


CHOOSE A HATCH UNDER THE TILE OF THE OPTIMAL SIZE
Plumbing hatches have an important feature - the tiles do not need to be cut. The size range is quite wide, for your tile, you can first try to choose a hatch from the range of standard sizes that are available. If necessary, we will make a door with individual dimensions to order.
Manufacturing precision to the millimeter. Dimensions from 200x200 to 1200x2000 mm, it all depends on your needs and tasks.
- The tile may be larger than the hatch itself - this is normal;
- The overhang of the tiles from the door is permissible no more than 5 cm from the side of the hinges;
- The overhang of the tiles on the other sides of the hatch door can be more than 5 cm;
- At least two thirds of the tiles must be glued to the door.
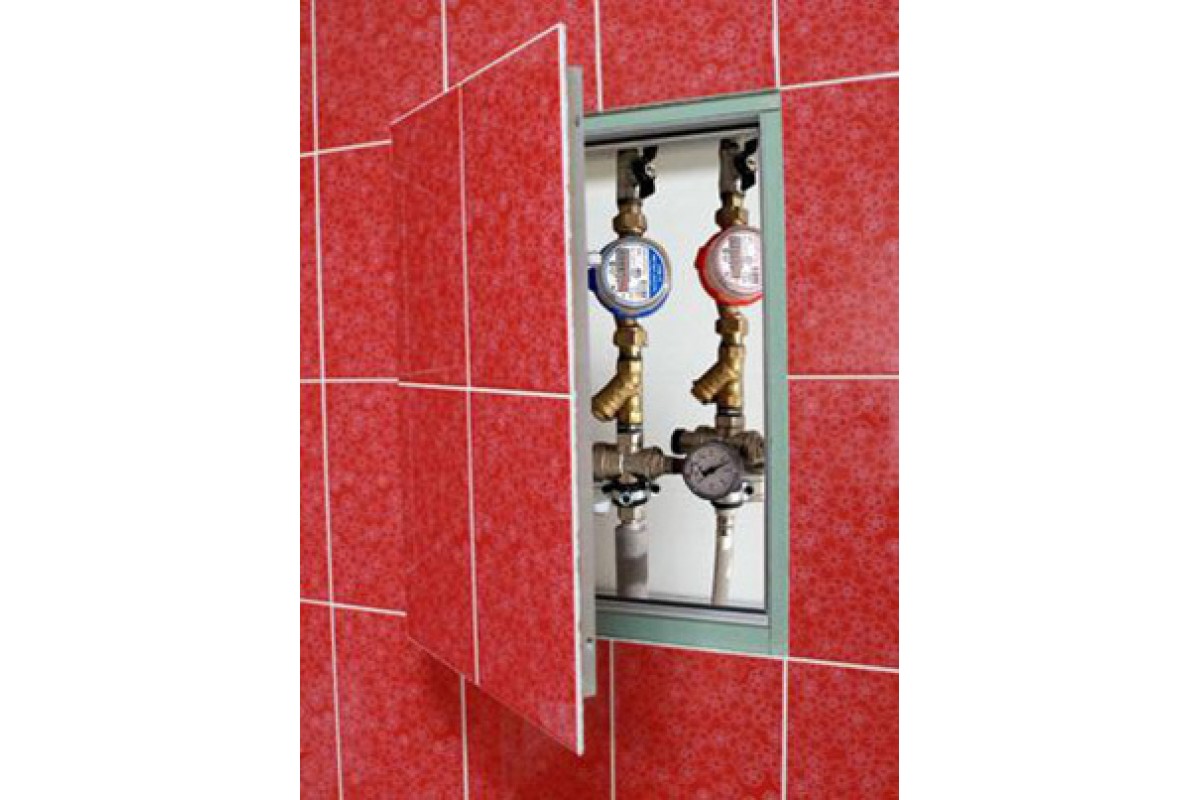
When choosing plumbing hatches, think about whether the size of the viewing window will be enough for you to carry out certain work. In a neatly and correctly mounted hatch, the seam along the contour of the door is completely invisible, which means that even large hatches will not violate the design of the room.
A small window would be enough to read the meters, but do not forget that the meters also sometimes need to be changed, which means that the size of the hatch should be sufficient for normal access. To hide a large boiler, you can order a special two-door hatch, which will allow you to simultaneously maintain access to the water heater and preserve the design of the room.To access the space under the bathroom, it is sometimes advisable to order a fairly wide, but not high two-door hatch.
Plumbing hatches for tiles have one main feature - no handles or locks need to be screwed to the surface of the tile. Opening is carried out by pressing the door or using a small suction cup that comes with the kit.
BEWARE OF PRODUCTS OF QUESTIONABLE QUALITY
Floor without flaw
Additional requirements are imposed on the design of floor hatches, the strengthening of the bearing parts and the cover requires attention. These structures must withstand the load from heavy objects that can stand on the hatch during operation. Floor hatches have a hidden design and a massive box. The installation of the hatch box is carried out during the period of the finishing floor screed. The door should not be higher or lower than the floor level. Such hatches are installed for access to pipes, as a hidden entrance to the basement. The material for the manufacture of hatches is steel for painting, ceramic tiles or any other decor. Hinged opening mechanism.

When choosing a hatch for access to communications, pay attention to each indicator of quality and comfort of use, ease of operation and manufacturer's warranties. A plastic sanitary hatch, the dimensions of which correspond to your needs, is the most popular opportunity to gain access to communications, while maintaining the aesthetic perception of the interior
Video tutorial on the installation of inspection hatches
All inspection hatches are installed according to the same principle, but there are some nuances that depend on the design and installation location. General installation scheme:
- Opening preparation. If necessary, it is increased or reduced to the desired size.
- Installation. The hatch is installed in the niche opening, checked by level and fixed.
- Door trim. The door of the structure is decorated with those facing materials that will be used for the wall, floor or ceiling.
- Sealing. The gap is filled with sealant. After drying, it is cut to the full depth.
- Examination. After installation, it remains only to check the functionality of the hatch, the ease of opening and closing the door, and the operation of the latches.
Check out the detailed video tutorial on installing plumbing hatches:
Comfortable living in the house largely depends on the correct choice of design and size of the hatch for a bath or toilet. Having put a suitable hatch, you can inspect and repair pipes, valves, meters, taps at any moment.
Communications should always be available, but not spoil the appearance of the premises. A high-quality inspection hatch will perfectly cope with this task.
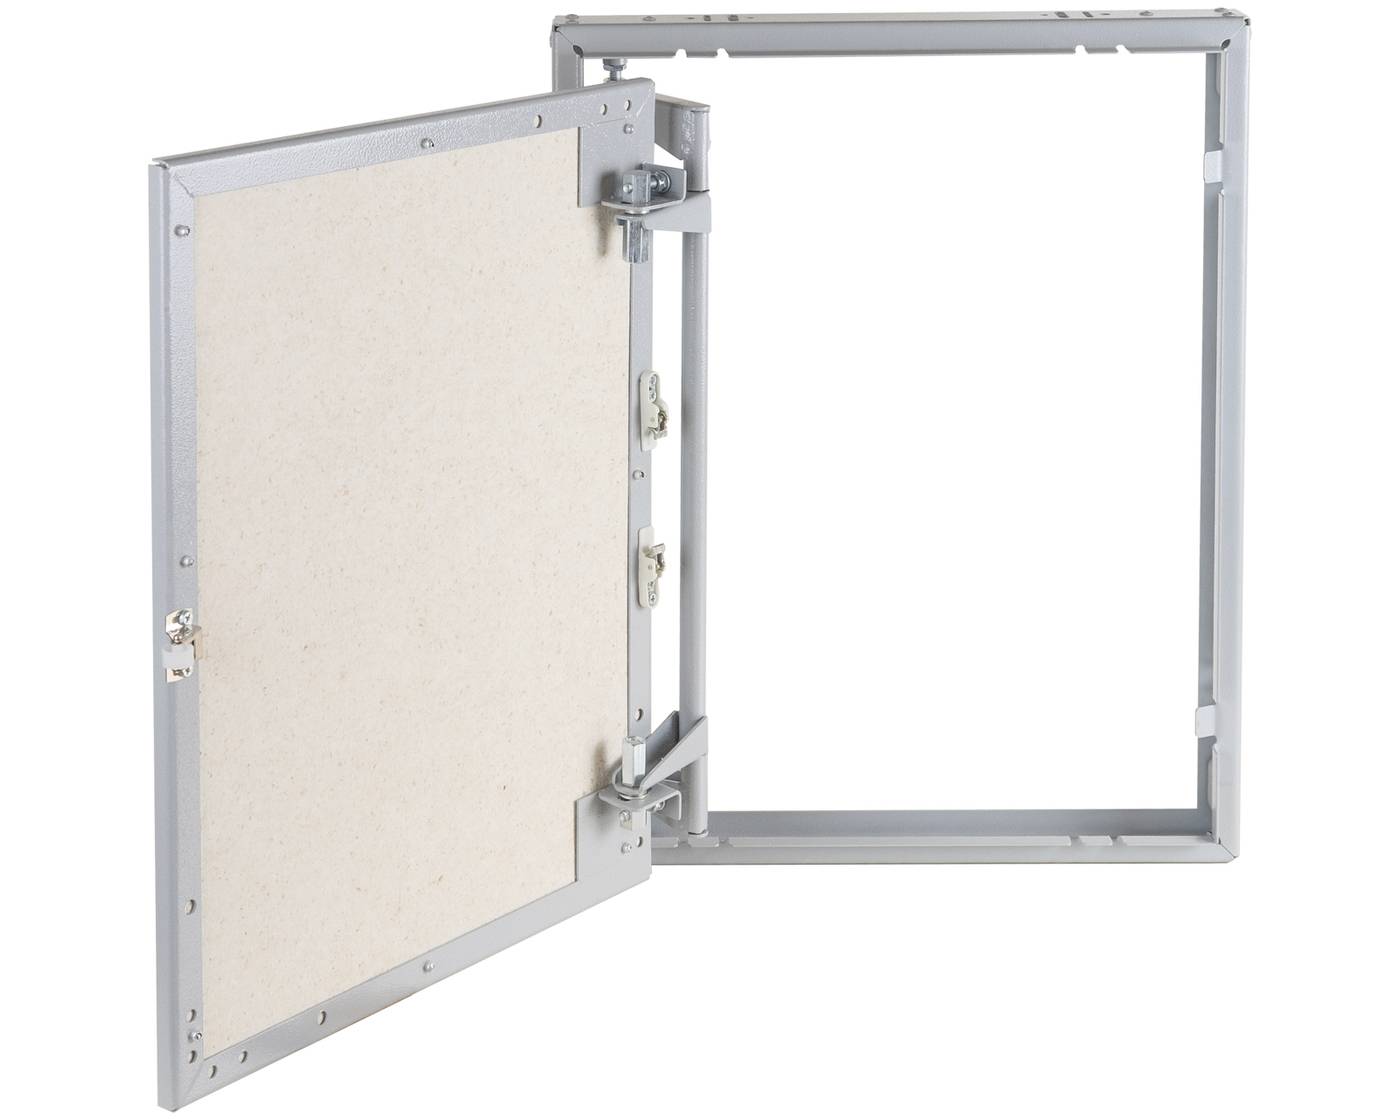
Design features of models
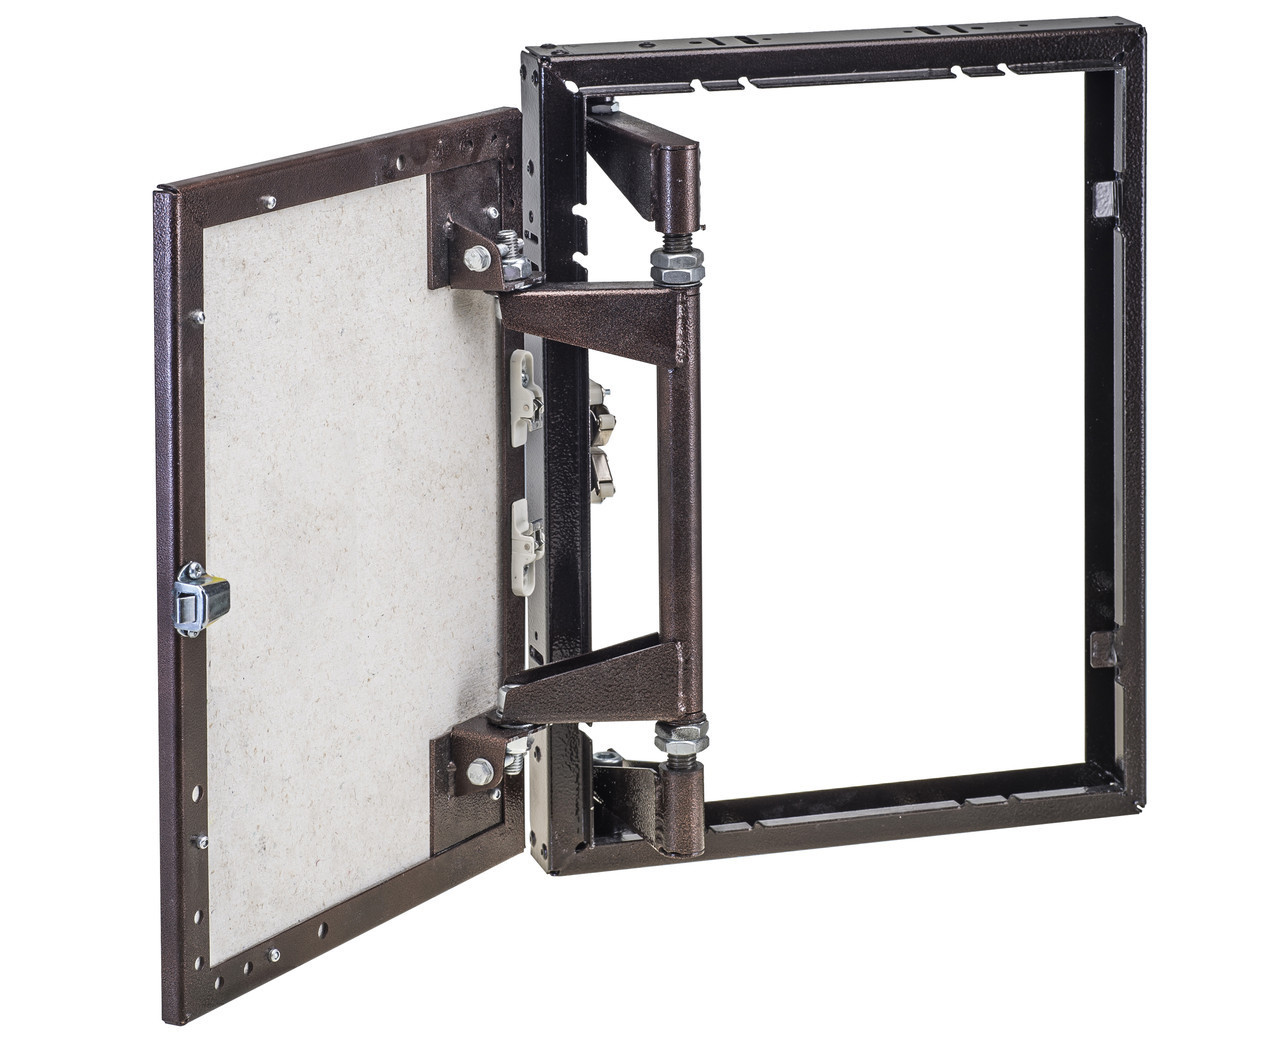
Hatches are mounted in different parts of the room - in ceilings, walls, floors. In many respects, the design of each specific model depends on the place of intended placement. Two main parts are unchanged - the frame and the door, the remaining elements may vary depending on the operating conditions.
Each model has its own design features, but the basic principles of their device are approximately the same: frame, hinges and door
The dimensions of the model are selected according to the size of the technical niche. They are usually 20x20-120x120 cm.The frame is firmly installed in the opening, and then the doors are mounted. Most often they are mounted on hinges, which can be made of metal or plastic (depending on the frame material).
There are two main types of frames:
- Adjustable. The owner can independently choose the size of the frame, and the excess material is simply cut off with a suitable metal tool.
- Unregulated. The size of the hatch is set during its manufacture and cannot be changed.
There are also frameless models. They are mounted using magnetic plates, and the main elements are fixed to silicone sealant or other suitable adhesives. Combined hatches are fixed with a frame and magnetic plates.
The materials from which the frames and hatch doors are made are varied. Aluminum is most often used for frames, and doors can be made of metal, plastic, aluminum, drywall, polystyrene foam
Inspection hatches are opened with suction cups. Press models are also common, which move away after pressing the plane of the door. Depending on the location of the niche, you can find a hatch that opens to the left or right. There are models that move in a vertical plane.
Image gallery
Photo from
Floor models are often equipped with a hinged door opening mechanism. There are hatches with a removable cover. This design is very convenient if communications are located under the floor or you need to equip the entrance to the basement. The outer part of the model is tiled, and it becomes completely invisible against the background of the floor surface.


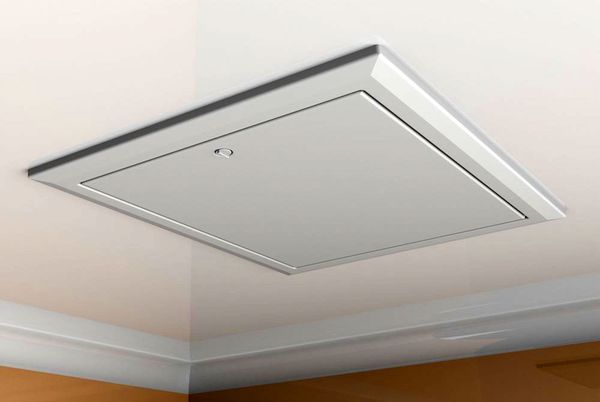
Inspection hatches in the ceiling most often hide electrical wiring or important components of the ventilation system.Usually these are models with a powerful folding mechanism that holds the doors open. Tiles are rarely mounted on ceiling models so as not to increase weight. Most often, the doors are painted or wallpapered.
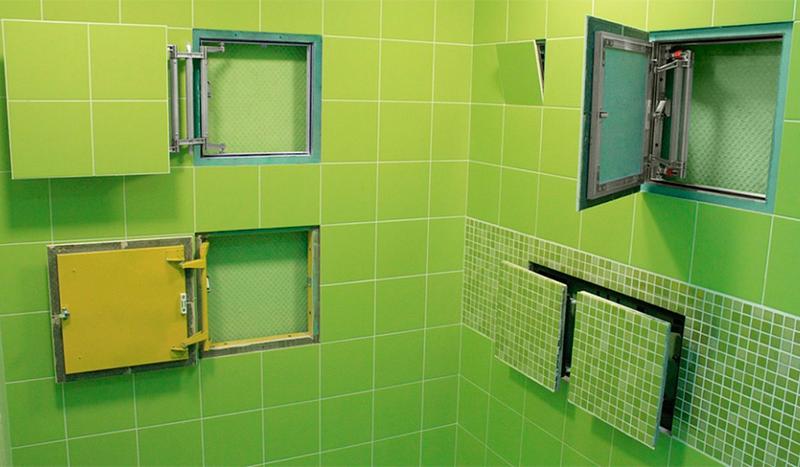
The size and location of technical niches are planned in advance when designing a communications connection scheme. Often you have to install not one, but 2-3 hatches. For example, in a combined bathroom, you will need to leave an audit for the sewer riser, a technical niche for access to the bathroom siphon. You may also need camouflage structures for water pipes and forced ventilation systems.
In many rooms, hinged or sliding doors are inconvenient. Then the owners buy or make removable hatches. The advantage of the designs is that they completely open the niche space, and repairs can be carried out without fear of hooking or breaking the door. Removable hatches are also tiled
Access hatch for tiles in the floor
Hatch for masking communications on the ceiling
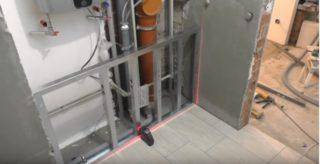
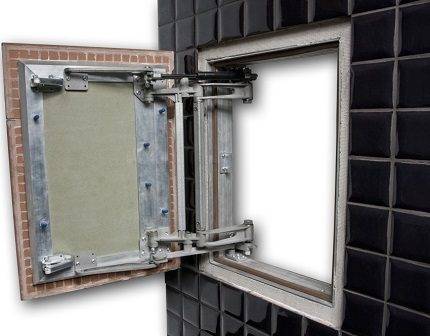
Making revision niches in the wall
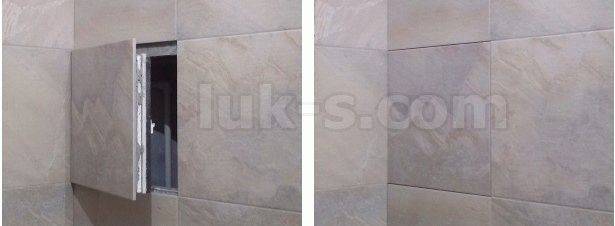
Invisible hatch with removable door
Inspection hatches are convenient designs that perfectly hide communications connection nodes without compromising freedom of access to them. They are easy to install and operate, reliable. The structures do not need any special care: the surfaces of the doors can be washed with the same products that are used for walls.
Some designs are equipped with powerful opening mechanisms that can withstand considerable weight. Such models can be fearlessly finished even with heavy materials, such as artificial or natural stone.
In the process of using the inspection hatch, it is only necessary to monitor the condition of the opening mechanism, lubricate it with machine oil in a timely manner and, if necessary, carry out minor repairs. Then the hatch will last as long as the wall decoration as a whole.
In some cases, you can even replace the tiles on the surface of the door if you carefully remove the old coating.
Varieties of secret hatches
Depending on the object hidden behind the hatch door, electrical, plumbing and ventilation devices are distinguished.
According to the location, wall, floor and ceiling structures are distinguished. The last two are subject to special requirements: the floor hatch must have a reliable frame structure with additional equipment, be moisture resistant and soundproof. The ceiling model should have light doors and reliable shutters that will not open on their own.
In apartments and residential buildings, most often, a square or rectangular plumbing hatch is installed in the toilet. If you wish, you can order or make a do-it-yourself tile hatch, however, their scope and installation are somewhat different.
At the same time, the more inconspicuously the inspection hatch in the interior is disguised, the better. Therefore, the interest of consumers is caused by such plumbing hatches as hidden, pressure and on magnets:
- Pressure. The push hatch for tiles uses, in principle, push systems based on roller mechanisms. The hatch under the pressure tile is quite often combined with invisible mechanisms, spatial loops, double, allowing you to save space and use handles.If we talk about some of the nuances of pressure systems, then it is worth mentioning one point, the fact is that the opening here occurs in two stages: after pressing hard, the door moves a little to the side, after which it becomes noticeable. In this state, the cover is easier to pull to the side.
- Hidden. Common stealth systems combine in their features the nuances of other options and make it possible to make a large plumbing hatch less noticeable. The use of special hinges and drywall on the lid make it possible to "disguise" the revision hatch under the wall. It is worth remembering that the installation of such a window must be taken into account in advance. Still at the stage of niche design. If you redo an already completed repair under the “invisibility”, this can only spoil the appearance completely.
- The neodymium magnet device is used in both floor and wall viewing windows. The hatch on magnets under the tile has a sufficiently large force of attraction, which makes it possible to withstand a fairly decent weight. In order to make this cover inconspicuous, the following technology is used: the groove for the hatch is made a little smaller so that the door is located under the lining that masks it. The magnet holds the lid itself, sometimes it is installed in such a way that in the future it can be moved to the side to reduce the attraction.
For larger sizes or if the lid is made of heavy materials, it is equipped with a handle for easier handling. Made from lighter materials and smaller sizes, they can be made without handles, larger ones are more often made folding.
The nuances of choosing the right hatch
When choosing a size, they are guided by the following parameters:
Technical niche dimensions. The opening can be laid a little or expanded, but in general, the hatch must match the niche, otherwise access to the equipment will be difficult.
Door dimensions. The ratio of the parameters of the support frame and the hatch itself may be different. It is necessary to clearly determine how much space is required for a detailed inspection and repair of communications.
Tile size. Finishing materials for walls are usually bought in advance, and this makes it easier to choose a door. The tile should protrude beyond the surface of the hatch by 0.5-0.7 cm (or better, the maximum protrusion should be no more than 5 mm)
It is also important that each tile is securely fixed: more than 60% of its area must be located on the hatch door.
For a spacious bathroom, you can choose a hinged hatch, and for a cramped one, a sliding or folding model is better.
If the opening of the revision niche is located on a plasterboard partition or a false wall, then a lightweight folding structure on an aluminum frame should be preferred.
A great option is to install a model with gas shock absorbers. When buying, you should carefully check the package and make sure that it includes spring mechanisms. If not, you'll have to buy them separately.
There are many manufacturers of inspection hatches whose products are worthy of attention.
The top three invariably include the following brands:
- "Phantom". The main advantage of the hatches of this brand is powerful reliable hinges that can withstand significant loads. Even doors with heavy finishes do not sag for many years of operation.
- "Hummer". A feature of the Hammer models is high-strength frames.The secret of their quality lies in the assembly features: the manufacturer uses argon-arc welding.
- "Glory". These are hatches with wear-resistant fittings that can withstand almost any weight of the finish. The doors of the models can be faced with ceramic tiles and even natural stone. They don't deform.
The range of stealth hatches is extensive, and for each revision niche there is sure to be a suitable model
It is important not to save money and buy a structure with a solid frame and good fittings.
Sometimes large technical niches are made, for example, if it is necessary to disguise a boiler, distributor, filter, meter, cold and hot water collector or other equipment behind a false wall. Often a large revision niche is required in a toilet or a combined bathroom for sewer service. If it is not possible to find a hatch of suitable sizes, then you can resort to other methods of masking communications.


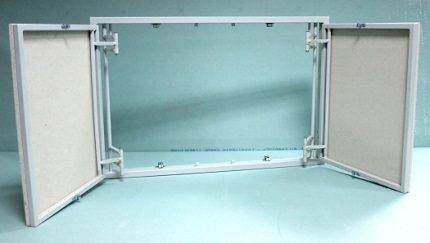
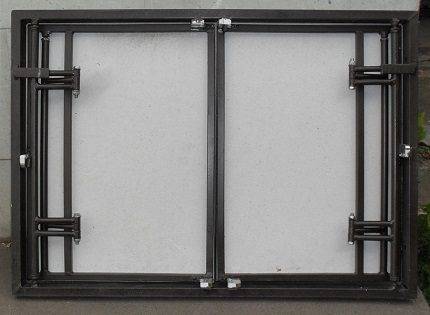
The frames of two-door inspection hatches are made of durable materials. They must withstand high loads. If the size of the niche is large, and they plan to finish the door with ceramic tiles, it makes sense to order a reinforced structure
If the opening width exceeds 70 cm, you can choose a single-door hatch with a strong frame and a powerful opening mechanism, but it is better to stay on a two-door model. Most often, such hatches are equipped with push or swing opening mechanisms.
In the second case, suction cups are additionally included in the kit.
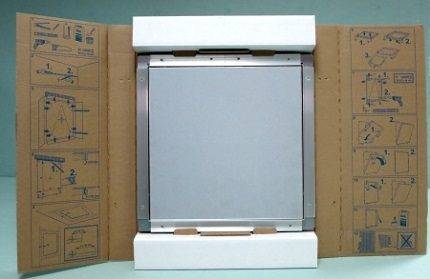
Some manufacturers have made sure that buyers must see the installation instructions. They placed it directly on the cardboard in which the models are packed. If you buy a two-door design, you should definitely familiarize yourself with the technology of its installation
The maximum size of the standard two-door model is 120 x 160 cm, but an even larger hatch can be ordered if required. In this case, you should determine in advance the dimensions of each of the doors.
They are calculated depending on the selected tile: it is necessary that when opening the doors they do not cling to each other, but at the same time they are beautifully decorated with finishing material.
Two-door tile models can be equipped with any opening mechanism. The most convenient and reliable doors are swing doors. However, the location of the revision niche can be inconvenient for opening them. Then it makes sense to consider other options
As for the door materials, when choosing two-door inspection hatches, it is better to give preference to models made of moisture-resistant gypsum-fiber board. The drywall option is not even worth considering, because. it will not withstand serious loads, it will quickly deform and fail. Its only advantage is cheapness.
Kinds
There are a large number of different types of tile hatches, for a better idea of the purpose of specific devices and their design, the variety presented is classified by type:
According to the purpose of communication networks and the equipment that they hide, hatches are divided into:
- electrical;
- plumbing;
- ventilation.
By location, devices are found:
- ceiling;
- wall;
- floor.
Ceiling hatches will help you get quick access to electrical wiring and other communications
Depending on what material the product is made of, inspection hatches are divided:
- Metal products.These models are durable and used for a long period of time without loss of quality, the doors are usually painted in any color with powder paint.
- Plastic hatches. A cheaper option compared to previous devices, most often performed with handles or a push-opening principle.
- alternative materials. Invisible hatch under the tile, can be made from any suitable materials available. In this case, usually the revision door is made using the material used for facing the room, which makes it possible to qualitatively disguise the revision against the general background of the finish.
In shape: devices for revision, there are square or rectangular, but if necessary, you can order a hatch of any geometric shape, or make it yourself.
The standard sizes of the models represented by the distribution network start from the parameters 10x10 cm and then the range of hatch sizes is identical to the sizes of ceramic tiles. The maximum size of a hatch that is commercially available is a device with a door side of 120 cm. This will mask the revision on the surface to be coated as much as possible.
How to choose an inspection hatch?
To determine the type of construction and other important parameters, you need to find out:
- where the hatch will be installed;
- type of external coating of adjacent walls;
- how often the mechanism will be used;
- are there any obstacles nearby that may interfere with the opening of the door;
- whether full access to the opening is required or a small gap will suffice.
The most important parameters are the dimensions and material of manufacture. Common are revision sanitary hatches, which are used not only in residential buildings, but also in production. They are made of aluminum or steel and have a hinged opening mechanism. Such a hatch is installed in the opening in the place where the water and sewer pipes pass.
Inspection hatch size
Manufacturers produce doors of standard dimensions. The most common are the following sizes:
- 100x100;
- 150x150;
- 150x200;
- 200x300;
- 250x400;
- 400x500;
- 400x600.
All parameters are in millimeters. Inspection doors can be made to order if a design with a non-standard shape is required: round or oval. Dimensions must be chosen in such a way as to ensure free and unhindered access if necessary. If possible, if there is a place for installation, it is better to have a small margin in size.
When choosing, it is worth considering the parameters of the tile. It should cover the hatch completely and consist of solid elements.
If a covering of pieces is laid on the outside of the door, the location of the hatch will attract attention. When the hatch is installed in a narrow place, it is worth choosing such a mechanism so that it does not interfere with fully opening the door and provides full access to communications
What is the hatch made of?
The following materials are used for manufacturing:
- aluminum;
- plastic;
- steel;
- polymers;
- wood.
The most common are structures made of various types of metals and a revision plastic hatch. They are affordable, can be installed in any room and are suitable for tiling.The material of manufacture also depends on the location. Floor hatches are made of steel, and ceiling hatches are made of plastic and polymers.


Metal structures are also distinguished by the material used to make the hinges. Aluminum have more room for adjustment and wear out more slowly. Steel hinges are able to withstand a load of up to 590 kg on the hatch door in the open position. Casting and assembly technologies help produce parts from aluminum with a nickel-zinc coating that reduces friction.
What to look for when choosing
Before buying a hatch, first think carefully for what purpose it will be used. A small size, for example, 10x10 cm, is only suitable for fixing instrument readings. The size of 20x30 cm corresponds exactly to the size of a standard tile.
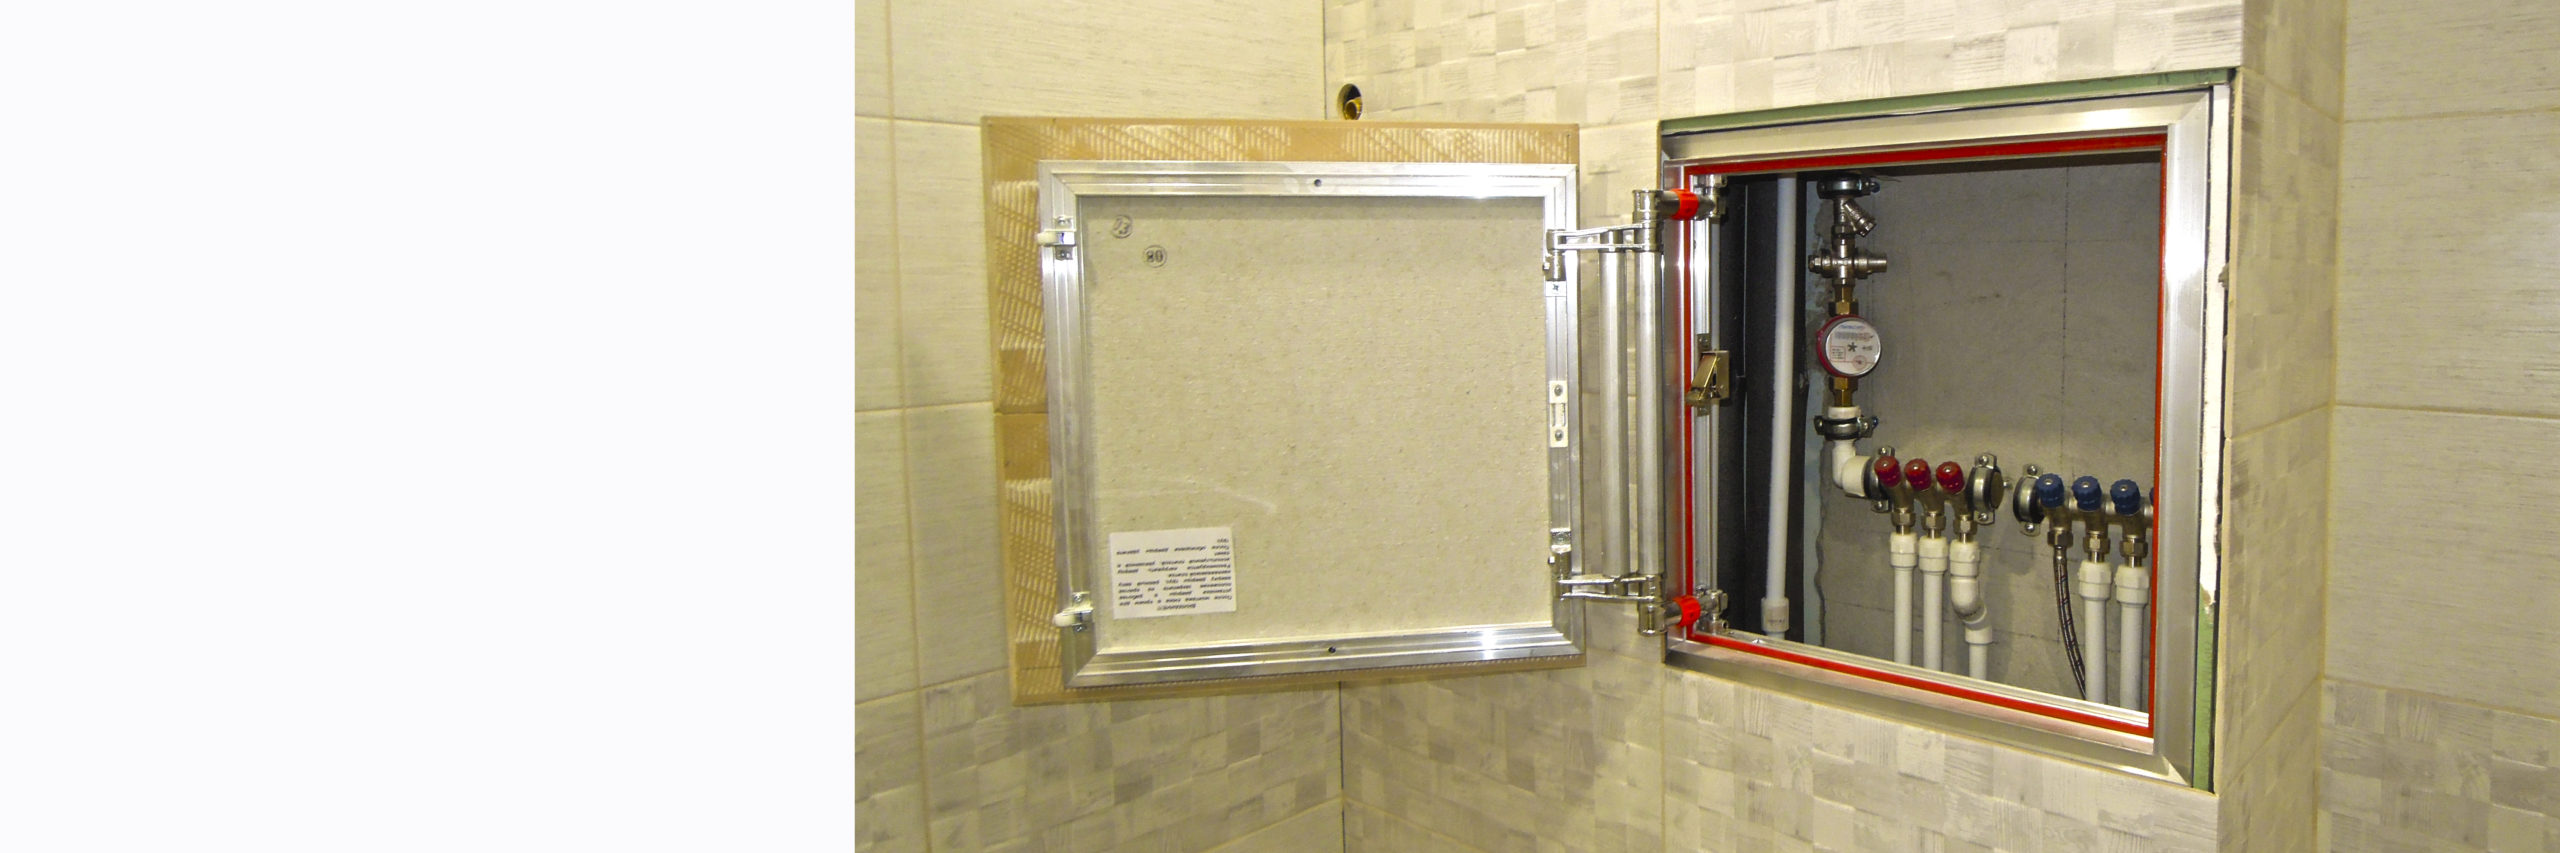
 The advantage of "invisibles" is the complete fusion of the manhole cover with the wall, so that the wall decoration looks solid, untouched.
If you will mount the hatch under the bathroom, and you want to have access to the accident site in case of a leak, you should choose a larger size. As a rule, for such purposes, models should be taken from 40x60 cm in size. Also, for these purposes, several hatches can be installed in a box or in a screen under the bathroom at once in order to have access to sewer pipes from all sides. In this case, you can buy options in the size of 40x40 cm.
 The difficulty of finding a plumbing hatch increases if the door does not have a handle. Such models usually have a push-to-open method.
First of all, you will need to mark the place where the device will be located.
Then take the necessary measurements to avoid curvature and inaccuracy of the lines. Be sure to use a building level, laser is best.
Next, under the desired dimensions, make a base and a frame. For these purposes, it is better to use an aluminum profile. It is sold in hardware stores and has various sizes. Set frame.
Start building the door. Its base is best made of drywall. It is durable and is not afraid of moisture.
Prepare holes in the door in which you will attach the hinge mechanism. Use a drill for this purpose. Step back from the edges of the door by 1 centimeter.
Then connect the hinges to the door. To do this, attach it to the frame and mark on it the place where you need to make holes for attaching the mechanism.
Attach the hinges to the frame and hang the sunroof
Please note that the hatch door is level. She should not rise above the wall
There should be a small gap between them for wall cladding and easy opening of the door.
Fasten the door with bolts, and if desired, you can proceed to its lining.
After that, you can proceed with the installation of the pressure mechanism.
 The larger the inspection hatch, the wider the coverage area and the possibility of repair work.
So, the hatch has already been purchased, the box for it has been made, it remains only to install it. Consider the features of its installation. First of all, you will need to choose the right type of fastening that will be used when installing the hatch. If it is mounted on an aluminum profile, then use self-tapping screws. If on concrete or brick, then concrete anchors. And in the event that neither one nor the other is suitable, then use liquid nails.
 It is good if all significant pipe connections, stopcocks and devices that require regular maintenance fall into the open technical area.
Then, in a pre-prepared niche, install the profile, and fix the hatch frame with self-tapping screws. Drill holes in the hatch frame for mounting it on the profile. Install the sunroof and open the door. Check with a level whether the entire structure is level. Now fix.
 When installing structures that serve several devices, it should be remembered that in addition to monthly readings from metering devices, it will occasionally be necessary to replace or repair "in place".
Plastic hatches for tiles series LP
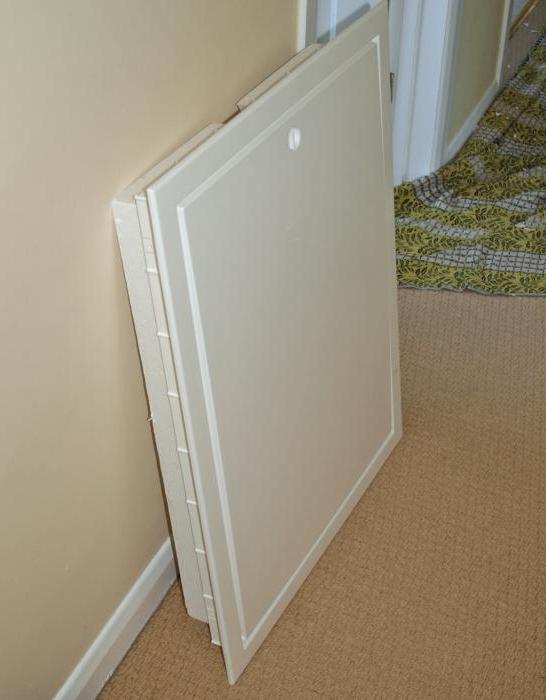
Plumbing hatches are installed in the opening of the viewing window. Today, the practice of using metal stealth hatches with a push mechanism is very widespread, but many people prefer to opt for a plastic LP hatch. There are arguments for this:
• plastic hatches LP under tiles are cheap;
• hatch LP has low weight and shallow depth, so it can be installed in a stretch ceiling or in a wall panel made of thin plasterboard;
• unlike metal hatches, which are mounted under the cladding, the plastic hatch is very easy to fasten in the opening with the help of spacers - even minimal experience is not needed for its installation.
Finish lining
This is followed by the installation of an invisible hatch under the tile and finishing cladding. It consists of the following works:
- The surface should be primed first.
- To avoid sagging of a medium-sized door, hang a weight that will be equal to the load from the cladding.
- If a push mechanism is used, then there must be a special bracket.This bracket will prevent accidental opening of the revision during veneering.
- The tile is glued to liquid nails or glue. The carrying capacity of revisions varies, this factor must be taken into account when choosing a tile and adhesive solution. No need to use a large layer.
- The tile is glued with a gap of 5 to 50 mm on all sides, a little less on the side of the loop. Ceramic tiles should go 50% or more onto the hatch, so take this into account when choosing a cladding.
Make sure that glue does not get into the gaps, especially into the gap between the frame and the tile, otherwise you will glue the revision tightly. The flush-mounted hatch can be lined with ordinary ceramic tiles, porcelain stoneware, as well as mosaics.
Inspection hatch for tiles correct calculation, installation and installation - video
It is important to observe the correct geometry and symmetry. Lined hatch should not stand out from the rest of the cladding
There should be no unexpected undercutting at this point, and the width of the seam should be similar to other seams around the entire perimeter.
Installation of inspection hatches
Without asking for help from specialists, installing an inspection hatch with your own hands is no more difficult than embedding any frame into a plasterboard partition or fixing a shelf with dowels to a main wall. The main condition is the correspondence of the dimensions of the hatch and the communication niche. Most hatch models are designed for fastening the frame with self-tapping screws, with the exception of the provided option specified in the instructions. Mounting anchors or other devices are additionally included in the package of inspection hatches.
The frame of the revision hatch is most often fixed to drywall.
1. We measure the dimensions of the frame and the distance between the holes in it, if they were intended.With a pencil, we mark the top point from the side of the door and mark the level under the opening.


2. We cut a hole in the GKL with an electric jigsaw, and try on a frame in it, if necessary, adjust it a couple of millimeters wider - for ease of installation.
3. In the opening, we fix the frame of the mounted hatch with clamps.
4. Using a screwdriver, we fasten the screws in the mounting holes.
5. If no holes are provided, then we land on building glue or a small amount of mounting foam. It is better to fix the plastic base of the revision hatch around the perimeter with titanium glue or liquid nails, and let it dry.
6. Check the reliability of fastening and only after that complete the finishing work, if necessary, with plaster and painting.
Hygienic simplicity
You should not put a plastic hatch in places with direct water ingress, a leaky door will not protect the plumbing box from dampness, which can lead to the destruction of the structure, the spread of fungus and the occurrence of pathogens. Its drawback is more of an aesthetic nature, but you can correct the situation by painting the door and frame in a color that is consonant with the rest of the color scheme of the room. The plumbing plastic hatch has a minimum size of 10 x 10 centimeters, a maximum of 40 x 60 centimeters, which completely covers the needs of access to pipes.
Estimated cost and popular sizes are shown in the table:
| Size, mm | Material, color | Average price, rub. |
| 100 x 100 | plastic, white | 140,00 |
| 150 x 150 | plastic, white | 160,00 |
| 150 x 200 | plastic, white | 180,00 |
| 200 x 200 | plastic, white | 200,00 |
| 200 x 250 | plastic, white | 220,00 |
| 200 x 300 | plastic, white | 240,00 |
| 250 x 300 | plastic, white | 280,00 |
| 250 x 400 | plastic, white | 300,00 |
| 300 x 300 | plastic, white | 320,00 |
| 400 x 500 | plastic, white | 600,00 |
| 400 x 500 | plastic, white | 600,00 |
| 400 x 600 | plastic, white | 870,00 |


