- Types of inspection hatch
- Hinged inspection hatch
- Sliding access hatch
- Hinged inspection hatch
- Removable inspection hatch
- Design Options
- Variety of inspection hatches
- opening mechanisms
- Choice of tools and materials
- How to choose an inspection hatch?
- Inspection hatch size
- What is the hatch made of?
- Varieties of secret hatches
- Installation of a hidden inspection hatch
- Homemade bathroom hatches
- Hatch with magnets
- Video about removable tiles on magnets below.
- Luke on glue
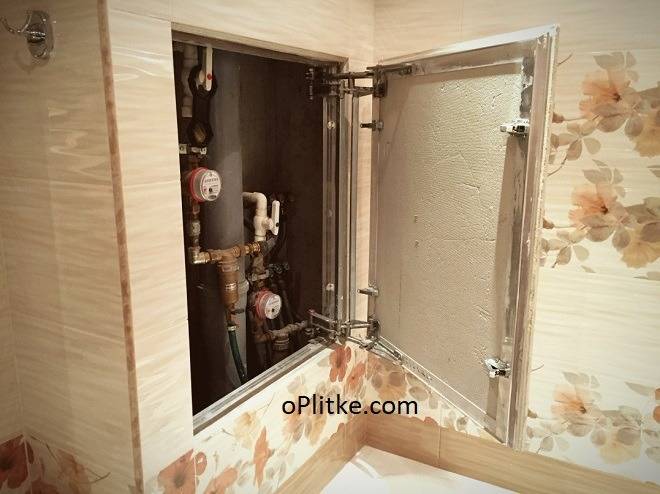
Types of inspection hatch
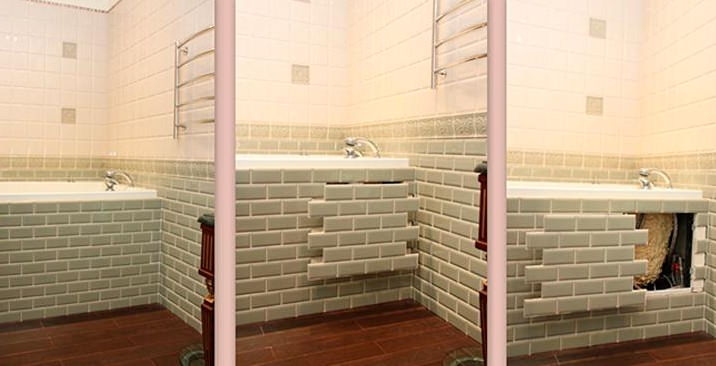
The main difference is the door opening system. The most commonly used is an inspection hatch for pressure tiles. It features a convenient opening method. This design is also called invisible due to the fact that with proper installation and high-quality cladding, at first glance it is impossible to determine the installation location of the hatch. When placed in a bathroom or toilet, the door can be equipped with a seal that prevents water from entering.
The revision plumbing hatch may have a suction cup opening system. This type is gradually disappearing. According to the structure of the external coating, two types can be distinguished: a hatch for painting or for tiling. Products differ in size, place and method of installation, materials of manufacture.Depending on the design, the doors of inspection hatches are divided into hinged, sliding, folding and removable.
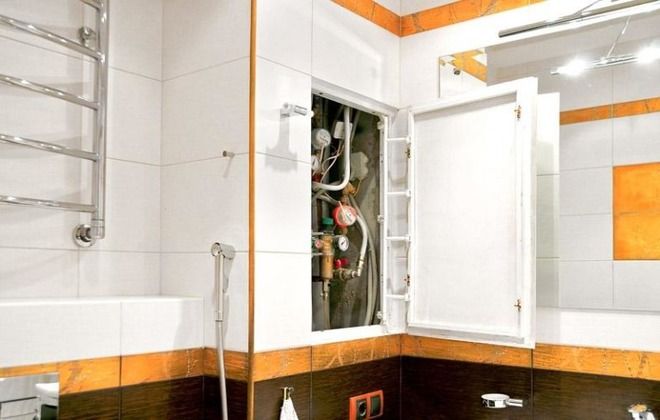
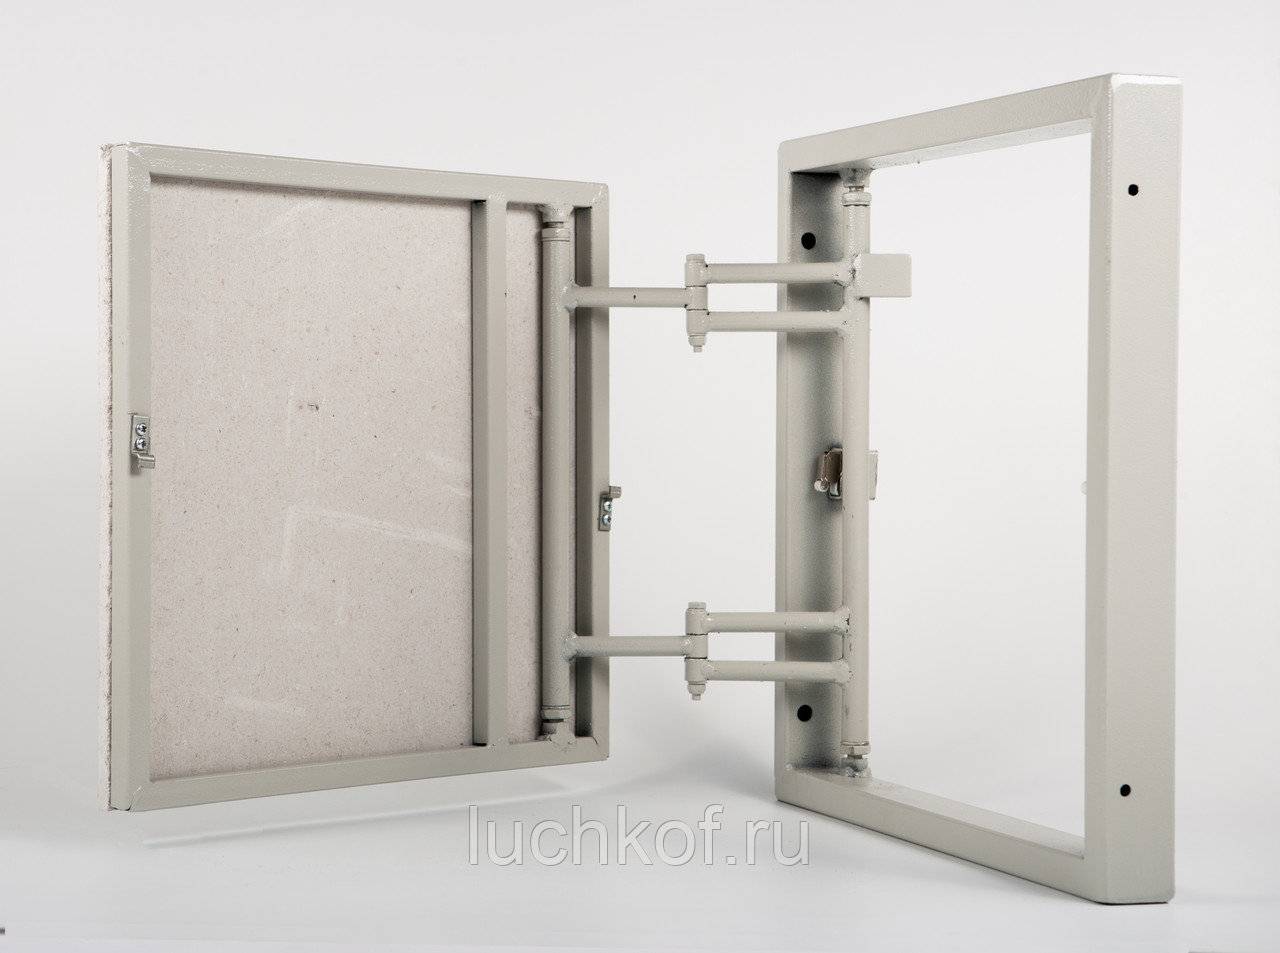
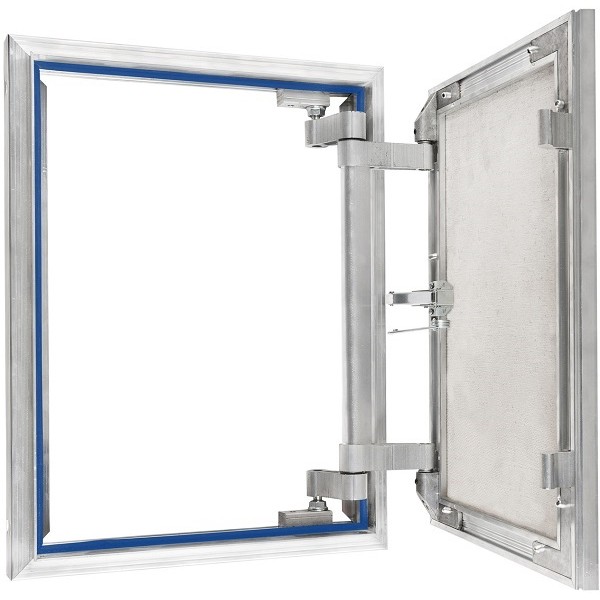
Hinged inspection hatch
In such models, the door is fixed with the help of two hinges, which help to open it and swing it open parallel to the wall. The outer surface may exceed the dimensions of the opening, so it can be decorated with decorative tiles, mirrors, mosaics and other materials. The inspection door hatch with a hinged design is widely used when installed in bathrooms and lavatories.
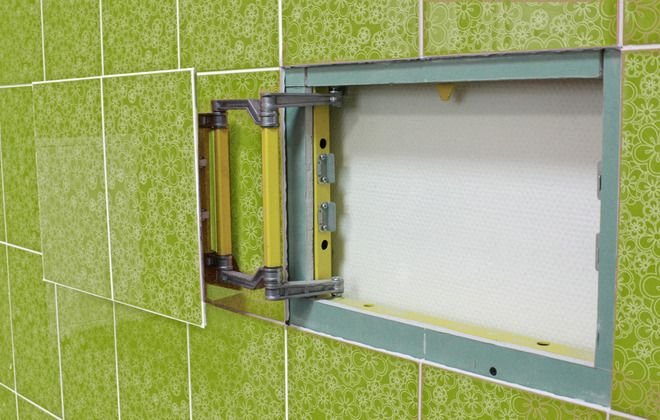
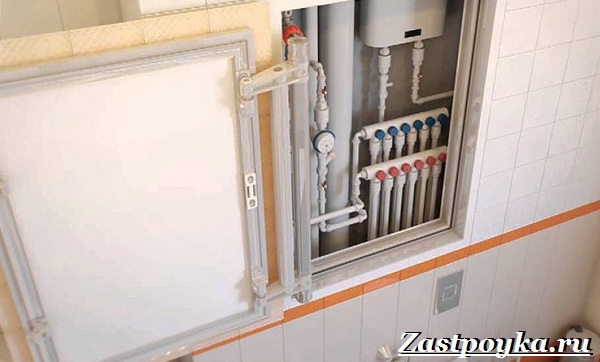
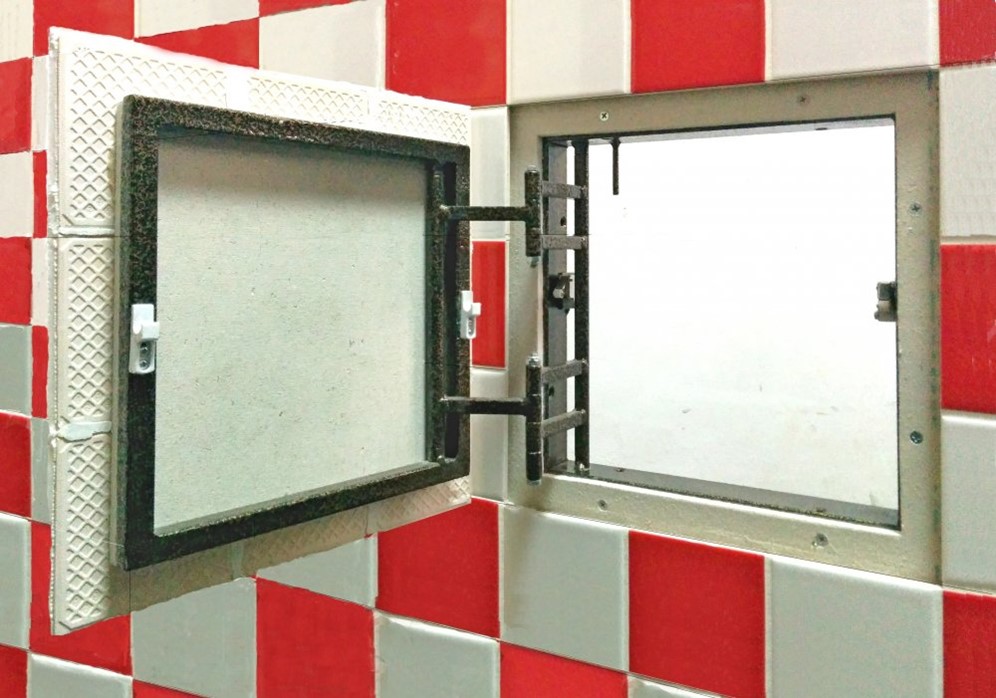
Sliding access hatch
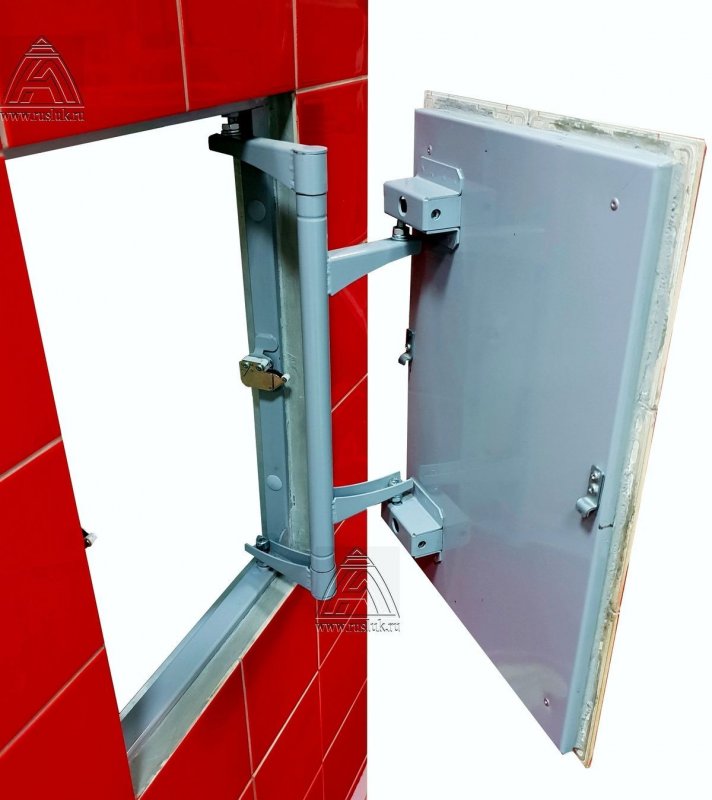
This version is equipped with a three-link hinge that allows you to slightly open the door and then move it parallel to the wall in any direction. A sliding revision sanitary hatch is installed in places where there is not enough space for a swing structure. The mechanism finds use in narrow corridors, under bathrooms, in cramped rooms and in corners. On the basis of a sliding structure, an invisible hatch is often performed.

Hinged inspection hatch
Equipped with a push-open mechanism. One of the main differences of the hinged hatch is the absence of hinges. The structure is made of steel and is installed in places where, due to the proximity of furniture or plumbing, it is not possible to place a hinged door. The features of the device help to make a concealed hatch with the help of a folding mechanism. It is installed in the floor for access to pipes and cellars. The hinged hatch is convenient in cases where it is not necessary to open the door completely, for example, to take meter readings.
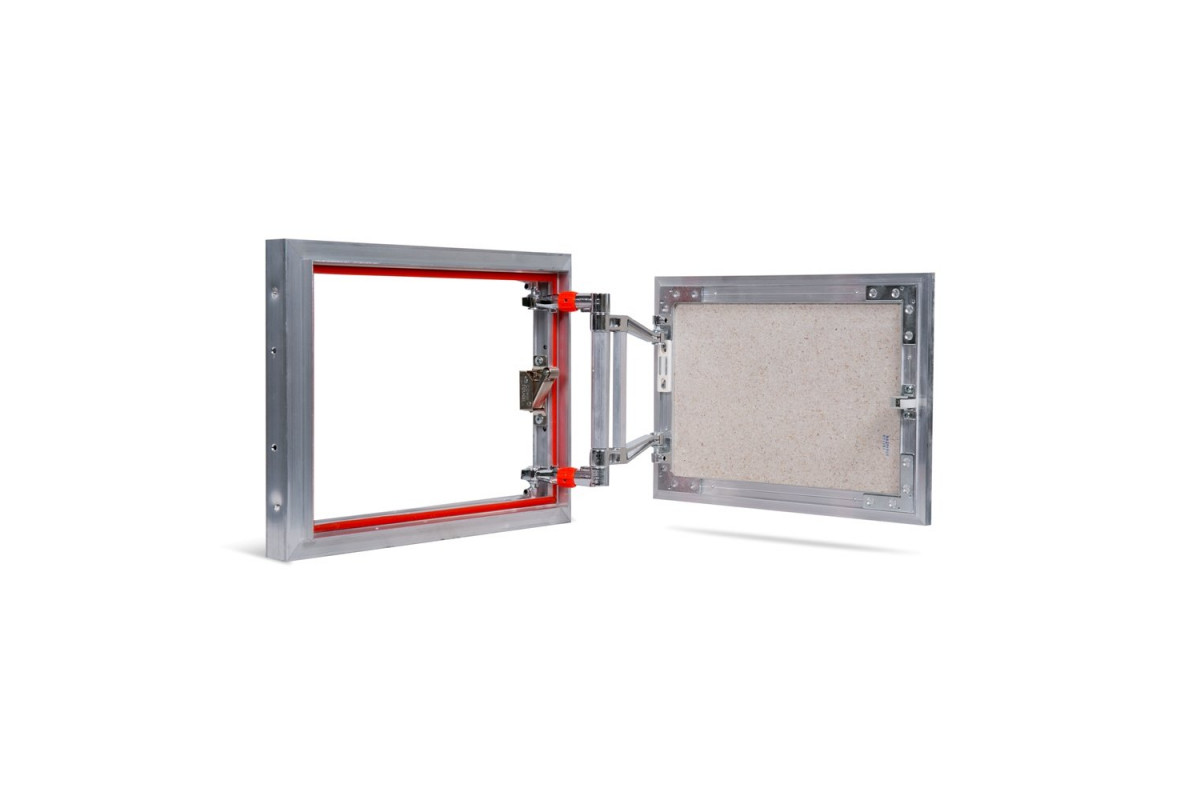
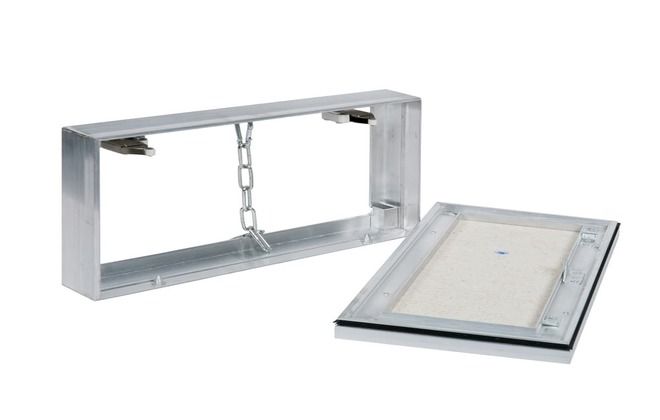
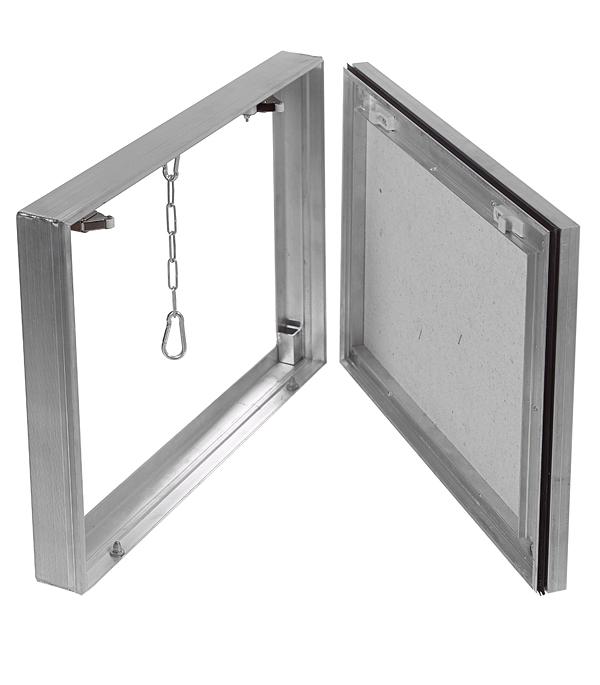
Removable inspection hatch
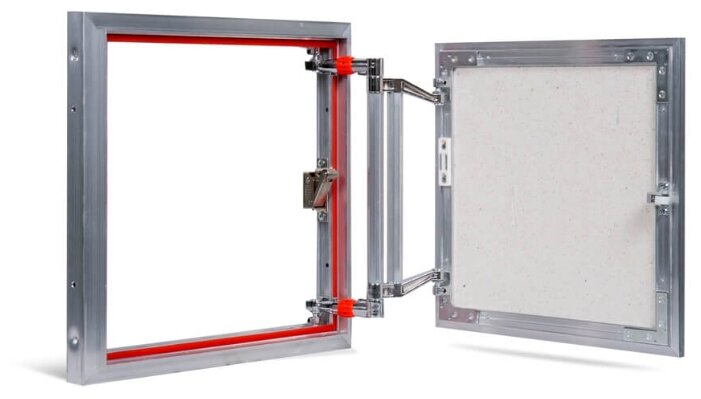
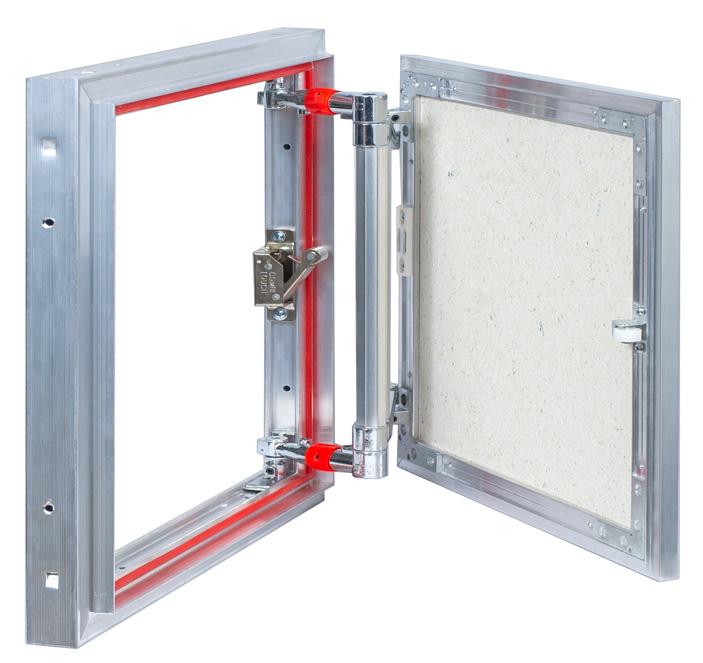
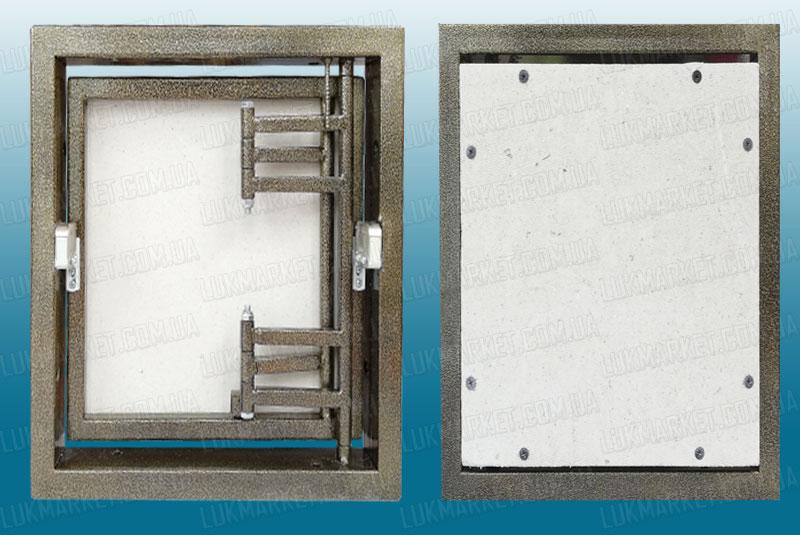
The most simple and convenient design is a frame made of aluminum or plastic and a door that is held with pressure locks.It can be completely removed by disconnecting the safety chain from the inside. A hidden, removable inspection hatch is very convenient in cases where you need to get full access to communications for replacement work. Devices of this type are large in size and are installed in places with difficult access, for example, under the bathroom.
Design Options
Hatches are distinguished by the method of installation:
- wall;
- floor;
- ceiling.
The first option is more common. Floor versions are characterized by a depth of not more than 76 mm. That's enough to hide communications. For installation in the floor, a cast steel hatch under the tile is chosen. The structure must be strong, as it will be subjected to significant loads. Doors of this type are not always decorated, because you can hide them under the floor mat.
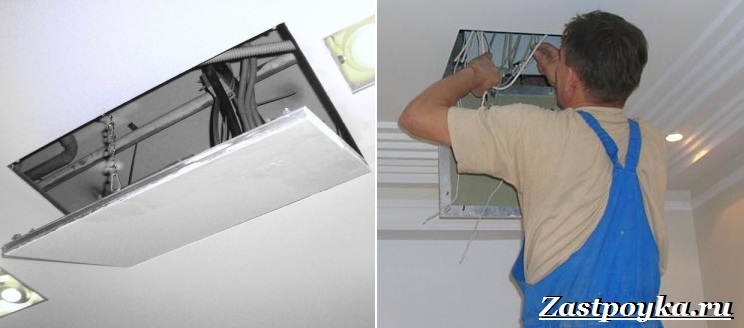
Ceiling analogues are less common, because they are more difficult to get to. They are made from a lightweight aluminum frame. By design, the following types are distinguished:
- single leaf;
- bivalve.
The first of the options is characterized by compact dimensions. It is installed in areas where it is necessary to provide access to a small communications node. This is a more common option for apartments and small houses. The disadvantage is the inability to inspect the pipes along their entire length within the same room.
The double-leaf hatch for tiles exceeds the single-leaf counterpart by almost 2 times in size. Thanks to this, it becomes possible to revise communications along the entire length. By design, this option is a combination of 2 single hatches, united by 1 frame.
Classification by opening method:
- swing;
- sliding.
The first option is more common. The doors open to the side opposite the wall where the hatch is installed. Swing doors are attached with hinged hinges. When closing, the fittings are hidden from the inside of the structure. Such products are often equipped with a roller-wedge mechanism. For opening, a special device is used, which functions like a suction cup. It must be pressed against the door and pull on yourself.
The sash is closed with tiles so that it does not protrude beyond the structure by more than 50 mm, and from the side of the hinges by 5 mm. After decorating with a finishing material, it should not be visible that an opening is hidden on the surface. The technological gap required to open the door is not filled with grout.
Sliding hatches are equipped with three-link hinges. Thanks to such fittings, it becomes possible to push the sash first towards itself, and then pull it to the side. At the first stage, the door protrudes 12 mm above the surface. This method of opening allows you to access the communications node without damaging the wall finish. The advantage of this option is the ability to place the hatch on a site where there is no free space, but plumbing fixtures and furniture are installed.
There are 2 more groups of structures that differ in the type of opening mechanism:
- pressure;
- folding.
In the first case, the sashes are pushed forward under the influence of a small force. It is advisable to choose this option if the surface of the tile is rough and it is not possible to use suction cups to open the sashes.Hinged hatches are mounted on objects where there is no free space either on the sides of the opening or in front. The sash is attached with chains. It is thrown forward when opened. It is possible to completely dismantle it if necessary.
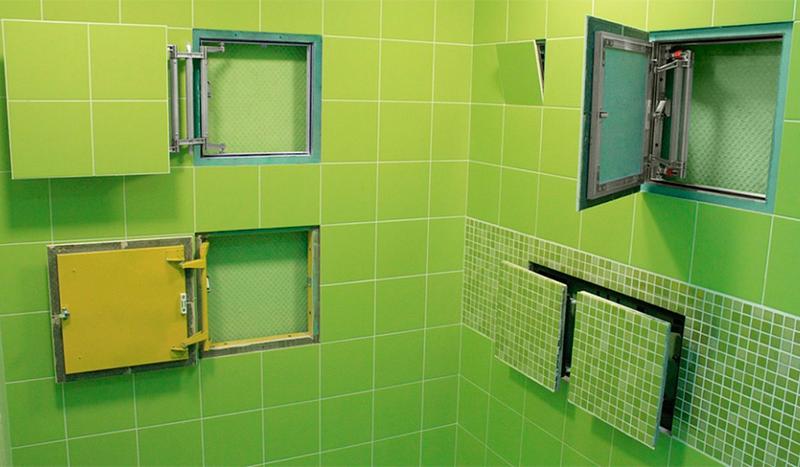
Variety of inspection hatches
The construction market offers a wide selection of inspection hatches from different manufacturers. Conventionally, they can be divided into three main types:
* The inspection hatch for tiles is designed for easy access to functional connections, while not making any special changes to the design. Similar models for tiles have been developed relatively recently, they were preceded by plastic copies.


Basically, concealed mounting is used to install doors. Any material can be glued into the niche of the door (tile, finishing stone, drywall, profile, etc.). There will be two ways to open: by pressing or by two suction cups.


The pressure inspection hatch is equipped with a click mechanism. One has only to make an effort, push on the door and it will open. A similar method is perfect for tiles with a variety of surface textures: from smooth to embossed. Competent design does not allow the tile to break during opening.
Swing doors with a "suction cup" device are designed on retractable hinges. The suction cup acts as a temporary handle; when pressed, the door slips out of the wall. A similar mechanism allows you to keep all the tiles intact.
The door of the sliding opening method is equipped with three-link hinges. A similar mechanism moves the sash parallel to the wall.It is used when it is impossible to use a swing door or there is too little space. The hatch opens, first, "on itself", then to the side.

For too cramped space, especially in small apartments, a hidden folding hatch is suitable. It is completely removable, which at first glance will seem inconvenient. You just need to get used to it, and you can tilt the door at a slight angle. Mount similar doors in wide spaces.
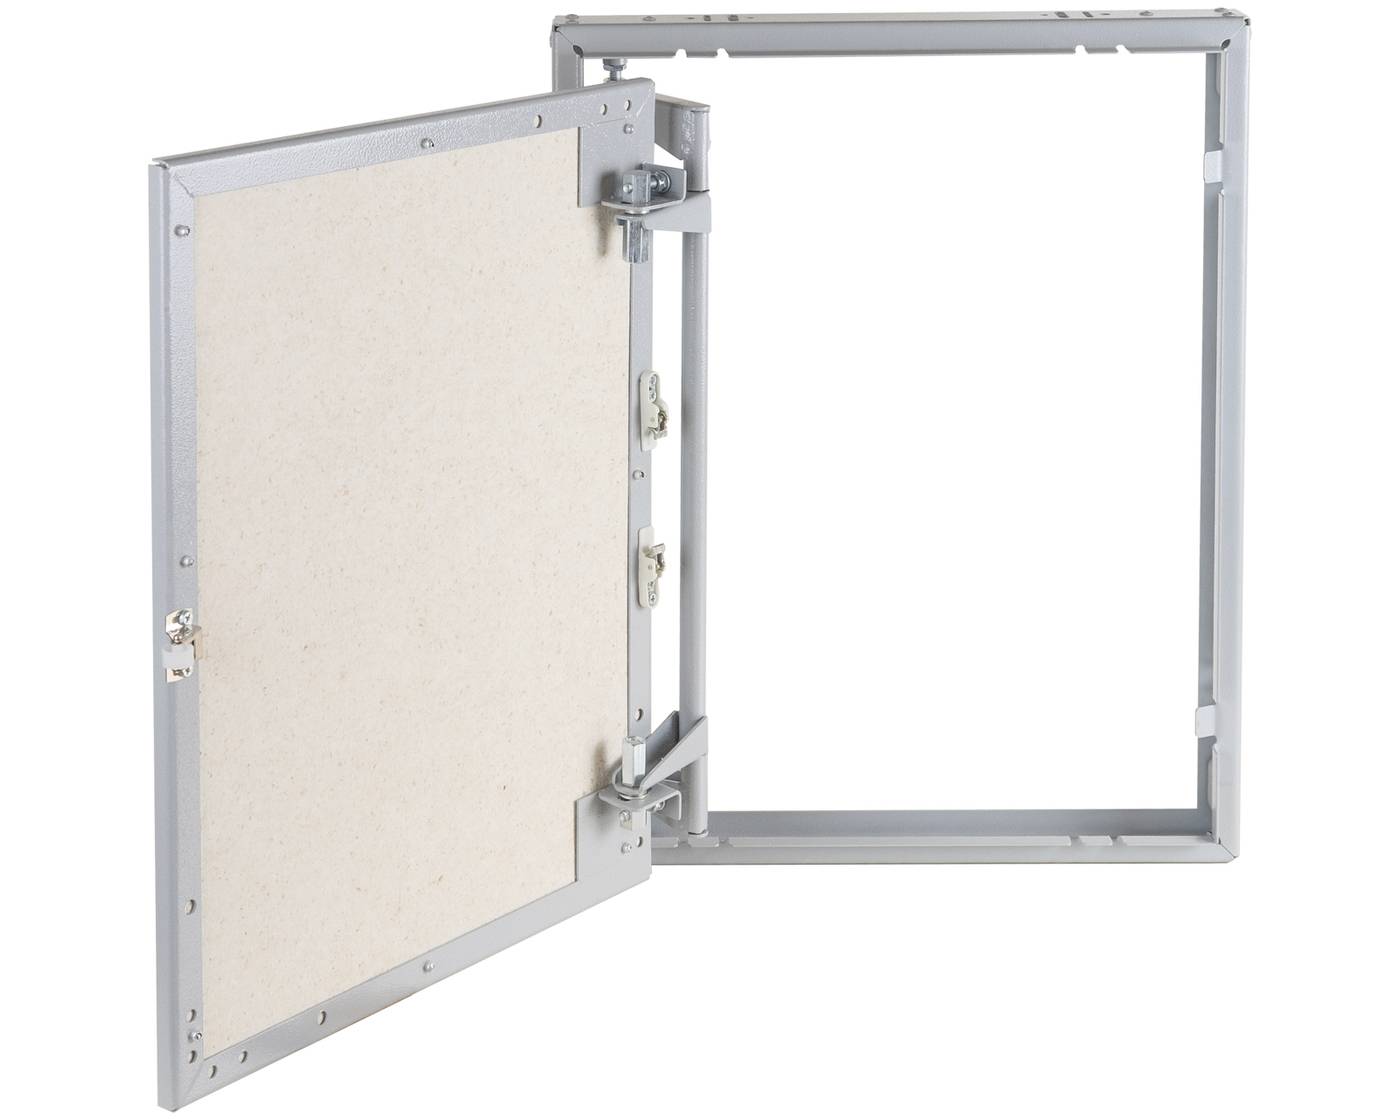
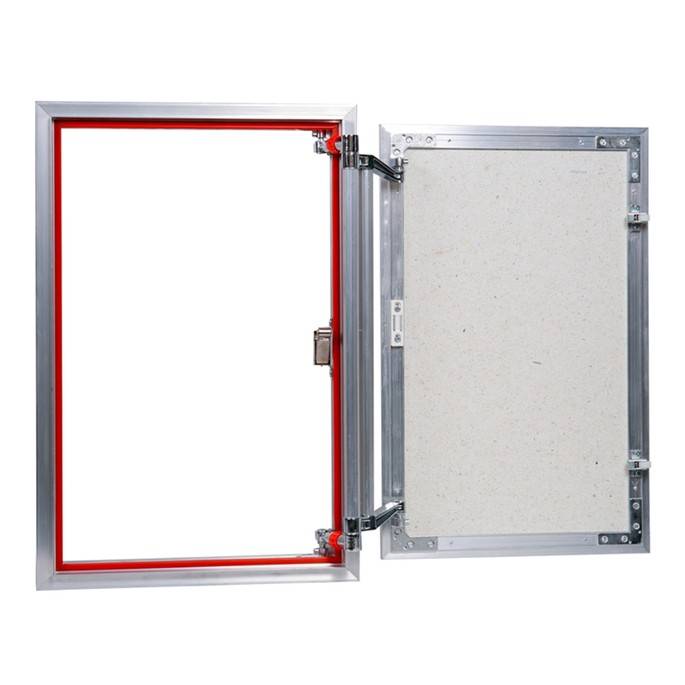
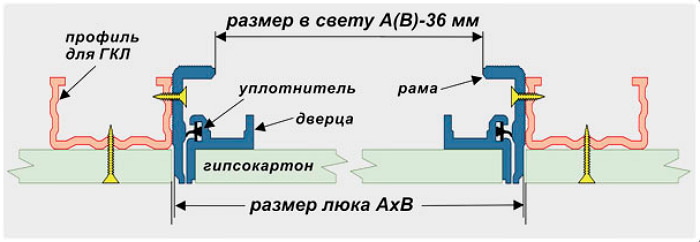
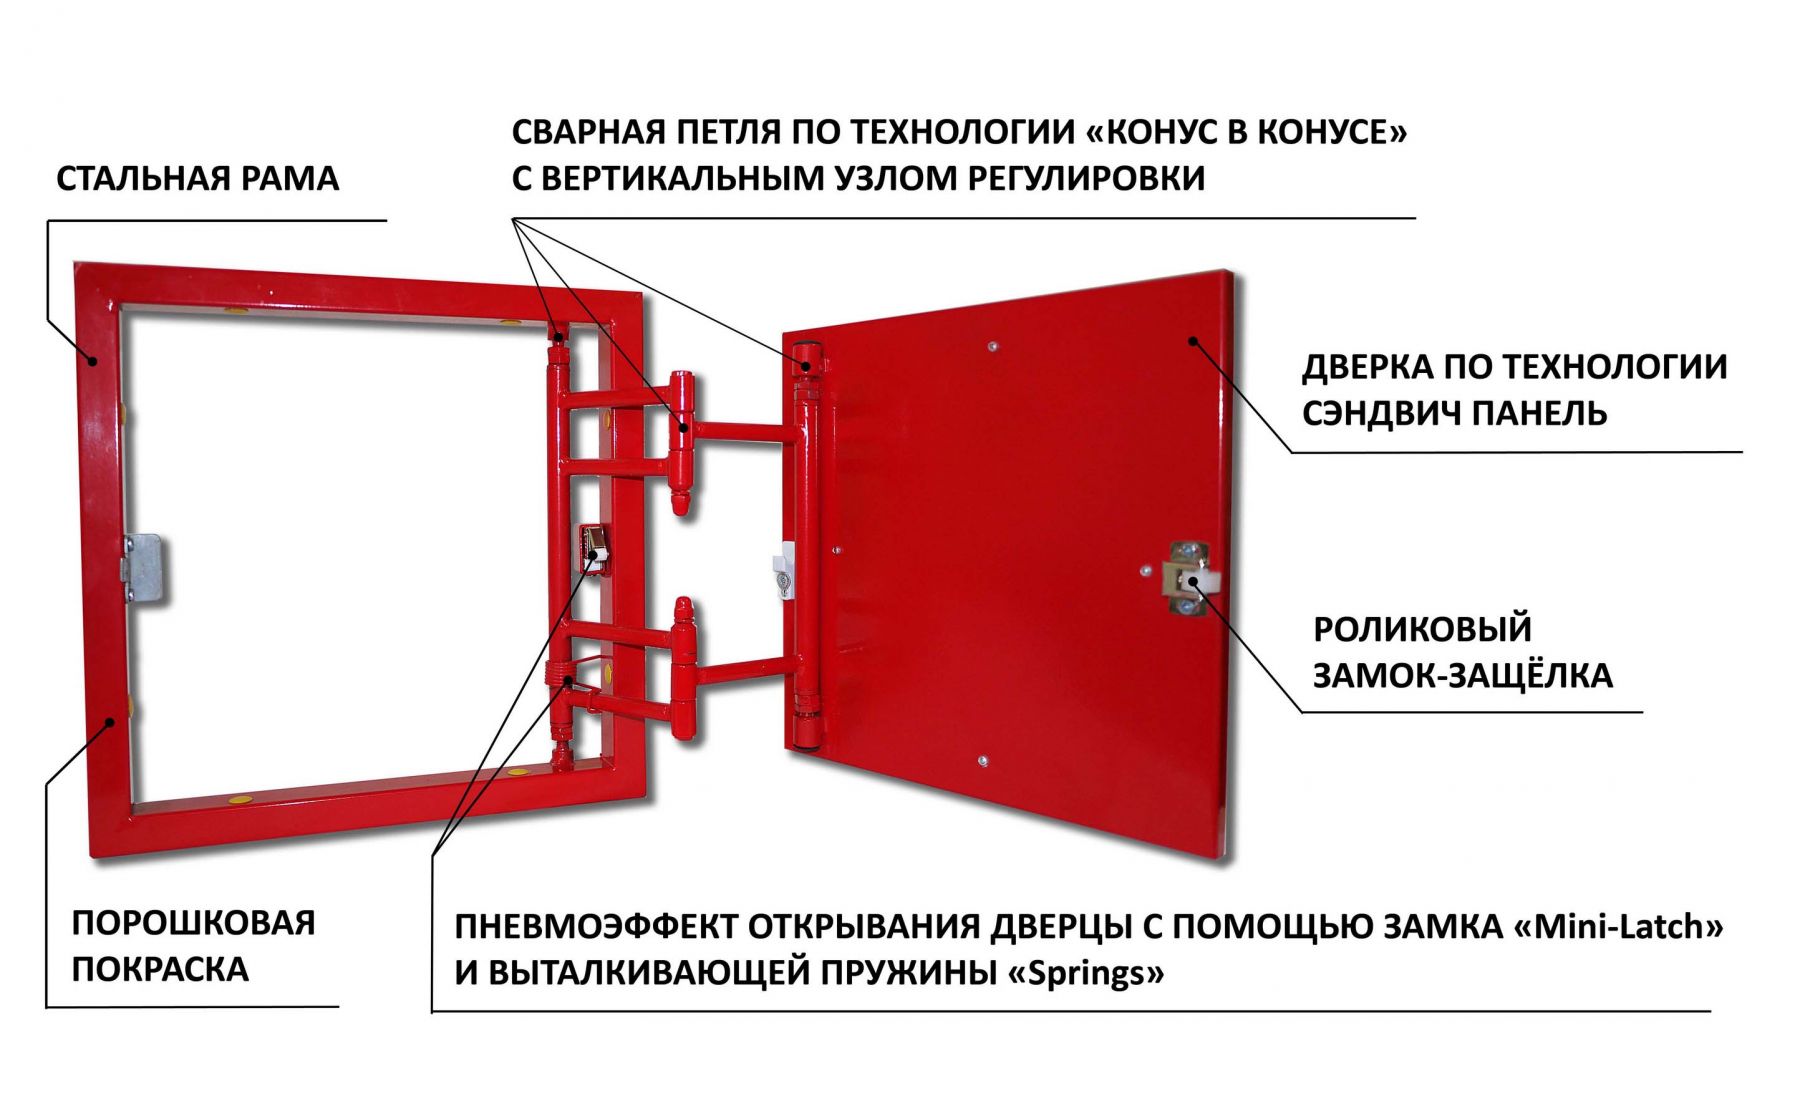
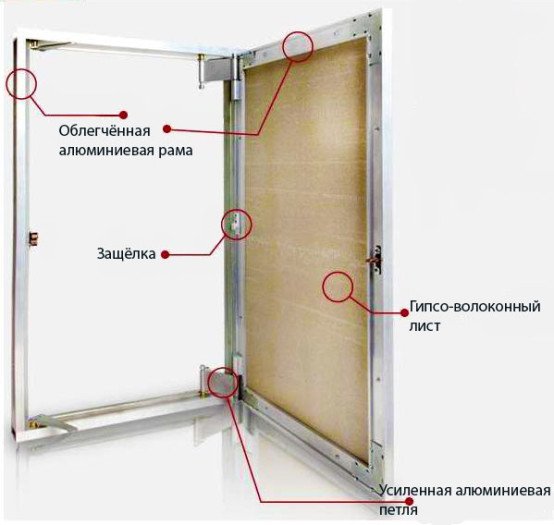
Hatches for tiles have a common design: it is an iron frame and a mobile door. A special gypsum fiber sheet is attached to the sash itself. It is on this sheet that any finishing material is attached. Such a hatch will perfectly fit into any patterned mosaic or color scheme.
As a revision hatch for sanitary purposes, there is a model on suction cups. Sizes can be very diverse, usually they are miniature, attached to the bottom of the tub lining. There are mosaic hatches that are made to order.

* It's no secret that the use of drywall has no boundaries. It is used wherever possible, but most often for finishing ceilings and walls. We have to face such a problem as inter-wall or inter-ceiling space.
Communications (air conditioning, chimneys, ventilation, and so on) or meters can be placed in such openings, which means that they will need access. In its quality, revision hatches for painting act.
Most often, the “swing box” model acts as an invisible hatch. It is an opening from a metal profile. It can be mounted in a structure made of different materials. It works by pressing the door, then it swings open.
For painting or pasting wallpaper, a model of a hidden hatch called "standard skirt" was developed. It is equipped with a hinged opening mechanism. Installed under false ceiling or plasterboard. A variation of this model is the “skirt-removable” hatch.
Two-door hinged hatches are widely used, they are also perfect for wallpaper or for painting. They can be used to access the air conditioning system, ventilation, boiler, safe, counter. Widely used in suspended ceilings.
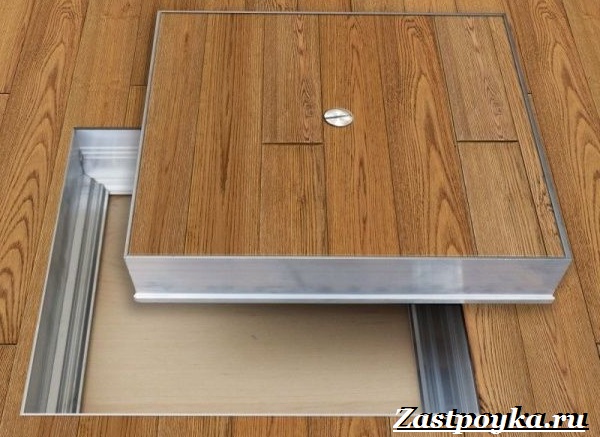
* Floor hatches are hingeless designs. They are equipped with a conventional removable cover; The material is attached to the body using any adhesive solution.
Models with a gas shock absorber have been developed, they are actively used for laminate flooring, tiles and parquet. The hatch cover opens smoothly at a right angle. Especially for the street, an inspection hatch of a metal sample was developed.
The lid is made of steel or galvanized, opening method - without hinges, removable. Tightness is provided by a rubber seal. There are also sockets for screwing handles.
The model of the inspection hatch made of plastic is designed for places of high humidity: ceiling, cool or shower rooms. They are fixed with a sealant or a special cement mortar. Opening method can be varied.
opening mechanisms
Manufacturers install the following door opening mechanisms:
- hinged;
- pressure;
- folding;
- sliding.
Each type of opening has its own advantages. When choosing, you should focus on ease of use.


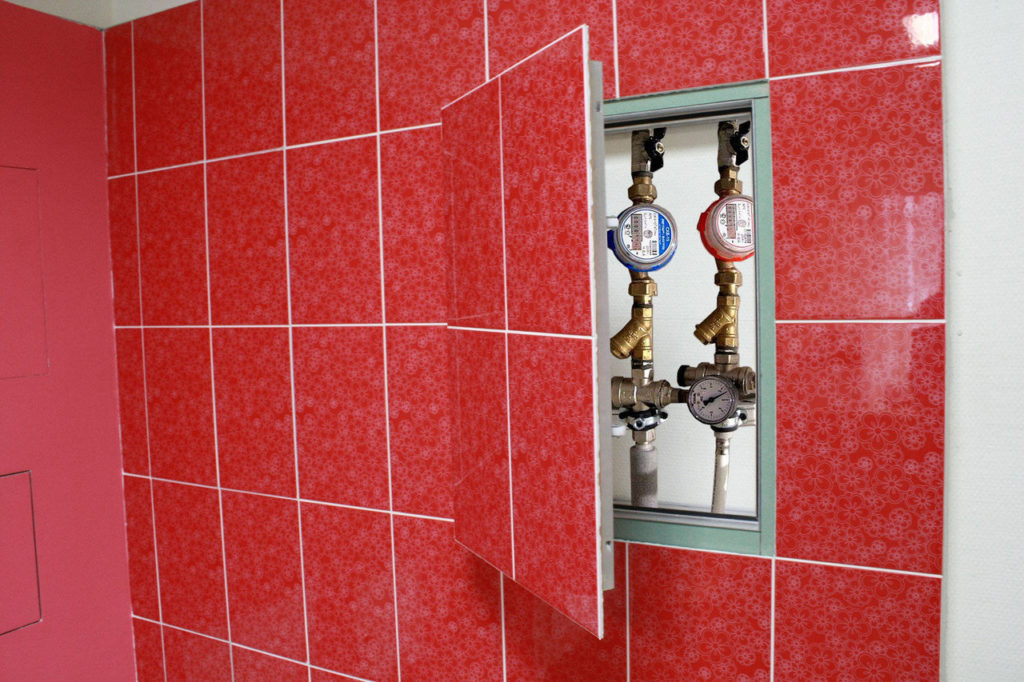


Image gallery
Photo from
This is the most familiar and popular type of doors.The hinged hinges of the mechanism are located on the inside of the structure, so they are invisible when the hatch is closed. Manufacturers have provided technological holes in the frame, and the buyer does not have to figure out where it is better to place fasteners
It is important to choose the right size of the door for the tile so that the finish hangs over the edges by no more than 5 mm. If the tile is smooth, a suction cup handle is ideal, but for a rough finishing material, you will have to choose another option, because
suction cups won't stick
This is an excellent option for opening the door if it is planned to finish it with embossed tiles. The mechanism works like this: when you press the surface of the door, it moves forward a little, after which it swings open in the same way as a regular swing door. An important nuance: they press on the doors with both hands, and the palms should be located symmetrically. Avoid sudden movements and press gently
This is a good choice if the revision niche is located in a hard-to-reach place (behind the toilet bowl, next to furniture, large household appliances). The sliding sunroof slides forward a little and then slides to the side. Thanks to a well-thought-out opening system, the doors do not cling to the wall finish and do not damage it. The opening mechanism can be operated with a suction cup or by pressing
Sometimes it is necessary to equip revision openings in places where it is impossible to open or even move the door without the risk of damaging the finish, plumbing or furniture. In this case, it is worth taking a closer look at folding models. They open at an angle. The design includes carabiner chains that securely hold the door.With this position of the door, you can conduct a superficial inspection of communications, and for repairs it is better to completely remove it
Swing door opening mechanism
Invisible sunroof with push mechanism
Sliding mechanism with three-link hinges
Hinged hatch for hard-to-reach areas
It is hardly possible to come up with a more convenient opening mechanism than a hinged one. However, an audit is often needed where access is difficult due to equipment or furniture. Then folding and sliding models help out. If there is space on at least one side, then it is better to choose a sliding mechanism. And for areas with difficult access, folding structures with the ability to completely remove the door are more suitable.
Choice of tools and materials
In order to make and install the hatch under the bathroom yourself, you must have the following tools and materials:
- push-to-open mechanism for opening the door without handles;
- moisture-resistant drywall (except for options with a brick or concrete wall) and plywood;
- wooden beam;
- reinforced mesh;
- PVA glue and tile adhesive;
- the ceramic itself according to the size of the entire surface for cladding, since its laying will be carried out immediately after the installation of the hatch;
- drills and screwdriver;
- self-tapping screws;
- tape measure and pencil.
Plywood, chipboard or OSB can be used as a material for the door itself and the hatch - it all depends on the number of tiles glued to it. The more ceramics, the stronger the structure should be. Oriented Strand Board is the most stable option, while plywood is fine if the door is only designed for one tile.The thickness of the opening part of the hatch when choosing an OSB must be at least 12 mm.
How to choose an inspection hatch?
To determine the type of construction and other important parameters, you need to find out:
- where the hatch will be installed;
- type of external coating of adjacent walls;
- how often the mechanism will be used;
- are there any obstacles nearby that may interfere with the opening of the door;
- whether full access to the opening is required or a small gap will suffice.
The most important parameters are the dimensions and material of manufacture. Revision plumbing hatches are considered common, which are used not only in residential buildings, but also in production. They are made of aluminum or steel and have a hinged opening mechanism. Such a hatch is installed in the opening in the place where they pass water and sewer pipes.
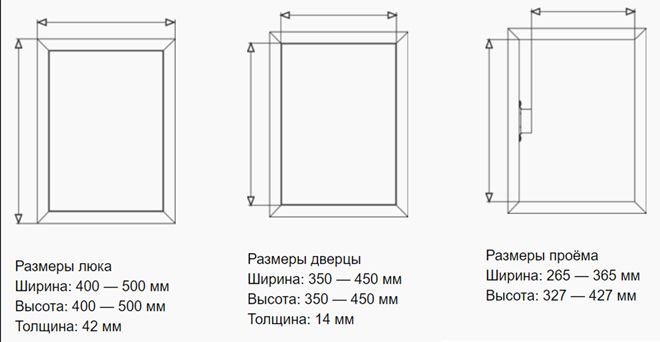
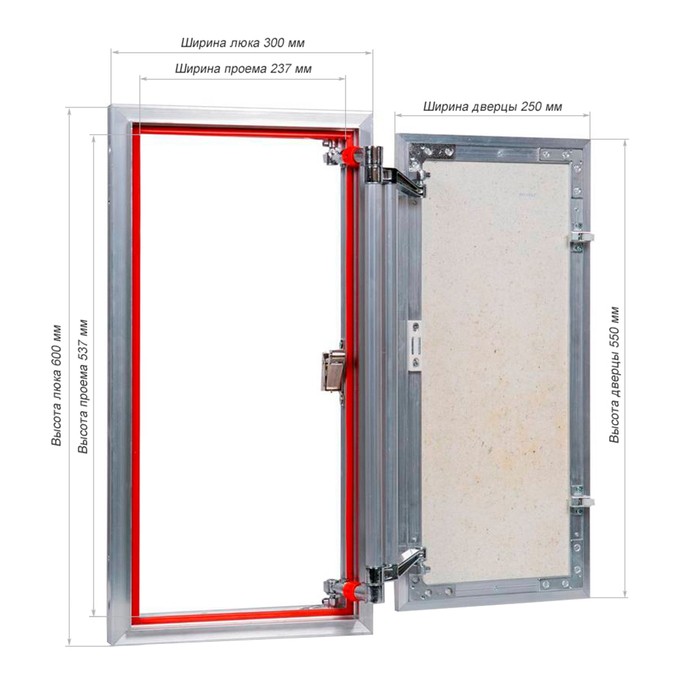
Inspection hatch size
Manufacturers produce doors of standard dimensions. The most common are the following sizes:
- 100x100;
- 150x150;
- 150x200;
- 200x300;
- 250x400;
- 400x500;
- 400x600.
All parameters are in millimeters. Inspection doors can be made to order if a design with a non-standard shape is required: round or oval. Dimensions must be chosen in such a way as to ensure free and unhindered access if necessary. If possible, if there is a place for installation, it is better to have a small margin in size.
When choosing, it is worth considering the parameters of the tile. It should cover the hatch completely and consist of solid elements.
If a covering of pieces is laid on the outside of the door, the location of the hatch will attract attention.When the hatch is installed in a narrow place, it is worth choosing such a mechanism so that it does not interfere with fully opening the door and provides full access to communications
What is the hatch made of?
The following materials are used for manufacturing:
- aluminum;
- plastic;
- steel;
- polymers;
- wood.
The most common are structures made of various types of metals and a revision plastic hatch. They are affordable, can be installed in any room and are suitable for tiling. The material of manufacture also depends on the location. Floor hatches are made of steel, and ceiling hatches are made of plastic and polymers.
Metal structures are also distinguished by the material used to make the hinges. Aluminum have more room for adjustment and wear out more slowly. Steel hinges are able to withstand a load of up to 590 kg on the hatch door in the open position. Casting and assembly technologies help produce parts from aluminum with a nickel-zinc coating that reduces friction.


Varieties of secret hatches
Depending on the object hidden behind the hatch door, electrical, plumbing and ventilation devices are distinguished.
According to the location, wall, floor and ceiling structures are distinguished. The last two are subject to special requirements: the floor hatch must have a reliable frame structure with additional equipment, be moisture resistant and soundproof. The ceiling model should have light doors and reliable shutters that will not open on their own.
In apartments and residential buildings, most often, a square or rectangular plumbing hatch is installed in the toilet.If you wish, you can order or make a do-it-yourself tile hatch, however, their scope and installation are somewhat different.
At the same time, the more inconspicuously the inspection hatch in the interior is disguised, the better. Therefore, the interest of consumers is caused by such plumbing hatches as hidden, pressure and on magnets:
- Pressure. The push hatch for tiles uses, in principle, push systems based on roller mechanisms. The hatch under the pressure tile is quite often combined with invisible mechanisms, spatial loops, double, allowing you to save space and use handles. If we talk about some of the nuances of pressure systems, then it is worth mentioning one point, the fact is that the opening here occurs in two stages: after pressing hard, the door moves a little to the side, after which it becomes noticeable. In this state, the cover is easier to pull to the side.
- Hidden. Common stealth systems combine in their features the nuances of other options and make it possible to make a large plumbing hatch less noticeable. The use of special hinges and drywall on the lid make it possible to "disguise" the revision hatch under the wall. It is worth remembering that the installation of such a window must be taken into account in advance. Still at the stage of niche design. If you redo an already completed repair under the “invisibility”, this can only spoil the appearance completely.
- The neodymium magnet device is used in both floor and wall viewing windows. The hatch on magnets under the tile has a sufficiently large force of attraction, which makes it possible to withstand a fairly decent weight.In order to make this cover inconspicuous, the following technology is used: the groove for the hatch is made a little smaller so that the door is located under the lining that masks it. The magnet holds the lid itself, sometimes it is installed in such a way that in the future it can be moved to the side to reduce the attraction.
For larger sizes or if the lid is made of heavy materials, it is equipped with a handle for easier handling. Made from lighter materials and smaller sizes, they can be made without handles, larger ones are more often made folding.
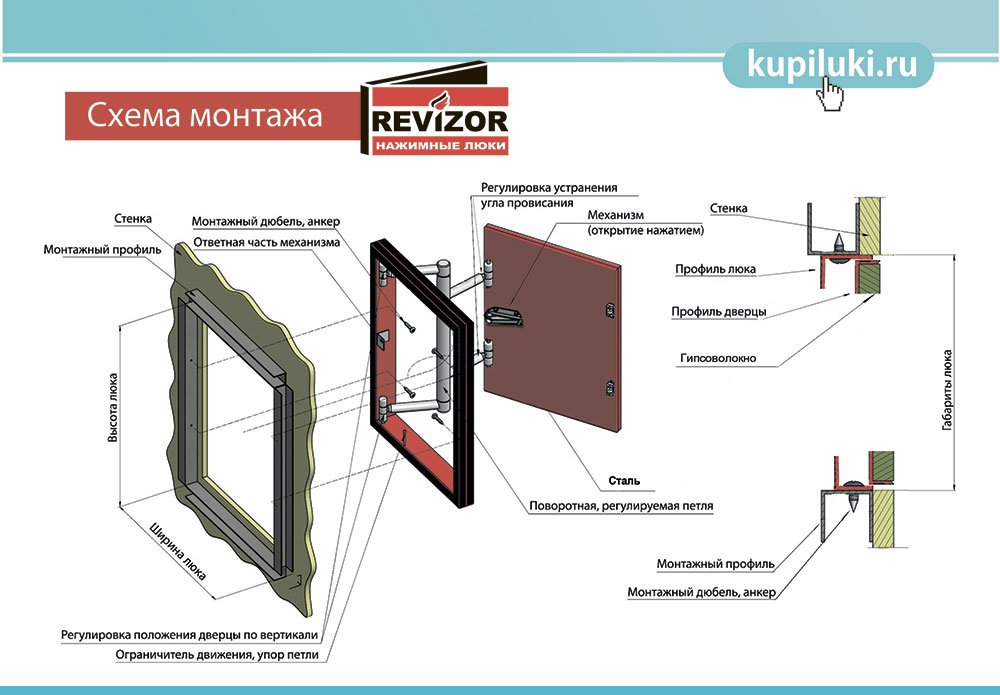
Installation of a hidden inspection hatch
More popular is the installation of a hidden hatch under the tiles on a metal frame, because the pipes are closed with a box made of drywall. But also the installation of this type of hatch can be carried out in an opening made of bricks or blocks. In this case, the inspection hatch is fastened with dowels, and the gap between the frame and the masonry must be filled with foam.
An invisible hatch is installed under ceramic tiles with your own hands as follows:
- During the installation of block and brick openings, the frame must be screwed onto the dowels, and the gap filled with foam.
- The main requirement is to provide a solid foundation that will not wobble. Therefore, it is necessary to design a rigid frame from profiles in advance. At least for this task, it is necessary to make 2 mortgages along the width or length of the hatch, but ideally they must be made from 4 sides.
- The frame is screwed to the profile from the box using pancake metal screws; through holes have already been specially made for them.The planes of the drywall profiles and the frame must match. Next, the frame is sheathed with drywall in such a way that there is an overlap on the frame.
- The position of the door can be adjusted using special nodes on the top or bottom on the hinges. A hex wrench will help to cope with this task.
- Small hatches are installed immediately with the door. When installing large hatches, the door is removed for convenience.
It is very important in which direction the invisible hatch will open.
When opening, the door should not touch the tiles on the adjacent wall, otherwise one careless movement and chips may appear on the tiles. In addition, the hatch should not adjoin the corner
The hatch should be located in such a place that you can freely access the meters and valves if repairs are required
In addition, the hatch should not adjoin the corner. The hatch should be in such a place that you can freely access the meters and valves if repairs are required.
Most often, the hatch is mounted either to the right or to the left. But it happens that it may be necessary to turn it over, and it will open up or down. For example, if lining is done in a narrow toilet, and large-format tiles are used for this, so as not to make unnecessary cuts. But such a phenomenon is quite rare and requires perfect wall preparation, since the gaps along the door opening contour will be minimal.
The tile is laid out taking into account the hatch door - it should be made only from whole elements without trimming. In this case, you can even trim the corner a little.
The next step will be lining the hatch door.
Homemade bathroom hatches
There are a large number of options for homemade hatches, we will focus on the two most simple and successful. The only limitation to such hatches is that the revision hole cannot exceed the size of one ceramic tile. But in most cases, this is quite enough to turn off engineering systems and simple revisions of their state.
Hatch with magnets
Magnets for tiles
Such a hatch can be made both for plasterboard sheathing and for masonry materials. True, metal plates for magnets will have to be embedded in masonry materials. The marking of the position of the hatch is traditional, there is no point in dwelling on it. During laying, leave the hole under the hatch unsealed. In this place, the tile can be temporarily attached with double-sided tape, due to this technique, the wall tub will be facilitated.
Step 1. If metal profiles are visible on the sides of the hole for the hatch - excellent, if they are not visible, then special ones should be installed. There is no need around the entire perimeter, two vertical or horizontal ones are enough. Which option to choose depends on the location of the profiles of the existing metal frame.


Step 2. Cut a piece of drywall to the size of the tile or slightly smaller.
Step 3. Prime the drywall surface on both sides, allow time to dry. After drying, glue ceramic tiles on one side with liquid nails, and magnets on the other side. You can buy them in the store, pick up magnets according to the thickness. The total thickness of the removable tile should be such that its surface is in the same plane as the surface of the finished wall.
Step 4. Insert the tile into the prepared hole, with the help of magnets it will be fixed.
We first screw the magnets to the frame at a distance that allows the tile to fall into place, plus a small margin
We attach plates to the magnets that will stick to the tile
After that, we apply tile adhesive to the plates and to the entire perimeter, sealed with adhesive tape
It is important to calculate the glue so that it does not get on the unprotected sections of the box.
Now put the tiles back in place.
We fix the tile, fix it with masking tape
Remove the masking tape, open the tile (after 6 hours)
Video about removable tiles on magnets below.
Next, the seam is sealed with silicone in the color of the grout, after hardening it is cut. This completes the work, everything is done quickly and very cheaply. The tile can be removed/inserted an unlimited number of times.
To open the hatch, you need to pry off the tile with any hook
Magnets are shown here. In this example, the master attached them directly to the primed surface of the tile.
For gluing, glue for ceramics and porcelain was used.
Luke on glue
Such hatches are recommended to be installed for revision of the bathroom siphon. If the installation of the bath is done correctly, then you will not have to use the hatch. There are very effective chemicals to clean the drain from grease deposits, and mechanical contamination is very rarely a problem. In case of emergency, a rubber plunger can be used to clean the siphon.


The pre-made hole for the hatch should be 1-2 cm smaller than the size of the tile.
Revision hole in the photo
Screen tiling
Cut tiles if needed
Screen veneer process
It is smeared with glue or silicone in several places, the number of points is not more than two per side, the size is approximately 1 cm2.This is enough for a relatively reliable fixation, at the same time, it will not be difficult to get the tile to open the hatch.
Seams can be rubbed or sealed with silicone
During the dismantling of the tile, it is necessary to cut off the silicone around the entire perimeter, carefully pry the tile with a thin metal plate or knife. In order not to damage the installed tile nearby, place a piece of cardboard or cloth between it and a metal object
Invisible hatch. Tile fixed with glue


