- Features of replacing a heating element in Termex
- Replacing the water heating element
- Features of various designs
- Electric heaters
- Indirect heating systems
- Gas and flow structures
- Do-it-yourself Termex boiler repair
- Replacing the heating element
- Faulty thermostat
- tank leak
- Other malfunctions
- Errors when replacing the heating element
- REPAIR OF THE WATER HEATER WITH YOUR HANDS - REPLACEMENT OF THE CORD
- How to remove and check the heater
- Draining water in the boiler
- How to get a heating element
- Checking an element
- The main types of breakdowns
- Fault types
- Causes of malfunctions
- How to extend the life of your water heater
- How to check if the heating element needs to be replaced in the water heater
- How to remove and check the water heater
- How to get a heating element
- Boiler repair: troubleshooting common problems
- Damage to the integrity of the inner tank or outer shell
- Gasket replacement
- Breakdown of the heating element
- Other boiler malfunctions
- Checking the health of the heating element
- Visual inspection of the element
- Testing with a tester
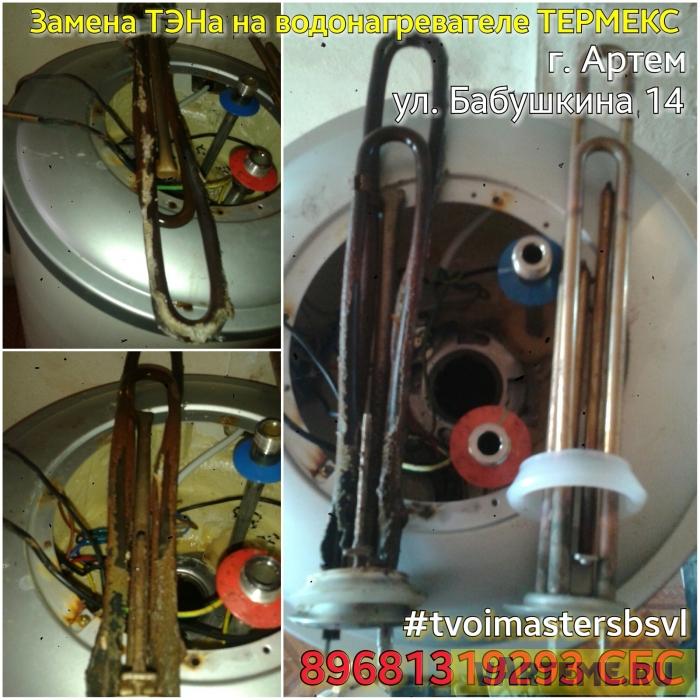
Features of replacing a heating element in Termex
As already mentioned, the company has been operating since 1995 and produces only water heaters of "different" modifications. Why in quotes? Yes, because the difference between the models is minimal and this directly concerns the topic of the article.
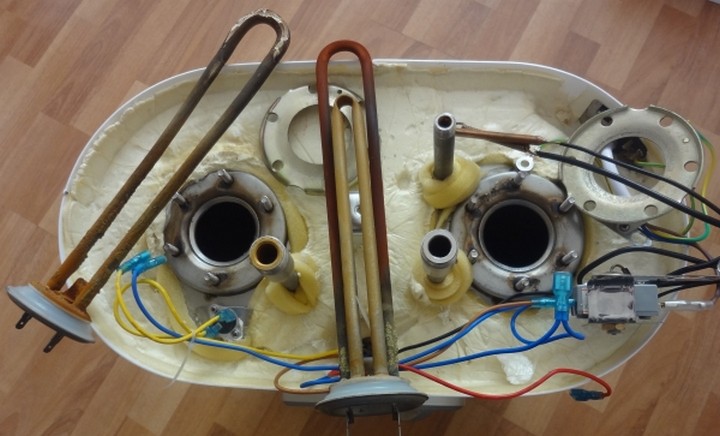
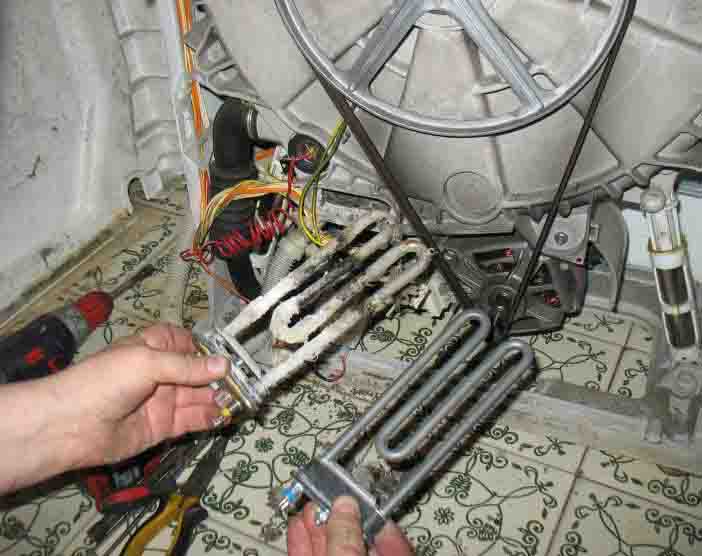
For those who are not in the know, we explain that with each replacement of the heating element in any water heater (if we are not talking about a dry heating element), you need to clean it from the scale formed inside. And in the case of other brands, this can be done through the same heating element mounting flange. This is how, for example, cleaning the boiler looks like when replacing the Ariston heating element (the sight is not very pleasant, but better than with Termex, believe me)
Boiler Termeks you will definitely have to:
- Take off the wall
- fill with water
- Turn over in anticipation that all the "slurry" from the scale will come out
- Repeat steps 2-3 until you have the strength or until clean water flows
There is no way to manually remove the scale!
Another surprise according to customer reviews is that the bolts on the flanges firmly stick to the nuts and there is no way to unscrew them. They are cut with a grinder. Do you have a Bulgarian at home? Didn't come with a boiler? And these 6 bolts are for each heating element, so if you have a 100 liter boiler for two heating elements, then you have 12 chances to use a grinder!
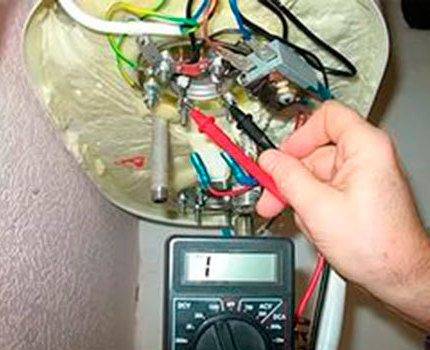
For reliable diagnosis, you will have to remove the cover that closes the heater. Then you can proceed like this:
- Ring the heating element with a multimeter to measure the resistance. The value "zero" on the monitor means a short circuit, and "infinity" means a break in the nichrome spiral, which heats the water.
- Check the heater with a tester with a test lamp. It caught fire - the heater is intact, and the reason for the incorrect operation of the boiler is something else.
You can take the heater out of the box to visually diagnose it for breaks. Descale the surface. This procedure requires accuracy. It is best to soak the heating element in a solution of citric acid (50 g per 1 liter of water).The scale will completely dissolve in about two days, but you can save time: bringing it to a flaky state, clean it with a soft brush.
Replacing the heating element
- insert the thermostat into the heating element;
- find the terminals on the thermostat that supply current, and connect them to the terminals of the tester device.
The call will mean the serviceability of the device, its absence indicates a breakdown of the thermostat.
Replacing the water heating element
First of all, you need to turn off the water supply. Usually the shut-off valve is located near the boiler. If there is none, you can turn off the water in the entire apartment (from the riser).
Each master can choose any of the two methods. The main thing is to stop filling the tank with water. Please note that the DHW tap must also be closed. Next, you need to do the following:
- drain water from the boiler;
- disconnect the device from the mains;
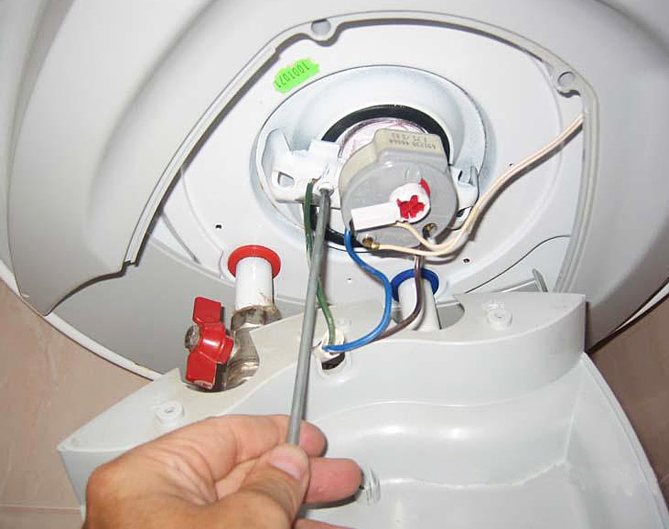
- remove the protective panel, for which a screwdriver is useful;
- using a phase meter, make sure that there is no voltage on the water terminals;
- remove the heating device from the mounts;
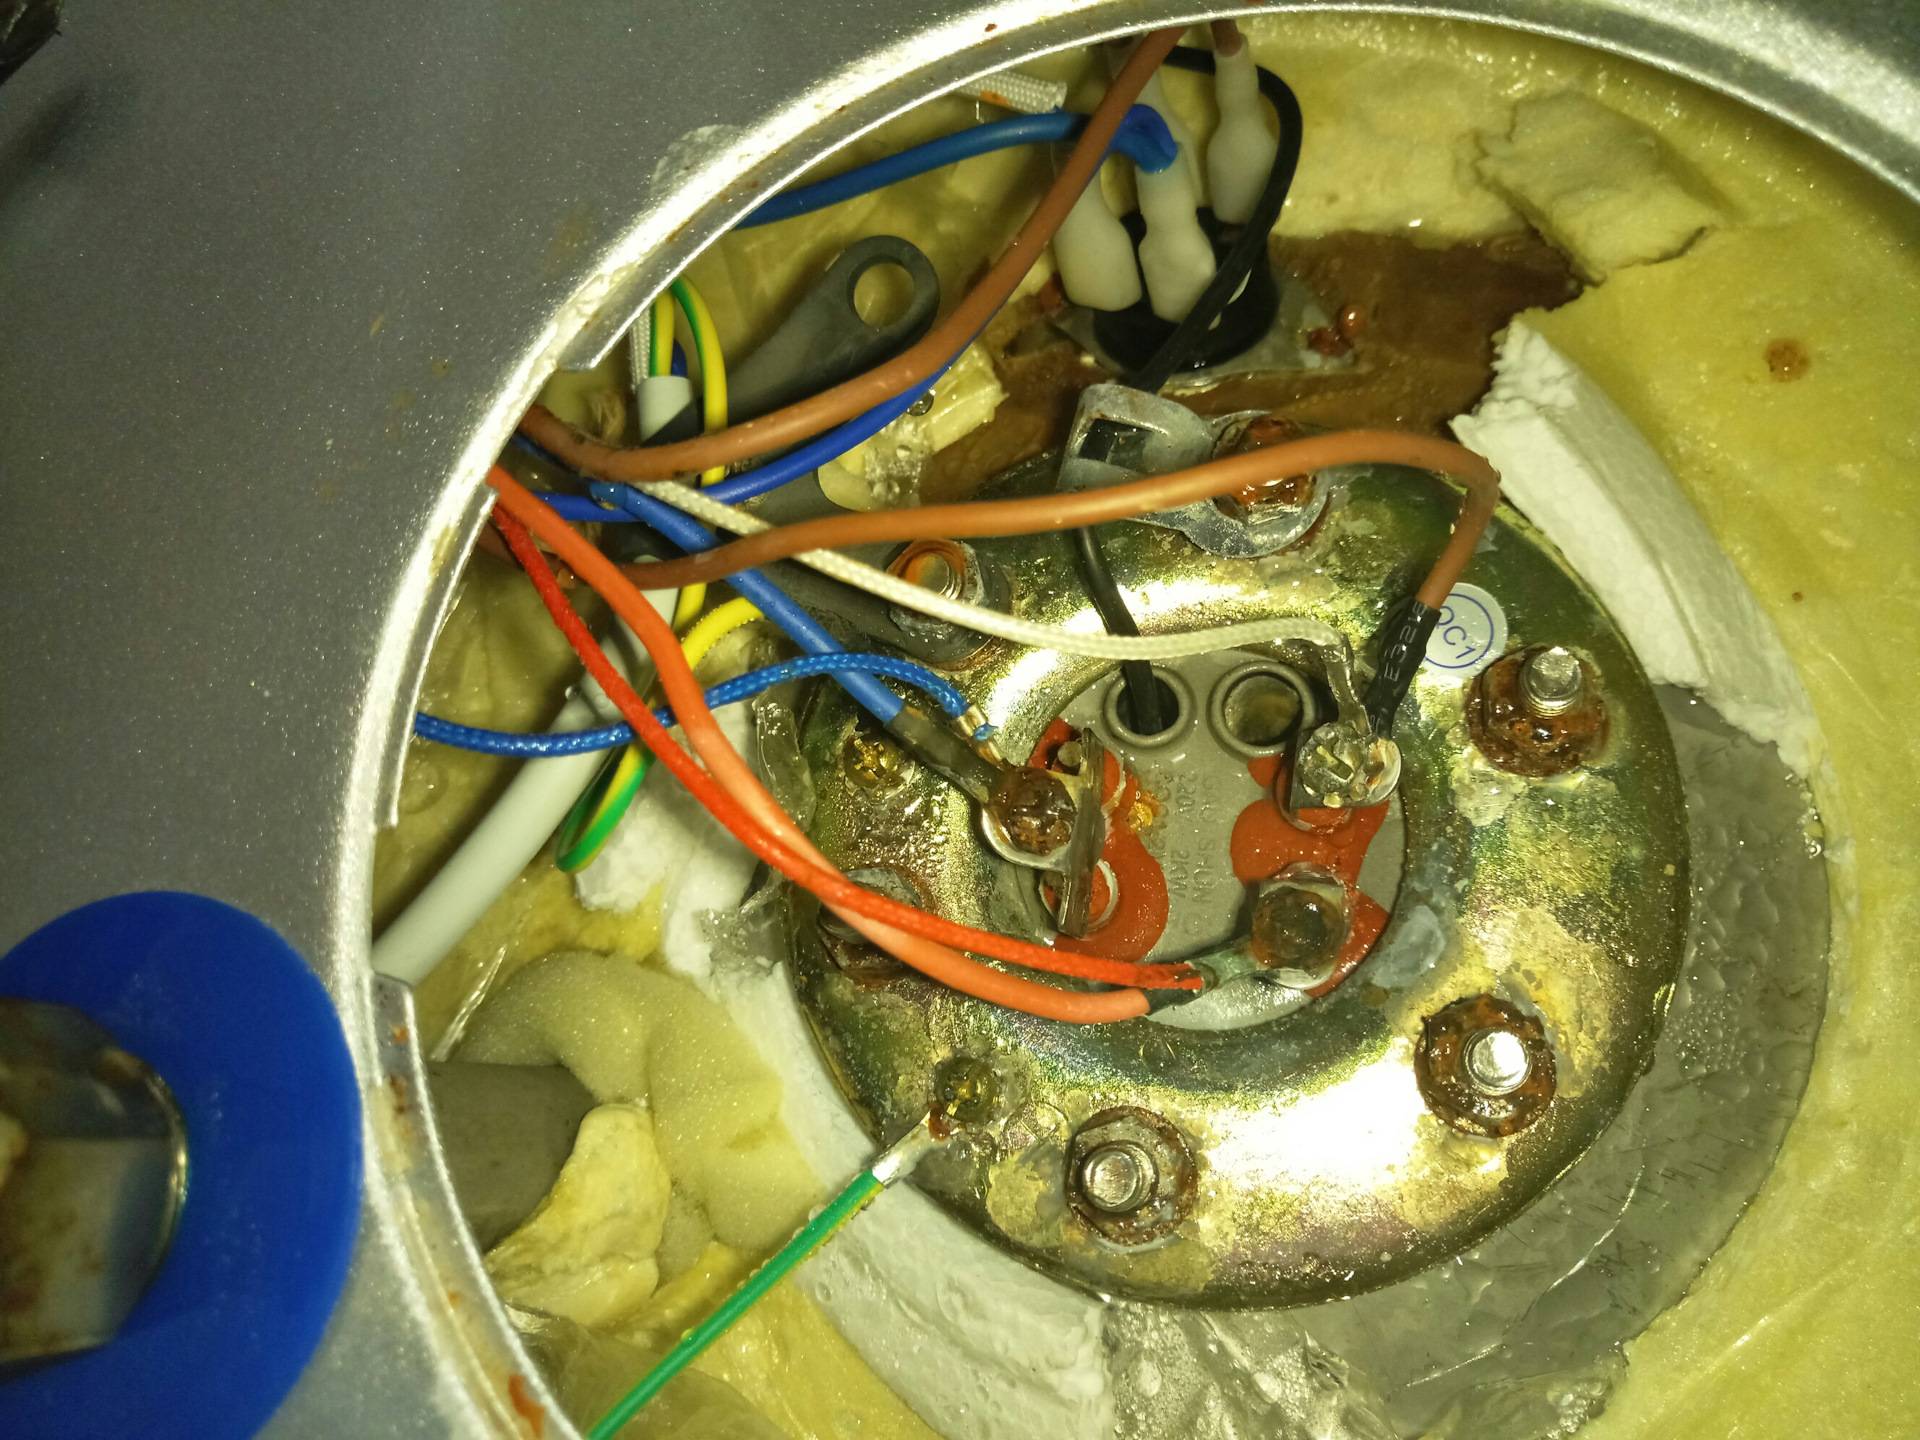
- disconnect the wires - before that, it is better to photograph the original circuit, which will save you from many problems;
- unscrew the nuts securing the heating element.
Together with the heating element, the anode that protects the boiler from rust should also be replaced. Next, you can install new parts. In this case, it is necessary to ensure that their contacts are dry. Indeed, otherwise, there is a risk of a short circuit.
Assemble the boiler in the reverse order
Particular attention should be paid to the electrical connection. A photograph taken earlier will help to cope with this.After all hoses have been connected, the equipment is tested for cold water supply.
Please note that the appliance cannot be plugged into the socket yet. After all, you first need to check if there is a leak. If there are no problems, then after all the air comes out through the hot water tap, you can turn on the device in the network
After all hoses have been connected, the equipment is tested for cold water supply. Please note that the appliance cannot be plugged into the socket yet. After all, you first need to check if there is a leak. If there are no problems, then after all the air has escaped through the hot water tap, you can turn on the device in the network.
What should be paid attention to?
To make the operation of the boiler as safe as possible, there are several points to be checked. First of all, you need to make sure that there is a ground connection. A good solution would be to install a residual current device.
A useful detail is the safety valve. It will not allow too high pressure in the inner tank. Also, the element is useful for draining liquid.
In order to preserve the components of the boiler in the event of a water supply failure, it is recommended to install a check valve on the cold line.
Features of various designs
Before proceeding to do-it-yourself water heater repair, you need to figure out what type the device belongs to. There are several varieties:
- electric boilers;
- flowing;
- indirect heating systems;
- gas columns.
Electric heaters
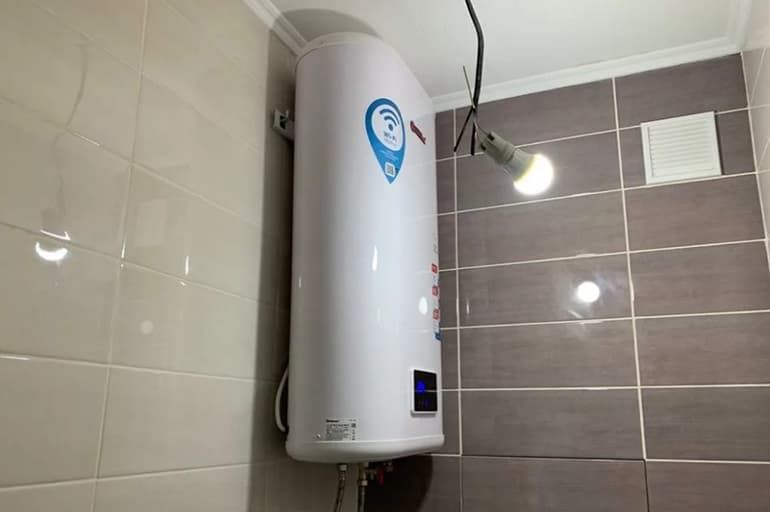
This type of boilers is considered the most popular. The design consists of a tank, a heat-insulating layer (polyurethane foam is often used), as well as an upper casing.
The heating element is located at the bottom of the device. Water is heated to a certain temperature, which is pre-set on the thermostat, the maximum value is +75°C.
If there is no water intake, the device maintains temperature indicators, turning the heating element on and off. It is equipped with protection against overheating, so when the maximum performance is reached, the device turns off.


The optimum temperature value is + 55 ° C, it is in this operating mode that the structure will last longer and save electricity.
 This device is the most common
The intake of hot water is carried out through a tube, which is located at the top of the device. The cold fluid inlet is located at the bottom of the device. The metal tank is protected from corrosion by a special magnesium anode, which has a certain working life. The element must be replaced once or twice a year, depending on the hardness of the water.
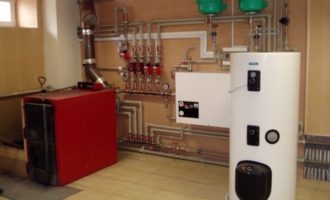
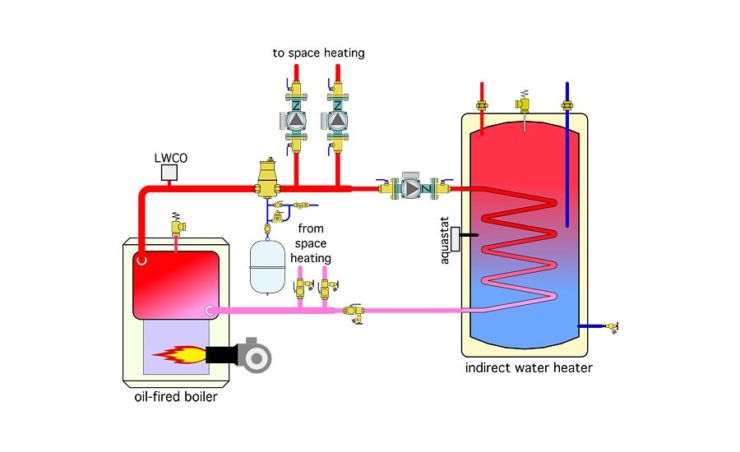
Indirect heating systems
Such products do not independently generate thermal energy, water is heated using a coil in which the coolant is located.
Cold water enters from the bottom of the device, hot water exits from above. Indirect heating devices can provide a large amount of hot water, which is why they are often installed in large houses. The principle of operation is the exchange of heat of liquids with different temperatures. In order for the output to be + 55 ° С, heating is carried out up to + 80 ° С.
The process takes a lot of time, this feature must be taken into account when choosing a suitable device. Like electrical counterparts, indirect ones are equipped with a magnesium anode.The structures are wall or floor, in addition, they can be connected to a double-circuit gas boiler. More expensive models are equipped with additional electric heating elements, which reduce the heating time as needed.
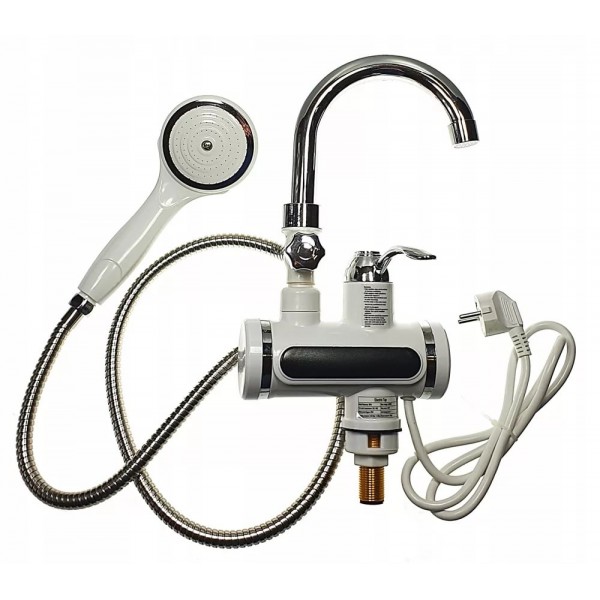
Gas and flow structures
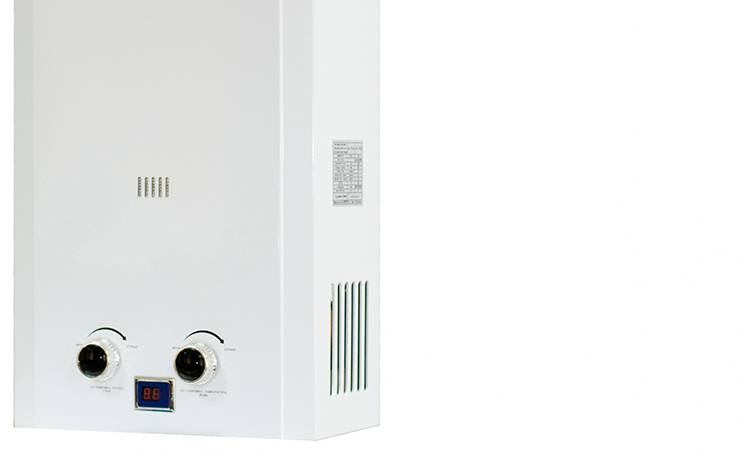
Gas appliances are only wall-mounted. Inside the structure there is a heat-insulating layer. The chimney pipe is located on top, and the gas burner is located below. The latter is a source of heating, in addition, it is assisted by the heat exchange of combustion products. An automatic electronic system monitors and extinguishes the gas as needed. The column is equipped with a protective anode.
Gas water heaters produce a large amount hot water for short period of time.
Electrical systems carry out heating with the help of heating elements of increased productivity. Despite their small dimensions, the products are high-power, so their scope is limited. Hot water is supplied regularly without interruption for heating.
 Gas water heaters are more efficient
Do-it-yourself Termex boiler repair
Before proceeding with the repair, first collect the necessary tools: a set of keys, an adjustable wrench, electrical tape, various screwdrivers, pliers. After that, turn off the water by shutting off the inlet and outlet taps to the water heater. Then drain water from the boiler tank, unplug it from the mains.
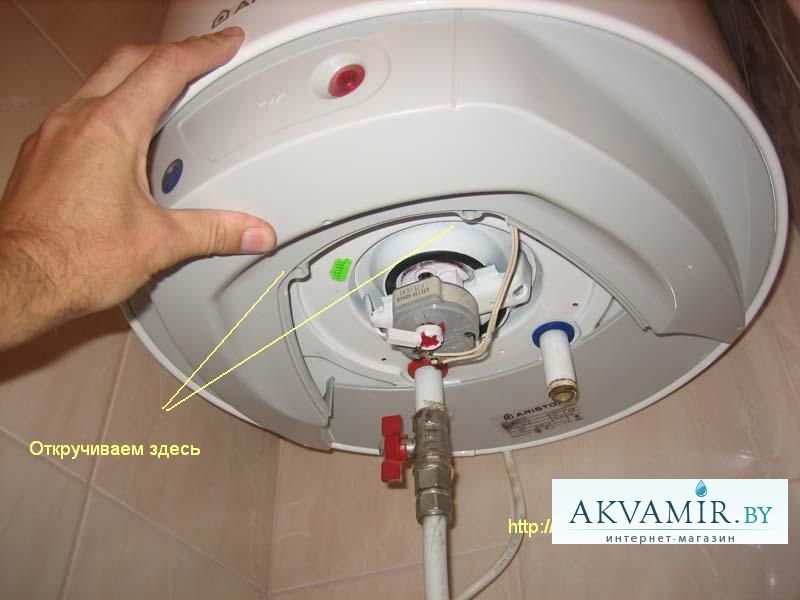
The next step is to remove the protective cover. If you have a vertically located boiler, then the cover is located below, and in the case of a horizontally located boiler, it is on the left or in front.
When dismantling the cover, pay attention to the stickers. Often the screws for its fastening are located under these stickers.
If you've removed all the screws and the cover still won't come off easily, check the stickers again.
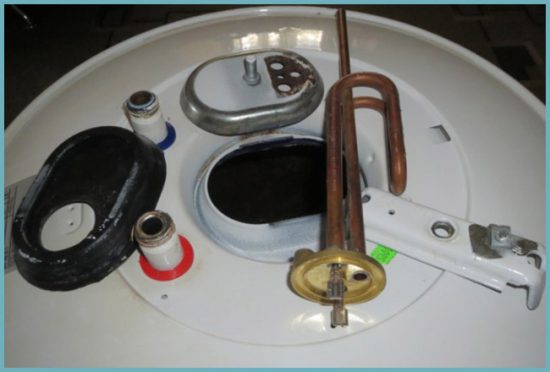
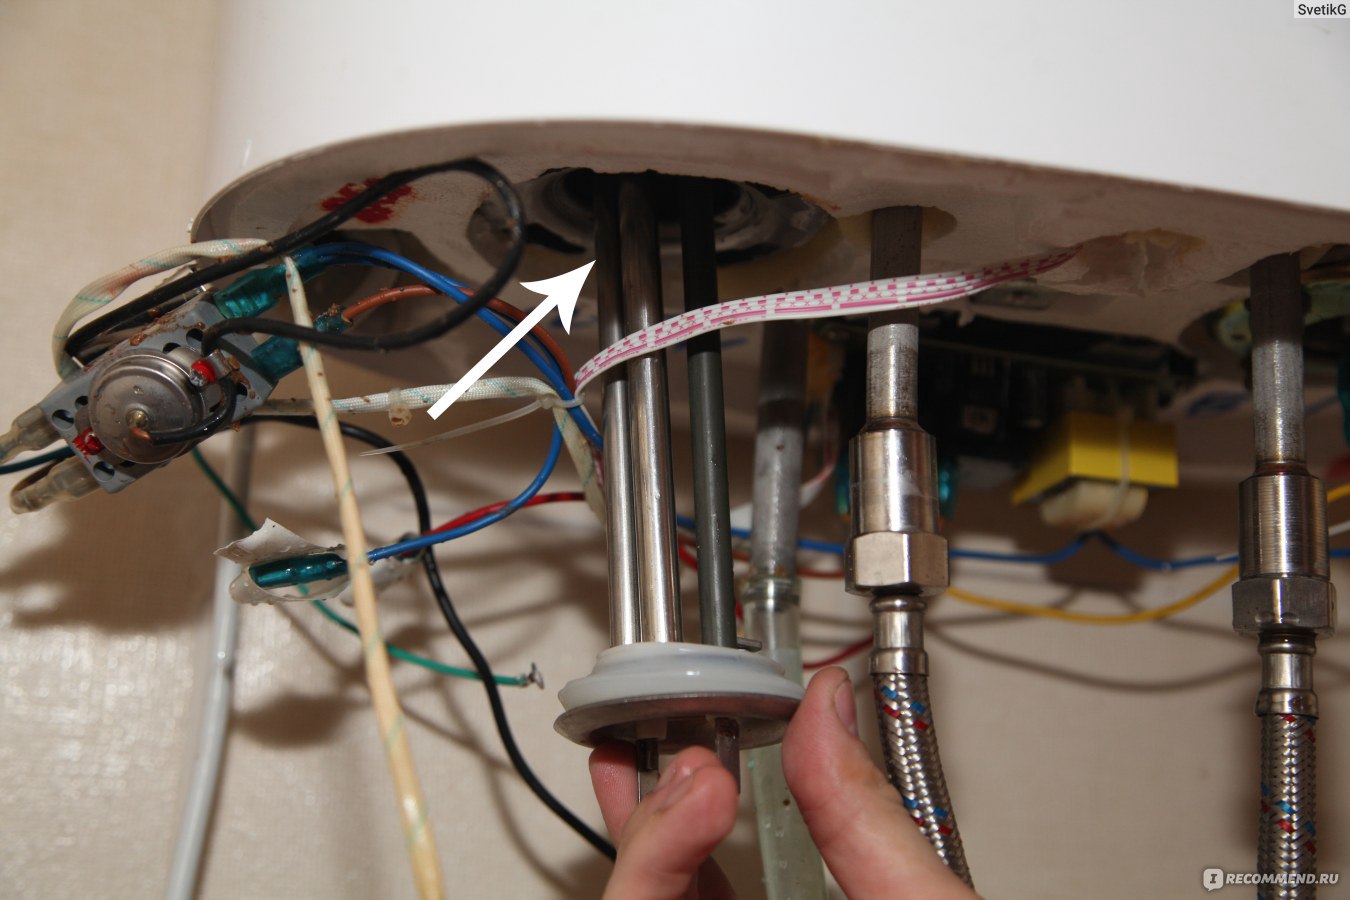
Replacing the heating element
First, perform all of the above steps, remove the tank cap.
To make it more convenient to work, you can even remove the tank from the wall.
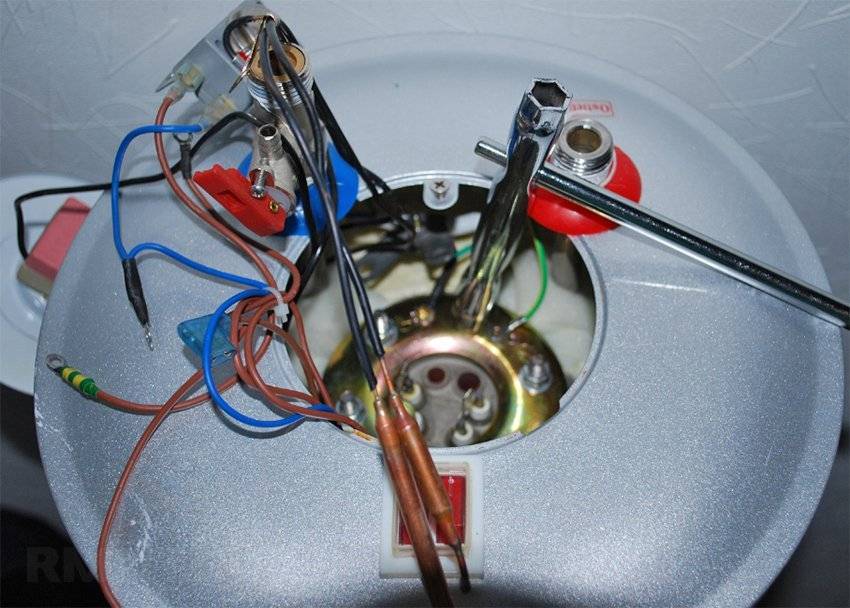
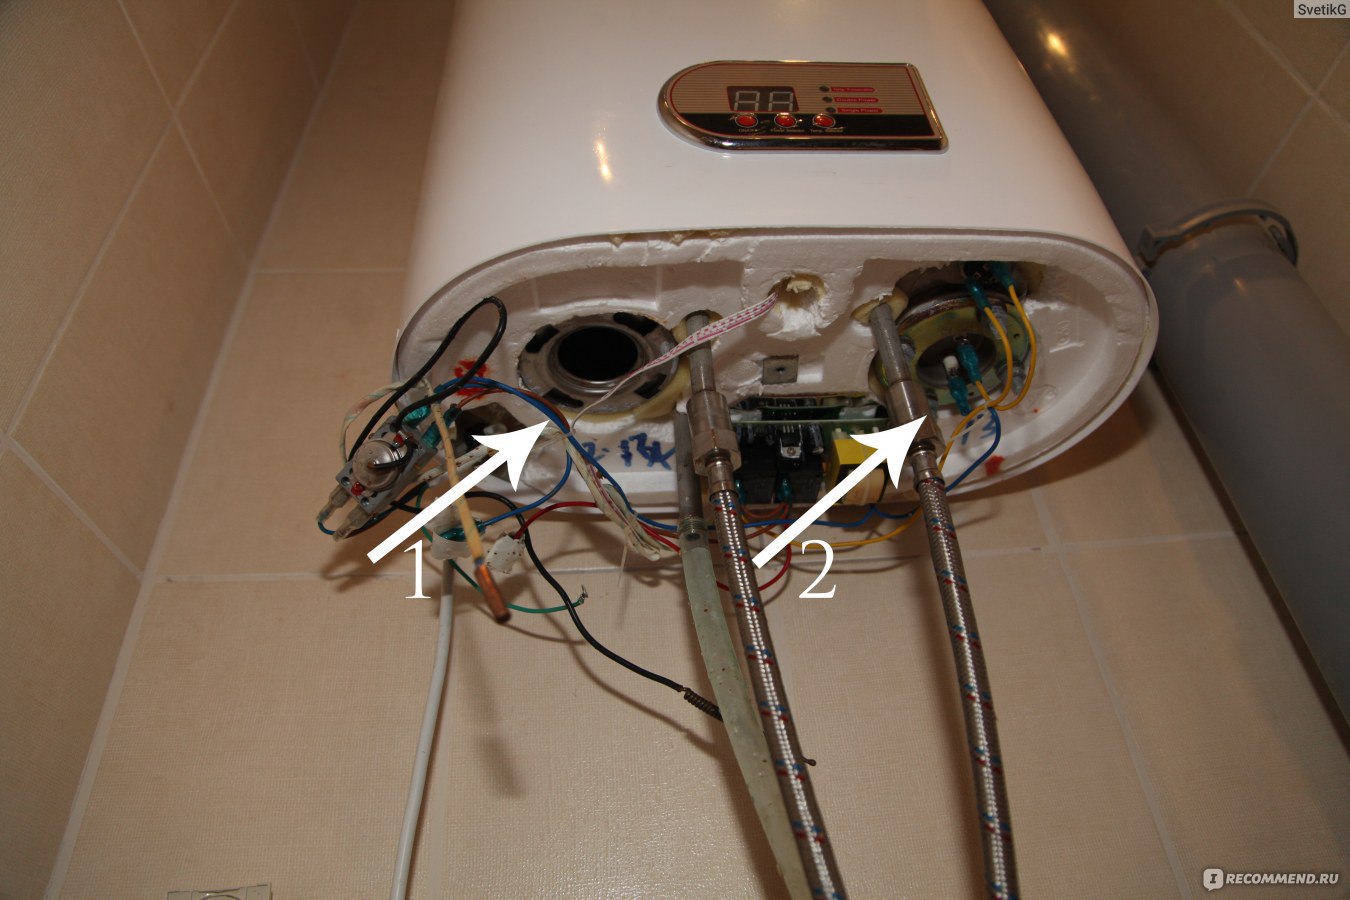
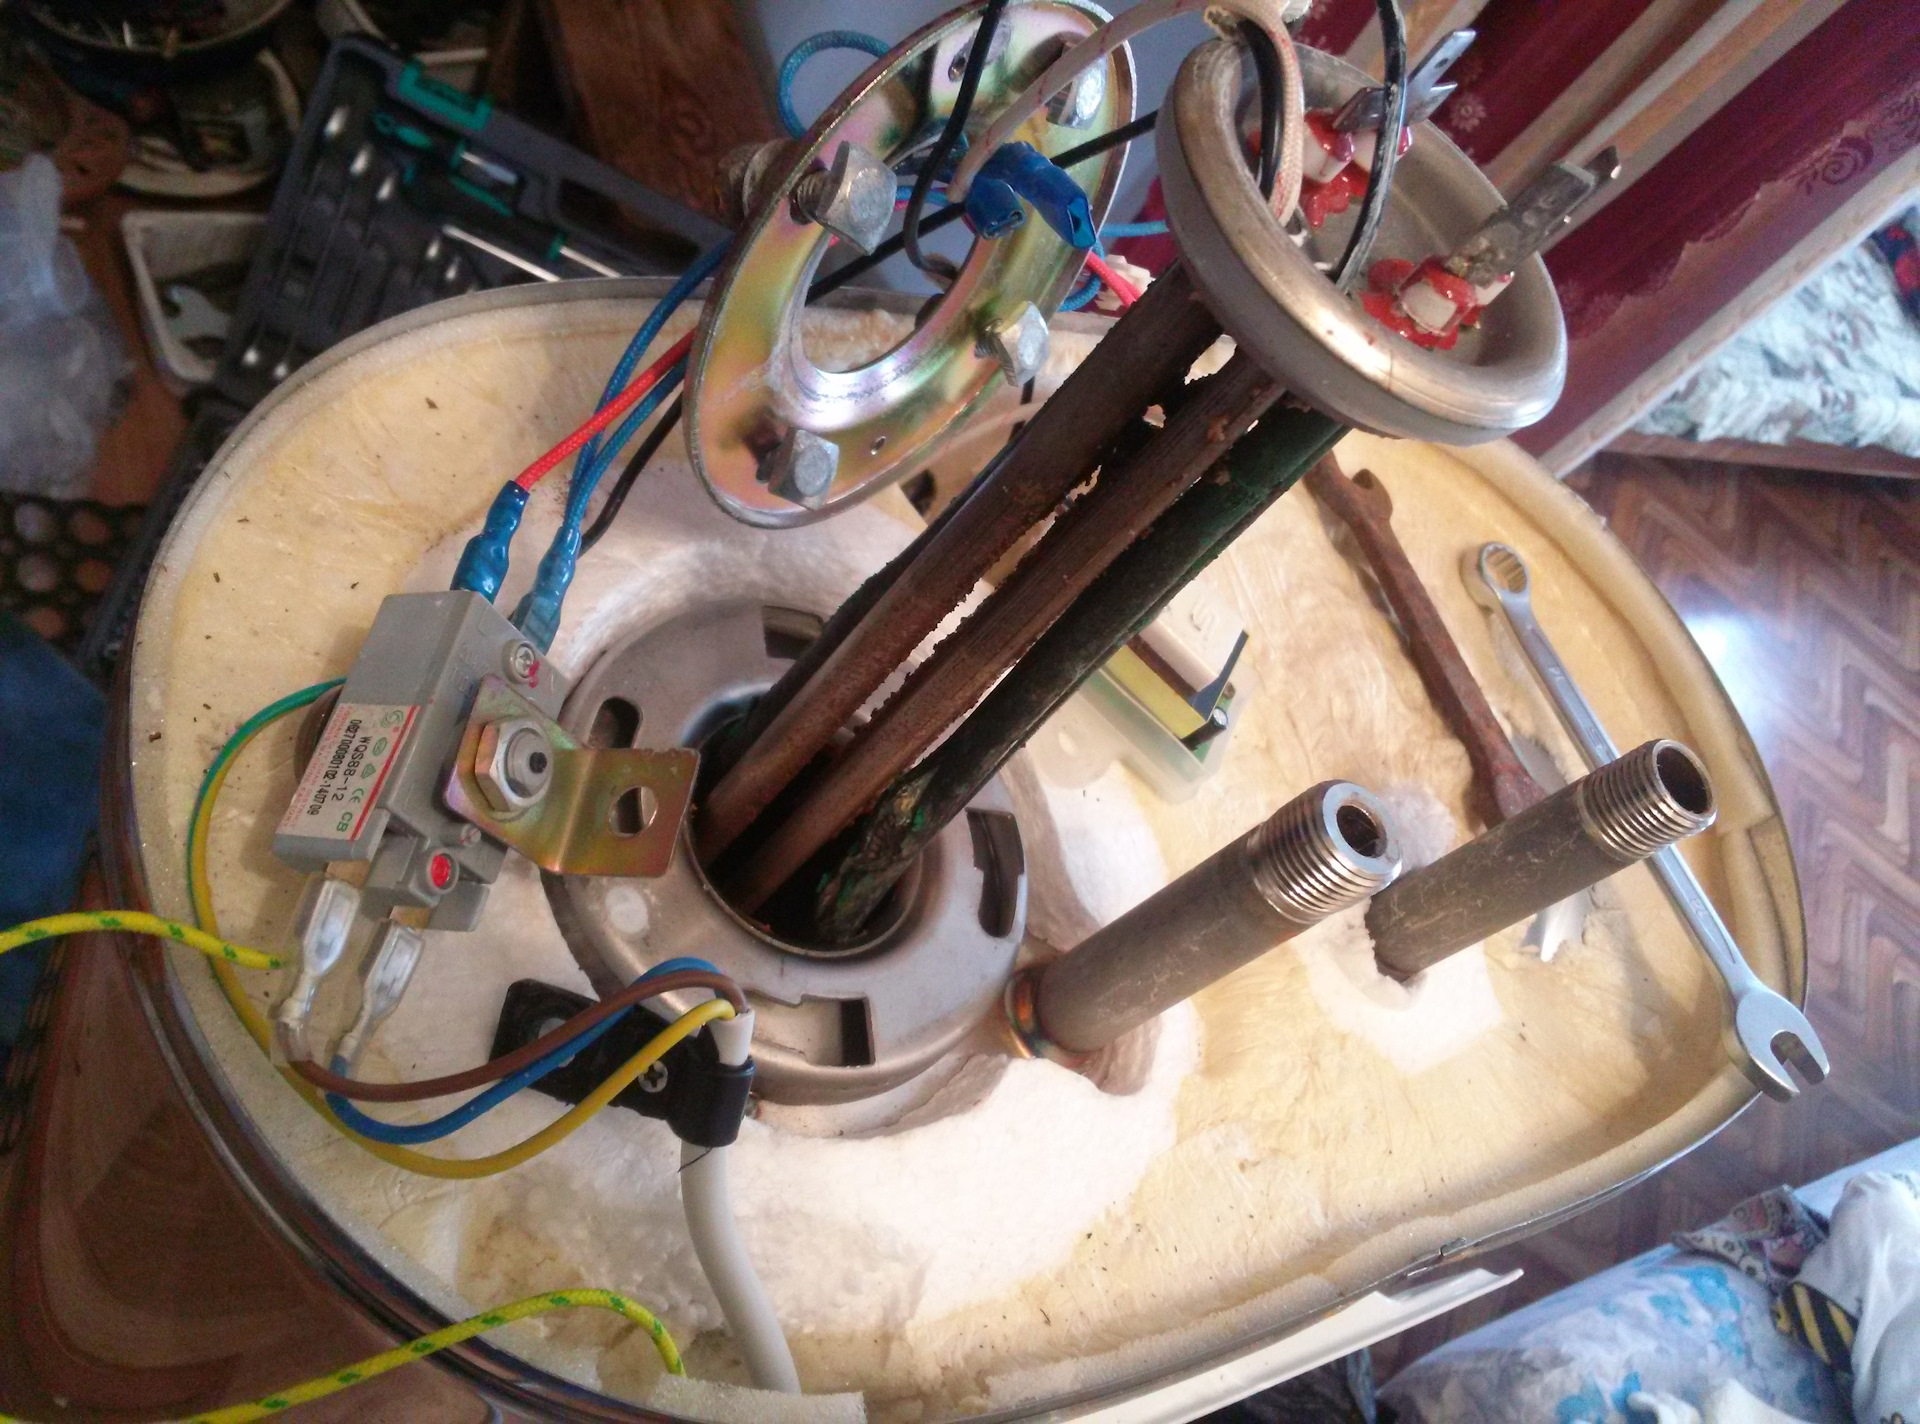
It is worth noting that most Termex models have not one, but two heating elements. Therefore, it is imperative to remember how and in what sequence the parts must be connected. And it is better to photograph the whole process.
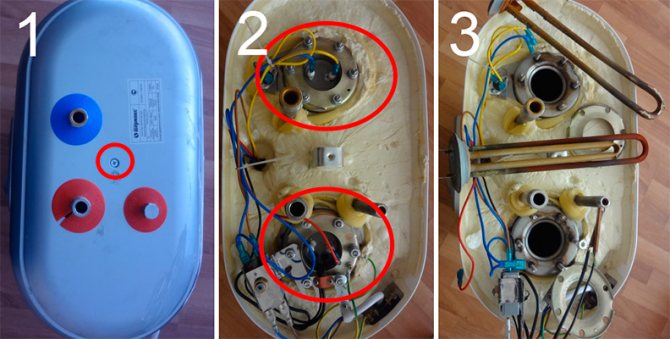
To remove the heating elements from the Termex water heater, remove the top cover by unscrewing the bolt; disconnect all plugs and unscrew the heating element mounting bolts.
The heating element itself is turned off as follows:
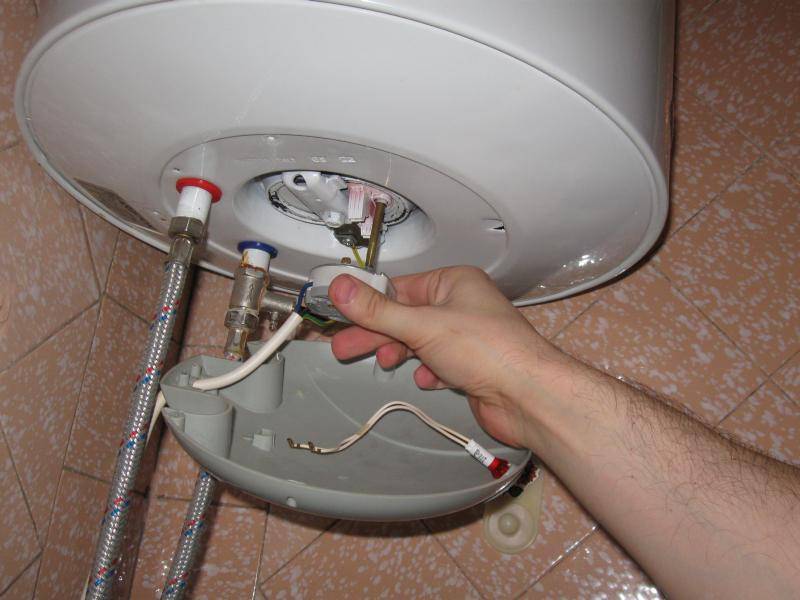
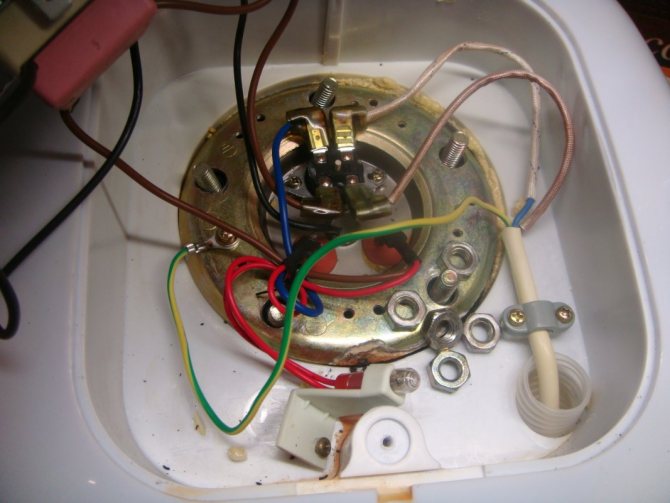
- after removing the cover, find the protective thermostat, remove the tips from it;
- also remove the tips (3 pieces) from the heating element;
- cut the plastic clamp;
- unscrew the screws, while removing the sensor;
- now disconnect the cable and unscrew the four screws;
- then it is necessary to dismantle the nut on the clamping bar and pull out the heating element.
After dismantling the heating element, it is imperative to clean the surface of the tank from dirt and scale. Only after that you can install a new heating element and collect everything back.
Do not forget that the heating element does not always need to be changed. If the water in the tank is still heated, but it happens slowly, then, most likely, scale has formed on the heating element. Then dismantle it and descale it. Then install. The problem should be gone. Also, do not forget that it is desirable to clean the heater with chemicals, and not scrape off the dirt.In the latter case, there is a possibility of damage to the part.
To clean the heating element, you can use a solution of citric acid or vinegar (its percentage in the solution should be about 5%). The part must be immersed in liquid and wait until the scale falls off. Then you need to rinse the heating element.
Faulty thermostat
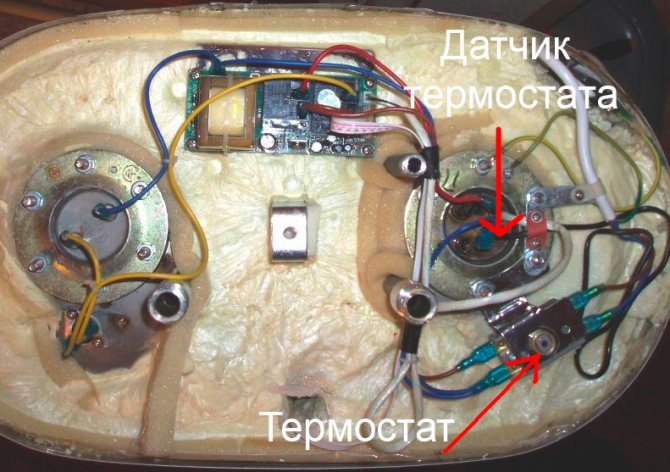
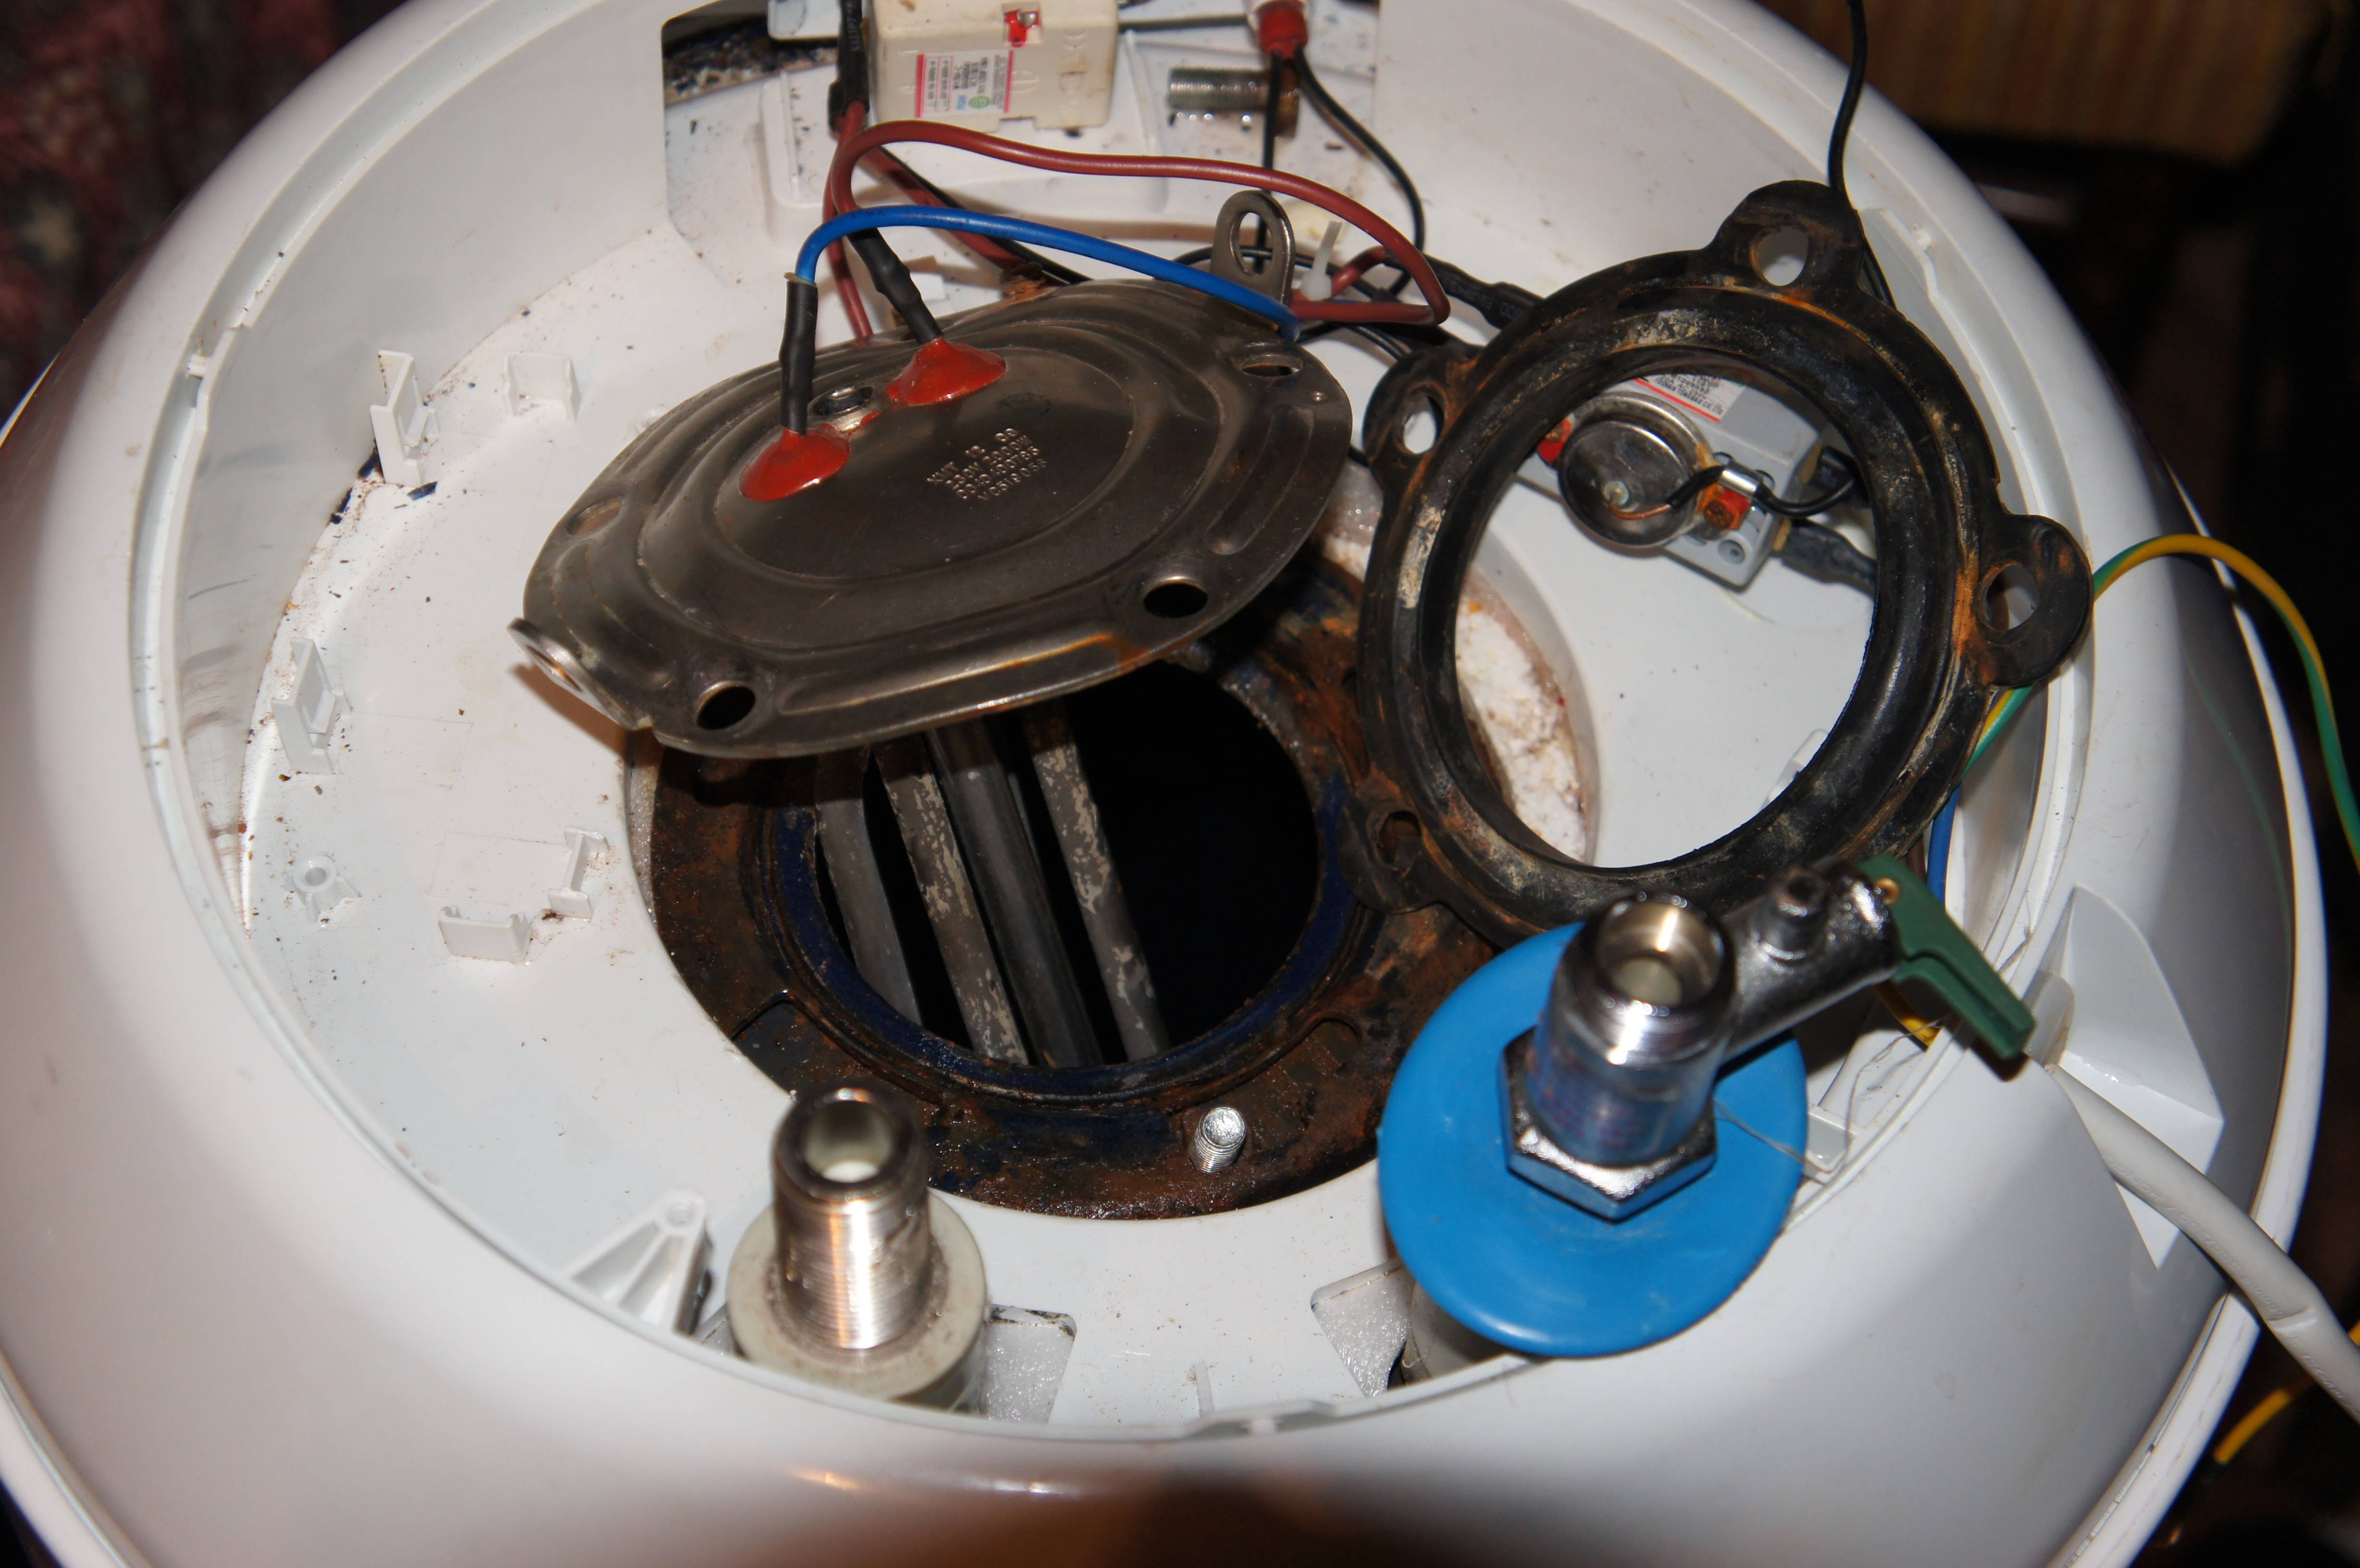
The thermostat in Termex water heaters is located under the cover, next to one of the heating elements, and its sensor is located inside the tank.
Sometimes the thermostat fails. This element cannot be repaired and must be replaced. To replace, you need to make all the preparatory steps, remove the cover, then remove the thermostat. But before dismantling, we recommend checking this part. To do this, use a lighter to heat the tip of the sensor (copper). If the thermostat is working, then you will hear a characteristic click, which means that the protection mechanism has worked and the circuit has opened. Otherwise, you will have to replace the part.
tank leak
No matter how trite it may sound, but first you need to find where the water flows from. A lot depends on this, because if the tank is rotten, you will have to buy a new water heater. So:
- if water oozes from the side seam, then the container is rusted, and repairs cannot be made;
- if water comes out from under the cover at the bottom, then you need to disassemble the tank.
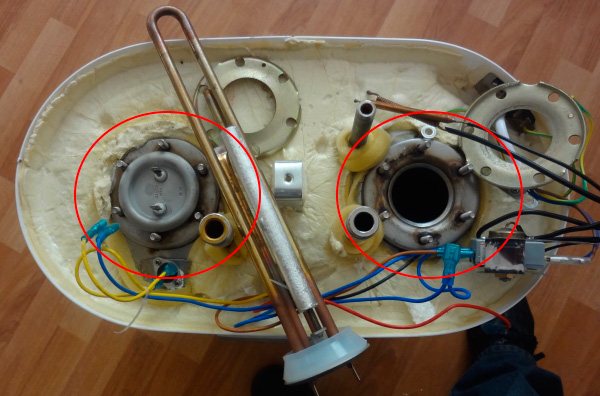
If traces of leakage are located in the places where the heating elements are attached, then your water heater is not hopeless and can be saved by replacing the gasket.
In the case of the second option, complete all the preparatory steps, then remove the plastic cover. Next, take a close look at where the water is leaking. If it comes out near the flange, then the rubber gasket has deteriorated (less often this is a problem with the heating element).Otherwise, the tank has rusted, the boiler can be thrown away. To replace the gaskets, you need to remove the heating element. But at the same time, it is necessary to carefully consider the heating element itself. If it cracked, then it is also better to replace it.


Other malfunctions
If you checked and replaced all the parts, but the boiler still does not work, then it is quite possible that the electronics have failed. The control board cannot be repaired, and it will be extremely difficult to find a similar one in a store. Therefore, in this case, we recommend contacting specialists.
Errors when replacing the heating element
1 Tightening the heating element fastening nuts in a circle. 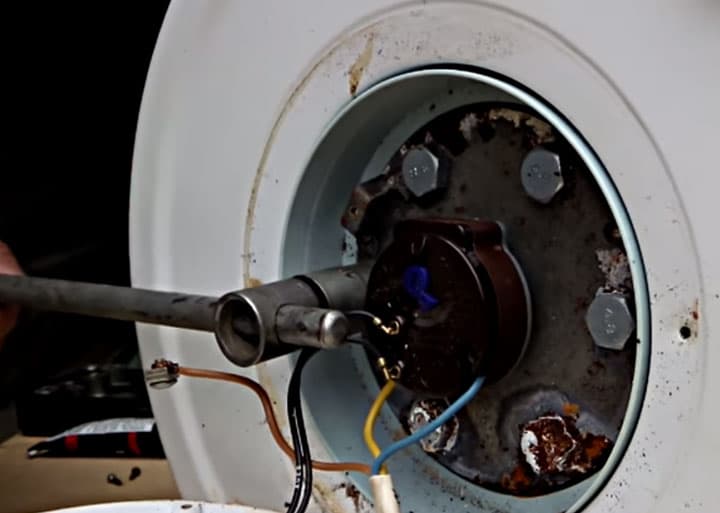
As already discussed in this article, this method will lead to a distortion of the flange and subsequent leakage. That is, you will have to remove the boiler from the wall again, unwind everything and reassemble it.
2 Applying sealant when installing the gasket.
No sealants can be used when replacing heating elements. Tightness should only be created due to uniform pressing the gasket material.
3Using an old gasket. 
No matter how intact it may seem, in any case, at each opening of the heaters, be sure to replace the sealing elements.
4Replacing only the heating element without replacing the magnesium anode.
Even if you did not find a suitable anode in your store, never install heaters inside the tank without it. Not only does this reduce the service life of the heating elements, in the end it all ends with the burnout of the boiler tank body. 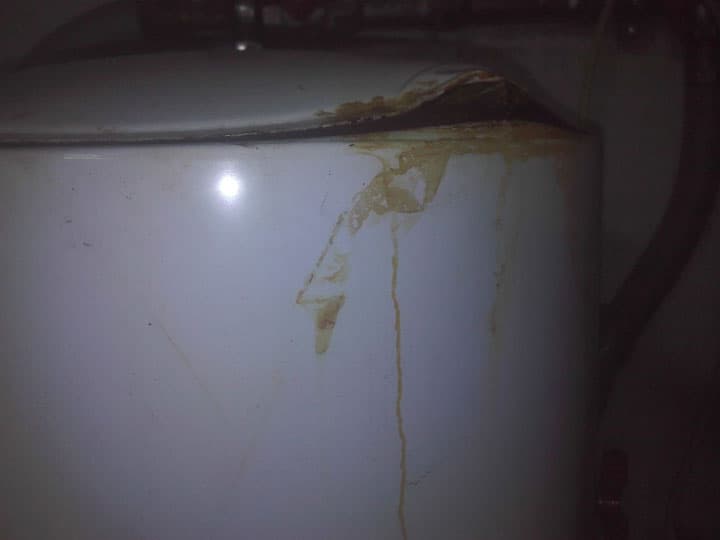
Then a leak appears, without the possibility of recovery or repair.
True, in some expensive models of boilers there are titanium anodes with electronic potential removal. 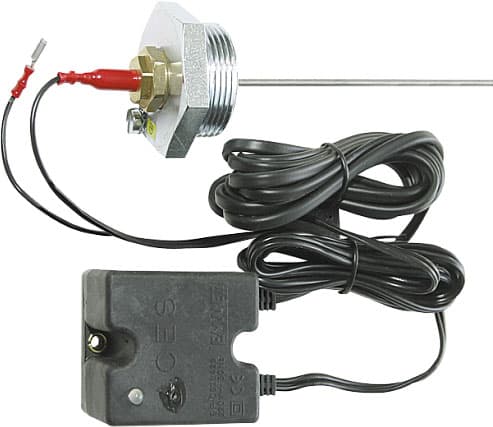
They just do not require replacement.Therefore, before unscrewing anything, carefully study the product passport.
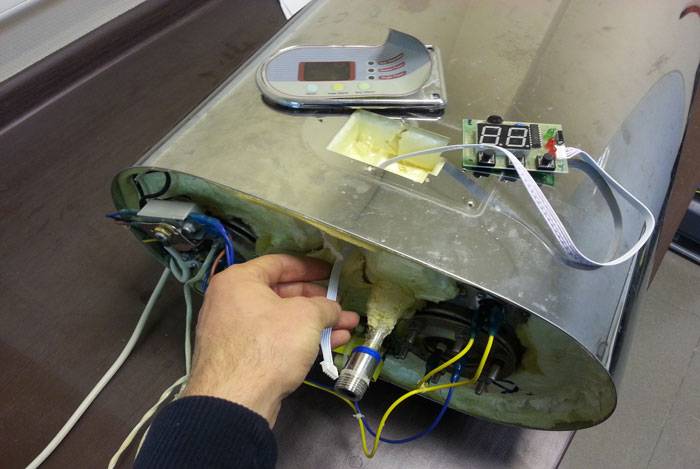
5Control board. 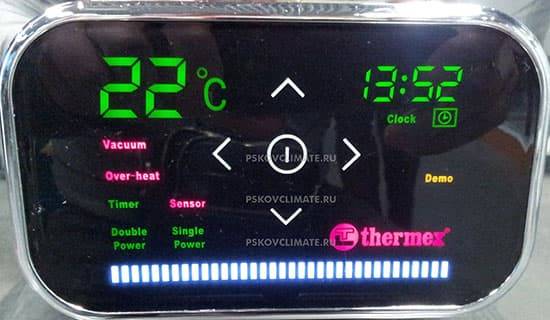
When flushing the tank and draining the water, be very careful, you can accidentally flood the electronic control board with the display, which is located on the side of the case, with water. In this case, the boiler simply will not start after turning on.
You will look for a reason for a long time, ringing all the terminals, and it will literally lie on the surface. You can soak this board even in the inverted state of the boiler. 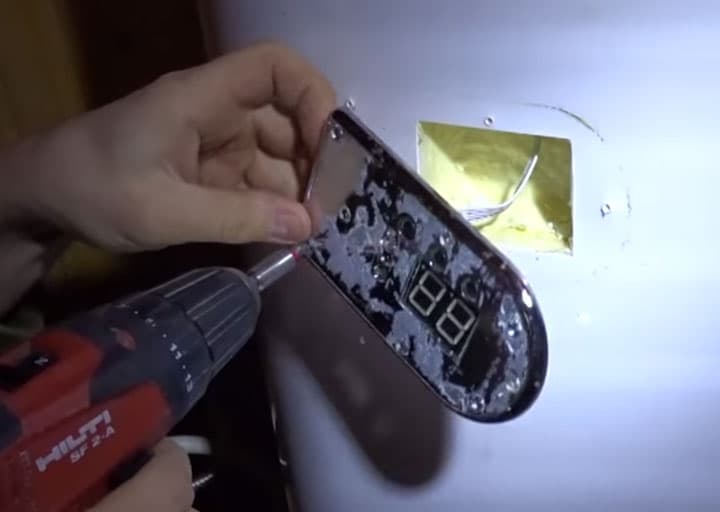
Look closely at the hole where the lone control wire goes. 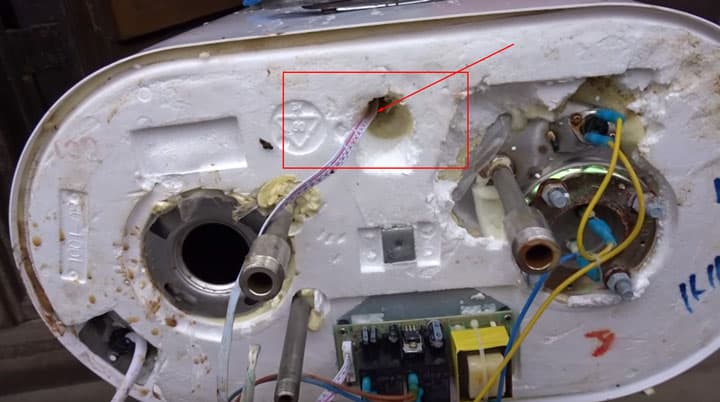
Water can simply flow down it directly to the electronics. So, initially, even before pulling out the heating elements, it is best to close this hole by stuffing any sealant there.
REPAIR WATER HEATER OWN HANDS – CORD REPLACEMENT
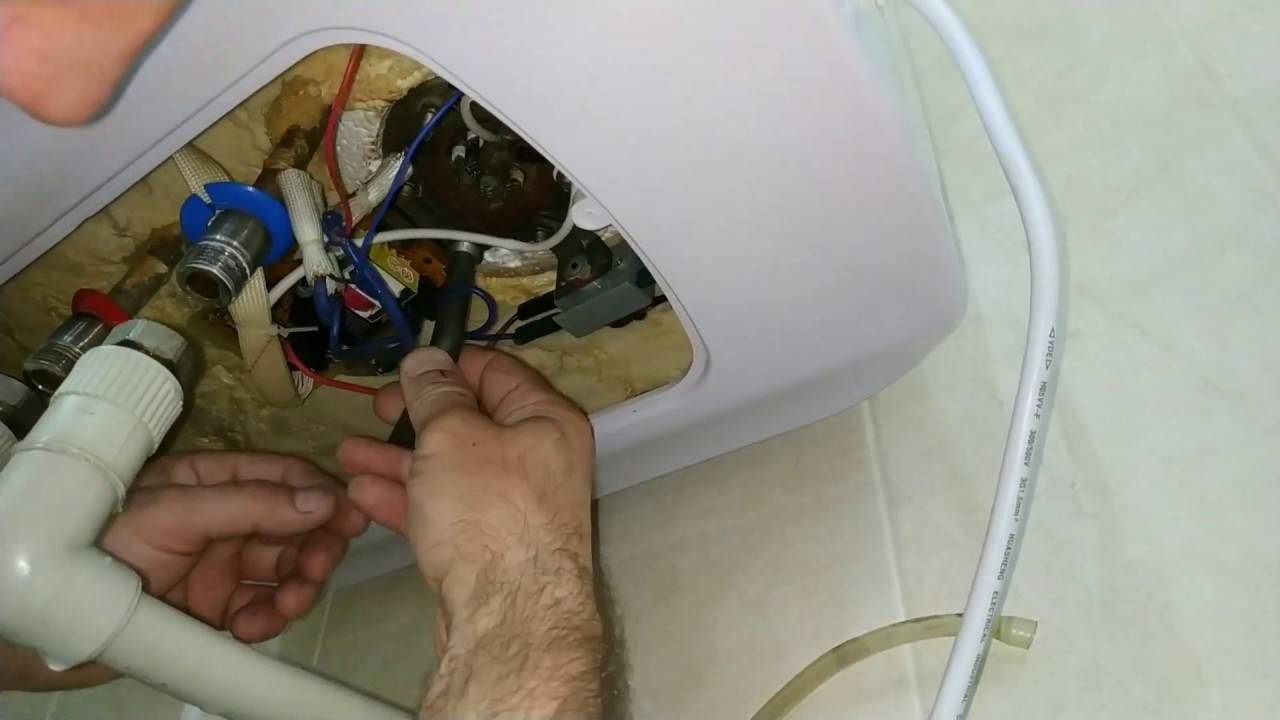
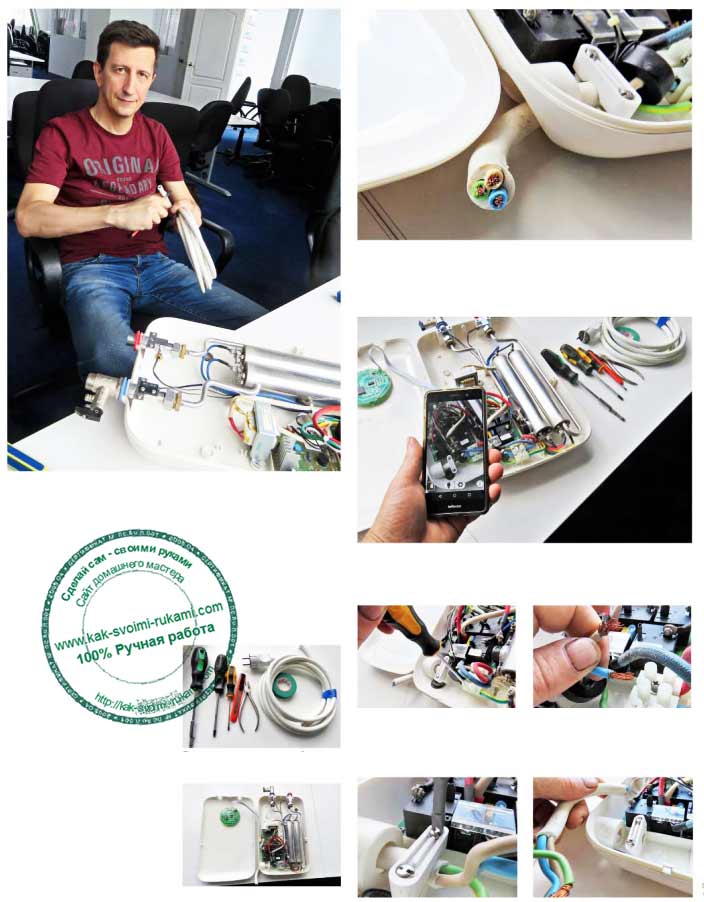
When a colleague of mine was moving, someone cut the power cord from a practically new instantaneous water heater. There are suspicions that this is the work of her ex-husband. But whoever did it, plugging the heater into the outlet will no longer work. Gotta do it.
In the workshop, only 2,000 rubles were asked for the installation of a new wire. But the amount to my colleague seemed overpriced. I took over the repairs. Everything you need was found at the nearest radio market. After a thorough study of the interior of the heater, it turned out that the screws that fix the wire at the exit from the housing have a tricky head. You can’t unscrew them with a simple screwdriver - you need a “horned” bit. This was found in the stall where I bought the wire. You can start repairing.
Here's what I needed to fix.
The body of the heater opens easily, the lid is fastened with two plastic latches.
Here's a piece sticking out of the hull. I have to say, it helped me a lot. “Sawed off” a piece from him, I went to choose a new wire. It’s very convenient when you have a sample: you definitely can’t go wrong when buying!
Before installing a new wire, it is better to take a picture of the wiring, for example, on a smartphone, so as not to confuse where to connect which wire.
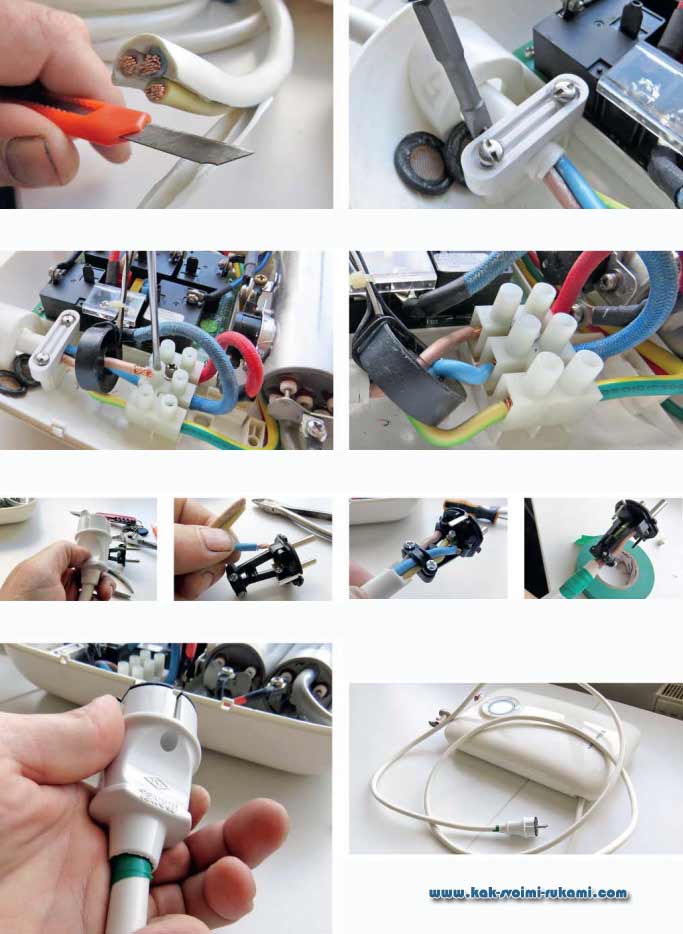
We unscrew the screws in the connecting block to remove the piece of the old wire.
We take out the ends.
We unscrew the screws that fix the wire at the output.
Remove the old wire.
Using a regular clerical knife, we clean the ends of the new wire.
We insert the stripped wires into the block and fix them by tightening the screws.
We insert a new wire and fix it at the output.
The new wire is connected.
We put the case on the wire.
We clean the ends of the wire.
We connect the wires.
To do this, unscrew and tighten three screws. We also fix the wire with a bar with two screws.


I recommend additionally securing the plug body to the wire. We wind a little electrical tape on the wire.
Now the case has sat down with an interference fit - you can no longer pull the wire out of the plug.
The wire is connected - you can install the heater in its place.
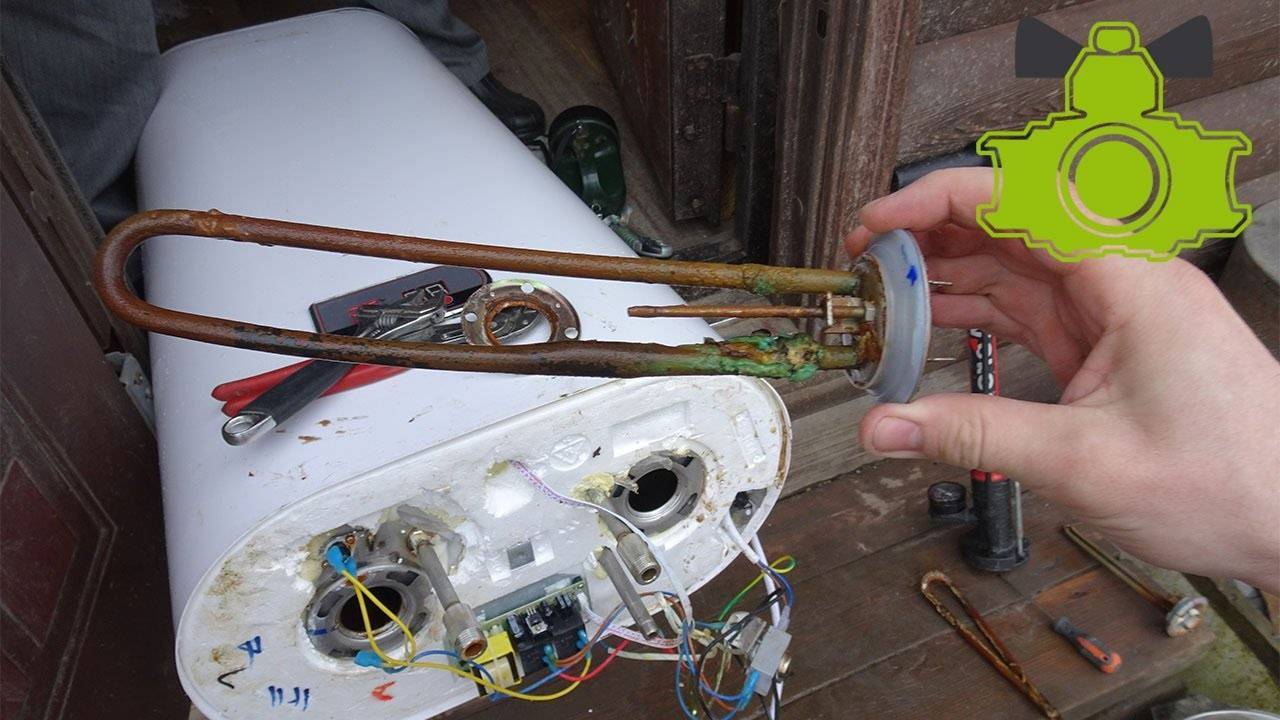
How to remove and check the heater
Most often, heating elements break in storage boilers, because they are constantly in the water. Regardless of the volume (50, 80 liters and more), various factors can affect the life of the part:
- The frequency of use of the boiler.
- Maximum heating temperature.
- Water quality.
Why do parts burn out? This happens when turning on equipment without water. Although most manufacturers warn this moment by the design features of the tank. Therefore, the main reasons for the heater to burn out will be water with a large amount of impurities and scale. The sediment covers the element in several layers, interfering with normal heat dissipation. As a result, the heating element overheats.

How to pull out the heater with your own hands? First of all, disconnect the boiler from the mains.
Regardless of the brand ("Polaris", "Elenberg" or "Termex"), turn off the machine in the shield. Now start draining the water.
Draining water in the boiler
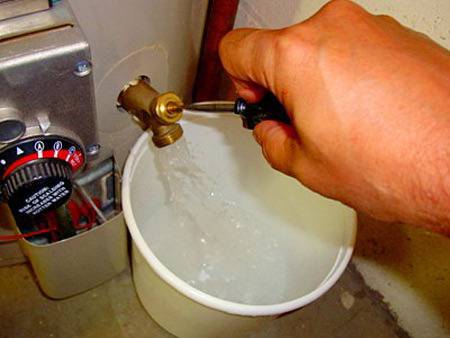
There are several ways to delete content. Through check valve:
- Substitute a deep container under the valve or connect a hose and lower it into the chamber.
- Open the valve and let the water drain.
- With a tank volume of 30 liters, the procedure will last at least 1 hour.
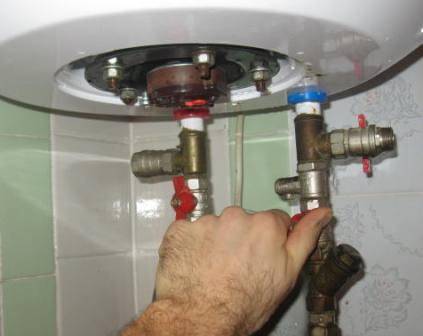
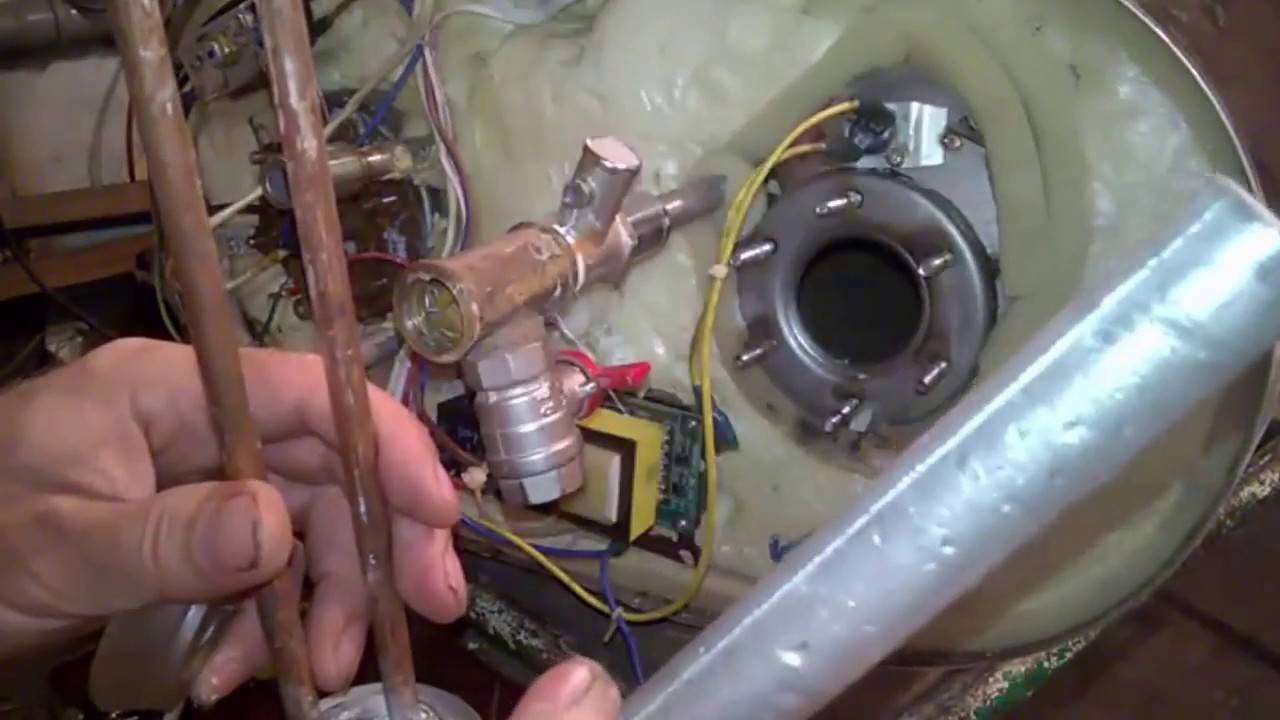
With a volume of more than 80 liters, it makes no sense to wait so long. Drain through the boiler inlet.
Close the water inlet valve.
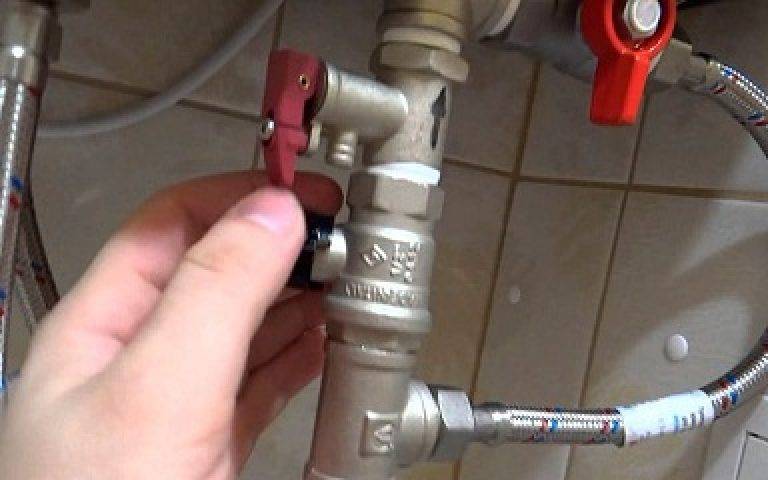
- Unscrew the cold water supply hose.
- Remove the valve.
- Unscrew the hose from the tank outlet.
- Open the boiler valve.
Substitute the container, and the contents will drain in a few minutes.
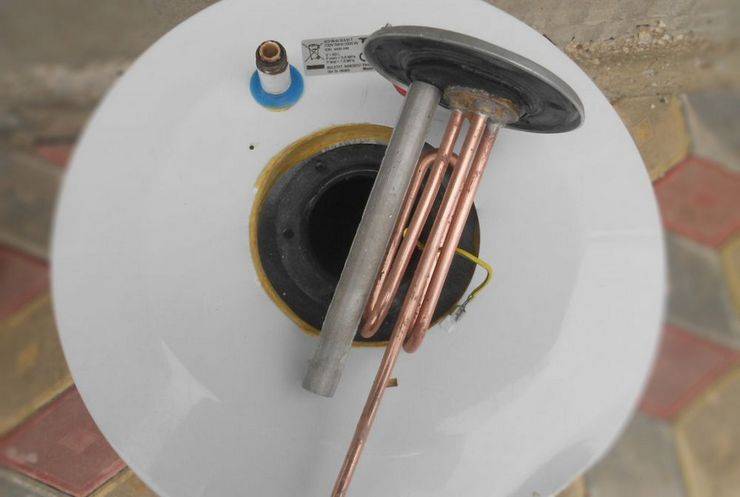
How to get a heating element
Now it's time to start dismantling the part, for this it is better to remove the equipment from the wall. The exception is models where the elements are located below. Proceed in sequence:
- First, disconnect all hoses that are connected to the body. Be careful: water can pour out of them.
- Remove the body from the hooks and lower it to the floor.
- Remove cover. Depending on the model, it may be located in different ways. Better take a look at the manual.
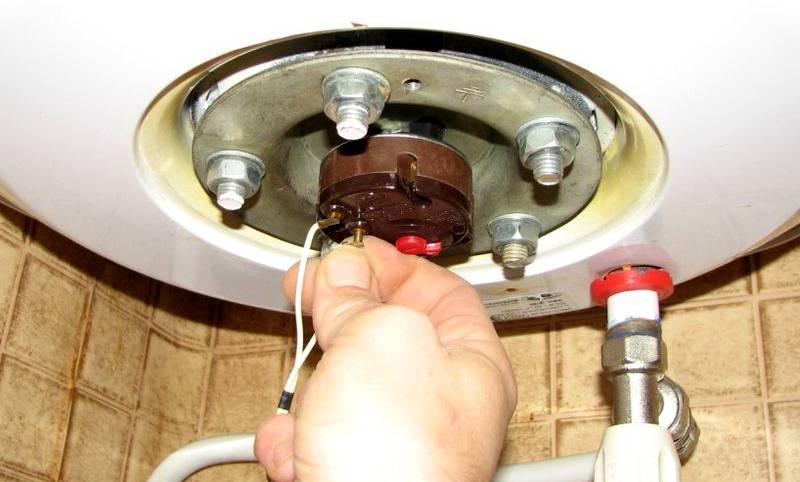
- Remove the decorative washers from the nozzles. They are in the Termex heaters.
- Using a Phillips or slotted screwdriver, unscrew the screws or unfasten the latches.
- Disconnect the thermostat wiring first. Take a photo of it beforehand to make the correct connection.

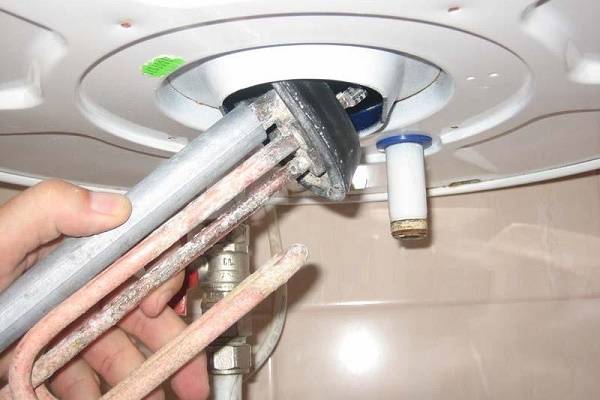
So, the heater is in your hands. Start diagnosing.
Checking an element
The first step is a visual inspection. Assess the general condition, the amount of scale and the integrity of the hull. If the insulation is broken, only replacement will help.
To diagnose with a multimeter, you need to determine the resistance of the element of your model. To do this, look in the instructions for the power of the device. Then do calculations using this formula:
Attach the multimeter probes to the heater contacts and see the result. If it matches the calculations, everything is in order. If the screen shows 1-0 ohms, a short circuit or open circuit has occurred.
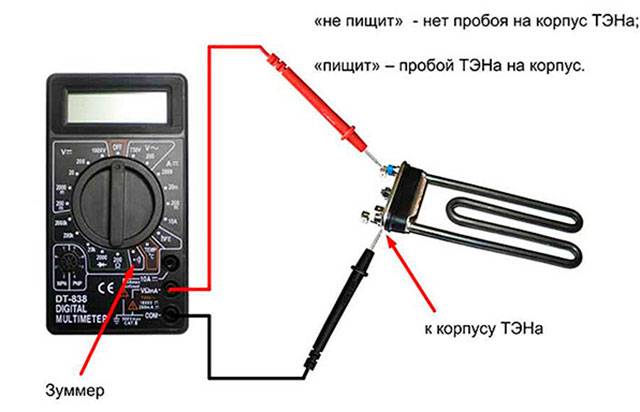
Next, the breakdown on the body is calculated. The primary sign of such a breakdown is considered to be water, which beats with current. A small discharge can be obtained from touching the tank.
Set the tester to buzzer mode. Attach one probe to the contact of the part, the other to the body. Does the tester beep? There was a test.
For the next test, you will need a megger. Set the range to 500 V. Connect the probes to the contact and body. Readings greater than 0.5 ohms are considered normal.
How to change the heating element? A new part must be selected in accordance with the model. The serial number can be found in the instruction manual. Installation is carried out in the reverse order.


The main types of breakdowns
The functionality of the device may be impaired for a number of reasons. Characteristic signs testify to the malfunctions of the heating element.
Fault types
The following phenomena are observed:
- The water takes a long time to heat up.
- The liquid does not reach the correct temperature.
- The user is “pinched” by the current.
- The heating element often turns on.
- During the heating process, a hiss is heard.
- At the outlet, the water has an uncharacteristic smell and color.
If the water is heated for a long time, does not reach the desired temperature, this indicates a breakdown.
The boiler should be stopped and repaired.
Causes of malfunctions
Heaters are subject to the following types of breakdowns:
- Burnout.
- Scale growth.
- breakdown of insulation.
The substance has a low thermal conductivity, as a result of which:
- The heater is overheating.
- The rate of heat transfer to the water decreases, which increases the duration of the product.
With a large thickness of scale, the heater may burn out.
This is a consumable: it gradually dissolves and therefore requires regular replacement. The average life of this part is 15 months.
How to extend the life of your water heater
For long-term operation of the storage water heater, certain rules must be observed. When connecting the water supply, it is advisable to install a reducer that can reduce the pressure to the desired level. This value should not exceed 6 atmospheres. To clean the incoming water, you can install a special filter.
The boiler will work for a very long time if maintenance is done on time. To exclude local overheating, scale can be removed from the surface of the heating element with citric acid. Additional services include a number of activities:
- check the condition of the magnesium anode, replace it;
- clean filters;
- avoid maximum heating;
- check the operation of the check valve;
- turn off the device at night.
If the boiler will not be used for a long time (2-3 months), it is advisable to drain all the water, turn off the water supply.
Water heater Climate technology
How to check if the heating element needs to be replaced in the water heater
Every electrical appliance has its own lifespan, and the electric water heater, unfortunately, is no exception. One of the possible problems that occur with such devices is the failure of the heating element (heater). The issue of diagnosing and eliminating this malfunction will be discussed in detail below.
How to remove and check the water heater
A signal that the heating element in the boiler could fail is the lack of reaction of the drive to turning on or knocking out the RCD. If everything is in order with the electrical wiring, there is electricity in the house, and the socket into which the heater is connected is working, it is worth checking the internal electrical circuit of the unit.
The sequence of actions is as follows:
- it is necessary to disconnect the device from the mains, and then unscrew the housing cover, behind which the electrical unit is located;
- if visual contact did not reveal a malfunction, there is every reason to diagnose the heating element;
- first check the thermostat, it may have turned off due to overheating - in this case, you must return it to working condition by pressing the button;
- the next step - you need to rid the heater of the contents: to quickly drain the water, it is recommended to disconnect its inlet and outlet from the nozzles, substituting an empty water container under them;
- if the installation diagram provides for a regular drain, you should open the corresponding taps and wait until the liquid is discharged;
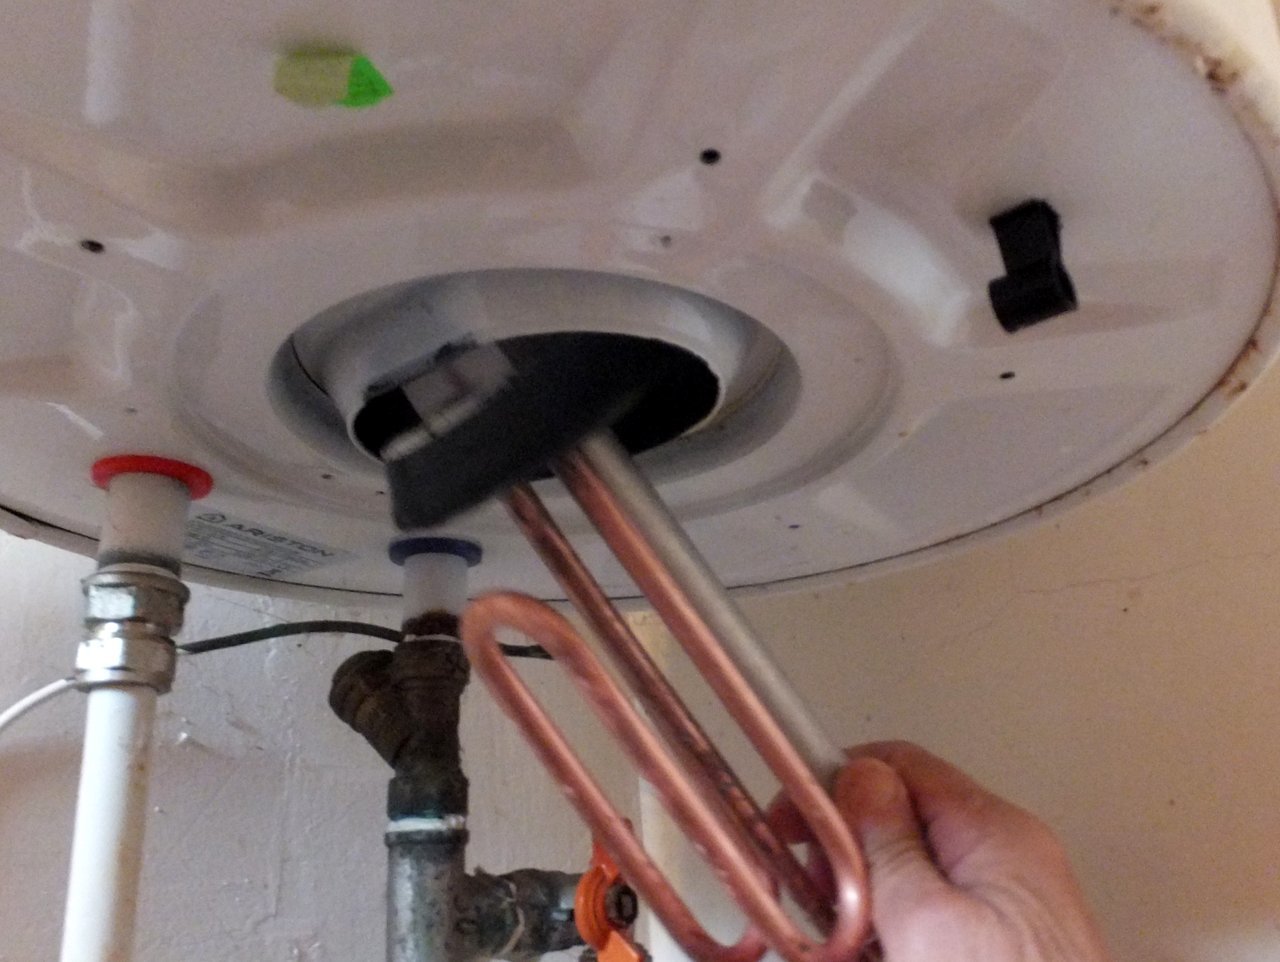
- further, you need to disconnect the drive from the water supply - if it has a vertical orientation, and the heating element is attached from the bottom, it can be dismantled in the working position.
In some cases, it is more convenient to perform further manipulations by first removing the boiler from the wall.
How to get a heating element
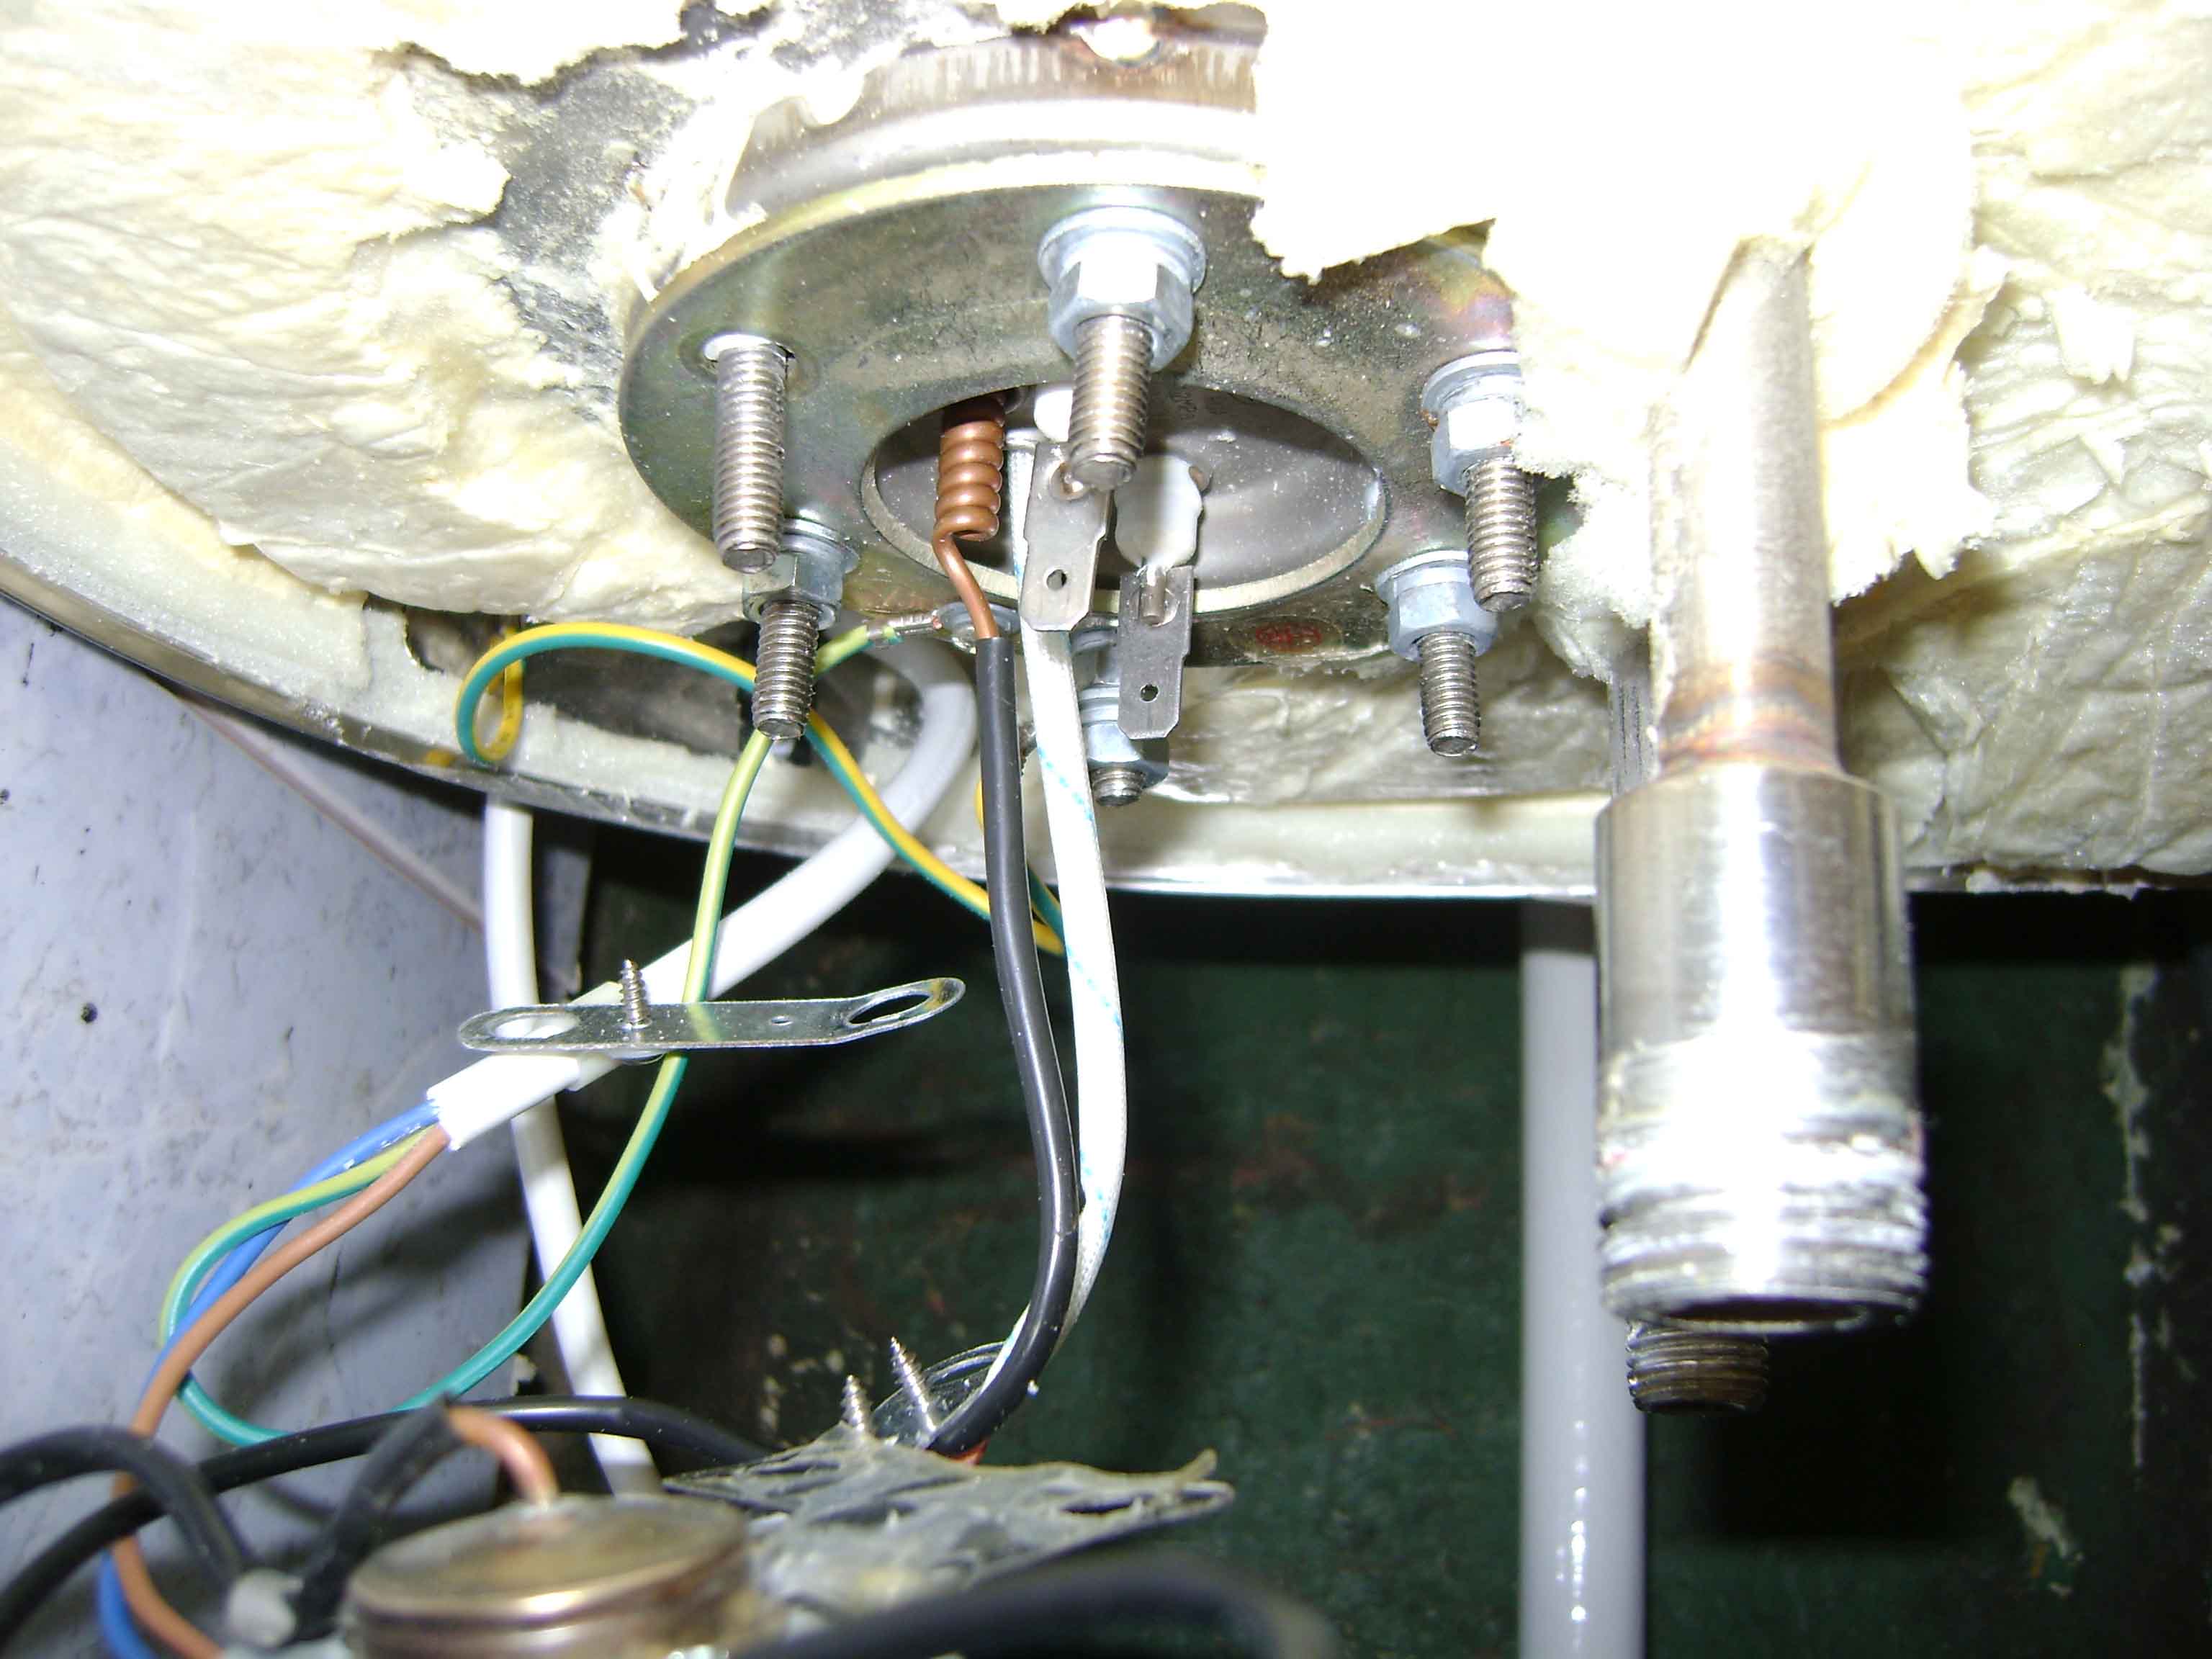
Before proceeding to further disassembly, it is advisable to photograph the circuit electrical wire connections, so as not to forget how they were connected when connected back. After that, you need to remove the terminals from the heating element. If there are other elements that interfere with its removal (for example, a thermostat), they will have to be detached.
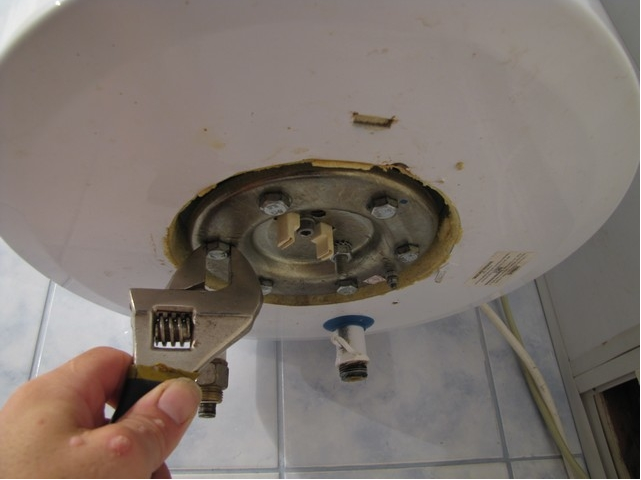
Using a wrench of a suitable diameter, unscrew the nuts or bolts that secure the heater to the boiler body and carefully remove it.
Examine the item carefully. If it is covered with a thick layer of scale, or the insulation is damaged, it will most likely need to be replaced.
Boiler repair: troubleshooting common problems
There are some of the most common problems that occur during the use of a water heater. Some of them can be fixed on their own. To eliminate others, you can not do without the help of a professional:
Damage to the integrity of the inner tank or outer shell
Such a malfunction may occur during inaccurate installation or careless use of the device. For example, a chip or crack can occur if you accidentally hit the boiler or drop a heavy object on it.
As a result of such a breakdown, the destruction of the heat-insulating material and the deterioration of the heat-insulating properties of the device will begin. It is also possible to actively develop corrosion. It is almost impossible to fix such a malfunction on your own. You will either need to contact a specialist or buy a new drive.
Gasket replacement
In the event that a leak has formed at the location of the protective gasket, you just need to replace it by conducting an independent maintenance. instrument maintenance.
Breakdown of the heating element
One of the most common malfunctions is the breakdown of the heating element.
Before starting to replace the heating element, you need to make sure that electricity is supplied to the drive. This can be done with a tester:
- The scale of the measuring device is set within 220-250 V
- We fix the voltage at the terminals of the tester connected to the mains
- Lack of voltage means boiler failure
- In the event that voltage is present, the test must be continued.
- The boiler must be disconnected from the network
- Then we disconnect the thermostat from the heater and remove the insulation from the contacts of the heater
- Using a measuring device, we take readings on open contacts
- The presence of voltage indicates the health of the heating element and vice versa
It is possible that the heating element is working, but the water does not heat up. Could be the thermostat is the cause.
- The tester should be set to maximum. We check the voltage at the input and output of the device
- In the absence of indications, it is necessary to replace the part (the presence of a positive reaction also does not give one hundred percent confidence in the serviceability of the device. It is necessary to continue measurements)
- We set the measuring device to a minimum and carry out a test on the thermostat contacts for a short time
- We try to warm up the temperature sensor with matches or a lighter and monitor the thermal relay. In the event that heating caused the thermal relay to open, the device is in good order. Otherwise, it will need to be replaced.
Other boiler malfunctions
In cases where the heating element and the thermostat are working properly, but the water is not heated, the possible reason lies in the boiler settings. If this does not help, the control board may be faulty. In this situation, you must contact the service center.


If a breakdown of one or another part is detected, it is necessary to replace it with exactly the same one, corresponding to all its characteristics (not only in appearance). The disassembly of the drive for maintenance should be done very carefully and gradually. In the event that the flasks of the device are broken, it will most likely be necessary to completely change the thermostat.
In situations where you are not confident in your ability to check or replace a particular part, it is better to contact a specialized service so that there is no need to purchase a new drive.
This is interesting: Installation geyser in the apartment hands: how to do everything right
Checking the health of the heating element
The above method of testing with an ohmmeter is not the only method for determining a breakdown. There are two more options that allow you to identify all kinds of problems and fix them in a timely manner, preventing the complete failure of the device. Let's consider them in more detail.
Visual inspection of the element
In this case, it is necessary to disconnect the equipment from the electrical network and drain the water from it. Then disassemble it and clean the heating element from scale, if it is present on its surface
It is important to inspect the component for the integrity of the coating
If even small cracks, chips or damage are found, the part can be safely sent to the trash can. After all, in this case, it will not be possible to repair it. The only thing that remains in such a situation is to replace the heating element with a new one.
The reason for damage to the coating of the element most often lies in the low quality of the materials used for its production. As a result, after one or two years of operation, such a heating element is literally torn to shreds and cannot be restored.
Testing with a tester
One of the ways to detect a malfunction of the heating element was given above. But if the ohmmeter did not give results, and nothing could be found during the visual inspection, then the last check is to look for a breakdown.
To do this, disconnect one of the terminals of the measuring device and run it along the surface of the water heating element. If the ohmmeter showed the exact resistance value, then there is a problem and the heating element must be sent to the scrap.
It is best to check the boiler with a digital multimeter or tester. In this case, you can determine as accurately as possible whether there is a malfunction or not.
If everything is in order with the heating element, then you should proceed to check the thermostat. To do this, it is necessary to connect the terminals of the measuring device to the contacts of the temperature sensor, which are used to supply electric current.
If the measuring device showed an accurate value or made a call, then the component is fully functional. Otherwise, the thermostat is broken and needs to be replaced.And for this you don’t even have to drain the water from the boiler.
To restore functionality, disconnect device from electricity, remove the panel, disconnect all wires from the thermostat and connect a new part. Remember that if you do not solve such a problem, then there is a risk of getting an electric shock if you touch the tank.