- Device assembly
- OUR PRICES
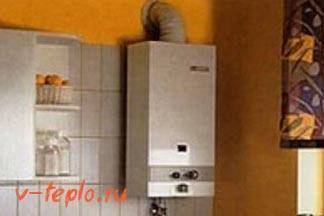
- Gas column repair Neva
- How to repair the union nut of the heat exchanger
- Repair of the microswitch in the start-up system of the geyser
- Advantages of the membrane for the gas column "Neva"
- Operation features
- Repair of heat exchangers of geysers
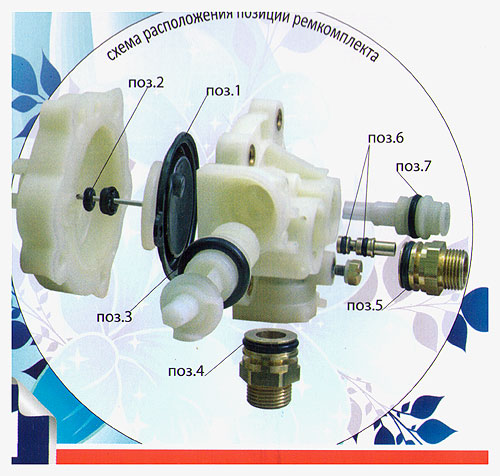
- About the reducer and the location of the diaphragm
- Radiator leak
- Speaker problems
- Removing the column lining
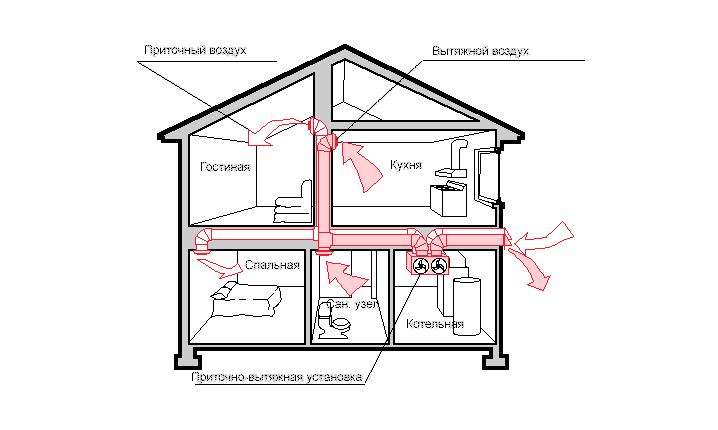
- The general structure of a household column
- Conclusions and useful video on the topic
Device assembly
In the old Neva and Astra water heaters, we put the top cover of the water regulator in place and tighten eight screws one opposite the other. We determine where the entrance to the regulator is and put it to the pipe through which water enters the column. The water unit is inserted into the gas unit and three screws are screwed in, with which they are attached to each other. It is advisable to change the gaskets at the inlet and outlet. After that, the cap nuts are tightened with a 24 wrench.
In new water heaters, we tighten four screws on the water regulator, fasten the water-gas unit to the burner. Next, we fasten the burner block to the back wall, connect the ignition and ionization electrodes and tighten the union nuts with a wrench.
We check after assembly.With the hot water tap open, gradually turn on the water at the column inlet. Make sure there are no leaks anywhere. You can double-check by running dry wipes on the union nuts. After a few minutes, we close the tap and check the same connections, but already under pressure. If everything is in order, the gas valve opens and the operation of the column is checked
It is important to check the gas connections by applying a soapy solution. If there are no leaks anywhere and everything works, you can attach the column casing. Also, the process of replacing the column membrane Astra HSV-21 1-V11-UHL 4.2, see the video:
Also, the process of replacing the column membrane Astra HSV-21 1-V11-UHL 4.2, see the video:

Get our book
Replacing the membrane gas column Neva 3208
Modern flow-type gas water heaters have a rubber membrane in their design, which serves to turn on the column. The constant pressure of water spoils it, wears it out and makes it tear. necessary work and part of annual maintenance. The most susceptible to wear membranes in devices of domestic production. Up to three replacements can be made during one year of operation of the NEVA 3208 dispenser.
Gas column membrane replacement - work that does not require professional training, but requires attention. In this article, we will tell you how to replace the membrane with your own hands using the NEVA 3208 gas column as an example.
OUR PRICES
|
| Departure of the master | Is free |
| Diagnostics (examination) of the water heater | 1390 rub | |
| Departure outside Kaluga | 30 rub/km | |
| Flushing the heat exchanger | from 1900 rub | |
| Water regulator replacement | from 1750 rub | |
| Replacing the electronic unit | from 990 rubles | |
| Gas cock lubrication | from 570 rubles | |
| Water heater service | from 3900 rub |

If your column is broken, we are ready to offer an urgent repair of a gas water heater in Moscow, St. Petersburg, Kaluga. To call the master, just call or place an order on the website.
Contact us at the service - we will competently establish the cause of the failure of the column and restore the efficiency of water heating equipment!
Gas column repair Neva
Most models of Neva gas water heaters have shown themselves to be simple and affordable water heaters for repair. They are far from the reliability of European models, but their repair is much cheaper, and almost always you can do it yourself.
The failure and subsequent repair of the spark plug is considered by the rules to be an atypical case of breakdown, therefore, having completed the repair work, it will be correct to look for the cause of the defect. Most often, plastic burnout occurs due to condensate flowing through the ventilation system onto the gas burner body.
How to repair the union nut of the heat exchanger
One of the most common defects in Neva gas water heaters for almost all models is the low quality of the heat exchanger metal. According to the rules, the heat exchange circuit through which water moves must not come into contact with aluminum parts, for example, a gas burner or a control unit. Any such contact can cause electrochemical corrosion of copper walls, and then the repair will be simply useless.


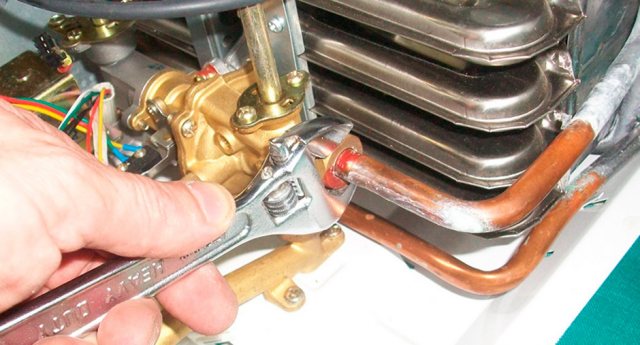
In addition, the rules for tightening the union nuts with which the heat exchanger is attached to the regulator and the outlet pipe are not always followed. With each removal and repair of the heat exchanger, the nuts cut a thin, barely visible track in the copper wall.Ultimately, the flared end and part of the copper pipe simply break off for the tenth time of twisting.
In this case, it is necessary to cut and level the breakage point, install a new nut with an external thread and connect the heat exchanger to the control unit with a conventional flexible hose. Any other repair option, as practice shows, is short-lived.
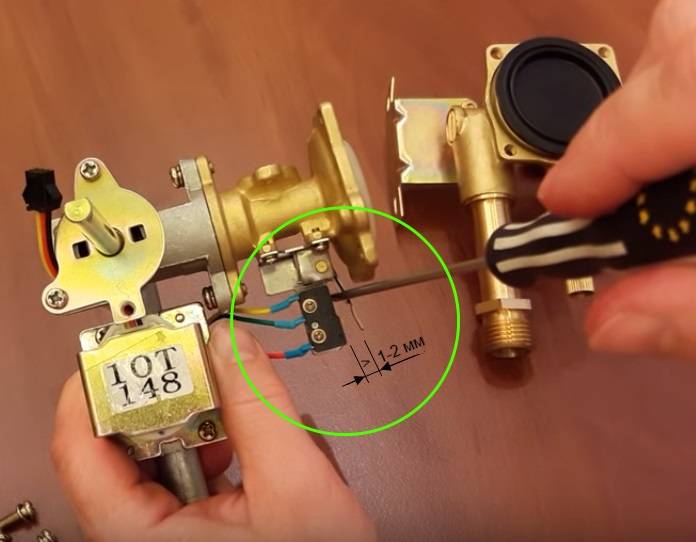
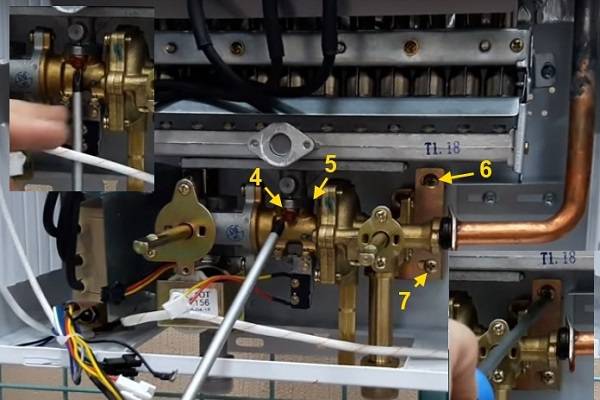
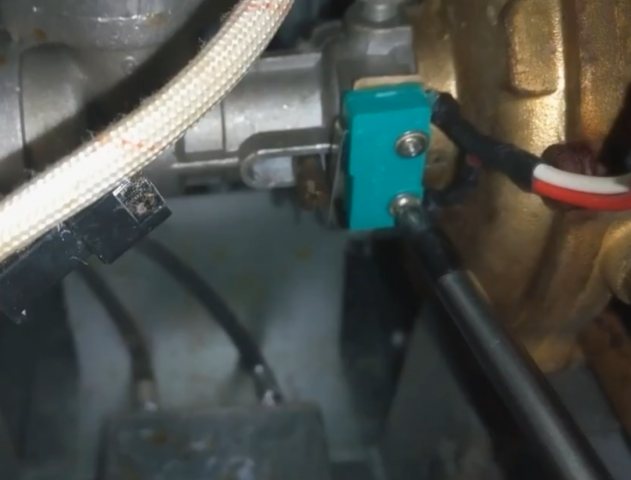
Repair of the microswitch in the start-up system of the geyser
A situation similar to the Oasis on dead batteries also happens with the Neva gas column. When you try to start the Neva, the indicator board lights up, but the gas burner does not ignite. Sometimes the column can be turned on 4-5 times.
In this situation, repair of the microswitch is required, due to premature wear of the part or improper adjustment of the assembly.
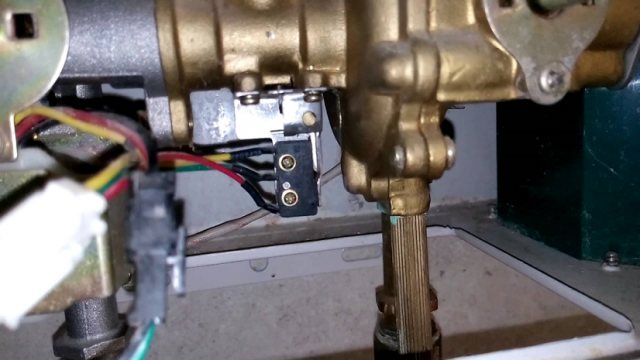
The switch is located next to the water pressure control unit. When the column is started, the membrane on the block squeezes out the stem, which unlocks the switch contact. Unlike the Oasis, all parts of the block, including the stem, are made of brass, so there is no corrosion, the microswitch itself is subject to repair and replacement.
To perform repair work, it is necessary to disconnect the connector, unscrew the two M3 screws and remove the switch housing from the bracket, as in the video
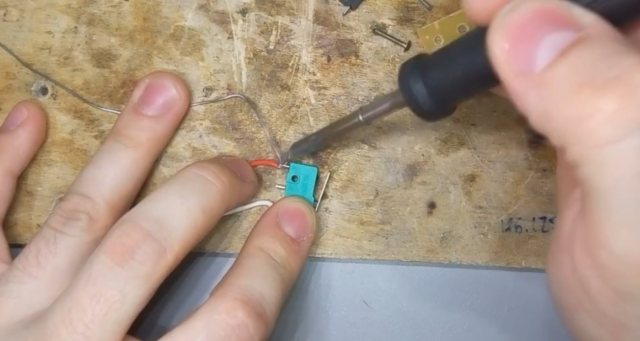
Replacing the mic is easy. You can buy an original part for 400-500 rubles. in a specialized salon or purchase an analogue for 50 rubles. at any radio parts store. There is no difference for repair, in both cases they will sell a part from Chinese consumer goods.
In order to carry out the repair, you will need to unsolder two strands of wire with a connector from the switch legs, put on a heat shrink tube and solder to the contacts of the new part.
At the final stage of the repair, the switch is screwed with old screws onto the mounting plate on the block. Next, you need to adjust the position of the microswitch body so that the stem completely releases the contact when moving. This is done using mounting screws. One of the screws bends with a radius, respectively, by rotating it, you can move the switch body in the right direction.
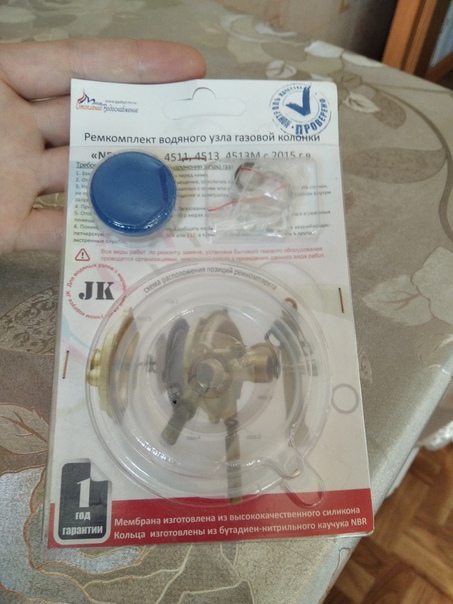
Advantages of the membrane for the gas column "Neva"
To replace a broken membrane yourself, you will need certain knowledge and skills. Repair of the Neva-4513 column can be performed with the help of service center specialists, but it will cost several times more
Before buying a part, it is important to study the device of a particular geyser

The rubber diaphragm designed to regulate the flow is designed to be used for five years. The real time of its serviceability largely depends on the quality and hardness of the water, the intensity of the column
When buying a membrane, it is important to pay attention to the rating and reviews of the manufacturer of the product.
Membrane Advantages:
- Made from high quality rubber.
- In the presence of an arcuate branch, having the shape of an eye.
- If the membrane is damaged, then the geyser does not produce hot water.
No matter how high quality the membrane is, over time it will become unusable. Modern technologies allow you to purchase the highest quality membrane without leaving your home. On specialized sites, the membrane can be ordered online.You can also buy a membrane in specialized stores, where you can consult with a specialist in real time.


Operation features
Modern gas water heaters are small and compact, so they can be placed in almost any convenient place. Their service life depends largely on how correctly they are installed and used in the future.
As you know, the device of the gas column is such that it has to work with quite dangerous fuel. For this reason, during installation, make sure that, God forbid, there is no gas leakage. If for one reason or another you cannot take care of this, or, even worse, you cannot eliminate all leaks, then further operation will turn into a dangerous occupation, which, sooner or later, can lead to an explosion.
For this reason install gas stove do it yourself is not recommended. It is better that this is done by professionals with all the necessary skills, experience, and appropriate equipment.
So, for installation, you need the following tools:
- dowel;
- filter on a magnet and on salt;
- drill;
- the required number of taps;
- pipeline;
- chimney corrugation;
- gas pipe;
- Mayevsky valve;
- in fact, the column itself.
The device is installed only in the kitchen and only on the wall, which is made of refractory material. The distance from the column to the wall surface should be at least 2 centimeters, if it turns out more, then it's even better. An asbestos sheet should also be laid here, which should have a thickness of at least 0.3 centimeters.
Important! The apartment / house must have a chimney that will remove the products of gas combustion. It will consist not only of vertical, but also of horizontal sections, and on them it must go under a slope (approximately 0.2 centimeters per linear meter)
So that the pipeline does not accidentally break through, the geyser should be installed only when the water is completely drained from the system.
But installation, as we said, is not the most important thing.
It is also important that the device is used correctly, for which certain operating rules must be observed. If you do not do this, then even the most expensive and high-quality model will soon break.
So we want to prevent this. First, we must not heat the water to a temperature that would exceed 60 degrees. The fact is that too high a temperature will lead to the formation of salt scale on the walls of the heat exchanger. As a result, more frequent cleaning or, even worse, replacement of the heat exchanger.
In addition, we can harm the design of the heat exchanger by using too hard water. To avoid this, soften the water using special tools, or install a special filter in the system.
Finally, it is not recommended to dismantle and clean the geyser with your own hands, because, we have already talked about this, professionals should do this procedure. Doing it yourself is extremely dangerous.
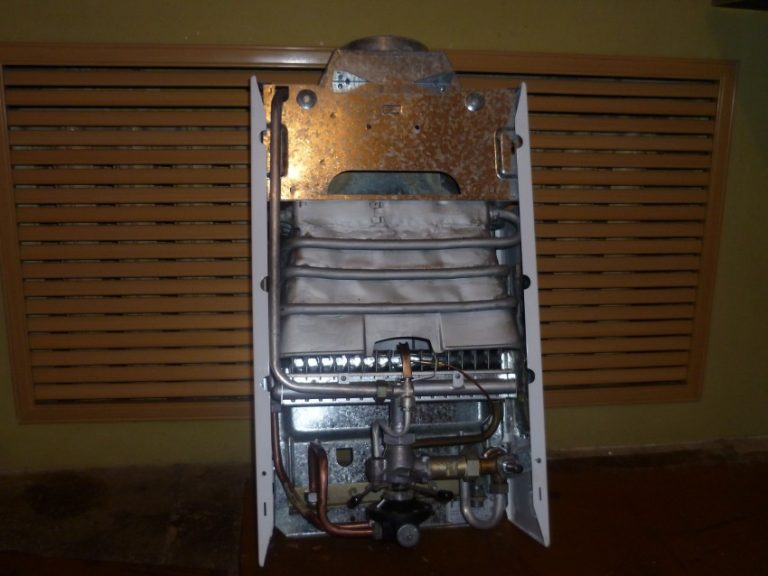
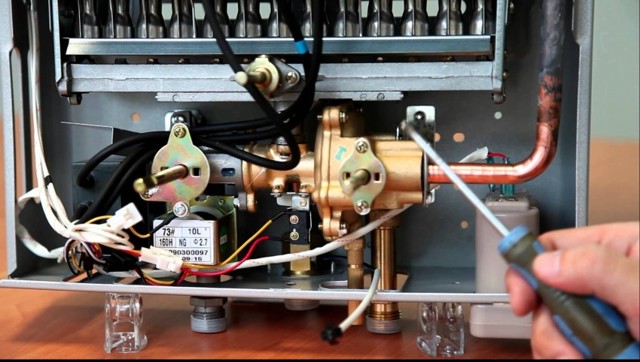
Repair of heat exchangers of geysers
One of the most severe cases of column damage is considered to be burnout, fracture or through corrosion of a copper heat exchanger.In the first two cases, the repair is performed only by replacing the part with a new spare part. In the case of through corrosion, thin, 02.0.5 mm holes are formed on the walls of the heat exchanger, through which water flows out of the circuit.
The defect, as a rule, is detected by intense soot formation, water leakage and pressure drop in the circuit when the tap is closed.
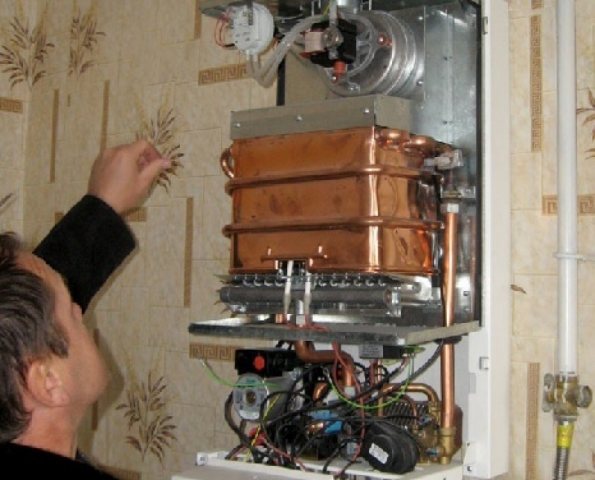
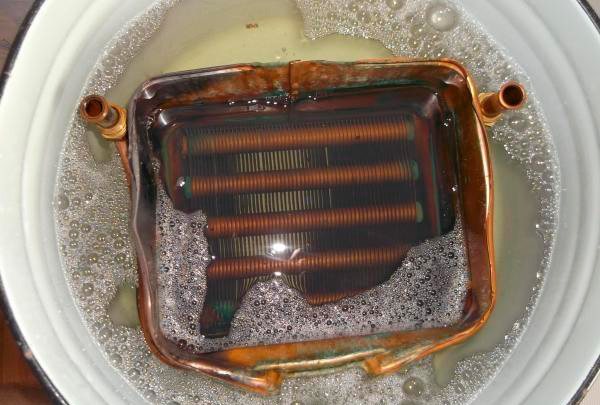
To repair the heat exchanger, you will need to remove it from the gas column mount. Next, the copper surface is cleaned of deposits of soot and scale and subjected to a hydraulic test.


The easiest way is to identify the place of corrosion by pumping air or water under excessive pressure. For example, the outlet of the heat exchanger is silenced with a rubber plug, and air pressure is supplied at the inlet by a hand pump. Geyser heat exchanger immersed in a container of water and determine the location of damage.
You can repair damage at home by soldering copper-silver pewter solder. The first is used to restore the hottest spots located close to the flame front. To seal with tin, the copper surface is etched with a solution of zinc in hydrochloric acid, heated with a torch and tinned with a massive piece of solder. For normal operation, the thickness of the tin patch must be at least 0.5-0.7 mm.
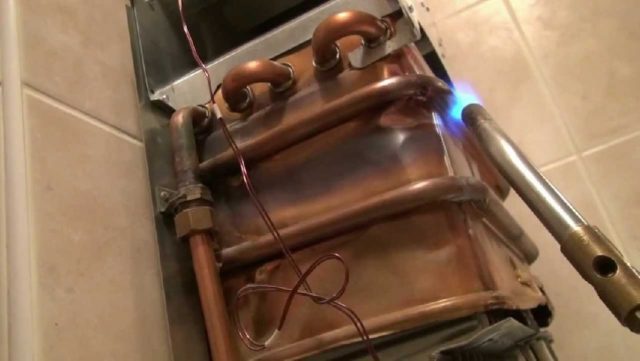
After the repair, the heat exchanger is checked twice more - using traditional air injection and holding under the operating pressure of water after installing the unit on the gas column. The pressure in the circuit must not drop for at least 15 minutes.
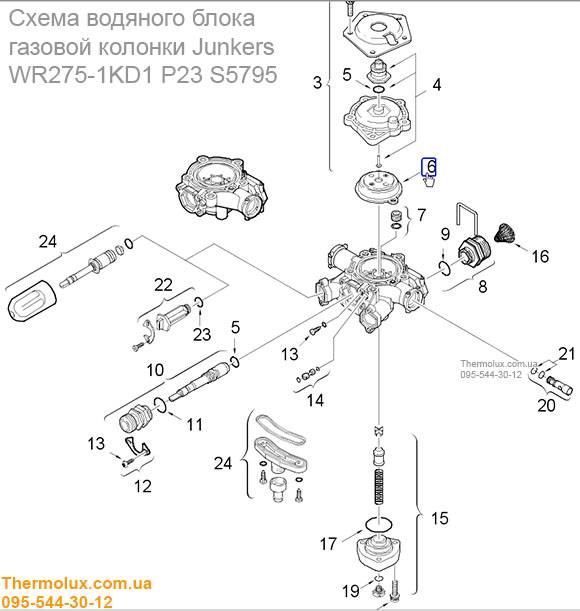
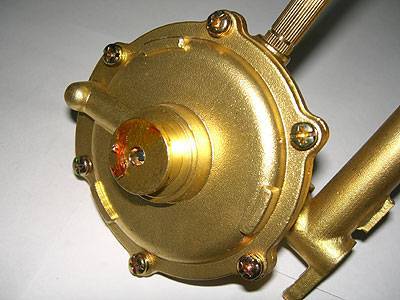
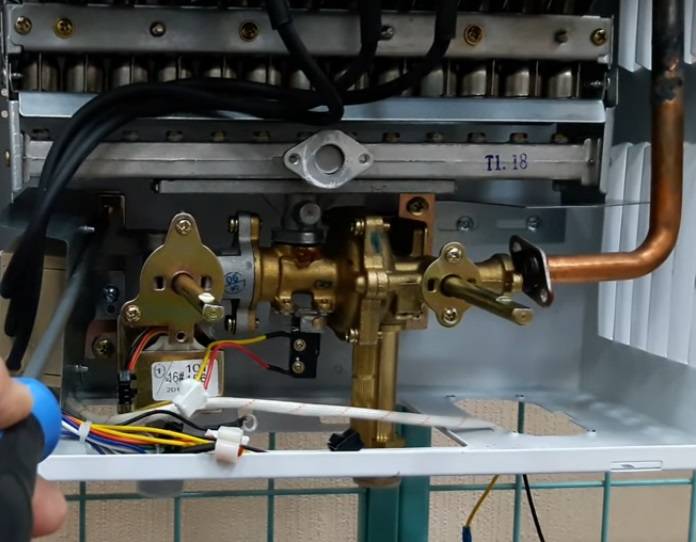
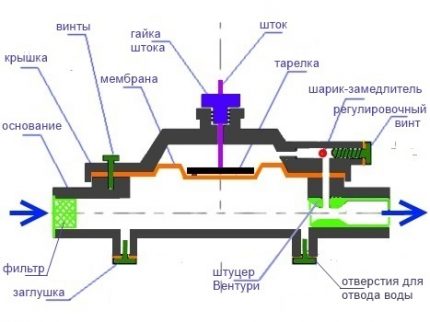
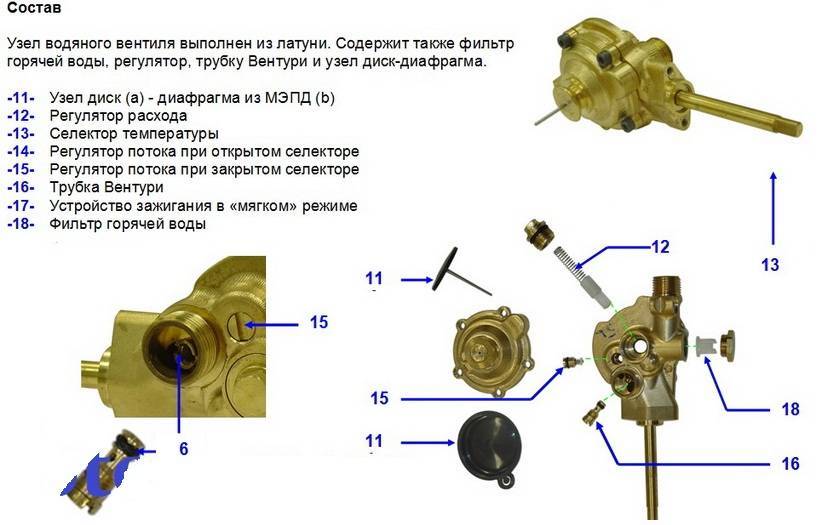
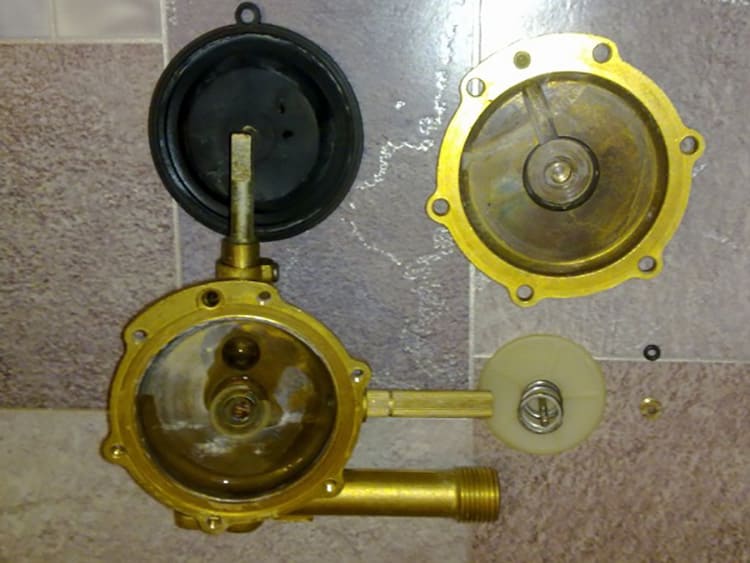
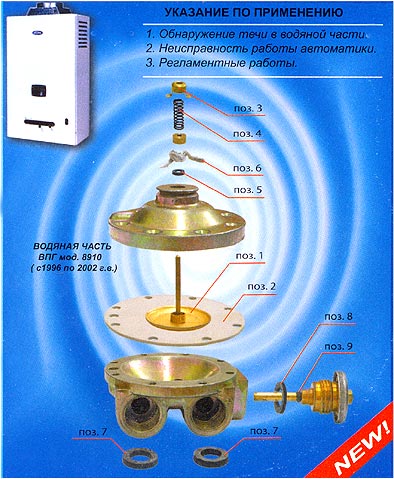
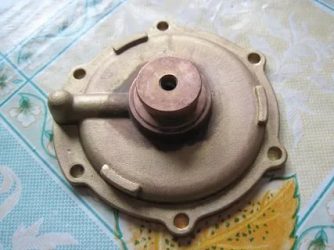
About the reducer and the location of the diaphragm
A device called a water reducer is part of almost any design of gas heat exchangers.
This part may have a different configuration depending on the model of the water heating apparatus, but the principle of operation of such devices remains unchanged.
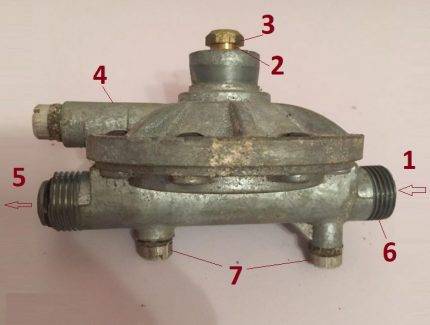 Gas column reducer, where the membrane is located: 1 - water inlet; 2 - the head of the rod and stuffing box group; 3 - stock; 4 - ball valve; 5 - water outlet; 6 - nozzle; 7 - plugs for draining water from the internal areas of the device
The water reducer installed on the gas column serves to maintain stable water pressure directly in the water heater heat exchanger system. Due to the uniformity of pressure, a uniform flow is ensured, which means the same uniform heating of the liquid.
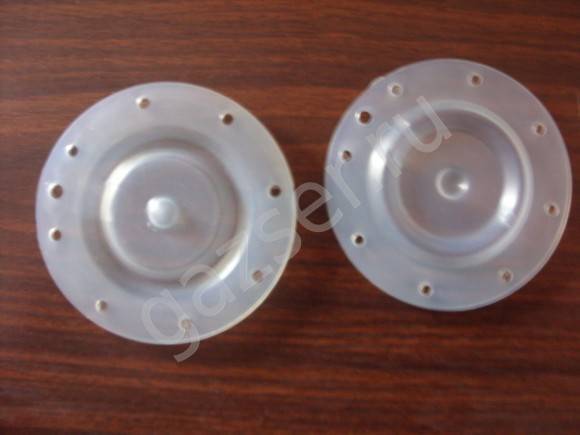
A part of the gearbox, which contributes to the smooth regulation of pressure, is a rubber membrane. This gear component, made in the form of a gasket, usually based on technical rubber, has the shape of a circle. It is installed inside the gearbox housing.
Due to the long-term operation of water heating equipment, being constantly in motion, the membrane gradually wears out. Wear of technical rubber in some places leads to material ruptures. Accordingly, the water pressure regulation function ceases to operate according to a given algorithm.
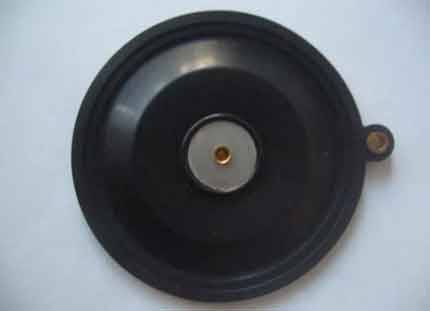
The prototype of a classic membrane based on technical rubber. The shape of the plate is round, the surface has a characteristic feature - a convex central part. Similar accessories are used on most geysers
In such cases, it becomes inevitable to replace the rubber membrane of the gearbox in the geyser, because the water heater does not work properly.
The quality of heating sanitary water is sharply reduced, and in other cases, the column simply cannot be put into operation. User comfort is lost.
Radiator leak
Hot water appears thanks to the existing heat exchanger. The heat exchanger radiator is metal pipes and plates located close to each other. The plates are in direct contact with the fire, due to which soot appears on them during operation.
The signs of soot accumulation are:
- The flame is yellow;
- When burning, the fire deviates to the side and heats the body (the flame should strive upwards);
- Soot falls off the gas column;
- Even when operating at full power, there is a slight heating of the water.
To remove soot, you will need to remove the casing by unscrewing the bolts (latches) that secure it.
After the assembly is removed, it must be washed by putting it in a container of water for several hours to deoxidize the soot. This will facilitate washing the space between the heat exchanger plates. For high-quality cleaning, it is recommended to use running water, a brush with a long bristle and detergents. After drying, the radiator is put in place.
Green spots on the heat exchanger indicate the presence of cracks and holes.
If the geyser is leaking due to the failure of the heat exchanger radiator, then the actions should be as follows:
- Water pipes must be closed to prevent water from entering the gas column. After that, the hoses are disconnected and the remaining water is drained. The remaining liquid in the coil is removed by a pump or vacuum cleaner, you can try to blow the water out with your mouth using a hose.This must be done, since the remaining moisture takes on heat during the soldering process, and it will not be possible to heat the metal to the desired temperature.
- Damaged areas (they are green) will need to be cleaned with sandpaper and degreased with a solvent, and then wiped dry.
- Crushed rosin or an aspirin tablet should be sprinkled on the work surface. Rosin and aspirin will serve as solder here.
- With a soldering iron with a power of at least 100 W (since they will have to work at a temperature of 180 degrees), it is necessary to increase the solder to a height of approximately two millimeters. If the soldering is loose, this means that the working surface is not warm enough. You can additionally heat up the soldering place with an iron or another soldering iron.
- You will need to solder each through damage in this way.
- After the soldering work is completed, it is necessary to wait until the working surface has completely cooled down and assemble the geyser.
- Before full operation, the equipment is launched in a test mode.
If the geyser is leaking, but no leaks are visible on the radiator, then perhaps they are located where it is turned to the body. In this case, it will be necessary to remove the heat exchanger from the housing, for which you will have to disassemble the entire column. Before starting the procedure, it is advisable to familiarize yourself with the diagram in the passport, since this is a rather time-consuming process and knowing the device of a particular model will simplify the work.


Soldering damage to pipes can only be used as a temporary measure to eliminate the cause of the geyser leak, since the repaired surface remains vulnerable.The best option for troubleshooting, due to which water drips from the column, is to replace worn elements with new ones.
Speaker problems
We will immediately make a reservation that we will consider the problems of flow heaters with an open combustion chamber, of which there are a great many installed in apartments and houses. We will bypass the repair of fully automated turbocharged columns with mains power and ignition from a hydrogenerator. These devices are quite complex and intervention in their design to an ignorant person is contraindicated. Troubleshooting of supercharged units should be carried out by service or gas services.
The list of malfunctions inherent in gas water heaters after several years of operation is as follows:
- the smell of gas;
- problems with ignition and start-up of the main burner;
- turning off the heater during operation;
- various leaks.
If you smell gas, whether it is permanent or intermittent, you must immediately turn off the corresponding tap, open the windows and call the emergency service. Explain to the dispatcher the nature of the problem, and he will make a decision - to urgently send a team to your home or simply send the master in the order of the queue. There are no other options, it is strictly forbidden to fix methane leaks on your own
There are no other options, it is strictly forbidden to fix methane leaks on your own.
Removing the column lining
Do-it-yourself geyser repair, like replacing batteries, is the only troubleshooting method that does not require removing the outer casing of the unit. For repairs geysers Vector, Oasis and any other in case of other malfunctions, an opening of the device will be required.To proceed with the removal of the casing from the water heater, it is necessary to shut off all the water and gas supply valves, after which, do the following (for example, the Neva 5611 water heater is taken, which we will disassemble on the table).
At the very beginning, you need to remove the control knobs from the unit panel. They are not fixed in any way, so it is enough to pull them towards you. If it is not possible to freely pull out the handle, then you can use some flat object, gently prying it from below so that it does not break. Geyser Oasis (Turbo series) also has a third “winter-summer” handle located in the center.
Under one of the handles of the water heater there is 1 screw that needs to be unscrewed. The presence of a screw under the handle is observed only in the Neva 5611 model, while in the Neva 4510 and Neva 4610 it is not.
A display is fixed on the casing of the device, to which 4 wires are connected. A pair consisting of red and black conductors is connected to the control module, and black and blue to the temperature sensor. For easy disconnection at the ends of the wires, there are connecting blocks that can be easily opened
Unplug all 4 wires by pressing the small tab on the block (if this is not done, the block may break).
Next, you need to unscrew the screws from the housing that hold the lining.
After that, put your fingers under the lining (be careful, you can cut yourself) and slightly pull it towards you so that the guide spikes located on the unit body come out of the slots.
Then the casing moves up, after which it must be removed from the hooks. The figure below shows the holes for the hooks.
The following figure shows the holes for the centering pins and the locations for the fixing screws (blue arrow).
Installing the cladding to its original place occurs in the reverse order.
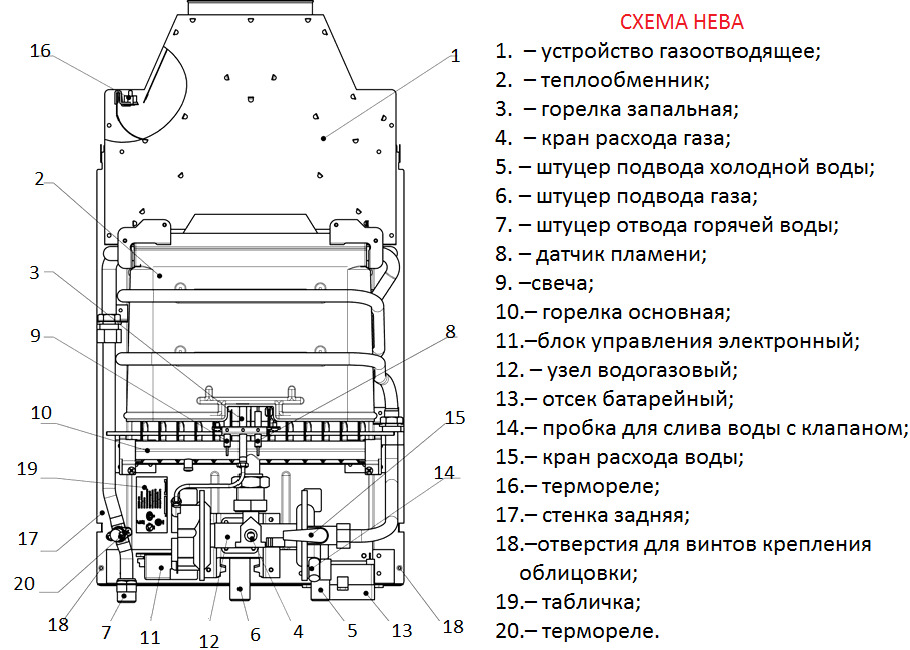
The general structure of a household column
A geyser is a flowing water heater. This means that water passes through it and heats up as it goes. But, before proceeding to an analysis of how a household geyser for heating water is arranged, we recall that its installation and replacement are associated with a centralized gas supply system.
Therefore, it is imperative to submit documents to the gas service of your region along with the corresponding application. You can read about the norms and necessary documents in our other articles, and now let's move on to the device.
Different models of geysers differ from each other, but the general structure of a household geyser looks something like this:
- Gas-burner.
- Igniter / ignition system.
- Exhaust and connection to the chimney.
- Chimney pipe.
- The combustion chamber.
- Fan (on some models).
- Heat exchanger.
- Pipe for gas supply.
- Water node.
- Pipes for water supply.
- A branch pipe for an output of hot water.
- Front panel with controller.
The central element of the column is a gas burner in which gas combustion is maintained, which contributes to heating the water. The burner is installed in the housing, it collects hot combustion products, the purpose of which is to heat water.
The body is made of metal and completely covers the front and sides of the speaker.
It is important that the body material conducts heat well, because the quality of heating depends on the transmission of heat.
Structural components of the geyser located inside the housing.Closed gas equipment shown here
On top of the apparatus there is an exhaust hood and a chimney through which the products of combustion leave the column and the room. Their device depends on whether the column is open or closed, which will be shown below.


Pipes meander in a coil inside the body, water passes through them under natural pressure and is warmed by hot gases. This whole system of pipes is called a heat exchanger. Below are two pipes: on the right - for receiving cold water from the pipeline, on the left side hot water flows out.
A filter is often installed between the water supply network and the geyser, which regulates the hardness of the water. Without a filter, the column may be covered with scale at high water temperatures. When entering the column, water passes through the water node, which serves as a kind of "connection" between the water flow and the gas flow. We will talk about this connection a little further.
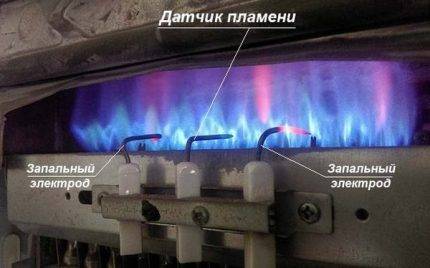 Burning gas burner with electric ignition and flame sensor. Sensors play an important role in the operation of equipment. Let's talk about their functions below.
With the help of another tube, which is also located below, the column is connected to the gas line.
There is also a front panel with a control unit. It is equipped with regulators to control the consumption of gas and water. Depending on the model, these can be simple knobs that need to be turned, or liquid crystal displays where you can see many characteristics of the speaker, or even the nature of its malfunction if the speaker does not work.
Conclusions and useful video on the topic
Owners of flowing water heaters sometimes face difficulties when lighting up - they cannot light the glow plug the first time.The problem can be solved by yourself:
If the solenoid valve fails, the gas supply to the burners stops, the security system is triggered and the column turns off. You can check the health of this component yourself:
Owners of gas water heaters simply need to know the design of the devices in order to understand in a timely manner what the problem may be and prevent its occurrence. It is worth familiarizing yourself with typical malfunctions that occur during operation. It is possible that you can eliminate simple violations in the work yourself.
Please write comments in the block below, post photos on the topic of the article, ask questions. Tell us about how you dealt with the problems of a gas water heater with your own hands. It is possible that visitors to the site will be able to take advantage of your advice.