- Methods for determining the malfunction of the hood
- Best Ways to Solve a Problem
- Device removal rules
- What should be a good ventilation system in the bathroom?
- Preventive measures for long-term performance of the hood
- Expert advice
- Filter cleaning
- How is the ventilation of the bathroom and toilet?
- Do-it-yourself installation
- What is an exhaust fan and what is it for?
- purpose
- Requirements and norms
- Norms and requirements
- History of origin and hood device
- Types and principle of operation
- Structural elements of the system
- Types and functions of ventilation for bathrooms
- Installing the fresh air damper
- Types of ventilation systems
- Installation of forced exhaust in the toilet and bathroom
- Fan mounting
- Installation of an axial fan according to the "bulb-fan" scheme
- Installation of an axial fan with a built-in delay timer
- System design
Methods for determining the malfunction of the hood
There should not be poor ventilation in the bathroom. Indeed, otherwise, the level of air humidity rises, which is an indicator of the ecological state of the premises. Damp air can cause people to feel unwell, feeling stuffy and heaviness, and is also the cause of exacerbation of chronic diseases.
That is why there is a concept of optimal and permissible indoor air humidity, which is indicated in GOST 30494-2011. For the bathroom, the optimal values \u200b\u200bare - 30-45%, acceptable - up to 60%.
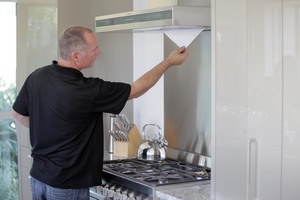
It is possible to prevent an increase in the level of humidity to critical levels if the malfunction of the hood is detected in a timely manner and eliminated. Therefore, if you begin to notice that after visiting the bathroom, moisture remains on the walls and mirrors for too long, it is advisable to check the traction force. For what you can use a sheet of paper (lean it against the ventilation grill) or a lit match (the flame will deviate towards the grill), which will allow you to determine the strength of the exhaust air flow. If it turns out to be too weak, a representative of the management company should be called.
A specialist using a special air velocity meter - anemometer will measure the air outflow rate per hour and give a conclusion on non-compliance with the standards. He can also determine the air permeability for the entire riser of an apartment building.
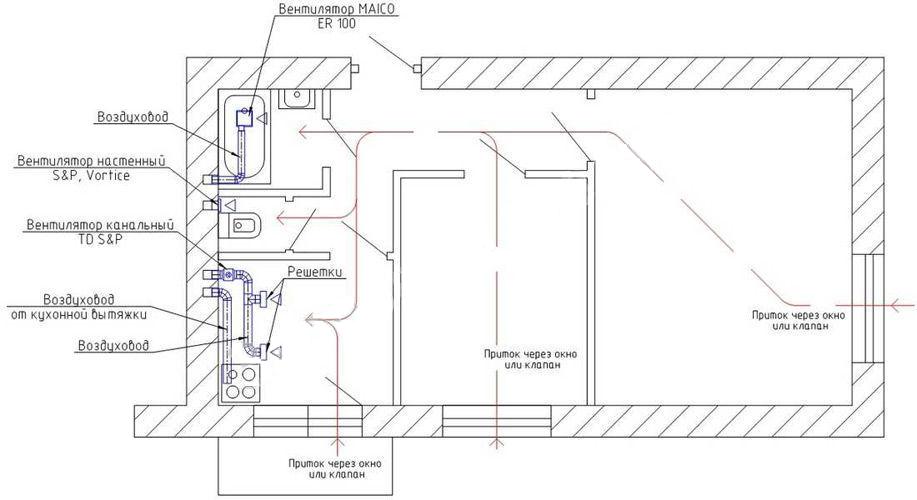
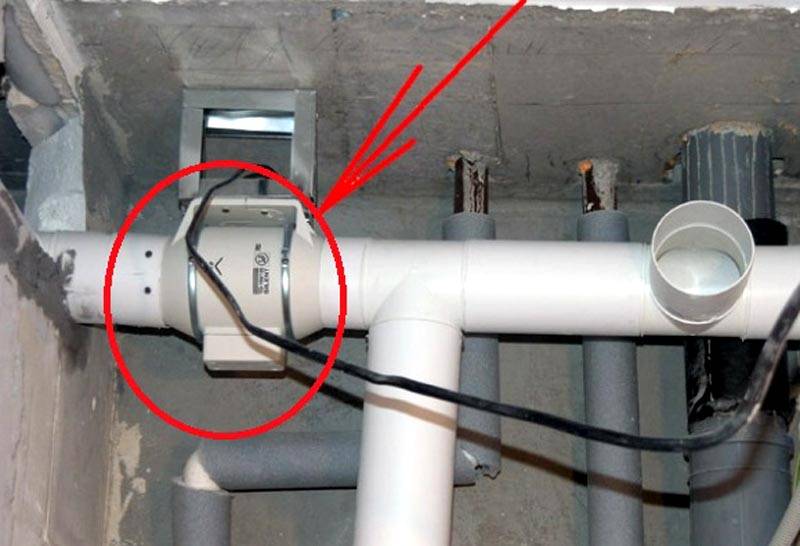
 When designing the hood yourself, you should consider installing a fan, especially in situations where the ventilation duct is bent. Otherwise, draft will not be created and the hood will not work.
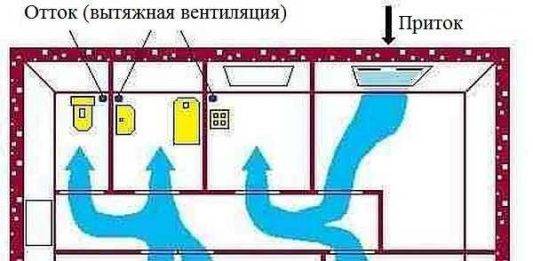
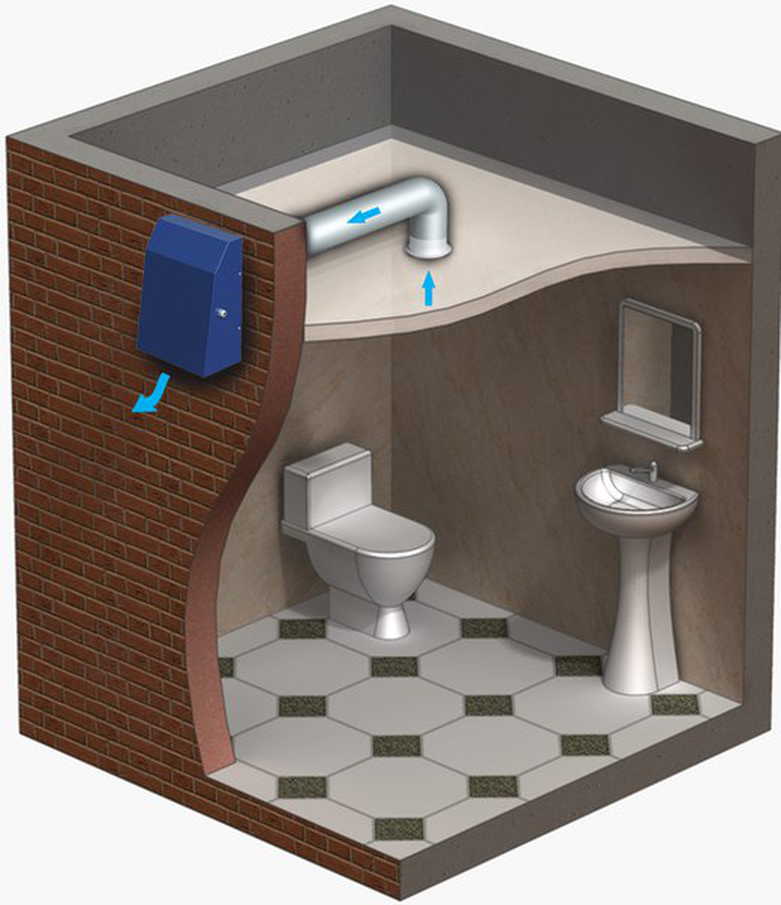
 When installing an exhaust fan, it is worth considering its location. It should be located further from the entrance and as high as possible. The ideal location is on the opposite wall from the entrance directly under the ceiling. It is then that the air entering the room has time to pass through the entire room before entering the hood
It is worth noting that a utility specialist may not determine the problem if it is associated with the use of an overly powerful fan by a neighbor - during the study of the traction force in the system, the exhaust device may be turned off.
In winter, you can also check the hood in the bathroom and toilet yourself. To do this, it is necessary to open wide the window and doors of the room where the ventilation outlet is located. This will allow you to disperse the exhaust draft by displacing warm air with cold air. It is enough to attach a sheet of paper to the exhaust grille. With a good ventilation system, it should stick to the grate.
Best Ways to Solve a Problem
And now let's talk about what to do if the hood in the toilet or bathroom does not work. So, the standard and most effective way to solve the problem associated with a ventilation malfunction is to contact the management company, which must take effective measures to restore the normal operation of the hood. Their responsibilities include checking, cleaning and restoring ventilation ducts.
They are also obliged to force the tenants of the apartment building, who independently dismantled or changed the ventilation ducts during redevelopment, to restore their original state.
 The main requirements for a fan in the bathroom are: power, quiet operation and moisture protection (IP). IP 25 is considered the best indicator of the latter. To maintain normal hearing, the noise level should not exceed 48 dB. Well, the fan power should not exceed the created air exchange of 25 cubic meters per hour for the toilet and bathroom and 50 cubic meters per hour for the combined bathroom
However, the involvement of a management company is a rather lengthy process.
Therefore, some problems can be solved independently:
- If there is a problem with the “backdraft” effect when air from the hood enters the room, then it is solved in two ways: either by installing a blower fan, which makes the air pressure in the room stronger, or by installing a decorative grille with a check valve in a standard hood opening, which will recreate an obstacle to the penetration of air into the room from the exhaust system.
- To improve the operation of the hood on the upper floors of an apartment building, an increase in the height of the box, which ends the ventilation duct, will help. It is located on the roof of the house and you can increase its length yourself using a corrugated pipe. You can also install a deflector, which, under the influence of wind, will create additional traction in the system.
- The problem with the hood in a private house can be solved by installing a separate duct. It will give an additional flow of air and, consequently, increase the pressure in the room, which will create an air circulation process. A vertical channel with access to the roof will work most efficiently.
- When the hood does not work in one of the rooms, the problem is solved by installing a fan. Only this installation must be carried out in strict accordance with regulatory requirements in order to avoid consequences. Currently, you can buy fans equipped with a humidity sensor, a time switch and a motion sensor, which allows you to use them most efficiently while saving electricity.
It is worth paying attention to the cleanliness of the decorative ventilation grille.There are cases of dust clogging a special mesh, which is necessary to prevent insects from entering the apartment, as a result of which the air cannot normally go into the ventilation duct.
It is also necessary to regularly clean the fan in the bathroom and toilet, taking into account the manufacturer's recommendations for caring for a particular model.
Device removal rules
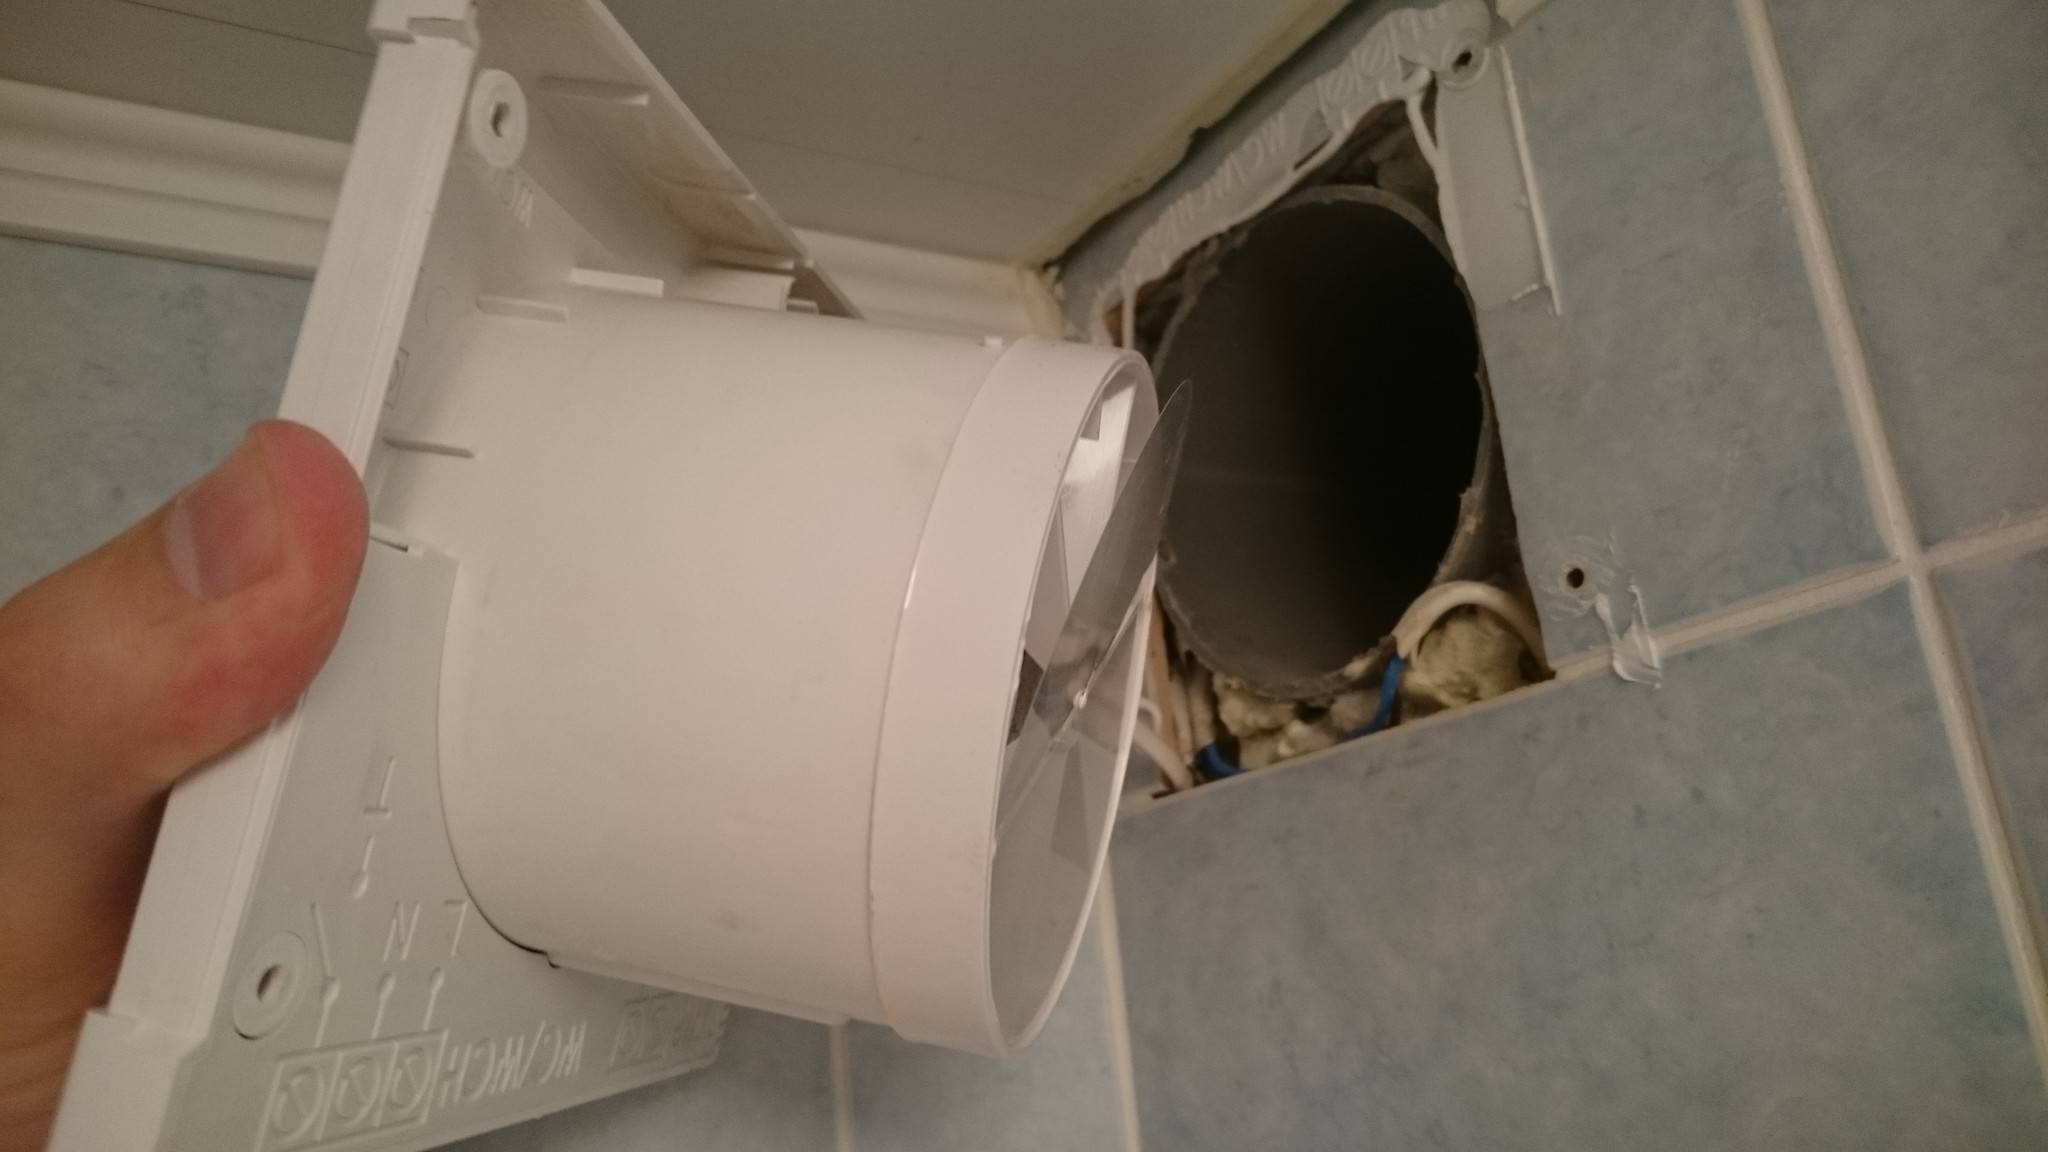
The first stage of work on replacing or cleaning the fan begins with the removal of the device. To do this, you need to perform the following actions:
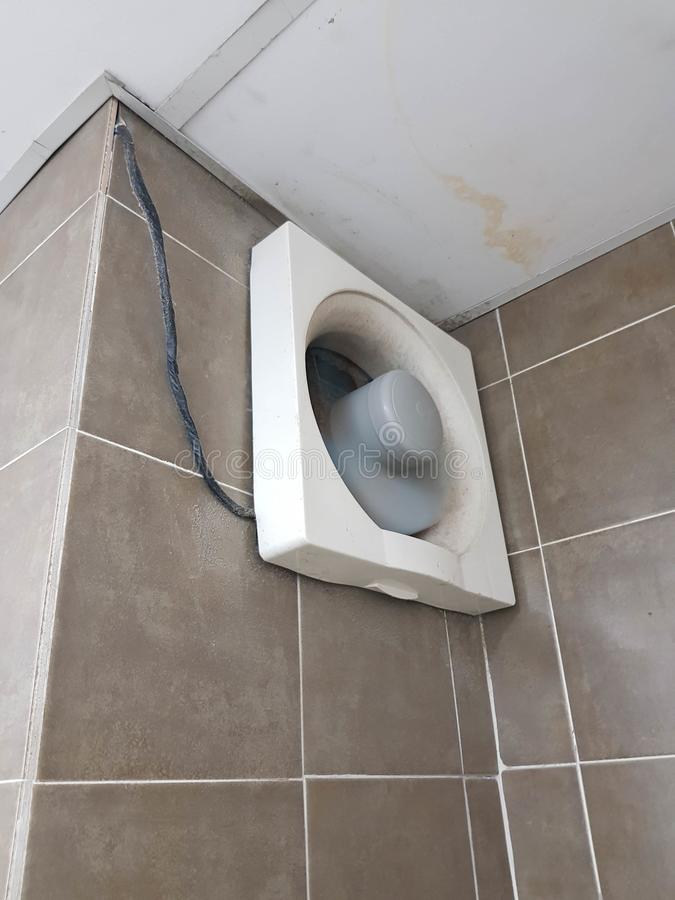
Remove the fan grill, which is usually fastened with four self-tapping screws, less often with glue.
Fan with grille removed
- Carefully remove the appliance (the electricity should already be turned off) and disconnect it from the mains - as a rule, in the bathroom it is connected to the light switch.
- Dismantle the device by removing the impeller fixed on the shaft with a collet clamp - to do this, just unscrew the fastening nut clockwise.
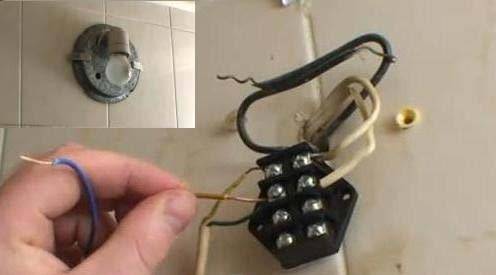
- Remove the electric motor of the equipment - for this, the fan is turned to the front side, and the wires are disconnected from the terminals. The motor is usually mounted with 2 screws and can be easily removed.
When removing the engine, it must be supported. If a recently used device is being disassembled, it is advisable to wear gloves. Although it is easier to wait a while, allowing the engine to cool.
Removing the electric motor
What should be a good ventilation system in the bathroom?
Construction guides of all countries and peoples contain a number of standards that must be strictly followed in order to ventilate wet rooms.
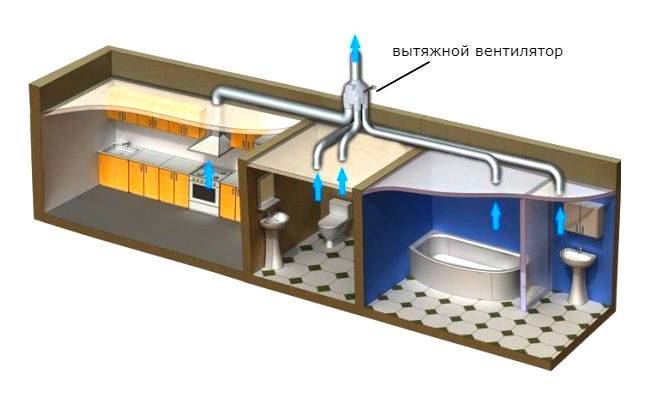
Ventilation systems should enrich the bathroom with 25 cubic meters of air every hour.For a combined bathroom (bathroom + toilet), ventilation should bring 50 cubic meters of air. Moreover, these standards are minimal.


Specialists in ventilated systems advise to ventilate the bathroom with an air exchange of 75 cubic meters per hour and 150 cubic meters for combined bathrooms.
For bathrooms, there are two types of ventilation: natural and forced. The method of application of each of them depends on the specifics of air exchange. Natural ventilation ensures the exchange of air by suction from the external environment, which can only take place due to pressure differences.
Air masses can get inside through a window, a door, a ventilator and so on. It must be recognized that, in the case of a separate toilet room, natural ventilation is acceptable. However, for combined bathrooms, it is often ineffective.
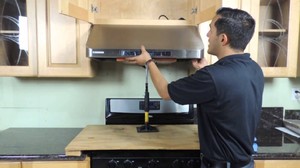
Preventive measures for long-term performance of the hood
In order for the air filtration structure to serve as long as possible and without major breakdowns, it is necessary, first of all, to follow the operating instructions, treat household appliances with care and take care of its components.
- Avoid heating an empty stove under the hood, especially open flames, these experiments can end sadly.
- The system should be mounted above the gas stove at a height of 70-80 cm, and above the electric stove at a height of 60-70 cm. If installed lower, deformation of the elements is possible, and when suspended above this range, the efficiency will be weak.
- Turn on the device in advance before heating the burner for a few minutes and turn it off a quarter of an hour after cooking, then the elimination of odors and fumes will be especially high quality.
-
Clean and rinse the metal grease trap every 3-4 weeks. Change disposable filters every six months or more often, depending on the intensity of use of the hood. Failure to comply with this condition will cause oil particles to penetrate inside the engine and settle on structural elements, leading to overheating and engine failure.
- Speed mode to start with the first step, gradually increasing. Use maximum speed as low as possible to prevent premature engine wear.
- Provide additional protection against voltage drops in the electrical network. Of course, the design of the hood provides for a fuse, but it cannot always cope with network instability. An additional relay will help to solve this issue, which will turn off the power supply in case of voltage drops.
Voltage relay
As you can see, a kitchen hood is not the most complex electrical appliance, and minor repairs can be done at home, with basic knowledge of electrical engineering and the necessary tools. Most of the problems do not require serious intervention, but if the cause of the malfunction could not be found out on the spot and the hood cannot be repaired on its own, then you should resort to the service of craftsmen and service centers.
Expert advice
- To check the correct operation of the electric motor, it is not necessary to remove the motor from the hood. You can perform the necessary actions by checking the resistance of the windings of the whole system. To do this, you need to find the wires that lead to the electric motor from the motherboard.Then the engine is diagnosed for defects in the wiring.
- The main check is the dismantling of the starting capacitor. In 90% of cases, the cause of a motor breakdown is a short circuit, which pierces the motor blades and prevents the operating voltage from passing deep into the system.
- When the complete dismantling of the electric motor has been carried out, the problem has been eliminated, it is necessary to check the operation of the entire system. Sometimes after repair, when the power is turned on, the engine does not start to work in ideal mode. Particular attention should be paid to the assembly. If the parts are not properly dismantled, the system may fail, and the fan will close.
Any person can repair the hood engine on their own. To perform these works, you need to prepare tools and read the assembly instructions for the corresponding ventilation model.
Minor damage that occurs during operation can be repaired with your own hands. But for this you need to know and understand the design elements of kitchen equipment hoods. Read the advice of our experts on how to repair the built-in hood with your own hands.
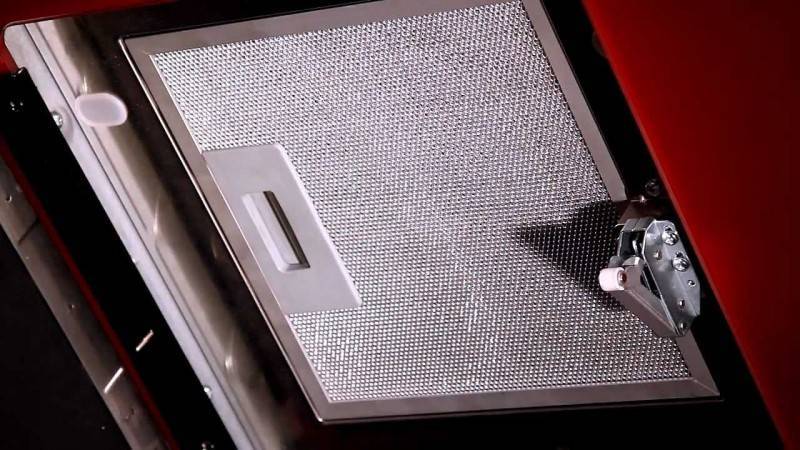
Filter cleaning
So, it's time to solve the question: how to clean the hood filter? It is the filter that is the place of increased accumulation of dirt, dust and grease, as it protects the inside of the hood from contamination.
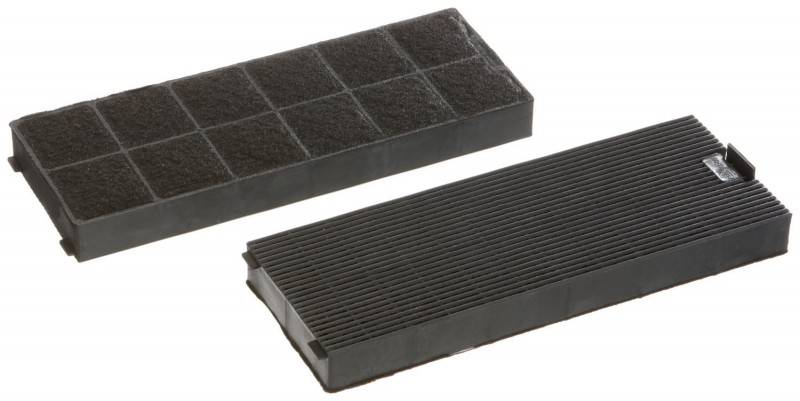
The filter looks like a multilayer grid with small cells, which are almost impossible to wash with bare hands. If the filter element is not very dirty, then cleaning it will not require much effort.
Just put it in a container of hot water and after a while treat it with detergent. Then rinse the grate with running water and leave to dry completely.

In the event that the usual cleaning did not give results, then you will have to use a more effective method - digestion. Choose a container that is suitable in size, put the filters in it and fill it with water.


The process can be repeated or the procedure time can be extended until the desired result is achieved. You should not often use alkaline preparations to combat pollution, as they can destroy the structure of the metal.


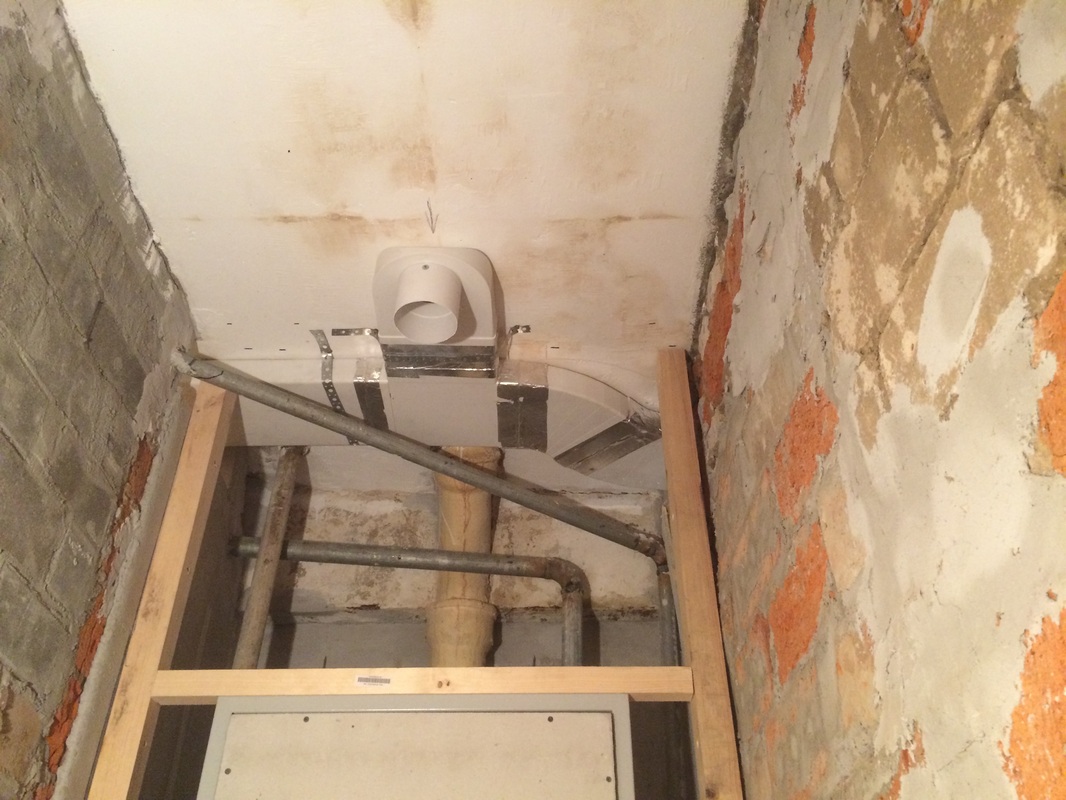
How is the ventilation of the bathroom and toilet?
Ventilation is, first of all, a whole system consisting of air channels and shafts. When designing it in a private or apartment building, stable performance is calculated with proper operation.
The ventilation device includes:
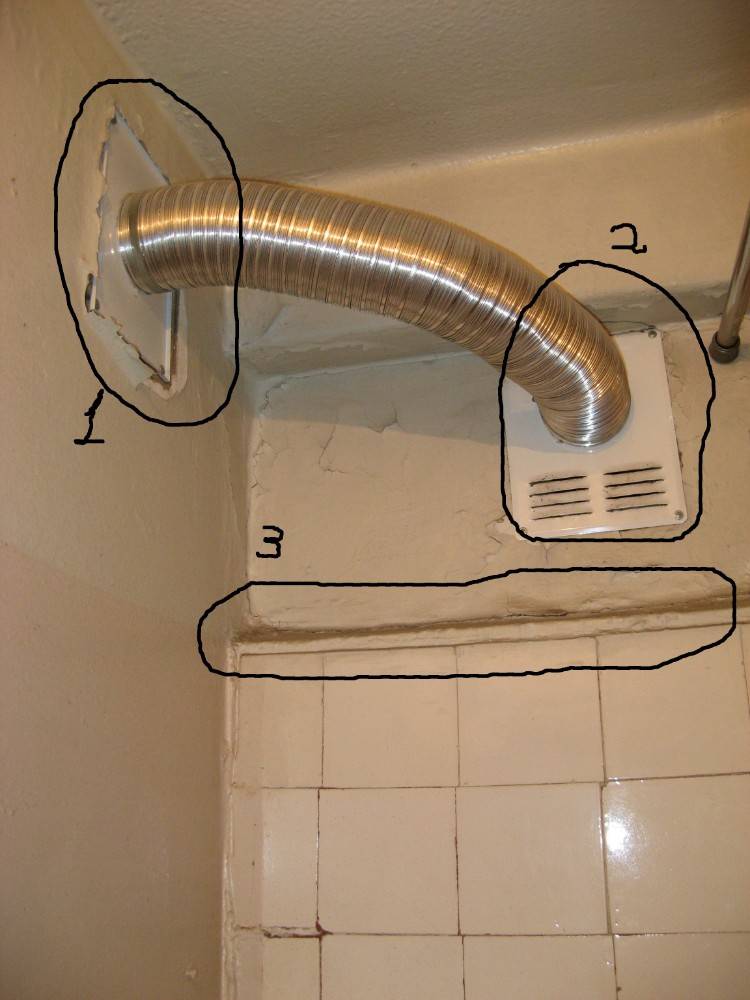
- Ventilation duct (ventilation shaft), which is a combination of solid straight air ducts and vertical shafts. The shaft and channel can be either round or square. A prerequisite for stable air movement is their purity and integrity. There are also horizontal ventilation ducts, but their length should not exceed two meters, otherwise the air movement will become difficult.
- A ventilation outlet is an opening in the wall of a bathroom or toilet that is connected to a ventilation duct. The size of the opening of the ventilation outlet does not necessarily correspond to the cross section of the duct and is calculated based on the creation of the throughput of the maximum possible volume of air.
- Ventilation grill - necessary to protect the ventilation duct from debris entering it, as well as from the possible penetration of insects and rodents into the room. Made from plastic or metal.It has a decorative look, since its front part should fit into the interior of the room.
It should be noted that ventilation can be natural and forced. The difference lies in the use of additional devices to mechanically create more traction.
 The most damp and damp room in the apartment is the bathroom. Proper operation of the hood will not allow humidity to rise and, as a result, mold, dampness, rust to form
Additional devices are installed in cases where effective ventilation of the room is not ensured due to natural draft.
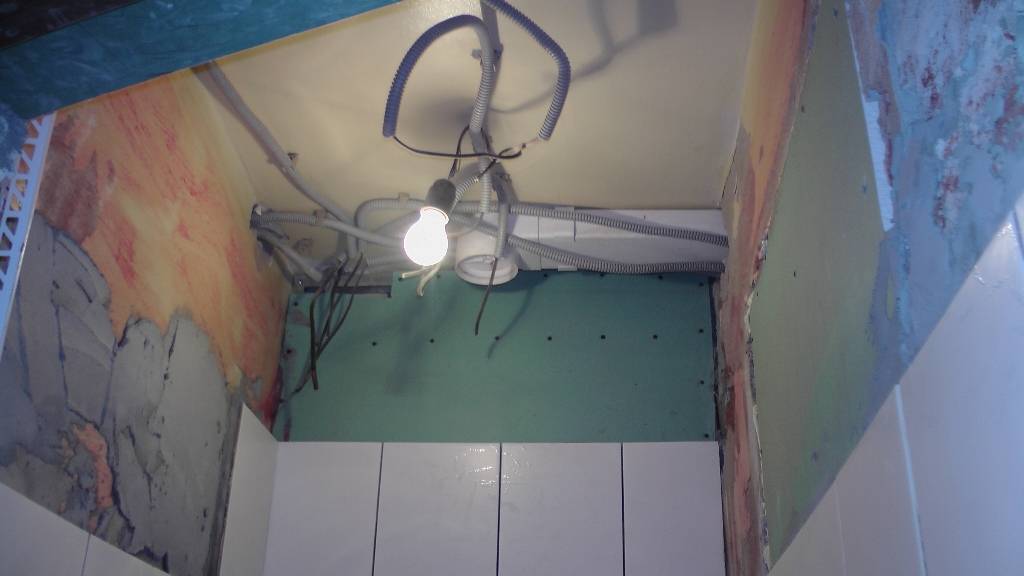
Do-it-yourself installation
When there is no ventilation system in the bathroom or toilet, then it's time to start designing and installing it yourself. Such work is carried out quite simply.
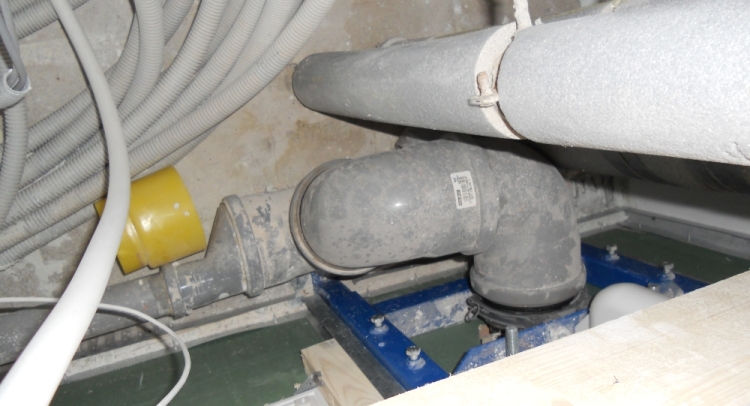
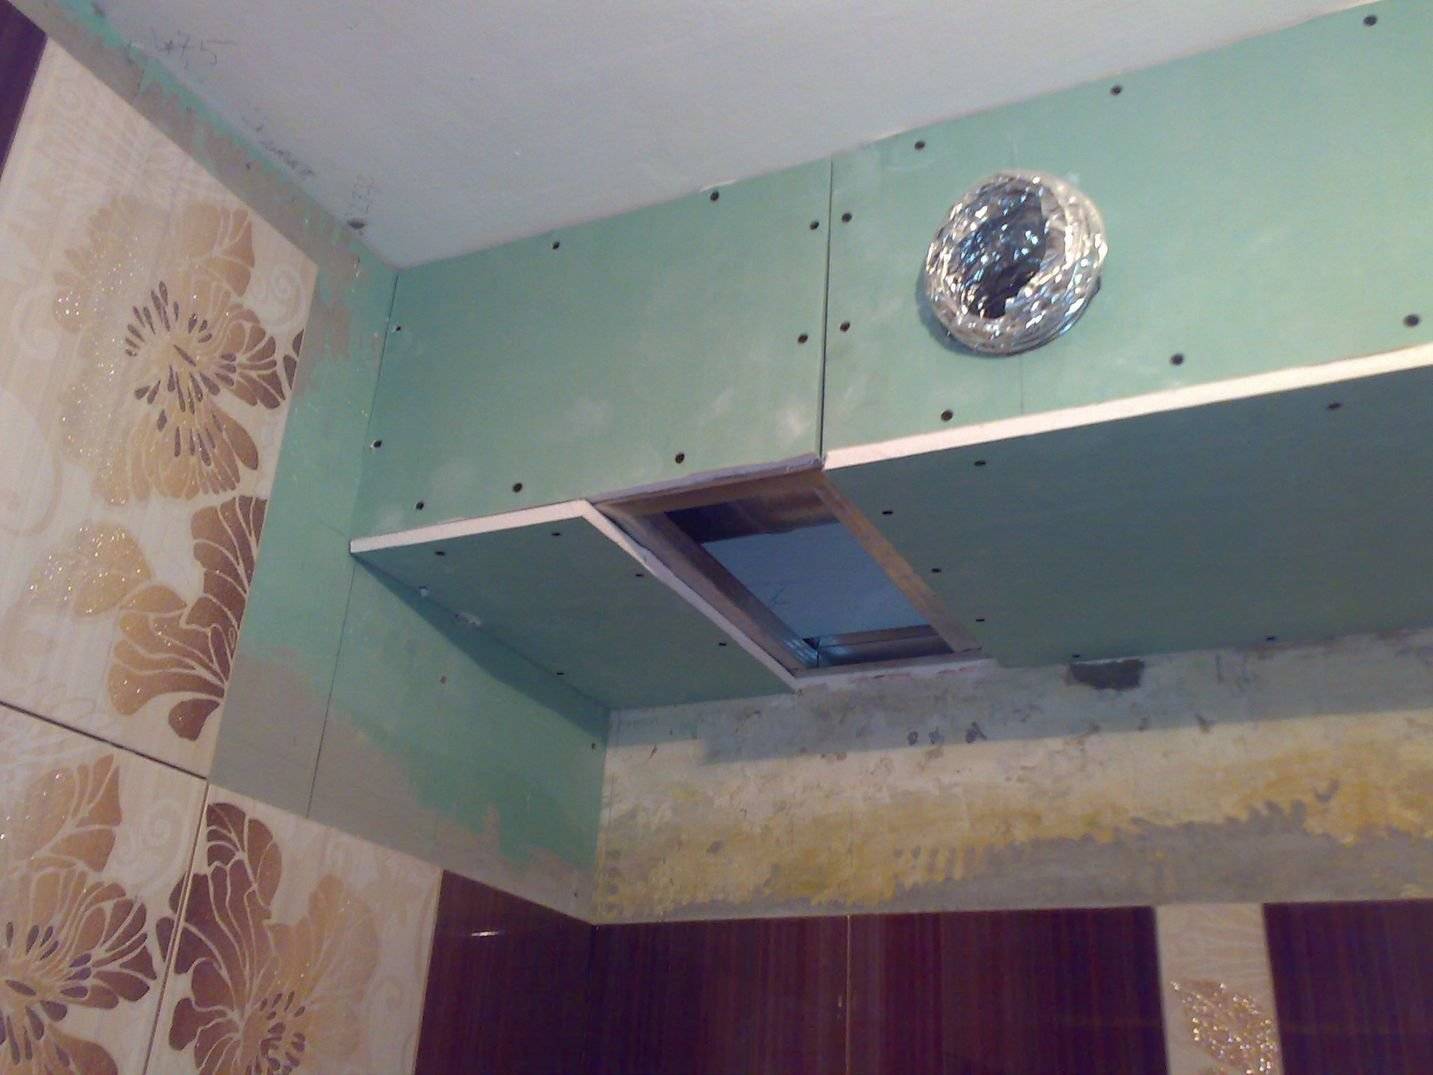
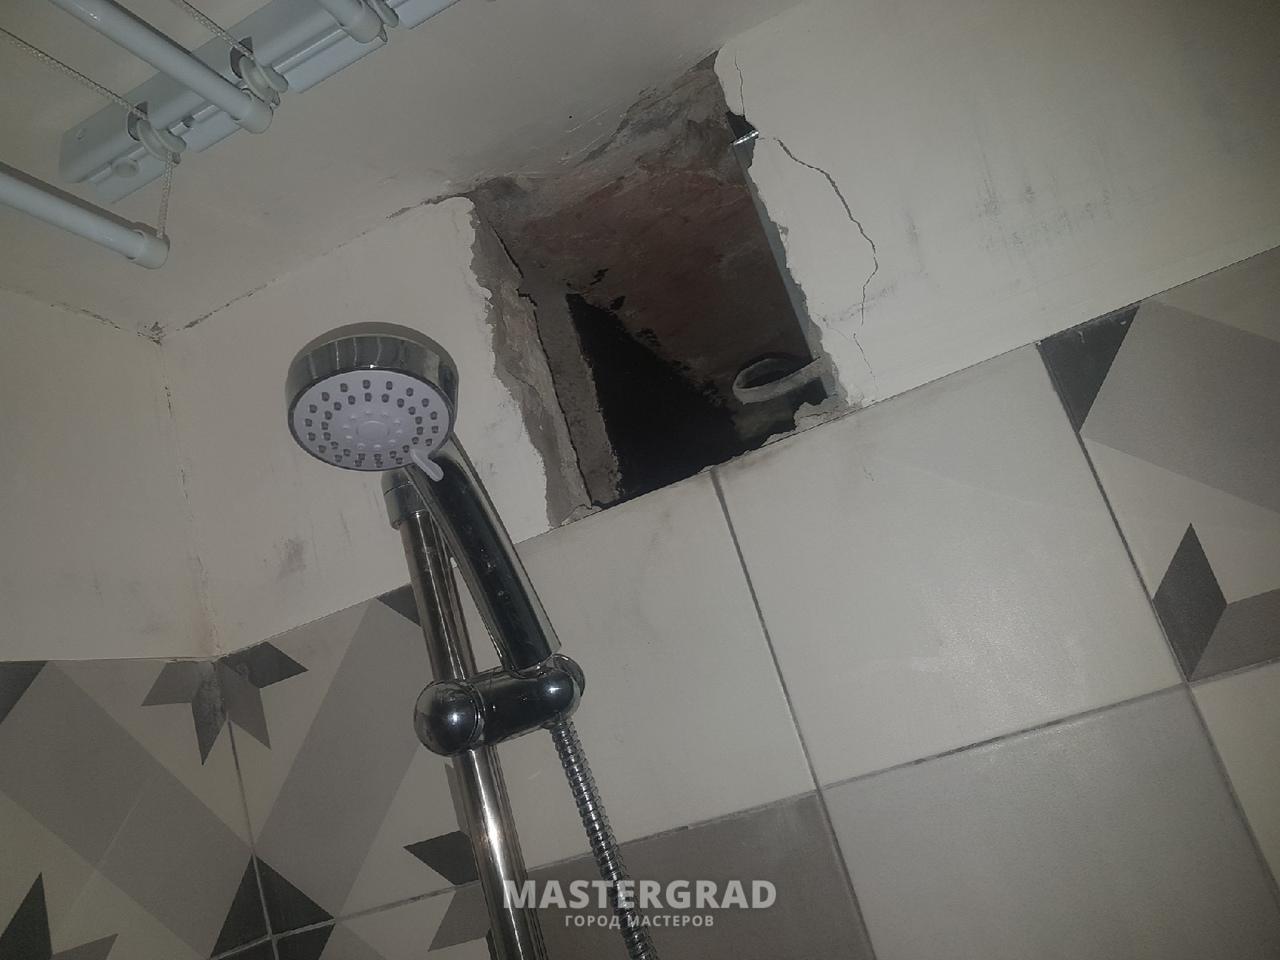
In apartment buildings, the systems are designed so that the ventilation ducts are located on the back of the baths and toilets.
The whole procedure will consist in the fact that it is necessary to carefully create a hole and bring it into the ventilation channel. High-rise buildings should already have niches leading to ventilation ducts
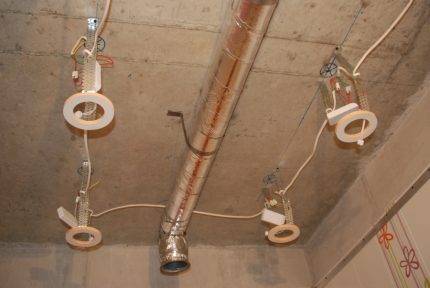
Niches themselves are usually equipped with radial, axial fans; devices are connected to power sources, one of the wires is connected either to a separate switch, or to the same one that opens the light circuit in the bathroom. This is quite handy, as the fan will be guaranteed to run when the lights come on in the bathroom.
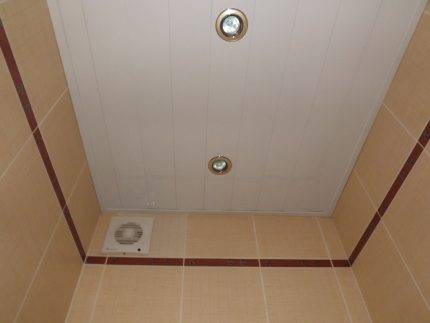
The range of modern systems on the market of ventilation products and services allows you to install many additional attachments - gyroscopes, temperature sensors, humidity controllers, speed controllers, timers.After that, the hole is closed with beautiful decorative grilles.
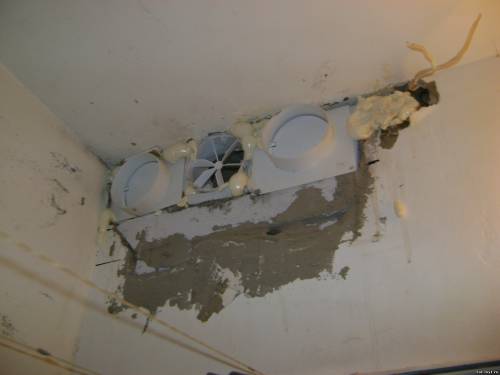
In cases where the bathroom is not combined, when the bathroom contains a ventilation duct, and the toilet does not use the same technology, only twice. The first fan is installed in a niche between the bathroom. and a channel, the second - in the second niche, between the bathroom and the bathroom.
In the case when it is necessary to install ventilation in a toilet in a private house, with your own hands you can make not only an exit to the ventilation duct, but also the ventilation duct itself. Experts advise either to take into account the channels when building walls, or competently connect to the exhaust system of the furnace (if any).
Let's move on to practical schemes and projects of ventilation systems.
What is an exhaust fan and what is it for?
This device looks like a small device that, by means of blades on a shaft, moves air through the pipes of the ventilation system. At the same time, it does not affect the natural exhaust into the bathroom, provided that a check valve is installed in the supply pipe.
purpose
The product for the hood will be in demand in places where dampness, smoke or a specific smell accumulate. Since unfavorable aspects lead to rotting and the formation of fungus or the appearance of dark spots on the walls and ceiling. And for the timely solution of these problems, it is required to restore the purity of the air to the state of sanitary standards. It is in these situations that the ventilating device can solve the problem.
Requirements and norms
Any exhaust system must ensure the pumping out of at least 50 m3 of air in terms of 1 toilet bowl. When using urinals, this figure is halved.In washrooms, all air must be renewed within a maximum of 60 minutes
Important: fresh air masses are not supplied to the bathroom itself (otherwise unpleasant odors and sources of danger will spread to other areas). If the floor area is less than 109 sq.
m and no more than 2 toilets are used, even in winter, the usual ventilation of an apartment or house is enough.
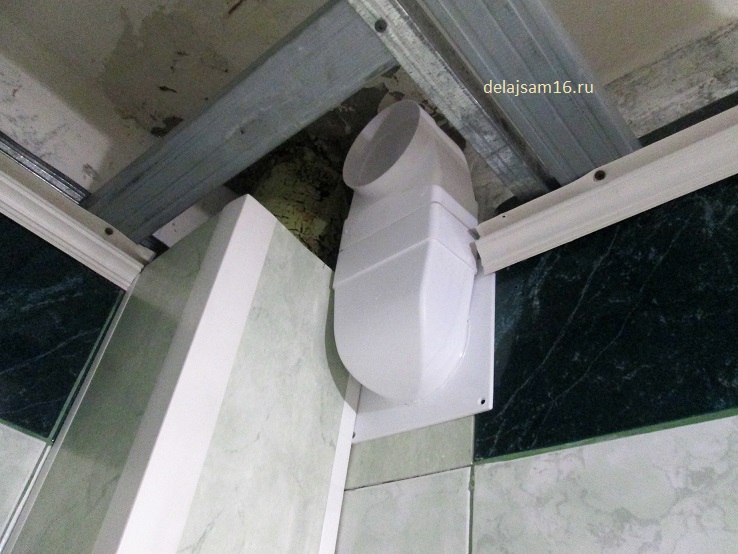
Of course, only a forced exhaust will help to protect against dangers normally. Relying on the natural process of air circulation will not work. Typically, the pull-out ceiling system is covered with a plastic box. To deter insects, rodents, any large debris, the conclusions are closed with a plastic grill.
Norms and requirements
We will study SNIPs and other regulatory documents in order to understand how much new air should come into the bathroom or toilet during ventilation.
According to the regulatory documentation, bathrooms measuring about 10 square meters or more should once receive new inflows of air masses every hour.
More than 30 cubes should leave the bathroom and toilet every hour. If the bathroom is large, then the calculation goes to the area of a small living room and multiplies by 1.5 (due to high humidity). These are the ventilation rates, these numbers are the minimum requirements.


History of origin and hood device
Since the beginning of ancient times, people have thought about the ventilation of enclosed spaces. This was especially true in food preparation areas.Initially, all actions were reduced to simple ventilation or such an arrangement of the cooking place, in which combustion products were naturally removed.
With the development of housing construction, kitchens have also changed. They began to use stoves and fireplaces, in which chimneys were used to remove combustion products. In the 19th century, the Russian scientist E. X. Land suggested that high-quality ventilation is impossible without artificial air exchange. The main development of the production of hoods was due to the Italian company Faber, which released the first plastic hood in 1958.
Modern hoods fully cope with the tasks assigned to them. Without losing performance, they have become compact and easy to use. Competition between companies leads to continuous improvement of product specifications such as performance, noise reduction, reliability.
Types and principle of operation
 A kitchen hood is a device designed to clean the air from smoke, odors, particles of fat, moisture that occur during the cooking process. Depending on the mode of operation, kitchen hoods are flow and circulation. The first type implies an exhaust mode, when the removed air is drawn out of the room, most often into the ventilation shaft. This mode is more preferable than the second one. The circulation mode is based on passing air through the filter system and returning it back to the room.
In appearance, exhaust devices are divided into the following types:
- domed;
- flat;
- embedded.
 Despite the appearance, the principle of operation and the device they have are the same. The main part of the kitchen appliance is the motor.The quality of air purification depends on its work and location. Having an exhaust fan in its composition, it provides the creation of air flows passing through the filter elements.
An asynchronous motor is used as a motor. Its axis repeats the movements of the injected or discharged air flow. Such an electric motor consists of a rotor located inside the stator. The distance between them is no more than two millimeters. The stator is a core with grooves on which the winding is wound. The rotor, the moving part with the shaft, consists of a core with a short-circuit winding. This design looks like a squirrel wheel.
When alternating current is applied to the stator winding, according to the laws of physics, an alternating magnetic field appears. An electromagnetic induction occurs on a closed conductor placed inside this field, which leads to the appearance of a current, and this, in turn, causes the rotor to rotate. Due to the fact that the stator has several leads, connecting a different number of them leads to a change in the fan speed.
Structural elements of the system
A special element of the hood is the check valve. It can be electric, opening the motor at startup, or mechanical, triggered by the pressure of the air flow. Its job is to allow air to pass in one direction and prevent it from passing in the opposite direction. In addition to the electric motor for the hood and the valve, the device includes:
- frame;
- power unit;
- control board;
- control unit panel;
- motor holder housing;
- backlight lamps;
- filters.
The body itself is made of sheet steel and is powder coated to prevent rust.The power supply is designed to start the electric motor and provide the necessary voltage to the control board and backlight lamps. The holder for the motor is used to reduce the level of vibration and noise from its operation, as well as to securely fix it. Filters have a different design, but everywhere a perforated aluminum mesh is used as a primary element. It effectively protects parts of the hood from contamination with grease. The control unit is made in the form of mechanical buttons or touch surfaces.
Types and functions of ventilation for bathrooms
Before making a choice in favor of a particular air exchange system, it is necessary to familiarize yourself with the types and principles of operation of such systems. Extraction of the bathroom can be organized by natural and forced methods.
Natural extract. Such an extract works due to the action of natural factors, such as the difference in pressure and air temperature in the room and outside. The exhaust air is removed through a ventilation duct in the wall of the house. To carry out air exchange, an open window or door through which fresh air enters is quite enough.
Installing the fresh air damper
The natural ventilation system in a private house works with the greatest efficiency only if a way is thought out to ensure a constant supply of fresh air from the street. This problem is perfectly solved by installing a valve in the wall of a private house. Outdoor air enters the house even with tightly closed plastic windows, passes through all rooms and is discharged through the exhaust outlet in the bathroom, covered with a decorative grille.
Thus, a constant air exchange is carried out, which is necessary to eliminate unpleasant odors from the bathroom, saturate the enclosed space with oxygen, and remove heavy humidified air outside the house to the street.
 Device supply valve designs allows you to understand how fresh air is supplied from the street to the house and in what volume
To install the supply ventilation valve in a log house, you will need:
- ordinary drill;
- crown with a diameter of 133 mm with a center drill;
- chisel;
- a hammer;
- tow or polyurethane foam;
- hacksaw for metal;
- screwdriver;
- self-tapping screws;
- screwdriver
In the living room of a private house-cottage, a hole with a diameter of 133 mm is drilled in the upper part of the log wall using a drill and a crown nozzle with a center drill. Work is carried out in several steps, chipping the drilled part of the tree with a chisel and a hammer. The hole in the outer wall is given a slight slope towards the street in order to drain condensate.
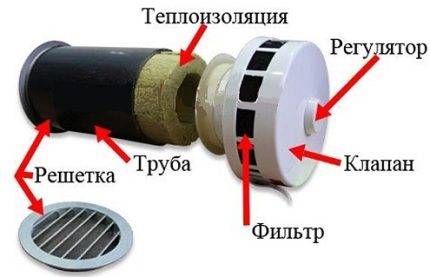
The supply ventilation valve kit includes a one-meter metal-plastic pipe, the inner walls of which are insulated with basalt heat-insulating material. The insulation does not allow the wall to freeze in the area of the drilled hole. A piece is cut from this pipe, the length of which corresponds to the thickness of the log.
The pipe is inserted into a hole in the wall. Small gaps are insulated with tow, which fills the gaps over the entire thickness of the wall. You can replace the tow with mounting foam. Further, from the street side, a grate equipped with an insect net is put on the pipe. The decorative grille comes with the valve.
 Installation of a supply valve in a wooden house can be done on its own without the involvement of ventilation specialists
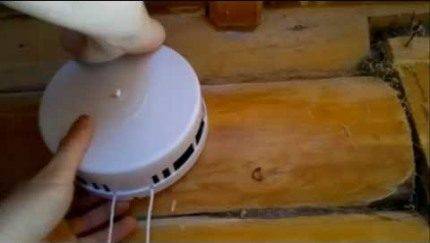
The valve itself is installed last. To install it, you need to remove the headband and free access to the mounting lugs. The valve consists of two petals that open at several angles of inclination. There is an arrow on the body, the direction of which is taken into account when installing the valve in a plastic pipe.


Additionally, we fix the valve to the wall with self-tapping screws. Then we put the headband, snapping it onto the fixed part. We return to its place the wheel that regulates the degree of opening of the valve petals.
Types of ventilation systems
Professionals advise using two types of ventilation systems:
- duct ventilation system;
- channelless ventilation;
The difference between these systems is obvious from their names - in the first design there is a ventilation duct, in the second - air flow is provided without it.
When working with bathrooms or bathrooms, it is desirable to exclude the creation of separate channels. It is customary to create an opening in the wall and remove the exhaust air into the general ventilation branch of the building. This procedure is not only more convenient and less expensive, but also more rational. Of course, this is applicable in multi-storey urban buildings. But, if we are talking about a private house, then you need to design ventilation at the stages of construction, in the process of building walls.
The air supply to the bathroom and toilet is realized, as a rule, through one channel - in the bathroom, after which an additional intermediate opening is created in the wall between the bathroom and the toilet for the passage of the exhaust air.
An exhaust fan designed for ventilation in the bathroom through the toilet can have a wide variety of appearance and size. But the most important thing is the power of the fan. It must match the current in the wiring.
Fans have the following design differences:
- the axial model moves air parallel to the axis of the instrument. This is done thanks to special blades. These systems are designed exclusively for channelless designs;
- diametrical models, which have a rather low productivity, have special drum-type wheels in their design;
- a centrifugal type device with a spiral housing guarantees extremely high performance, however, during operation, the system creates quite a lot of noise;
- the combined, centrifugal-axial device is more silent while working with the same efficiency as a simple centrifugal system.
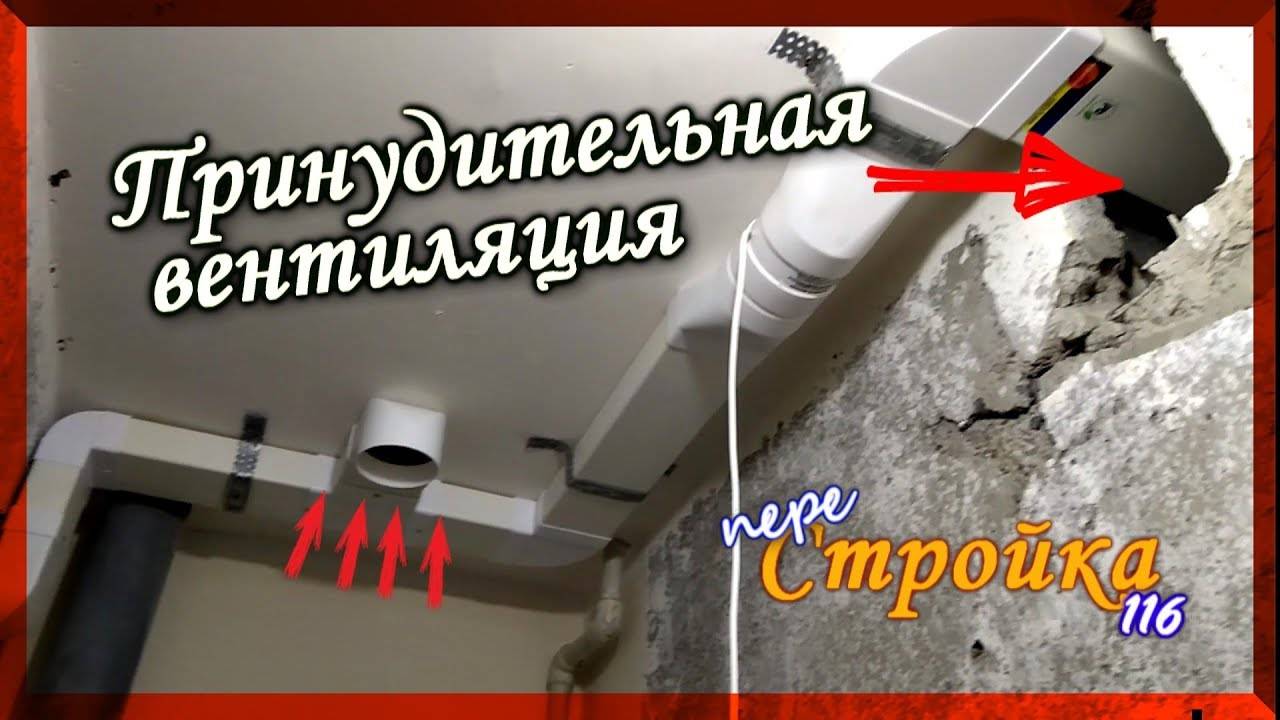
Installation of forced exhaust in the toilet and bathroom
It is possible to carry out the correct installation of a ventilation hood with your own hands only on the condition that you are at least a little familiar with the work of an electrician and do not hold a screwdriver in your hands for the first time. Otherwise, it would be better to let an electrician do the installation work.
Installation steps:
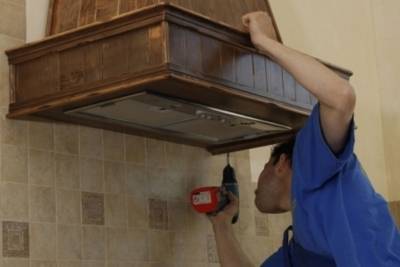
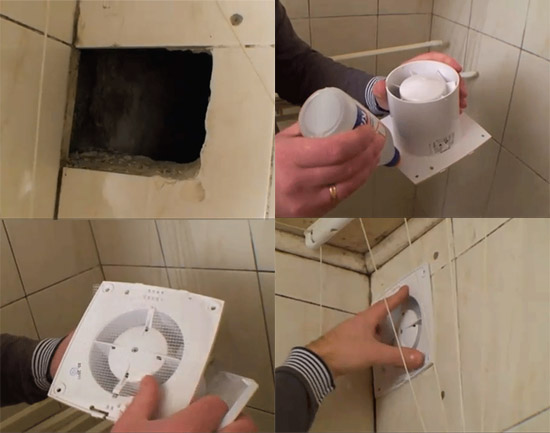
- All forced hoods are mounted in the opening of the natural ventilation channel. If the opening is too small, it can be expanded with a grinder or a hammer and chisel.
- Having mounted the device in the opening, fix it with self-tapping screws or “plant” it on liquid nails. Outside, you should only have a grill.
- The next step is to connect the hood to electricity.You can make a separate switch for the device or connect the cord to the light switch so that the hood turns on when a person enters the bathroom for their own needs. In some cases (for example, in families with children), this technique is not entirely rational - energy consumption will be an order of magnitude higher.
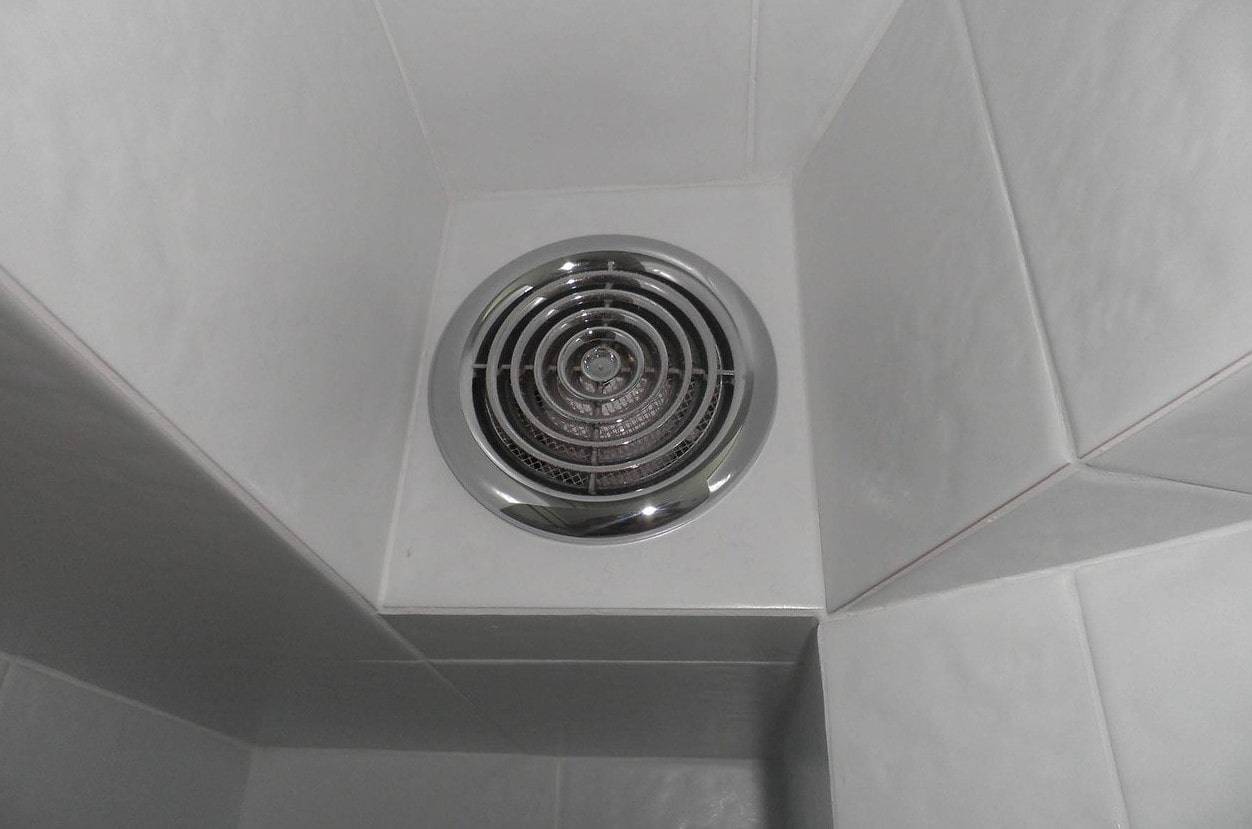
- After completing the installation of the device, fix the grille to it from the outside with the help of clamps.
Completion of the hood installation
Fan mounting
Before you start installing a fan in a bathroom or toilet, we consider it necessary to convey one fact to you.
In fact, fines for unauthorized installation of a fan are issued extremely rarely, so when choosing between the smell of a neighbor's sewer and installing a fan in a toilet (bathroom), most people prefer the latter option.
Installation of an axial fan according to the "bulb-fan" scheme
This scheme will be of interest to those who want to know how to make ventilation in the toilet quickly and without unnecessary "bells and whistles".
- Remove the ventilation grill.
- Clean the exhaust duct from debris and dust.
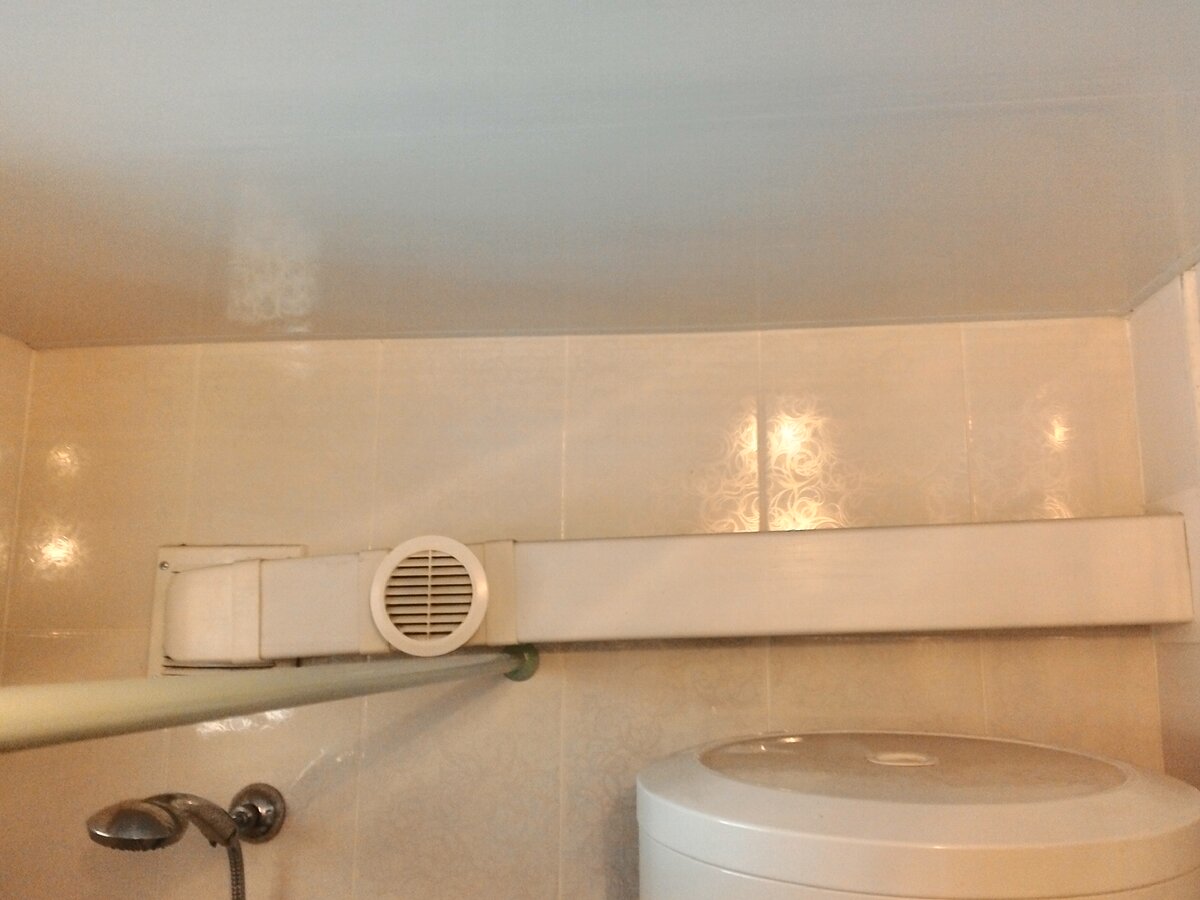
If the hood is mounted after finishing work, on a tile wall, we recommend not to screw the installed fan with self-tapping screws, but to glue it with polymer glue or sanitary silicone. It is best to buy a fan with a decorative latch grille - so you will not see holes for fasteners. - We apply glue to the flange and for a few seconds we connect the surface of the fan and tiles. We tear off, wait about a minute, after which we finally glue it.
- It is impossible to make open wiring in rooms with a high level of humidity, therefore, before connecting, the wire must be hidden in a corrugated sleeve or box.
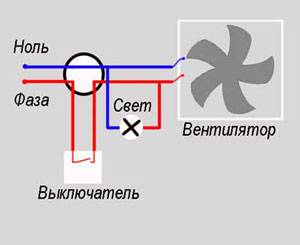
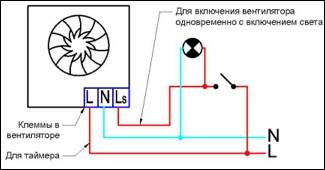
- We connect the fan according to the simplest scheme, which provides for the simultaneous switching on of the light and the fan. For this:
- turn off the voltage in the network;
- remove the cover from the lamp, disconnect the light bulb. We clean the conclusions of the wires going to the light bulb and the fan. We connect the wiring through the terminal block. Twisting is not recommended.
- connect the wires to the fan terminals. Directly if your equipment is powered by 220V or through a power supply if you bought a model with a low-voltage electric motor. - We close the wires with a decorative grille. If you did everything correctly, then when you press the switch key, the light and fan will turn on.
Before you make an exhaust hood in the toilet according to this scheme, you need to be aware of its “weak points”. Since the connection goes through a light bulb, you will have to use a two-core cable (phase-zero). Grounding the equipment will work only if you throw a separate wire between the “ground” of the fan and the “ground” of the outlet or switch.
Installation of an axial fan with a built-in delay timer
For those who want to make ventilation in the bathroom, we recommend purchasing a model with a built-in timer. The scheme of its work is as follows: when the light is turned on, the hood starts working. When a person leaves and turns off the light, a delay timer (from 2 to 30 minutes) is activated and the fan continues to draw out humid air.
Below is the installation procedure, for those who do not know how to install the hood in the bathroom according to this scheme.
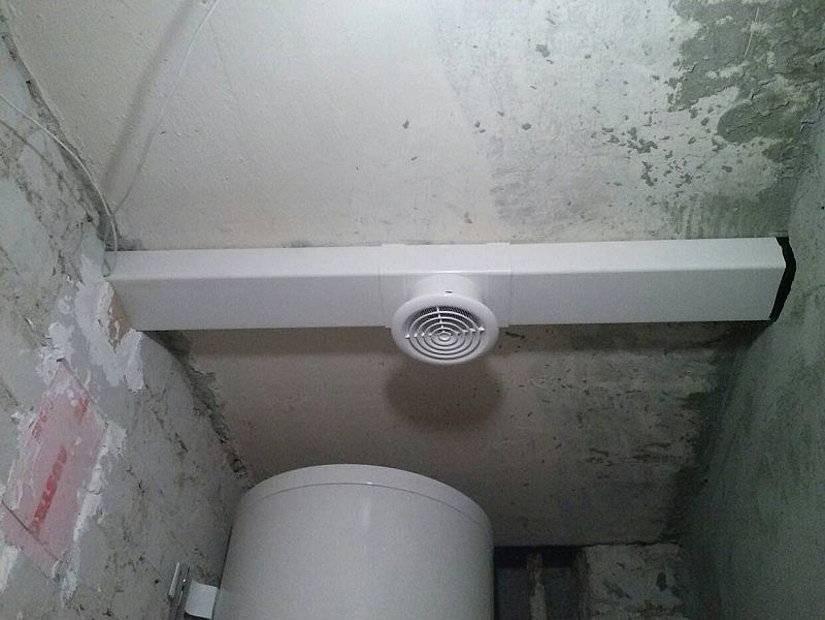
- We make strobes or if the bathroom is already finished, we lay plastic boxes for open wiring.
- Remove the decorative (front) cover of the device.We pass the wires (zero and phase) through the fan housing and the holes of the built-in terminal block, but do not fix it yet.
- Set the delay time. There are models where the setting is made from the remote control, but in inexpensive models this parameter is set using a slotted screwdriver on the TIME control.
- We fasten the body with self-tapping screws to the wall or sit it on silicone sealant.
- We clamp the wires in the fan terminals. We connect the stripped wire leads from the fan and the light bulb through the terminal block. We pull the wiring from the light bulb to the switch. Before you make a hood in the bathroom, decide where the switch will be. For reasons of convenience, we recommend moving it to the inside wall of the bathroom, but the degree of protection of the shell must be at least IP44.
- We put the cable in the box.
- Close and fasten the decorative cover of the fan.
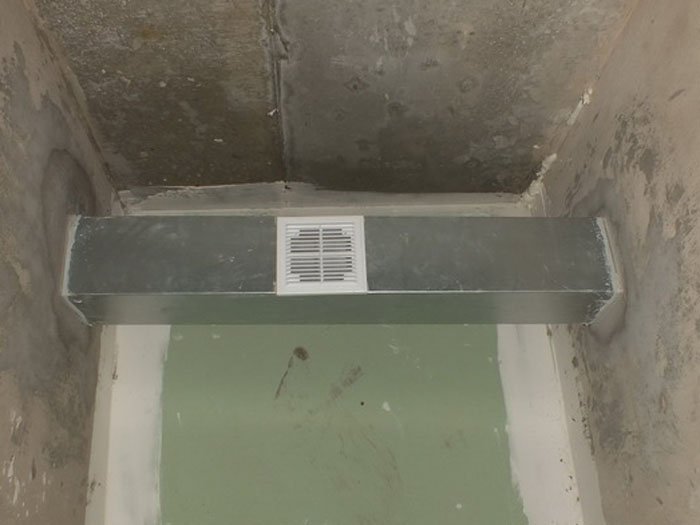
System design
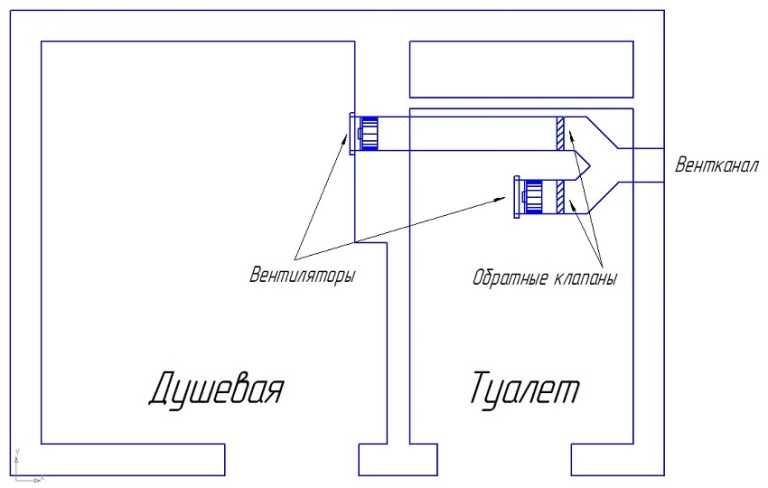
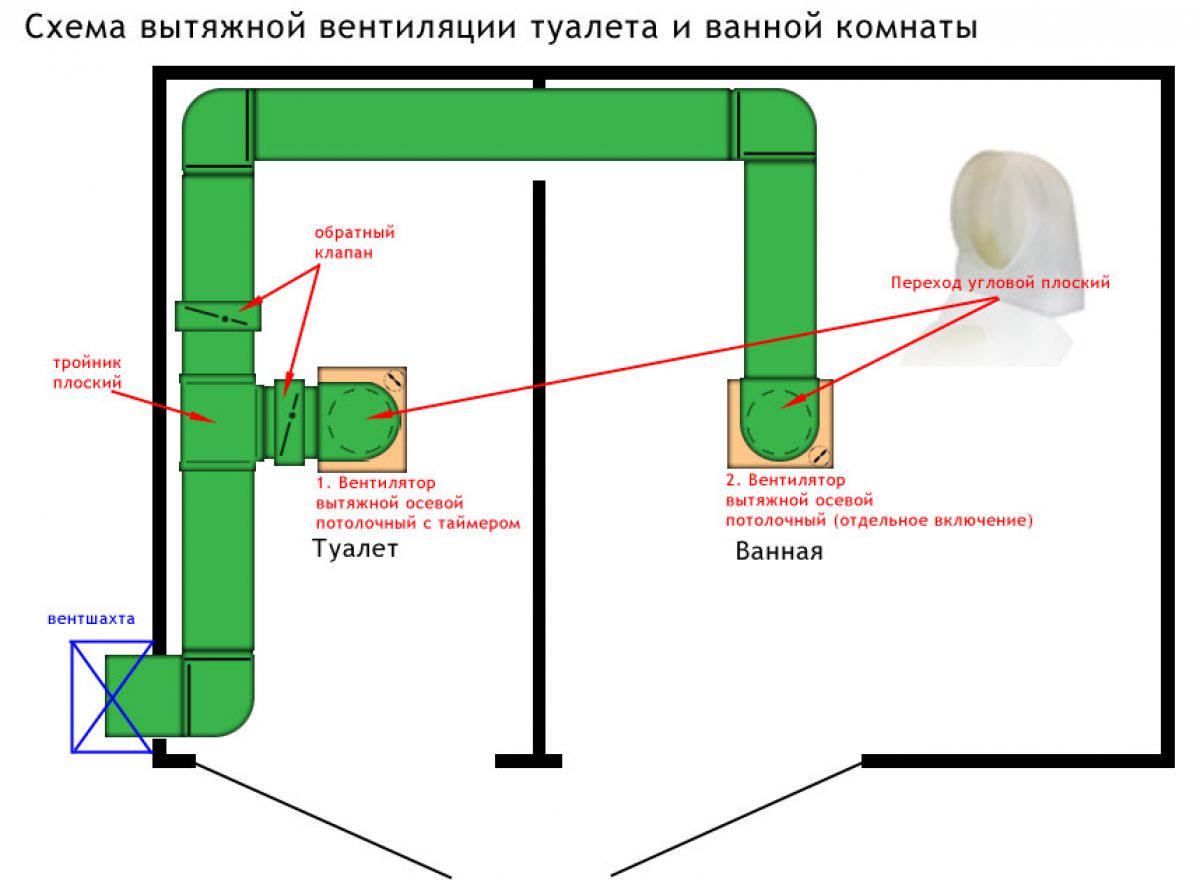
For the introduction of fans into wall openings, the most correct is to use not only decorative grilles, but also filtration systems. If you have to knock out an additional hole between the bathroom and the bathroom (for air wiring), then the filter between the two rooms is a very rational piece of the ventilation system. After all, polluted air from the toilet will not be able to penetrate into the bathroom.
Imagine in the figure fan wiring diagram in the general wiring:
The installation scheme of the ventilation system consists of the following strategic steps:
mounting the air duct (it is important to choose the correct diameter and length);
design an optimal exhaust system for bathrooms (taking into account the power of the electrical wiring);
with your own hands in the toilet (you can also with the help of a master) make a neat, even hole;
Install ventilation in the toilet or bathroom;
When ventilation systems need to be introduced into the toilets and bathrooms of private houses, it is necessary to start by organizing the connection of the ventilation duct to a common chimney; or create a ventilation duct.
When designing a new channel, it is necessary to carefully consider all the stages of laying ventilation through the bathroom.
We advise you not to use metal boxes for creation of a ventilation duct of a private house. Not only do metal structures oxidize, they also require dismantling and replacement every 5 years. If the exhaust air duct is used with a direct outlet to the chimney, then due to carbon dioxide, the metal surface of the box will become even more corroded.


The most rational is the installation of plastic boxes. No wonder they almost completely ousted metal from the market.
Try to avoid corrugated pipes, they are optimal only for short ventilation ducts.
The boxes must be installed during all repairs. Moreover, it is desirable to install before the process is started.
However, even after you have personally designed the entire system, made sure that it functions and complies with all standards, ventilation may fail. The problem may be with inaccuracies in the calculation of the cross sections of the ventilation ducts. Also, the most common mistakes are incorrect installation.
If a lot of time has passed after you built the ventilation system, and after this time the system began to noticeably junk, it means that a lot of debris has most likely accumulated in the channel, which falls either from the side of the roof or from the air. If one of the neighbors did such a major overhaul that affected the box, then the reason may be in traffic jams of construction debris located across the airway.


