- Room cleaning
- Causes of tank leaks and their elimination
- Tank overflow
- Valve not holding
- Other malfunctions
- Trouble-shooting
- How the flush tank works and adjusting its mechanisms
- Method for adjusting the water level in an old-style flush barrel
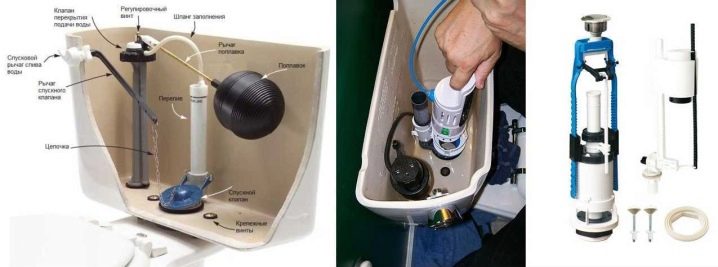
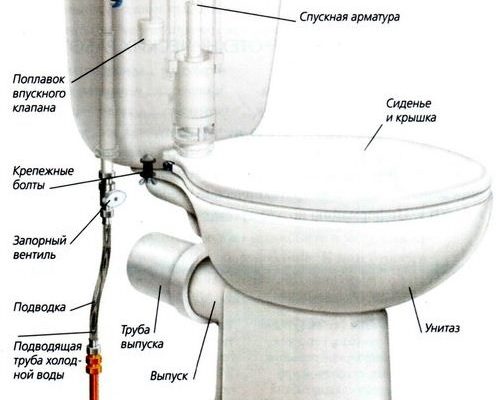
- The main elements of the toilet tank
- Leakage of the tank through the fixation nodes
- Repair of fittings in the drain tank
- Toilet cistern leaking
- Water is not drawn
- Toilet button malfunctions
- Adjustment
- Elimination of sticking
- Elimination of failure
- Replacing the button with a new one
Room cleaning
Cleaning the toilet before repair is easier than the bathroom, but it has its own characteristics:
- Before knocking the tiles off the floor, carefully inspect the toilet mounts (assuming all plumbing is removed immediately). The laboriousness of work on the floor and the cost of them largely depend on their condition, see the section on repairing the floor.
- Both the floor and the walls do not need to be dug up to bare masonry, slabs or ceilings: the bulk of the plaster and screed in the toilets, as a rule, do not deteriorate even in damp block Khrushchevs.
- Tiles can be knocked down rough, without cleaning the floor to a smooth surface: with a self-leveling screed, small irregularities are insignificant.
- The paint and the top layer of plaster from the ceiling and walls are dusty, but easy to clean off with a drill and a round metal brush. With some skill, you can then immediately paint, glue tiles and wallpaper.
- The skill of cleaning with a brush is developed quite quickly, so it is better to start cleaning from the surfaces covered later by the sanitary cabinet: there the flaws will hide forever.
- At the end of the stripping, the walls and ceiling must be vacuumed and treated with a roller with a deep penetration primer on concrete. While you are messing with the floor, the walls and ceiling will be completely ready for painting, gluing and cladding.

Causes of tank leaks and their elimination
If water does not hold in the toilet bowl, then this can be caused by two reasons:
Below we will take a closer look at the possible causes of malfunctions in these mechanisms and their correction.
Tank overflow
Tank overflow can occur for the following reasons:
- Float position incorrectly adjusted – adjustment can be carried out in different ways, depending on the design of the valve. For example, if the lever is metal, then you just need to gently bend it. Plastic levers can have a ratchet or an adjusting screw.
- hole in the float - in this case, the part can be temporarily sealed and then replaced.
- Float covered in mud - as it is not difficult to guess, the part just needs to be cleaned of dirt.

Membrane failure
- if the water does not shut off in any position of the float mechanism lever, then there is only one way out - to replace the shut-off valve. The price of the membrane is low and it is not difficult to find it on the market or in specialized stores.
Dismantling parts is not at all difficult.In some models, all fasteners are plastic, so dismantling can be done even without tools.
Valve not holding
If the water supply is shut off, but the flow does not stop, then the valve does not hold in the toilet bowl.
There can be two reasons for this error:
- Dry rubber valve;
- Debris got under the valve.
In any case, to fix the problem, you will need to dismantle. The design of the drain device may be different, respectively, the dismantling is also carried out in different ways. Most often, the mechanism is disassembled into two parts, as a result of which you can get the valve.

The instructions for fixing this problem are extremely simple:
- First of all, it is necessary to clean the valve and the drain hole from dirt;
- Then the device must be assembled and installed in place;
- If the toilet still does not hold water, you need to disassemble the mechanism again and replace the valve.
Other malfunctions
In addition to those described above, some other malfunctions may occur in the drain system, the following are the most common:
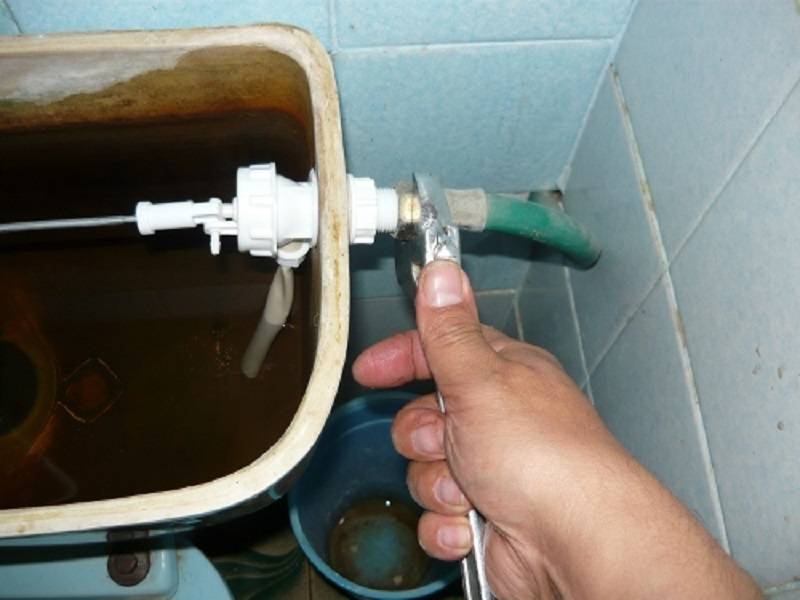
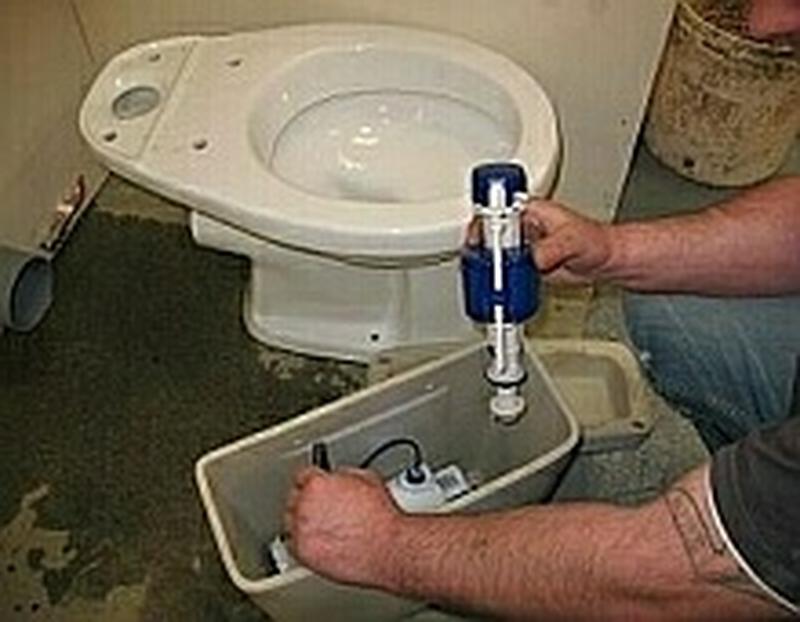
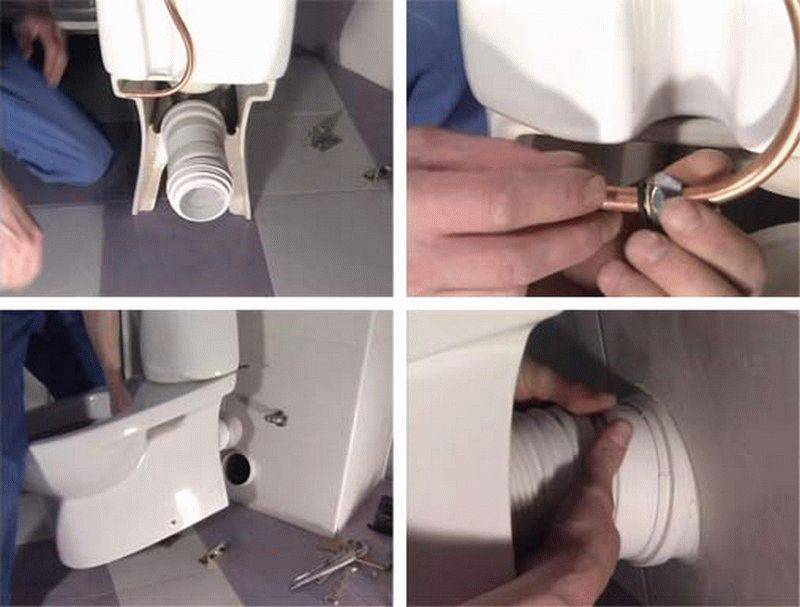
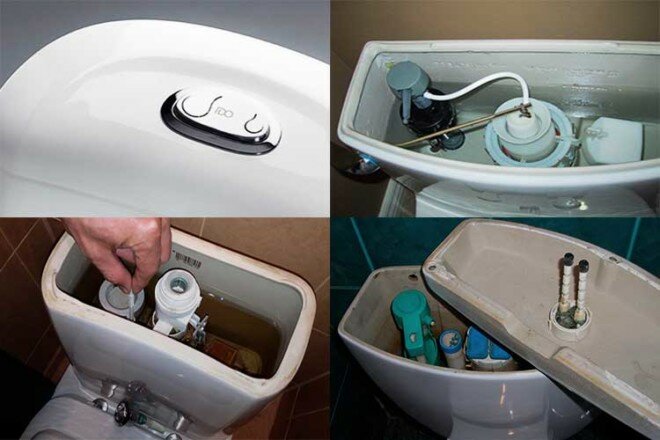
Connection leaking between cistern and toilet - in this case, it is necessary to completely dismantle the tank, replace all existing gaskets, including screw seals.
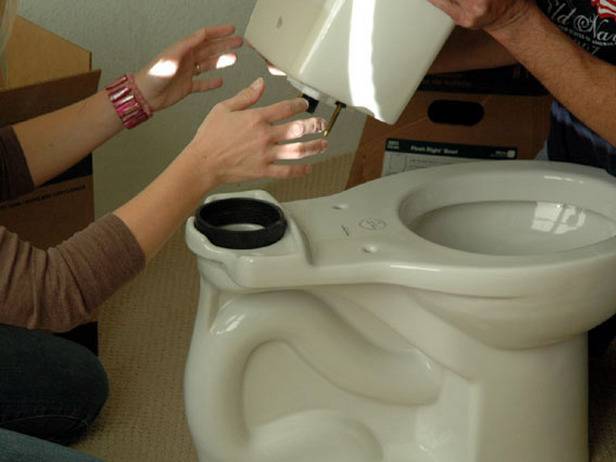
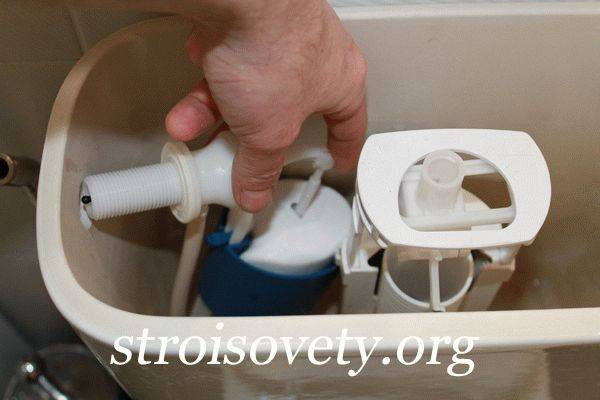
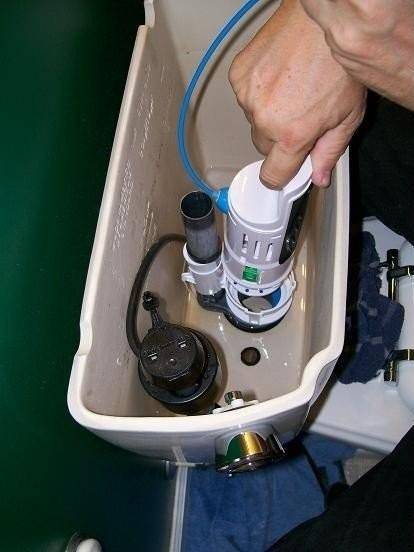
In the photo - dismantling the drain tank
Mechanical failure of any elements of valves - this problem can only be solved by replacing broken parts.
That's actually all the information that you need to know in order to independently eliminate such water breakdowns.
Trouble-shooting
If the toilet cistern is broken and the water drains continuously, the point is in the wrong position of the float lever. In this case, this can be easily fixed by installing it in its original place. Another situation is also possible.The float is a light hollow vessel filled with air, which allows it to easily float on the water surface, the level of which is 25 mm below the inlet. Perhaps because of the water that has entered the float and weighed it down, the shut-off valve does not close completely. To eliminate the malfunction, the water must be drained, the gap must be sealed with heated plastic. Given that it is undesirable to leave the toilet in this state for a long time, you will have to buy and install a new float in the very near future.


How to fix a toilet cistern that has been leaking water from the tank into the toilet and, in addition, the flush button often does not work? In this case, the matter is in the siphon membrane, which, due to wear or tear, does not retain water. There is only one way out - the replacement of the membrane, for which it is necessary:
- free the tank from water;
- on the crossbar installed on the edges of the tank, fix the float;
- remove the siphon and the membrane without completely unscrewing the nut between the tank and the flush;
- replace the membrane and reassemble the system.
Modern flush cisterns for toilets, despite the different design, have common problems. In cases where the operation of the flush button is disrupted, the damaged rod will have to be repaired - for this, you can independently make a new part from the wire, removing the broken one - in case of emergency. At the earliest opportunity, the rod must be replaced with a new one.
If the toilet tank is leaking, repairs must be done immediately - over time, the leak can increase, causing significant trouble for the owners.The cause of leakage can be the wear of the membrane, gaskets, corrosion and mobility of fasteners.
How to repair the toilet bowl if the noise of the water that is being collected interferes with those living in the house? There are at least two proven options:
- make and install a muffler with your own hands from a piece of flexible plastic pipe: vertically, the lower end of the plastic muffler pipe is immersed below the water level, the upper one is installed next to the float valve;
- put a control valve, which can be purchased at plumbing stores.
 How to fix a toilet bowl
If the measures taken do not help to reduce the noise produced when the tank is filled with water, the drain system will have to be replaced.
It happens that the water does not descend. This occurs if the water level in the tank is lowered as a result of an incorrect angle of the float valve lever, which can be corrected with the adjusting screw. If the float system is made of brass, the position of the lever can be changed by bending it up, slightly unscrew the nut, and raise the mount.
Smooth draining can be ensured by tightening the screw securing the trigger lever.
If it becomes necessary to replace the drain mechanism, before starting work, the water supply valve to the toilet should be removed, the cover removed, the tank separated from the toilet bowl by unscrewing the fasteners. To perform work, it is convenient to place a drain device for future work. Remove the old drain system, replacing it with a new one. Install the tank on the toilet, securing with new fasteners
After installing the system, tighten the seal washer on the inlet hose, trying to do it carefully so as not to cut through the rubber gasket - otherwise a leak may appear in this place
Given the long stay in conditions of high humidity, the fasteners may rust, and additional effort will be required to remove them. In this regard, you should also consider the need for replacement and stock up on new gaskets (seals) and fasteners that will be needed when installing the tank in place.
 We repair the drain tank with our own hands
Sometimes, although rarely, questions arise during the operation of the toilet. Check the correctness of its installation, it is possible that the toilet is fixed incorrectly, with a slight skew. In this case, you will also have to check the installation of the tank - it is possible that the problems described above have arisen in it.
How the flush tank works and adjusting its mechanisms
After installing the toilet bowl and connecting it to the water pipe, it is necessary to check that all connections are tight, the liquid is collected to the desired level and drained from the tank completely or half of the capacity. All this can be achieved by adjusting the flush mechanism in the toilet. Before embarking on this process, it is necessary to understand in detail what it consists of. The drain mechanism is adjusted using tools and materials such as:
- wrench;
- pliers;
- fumlenta;
- wire;
- rubber gasket;
- sealant.
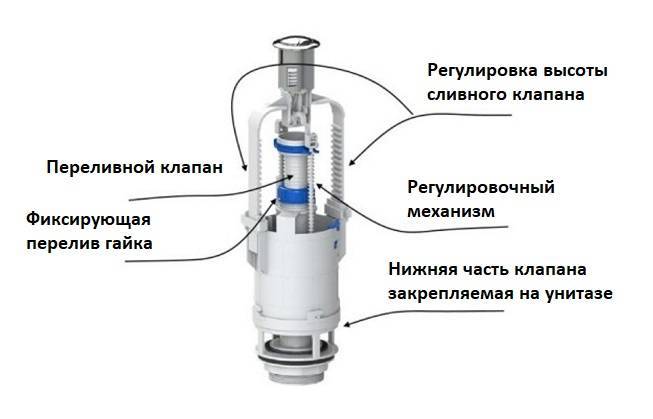
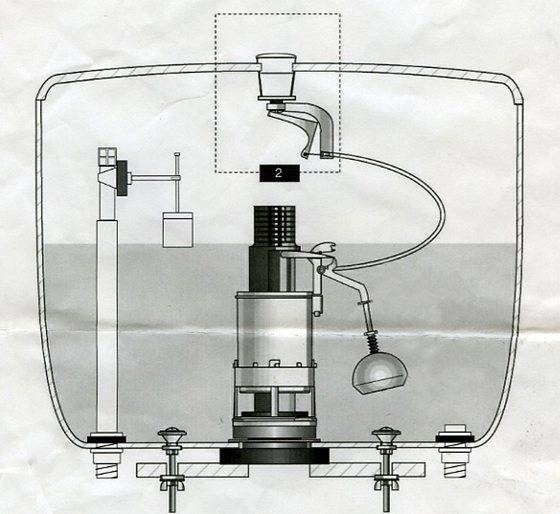
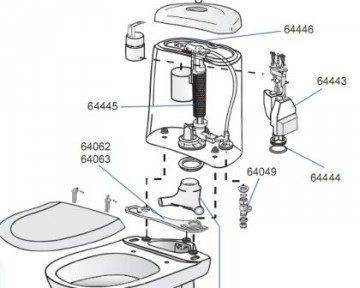
Schematic diagram of a toilet cistern.
Currently, many different modifications of toilet bowls and tanks for them have been created, but the principle of operation of the internal mechanism is the same for everyone.The drain device of all modifications is based on a device for draining water and shutoff valves, which consists of an inlet valve and a float. The water supply device is attached to the hole, which is located on the top right or left side of the barrel. A rubber gasket is placed on the inside to fasten the valve, and a plastic nut is screwed on the outside.


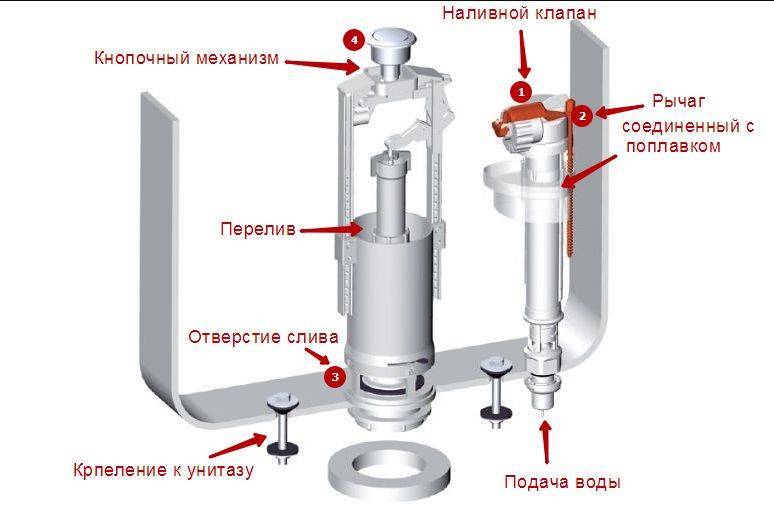
When liquid enters through the valve, the float rises and, at the right level, presses on the plastic plug with a rubber gasket at the right level. She, in turn, closes the water supply nozzle. To avoid overflow, the float can be adjusted. To do this, its lever must be bent so that the liquid is just below the drain pipe. If the lever is made of plastic, then it is provided to be adjusted with a ratchet or a fixing screw.
In some flush tanks, water constantly flows into the sewer through the drain pipe and cannot rise to the desired level, of course, and the float cannot rise to the required height. This happens when the seal is worn out a little, and because of this, the seal is broken. Eliminate such a malfunction can be the help of a simple device - a small load, for example, a nut.
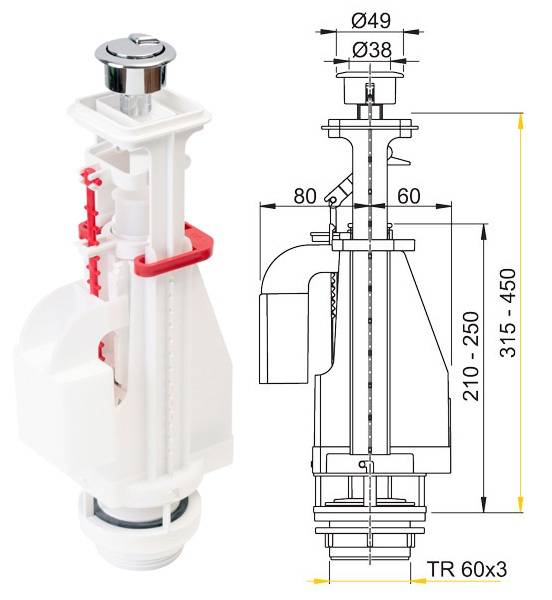
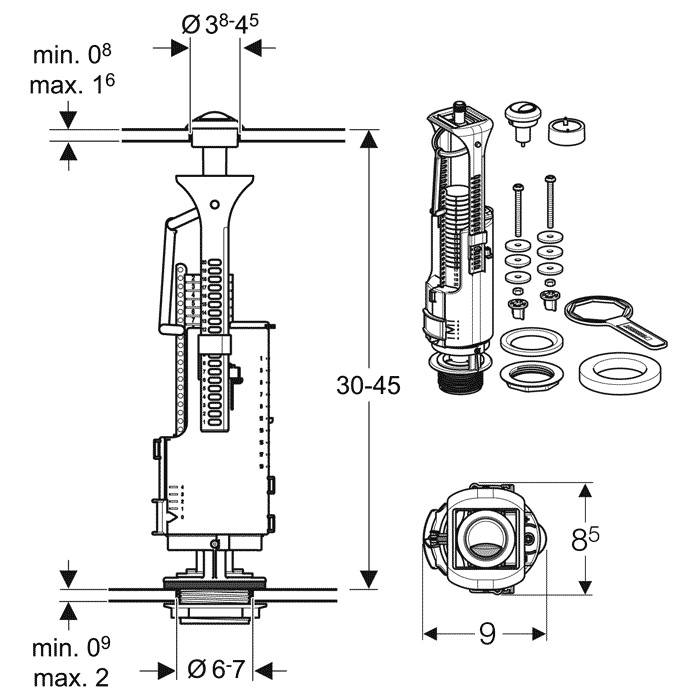
Scheme of the drain mechanism 3/6 l for the toilet bowl.
It is not difficult to assemble such a structure. To do this, the weight is suspended above the outlet on a pear or lever. Such a device helps to achieve not only tightness, but also they can adjust the drain process.When the trigger raises the valve using a button or lever, the liquid begins to drain into the toilet, and at that time low pressure forms in the pipe and, despite strong suction, using a weight, you can stop draining the liquid at any time.
The water level can also be adjusted using the overflow pipe. It is set so that its upper edge is located just above the water level, while the float will be able to close the valve for its intake. Sometimes, due to some defect, liquid is drawn into it, and it cannot perform its function, therefore, in this case, the float must be replaced.
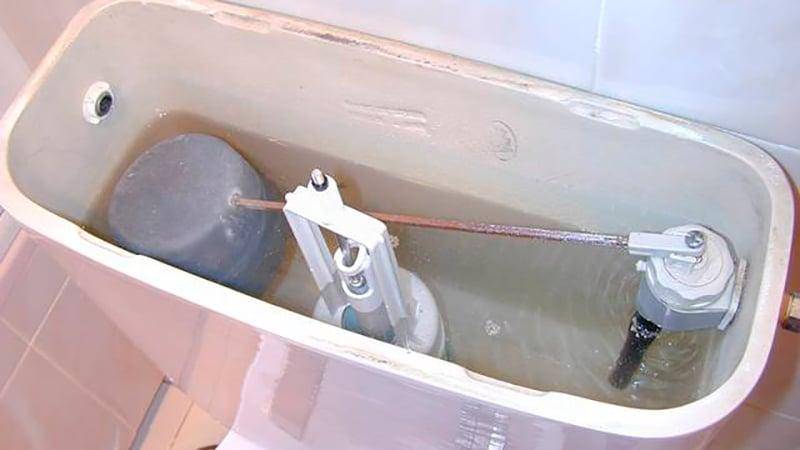
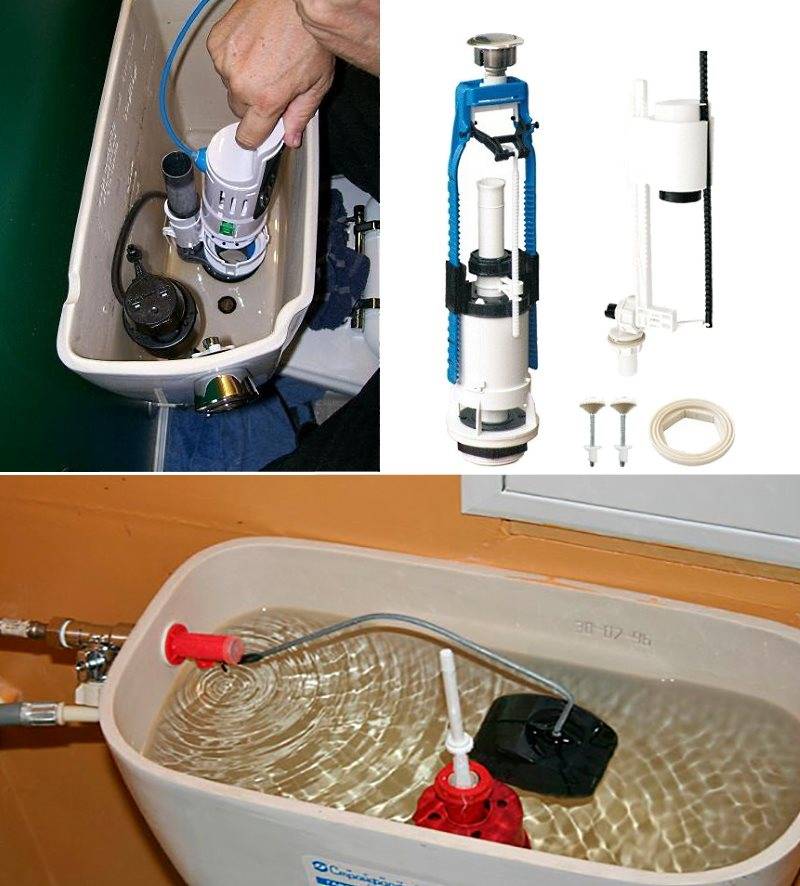
Method for adjusting the water level in an old-style flush barrel
A simple cistern design.
In newer models of this plumbing equipment, it is not necessary to adjust the toilet bowls, since the liquid has already been drained into them by the manufacturer. In modern cisterns, there are two buttons for draining. One serves to completely release water into the sewer, and when the second button is pressed, only half the volume of the tank is consumed.
On older models, in which the tanks are suspended high, the side lever, when draining water, grabs the bell by the ear and because of this, over time, during operation, it can bend or pinch the hinge. In order for such a flushing device to work clearly, the hinge between the lever and the button is fixed with several turns of wire. In this way, a device is made in the form of a fixed lever between the drain mechanism and the riser
With the help of such a device, you can adjust the flow of fluid in the toilet, which is important for economical water consumption.
Using all these simple tools, adjust the cistern flush mechanism so that the toilet works properly and economically.
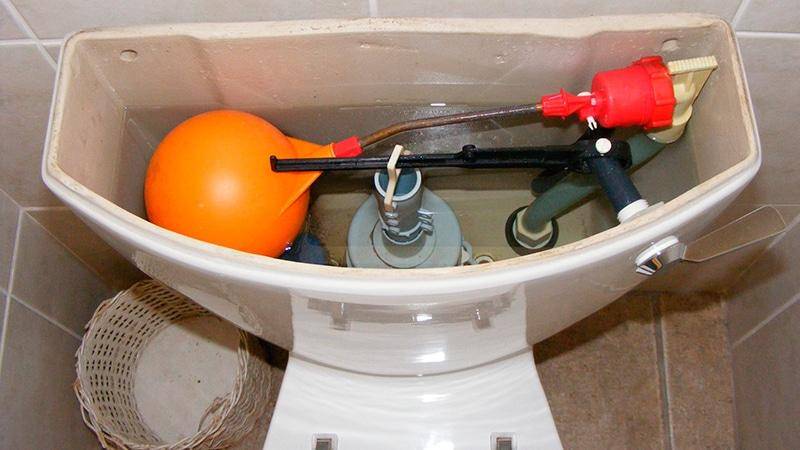
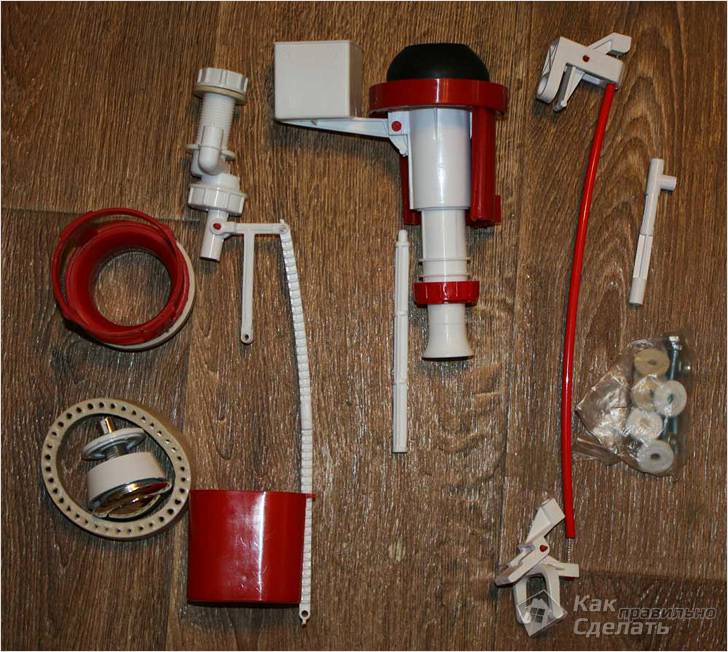
The main elements of the toilet tank
The most common are the push-button and rod mechanism for draining water, the latter option is more common in old toilet bowls of the Soviet era. In all cases, water fills the tank to the required level, and then its flow is stopped by a shut-off valve using a float mechanism. The device of any drain tank includes the following components:


- Drain valve. It provides water supply to the toilet bowl when you press the button or raise the stem. The valve is hermetically fixed in the hole and in the normal state does not allow leakage.
- Filling valve connected to the float. He is responsible for controlling the amount of water in the toilet bowl, ensuring that the flow stops when the desired level is reached.
- An overflow mechanism that prevents exceeding the set mark and flooding the room. It activates the drain when the start button is pressed, and excess water will go down the drain.
Do-it-yourself toilet cistern repair can be done if one of these basic elements is damaged. If there are cracks on the body after a strong blow, it is better to immediately change the tank to a new one. No adhesives can reliably fix the ceramics, there will be a constant risk of new leaks and flooding.
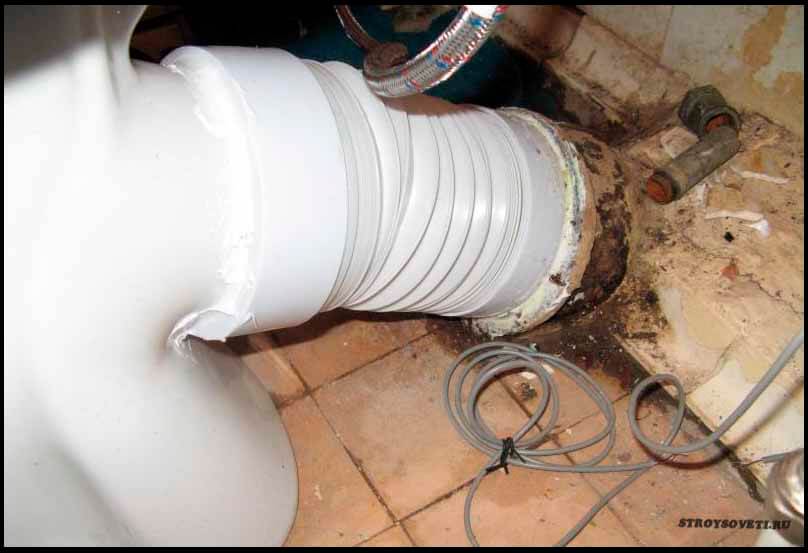
This is interesting: Installing the corrugations for the toilet: analysis of installation steps
Leakage of the tank through the fixation nodes
The most dangerous type of leakage that can harm the property of the owner and neighbors is the flow of water through the fasteners of the drain tank to the appliance on the floor.In this case, it is urgent to replace the defective bolts with new ones.
For this you need:
- drain the water from the tank;
- disconnect the inlet valve, as well as the supply hose;
- unscrew the bolts, remove the tank;
- pull out the old fasteners from the grooves;
- clean the joints from rust, corrosion with a stiff brush.
- screw bolts with a fixed cuff onto the shelf;
- tighten fasteners;
- make a test run of water, followed by checking the system for leaks.
If this procedure did not bring the desired result, you should pay attention to the condition of the rubber gaskets located on the tank itself. Their deformation is also the cause of the leakage of the device.
To fix the problem, you need to replace it.
First of all, you should turn off the water, loosen the lock nuts, remove the block on which the gasket was located, replace it, if necessary, apply sealant to its surface. After that, install it in its original place, carefully tightening the bolts.
Repair of fittings in the drain tank
During the operation of the toilet, problems periodically arise - either it flows, or, on the contrary, no water is drawn into it. Sometimes, tired of the inconvenience, people buy new toilets. But in vain. Most of the faults are fixed in 10-20 minutes. Moreover, everything is so simple that everyone can handle it. You don't have to call a plumber. You can do everything with your own hands.
We are talking about devices with a lower water supply. After installation, the toilet cistern must be adjusted. By default, they come from the factory set to the maximum amount of water in the tank. This amount is often excessive.With a simple adjustment, we can reduce the volume of water in the tank. For this:
- Turn off the water supply, drain the water.
- Unscrew the button.
- We remove the cover.
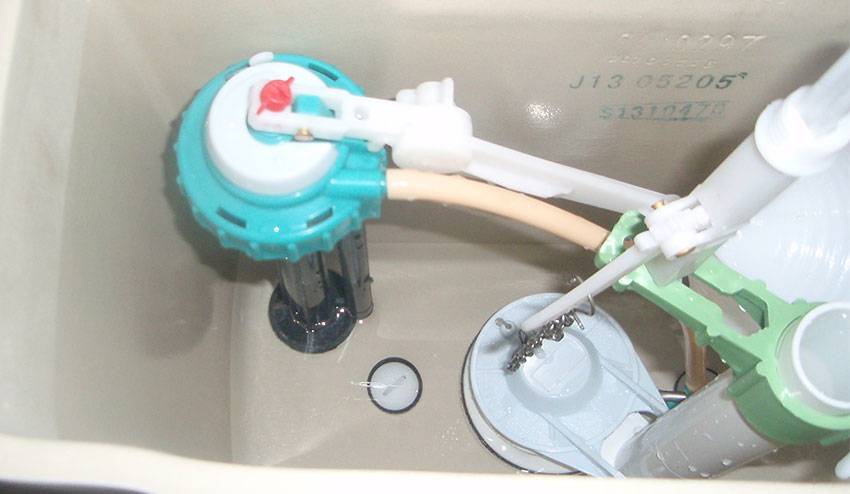
Where is the adjusting screw
- There is a plastic screw on the float mechanism. Unscrewing / twisting it changes the amount of water. If it is necessary to reduce the amount of water, we tighten the screw, lowering the float down. At the next filling (you can turn on the water), the water level should drop.
- Install the cover and button.
We invite you to familiarize yourself with the sound of flushing the toilet: do-it-yourself video installation instructions, features of silent products, what to do if the tank is noisy, price, photo
The same procedure is necessary if water constantly leaks from the tank. One reason is that the float is too high. Because of this, water flows through the overflow system.
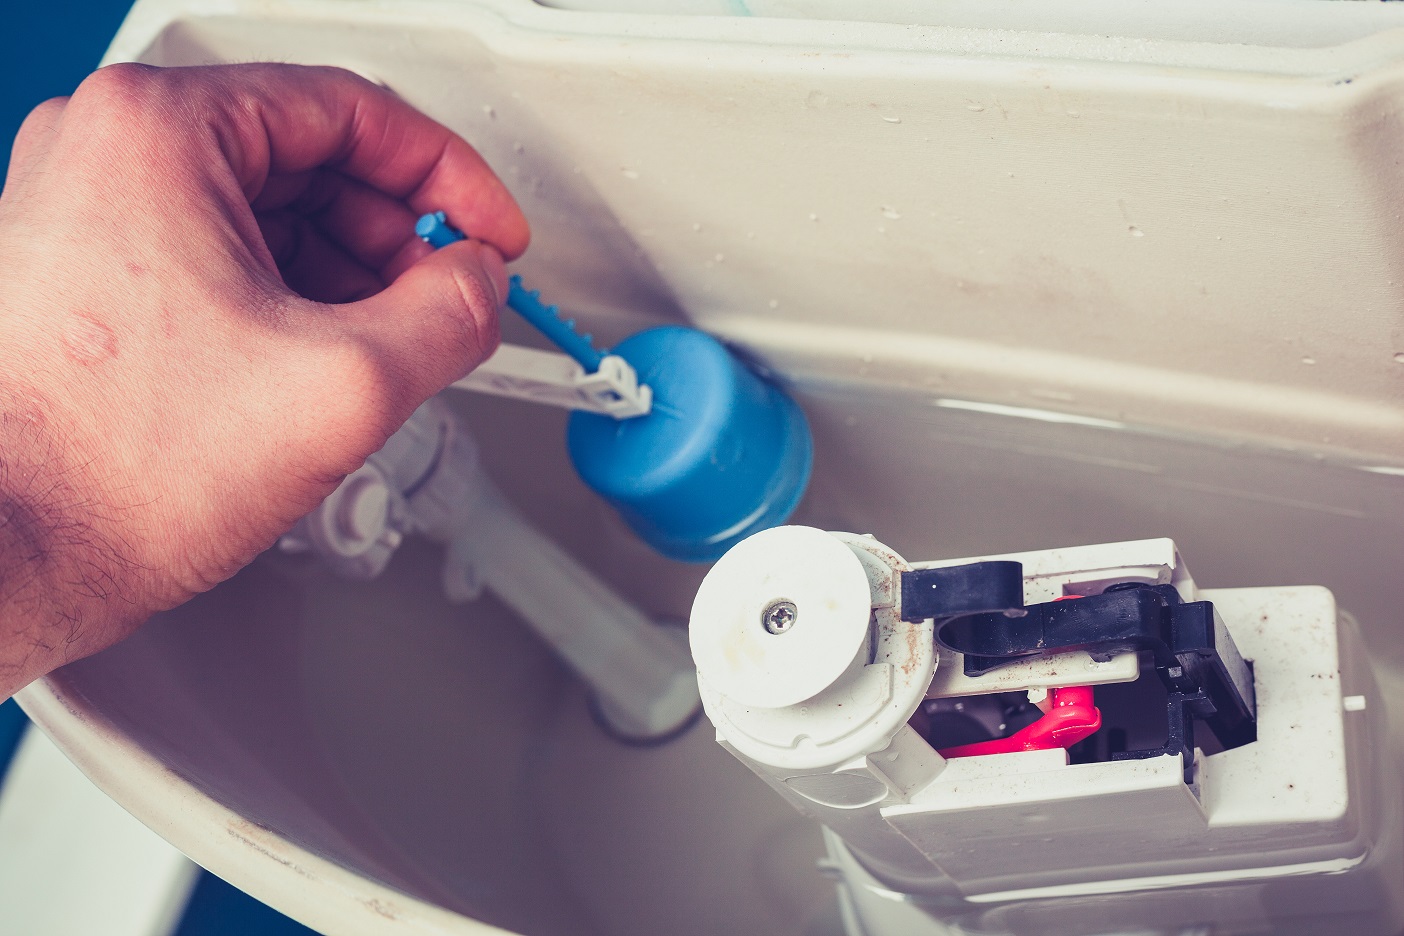
With a side water supply and a float mechanism, the adjustment is even easier - we change the position of the float by bending its lever. On the one hand, it is easier, but on the other hand, it is more difficult. You have to bend it many times to achieve the required level.

By bending the float lever we change the water level in the drain tank
Toilet cistern leaking
If the water in the toilet is constantly leaking, and its level is normal, we move on. There are several reasons for this leak. And if so, then the methods of elimination will be different.


- The sealing gum under the drain valve in the tank silted up, dirt got under it, a groove (or several) appeared on its surface. The method of treatment is to clean the existing gasket or replace it with a new one. To resuscitate the old one, you need to: turn off the water, drain it,
- remove the trigger mechanism by unscrewing the plastic nut from the bottom;
- pull out the drain valve, remove and examine the gasket, clean it of settled particles, if necessary (there are grooves), grind it with very fine sandpaper until smooth;
- reinstall, connect everything and check the operation.
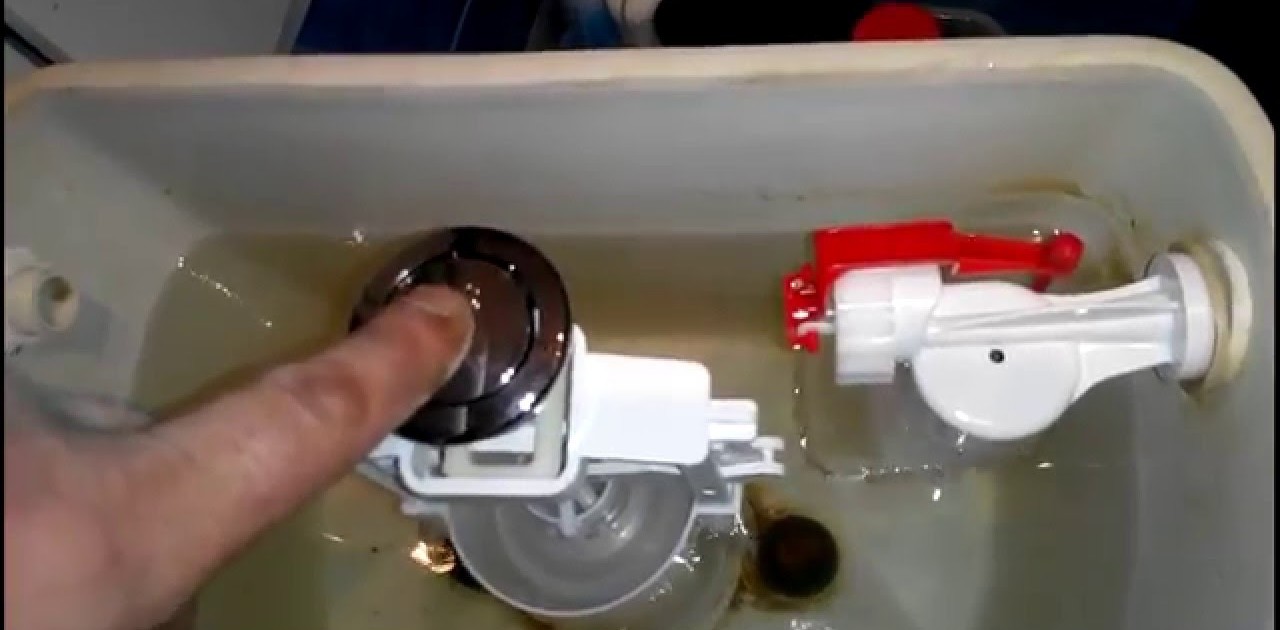
The trigger mechanism itself was demolished. To check if this is the case, you can lightly press on the mechanism with the cover removed. If the leak has stopped, then that's the issue. Still leaking - you should try to clean the gasket (described above) or replace it. If the flow stops when pressed, you can replace the fittings or weight the glass.
Where to put weight
To do this, remove the trigger mechanism and put something heavy in its lower part. It can be several pieces of metal, a sock filled with pennies, sand, etc. We install the device in place and check the work.
Water is not drawn
Another problem that can eliminate by hand - Water is not drawn into the drain tank. Most likely it's a blockage - a filter or tubes are clogged. Long talk, better watch the video.
If your toilet has a leak, you should pay attention to the following:
- whether the drain tank is hermetically fixed;
- whether the seal is worn or damaged.
Drain tanks with a bottom water supply are more difficult to repair. In them, a leak can also be formed from the wear of the seal at the point of entry of water. In this case, the seal should be replaced with a new one and fixed with sealant.
Repairing the valve on the drain tank can also solve the problem. The purpose of the valve is to ensure the dosing and movement of water in the toilet.The basic principle of the toilet is as follows: when water enters, the float rises to a predetermined level, after which the water stops flowing. After draining, the float lowers and water begins to accumulate again.
Toilet button malfunctions
All signs of a malfunction of the toilet flush button can be classified as follows:
- insufficient volume of water for flushing (full or partial);
- sticking;
- sinking (falling).
In the first case, it is not about how to repair the button, but about adjustment.
Adjustment
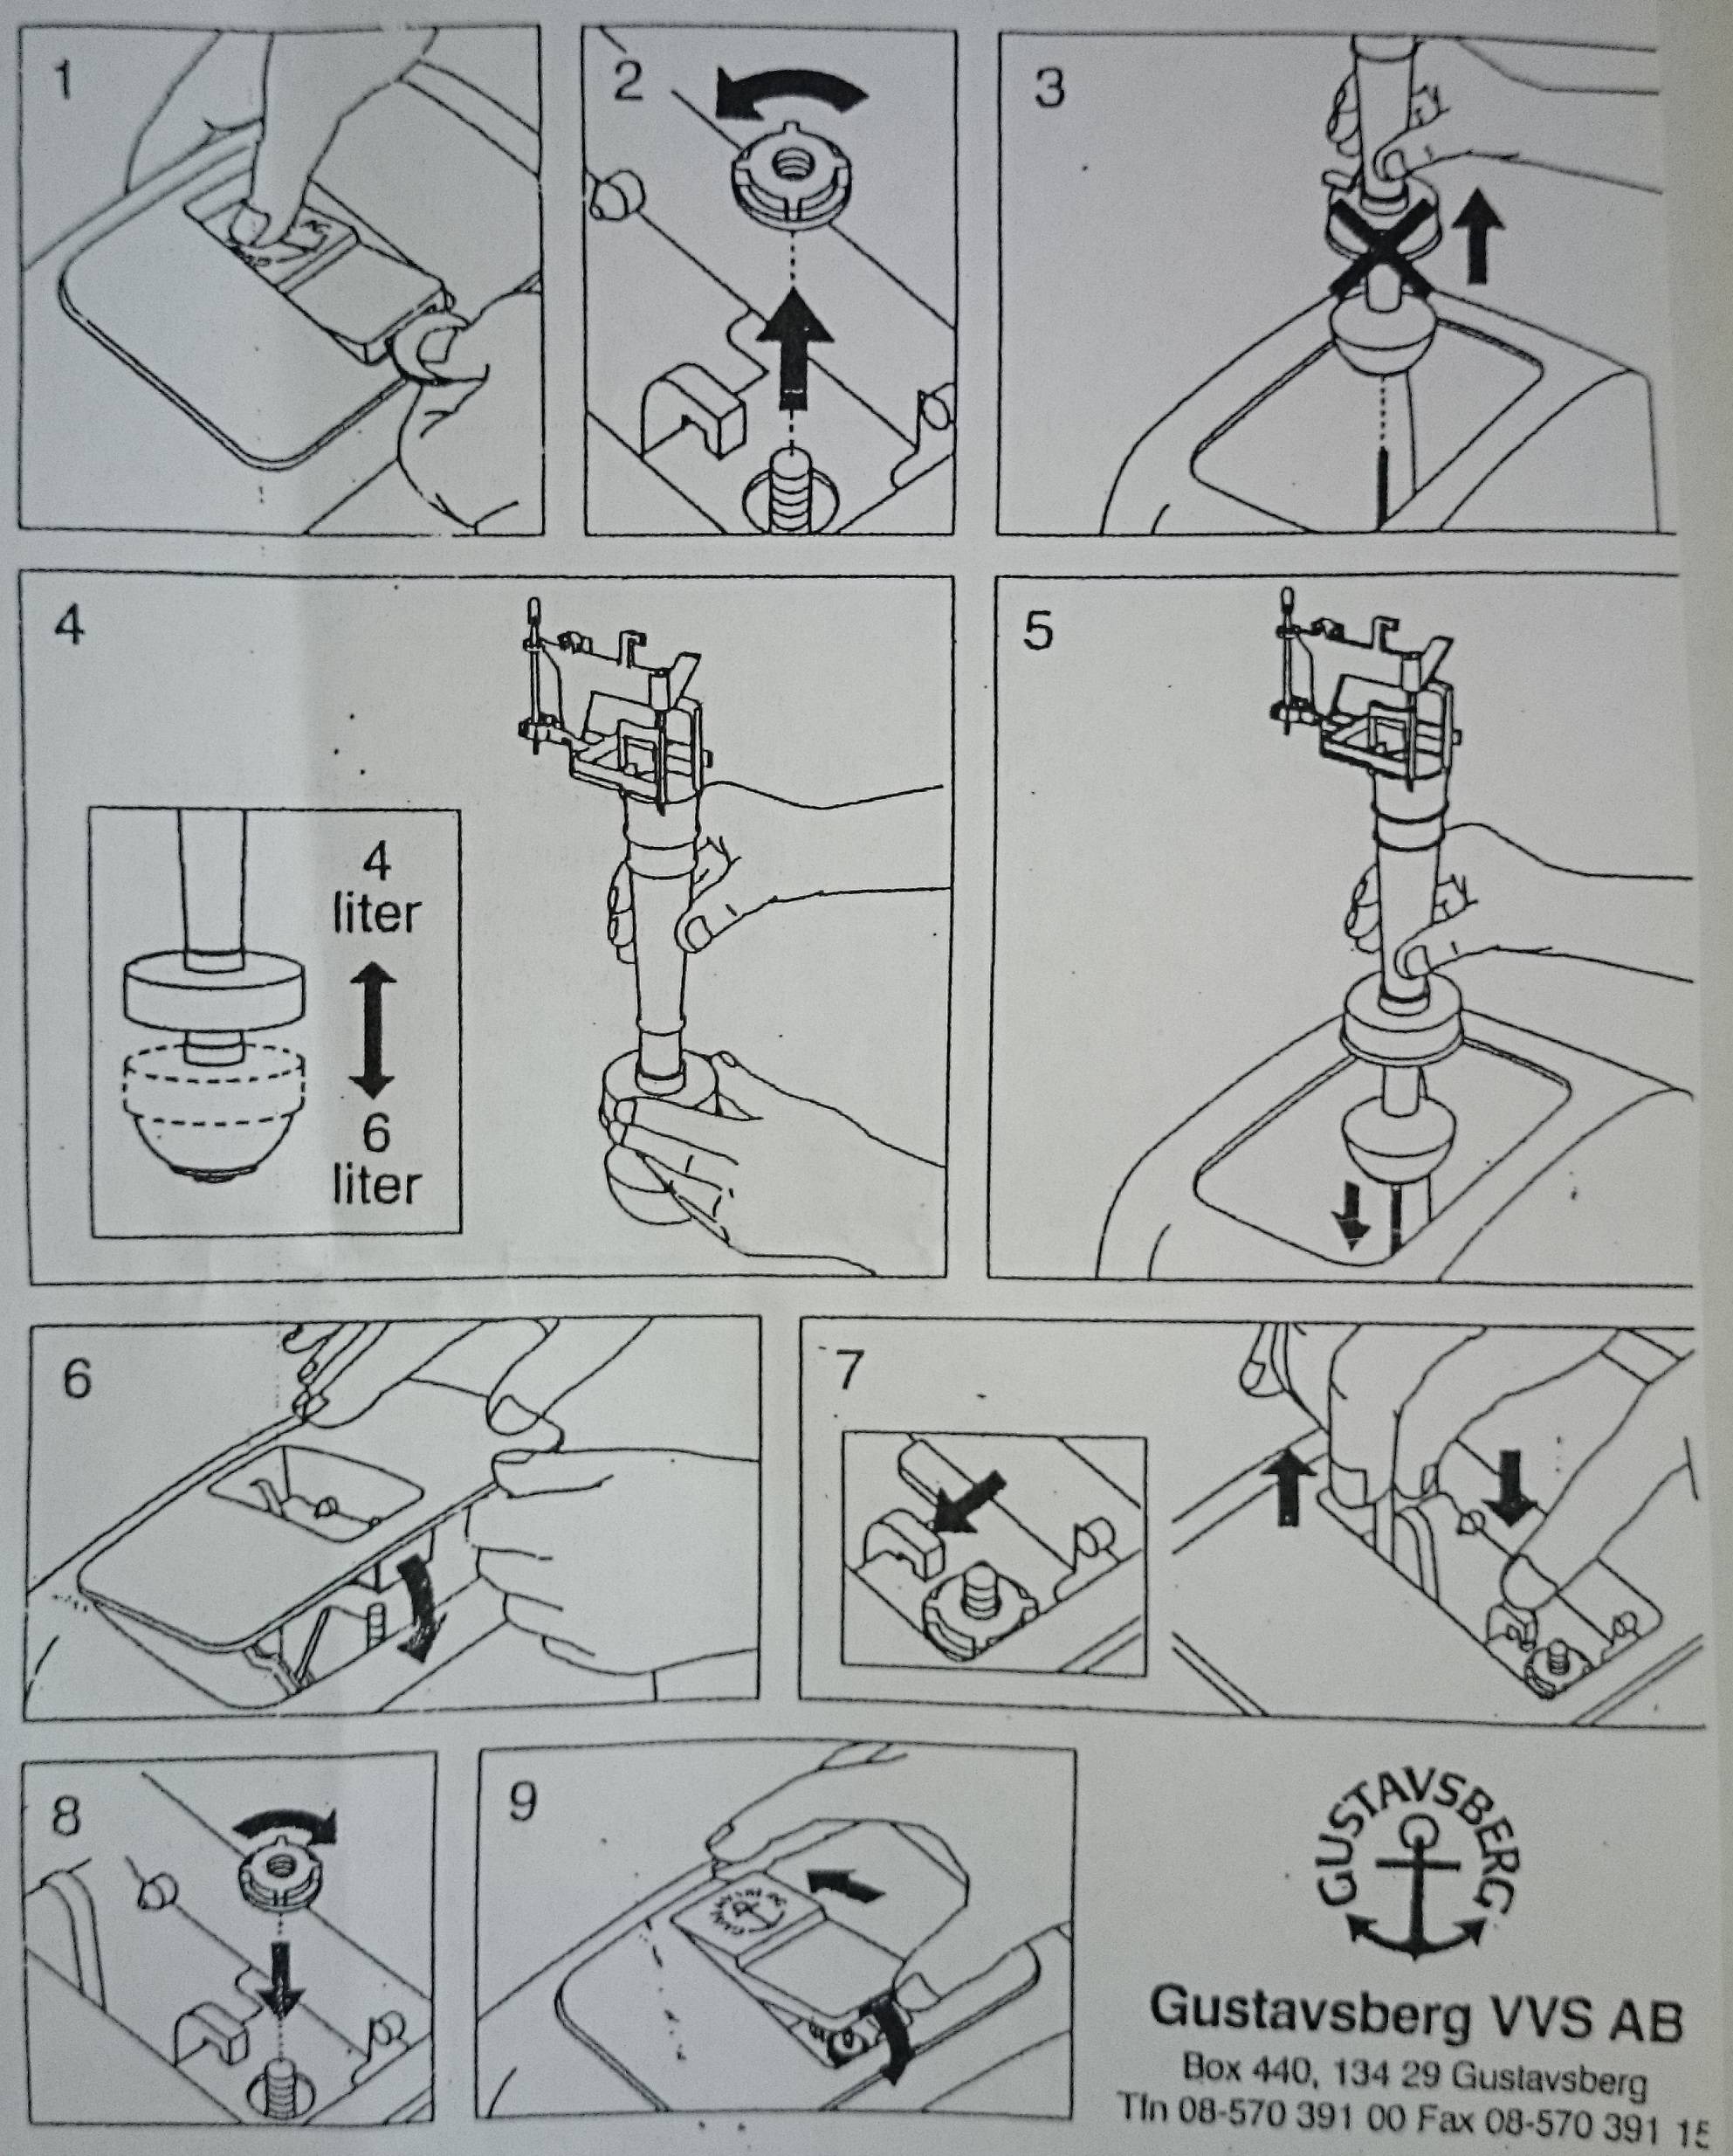
The volume of a full flush is adjusted using a float - its position on the rod relative to the overflow tube ensures the water level in the fully filled tank. The standard recommendation is that the supply cut-off should occur when the water table is 15-20 mm below the edge of the overflow:
- Float setting. At the bottom feed valve, the rack and pinion is disengaged in the float, which is then moved up or down along the guide. Similarly, the side feed valve is adjusted - the only difference is in the relative position of the float and the shutoff valves of the water supply.
- Adjusting the button of the drain tank comes down to moving the overflow tube relative to the “glass” of the button mechanism and adjusting its height. To do this, unscrew the fixing nut on the tube, disconnect the rod, move the tube to the desired position and tighten the nut. Then, pressing the petals on the glass and moving the guides, set the height of the entire mechanism. At the final stage, the rod is snapped back on the overflow tube retainer.
The fittings of a two-level tank also have a small flush float, which must be moved along its own rack guide on the overflow tube.The position of this float determines the amount of water in a partial flush.
But if the button sinks or sticks, then what to do - adjustment or repair, can be decided only after finding out the cause of the malfunction.
Elimination of sticking
Button sticking can have different causes and manifestations. To eliminate sticking, you need to get to the fittings. For this:
- shut off the supply of cold water to the tank (if there is no separate valve, close the common tap on the riser);
- unscrew the retaining ring;
- remove the button from the seat;
- remove the tank lid;
- determine the cause of the sticking.
If the tank, and therefore the fittings, are new, then sticking can occur when the button is “excessively” pressed hard. The reason is a rough surface or burrs on the plastic parts of the armature, which lock the button and prevent it from returning to its original state. In this case, you just need to clean the problem area.
As another reason for the button sticking, there may be a misalignment or displacement of the push lever that moves the rod. To restore the operation of the tank, it is necessary to re-adjust and tune the mechanism.


The third reason is the accumulated deposits in the button socket (dust, debris, plaque). The problem is solved by simply cleaning and flushing this working unit.
If the drain stops working due to wear or breakage of any part, then you will need to completely replace the entire mechanism with a new one that matches the model of the tank.
Elimination of failure
One of the common reasons why sinks (fails) button in the cistern toilet bowl is an incorrect setting of the mechanism.
For the behavior of the adjustment you need:
- shut off the water supply;
- completely drain the water from the tank;
- remove the button and tank cover;
- dismantle the mechanism;
- adjust the height of the overflow edge relative to the water surface;
- adjust the height of the mechanism, taking into account that the fully pressed button should not touch the overflow tube;
- adjust the floats for full and partial drain.
Another reason for failure is the failure of the return spring of the pusher, which the button presses on. And in cases where the button assembly is non-separable, the button will need to be replaced.
Replacing the button with a new one
If the button assembly fails, there is no need to change the entire drain valve. Troubleshooting is possible toilet cistern button replacement. But it must be the same model as the broken part. Work is carried out in the following sequence:
- remove the faulty assembly by disconnecting it from the tank lid;
- check the settings of the drain valve and the float of the shut-off valves on the water supply;
- install a new button, check the operation of the drain device.
If the toilet tank was released a long time ago, or the model is so rare that it is not possible to find “spare parts” for it, then you will have to completely replace the entire drain valve with a new one that fits its installation dimensions.


![[instruction] do-it-yourself toilet installation | video](https://fix.housecope.com/wp-content/uploads/e/0/5/e05c3aaa569c15a65a76abf551b1139c.jpg)