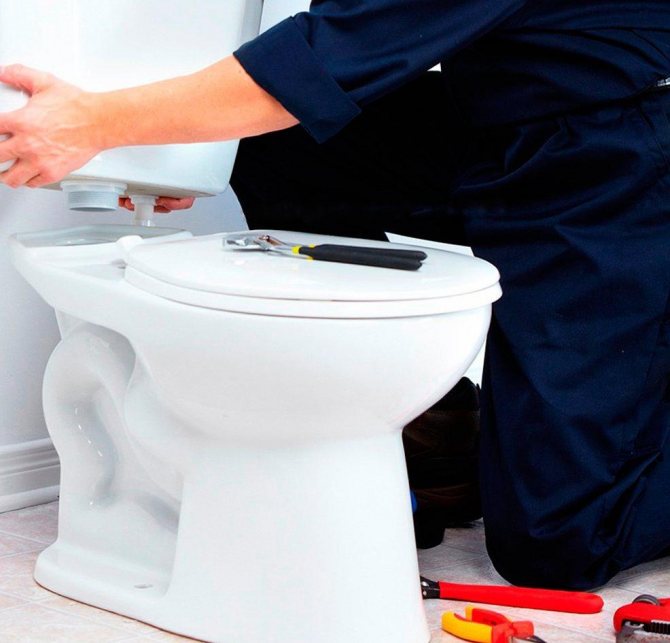
- How to fix a toilet bowl: typical breakdowns and how to treat them
- Continuous flow of water into the cistern
- Continuous flow of water into the toilet
- Noisy tank filling
- What other malfunctions of tanks are encountered?
- Lid resuscitation option with microlift
- Steps to replace cistern fittings
- Installing toilet lids
- Causes of failure when the tank passes water and leaks
- Wrong installation and is it possible to fix it
- Water flows after collection and filling - malfunction of the drain device
- The main malfunctions of the toilet bowl
- Crack repair
- Cuff replacement
- Removing blockages
- Dishwasher not washing dishes
- Toilet button malfunctions
- Adjustment
- Elimination of sticking
- Elimination of failure
- Replacing the button with a new one
- seat cover replacement
- Causes of tank leaks and their elimination
- Tank overflow
- Valve not holding
- Other malfunctions
- General information
- Shutoff valve device
- float mechanism
- Drain mechanism
How to fix a toilet bowl: typical breakdowns and how to treat them
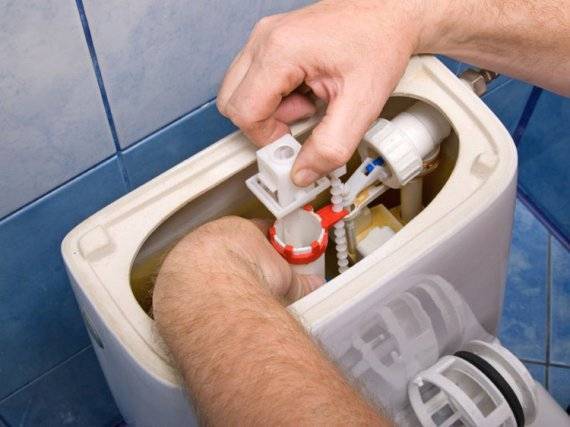
If your toilet bowl is noisy or leaking, you should know that you have encountered the most typical breakdowns for this device. And these can and should be eliminated with your own hands. Consider these and other defects in the mechanisms of drain tanks in more detail.
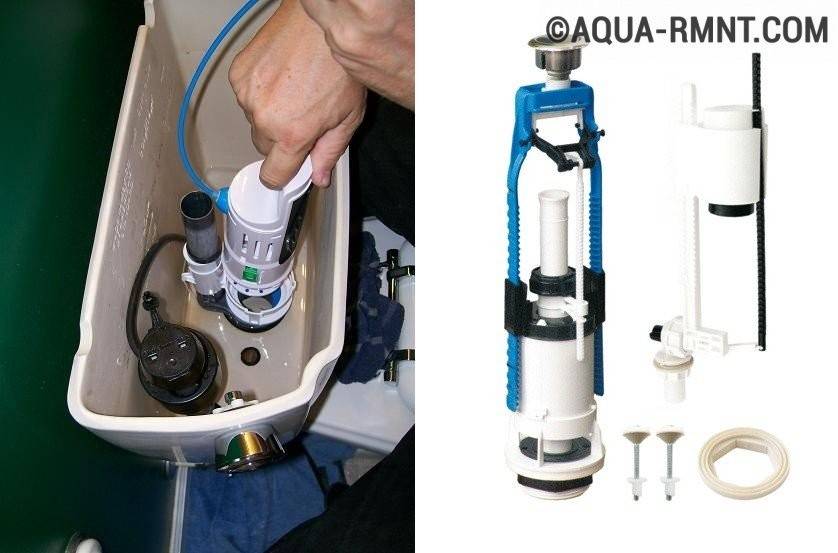
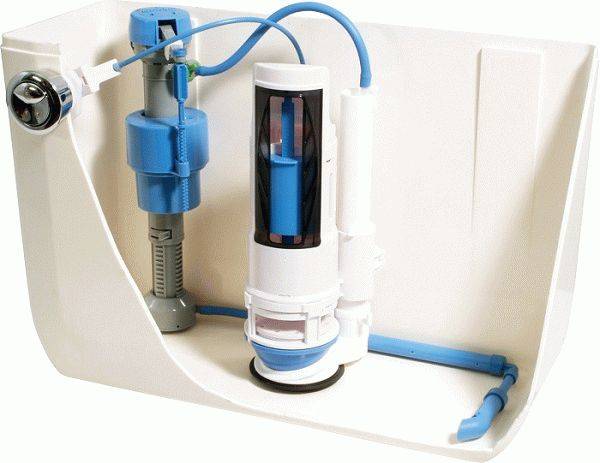
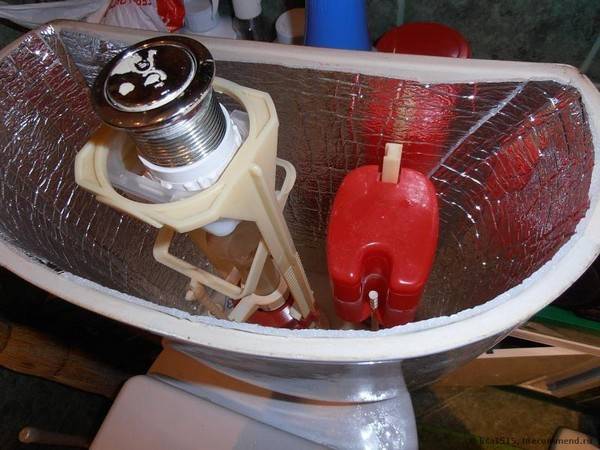
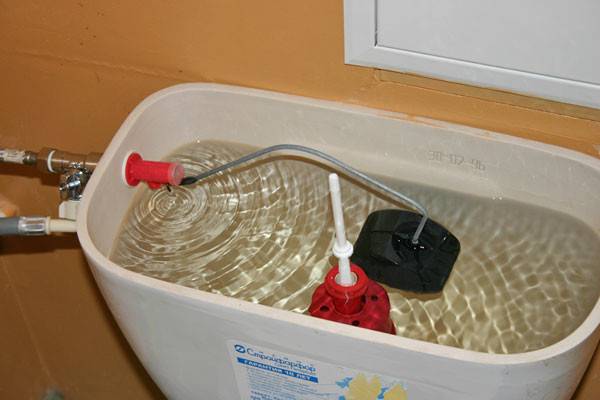
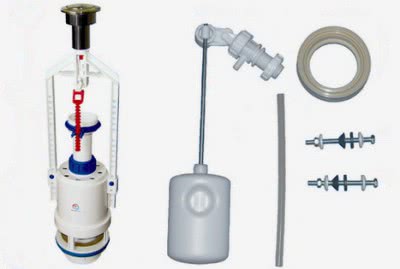 Fittings for drain tank
Continuous flow of water into the cistern
This malfunction can be caused by:
skew of the float lever;
Remedy. Set the lever to the optimal position for it.
float damage. The float can pass water inside itself, which inevitably leads to its aspiration to the bottom of the tank;
Remedy. The issue is resolved solely by replacing the part.
Remedy. Float valve replacement.
 Replacing the float does not require special education, everything can be done independently
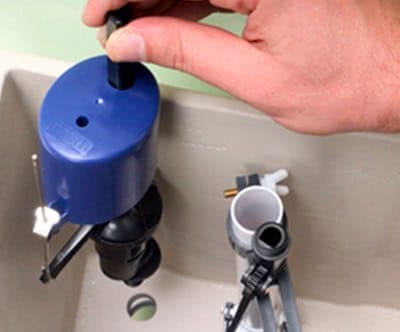
Instructions on how to completely replace the float valve
- Empty the tank.
- Unscrew the fitting connecting the float valve to the water pipe with a wrench.
- Disconnect the lever.
- Unscrew the inner and outer fixing nuts.
- Remove the float valve.
- Install the new valve, reattach the float arm. It is highly desirable to use the same fixing nuts.
- Run water into the tank.
- Lock the float lever in the desired position.
Continuous flow of water into the toilet
The reason that the toilet bowl is leaking, in this case, lies in the damage to the siphon membrane.
Remedy. Membrane replacement.
Instructions on how to replace the siphon membrane
- Tie the float arm to the crossbar attached in advance in place of the tank lid.
- Drain all water from the container.
- Unscrew the nut that connects the flush pipe to the tank.
- Loosen the siphon nut.
- Disconnect the siphon from the release lever.
- Replace the diaphragm with a new one of the same size.
- Assemble all involved fittings in reverse order.
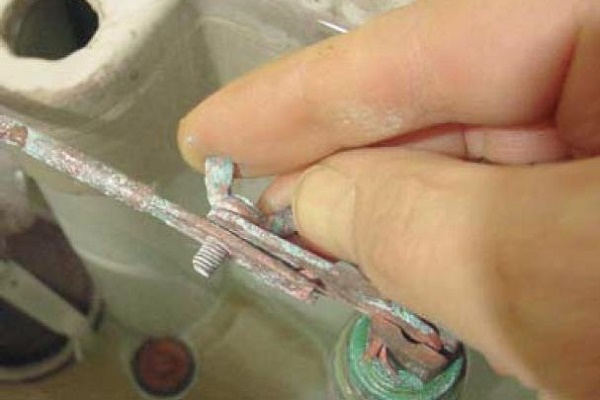
Here the reason is obvious and unconditional - the thrust has become unusable.
Remedy. Installation of new traction.
Noisy tank filling
The problem, it would seem, is not the most terrible. But the fragile human psyche classifies it differently - especially when the sound accompaniment coming from the bathroom makes it difficult to fall asleep at night.
Remedy. Silencer installation - attaching a flexible plastic tube to the float valve.
If installing a muffler does not solve the problem, a stabilizing float valve will come to the rescue. Its piston is a hollow structure with a stabilizing chamber at the end.
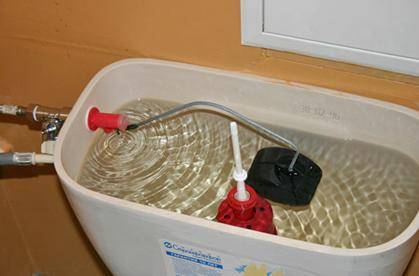
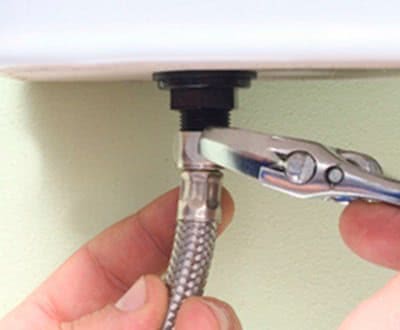 If the toilet cistern is leaking at the hose connection, simply tighten the nut or replace the gasket
What other malfunctions of tanks are encountered?
Toilet cistern leaking in the place of its attachment to the platform of the bowl
Try tightening the bolts that hold the drain pan to the toilet. But it is undesirable to overdo it especially, because in this way you run the risk of completely saying goodbye to the toilet bowl (this same platform may burst).
If defects are observed in the casting itself, it will not be superfluous to coat the cuffs with sealant.
Leak at the junction of the hose with the inlet fitting
Tighten the hose nut; if it's the gasket, replace it.
Lid resuscitation option with microlift
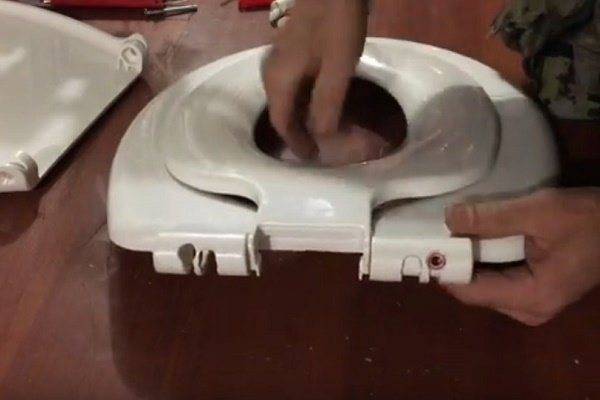
It is almost always impossible to restore the efficiency of the seat microlift with a cover, but the plumbing fixture itself will still be able to serve. True, it will not lock smoothly. The following photo selection will help you get acquainted with the repair operations:
Image gallery
Photo from
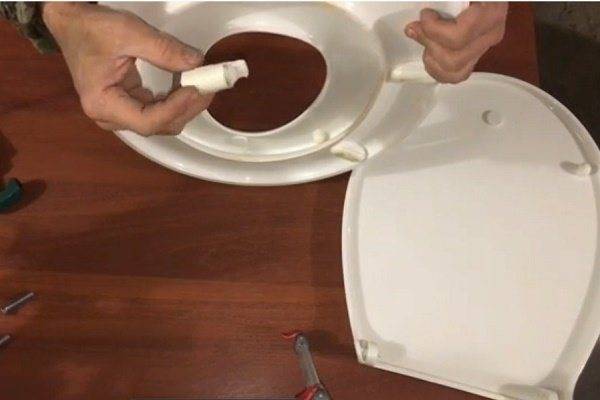
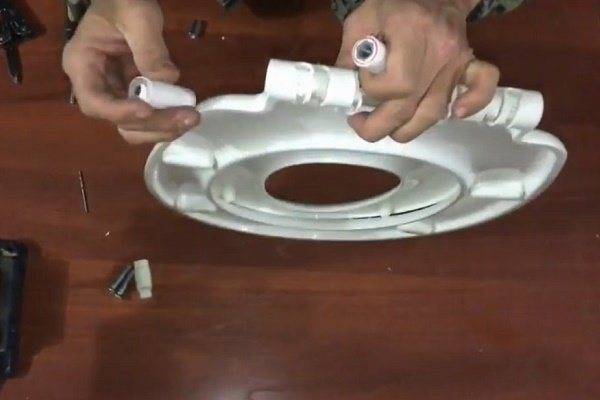
We will inspect the plumbing fixture with an additional child seat and microlift, assess the condition of the device. If it cannot be restored, we will create devices for holding the lid and attaching the seat to the toilet
We stock up on a piece of polypropylene pipe. In our example, a pipe with a diameter of 20 mm is suitable. Let's check if it is suitable for the production of the sleeve
For the production of fasteners, we will need two M8 bolts 30-40 mm long. They are needed to secure the lid.
Take two long nuts on M8. They will be aggressively fixed in the sleeve, necessary to secure the cover
Step 1: Inspection and detection of damage to the microlift Step 2: Preparation of a PP pipe with a diameter of 20 mm Step 3: Preparation of a pair of M8 bolts for fasteners Step 4: Preparation of long distance nuts
Stocked up with everything you need to carry out repairs, now let's take a building hair dryer, a drilling machine and a screwdriver to get started:
Image gallery
Photo from
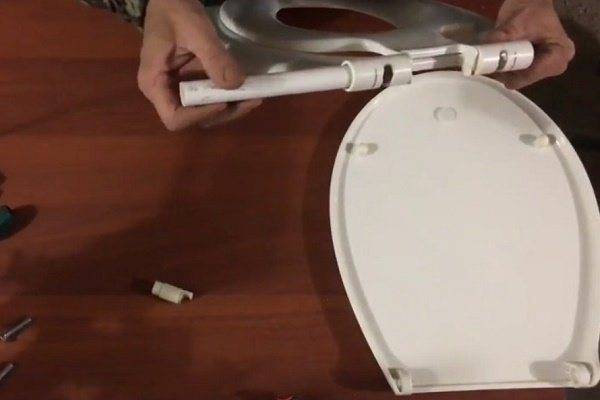
We start a piece of polypropylene pipe into the hinge hole, while connecting the adult and children's seats. We mark the actual size of the future sleeve in fact
We turn on the building hair dryer and heat the nut with hot air for 5 - 10 minutes
We put the heated nut into the pipe to the mark made earlier and rapidly cool the contact space under a stream of cool water
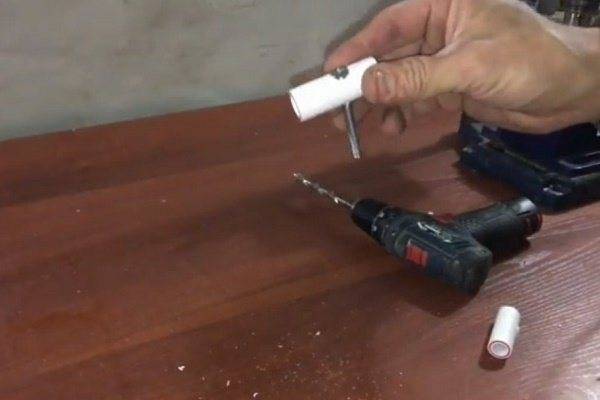
Using the same method, we make a second blank for the sleeve. The cooled pipe must firmly tighten the nuts. As a result, two pipe sections will be obtained, partly filled with nuts installed in them.


After assembling the adult and child seats and inserting blanks into their swivel joint, we check how they move relative to each other
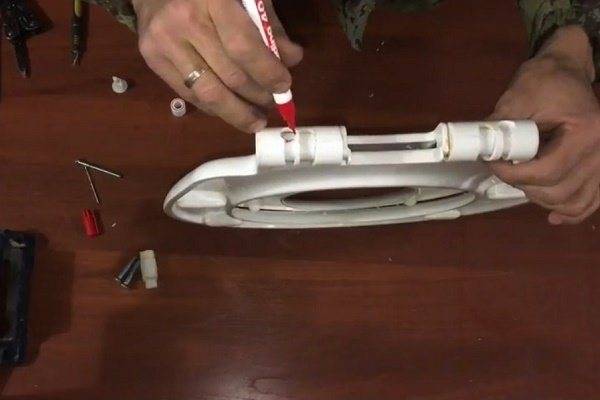
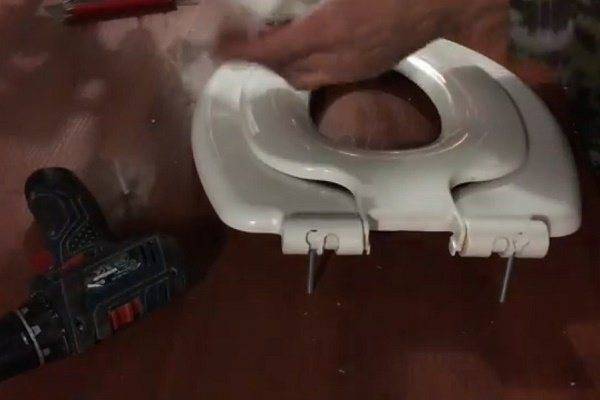
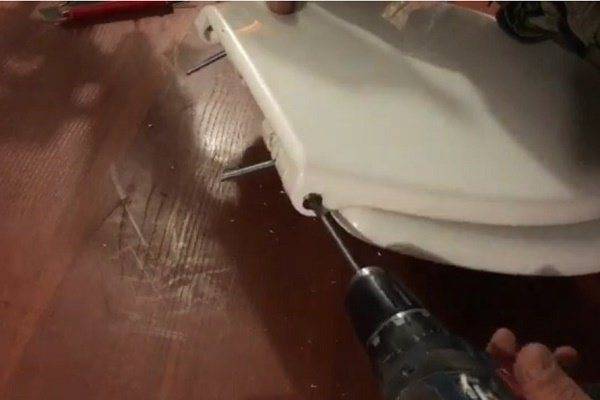
Having installed both blanks in a swivel joint so that the sides with the nuts “look” outward, we mark the points for drilling holes for the iron rods with which the fixture is fixed to the toilet
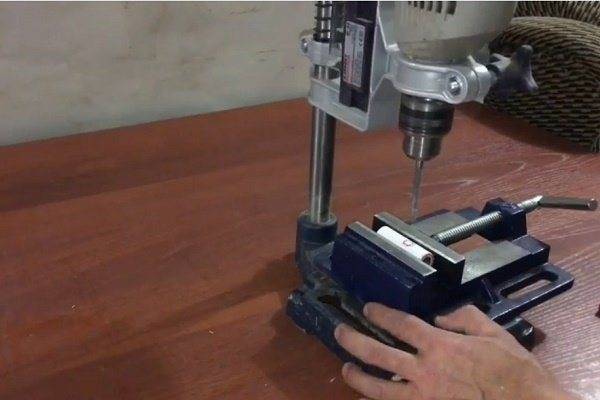
We drill holes with a drill for 6 for iron rods, with which the seat with a lid is screwed to the toilet
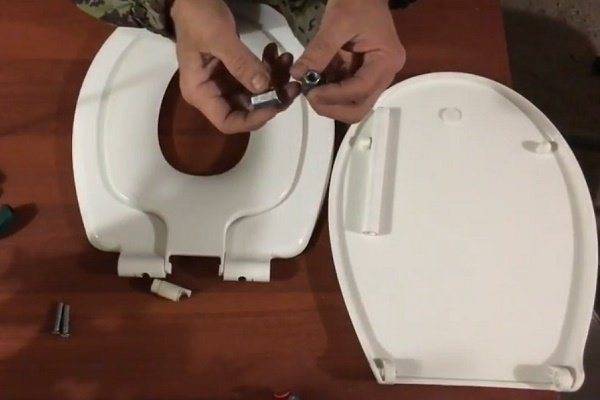
We put a holder into the drilled hole - an iron rod, onto which a fixing nut is screwed from below the plumbing
Step 5: Marking the pipe for the production of the sleeve Step 6: Heating the long nut with a blow dryer Step 7: Inserting the heated nut into the PP pipe Step 8: Making 2 blanks for the sleeves Step 9: Checking the action of the finished blanks Step 10: Marking the points for installing the holders Step 11: Drill holes for the holders Step 12: Ready to install and fasten the sleeve
Now you can safely proceed to the final assembly and fastening of a comfortable fixture to the toilet:
Image gallery
Photo from
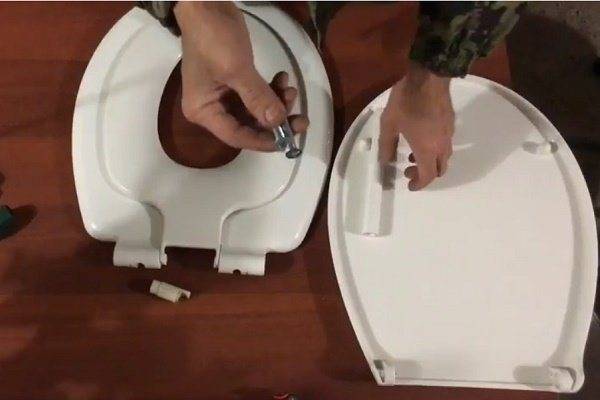
We install the bushings made in their seats, check the action of the hinge mechanism and the movement of 2 seats relative to each other
We install holders, with the help of which the device of 2 seats and a cover is attached to the plumbing through the holes in it
Through pre-drilled holes on the side of the cover, we fasten it to the seats
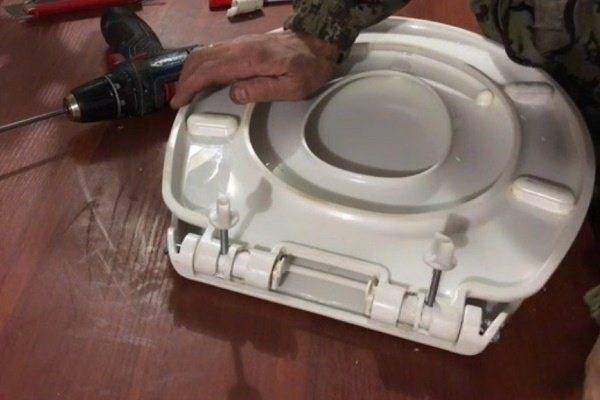
Again, we check how the swivel joints work, with what ease the parts of the device move. If everything is fine, put it in space by screwing the plastic fixing nuts on the bottom of the toilet
Step 13: Pre-assembly and operation check Step 14: Mounting of fixture holders Step 15: Attaching the cover to the seat with M8 screws Step 16: Checking the operation of the cover and preparing for installation
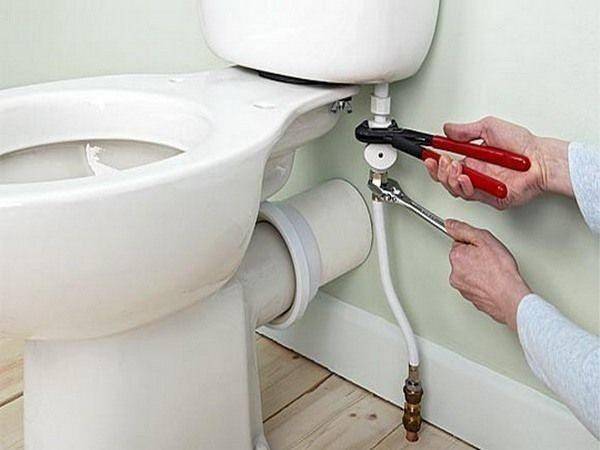
Steps to replace cistern fittings
There are times when the installed drain mechanism becomes unusable.The following causes of such a breakdown are distinguished: deformation and wear of low-quality reinforcement parts, as well as excessive water hardness, which has a negative long-term effect on the metal parts of the structure.
To fix the problem, a complete replacement of the fittings of the toilet cistern should be carried out.
Consider the sequence of work.
- Drain the liquid from the tank and shut off the water supply to the structure.
- Disconnect supply hose.
- Unfasten the tank with an adjustable wrench. After that, unscrew the water supply tap, as well as the toilet drain valve.
- Install new fittings and fix the tank.
Remember, during the installation of a metal frame, it is important to replace the gasket that is installed between the toilet and the tank. This will minimize the risk of leakage.
- Fix the float, check the presence of the sealing washer on the fluid supply hose.
- Adjust the filling level of the toilet bowl design. For this purpose, the float should be set to the required position.
For the emergency overflow system to function correctly, the neck of the tube should be positioned 13mm above the water level in the tank.
In order to protect the fastening of the toilet bowl from rust, its surface must be covered with a layer of grease.
In order to eliminate the breakdown of the drain system, it is important, first of all, to study the structure of the device, identify the cause of the problem, and also familiarize yourself with the mechanism restoration technology. "Armed" with useful knowledge, the necessary materials, tools, you can safely proceed to eliminate design faults
"Armed" with useful knowledge, the necessary materials, tools, you can safely proceed to eliminate structural failures.
Installing toilet lids
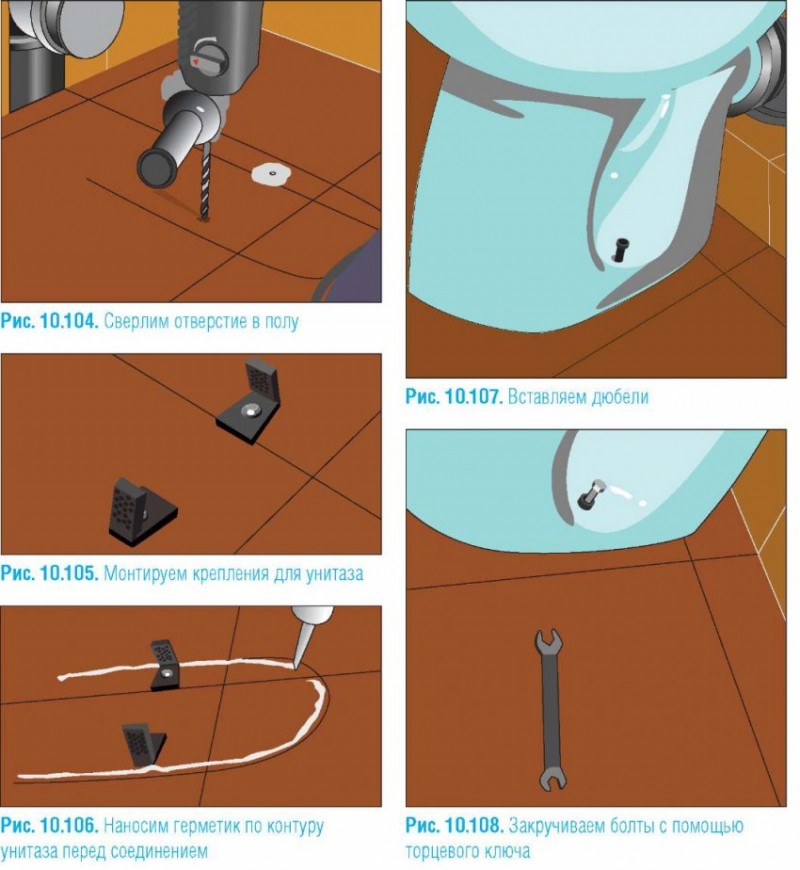
You can install and replace the cover with a new one yourself without outside help. If you figured out the new cover, then for replacement / installation, you must first prepare a tool: a socket wrench, pliers, a hacksaw and waterproof silicone sealant.
The installation process is carried out according to the following algorithm:
- Delete the old design.
- We put new fasteners in the freed holes.
- We install a rubber insert at the bottom of the lid.
- Using fixing bolts, we fix the structure to the toilet bowl.
A microlift is a fragile but functional device and, as a rule, it is not possible to fix the breakdown on its own (with the exception of those listed above)
When choosing a new cover, it is important to pay attention to the quality of the product, the manufacturer, functionality and dimensions. They are easy to care for, if necessary, the covers are removed in a matter of minutes.
Causes of failure when the tank passes water and leaks
Before you fix the breakdown, you should find out its possible causes. So, we can highlight the main ones.


Wrong installation and is it possible to fix it
Typically, new plumbing fixtures that are not installed properly will leak within the first 6 months after installation.
Water flows after collection and filling - malfunction of the drain device
After a long time of use, the fittings wear out, reminding themselves of breakdowns. Also, problems can arise much earlier if low-quality cistern fittings materials were used in plumbing.
To identify the problem, you need to close the water supply connected to the tank and observe the leak. If water leaks when the water supply is turned off, then the drain valve has broken. This can be due to blockages, build-up of salt deposits from water, or normal wear and tear. You can get rid of the breakdown by arranging a “general” cleaning of the tank with getting rid of plaque and random debris.
If the water remains in the tank and does not flow into the bowl, then the cause is an incorrectly adjusted float, or a blockage in the automatic water supply system. In this case, you should try to adjust the pressure of the water supply.
The main malfunctions of the toilet bowl
Do-it-yourself toilet repair can be done if:
- a small crack has formed on the bowl;
- the cuff connecting the device to the sewer has worn out;
- the toilet is clogged.
Crack repair
A crack in the toilet can be formed as a result of:
- mechanical impact on the toilet bowl;
- flushing hot liquid down the toilet.
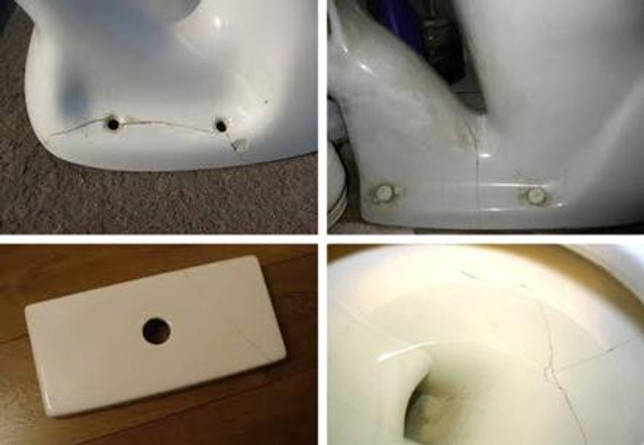
Minor damage to various parts of the toilet bowl
If a crack has formed in the upper part of the bowl or in the place of its attachment, then the malfunction can be eliminated. If there is a crack in the lower part, a complete replacement of the plumbing product will be required.
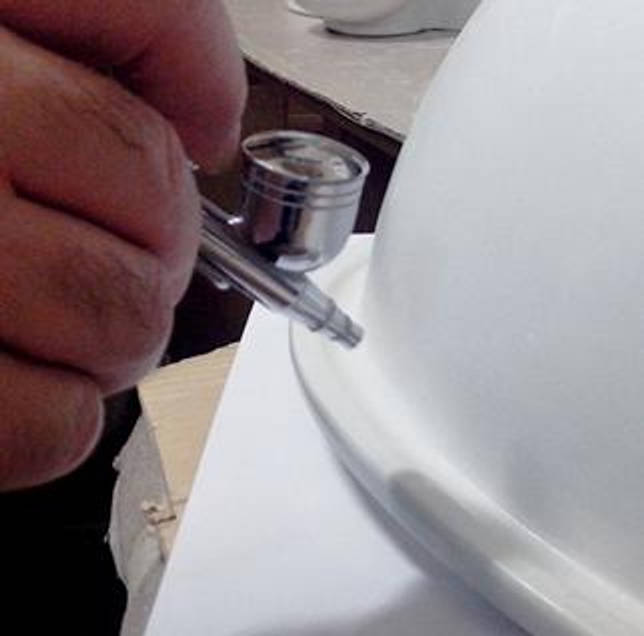
To fix the crack you will need:
- drill with a small drill;
- sandpaper;
- Sander;
- any solvent;
- epoxy resin or other similar adhesive.
Repair is carried out in the following order:
- the ends of the crack are carefully drilled to prevent further divergence. Drilling the bowl must be extremely careful to prevent damage. If the toilet cracked during the work, then it will need to be replaced;
- along the entire length, the crack is cleaned;
- the surface is degreased;
- the prepared surface is filled with resin and left to dry completely;
- the resulting seam is polished.
Cracked toilet bowl repair
Cracks formed on the drain tank are repaired in a similar way. Repair of the tank lid is most often not carried out, since the low cost of products allows a complete replacement of the cracked surface.
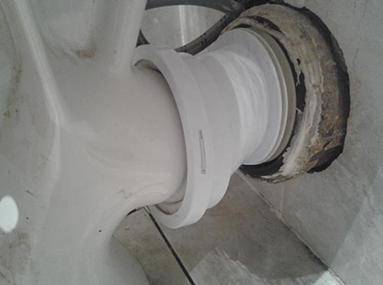
Cuff replacement
If a puddle forms under the toilet, then the reason lies in the wear of the rubber cuff, which is a seal between the toilet drain and the sewer pipe.
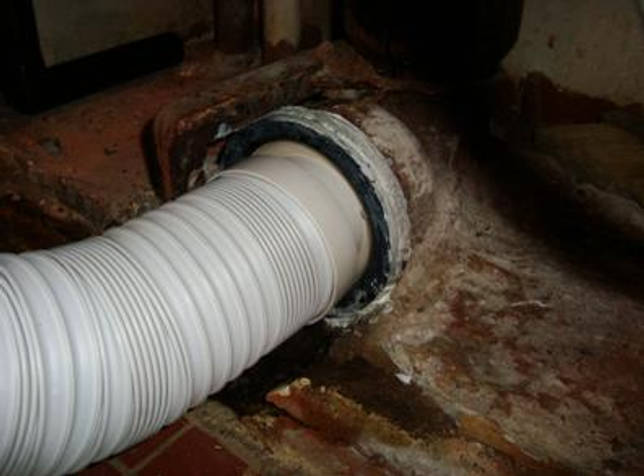
Toilet leak due to sewer cuff
The cuff is replaced as follows:
- dismantling of the old gasket. To do this, you can use an ordinary knife;
- the surfaces of the pipe and the sewer inlet are cleaned of contaminants;
- all surfaces are treated with sealant for a better fit of the new gasket;
- a new cuff is inserted into the sewer hole and then put on the toilet drain. For strength, the joints can be additionally treated with silicone sealant.
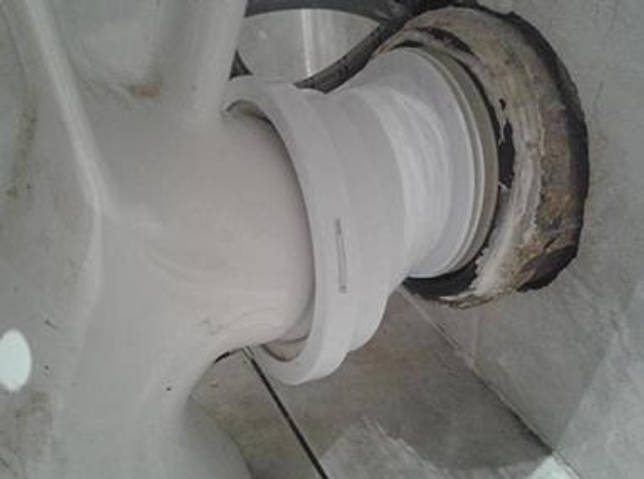
Replacing the sewer cuff on the toilet
The described method is suitable for toilet bowls with oblique and horizontal outlet. If the toilet is leaking with release to the floor, then to replace the cuff, preliminary dismantling of the plumbing is required.
Removing blockages
The reason for the slow draining of water from the toilet bowl is a blockage.

Clogged toilet drain
To help you deal with the problem:
- various chemicals, for example, Tiret turbo;
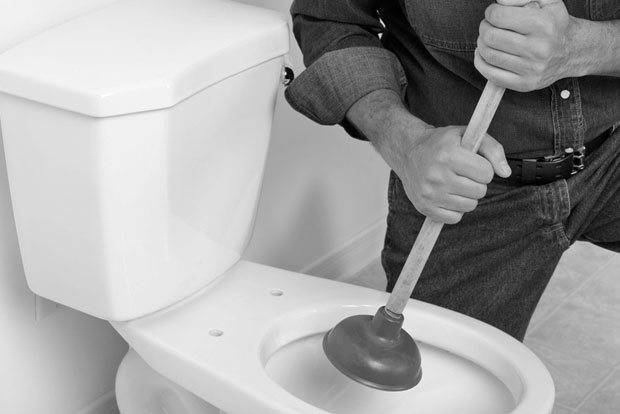
- plunger;
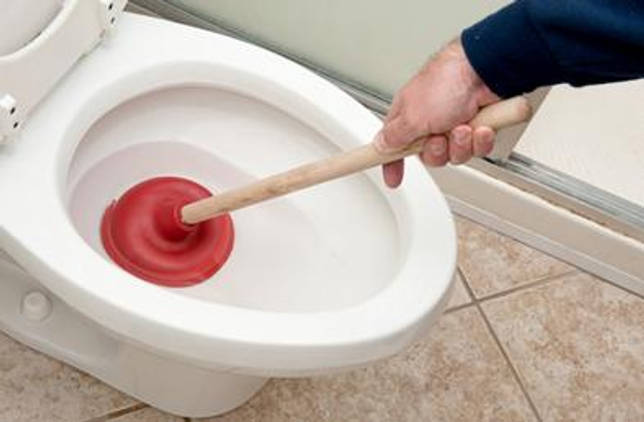
Removing clogs with a plunger
plumbing cable.
Removing blockages with a plumbing cable
Dishwasher not washing dishes
The machine turns on, fills with water, heats the water. But then the characteristic sound of washing is not heard. There are no water flows. There may be three reasons. Firstly, the filter is clogged. The filter is located at the very bottom of the dish chamber. It needs to be opened and washed. Secondly, the nozzles in the combs are clogged. The nozzles can be cleaned with a toothpick. Thirdly, the circulation pump has broken down, which drives water from the bottom of the dish chamber to the nozzles and ensures washing dishes. This pump works with a characteristic sound when the dishes are washed. If there is no sound, then the pump is probably broken. You can replace the pump yourself. It is installed under the bottom of the dish chamber. Power is supplied to it with a clip, water is supplied and discharged through tubes, which are put on the inlet and outlet pipes of the pump and secured with clamps. Clamps must be removed, tubes disconnected. The pump is attached with one or more self-tapping screws. Unscrew them and remove the pump. Installation is in the reverse order.
(read more…) :: (to the beginning of the article)
| 1 | 2 |
:: Search
Unfortunately, errors occur periodically in articles, they are corrected, articles are supplemented, developed, new ones are being prepared. Subscribe to the news to stay informed.


If something is not clear, be sure to ask! Ask a question. Article discussion. messages.
Hello! We have a simple problem. One meter feeds two houses. Previously, he stood in the house, now he has gone for the third month since he was taken out into the street. Previously, it was winding from 250 to 500 kW for two houses. As they took it out into the street, it became 700-1000 !!!!! Moreover, when the husband connected the wires, he did everything in the same way as at home. The electricians came to seal, they said that it was not right Read the answer ...
New machine BOSH SMV40E50RU. The door does not lock in the open position.
Send back to the store, or is it not difficult to fix? Thank you! Read answer...
Dishwasher problem. Stopped working in the middle of the program. Removed the filter and cleaned the injectors. I turned it on - I collected water, the pump does not work (the machine does not supply water to the blades). Disconnected from the network, drained the water connected - ignores the lack of water, the heating element heats dry. Read answer...
Hello, tell me what can be with the dishwasher. BEKO 1500, age 6 years. the upper basket stopped washing, at the same time they noticed that the machine is very hot, it heats the water almost to a boil, and on any programs, even where there should be no heating (for example, on a cold rinse). The duration of the programs has also changed, the departments are skipped Read answer…
More articles
Knitting. magnificence. Zephyr. Shamrock. Drawings. Pattern patterns...
How to knit the following patterns: Splendor. Zephyr. Shamrock. Detailed instruction…
Washing machine malfunctions. Won't turn on, no water coming in, no...
List of common washing machine problems. Signs of one or the other...
Dishwasher maintenance...
Installation, connection and operation of the dishwasher. What are the drawbacks...
Knitting. A flock of birds. Openwork virtuosity. Drawings. Pattern patterns...
How to knit the following patterns: A flock of birds. Openwork virtuosity. Detailed ins…
Knitting. Linen motif. diagonal plane. Mermaid. Drawings. FROM…
How to knit the following patterns: Linen motif. diagonal plane. Mermaid….
Knitting. Flowers for children's products. Drawings. Pattern patterns...
How to knit the following patterns: Flowers for children's products. Detailed instructions…
Knitting. Lyra. Drawings. Pattern patterns...
How to knit the following patterns: Lyres. Detailed instructions with explanations ...
Knitting. Two loops fastened with a crochet. Openwork originality. Curl…
How to knit a combination of loops: Two loops, secured with a crochet. Drawing examples...
Toilet button malfunctions
All signs of a malfunction of the toilet flush button can be classified as follows:
- insufficient volume of water for flushing (full or partial);
- sticking;
- sinking (falling).
In the first case, it is not about how to repair the button, but about adjustment.
Adjustment
The volume of a full flush is adjusted using a float - its position on the rod relative to the overflow tube ensures the water level in the fully filled tank. The standard recommendation is that the supply cut-off should occur when the water table is 15-20 mm below the edge of the overflow:
- Float setting. At the bottom feed valve, the rack and pinion is disengaged in the float, which is then moved up or down along the guide. Similarly, the side feed valve is adjusted - the only difference is in the relative position of the float and the shutoff valves of the water supply.
- Adjusting the button of the drain tank comes down to moving the overflow tube relative to the “glass” of the button mechanism and adjusting its height. To do this, unscrew the fixing nut on the tube, disconnect the rod, move the tube to the desired position and tighten the nut. Then, pressing the petals on the glass and moving the guides, set the height of the entire mechanism. At the final stage, the rod is snapped back on the overflow tube retainer.
The fittings of a two-level tank also have a small flush float, which must be moved along its own rack guide on the overflow tube. The position of this float determines the amount of water in a partial flush.
But if the button sinks or sticks, then what to do - adjustment or repair, can be decided only after finding out the cause of the malfunction.
Elimination of sticking
Button sticking can have different causes and manifestations. To eliminate sticking, you need to get to the fittings. For this:
- shut off the supply of cold water to the tank (if there is no separate valve, close the common tap on the riser);
- unscrew the retaining ring;
- remove the button from the seat;
- remove the tank lid;
- determine the cause of the sticking.
If the tank, and therefore the fittings, are new, then sticking can occur when the button is “excessively” pressed hard. The reason is a rough surface or burrs on the plastic parts of the armature, which lock the button and prevent it from returning to its original state. In this case, you just need to clean the problem area.
As another reason for the button sticking, there may be a misalignment or displacement of the push lever that moves the rod. To restore the operation of the tank, it is necessary to re-adjust and tune the mechanism.
The third reason is the accumulated deposits in the button socket (dust, debris, plaque). The problem is solved by simply cleaning and flushing this working unit.
If the drain stops working due to wear or breakage of any part, then you will need to completely replace the entire mechanism with a new one that matches the model of the tank.
Elimination of failure
One of the common reasons why the button in the toilet cistern sinks (fails) is the incorrect setting of the mechanism.
For the behavior of the adjustment you need:
- shut off the water supply;
- completely drain the water from the tank;
- remove the button and tank cover;
- dismantle the mechanism;
- adjust the height of the overflow edge relative to the water surface;
- adjust the height of the mechanism, taking into account that the fully pressed button should not touch the overflow tube;
- adjust the floats for full and partial drain.
Another reason for failure is the failure of the return spring of the pusher, which the button presses on. And in cases where the button assembly is non-separable, the button will need to be replaced.
Replacing the button with a new one
If the button assembly fails, there is no need to change the entire drain valve. You can fix the problem by replacing the toilet bowl button. But it must be the same model as the broken part. Work is carried out in the following sequence:
- remove the faulty assembly by disconnecting it from the tank lid;
- check the settings of the drain valve and the float of the shut-off valves on the water supply;
- install a new button, check the operation of the drain device.
If the toilet tank was released a long time ago, or the model is so rare that it is not possible to find “spare parts” for it, then you will have to completely replace the entire drain valve with a new one that fits its installation dimensions.
seat cover replacement
One of the significant circumstances of the fatal failure of the mechanism is the wrong choice of model and errors during its installation. Therefore, when purchasing the latest cover, you should be guided by the following rules:
take into account the dimensions of plumbing;
pay attention to the shape and configuration of the toilet;
give preference to products of proven manufacturers.
Seats for sale with a lid are suitable for toilet bowls of any design: floor, side, hinged.
When choosing the latest model, it is important to take into account the individuality of the plumbing device and pay attention to ensuring that the distances between the fasteners of the system coincide with the seat attachment points
To replace a broken cover with a closer for a new one, you will need a set of tools:
- hacksaw;
- pliers;
- end key.
Of the materials, you will also need silicone or oil to process the dried parts. In the standard, it is better to use a special lubricant, which, penetrating into the cracks, freezes rust.


Usually the lid with the toilet seat is fixed with 2 bolts. But in some models, instead of them, an iron hairpin may be involved. For dismantling, it is only necessary to lower / raise the cover, and then unscrew the pins.
If the cover has been used for a sufficiently long period, there is a high possibility that the bolts are clogged, and the attachment points are covered with plaque and “soldered” to the body.

To ensure the easiest unscrewing and simplify the task for yourself, the bolts will have to be coated with oil or silicone beforehand, but this is not always excellent
Using pliers, carefully, trying not to destroy the decorative surface of the toilet bowl, unscrew the clamp and bolts. To protect plumbing from possible damage when working with pliers, it is better to cover the surface with rags or cardboard cuts.It is not worth pushing this recommendation, otherwise, with the smallest mistake, you will have to change not only the lid, but also the toilet bowl.
In the latter case, if the processing did not give the desired result and the plastic bolts do not lend themselves, they can be sawn with a hacksaw or cut off with a hot knife blade. Do not be afraid that the melted plastic will stain the plumbing. After hardening, it will not be difficult to remove it from the surface.

Having dismantled the old cover, in the grooves on the toilet they remove the remnants of dirt, accumulations of rust and limescale, after which bolts are inserted into the attachment points and the system is fixed
Installing the new cover is done in the following sequence:
Rubber inserts are inserted into the new seat cover. They provide a soft fit of the product to the seat.
Fasteners are installed in the holes on the toilet. They are screwed using rubberized seals.
Fix the cover to the seat with iron or plastic bolts.
They center the structure and inspect the seat for tightness.
Since the main reason for the breakdown of the mechanism can be the incorrect position of the cover and seat, it is important to literally adjust the cover when installing the structure.
The fundamental point: adjustment and centering is done on the step, when the fixing nuts are only baited, but not yet tightly tightened.
Causes of tank leaks and their elimination
If water does not hold in the toilet bowl, then this can be caused by two reasons:
Float problem
The water level exceeds the allowable rate, and water flows into the toilet through the overflow.
Tank overflow
Tank overflow can occur for the following reasons:
- The position of the float is incorrectly adjusted - adjustment can be carried out in different ways, depending on the design of the valve. For example, if the lever is metal, then you just need to gently bend it. Plastic levers can have a ratchet or an adjusting screw.
- A hole in the float - in this case, the part can be temporarily sealed and then replaced.
- The float is overgrown with mud - as you might guess, the part just needs to be cleaned of dirt.
Membrane allows incoming water to pass through
Membrane malfunction - if the water does not overlap in any position of the float mechanism lever, then there is only one way out - to replace the shutter valve. The price of the membrane is low and it is not difficult to find it on the market or in specialized stores.
Dismantling parts is not at all difficult. In some models, all fasteners are plastic, so dismantling can be done even without tools.
Valve not holding
If the water supply is shut off, but the flow does not stop, then the valve does not hold in the toilet bowl.
There can be two reasons for this error:
- Dry rubber valve;
- Debris got under the valve.
In any case, to fix the problem, you will need to dismantle the toilet cistern valve. The design of the drain device may be different, respectively, the dismantling is also carried out in different ways. Most often, the mechanism is disassembled into two parts, as a result of which you can get the valve.
The instructions for fixing this problem are extremely simple:
- First of all, it is necessary to clean the valve and the drain hole from dirt;
- Then the device must be assembled and installed in place;
- If the toilet still does not hold water, you need to disassemble the mechanism again and replace the valve.
Other malfunctions
In addition to those described above, some other malfunctions may occur in the drain system, the following are the most common:
The connection between the tank and the toilet is leaking - in this case, it is necessary to completely dismantle the tank and replace all existing gaskets, including screw seals.

In the photo - dismantling the drain tank
Mechanical failure of any elements of valves - this problem can only be solved by replacing broken parts.
Note! The ceramic drain container can be quite heavy, so you need to handle it carefully so that it does not break. That's actually all the information that you need to know in order to independently eliminate such breakdowns of the toilet cistern, such as water flow
That's actually all the information that you need to know in order to independently eliminate such breakdowns of the toilet cistern, such as water flow.
Leaking cistern is one of the most common problems. As we found out, you can eliminate it yourself without much time and effort. Moreover, in most cases, you don’t even have to disassemble the mechanism, since it is enough to adjust the position of the float.
From the video in this article, you can get some additional information on this topic.
This is interesting: Haiba faucets: advantages and product overview
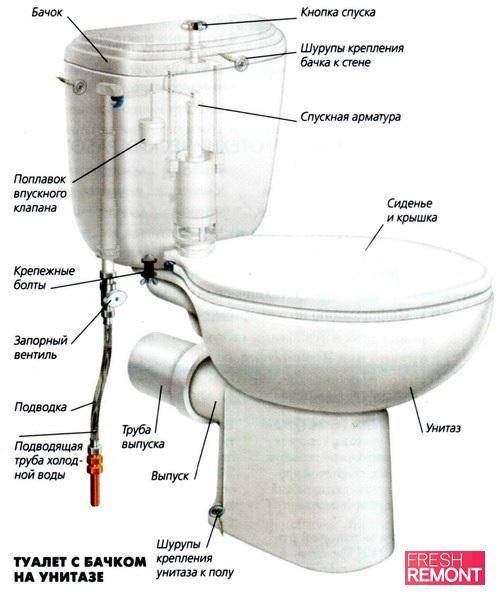
General information
Many people are afraid to “touch” the plumbing with their own hands and call specialists in the event of any breakdowns. However, the device of the drain tank is quite simple and understandable, thanks to which everyone can repair it without having any social knowledge.To do this, you only need the ability to handle elementary tools.


For some breakdowns, it may be necessary to replace the failed parts. In this case, it is necessary to dismantle the faulty elements and come with them to the plumbing store in order to select the appropriate repair kit.
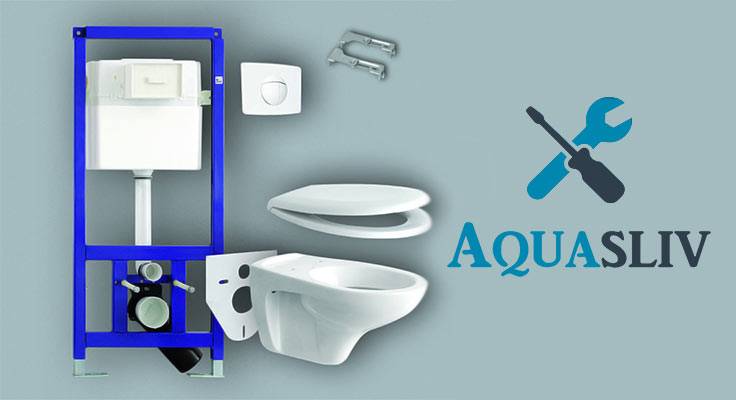
Separately, it should be said about the repair of the wall-hung toilet cistern, which is a much more complicated procedure. This is due to the fact that the container is hidden in the installation, as a result of which it will be necessary to break the decoration of the room. The tank itself in this case may differ in shape from the traditional one, however, the principle of its operation is the same.
Advice! Many people don't know how much weight a wall hung toilet can hold. so they are afraid to install it. However, if you look in the characteristics of this device, how many kg the hanging toilet can withstand. it turns out that it is designed for a maximum weight of 450 kg, respectively, it can withstand a person of any build and at the same time will have a significant margin of safety.
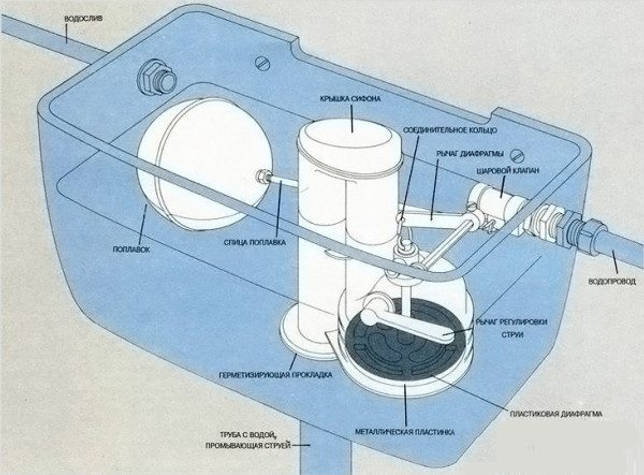
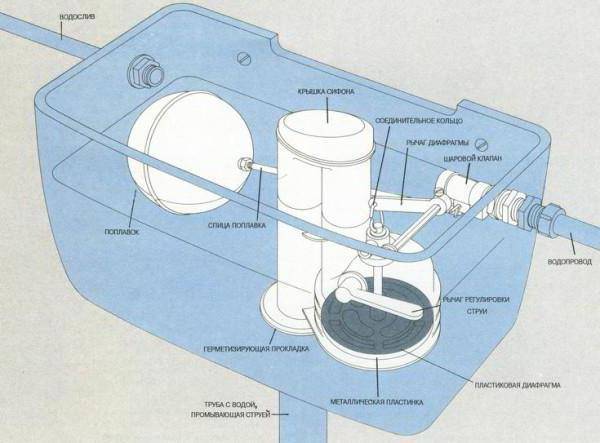
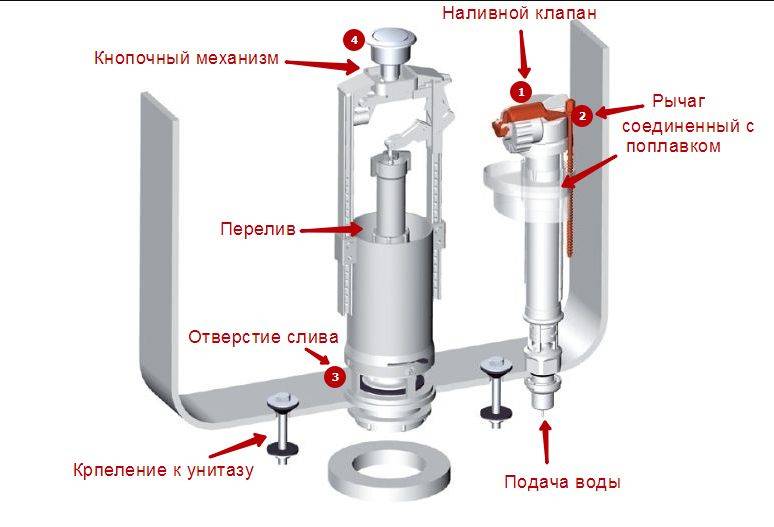
Scheme of the device of shutoff valves
Shutoff valve device
The drain mechanism of the tank in the professional world of plumbers is called a shut-off valve. Before proceeding with self-repair, you should figure out how it works.
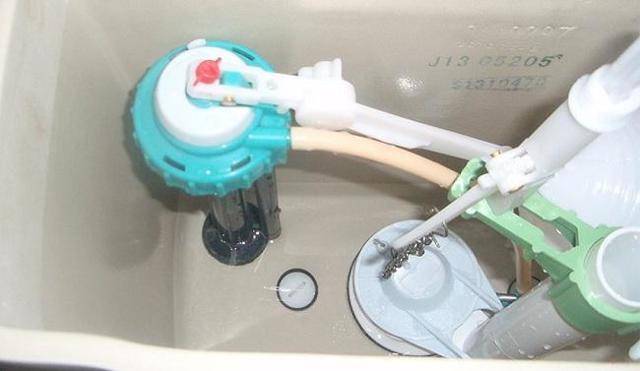
So, if an uninformed person opens the lid of the container, he will see only two details there:
- float mechanism;
- Drain mechanism.
Below we will take a closer look at their device.
Note! The device of valves in your tank may differ slightly from that described in this article. But, in any case, this is a fairly simple mechanism, which is not difficult to figure out.
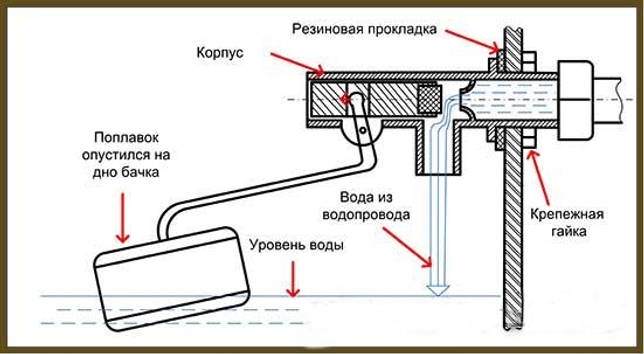
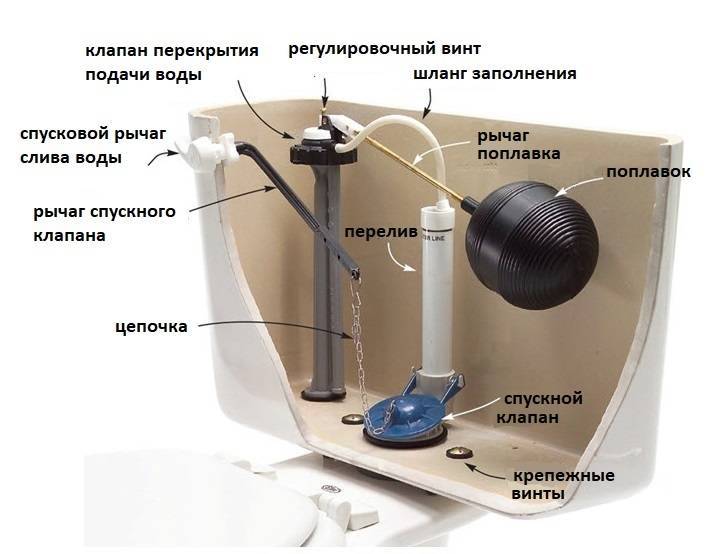
Float mechanism diagram
float mechanism
The float mechanism consists of two parts:
- Housing with a membrane that shuts off the water supply;
- A float with a lever that adjusts the position of the membrane in the housing.
The water filling level can be adjusted by the position of the float.
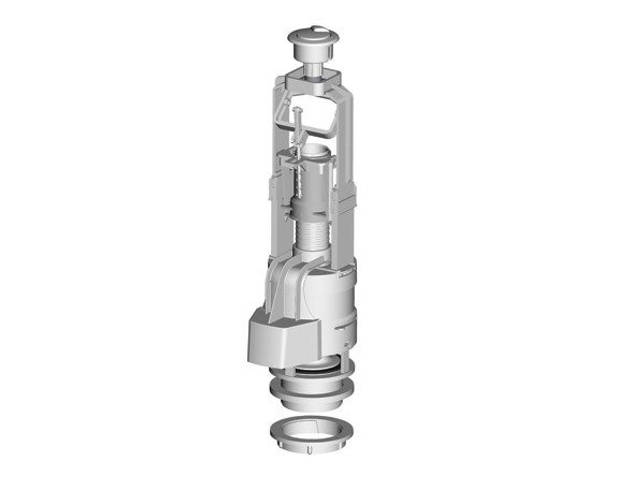
Drain mechanism
The drain mechanism device, as a rule, includes three main parts:
- Valve;
- Frame;
- Drain button with lever system.
The principle of operation of this device is quite simple - the position of the movable valve, located in a plastic case, is changed using a system of levers as a result of pressing a button. In addition, there is an overflow in the tank, which directs excess water into the toilet bypassing the valve, which helps prevent its overflow and, as a result, flooding of the apartment.