- Ratings
- Which is better to choose a water heated towel rail: manufacturer rating
- Rating of the best wired headphones of 2020
- Rating of the best mobile phones for games
- Fault symptoms
- How to clean a gas column radiator
- Why do the "insides" of the geyser get clogged?
- Gas column repair Neva
- How to repair the union nut of the heat exchanger
- Repair of the microswitch in the start-up system of the geyser
- Water intake cleaning option
- Checking the result
- Radiator repair
- Cleaning
- Soldering and Troubleshooting
- Rule out other column problems
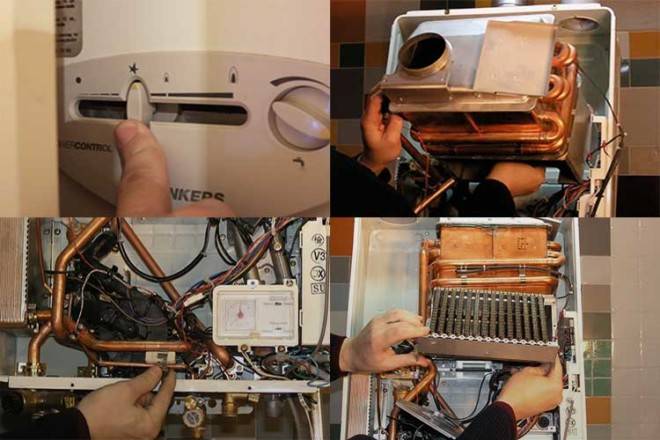
- External inspection of the water heater
- Troubleshooting inside the column
- Rules for dismantling and disassembling the gearbox
- Removing the reducer from the column
- Dismantling the frog of the water heater "Neva 3208"
- The procedure for removing the gearbox "Neva-transit"
- Water Regulator Disassembly
- Frog reassembly
- Testing the repaired node
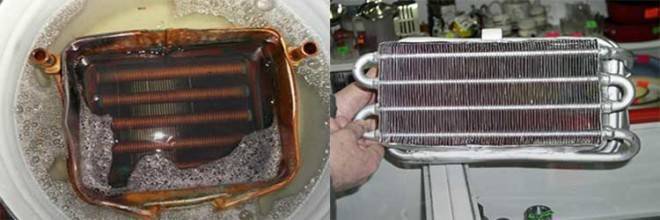
- How to clean the heat exchanger?
- Descaling procedure
Ratings
Ratings
- 15.06.2020
- 2977
Which is better to choose a water heated towel rail: manufacturer rating
Types of water heated towel rails: which one is better to choose, rating of manufacturers and overview of models. Advantages and disadvantages of towel dryers. Features and installation rules.
Ratings

- 14.05.2020
- 3219
Rating of the best wired headphones of 2020
The best wired earbuds for 2019 A brief overview of popular devices designed for a variety of purposes. Pros and cons of budget gadgets.
Ratings

- 14.08.2019
- 2582
Rating of the best mobile phones for games
Rating of the best mobile phones for games and the Internet. Features of choosing a gaming smartphone. Main technical characteristics, CPU frequency, amount of memory, graphics accelerator.
Ratings
- 16.06.2018
- 864
Fault symptoms
The following signs indicate that the column is clogged:
- The burner ignites poorly, strong cotton can be heard;
- The heater starts, but the burner goes out almost immediately;
- Soot pours from under the casing below;
The unit works at maximum power, and the water is barely heated.
Recommendations on how to clean the gas column heat exchanger or igniter will be different, so you need to immediately understand what and where exactly the problem is. So the cotton in the chamber indicates that excess gas accumulates before ignition.
In this case, look for instructions on how to clean the igniter, which is responsible for the timely ignition of the fuel. If the flame is very weak and has a pronounced yellow color, the jet is clogged. The ignition unit in most models is easy to disconnect from the main burner, and then calmly remove all debris.
Traction and overheating sensors are triggered by the accumulation of an excessive amount of soot. It is concentrated between the fins of the heat exchanger. In this case, the cross section of the gas-air path decreases, and the operating temperatures increase. In this case, you need a liquid to clean the gas column heat exchanger from soot.
If they literally fall out from under the decorative apron, it should be done immediately.
If cleaning the gas column heat exchanger did not give the required results, check the main burner. Soot can clog its nozzles, and heating is not properly performed, again. The geyser burner and the heat exchanger are closely connected, so it is advisable to carry out preventive maintenance of both units at the same time.
The heat exchanger of the geyser must also be cleaned of scale in order to restore the normal flow area. Any deposits on the walls reduce it and negatively affect the functionality of the device.
The "overgrowth" of the internal pipe passages is indicated by a decrease in the pressure of water at the outlet of the device at a normal inlet pressure. Tap water salts cannot be put anywhere - and it is they that lead to clogging of pipe passages. Over time, as a result of their natural deposition, the walls become clogged, and the plaque is very thick and durable. In this case, cleaning the gas column heat exchanger using the flushing method helps.


To summarize, when to perform maintenance (and the sooner the better):
- The device during operation quickly goes out or does not turn on at all. First check the gas supply - if there is no problem, make sure that there is sufficient water pressure. When the pressure is also stable, test the ignition element. With a thick layer of burning and soot, it will not work normally until the pollution is removed. Solutions to the problem - cleaning the burner.
- Constant activation of the thermal protection of the device - in order to prevent the equipment from overheating, a heat sensor is provided in it. This sensor signals critical temperature rises, warns the owner about equipment malfunctions.When the sensor is triggered too often, it makes sense to clean the pipes and the burner.
- Thermal protection is triggered - the sensor in the column is provided so that the equipment does not overheat and, accordingly, does not fail prematurely. It signals an increase in current indicators above critical levels. If the sensor is triggered frequently, check the pipes - most likely, scale has accumulated there. Since scale has good thermal insulation properties, the appliance overheats and shuts down.
- The productivity of the device has significantly decreased for unknown reasons - for example, the water began to heat up slowly, the pressure dropped sharply. It is necessary to test the heat exchanger for scale and remove all deposits from the working parts of the device.
We figured out the causes and signs of blockages, now let's see how to clean the gas column with our own hands, what is needed for this.
How to clean a gas column radiator
Among the regular maintenance measures for gas water heating equipment, cleaning of the heat exchanger occupies an important place. Cleaning should be done at least once a year
If your area has hard water with various impurities, then you can hold the event more often. In addition, cleaning is the first thing to do if the column has become worse at heating water for no apparent reason.
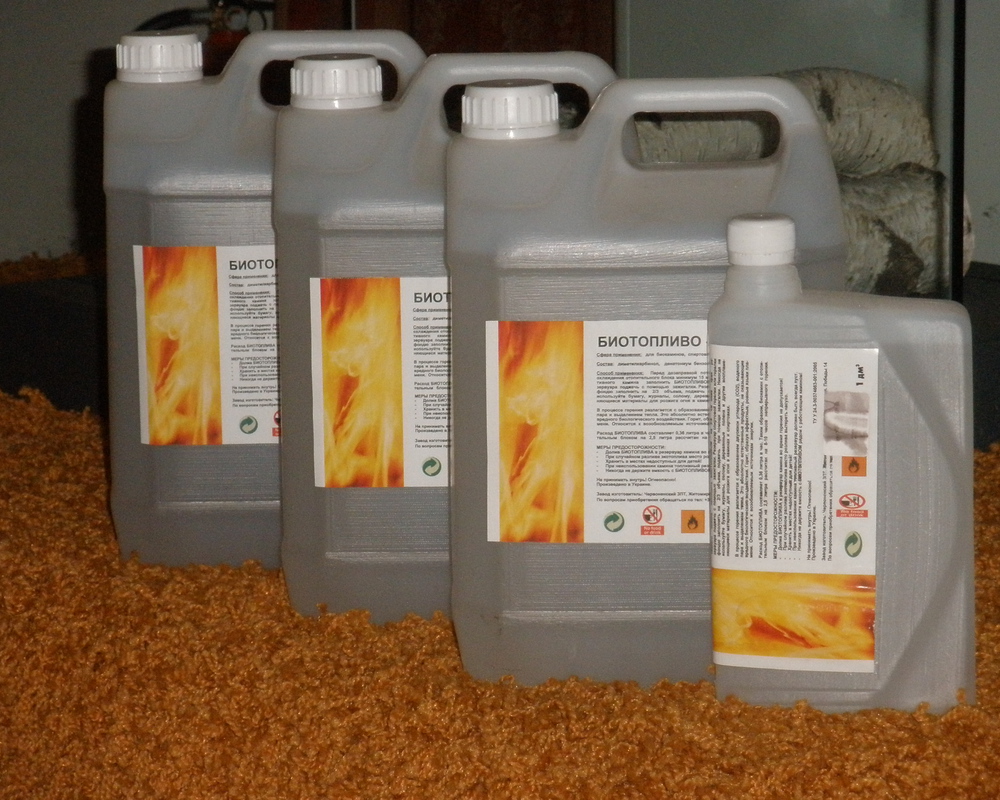
Citric acid is available to everyone, effective and absolutely safe for metal. At the same time, the product does not emit carcinogenic substances and an unpleasant odor.
 It is not recommended to use hydrochloric acid in cleaning the gas column radiator, because it can react with the metal from which the heat exchanger is made
In order to clean the radiator with a “lemon” you need to:
- Dissolve 100 grams of the substance in a liter of warm water;
- Pour the resulting solution into the heat exchanger;
- Lower the part into a container with a solution;
- Wait 15-20 minutes;
- Rinse the radiator with running water;
- Wait for the part to dry.
You can use vinegar essence to clean the radiator. In this case, the cleaning algorithm should be left unchanged. You can rid the radiator of scale with the help of special tools (for example, antiscale SK-110A).
Why do the "insides" of the geyser get clogged?
The reason for such pollution lies in the principle of operation of the device. The device heats water with gas, and therefore accumulations of soot and soot cannot be avoided. In addition, the incendiary element itself is very often contaminated, collecting soot on its wick.
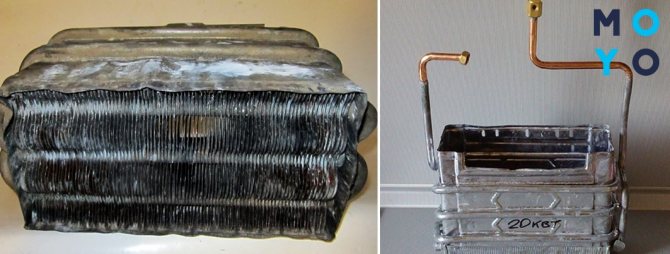
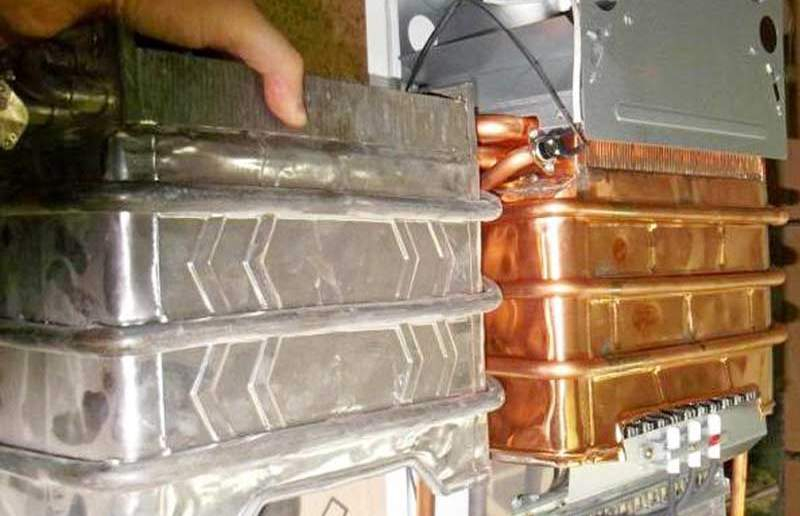
But the real apocalypse comes when scale “settles” in the pipes of the water heater. It not only interferes with the normal operation of the equipment, but can completely disable it, completely clogging the plumbing part. The appearance of scale in the heat exchanger is especially dangerous.
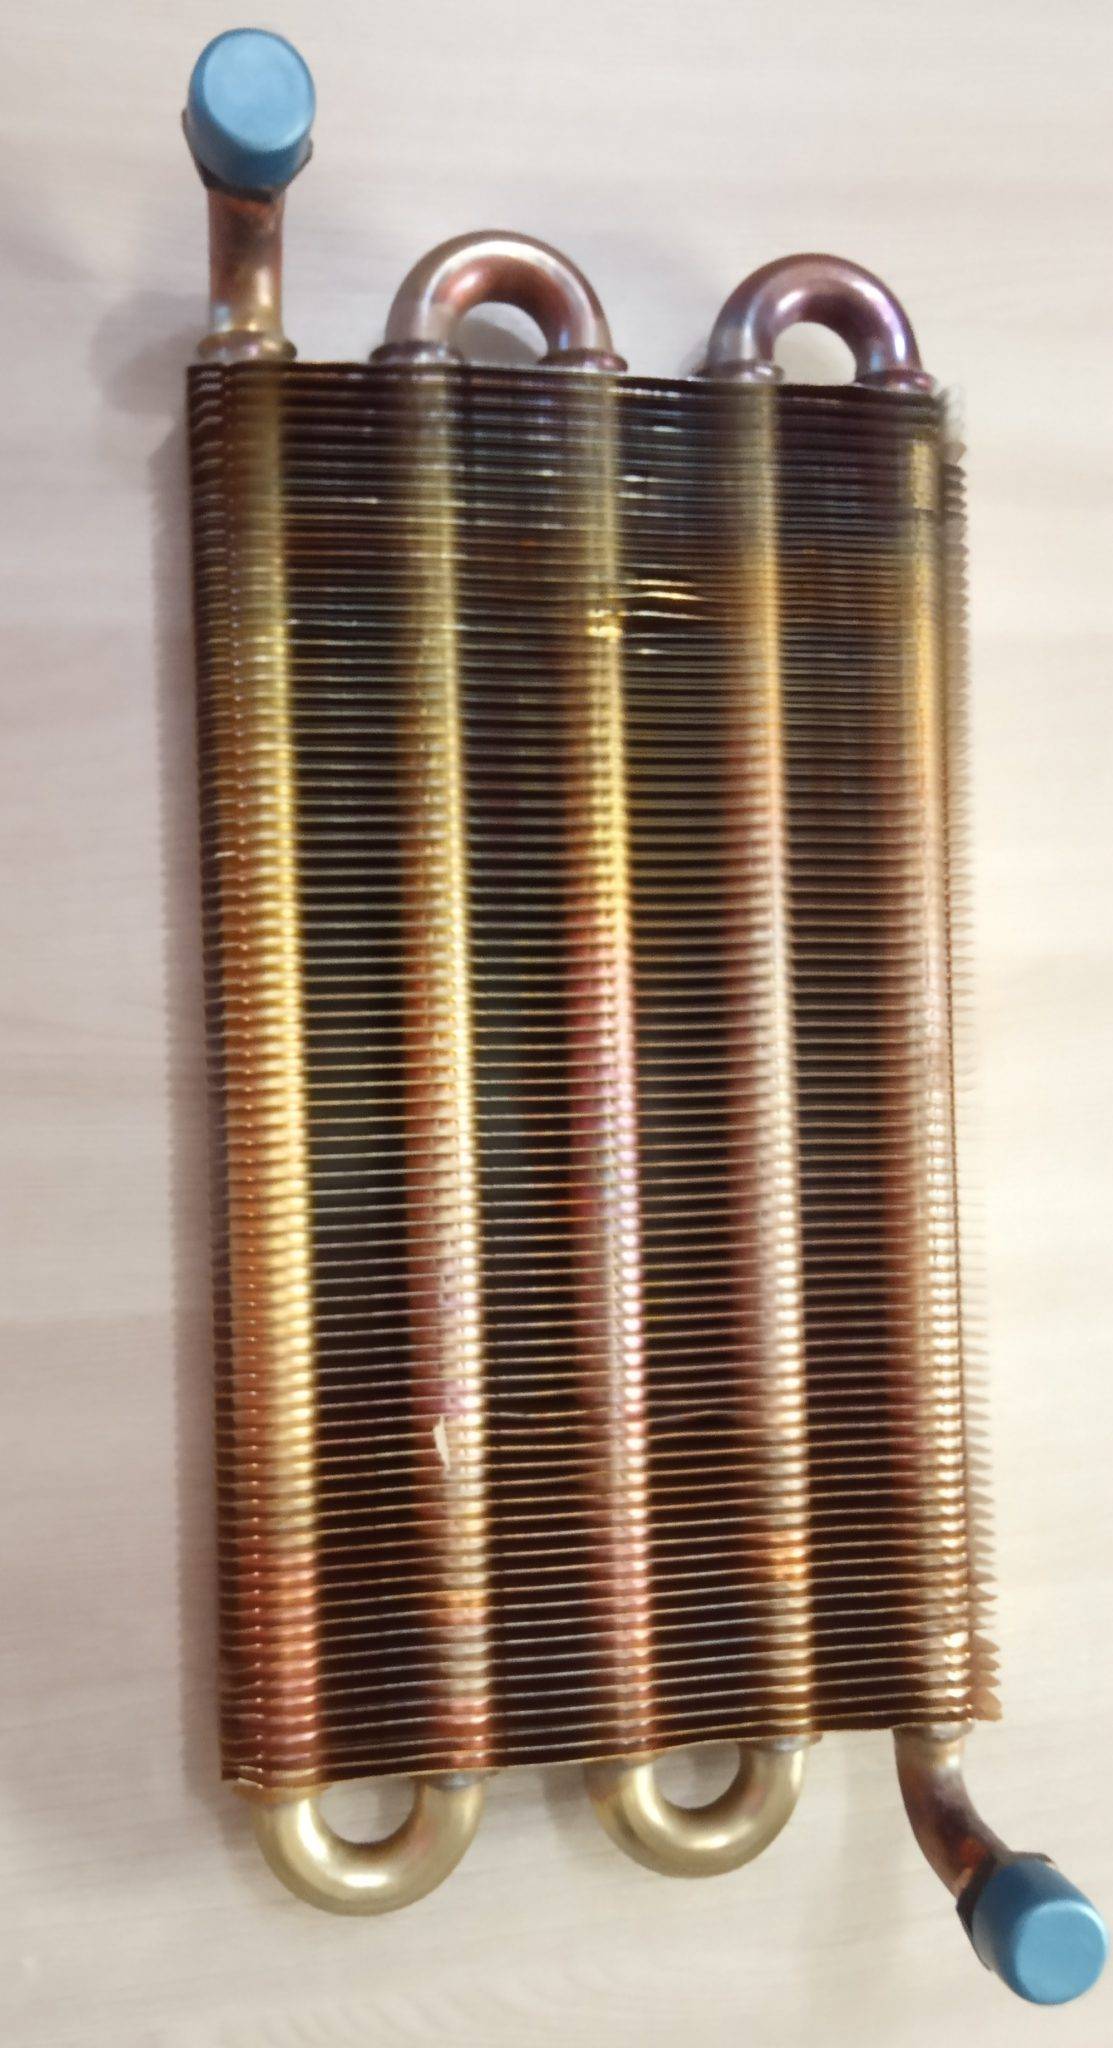
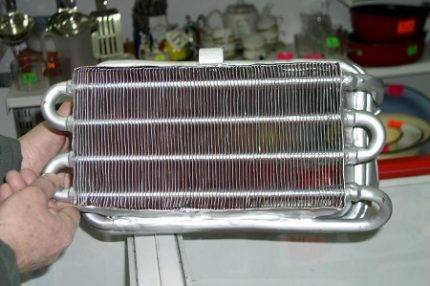
The heat exchanger is a collection of tubes placed above the gas burner. Water must flow constantly and unhindered through them, it is in them that it heats up evenly. When scale builds up in these tubes, there is an interruption in the supply of hot water.
You may be interested in: 9 important questions when choosing a geyser
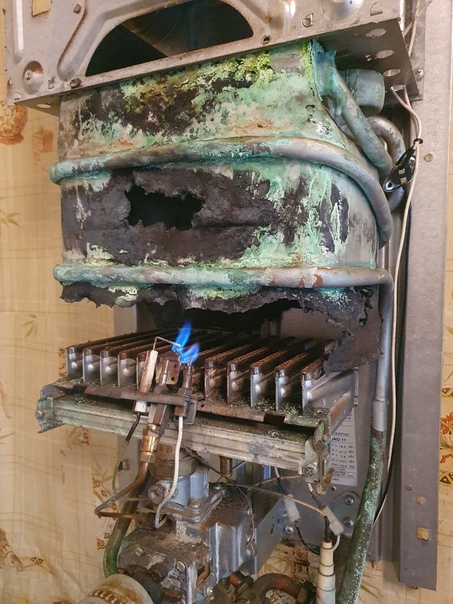
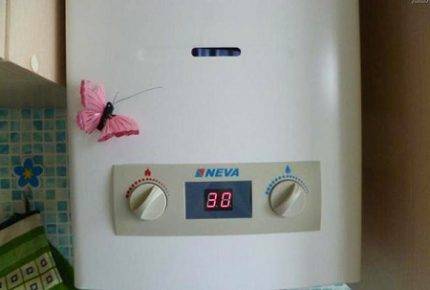
Gas column repair Neva
Most models of Neva gas water heaters have shown themselves to be simple and affordable water heaters for repair.They are far from the reliability of European models, but their repair is much cheaper, and almost always you can do it yourself.
The failure and subsequent repair of the spark plug is considered by the rules to be an atypical case of breakdown, therefore, having completed the repair work, it will be correct to look for the cause of the defect. Most often, plastic burnout occurs due to condensate flowing through the ventilation system onto the gas burner body.
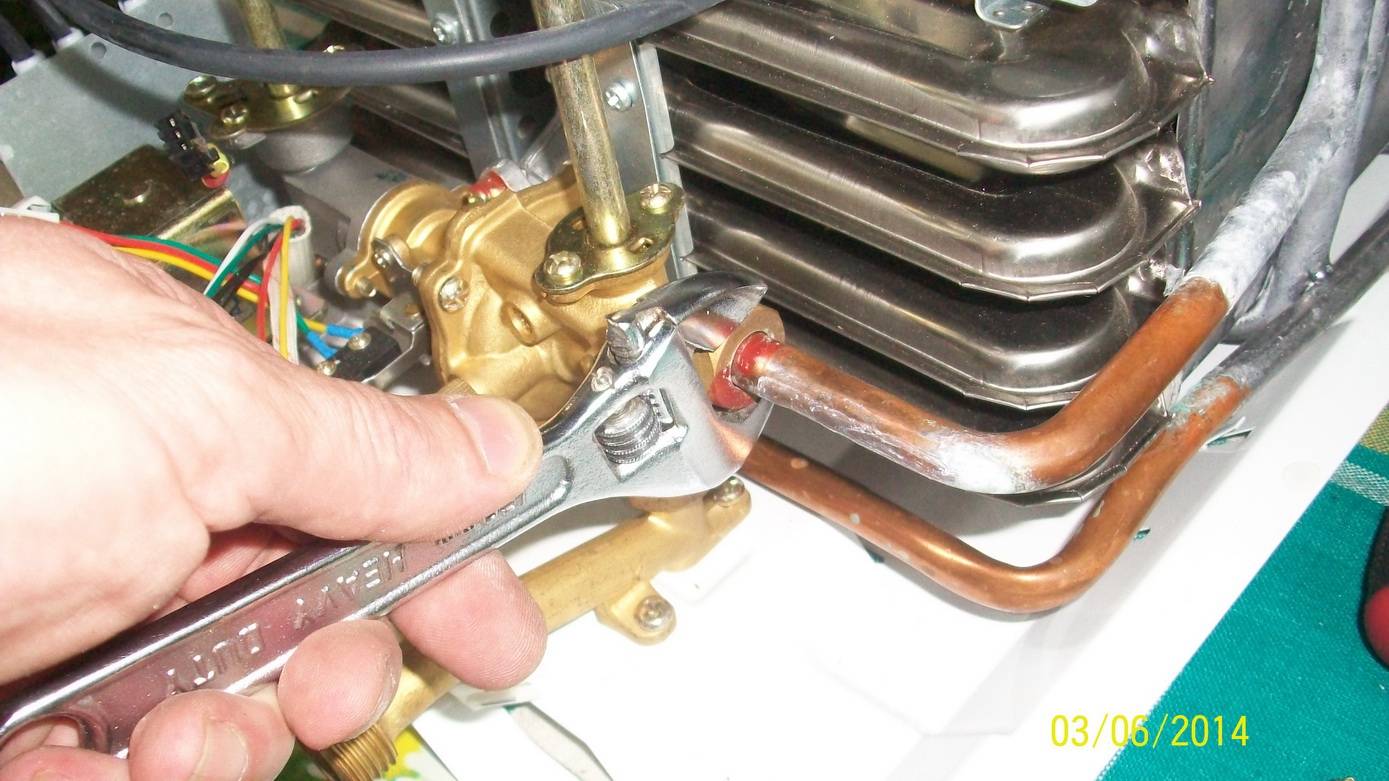
How to repair the union nut of the heat exchanger
One of the most common defects in Neva gas water heaters for almost all models is the low quality of the heat exchanger metal. According to the rules, the heat exchange circuit through which water moves must not come into contact with aluminum parts, for example, a gas burner or a control unit. Any such contact can cause electrochemical corrosion of copper walls, and then the repair will be simply useless.
In addition, the rules for tightening the union nuts with which the heat exchanger is attached to the regulator and the outlet pipe are not always followed. With each removal and repair of the heat exchanger, the nuts cut a thin, barely visible track in the copper wall. Ultimately, the flared end and part of the copper pipe simply break off for the tenth time of twisting.
In this case, it is necessary to cut and level the breakage point, install a new nut with an external thread and connect the heat exchanger to the control unit with a conventional flexible hose. Any other repair option, as practice shows, is short-lived.
Repair of the microswitch in the start-up system of the geyser
A situation similar to the Oasis on dead batteries also happens with the Neva gas column.When you try to start the Neva, the indicator board lights up, but the gas burner does not ignite. Sometimes the column can be turned on 4-5 times.


In this situation, repair of the microswitch is required, due to premature wear of the part or improper adjustment of the assembly.
The switch is located next to the water pressure control unit. When the column is started, the membrane on the block squeezes out the stem, which unlocks the switch contact. Unlike the Oasis, all parts of the block, including the stem, are made of brass, so there is no corrosion, the microswitch itself is subject to repair and replacement.
To perform repair work, it is necessary to disconnect the connector, unscrew the two M3 screws and remove the switch housing from the bracket, as in the video
Replacing the mic is easy. You can buy an original part for 400-500 rubles. in a specialized salon or purchase an analogue for 50 rubles. at any radio parts store. There is no difference for repair, in both cases they will sell a part from Chinese consumer goods.
In order to carry out the repair, you will need to unsolder two strands of wire with a connector from the switch legs, put on a heat shrink tube and solder to the contacts of the new part.
At the final stage of the repair, the switch is screwed with old screws onto the mounting plate on the block. Next, you need to adjust the position of the microswitch body so that the stem completely releases the contact when moving. This is done using mounting screws. One of the screws bends with a radius, respectively, by rotating it, you can move the switch body in the right direction.
Water intake cleaning option
We figured out how to clean the gas column burner, how and how to flush the radiator.The last item in the review is cleaning the water intake assembly. It contains a strainer that prevents clogging of the pipes with large pieces of rust and other deposits. Be sure to check the membrane tension - if it is insufficient, there will not be sufficient thrust from the gas column after turning on the water tap.
How to clean the column in case of blockage of the water intake unit:
- Remove the unit from the device.
- Unscrew the screw part and open the housing.
- Clean the filter under a powerful running water jet.
- Check the membrane - if there are bulges, the part has worked out and needs to be replaced, it would be best to install a silicone product.
- Close the water inlet cover, preferably with screws. This will guarantee the most uniform tension.
You yourself can only clean the jet nozzles - in other situations, you will need the help of a professional craftsman. The plumbing component is not so complicated and allows for “domestic” interventions. The main thing is to follow the basic rules and follow the established standards for the work.
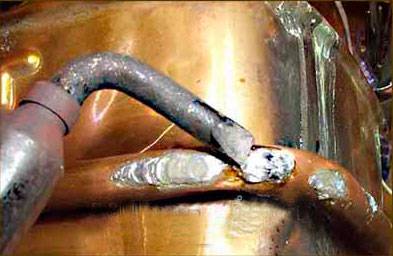
Checking the result
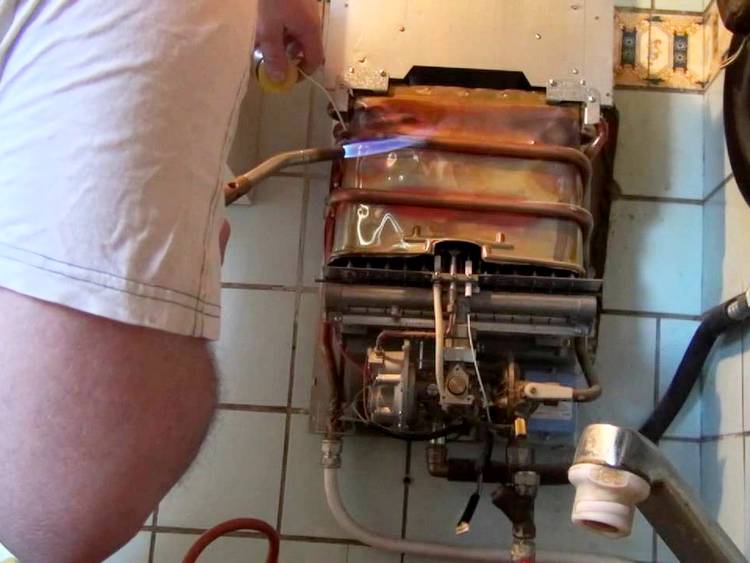
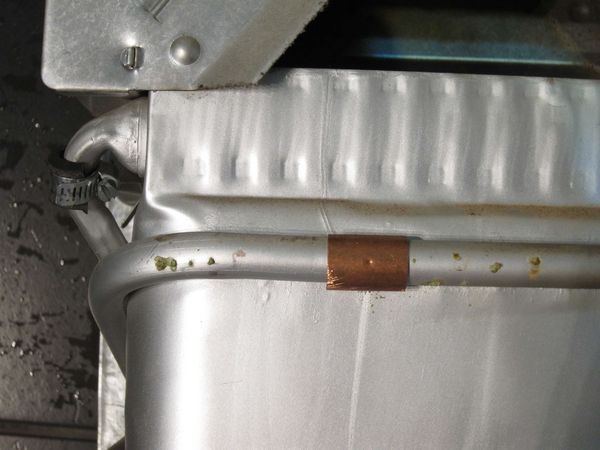
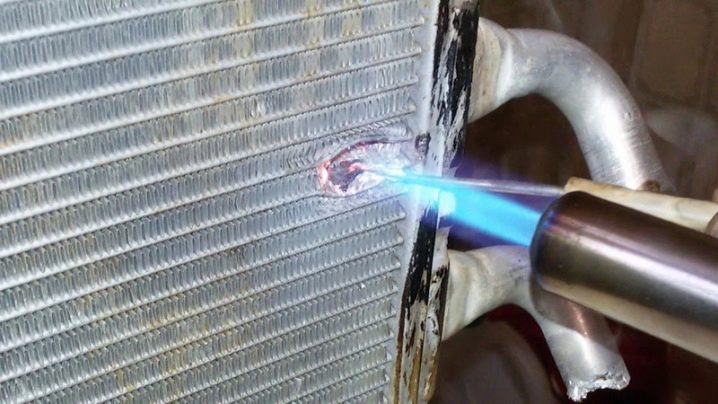
After completing the soldering of the gas column heat exchanger, you should carefully inspect all radiator pipes. If green spots are visible somewhere, most likely these are small fistulas. These places also need to be cleaned and soldered so as not to disassemble the column again in the future.
Next, water is supplied to the column and the tap is gradually turned on. The water in the system must be filled slowly. At first, air will come out of the faucet along with the water. When the system is full, the valve is fully opened to check the soldering with maximum water pressure. At this time, the place of soldering is carefully examined for leaks.
The last step in the test will be to turn on the column and check already with hot water. Just in case, the place of soldering is wiped with a paper towel. If there is minimal moisture, it will show it.
Radiator repair
Let's figure out what to do if your column is broken.
Cleaning
In one of the publications, we wrote how to clean the gas column as a whole. Let's take a closer look at flushing the heat exchanger.
If you notice that the column has become worse at heating water or the pressure has decreased, clean it. Salts of potassium and magnesium settle on the walls, clog the tubes of the coil. Therefore, it is required to descale the product at least once a year.
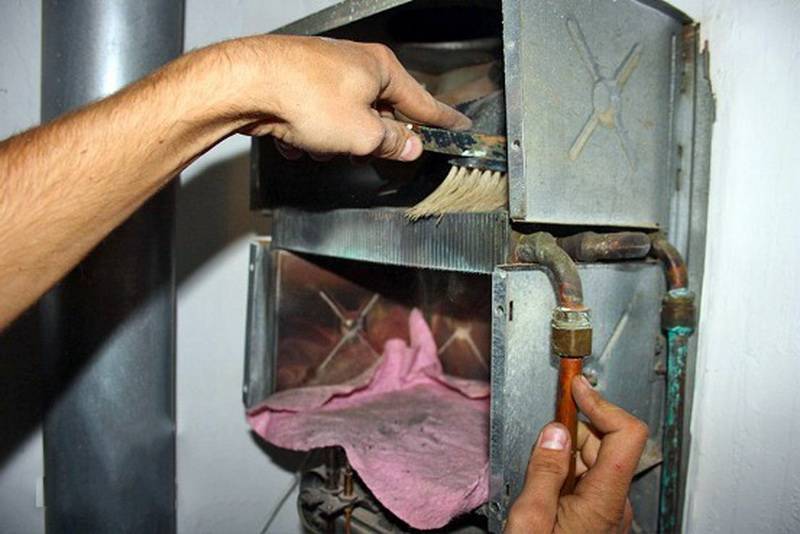
How to clean:
- Shut off the water and gas supply.
- Remove the cover of the device. Often it is mounted on the two lower screws.
- Lift the cover up, pull it towards you.
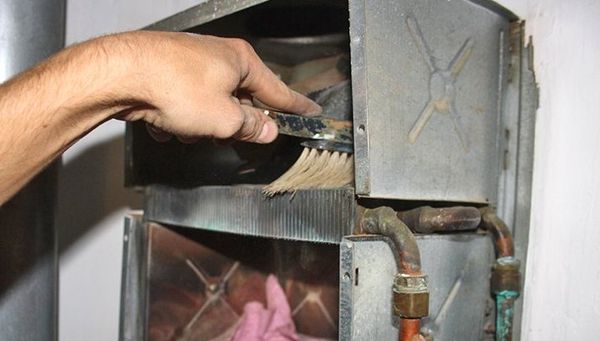
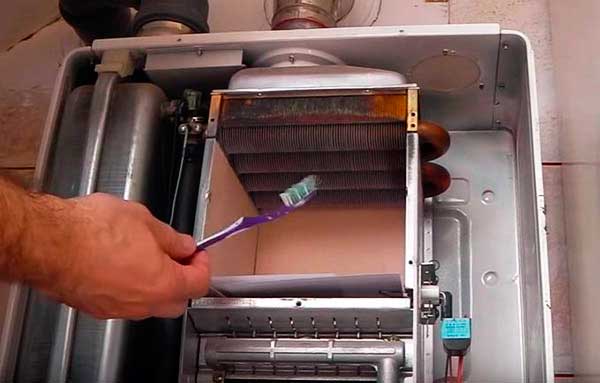
- The plates are cleaned of dust with a brush or vacuum cleaner.
You can wash the product at home with citric and hydrochloric acid
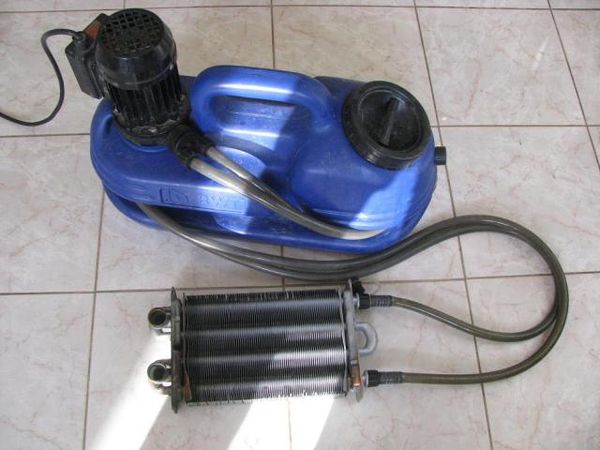
The latter must be used very carefully in case of severe contamination. To create circulation of liquid through the coil, you can use a watering can or a pump
- Locate the tube that goes from the electronic unit to the radiator.
- Disable it.
- Open the mixer; you can loosen the nut so that the water drains better.
- Connect the rubber hoses to the inlet and outlet of the product, after disconnecting the nozzles.
- Place the heat exchanger over a large tank, a bathtub.
- Pour a solution of hydrochloric acid (5-15%) from a watering can into the inlet. Repeat the flush cycle at least 5 times.
- Then rinse the serpentine under the faucet until the water runs clear.
To clean with citric acid, do this:
- Dilute 100 g of powder in 350 liters of water.
- Pour the solution inside with a watering can.
- You can leave it to stand for 30 minutes or place it in a container of water and heat it on the stove until the scale has gone.
Then the product is dried and connected in the reverse order.
Some users use the calcination method, but it is more risky. To do this, the radiator is evenly heated by a burner until the scale inside cracks. Then it is washed with small portions of water.
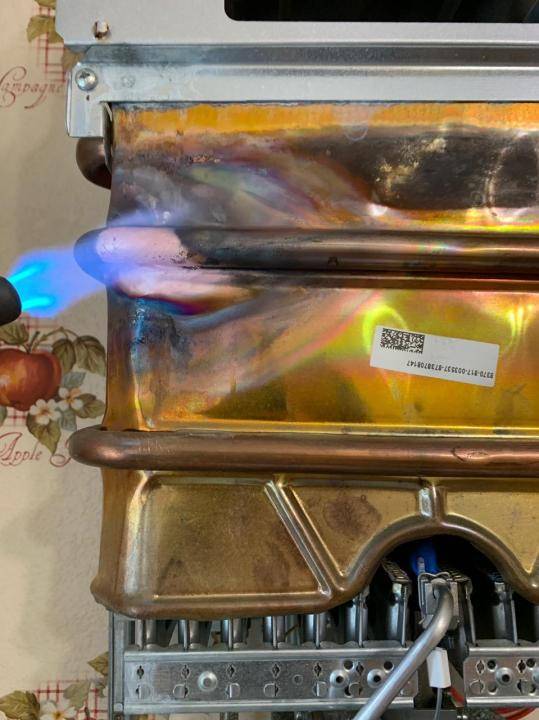


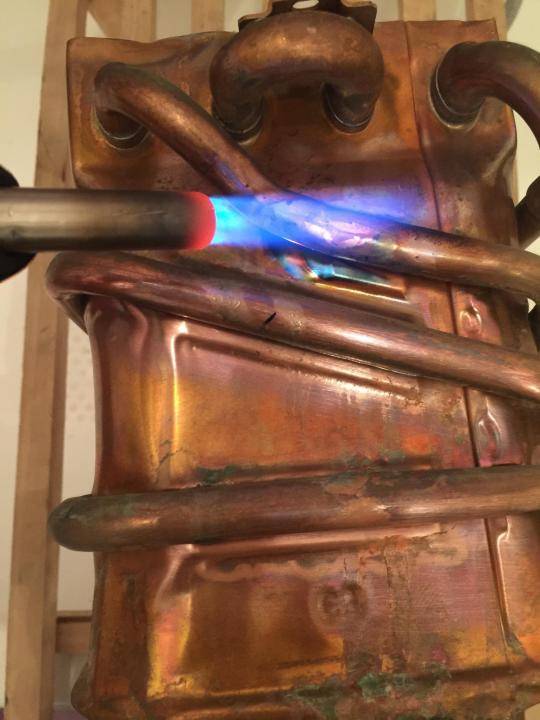


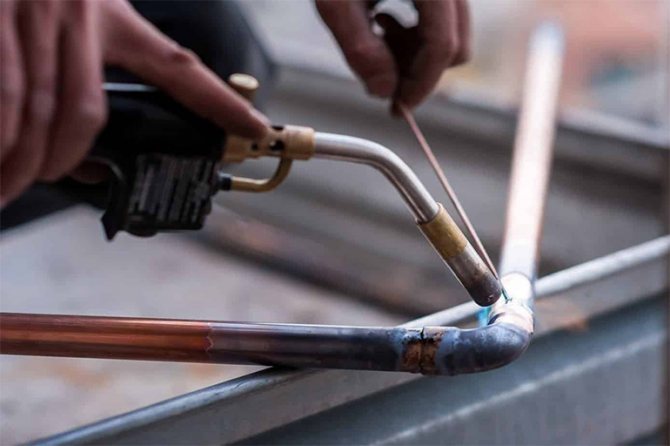
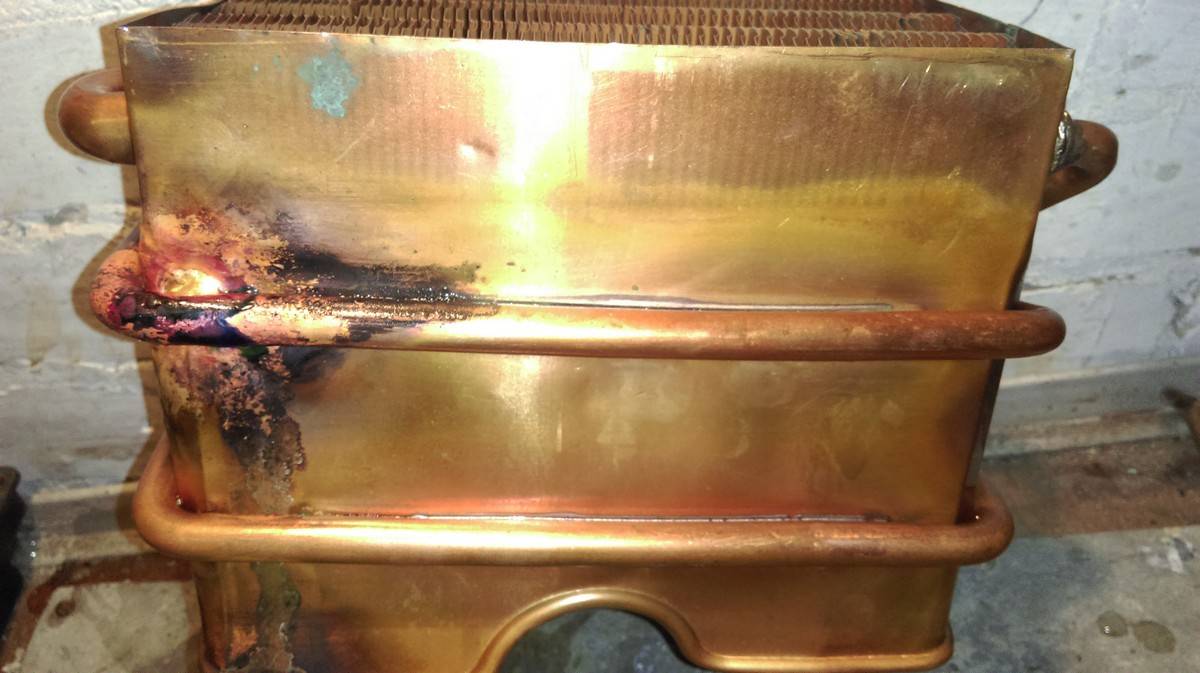
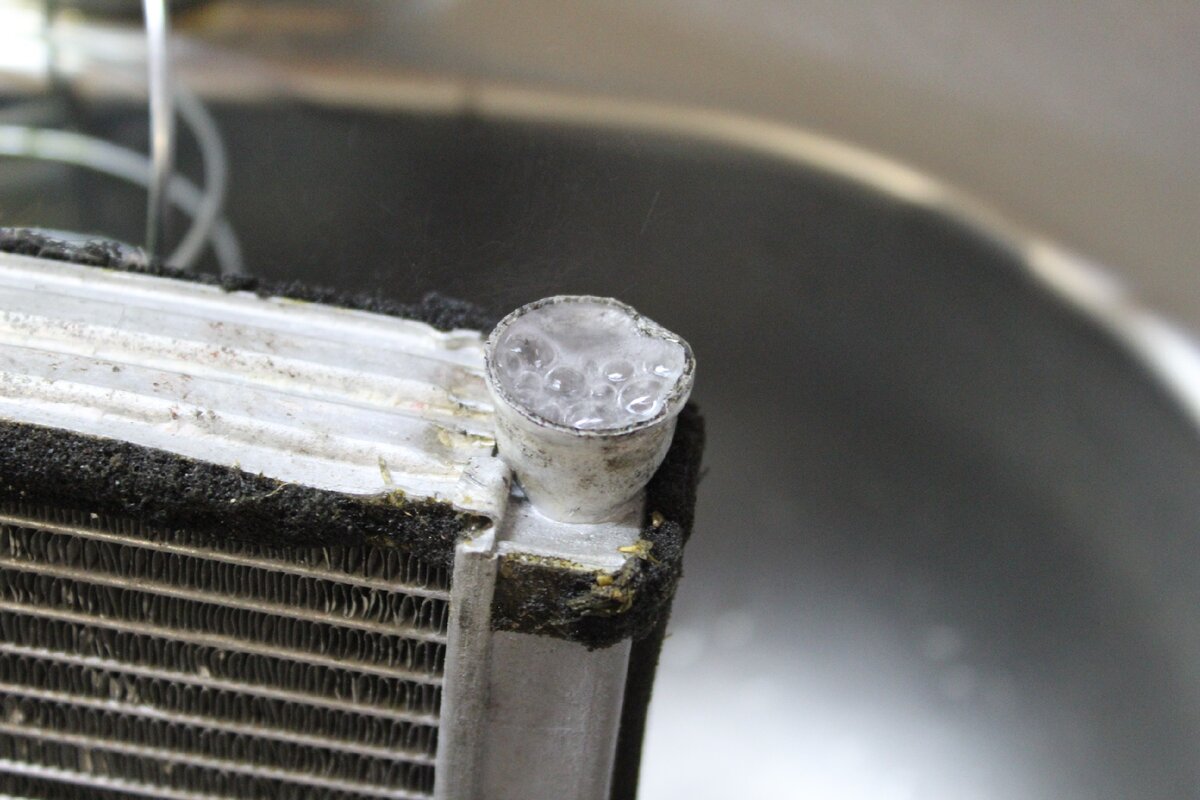
Soldering and Troubleshooting
We described the soldering process in detail in the article “How to solder a gas column”. Recall that you can solder corrosive damage using a soldering iron with a power of 100 W or more or a gas burner. POS-61 solder and flux are also used.
What to do if the heat exchanger burned out? How to glue the device? Useful copper and tin patches. Can lids can be used.
You can fix the patch with a riveter. It is necessary to make holes around the hole with nails and fix the plate with wire.
Cold welding can also be used to eliminate leaks. The material is kneaded to a plastic state and superimposed on the damage. Wait until it hardens, and you can operate the radiator.
This is how you can return the column to working capacity yourself. During disassembly, do not forget about safety rules, shut off the gas supply.
The video shows the repair of the gas column:
Rule out other column problems
Most often, you may encounter a situation where the column initially does not kindle a flame. First you need to determine what specifically led to this.After all, the problem may not be in the heat exchanger at all, but, for example, in dead batteries. Therefore, diagnostics is indispensable. Moreover, some of the breakdowns can be eliminated with your own hands, and in some cases you will have to call a specialist from the gas service.
External inspection of the water heater
Competent diagnostics will allow you to quickly carry out repairs on your own.
It is not recommended to carry out self-repairs if the geyser is under warranty. The service department can remove the device from warranty service
There are a number of elementary steps that should be performed before you go to explore the water heater from the inside:
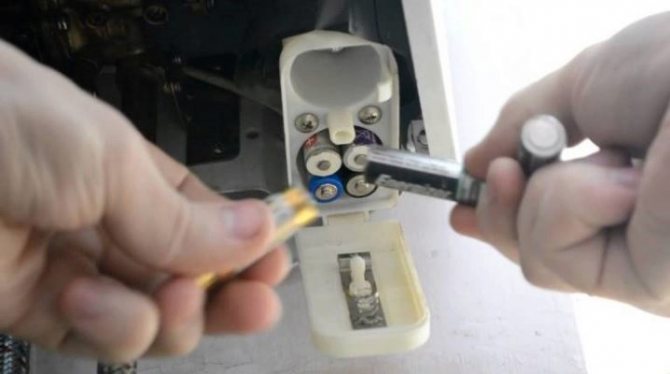
- Replacing the battery and cleaning the power contacts.
- Checking the draft of the chimney and the presence of pressure in the cold water supply system.
- Checking the fuse (for turbocharged speakers). You can turn the plug in the switch to change the phase location - relevant for imported models, as they are quite sensitive to this.
- Mesh filter cleaning. This is a sump that can be found on a pipe that supplies cold water. Often the mesh is a constructive component of the water node.
- Observe the ignition electrodes. To do this, just open the hot water tap, after which sparks should form. If the chamber is closed, then you can listen to the body. Characteristic sounds like clicking charges should be heard.
The above steps may not always help. Then you have to look inside the column, for which you have to remove the case.
Each gas column repair should begin with checking the batteries and cleaning the contacts if they are oxidized. You also need to inspect and clean the igniter.There are speaker models that have a small window for access to the electrodes, which can be cleaned with a brush.
Troubleshooting inside the column
If external inspection and replacement of batteries did not help, then you can start troubleshooting directly inside the device.
To do this, remove the casing of the water heater and check the main components one by one. It is better to perform all actions with an assistant. He should be asked to open hot water, and he himself needs to monitor the movements of the stem. The responsibility of this element is to act on the pressure plate to move it away from the microswitch button.
In the case when the pusher does not perform any movements, then with a probability of 100% the problem lies in the water block. If this problem occurs, it is necessary to disassemble the unit in order to clean and change the membrane in it.
Also, the stem can press on the plate, but the button will remain pressed. In this case, it is necessary to check the water regulator for scale. It must be found and cleaned.
If all the above elements work in normal mode, the button is pressed, but no sparks are formed, then in this situation the microswitch itself may be the culprit. To verify this, you need to disconnect its connectors and clamp the two terminals with a screwdriver. If in this case sparks immediately begin to form, then the switch is out of order and should be replaced.
It is necessary to check by closing the connector that is connected to the impulse block. The plug of the microswitch must not be touched.
The solenoid valve may also fail, due to which gas will not be supplied.To do this, check each of the sensors in the circuit by alternately closing. You can also use a multimeter to dial.
Rules for dismantling and disassembling the gearbox
Regardless of the modification of the geyser, before starting repairs or preventive maintenance, turn off the gas and cold water supply to the unit.
To drain the water from the system, open the hot water tap located below all water-folding devices powered from the column. We place a wide container (basin or bucket) under the dismantled water unit, where the remaining water from the gearbox will drain.

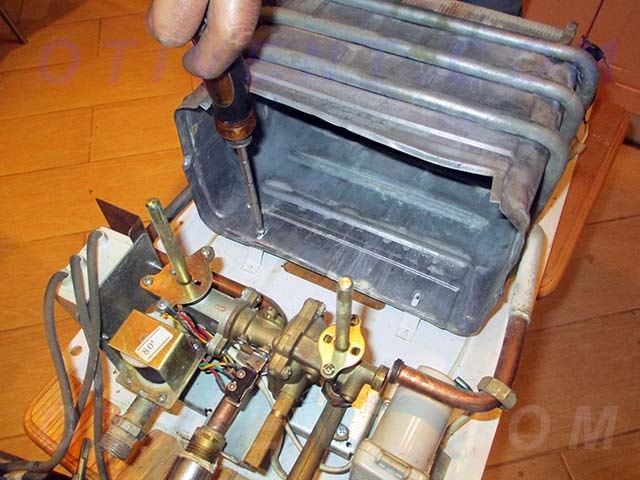


Removing the reducer from the column
Often the frog can be removed separately. But in some columns it is impossible to do this, so you have to dismantle both blocks together. There are models of instantaneous water heaters in which, in order to gain access to the insides of a frog, it is not at all necessary to dismantle it - just remove the cover.
Dismantling the frog of the water heater "Neva 3208"
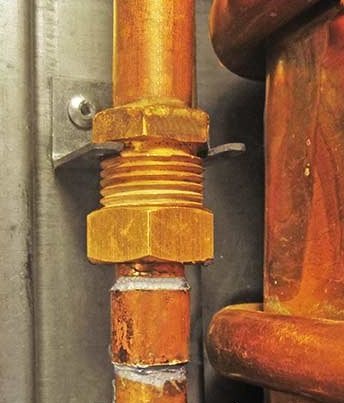
In the column "Neva 3208" it is easy to dismantle the gearbox, as in other similar devices. To do this, unscrew the union nuts on the inlet and outlet pipes of the housing, and also unscrew the three screws that secure the frog to the gas unit. When unscrewing the nuts and screws that fix the water regulator, hold the dismantled block with your hand so as not to accidentally deform the parts of the gas unit.
When dismantling the water regulator with a wrench, unscrew 2 union nuts of the pipes in the indicated order, then unscrew 3 screws with a screwdriver
The procedure for removing the gearbox "Neva-transit"
To repair the water reducer, it must be removed from the column housing.We will analyze how to do this using the example of dismantling the Neva-Transit column, since the fastening of gas-water units in many modern models is very similar. First, remove the adjusting knobs on the front panel. They are just dressed in stocks.
After that, unscrewing the screws, remove the front panel
Please note that the digital display on the front panel is connected with detachable terminals to the electronic devices of the speaker. Therefore, by pulling the panel towards ourselves, we disconnect the terminals and only after that we remove the panel completely
Do you have a Neva gas water heater? We recommend that you read more about typical malfunctions and how to fix them.
Water Regulator Disassembly
Having freed the frog and drained the last water from it, unscrew the lid. Often the screws are soured. To facilitate the work and in order not to disrupt the slots, we use the special tool WD-40. After unscrewing the screws, remove the cover, remove the membrane and inspect the condition inside.
We replace the parts that have become unusable, clean and wash the insides (surfaces, channels, if necessary, clean the body from the outside), install the parts in place and assemble the frog in the reverse order.
Frog reassembly
It is especially important to set the aperture correctly. The bypass hole must exactly match the holes of the same name in the cover and base.
If the channel connecting the cavities of the base and the cover is blocked, the column will not work.
After installing the cover on the base, tighten the screws.We install the assembled gearbox in place (also in the reverse order), not forgetting about the sealing gaskets on the pipes and on the connection of the water-gas unit with the platform of the gas burner leg.
Screws should be baited and finally tightened without misalignment. To do this, they are installed and baited in pairs-crosswise and similarly screwed up to the stop.
A gasket is installed in this place (between the burner and the gas unit). Be careful - the safety of the geyser is ensured by the tightness of this unit
Testing the repaired node
After installing the repaired frog, we check the operation of the water part without connecting the gas by opening the hot water tap.
Watching:
- whether drops have appeared on the connections;
- whether the flow rate is the same when hot and cold water are turned on separately;
- whether the burner igniter clicks;
- whether the stem moves normally when opening and closing the valve.
If not everything goes as it should, it is worth double-checking your work. However, sometimes the reason may lie not only in the water node.
Only after the mounted frog has passed the test can gas be supplied to the column. But do not forget about the safety rules when using the column. And if you smell gas, you should immediately shut off its supply, arrange ventilation and call the gas workers.
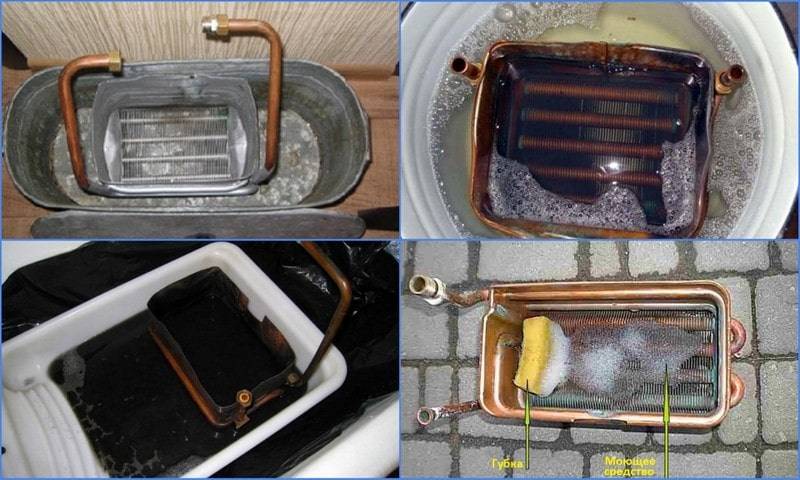
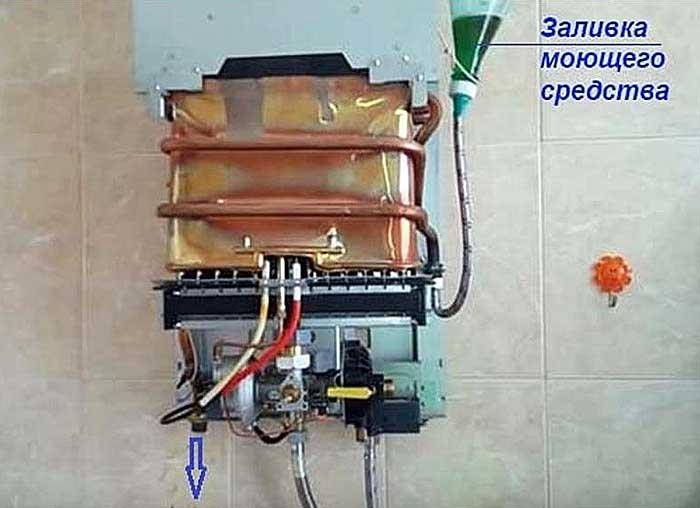
How to clean the heat exchanger?
In this section, we will tell you how and with what to rinse the gas column heat exchanger at home. You will need to perform a number of actions:
- Disconnect the pipes at the inlet and outlet of the water in the device. If you do such activities irregularly, most likely, the fastening nuts will be clogged with scale, which prevents them from detaching.In such a situation, use a special fluid that is sold at any car dealer. Drip it with an oiler into the junctions of the nuts, wait 15 minutes and calmly unscrew the nuts.
- Remove the heat exchanger, pour the descaling agent inside with a funnel. You can use for this a solution consisting of 0.5 liters of hot water and 100 g of citric acid.
- Drain the solution, rinse the heat exchanger thoroughly. If you do not remove all the scale that has moved away from the walls, then it will clog the tubes of the device, so rinse it under strong pressure of running water.
- Install the washed heat exchanger in place, tighten the fastening nuts, but before that, replace the gaskets.
Descaling procedure
To flush the heat exchanger of a conventional geyser, you must first find the valves that shut off the flow of gas and water to the device, and then turn them.
At the same stage, it is recommended to get the instruction manual and refresh the information about the device device, as well as the manufacturer's recommendations. This will avoid errors during disassembly.


To disassemble the column, you will need the usual tools that any experienced craftsman has at his disposal:
- adjustable and pipe wrench;
- straight and Phillips screwdrivers;
- paronite gaskets;
- a hose with a length of at least half a meter;
- metal clamp to fix this hose.
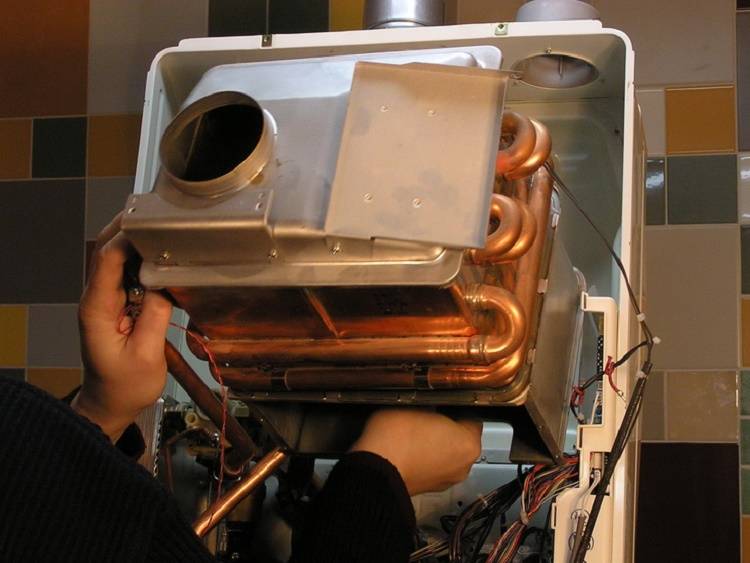
The hose is connected to the outlet of the heat exchanger and lowered into the sink so that the waste water with impurities can be drained into the sewer. If this is not possible, you will also have to stock up on a large enough container to drain the water. Remove the protective cover from the column.Be careful not to break the control panel.
To clean the heat exchanger from scale, it is usually dismantled, and then reinstalled, sealing the threaded connections
Now you need to remove the water filter, which is usually fixed with a nut. The filter should then be washed and reinstalled. If the deposits are found to be too complex, it is recommended to use chemical cleaners to remove contaminants from the mesh. Filter damage may be detected during the flushing process. In this case, it is better to replace it.
Now you need to disconnect the heat exchanger from the water pipes, usually in these places a conventional threaded connection is used, which should simply be unscrewed. The heat exchanger is removed from the hinges and turned over. Some craftsmen advise putting it in a large enough container for cleaning so that aggressive chemicals do not leak onto the floor.
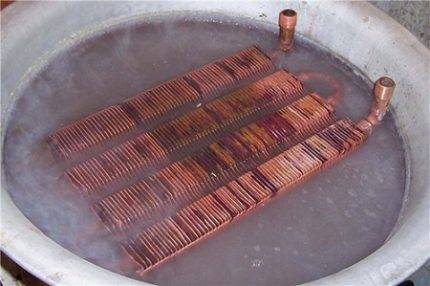
To thoroughly rinse the heat exchanger, it can be placed in a spacious container with a cleaning agent. Processing time depends on the instructions on the package.
As a cleaner, you can use suitable products, for example, “Antinakipin”. The usual 9% vinegar solution and other household formulations are also suitable. You can make a solution of citric acid: 100 g per liter of water.
Some people have had positive experiences with descaling drinks like Pepsi-Cola or Sprite, which contain phosphoric acid. But you should not use vinegar essence for these purposes, it can corrode the walls of pipes, you will have to carry out serious repairs.
The heat exchanger is turned over and the cleaner is poured into it using a rubber pear or a large syringe.Usually you need at least 500 ml of the substance, but not more than a liter. After that, vinegar or citric acid is left inside for about a quarter of an hour. When using industrial cleaners, it is recommended to follow the instructions.
Remove the protective cover from the geyser carefully so as not to damage the electronic control panel and other elements of the device
At the end of cleaning, the solution is drained, and the pipes are washed from accumulated dirt. To do this, the inlet of the heat exchanger is again connected to the water supply, and a container is placed at the outlet to collect dirty water.
Rinsing is carried out until a clean stream appears. In the presence of serious contamination, a single cleaning procedure may not be enough, it will have to be repeated again using a fresh portion of the cleaner.
Upon completion of the work, it is necessary to assemble the column in the reverse order. The heat exchanger is connected to the water supply. In this case, threaded connections should be sealed and treated with graphite grease. All gaskets present at the installation sites must be immediately replaced with new ones.
Now it is necessary to install the washed coarse filter in place, put the casing on the device and again supply gas and water to the column by unscrewing the corresponding valves. It remains to perform a control start-up of water to make sure that the column is working properly.