- Water node malfunction
- Repair of a replaced gas column heat exchanger
- The principle of operation of the thrust sensor in the gas column
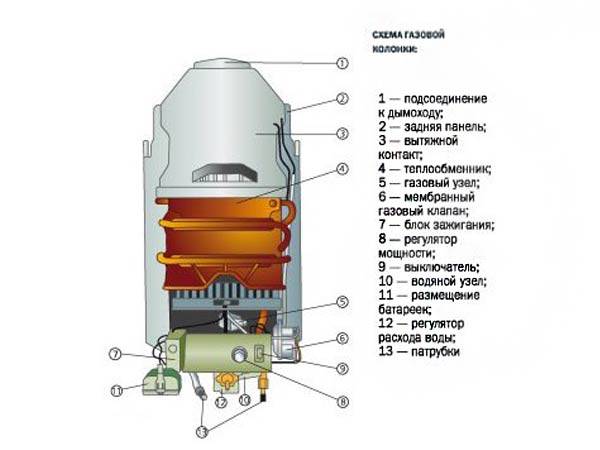
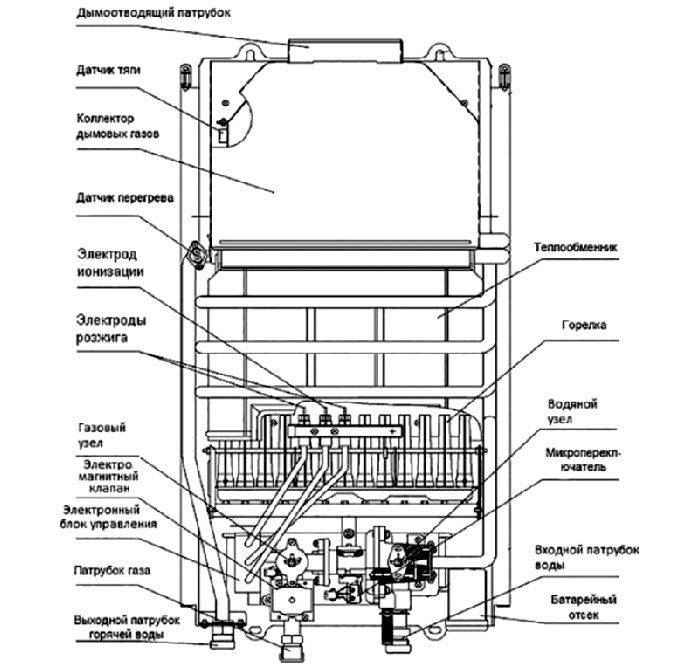
- Device device
- Varieties of gas burners
- Soldering methods
- With a soldering iron
- Gas-burner
- Cold welding
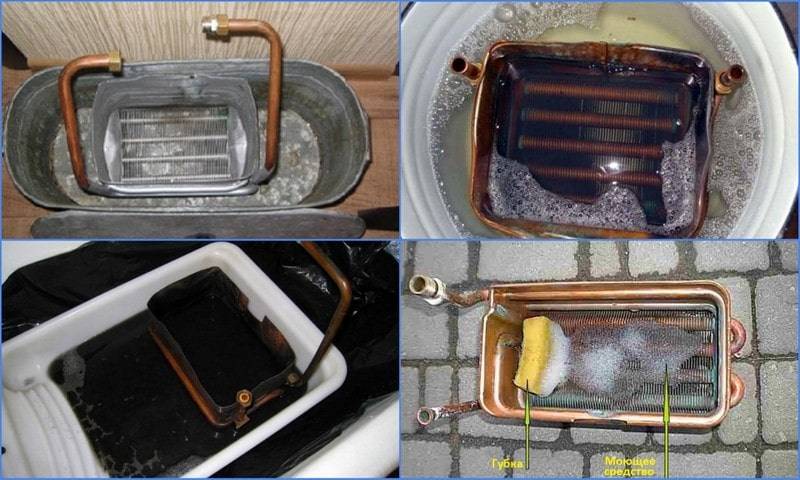
- Ways to clean the instantaneous water heater
- Finding and eliminating causes
- Reason number 1: an error in the connection of pipes
- Reason number 2: lack of draft in the chimney
- Reason number 3: high sensitivity of the protective relay
- Reason #4: Dead Ignition Batteries
- Reason number 5: not enough strong water flow or its complete absence
- Reason #6: Dirty Filters
- Reason #7: Membrane Deformation
- We service the igniter and the water intake unit
- The right choice of geysers
- Varieties of geysers
- How is the gas column arranged?
- The main types of geysers
- How is such a unit arranged?
Water node malfunction
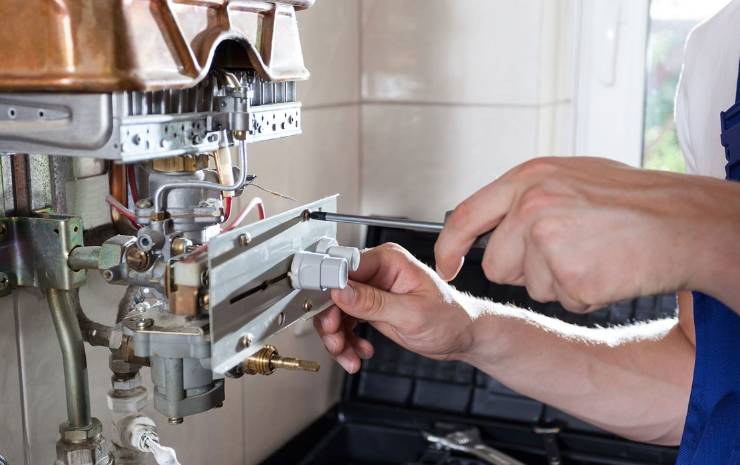
Most often, gas water heaters are repaired due to a malfunction of the water block. Its job is that, under the influence of fluid pressure, the membrane inside it, bending, transmits movement to the rod, and already it moves the pusher of the gas unit. As a result, the spring valve opens and the power supply to the control module is switched on.Therefore, if the water unit is faulty, then the device will not start.
The failure of the water block can be determined by external signs.
- If you opened the water supply, and the rod pressing the switch plate remained motionless (shown in the figure with a blue arrow), this means that the membrane located inside the main component of the water unit, the “frog”, is damaged.
- Jamming of the stem may be due to its sticking.
- There may be a leak in the place where the gas and water units are interconnected, or seepage of liquid from under the control valve (shown by red arrows).
If you notice at least one sign, then the node will need to be removed and repaired. The water unit is removed only together with the gas module, since they are a single structure. You can do this in the following way:
- after you have made sure that the gas valve on the pipe is switched to the closed state, you can disconnect the supply hose (a);
- similarly, when the water supply is turned off, the nut on the water block pipe (b) is unscrewed;
- then, using a wrench, unscrew the nut that connects the water block to the heat exchanger (c);
- disconnect the terminal block (d) on the conductors connecting the solenoid valve with the control module;
- in the same way, the wires (e) going to the switch are disconnected;
- using a screwdriver, it is necessary to unscrew the 2 screws (e) that attach the branch pipe to the water-gas unit, through which fuel is supplied to the burner manifold;
- after unscrewing the fastener, the entire assembly can be easily removed from the device.
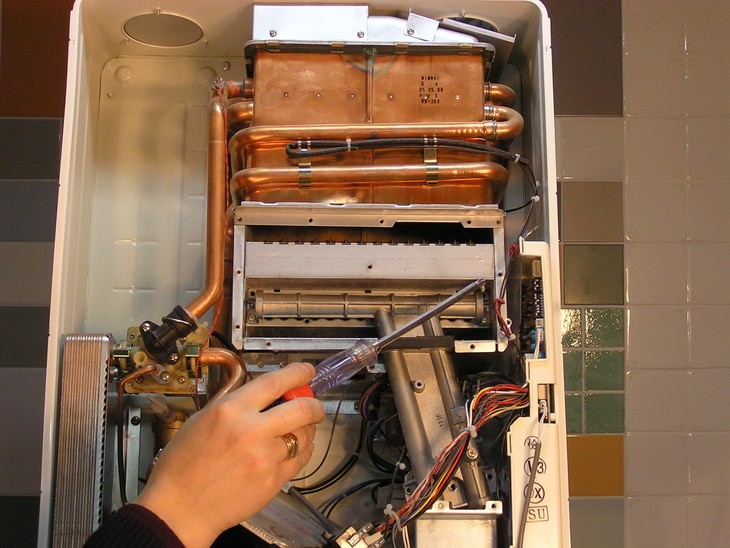
Next, you need to disassemble the gas-water module itself.
After removing the device, it is required to separate the water unit.To do this, unscrew the 2 screws (indicated by arrows). It is not necessary to unscrew them completely. With the help of a clamp, they fix the “frog” in the gas unit. The fastening of the “frog” to the latter in different models may differ, as, for example, in the gas column Neva 3208.
This is what the gas module looks like with the water module disconnected.
Next, you will need to disassemble the “frog” itself by unscrewing 6 screws. They can stick and twist out tightly or even “lick off” with a screwdriver if you apply a lot of effort. To prevent this from happening, you can first drop a special liquid WD-40 on them, after which they will easily unscrew, and none of them will break.
After successfully unscrewing the screws, the module opens into two halves, and you will see a rubber membrane.
The membrane must be carefully examined, and if it is found that it has been greatly stretched, or there are gusts on it, it must be replaced with a new one.
To get to the plate with the spring, you need to remove the membrane. If it is intact, it must be done carefully so as not to damage the ring with which it is put on the pipe (indicated by the red arrow in the figure above).
After removing the membrane, you will see a plate with a spring.
So that you do not disassemble the unit once again, inspect the oil seal
To do this, carefully remove the plate with the rod.
Remove the spring and you will see a plug with a slot for a screwdriver. There is an o-ring underneath.
The plug must be unscrewed from time to time to lubricate and replace the rubber seal.
Having previously purchased a repair kit for the “frog”, change the failed gland and membrane.When you install the oil seal back, do not forget to lubricate it with silicone grease, and also lubricate its location.
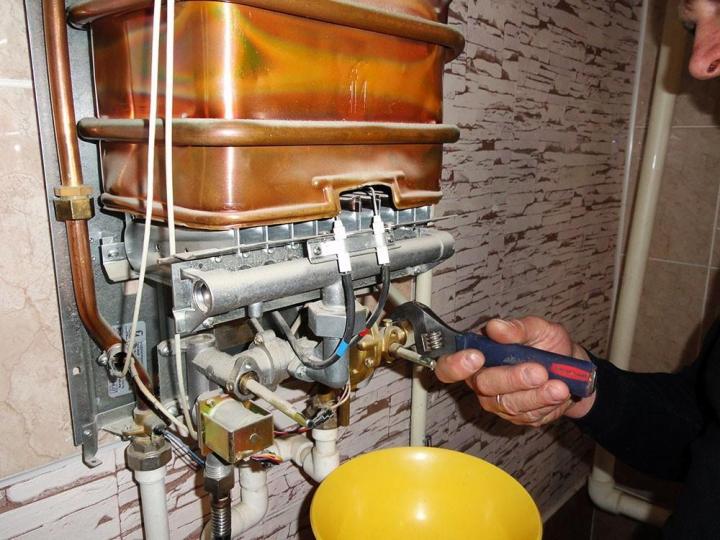
The assembly of the water block of the geyser occurs in the reverse order. The plug must be tightened so that the stem passes through it without much effort. When you fully assemble the “frog”, the repair of the water block can be considered finished.
The repair of the Neva 3208 gas column due to a “frog” malfunction is similar and intuitive, although the internal view of the unit is slightly different. The gas column Neva 4511 is also disassembled, the repair of which is quite feasible with your own hands.
When a Chinese geyser is being repaired, the size of the water unit is always surprising. It is quite small in size, and to disassemble the “frog”, you need to unscrew only 4 screws.
Repair of a replaced gas column heat exchanger
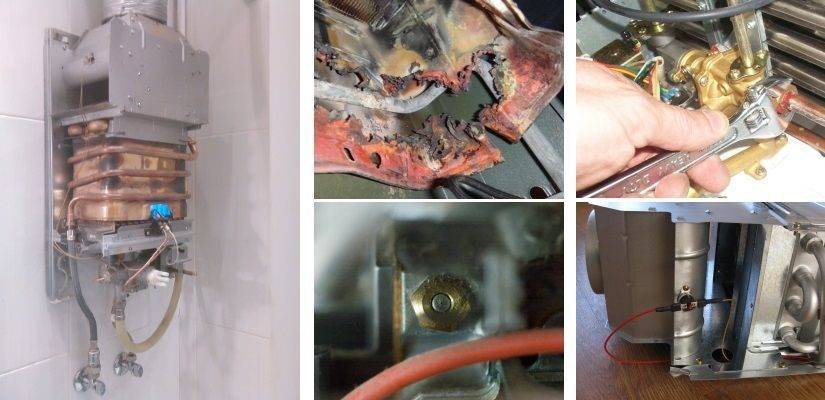
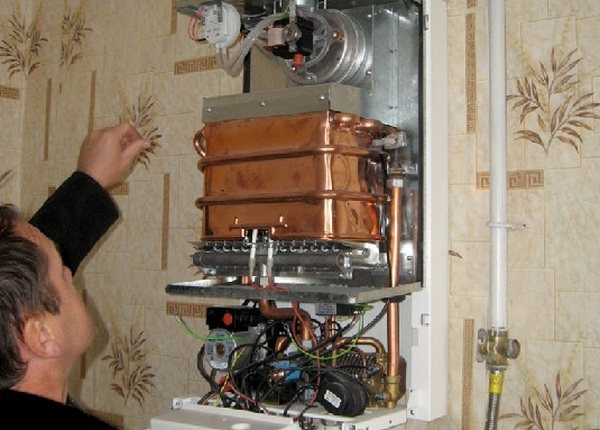
For almost three years, the NEVA LUX-5013 gas water heater worked properly after replacing the heat exchanger, but happiness did not last forever, and suddenly water began to drip from it. I had to redo the repair.
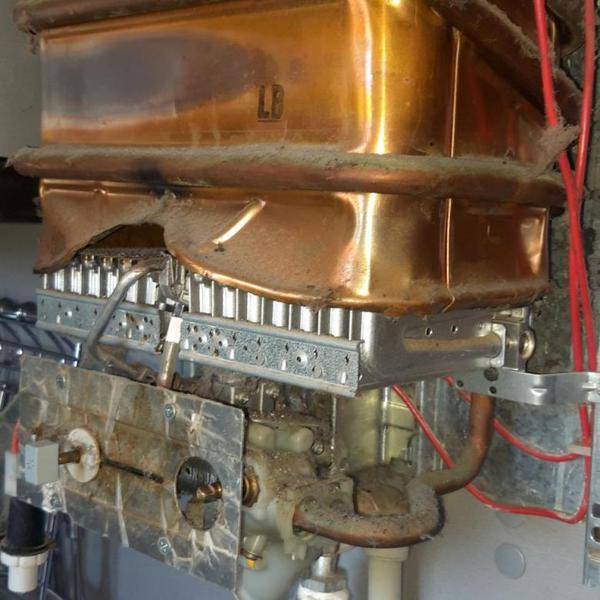
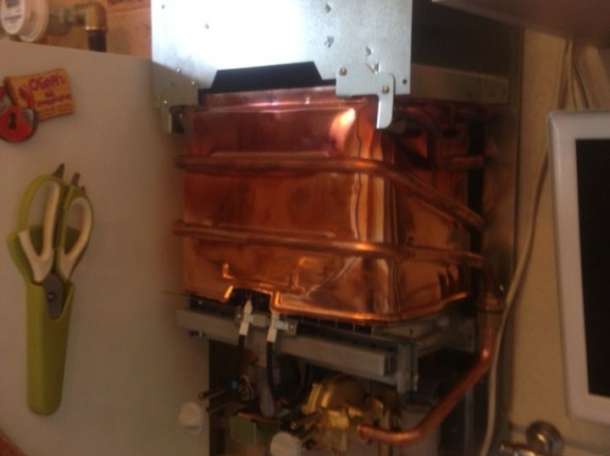
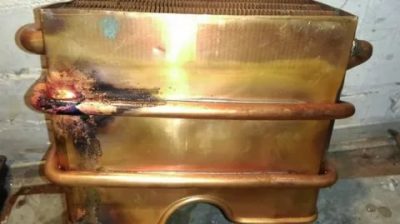
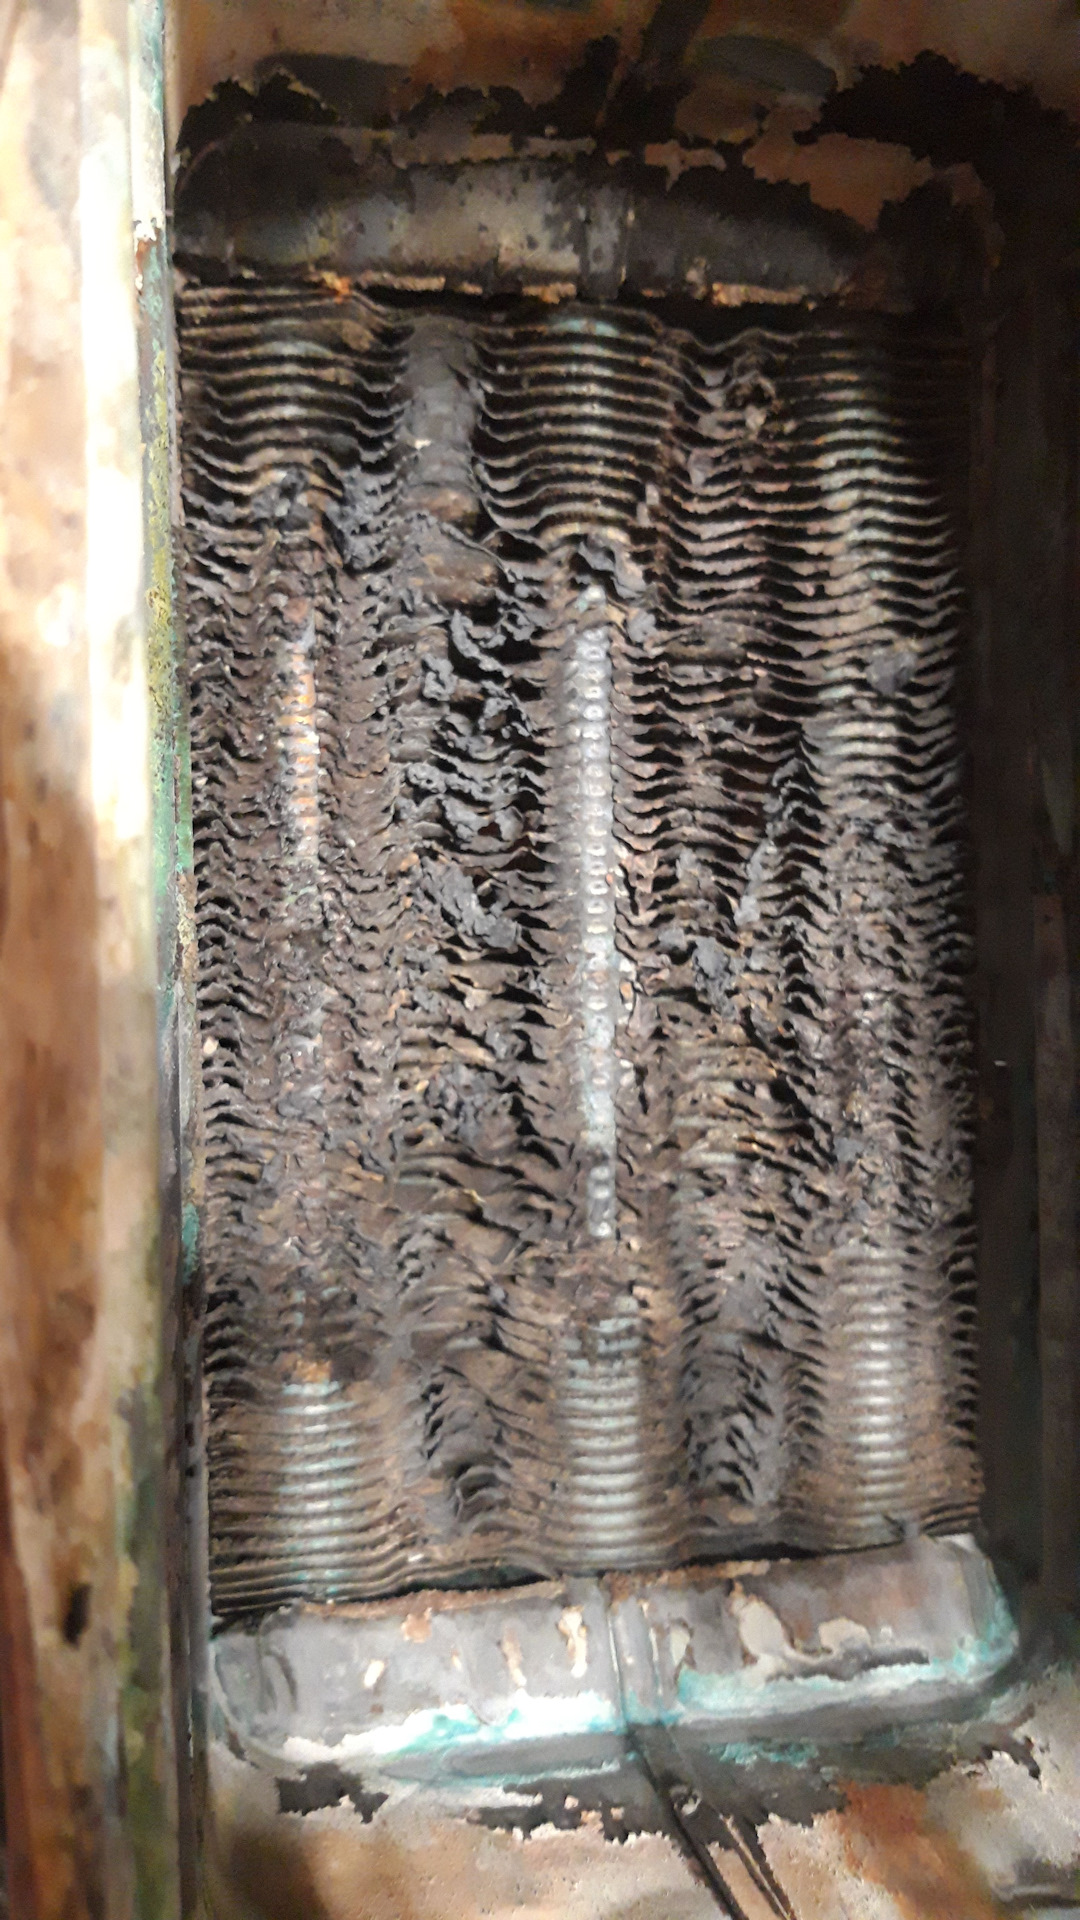
Removing the casing confirmed my fears: a green spot appeared on the outside of the heat exchanger tube, but it was dry, and the fistula from which water oozed was on the side inaccessible for inspection and soldering. I had to remove the heat exchanger for repair.
When looking for a fistula on the back of the removed heat exchanger, a problem arose. The fistula was at the top of the heat exchanger tube and water oozed from it and flowed along all the tubes below. As a result, all the turns of the tube below the fistula turned green on top and were wet. Whether this was a single fistula or there were several, it was impossible to determine.
After the green coating had dried, it was removed from the surface of the heat exchanger using fine sandpaper. An external examination of the heat exchanger tube did not reveal blackened dots. To search for leaks, it was necessary to pressure test the heat exchanger under water pressure.
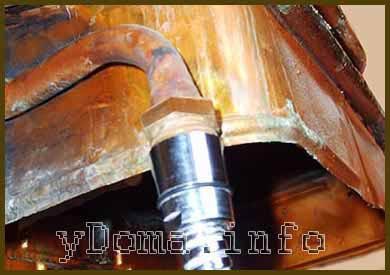
To supply water to the heat exchanger, the above-mentioned flexible hose from the shower head was used. One end of it was connected through a gasket to the water pipe for supplying water to the gas column (in the photo on the left), the second was screwed to one of the ends of the heat exchanger tube (in the photo in the center). The other end of the heat exchanger tube was plugged with a water tap.
As soon as the tap for supplying water to the geyser was opened, drops of water immediately appeared in the supposed places of fistulas. The rest of the tube surface remained dry.
Before soldering the fistulas, it is necessary to disconnect the flexible hose from the water supply network, open the plug valve and drain all the water from the heat exchanger by blowing it out. If this is not done, then the water will not allow the soldering place to be heated to the desired temperature, and the fistula will not be able to be soldered.
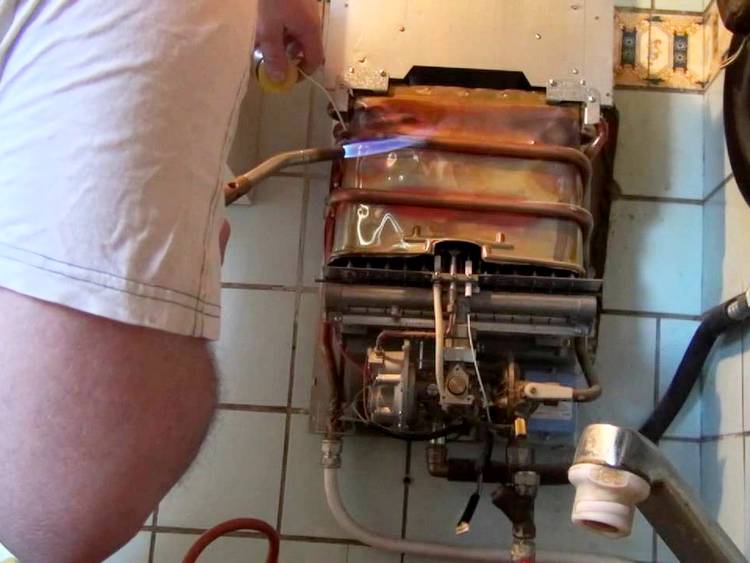
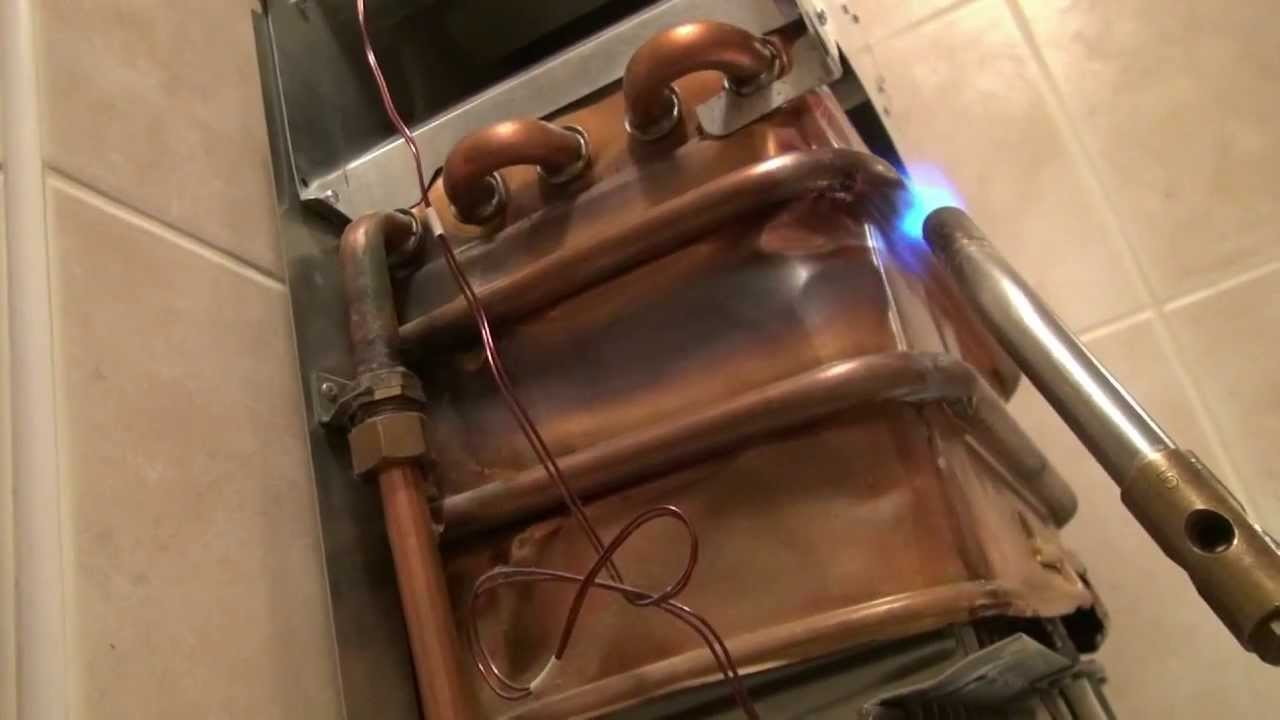
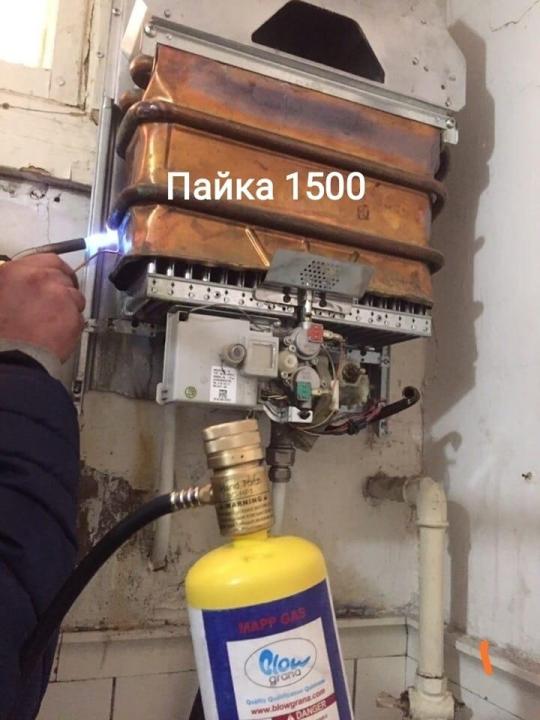
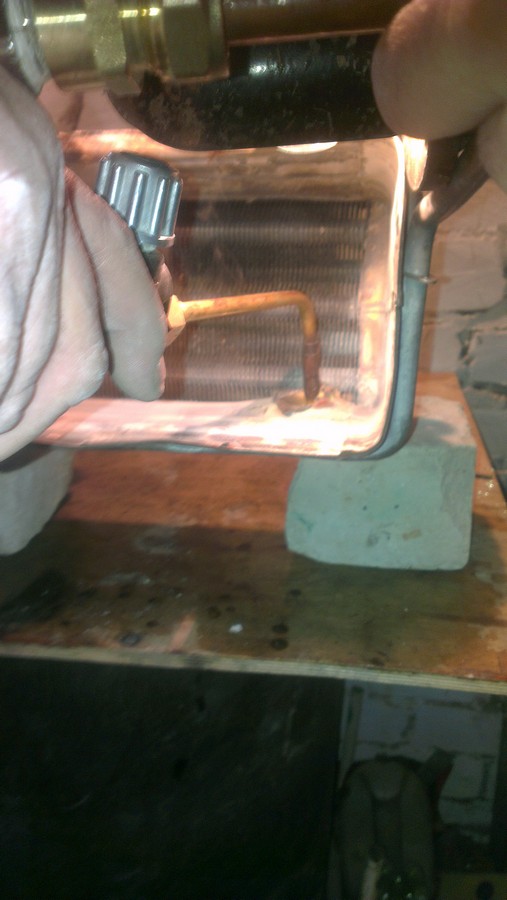
For soldering the fistula, which was located on the bend of the heat exchanger tube, I used two soldering irons. One, whose power is 40 W, led the tube under the bend for its additional heating, and the second, with a hundred-watt, performed soldering.
I recently purchased a construction hair dryer for the household, and soldered the fistula in a straight section, warming up the place of soldering them additionally. It turned out that soldering with a hairdryer is much more convenient, since copper warmed up faster and better. The soldering turned out to be more accurate.It’s a pity I didn’t try to solder the fistula without a soldering iron, using only a building hair dryer. The temperature of the air from the hair dryer is about 600 ° C, which should be enough to heat the heat exchanger tube to the melting temperature of the solder. I'll check it out next time I repair.
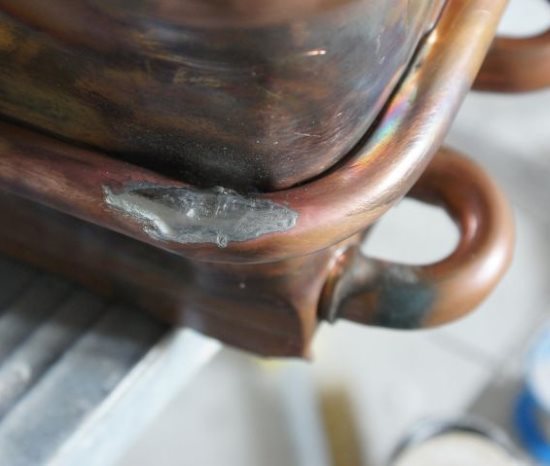
After repair, the place of the heat exchanger tube, where the fistula is located, is covered with a millimeter layer of solder, and the water path is reliably blocked. Repeated pressure testing of the heat exchanger showed the tightness of the tube. Now you can assemble the gas column. Water will no longer drip.
I bring to your attention a short video on how to solder a gas column radiator.
Total views: 23988
It should be noted that with the help of the presented technology, it is possible to successfully repair not only gas column heat exchangers, but also copper heat exchangers and radiators of any other types of water heating and cooling devices, including copper radiators installed in cars.
The principle of operation of the thrust sensor in the gas column
Combustion products from the furnace enter the chimney to the street. If the level of air suction in the duct is reduced, the room will smoke. The room is filled with carbon monoxide, which has a detrimental effect on a person. Vapor poisoning can lead to suffocation.


Attention! If there has been an accumulation of carbon monoxide in the room, it is necessary to intensively ventilate the apartment (open all windows), close the doors to adjacent rooms and call gas facilities specialists. The thrust sensor consists of:
The thrust sensor consists of:
- bimetallic plate;
- plugs;
- nuts;
- fitting.
The bimetal relay signals the shutter valve to turn the boiler system on or off.
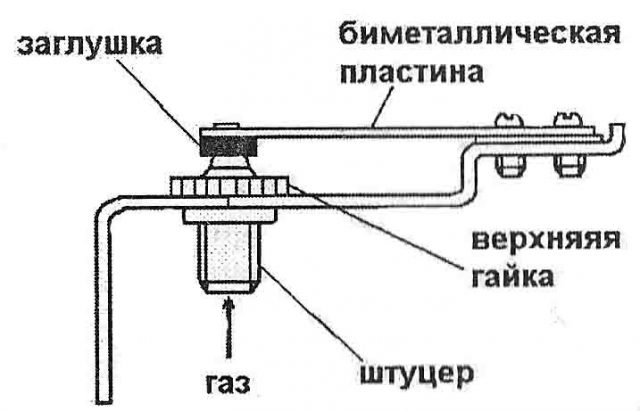
The thermal relay consists of a bimetallic plate with moving contacts
The temperature of the exhaust gas, which is in the chimney, depends on the intensity of the intake of fresh air. The better the traction, the lower it is. When heated, the bimetallic plate expands, which leads to separation of the contact when the temperature reaches a critical value.
Gas boilers run on natural and liquefied gas. In the first case, the normal range is 75-950 0C. In the second case, adequate operation of the boiler occurs when the gas is heated within 75-1500 0C.
The calorie content of liquefied propanobutane gas is higher than that of natural gas. Therefore, the combustion temperature also rises. The thermal relay is set to turn off at 950 0C for natural gas and at 1500 0C for propanobutane devices.
Sensor gas boiler draft AOGV is located in the zone of action of the wick and is connected to an electromagnetic circuit element that opens the gas supply.
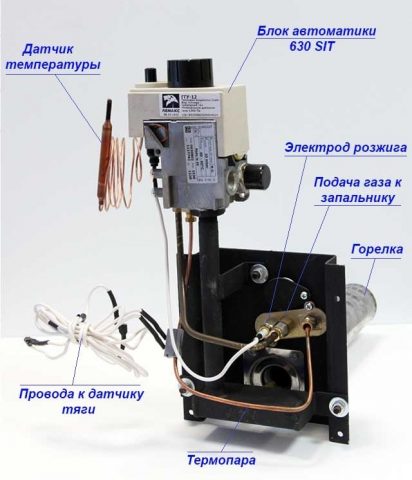
The gas supply control circuit of the AOGV boiler provides for the mandatory presence of a temperature sensor
The thermocouple electrode is placed near the igniter. While it heats up, the gas supply does not stop. Once the electrode has cooled, the supply is closed.
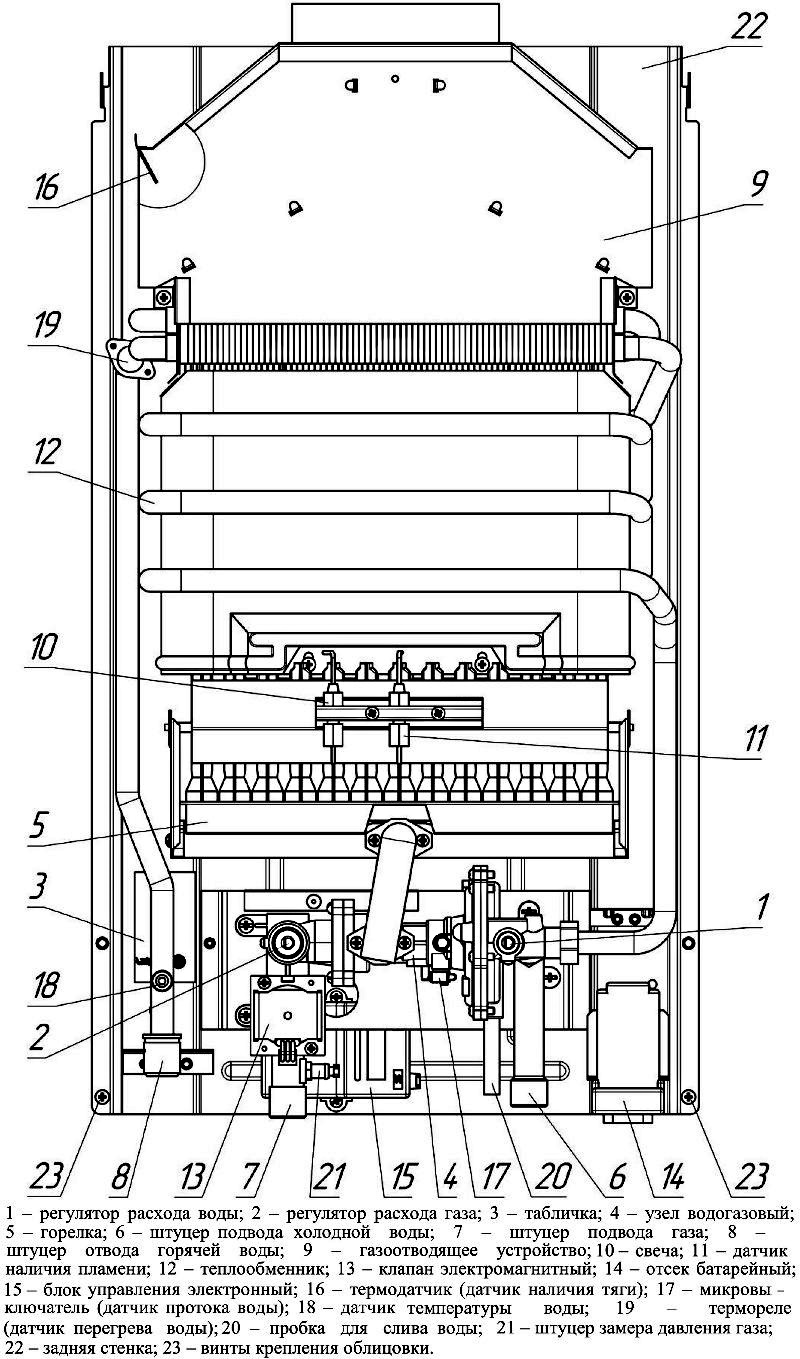
Device device
In order to be able to diagnose device malfunctions without the help of a geyser master, you need to have a general idea of \u200b\u200btheir device, because it depends on how the repair work will take place. No need to delve into the intricacies of assembling many different models, because. most of them are similar. Therefore, we can limit ourselves to acquaintance with the general principles of operation of such devices.
By historical standards, hot water appeared in homes not so long ago.Water heating was carried out by various methods, but the easiest way to do this was with a solid fuel heater. Usually it was heated with coal, less often they used firewood or fuel oil. In order to have enough hot water for taking a bath, we had to spend quite a lot of time on heating - from 2 hours or more. Of course, this is not very convenient, and gas water heaters were created to solve the problem.
You can familiarize yourself with the device of the geyser in this video:
This device is designed to increase the temperature of water using gas from the city mains. To speed up the heating process, heat exchangers were built into the equipment - it is in them that moisture is distributed through a system of thin tubes located above the gas burner. Due to this feature, the column is able to heat water quite quickly and does not require filling a large tank.
 Geyser - equipment that allows you to heat water using gas
This is the main principle of operation of all gas appliances, the rest of the technical filling is designed to ignite, maintain the flame, regulate the heating temperature, and also ensure safety during operation. The ignition of the main component - the burner - can occur:
- From the igniter. It is ignited manually with a match, a special lighter, or turned on with a button (automatic or mechanical). The first options are considered obsolete, so such speakers can hardly be found on sale.
- Without igniter (piezo ignition).
- With the help of electronics. This method works in the same way as car ignitions.
The safety system blocks the flow of gas to the burner if water gets inside
Most modern speakers are equipped with a mechanical security system. Even devices with electronic filling have this type of protection located between the membrane in the device for receiving water and the valve of the gas pipe. The system works according to the following principle: the valve stops interfering with the flow of natural fuel into the device only if the water pressure presses on the membrane with the required force. Everything can be explained even more simply: gas is not supplied to the burner if water does not enter the column.
Varieties of gas burners
In general, despite the wide range of burners, they all consist of the same set of basic elements:
- devices for fixing and holding gas cylinders;
- nozzles;
- instrument heads;
- a gas flow regulator to avoid excessive fuel consumption or insufficient heating of the working surface;
- burner gearbox.
In addition, depending on the manufacturer and product brand, burners can be provided with additional elements, such as tips, adapters, and others.
According to the temperature of heating the working medium, the burners are divided into:
- household products (a gas combustion temperature of 1000-1500 ° C is reached);
- industrial gas burners (corresponding parameter - 1500-2000 ° C).
Depending on which gas mixture is used during the operation of the device, the burners are divided into:
- propane - the most common tools, there are universal and special purposes; characterized by the possibility of ignition using piezoelectric elements and saving incoming gas;
- using MAPP-gas - their distinctive feature is the increased energy of gas combustion while maintaining the softness of the flame, which prevents damage to the pipe;
- acetylene-oxygen - can be equipped with a disposable gas cylinder or work stationary; used for highway work.


Soldering methods
There are three main ways to solder a heat exchanger in a gas column. They differ in the tools used.
With a soldering iron
In this case, for soldering, you will need a good soldering iron with a power of more than 100 W, solder and flux. First of all, a flux is applied to the place of soldering - a special paste, rosin or aspirin. This component allows you to clean the surface of oxide so that the solder is distributed more evenly.
Next, the copper tube is heated with a soldering iron and solder is gradually applied to it. It is desirable that the solder melts from the hot surface of the pipe, and not from contact with the soldering iron.
The solder layer must reach 1-2 mm so that the soldering point can withstand the pressure of the coolant in the circuit.
Gas-burner
To solder holes in the heat exchanger in this way, you will need a torch, a bottle of liquefied gas, solder and flux. After connecting the burner, it is ignited, the intensity of the flame is adjusted - it should not be high so as not to damage the elements of the gas column coolant during soldering.
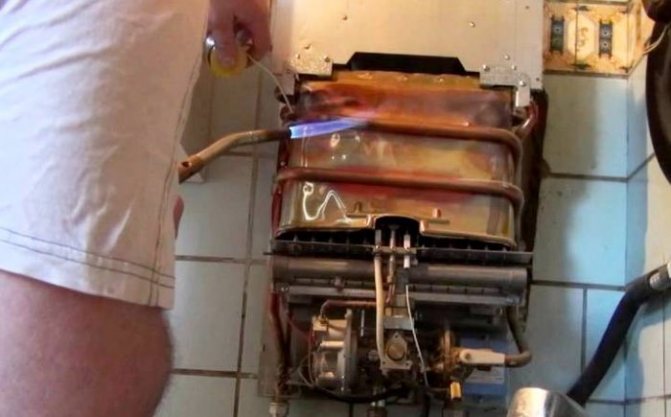
The fistula in the copper pipe is dried with a burner to eliminate residual moisture. Flux is applied (usually borax powder). Then they begin to gradually warm up the pipe itself, so that the solder applied further begins to melt.
Upon completion of soldering, flux residues are carefully removed so that it does not corrode the surface of the heat exchanger tube.
Cold welding
When using a chemical soldering method using cold welding, it is desirable to use a material that will retain strength and will not melt when in contact with hot water. Otherwise, a fistula will form again in the brazed plate heat exchanger, and work will have to be started all over again.
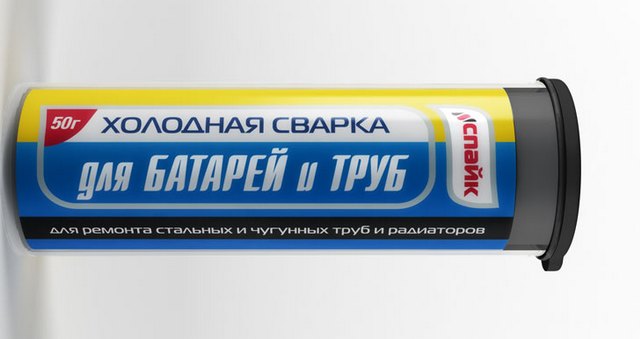
When working with cold welding, gloves are required to protect the hands. A little substance should be kneaded in the hands for about 3 minutes. When the weld begins to harden, the patch is applied to the leak and pressed firmly until it finally seizes.
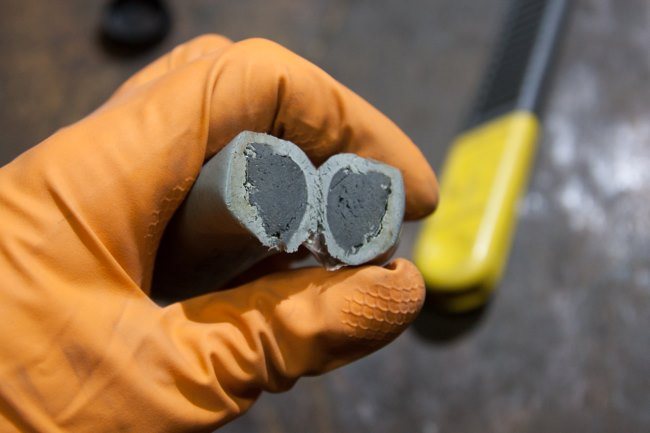
In cases where the heat exchanger has leaked in several places at once, or the fistulas are very large, it is advisable to solder a patch from a copper plate or a piece of a copper tube.
Ways to clean the instantaneous water heater
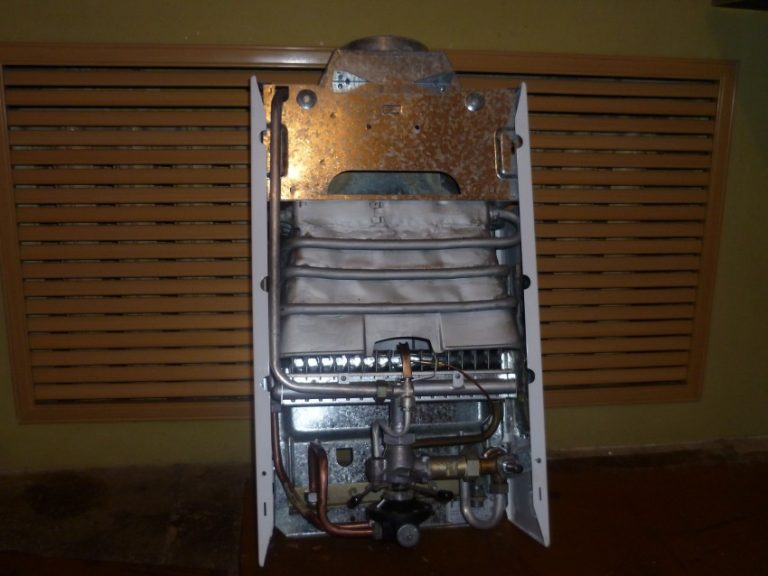
Cleaning the geyser does not always mean complete disassembly, down to the screw. But one question is the prevention of a completely serviceable unit, and quite another is the removal of many years of scale from the coil, soot from the burner. A tankless water heater can be serviced in the following ways:
- completely disassemble the column, clean the gas burner and rinse the copper heat exchanger;
- flush the radiator without disassembly;
- clean the working elements of the unit from soot and contaminants - an igniter, electrodes, a water unit (colloquially - a “frog”).
Scheme of instantaneous water heater using natural gas
If the device has been operated without maintenance for many years, the channels are half clogged with scale, and gas burner flame turned yellow from blockages, then the first option is clearly realized - complete disassembly. A similar decision is made when you need to solder a leaky radiator.
Preventive flushing of the household column heat exchanger is carried out without dismantling (method No. 2). Local soot removal (option No. 3) is performed when the ignition system fails - the igniter barely burns, there is no spark on the electrodes, loud pops are heard in the combustion chamber at the moment the burner is started.
Finding and eliminating causes
So, why does the gas column not turn on? A number of situations can be at fault:
- Error in connecting pipes;
- No draft in the chimney;
- High sensitivity protective relay;
- Discharged ignition batteries;
- Weak water pressure or its complete absence;
- Filter clogging;
- Membrane deformation.
Let's consider all the listed reasons in more detail and analyze effective methods for their elimination:
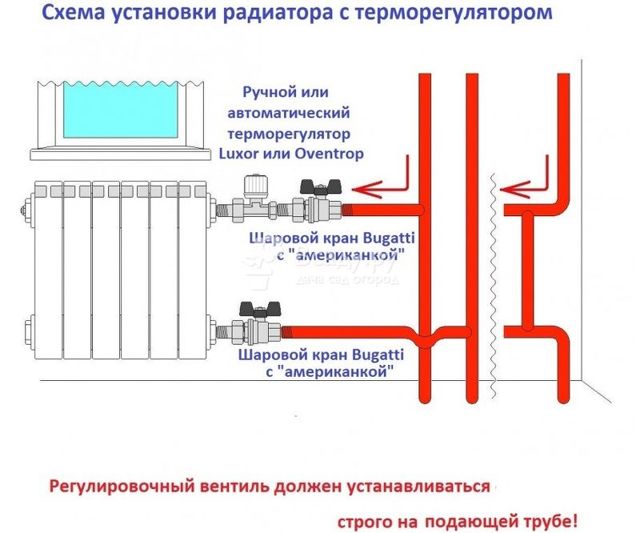
Reason number 1: an error in the connection of pipes
The water heater protection system itself shuts off the gas supply if errors are made in connecting pipes. To prevent this, simply follow a simple and understandable scheme:
Reason number 2: lack of draft in the chimney
Due to the pollution of the chimney as a result of the accumulation of soot or the ingress of construction debris into it, the vector of movement of combustion products changes up to the opposite. This poses two dangers:
The returning mixture of carbon monoxide and air extinguishes the burner
. As a result, the protection system is activated, and the operation of the gas water heater is blocked;
The returning mixture of carbon monoxide with air penetrates into living quarters
. This option is even worse, as it poses a danger to the health and even the life of the household. It is possible in the case when the force of the "overturned" thrust is not enough to put out the fire.


Let's figure out what to do in the described situation:
| A photo | Description |
| First check, if someone installed a satellite dish above the exit of the ventilation shaft. This may be quite enough to create a reverse thrust effect. In this case, the problem can be solved by negotiating with neighbors without calling chimney cleaning specialists. | |
| Call specialists to clean the ventilation duct. If no external factors interfere with the release of combustion products, then the reason for the lack of draft is clearly a clogged chimney. You can try to clean it yourself, but there is a danger that you, without the appropriate experience, will damage the neighboring branches with your actions. |
Reason number 3: high sensitivity of the protective relay
The gas column lights up, after which it soon fades out? In this case, the problem is most likely a too sensitive relay, in which overheating protection is triggered. There are two options for solving the problem:
Temporary
. You should open the window to lower the temperature in the room;
Radical
. The only way to fix the problem is to replace the relay.
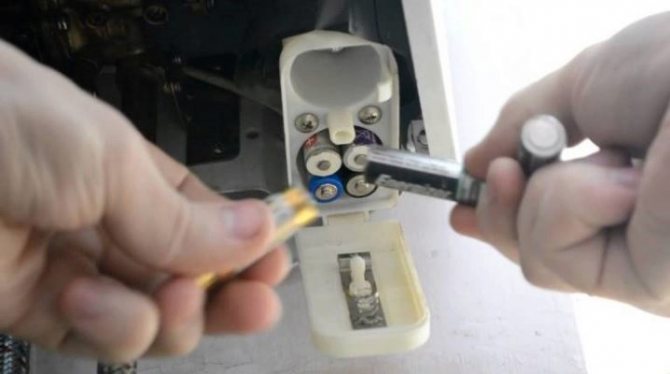
Reason #4: Dead Ignition Batteries
Another reason why the main burner does not light up may be dead batteries. This can be determined by the idle clicks of the piezo ignition element when hot water is turned on.
It is also worth noting that the problem described applies exclusively to water heaters equipped with an automatic switching system.
Reason number 5: not enough strong water flow or its complete absence
In order for the gas column to turn on, there must be a pressure of water of a certain strength. If it is too weak, then the unit will not turn on.In this case, you should first clarify the source of the problem by opening the cold water tap in the bathroom:
If the water supply level is weak there too
, means that the matter is in the city water supply system. There's nothing you can do here, you'll have to wait;
If the liquid runs normally
, most likely, the column itself is clogged.
In the second case, you can call the wizard, or you can try to clean the device yourself. The instruction looks like this:
- Shutting off the gas supply;
- We unscrew the pipes;
- Removing the gas column from the hinges;
- Set it upside down on the table;
- Pour inside a special cleaning liquid with a syringe. The price of such a mixture is not very high, and you can buy it at any specialized store;
- We leave the unit for a couple of hours.
Reason #6: Dirty Filters
Another reason for the column to malfunction may be filter contamination. Scale, rust and other insoluble impurities clog the grates over time, and they need to be cleaned. In this case, we are talking not about one object, but about several at once:
| A photo | Name and location of the filter |
| Water node in the column itself. In some cases, it can be cleaned in the manner described above, in others it will be necessary to disassemble the device and clean the grate manually or completely change it. | |
| Coarse filter. It is located on the pipe supplying cold water to the water heater. | |
| Faucet filter. |
Reason #7: Membrane Deformation
The geyser also does not work in the event of cracks, ruptures or other deformations on the membrane. In this case, you need to replace it.
We service the igniter and the water intake unit
If it becomes necessary to clean the water unit, do not rush to disassemble the entire apparatus. Look at the instruction manual for the water heater, find the “frog” on the diagram and follow the following algorithm:
- Remove the control knobs and front cover.
- Dismantle the water unit by disconnecting the nozzles.
- Unscrew the screws holding the cover, remove it and get to the membrane.
- Clean the filter - mesh and water holes in the body of the "frog" using a wooden stick or soft copper wire. Remove scale with a brush.
- Rinse the parts with water and assemble the assembly. Replace damaged or cracked membrane immediately.


Clean the pilot burner jet (wick) with a thin copper wire or a toothpick moistened with alcohol. Wipe the ignition electrodes and the flask of the flame sensor (thermocouple) thoroughly from soot, otherwise, over time, the column will spontaneously turn off.
The right choice of geysers
If you decide to purchase a gas column device for yourself, then pay attention, first of all, to the power of the model you have chosen. It should be enough to provide all members of your family with hot water.
The power of almost all modern models fits into the range from 3 to 60 kilowatts.
Important! The more powerful the geyser, the more water it will be able to heat within a certain period of time. The average "cell of society", consisting of four people, needs a device with an average power of 16-24 kilowatts
It is more than enough to wash the dishes and everyone was able to take a shower.Even if the device has a low power of 16 kilowatts, it will be able to give 10 liters of hot water, which is enough to be able to wash and wash the dishes at the same time. Of course, if you can, then buy a column with a capacity of 24 kilowatts, as it will be able to provide 24 liters of heated water
The average "cell of society", consisting of four people, needs a device with an average power of 16-24 kilowatts. It is more than enough to wash the dishes and everyone was able to take a shower. Even if the device has a low power of 16 kilowatts, it will be able to give 10 liters of hot water, which is enough to be able to wash and wash the dishes at the same time. Of course, if you can, then buy a column with a capacity of 24 kilowatts, as it will be able to provide 24 liters of heated water.
In addition, it is desirable to take into account the water temperature that a particular model can provide. For its designation, the Latin letters DT are used. For example, if water already enters the heat exchanger at a temperature of 12 degrees, then in it it will heat up to 24. therefore, it can be used even without prior dilution.
Today, there are models that are able to heat water even up to 50 degrees. Their power, as well as the cost, is an order of magnitude higher than conventional models. For this reason, if several plumbing elements are connected to the system at once, then it is better to purchase a more powerful column so that it can provide them all with hot water at the same time.
Also, when buying a geyser, see if it is equipped with security sensors. They are of the following types:
- overheating;
- burner damping;
- burning;
- reduced pressure;
- temperature;
- sudden interruption of water supply.
And remember: gas water heaters are only allowed to be installed in the kitchen! Installation of a geyser in the bathroom is prohibited! Unless it (the bathroom) meets all existing requirements.
As a conclusion
So, we have analyzed what a gas water heater is, what are its features, what malfunctions can occur during operation and how to fix them later. We only note that such devices are extremely economical, especially in the light of ever-increasing utility rates. And the last thing: do not forget that the preventive maintenance of the column should be carried out annually.
Varieties of geysers
How is the gas column arranged?
An ordinary gas water heater is equipped with an iron box, which looks like a kitchen cabinet for household needs. From it go gas and water pipes. The internal device always consists of a heat exchanger, main and additional burners. As soon as the water tap is opened, the gas valve flap opens, due to which gas enters the pilot burner, and then the main burner turns on.
Due to the combustion of gas, a certain amount of heat is released, which is necessary for instant heating of the water passing through the heat exchanger, located directly above the burners in a pipe in the form of a spiral.
Further, hot water passes through the water pipe towards the open faucet. Where do combustion products go? They leave through the chimney that goes outside from the top of the water heater.
The main types of geysers
There are several options for igniting the igniter, according to which there are electronic, manual products and with piezo ignition. The manual model is considered outdated and outdated, because one cannot do without matches. And the main burner cannot ignite without turning the knob.
Modern appliances require a comfortable, practical and safe ignition system that works on an electronic basis. Opening the faucet activates water pressure and a program characterized by the appearance of a spark charge for AA batteries. At the same time, the position of the gas valve changes.

You can always find a good gas column
Thus, one spark is enough for the first burner to start burning, and the second one to connect to it.
How is such a unit arranged?
When cleaning the Neva gas column with your own hands and other brands, you need to take into account the design features of such units. Visually, they look like a large iron box with pipes - one gas, the second supplies cold water.


Inside the case are:
- Igniter;
- Burner;
- Heat exchanger for hot water supply.
The unit works as follows. First, the user opens the hot water tap, at which time the column automatically turns on the ignition. The igniter is turned on - it ignites the main burner, and it starts to heat cold water in the heat exchanger until the set temperatures are reached. A similar principle is used by most models of boilers.
From a constructive point of view, modern heat exchangers are maximally thought out. For example, the heat exchanger from the column has the shape of a coil (spiral), which guarantees the fastest heating of water before it is supplied to the tap.Combustion products are immediately removed from the room through the chimney into the ventilation. Cheap models do not always contain output, which is their main drawback. Therefore, when choosing equipment, consider all the main factors - this will help you make the only right choice of equipment and prevent unnecessary expenses in the future.