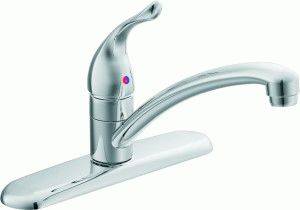
- Types and arrangement of mixers
- Helpful Hints
- Replacing the switch mechanism of the shower faucet
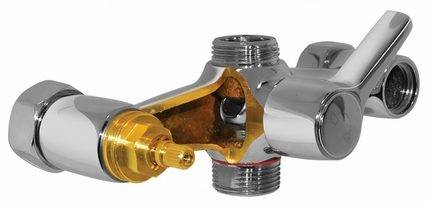
- How the mixer works
- Device in the shower
- Potential damage that needs to be repaired
- How to disassemble a bathroom faucet and repair it yourself
- Shower faucet disassembly
- How to fix a leak in a kitchen faucet yourself
- Types of mixers
- Necessary set of tools and materials
- Fixing a leak at the spout attachment point
- Lever Faucet Repair
- Repair of a two-valve mixer
- Signs that a faucet is leaking
- Faucet switch repair
- Installation and repair of a bathroom faucet with a shower
- Repair of a single-lever faucet with a swivel spout
- General rules for plumbing repairs
- Single lever mixers - causes of failure
- How to repair a faucet in a bathroom with a shower?
- Causes and procedure for eliminating leaks in a single-lever faucet
- Causes and procedure for eliminating leaks in a two-valve mixer
- Shower Switch Repair
- Care
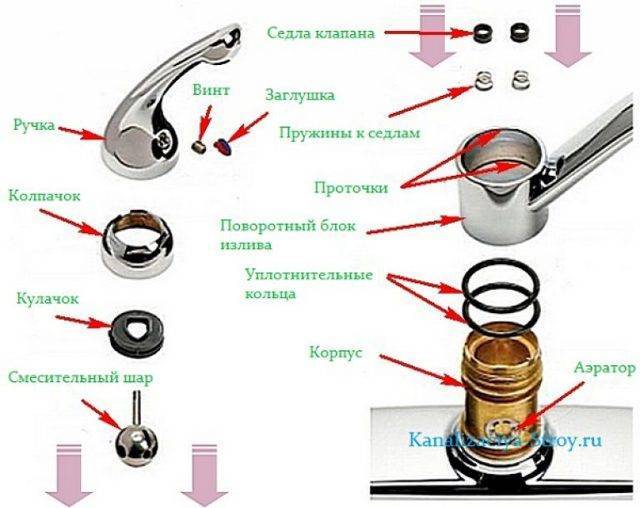
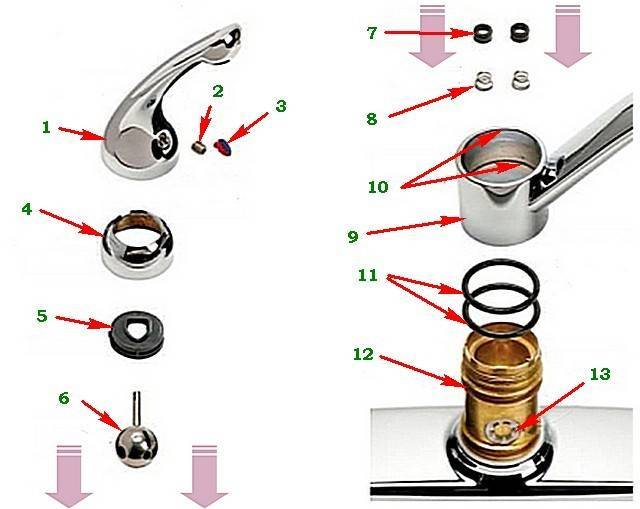
Types and arrangement of mixers
There are various models of mixers. They differ in the type of fastening.
- Wall. They are fixed on communications coming out of the walls. More suitable for the bath.
- Preinstalled. They are connected to the outlet hoses through the holes made by the manufacturer.
- Mortise.Holes are pre-made where the model is mounted and fixed. Used for non-standard room layout.
There are types and according to the principle of action. This affects the functionality of the locking element.
- Single lever. At the heart of the swivel lever. Can be rotated horizontally or vertically. More suitable for the kitchen due to ease of use;
- Two-valve. The basis is two valves, separately for cold and hot water. This type is considered the most reliable. The classic version, in demand;
- Touch. It is based on a photocell that reacts to the hand that is brought to the spout. The option is more expensive and uses high technology.
 Mixers are different, so each has its own instructions
Helpful Hints
If you want to troubleshoot the faucet in the bathroom yourself, then before starting the process, it would be useful to read some useful tips from experts.
They are as follows:
- Before buying a replacement cartridge, first remove the defective one. Having a sample in front of you, it is easier to purchase exactly the model that you need.
- Do not ignore the gasket that is located between the drain and the outer surface of the tap. This seal also wears out over time and needs to be replaced.
- Often, along with the aerator, the details of the cleaning filter, which are located at the entrance to the apartment, can also become contaminated. If the cleaning result is unsatisfactory, unscrew the specified filter, and then check it for clogging.
- After all the malfunctions have been eliminated, it is necessary to combine all the available caps on the mixer with internal grooves with jewelry accuracy. If this is not done, the plumbing fixture will leak.
- Control the quality of the water that is supplied to the faucet. For this purpose, use a modern filter for mechanical water purification.
- Experts recommend installing filters before entering the water supply system.
- If possible, purchase a filter that can reduce water hardness. This is especially true for ceramic mixers, because they can accumulate large amounts of heavy metal salts and other suspended matter.
- If the turned on faucet makes a very loud sound that is heard in the pipes, then you need to make sure that the latter are securely fixed. If, during the inspection, insufficiently fixed plumbing elements were found, then they should be securely tightened with clamps.
If you couldn’t fix something on your own, then we suggest watching a useful video that clearly demonstrates how to repair a plumbing product.
Replacing the switch mechanism of the shower faucet
A sign of a faulty shower switch is the impossibility or stiffness of switching the mechanism, and also if, in any position of the switch, water continues to flow simultaneously from the gander and the shower. Repair of the switching mechanism will depend on the type of switch:
- ball;
- axle box;
- eccentric;
- cartridge;
- separate block from the shower.
Ball mechanisms are the most reliable, but they cannot be repaired, therefore, in the event of a breakdown, the entire mixer will have to be replaced.All other switches are repaired as follows:
- Remove the plug on the mixer switch handle. It can be easily removed by picking it up with a fingernail or a clerical knife. Unscrew the fixing screw. In many models, the plug may be a bolt.
We take the pen.
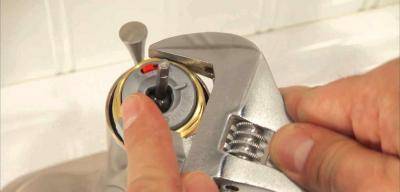
It is necessary to unscrew the axle box mechanism or the nut that secures the eccentric or cartridge.
Unscrew the nut with a wrench
Pull out the mechanism. If it is eccentric, then we extend the eccentric itself. The box and cartridge mechanisms are completely removable.
To remove the rest of the eccentric mechanism, you need to unscrew its internal component:
- unscrew the nut holding the spout;
- move down, take out the spout;
- under the nut is the removable part of the eccentric mechanism. This part needs to be unscrewed, but here you have to tinker a lot. Wrap the mechanism with a cloth so as not to damage the decorative coating with a gas wrench. You will have to unscrew the body;
- if it was not possible to unscrew the inner part, then the entire mixer will have to be replaced.
The removed cartridge is checked for operability. We change the faulty mechanism to a new one and assemble it in the reverse order.
The switch in the form of a separate block changes completely:
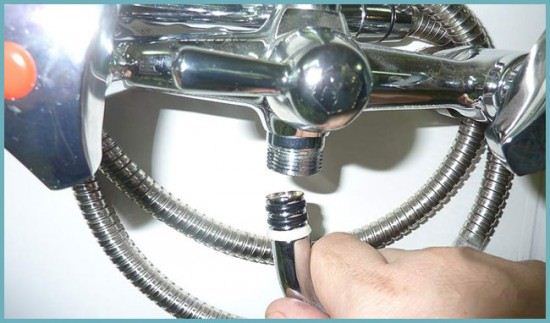
- unscrew the shower hose;
- unscrew the nut connecting the switching unit with the mixer;
- remove the spare part together with the gander;
- turn off the spout;
- install a new switch mechanism.
Advice. If, after removing the mixer switch, water oozes out from under the nut, then most likely the cartridge is in order, the nut has loosened, which must be carefully tightened.
How the mixer works
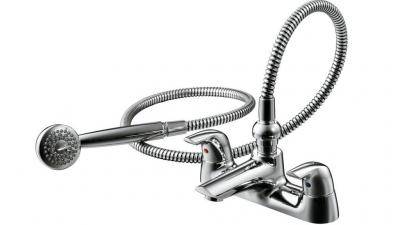
All devices with a shower for a bath have a spout, a hose and a watering can, a lever for switching the water mode.
Otherwise, the structure of the units differs depending on the type of mixer: two-valve ones have two taps on both sides of the drain, lever ones are equipped with a water switch lever.
There are also complex expensive designs that have additional elements, for example, touch controls with a control panel.
Device in the shower
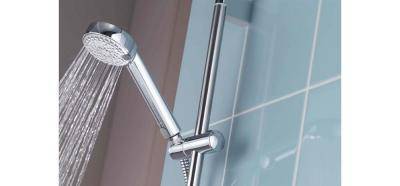
The unit intended for use in the cab is arranged differently. It does not have a spout, but only shower accessories.
Temperature and water pressure are regulated by one lever with a cartridge inside. By raising or lowering the pressure is regulated, and the temperature is adjusted by moving from side to side. Complex designs have a second cartridge that switches the mode.
Potential damage that needs to be repaired
- Failure of the internals of the system.
- Shower hose broken.
- Mode switch damaged.
- Disruption of the clip from the thread.
These troubles occur due to improper installation and use of the structure, poor water quality or normal wear and tear. With the initial purchase of a low-quality product at an attractive price, you should not expect long and flawless work from it. And if with the first three options, repairing the mixer is possible and not difficult, then in the third case, it is necessary to replace the entire unit.
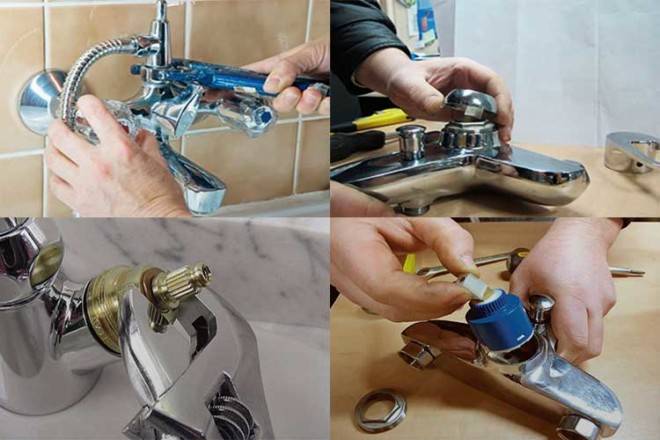
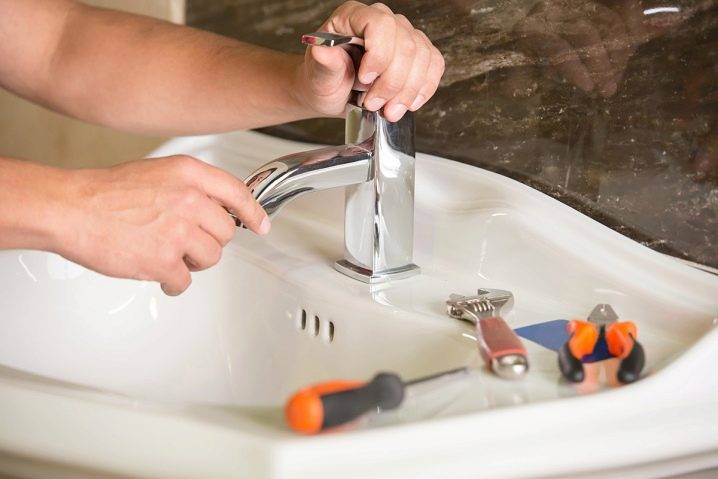
How to disassemble a bathroom faucet and repair it yourself

If there is a minor problem, for example, a leak in the wrong place, there is no desire to call a plumber, but it is imperative to repair the device.
It is worth noting that this is not very difficult to do, but it is important to study the information and stock up on a tool. To fix the damage, the unit must be disassembled. Be sure to turn off the water before starting work.
Before starting work, be sure to turn off the water.
Required tools:
- screwdrivers: flat and cross-shaped;
- wrenches: wrench and adjustable;
- pliers;
- hexagon;
- sealant;
- replacement parts.
Important! All chrome surfaces must be protected to avoid scratches!
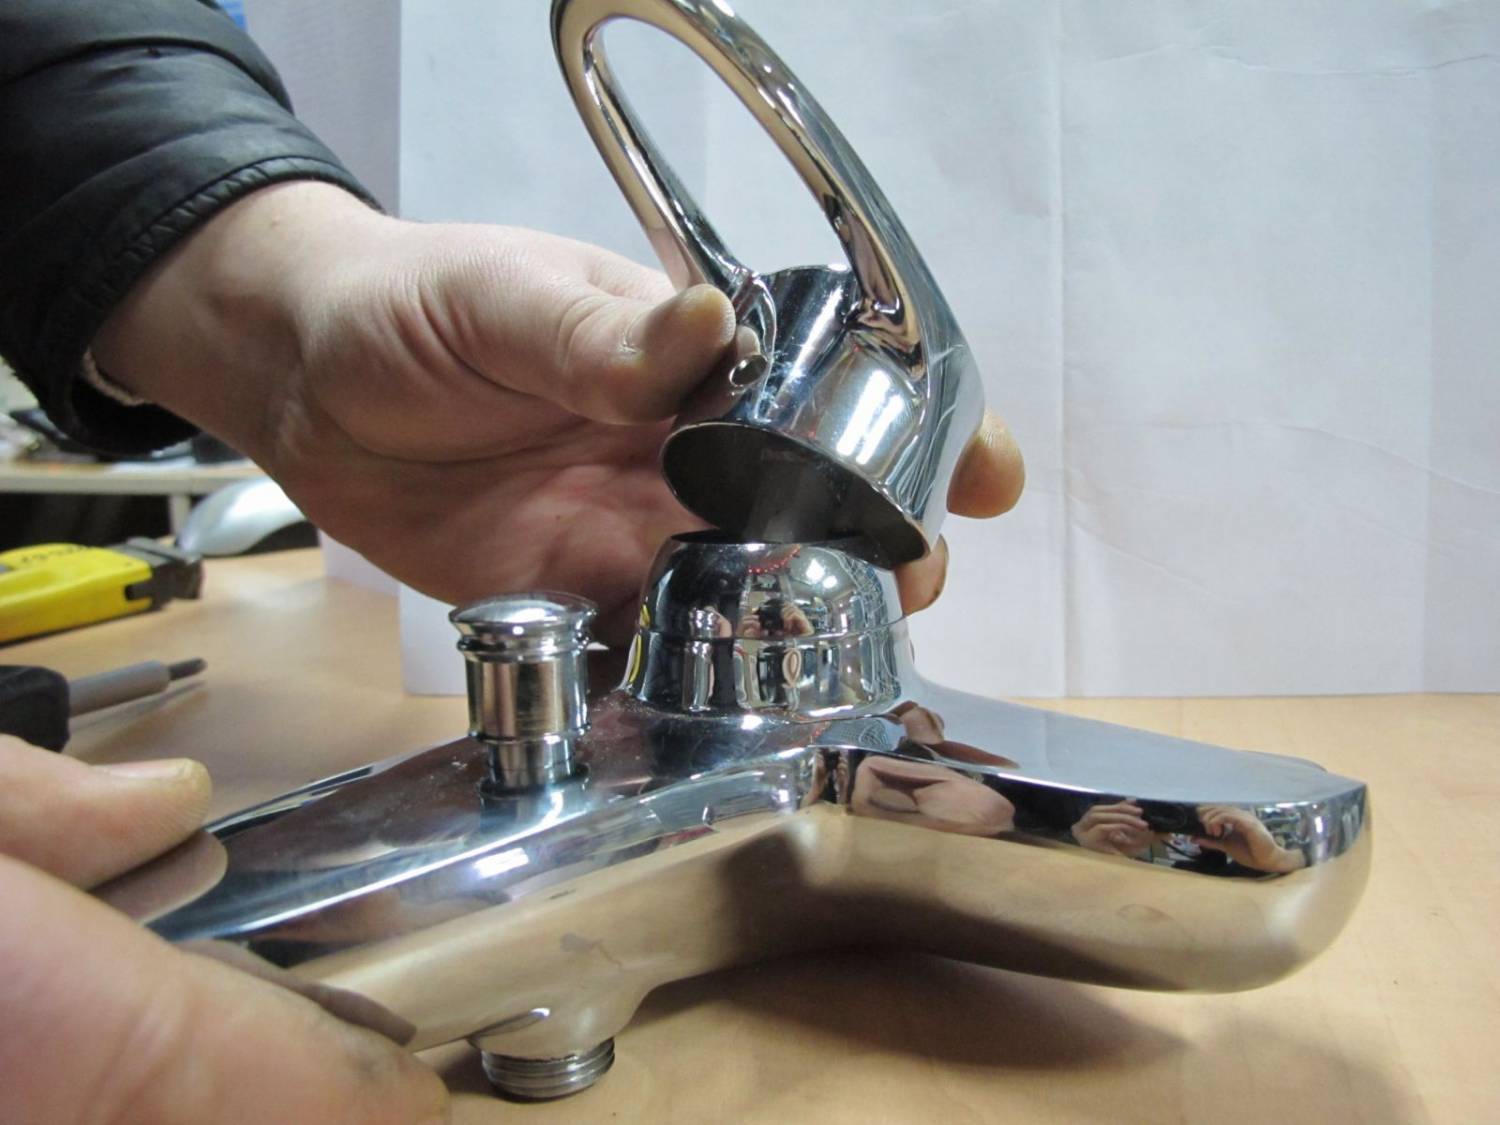
Shower faucet disassembly
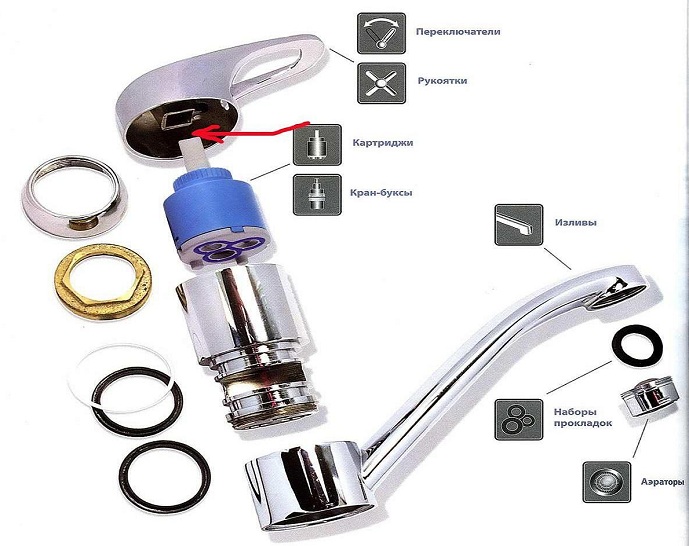
The procedure for disassembling the structure to eliminate the breakdown depends on the model. Single-lever cartridges have two types of cartridges: ceramic and ball.

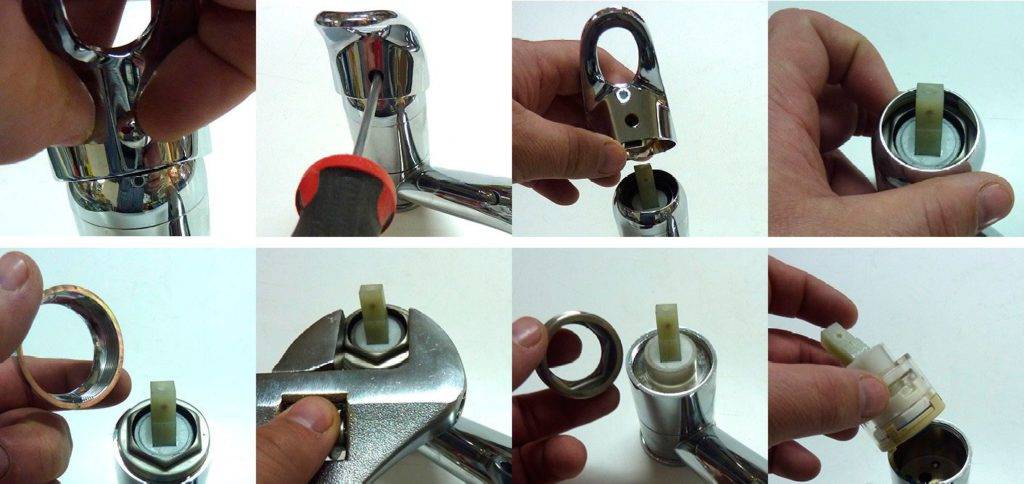

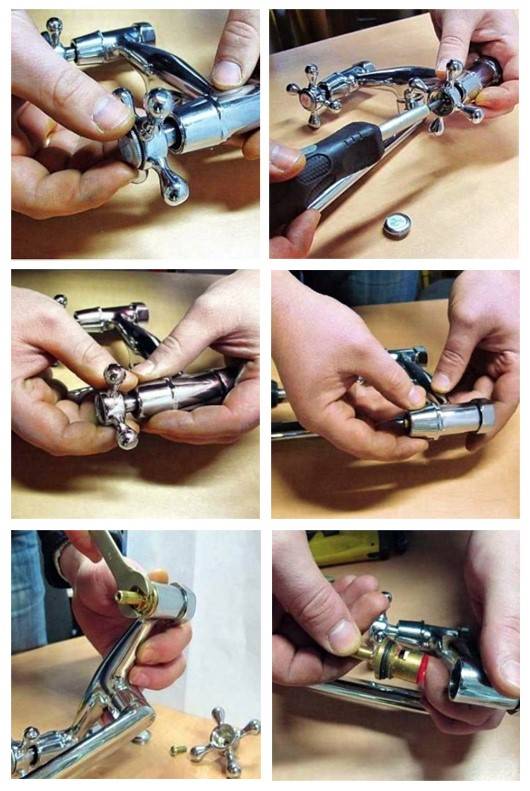
The breakdown of the first type cannot be repaired, and in this case, the entire cartridge simply changes. If the second type fails, the cartridge can be repaired.
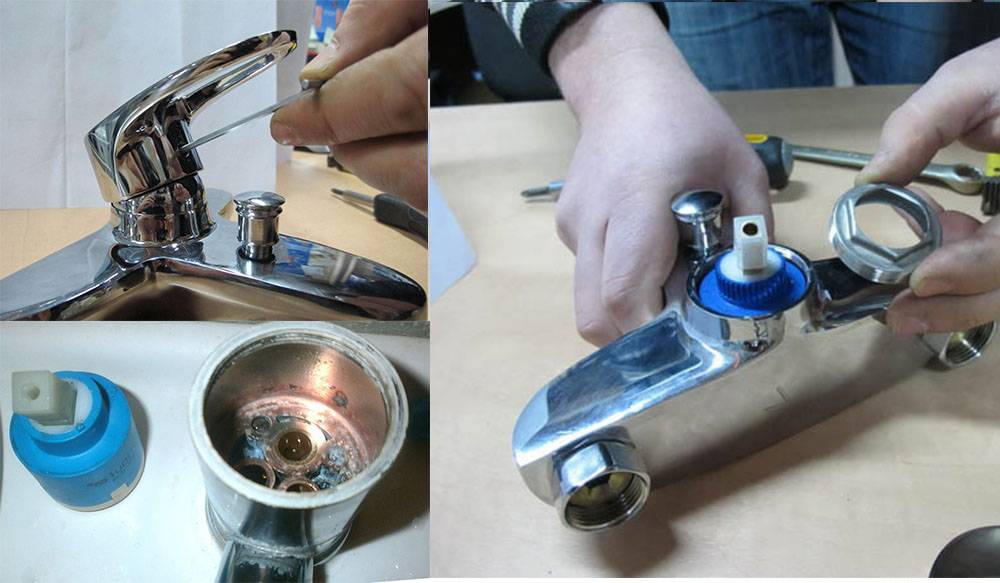
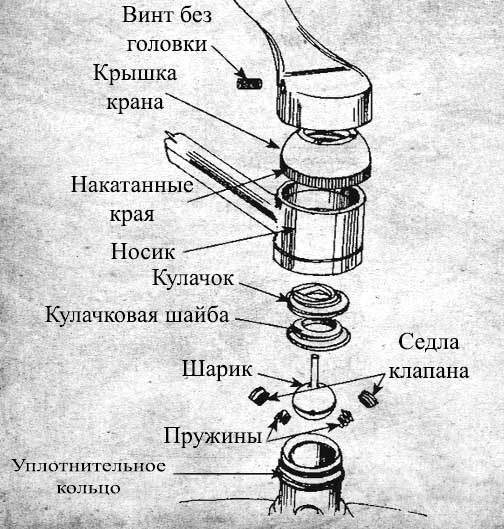
Single-lever models are disassembled as follows:
Removing the lever.
Removing the decorative cap. It is usually located under the lever
It is important to remember that this is a fragile element. Removing the cartridge, repairing or replacing it
Remove the cartridge, repair or replace it.
Assemble the structure in reverse order.
Analysis of valve mixers:
- The decorative trim on the valve is removed.
- Under it is a screw, it is unscrewed.
- The valves are removed, the crane boxes are removed.
- Leaky gaskets or crane boxes are changed.
- The structure is being assembled.
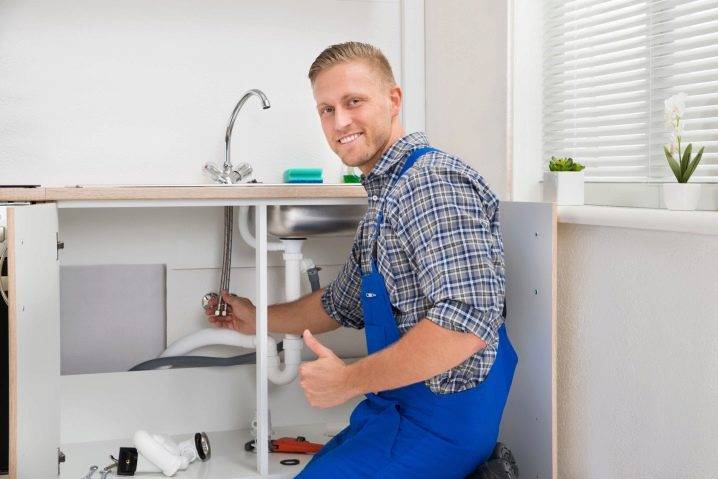
How to fix a leak in a kitchen faucet yourself
Active use of the kitchen faucet every day and the presence of impurities in the water over time lead to the fact that the device becomes leaky and the liquid begins to constantly ooze out. Moreover, this can happen either through the traditional outlet of the spout, or near its base.If you do not respond in time, then the mixer will lose its external attractiveness due to surface deposition of salts, yellow smudges will begin to appear on the sink, and the water meters will wind up extra turns.
For complex repairs, you can call a professional plumber. But the elimination of the most common breakdowns is within the power of “amateur plumbers”. This does not require a professional expensive tool and super-skills.
Types of mixers
The sequence of technological operations required to repair the mixer depends on its model. There are currently two types in active use:
Two-valve, in turn, are subdivided:
- with ceramic liners (half-turn, quarter-turn);
- with rubber seal.
Necessary set of tools and materials
In order to start repairing a kitchen faucet, it is enough to have at your disposal a simple set of plumbing tools suitable for use in different situations:
a set of open-end wrenches (can be replaced with adjustable wrenches with a jaw width of up to 19 mm);
- Phillips and flat screwdrivers (you need at least a couple of sizes);
- pliers;
- fum tape (can be replaced with tow);
- solidol.
Attention! Not the fact that all of the listed tool is useful in a particular situation. It all depends on the design of the faulty mixer and on what kind of breakdown you will have to face.
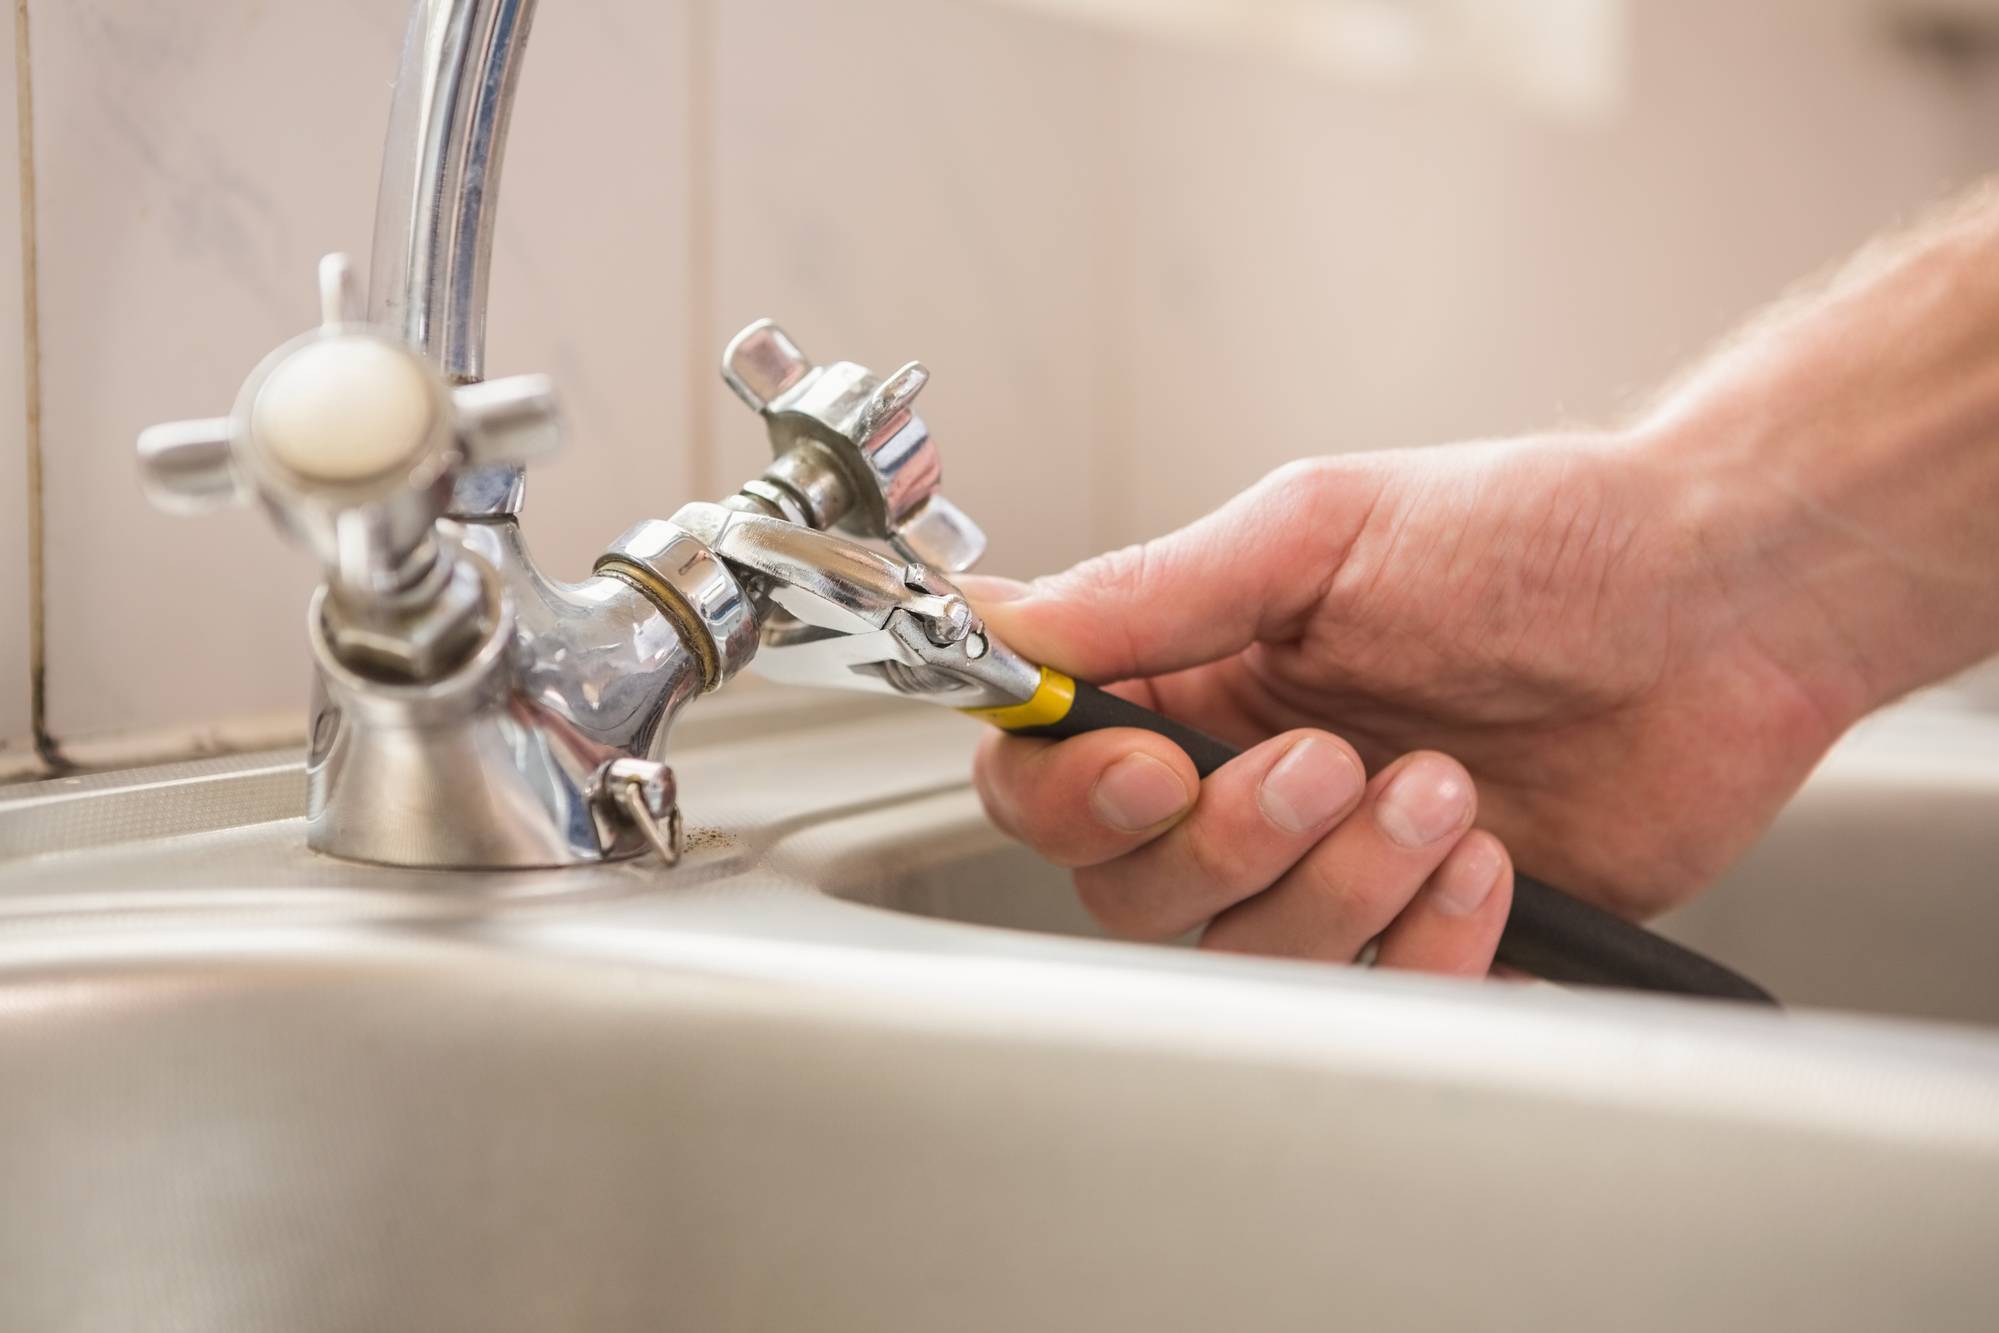
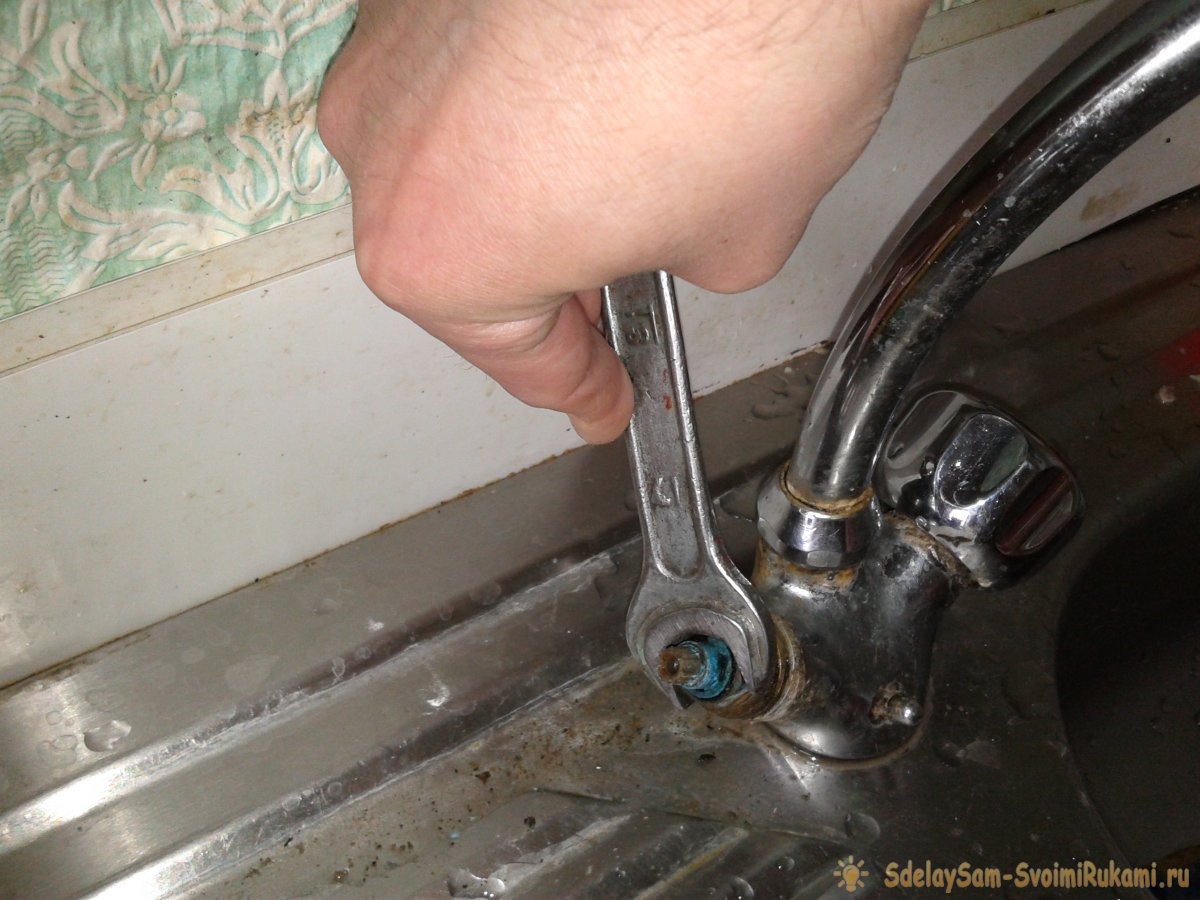
Fixing a leak at the spout attachment point
If at the base of the spout (sometimes called a “gander”) water began to leak, then the most common reasons are considered to be the following:
- the union fixing nut on the spout has loosened;
- deformed (erased) gasket.
The first breakdown is easy to fix - just tighten the nut at the base of the spout with a wrench. Thanks to this procedure, the gander will sit more tightly in its place and the joint will stop flowing.
If this does not help, then the gasket is most likely worn out. This happens when the gander is actively turned in the mixer in different directions. To fix a leak:
- Loosen the union nut.
- Remove spout.
- Assess the condition of the gasket and, if it shows signs of wear, replace it. For better tightness of the connection and to facilitate the rotation of the gander, the gasket is lubricated with grease.
If water oozes out of the outlet of the mixer, the problem is usually in its locking part.
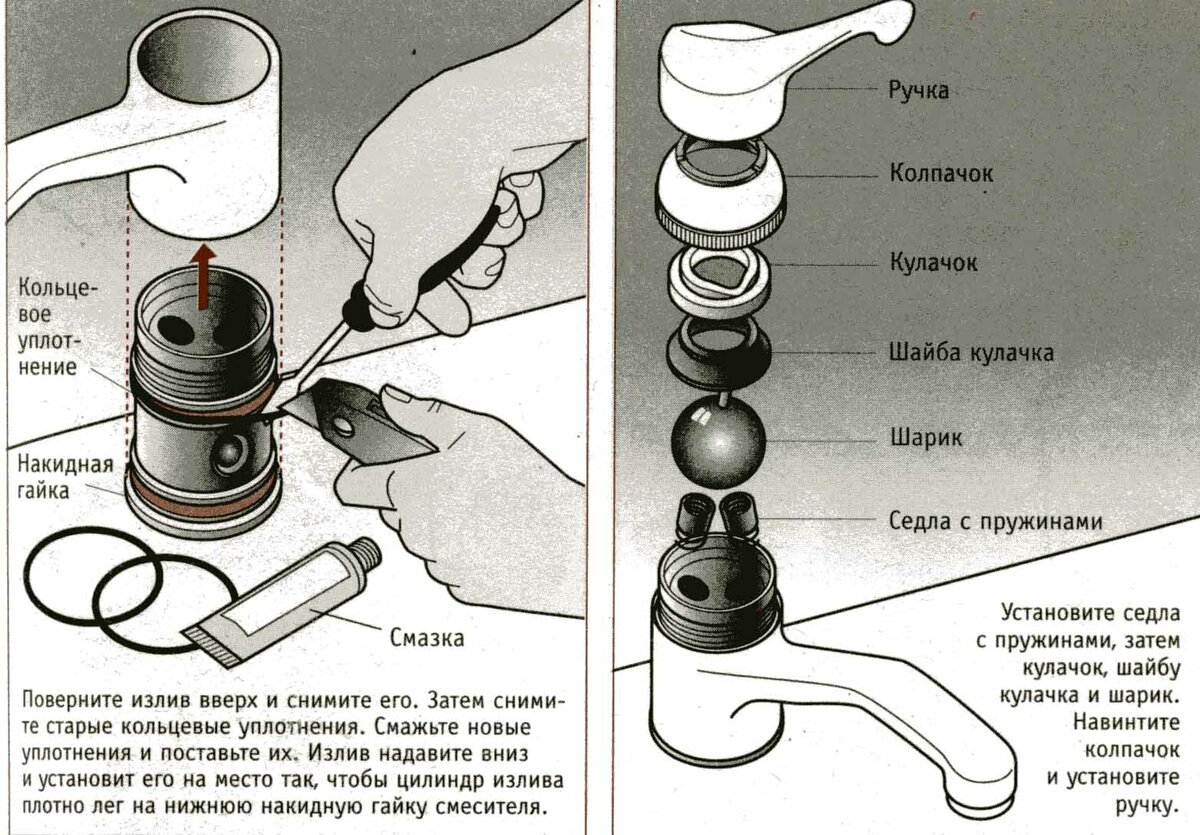
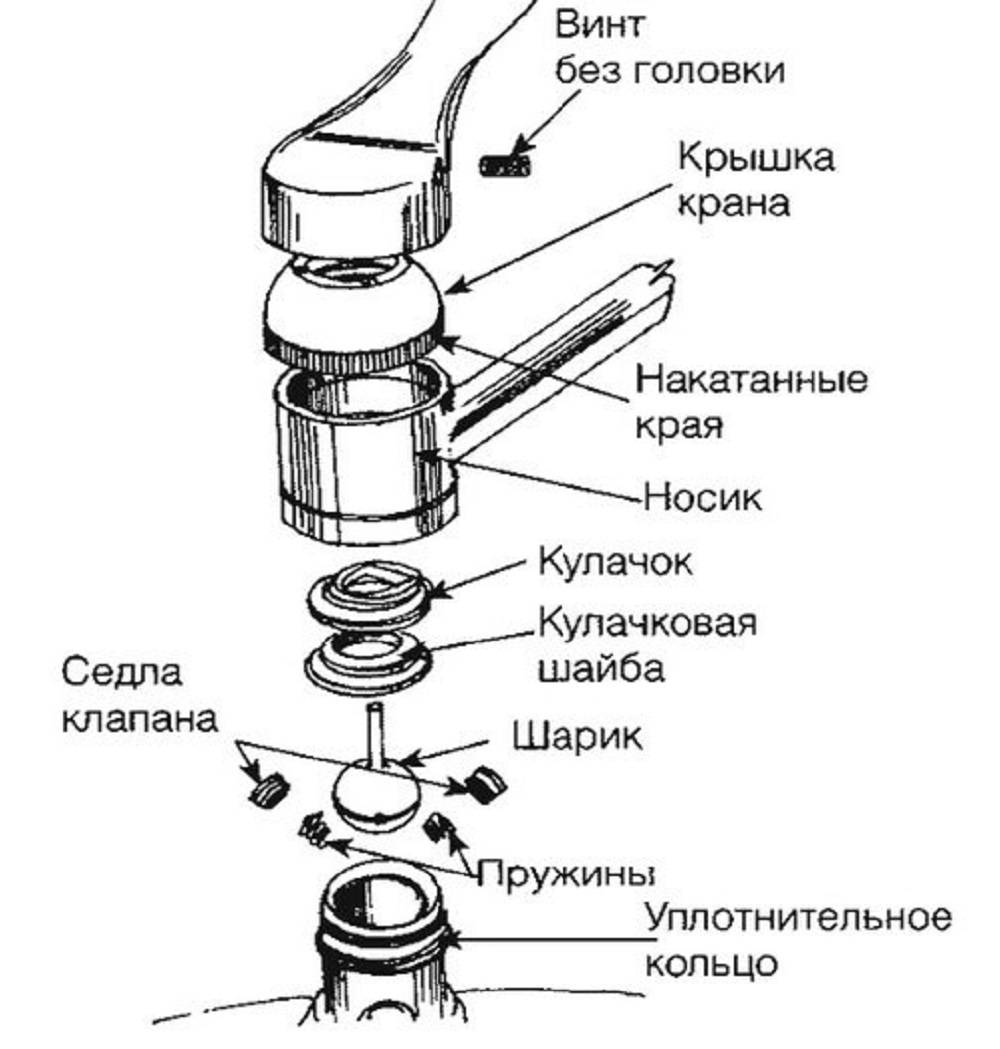
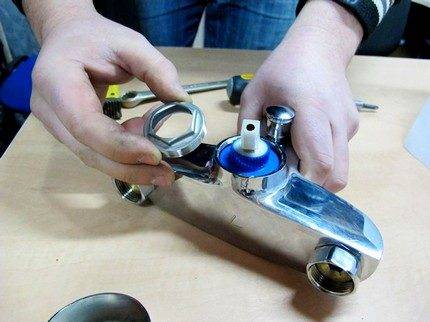
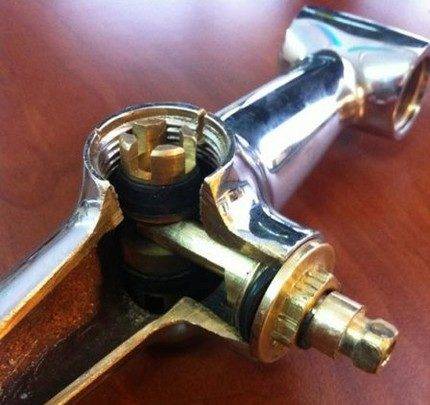
Lever Faucet Repair
Lever models are distinguished by the design of the shut-off and mixing cartridge:
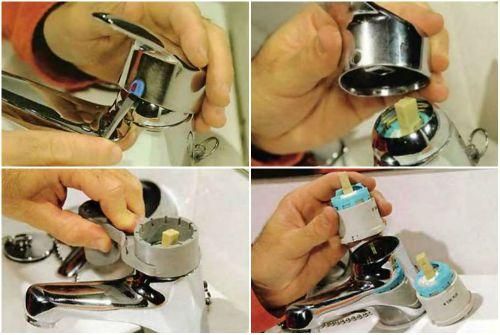
The cause of leakage in such models may be the ingress of specks into the locking unit. To fix the problem, you need to disassemble the mixer and clean the internal cavity from all kinds of debris. For both types of lever mixers, the disassembly procedure begins the same way:
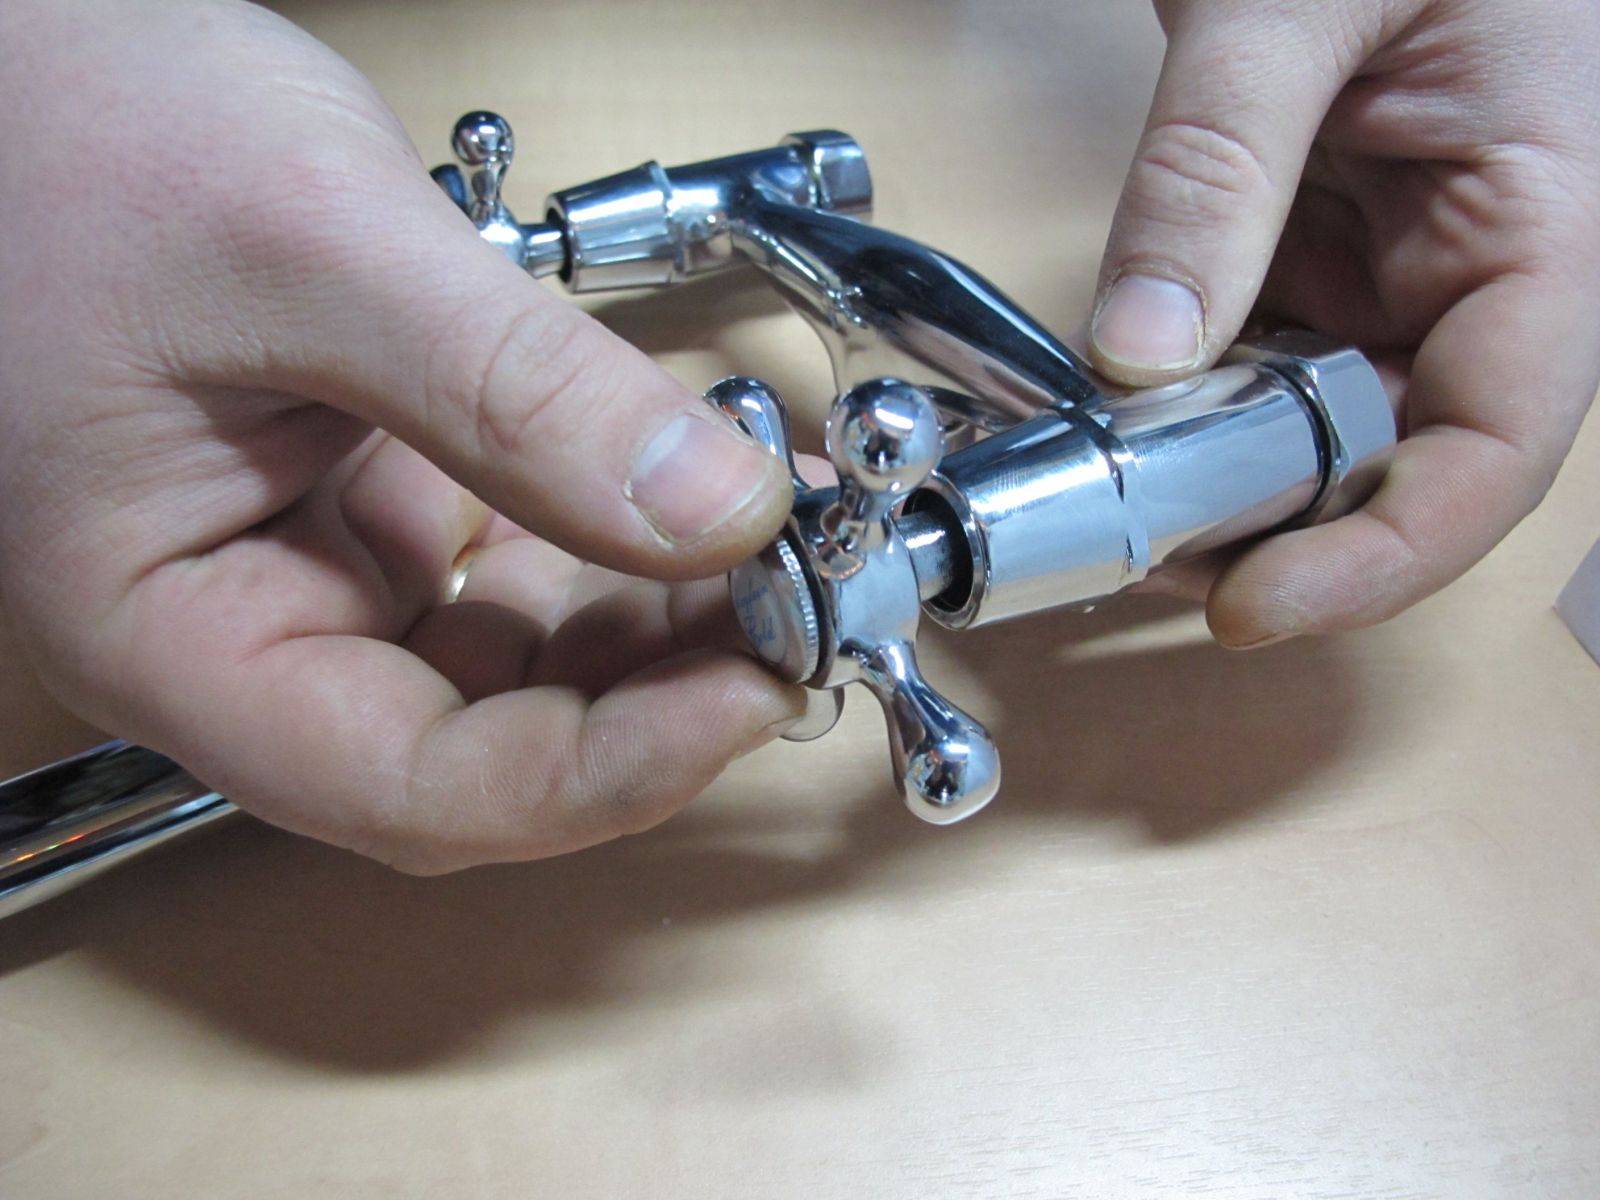


- Remove the decorative trim on the fixing screw.
- Loosen the locking screw with a Phillips (rarely hex) screwdriver and remove the handle-lever.
- Remove the decorative ring and remove the clamping nut.
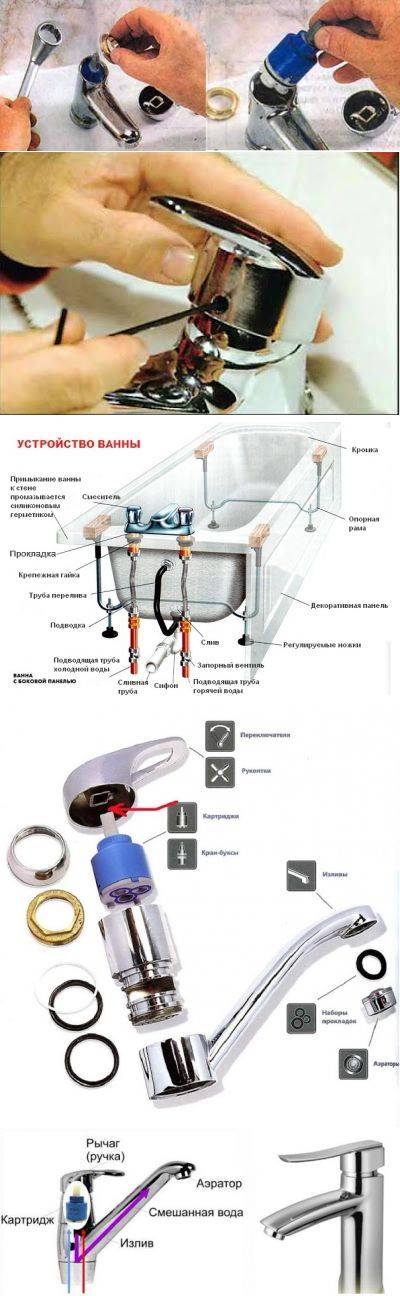
But the cartridges themselves (ball and disk) differ in design. In the first case, the passage of water is blocked by a ball with supply and mixing grooves for water. In the second case, the channels are blocked by two well-polished ceramic perforated plates.
If cleaning the cartridge from debris did not help, you will have to change the entire obturator. Over time, it wears out and loses its tightness.
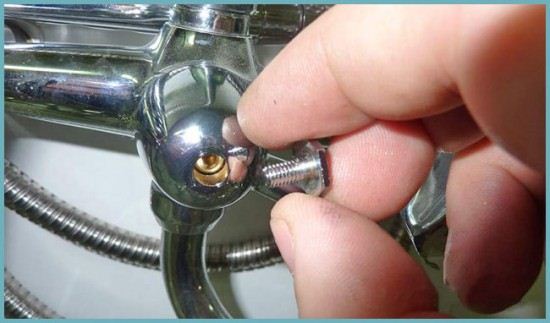
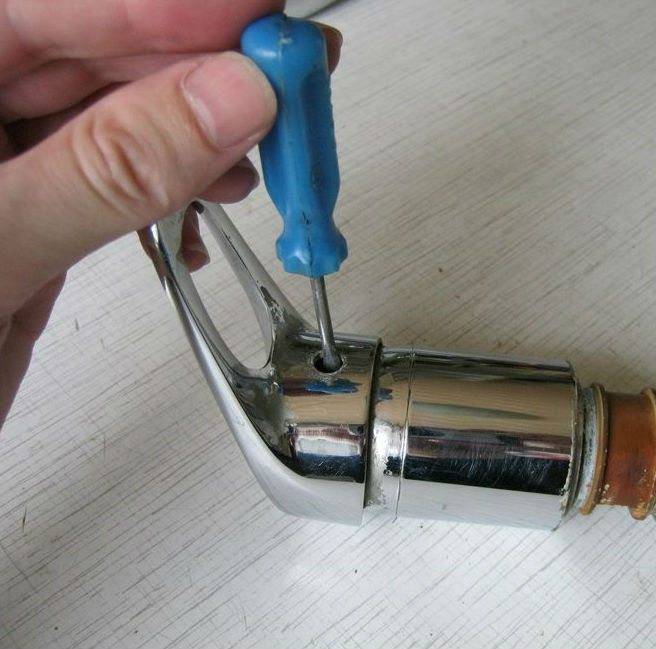
Repair of a two-valve mixer
For such models, the causes of leaks can be identical to the lever ones - clogging and wear of the obturator. But in any case, you have to disassemble them. For this you need:
- Remove the lining on the ends of the flywheels (unscrew or pry with a screwdriver).
- Unscrew the fixing screws and remove the flywheels.
- Unscrew the faucet box using the right size wrench.
Now you can clean the obturator seat from debris, check it for mechanical defects. Rinse ceramic plates or rubber gasket. If the result in eliminating the leak is zero, you will have to change the obturator.
The easiest way is to completely change the crane box. But you can get by with "less blood." It is not difficult to change the rubber gasket for a new one or even cut it yourself. Ceramic plates can be bought as part of a ready-made repair kit.
These are the main causes of leaks in the kitchen faucet and how to fix them. Obviously, there should be no difficulties and everything can be done without the involvement of professionals.
Signs that a faucet is leaking
A leak from a faucet is not always visually detectable. Sometimes we may not know that there is a similar problem.
Therefore, it is important to know the main signs of a kitchen faucet malfunction:
The appearance of dampness near the sink, the formation of small puddles
Most do not pay attention to this, attributing it to their carelessness while using the sink. However, it is dampness that is an alarming signal and may indicate depressurization of flexible hose connections;
Water does not flow from a tap, but from under a lever or valves. Most often this happens due to the failure of the valve box or cartridge;
Weak water pressure and difficulty in adjusting the temperature may indicate clogging of the supply hoses or poor patency of common house pipes.
Most often this happens due to the failure of the valve box or cartridge;
Weak water pressure and difficulty in adjusting the temperature may indicate clogging of the supply hoses or poor patency of common house pipes.
And of course, the most important sign of a breakdown is constantly dripping water from the tap, even in the closed position.
Faucet switch repair
No less often fail and shower switches. And problems manifest themselves in the form of too tight running or fluid leakage in the closed position of the mechanism. There are two types of mixers. The former are already equipped with built-in switches of the “shower-nose” type, the latter, referred to as the “moon”, are collapsible structures.
 Luna faucets are independent collapsible structures responsible for switching the flow of water between spout and shower
Collapsible structures "moon" are subject to repair. Shower-spout devices equipped with built-in switches cannot be repaired in the event of a breakdown. The only way out is to make a complete replacement.
The technology for repairing such switches on a mixer includes the same steps as when troubleshooting a crane box. But it should be borne in mind that switches can be equipped with one of two types of mechanisms:
- rod - equipped with a push-button spring-loaded rod that drives the valve, redirecting the movement of water from the gander to the shower;
- ball - structurally resembles a disk crane box and allows the switch handle to make a full turn.
Ball mechanisms have an almost unlimited resource. Their only drawback is their sensitivity to large suspensions. Even an attempt to close a switch jammed with scale can provoke a breakdown.
 Rod devices are convenient due to the minimum actuation force, but due to the liming of the valve rubber, they have a low resource
Owners who have installed faucets with a rod diverter as a switch most often encounter a problem in which the device stops locking the shower when the water is turned off. And the key reason for the breakdown of such structures is the failure of the disk-type core installed inside, the replacement technology of which is described in detail above.
 If the role of the switch is performed by a ball mechanism, when repairing the structure, you can get by with small “victims”
When repairing a shower mixer ball valve, disassembly and repair work is performed in the following sequence:
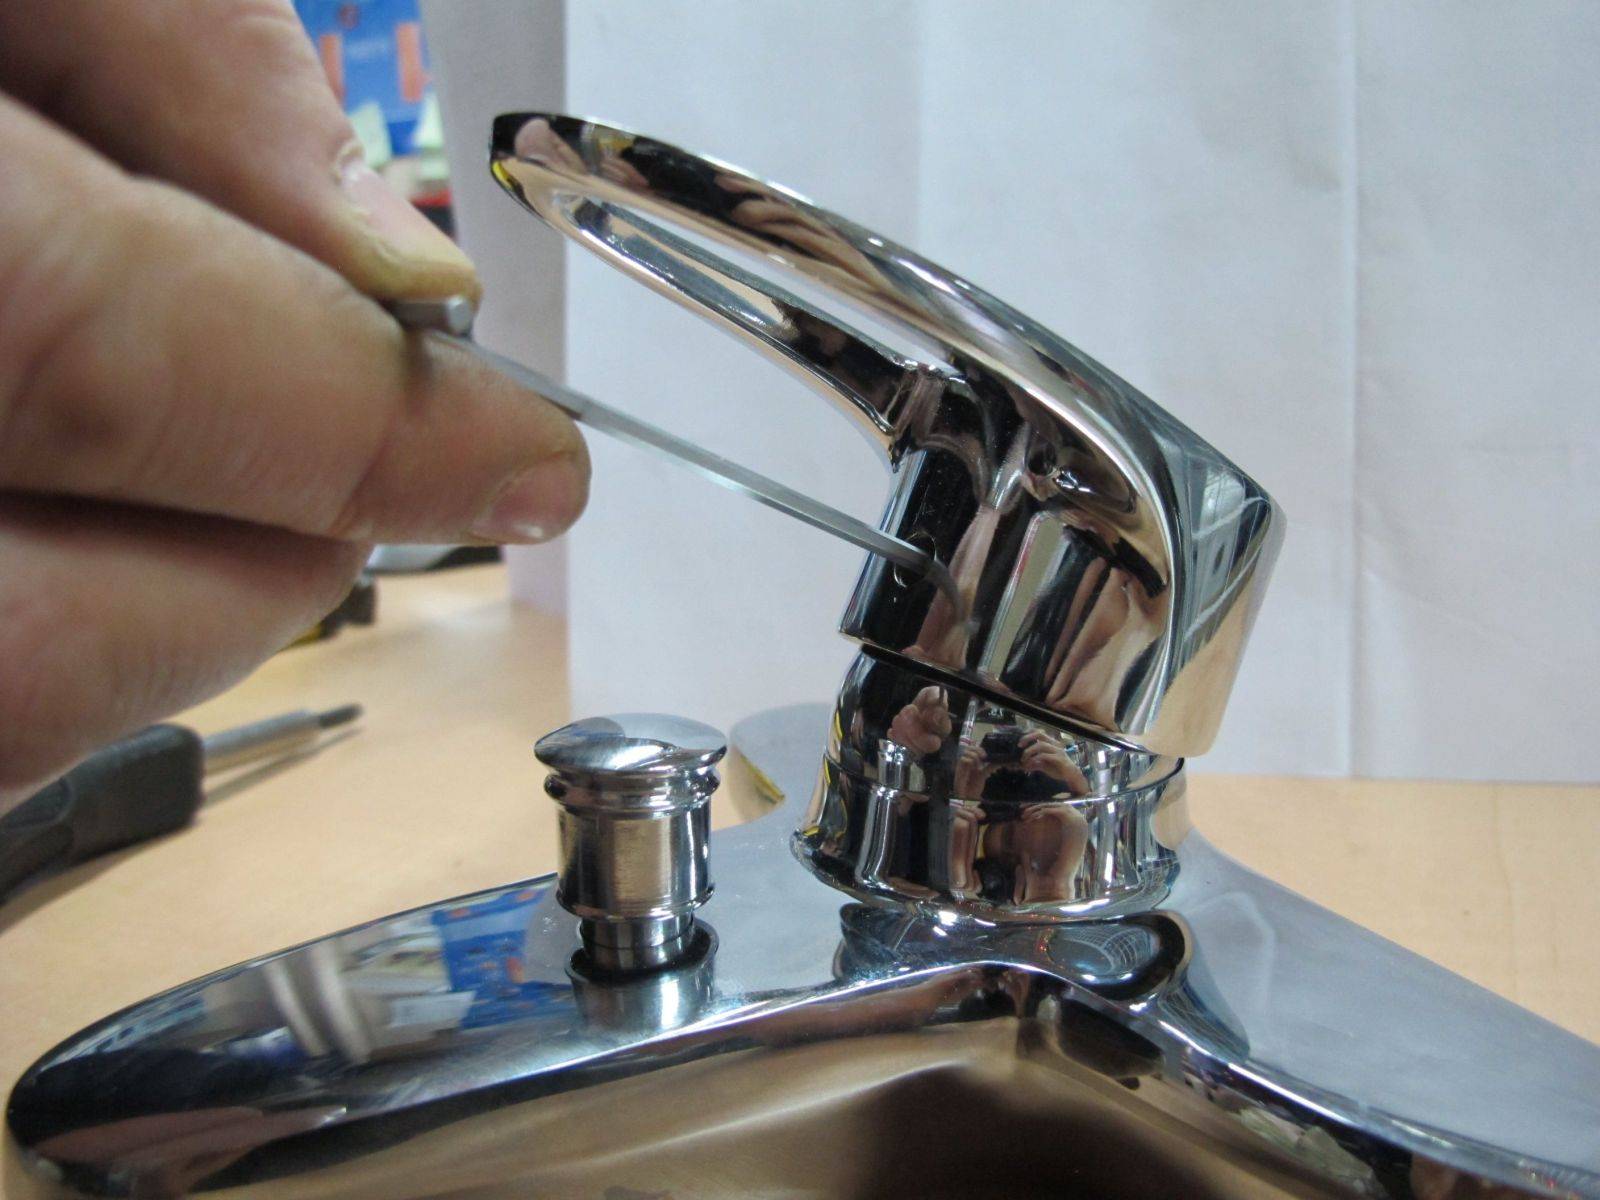
Remove the front cover-plug of the shift lever and unscrew the screw.
After unscrewing the sleeve, carefully remove the handle. Depending on the design, it can be delivered separately, or it can be connected to a ball plug.
The removed ball is inspected for dirt or rust. If one is found, then it is carefully cleaned.
Disconnect the shower hose, remove the top cover and clean the inside of the body


When cleaning, special attention should be paid to plastic cone seats for ball installation.
The cleaned parts are assembled into a single structure.
If, when disassembling the mixer, the ball remains inside, then you should first remove the gander, and then unscrew the bottom cover.This work should be done as carefully as possible so as not to damage the thread.
Shower switch repair video guide:
Installation and repair of a bathroom faucet with a shower
It is useful to know the design of a bathroom faucet with a shower. After all, this will allow you to find the cause of the formation of a breakdown and fix everything. A shower saves a lot of water. It adds convenience when taking a bath. Therefore, many homes have a faucet that is connected to the ability to switch to a shower. Their device cannot be called simple. This leads to a fairly frequent need to repair them or completely change them. Work disruptions can happen at the wrong time. Therefore, it is worth knowing how to determine the cause of the breakdown and try to eliminate it.
It is not always the quality of the product that fails. An expensive faucet can also fail. The main and most common cause is the quality of the water used. It can ruin even a high-quality model. Sometimes the injury from bad water is so severe that repair is not possible and the product must be replaced with a new one.
 It is better to know the mixer device in advance, so it will be easier to fix it
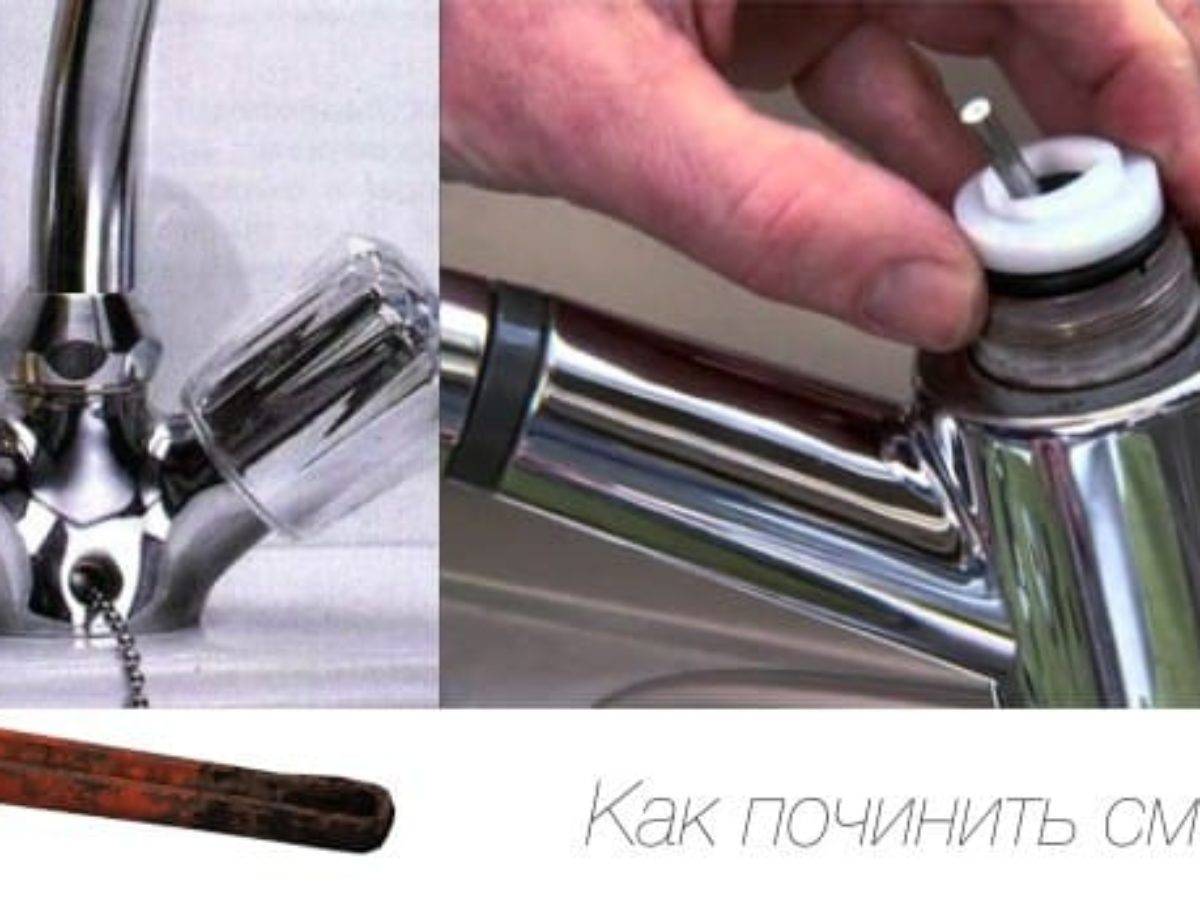
Repair of a single-lever faucet with a swivel spout
Faucets with a swivel spout are installed on sinks in the kitchen or bathroom. From time to time, a leak starts from under it. The locking mechanism in this case is not to blame, just the gaskets have lost their elasticity or the lubricant has dried up.

Repair of a single-lever mixer with a movable spout
In this case, disassemble the mixer as described above, then remove it by pulling up the spout. Remove all old gaskets. If they are stuck, you can use a flathead screwdriver or even a knife blade.You need to remove them, but they still need to be replaced. On the removed gaskets, select new ones. It is desirable that they be made of silicone, not rubber. Silicone is more elastic, retains its properties longer, better tolerates contact with water.
Lubricate new gaskets with sanitary silicone grease, install in place. Install the spout in place. It must be pressed down well so that it rests against the union nut on the mixer body. Next is the assembly of the rest of the mechanism.
General rules for plumbing repairs
Before disassembling in order to repair the faucet faucet, shower column, toilet bowl and other plumbing equipment, it is necessary to understand the general principles of repair work.
- ALL actions are performed with the water completely blocked in the apartment or house. If individual elements are located on different water risers, it is enough to turn off only the required riser. To replace the shut-off valves on the riser, the water supply to it is turned off. For apartment buildings, this is done by maintenance personnel of utility networks, by prior agreement.
- After repair, installation of new equipment, the water supply is turned on with a gradual increase in pressure. This is especially true for the supply of hot liquid from a centralized water supply or water heater.
- In case of failure of newly installed or repaired equipment, water is first shut off, and only after that work is carried out to detect the problem and eliminate it.
- The use of tow, jute and other "traditional" materials instead of the seals recommended by the manufacturer is undesirable.
- Installation and repair work is carried out using specialized tools, personal protective equipment and suitable clothing.
Important: if repairs are carried out at the moments of a centralized shutdown of water, local shutdown of communications should not be neglected.
Single lever mixers - causes of failure
Despite the fact that such mixers are of two types, the causes of failure are often similar, although there is some difference:
Swivel faucet for kitchen
- the ball valve mechanism is considered more reliable. True, over time, the steel ball corrodes. Teflon seals and gaskets also wear out, and then water begins to leak. They can be quickly replaced. However, if the ball itself cracked, then you will need to buy a new one;
- disc ceramic cartridge is not afraid of rust and hard water. This single lever will last for many years. The design itself consists of thin plates that are carefully fitted to each other. The gap is hundredths of a millimeter, so debris or a grain of sand can cause chipping and breakage. In this case, it will also be necessary to make a replacement;
- blockage sometimes leads to deformation of the rubber seat and the valve itself. Therefore, it will be necessary to disassemble, clean and replace the rubber;
- a loose lever will cause water to seep in. To stop this, just tighten all connections well;
- a small crack on the body itself can be repaired with a sealant. If this fails, then it is better to find another mixer.
A common cause of problems lies in the water itself, or rather, its hardness. Even a regular cleaning filter will allow a single-lever filter to last much longer and without breakage.
How to repair a faucet in a bathroom with a shower?
Faucet failures are caused by a lot of reasons related to poor-quality materials, improper installation and many other factors.
To eliminate the causes of the breakdown, you should call the wizard or you can try to do it yourself.
Causes and procedure for eliminating leaks in a single-lever faucet
To repair a single-lever mixer with your own hands, you need to establish the causes of its breakdown. There can be many of them, consider the main ones:
- mechanical damage caused by the breakage of the body or the formation of cracks on it;
- the formation of a gap on the seats and the ball;
- production on the gasket;
- malfunction of the aerator due to rusting of the material;
- aerator gap.
If the problem arose due to a broken case, you should use a waterproof sealant or cold welding. The necessary parts are wiped with a rag, the damaged areas are carefully smeared. However, such repairs will not be enough for a long time, and soon the whole body will have to be replaced.
With a weak pressure of water, it is necessary to remove the aerator and clean it and the mesh with a brush. The faucet through which the fluid flows may also be contaminated.
If the tap is leaking, but it is impossible to determine the cause of the malfunction from the outside, then you need to completely disassemble the entire mechanism and look for the cause thoroughly, checking each part separately:
- To begin with, the water supply is shut off, then the plug is removed with a screwdriver.
- Next, you need to unscrew the screw that holds the decorative cap.
- Then the cartridge is pulled out - for this, the nut is unscrewed with a key. All parts should be checked for defects.If none are found, move on.
- Having removed the valve completely, we look at the gasket, springs, ball and rubber seal. Worn-out parts should be replaced with new ones. The rest are wiped with a rag from accumulated precipitation and deposits.
One of the most common problems is debris getting under the ball and valve seats. In this case, you will have to change the entire cartridge as a whole.


Causes and procedure for eliminating leaks in a two-valve mixer
The main reason for the breakdown of such cranes is their quality. Oil seals on the crane box or gasket can also skip. These parts can be replaced.
Step-by-step instructions for disassembling a two-valve mixer:
- shutting off the water supply
- blockage removal,
- unscrewing the fixing screws,
- removal of the crane box using a wrench.
It is best to remove the plugs with a thin screwdriver so as not to spoil them.
The screws must be unscrewed carefully, as they are most often subjected to oxidation, and it is difficult to unscrew them. You can use WD-40 or a few drops of acetic acid.
The crane box is unscrewed from the body with a wrench counterclockwise. Pulled out with fingers. For repair, it is necessary to inspect the seat in the body so that there are no cracks on it. Then the gland and gaskets are changed on the crane box. The assembled mechanism must be rubbed with a silicone-based lubricant, and then assembled in the reverse order. Next, you need to install the crane box and clamp it with a key. Do not tighten the mechanism too much, so as not to break the threads in the case. If it is torn off, then it will be necessary to change the entire mixer.
Shower Switch Repair
There are several types of shower switches, let's look at some of them.
Zolotnikovy
The leak in such switches comes from under the handle, which opens and closes the water supply.
- rubber rings on the swivel rod have worked or they are not there,
- the gasket on the bushing has worn out,
- the box is twisted.
After correcting or replacing parts, the switch must be reassembled and tested. Do not forget about the lubrication of the switching mechanism.
To disassemble this mechanism, you need to turn off the tap, remove the cap, unscrew the screw and pull out the button with the spring.
- the spring sagged and does not hold,
- worn valve rings.
If the spring has sagged, it should be replaced with a new one or made independently. To do this, it is stretched and heated red-hot, after which it is lowered into cold water. After cooling, it must be heated again for uniform hardening. You can also make a wire spring in the same way.
If the valve rings become brittle, they should be replaced. After replacement, the entire mechanism must be lubricated with petroleum jelly or other lubricant.
The main malfunction is that the cork does not fit well to the body and leaks. It may also be:
- bad rubbing,
- mechanism erosion,
- the presence of solid particles in the body.
In order to fix such a switch, it is necessary to unscrew the screw, remove the handle, unscrew the nut and remove the retaining ring. After a thorough inspection, lubricate the parts with petroleum jelly and reassemble.
Care
Like any thing, faucets also require constant and high-quality care. This will extend their service life. Below are the basic principles and tips on how to better care for faucets of any kind. It is recommended to take them into account in everyday life.
First of all, the quality of water affects their service life.When foreign bodies enter the mixer, numerous breakdowns occur. Therefore, it is recommended to install mechanical filters in your home. Such filters are often equipped with a self-flushing system that sends all debris immediately into the sewer.

Also today it is possible to install special filters that reduce water hardness. Hard water has a particular negative effect on ceramic faucets and they quickly become unusable.
As for sensor mixers, it is better to install them only on the washbasin. They are equipped with a thermostat that can be adjusted to supply water at a comfortable temperature. If you install such a mixer, for example, in the kitchen, then it will be inconvenient to use it there, since you will have to change the water temperature very often. Consequently, the thermostat may be unsuitable for such a frequent change of positions and will quickly become unusable.

Thus, if there are problems with the faucet in the house, you can save money and repair it yourself. To do this, first of all, it is necessary to study all the instructions for repairing mixers, clearly follow the algorithm of actions.
First you need to determine what type of device is installed in your home. It can be a valve mixer, lever or touch. The latter option will most likely require professional repair, as it is a high-tech device, and self-tampering can only make things worse.
The situation is much simpler with conventional valve and single-lever mixers.If cracks do not appear on the case itself, from which it leaks, then most likely you will only have to replace any components, be it gaskets, valves, cartridges or crane boxes.


Before replacing them, it is necessary to block the access of water, remove the broken part and go to the store with it. This will prevent you from buying the wrong part.
To extend the life, it is better to choose more durable materials, such as ceramics and silicone, instead of short-lived plastic or rubber.
After purchasing the necessary materials, you can proceed with the installation. It's best to have all the tools you need at hand. During installation, make sure that dirt or dust does not get inside the mixer. They can again contribute to the emergence of unwanted problems.
During operation, it is important to properly care for the device, because this is the key to its long service life. To improve the quality of water, you can install special mechanical filters, as well as filters that reduce its hardness.
Using the mixer, you do not need to apply great efforts when opening and closing the water. This can lead to mechanical damage.
It is also important to remember that it is necessary to select a faucet taking into account its location, as well as on which sink or bath it will be installed, whether it will correspond to their size. It should be noted that when choosing a sensor mixer, it is best to install it on a washstand designed directly for washing hands.
There, its service life will be the longest, and the use is truly convenient.
How to fix the mixer with your own hands, see the video below.


