- Possible problems and solutions
- The pump hums and the impeller does not turn
- The pump does not work at all
- The pump turns on, but stops after a couple of minutes
- Pump makes noise when turned on
- Pump vibrates and makes noise
- Weak pressure
- Equipment does not turn on
- Connecting and servicing the machine
- How to disassemble the unit to diagnose a breakdown
- How to find out the cause of a malfunction of a submersible pump?
- What do they do first?
- Where might the problem lie?
- Water jet pump repair
- How to do your own repairs
- Pump repair
- DIY repair
- Water jet dzhileks 60 32 unit repair
- Setting up a submersible pump "Brook"
- Selecting an installation site
- The main malfunctions of submersible pumps
- The pump is not working
- The pump works but does not pump
- Low machine performance
- Frequent switching on and off of the device
- Water is supplied with pulsation
- The buzz of the machine is heard, but the water does not pump
- The unit does not turn off
Possible problems and solutions
What breakdowns can occur and how to repair the circulation pump with your own hands? Let's figure it out.
The pump hums and the impeller does not turn
Possible reasons:
- Foreign object in the impeller chamber.
- A long downtime of the apparatus led to the oxidation of the rotor shaft.
- The power supply to the device terminals is interrupted.
In the first case, troubleshooting can be done by carefully removing the device and unrolling the housing in the impeller area. If there is a foreign object, remove it and turn the shaft by hand. In order to avoid re-entry of a foreign body, a filter should be installed on the nozzle.
The circulation pump buzzes even in the event of a power failure. First, check the voltage with a tester. If the cable is damaged or broken, it must be replaced. If the cable is in order, look at the voltage at the terminals. The infinity icon on the tester indicates a short circuit. Less voltage means winding break. In both cases, the terminals must be replaced.
The pump does not work at all
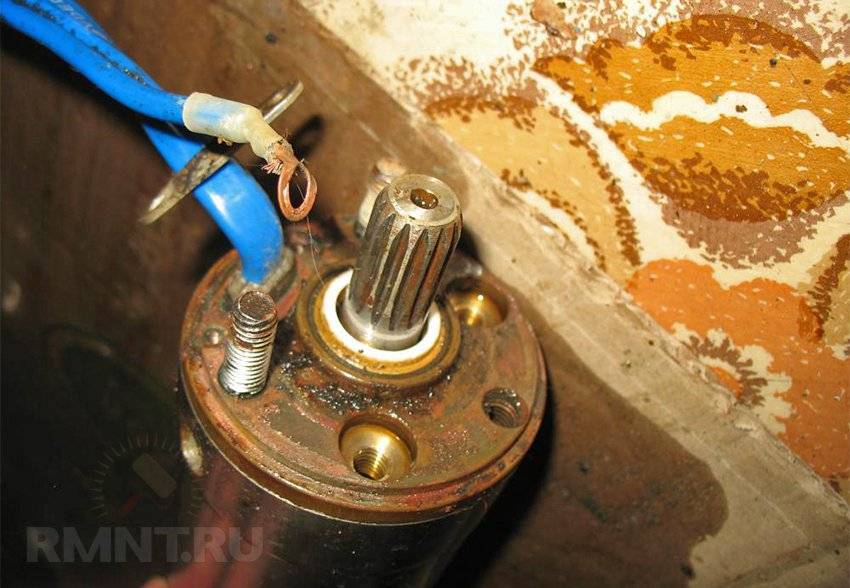
The pump does not work when there is no voltage in the network. The tester checks the voltage, as well as the correct connection of the device to the power supply.
Circulation pump shaft
If there is a fuse in the pump, there is a risk of it blowing from power surges. If this happens, replace the fuse. It is advisable to install a reliable stabilizer.
The pump turns on, but stops after a couple of minutes
The reasons may be:
- Lime scale between moving parts of the device.
- Incorrect connection of the pump in the terminal area.
The pump can turn on, but also immediately stop if there is scale. Remove limescale and lubricate the joints between the stator and the rotor.
In the second case, check the density of the fuse on the device. It is removed and all clamps are cleaned. All wires must be correctly connected in the terminal box.
Pump makes noise when turned on
If the pump is noisy, this may indicate the presence of air in the system.It is necessary to bleed the air from the pipes, mount a unit in the upper part of the circuit so that the air is released automatically.
The pump may also make noise due to wear of the impeller bearing. It is required to disassemble the body of the apparatus, and, if necessary, replace the bearing.
Pump vibrates and makes noise
If turning on the pump is accompanied by vibration and noise, then the reason is insufficient pressure in a closed circuit. You can solve it by adding water to the pipes or by increasing the pressure at the pump inlet.
Weak pressure
With a low pressure or when the pump almost does not pump the coolant, check the direction of rotation of the impeller in the body of the apparatus. If the impeller does not spin correctly, then a mistake was made when connecting the pump to the terminals by phases if a three-phase network is used.
The decrease in pressure may be due to the high viscosity of the coolant. At the same time, the impeller experiences increased resistance and does not work well, not at full strength. It is necessary to check the mesh filter and clean it. It is also advisable to check the cross section of the pipes of the holes. After that, you will need to adjust the correct parameters for the pump.
Equipment does not turn on
The pump does not turn on when there is a power problem. It is necessary to check the phases and fuses. If they are in order, then the drive winding burned out. In this case, you will have to seek help from specialists.
The internal surfaces of the pump must be free of rust.
When diagnosing equipment, you can use the indicator - a tester for the rotation of the shaft of the circulation pump. It allows you to verify that the pump is working without connecting to the mains.
Connecting and servicing the machine
Before lowering the device into the well, it must be prepared:
- Pressure pipeline connection. Actually, what it will be depends on the depth of installation and the purpose of using the device. It can be a watering hose if the pump will be used for irrigation only or for filling containers with water, or a pipe made of metal or durable plastic in the case of a stationary installation to work in tandem with a hydraulic accumulator.
-
Check valve installation. You need to know that the connection diagram for the Aquarius pump operating in a closed pressure water supply system must necessarily include a check valve that is not installed at the factory. The operation can be performed in two ways: tapping into the pipeline at a distance of not more than 1 m from the outlet pipe or mounting the valve directly into the pipe. Experts recommend choosing a check valve model with a brass seat.
-


To work in a closed pressure water supply system, the pump must be equipped with a check valve
Rope fastening. A cable, which can be either nylon or steel, is passed into special eyes on the body and firmly attached. You need to know that it is forbidden to raise and lower the device by the cable. Practice shows that in order to facilitate the descent and ascent, it is best to fix the cable in the pressure pipe using special brackets, so the risk of mechanical damage will be minimized. Then the Aquarius pump is connected through the power cord to the outlet.
The device is carefully lowered into the well, while no tension is allowed pressure hose and cable power supply. The equipment is fixed at the required depth with a cable
The pump is ready for use.
Despite the fact that the device is very reliable and designed for uninterrupted long-term operation, it is recommended to take it out of the well and inspect it every two years. You should start with an external examination. The motor axle should not stick during rotation, which should ideally be soft and light. If everything is so and the device regularly supplies water at the right pressure, you can put it in place.
If there are doubts about the operation of the equipment, further inspection should be carried out. The fundamental design of the Aquarius pump suggests that rotation bearings need to be regularly inspected and possibly replaced. It is worth checking the condition of these parts, the oil seal, as well as the oil level. If necessary, seals and bearings must be replaced, oil must be added. You should also inspect the motor winding for possible damage or signs of overheating.
The engine must be disassembled very carefully: the cable insulation becomes brittle over time and can be very easily damaged. The pump part does not require special care, however, if the pressure of the apparatus has decreased significantly, it is worth changing the impellers, which are most likely worn out
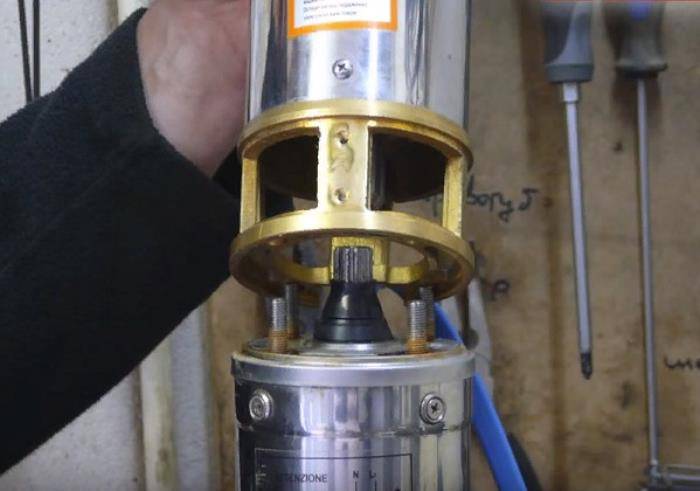
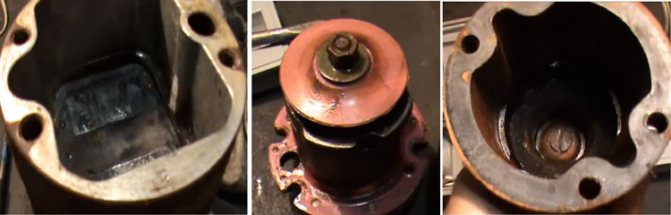
How to disassemble the unit to diagnose a breakdown
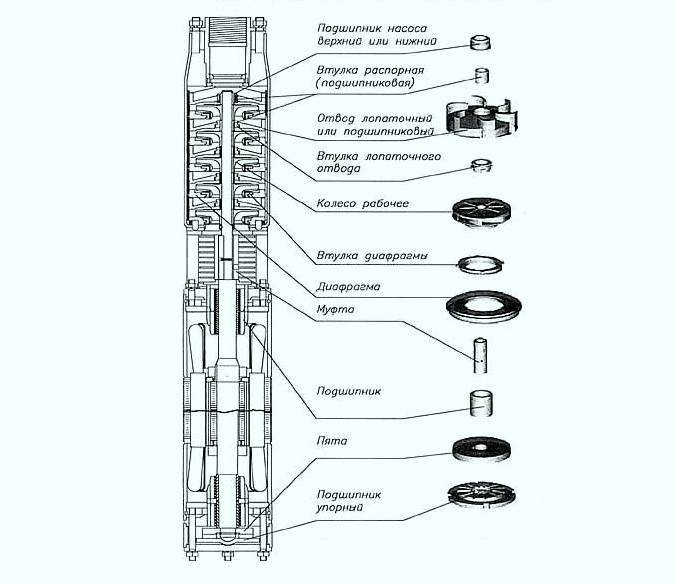
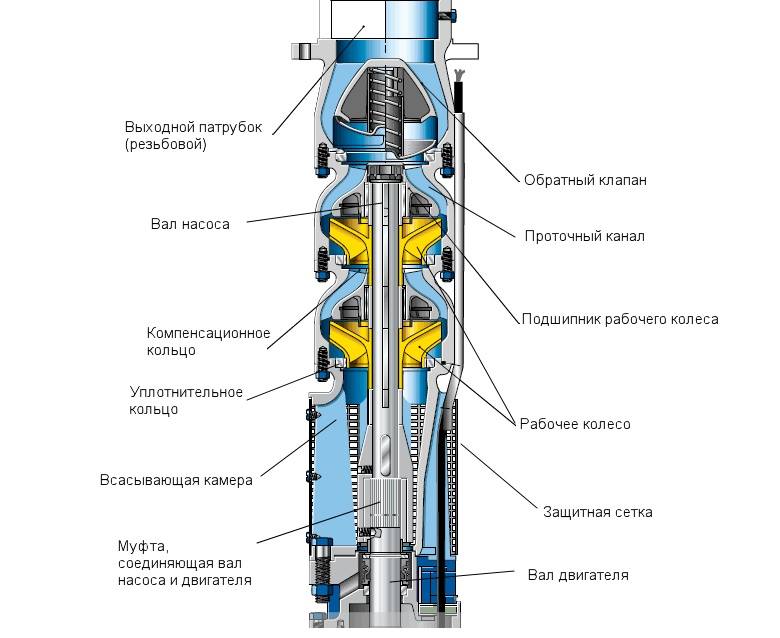
In case of pump breakdowns requiring replacement of parts located inside its housing, disassembly of the unit will be required. A submersible pump consists of a motor compartment and a compartment with one or more impellers, the purpose of which is to capture water. Below is a diagram of the device of that part of the centrifugal pump where the impellers are installed.
As can be seen from the figure, the impellers are mounted on the shaft of the unit.The more of them, the higher the pressure created by the pump. The rotary engine is located in the second compartment of the hydraulic machine. It is in a sealed case, and to open it, you need to know some of the nuances.
So, in order to move from theory to practice and disassemble the pump, follow these steps (depending on the manufacturer, the design of the unit may differ).
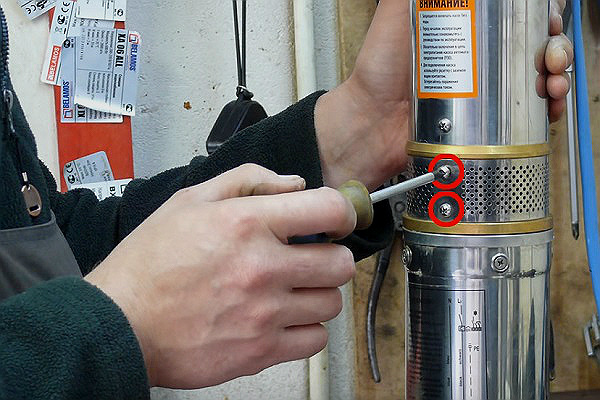
- Unscrew the 2 screws holding the mesh of the device.
- Remove the mesh and turn the motor shaft by hand. If it does not spin, then the problem may be either in the engine compartment or in the pumping part of the apparatus.
- First you need to disassemble the pumping part of the device. Unscrew the 4 screws holding the power cable channel and disconnect it from the machine body.
- Next, unscrew the 4 nuts holding the pump flange.
- After unscrewing the fasteners, separate the pumping part of the apparatus from the engine. At this stage, it is possible to determine in which section the jamming occurred. If the shaft of the pump compartment does not rotate, then this assembly must be disassembled.
- Unscrew all fasteners holding the lower flange of the pump part of the unit.
- An adapter must be screwed into the fitting located at the top of the block, which will help keep the threads from damage.
- Secure the pump in a vise.
-
Having picked up a suitable tool, unscrew the bottom flange.
- The impeller assembly can now be pulled out and inspected for faults.
- Next, you should check the support shaft for wear or play.
- To replace (if necessary) the impellers, it is necessary to fix the shaft in a vice and unscrew the top nut.
-
At the next stage, the blocks are removed, washed and, if necessary, replaced with new ones.
- The assembly of the pumping part of the apparatus is carried out in the reverse order.
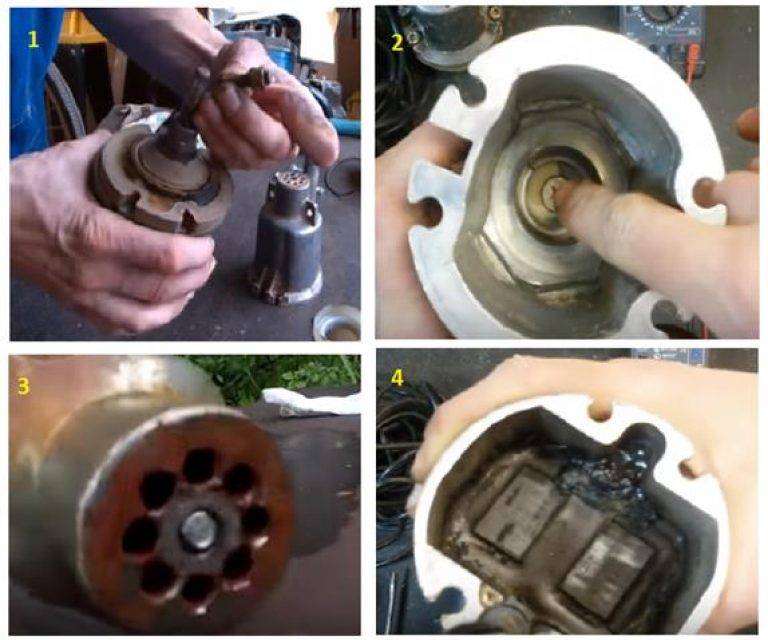
- To disassemble the electric motor, it must also be fixed in a vise.
- Next, remove the plastic flange protection by unscrewing the fasteners.
- Remove the retaining ring holding the cover with a pair of pliers.
- Remove the cover using a slotted screwdriver.
- Remove the rubber membrane from the housing.
- Remove the capacitor.
- At this stage, you can check the oil level, its quality, identify the cause of jamming, etc. The engine block is assembled in the reverse order.
How to find out the cause of a malfunction of a submersible pump?
To lift or not to lift equipment from the well? The simplest option is to analyze the operation of the equipment using indirect signs, without additional manipulations. After identifying all possible culprits, they act by elimination, leaving the most likely cause. But this way is not ideal. It is not always possible to count on the fact that the failure is caused by a simple reason that is easy to fix: for example, reconfiguring the accumulator - changing the operating pressure range.
Therefore, it is better to immediately assume that the malfunction is caused by more serious circumstances, which means that the “naughty” pump will have to be “extracted” from the well. In this case, the owners have a good opportunity to prevent a serious accident, which in the future may require expensive repairs. The first step is to check the power supply. If the voltage is normal (200-240 V), then interruptions in the operation of the equipment due to surges are excluded.


What do they do first?
To find out the exact cause of the device failure, proceed as follows:
- stop, turn off the water supply system, then raise the structure to the surface;
- remove the top cover from the case, then disassemble the mechanism, referring to the instructions;
- conduct a thorough inspection of each part: look for signs of wear or breakage, friction (abrasive, wet, dry), cracks, accumulation of dirt, etc .;
- the electric motor is tested in the same way, the valve, filters, HDPE pipe, and the integrity of the power cable are checked for defects.
Lastly, the sensors, relays, control unit, installed protection units are examined.
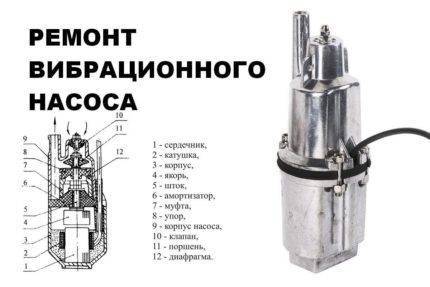
Where might the problem lie?
If the operation of the device is no longer satisfactory, then check the status of all the main nodes.
- Piston or impeller. They must be absolutely perfect, not have any damage, or even a hint of the slightest deformation.
- Distance between piston and coil magnets. Ideal - 4-5 mm. Smaller values will lead to overheating of the electric motor, larger ones will cause the coils to beat.
- Optimum distance between valve and body. It is 7-8 mm. In this case, water will flow freely without problems in the absence of pressure.
Such a check, carried out periodically, will reduce the risk of almost any malfunction of the submersible pump, and will help prevent serious equipment malfunctions.
Water jet pump repair
How to do your own repairs
In the article presented to your attention, you will learn the principle of the pump device, and you will also be able to deal with the nuances and aspects that you need to know in order to repair the Water Cannon and we will take a closer look at a real example of a real model 60-52. Naturally, you will also get acquainted with possible problems that are indicated in those. passport and the method of their elimination.
Pump repair
Repair of the pump is urgently required, especially for the private sector, it can mean again buckets-watering cans. A significant complication of the situation, if the water supply at the site is organized within the circumference of the well.
Naturally, even someone who is slightly familiar with such matters is able to repair equipment such as "Brook", but restoring the unit's performance is a rather laborious task, which is not easy to perform without certain knowledge in this area.
In the case of unskilled repairs, there is a possibility that oil will penetrate into the well, which will have to be eliminated with the help of highly qualified professional specialists.
Otherwise, you will have to do this work on your own.
DIY repair
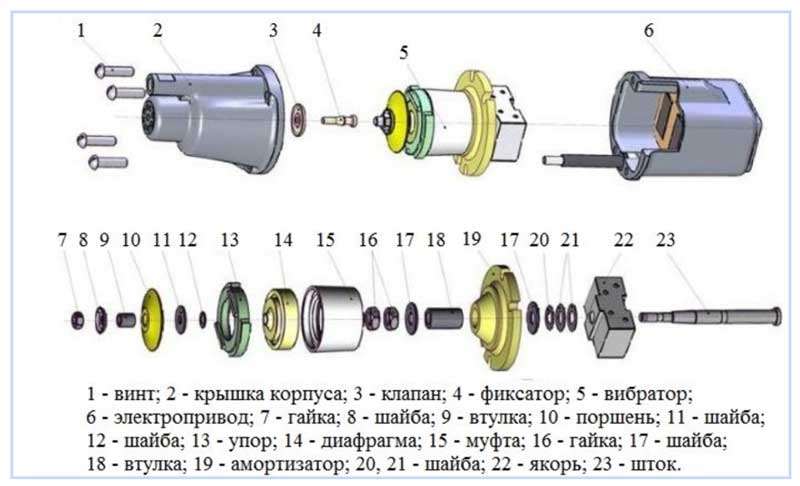
Components. Analysis of the components.
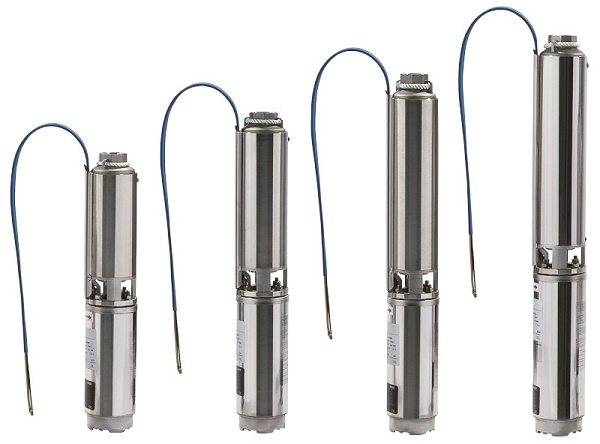
Units of this type, specially designed for interaction with wells, have a certain (different) number of stages, based on the model marking. All parts of this type can be freely divided into several typical categories.
The first and third positions are almost identical in their dimensions and are made of high-quality and durable plastic, which together resembles a mushroom in its appearance. The glasses, respectively, are made in the form factor of a cylinder, which are made from black polyamide.
The bottom is essentially a disk, which is made of the same material, and there is a hole in its center. Together with the glass, they form a double bottom.An anti-friction washer will inherently prevent friction of parts, as a rule, when parsing, blue-white color variations are most common. The first few are thinner.
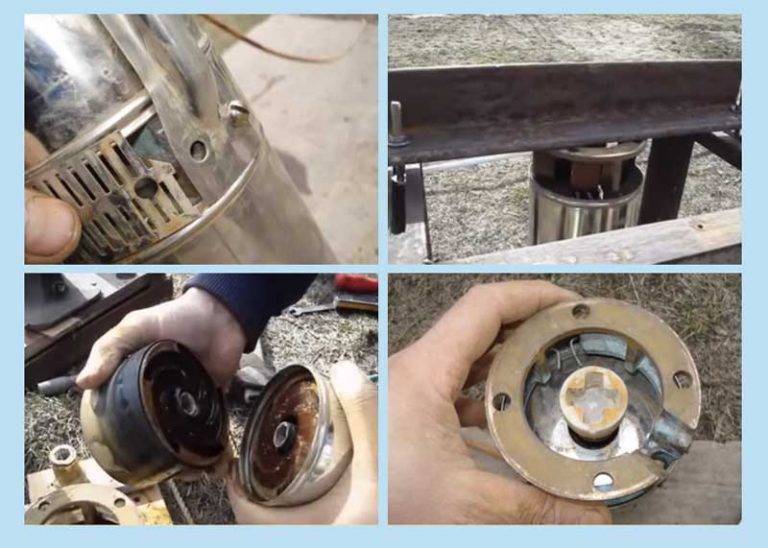
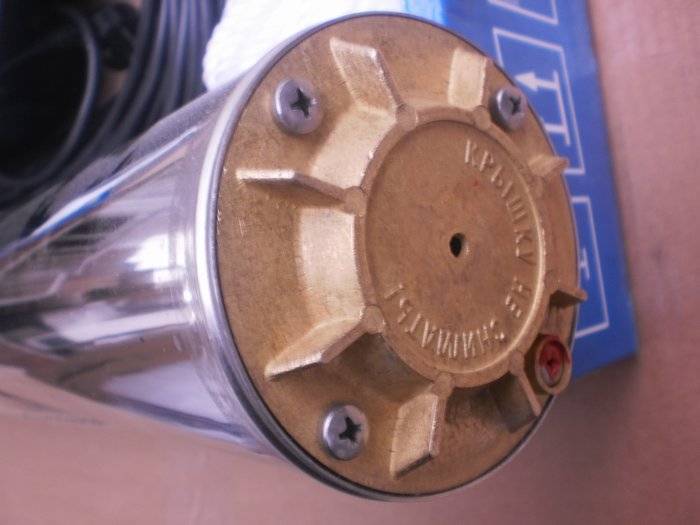
Disassembly 60-52
To repair the water jet, first of all you should unscrew the cover equipped with specialized holes for the subsequent removal of other parts. If you need to clamp the device in a vise, be extremely careful, as the inside of the hollow format. The best solution would be a rubber lining (dense) on all sides.


Next, disassemble the pumping part. The parts removed from the shaft should be laid out in the most accurate way, which will allow them to be returned to their place in the same but reverse order.
Take out the stop ring and the motor. For this action, you will need to install the unit vertically.
Attempting to extract through a thread will fail, as it will not be able to pass through it. After you lay the pump in a horizontal position, pull the cable and pull the motor
Remove the cover of the compartment containing the wires, put the engine on its side and, using a powerful screwdriver and a mallet (rubber), knock out as carefully as possible
Water jet dzhileks 60 32 unit repair
Indicated malfunctions
The units outline the main malfunctions, as well as their causes and methods of elimination.
But in a huge number of cases, a recommendation to contact a specialized service center will simply be indicated.
Two additional breakdowns that are not included in the passport are very often called by experts: there is no water injection at startup, and the device also beats with current without making any sounds.
The first malfunction symbolizes that the impellers and stage covers have worn out. And in the second option, we will talk about a capacitor failure. More than likely, it is caused simply by exposure to moisture, which in a certain way gets through the cable entry directly into the condenser compartment. Naturally, such a part will only be subject to replacement with a serviceable one.
Sufficiently careful and careful handling of the unit will extend its service life without any problems, but from time to time you still have to carry out preventive maintenance either on your own or by contacting a specialized service center.
The difficulty of self-repair will lie not only in the ability to disassemble a somewhat complex device, but also to find the necessary replacement parts, which is even more problematic, why the best solution would really be to contact such a center.
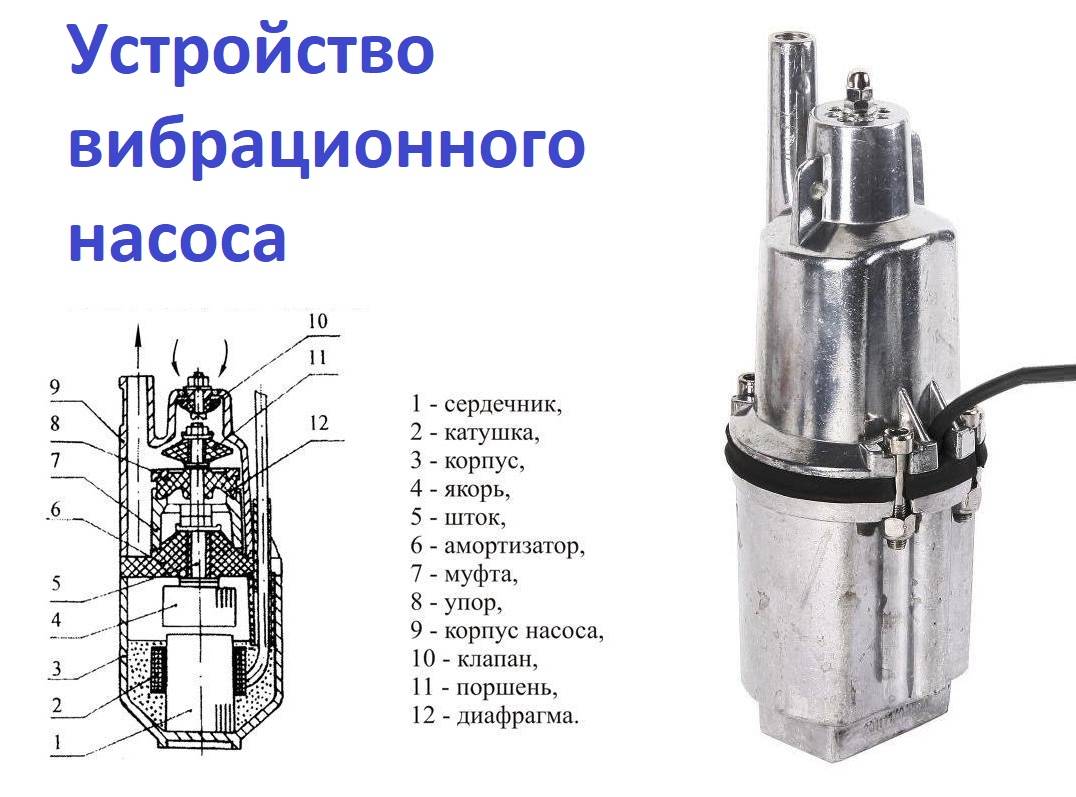
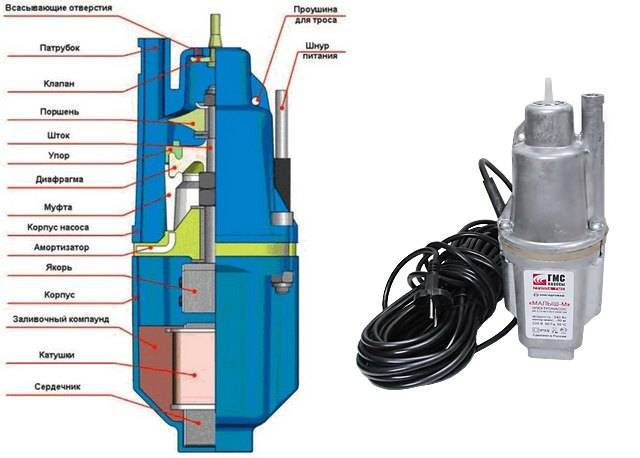
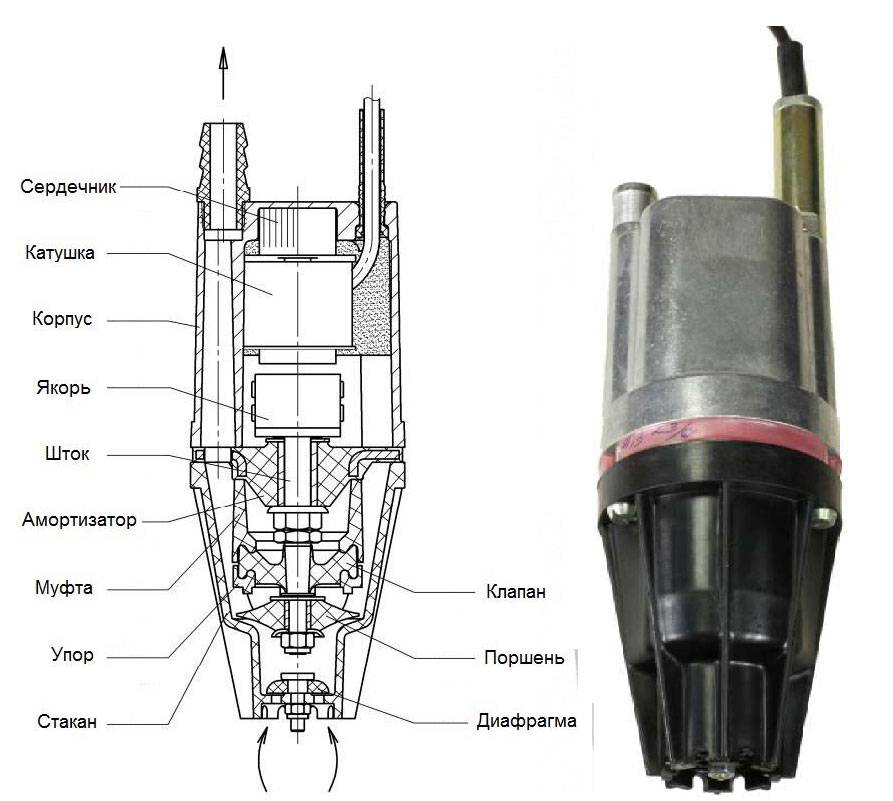
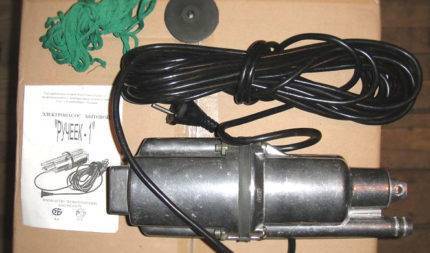
Setting up a submersible pump "Brook"
The Brook pump is considered reliable equipment. With proper operation and timely maintenance, it rarely breaks. In some cases, troubleshooting can be done by adjusting the pump. To do this, first of all, an idle or unstable pump must be removed from the well (well) and suspended without a hose in a container of water. Next, you need to turn on the device in the network and check the voltage, it must be at least 200V.
If the voltage in the network is correct, then turn off the pump, drain the water from it and blow through the outlet. Blowing can be done by mouth without using any special tools.
A properly tuned Brook pump is blown through without problems, and if you blow harder, you can feel the piston stroke inside. The air must also flow in the opposite direction. If this does not happen, then it is necessary to configure two parameters of the unit, having previously disassembled it.

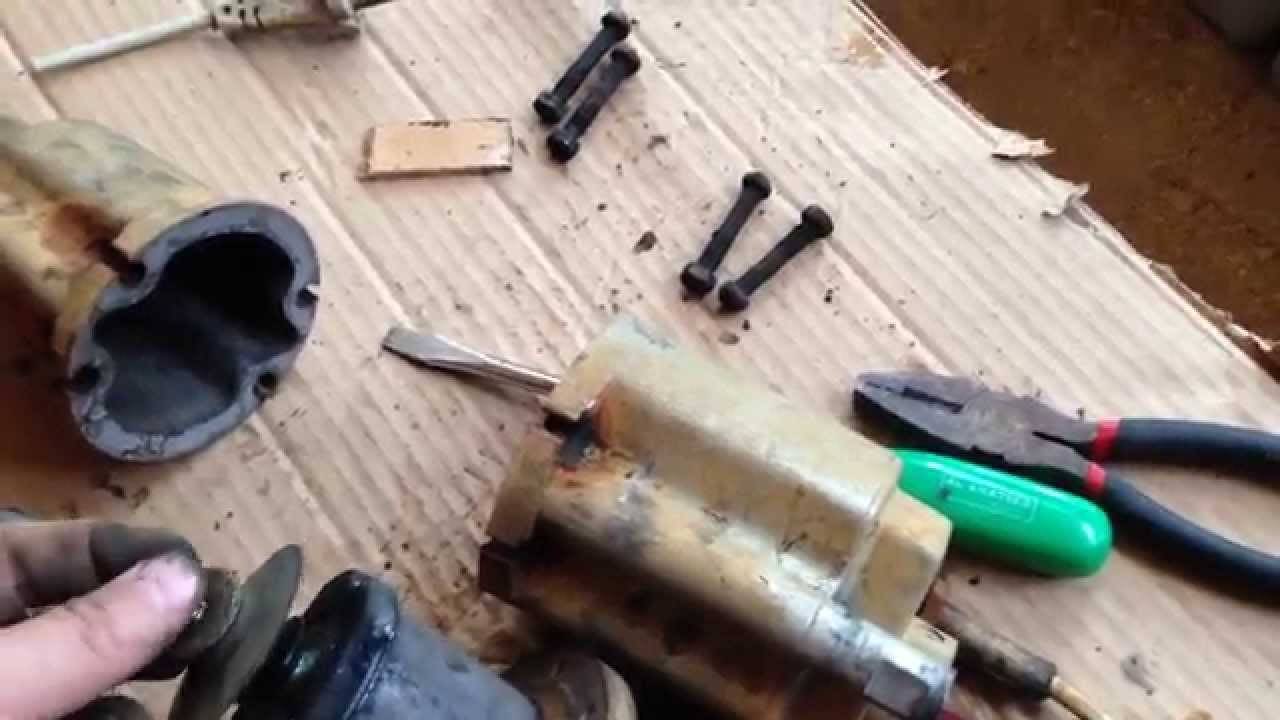


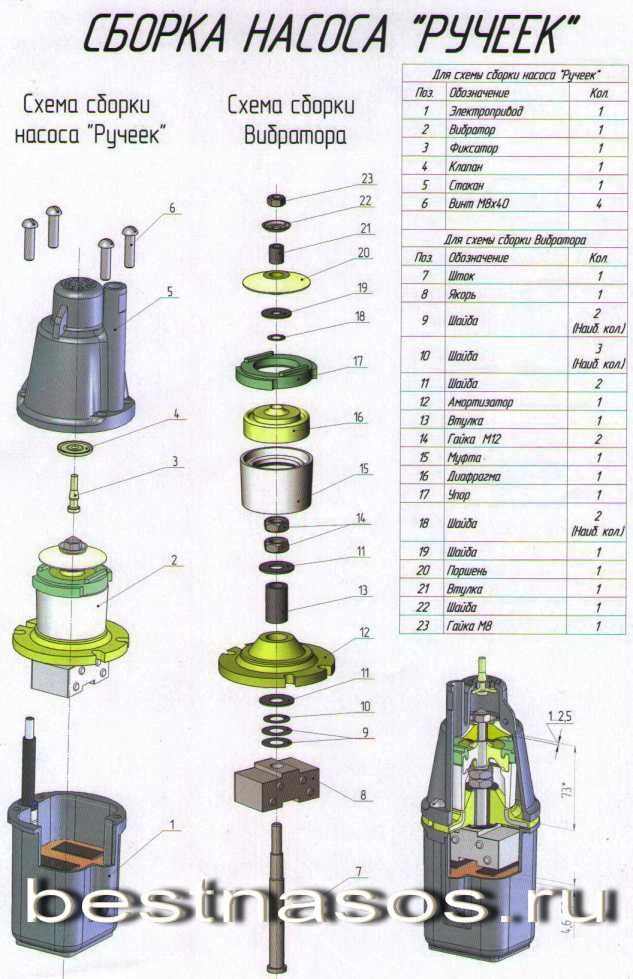
The dismantling of the household pump "Brook" is carried out with the help of a vice, which compresses the ledges on the housing, located next to the screws. You need to loosen the screws gradually, in turn. At the first disassembly, it will not be superfluous to replace the screws with similar screws with a convenient hex head, this will greatly facilitate assembly and disassembly during the next repair.
From the above-described principle of operation of the "Brook" pump, it follows that the two parameters are configured in the following order:
Piston position adjustment. It must be parallel to the rest of the unit. Parallelism is controlled using a caliper. Misalignment of the piston body may occur due to the gap between its metal sleeve and the rod. To eliminate it, you need to wind the stem with foil until it is completely parallel.
Checking the alignment of the axes of the rod and piston. When they are displaced, the inlet glass usually “fidgets” along the gasket. To eliminate it, it is necessary to disassemble and reassemble the assembly, temporarily securing the glass to the gasket with pieces of adhesive tape during assembly.
Setting the distance between piston and seat. It should be approximately 0.5 mm. Adjustment is made by changing the number of washers 0.5 mm thick, mounted on the stem. This indentation is necessary so that the air during blowing, and subsequently water, passes into the outlet pipe without obstacles, and when the pressure increases, the outlet is blocked by a piston.
As the number of washers increases, the piston approaches the seat, so air will not pass when blowing through the mouth. Only with suction in both versions, the air must circulate freely.
It happens that the piston rod is bent. It's unlikely to be fixed. However, if this did not affect the operation of the unit, you can slightly correct the position by turning the gasket relative to the rod by 180?.
A properly configured and assembled vibration pump without a hose, when immersed in a container of water, should give a head of 0.2-0.3 m and work smoothly at normal voltage in the mains 220V plus / minus 10V. If, after adjustment, the equipment does not work or does not work satisfactorily, then it is necessary to establish the cause of the breakdown and eliminate it.
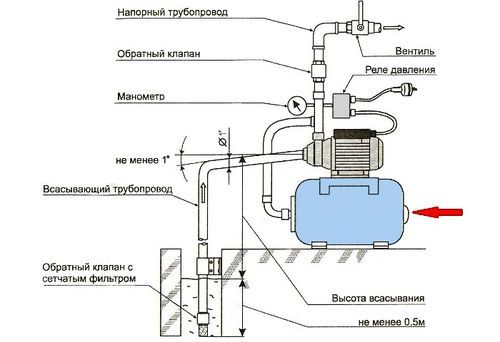
Selecting an installation site
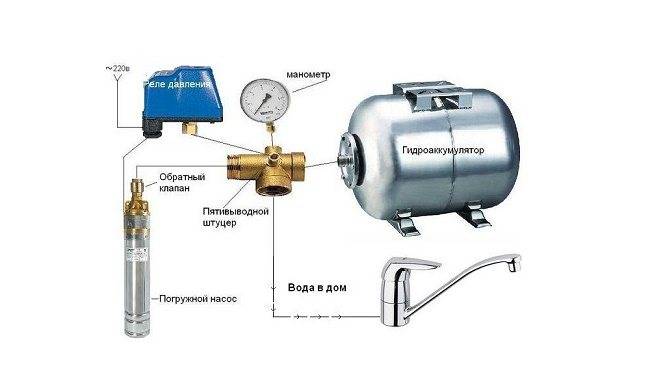
For the correct operation of the equipment, the connection of the pressure switch to the pump must be carried out in such a way as to avoid the influence of turbulence and sudden pressure drops when the pumping equipment is turned on and during its operation. The best place for this is in the immediate vicinity of the accumulator.
Before installing the pressure switch, pay attention to the operating mode recommended by the manufacturer, in particular, to the permissible values of temperature and humidity. Some models can only work in heated rooms. In the classical scheme for connecting a pressure switch to a deep pump of autonomous water supply, the following equipment is installed in front of the switch:
In the classical scheme for connecting a pressure switch to a deep pump of autonomous water supply, the following equipment is installed in front of the switch:
- transfer unit,
- check valve,
- pipeline,
- shutoff valve,
- sewer drain,
- filter for preliminary (coarse) cleaning.
When using many modern models of surface-type pumping units, installing a water pressure switch for a pump can be much easier: a block installation is carried out when the switch is installed with the pump. The pumping unit has a special fitting, so the user does not need to independently look for the most suitable installation location. The check valve and filters for water purification in such models are often built-in.
The connection of the pressure switch to the submersible pump can also be carried out if the accumulator is placed in the caisson and even in the well itself, since moisture-proof execution of control equipment is often required and the operating conditions of the pressure switch can allow it to be located in such places.
Obviously, the choice of method and location of installation depends on the version of the equipment, usually all recommendations in this regard are indicated by the manufacturer in the accompanying documentation.
The main malfunctions of submersible pumps
If failures are noticed in the operation of a submersible pump, then it is not always necessary to remove it from the well for inspection. This recommendation applies only to pumping stations in which a pressure switch is installed. It is because of him that the device may not turn on, turn off or create poor water pressure. Therefore, the operability of the pressure sensor is first checked, and after that, if necessary, the pump is removed from the well.


Water pump malfunctions will be easier to diagnose if you first familiarize yourself with the most common failures of this unit.
The pump is not working
The reasons that the pump does not work may be as follows.
- The electrical protection has tripped. In this case, disconnect the machine from the mains and turn on the machine again. If it knocks it out again, then the problem should not be sought in the pumping equipment. But when the machine is turned on normally, do not turn on the pump anymore, you must first find the reason why the protection worked.
- The fuses have blown. If, after replacement, they burn out again, then you need to look for the cause in the power cable of the unit or in the place where it is connected to the mains.
- An underwater cable has been damaged. Remove the device and check the cord.
- The pump dry-run protection has tripped. Before starting the machine, make sure that it is immersed in the liquid to the required depth.
Also, the reason that the device does not turn on may lie in the incorrect operation of the pressure switch installed in the pumping station. The start pressure of the pump motor needs to be adjusted.
The pump works but does not pump
There may also be several reasons why the device does not pump water.
- Stop valve closed. Turn off the machine and slowly open the tap. In the future, pumping equipment should not be started with the valve closed, otherwise it will fail.
- The water level in the well has dropped below the pump. It is necessary to calculate the dynamic water level and immerse the device to the required depth.
- Check valve stuck. In this case, it is required to disassemble the valve and clean it, if necessary, replace it with a new one.
- The intake filter is clogged. To clean the filter, the hydraulic machine is removed and the filter mesh is cleaned and washed.
Low machine performance
Advice! If the performance of pumping equipment drops, the mains voltage should be checked first. It is because of its reduced value that the engine of the unit cannot gain the necessary power.
Also, performance degradation causes:
- partial clogging of valves and valves installed in the water supply system;
- partially clogged lifting pipe of the apparatus;
- pipeline depressurization;
- incorrect adjustment of the pressure switch (applies to pumping stations).
Frequent switching on and off of the device
This problem occurs if the submersible pump is paired with a hydraulic accumulator. In this case, frequent starts and stops of the unit can be provoked by the following factors:
- in the hydraulic tank there was a decrease in pressure below the minimum (by default it should be 1.5 bar);
- there was a rupture of a rubber pear or diaphragm in the tank;
- the pressure switch is not working properly.
Water is supplied with pulsation
If you notice that the water from the tap does not flow in a constant stream, then this is a sign of a decrease in the water level in the well below the dynamic one. It is necessary to lower the pump deeper if the distance to the bottom of the shaft allows this.
The buzz of the machine is heard, but the water does not pump
If the pump is buzzing, and at the same time water is not pumped out of the well, then there may be several reasons:
- there was a “gluing” of the impeller of the apparatus with its body due to long-term storage of the device without water;
- defective engine start capacitor;
- dipped voltage in the network;
- the impeller of the pump has jammed due to dirt collected in the body of the apparatus.
The unit does not turn off
If the automation does not work, the pump will work without stopping, even if excessive pressure is created in the hydraulic tank (seen from the pressure gauge). The fault is the pressure switch, which is out of order or incorrectly adjusted.


