- Repair and replacement of crane boxes
- Worm gear devices
- Crane boxes of disk type
- How to replace the crane box?
- 3 Crane box stuck to the body - we select the appropriate method of dismantling
- Faucet Cartridge Repair
- Main malfunctions
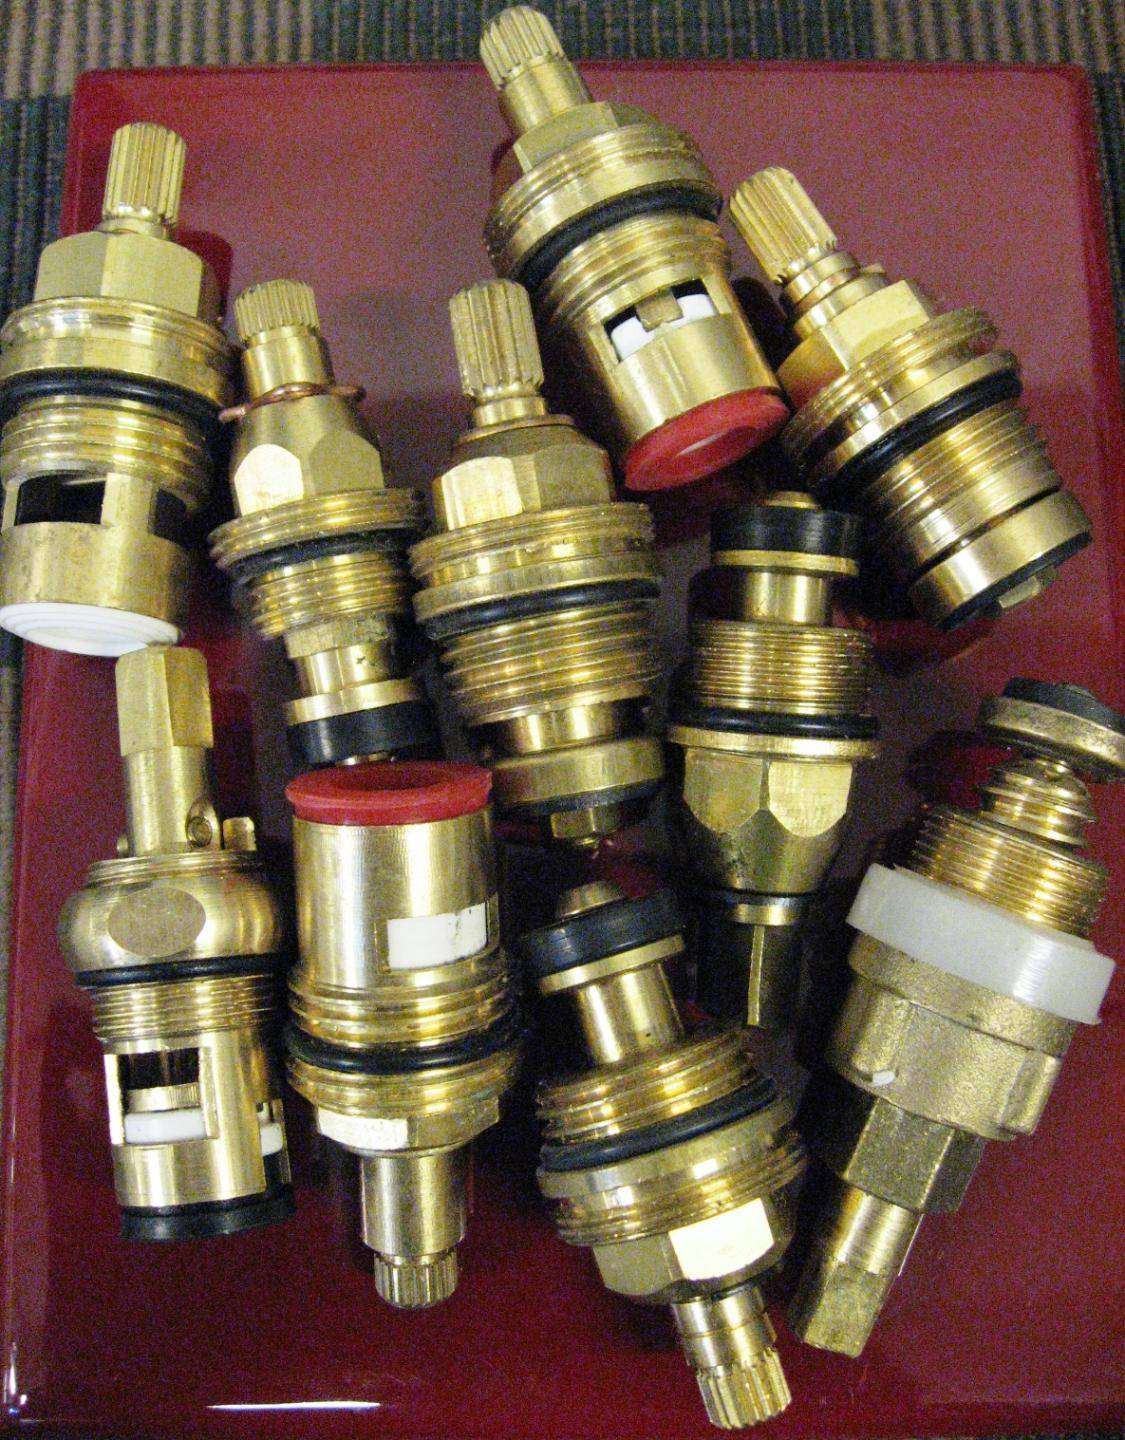
- Crane boxes
- Differences
- Repair work
- How to fix a ball mixer?
- Best Answers
- What are crane boxes
Repair and replacement of crane boxes
This element is the main locking mechanism of the mixer. The internal core responsible for the performance of the crane needs to be replaced if any of the two “symptoms” appear:
- in the event of permanent leaks in the closed state;
- when uncharacteristic sounds appear in the form of a rattle when turning the mixer.
The sequence of actions when replacing a crane box depends on what type of device: with a worm gear or a disk version.
Worm gear devices
Worm-driven axle boxes are equipped with a retractable stem with a rubber cuff. Due to 2-4 turns of the rod, the water supply is completely blocked. Mechanisms of this type are famous for their low price and ease of use. But they have a short lifespan.
 The limited service life is due to the loss of smooth running, which occurs due to the large number of closing / opening valve revolutions
Devices with a worm gear must be changed if cracks and chips are found on the saddle.
The replacement of the crane box is carried out in several stages:
- Remove the top cap from the flywheel. To remove the tap valve, unscrew the bolt located under the flywheel cap. If this process is difficult, pliers are used.
- With a little effort, unscrew the valve. The thread and the inner surface of the flywheel are cleaned from operational debris accumulated in the cavity.
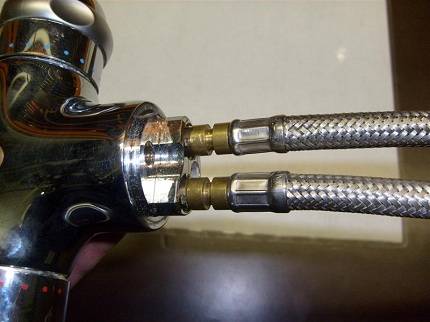
- With the help of sliding pliers, the “hardened” faucet fittings are unscrewed, opening access to the core installed in the mixer.
- Carefully remove the box. To ensure a tight entry of the new core, thereby preventing the flow of liquid, the mixing thread is cleaned before deepening the crane box. With the help of a card brush, the flywheel base and the nose of the gander are also cleaned.
- After making sure that the new axle box is compatible with the threaded connection, screw the new element into place of the removed one.
- Carry out the assembly of the crane in the reverse order.
To prevent damage to the glossy surface, before fixing the instrument, it is recommended to build a layer by placing a dense piece of fabric under it.
 When screwing in a new box-box, to seal the thread, it is necessary to wind in several layers with using FUM tape
When installing an inexpensive mixer model, it is advisable to check the presence of a sufficient amount of lubricant even at the installation stage. If necessary, oil seals should be lubricated with silicone or any other waterproof lubricant.
Crane boxes of disk type
The main working unit of the crane box, made of ceramics, are two tightly pressed plates with symmetrical holes.When shifted at the moment the handle is turned, they block the flow of water.
 Crane boxes made of ceramics most often become unusable due to interaction with water, which contains various kinds of impurities.
Ceramic faucet boxes are famous for their long service life, but less resistance to polluted water. The main reason for their failure is the ingress of foreign objects into the interplate space.
If the integrity of the ceramic inserts responsible for controlling the flow of water is violated, they cannot be repaired. In this case, the defect can be eliminated only by completely replacing the old core with a new one.
The technology for disassembling a disk structure is not much different from that used for worm gears. It includes five main steps:
- Using a screwdriver, lift the top plastic cover of the valve.
- Loosen the fixing screw.
- Take off the flywheel.
- Remove the upper part of the box from the saddle.
- By separating the upper and lower parts, they gain access to ceramic discs.
When installing a new core made of ceramic, it is important to control the degree of tension. It is easiest to ensure tight screwing and pressing of the crane box into the mixer by installing a lock nut
In the future, in order to prevent damage to the core of the disk version, experts recommend installing coarse filters at the apartment entrance. They will protect ceramic elements from the harmful effects of water impurities.
Video advice: how to repair disk crane box:


How to replace the crane box?
1. If you mustered up your courage and decided to replace the faucet box yourself, then the first thing you need to do is to turn off the supply of cold and hot water with shut-off valves at the inlet from the riser (water meters).
After you have shut off the water from the riser, you need to check whether the water is completely shut off. To do this, unscrew the cold and hot water taps on the mixer. If water does not start flowing from the mixer, then you have shut off the water well and you can start replacing it.
In the event that you plan to replace only one faucet box, you can only cut off the supply of the corresponding water. Just keep in mind that in this case you will not be able to open the second crane box. So, if you can shut off all the water, you better do it.
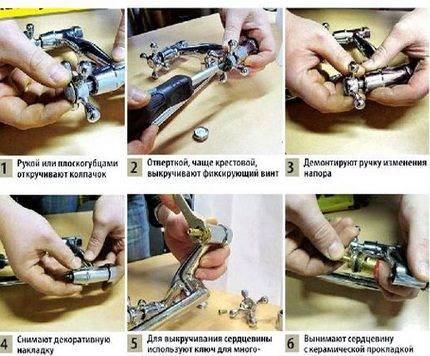
2. Remove the valve handle. To do this, remove the decorative valve cap. If it is screwed onto the body of the handle, then unscrew it counterclockwise with your hands, or carefully using pliers. If the plug is inserted into the handle body, carefully pry it out with a knife or flathead screwdriver and remove it from the valve.
3. Unscrew the screw that has opened to your eyes with a suitable screwdriver and remove the valve.
It often happens that the valve handle is jammed on the splines of the valve stem and does not want to be removed. In this case, try to pull the handle off by loosening it in different directions, or gently tapping it from different sides. You can also try moistening the seat of the handle on the stem with kerosene or a penetrating lubricant.
Some faucets have an additional decorative slip skirt covering the top of the faucet box.
After removing the handle, unscrew the decorative skirt by hand, turning it counterclockwise.If it is not screwed on the thread, then simply pull it off the mixer body.
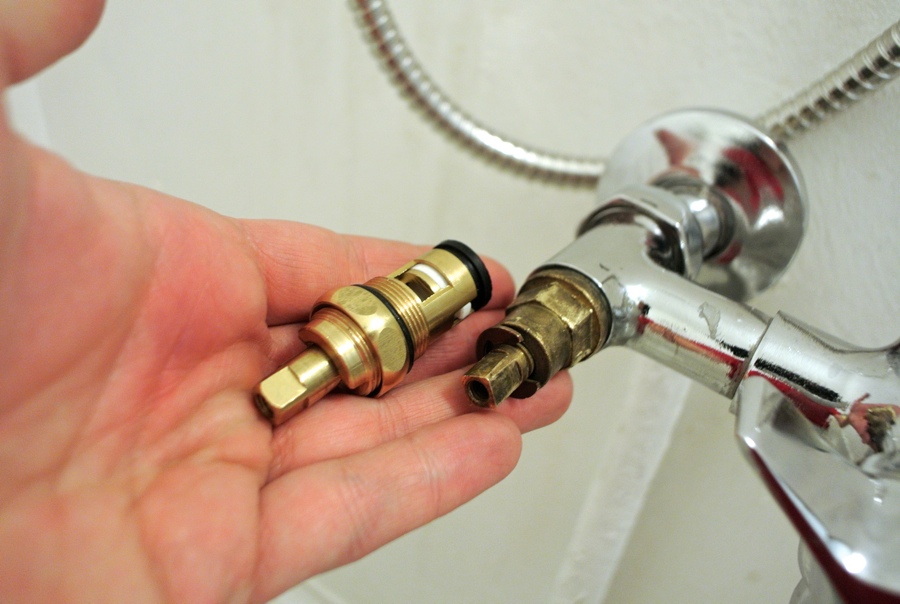
4. Using an adjustable wrench, open-end wrench or pliers, unscrew the faucet box by turning it counterclockwise and remove it from the mixer body.
5. Purchase a new crane box. To be completely sure that you will get the crane box that suits you, take the old crane box that you just removed with you to the store or to the market and show it to the seller. This way you will insure yourself against buying the wrong part.
At this stage, you will be able to upgrade your faucet. If your faucet was previously equipped with worm-type faucets, then instead of them you can purchase and install ceramic faucets of suitable size. In this way, you will increase the reliability of the mixer and significantly improve its user performance. In addition, ceramic bushings are installed in the same places where their old worm relatives previously stood, without the need for any alterations.
6. Install the new crane box in reverse order. Check for the presence of the necessary rubber seals in the design. Before installation, I recommend cleaning the thread for the tap-box in the mixer and the seat from possible dirt, scale, rust particles, etc.
Take care not to over-tighten the threaded connections during installation. Screw the faucet box into the mixer by hand until it stops. Then, without applying too much effort, so as not to strip the thread, tighten the axle box with a wrench or pliers.
7. Close the installed bushings, then open the shut-off valves to check the quality of the work done. If water drips somewhere after installation, tighten the appropriate connections with a wrench.
Replace the decorative skirt, valve, plug and you can use the updated mixer.
In the event that you decide to only replace the gasket on the worm-type bushing (note that the ceramic bushing changes completely), then you will still need to remove the bushing first, using the instructions you read earlier.
3 Crane box stuck to the body - we select the appropriate method of dismantling
After removing the valve and plugs, you need to unscrew the faucet box, but it has become stuck and it is impossible to remove it in the usual way using an adjustable wrench. We offer you four methods, from less to more labor-intensive.


If you can’t unscrew the faucet box with an adjustable wrench, then it has boiled
Let's start with the chemical method. Here we use the already familiar WD-40 solution, Sillit plumbing fluid or table vinegar. After using any of the above products, especially WD-40, the mixer must be thoroughly rinsed with water. We generously lubricate the connection with liquid and leave it overnight. The next morning, the thread weakens, the crane box is easily removed.
If chemistry does not help, use the thermal dismantling method. Since the mixer body and the faucet box have different expansions, we heat the junction with a building hair dryer at a minimum temperature and a remote distance from the threaded part. We achieve that the bolt and the upper part of the crane box are unscrewed by hand.An open flame, such as a gas burner, will speed up the process, but this method is unsafe due to the high risk of burns and melting of plastic parts.
The next step is tapping the mixer around the threads. If the axle box is made of light alloy, this method should work for you. Armed with a hammer, preferably a mallet, we begin to tap the threaded connection from all sides. This action must be performed at least 15-20 times. The departed limescale and rust will weaken the connection, we take out the crane box.
If the proposed methods did not bring the desired result, we use the complete dismantling of the fittings, reaming the hole. We cut off the protruding part of the crane box with a hacksaw for metal. With a drill or cutter of the desired diameter, we drill out the rest in the mixer. When you get to the ceramic plates, break them out with a screwdriver so as not to damage the drill tip. Now we take the pliers, insert them into the resulting recess and unscrew the edge of the crane box. To prevent slipping during operation, we work with pliers with one hand, and with the other we hold the mixer base with a large key.
To change the crane box, we get a new part and screw it into place. Having bought locking fittings with a worm-type rubber gasket, we first twist the stem so that it is as short as possible. When installing a ceramic bushing, do not tighten it too tightly so as not to damage the ceramic parts. It is enough to insert the fittings into the hole and tighten the nut.
After twisting the crane box, we assemble the parts in the reverse order, put on plastic rings, twist the handles, fix the plugs in place.
Faucet Cartridge Repair
Cosmetic repair of the mixer cartridge can be done by hand. But, we note right away that this only applies to breakdowns associated with clogging of working surfaces or wear of thrust rings. If the plates or balls are worn out, cracks appear, etc., then the device must be replaced. Neither professionally nor independently repair it will work.

What can be done with cosmetic single lever mixer repair:
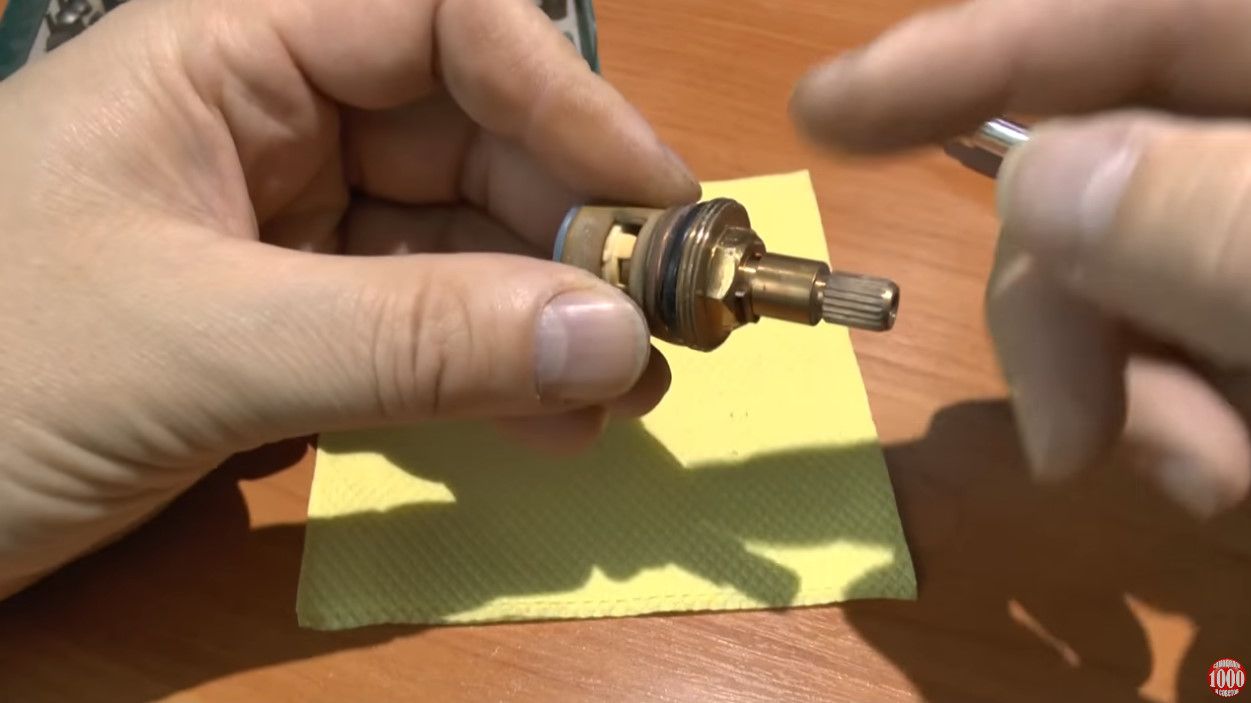
Video: disassembling a single-lever faucet cartridge
Main malfunctions
If the faucet leaks when turned off, then this is a sure sign of a cartridge failure. The consequences of a malfunction can be anything from flooding your neighbors to a cosmic utility bill.
If the faucet drips, it flows from the spout in the closed position, or water leaks from the spout when you switch the “Rain” mode (in the shower), then you need to disassemble faucet and replace cartridge. The main reason for water leakage may be that the locking mechanism has worn out or the cartridge itself has cracked.

Similarly, if a flag or two-valve faucet hums, creaks or turns hard. There may also be several reasons for this:
- The cartridge is not the correct size. The diameter of the tap spout is slightly smaller than the outlet of the cartridge or the stem is longer than necessary. As a result, the lever cannot rotate normally on its axis;
- If the tap is very noisy, then this is affected by a sharp pressure drop in the system. Most often, to eliminate such a malfunction, it is enough to replace the sealing gasket in the crane box. It will be useful to check the condition of the seal every few months.
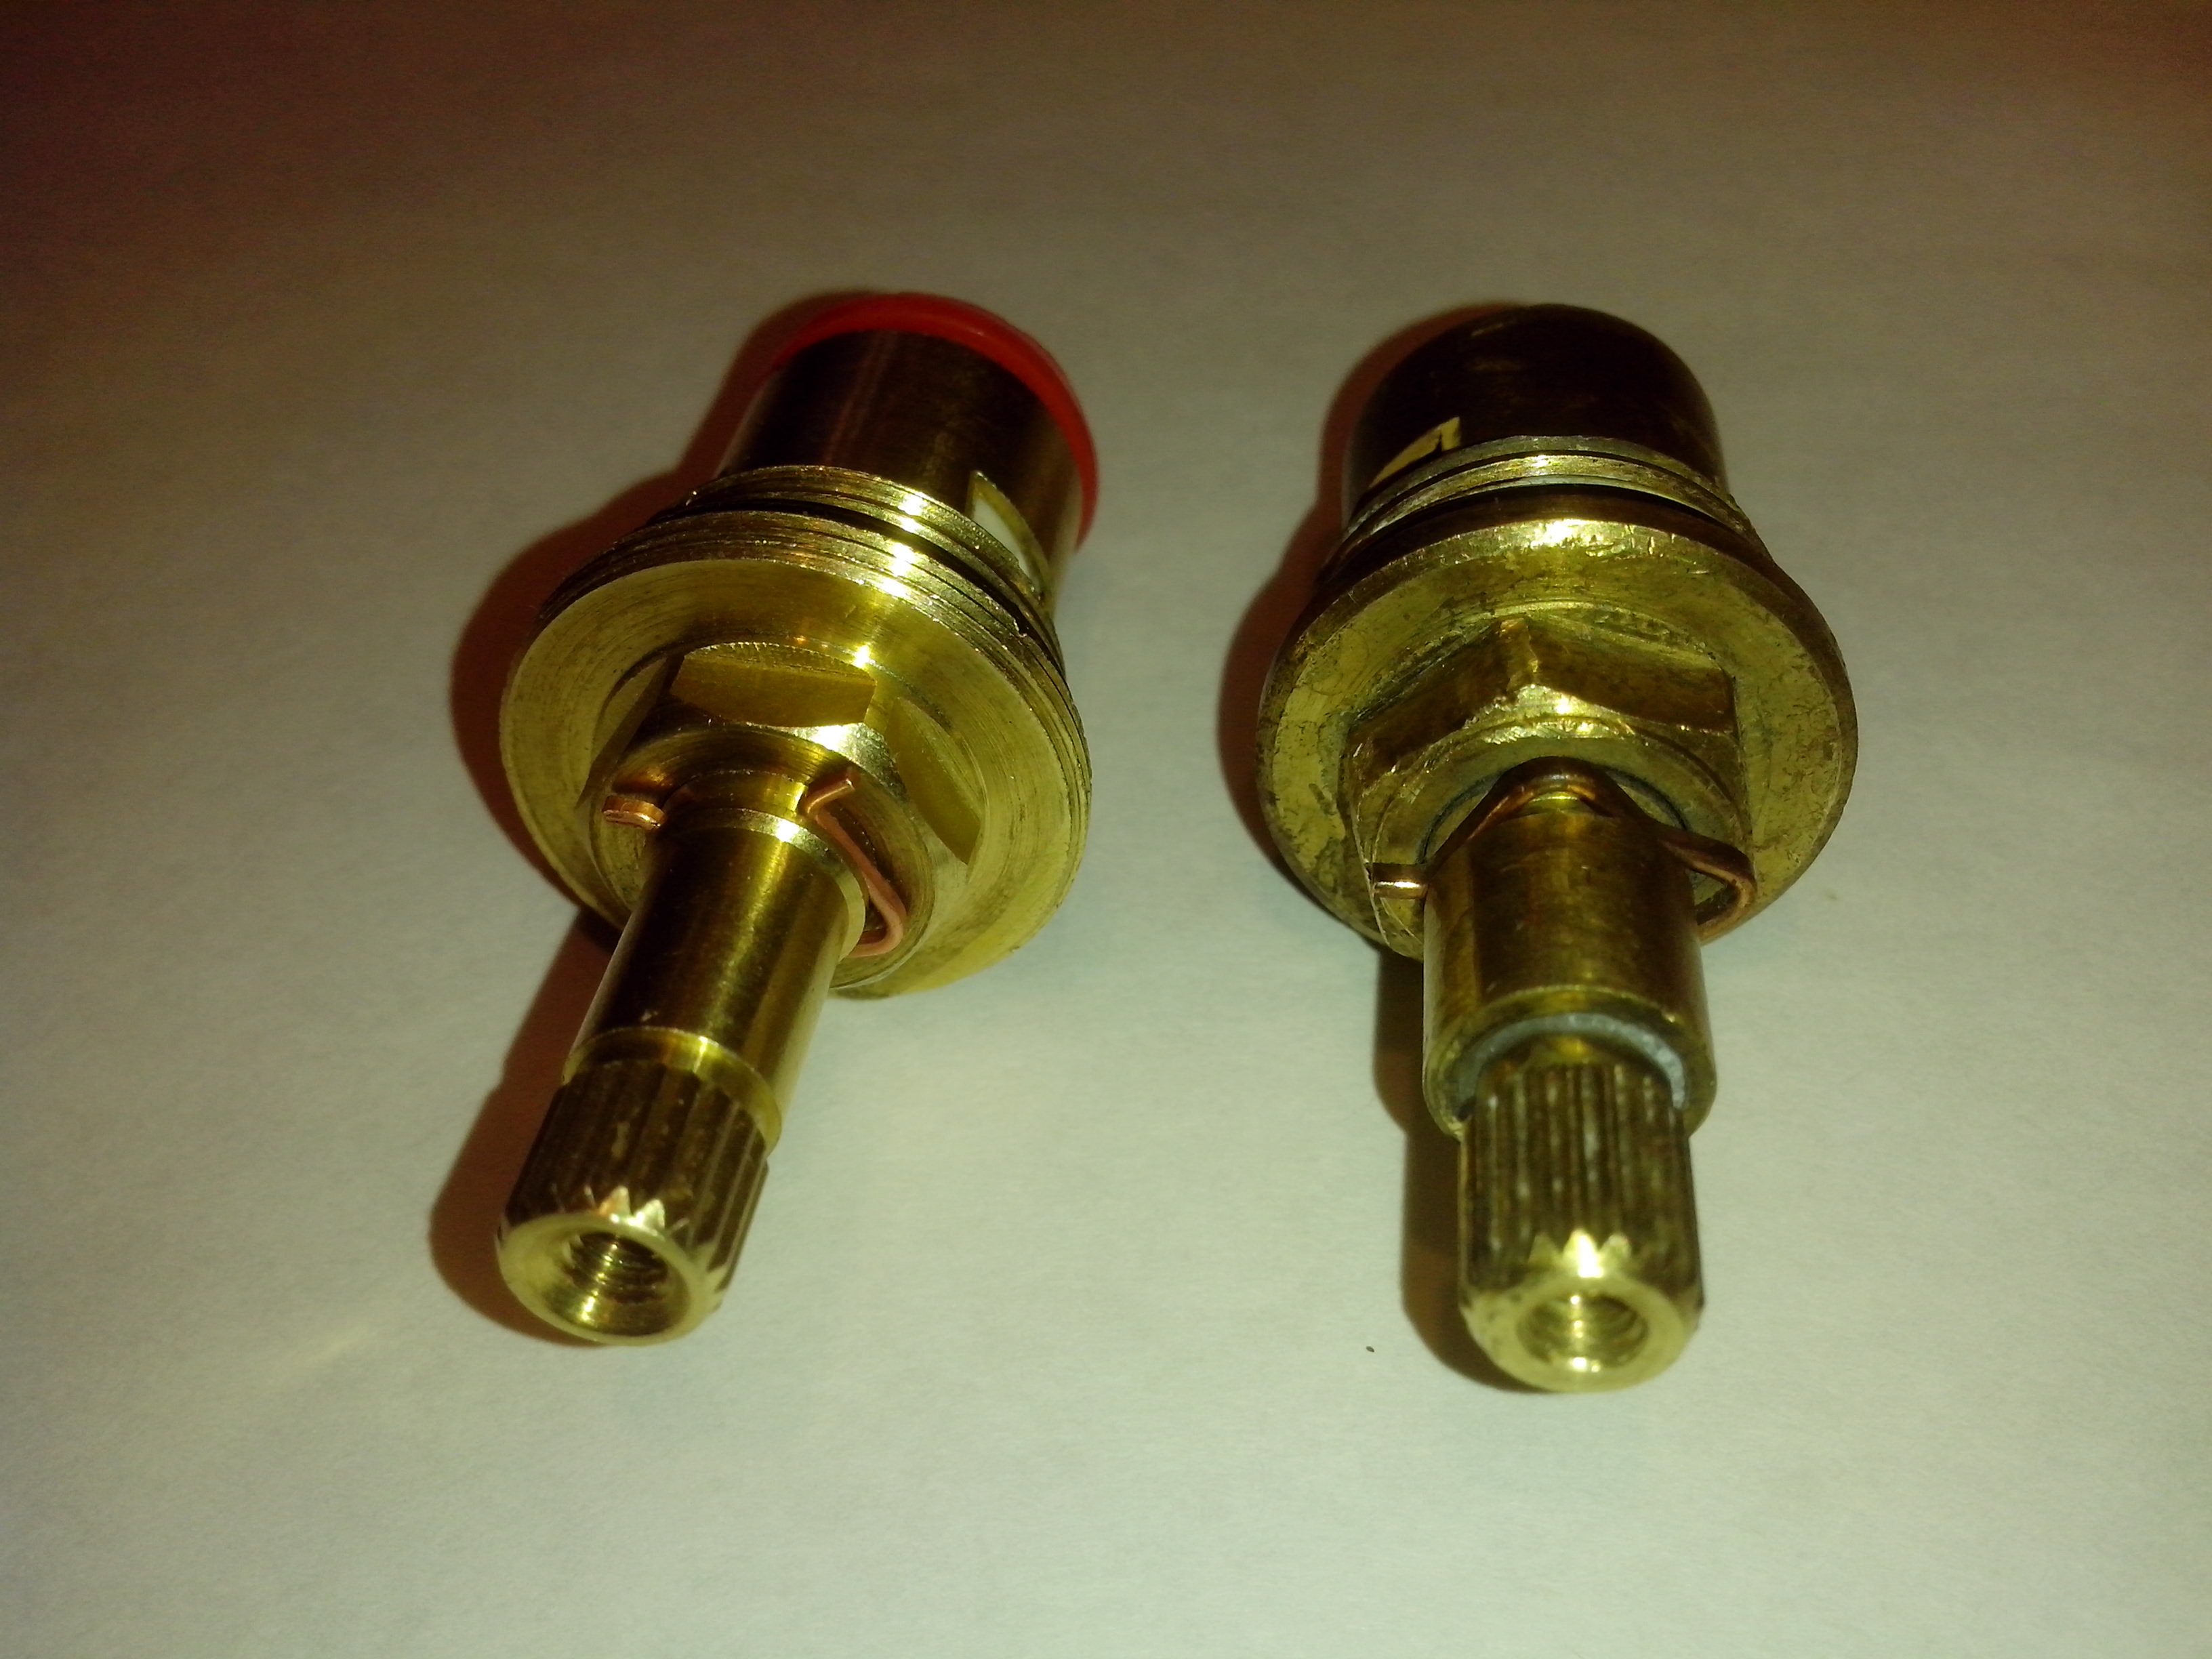
Crane boxes
Differences
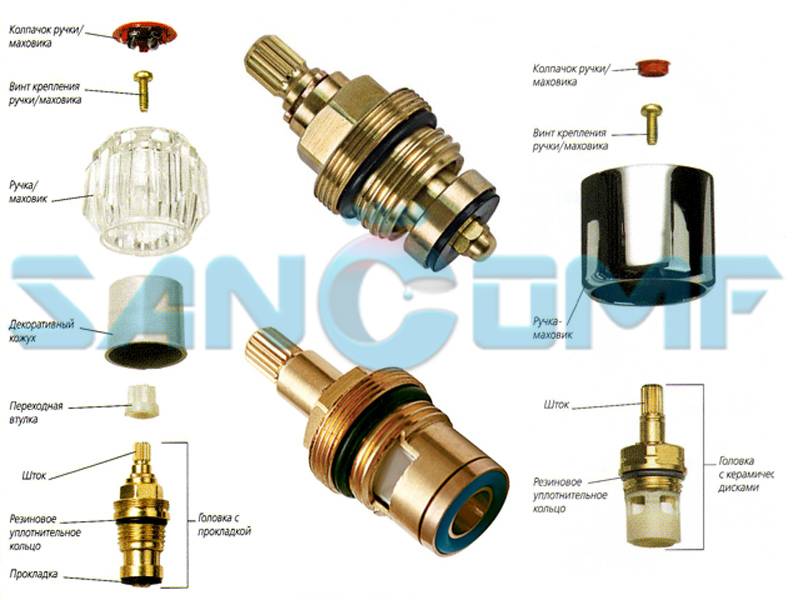
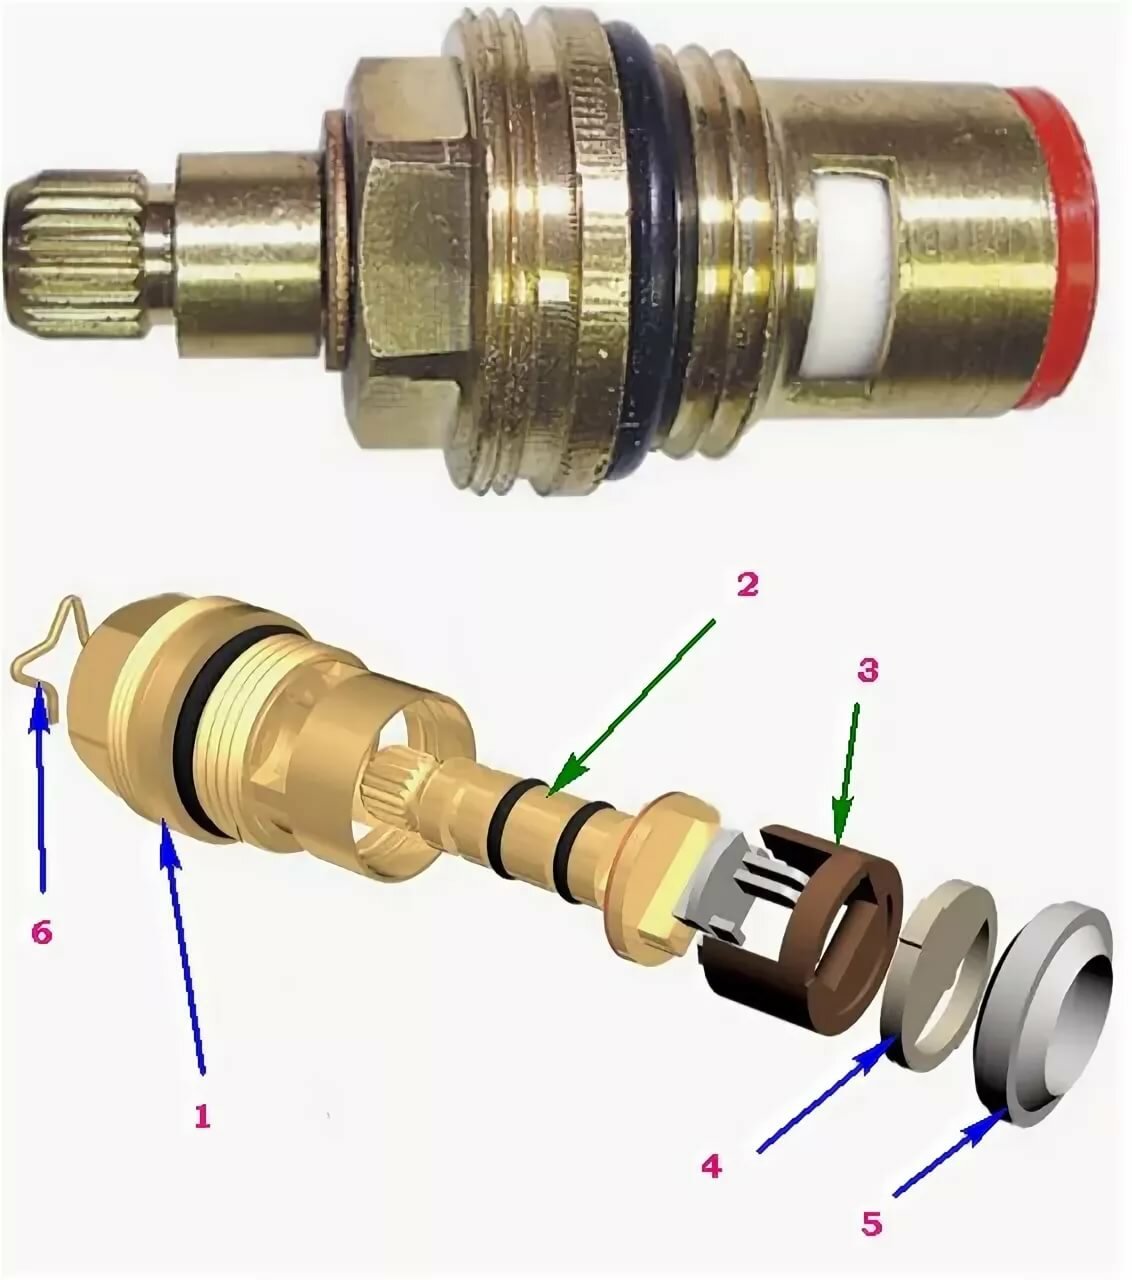
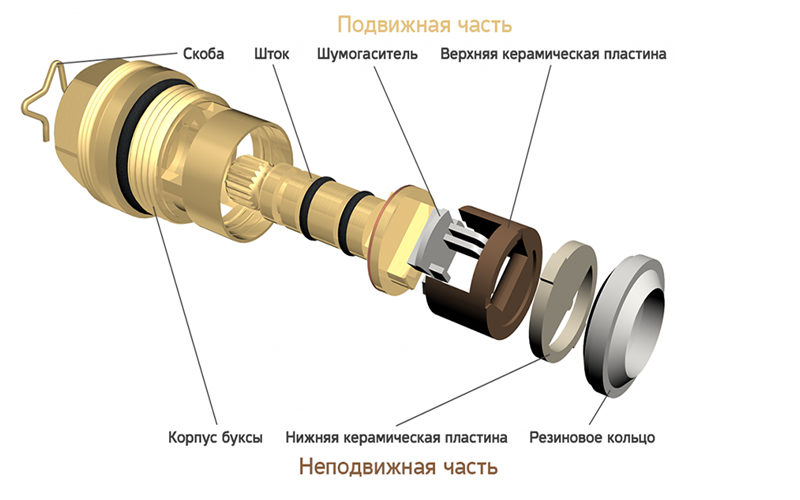
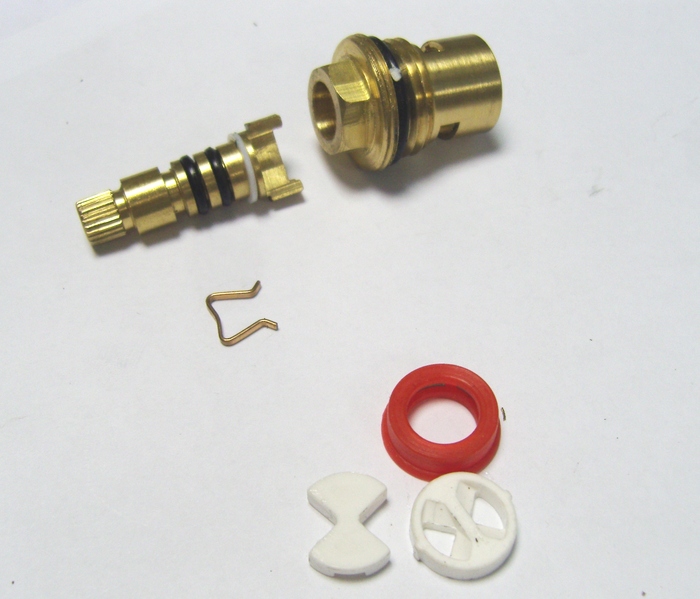
To figure out how to change the faucet box in the mixer, or even better, repair it, you need to understand from what does it consist of and how it works, that is, how it regulates the water flow.
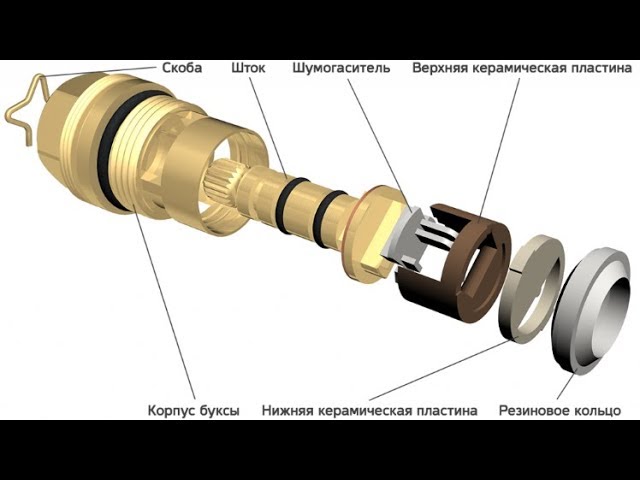
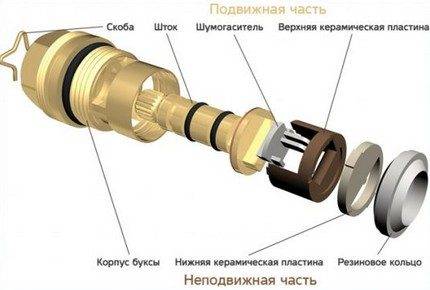
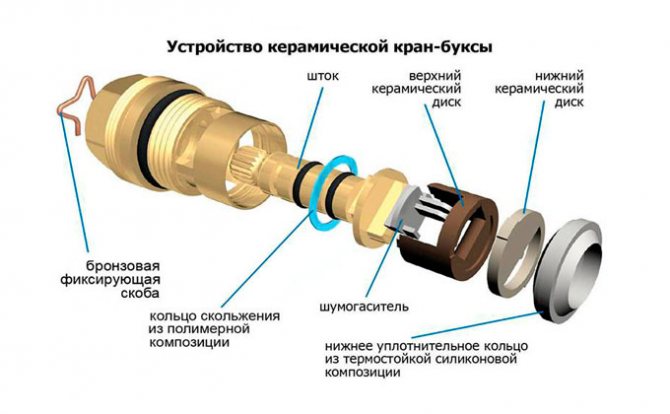
The entire repair kit is divided into movable and fixed parts, where the first includes a retaining ring or bracket, a rod with a fork, a silencer and an upper ceramic plate with a hole. The fixed parts include the case itself, the bottom ceramic plate with a hole and the rubber ring for sealing. (See also the article Flexible faucet connection: peculiarities.)


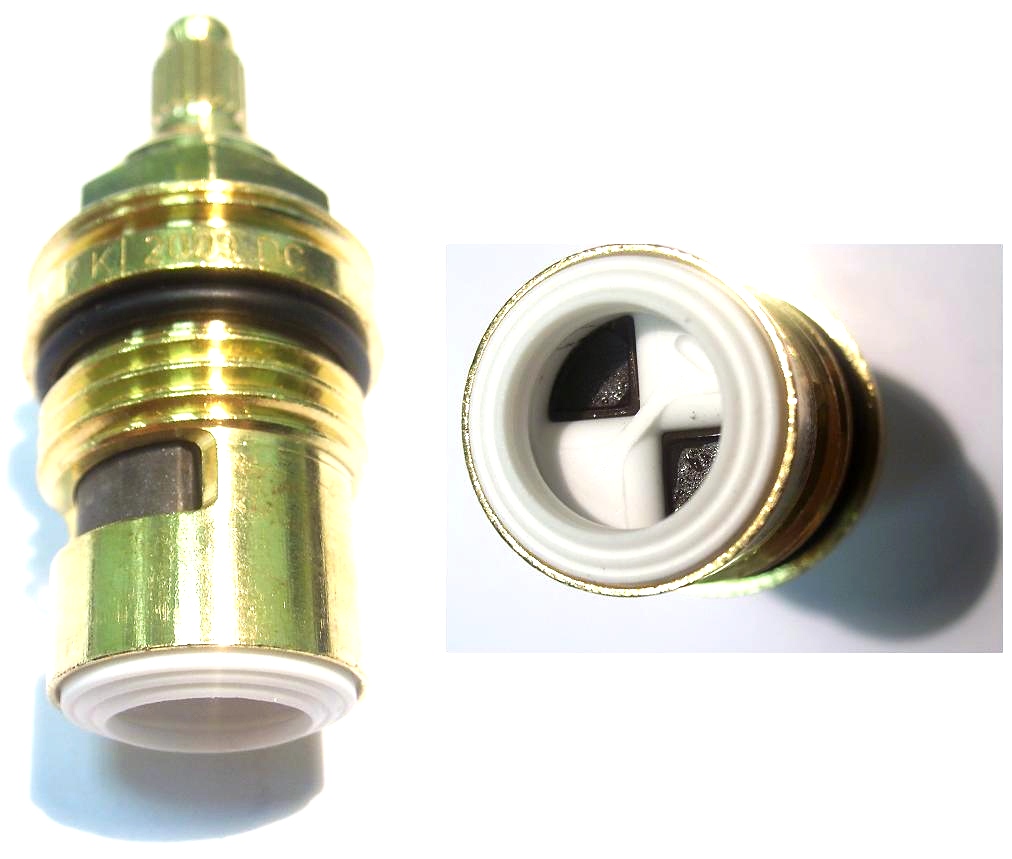


You have probably already noticed that the holes in the ceramics are not located in the center and it is this factor that allows you to regulate the flow of water. That is, when the holes match, a full passage opens, but when the top plate rotates around its axis, the holes gradually shift relative to each other, which reduces the passage until it is completely closed. The rubber seal does not allow water to break through to the sides, but it flattens over time and then the question arises of how to change the bushing tap in the mixer
The rubber seal does not allow water to break through to the sides, but it flattens over time and then the question arises of how to change the axle box faucet in the mixer.
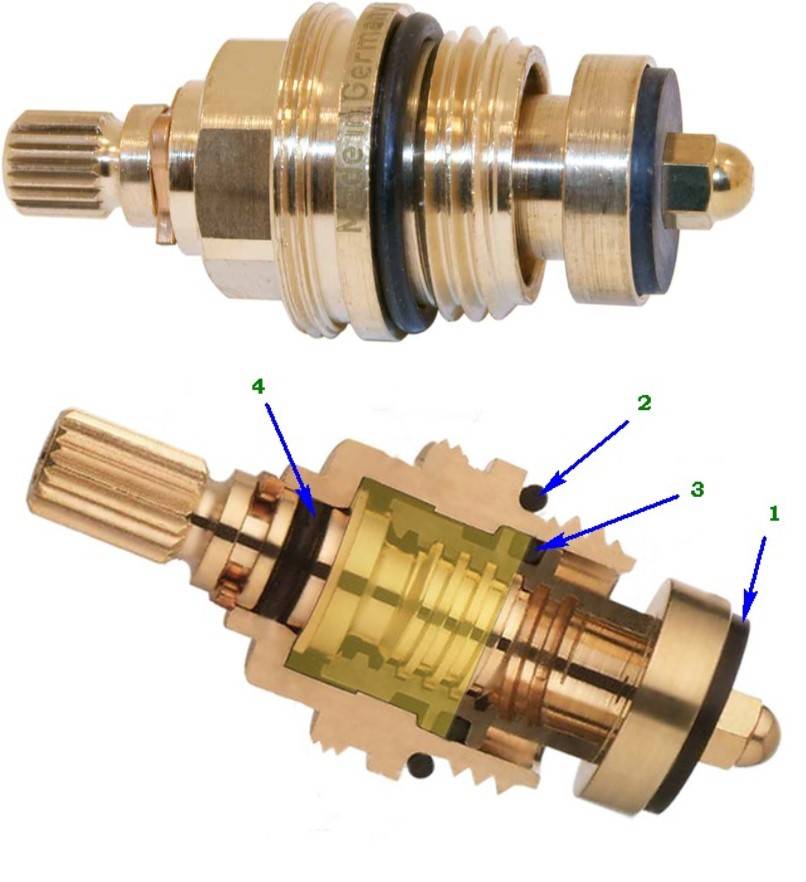
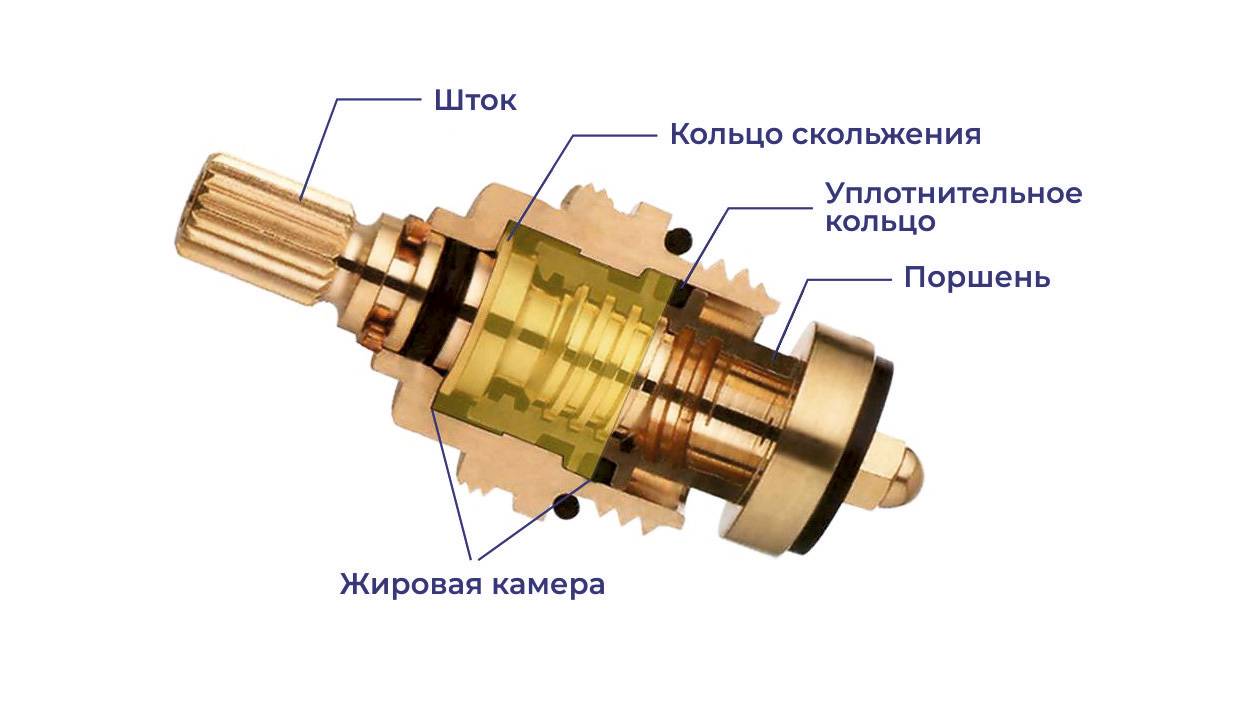
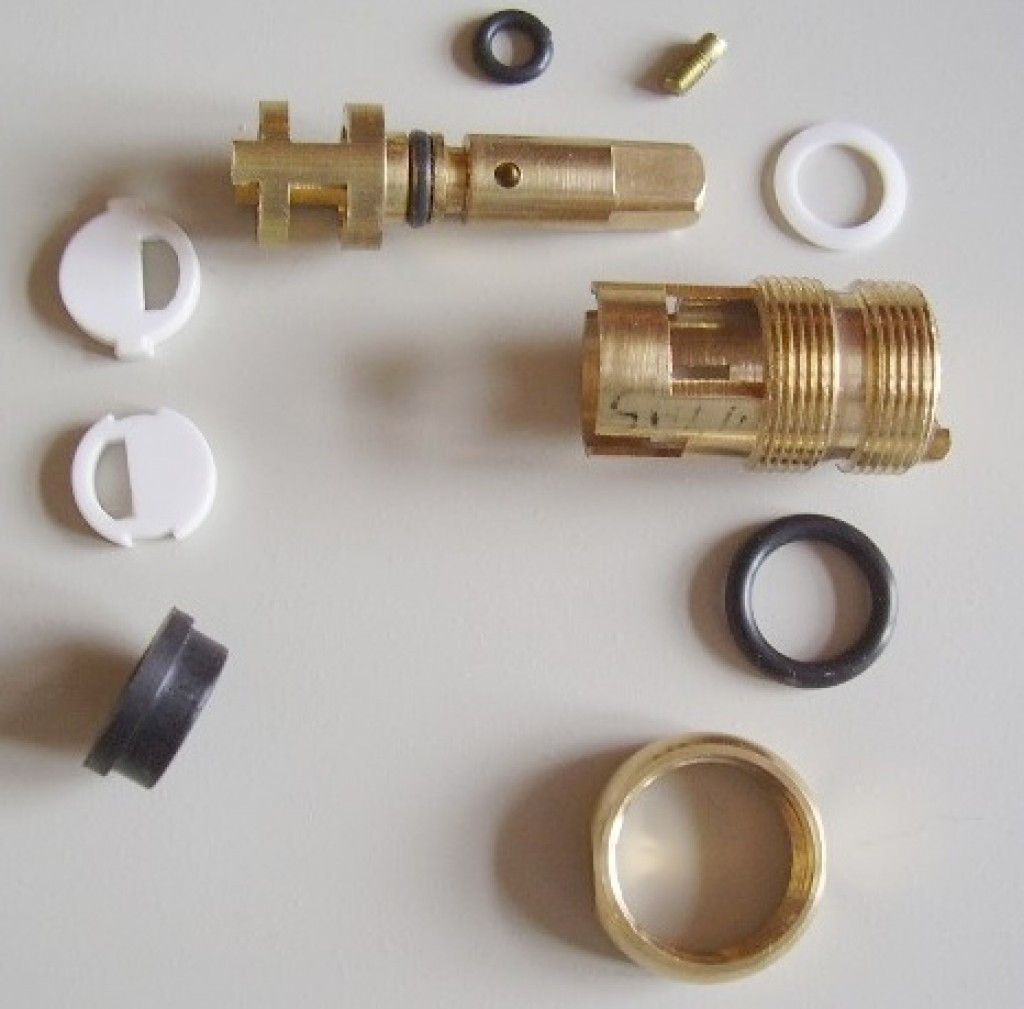
In the case when, when closing and opening the valve, you need to make many turns (from 5 to 10), then this indicates that there is a shut-off valve with a worm gear. Despite the fact that the replacement of the crane box in this type of mixer is almost the same as the ceramic version, however, its device is somewhat different.
In this case, the rod serves as a piston that is raised and lowered using a worm gear, but in order to prevent water from flowing through this assembly, there is a fat chamber.
Occasionally, the reason for the failure of such a mechanism is the wear of the “worm” thread, but in most cases, this is the wear of the rubber gasket on the piston, so replacing the faucet box in the mixer is not needed here - just change the gasket (valve).
Repair work
We first need to remove the valve, how to unscrew the crane box on the mixer is possible only after its dismantling (it interferes). To do this, pry off a decorative plug in the center of the lamb with a knife or screwdriver and remove it, under the bottom there is a bolt that needs to be unscrewed and then we will remove the valve
If you have handles, then such a bolt is usually located under the lever on the handle body (it is also closed with a plug).
Now we need to remove the locknut by turning it counterclockwise, but this must be done carefully so as not to scratch the body. Often, there may be another, decorative nut above the locknut, which in most cases can be unscrewed by hand. Now you can simply pull out the stop valves, but sometimes there is still a retaining ring for additional fastening - dismantle it, since it will be possible to remove the bushing valve from the mixer only after that.
Now you can simply pull out the stop valves, but sometimes there is still a retaining ring for additional fastening - dismantle it, since it will be possible to remove the bushing valve from the mixer only after that.
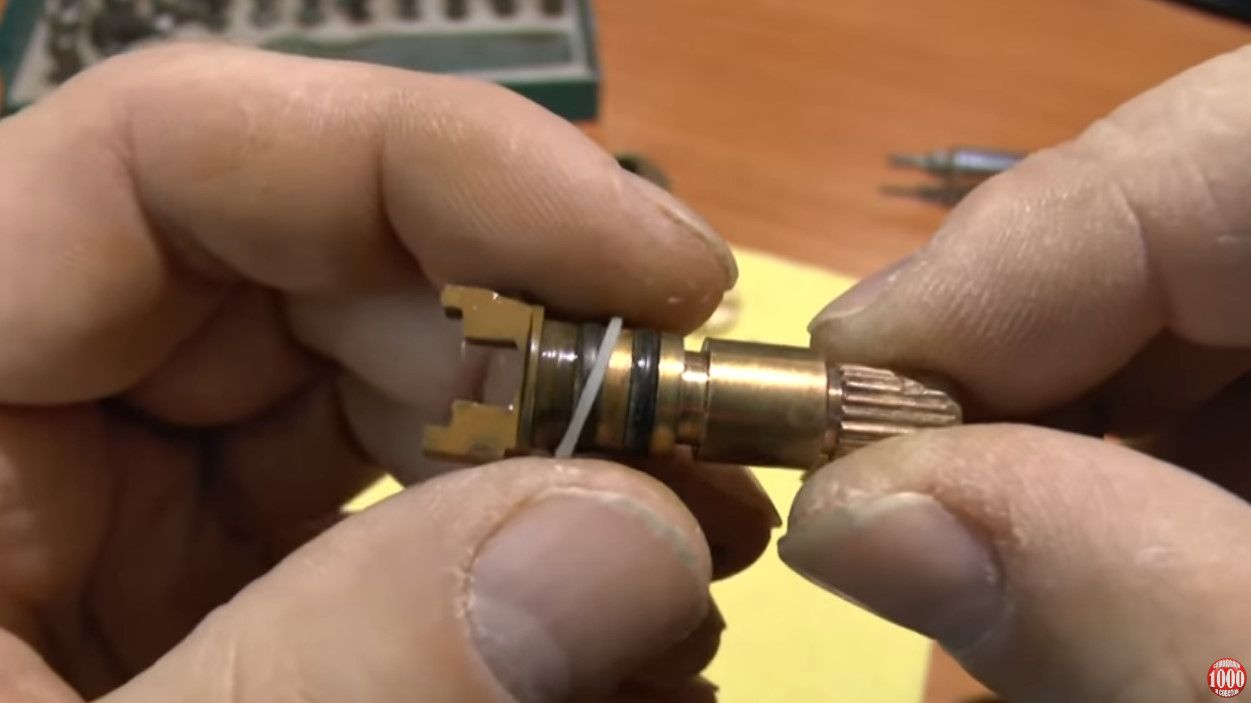
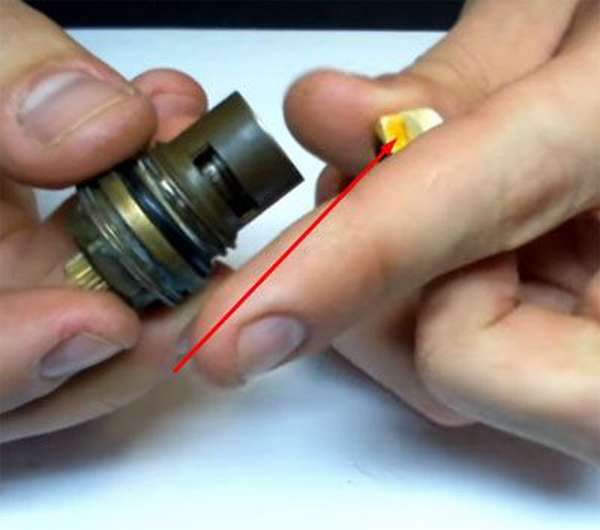
Now you can just go to the store with the locking mechanism removed and buy the same one, fortunately, its price is low, but you can save yourself from buying if you disassemble and repair it. To do this, remove the retaining ring from the stem and squeeze the ceramic pair with the gasket out of the body with its rod. If there is plaque on the body, then you will need to hit the end of the rod with a screwdriver or pliers.
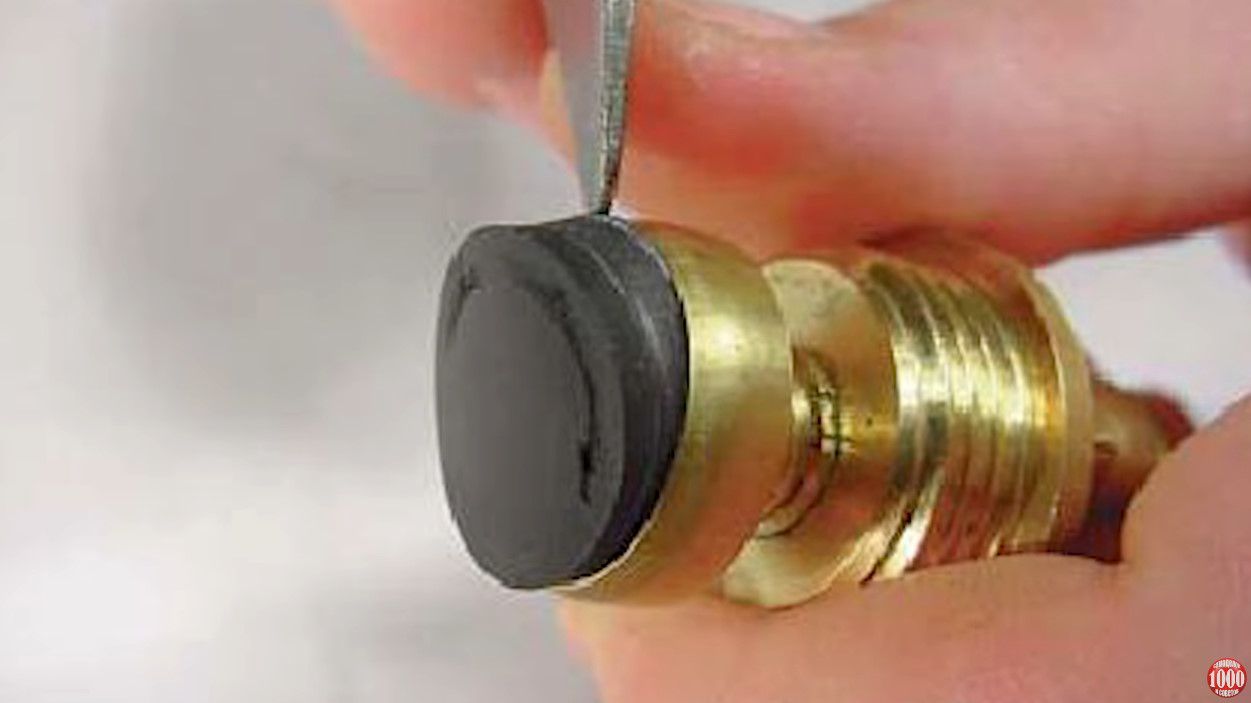
- In order to eliminate the leak, we need to increase the thickness of the flattened ring, but since this is not possible, we will simply increase the length of the inner box set. To do this, look at the photo above - there you can see where to stick two or three layers of electrical tape to increase the thickness of the upper ceramic plate. In addition, a home-made washer made of copper wire can be substituted under the rubber sealing ring, as if increasing the thickness of the gasket. (See also the article How to choose a sink: features.)
- Replacing the rubber valve in a crane box with a worm gear will not cause any problems at all. To do this, unscrew the bolt with a washer and change the valve (you can even make it homemade, made of thick rubber).
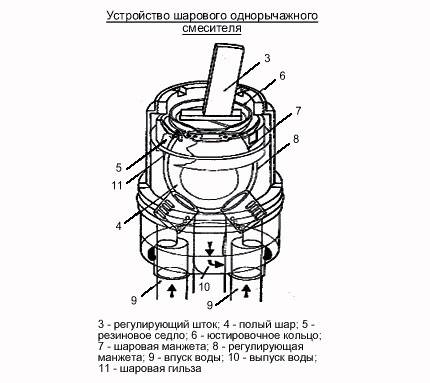
How to fix a ball mixer?
The ball mixer was invented almost half a century ago, and since then its design, in fact, has not changed. It is very simple and quite reliable - there is nothing to break here.
If any problems arise, then most of all they are associated either with poor-quality materials from which the plumbing fixture is made, or with bad water. As in the case of a disc mixer, the gaskets must be removed, carefully examined for damage, and then either replaced or cleaned of dirt, washed, dried and reinstalled.
The most common type of ball valve mixer failure is a poor jet. It most often occurs due to a clogged ball mechanism.
For ball valve faucet models, the disassembly and repair process is the same as above. The difference is only in the position of the ball, which rotates relative to the rubber seats tightly pressed against it. The contact density of the parts is ensured by the water expanding the mechanism.
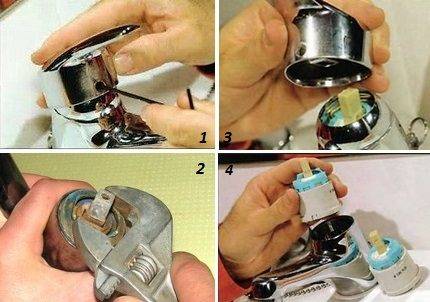
The lever itself, which transmits the movement to the control rod, is removed in the same way as in disk models: you need to uncork the decorative plug, unscrew the screw, remove it, and then remove the mixer lever.
Next you need to open clamping nut and remove puck underneath. This opens up access to the ball. The ball itself is easy to remove - you just need to pull the stem.


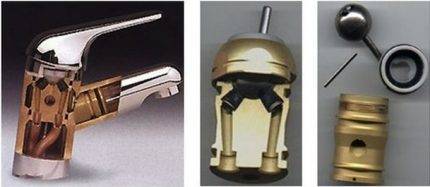
Internal view of a ball mixer. The ball lock mechanism is located inside the cartridge, made in the form of a sleeve. The ball inside it is held by saddles, the strength of the position of the sleeve itself is provided by the cuff and springs
On this, the disassembly of the mixer can be considered complete and proceed to inspect the parts, replace them or clean them from contaminants.
As noted above, most often the problem is salt and sand deposits on rotating parts and mixer elements in contact with them. All dirt must be carefully removed and be sure to inspect the springs - they can also be dirty. In addition, the springs may lose their elasticity and need to be replaced.
The reason for the breakdown of the mixer may also lie in the ball itself. Ideally, it should be made from high quality stainless steels.In this case, it only needs to be cleaned of dirt.
In fact, manufacturers, especially Chinese ones, save on expensive materials and produce parts from low-quality metal. Over time, the surface of such a ball begins to peel off, rust, the water holes become clogged with rust particles and the mixer fails.
In this case, cleaning the surface will not help, the ball will have to be replaced. The old part, as in the case of a disk cartridge, must be taken with you to the store for comparison.
It is necessary to assemble the ball mixer in exactly the reverse order, work very carefully and center the parts. An incorrectly installed element will wear out quickly and may cause another breakdown.
A separate item should be mentioned the most common and, at the same time, an insignificant problem - clogging of the mixer aerator. This little detail is a regular mesh and is designed to prevent splashing. The cells of the mesh eventually become clogged with salt deposits and miniature particles of debris.
Removing the aerator is very simple - you need to unscrew the washer at the end of the spout and pull out the part. If the mesh has not become completely unusable, but simply clogged, it must be cleaned and reinstalled.
The aerator can be replaced if it is possible to find an analogue that is suitable in size, or, in extreme cases, use a mixer without it.
Another problem is the clogging of the mixer hoses.
Flexible conduits - rather thin tubes - have a small diameter and may well become clogged. Particularly prone to clogging are the junctions of tubes with other parts.
Given the state of modern water pipes and the quality of city water, there is nothing unusual here.In this case, you need to turn off the water, unscrew the supplies, clean them, inspect for damage to the threads and install them back.
Best Answers
Evil:
Either break the “lamb”, or grab it with an adjustable wrench and unscrew (counterclockwise) the entire crane box, buy another one along with the “lamb”. Well, if I understand you correctly.
Nikolai Mogilko:
drill out the bolt or at least its head
K-GOLEM:
only experienced managers or merchandisers can handle this problem... :)))
dZen:
A household drill can cut a new slot. Or she just drill out.


Alexey from Russia:
if the valve is no longer needed, cut it off with a grinder. there is an option to unscrew the valve itself from the mixer. but first turn off the water completely - both cold and hot.
Grandfather Au:
I would have posted a photo, but from where we know. white while spray on the bolt for half an hour. If copper plated - should turn away
researcher:
It's easier to find a man than to master the technology of repair. Just don't say that it was the husband who wrote it, because it's not a husband, but a boy!!!!
Alexander:
You cannot even imagine what a nightmarish mixer the imagination draws on your question. The valve is unscrewed from the mixer with an adjustable wrench and is not attached to it with any bolts. The head of the bolt is for a wrench and does not have a slot for a screwdriver. If you can’t remove the valve because of the flywheel, break it, drill a screw, etc., whatever you like. If anything, a set of new flywheels for the mixer is not so expensive.
uncle Ivan:
Throw a photo in a personal, then you can tell something. Valves and mixers are different now, and it’s so easy not to tell. I understand that you need to first remove the lamb, and then unscrew the axle box.
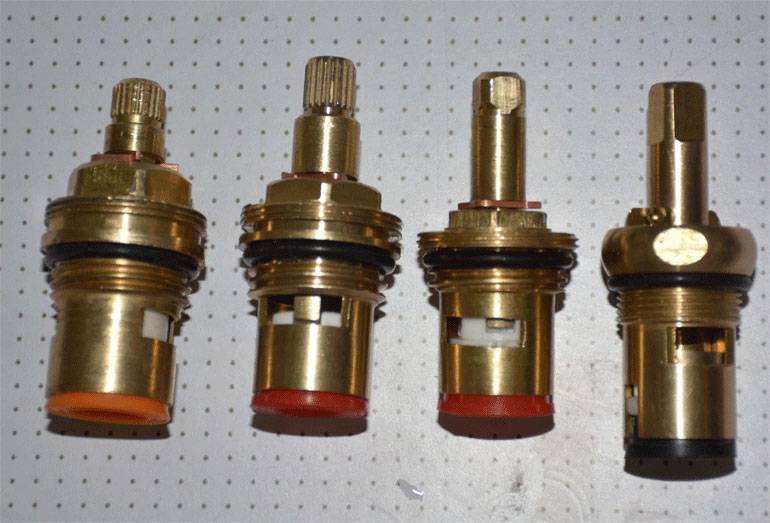
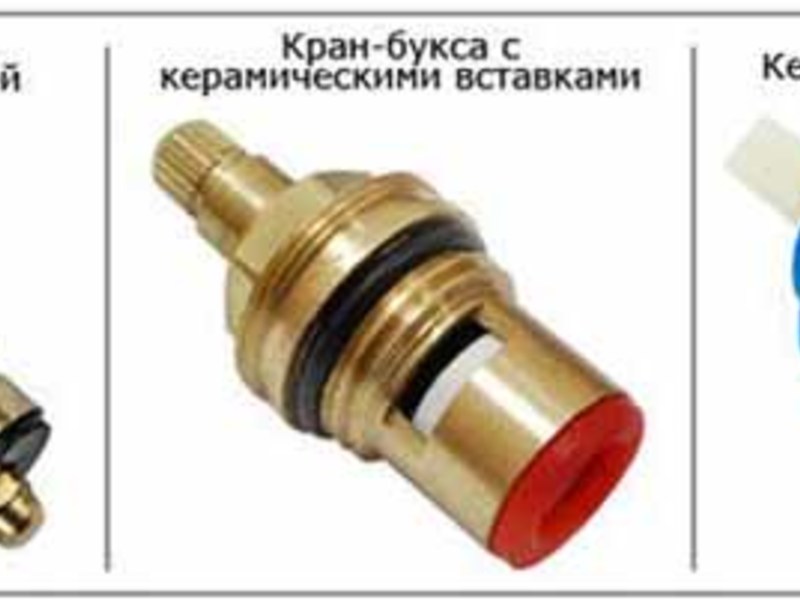
What are crane boxes
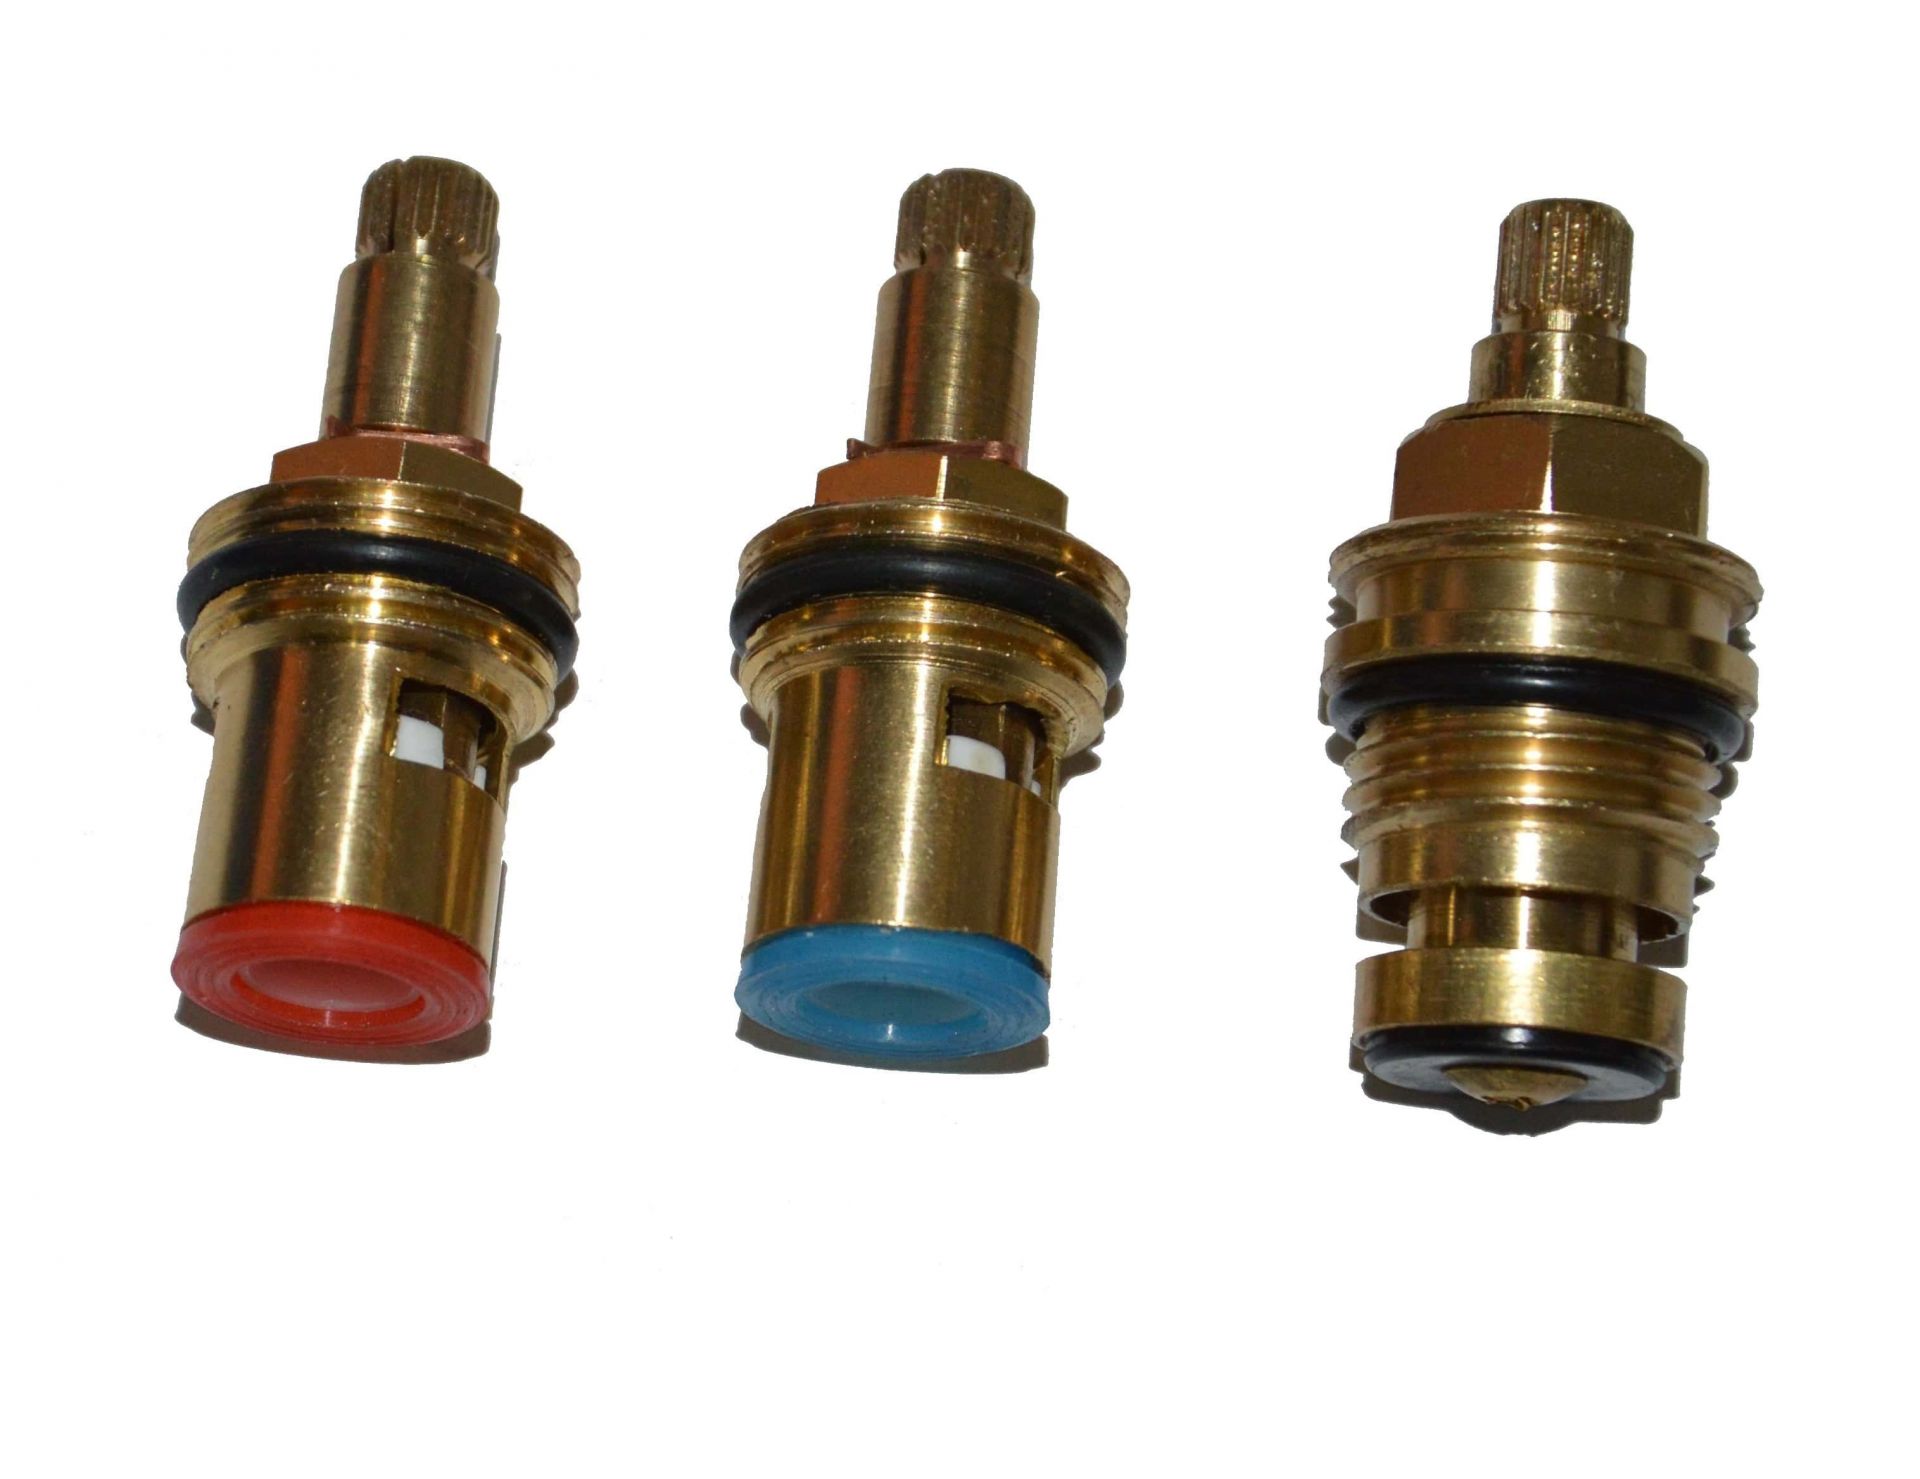
This element of the mixer is of two types: with a gasket and a rod or with ceramic moving plates. They differ from each other in the following aspects:
- With stock. It moves by means of a worm gear and closes the valve opening with a rubber plug. When the gasket begins to rust, it can be easily replaced with a new one, since its cost is very low. The disadvantages of this type of device include the fact that the gasket will have to be replaced very often, since it becomes unusable very quickly.
- Crane box with ceramic discs. In such a mechanism, to open the tap, it is not necessary to rotate the valve, since it has one handle, which is enough to turn to one side. The design of such a mechanism is not complicated: the stem is equipped with a disk with a hole, and the second disk (with exactly the same hole) is installed so that it is stationary. All it takes is a slight turn of the knob.
In theory, if the ceramic discs (in the second version) are broken, they can be replaced. Although it is worth noting that they very rarely fail, and it is much easier to replace the crane box itself than to replace disks.
If we talk about the disadvantages of the second option, then a ceramic product does not work well in hard water, in which there are many different solid particles, since they have an abrasive effect on the discs, thereby accelerating the destruction process, and this leads to leaks and repairs.
Before replacing the crane box, you first need to select and buy a new device. Sometimes you can make a mistake and purchase the wrong item. To prevent this from happening, it is recommended to remove the old element and take it with you.So you can pick up exactly the part that you need.
This should be done because different elements are installed in each mixer. They differ in characteristics: the length and pitch of the thread, the size of the seating area for the valve, etc. At any point of sale, the seller will help you make the right choice according to the sample that you took with you.


