- Correct the risk of ceramic lining cracking
- What else is important to know?
- Cover repair
- Lid repair with microlift
- Tank repair
- What to do if the toilet cistern with a button is leaking?
- No water is drawn into the tank
- Decreased flow strength
- Elimination of external leaks
- Condensation forms on the tank
- How to clean a rusty toilet bowl?
- Types of drain tank
- The internal device of the drain tank
- The purpose of the float
- overflow
- Inlet
- Release (drain)
- Siphon tank
- Final stage
- Toilet flush repair
- How to disassemble a toilet bowl with a button
- How to replace the dial valve
- Replacing the bleed valve of the drain barrel
- Wall hung toilet
- Preparing for installation
- Required tool
- What to Consider
- Taking measurements and markings
- Choice of location and sequence of installation steps
- Installation repair methods
- Finding a problem inside the cistern
- Restoring the function of the flush button
- Breakdown detection methods
- Connecting a plumbing fixture
- Well measure the surface of the wall
- Common types of breakdowns and their possible causes
- Tank
- Frame
- Toilet
Correct the risk of ceramic lining cracking
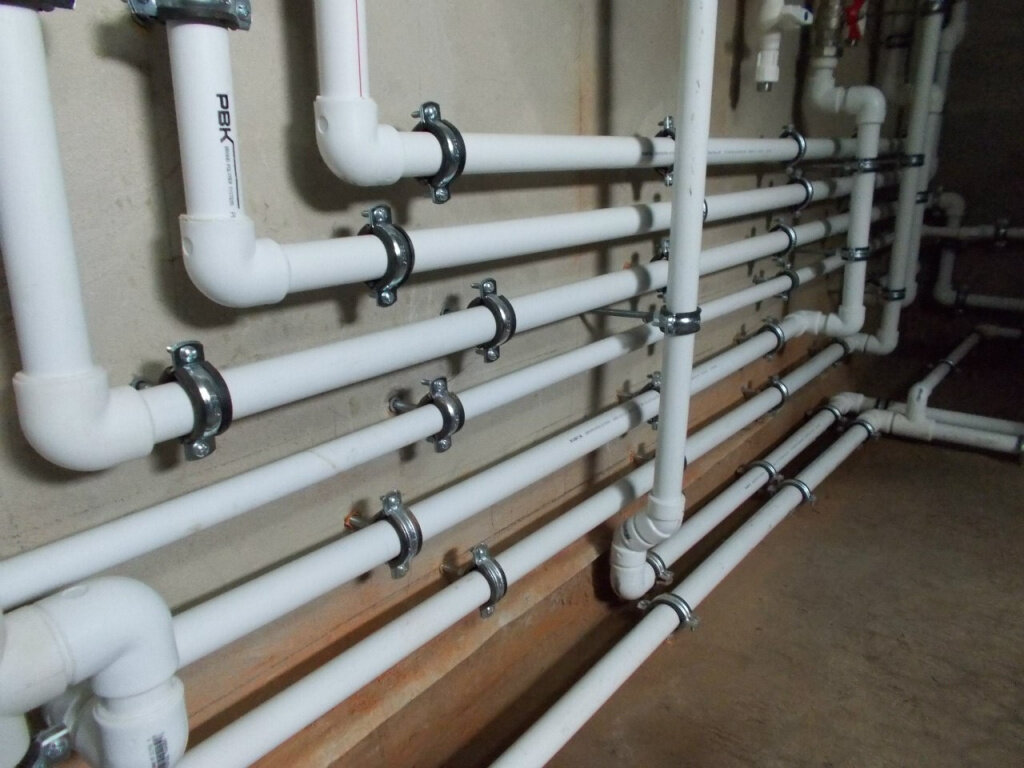
Before assembling and finishing the frame of the concealed toilet, remember to firmly connect it to the wall and floor of the room.Also make sure that the body is resistant to significant loads, which eliminates the risk of cracking the glaze around the ceramic bowl. When work is carried out using low-quality materials or in a careless manner, the effect will be cracking the tiles under the pressure of the bowl by only a few tens of kilograms.

Therefore, the housing of the concealed housing must be sufficiently rigid, having a minimum thickness of 20 mm. To do this correctly, it is necessary to install a double layer of drywall with a thickness of 12.5 mm each or use a single structural board, which is 20 mm thick as standard, as well as a zone of increased load resistance at the place where the toilet is installed.
The advantage of placing a drywall or building board frame is that any wall shape can be created. This is a more pleasing bathroom look, thanks to under-cladding covering all unsightly fittings and being easy to keep organized by minimizing visible fittings.
What else is important to know?
- That there are two ways to mount embedded equipment:
- the frame is attached, followed by a drain tank and pipes;
- separately carry out the installation of the entire system, followed by installation in place.
- What you need to know, regardless of the option you choose:
- connecting pipes to the toilet is carried out after installing the installation and false panels with cut out holes for pipes and fasteners;
- to prevent displacement of the frame during installation and connection of the toilet bowl, it must be checked with a level.
- What in terms of usability:
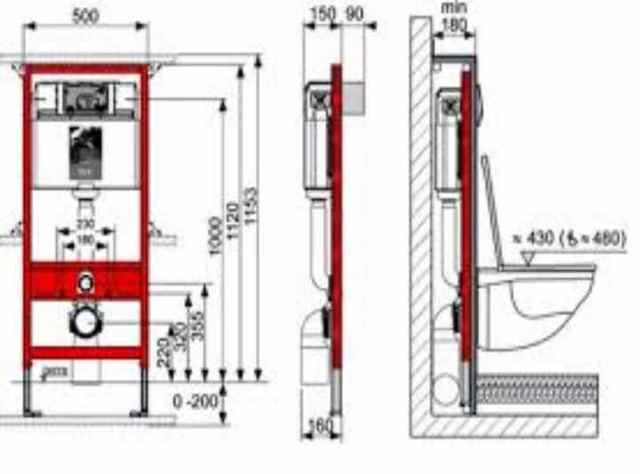
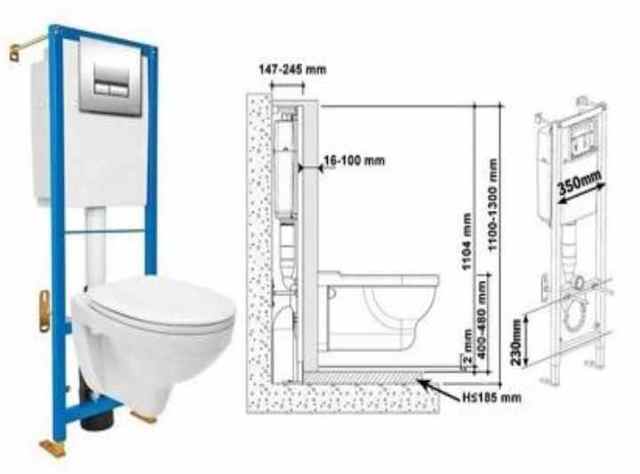
- the height of the button from the base should not exceed 1000 mm;
- the height of the hanging toilet bowl from the floor should be within 410 - 430 mm;
Assembled in accordance with the requirements of the manufacturer, the built-in plumbing will regularly serve for more than one year without additional settings or repairs, and its aesthetic parameters will harmoniously complement the interior of any bathroom.
Cover repair
Lids may vary in strength, material, price. The reasons for their breakdowns can also be different: factory defects, improper operation, excessive loads.
Plywood cover is one of the cheapest, but not very common options. In the event of its breakdown - the appearance of a crack - everything can be fixed with ordinary second glue. You can try to rehabilitate plastic ones with ordinary acetone or liquid nails. To do this, they need to be applied to the docked edges of the crack and fixed for a few seconds. However, this repair is short-lived, the crack will still make itself felt, so it's easier to replace.
The situation is more complicated if the microlift does not work.
Lid repair with microlift
The principle of operation of this mechanism is similar to the operation of conventional door closers. The microlift does not allow the toilet lid to fall quickly, thereby saving ceramics from chips and cracks.
The most common cause of failure of this mechanism is a sudden closing of the lid. Many out of habit lower it manually, which cannot be done, since the spring is designed only for smooth lowering.
Some breakdowns cannot be eliminated on their own, since the microlift is often a non-separable structure or it can be very difficult to find the necessary parts. In this case, you need to call a specialist or make a replacement. These breakdowns include:
- spring failure;
- wrong stock.
However, there are breakdowns that you can try to fix with your own hands:
- Detaching the base of the structure from the toilet, which entails turning it. The cause of the malfunction is the loosening or breakage of the mounting bolts. In this case, you need to disconnect the device and replace the faulty bolts.
- Loose fastening bolts. To fix this problem, you need a regular hexagon. When removing the caps on the legs of the mount, the hexagonal holes open, with the help of a special screwdriver it is necessary to tighten them.
- The reason for the malfunction of the model with a microlift may be the accumulation of grease in a certain area of \u200b\u200bthe cylinder. To eliminate the malfunction, you just need to carefully distribute the lubricant throughout the mechanism.
Tank repair
Any, even the most reliable mechanism, can fail sooner or later, this undeniable axiom applies to the drain system. Consider several characteristic shelves of the tank fittings and how to eliminate them without the help of a plumber.
What to do if the toilet cistern with a button is leaking?
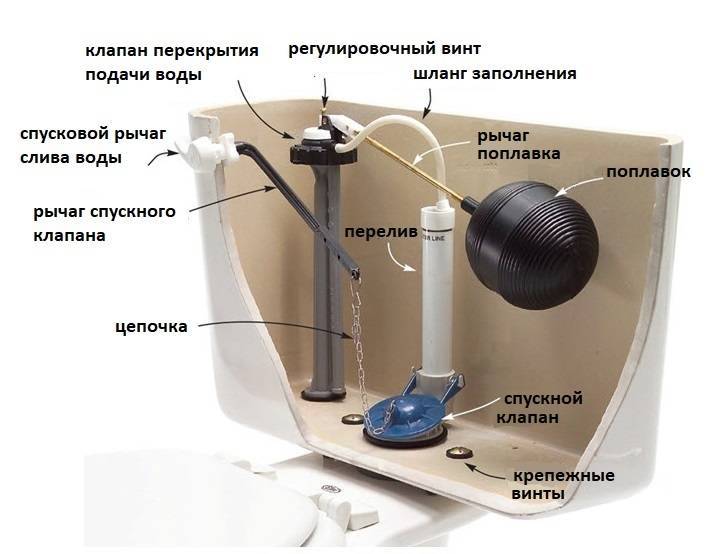
There are several reasons that can lead to water leaking into the toilet bowl, we list them:
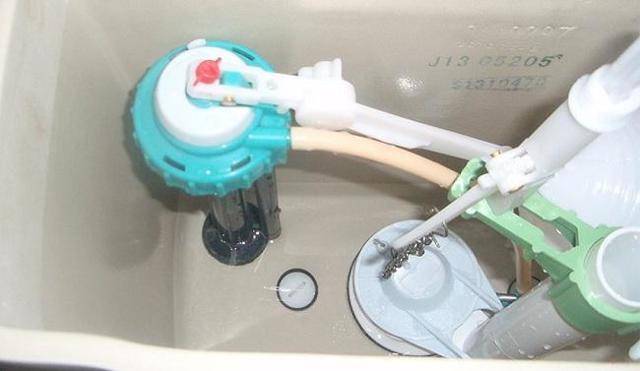
- The float on the shutoff valves has gone astray, as a result, after filling a certain level, water flows through the overflow pipe. This is easy to find by removing the tank cap and inspecting the insides. To eliminate the leak, it is enough to adjust the height of the float. Alternatively, there may be a loss of tightness by the float, in which case it must be removed and replaced, or repaired (sealed).
- The regulator responsible for the height of the button has shifted, as a result, a gap has formed between the drain valve and the hole in the toilet bowl.To fix the problem, just adjust the height of the button.
- The valve on the stop valve broke. It is checked by pressing the lever coming from the float, if the water does not stop flowing, this indicates a valve malfunction. In this case, the shut-off valves should be changed (not forgetting to first shut off the water supply).
- At the base of the overflow tube, the nut has loosened, as a result, water drips into the toilet bowl, the connection should be tightened.
No water is drawn into the tank
This malfunction clearly indicates problems with the shutoff valves, as a rule, this is a clogged valve or a float stuck on the pulley. In the first case, it is necessary to clean the valve (the procedure did not give results; the fittings will need to be replaced, but before that it is recommended to check the presence of water supply), in the second, adjust the float.
Decreased flow strength
If even with a completely filled tank, due to a weak flow, the cleaning of the toilet bowl is unsatisfactory, this indicates that the drain hole has become clogged. The reason may also be a jumped off rubber hose (installed to reduce noise). In this case, you will need to dismantle the tank (by disconnecting it from the water and removing the mounting bolts) and clean it.
Elimination of external leaks
If water begins to appear under the toilet, this indicates an external leak. It is available in the following locations:
- Between cistern and toilet. The reason can be caused by both improper installation of the tank, and aging of the gasket. In any case, the tank must be dismantled, then the joints must be cleaned and dried, and only after that a gasket of the same type should be installed.Silicone adhesive can be used to guarantee tightness (applied to the joints and gasket).
- At the point of water supply. Turn off the water, then remove the hose, wind the thread around the thread and twist the connection.
- The places where the mounting bolts are installed let water through, the reason is improper installation or the rubber seals have dried up. To eliminate the leak, it is necessary to unscrew and remove the fasteners (the tank can not be dismantled) and change the gaskets (we recommend installing conical gaskets).
Condensation forms on the tank
There are two reasons for such a visual manifestation of the laws of physics:
- High room humidity. Eliminated by installing forced ventilation.
- A malfunction associated with the constant flow of cold water into the tank (water is leaking into the toilet bowl). It is enough to eliminate the malfunction, and the condensate will stop collecting.
How to clean a rusty toilet bowl?
The accumulation of dirt and rust is one of the reasons for the failure of the drain mechanism, so regular maintenance is necessary. To do this, it is necessary to completely drain the water and treat the inner surface with special products, such as Domestos or Sanfor, and then rinse the tank several times with water.


There is another way to clean rust: Sanoxgel is poured into the water of the toilet tank, after which about half a liter of vinegar essence is added. Leave this mixture for a couple of hours, after which it is necessary to draw and drain water several times.
Types of drain tank
Toilet bowls are divided into several types. Types differ in the type of escapement device, in the material of manufacture and in the method of installation.
According to the location of the trigger lever of the tank:
top; side
According to the material from which the tank is made:
- plastic;
- ceramic;
- cast iron.
By installation method:
- wall installation;
- installation on the toilet shelf;
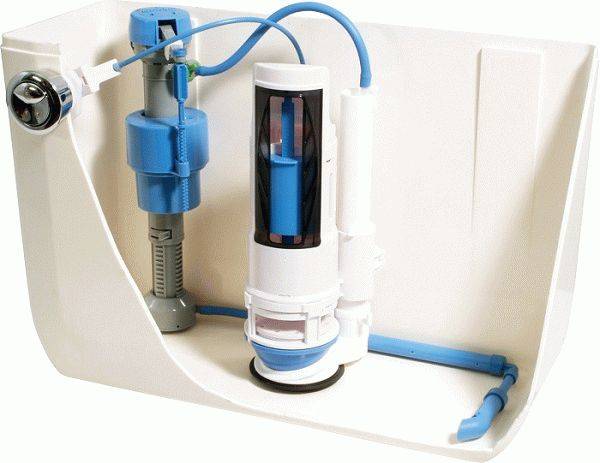
Each type of flush tank has an internal device that performs the work of filling water into the tank, adjusting the rate of water in it and flushing.
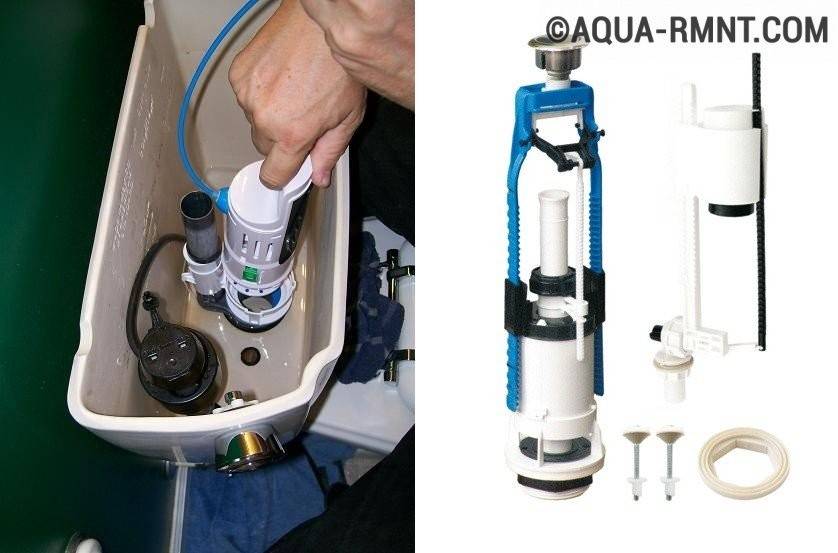
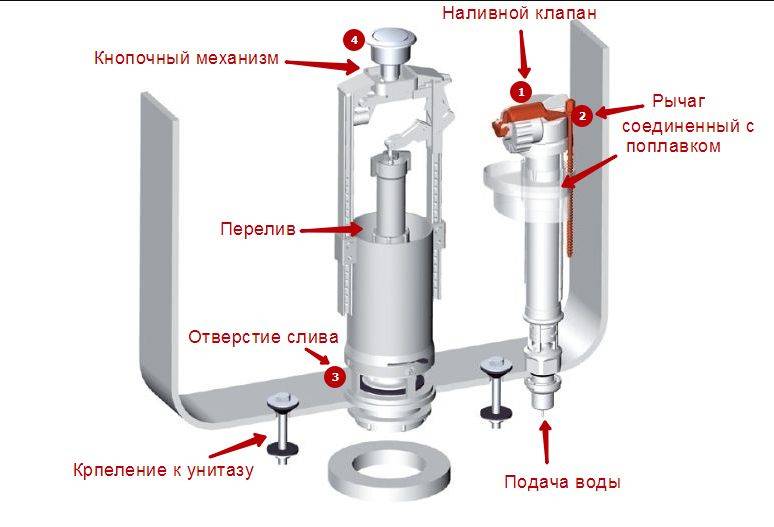
The device of a ceramic drain tank consists of:
- filling valve;
- overflow;
- drain valve.
toilet cistern device
The internal device of the drain tank
The purpose of the toilet cistern and its internal structure is the implementation of work:
- for filling water into a tank,
- adjusting the rate of water in it
- and the implementation of the flush itself
The purpose of the float
A float emerges from the water.
The purpose of the float ball valve is directed to:
- for supplying water to the tank,
- its dosage and rate.
The principle of operation of the float valve is that when there is enough water in the tank, the float pops up, setting in motion a special plug with a lever, which blocks the access of water to the tank.
overflow
The overflow is responsible for directing excess water into the toilet. It is needed so that the tank does not overflow, and water does not pour over its edge. This mechanism is usually made in the form of a small plastic tube and is located in the center of the tank. That is why, if the water level in the toilet bowl is not properly adjusted, water constantly leaks into the bowl.
Inlet
The design of the filling fittings includes an inlet valve 5 of the rod type.Its operation is controlled by the float of the toilet bowl 3, acting on the cut-off rod through a brass rocker. A similar system is called a float valve and is still used in a slightly modified form.
Figure 2
Figure 3 will help you better understand the operation of the filling unit. It shows the water level 1 after the storage tank has been emptied, after which the float mechanism 2 (including the rocker arm or spoke lever 3) is in the lower position. The upper part of the rocker arm 3, located in the body of the faucet (valve) 4, shifted the pusher rod 5 with an elastic gasket 6 to the left, which activated the water supply through the inlet 8 and inlet 10. As the container is filled, the lower end of the lever moves up, and its upper arm accordingly shifts the pusher to the right and gradually closes the spout opening, pressing gasket 6 towards it.
The faucet is fixed on the wall of the tank with a fixing nut 9 from the outside. The threaded connection of the tap is sealed with a rubber gasket 7 from the inside. To dampen the noise of the falling jet 11, a tube of a suitable diameter is additionally put on the outlet fitting of the inlet valve, lowering its lower end below the minimum water level.
Figure 3
Release (drain)
Adjusting the toilet cistern cannot be complete without adjusting the outlet and overflow units. Their schemes are shown in figure (diagram) 2 - plumbing fixtures with lever-type drain mechanisms. But, despite the similar types of drives (rocker 4), they have fundamental differences in the principles of operation.
Siphon tank
Figure 2a shows a drain system using siphon chamber 1. The curved cavity solves two problems at once:
Serves as a fixed height overflow.
- The liquid level in the right receiving part of the siphon cavity always corresponds to the adjusted water level in the tank, it cannot be higher than the dividing wall. If the toilet float 3 is set incorrectly - it does not have time to close the inlet valve 5, then the liquid flows into the left side of the siphon (air) and flows out through the flush pipe.
- Supports (automates) the release of liquid, allowing you to release the handle 6 immediately after activation. At the beginning of the flush cycle, water rushes down under the raised valve 2. When it is in the lower position, the flow continues through the curved siphon tube due to the vacuum created by the flow falling at high speed in the vertical flush pipe. An effective pressure drop caused by a moving liquid is only possible with a sufficiently high placement of the sanitary cistern.
Sanitary fixtures made according to scheme 2a no longer meet modern aesthetic requirements. At the same time, they are characterized by too large and unregulated water consumption.


Final stage
After completion of work, the entire structure is again checked for tightness. To do this, simply draw water into the tank until it is completely filled. Then the water is poured into the toilet, observing whether there is a leak, what force the pressure is.
The most likely problems and how to fix them.
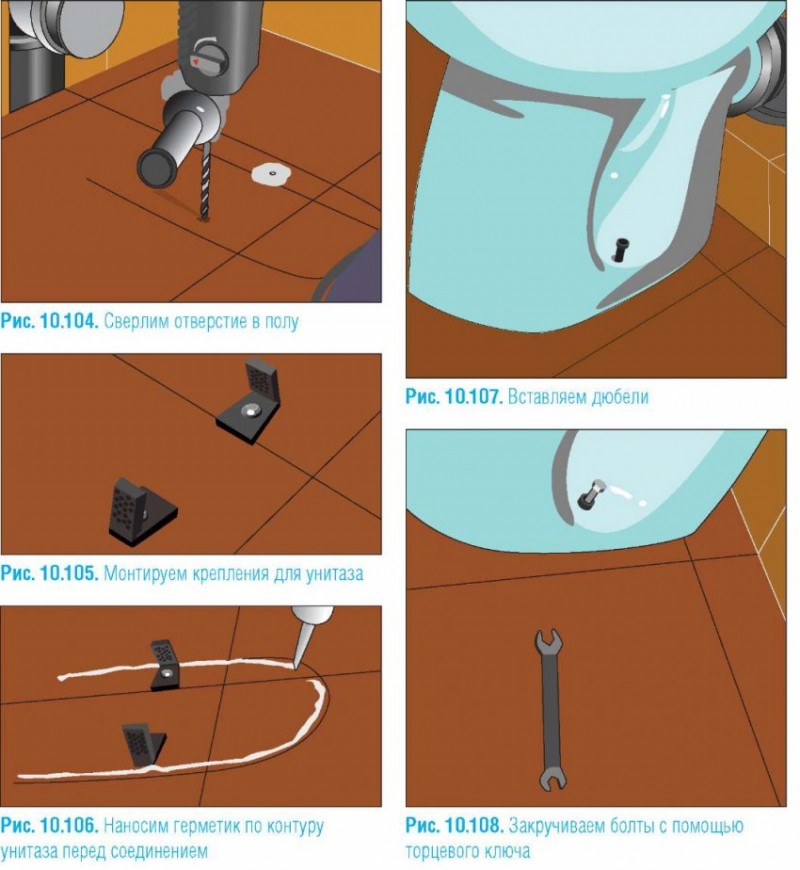
- If smudges are found on the toilet bowl, the cause may be incorrect installation of sealing seals. They are easy to adjust or change. It is necessary to turn off the water, unscrew the fasteners connecting the toilet bowl to the supporting structure, check the gaskets.
- If the toilet is loose, tighten the bolts that secure it to the installation.Care must be taken not to damage the threads or crush the ceramics.
- If there is a weak discharge of water into the sewer, then you should make sure that the slopes of the pipes are sufficient, as well as that they turn smoothly.
Toilet flush repair
If the flow of water, after the next drain, from the barrel into the bowl continues, it means that the shut-off valve or the drain mechanism has broken. To determine exactly the source of the problem that has arisen, disassembly and repair of the toilet cistern is required.
How to disassemble a toilet bowl with a button
1. Drain button, fixed with a locking ring. To dismantle it, you need to hold down the button and rest it with your finger or a screwdriver in one of the small depressions and turn the ring counterclockwise;

Dismantling the locking ring of the toilet flush button
2. Carefully remove, together with the plug, the unscrewed ring. Under them you will see the trigger mechanism;

How to remove the toilet lid with the button
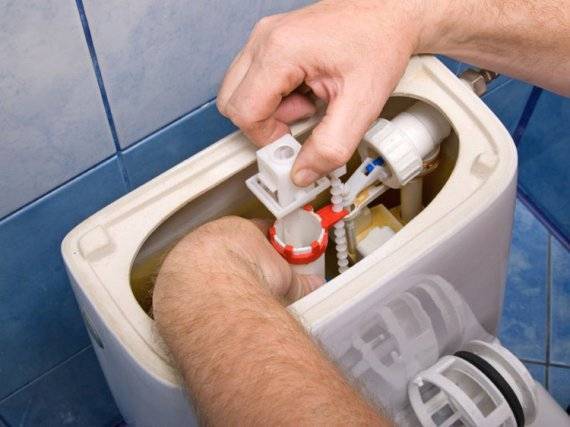
3. To thoroughly examine the trigger mechanism, you need to remove the cover of the drain barrel.
Next, we look and look for the cause of the problem:
- If the problem is in the locking mechanism, then water will begin to flow into the bowl after the drain tank is completely filled.
- If there is a malfunction in the typesetting mechanism, then the float will not rise along the flow of liquid, but will remain at the bottom of the tank. The reservoir itself, of course, will not be able to collect, due to constant leakage, the proper water level. Or, conversely, the tank is overfilled. The surplus falls into the overflow, from where, through a direct outlet, into the toilet bowl.

Toilet flush design
Two ways to repair the drain barrel and eliminate such malfunctions:
- Complete replacement of tank fittings;
- Partial (one of the valves) replacement.
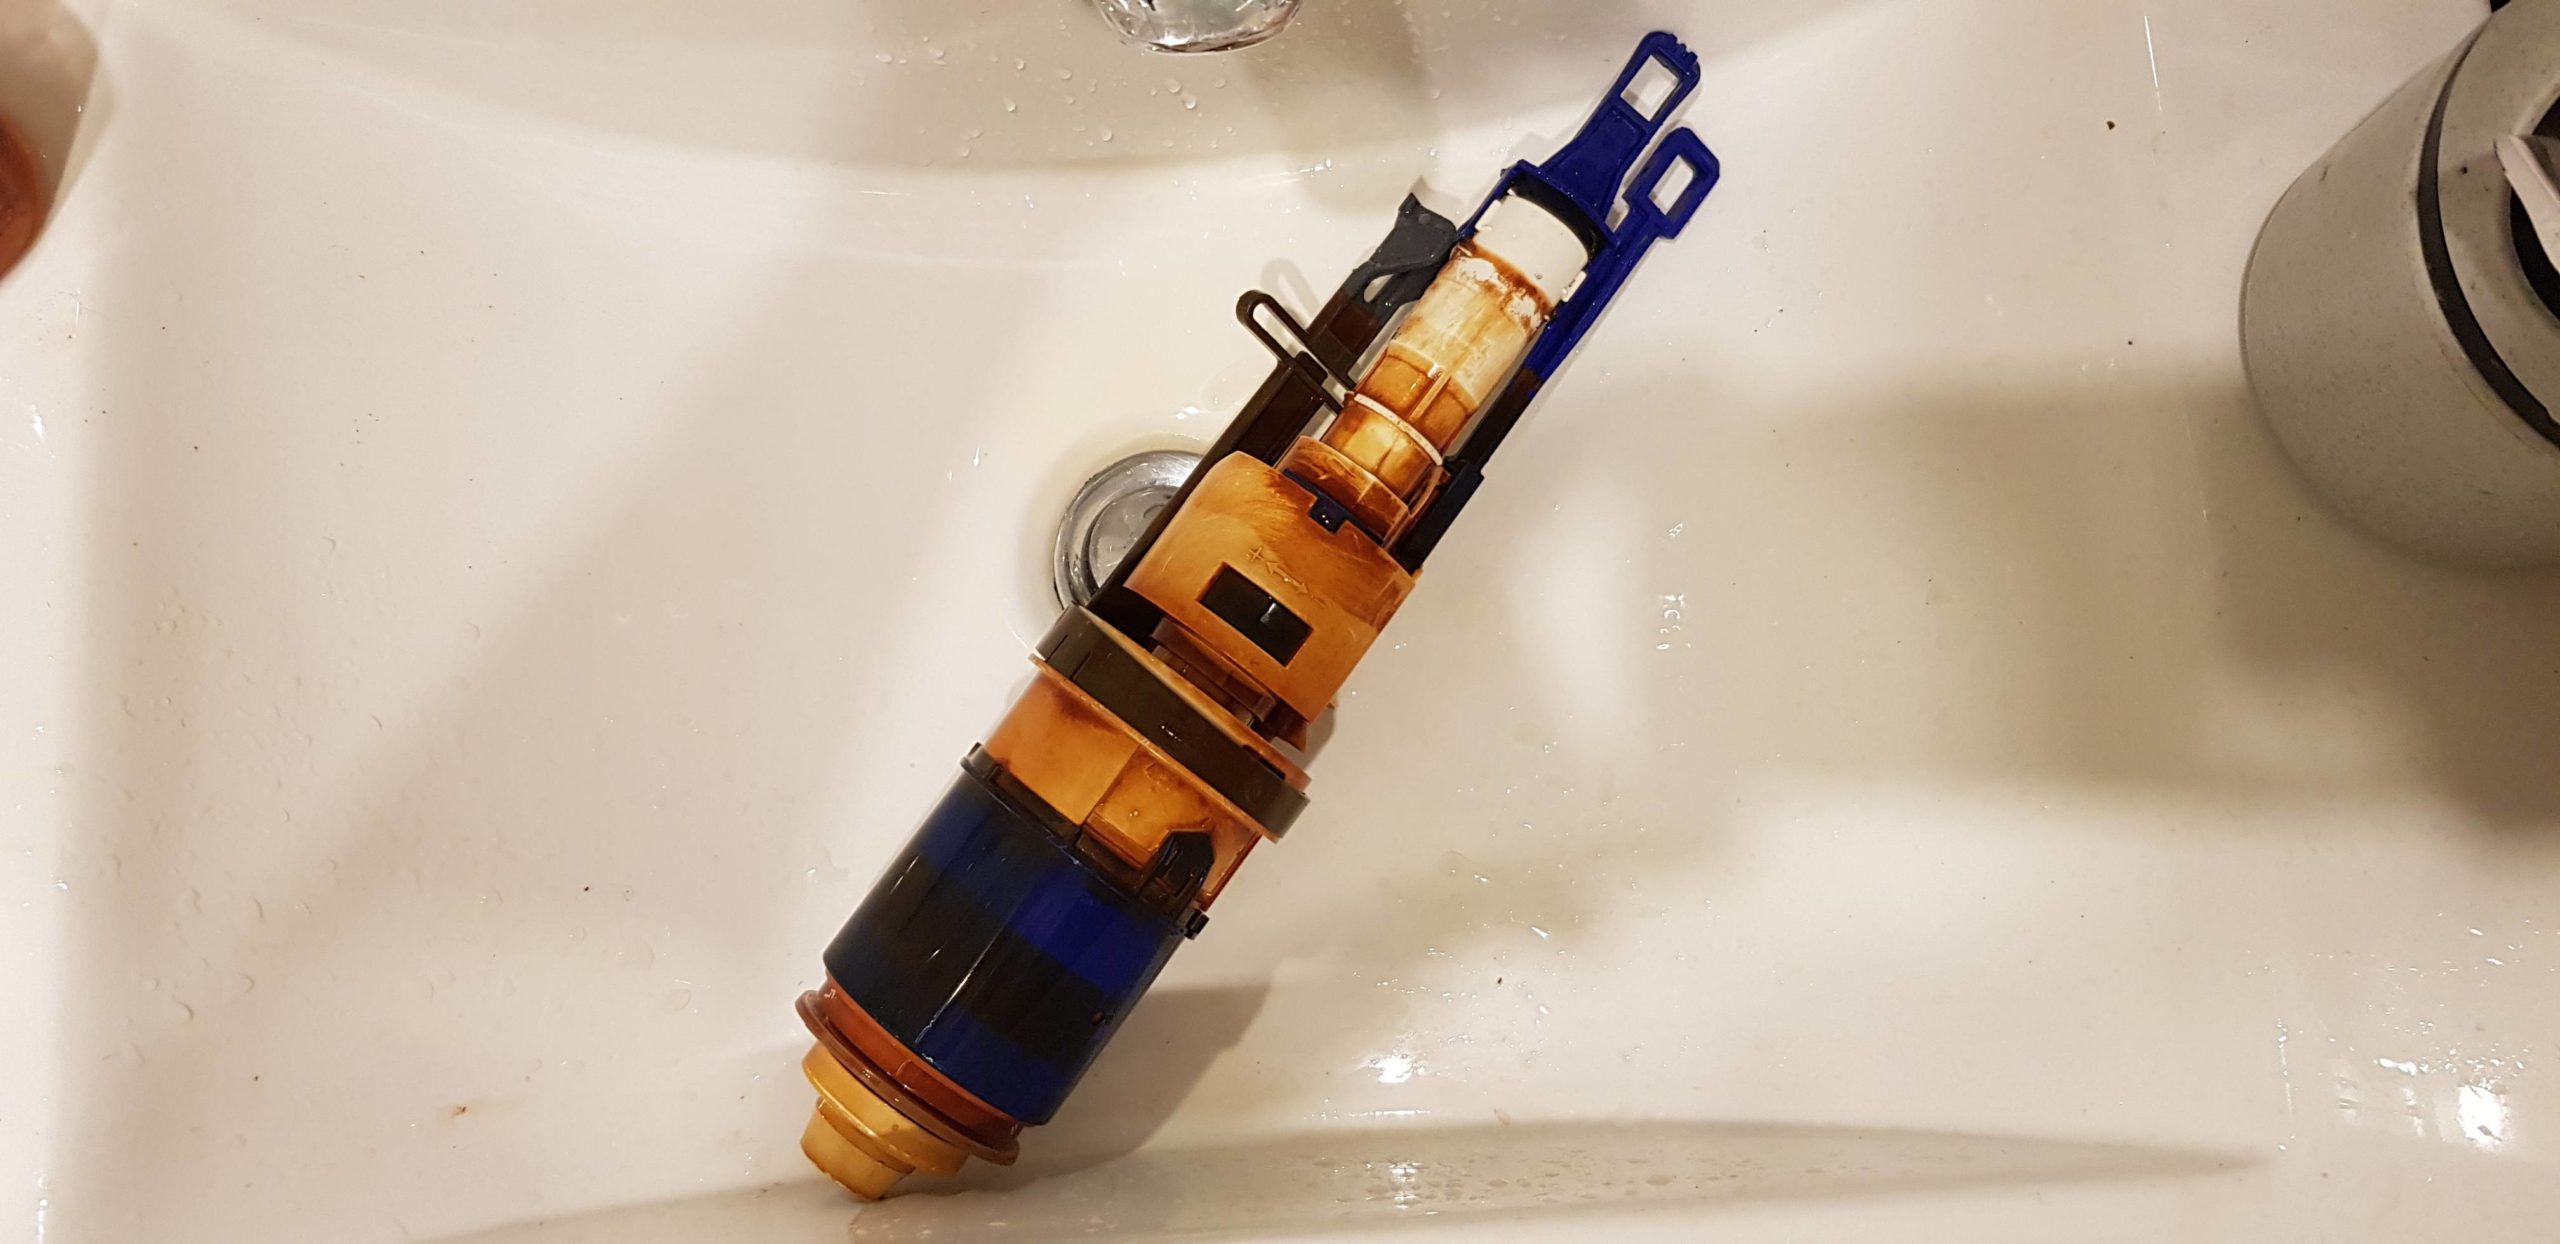
How to replace the dial valve
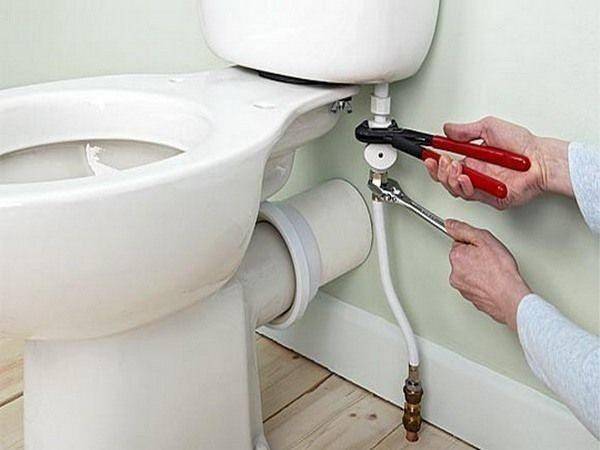
- First, turn off the water in the riser.
- Then, disassemble the tank and remove the lid.
- Using an adjustable wrench, unscrew the flexible pipe from the water outlet. Under it, you will see the inlet of a type-setting tap or valve.
- We unscrew the device from the drain tank.
- Instead, we install a new crane. If the outlet is plastic, then sealing the thread is not necessary. Well, if the adapter, between the flexible hose from the outlet and the valve, is metal (brass), then we wind, for sealing, a fugue tape;
- Next, assemble in reverse order.
Replacing the bleed valve of the drain barrel
As practice shows, the main cause of the leak is the wear of the ring under the valve. Changing it will not be difficult, even for a novice plumber
The sequence of steps to replace the drain valve:
- We disassemble the tank and remove the cover;
- Then, carefully, remove the accessories from the tank;
- We take out the ring that seals the gap between the valve and the drain hole of the bowl;
- Install a new gasket in its place. There is no way to buy such a ring, you can cut it yourself out of rubber;
- We assemble in the reverse order.
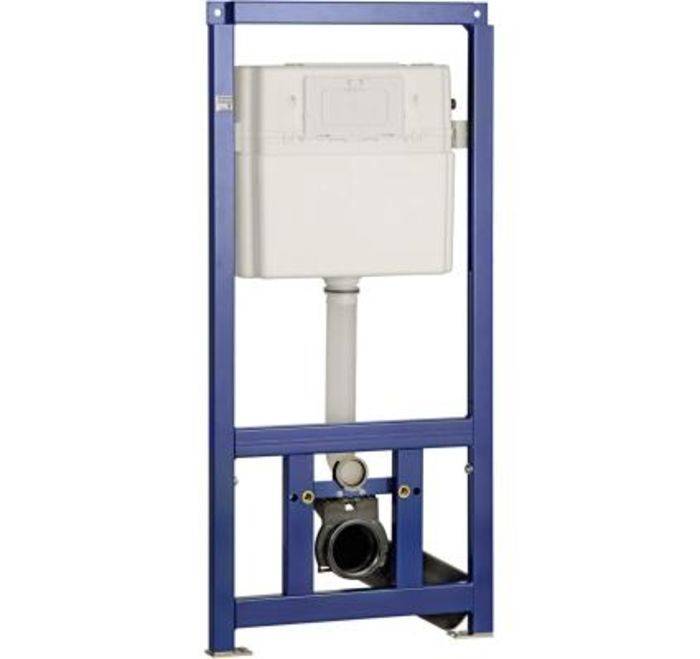
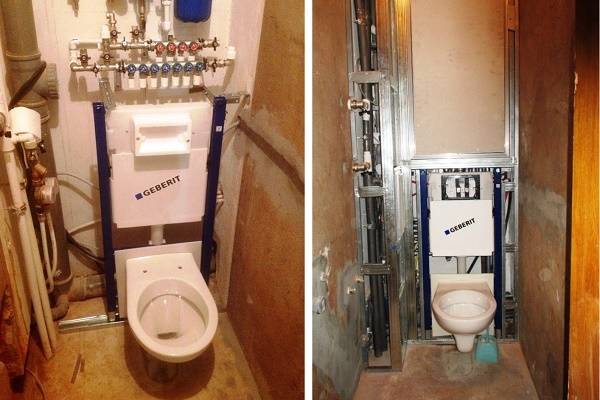
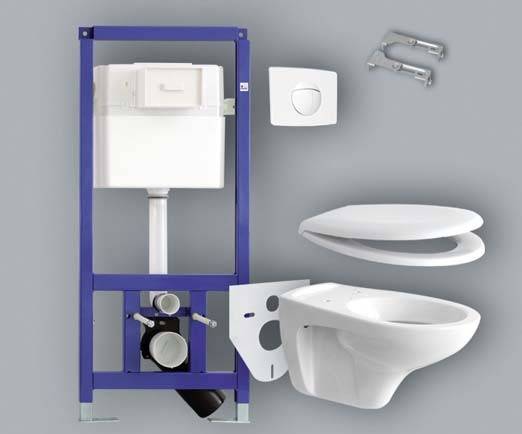
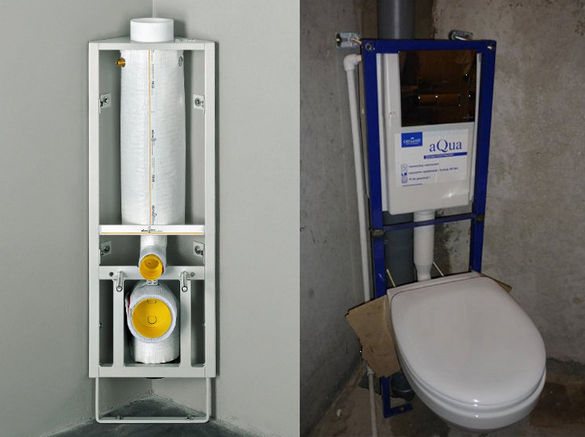
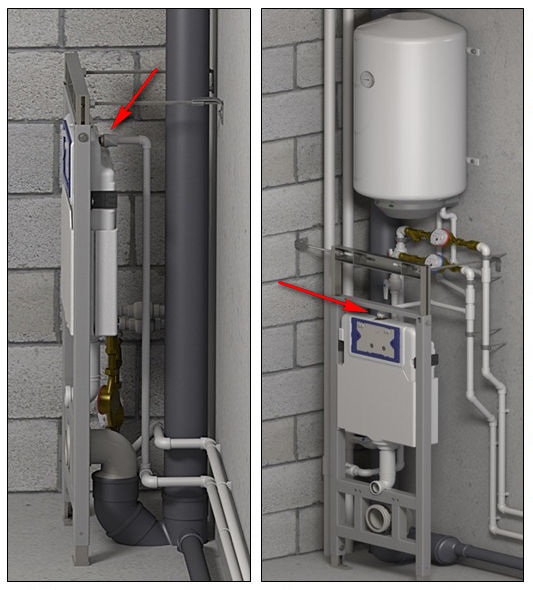
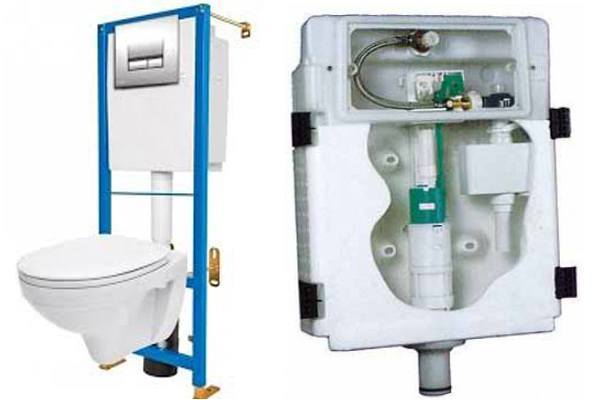
Wall hung toilet
A hanging toilet is much more complicated than a monolithic or compact version. The installation is a high-strength metal frame, which is installed inside the wall niche and securely fixed to the floor and wall. There is a small space between the floor and the bowl of the wall-hung toilet. It is much easier to clean the sanitary unit in such conditions, since there are simply no toilet legs.A flat plastic water tank is attached to the frame, and then the required communications are brought to the niche, they are finishing and hanging the toilet itself. The bowl remains outside, but the rest of the "stuffing" remains hidden behind the wall. A flush button is also displayed on the wall, which is usually located in the wall above the bowl. Even from such a brief and concise description, it can be understood that the installation work of such a device is a rather laborious process.
The bowls of hanging toilet bowls differ significantly in structure, configuration, shape, design, size, shades and other equally important characteristics, which leaves a wide scope for the selection of suitable plumbing. But among the shortcomings, the high cost should be noted. Taking into account the installation costs, the cost of such a toilet sometimes even doubles the cost of a conventional floor model. But manufacturers decided to take into account the increasing level of popularity of suspended plumbing, and therefore relatively inexpensive models appeared on sale. An additional disadvantage is that the frame and tank, which are hidden in the wall, are not very accessible for repairs in case of emergency. If the damage is severe, you may need to unroll the entire wall and refinish the area.
Preparing for installation
Required tool
It begins with the acquisition of the necessary components, preparation of the workplace and tools. A puncher will be required to prepare holes in concrete or brick, and a float level (a convenient size of 50-60 cm) to control the vertical and horizontal orientation of the product in space.You will also need: a set of wrenches, a hammer, drills or drills with carbide tips, possibly pliers, screwdrivers, a construction knife. To accurately determine the place where the toilet installation will be installed, you will also need a pencil and a tape measure. Having everything you need on hand will speed up the assembly process and save your nerves.
What to Consider
At the stage of preparation, you need to consider:
- the accuracy of the niche marking and its suitability for installing the purchased equipment model;
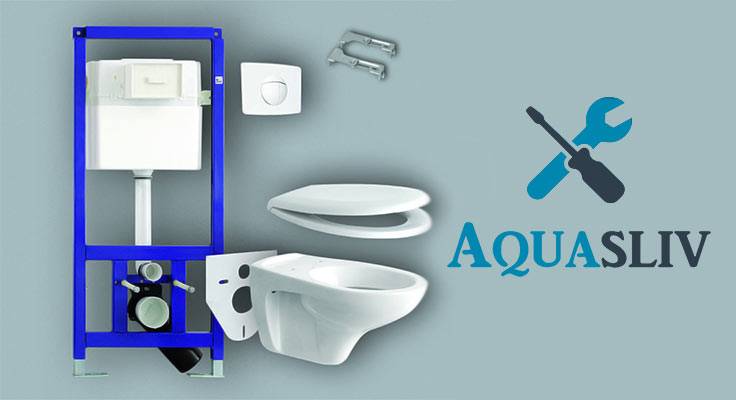
- it is better to purchase a toilet-installation product as a whole set in order to save yourself from the selection or adjustment of equipment elements to match their sizes, from the mismatch of inlets and outlets;
- when buying, carefully check the completeness of the parts (carrier frame, flush keys, flush tank, the presence of adapters, fixing elements);
- the choice of the method of fastening for a block or frame structure, on which the successful implementation of installation work depends;
- you can choose a model with electronic control and a convenient arrangement of buttons for draining. Such products provide special comfort in subsequent operation.
Taking measurements and markings
The scheme of marking stages for the installation of a toilet bowl is presented in the following parts:
- an center line is applied to the wall, passing through the center of the future installation;
- the clearance between the wall and the structure is measured (it must be at least 15 mm, more is allowed);
- marks are drawn on the wall where the tank for draining water will be located;
- marks are left on the floor, as well as on the wall, where the structure will be fastened.
Accuracy and attention to detail at the preparatory stage will greatly facilitate the implementation of subsequent assembly activities.
Choice of location and sequence of installation steps
When choosing the best location for the toilet, pay attention to a number of features of the room. First, on its geometric parameters
Naturally, installation should be carried out where the plumbing fixture will interfere less. A good solution is a corner installation, it allows you to economically use limited space, and also helps to implement unusual design solutions.


There are corner installations on sale, but, in principle, a conventional frame installation can be installed in the corner of the room.
Secondly, the proximity of the passage of communications, especially sewers, is important. The lengthening of engineering routes will require the allocation of additional space for them. In addition, you will have to take into account the installation slope of the sewer (1.5-3 cm per 1 m), which, in the event of a significant removal of plumbing, will increase the height of its attachment
Attention should be paid to these factors, which will also facilitate further operations for organizing drain points and water inflows for other bathroom equipment.
The sequence of work on assembling the installation of a toilet bowl with your own hands lies in following the step-by-step instructions, which defines the following main steps:
- determining the location of a plumbing fixture with a frame or block system;
- installation and fastening of all structural elements;
- supply and connection of communications;
- checking all systems.
Installation repair methods
Along with the purchase of a toilet installation, it is advisable to immediately buy a spare repair kit.It may be needed in 10-12 years or already after 3-4 years from the start of using the system. In order not to run around and not look for spare parts, you should always have them in the pantry / on the shelf with tools.
Finding a problem inside the cistern
The amount of repair work will depend on what exactly is broken. The most common valve problems are:
- Water continues to run after the flush is complete. The reason may be the accidental ingress of foreign objects into the drain tank - hair, cardboard, pieces of construction debris and other inclusions. The solution to the issue is to get the filling and drain mechanisms and fix the problem;
- Slowly water comes out of the tank after pressing the flush button. Damage to the accordion of lifting the drain mechanism is possible. The way out is to replace the drain mechanism;
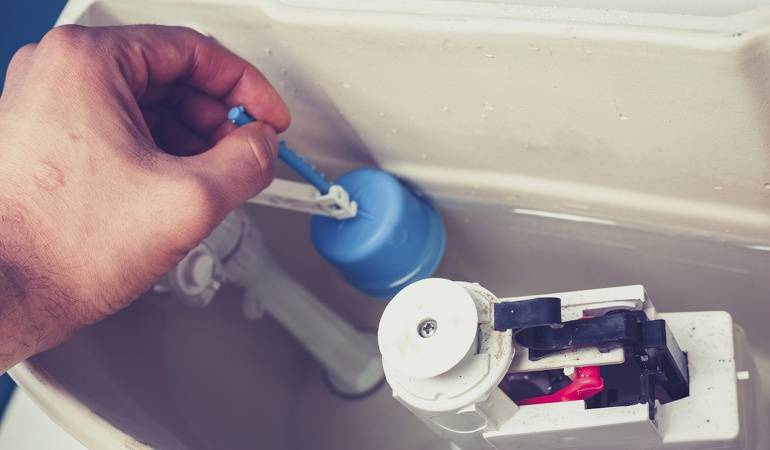
- Water is not drawn into the tank - there may be problems with the float. It may come off the mount. The solution is to disassemble the system and replace the float;
- The valve does not completely shut off the water - change the membrane or replace the gasket.
It turns out that in most cases you need to look inside the drain tank without taking it out of the wall. It will be possible for a home craftsman to do this, having enlisted instructions for dismantling the fittings.
Restoring the function of the flush button
The flush button is mounted on a special frame and connected to the system using levers and cables. They are pneumatic and mechanical.
It is important that the devices are reliable and of high quality for a long service life.
On sale you can see various models of buttons - with backlight, with two and with one key. They differ in size, color, shape and material from which they are made.But some options can be universal - suitable for installations of various manufacturers.
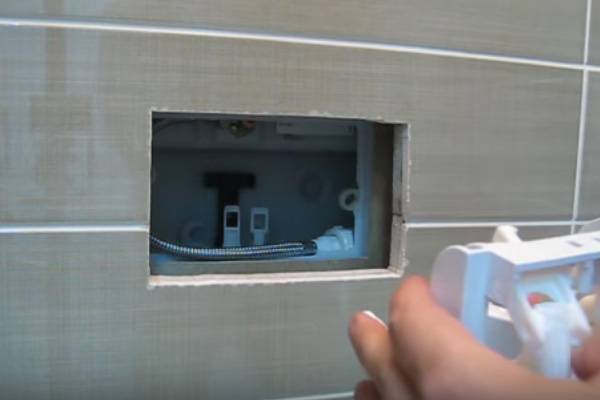
If the flush button does not work well, then you need to remove it and look into the revision window of the installation. It is possible that the air hose leading to the installation through the pneumatic button is loose. Or the button itself is broken.
The solution to the issue depends on the situation - adjusting the hose or buying a new button. Often, in the instructions for a particular model, the manufacturer not only describes the installation process, but also indicates which buttons are suitable.
Breakdown detection methods
When you have to find a breakdown inside the installation, it is not at all necessary to break the wall. You can get the drain tank mechanism through the inspection window. Let's take a closer look at how to do this using the Geberit installation as an example.
First you need to remove the decorative trim with the flush button by pressing down and pulling it towards you. Then you have to remove the frame on which the key is attached.
To do this, unscrew the screws, pull out the plastic clamps-pushers. Then, in a way that depends on the model and manufacturer of plumbing, you have to remove the partition by pressing on its latches. This partition can be marked with a scheme for dismantling the fittings of the drain tank, which is used to clean the valves and check the seals.
An important step is to shut off the water flowing into the drain tank. Otherwise, with your actions, you can arrange a real disaster on a local scale - flood not only your bathroom, but also your neighbors from below.
The popularity of suspended installations is due to their compactness, compared to traditional toilet designs.The flush mechanism is mounted inside the wall, which makes it easier to clean, but makes it difficult to repair the toilet installation. Troubleshooting is performed through the inspection window in which the flush button is mounted.
Connecting a plumbing fixture
At the final stage of the installation of the toilet with installation, the most important operations are its reliable connection to the water and sewer networks.
The cistern is fed from the side or from above, however, at any location it is not recommended to use flexible hoses to connect the cistern to the water supply due to their short service life. Moreover, in the event of their failure, the replacement of the connections will require the dismantling of the false wall (if a hatch is not provided for access to the utilities). For these reasons, it is desirable to use pipes made of polymeric materials or stainless steel bellows connectors.


To connect the tank to the water supply, it is desirable to use pipes made of polymeric materials.
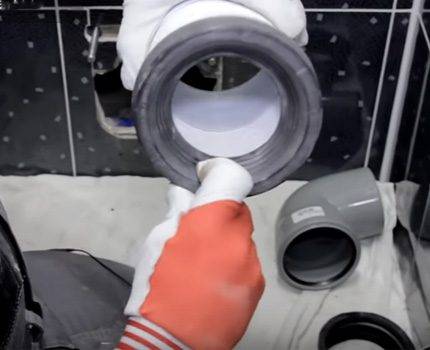
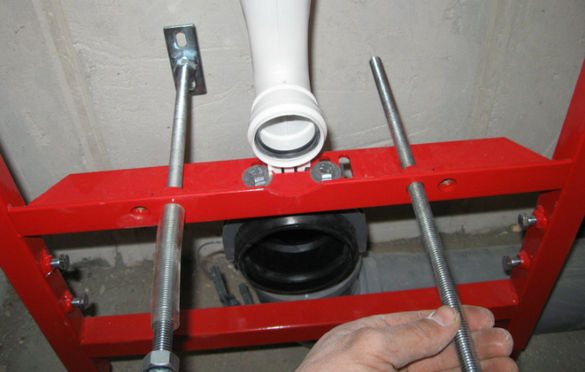
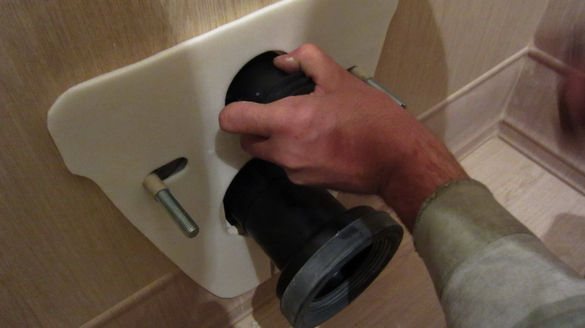
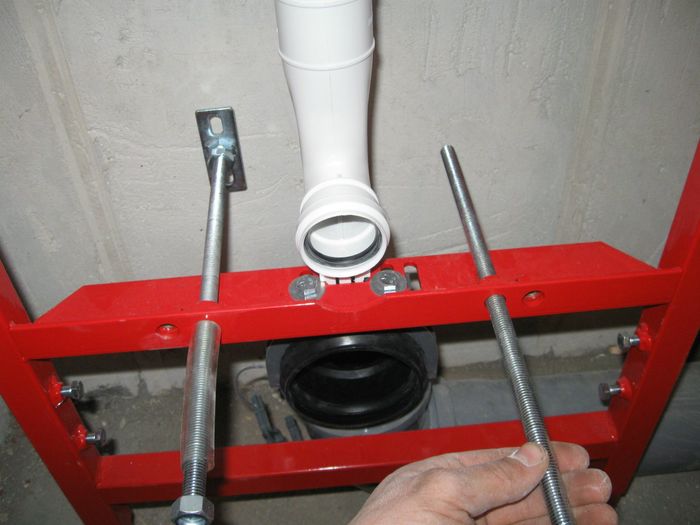
Next, you need to prepare pipe fasteners. The 90º toilet outlet is inserted into the sewer pipe and is rigidly attached to the installation frame using a plastic clamp-fastener.

1. The outlet for connecting the outlet of the toilet is inserted into the sewer. 2. Next, the outlet is attached to the installation frame using a plastic clamp with a latch.
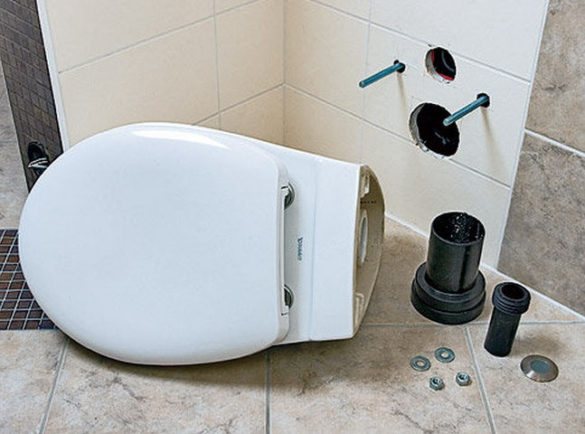
Studs are screwed into the frame and counterattached to connect the bowl of the wall-hung toilet bowl. Some models provide for fastening the studs to the installation frame and additionally to the main wall.
Studs for fixing a wall-mounted toilet bowl.
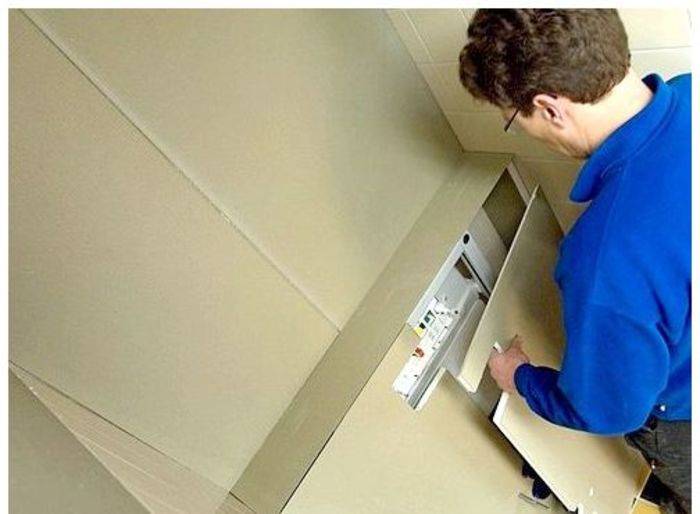
An intermediate check is in progress. The internal structure is closed with a false panel. Panels are often made from plasterboard sheets, then decorated with tiles or plaster.

Drywall is the most convenient material for mounting a false wall.
Drywall is convenient in that it is easy to make holes in it for connecting the installation to the toilet bowl itself, as well as flush buttons.
To connect the toilet to communications, the connecting pipes are shortened to the desired size.
To connect the toilet bowl with communication systems (to the sewerage drain tank), special pipes are used. The length of the pipes comes with a margin. Subsequently, the nozzles are shortened to the desired size, taking into account the thickness of the decorative panel.
To protect against damage to the wall covering and the toilet, a shock-absorbing pad is installed between them. And protective PVC tubes are put on the studs.
The toilet is tightly attracted to the supporting structure. To prevent damage to the surface of the toilet bowl when tightening the nuts, washers made of durable plastic are provided in the kit.
Next, install the drain tank button. When installing it, you should carefully read the instructions - the design of buttons from different manufacturers can vary quite a lot.
You can familiarize yourself with the principle of operation of the button of the drain tank by watching the video:
After connecting the toilet bowl to the cistern and sewer outlet, the entire structure is tested for strength, correct assembly of individual elements, reliability of fastenings and tightness.
Well measure the surface of the wall
For installation hidden in the wall, you must reserve a suitable surface about 40-50 cm wide, 15-20 cm long and 120 cm high.In addition, you should have a place to hang a bowl about 40 cm wide and 55 cm long, as well as free space that guarantees comfortable use of the toilet (space about 20 cm on both sides and 80 cm wide and 60 cm long in front).


If you do not respect these dimensions, it may turn out that the later built-in concealed installation, together with the ceramic cladding, will not fulfill its functional role. What else should I pay attention to before assembling? Of course, for the possibility of separating the sanitary zone, that is, separating from the partition the place where the toilet will be located, from the section for the bath and washbasin. Such a partition will provide members of the house with greater comfort when using the bathroom.
Common types of breakdowns and their possible causes
High-quality plumbing repairs are guaranteed by the master. However, you can do the repair work yourself just as well, knowing how to fix the toilet installation. You should always start by identifying the cause of the malfunction, after which it is eliminated. To make it easier to navigate in the problems that arise, we localize them by individual installation nodes:
- tank;
- frame;
- toilet.
Tank
The tank, or rather its fittings, gives the owners the most trouble. Although rare, the body of the tank also creates problems, and at the same time, rather big ones. Let's consider the causes of malfunctions in more detail.
The tank body is leaking. The plastic body of the tank can pass water through a crack formed as a result of:
- frame skew - during installation, errors were made in fixing the frame due to inattention, as a result, due to uneven stress, the plastic may crack over time;
- a strong accidental blow to the body after a while also leads to the formation of a crack.
The installation does not hold water. The constant flow of water into the toilet does not lead to catastrophic consequences, but it spoils the appearance of the bowl: red streaks appear and the water bill increases. This is possible for several reasons:
- low quality of the plastic mechanisms of the drain unit - they bend over time and do not provide a snug fit of the valve to the drain hole;
- the membrane valve is covered with plaque (hard water) and does not hold water well, as a result of which there is a constant overflow of water;
- the valve or diaphragm naturally wears out during operation. Water either does not hold, or overflows;
- a foreign object got under the valve: hair, construction debris, etc.
Water flows into the tank continuously. This is usually one of three reasons:
- a crack appeared in the float and, having collected water, it does not rise;
- the float arm is deformed - the float cannot rise up;
- diaphragm valve damaged.
Water either does not enter the tank completely, or flows very slowly. Coarse and fine filters clogged with dirt do not let water through.
Continuous, strong flow of water into the toilet. In this case, the problem is in the exhaust valve: it has worn out or deformed over time.
Drain button does not work. Quite rarely, but the owners of the installation are faced with the fact that the drain button does not work. There are several reasons:
- the latch broke, as a result of which the pusher changed position and went deep into the tank;
- rocker broke;
- the rocker arm has come out of the hook of the stem lifting valve.
The above malfunctions and the reasons that caused them are inherent in all installation models, regardless of whether it is a popular brand (Sanit, Tece) or an unknown brand.
Frame
The frame of the installation is designed for a weight of about 400 kg. Such a margin of safety is explained by the fact that the load falls on the frame not only of the person sitting on the toilet, but also of the nodes attached to it. Such strength is provided by powerful metal profiles. However, not all manufacturers meet this criterion.
On sale you can find models with a load indicator of 600-800 kg, as well as 100-200 kg. The lightweight frame is designed for children. From an adult (70-80 kg + toilet bowl + water tank), it can bend or crack with all the ensuing consequences.
Toilet
Problems with the toilet itself can be twofold:
toilet installation leaks after flushing: water appears on the floor in the toilet
There is only one reason in such cases: the sealing of faience (porcelain) pipes with plastic fittings is broken, where water leaks;
chips and cracks appeared on the toilet bowl - the problem arose due to careless handling of heavy objects. They fell on the toilet and damaged it.