- The subtleties of disassembling cars of different brands
- Samsung Disassembly Steps
- The nuances of repairing models from Ariston
- Atlant washing machine disassembly procedure
- The specifics of Electrolux brand machines
- Features of washing equipment brand LG
- Washing machine shock absorber repair
- Health check
- How to change shock absorbers in a washing machine
- Device and principle of operation
- Washing machine leveling
- Spare parts selection rules
- What is shock absorber
- Why is it needed
- What does it consist of
- How is it different from a damper
- How to adjust the washing machine yourself
- How to remove and inspect shock absorbers from a washing machine
- Causes of breakdowns and ways to eliminate them
- No water coming in
- Calling the master: repair price and ordering
The subtleties of disassembling cars of different brands
Washing machines made by different manufacturers are generally similar and perform the same set of basic functions. However, there are significant differences in the design of the units and the arrangement of internal working parts.
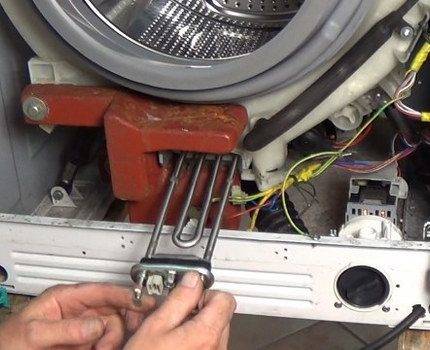
For many popular models of washing machines, the heating element is located in front. To get to it, you just need to remove the front cover and carefully remove the part for later repair, replacement or cleaning.
For correct disassembly, it is very important to know the specific unique features of the model to be repaired.Then the work will be easy and it will be possible to penetrate the malfunction zone without any problems.
Samsung Disassembly Steps
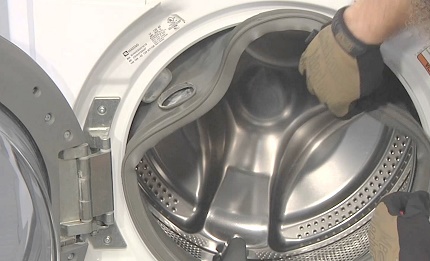
Samsung household washing machines are quite easy to disassemble. The powder loading container is conveniently located and is held on by only two self-tapping screws. The working heating element is located at the bottom of the tank directly under the front cover and it is easy to get to it.
If the Samsung washing machine does not open the door, the problem should be sought in the control module. It is quite difficult to cope with the repair of such a plan on your own. It is better to transfer this work to specialists from the service center
The step-by-step guide provided in our recommended article will acquaint you with the repair of Samsung brand washing machines in detail.
The nuances of repairing models from Ariston
In Ariston products, bearings and tank seals most often fail. The design of the model is thought out in such a way that this unit cannot be repaired. But for skilled and experienced home craftsmen, there are no barriers.
To replace the stuffing box, the whole tank is flared or sawn with a hand saw. There is no other way to restore parts, except, of course, buying a new tank and installing it at the company's proprietary service center.

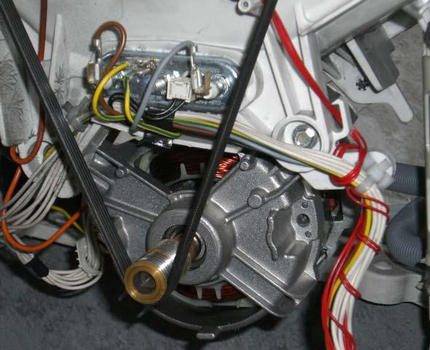
A spoiled engine in the Ariston technique is a common occurrence. To fix it, you need to unscrew the bolts, remove the back of the case, and then remove the assembly. If, after diagnostics, it turns out that the element cannot be repaired, you will have to buy a new one and install it in place of the old one.
The latest generation Ariston brand washers are equipped with self-diagnosis devices, which significantly speeds up the process of finding a breakdown.Codes of malfunctions and errors in operation are displayed on the board, notifying of a problem that has arisen or is brewing. Their decoding will help to understand what and how to repair.
Atlant washing machine disassembly procedure
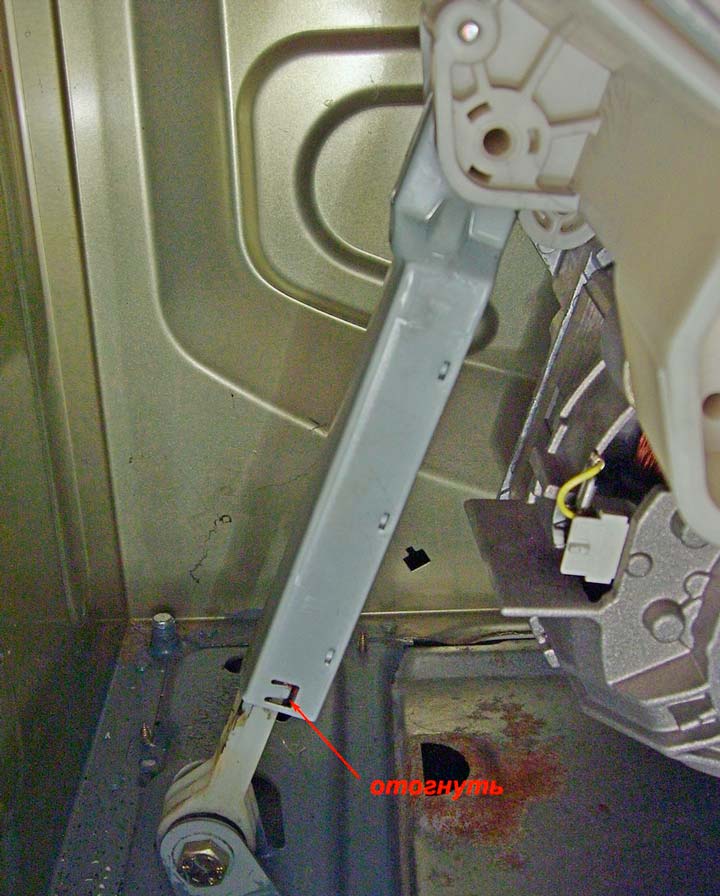
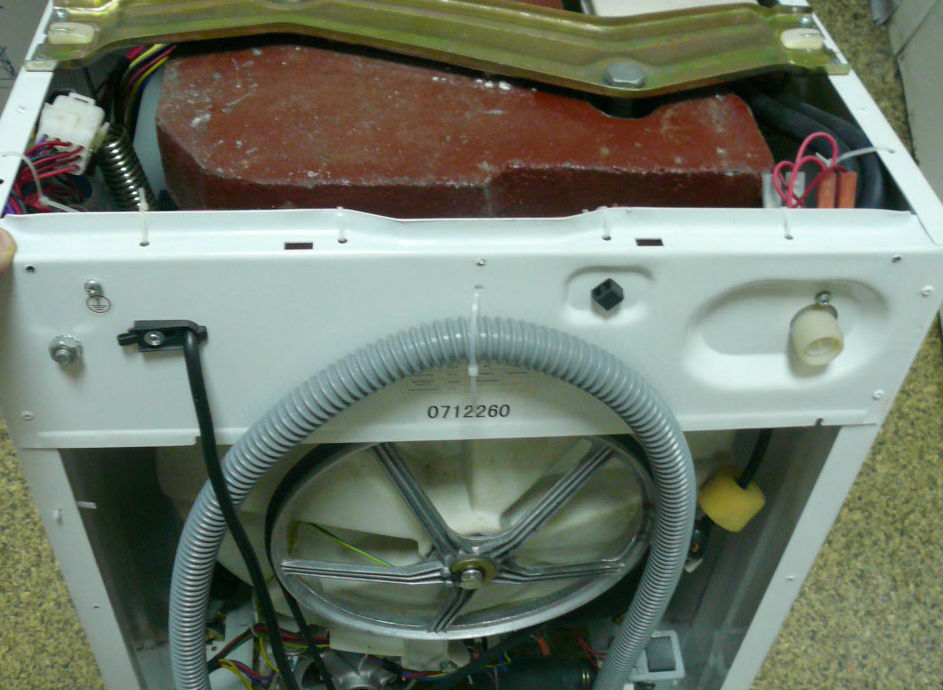
Atlant brand devices are practically designed and repairable. At the very beginning of disassembly, it is necessary to remove the counterweight, and then remove the external control panel. The drum in these models consists of two halves, tightened with bolts, so any working parts can be replaced in a jiffy.
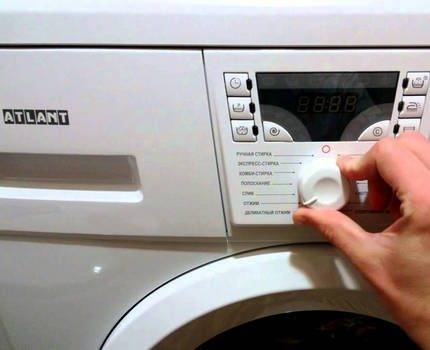
Models from Atlant have a built-in self-diagnosis system. In the event of a malfunction, the electronics displays the relevant information on the display. Hosts can read the message, consult the documentation, and determine how to resolve the issue
The specifics of Electrolux brand machines
Electrolux cars are very reliable and rarely break down. The top ten Electrolux washing machines in sales will be introduced by our rating. The front panel can be removed in an elementary way and immediately opens access to all the main nodes and details.
Working bearings and seals are placed on separate removable supports. To replace them, you do not need to completely disassemble the drum.
If in the washing machine Electrolux working drum does not turnmost likely, the brushes, drive belt, motor or control board are damaged. You can search for a problem yourself, but the masters from the service center will do it faster and at the highest professional level
Features of washing equipment brand LG
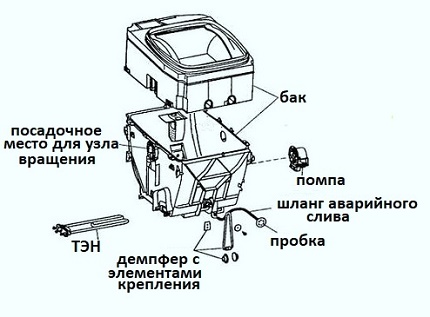
LG household washing appliances have a complex design. To remove the front panel, you will first have to unscrew the nuts with a screwdriver that securely fix the hatch cover.Then you have to carefully remove the screw that tightly tightens the clamp to hold the cuff.


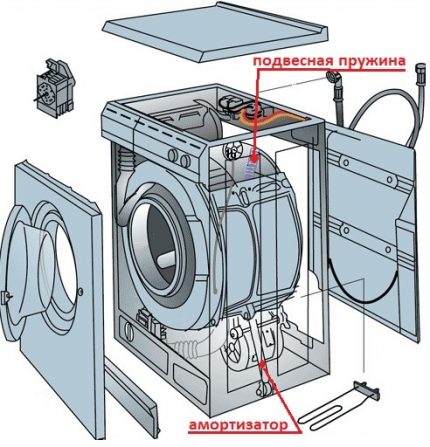
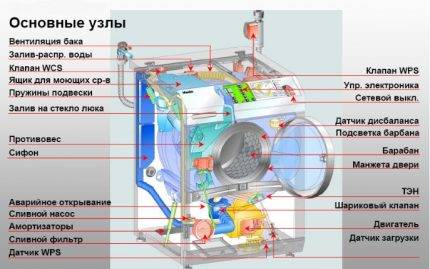 To make it easier to cope with the disassembly of washing equipment, you can visually study the design features of the unit by considering this diagram
Then you will need to remove the weighting agent located on top and only after that carefully remove the tank to be repaired or replaced.
The South Korean manufacturer supplies its new models with a self-diagnosis system. Decoding error codes will help you quickly and accurately determine what needs to be changed and where to repair. It will allow you to immediately decide whether it is worth doing the repair yourself or it is better to contact the workshop.
Washing machine shock absorber repair
Replacing shock absorbers in a washer can be carried out even by an amateur, while a person will not harm the car.
Health check
For washing shock absorber repair do-it-yourself machines it is necessary to check which part has become unusable.
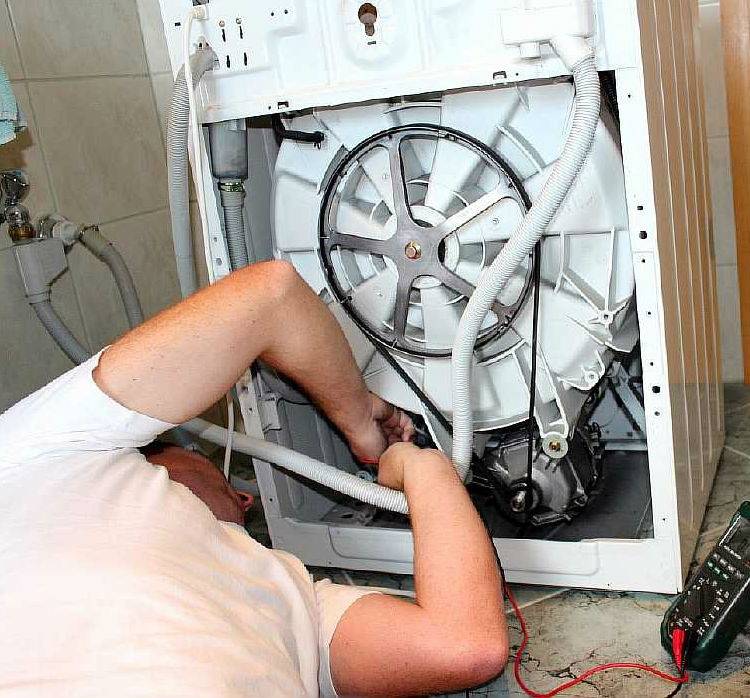
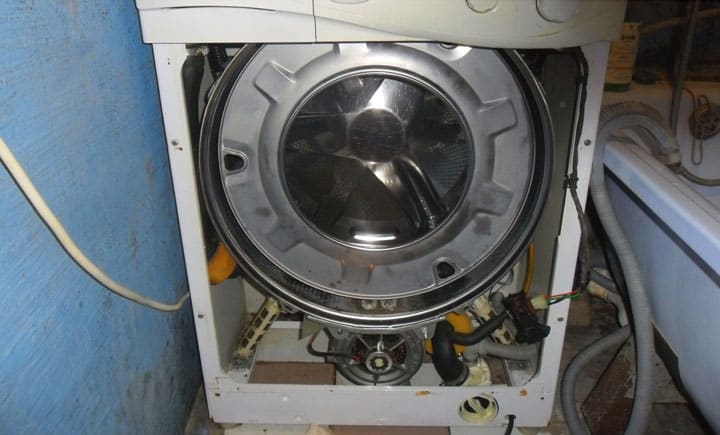
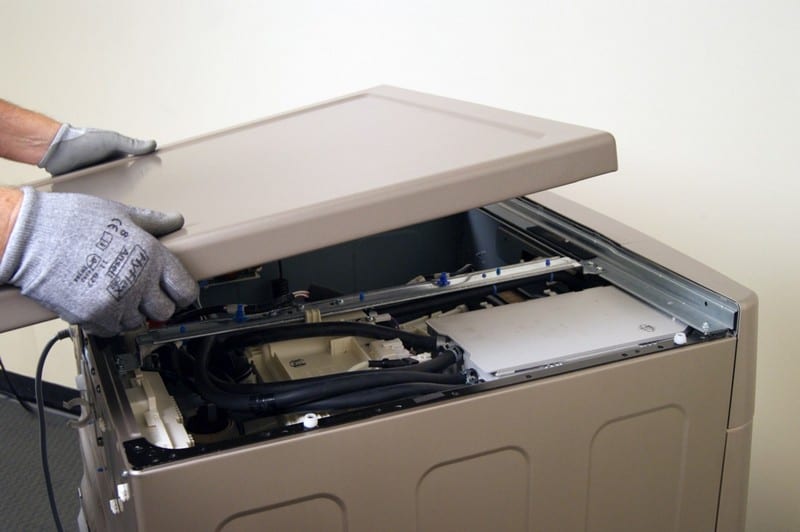
It is necessary to provide access to the damper part of the mechanism. It is recommended to put the washing machine on its side. Then follow the instructions:
- Unscrew the two screws on the back of the machine that secure the top cover and remove it.
- Pull out the detergent drawer.
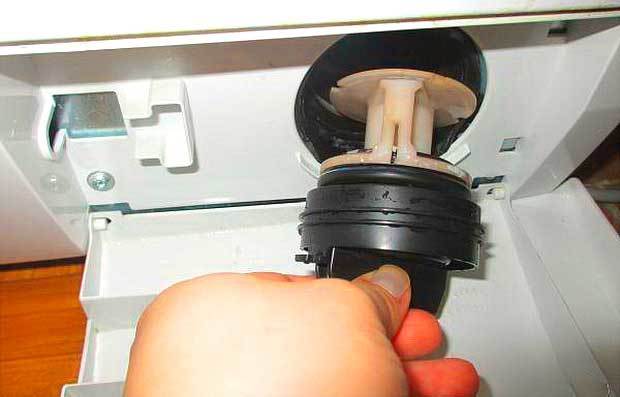
- Release the drain filter from the panel covering it.
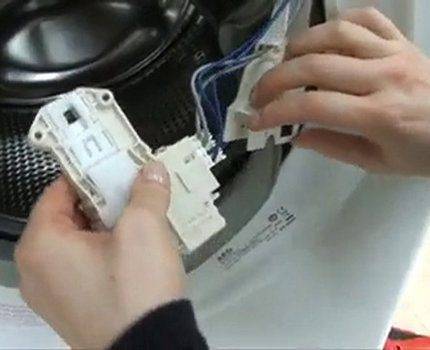
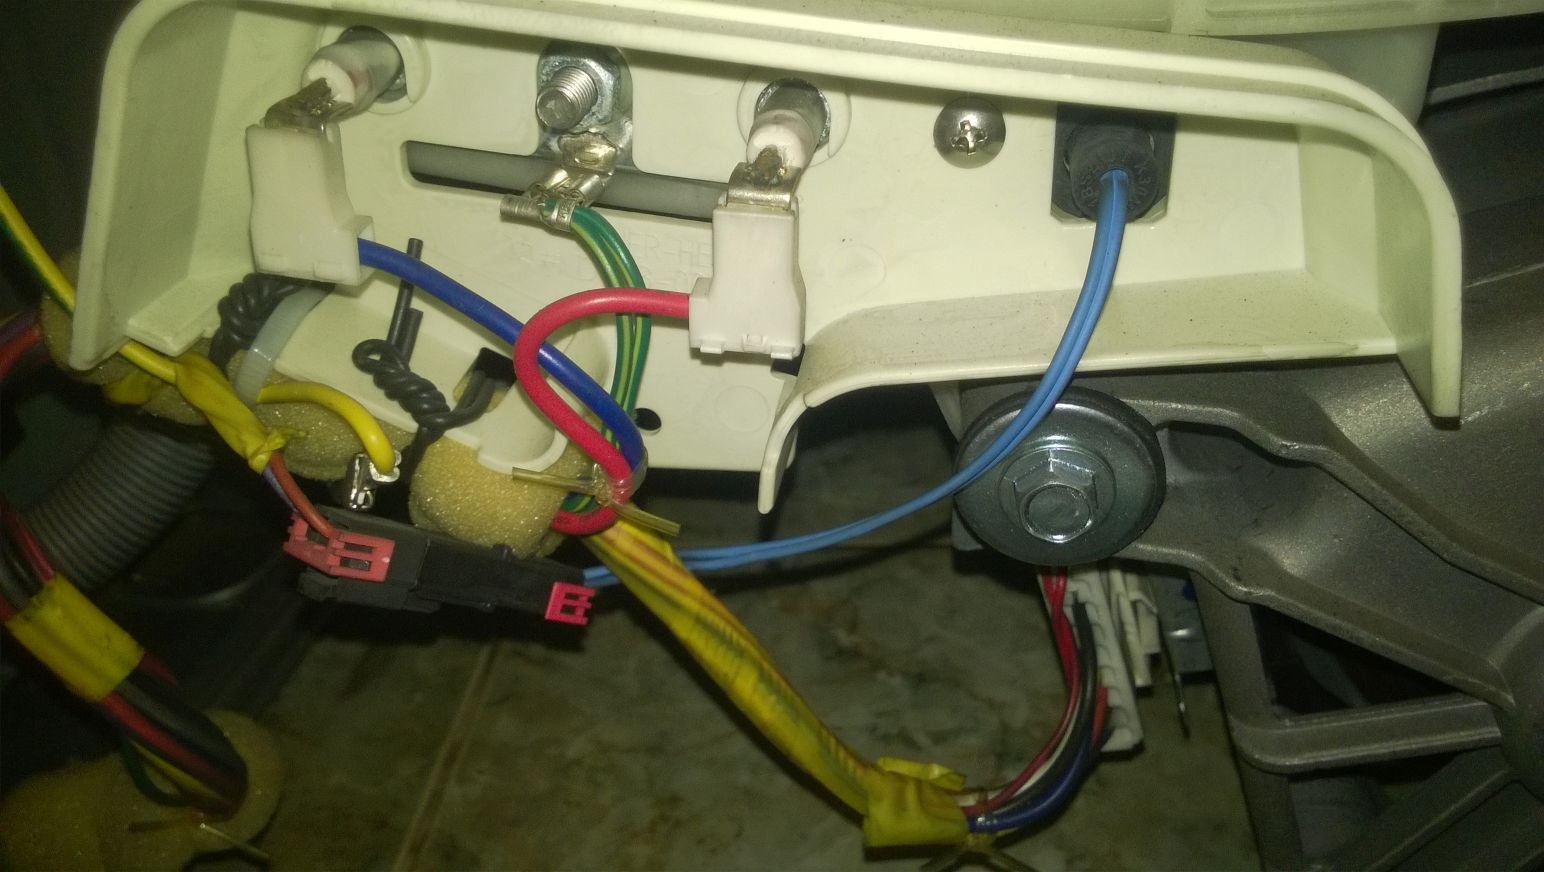
- Remove control panel. To do this, it will be necessary to unscrew the additional bolts and disconnect the wires.
- After gaining access to the cuff of the front of the device, remove the fixing collar, and then the cuff itself. Push it inside the machine.
- It is now recommended to detach the facade.
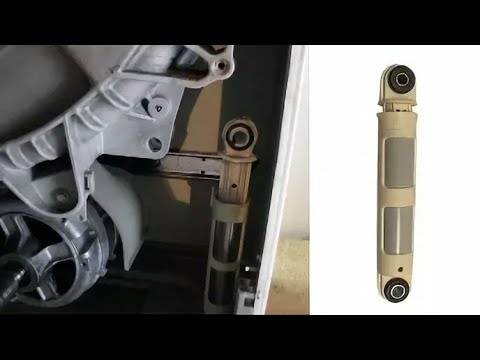
To understand whether it is worth changing the damper, it is recommended to compress it. If it compresses and decompresses very easily and freely, then the device must be replaced.If the design is compressed with difficulty, then the shock absorber will still work.
There are other reasons for the failure of the device.
- Worn liner or gasket. Then replace the rubber part of the device.
- Mechanical deformations due to improper transport. This will need a replacement.
- The bolts are worn out and the shock absorber just hangs on them. Bolts will need to be replaced.
How to change shock absorbers in a washing machine
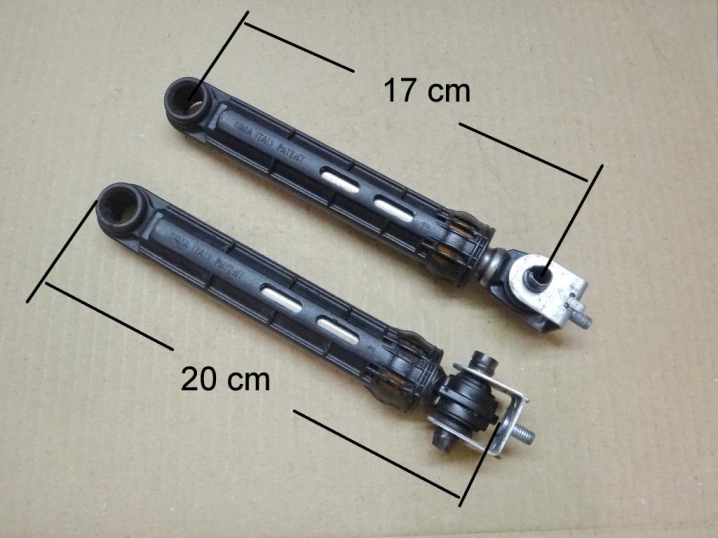
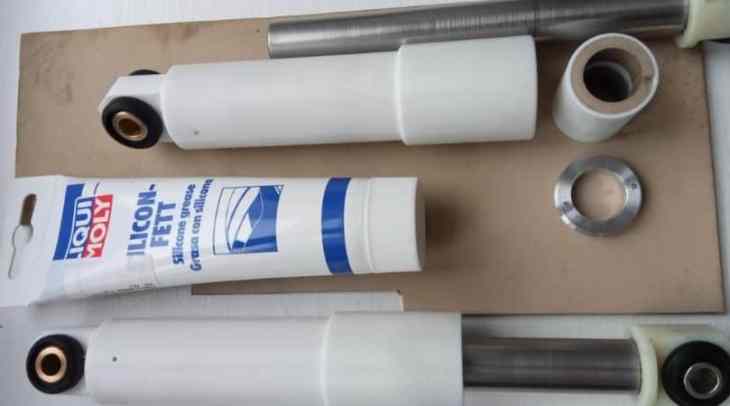
The ideal option when repairing shock absorbers is to replace it with an original spare part with the same characteristics. It happens that the necessary original spare parts are not available for sale, or they need to be ordered and waited a long time. In this case, you can choose dampers that are similar in characteristics. First of all, the following parameters are taken into account:
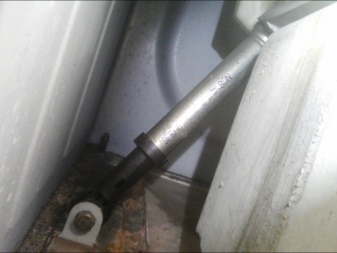
- Resistance created during operation. In most cases, this parameter is printed on the body of the element in the form of a digital designation in newtons. Most often it is in the range from 80 to 120 N;
- The distance between the mounting axes in a fully folded and compressed state;
- Attachment type. If there are no special latches on the shock absorbers, then it is fastened either with bolts or with plastic fingers. Usually bushings of silent blocks have a hole for an M10 or M8 bolt.
Having picked up an analog similar or close in characteristics and having redone the mount, it is easy to install it in place. Dampers are replaced in the reverse order of disassembly.
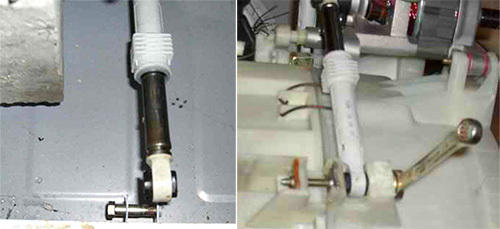
Device and principle of operation
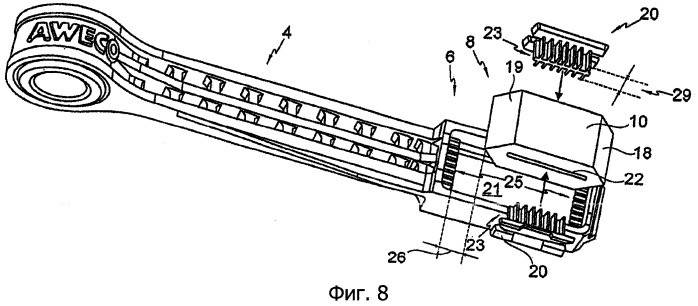
A shock absorber in a washing machine is an important part, without which no device can function normally.This element is a small body part, inside of which there is a piston with a return spring, a gasket, a rod and fixation bushings.
There are vertical shock absorbers, as well as variations that are located at a slight angle of inclination.
Bushings equipped with latches or bolts are used as clamps. With their help, it is possible to ensure high-quality fixation of the shock absorber in the lower body part of the unit, as well as on the side surface. In the role of fasteners, return springs are used, which are considered a key component in depreciation.

Shock absorbers are not universal parts, so their appearance may vary depending on the model of the device for which they were made. Each variety is aimed at working with a certain mass of things that are loaded into the drum. It is worth noting that the shock absorber is able to absorb vibration of 40-180 N in home devices, and for professional units this figure is much higher.
Shock absorbers differ in their size, the diameter of the holes for installation.
Washing machine leveling
The device is installed in a certain sequence. In the process of alignment, the correct legs play a role. On sale there are models on which only two of them are regulated, and there are where all four are regulated.


Before installing the machine, it is necessary to check the floor surface for the horizontal line, only after making sure that the surface is absolutely flat, you can begin to install the equipment.
For a safe washing process, the machine must be leveled.Not everyone knows how to properly install a washing machine, especially if the surface on which the machine is installed is uneven.
To make sure the surface is even, a building level is used when installing the machine. If there are significant drops, hills or, vice versa, pits at the installation site, it will not be possible to install the machine evenly. The floor surface must be leveled first.
After leveling the floor, the machine must be connected to the water supply and sewerage, so that after the final installation, the equipment can no longer be moved. Using a wrench, the locknut on the legs is unscrewed.
Next, the machine is installed in a permanent place and, using the building level, the surface of the machine is leveled. Focusing on the level, adjusting the legs achieves a flat surface.
Installing and leveling the washing machine
The corner of the washing machine rises when the corresponding leg is unscrewed, therefore, by twisting it in the opposite direction, the corner drops. It is necessary to control the level in several zones.
The level is placed on the top cover of the machine, first along, and then across and diagonally. All indicators should point to zero, or the control bubble in the level should be exactly in the middle.
Despite the fact that the level shows zero on the horizontal surface of the machine, it is necessary to check that the vertical sides are also in line with the level.
After all the legs are set to the desired length, its surfaces remain equal relative to the level of the nut and are fixed to maintain the selected position.
Installing a washing machine by level is not only an aesthetically external necessity, but also a characteristic, if it is not observed, it is pointless to expect high-quality work from a typewriter.
An uneven position will cause the drum to move, especially when inside heavy laundry, which in turn will lead to an uneven position relative to the axis. As a result of an unstable position, the machine can move during the washing process, vibrate strongly.
Rubber pads to reduce vibration
Vibration and movements during washing will contribute to the rapid wear of the fixing and other elements inside the device.
Special rubber pads allow not only to reduce vibration, but also to create additional shock absorption and also fix the machine in place.
- If during the spinning process the machine remains in place, there is no visible vibration, then it is installed in compliance with all the rules.
- When spinning, the machine vibrates, rattles or moves, additional adjustment of the position is necessary.
- If anti-vibration pads are not used, it is worth purchasing them and installing them under the legs.
It is better to choose a level length of approximately 40 cm, with a bubble, and not electronic or laser. It is this type of level that is more suitable for leveling small surfaces.
If it is not at hand, then you can replace it with a plastic container into which water with dye is poured, and on the outside, at the level of the edge of the water, a strictly horizontal line is applied, which will serve as a reference point. If, after adjusting at a homemade level, the strip and the liquid level clearly coincide, and the device is stable, does not stagger, then the machine is installed correctly.
Spare parts selection rules
Each model of the washing machine has its own design features. Therefore, universal spare parts that fit all washing machines do not exist.


When buying new shock absorbers, it is advisable to make sure of their quality. When compressed, the part must resist.
If, when compressing, practically no effort is required, such a part is not suitable for installation.
You should not purchase more powerful shock absorbers with the hope that the washing machine can be overloaded. This is an erroneous opinion, this cannot be done, since all elements of the machine (and not just dampers) are designed for certain loading parameters set by the manufacturer.
If in doubt about choosing a new pair of parts, you can go to the store with the removed ones and ask the seller to pick up similar ones.
Video review on the selection of shock absorbers:
What is shock absorber
Why is it needed
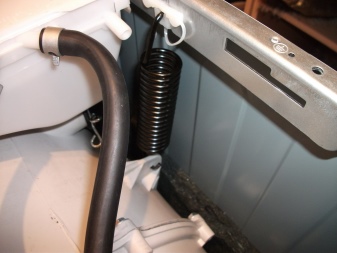
Shock absorbers absorb the vibration load on the drum, facilitating its work and extending the life of the entire washer. Most often, the elements are installed in a standard place - under the tank. The springs move back and forth (along a reciprocating path), due to which they “eat up” the load. That is why the tank does not knock on the walls.
What does it consist of
The part has a spring-piston design: it resembles a cylinder in shape. Inside there is a rod, consisting of a rod holder and a rubber gasket, which is impregnated with a special lubricant for effective friction. The upper part of the stem is specially made for the insertion of polymer inserts and rubber gaskets. A piston with another gasket is fixed on the base of the rod.
How is it different from a damper
Dampers are a modern type of shock absorber. The principle of operation is the same, the difference is only in the position of the springs: in models with dampers, they are not installed inside the part, but at the top, and the tank is suspended on them. This allows faster spring replacement and less chance of breakage.
How to adjust the washing machine yourself
You will need:
- Tools.
- Dowel.
- Liquid Nails.
- Plywood.
First you will need to check the surface on which you are going to install your washing machine.
If the floor is uneven, then it doesn’t matter what kind of coating it has - tiled or concrete - the machine will still not be the way it should be. This means that even with a slight vibration, the machine will still jump and slowly move from its original location.
If this is your case, then you need to level the floor, and then you don't even have to adjust the washing machine.
If your floor surface is flat, then you should look at how the legs of the washing machine stood up. To do this, gently shake the machine back and forth. You can also tilt it slightly to the sides. This is necessary in order to understand which legs should be raised for adjustment.
Now let's move on to the process of regulating the washing machine. To do this, those legs that need to be lifted should be untwisted (or rather the washer on them), and then we scroll the leg clockwise or counterclockwise. This is the adjustment process itself. To check the accuracy of the installation, use the building level. Ideally, the level bubble should be centered. To measure, it will be most convenient to put the level on the machine itself and make adjustments.
An additional device can be used to adjust and align certain types of machines. Take a plywood sheet and cut out the base for the typewriter. Next, you should attach it to the floor with dowels or liquid nails.
The following operation can be called a folk method: wipe the floors with very sweet water and immediately put your newly acquired appliance on them. It should stick to the surface. The method, frankly, is doubtful, but those who did this assure that everything went perfectly.
What to do if you can not get rid of the vibration?
The destruction of internal elements, such as shock absorbers, dampers and counterweights, as a rule, causes shaking and displacement of the washer during the spin cycle.
Only a specialist will be able to accurately determine the malfunction and replace the part at the highest level, therefore, if the vibration does not disappear with the correct implementation of all instructions, we strongly recommend that you seek the advice of a specialist.


TOP stores of washing machines and household appliances:
- /- household appliances store, a large catalog of washing machines
- - Inexpensive hardware store.
- — profitable modern online store of home appliances
- — a modern online store of home appliances and electronics, cheaper than offline stores!
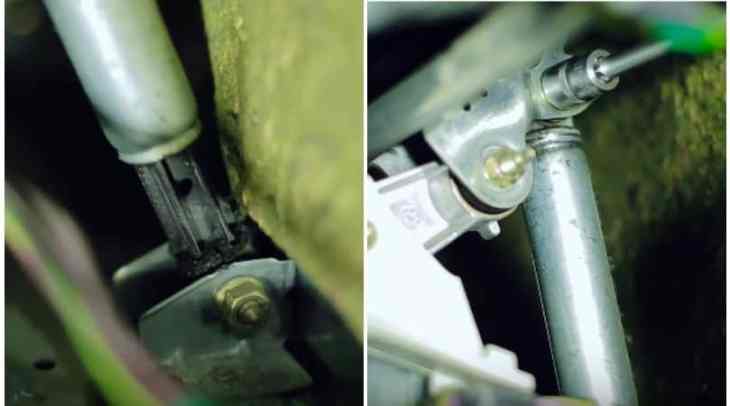
How to remove and inspect shock absorbers from a washing machine
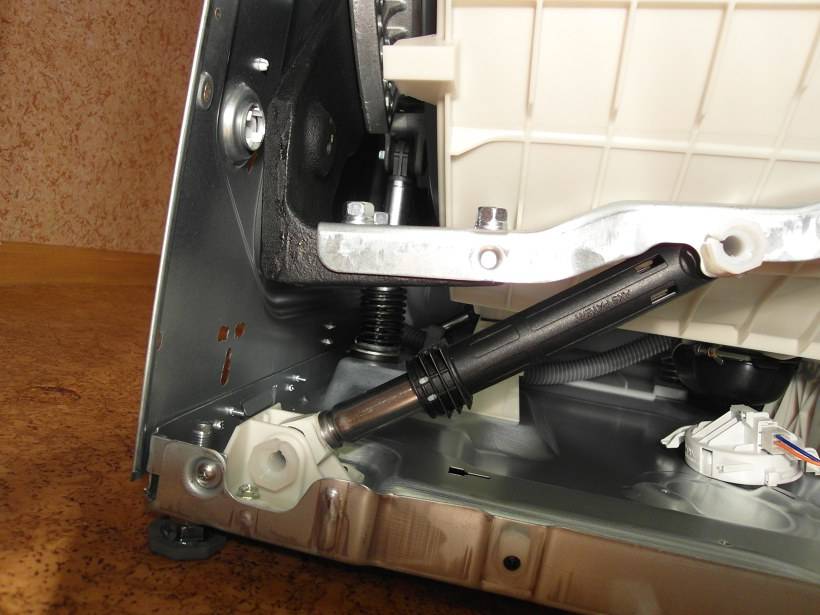
All damping elements are protected by a housing and lining, in order to get to the damper mounts on different models of washing machines, different disassembly approaches are required.
When replacing dampers on a washing machine, there is no need to completely disassemble it. For example, to provide access to shock absorbers on Bosch washing machines, it is enough to remove the front cover.In these models, dampers have a classic single-bolt mount, located at the bottom of the unit. The upper part of the mount to the tank rests on the latches that are part of it.
In order to remove the shock absorber from the tank, the connection is drilled with a long drill with a diameter of 13 mm, then you need to remove the part through the front of the machine.
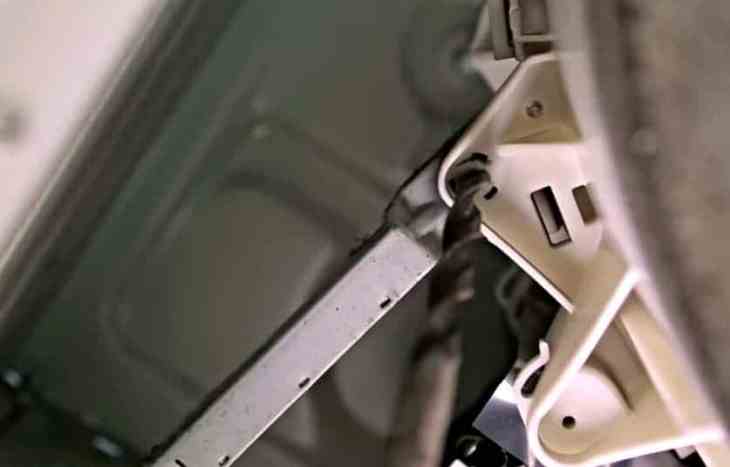
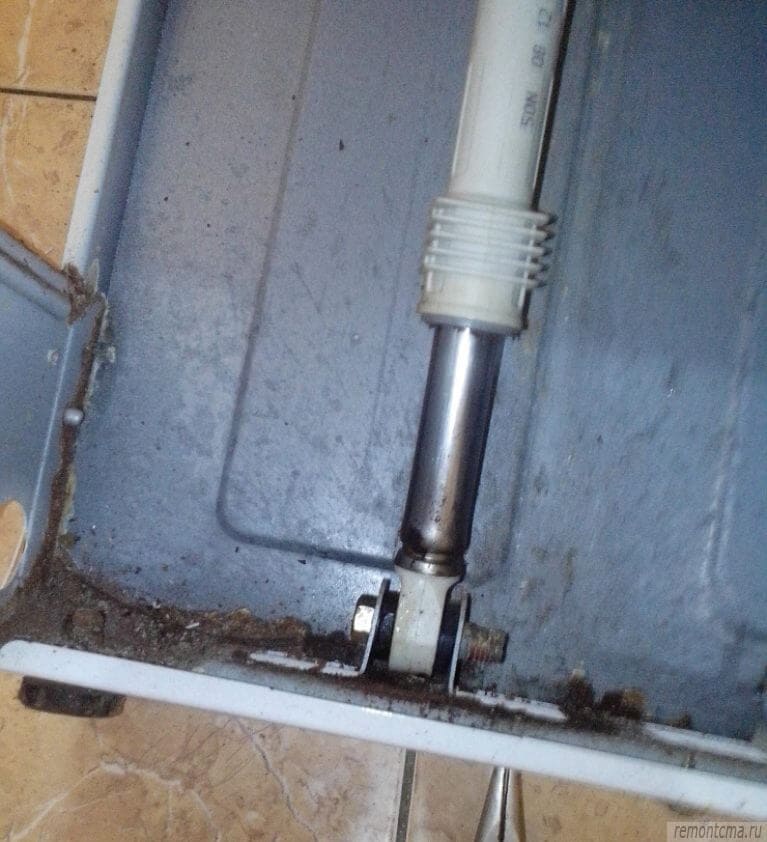
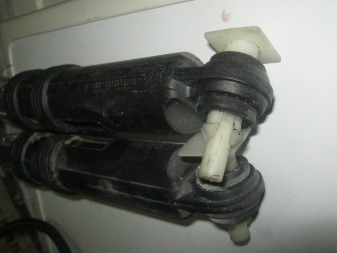
On some LG models, no covers need to be removed to remove the damper. To do this, it is enough to put the unit on its side, having previously disconnected it from the power supply, water supply and sewerage. The shock absorber is fastened on both sides with plastic pins with locking latches. By depressing the latch, you can easily remove the finger from the hole, releasing it from the mount. If the finger is removed very tightly, you can use a special tool such as an automobile VDshka.

In Samsung washing machines, m8 or m10 bolts are most often used to mount dampers. They are unscrewed with ring wrenches or socket heads, 12-13 mm in size. Bolt fastening is used in models from Miele, AEG and many other manufacturers. In Wirhpool models, shock absorbers on both sides are mounted on special latches; by pressing them, you can freely remove the damping elements.
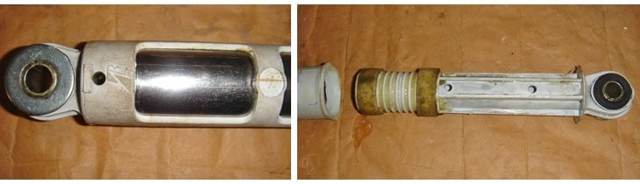
Regardless of the method of fastening, removal must be done carefully, without using an impact tool that can damage the plastic tank or other elements of the device. Checking the damper is carried out by simply pressing the rod and pulling it out of the body. In this case, there should be noticeable resistance to pressing by hand.
If the stem enters freely, and in some cases simply falls out of the body, the shock absorber needs to be replaced.In some dampers, a special sealing grease is placed in the internal cavity of the housing.
If the rod is freely extended and there is no lubrication, and traces of rust are visible inside, we can talk about wear and tear of the shock-absorbing devices.
Causes of breakdowns and ways to eliminate them
- the washing machine does not turn on;
- water is not collected;
- water is drawn very slowly;
- water remains cold throughout the wash;
- the washing machine turns off during the wash cycle;
- the drum does not rotate;
- water does not drain;
- the machine is very noisy;
- water flows from the machine;
- the washing machine vibrates very strongly;
- the door does not open.
- Wrong program selected.
- The door is not locked.
- No power supply. (Check the electricity in the apartment, directly the socket, whether the plug is inserted into the socket).
- Check if water is getting into the machine.
- Breakage of electrical wiring in the machine. It is necessary to de-energize the machine, remove the back cover and check the terminals, if they are oxidized, you need to clean them. Check wires for breaks.
- Sometimes the timer can be the cause. To check whether this is so, you need to select different programs, if the washing machine works on one of them, then the timer needs to be replaced.
No water coming in
- Check that there is water in the water supply and that the taps are not closed.
- Check the integrity of the inlet hose and whether it is clogged.
- Check the intake filter for cleanliness. To do this, turn off the water supply, unscrew the inlet hose and unscrew the filter with pliers. Rinse thoroughly under running water and put everything back in place.
- Intake valve blockage.Dirt that has passed through the filter can damage the valve. In this case, you need to find the inlet pipes and replace the valve.
- The water regulator is broken.
When the required amount of water has accumulated, gas is compressed in the compartment with the pressure regulator. The switch is activated, the water supply stops and its heating begins. In fact, this is a tube, if it clogs or breaks, then the machine will not work.
Repair:
- First you need to check how the tube is mounted on the switch. If the end has hardened, then you need to cut it off a little and put it on again.
- To check the switch itself, you should blow into the tube, if a click is heard, then the switch is working.
- There is a hose between the pressure chamber and the tank, you need to check the clamp on it, loosen it a little if necessary.
- Wash the camera and check it for damage.
- The water level regulator is broken. If it is faulty, then the machine does not understand that the water has already accumulated in the right amount and does not turn on the heater. The regulator should be checked and replaced if broken.
- Scale on the heating element. Due to hard water, the heater becomes covered with plaque over time, you need to periodically descale the machine. If this is not done, then you will have to completely unwind the machine and clean the heating element directly.
- Breakage of wires leading to the heater. The wires are checked for breaks and the terminals are cleaned.
- Thermostat failure. If it's faulty. It is possible that the heater is turned off too early.
There can be many reasons: power outage, water supply, blockage in the drain or inlet hose, the pump, thermal relay, heating element, timer, engine broke down.
In this case, you need to check the supply of electricity and water, if this is not the case, then the machine is disconnected from the water supply and electricity.The water is drained manually and all other nodes are checked.


- Drive belt loose or broken. You need to spin the car and check the integrity of the belt. A normally tensioned belt should move 12 mm when pressed. If the machine is equipped with a belt tension regulator, then the engine moves down a little and the bolt is tightened. If there is no such function, then you will have to change the belt.
- If the door latch is broken, the drum will also not rotate.
- Broken engine.
- Check if delayed wash or pause is selected.
- Check drain hose for blockages or kinks.
- Check exhaust filter. If clogged - clean, if broken - replace.
- Check pump. You need to remove it and check for the presence of foreign objects. Before removing it, you need to put a rag for water, release the clamps that attach the hoses to the pump. Check how the impeller rotates, if it is very tight, then loosen it a little. Check if the threads are wound on the rotating shaft. If there are no blockages, then it needs to be replaced.
- Check fluid regulator, timer.
In case of leaks, you need to check the integrity and fastening of the hoses, the door seal.
The reasons:
- Overload.
- Uneven distribution of things.
- The machine is on uneven ground and not level.
- The ballast has loosened.
- Suspension springs broken or weakened.
- Check tank for small items. The most common reason is forgotten coins in pockets.
- Check door latch.
- If a squeal is heard during operation, then the belt is slipping. It needs to be tightened or replaced.
- Crack. Most likely the bearings are broken.
Instructional video
Calling the master: repair price and ordering
If it is impossible to replace the shock absorbers on your own, it is better to call a master from a company that provides repair of washing household appliances. When leaving an application, it is necessary to inform the dispatcher of the automatic machine model, this information is in the passport for the product. If the dampers have already been purchased, then this should also be mentioned.
The cost of the work of a specialist depends on the price list of the company (you can familiarize yourself with it in advance). On average in the capital, replacing one shock absorber in a Samsung washing machine will cost from 1,300 rubles in the capital (excluding the price of the part).
The duration of the wizard’s work on average is up to 1.5 hours, if along the way there were no problems that also require the attention of a specialist. Upon completion of the work, a test run of the machine is made and a guarantee is issued for the repair.
It is not advisable to call masters on random ads, as there is a risk of falling for scammers. At the same time, high-quality repairs can not be obtained at all. It is better to contact a trustworthy company that has been in the market for the provision of services for several days.


