- Purpose and device
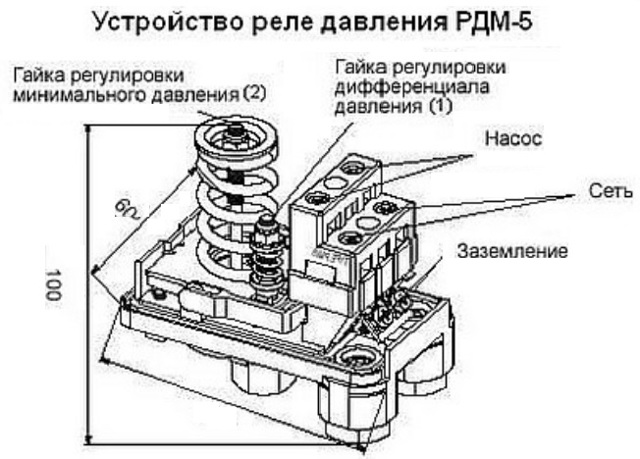
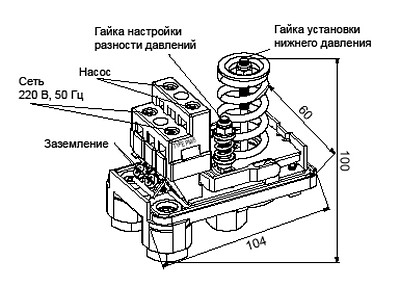
- Pressure switch device
- Species and varieties
- Installation and adjustment of the water pressure switch for the pump
- Consideration of the connection diagram of the water pressure switch for the pump
- Setting up the pressure switch of the pumping station on your own
- The device and principle of operation of the relay
- Prices for pumping stations
- Expert advice
- The need to adjust the water pressure switch for the pump
- Instrument Adjustment Recommendations
- How to correctly set the pressure levels for switching on and off the pump?
- Pump Relay Selection Criteria
- Water level sensors
- flow controllers
- float
- Step-by-step instructions for adjusting the pressure switch
- Water pressure switch adjustment
- How to determine relay thresholds
- Setting the pressure switch for a pump or pumping station
- Conclusions and useful video on the topic
Purpose and device
In order to maintain a constant pressure in the water supply system of a private house, two devices are needed - a hydraulic accumulator and a pressure switch. Both of these devices are connected to the pump through the pipeline - the pressure switch is located in the middle between the pump and the accumulator. Most often, it is located in the immediate vicinity of this tank, but some models can be installed on the pump housing (even submersible). Let's understand the purpose of these devices and how the system works.
One of the pump connection diagrams
A hydraulic accumulator is a container divided by an elastic pear or membrane into two halves. In one, air is under some pressure, in the second, water is pumped. The water pressure in the accumulator and the amount of water that can be pumped there is regulated by the amount of air pumped. The more air, the higher the pressure maintained in the system. But at the same time, less water can be pumped into the tank. Usually it is possible to pump no more than half of the volume into the container. That is, it will be possible to pump no more than 40-50 liters into a hydraulic accumulator with a volume of 100 liters.
For normal operation of household appliances, a range of 1.4 atm - 2.8 atm is required. To support such a framework, a pressure switch is required. It has two operation limits - upper and lower. When the lower limit is reached, the relay starts the pump, it pumps water into the accumulator, and the pressure in it (and in the system) increases. When the pressure in the system reaches the upper limit, the relay turns off the pump.
In a circuit with a hydroaccumulator, for some time water is consumed from the tank. When enough flows out so that the pressure drops to the lower threshold, the pump will turn on. That's how this system works.
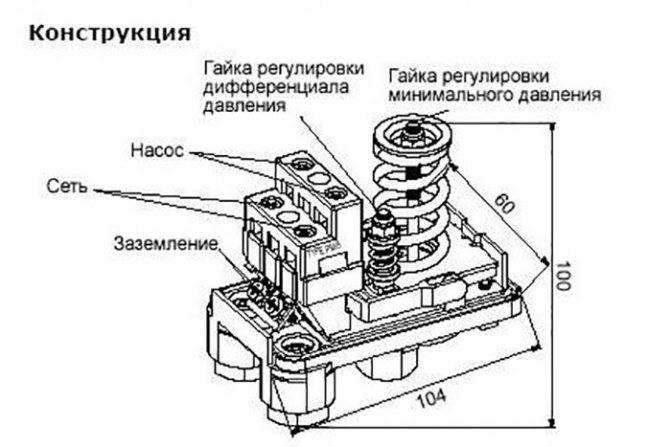
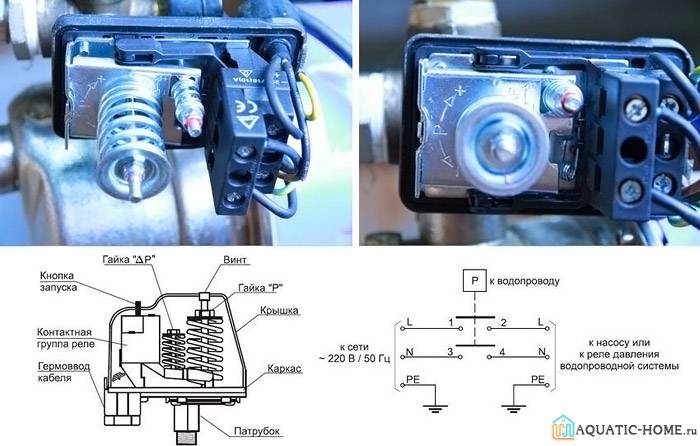
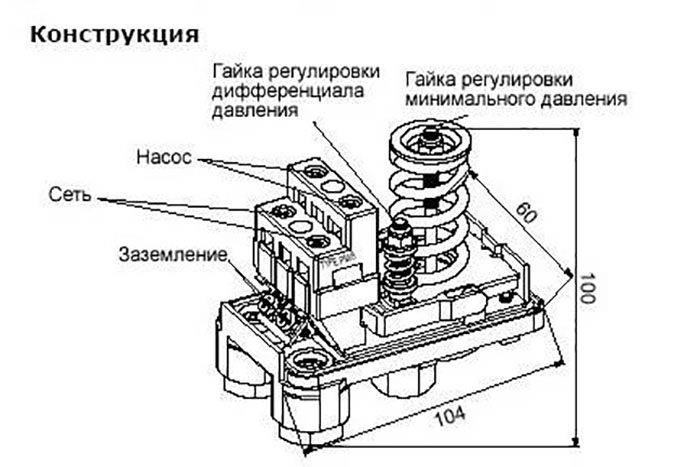
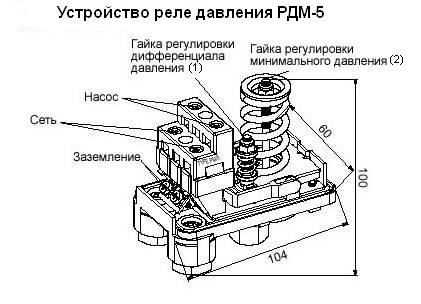
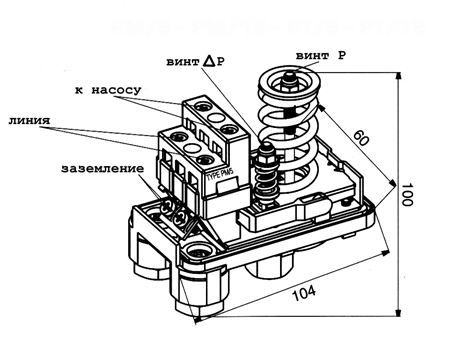
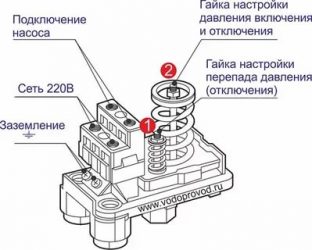
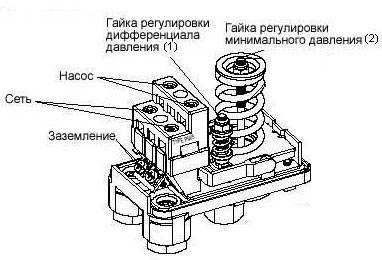
Pressure switch device
This device consists of two parts - electrical and hydraulic. The electrical part is a group of contacts that closes and opens on / off the pump. The hydraulic part is a membrane that exerts pressure on the metal base and springs (large and small) with which the pump on / off pressure can be changed.
Water pressure switch device
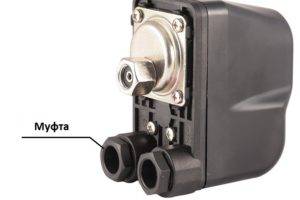
The hydraulic outlet is located on the back of the relay.It can be an outlet with an external thread or with a nut like an American. The second option is more convenient during installation - in the first case, you either need to look for an adapter with a union nut of a suitable size or twist the device itself by screwing it onto the thread, and this is not always possible.
The electrical inputs are also located on the back of the case, and the terminal block itself, where the wires are connected, is hidden under the cover.
Species and varieties
There are two types of water pressure switches: mechanical and electronic. Mechanical ones are much cheaper and usually prefer them, while electronic ones are mostly brought to order.
| Name | Pressure adjustment limit | Factory settings | Manufacturer/country | Device protection class | Price |
|---|---|---|---|---|---|
| RDM-5 Gileks | 1- 4.6 atm | 1.4 - 2.8 atm | Gilex/Russia | IP44 | 13-15$ |
| Italtecnica RM/5G (m) 1/4″ | 1 - 5 atm | 1.4 - 2.8 atm | Italy | IP44 | 27-30$ |
| Italtecnica RT/12 (m) | 1 - 12 atm | 5 - 7 atm | Italy | IP44 | 27-30$ |
| Grundfos (Condor) MDR 5-5 | 1.5 - 5 atm | 2.8 - 4.1 atm | Germany | IP 54 | 55-75$ |
| Italtecnica PM53W 1″ | 1.5 - 5 atm | Italy | 7-11 $ | ||
| Genebre 3781 1/4″ | 1 - 4 atm | 0.4 - 2.8 atm | Spain | 7-13$ |
The difference in prices in different stores is more than significant. Although, as usual, when buying cheap copies, there is a risk of running into a fake.
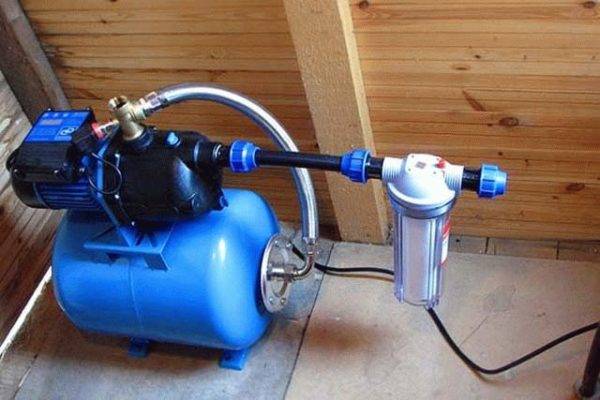
Installation and adjustment of the water pressure switch for the pump
If the installation and adjustment of the pressure switch water pump will be carried out on its own, then you will not have to spend financial resources directly on attracting professionals. The process of connecting and configuring the device is not difficult.
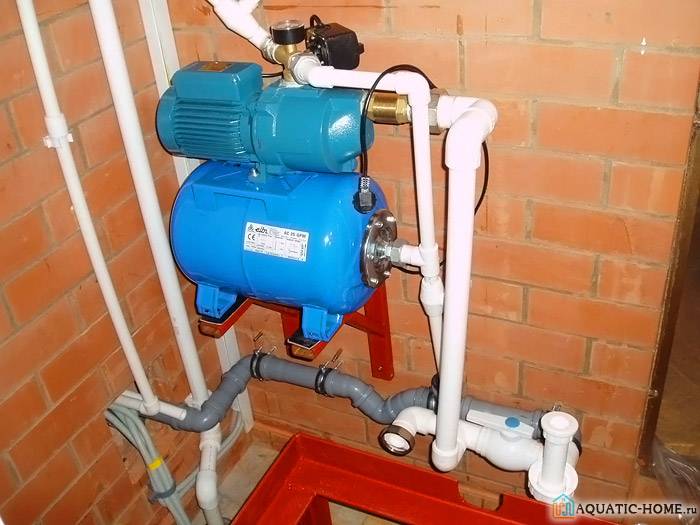
An example of installing the device in conjunction with a pumping station
Related article:
Consideration of the connection diagram of the water pressure switch for the pump
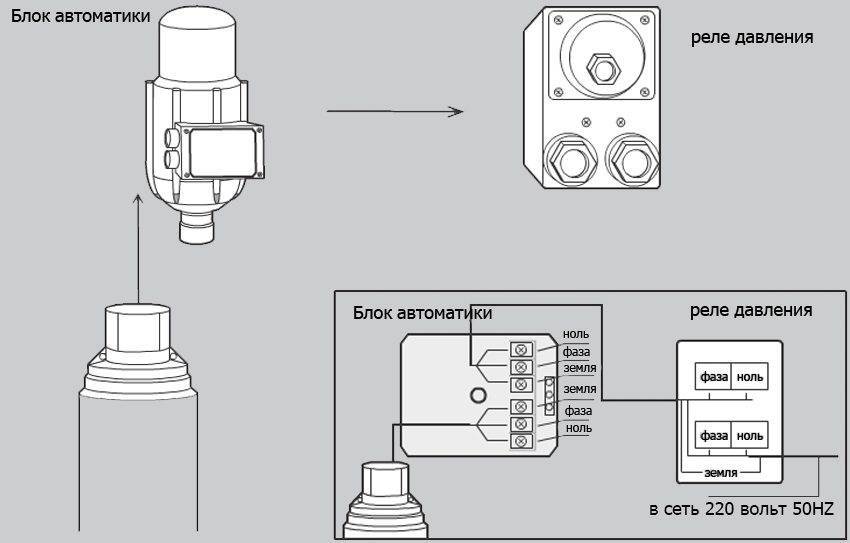
The finished fixture is permanently connected to the electrical and plumbing systems, since there is no need to move it. For connection, a dedicated electricity line is not at all necessary, but still desirable. From the shield it is recommended to bring a copper cable with a cross section of 2.5 sq. mm.
Basic wiring diagram
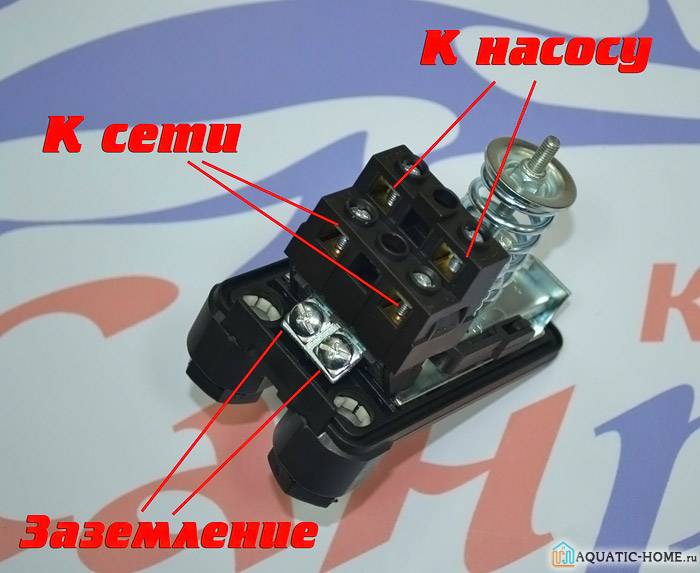
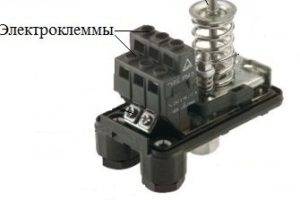
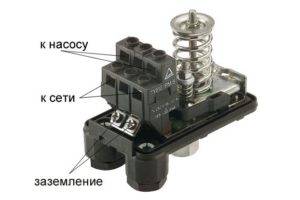
The circuit must be grounded, since the combination of electricity with water is quite dangerous. Cables are inserted into special holes located on the back of the case. Under the cover there is a special block with contacts:

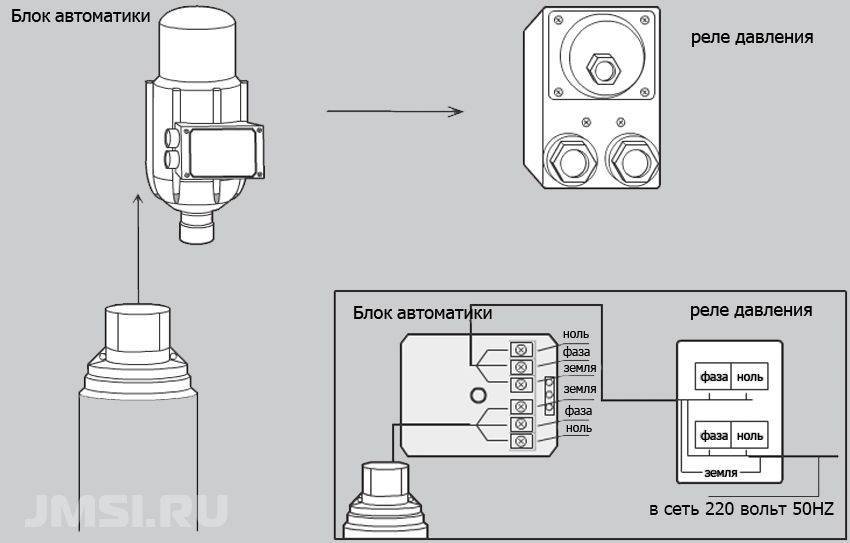
- terminals for connecting phase and neutral wire;
- contacts for grounding;
- terminals for wires leading from the pump.
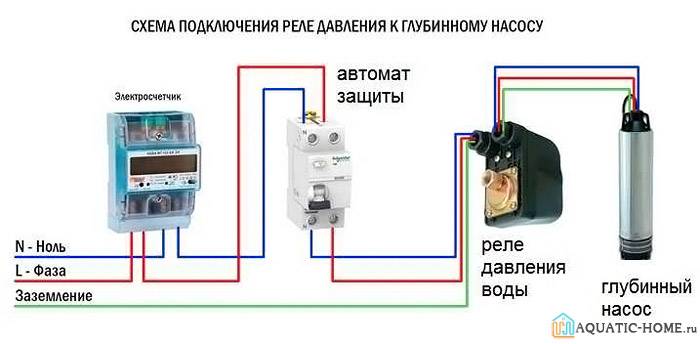
Connection diagram to the electric meter and RCD
Setting up the pressure switch of the pumping station on your own
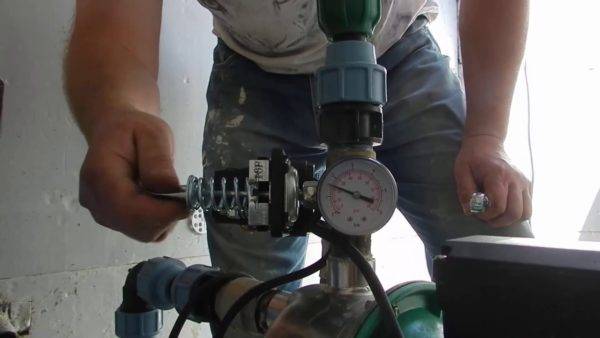
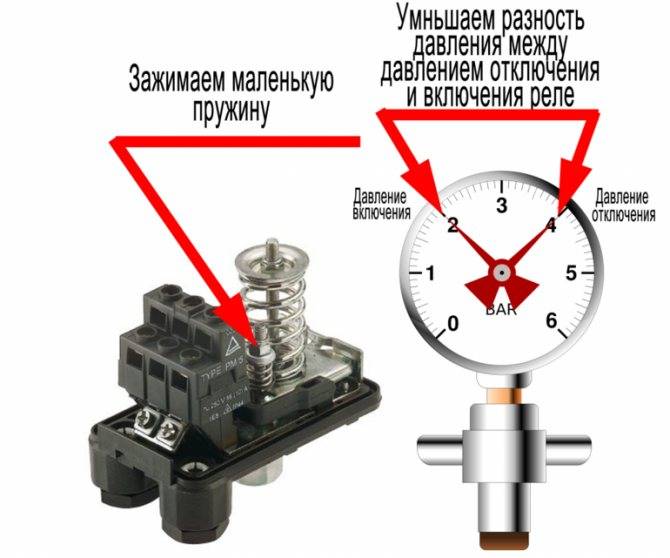
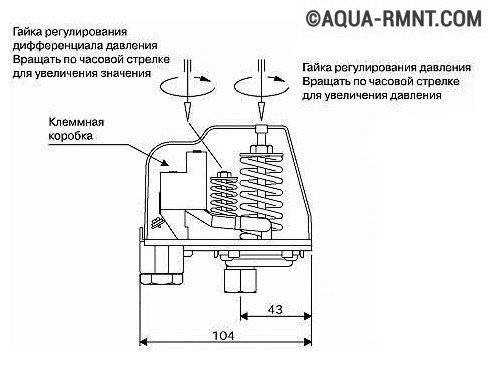
To set up the system, you need a reliable pressure gauge that can accurately measure pressure. According to his testimony, adjustments are made. The whole process comes down to tightening the springs. Turning it clockwise increases the pressure and vice versa.
Large and small springs inside the case are necessary to adjust the device
The setup sequence is something like this:
- The system is started, after which, using a pressure gauge, the thresholds are monitored at which the device turns on and off;
- Using a suitable wrench, the large spring responsible for the lower threshold is released or compressed.
- The system is turned on and the set parameters are checked. If necessary, adjustments are made.
- After setting the lower pressure level, the upper limit is adjusted. To do this, the same manipulations are performed with a small spring.
- Final testing of the system is in progress. If the results are satisfactory, then the tuning process can be considered complete.
The springs can be accessed after removing the housing
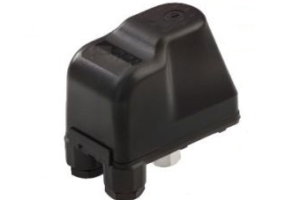
The device and principle of operation of the relay
 Pumping station for a private house
Prices for pumping stations
Pumping stations
The pumping station is quite compact and has a simple device. The relay itself consists of several elements.
Table. Components of the pressure switch.
| Element name | Purpose and brief description |
|---|---|
| Switching pressure adjustment spring and nut | This spring sets the pump shutdown parameters. When it is compressed, the maximum pressure increases. Adjustable with a nut. When the nut is loosened, the pressure drops. The spring is mounted on a movable plate that turns on/off the terminals. The movable plate is connected by a metal pipe to the hydraulic accumulator. The pressure of the water lifts it, the contacts open. |
 Frame Frame | Made of metal, used to fix all relay elements. |
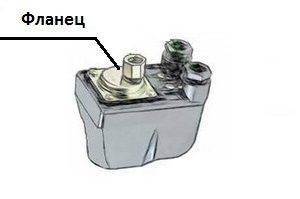 metal flange metal flange | With its help, water is supplied from the accumulator to the relay. At the same time fixes the device on the pumping station. |
 Cable entry sleeves Cable entry sleeves | One is supplied with mains power, and the second supplies voltage to the electric motor. |
 Cable terminals Cable terminals | The phase and zero of the engine are connected to the lower ones, the mains supply to the upper ones. It is not necessary to follow this order. |
 grounding grounding | Connects the metal case of the pumping station to the grounding of a house or apartment. Do not confuse the neutral wire and grounding, they are different concepts. |
Factory settings do not always meet the wishes of consumers, in this regard, it is very often necessary to make an independent setting of the parameters.
 Adjusting the relay parameters allows you to achieve maximum efficiency of the equipment
 The principle of operation of the pressure switch
Expert advice
To properly adjust the pressure switch, you must follow these recommendations:
- power to the relay is connected through a separate line with an RCD;
- be sure to use grounding;
- if water appears inside or on the relay, then it must be urgently turned off; this is a sign of a ruptured membrane;
- filters must be used in the water supply system; they require regular cleaning;
- 1-2 times a year, the relay is unscrewed and washed;
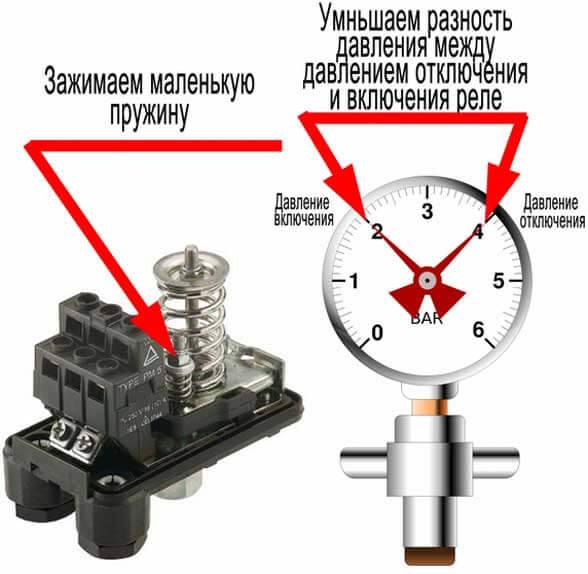
- the smaller spring element is more sensitive than the large one, so when adjusting it, turn the nut more slowly;
- a small spring serves to set the difference between the upper and lower thresholds for the relay;
- delta should be within 2 atm - this ensures the normal filling of the drive with water.
Proper installation, configuration and timely maintenance of the pressure switch guarantees corrective and uninterrupted operation of the pumping station for many years and ensuring a stable water pressure in the system.
The need to adjust the water pressure switch for the pump
Setting up the relay independently or with the involvement of qualified specialists is required in any case when assembling the pumping station from separate parts. It is possible that setting the water pressure switch will be required even if the finished pumping station is purchased from a specialized store.
This is explained by the fact that each water supply system is characterized by individual characteristics and the needs of residents are also different. The degree of water pressure in a house with a shower, sink and bathtub is significantly different from a spacious country house with a jacuzzi and hydromassage. In this case, it is necessary to adjust the water pressure in the water supply system and configure the equipment individually for each case.
When deciding how to connect a water pressure switch, it should be remembered that in addition to the initial setup that is performed during the installation of pumping equipment, during operation it is necessary to monitor and adjust the operation of the equipment.
In addition, in the case of replacing or repairing a separate element of the pumping station, additional adjustment of the water pressure regulator relay is also required. It is worth saying that the process of adjusting equipment is similar to the procedure for setting it up.


Instrument Adjustment Recommendations
By manipulating the springs, you can achieve a change in the pump shutdown threshold, as well as adjust the volume of water in the hydroaccumulator tank. It is generally accepted that the larger the delta, the greater the volume of liquid in the tank. For example, with a delta of 2 atm. the tank is filled with water by 50%, at a delta of 1 atm. - by 25%.
To achieve a delta of 2 atm., It is necessary to set the lower pressure value, for example, to 1.8 atm., and the upper one to 3.8 atm., Changing the position of the small and large springs
First, let's recall the general rules of regulation:
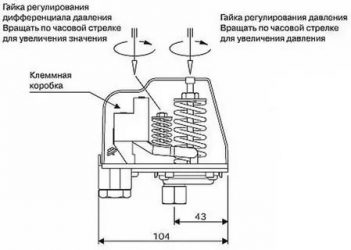
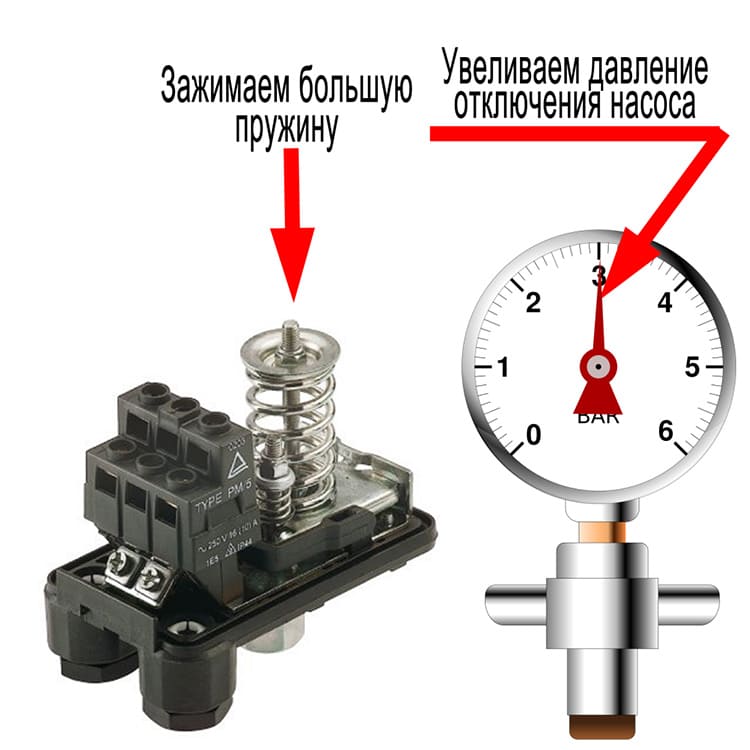
- to increase the upper limit of operation, that is, to increase the shutdown pressure, tighten the nut on the large spring; to reduce the "ceiling" - weaken it;
- to increase the difference between the two pressure indicators, we tighten the nut on a small spring, to reduce the delta, we weaken it;
- nut movement clockwise - increase in parameters, against - decrease;
- for adjustment, it is necessary to connect a pressure gauge, which shows the initial and changed parameters;
- before starting the adjustment, it is necessary to clean the filters, fill the tank with water and make sure that all pumping equipment is working.
How to correctly set the pressure levels for switching on and off the pump?
As mentioned above, pumping stations supplied ready for operation have a relay already configured according to the most optimal parameters. But, if it will be assembled from separate elements on site, then it is necessary to adjust the relay without fail, since it is necessary to ensure a normal relationship between the volume of the tank and the pump power. There is also a need to change the initial setting. Therefore, in these cases, the procedure should be as follows:
- after completing the pressure adjustment in the tank, turn on the pumping station so that water is pumped. It will turn off after the limit value is reached. Each device has its own pressure limit and maximum allowable head, which must not be exceeded. This can be determined by the cessation of its growth. The pump must then be switched off manually. If the maximum value does not match the level given in the instructions for the relay, adjustment should be made by turning the small nut;
- lower pressure is measured in the same way. It is necessary to drain the water from the tank and observe the pressure gauge readings. The pressure will gradually drop and when it reaches the lower limit, the pump will turn on.To adjust it, you need to tighten the large nut. The lower pressure indicator should be somewhere 10% higher than the pressure in the tank. Otherwise, the rubber membrane may quickly become unusable.
Typically, the pump is selected with parameters that do not allow the tank to be pumped to the extreme limit. And the pressure that should turn it off is set to a couple of atmospheres more than the turn-on threshold.
It is also allowed to set limit pressure levels that differ from the values recommended by the relay manufacturer, which allows you to create your own version of the operating mode of the pumping station. When adjusting the pressure with a small nut, it should be borne in mind that the starting point should be the lower level set by the large nut. Rubber hoses and other plumbing are designed for pressure not higher than recommended by the manufacturer, which should be taken into account during installation. In addition, excessively strong water pressure is often unnecessary and causes discomfort.
Pump Relay Selection Criteria
There are many universal models that are sold separately from pumping stations and can be used to assemble the system yourself. When purchasing a relay or automation unit, it is necessary to rely on the characteristics of the device. They can be found in the technical documentation.
It is important that the capabilities of the relay match those of the rest of the equipment. Before buying an automation unit or relay, carefully study the technical data of the model
In most cases, they are standard: nominal pressure from 1.5 atm., Maximum - 3 atm.
Before buying an automation unit or relay, carefully study the technical data of the model.In most cases, they are standard: nominal pressure from 1.5 atm., Maximum - 3 atm.
You should start from the nominal pressure, but the upper limit of the working pressure is also important. The electrical data and the maximum water temperature must be taken into account. A mandatory parameter is the IP class, which indicates dust and moisture protection: the higher the value, the better.
Connection thread sizes are indicated in inches: for example, ¼ inch or 1 inch. They must match the dimensions of the connection fitting. The dimensions and weight of the devices themselves are approximately the same and are secondary characteristics.
It should also be remembered that there are built-in and remote models. Most of the devices on sale are universal: they can be connected directly to the hydraulic tank or mounted on a pipe.
Electronic relays have the same functions as mechanical ones: they are responsible for the supply of water and protect the pump mechanism from dry running. They are more capricious than simple models, and are sensitive to suspended particles in the water. To protect the device, a strainer-strainer is installed in front of its connection point.
In fact, an electronic device is an automation unit with a convenient display and a system of buttons that makes it possible to perform adjustments without disassembling the device.
One of the differences from the traditional model is the pump shutdown delay. If, when the pressure rises, the mechanical device works quickly, then the electronic analogue turns off the equipment only after 10-15 seconds.This is due to a careful attitude to technology: the less often the pump is turned on / off, the longer it will last.
Some switch models, as well as automation units, work without a hydraulic accumulator, but their functionality is limited to simpler use. Suppose they are great for watering a garden or pumping liquid from one tank to another, but they are not used in the water supply system at home.
At the same time, the technical characteristics of the devices are the same as those of traditional relays: the factory setting is 1.5 atm., The shutdown threshold is 3 atm., The maximum value is 10 atm.
Water level sensors
There are two types of flow sensors - petal and turbine. Flap has a flexible plate that is in the pipeline. In the absence of water flow, the plate deviates from the normal state, contacts are activated that turn off the power to the pump.


It looks like petal flow sensors The device of the petal sensor The device of the turbine water flow sensor Water flow sensor for water supply Types and parameters of water flow sensors for the pump
Turbine flow sensors are somewhat more complicated. The basis of the device is a small turbine with an electromagnet in the rotor. In the presence of a flow of water or gas, the turbine rotates, an electromagnetic field is created, which is converted into electromagnetic pulses read by the sensor. This sensor, depending on the number of pulses, turns on / off the power to the pump.
flow controllers
Basically, these are devices that combine two functions: protection against dry running and a water pressure switch. Some models, in addition to these features, may have a built-in pressure gauge and check valve. These devices are also called electronic pressure switches.These devices cannot be called cheap, but they provide high-quality protection, serving several parameters at once, providing the pressure required in the system, turning off the equipment when there is insufficient water flow.
| Name | Functions | Parameters of operation of protection against dry running | Connecting dimensions | Producing country | Price |
| BRIO 2000M Italtecnica | Pressure switch flow sensor | 7-15 sec | 1″ (25mm) | Italy | 45$ |
| AQUAROBOT TURBIPRESS | Flow switch pressure switch | 0.5 l/min | 1″ (25mm) | 75$ | |
| AL-KO | Pressure switch check valve dry running protection | 45 sec | 1″ (25mm) | Germany | 68$ |
| Dzhileks automation unit | Pressure switch protection from idling pressure gauge | 1″ (25mm) | Russia | 38$ | |
| Aquario automation unit | Pressure switch protection from idling pressure gauge non-return valve | 1″ (25mm) | Italy | 50$ |
We offer you to familiarize yourself with How to wash a cast-iron bath at home
In the case of using an automation unit, a hydraulic accumulator is an extra device. The system works perfectly on the appearance of a flow - the opening of a tap, the operation of household appliances, etc. But this is if the headroom is small. If the gap is large, both a GA and a pressure switch are needed. The fact is that the pump shutdown limit in the automation unit is not adjustable.
The pump will only turn off when it reaches maximum pressure. If it is taken with a large headroom, it can create excess pressure (optimal - no more than 3-4 atm, anything higher leads to premature wear of the system). Therefore, after the automation unit, they put a pressure switch and a hydraulic accumulator. This scheme makes it possible to regulate the pressure at which the pump is turned off.
These sensors are installed in a well, borehole, tank.It is advisable to use them with submersible pumps, although they are compatible with surface pumps. There are two types of sensors - float and electronic.
float
There are two types of water level sensors - for filling the tank (protection against overflows) and for emptying - just protection against dry running. The second option is ours, the first one is needed when filling the pool. There are also models that can work this way and that, and the principle of operation depends on the connection scheme (included in the instructions).
The principle of operation of the float switch
These devices can be used not only to control the minimum water level and dry running in a well, well or storage tank. They can also control overflow (overflow), which is often necessary when there is a storage tank in the system, from which water is then pumped into the house or when organizing water supply to the pool.
The same device can control different levels, including the minimum
These are the main ways in which protection against dry running of the pump is organized in the water supply systems of a private house. There are also frequency converters, but they are expensive, so it is advisable to use them in large systems with powerful pumps. There they quickly pay off due to energy savings.
Step-by-step instructions for adjusting the pressure switch
Step 1. Check the compressed air pressure in the accumulator. There is a rubber plug on the back of the tank, you need to remove it and get to the nipple. Check the pressure with an ordinary air pressure gauge, it should be equal to one atmosphere. If there is no pressure, pump in air, measure the data and after a while check the indicators.If they decrease - a problem, you need to look for the cause and eliminate it. The fact is that most equipment manufacturers sell hydraulic accumulators with pumped air. If it is not available when buying, then this indicates a marriage, it is better not to purchase such a pump.
First you need to measure the pressure in the accumulator
Step 2. Disconnect electrical power and remove pressure regulator housing protective cover. It is fixed with a screw, removed with an ordinary screwdriver. Under the cover there is a contact group and two springs compressed by 8 mm nuts.
To adjust the relay, you must remove the housing cover
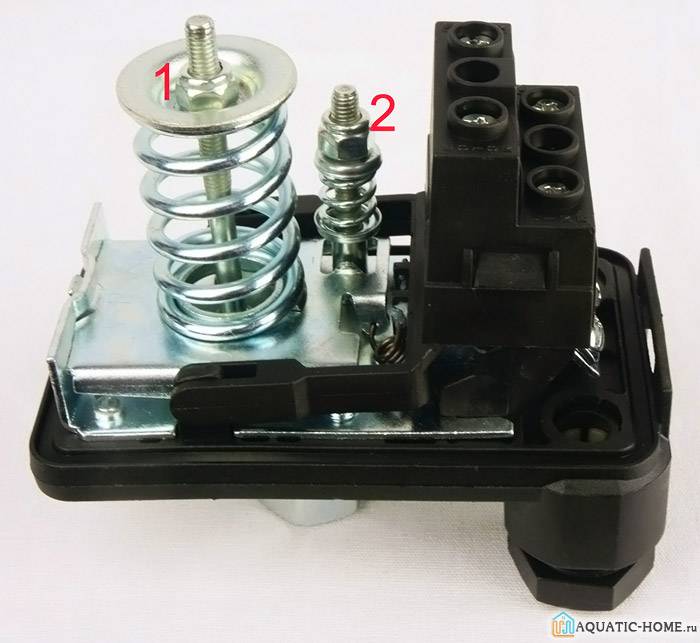
Big spring. Responsible for the pressure at which the pump turns on. If the spring is fully tightened, then the motor switch-on contacts will be constantly closed, the pump turns on at zero pressure and constantly works.
Small spring. Responsible for turning off the pump, depending on the degree of compression, the water pressure changes and reaches its maximum value
Please note, not the optimal working, but the maximum according to the technical characteristics of the unit.
Relay factory settings need to be adjusted
For example, you have a delta of 2 atm. If in this case the pump is turned on at a pressure of 1 atm, then it will turn off at 3 atm. If it turns on at 1.5 atm, then it turns off, respectively, at 3.5 atm. and so on. Always the difference between the pressure on and off the electric motor will be 2 atm. You can change this parameter by changing the compression ratio of the small spring.Remember these dependencies, they are needed to understand the pressure control algorithm. The factory settings are set to turn on the pump at 1.5 atm. and shutdown at 2.5 atm., delta is 1 atm.
Step 3. Check the actual operating parameters of the pump. Open the tap to drain the water and slowly release its pressure, constantly monitor the movement of the pressure gauge needle. Remember or write down at what indicators the pump turned on.


When the water is drained, the arrow indicates a decrease in pressure
Step 4. Continue monitoring until the moment of shutdown. Also note down the values at which the electric motor cuts out. Find out the delta, subtract the smaller from the larger value. This parameter is needed so that you can navigate at what pressures the pump will turn off if you adjust the compression force of the large spring.
Now you need to notice the values at which the pump turns off
Step 5. Shut off the pump and loosen the small spring nut about two turns. Turn on the pump, fix the moment it turns off. Now the delta should decrease by about 0.5 atm., The pump will turn off when the pressure reaches 2.0 atm.
Using the wrench, you need to loosen the small spring a couple of turns
Step 6. You need to ensure that the water pressure is in the range of 1.2–1.7 atm. As mentioned above, this is the optimal mode. Delta 0.5 atm. you have already installed, you need to lower the switching threshold. To do this, you need to release a large spring. For the first time, turn the nut, check the starting period, if necessary, fine-tune the compression force of the large spring.
Large spring adjustment
You will have to start the pump several times until you achieve switching on at 1.2 atm., And turning off at a pressure of 1.7 atm. It remains to replace the housing cover and put the pumping station into operation. If the pressure is correctly adjusted, the filters are constantly in good condition, then the pump will work for a long period of time, there is no need to do any special maintenance.
Pump Relay Selection Criteria
Water pressure switch adjustment
Let's analyze the adjustment of the pressure switch using the example of RDM-5, which is one of the most common devices. It is produced with a setting of a smaller barrier of 1.4-1.5 atmospheres and a larger one - 2.8-2.9 atmospheres. During installation, these indicators must be adjusted depending on the length of the pipeline and the plumbing used. You can change one or both limits in either direction.
In our device there are 2 springs of different sizes, with which you can set the limits for the start and stop of the pumping device. The large spring changes both barriers at the same time. Smaller - the width in the specified range. Each one has a nut. If you turn it and twist it - it increases, if you unscrew it - it falls. Each turn of the nut corresponds to a difference of 0.6-0.8 atmospheres.
How to determine relay thresholds
The smaller barrier is tied to the volume of air in the storage tank, more than 0.1-0.2 atmospheres is recommended. So, when there are 1.4 atmospheres in the accumulator, then the shutdown threshold should be 1.6 atmospheres. In this mode, there is less load on the membrane, which increases operation.
It is important to pay attention to the nominal operating conditions of the pumping device, recognizing them in the performance characteristics. The lower barrier of the pumping device is not less than the selected indicator in the relay
Before installing the pressure switch - measure it in the storage tank, often it does not correspond to the declared characteristics. To do this, a pressure gauge is connected to the control fitting. In the same way, the pressure is controlled during regulation.
The highest barrier is set automatically. The relay is calculated with a margin of 1.4-1.6 atm. If the smaller barrier is 1.6 atm. - the larger one will be 3.0-3.2 atm. To increase the pressure in the system, you need to add a lower threshold. However, there are limitations:
- The upper limit of household relays is no more than 4 atmospheres, it cannot be increased.
- With its value of 3.8 atmospheres, it will turn off at an indicator of 3.6 atmospheres, as this is done with a margin to save the pump and system from damage.
- Overloads adversely affect the overall operation of the water supply system.
Essentially everything. In each case, these indicators are set individually, they depend on the source of water intake, the length of the pipeline, the height of the water rise, the list and technical features of plumbing.


Setting the pressure switch for a pump or pumping station
For a qualitative adjustment of the operability of the water supply, a proven pressure gauge is required, which is connected near the relay.
Adjustment of the pumping station consists in turning the nuts supporting the relay springs. To adjust the lower limit, the nut of the larger spring is rotated. When it is twisted, the pressure increases, when it is unscrewed, it decreases. The adjustment is half a turn or less.Setting up a pumping station consists of the following steps:
- The water supply is turned on and with the help of a pressure gauge the barrier to start and stop the pump is fixed. A large spring is being clamped or released. Restart the system and check both pressure limits. Both values are shifted by the same difference.
- Thus, the adjustment continues until it is completed. After setting the lower limit, the upper indicator is adjusted. To do this, adjust the nut on the smaller spring. It is as sensitive as the previous adjustment. All actions are similar.
When setting up the relay, it is important to know that not all models have the technical ability to adjust the difference between the lower and upper limits. In addition, there are models in a sealed housing that can be installed directly on the pump housing.
They can also be submerged in water.
There are instances that are combined with an idle relay that can turn off the pump in the absence of water. They protect the engine from overheating. This is how the water pressure for the pump is regulated, which provides a gentle mode for the water supply.
Conclusions and useful video on the topic
Practical video tips will help you better understand how to adjust the new pressure switch of the pumping station if the parameters do not suit you for some reason. You will also learn how the dry running device differs.
Recommendations for setting up automation:
Professional tips for proper adjustment:
Comparative characteristics of two types of relays:
To correct the operation of the pressure switch, specialists are usually not invited, as this is a simple procedure that takes a little time.You can leave the factory settings, but even a minimal adjustment will help extend the operation of the pump and hydraulic tank, as well as optimize the operation of the station.


