- Water level sensors
- flow controllers
- float
- We connect the relay to the water line
- The procedure for connecting the pressure switch to the water line for dummies (specialists can not read)
- Features of operation of pumping stations
- Step-by-step instructions for adjusting the pressure switch
- How to properly adjust the relay and calculate the pressure
- Basic rules for setting parameters
- Inside the container
- Pump start level and shutdown marks
- First step before setting up
- Setting the pressure switch
- Device and principle of operation
- Device adjustment
- Design features and principle of operation
- Conclusions and useful video on the topic
Water level sensors
There are two types of flow sensors - petal and turbine. Flap has a flexible plate that is in the pipeline. In the absence of water flow, the plate deviates from the normal state, contacts are activated that turn off the power to the pump.
It looks like petal flow sensors The device of the petal sensor The device of the turbine water flow sensor Water flow sensor for water supply Types and parameters of water flow sensors for the pump
Turbine flow sensors are somewhat more complicated. The basis of the device is a small turbine with an electromagnet in the rotor.In the presence of a flow of water or gas, the turbine rotates, an electromagnetic field is created, which is converted into electromagnetic pulses read by the sensor. This sensor, depending on the number of pulses, turns on / off the power to the pump.
flow controllers
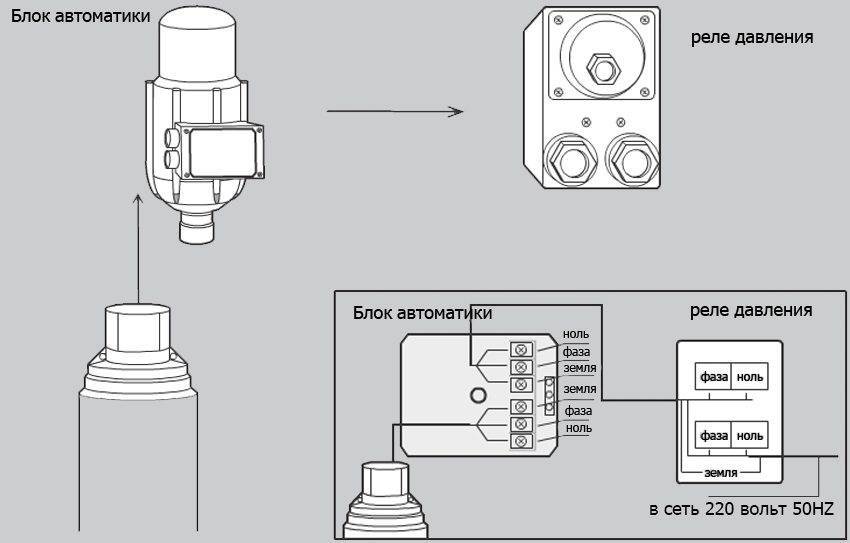
Basically, these are devices that combine two functions: protection against dry running and a water pressure switch. Some models, in addition to these features, may have a built-in pressure gauge and check valve. These devices are also called electronic pressure switches. These devices cannot be called cheap, but they provide high-quality protection, serving several parameters at once, providing the pressure required in the system, turning off the equipment when there is insufficient water flow.
| Name | Functions | Parameters of operation of protection against dry running | Connecting dimensions | Producing country | Price |
| BRIO 2000M Italtecnica | Pressure switch flow sensor | 7-15 sec | 1″ (25mm) | Italy | 45$ |
| AQUAROBOT TURBIPRESS | Flow switch pressure switch | 0.5 l/min | 1″ (25 mm) | 75$ | |
| AL-KO | Pressure switch check valve dry running protection | 45 sec | 1″ (25mm) | Germany | 68$ |
| Dzhileks automation unit | Pressure switch protection from idling pressure gauge | 1″ (25mm) | Russia | 38$ | |
| Aquario automation unit | Pressure switch protection from idling pressure gauge non-return valve | 1″ (25mm) | Italy | 50$ |
We offer you to familiarize yourself with How to wash a cast-iron bath at home
In the case of using an automation unit, a hydraulic accumulator is an extra device. The system works perfectly on the appearance of a flow - the opening of a tap, the operation of household appliances, etc. But this is if the headroom is small. If the gap is large, both a GA and a pressure switch are needed.The fact is that the pump shutdown limit in the automation unit is not adjustable.
The pump will only turn off when it reaches maximum pressure. If it is taken with a large headroom, it can create excess pressure (optimal - no more than 3-4 atm, anything higher leads to premature wear of the system). Therefore, after the automation unit, they put a pressure switch and a hydraulic accumulator. This scheme makes it possible to regulate the pressure at which the pump is turned off.
These sensors are installed in a well, borehole, tank. It is advisable to use them with submersible pumps, although they are compatible with surface pumps. There are two types of sensors - float and electronic.
float
There are two types of water level sensors - for filling the tank (protection against overflows) and for emptying - just protection against dry running. The second option is ours, the first one is needed when filling the pool. There are also models that can work this way and that, and the principle of operation depends on the connection scheme (included in the instructions).
The principle of operation of the float switch
These devices can be used not only to control the minimum water level and dry running in a well, well or storage tank. They can also control overflow (overflow), which is often necessary when there is a storage tank in the system, from which water is then pumped into the house or when organizing water supply to the pool.
The same device can control different levels, including the minimum
These are the main ways in which protection against dry running of the pump is organized in the water supply systems of a private house.There are also frequency converters, but they are expensive, so it is advisable to use them in large systems with powerful pumps. There they quickly pay off due to energy savings.
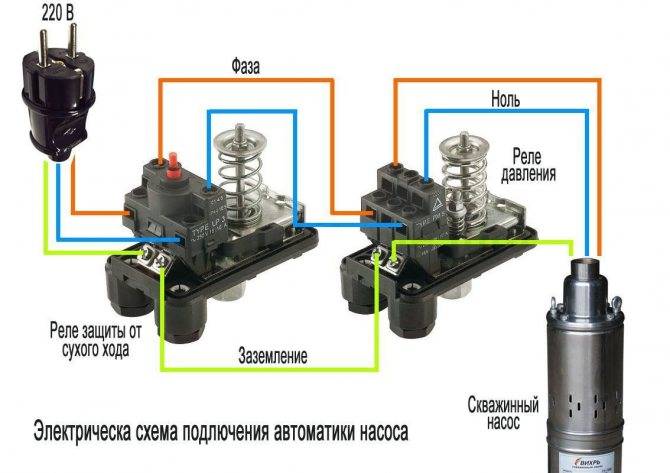
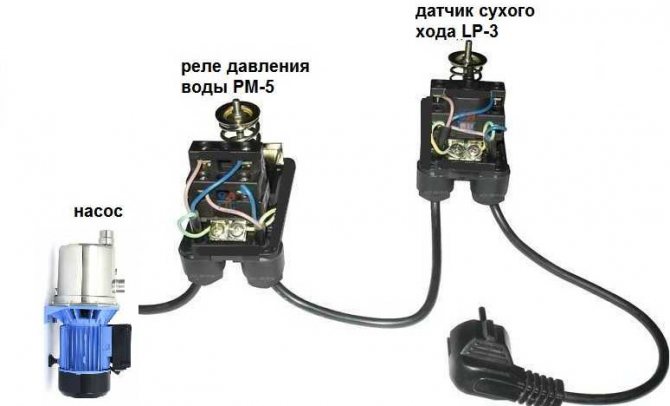
We connect the relay to the water line
It is necessary to connect the pressure switch to water first of all, and to electricity second. Setting up the relay is the last, third stage.
There are good articles on threaded connections!
- Seals for threaded connections of water pipes - choose the best
- We use the thread as a sealant for threaded joints
Suppose everything turned out great and we found that piece of threaded pipe to which the pressure switch must be screwed. Do you know how to make reliable threaded connections? If yes, then good. If not, then you have to practice. Now there is a Tangit Unilok thread on sale. It's pretty cute and comfortable. It is more convenient than flax for sealing threaded water connections, but it is quite expensive. we will use it!
The procedure for connecting the pressure switch to the water line for dummies (specialists can not read)
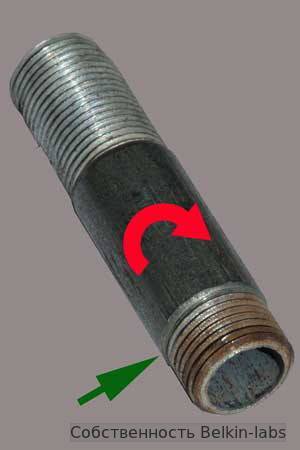
So let's pray, let's get started. When sealing threads with flax or tangit, there are some tricks. Tangit is wound, which is obvious, on the thread, which is on the tube. We have this tube end, that is, the end face towards us. It turns out that we are looking directly at the end, on which we will wind whatever it is. We estimate approximately how much thread we will use. We take the tangita thread and start wrapping it. We start this process not from the end, but to the end, stepping back from the edge to the distance that will be inside the nut. In the above diagram, I indicated the approximate position from which to start with the green arrow.When winding the tangit, twist the thread clockwise (red arrow in the diagram), looking at the end of the pipe. The first loop should firmly secure the thread. so that it does not stretch and does not bloom. Then we act according to the instructions for the tangit, that is, we make sure that the thread does not lie inside the thread grooves.
You need to wind quite evenly and tightly. Do not try to wrap it so that you get a whole tumor of tangit. This is where some experience is really needed. Wrapping a little is bad. Will flow. A lot - do not screw the nut, crush the thread and again it will flow. Dont be upset! Get it - good. No - practice. Suppose wrapped. We start to wind the relay
Let's spin slowly! very slowly and carefully. First, hands, but not for long. As soon as we feel resistance, we begin to work with a wrench
The first sign that everything is fine is that the nut is not screwed too easily along the tangit. The presence of the thread should be felt, but in moderation. We carefully monitor how the relay nut is screwed on. If she twists on tangit - it's just fine. Unfortunately, you may find that the tangit under the nut forms loops, bunches up and comes out of the thread. This is bad. In this case, I propose to twist a little more and, if the situation with the loops worsens, then it is better to unscrew the relay and redo the entire winding. In this case, it is better to free the thread from the old thread and make everything clean


As soon as resistance is felt, we begin to work with a wrench. The first sign that everything is fine is that the nut is not screwed too easily along the tangit.The presence of the thread should be felt, but in moderation. We carefully monitor how the relay nut is screwed on. If it is wound on a tangit, then this is just fine. Unfortunately, you may find that the tangit under the nut forms loops, bunches up and comes out of the thread. This is bad. In this case, I propose to twist a little more and, if the situation with the loops worsens, then it is better to unscrew the relay and redo the entire winding. In this case, it is better to free the thread from the old thread and make everything clean.
Suppose everything worked out, there were no loops, or there was one small one that formed when we had practically wound everything up. Then we twist the relay to the end. But not too hard! We translate the spirit. There is a high probability that everything will be in order and there will be no leakage.
Features of operation of pumping stations
The operation of pumping equipment should be carried out in accordance with the instructions. Subject to all the rules, the equipment will last a long time, and the number of breakdowns will be minimal. The main thing is to eliminate any malfunctions in time.

From time to time, the pumping station should be serviced
Station operation features:
- Once every 30 days or after a break in work, the pressure in the accumulator should be checked.
- The filter will need to be cleaned. If this rule is not followed, water will begin to flow jerkily, pump performance will decrease significantly, and a dirty filter will lead to dry operation of the system, which will cause breakdowns. The frequency of cleaning depends on the amount of impurities in the water that comes from the well or well.
- The installation site of the station should be dry and warm.
- The system piping must be protected from freezing during the cold season.To do this, during installation, observe the desired depth. You can also insulate the pipeline or use an electrical cable that is mounted in trenches.
- If the station is not operated in winter, then the water from the pipes should be drained.
In the presence of automation, the operation of the station will not be difficult. The main thing is to change the filters in time and monitor the pressure in the system. Other nuances are taken into account at the installation stage.
Step-by-step instructions for adjusting the pressure switch
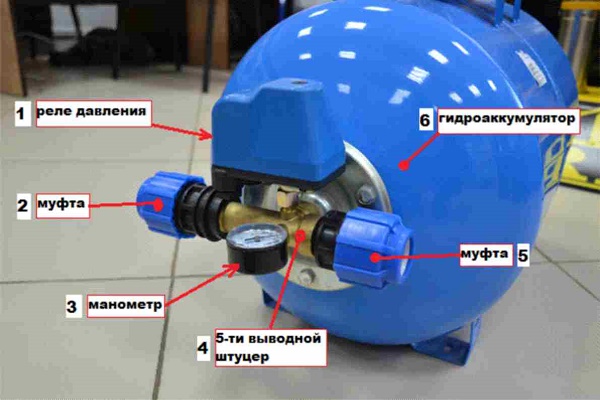
Step 1. Check the compressed air pressure in the accumulator. There is a rubber plug on the back of the tank, you need to remove it and get to the nipple. Check the pressure with an ordinary air pressure gauge, it should be equal to one atmosphere. If there is no pressure, pump in air, measure the data and after a while check the indicators. If they decrease - a problem, you need to look for the cause and eliminate it. The fact is that most equipment manufacturers sell hydraulic accumulators with pumped air. If it is not available when buying, then this indicates a marriage, it is better not to purchase such a pump.
First you need to measure the pressure in the accumulator
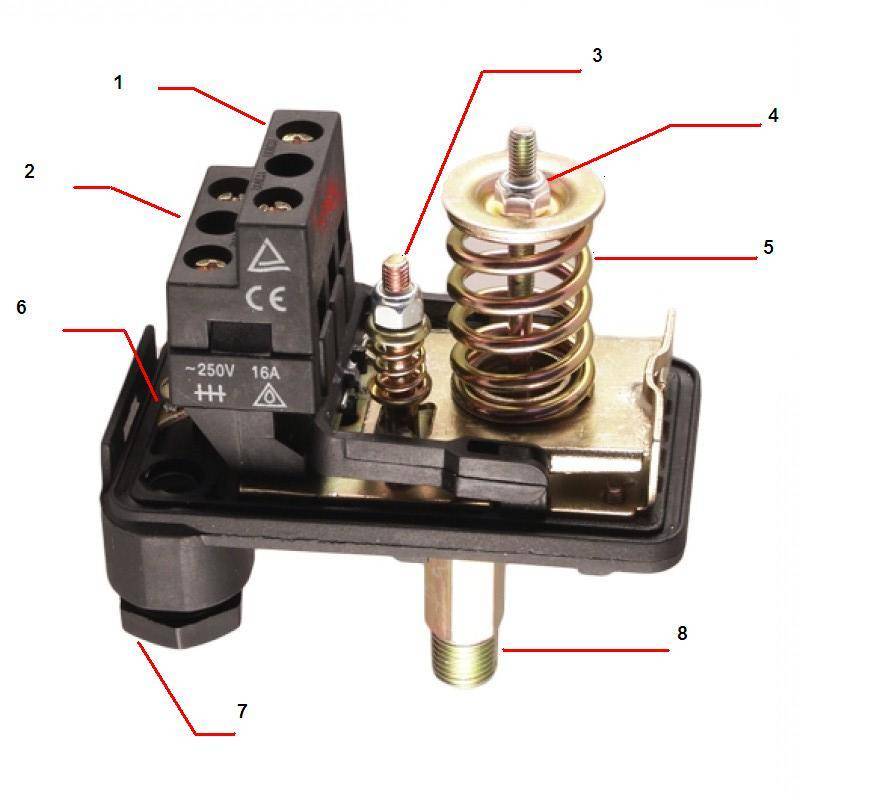
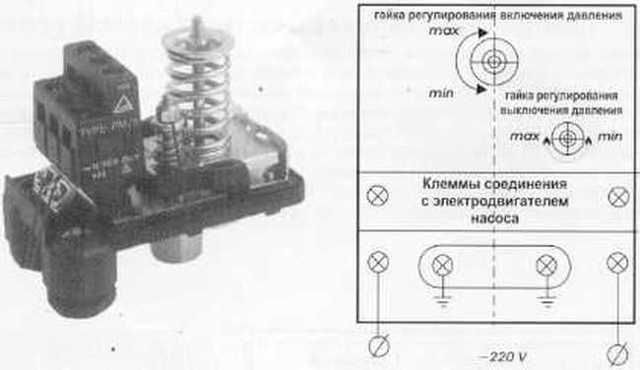
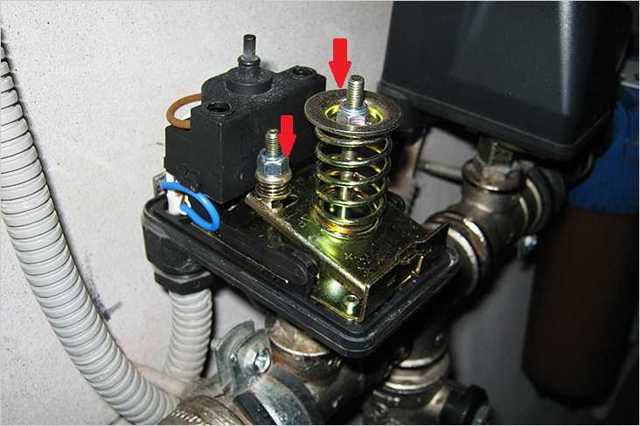
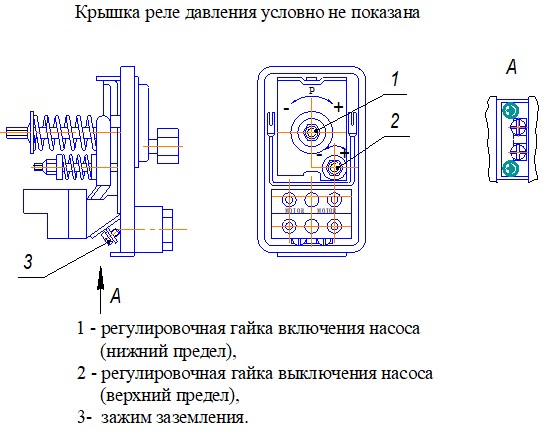
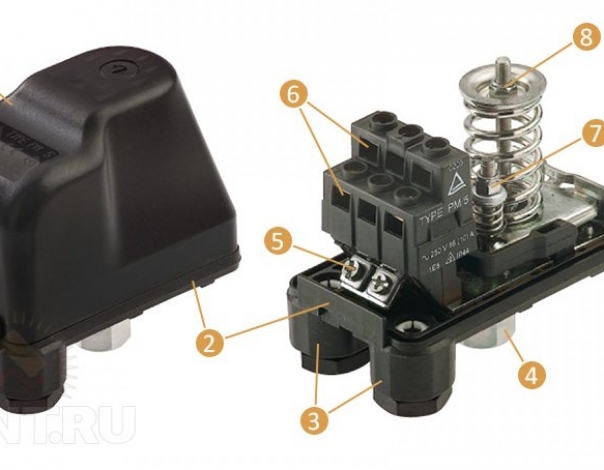
Step 2. Disconnect electrical power and remove pressure regulator housing protective cover. It is fixed with a screw, removed with an ordinary screwdriver. Under the cover there is a contact group and two springs compressed by 8 mm nuts.
To adjust the relay, you must remove the housing cover
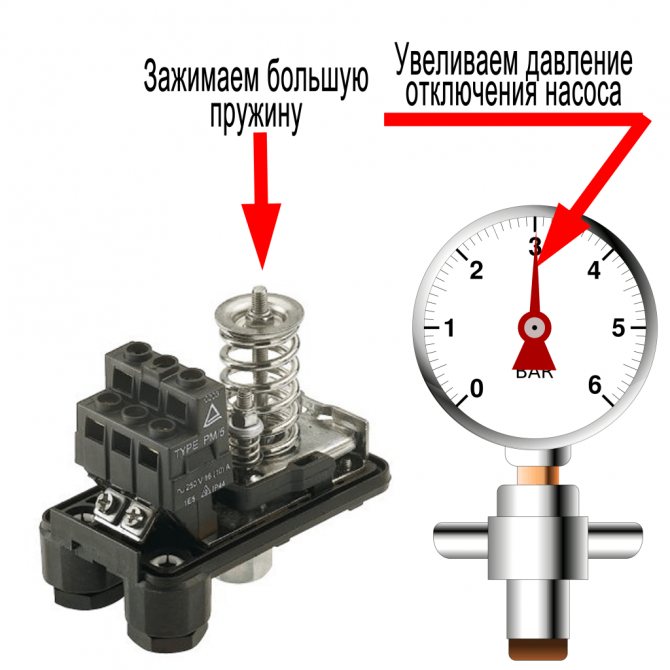
Big spring. Responsible for the pressure at which the pump turns on. If the spring is fully tightened, then the motor switch-on contacts will be constantly closed, the pump turns on at zero pressure and constantly works.
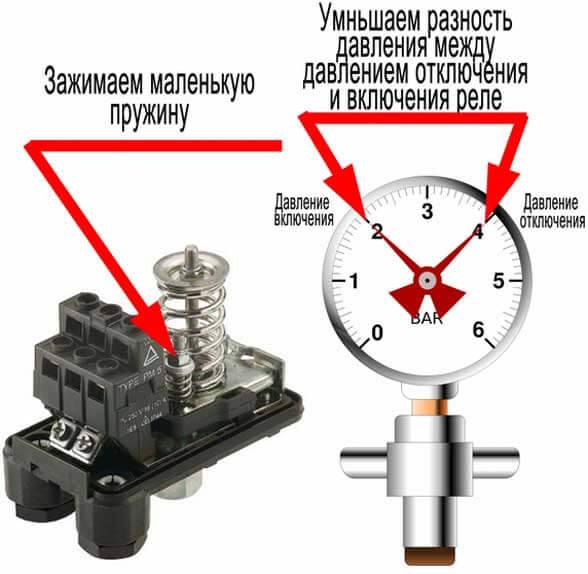
Small spring.Responsible for turning off the pump, depending on the degree of compression, the water pressure changes and reaches its maximum value
Please note, not the optimal working, but the maximum according to the technical characteristics of the unit.
Relay factory settings need to be adjusted
For example, you have a delta of 2 atm. If in this case the pump is turned on at a pressure of 1 atm, then it will turn off at 3 atm. If it turns on at 1.5 atm, then it turns off, respectively, at 3.5 atm. and so on. Always the difference between the pressure on and off the electric motor will be 2 atm. You can change this parameter by changing the compression ratio of the small spring. Remember these dependencies, they are needed to understand the pressure control algorithm. The factory settings are set to turn on the pump at 1.5 atm. and shutdown at 2.5 atm., delta is 1 atm.
Step 3. Check the actual operating parameters of the pump. Open the tap to drain the water and slowly release its pressure, constantly monitor the movement of the pressure gauge needle. Remember or write down at what indicators the pump turned on.
When the water is drained, the arrow indicates a decrease in pressure
Step 4. Continue monitoring until the moment of shutdown. Also note down the values at which the electric motor cuts out. Find out the delta, subtract the smaller from the larger value. This parameter is needed so that you can navigate at what pressures the pump will turn off if you adjust the compression force of the large spring.


Now you need to notice the values at which the pump turns off
Step 5. Shut off the pump and loosen the small spring nut about two turns. Turn on the pump, fix the moment it turns off.Now the delta should decrease by about 0.5 atm., The pump will turn off when the pressure reaches 2.0 atm.
Using the wrench, you need to loosen the small spring a couple of turns
Step 6. You need to ensure that the water pressure is in the range of 1.2–1.7 atm. As mentioned above, this is the optimal mode. Delta 0.5 atm. you have already installed, you need to lower the switching threshold. To do this, you need to release a large spring. For the first time, turn the nut, check the starting period, if necessary, fine-tune the compression force of the large spring.
Large spring adjustment
You will have to start the pump several times until you achieve switching on at 1.2 atm., And turning off at a pressure of 1.7 atm. It remains to replace the housing cover and put the pumping station into operation. If the pressure is correctly adjusted, the filters are constantly in good condition, then the pump will work for a long period of time, there is no need to do any special maintenance.
Pump Relay Selection Criteria
How to properly adjust the relay and calculate the pressure
All devices leave the production line with certain settings, but after purchase, additional verification must be performed. When buying, you need to find out from the seller what values the manufacturer recommends using when adjusting the depth pressure. In other words, the pressure at which the contacts close and open.
If the station fails due to improper adjustment of the pressure switch of the jumbo pumping station, then it will not be possible to use the manufacturer's warranty.
When calculating the cut-in pressure values, the following parameters are taken into account:
- Required pressure at the highest draw-off point.
- Difference in height between the top draw point and the pump.
- Loss of water pressure in the pipeline.
The value of the switching pressure is equal to the sum of these indicators.
The calculation of the turn-off pressure to solve the question of how to set up the pressure switch is performed as follows: the turn-on pressure is calculated, one bar is added to the value obtained, then one and a half bar is subtracted from the amount. The result should not exceed the value of the maximum allowable pressure that occurs at the outlet of the pipe from the pump.
Basic rules for setting parameters
 New equipment is usually set to factory settings, but it is better to check them.
Since in the event of a breakdown of the new water supply system (with an incorrectly installed initial adjustment), it is possible to refuse to use the equipment and return finances.
Before setting, you should know the recommended parameters for setting the allowable pressure. Its calculation is carried out taking into account the intended use (frequency of use, time of year of operation, etc.)
The calculation is carried out in 3 steps. The water pressure inside the accumulator is determined, as well as the level of pump start-up and pump shutdown, each of which has its own characteristics.
Inside the container
The indicator inside the tank should be higher than at the highest point of flow - add 6 to the length of the pipes of the upper point of water flow, and then divide by 10.
But if there are many points of use or there is a large branching of the pipeline, then a calculation should be made:
| Type of equipment | Utilization factor, Cx | Number of each species, n | Product Cx*n |
| Toilet | 3 | ||
| Shower | 2 | ||
| Bathroom | 2 | ||
| Faucet in the sink | 6 | ||
| Bidet | 1 | ||
| Faucet in the kitchen | 2 | ||
| Washing machine | 2 | ||
| Dishwashing machine | 2 | ||
| Irrigation faucet | 2 | ||
| The total coefficient Su is = ______ |
- Determine the total amount of water consumption, that is, make a list of apartments that use water in the house, and indicate the amount of each technical equipment.
- Fill in the table and display the indicator.
- Using the table below, determine the value of the maximum water flow. If the number is odd, then you need to choose the closest possible number.
| Su | 4 | 6 | 8 | 10 | 12 | 14 | 16 | 18 | 20 | 25 | 30 | 35 |
| 12 | 18 | 24 | 30 | 36 | 40,8 | 46,8 | 51 | 55,8 | 67,8 | 78 | 87,6 |
It should be remembered that if the value is too low, then water will not flow to the appliances. If it is high, the accumulator will be constantly empty, and there is also a risk of membrane rupture.


Pump start level and shutdown marks
The inclusion is calculated by summing the following values:
- required pressure at the top point of water flow;
- the difference between the highest point of water supply and the location of the pump.
To calculate the pressure at the last point, the formula is used: pressure = (distance to the upper point of the flow +6) / 10.
The top point of the fence is the bathroom on the top floor. There is a segment of the path from it to the pump installation site. The greater the distance, the greater the pressure needed to lift the water. For example, for a building with 2 floors, the value will be 7 m, that is, P \u003d (7 + 6) / 10 \u003d 1.3 atmospheres.
The shutdown is calculated as follows: add 1 to the shutdown pressure and subtract 1.5 bar. The shutdown value is determined using a pressure gauge, and then the calculation is carried out.
If, when the pump is turned off, the pressure is greater than the maximum possible pressure, then the analysis was not performed correctly.
First step before setting up
The pressure switch is adjusted during the initial installation and then, if certain problems arise in the plumbing system.
In the second case, before starting to configure the relay unit, it is necessary to establish the cause of the malfunction. Perhaps the matter is not at all in the device in question, there is no need to touch it.
 Before setting up the relay, make sure that the accumulator, pipes and fittings hold pressure. If there are fistulas and leaks in the system, you must first get rid of them
The second extremely important point is water purification. The accumulator and relay have a rubber membrane. If sand gets into the pipes, then this gum will deteriorate (crack) and stop holding pressure. In a system with a hydraulic accumulator, cleaning filters must be present without fail.
If the pressure in the water supply on the pressure gauge has reached Rstop, but the pump continues to work, then the problem usually lies in the clogging of pipes and / or filters. It is also possible with the output to the relay of the contacts for supplying voltage to the pumping station. In the first case, you need to get rid of sand and scale in the system, and in the second, check the contact group and 220 V wiring.
It is also possible that the water from the pipes in the house is completely drained, but the pump does not want to turn on. Here we first check the power supply.
If there is voltage in the network, the wiring and contacts are working, then “9 out of 10” the pressure switch is out of order. It will have to be changed to a new one, it is almost impossible to somehow repair this device.
Setting the pressure switch
There are times when the default sensor settings do not suit users of pumping equipment.For example, if you open a tap on any floor of a building, you will notice that the water pressure in it is rapidly decreasing. Also, the installation of some water purifying systems is not possible if the compression force in the system is less than 2.5 bar. If the station is set to turn on at 1.6-1.8 bar, then the filters will not work in this case.
Usually, setting up a pressure switch with your own hands is not difficult and is performed according to the following algorithm.
- Write down the readings on the pressure gauge when turning the unit on and off.
- Unplug the station's power cord from the socket or turn off the machines.
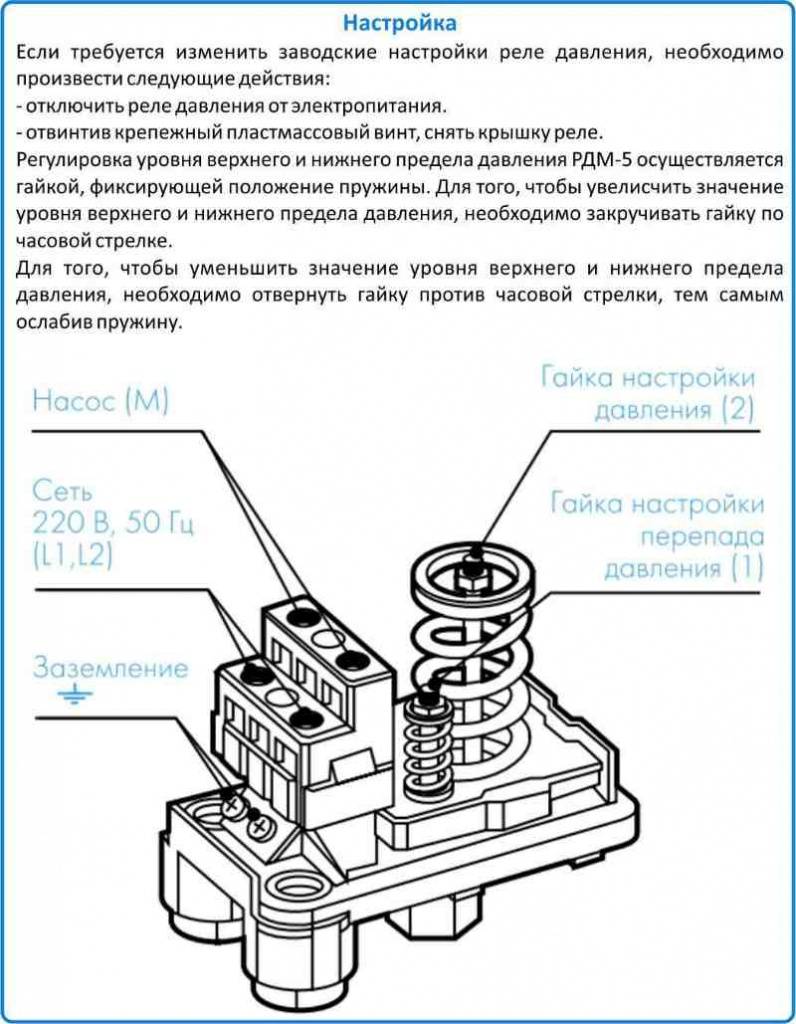
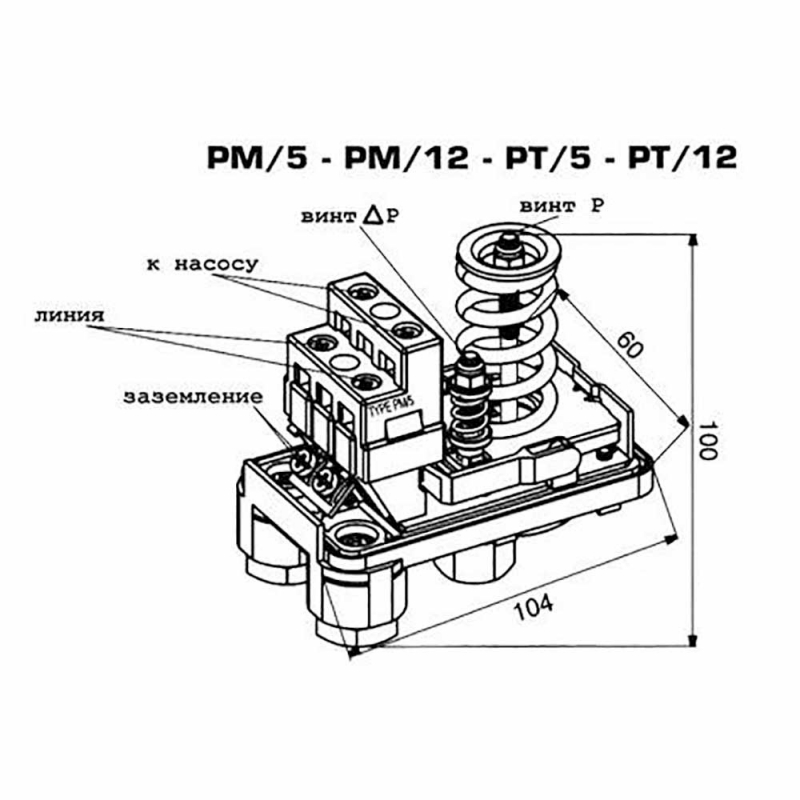
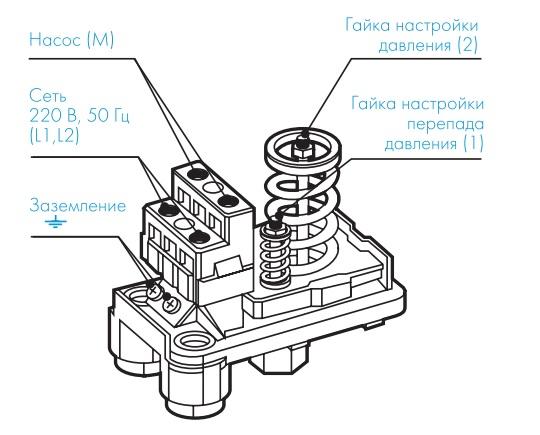
- Remove the cover from the sensor. Usually it is fixed with 1 screw. Under the cover you can see 2 screws with springs. The one that is larger is responsible for the pressure at which the station engine starts. Usually there is a marking in the form of the letter “P” next to it and arrows are drawn with the signs “+” and “-” applied next to them.
- To increase the compression force, turn the nut towards the “+” sign. And vice versa, to reduce it, you need to turn the screw to the “-” sign. Turn the nut one turn in the desired direction and start the machine.
- Wait until the station turns off. If the pressure gauge readings do not suit you, then continue to turn the nut and turn on the device until the pressure in the accumulator reaches the required value.
- The next step is to set the moment when the station is turned off. A smaller screw with a spring around is designed for this. Near it is the marking “ΔP”, as well as arrows with the signs “+” and “-”. Setting the pressure regulator to turn on the device is carried out in the same way as to turn off the device.
For example, the unit is factory set to Pon = 1.6 bar, and Poff = 2.6 bar. It follows from this that the difference does not go beyond the standard value and is equal to 1 bar. If it is required for any reason to increase Poff up to 4 bar, then the interval should also be increased to 1.5 bar. That is, Ron should be around 2.5 bar.
But with an increase in this interval, the pressure drop in the water supply system will also increase. Sometimes this can cause discomfort, since you will have to use more water from the tank in order for the station to turn on. But due to the large interval between Ron and Roff the pump will turn on less frequently, which will increase its resource.
The above-described manipulations with the compression force settings are only possible with equipment of the appropriate power. For example, in those the passport to the device states that it can give out no more than 3.5 bar. So, set up R on itoff = 4 bar does not make sense, since the station will work without stopping, and the pressure in the tank will not be able to rise to the required value. Therefore, in order to obtain a pressure in the receiver of 4 bar and above, it is necessary to purchase a pump of the appropriate capacity.


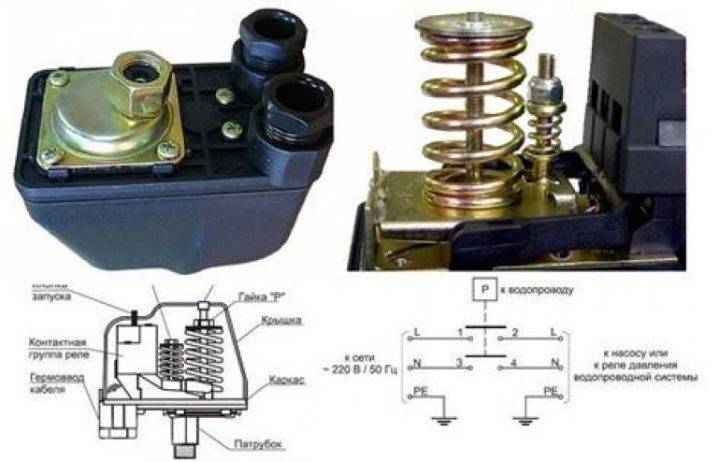
Device and principle of operation
Electromechanical relays consist of a plastic housing, a spring block and contacts controlled by a membrane. The membrane is in direct contact with the pressure pipe and is a thin plate that plays the role of an element of perception. It instantly reacts to changes in the pressure level in the pipeline, which entails the alternating switching on of contacts. The spring block of the water relay consists of 2 elements.The first is a spring that controls the minimum allowable pressure level, and is responsible for containing the main onslaught of water. The lower pressure limit is adjusted using a special nut. The second element is the top pressure control spring, and is also adjustable with a nut.
The principle of operation of the relay is that the contacts, thanks to the membrane, respond to pressure fluctuations, and when they close, the pumps begin to pump water. While when they open, the electrical circuit breaks, the power to the pumping equipment is turned off and the forced water supply stops. This happens due to the fact that the relay has a connection to a hydraulic accumulator, inside which there is water with compressed air. The contact of these two media is due to the flexible plate.
When the pump is turned on, the water inside the tank presses through the membrane on the air, as a result of which a certain pressure is created in the tank chamber. When water is consumed, its quantity decreases and the pressure decreases. In addition to the standard equipment, some models can be equipped with a forced (dry) start button, an operation indicator, a soft start device and special connectors used instead of traditional terminals.
Usually, an indicator of 2.6 atmospheres is taken as the upper threshold, and as soon as the pressure reaches this value, the pump turns off. The lower indicator is set at around 1.3 atmospheres, and when the pressure reaches this limit, the pump turns on.If both resistance thresholds are set correctly, the pump will operate in automatic mode, and manual control will not be required. This will eliminate the need for the constant presence of a person and ensure an uninterrupted supply of tap water to the consumer. The relay does not require special expensive maintenance. The only procedure that will need to be performed from time to time is the cleaning of contacts, which oxidize during operation and require care.
In addition to electromechanical models, there are also electronic counterparts, which are distinguished by more precise adjustment and aesthetic appearance. Each product is equipped with a flow controller - a device that instantly turns off pumping equipment in the absence of water in the pipeline. Thanks to this option, the pump is reliably protected from running dry, which prevents it from overheating and premature failure. In addition, the electronic relay is equipped with a small hydraulic tank, the volume of which usually does not exceed 400 ml.
Thanks to this design, the system receives reliable protection against water hammer, which significantly extends the service life of both the relays themselves and the pumps. In addition to a large number of advantages, electronic models also have weaknesses. The disadvantages of products include high cost and increased sensitivity to the quality of tap water. However, the money spent is quickly paid off by the reliability and durability of the devices, and special sensitivity is eliminated by installing a filtration system.
Thus, the pressure switch is an integral component of downhole or downhole pumping equipment, it helps to fill the hydraulic tank and maintain normal pressure in the network without human assistance.The use of a relay allows you to fully automate the process of water supply and eliminates the need to turn on the pump yourself when the pressure drops or the storage tank is empty.
Device adjustment
Many owners are wondering how to adjust the water pressure regulator in the apartment. This task can be easily done by hand. Most devices come with a preset setting. According to this, the pressure in them is 3 bar. But, if necessary, you can reduce or increase this parameter yourself.
You may need a wrench or a wide screwdriver to make adjustments. The choice of tool depends on the gearbox model. Of course, in modern devices, configuration is done manually without using any additional tools.
First of all, you need to make sure that water pressure reducer securely installed in the plumbing. After installation, the device opens the water supply. At this stage, you need to check the system for leaks. To prevent such problems, sealing material should be used when mounting the gearbox.
Adjustment of the water pressure reducer in the apartment is carried out with the taps closed. At the bottom of the device there is an adjusting head, which is responsible for adjusting the pressure of the liquid in the pipeline. If the pressure needs to be increased, the head rotates clockwise. Otherwise, the rotational movements are performed counterclockwise.
One full rotation of the head allows you to change the pressure by 0.5 bar. This will be noticeable by the movement of the arrow. Thus, the water pressure regulator in the apartment is adjusted.The work can be easily done by hand.


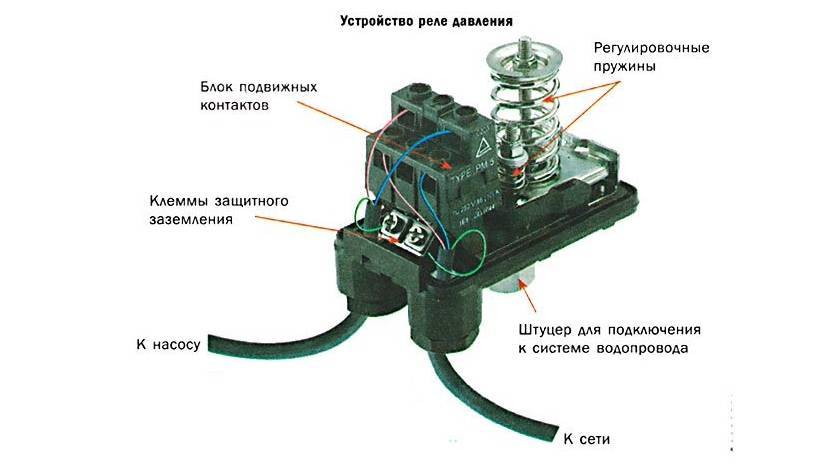
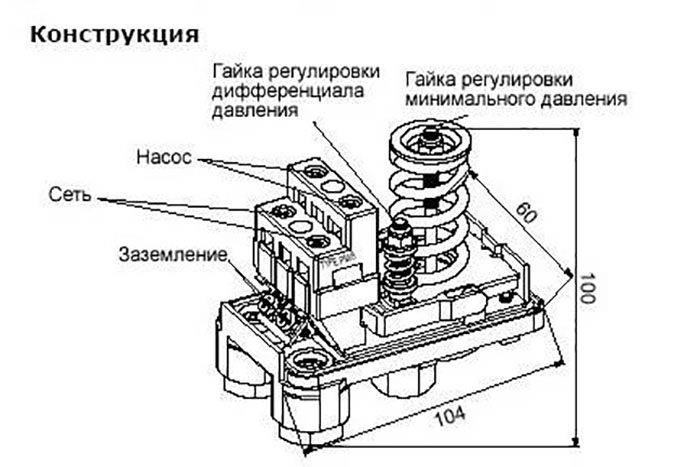
Design features and principle of operation
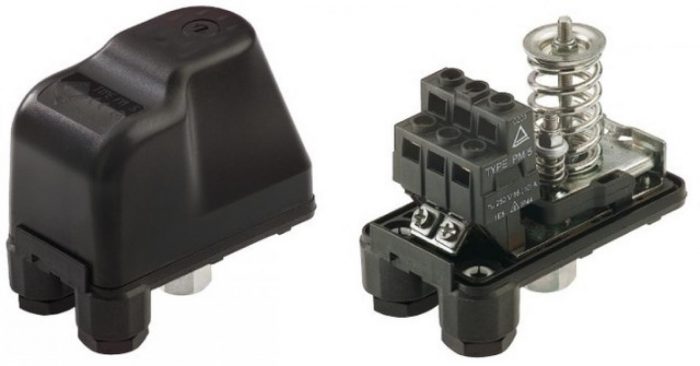
The design of the relay is made in the form of a compact block with springs, which, by means of a nut, allows you to adjust the minimum and maximum pressure. A membrane is connected to the springs, which reacts to its drops and closes or opens the electrical circuit, which causes the pumping equipment to start or stop. The principle of operation looks like this:
- When the pressure drops to the set minimum, the pressure of the spring on the membrane is released and the contacts are closed, which leads to the start and pumping of water into the system.
- If it rises to the set maximum, the compression of the spring increases, which leads to the opening of the contacts and the stop of the pump.
If the relay is used in conjunction with a pumping station, then the principle of operation is as follows:
- First, the pumping equipment draws water into the hydraulic tank.
- As the rubber bulb fills, the air pressure in the tank increases. In this case, the information is fed to the manometer.
- When the pressure in the accumulator rises to the upper limit set on the relay, the device opens the contacts, which turns off the pumping equipment and stops pumping water.
- Over time, the water from the tank is consumed by the consumer, and the air pressure gradually decreases. When it reaches the minimum set on the relay, the relay activates and closes the contact, which leads to the start of the pumping equipment and the intake of water into the tank.
- After that, the cycle repeats.
Thanks to the use of a relay in the plumbing system, it is possible to maintain a constant pressure and the water pressure necessary for comfortable water supply.In this case, the operation of the pumping unit occurs in automatic mode. If the upper and lower pressure parameters are correctly set on the relay, then the pump will operate in the optimal mode without overloads, which in turn will extend its service life and protect it from premature wear.
Conclusions and useful video on the topic
How to properly set the pressure switch:
In simple words about the pressure switch for hydrostorage tanks:
How to adjust the pressure switch in the pumping station:
Without a properly functioning and properly configured pressure switch, the accumulator turns into an unnecessary piece of iron. The adjustment of the device in question, at first glance, looks extremely simple - there are only two springs that need to be tightened / loosened. However, the configuration of this device has its own nuances. If mistakes are made during adjustment, then instead of being useful, the hydraulic accumulator can only bring problems.
If you have personal experience in setting up a pressure switch or have any questions, write in the comment box below. Our experts will definitely help you understand the selection and configuration of this device to maximize the efficiency of your water supply or heating system.


