- The principle of operation of the pressure switch
- Device and principle of operation
- Connecting the water pressure switch
- Electrical part
- Pipe connection
- Instructions for setting up a pumping station
- Checking the air pressure in the accumulator
- Parameter control
- If there is no hydraulic accumulator
- Relay control process
- How to buy Gilex CRAB in Minsk
- Possible errors when debugging the pressure switch
- The principle of operation of the relay
- Water pressure switch adjustment
- How to determine relay thresholds
- Setting the pressure switch for a pump or pumping station
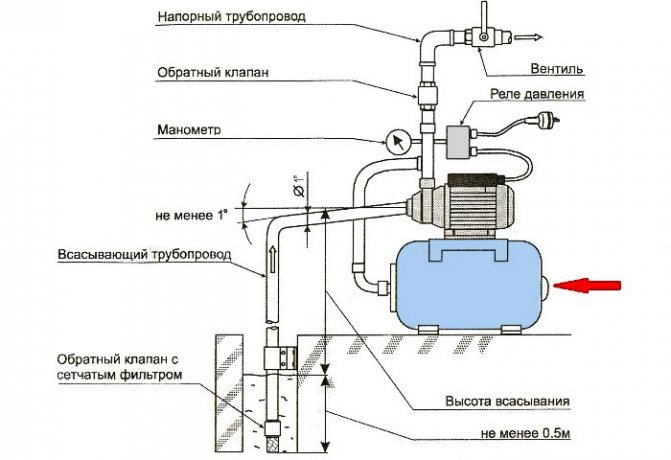
- Installation and connection of a pumping station in a private house
- Step-by-step instructions for adjusting the pressure switch
The principle of operation of the pressure switch
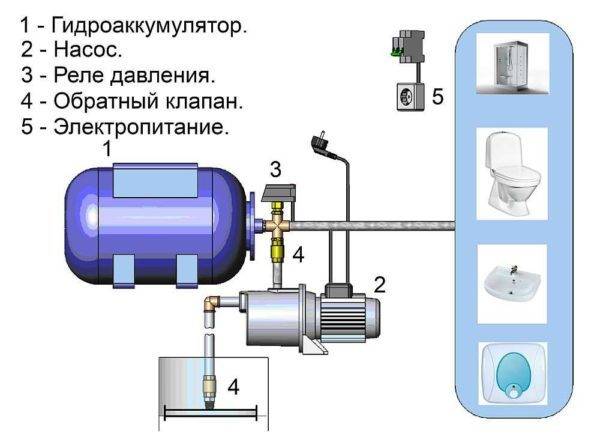
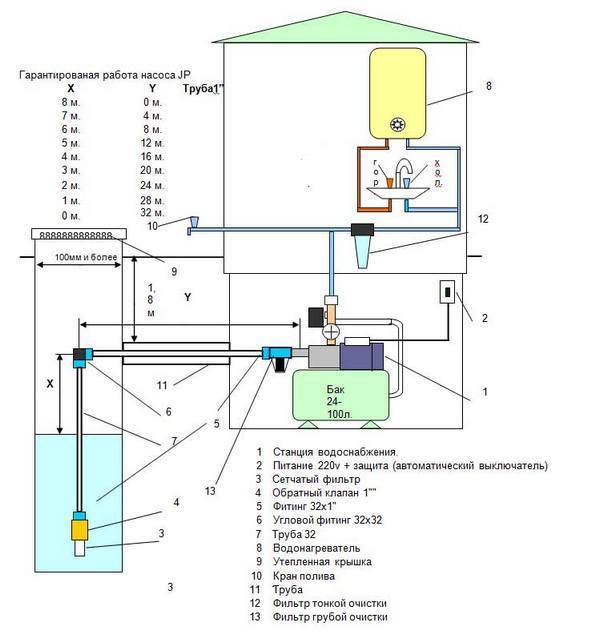
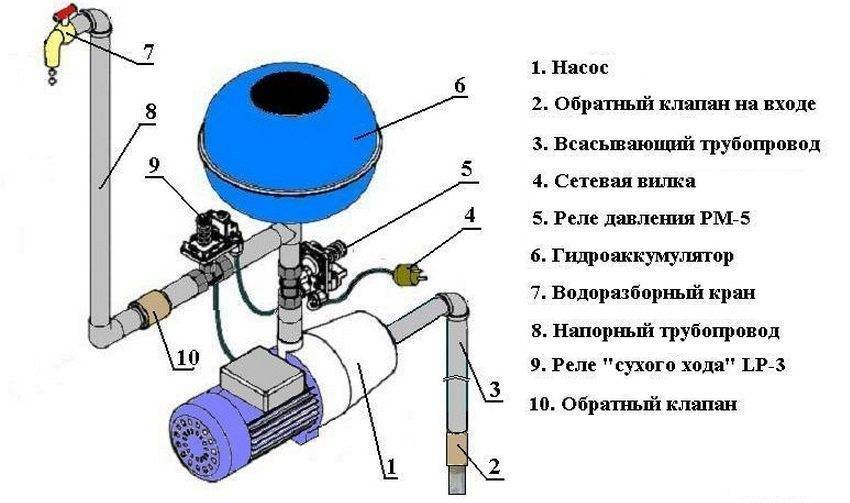
An autonomous water supply system in a private house consists of water pipes, a pump, and controls and cleaning elements. The hydraulic accumulator in it plays the role of a water pressure control device. First, the latter is stored in the battery, and then, as necessary, it is consumed when the taps are opened.
This configuration of the water supply system allows you to reduce the operating time of the pumping station, as well as the number of its “on / off” cycles.
The pressure switch here performs the function of controlling the pump.It monitors the level of filling of the accumulator with water, so that when this tank is empty, it will turn on the pumping of liquid from the water intake in time.
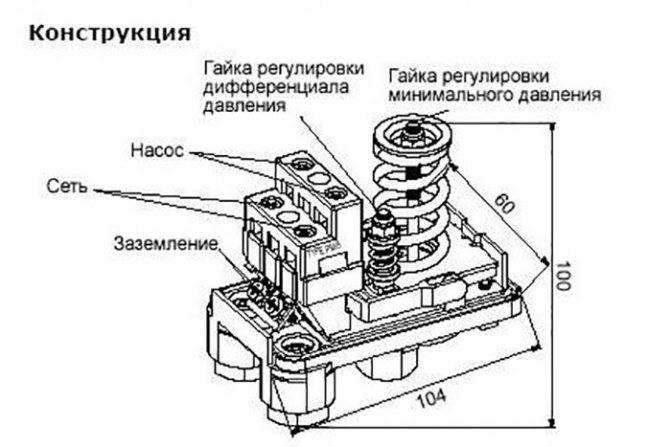
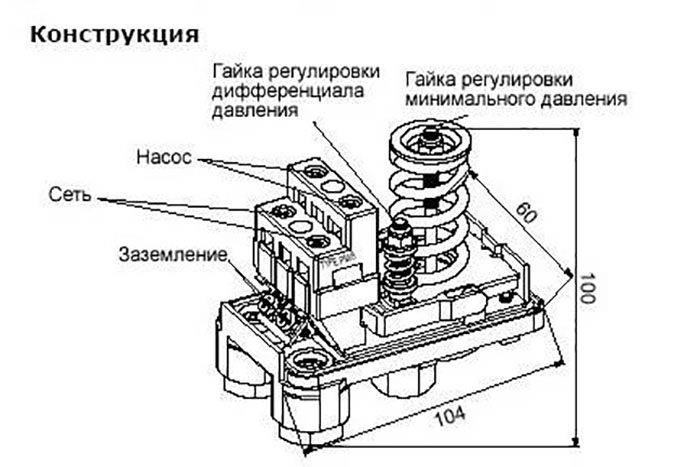
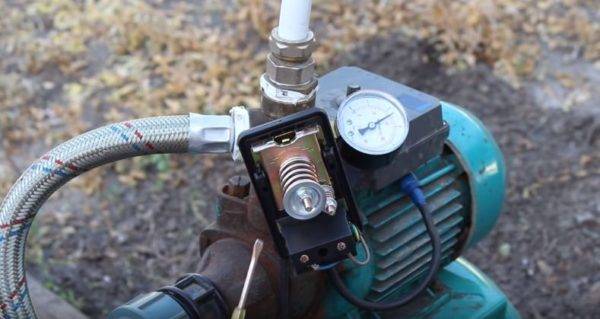
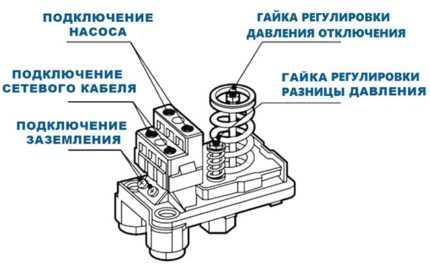 The main elements of the relay are two springs for setting pressure parameters, a membrane responsive to water pressure with a metal insert and a 220 V contact group
If the water pressure in the system is within the parameters set on the relay, then the pump does not work. If the pressure drops below the minimum setting Pstart (Pmin, Ron), then an electric current is supplied to the pumping station to make it work.
Further, when the accumulator is filled to Рstop (Pmax, Рoff), the pump is de-energized and switched off.
Step by step, the relay in question works as follows:
- There is no water in the accumulator. The pressure is below Pstart - set by a large spring, the membrane in the relay is displaced and closes the electrical contacts.
- Water begins to flow into the system. When Rstop is reached, the difference between the upper and lower pressures is set by a small spring, the membrane moves and opens the contacts. As a result, the pump stops working.
- Someone in the house opens a faucet or turns on a washing machine - there is a decrease in pressure in the water supply. Further, at some point, the water in the system becomes too small, the pressure again reaches Rpusk. And the pump turns on again.
Without a pressure switch, all these manipulations with turning the pumping station on / off would have to be done manually.
 The data sheet for the pressure switch for accumulators indicates the factory settings to which the control springs are initially set - almost always these settings have to be changed to more suitable ones
When choosing the pressure switch in question, first of all, you should look at:
- the maximum temperature of the working environment - for hot water and heating, their own sensors, for cold water, their own;
- pressure adjustment range - the possible settings of Pstop and Rpusk must correspond to your particular system;
- maximum operating current - the pump power should not be higher than this parameter.
The setting of the pressure switch under consideration is made on the basis of calculations, taking into account the capacity of the accumulator, the average one-time water consumption by consumers in the house and the maximum possible pressure in the system.
The larger the battery and the greater the difference between Rstop and Rstart, the less often the pump will turn on.
Device and principle of operation
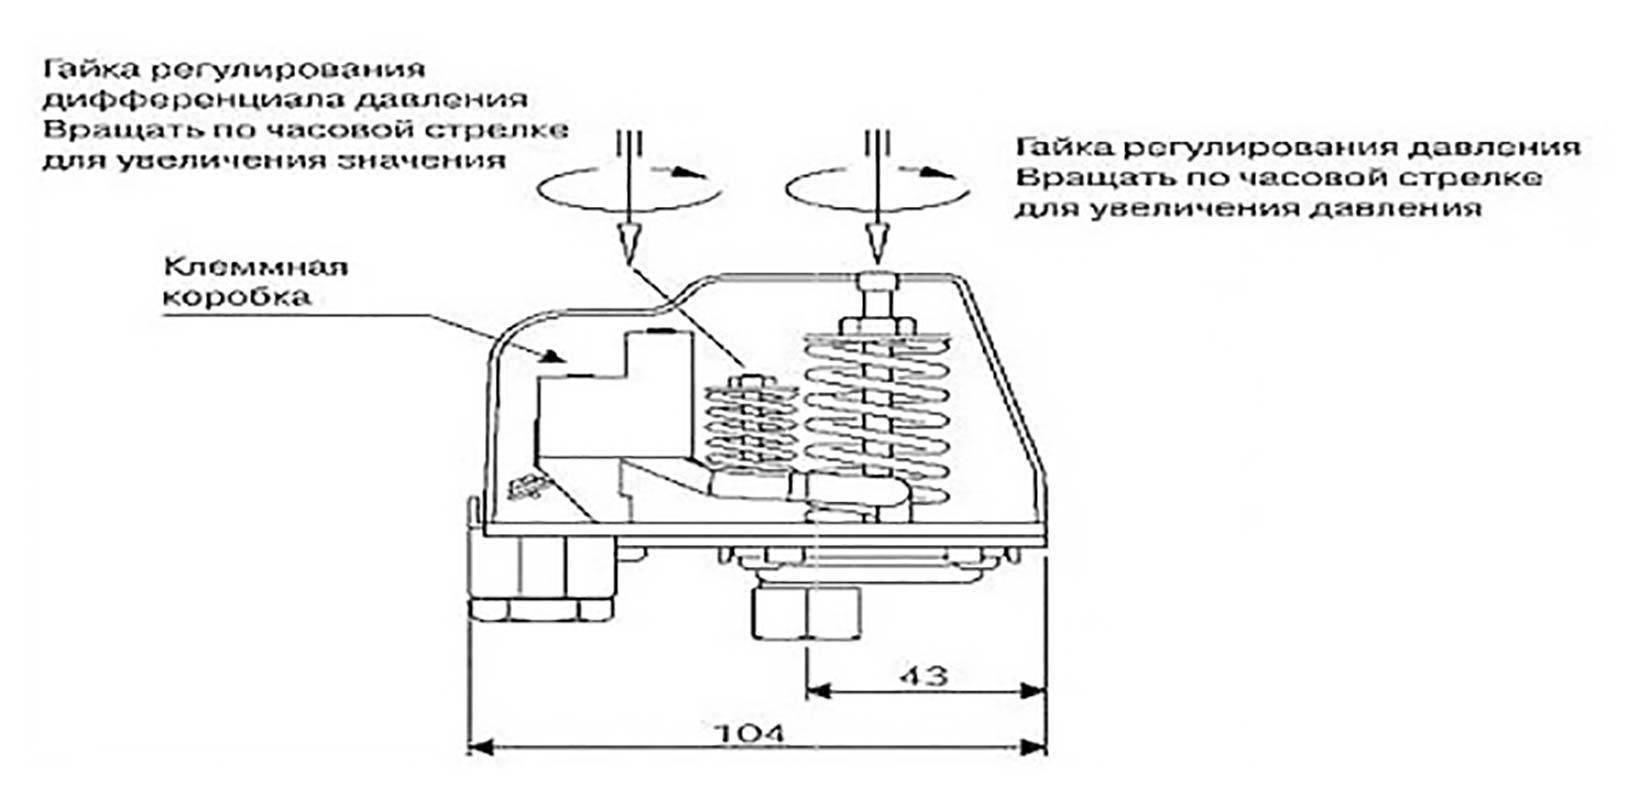
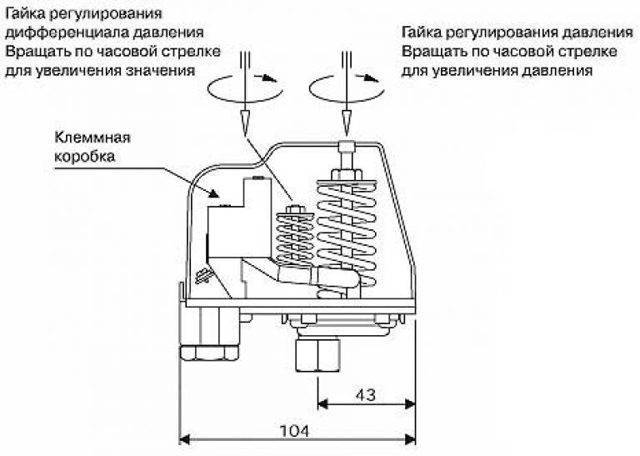
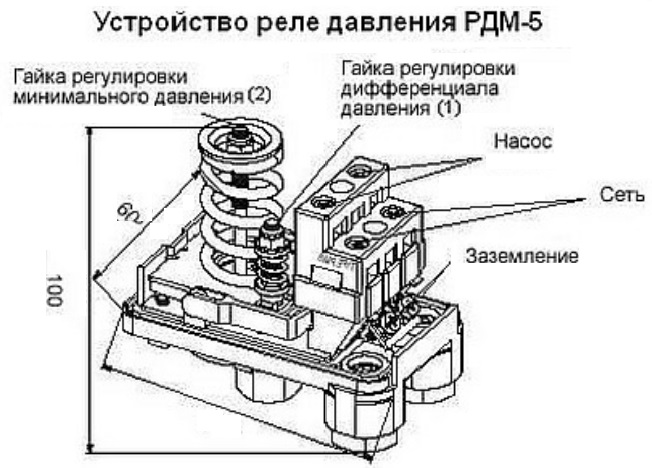
Electromechanical relays consist of a plastic housing, a spring block and contacts controlled by a membrane. The membrane is in direct contact with the pressure pipe and is a thin plate that plays the role of an element of perception. It instantly reacts to changes in the pressure level in the pipeline, which entails the alternating switching on of contacts. The spring block of the water relay consists of 2 elements. The first is a spring that controls the minimum allowable pressure level, and is responsible for containing the main onslaught of water. The lower pressure limit is adjusted using a special nut. The second element is the top pressure control spring, and is also adjustable with a nut.
The principle of operation of the relay is that the contacts, thanks to the membrane, respond to pressure fluctuations, and when they close, the pumps begin to pump water.While when they open, the electrical circuit breaks, the power to the pumping equipment is turned off and the forced water supply stops. This happens due to the fact that the relay has a connection to a hydraulic accumulator, inside which there is water with compressed air. The contact of these two media is due to the flexible plate.
When the pump is turned on, the water inside the tank presses through the membrane on the air, as a result of which a certain pressure is created in the tank chamber. When water is consumed, its quantity decreases and the pressure decreases. In addition to the standard equipment, some models can be equipped with a forced (dry) start button, an operation indicator, a soft start device and special connectors used instead of traditional terminals.
Usually, an indicator of 2.6 atmospheres is taken as the upper threshold, and as soon as the pressure reaches this value, the pump turns off. The lower indicator is set at around 1.3 atmospheres, and when the pressure reaches this limit, the pump turns on. If both resistance thresholds are set correctly, the pump will operate in automatic mode, and manual control will not be required. This will eliminate the need for the constant presence of a person and ensure an uninterrupted supply of tap water to the consumer. The relay does not require special expensive maintenance. The only procedure that will need to be performed from time to time is the cleaning of contacts, which oxidize during operation and require care.
In addition to electromechanical models, there are also electronic counterparts, which are distinguished by more precise adjustment and aesthetic appearance.Each product is equipped with a flow controller - a device that instantly turns off pumping equipment in the absence of water in the pipeline. Thanks to this option, the pump is reliably protected from running dry, which prevents it from overheating and premature failure. In addition, the electronic relay is equipped with a small hydraulic tank, the volume of which usually does not exceed 400 ml.


Thanks to this design, the system receives reliable protection against water hammer, which significantly extends the service life of both the relays themselves and the pumps. In addition to a large number of advantages, electronic models also have weaknesses. The disadvantages of products include high cost and increased sensitivity to the quality of tap water. However, the money spent is quickly paid off by the reliability and durability of the devices, and special sensitivity is eliminated by installing a filtration system.
Thus, the pressure switch is an integral component of downhole or downhole pumping equipment, it helps to fill the hydraulic tank and maintain normal pressure in the network without human assistance. The use of a relay allows you to fully automate the process of water supply and eliminates the need to turn on the pump yourself when the pressure drops or the storage tank is empty.
Connecting the water pressure switch
The water pressure switch for the pump is connected immediately to two systems: to electricity and plumbing. It is installed permanently, since there is no need to move the device.
Electrical part
To connect a pressure switch, a dedicated line is not necessary, but desirable - there are more chances that the device will work longer.A cable with a solid copper core with a cross section of at least 2.5 square meters should go from the shield. mm. It is desirable to install a bunch of automatic + RCD or difavtomat. The parameters are selected according to the current and depend more on the characteristics of the pump, since the water pressure switch consumes very little current. The circuit must have grounding - the combination of water and electricity creates a zone of increased danger.
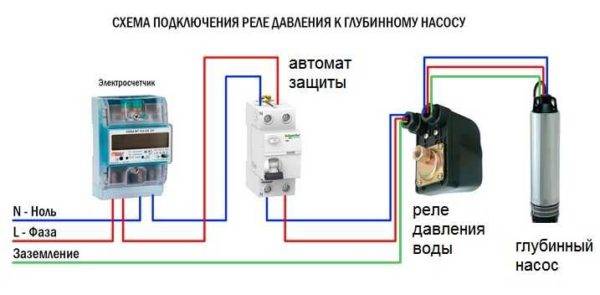
Scheme of connecting the water pressure switch to the electrical panel
Cables are brought into special inputs on the back side of the case. There is a terminal block under the cover. It has three pairs of contacts:
- grounding - the corresponding conductors coming from the shield and from the pump are connected;
- terminals line or "line" - for connecting the phase and neutral wires from the shield;
- terminals for similar wires from the pump (usually on the block located above).
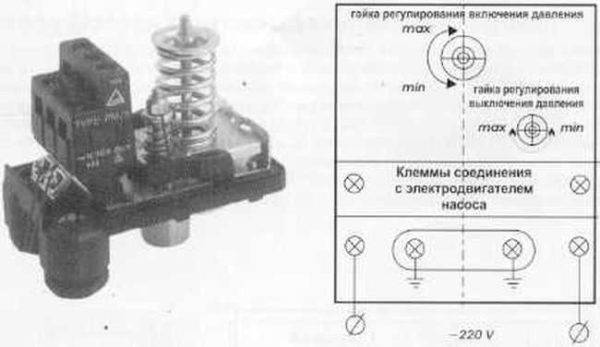
The location of the terminals on the housing of the water pressure switch
Pipe connection
There are different ways to connect a water pressure switch to a plumbing system. The most convenient option is to install a special adapter with all the required outlets - a five-pin fitting. The same system can be assembled from other fittings, just a ready-made version is always better to use.
It is screwed onto a pipe on the back of the case, a hydraulic accumulator is connected to the other outlets, a supply hose from the pump and a line that goes into the house. You can also install a mud sump and a pressure gauge.
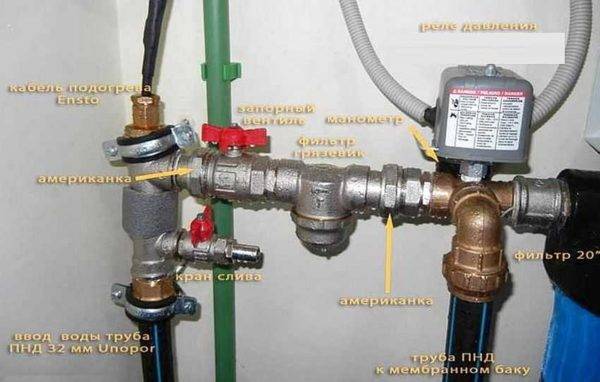
Example of tying a pressure switch for a pump
With this scheme, at a high flow rate, water is supplied directly to the system - bypassing the accumulator. It begins to fill up after all the taps in the house are closed.
Instructions for setting up a pumping station
If the adjustments made at the factory do not correspond to the necessary ones, the relays are adjusted again.
Checking the air pressure in the accumulator
The manufacturer pumps air into the hydraulic pump, the pressure of which reaches 1.5 atm. Leaks often occur due to the long shelf life, so after buying such a device, you need to check the pressure yourself.
To do this, unscrew the protective cap and put a pressure gauge on the spool. Some pumps have it in the kit, if not, then take the car. The higher the accuracy of the instrument used, the better.


In accordance with the selected mode of operation, the required value is set. With indicators less than 1 atm, the pear rubs against the walls of the vessel and is damaged over time. If the pressure is high, then it will not be possible to pump a lot of water into the accumulator, because. its volume will be occupied by a pear with air.
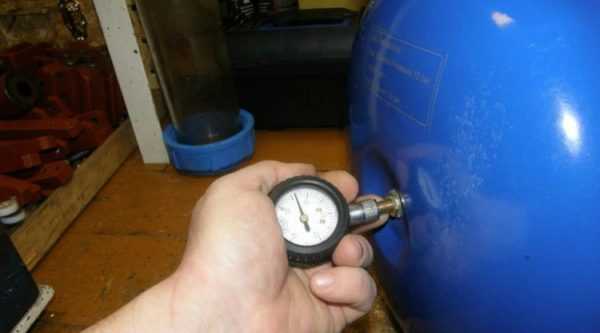 We measure the pressure in the accumulator.
Parameter control
The manufacturer sets up the equipment so that if, when the hydraulic pump is turned on, the pressure is 1.6 atm, the corresponding indicator for air does not exceed 1.4-1.5 atm.
If the minimum actuation value is set to 2.5 atm, then this indicator for air should be 2.2-2.3 atm. It is necessary to control the pressure in this accumulator chamber once every 6-12 months, even if the relay settings have not been changed.
If there is no hydraulic accumulator
Some models of deep pumps do not have a storage tank. They are protected from running dry, they work when the specified parameters are reached.
The disadvantage is that they do not have a supply of water, and the pump is often turned on. When the tap is opened, the pump starts, and after it is closed, it works a little more to pump water into the system.
Advantages:
- small size of equipment;
- savings on the purchase of a hydraulic accumulator;
- constant water pressure.
This option is suitable for long-term switching modes (water collection, irrigation, etc.).
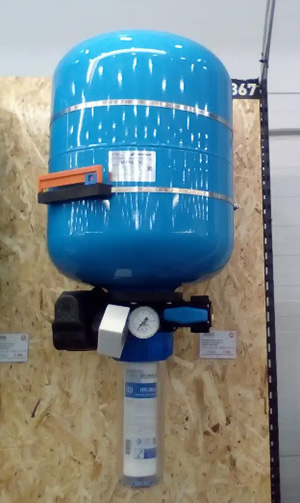
 Pump stations without hydraulic accumulator.
Relay control process
The setup is done in this order:
- Disconnect the hydraulic pump from the network, drain all the water from the water supply.
- Start the station and record the pressure at which the relay will turn on. The indicator corresponds to the lower threshold.
- They open the farthest tap and notice when the equipment turns on again. This will be the upper limit.
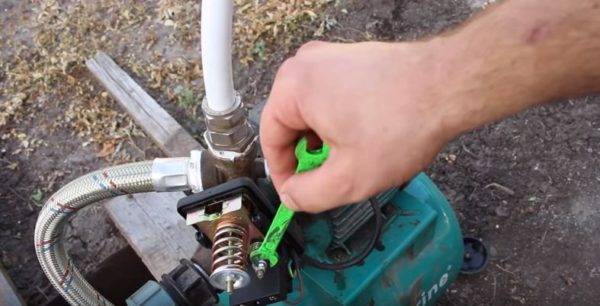
- If the water pressure from the tap is weak, increase the pressure. To do this, turn the nut on the large spring.
- Set up the delta, it should be 1.5-2 atm. To do this, adjust the lower spring.
After the settings have been made, water is again removed from the system and the hydraulic pump is turned on. If the pressure suits, then everything is done correctly.
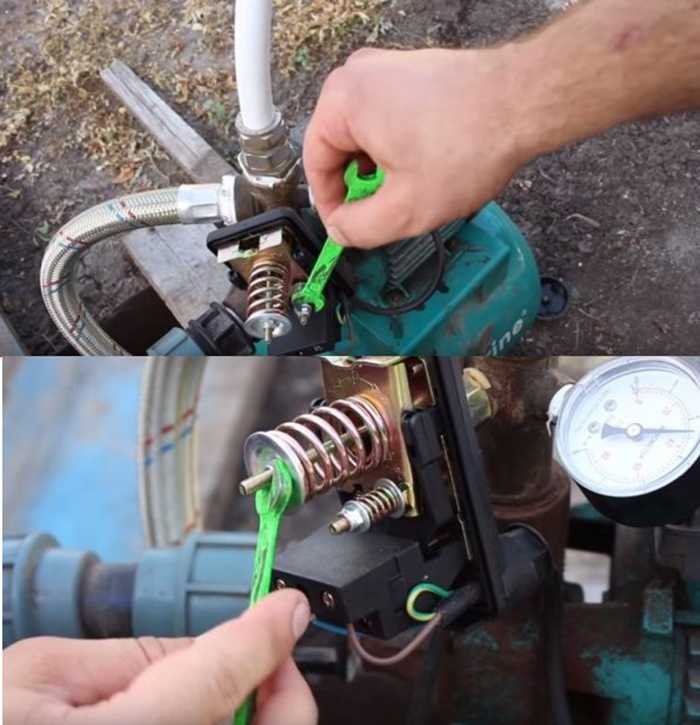 Adjustment of small and large springs.
How to buy Gilex CRAB in Minsk
Automated pure water supply systems Gileks CRAB 24 and Gileks CRAB 50 have the highest rates of positive feedback from our customers from all over the country. All this is due to their simplicity of design and reliability of the elements in operation.
If you are planning to buy an automatic water supply system Gileks CRAB, then contact our online hypermarket site and, without leaving your home, order any model from our consultant. You just have to choose which model to buy for your farm, CRAB 50 or CRAB 24. In any case, you will be happy with your choice!
You can place your order from any city in Belarus and easily buy Gilex CRAB 50 in Minsk with delivery to your address. Buying a complex automation system on a CRAB tank in our store is always a win!
For a stable supply of water with the required pressure values, it is not enough just to buy a pumping station. The equipment still needs to be set up, launched and properly operated. Admit it, not all of us are familiar with the intricacies of customization. And the prospect of spoiling devices with incorrect actions is not very attractive, do you agree?
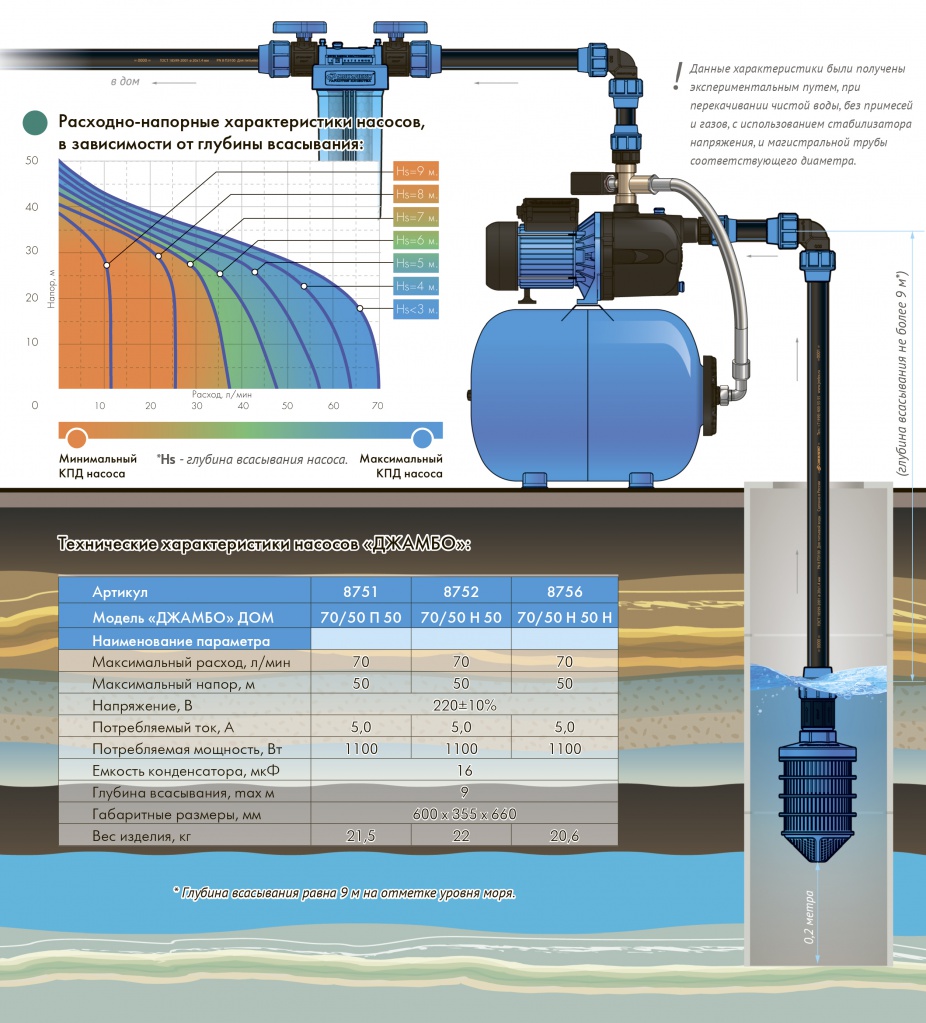
You will learn about the causes of pressure drops and learn how to eliminate them. Graphic and photo applications will explain how to properly configure pumping equipment.
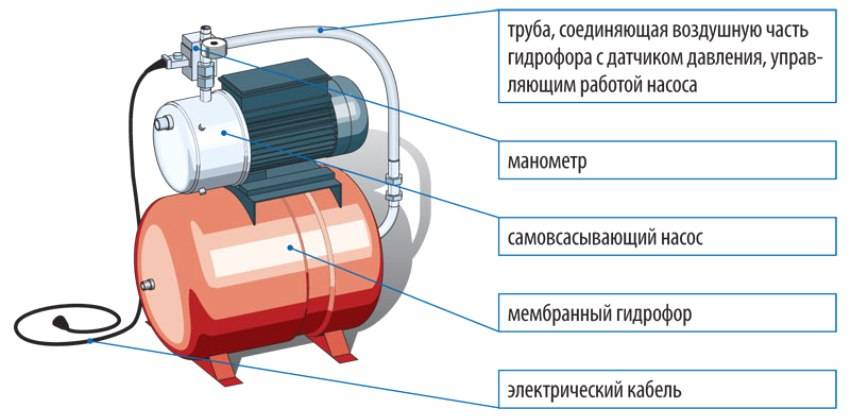
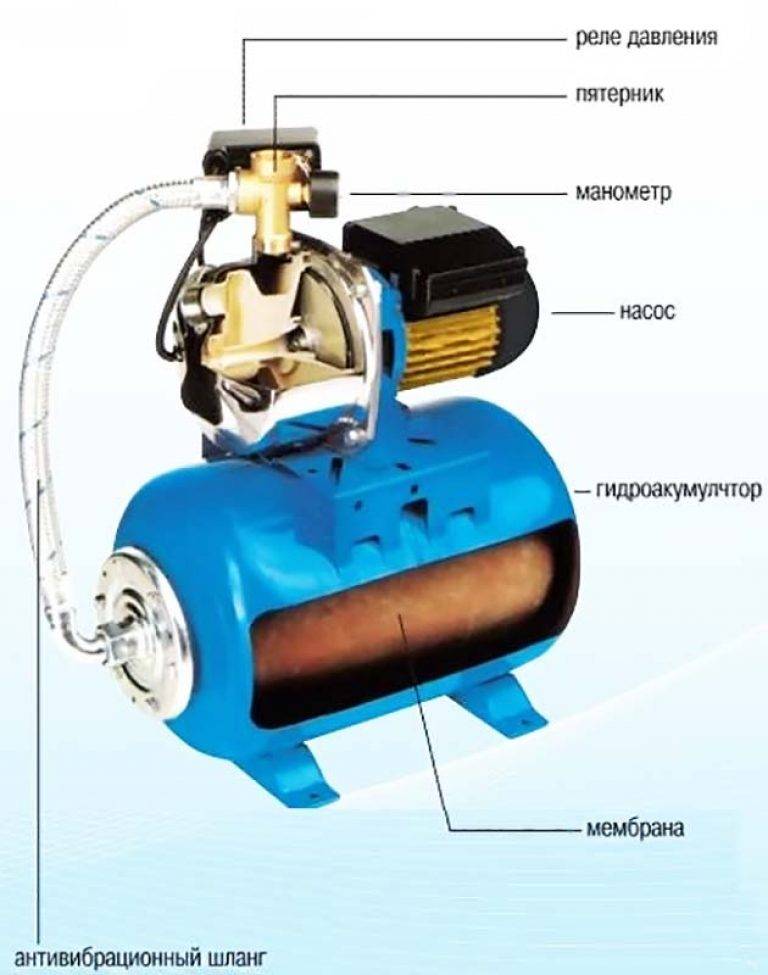
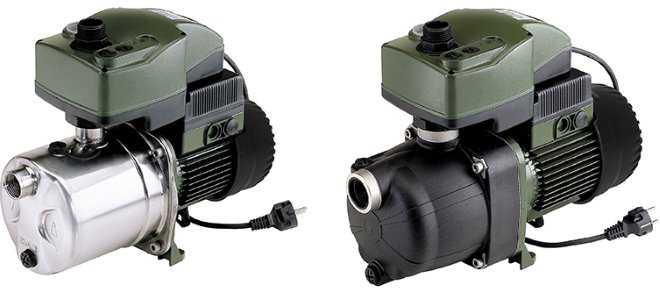
A ready-made pumping station equipped with the manufacturer is a mechanism for forced water supply. The way it works is extremely simple.
The pump pumps water into an elastic container located inside a hydraulic accumulator, also called a hydraulic tank. When filled with water, it expands and presses on that part of the tank that is filled with air or gas. The pressure, reaching a certain level, causes the pump to turn off.
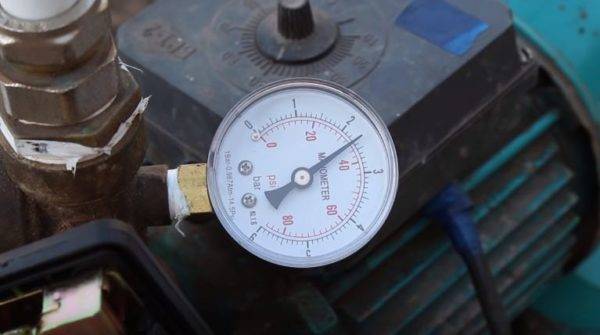
During the intake of water, the pressure in the system drops, and at a certain moment, when the values \u200b\u200bset by the owner are reached, the pump starts working again. The relay is responsible for turning the device off and on, the pressure level is controlled using a pressure gauge.


Violations in the operation of a household pumping station can cause breakdowns of plumbing equipment
The article we recommend will acquaint you with the principle of operation, varieties and proven installation schemes in more detail.
Possible errors when debugging the pressure switch
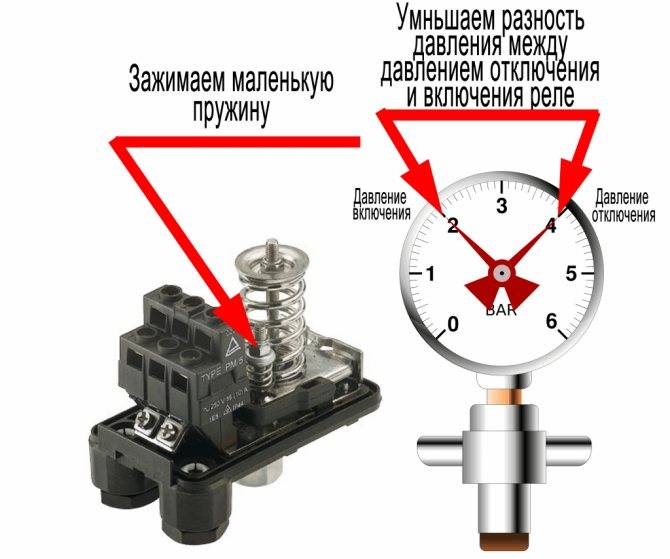
When adjusting the relay, it must be remembered that a small spring is more sensitive than a large one. The nut on the first must be turned slowly and carefully. And most importantly, the small spring does not set the water pressure itself to turn off the pump, but the delta between the thresholds for the automation.
Another point - the lower threshold should not exceed 80% of the maximum pressure for a particular relay that comes with pumping equipment. If the pressure in the taps is insufficient, then the relay switch will have to be changed to a more “powerful” one.
It is recommended to check the pressure of the pumping station once every six months. You will need to completely drain the water. And then turn it on, checking the real values of the thresholds on the pressure gauge. In general, adjusting the water pressure at a home autonomous water supply station should not cause problems. It is necessary to tighten with a wrench or a screwdriver only a couple of nuts on two springs.
The principle of operation of the relay
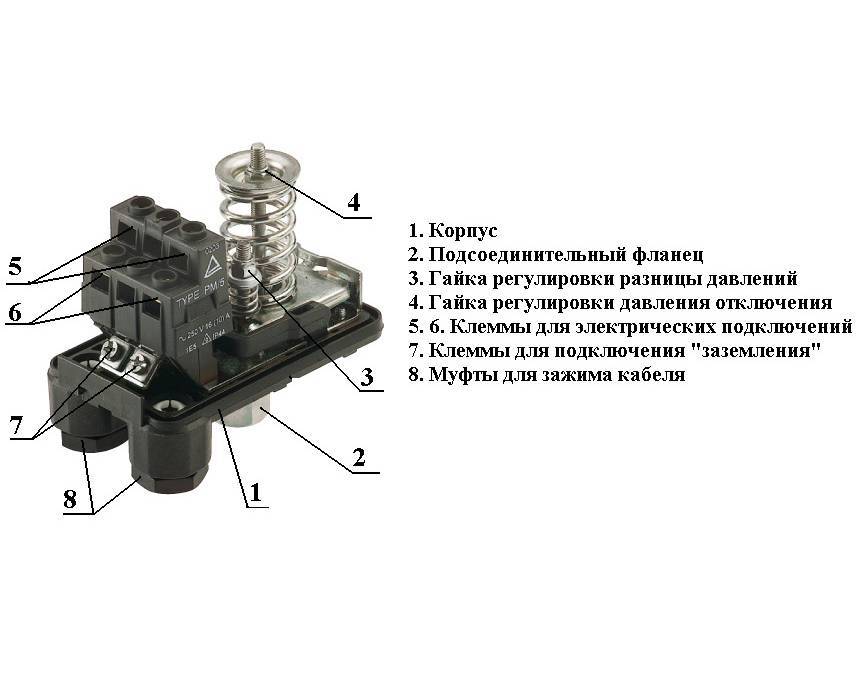
The main element of the pressure switch can be called a group of contacts fixed on a metal base. It is this part that turns the device on and off. There is a large and small spring next to the contacts, they regulate the pressure inside the system and help in solving the issue of how to increase the water pressure in the pumping station. The membrane cover is fixed at the bottom of the metal base, under it you can directly see the membrane and the metal piston. Closes the entire structure with a plastic cap.
To understand how to properly set up a pumping station, you need to know that the pressure switch works according to the following scheme:
- When the tap is opened, water from the storage tank flows to the point of analysis. In the process of emptying the container, the pressure begins to gradually decrease, respectively, the degree of pressure of the membrane on the piston decreases. The contacts close and the pump starts to work.
- During the operation of the pump, the taps at the points of analysis can be open, at this time the water enters the consumer. When the tap is closed, the tank starts filling with water.
- An increase in the water level in the tank leads to an increase in pressure in the system, which begins to put pressure on the membrane. It begins to put pressure on the piston, which helps to open the contacts and stop the pump.
A properly adjusted water pump pressure regulator ensures the normal frequency of switching on and off the pumping station, normal water pressure and equipment life. Incorrectly set parameters cause continuous operation of the pump or its complete stop.
Water pressure switch adjustment
Let's analyze the adjustment of the pressure switch using the example of RDM-5, which is one of the most common devices. It is produced with a setting of a smaller barrier of 1.4-1.5 atmospheres and a larger one - 2.8-2.9 atmospheres. During installation, these indicators must be adjusted depending on the length of the pipeline and the plumbing used. You can change one or both limits in either direction.
In our device there are 2 springs of different sizes, with which you can set the limits for the start and stop of the pumping device. The large spring changes both barriers at the same time. Smaller - the width in the specified range. Each one has a nut.If you turn it and twist it - it increases, if you unscrew it - it falls. Each turn of the nut corresponds to a difference of 0.6-0.8 atmospheres.
How to determine relay thresholds
The smaller barrier is tied to the volume of air in the storage tank, more than 0.1-0.2 atmospheres is recommended. So, when there are 1.4 atmospheres in the accumulator, then the shutdown threshold should be 1.6 atmospheres. In this mode, there is less load on the membrane, which increases operation.
It is important to pay attention to the nominal operating conditions of the pumping device, recognizing them in the performance characteristics. The lower barrier of the pumping device is not less than the selected indicator in the relay
Before installing the pressure switch - measure it in the storage tank, often it does not correspond to the declared characteristics. To do this, a pressure gauge is connected to the control fitting. In the same way, the pressure is controlled during regulation.
The highest barrier is set automatically. The relay is calculated with a margin of 1.4-1.6 atm. If the smaller barrier is 1.6 atm. - the larger one will be 3.0-3.2 atm. To increase the pressure in the system, you need to add a lower threshold. However, there are limitations:
- The upper limit of household relays is no more than 4 atmospheres, it cannot be increased.
- With its value of 3.8 atmospheres, it will turn off at an indicator of 3.6 atmospheres, as this is done with a margin to save the pump and system from damage.
- Overloads adversely affect the overall operation of the water supply system.
Essentially everything. In each case, these indicators are set individually, they depend on the source of water intake, the length of the pipeline, the height of the water rise, the list and technical features of plumbing.


Setting the pressure switch for a pump or pumping station
For a qualitative adjustment of the operability of the water supply, a proven pressure gauge is required, which is connected near the relay.
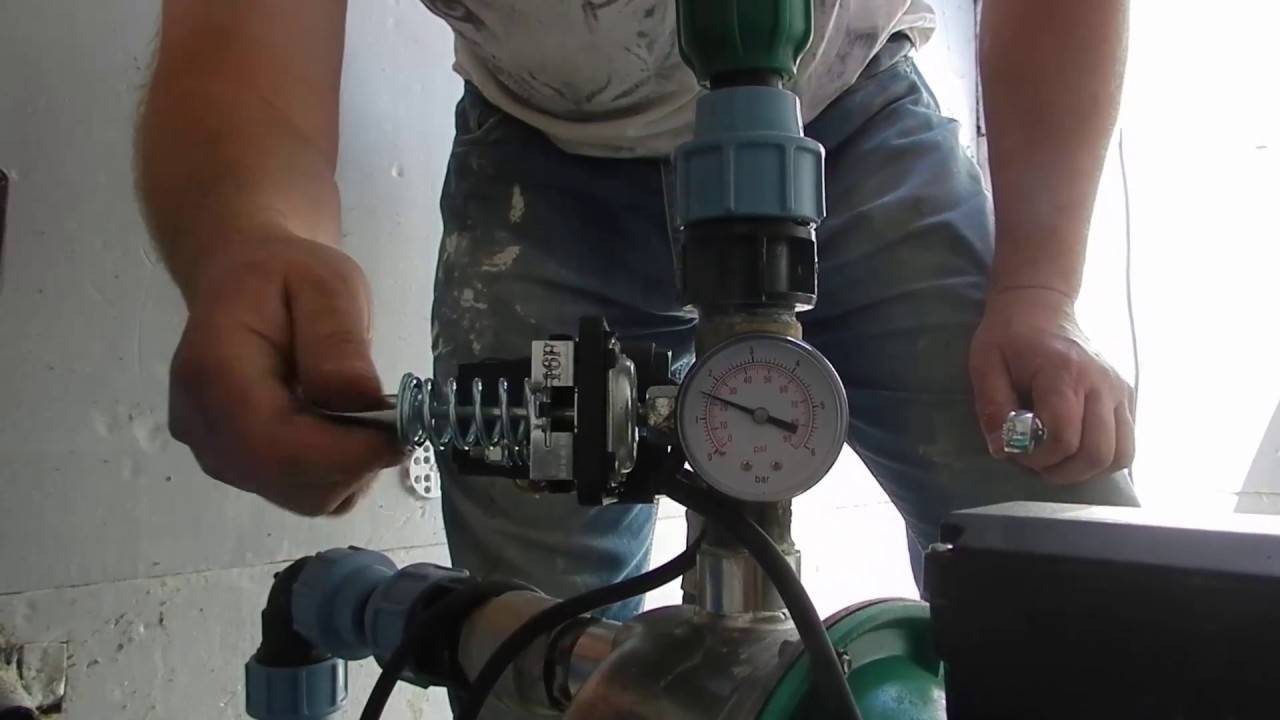
Adjustment of the pumping station consists in turning the nuts supporting the relay springs. To adjust the lower limit, the nut of the larger spring is rotated. When it is twisted, the pressure increases, when it is unscrewed, it decreases. The adjustment is half a turn or less. Setting up a pumping station consists of the following steps:
- The water supply is turned on and with the help of a pressure gauge the barrier to start and stop the pump is fixed. A large spring is being clamped or released. Restart the system and check both pressure limits. Both values are shifted by the same difference.
- Thus, the adjustment continues until it is completed. After setting the lower limit, the upper indicator is adjusted. To do this, adjust the nut on the smaller spring. It is as sensitive as the previous adjustment. All actions are similar.
When setting up the relay, it is important to know that not all models have the technical ability to adjust the difference between the lower and upper limits. In addition, there are models in a sealed housing that can be installed directly on the pump housing.
They can also be submerged in water.
There are instances that are combined with an idle relay that can turn off the pump in the absence of water. They protect the engine from overheating. This is how the water pressure for the pump is regulated, which provides a gentle mode for the water supply.
Installation and connection of a pumping station in a private house
Then the station must be connected to the electrical network for a soft start and check the pressure and automation. At first, water goes with air - air plugs come out, which formed during the filling of the pumping station.
When the water flows in an even stream without air, your system has entered the operating mode, you can operate it. The station should not be started very often, otherwise the engine will overheat. The rate of launches in one hour is up to 20 times (the exact figure should be indicated in the technical data sheet of the system). Then, during operation, it is necessary to control the air pressure in the accumulator (1.5 atmospheres).
Comments
Water in our house is one of the main criteria by which it can be called comfortable.
If you remember that without water a person can live the least, only less without air, then the importance of water supply to your home becomes paramount.
Unfortunately, the water from our wells is no longer always applicable for use as drinking water, but the need for washing dishes, floors, washing clothes, washing yourself, as well as using water for other technical needs, you still will not disappear anywhere. Moreover, water consumption can turn out to be so large that it will be very difficult to supply it to your house in the old proven grandfather way, using a rocker and buckets, and besides, it will take you a lot of time.
Fortunately, progress does not stand still.
Step-by-step instructions for adjusting the pressure switch
Step 1. Check the compressed air pressure in the accumulator. There is a rubber plug on the back of the tank, you need to remove it and get to the nipple.Check the pressure with an ordinary air pressure gauge, it should be equal to one atmosphere. If there is no pressure, pump in air, measure the data and after a while check the indicators. If they decrease - a problem, you need to look for the cause and eliminate it. The fact is that most equipment manufacturers sell hydraulic accumulators with pumped air. If it is not available when buying, then this indicates a marriage, it is better not to purchase such a pump.
 First you need to measure the pressure in the accumulator
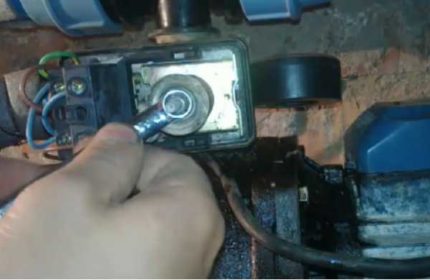
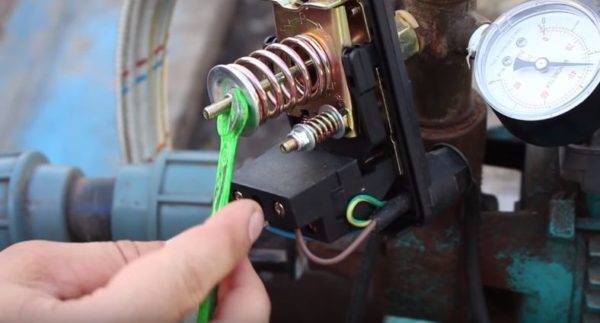
Step 2. Disconnect electrical power and remove pressure regulator housing protective cover. It is fixed with a screw, removed with an ordinary screwdriver. Under the cover there is a contact group and two springs compressed by 8 mm nuts.


 To adjust the relay, you must remove the housing cover
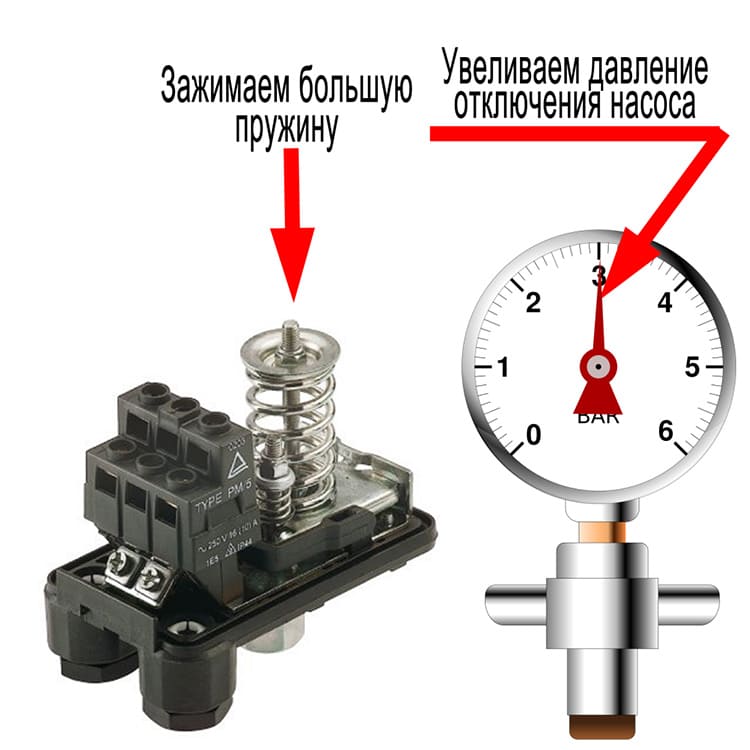
Big spring. Responsible for the pressure at which the pump turns on. If the spring is fully tightened, then the motor switch-on contacts will be constantly closed, the pump turns on at zero pressure and constantly works.
Small spring. Responsible for turning off the pump, depending on the degree of compression, the water pressure changes and reaches its maximum value
Please note, not the optimal working, but the maximum according to the technical characteristics of the unit.
 Relay factory settings need to be adjusted
For example, you have a delta of 2 atm. If in this case the pump is turned on at a pressure of 1 atm, then it will turn off at 3 atm. If it turns on at 1.5 atm, then it turns off, respectively, at 3.5 atm. and so on. Always the difference between the pressure on and off the electric motor will be 2 atm.You can change this parameter by changing the compression ratio of the small spring. Remember these dependencies, they are needed to understand the pressure control algorithm. The factory settings are set to turn on the pump at 1.5 atm. and shutdown at 2.5 atm., delta is 1 atm.
Step 3. Check the actual operating parameters of the pump. Open the tap to drain the water and slowly release its pressure, constantly monitor the movement of the pressure gauge needle. Remember or write down at what indicators the pump turned on.
 When the water is drained, the arrow indicates a decrease in pressure
Step 4. Continue monitoring until the moment of shutdown. Also note down the values at which the electric motor cuts out. Find out the delta, subtract the smaller from the larger value. This parameter is needed so that you can navigate at what pressures the pump will turn off if you adjust the compression force of the large spring.
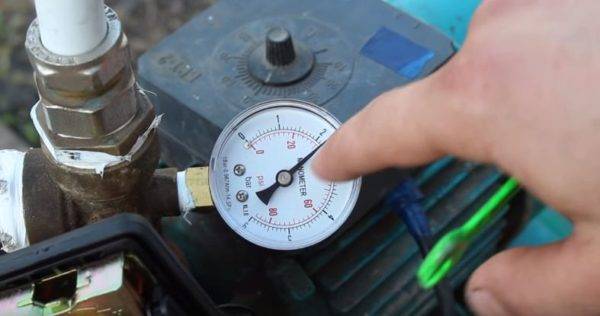 Now you need to notice the values at which the pump turns off
Step 5. Shut off the pump and loosen the small spring nut about two turns. Turn on the pump, fix the moment it turns off. Now the delta should decrease by about 0.5 atm., The pump will turn off when the pressure reaches 2.0 atm.
 Using the wrench, you need to loosen the small spring a couple of turns
Step 6. You need to ensure that the water pressure is in the range of 1.2–1.7 atm. As mentioned above, this is the optimal mode. Delta 0.5 atm. you have already installed, you need to lower the switching threshold. To do this, you need to release a large spring. For the first time, turn the nut, check the starting period, if necessary, fine-tune the compression force of the large spring.
 Large spring adjustment
You will have to start the pump several times until you achieve switching on at 1.2 atm., And turning off at a pressure of 1.7 atm. It remains to replace the housing cover and put the pumping station into operation. If the pressure is correctly adjusted, the filters are constantly in good condition, then the pump will work for a long period of time, there is no need to do any special maintenance.
 Pump Relay Selection Criteria


